Publishing in Webflow isn't as simple as clicking one button and having your changes go live. Webflow has four independent publishing mechanisms — full-site publish, single-page publish, CMS item publish, and branch merge — each with its own rules, permissions, and edge cases. This guide covers how each path works across every plan tier, how staging and production differ, how to prevent teammates from publishing unfinished work, and how page branches and design approvals fit into a safe team workflow.
Why understanding Webflow publishing matters
- Preventing accidental production pushes: Knowing how each publishing path works stops scenarios like a teammate clicking Publish and pushing a designer's half-finished work live alongside their own content edit.
- Publishing CMS content independently: You can publish a single blog post or product without touching the rest of the site, which matters when marketing teams need to ship content while design work is still in progress.
- Using staging as a real review environment: Treating staging as a separate destination (not just a preview) lets you review changes before they hit production, catching issues before clients or customers see them.
- Role-based permissions: Restricting publish rights at the role level stops content editors from triggering site-wide publishes — the cleanest way to prevent "why did my WIP go live?" incidents.
- Scheduling content for future releases: Setting blog posts or campaign pages to publish automatically at a specific time lets marketing teams plan launches without someone needing to hit publish manually.
- Recovering from bad publishes: Understanding what backups actually restore (and what they don't) means you can fix mistakes quickly instead of scrambling when something goes wrong on the live site.
The four publishing paths in Webflow
Every change in Webflow reaches production through one of exactly four paths, and each one has its own trigger, permission, and scope. Understanding these paths as separate systems — not variations of the same button — is the foundation for everything else in this guide.
Full-site publishing
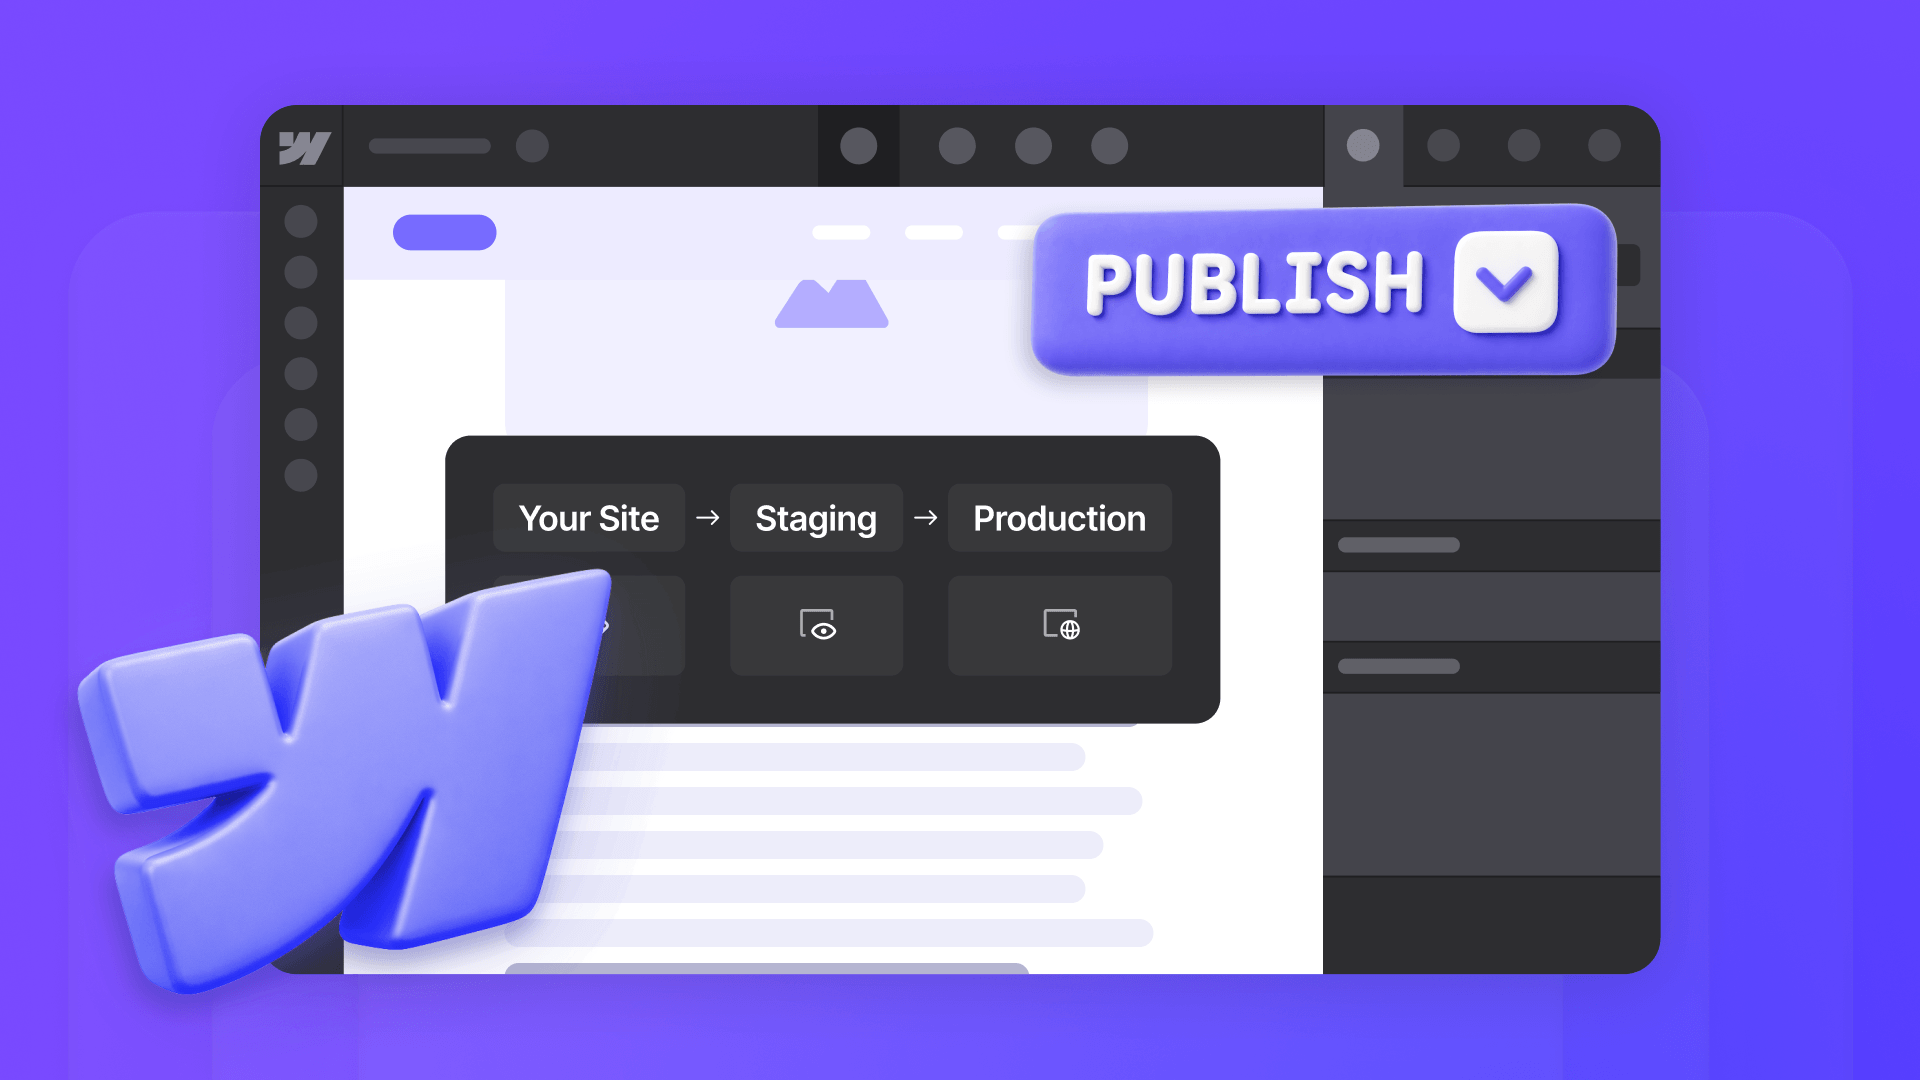
Full-site publish pushes every unpublished change currently in the Designer across every page. That includes merged branches, direct edits, new pages, style changes, and any CMS items that are explicitly queued for publication.
The trigger is clicking Publish from Site actions or Site settings. Permissions depend on your Workspace plan: on Growth and Agency Workspaces, publishing rights attach to specific site roles through the Can publish toggle. On Enterprise, publishing is governed by custom roles with granular staging-versus-production permissions.
Full-site publish is all-or-nothing in terms of what content goes live. You can pick which domains receive the publish (staging only, production only, or both), but you can't pick a subset of changes within a single publish.
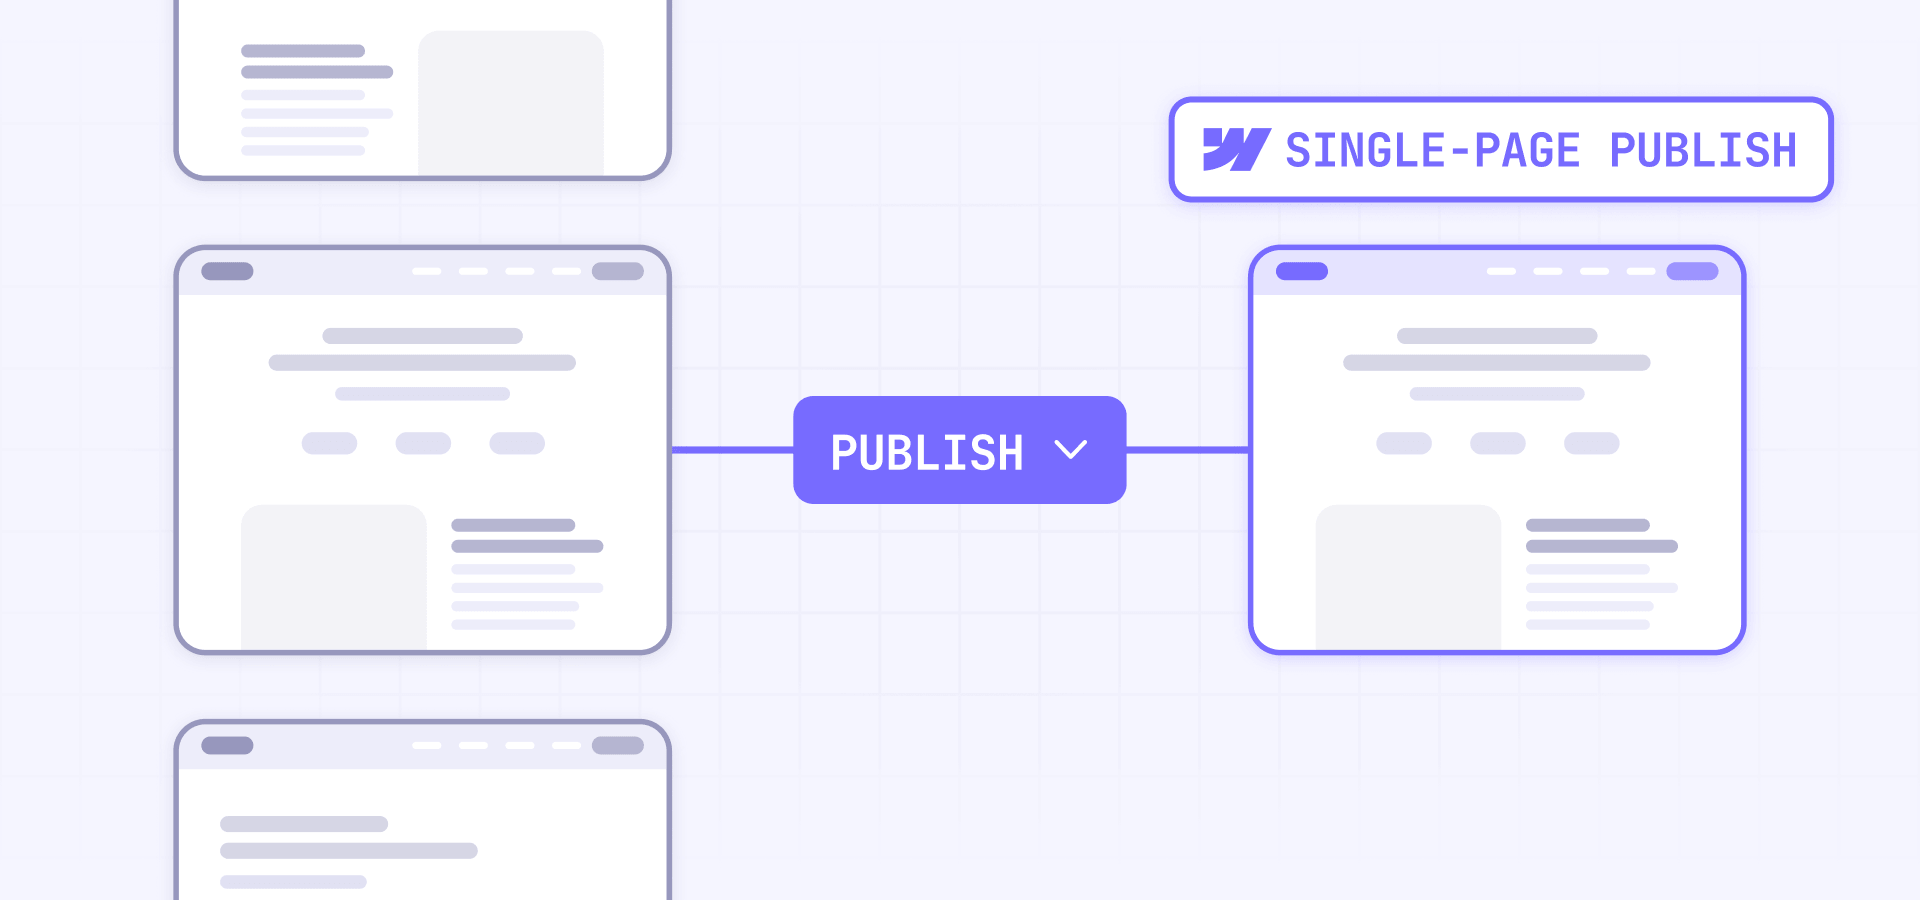
Single-page publishing
Single-page publish pushes one static page or one CMS template page's layout, including its localized versions, without touching any other unpublished changes.
You trigger it from inside the publish modal by choosing This page or This CMS template. According to Webflow's current documentation, this path is Enterprise-only. If you're on Basic, CMS, or Business plans, you'll need to use full-site publish or the staging-first workarounds described later in this guide.
Important caveat: Single-page publish excludes CMS item content and site-wide settings. The published page can reflect global style, component, variable, and interaction changes, but other pages may remain on the older live version until they are individually published or a full-site publish is run.
CMS item publishing
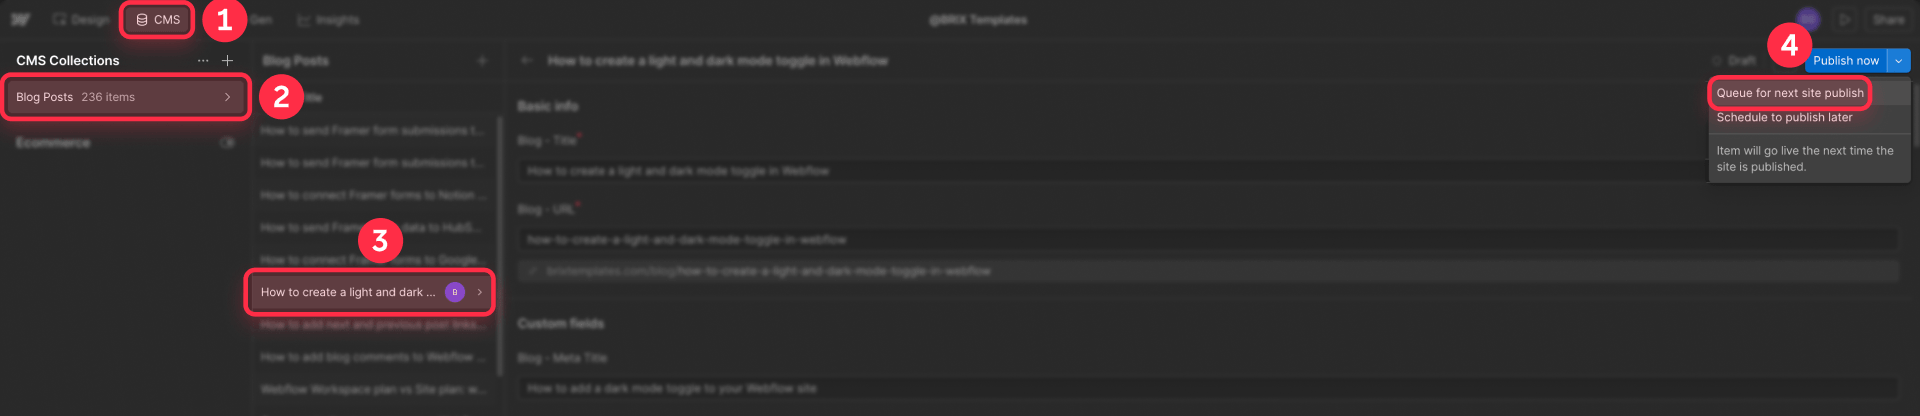
CMS item publish pushes a single Collection item's content live without requiring a full-site publish. You trigger it through the Publish now option inside the item editor, or through the Webflow CMS API.
CMS publishing permissions vary by plan. On Enterprise and partner Workspaces, CMS publishing is controlled by role permissions and custom roles, including the Publish CMS items to production permission. On other plans, all roles except Reviewer can publish CMS items to production. Note that on non-Enterprise plans, teammates with Can publish turned off can still publish single CMS items through single-item publishing and scheduling where supported.
The gotcha worth knowing is referenced item cascades. If your blog post references an author item with pending changes, publishing the post also publishes the author update. This surprises a lot of teams and is a common cause of unexpected content going live.
Branch merging
Branch merge doesn't publish anything directly. A merge only updates the Designer state of one page on the main site.
The trigger is a designer requesting approval on an Enterprise page branch, a reviewer approving it, and the merge happening in the Designer. Page branching, design approvals, and branch staging are all exclusive to Enterprise Workspaces.
The critical point: Merge and publish are separate actions. A merged branch sits in the Designer state until someone runs a full-site publish or single-page publish. Merging does not push anything live, which trips up teams that assume approval equals deployment.
How full-site publishing actually works in Webflow
Full-site publish is the most-used publishing path and also the most-misunderstood. Two questions come up constantly: what actually gets included in a full-site publish, and why does half-finished work go live when a teammate clicks Publish?
What a full-site publish includes
A full-site publish pushes every unpublished change currently in the Designer. That covers merged branches, direct edits, new or modified pages, style and component changes, and any CMS items that are explicitly queued to publish.
What it does not include: CMS items saved as Draft (never published), CMS items with Changes in draft (unless explicitly set to publish), scheduled CMS items (which publish only at their scheduled time), branches that haven't been merged yet, and certain Site settings changes that fall outside the pre-publish summary (custom code changes in the Custom code tab are an exception and do publish).
Staging versus production
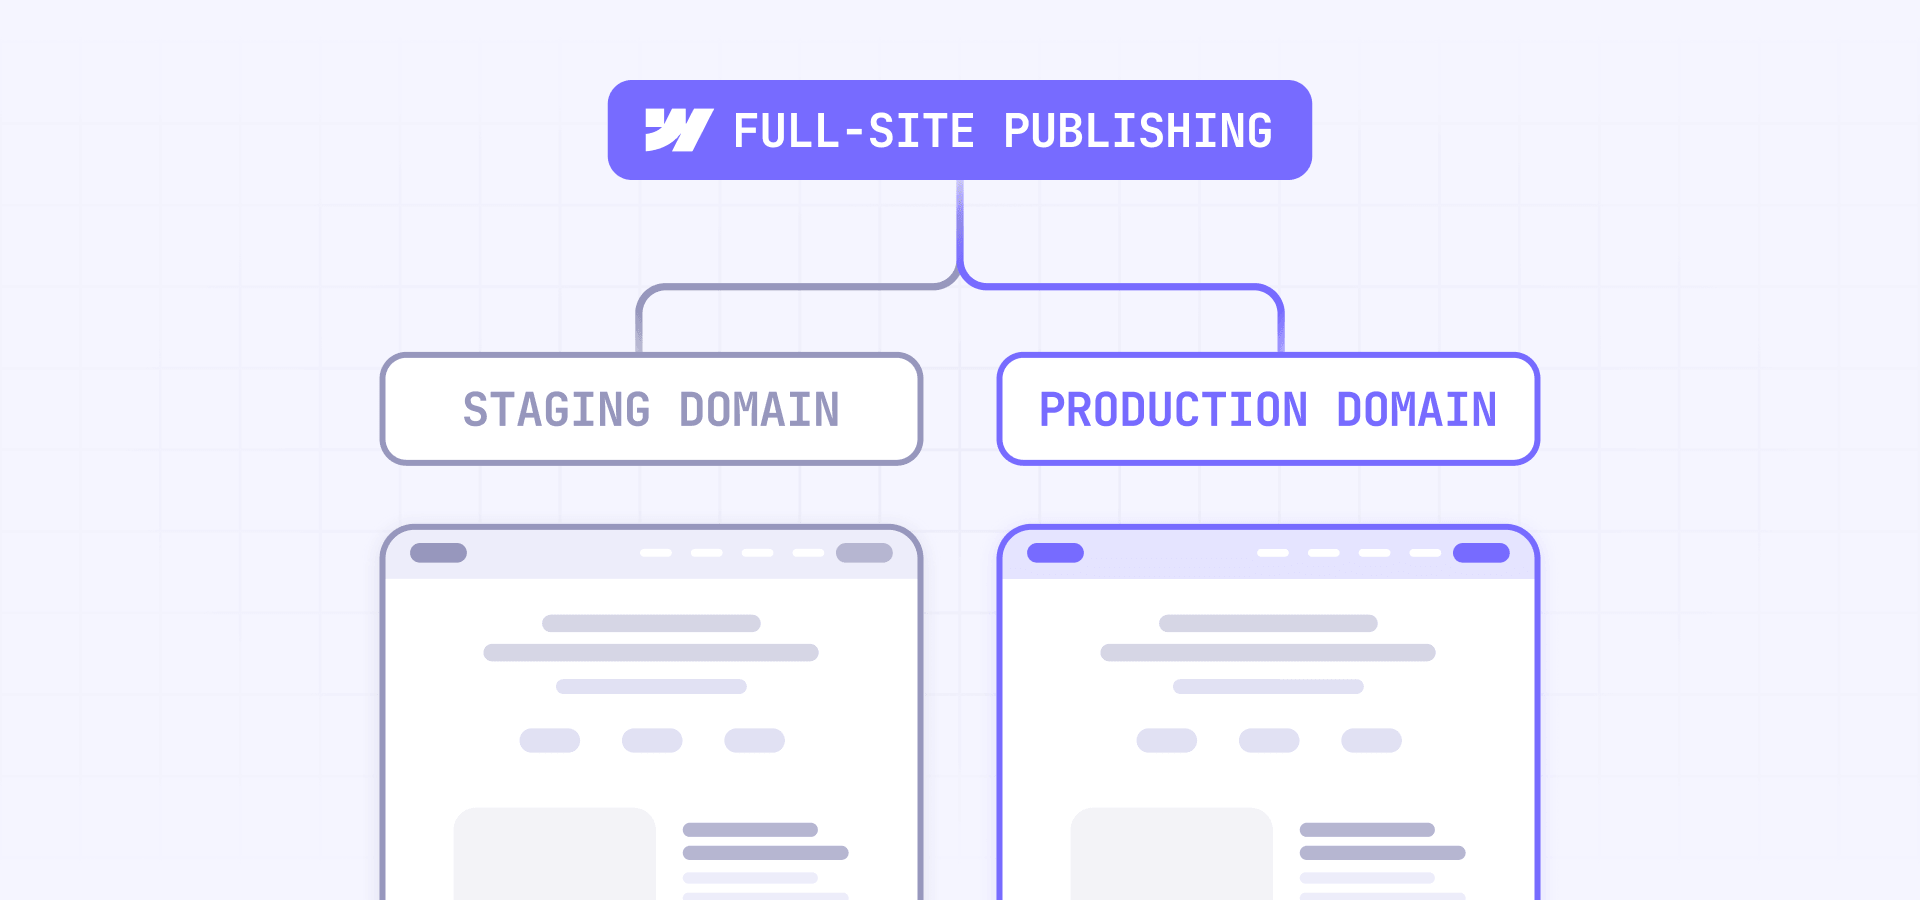
Staging is your yoursite.webflow.io subdomain, or a custom staging domain if you're on Enterprise. It's public by default but can be hidden from search engines through Site settings → SEO. Staging exists on every plan and doesn't require a paid Site plan.
Production is your custom domain. It requires a paid Site plan to use and is visible to the public web. If you haven't connected yours yet, our step-by-step guide to connecting a custom domain to Webflow with Cloudflare walks through the full setup.
The nuance most teams miss: staging and production are separate destinations, not separate versions of your site. They can show the same content, or they can diverge. If you publish only to staging (by unchecking production in the publish modal), your live site stays on the previous version while staging shows the newer state. The two only match when you've published the same changes to both.
How to publish only to staging
Reviewing on staging before pushing to production is the most common request in Webflow team workflows:
- Open your site in the Designer or go to Site settings
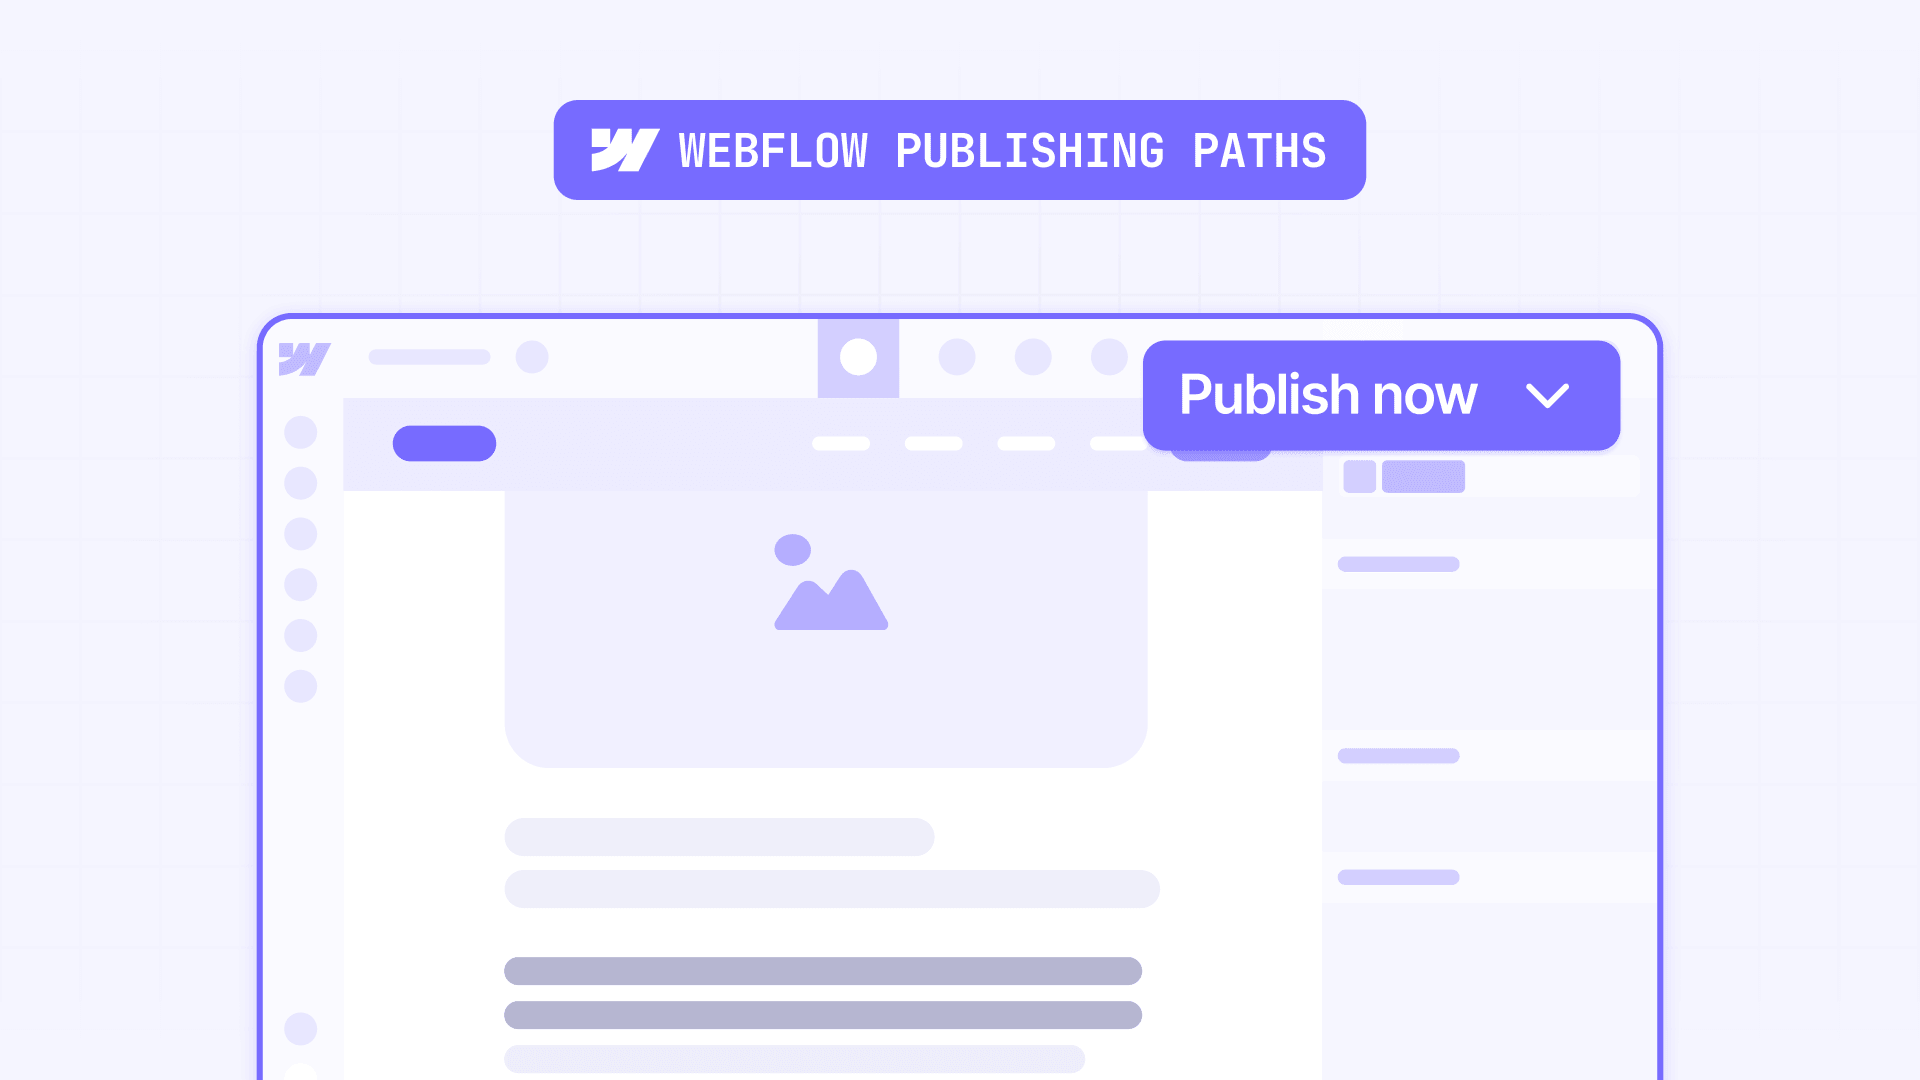
- Click Publish
- Check the Webflow staging subdomain box
- Uncheck your custom domain
- Click Publish to selected domains
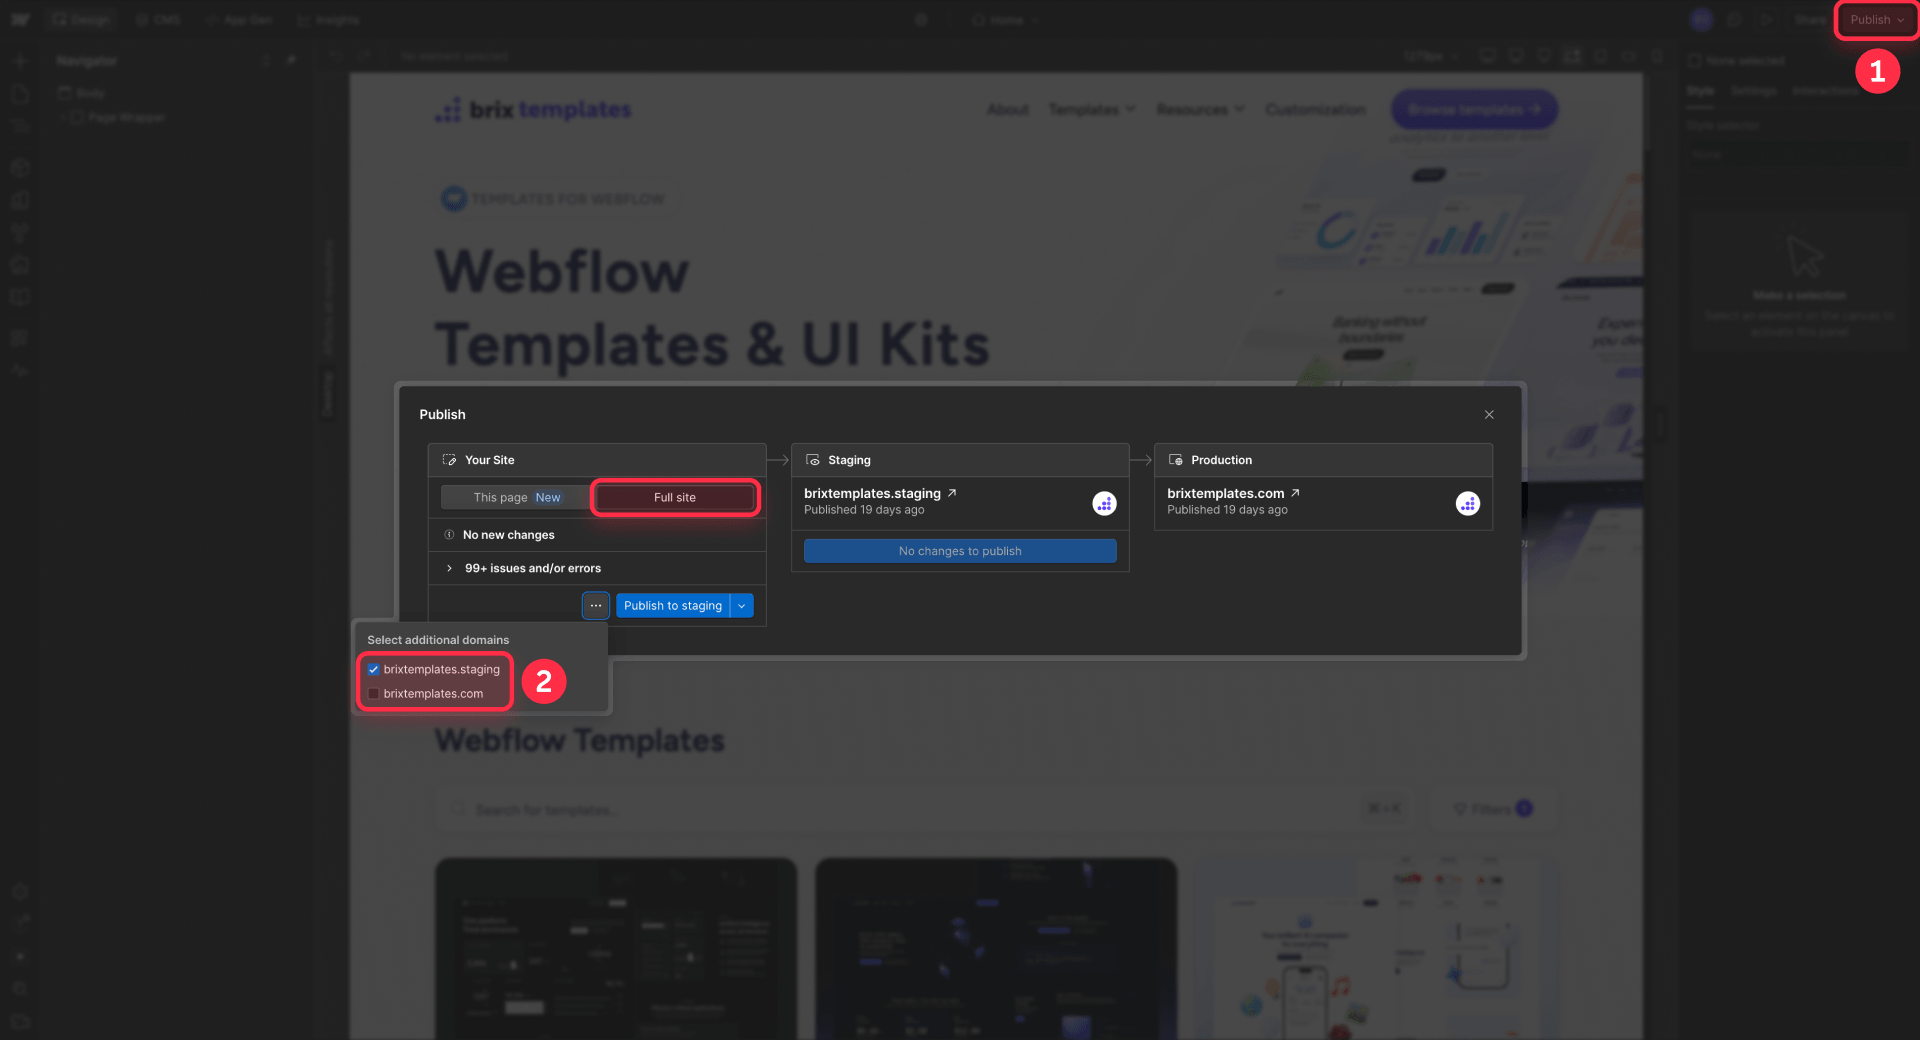
This publishes every unpublished change to staging only. Production stays on whatever was there before.
The Enterprise publishing workflow
On Enterprise plans, Webflow offers a structured three-stage promotion model — Designer → Staging → Production — with diffs between each stage showing exactly what's changing. It's the cleanest release system Webflow offers natively. You can read our Webflow Enterprise evaluation guide for the full context on when this tier justifies its cost.
Staging subdomain gotchas
Two small details that catch teams off guard. First, staging subdomains starting with "ad" or "ads" can be blocked by ad blockers, which creates confusing "page not loading" reports from clients. Pick a different subdomain if yours starts that way. Second, if you want staging hidden from search engines, you need to explicitly disable indexing in Site settings → SEO, because Webflow doesn't disable it by default. For the complete walkthrough, see our guide on how to stop Google from indexing your Webflow staging subdomain.
How to publish a single Webflow page without publishing the whole site
This is the most-asked Webflow publishing question in forums and the Wishlist. Before going further, one critical fact: according to Webflow's current documentation, single-page publishing is an Enterprise-only feature. If you're on Basic, CMS, or Business plans, you'll need the workarounds at the end of this section.
What single-page publishing covers
Single-page publish pushes one static page or CMS template page's layout without touching any other unpublished changes. It's designed for three scenarios: urgent copy fixes on a single page, pushing a new landing page while other work is still in progress, and hotfixes that shouldn't wait for the next full-site publish cycle.
What a single-page publish doesn't include
The scope is narrower than most people expect:
- CMS item content excluded: You're publishing the page layout, not the Collection items that might appear on it
- Site-level settings excluded: Settings changes still require a full-site publish
- Other pages stay on older version: Global style, component, variable, and interaction changes appear on the published page, but other pages remain on their previous live version until individually published or a full-site publish is run
- No rollback available: You can't revert to a previous single-page publish; you can only edit and republish
- No unpublishing option: Single-page publish can't be undone by unpublishing that page alone
- No scheduled publishing: Single-page publishes happen immediately with no option to queue for later
How to do a single-page publish in Webflow
- Open the page in the Designer
- Click Publish
- Choose This page or This CMS template
- Review the publish summary
- Click Publish to staging or Publish to production
Enterprise only: Single-page publishing is currently available only on Webflow Enterprise plans.
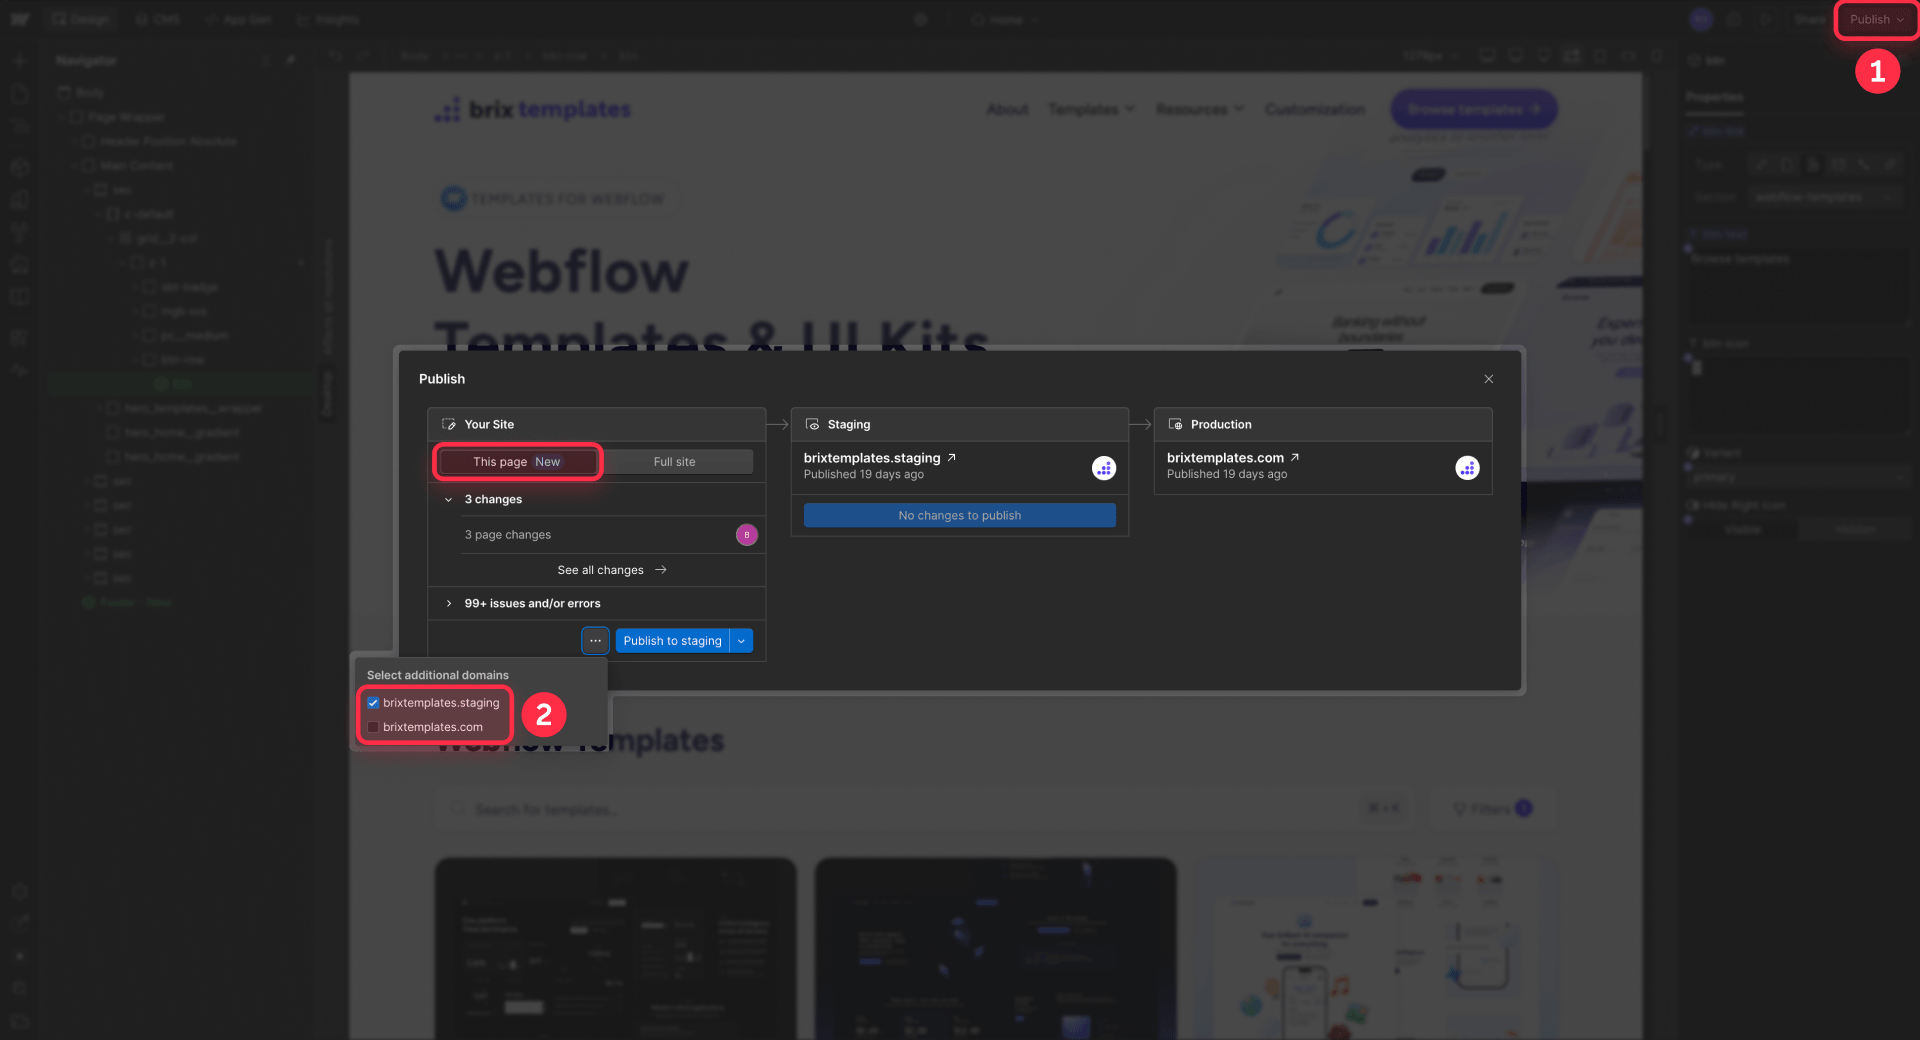
Important: If you publish a single page to staging first, you can later use Publish to all domains to push only that page to staging and production. By contrast, Publish to production makes production match all changes currently in staging — not just that page.
When single-page publishing isn't available
Even on Enterprise, single-page publish has prerequisites. Your site must have been fully published at least once, because until a full-site publish has happened, single-page publish is unavailable. It only works from the main branch — you can't single-page publish from inside a page branch environment.
Workarounds for Basic, CMS, and Business plans
If you're not on Enterprise, your options for pushing changes without affecting everything else are:
- Draft pages in the Pages panel: Mark pages you're working on as Draft to exclude them from publishes, then toggle off Draft and publish when ready
- Staging-only publishes: If your edit is ready for production but you want to review on staging first, publish only to staging, verify, then publish to production afterward
- Publish freeze windows: For small teams, agreeing that "nobody publishes between 2pm and 3pm while I finish this" is often easier than working around Webflow's architecture
How to publish a Webflow CMS item without publishing the whole site
The second-most-asked publishing question, and the direct answer is yes. Webflow has supported individual CMS item publishing for years, and it's available on every plan that includes CMS functionality.
CMS item actions versus status
Most tutorials mix up two separate concepts: the actions you can take on a Collection item, and the status the item ends up in. Keeping these mentally separate makes everything else easier to understand.
Actions available on a Collection item:
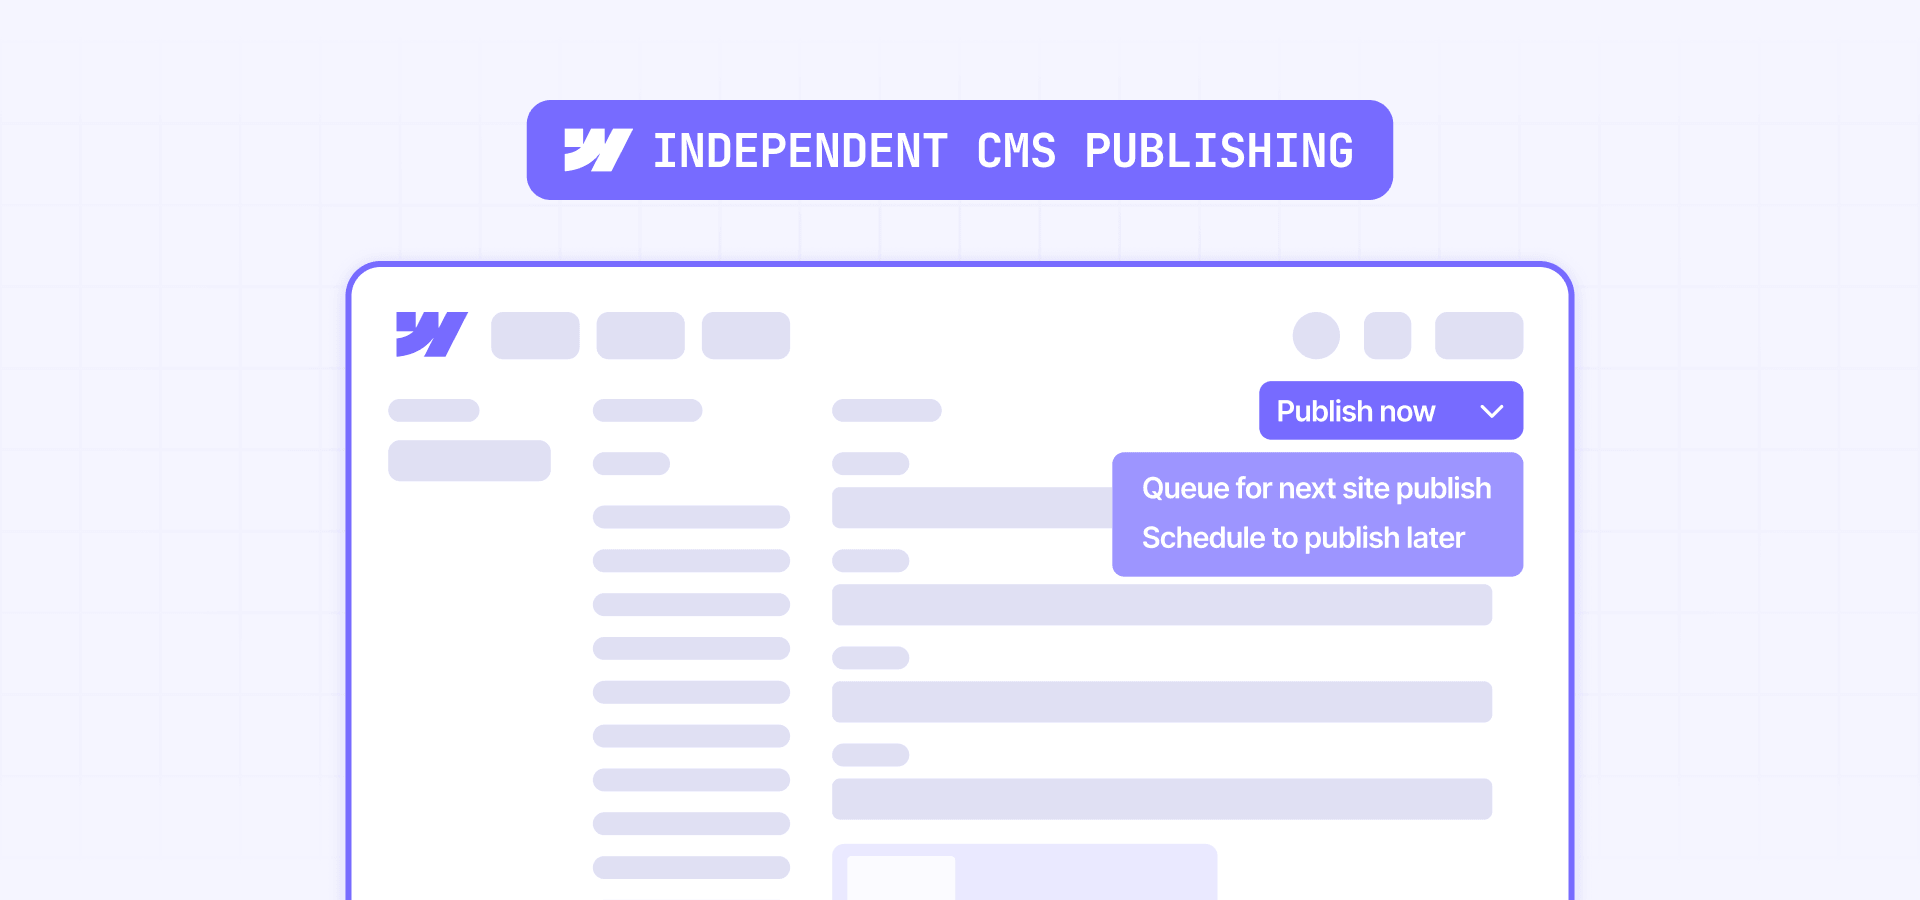
- Publish now: Push the item live immediately, independent of the site
- Queue for next site publish: Mark the item to go live on the next full-site publish
- Remove from queue: Cancel a queued publish
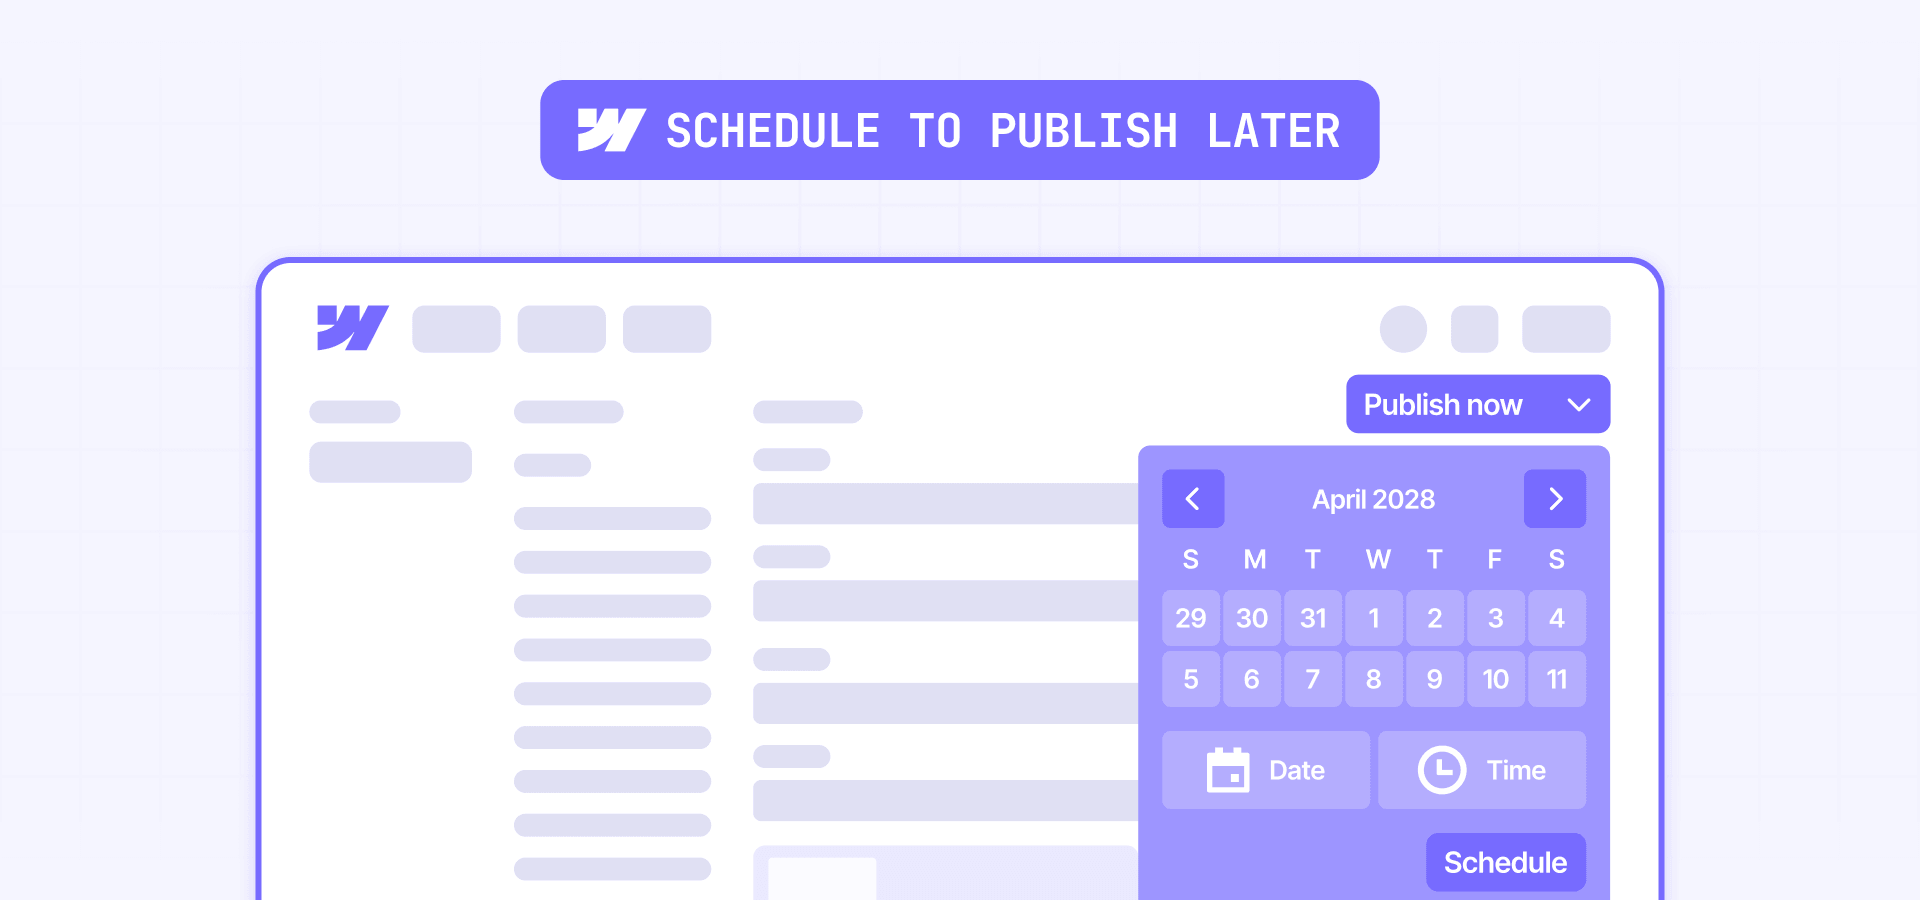
- Schedule to publish later: Set a future datetime for automatic publication
- Unpublish: Remove a live item from the site immediately
- Archive: Remove the item on the next full-site publish, or cancel pending scheduled publishes
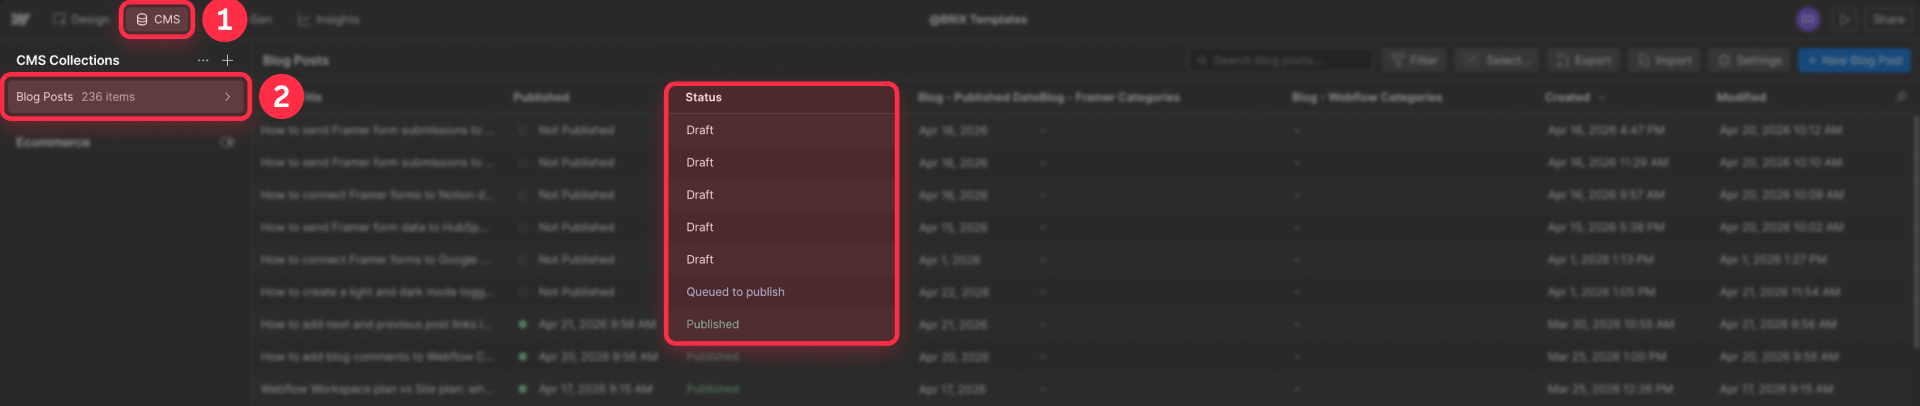
Statuses a Collection item can have:
- Draft: Hidden, has never been live
- Changes in draft: Live on the site, but with unpublished edits sitting in draft
- Queued to publish: Will go live on the next full-site publish
- Scheduled: Will go live automatically at a set future time
- Published: Fully live on the site
- Archived: Removed from the live site
When someone says "I saved the item as draft," the relevant question is whether the item was previously live (status becomes Changes in draft) or brand new (status becomes Draft). The two behave differently on a subsequent full-site publish.
How drafts actually work
Drafts don't behave the way most people assume. A Draft item — meaning it has never been published — stays hidden even after a full-site publish. The publish doesn't promote drafts to live content.
Changes in draft also behaves differently than many expect. The item is still live with its previous content, and saving new changes as draft doesn't unpublish the item. It just means the new changes aren't live yet. However, a full-site publish does not automatically push draft changes live. The item must be explicitly set to Publish now or Queue for next site publish for those changes to go live.
If someone assumes "saving as draft means it'll go live next time I publish everything," they're incorrect for both statuses.
The referenced item cascade
Webflow's CMS supports reference and multi-reference fields, which let Collection items point to other Collection items. When you publish a CMS item, Webflow also publishes the items it references if they have pending changes. This isn't occasional behavior — Webflow's documentation confirms it happens on every single-item publish.
A practical example: a Blog Post references an Author item. If the author's profile has unpublished changes, publishing the blog post also publishes the author update. In a team environment where different people edit different Collections, this is how the "I only published a blog post, why did the author's bio change too?" scenario happens.
There's no native switch to publish one item and nothing else. The reliable approach is checking referenced items for pending changes before publishing a parent item, especially when multiple teammates work in different Collections.
When CMS item publishing is blocked
The Publish now option sometimes goes grey. Documented causes include:
- Domains have different publish times: Publishing or unpublishing can be blocked when the site's connected domains were last published at different times
- Site has been restored from backup: A backup restore can put domains out of sync and block single-item publishing
The fix in these cases is straightforward: run a full-site publish once to sync publish dates across connected domains, then single-item publishing works again. Teams on Localization have additional edge cases where items appear published in the CMS but don't show up on the live site until a full-site publish realigns the locale data.
Why CMS publishing skips Design Approvals
This is the most important gotcha for teams on Enterprise: Design Approvals does not gate CMS item publishing. On Enterprise, a content editor with Publish CMS items to production permission can push CMS content live without any branch approval process. On other plans, all roles except Reviewer can publish CMS items. Design Approvals only controls branch merges.
Teams that rely on Design Approvals as a universal "nothing goes live without review" gate often miss this. If you want CMS changes reviewed before going live on Enterprise, you need to restrict the Publish CMS items to production permission at the role level and have editors save changes without publishing, allowing someone with production publish rights to review and publish them.
How to schedule Webflow content for future publication
Scheduling exists in Webflow but has narrow edges that catch teams off guard. Most of the limitations come from what the feature covers and what it explicitly doesn't.
How scheduled CMS item publishing works
Open any Collection item, choose Schedule to publish later, and set a target datetime. The item goes live automatically at that moment without requiring a manual publish. Scheduling is available on CMS, Business, and Enterprise plans, but not on Basic.
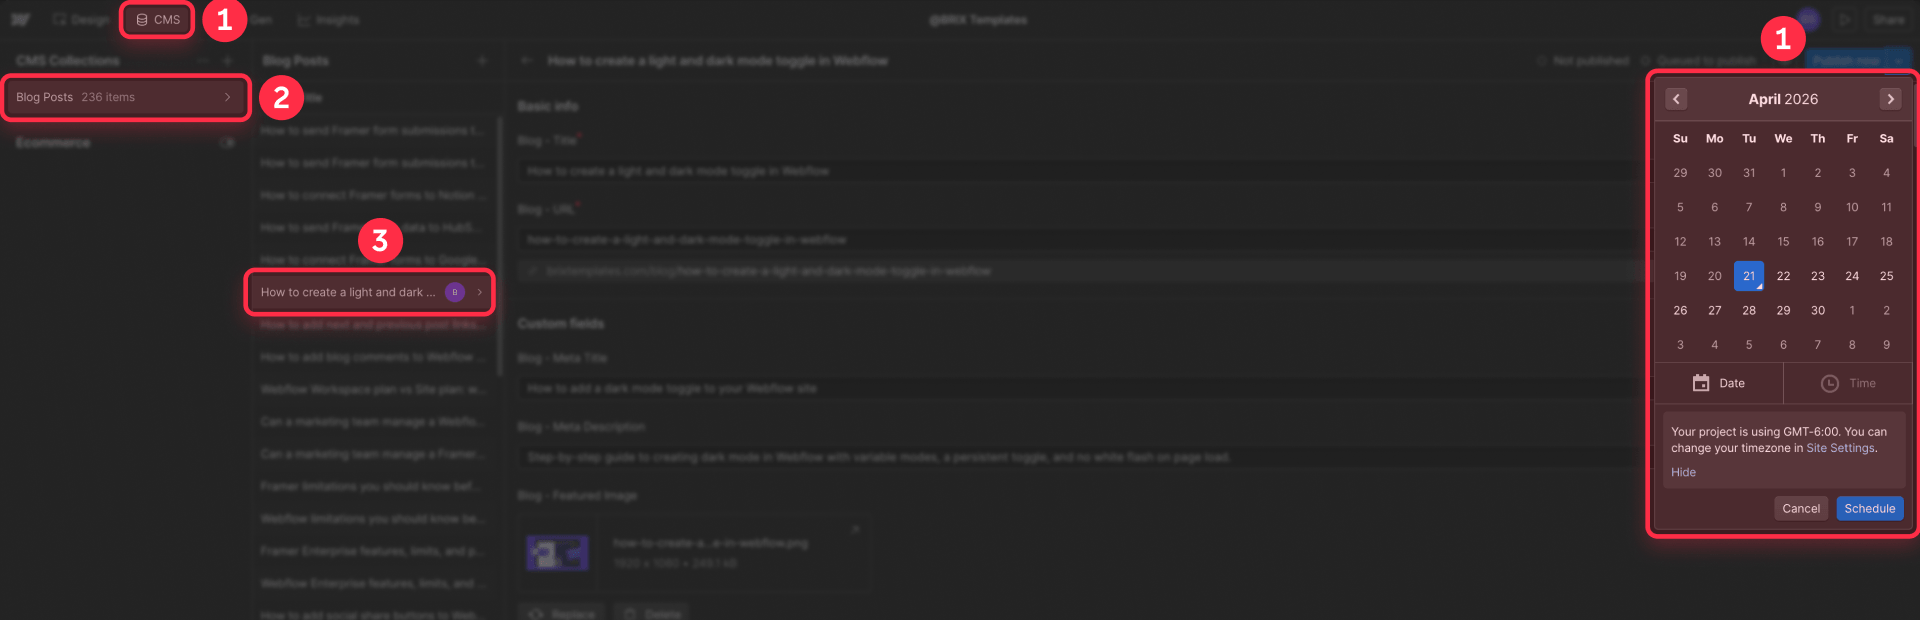
One critical timing detail: scheduled times follow your site's configured timezone, not your browser's. If your site timezone is set to Pacific Time and you're in Colombia scheduling a post for 9am, it'll publish at 9am Pacific, not 9am Colombia time. Always verify the timezone setting in Site settings before scheduling anything time-critical.
The "only never-published items" scheduling limit
The biggest limitation generates the most Wishlist votes: scheduling only works for items that haven't been live before. You can schedule a brand-new post, or a post currently in Draft, to publish at a future time. You cannot schedule an update to an already-published post.
This is a known limitation that Webflow's Wishlist tracks as an active request, but it hasn't shipped yet. The workaround is unpublishing the item, updating its content, then scheduling it. The item is now treated as a new publish, but it's off the site during the gap — rarely what teams actually want.
What you can't schedule
- Full-site publishes: No way to queue a complete site publish for a future time
- Single-page publishes: Even on Enterprise, these happen immediately with no scheduling option
- Updates to already-live CMS items: Only new items or currently drafted items can be scheduled
- Unpublishing actions: You can't schedule an item to be removed at a future time
A manual full-site publish doesn't disrupt already-scheduled Collection items. If you scheduled a blog post to go live on Friday and someone publishes the site on Wednesday, the scheduled item still publishes at its original time. Only queued items go out with the next site publish.
How to stop teammates from publishing unfinished work in Webflow

Every multi-person Webflow team hits this pain point eventually. The fix isn't one toggle — it's a layered permissions system. Your available controls depend on your Workspace plan, not just your Site plan, which is a distinction teams often miss. For the full breakdown of how Workspace plans and Site plans relate, see our Webflow pricing guide.
The Can publish behavior
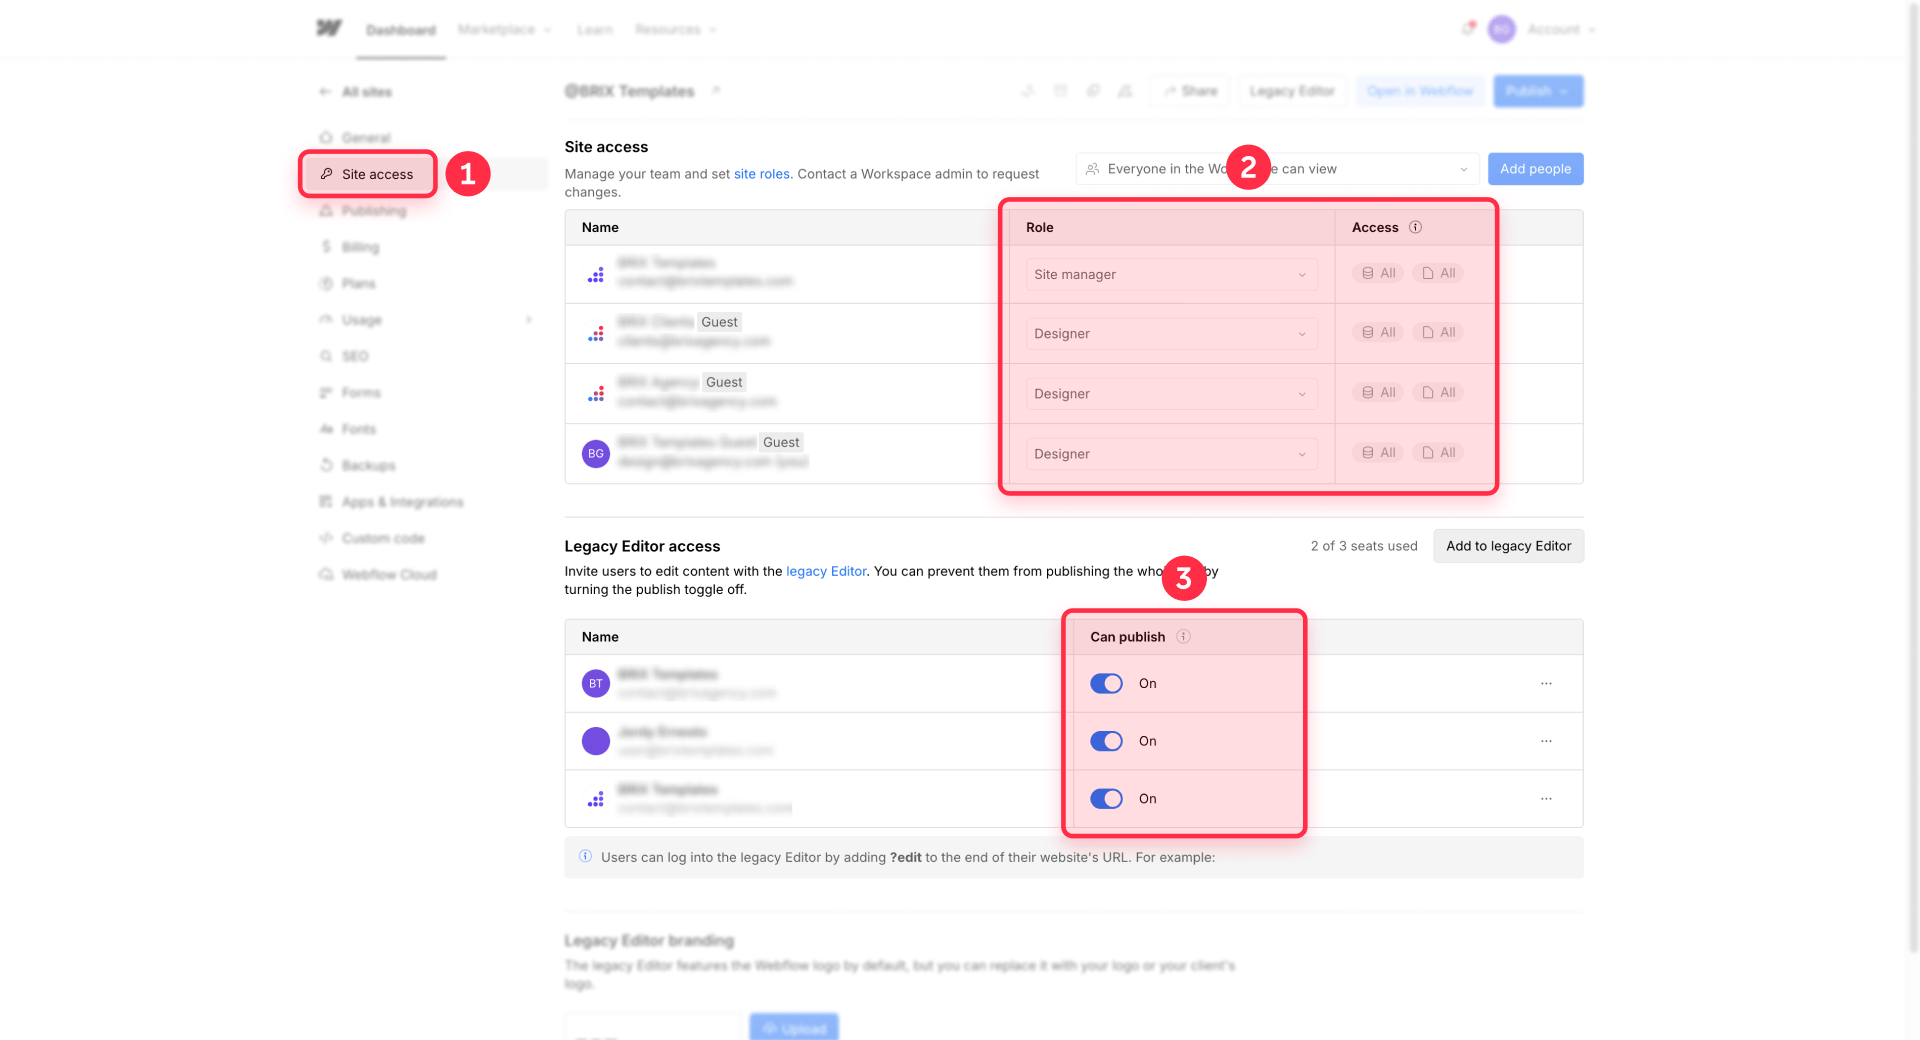
On Growth and Agency Workspace plans, you control whether each teammate has publishing rights through the Can publish toggle on their assigned role. On Enterprise, this control migrates to custom roles with granular permissions that replace the older toggle behavior.
The baseline principle is the same across plans: not everyone on the team needs publish rights. Content editors and marketers usually shouldn't publish the full site; they should publish CMS items and let a site manager handle site-wide publishes.
Role-based permissions
Webflow's standard roles have different publishing capabilities:
- Content editor: Limited to content editing in the Editor; can publish CMS items if the Workspace plan allows
- Marketer: Adds the ability to create pages from templates and edit component properties
- Designer: Full design access; publishing rights depend on the specific role configuration
- Site manager: Full access, including all publishing paths
- Reviewer (Enterprise): Can approve branches but can't publish
On non-Enterprise plans, these roles and their publishing rights are configured through the Can publish toggle on Growth and Agency plans.
Custom roles for Enterprise Workspaces
Enterprise custom roles let you separate permissions that are bundled together on lower plans:
- Publish site to staging vs. Publish site to production: Separate the two destinations into distinct permissions
- Publish CMS items to production: A separate permission controlling who can publish CMS content to production
- Make changes without approval: If disabled, the user can only edit through branches
- Approve changes: Only granted to designated reviewers
Practical role setups
Two-person team: Designer gets full publish rights on both staging and production. Content editor gets CMS item publishing only — they can publish blog posts but can't trigger site-wide changes.
Five-person marketing team: One publisher (usually a senior marketer or ops person) holds production publish rights. Three Marketers can edit, stage, and publish CMS items but can't trigger site-wide publishes. One reviewer checks work but has no publishing rights.
Agency plus client: Agency operates as Workspace guests with design and staging publish rights but no production publish rights. Client team has Content editor or Marketer roles with CMS publishing. A designated publish gatekeeper on the client side holds production publish rights.
The Preview mode misconception
Teams sometimes confuse Preview mode with staging. Preview is a read-only render of the Designer state visible only to people who already have Designer access. It's viewing, not publishing. Setting permissions around Preview doesn't control what gets published.
Page branches, design approvals, and governed publishing in Webflow

Once you understand the four publishing paths and the role system, page branches and design approvals become the governance layer on top. These are Enterprise-only features — page branching, design approvals, the publishing workflow, and branch staging are all exclusive to Enterprise Workspaces. They're not the answer for every team, but for teams with junior builders or external contributors on Enterprise, they close the last gap in the publishing flow.
What page branches actually do
A page branch is an isolated snapshot of one page, not a clone of the full site. Changes inside the branch don't affect the main site until merged. Other pages, CMS collections, global styles, and components stay shared with main. Branching isolates the page layout, not the content architecture.
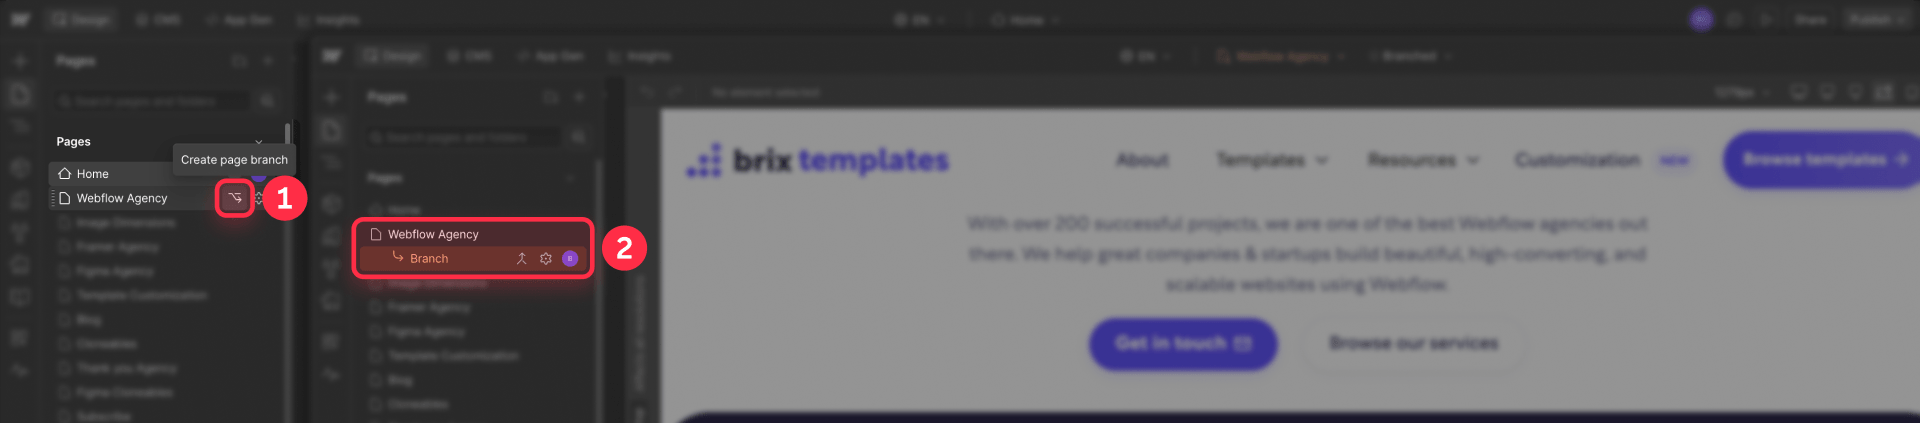
How design approvals add a review gate
Assigning the Designer (needs approval) role forces that user to work exclusively in branches and request approval before merging. A reviewer with the Approve changes permission (site managers, designers, reviewers, or custom roles configured for it) reviews the branch on its dedicated branch staging URL and approves or rejects.
An approval doesn't mean the work is live. Merge and publish are separate actions — an approved branch merges to the Designer state of the main site, and then someone still has to run a full-site publish or single-page publish to push that merged change to production.
Branch staging versus site staging versus production
Three destinations that teams confuse constantly:
- Branch staging: Auto-generated when a designer requests approval, shows only the branched page's state for review
- Site staging: Your yoursite.webflow.io or custom staging domain showing the full main site after merges
- Production: Your custom live domain visible to the public
Branch staging cannot publish to production. It's a review destination, not a deployment path. One other subtlety: branch staging only shows Collection items that were already created and published at the moment the branch was staged.

When to use branches versus single-page publish
- Direct edits: Solo designers on trusted work, no review needed
- Single-page publish: Quick fixes scoped to one page with stable global dependencies
- Page branches: Multi-person teams, junior builders, experimental redesigns, or changes requiring stakeholder review before merge
Page branch limits
- One active branch per page — two designers can't branch the same page simultaneously
- One designer at a time per branch — no concurrent editing
- Comments don't survive merges — review comments are deleted at merge
- Main page edits can be lost at merge — merge replaces the entire page rather than diffing changes
- Branch staging deleted on merge — the review URL doesn't persist
- CMS is shared with main — new items added to main appear inside the branch
Why Design Approvals isn't a universal safety net
Worth emphasizing: Design Approvals only governs branch merges. It does not gate CMS item publishing (covered by the Publish CMS items to production permission on Enterprise), single-page publishing, or full-site publishing by anyone with publish rights.
The most common team failure mode is assuming Design Approvals means "nothing goes live without review" when it actually means "no branch merges without review." If your real goal is universal review before production, you need to combine Design Approvals with restricted CMS publish permissions and restricted production publish rights across the team.
Troubleshooting Webflow publishing issues
- Publish button is greyed out on your CMS item: This usually means the site's connected domains have different publish times, or the site has been restored from backup. Run a full-site publish once to sync publish dates across connected domains, then try the CMS item publish again.
- Half-finished work went live when a teammate published: A full-site publish pushes every unpublished change across the entire site, including work from other teammates. Always publish from Site actions or Site settings, where per-domain checkboxes let you push to staging only first.
- Scheduled CMS item didn't publish at the set time: Check that your site's timezone in Site settings matches what you expected, because scheduled times follow the site timezone, not your browser's. Also confirm the item hadn't been previously published — scheduling only works on never-live items.
- Staging shows different content than production: This is expected behavior when you publish to one destination without the other. Open the publish modal, check both the staging subdomain and your custom domain, then publish to sync them.
- Publishing one CMS item caused other items to update: You hit a referenced item cascade. Before publishing any item, check its reference and multi-reference fields for items with pending changes, and handle those separately if needed.
- CMS item with Changes in draft didn't update after full-site publish: This is expected behavior. Items with Changes in draft status do not automatically publish their draft changes on a full-site publish. The item must be explicitly set to Publish now or Queue for next site publish.
Frequently asked questions about Webflow publishing
Can I publish a single Webflow page without publishing the whole site?
Only on Webflow Enterprise plans. Webflow single-page publishing lets you publish one static page or one CMS template page without pushing other unpublished site changes live, but the feature is not available on Basic, CMS, or Business plans. On non-Enterprise plans, the closest workarounds are using Draft pages to keep unfinished pages out of publishes, or publishing to Webflow staging first before publishing to production.
Can I publish a Webflow CMS item without publishing the whole site?
Yes. Webflow CMS item publishing lets you publish a single Collection item without running a full-site publish. In the Collection item editor, choose Publish now instead of Queue for next site publish. The main catch is that Webflow can also publish any referenced or multi-referenced CMS items that have pending changes, so publishing one blog post can also push related author or category edits live.
What's the difference between Webflow staging and production?
In Webflow, staging and production are two different publishing destinations. Webflow staging is your yoursite.webflow.io subdomain, or a custom staging domain on Enterprise, and it is mainly used for testing and review. Webflow production is your live custom domain. They are not separate site versions by default — they can match, or they can diverge if you publish to one without publishing to the other.
How do I publish only to Webflow staging without going live?
To publish only to Webflow staging, open Site settings → Publishing or Site actions → Publish, check the staging domain, uncheck the production domain, and publish only to the selected domain. This sends your unpublished Webflow changes to staging without updating the live custom domain — the safest way to review changes before they reach production.
How do I schedule a Webflow blog post to publish later?
To schedule a Webflow CMS blog post, open the Collection item, choose Schedule to publish later, and set the publish date and time. In Webflow, scheduled publishing follows the site timezone, not your browser timezone. Also, Webflow scheduling only works for items that have never been published before — you cannot schedule an update to an already-live post without first unpublishing it.
How do I undo or revert a Webflow publish?
There is no one-click undo publish feature in Webflow. To revert a Webflow publish, you usually either restore a backup from Site settings → Backups or manually edit the affected page or CMS content and republish. A backup restore rolls back the entire site state, not just one change, so it should be used carefully on production sites. For step-by-step instructions on the restore process, see our guide on restoring a single page from Webflow backups.
How do I stop editors from accidentally publishing my Webflow site?
To stop accidental publishes in Webflow, restrict publishing permissions at the role level. On Growth and Agency Workspaces, use the Can publish toggle to control who can publish. On Enterprise, use custom roles and permissions to separate staging publish rights from production publish rights. This is the safest way to prevent marketers, editors, or junior teammates from pushing unfinished Webflow work live.
Conclusion
Webflow's four publishing paths — full-site, single-page, CMS item, and branch merge — are independent mechanisms with their own rules and permissions. Matching the right path to each change, combined with role-based permissions and staging reviews, protects your site from accidental publishes and team missteps. If you're setting up a Webflow site for a team and want publishing permissions, staging workflows, and approval processes structured properly from day one, our Webflow agency can help design the governance model before anything goes live.


Join readers commenting on this post!