
This guide walks you through connecting your custom domain to your Webflow website using Cloudflare for domain management. We'll cover the essential steps to get your domain working smoothly with Webflow. This provides a strong foundation for our upcoming tutorials, where we'll show you how to leverage Cloudflare to optimize your Webflow site. Here are a few things we'll cover:
- How to geo-block visitors on your Webflow site using Cloudflare
- Optimizing Webflow bandwidth usage
- Blocking or allowing visitors from specific countries
- Speeding up your Webflow site with Cloudflare’s caching and CDN features
What you need before we begin
- A published Webflow site – Your site should be built and live on Webflow
- A custom domain with access to your provider – Your domain should already be registered with a provider like Namecheap, GoDaddy, etc., and you’ll need to log in to configure DNS records and change nameservers
- A Cloudflare account – You can create a free account at cloudflare.com
- 5 minutes – The setup is quick but requires careful attention to detail
Now that you have everything ready, let’s move on to setting up Cloudflare as your DNS provider.
How to set up Cloudflare as your DNS provider for Webflow
Add your domain to Cloudflare
- Create a Cloudflare account or log in at Cloudflare.com
- Click Add a Site in your dashboard
- Enter your domain name in the Enter an existing domain field
- Choose Quick scan for DNS records
- This feature automatically scans and imports your current DNS records—including email settings and subdomains—ensuring a smooth transition
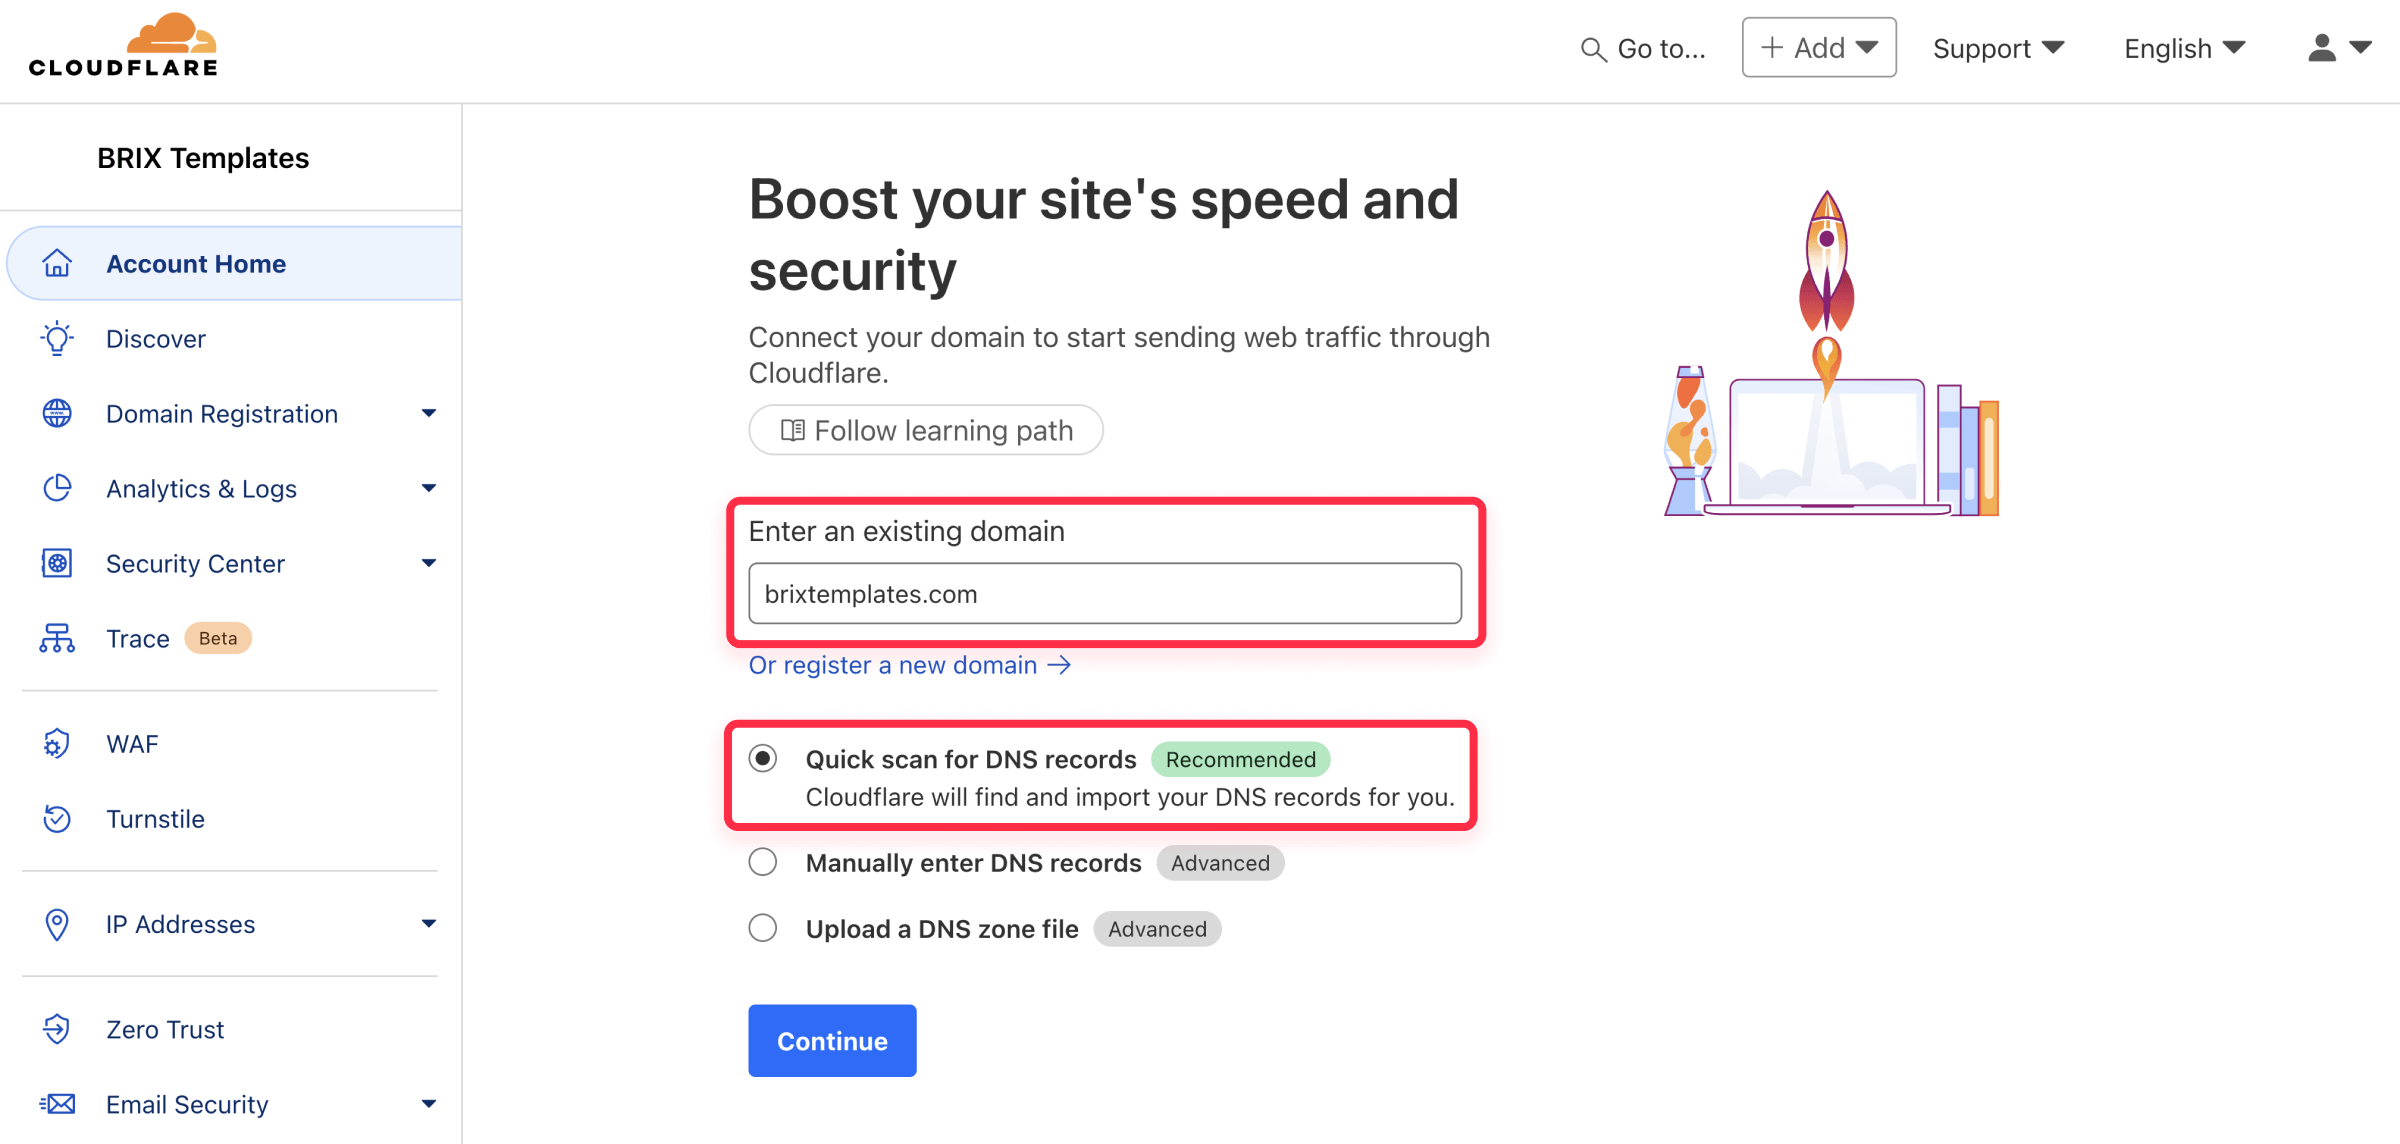
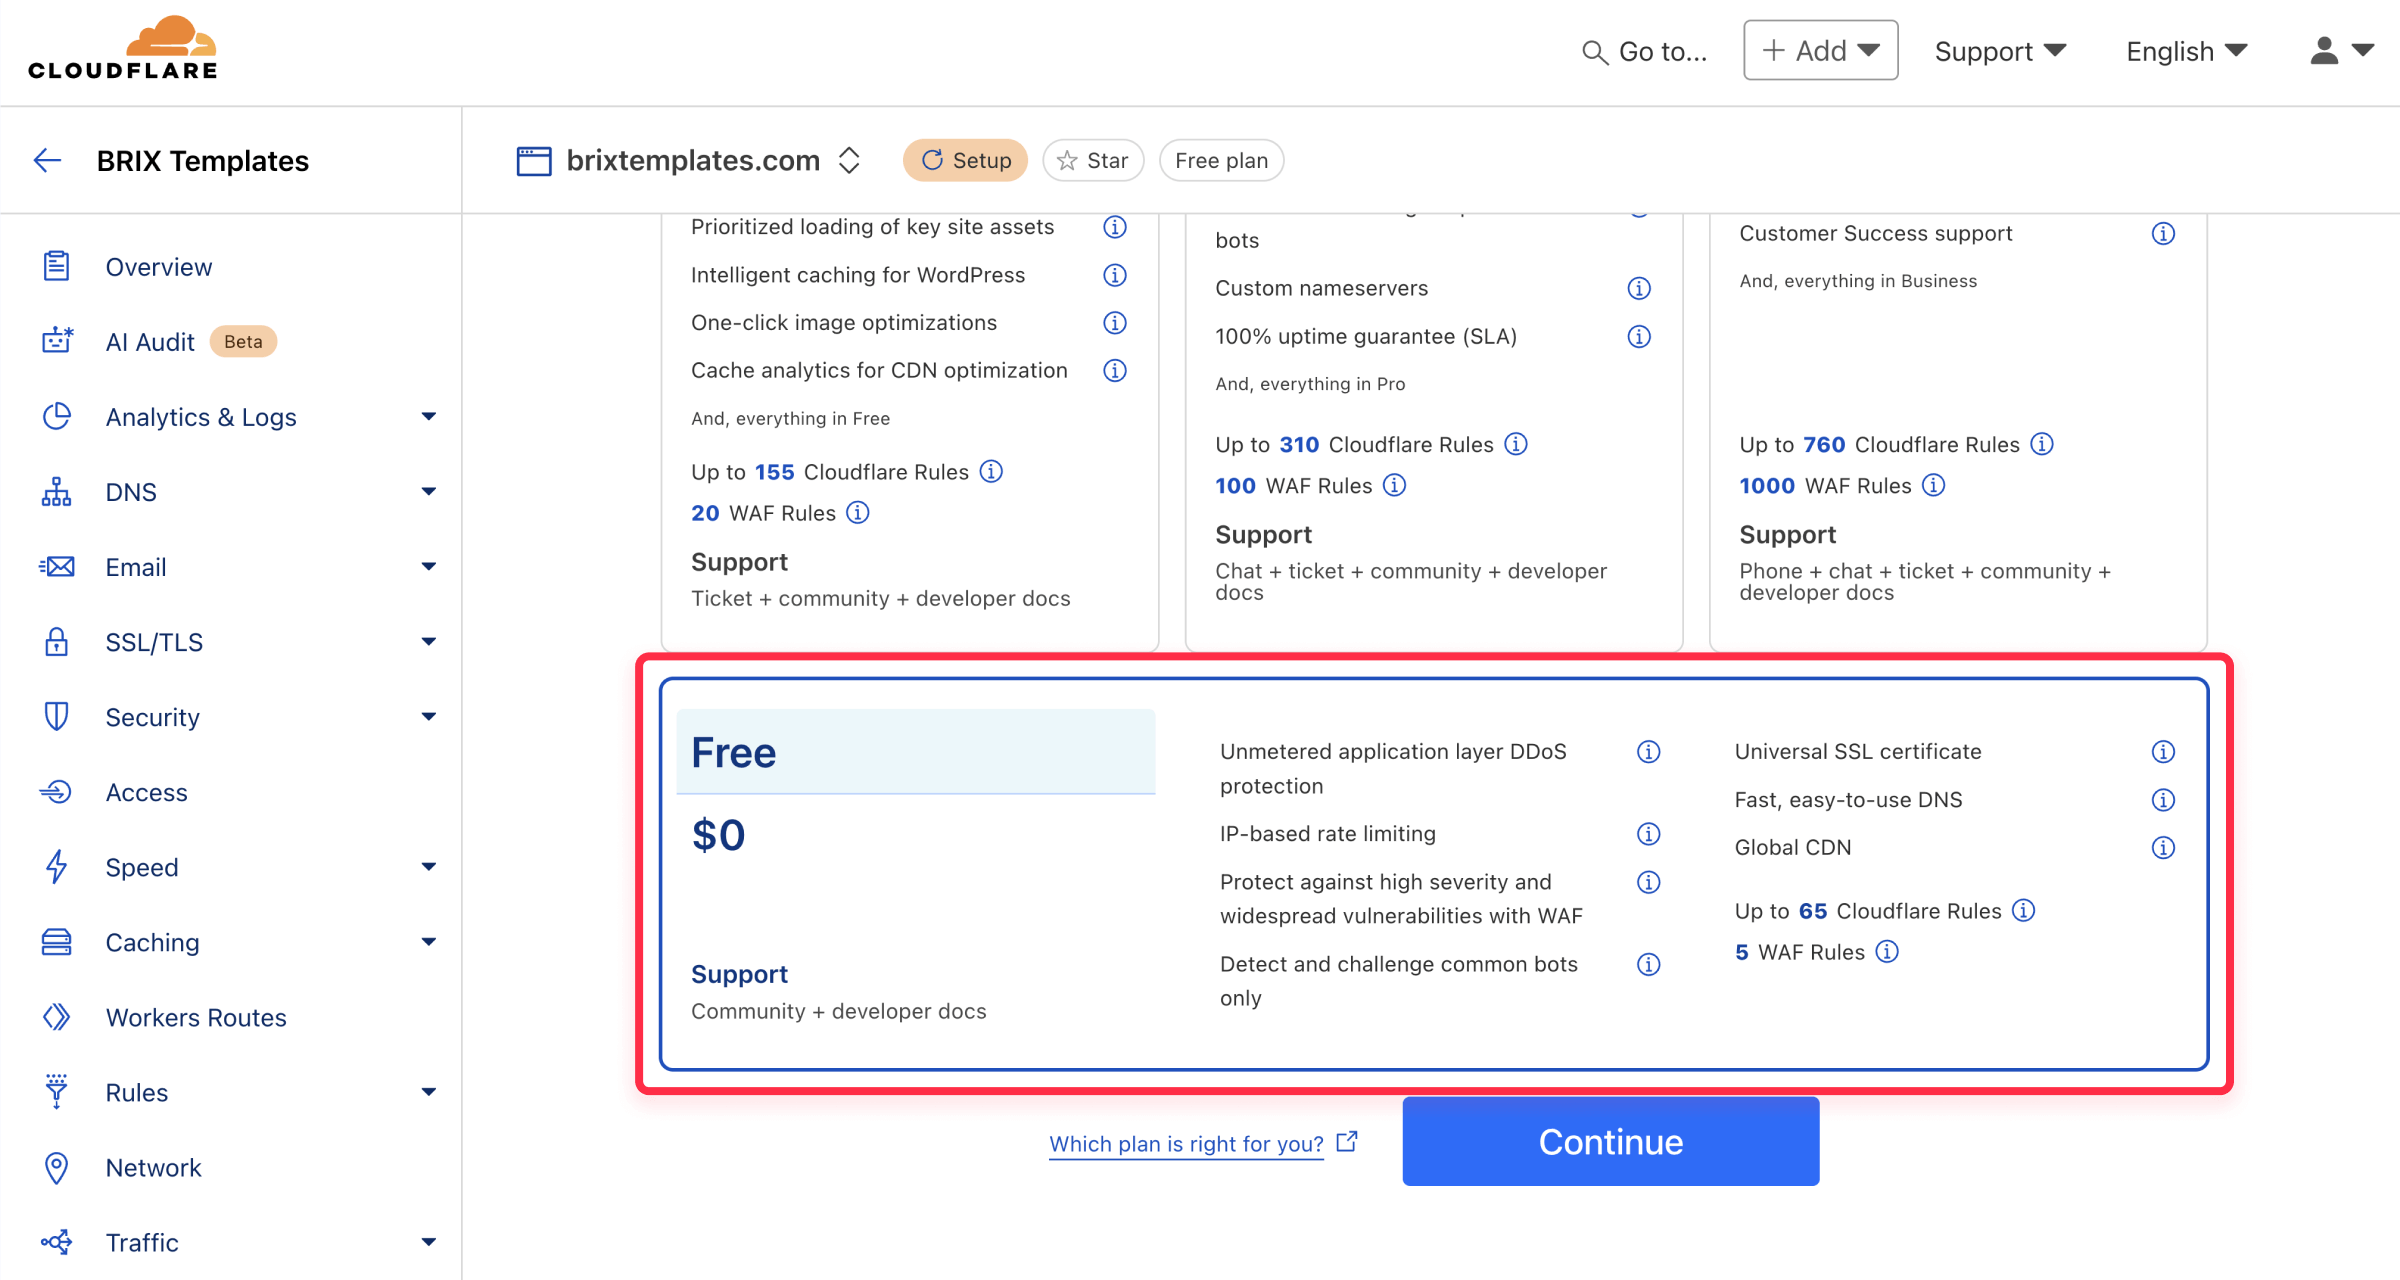
- Click Continue and select the Free plan to start (you can upgrade to Pro or Business plans later for additional features)
- After the scan, you'll see a Review your DNS records page summarizing the DNS records Cloudflare found. Review these records, comparing them with your current DNS provider's control panel to ensure everything was imported correctly

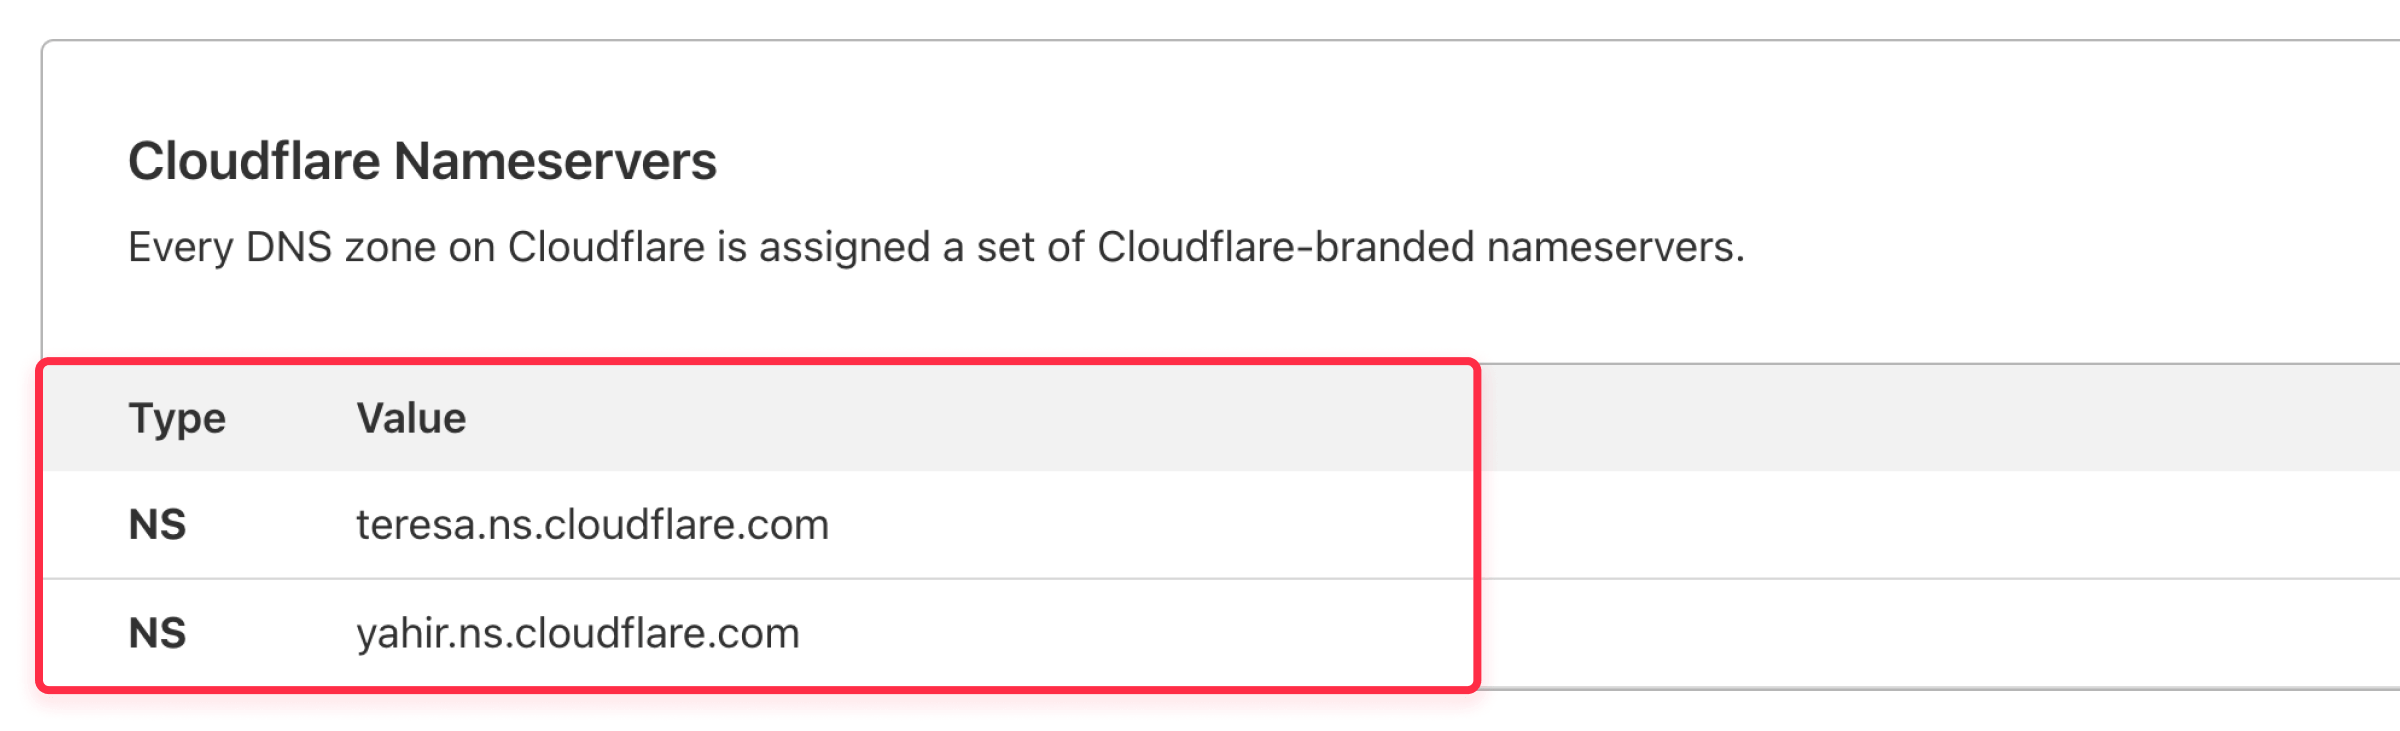
- Click Continue to see your two unique Cloudflare nameservers (they'll look like diana.ns.cloudflare.com). Keep this page open - you'll need these exact names for the next step
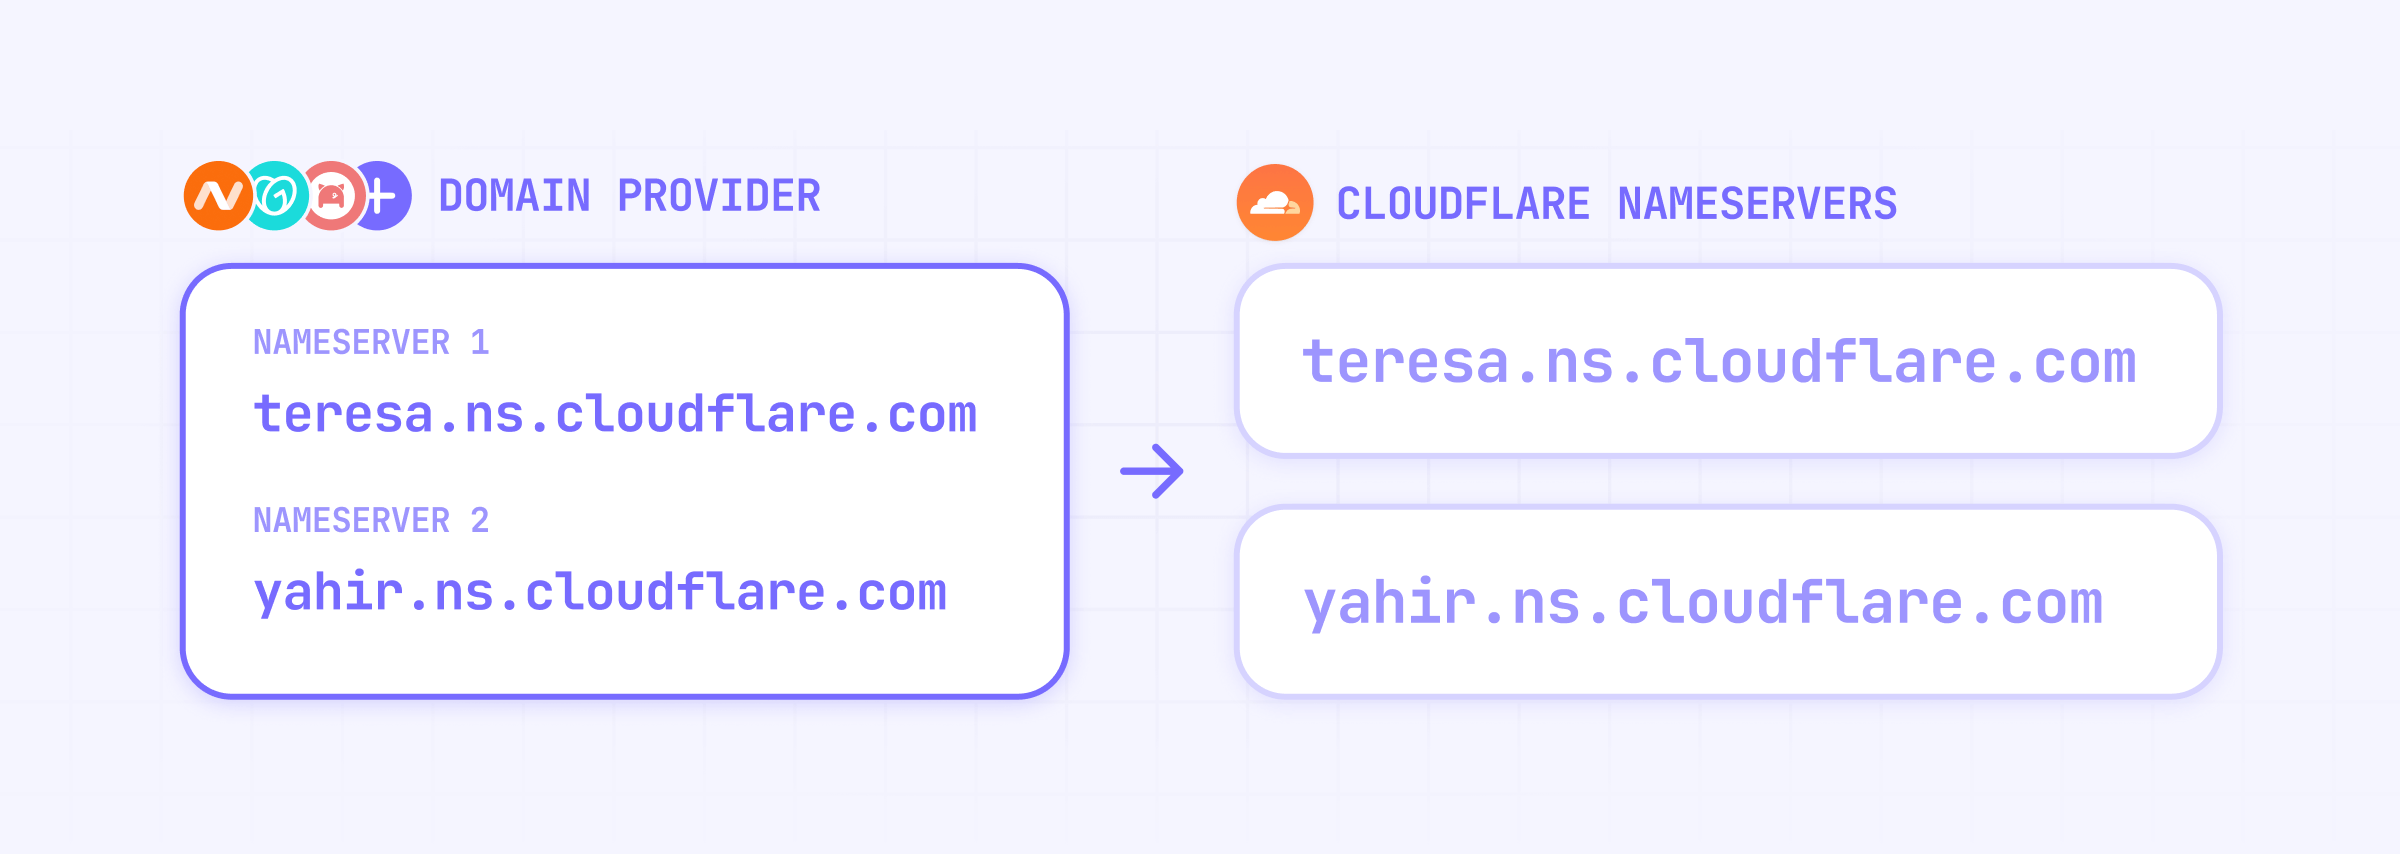
Update your domain nameservers
Once you have your Cloudflare nameservers, you'll need to update them with your domain provider. While this process is similar across all domain registrars, the exact menu names and layout will vary. We'll use Namecheap as an example in this guide, but you can find detailed instructions for your specific provider here:
- Namecheap nameservers guide
- GoDaddy nameservers guide
- Porkbun nameservers guide
- Domain nameservers guide
- HostGator nameservers guide
- Bluehost nameservers guide
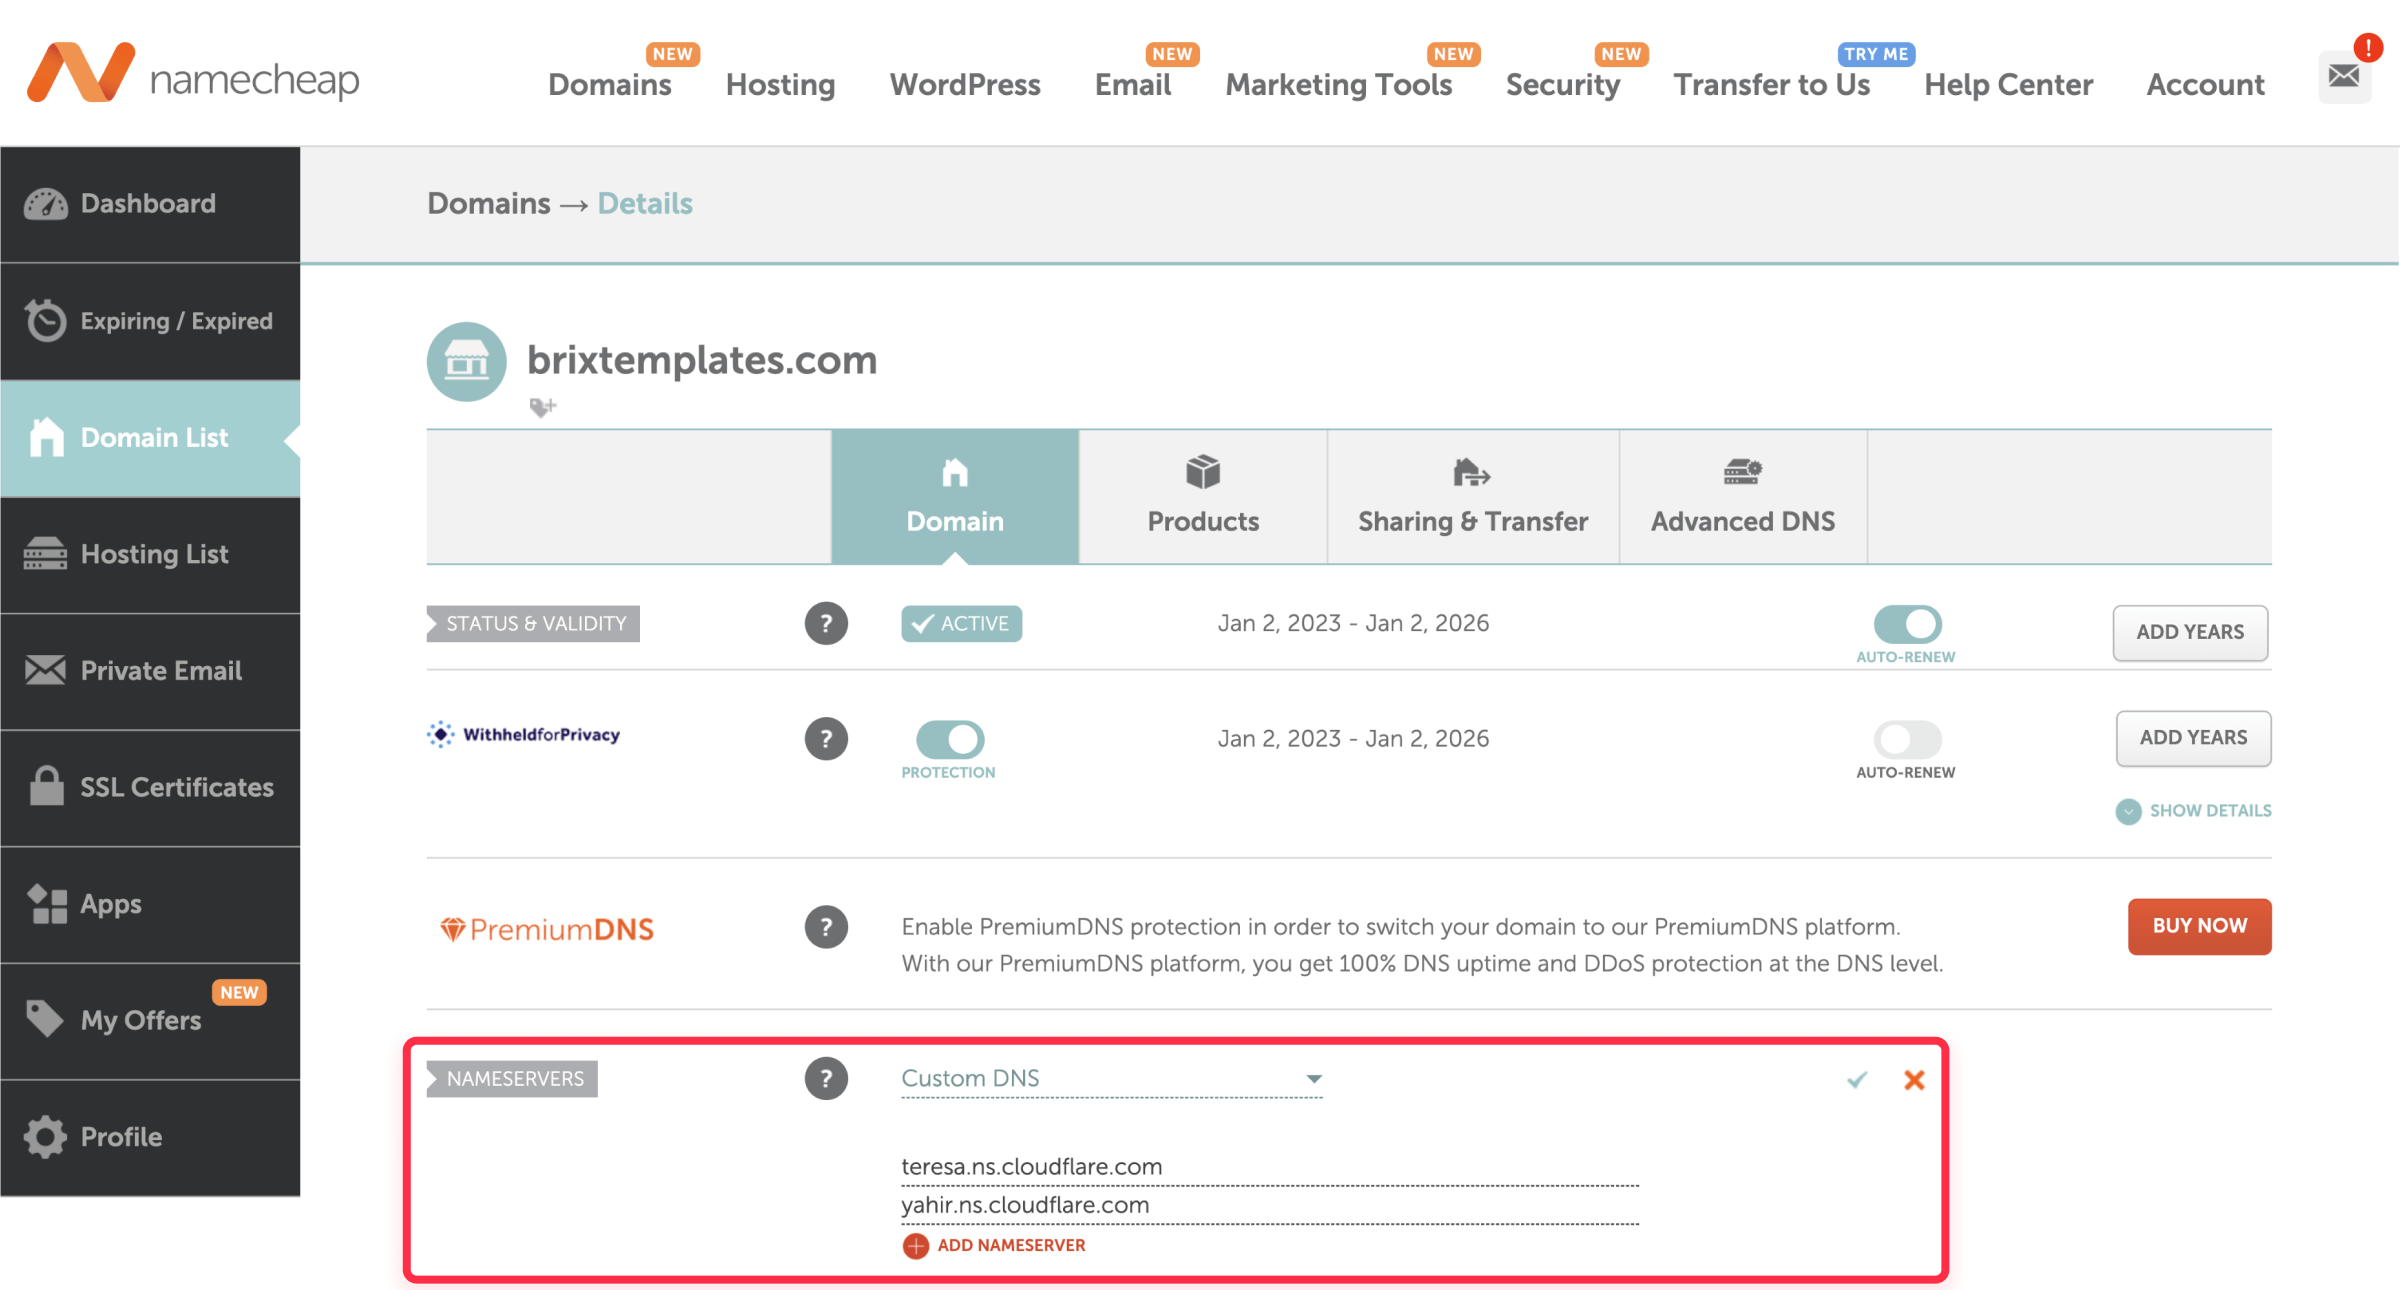
Using Namecheap as our example, here's how to update your nameservers:
- Log in to your Namecheap account
- Navigate to your domain list and click Manage next to your domain
- In the Nameservers section, select Custom DNS
- Enter the two Cloudflare nameservers you received earlier
- Save your changes
Note: Allow 24-48 hours for nameserver changes to propagate globally, though it's often much faster (5-10 minutes). During this time, your website will continue working normally as it transitions to Cloudflare.
How to configure your Webflow domain settings
Add or manage your domain
- Access your Webflow project settings
- Navigate to the Publishing tab
- Under Production, either:
- Click Add custom domain for new setup
- Or review existing domains if already configured
DNS records setup
Before configuring your DNS records, first remove any existing AAAA records from your DNS settings to ensure your site loads properly.
You'll need to configure the following DNS records regardless of which domain version (root or www) you plan to use as your default:
Required DNS records:
- A Records for root domain
- Type: A
- Name: @
- Values: (Refer to Webflow project settings for the latest IP addresses, as they may change periodically. Example: 75.2.70.75, 99.83.190.102)
- CNAME record for WWW
- Type: CNAME
- Name: www
- Value: proxy-ssl.webflow.com
Choose your primary domain
After setting up your DNS records, you'll need to choose whether your site uses the root domain (e.g., example.com) or the www subdomain (e.g., www.example.com) as its default address. This setting is configured within Webflow.
We recommend using the root domain (example.com) for a cleaner, more modern URL. The www. prefix is largely outdated, and most modern websites default to the root domain. Additionally, many browsers automatically resolve the root domain (for example, Google Chrome hides www. in the address bar).
Important considerations:
- Existing sites: If your site is already using www and is well-established, it's generally best to keep it that way. Changing to the root domain requires re-indexing, which can temporarily impact SEO as search engines need to recrawl and reassess your site with the new URL structure. This process may cause fluctuations in rankings, so it’s best to proceed only if there’s a strong business case for the change.
- Either option works: This Cloudflare setup works perfectly fine with either the root domain or the www subdomain.
How to set your primary domain in Webflow:
- Go to Project Settings > Publishing.
- Under "Primary Domain," select either your root domain (e.g., example.com) or your www subdomain (e.g., www.example.com).
- Ensure SSL is enabled.

Webflow automatically handles redirects between the www and non-www versions of your site, so you don't need to configure any additional redirects in Cloudflare.
How to configure Webflow DNS records in Cloudflare
Essential DNS records setup
- Navigate to the DNS tab in your Cloudflare dashboard
- Add the following records based on your preferred setup as we mentioned above:
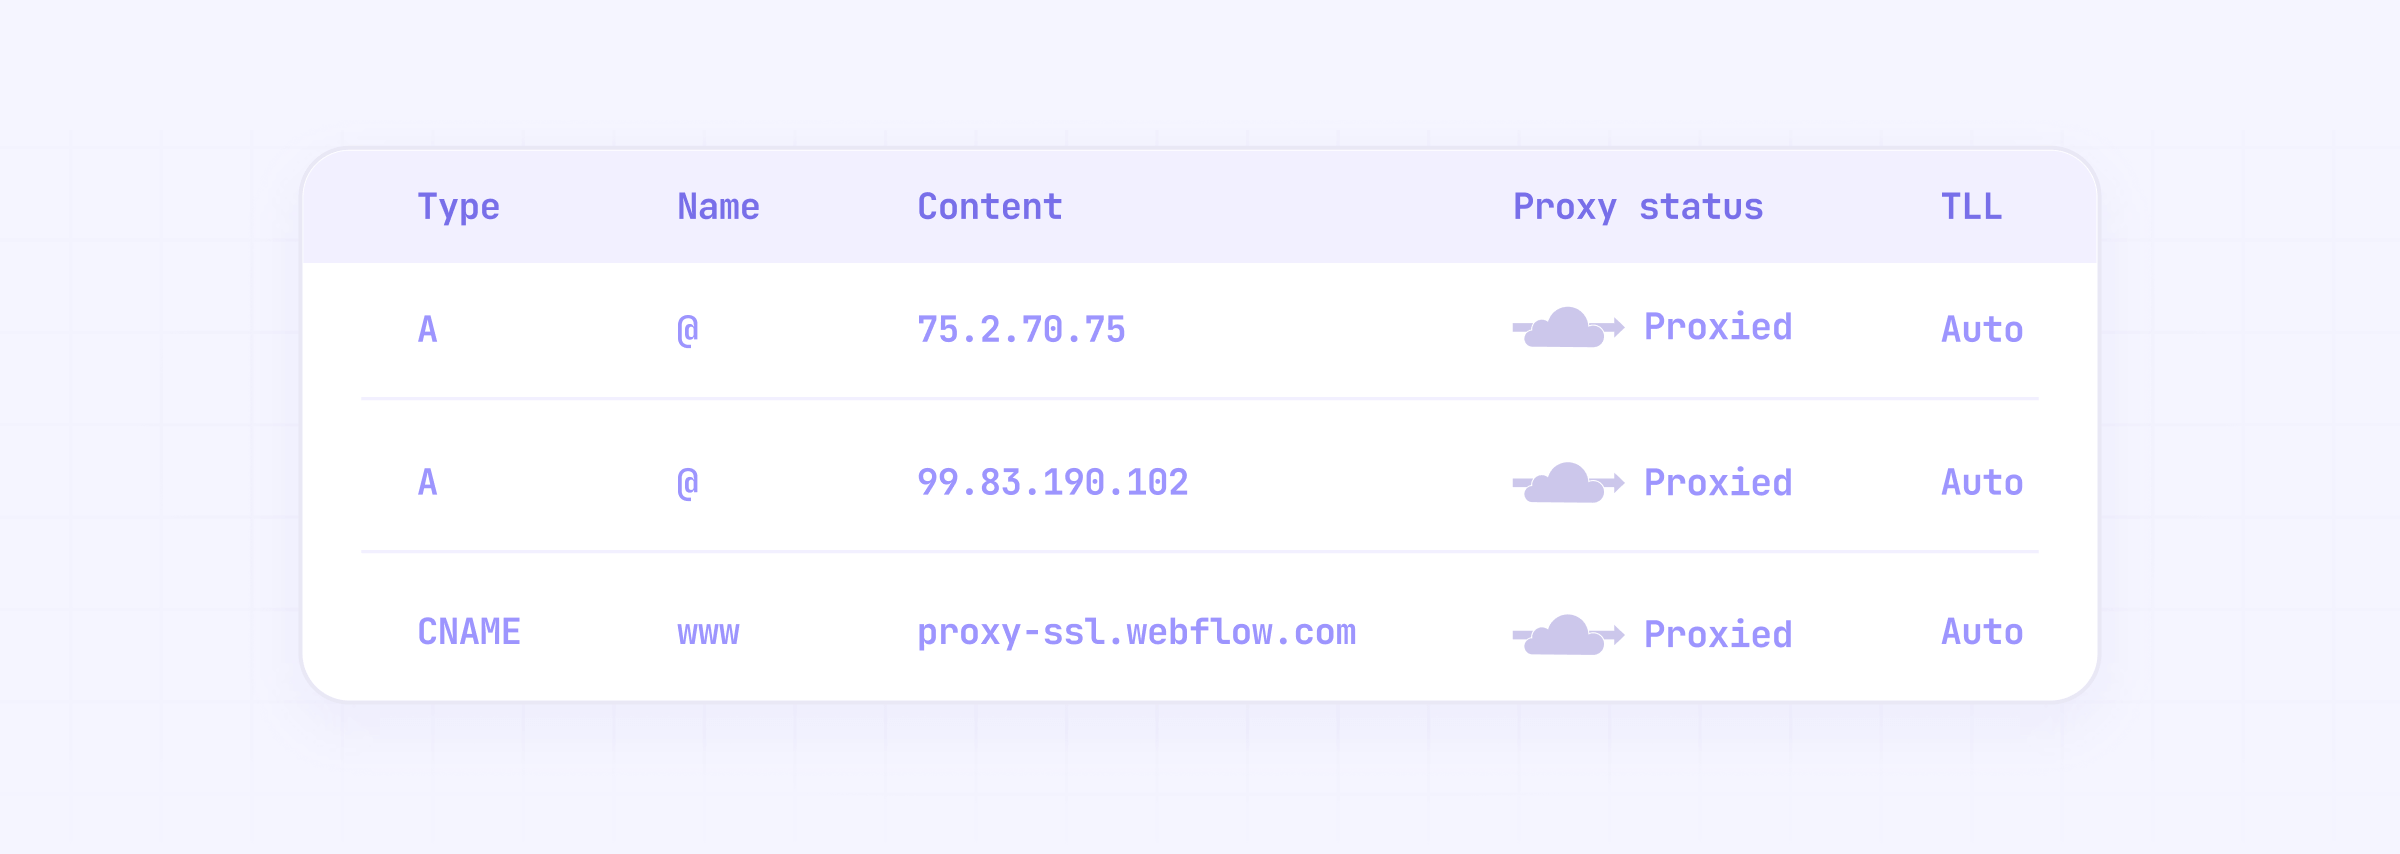
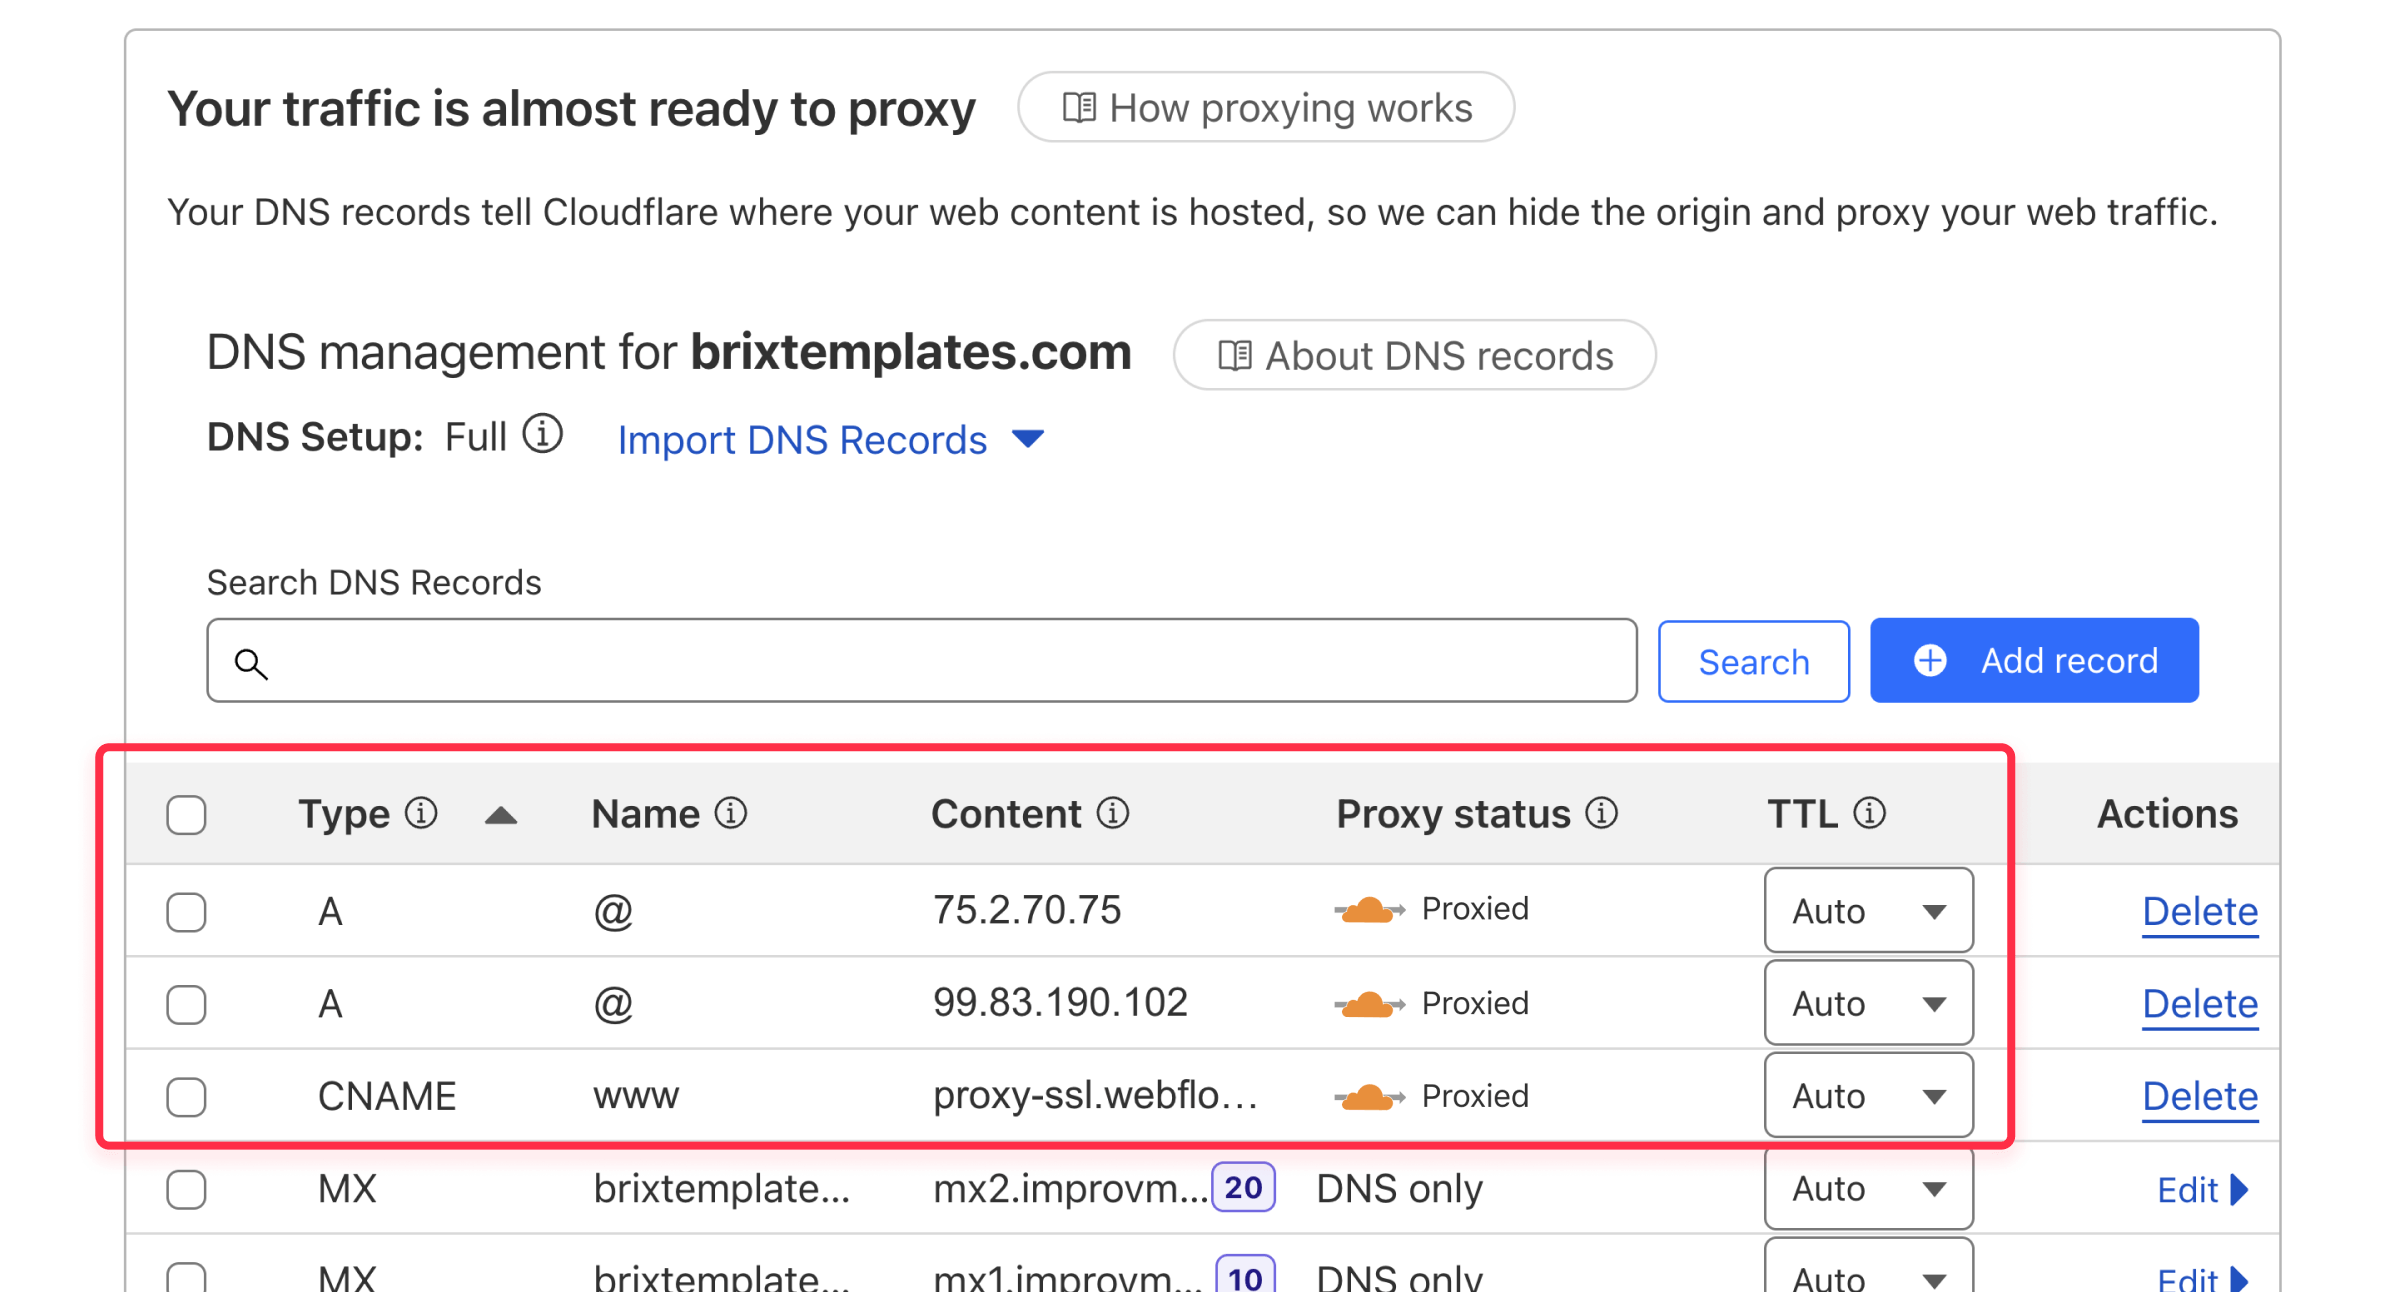
Important: When adding these DNS records in Cloudflare, ensure that the Proxy status (the cloud icon) is set to Proxied (orange cloud) for all of the records listed below. This enables Cloudflare's performance and security features. Because you are enabling the proxy, you must also configure specific Page Rules, which we'll cover in the next section. Without these Page Rules, your site will experience SSL and connection errors.
Add the following records:
For the root domain add two A records:
- Type: A
- Name: @
- Value: (Refer to Webflow project settings for the latest IP addresses, as they may change periodically. Example: 75.2.70.75, 99.83.190.102)
For the www subdomain, add the following DNS record:
- Type: CNAME
- Name: www
- Value: proxy-ssl.webflow.com
After adding your records, click Continue to activation and follow the instructions. Note that DNS changes may take a few minutes to a few hours to take effect, though they typically propagate quickly.
Cloudflare page rules (Critical)
Because you’ve enabled the proxy (orange cloud) in Cloudflare for your Webflow DNS records, you must set up specific Page Rules to prevent conflicts.
Webflow already provides SSL security, and if Cloudflare also tries to manage SSL, it can cause issues like:
- SSL errors (such as “too many redirects”).
- Redirect loops that make your site unusable.
- Slow or broken site loading due to routing conflicts.
These Page Rules ensure that Cloudflare does not interfere and that Webflow’s SSL works correctly.
How to add Page Rules in Cloudflare
Now that we know why these rules are important, let’s set them up in Cloudflare:
- Go to Rules > Page Rules in your Cloudflare dashboard.
- Click Create Page Rule.
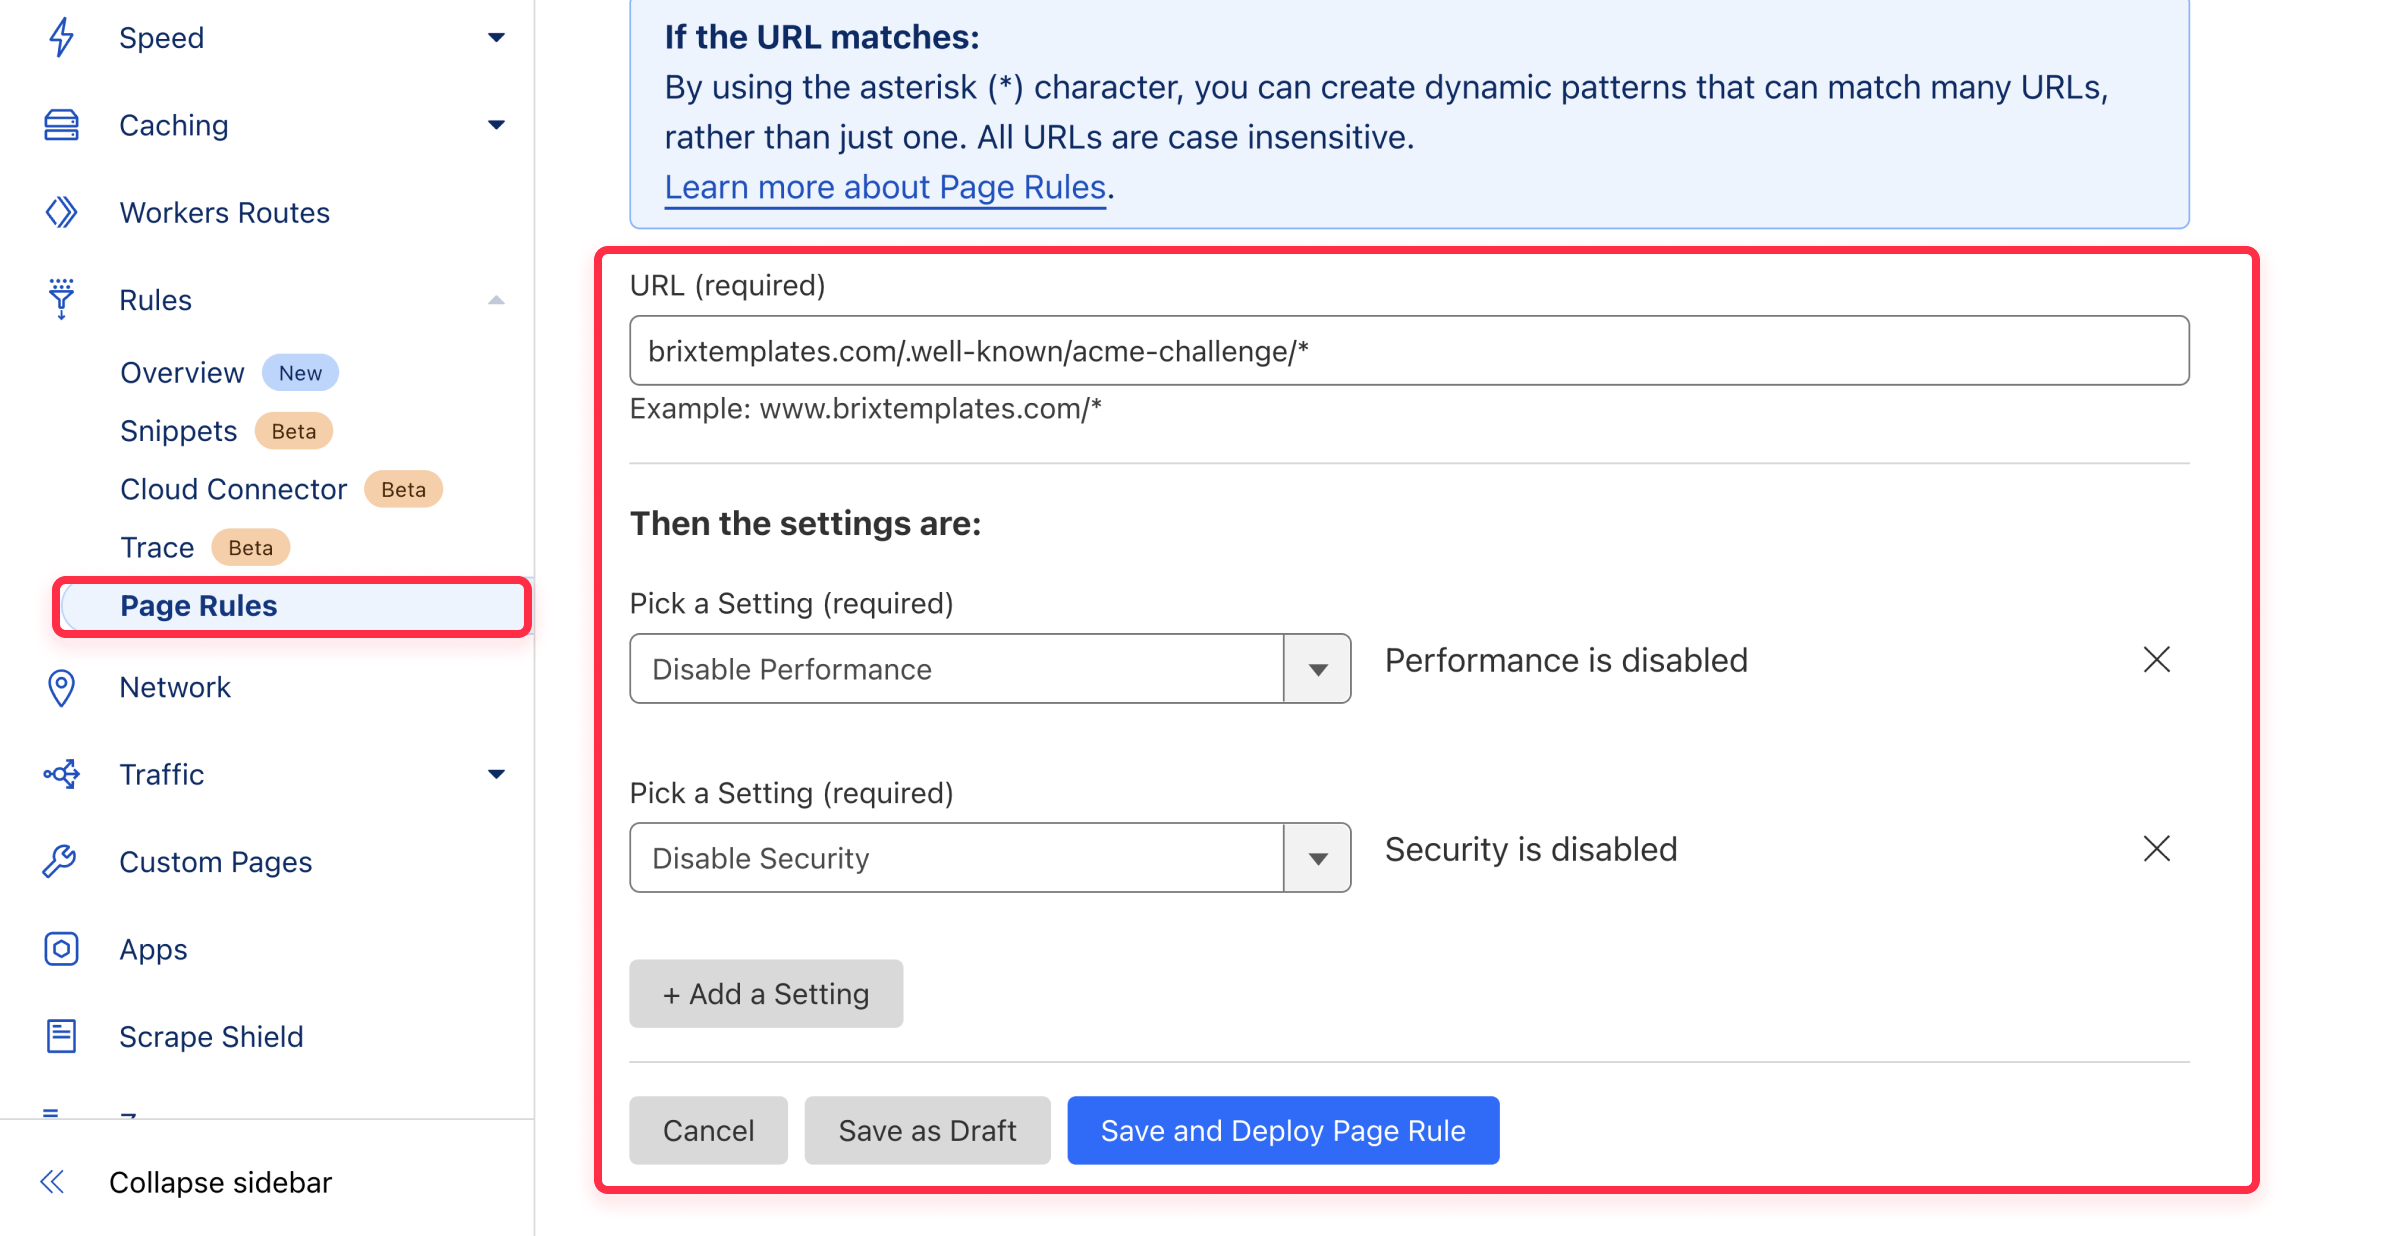
- Configure the rule as follows:
- If the URL matches: Enter yourdomain.com/.well-known/acme-challenge/*.
- Important: Replace yourdomain.com with your actual domain name.
- Important: If you've chosen to use www as your primary domain in Webflow, enter www.yourdomain.com/.well-known/acme-challenge/* instead. Use the correct version (with or without www) that matches your Webflow setting.
- Then the settings are:
- Click + Add a Setting and choose Disable Performance from the dropdown. The interface will show that performance is disabled.
- Click + Add a Setting again and choose Disable Security from the dropdown. The interface will show that security is disabled.
- Click Save and Deploy Rule.
- If the URL matches: Enter yourdomain.com/.well-known/acme-challenge/*.
SSL/TLS configuration
- Go to the SSL/TLS section in Cloudflare
- Set SSL/TLS encryption mode to Full (Strict)
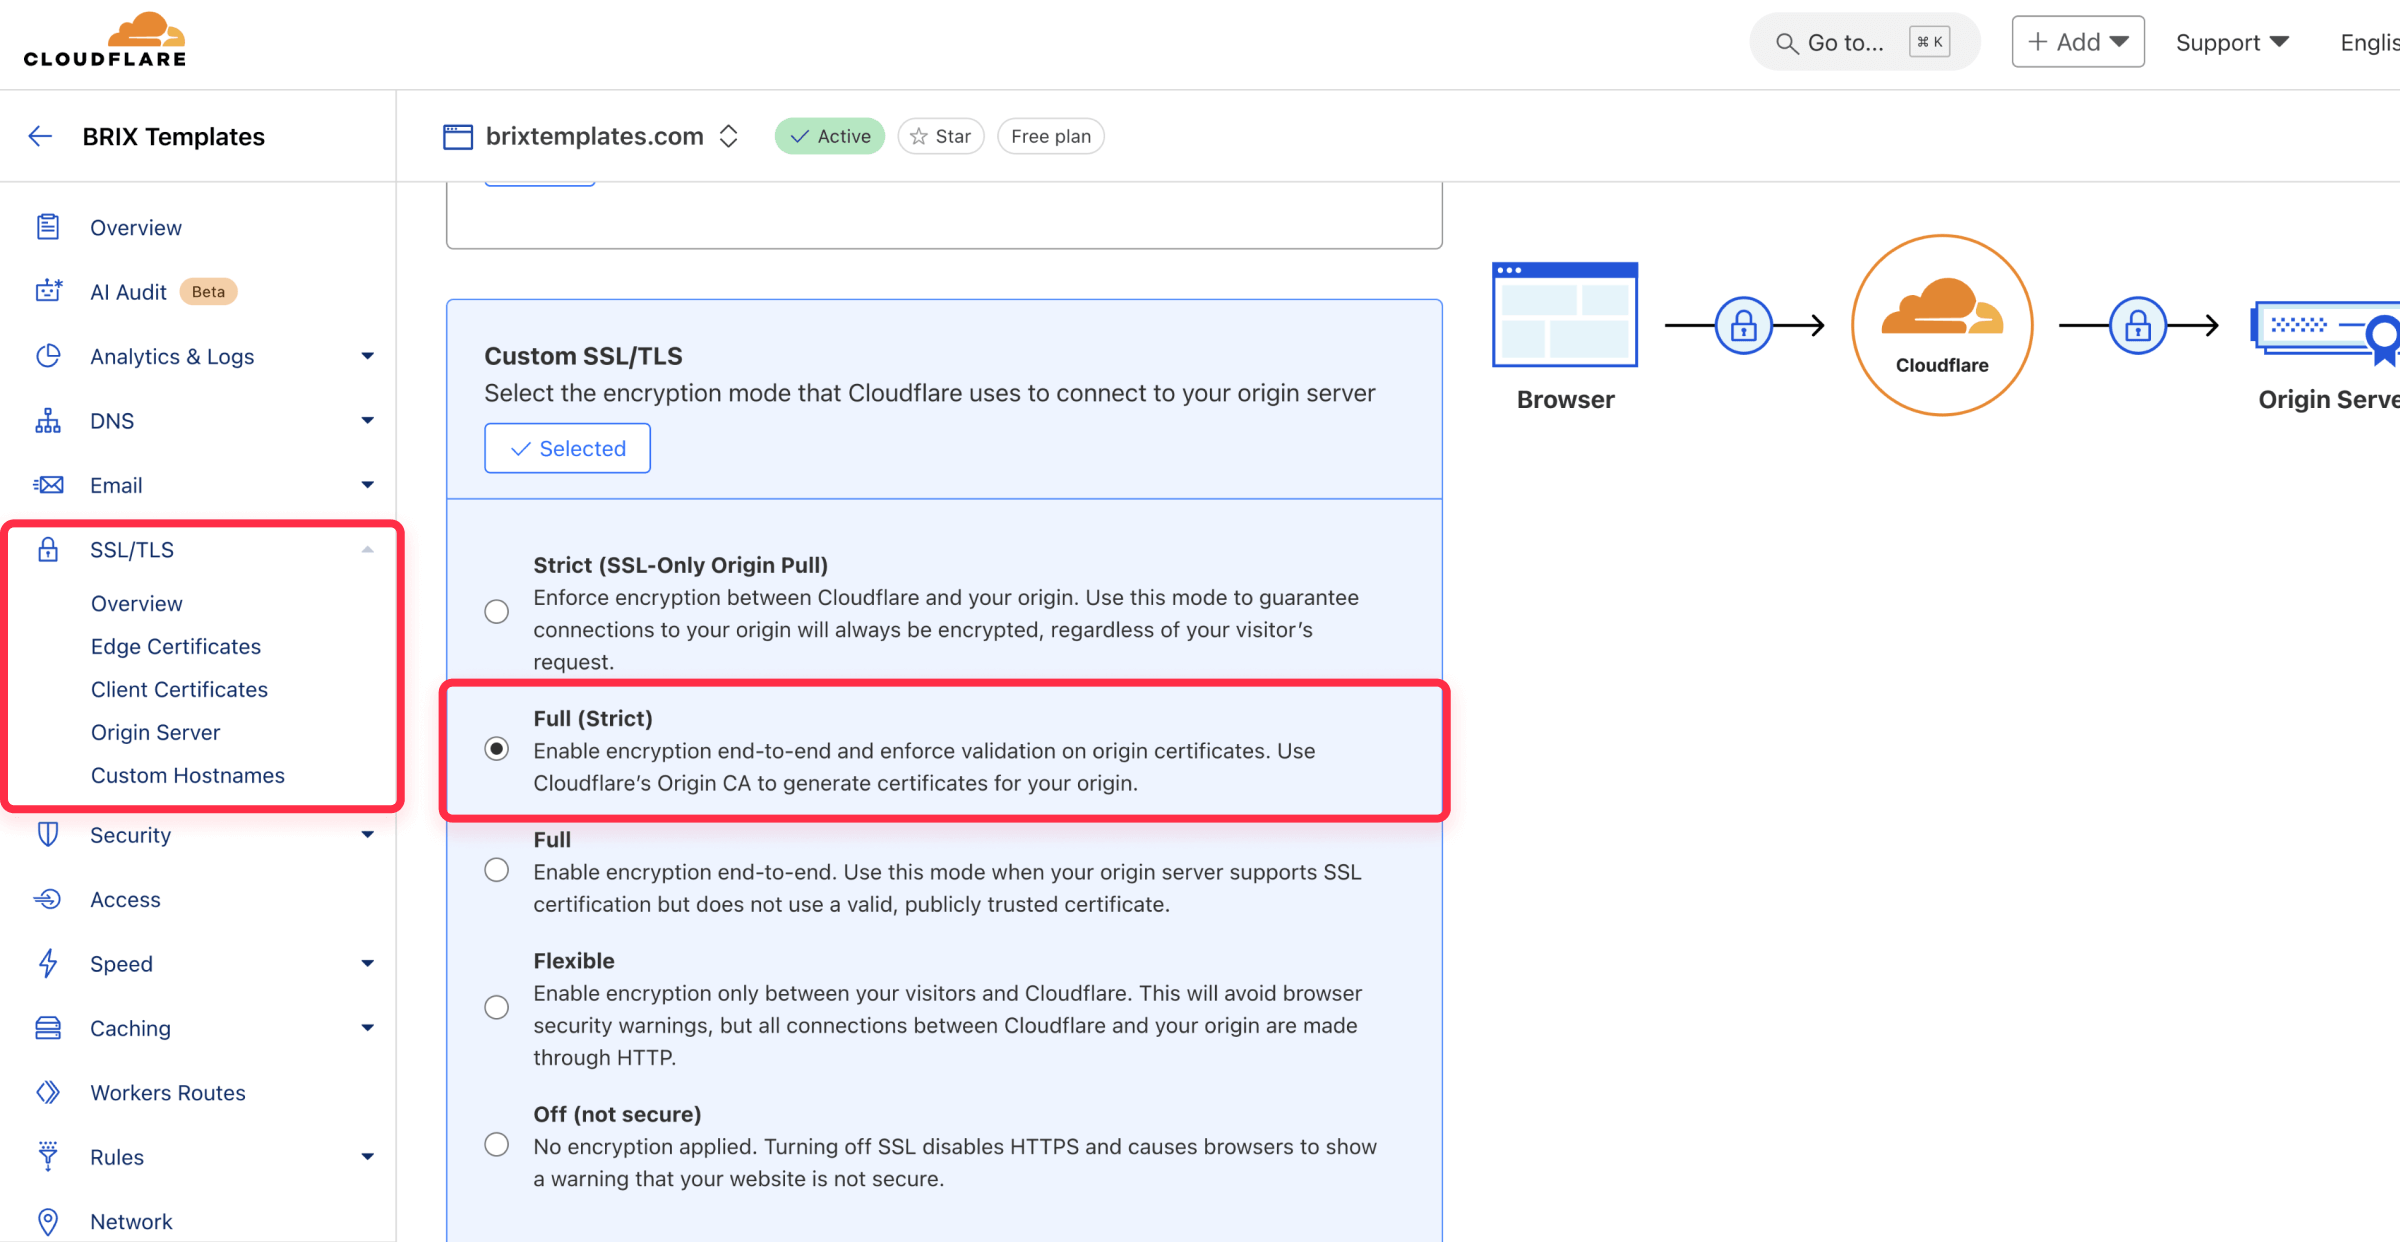
- Enable Always Use HTTPS under Edge Certificates
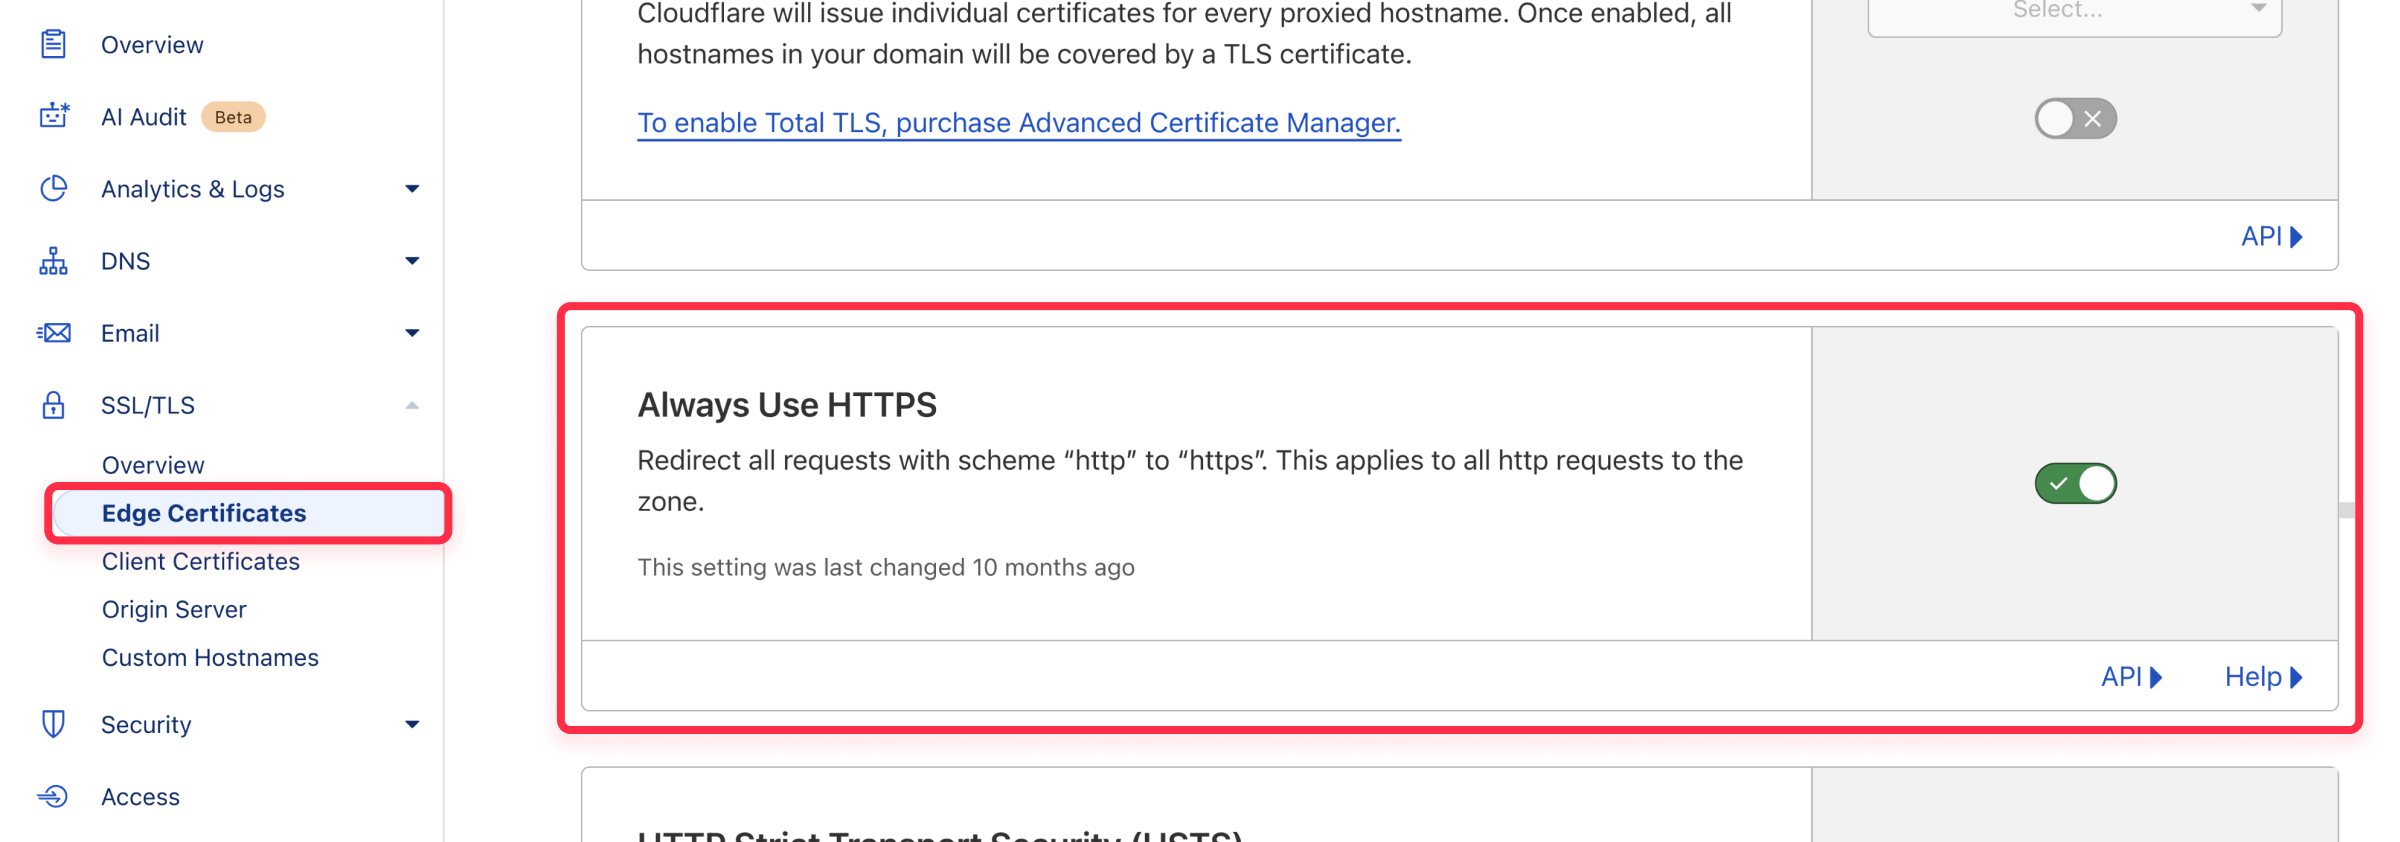
Proper SSL/TLS configuration ensures a secure, encrypted connection for your Webflow site through Cloudflare. Setting Full (Strict) mode and enabling Always Use HTTPS prevents security issues. With this in place, your site is fully protected and ready for further Cloudflare optimizations.
How to troubleshoot Webflow and Cloudflare connection issues
Having trouble? Here's a quick guide to check the most important things, using accurate terms:
Website not loading (DNS connectivity checks)
DNS propagation time: Nameserver changes can take minutes to 48 hours to propagate across the internet. Check propagation status at whatsmydns.net by checking "NS" records. If not complete after 48 hours, verify your nameserver settings with your registrar.
DNS records (in Cloudflare): In Cloudflare DNS settings, verify these essential records that connect your domain to Webflow:
- A records: Type A, Name @, correct IPv4 address from Webflow, Proxy status "Proxied". This connects your main domain (example.com) to Webflow
- CNAME record: Type CNAME, Name www, Target proxy-ssl.webflow.com, Proxy status "Proxied". This connects www.example.com to Webflow
Critical: Page rule:A missing or incorrect Page Rule can prevent both site loading and SSL certification. In Cloudflare Rules > Page Rules, ensure this exists:
- If URL matches: yourdomain.com/.well-known/acme-challenge/* or www.yourdomain.com/.well-known/acme-challenge/*
- Settings: Check if you have added these settings, Disable Performance and Disable Security
Other website loading checks: If your site still won't load, try these steps:
- Check Webflow settings: Verify your site is published and the domain settings in Webflow matches your Cloudflare setup.
- Clean up DNS: Remove old or duplicate records, especially AAAA records which can cause conflicts.
- Reset Cloudflare: After any changes, use the "Purge Everything" option in Cloudflare to clear cached content.
HTTPS/SSL errors (Secure connection checks)
Wait for SSL activation: After changing DNS, Cloudflare, or SSL settings, allow up to 30 minutes for the SSL certificate to fully activate. Try clearing your browser cache or using a different browser to verify.
Cloudflare SSL/TLS setting: Set SSL/TLS encryption mode to "Full (Strict)" to ensure secure connections between visitors, Cloudflare, and Webflow. Never use "Flexible" SSL as it creates security vulnerabilities.
Always use HTTPS: Enable "Always Use HTTPS" in SSL/TLS > Edge Certificates to force secure connections.
Conclusion
You have successfully connected your custom domain to Webflow via Cloudflare, ensuring your website is properly linked and secure. By following this guide, you’ve completed the essential setup needed to get your site running smoothly.
This setup is just the beginning! In future tutorials, we’ll show you how to optimize performance, manage bandwidth, enhance security, and unlock more advanced Cloudflare features for your Webflow site.
Need help with your Webflow site? Our agency specializes in Webflow solutions. Whether you need help setting up your domain or want to use Webflow and Cloudflare for advanced features, we’re here to help. Contact us to optimize your setup.


Join readers commenting on this post!