
When your team already collaborates inside Microsoft Teams, a practical approach is to push every submission directly into the right channel the moment it arrives. Real-time visibility means faster response times, fewer missed opportunities, and better coordination across sales, support, and operations.
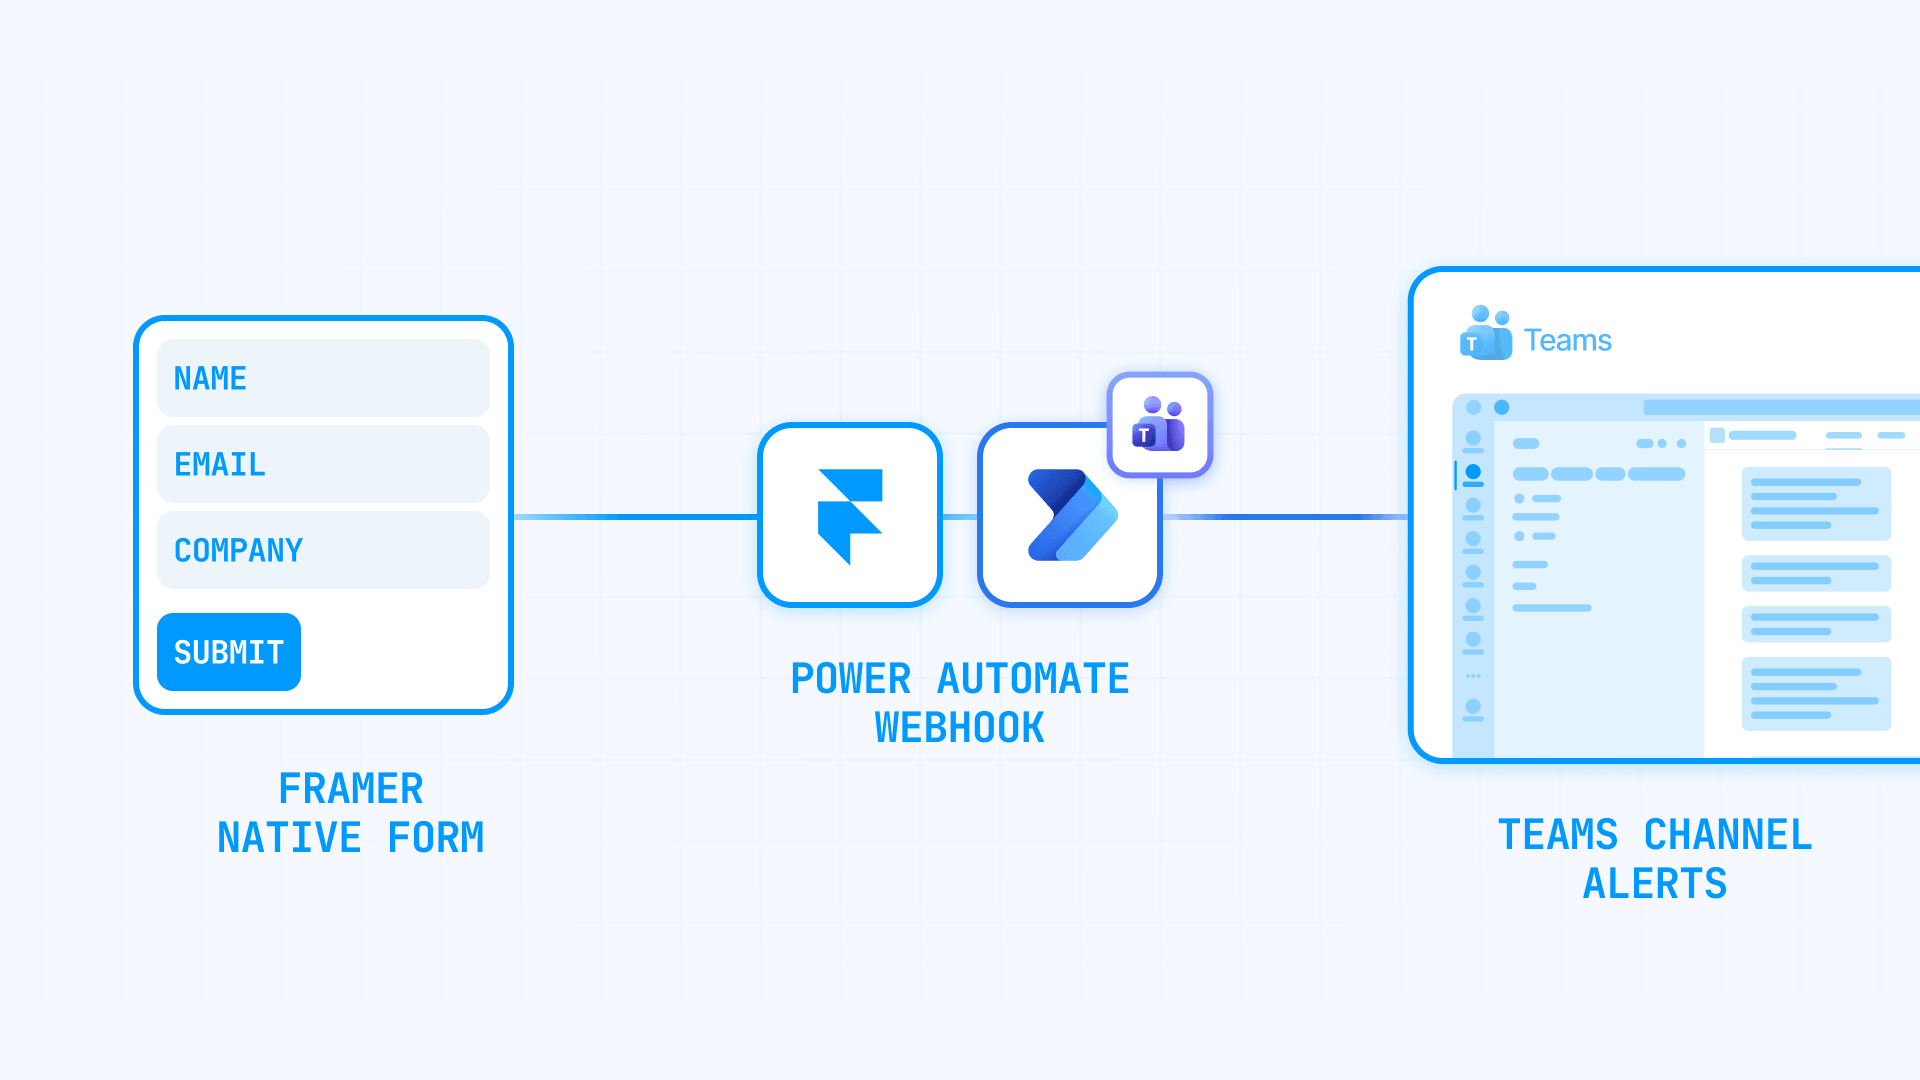
Framer native forms can send submission data to a custom webhook without requiring third-party plugins or external form tools. The architecture looks like this: Framer native form sends data to a webhook destination, Power Automate receives that webhook and processes the payload, and a message posts automatically to your chosen Teams channel.
This guide walks through the complete setup as it actually works today, including the specific configuration steps required in Power Automate and the common issues that cause failures. If your site runs on Webflow instead of Framer, we have a parallel guide on sending Webflow form submissions to Microsoft Teams using the same Power Automate approach.
Why Teams notifications matter for form submissions
Getting form data into Teams immediately solves real operational problems beyond just convenience.
- Faster lead response: Sales teams can act on inbound interest within minutes instead of hours. Speed-to-lead directly impacts conversion rates.
- Support visibility: New requests appear where your team already collaborates, making ownership clear and preventing submissions from disappearing into private inboxes.
- Cross-functional coordination: Marketing, sales, and support can all see relevant submissions without forwarding emails or checking separate dashboards.
- Centralized communication: Form context stays attached to the team conversation, making follow-up discussions easier to track.
- Searchable history: Every submission becomes part of your Teams archive, searchable later when you need to reference past inquiries.
Why this integration requires Power Automate
Microsoft has been transitioning users toward Teams Workflows as the modern replacement for older connector-based webhook patterns. You can start the workflow creation process from inside Teams, but the simplified Teams builder does not expose the webhook trigger clearly enough to complete the setup there.
In practice, the reliable implementation ends up being configured in Power Automate. The Teams-side entry point is useful for launching the process, but you will need to move into the full Power Automate designer to access the correct trigger and configure the flow properly.
This approach avoids external middleware accounts and third-party service dependencies. In many cases it avoids extra tools, though actual costs and capabilities depend on your organization's Microsoft 365, Power Automate, and Teams licensing, configuration, and permissions.
What you need before starting
Before configuring the integration, confirm you have these pieces in place.
- A Framer site with a native form: Use Framer's built-in form component, not an embedded third-party form. Native forms support webhook destinations directly.
- Access to Power Automate: You need permission to create flows in your Microsoft 365 environment. This is typically included with business subscriptions that include Teams.
- Descriptive form field naming: Framer sends webhook data as JSON, and your input field names become the JSON keys. Use clean, stable names like first_name, email, company_name, and inquiry_message rather than generic labels.
How to set up Framer form submissions to Microsoft Teams
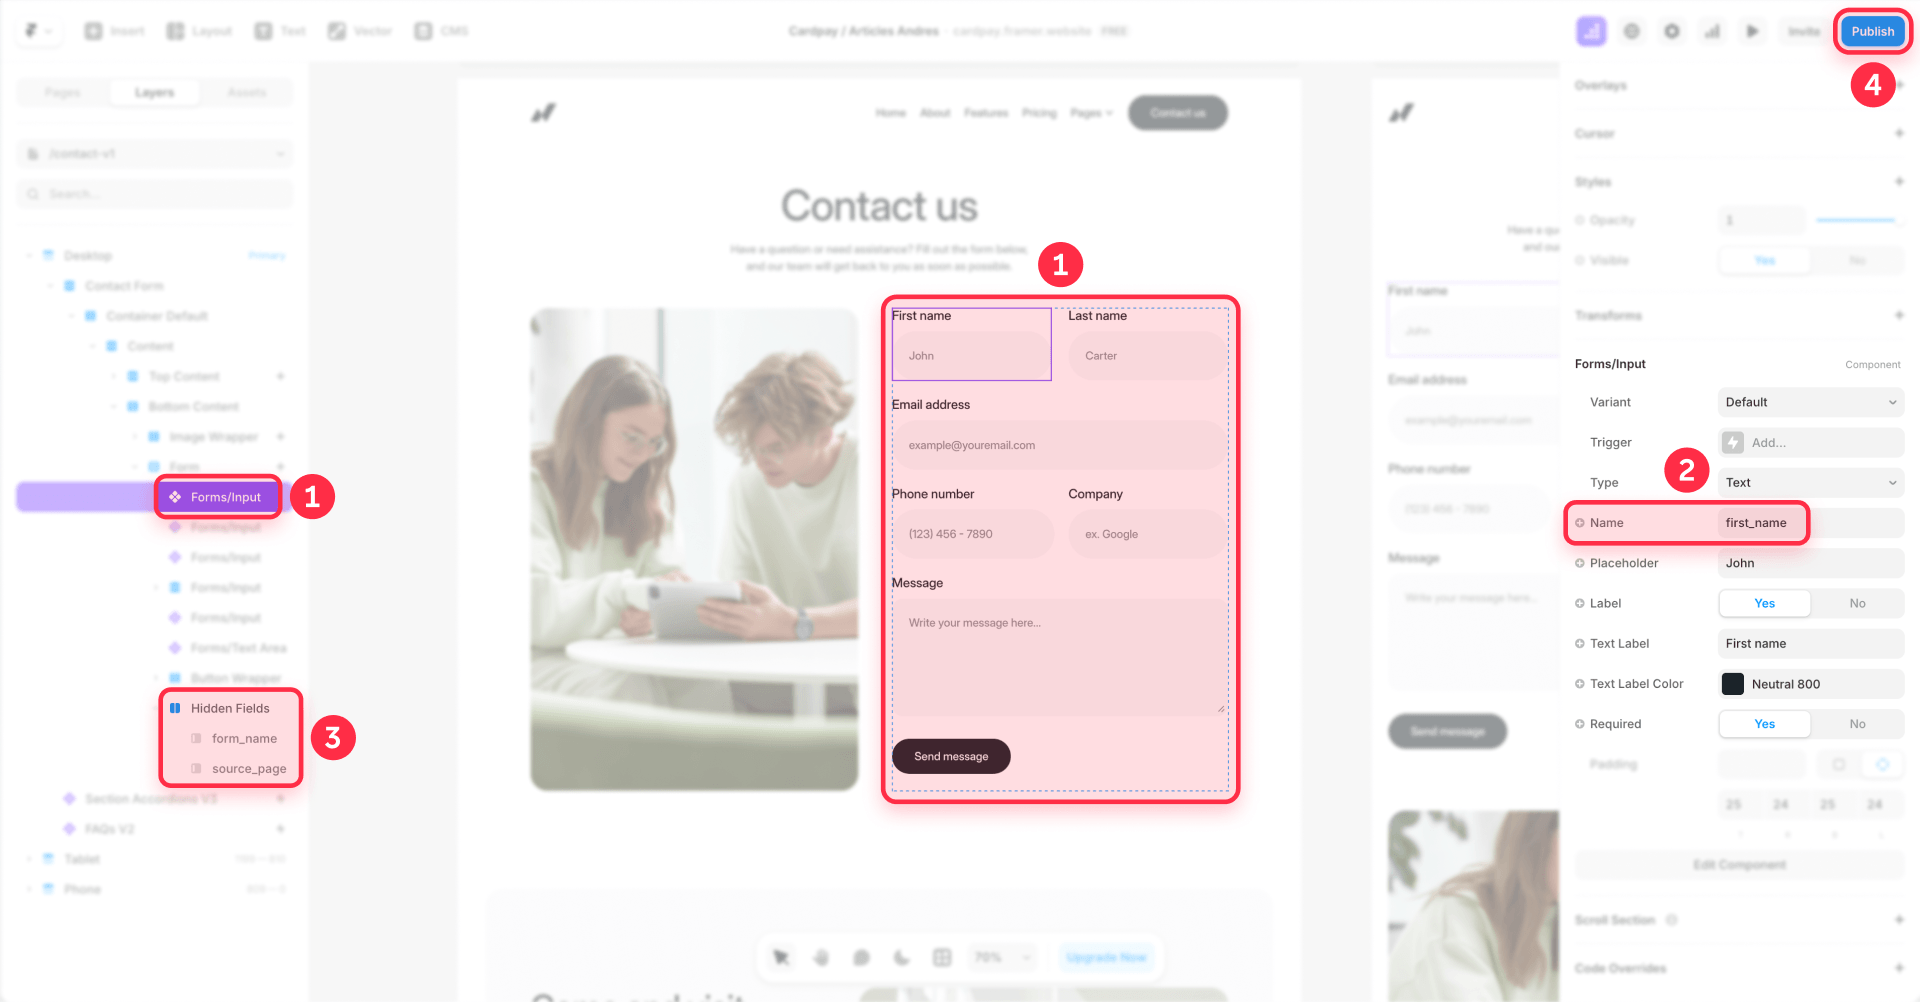
Step 1: Configure your Framer form with proper field names
Open your Framer project and add a native form using the Insert menu. The critical detail here is naming your fields like API keys rather than marketing labels.
Since Framer sends webhook data as JSON and your input names become the keys, clean naming makes automation much easier downstream. Use names like:
- first_name
- last_name
- phone_number
- company_name
- Inquiry_message
Avoid messy field names like "Full Name" or "How can we help you today?" which create awkward JSON keys and complicate parsing. To keep lead quality high, consider blocking personal and disposable email addresses in your Framer forms so only business submissions come through.
For source tracking, add hidden fields such as form_name and source_page. Use the actual Hidden property in Framer rather than simply toggling visibility off. Invisible inputs that are not properly marked as hidden may be excluded from the submission payload. For the phone number field specifically, you can add a phone number input mask in Framer to format entries as users type, keeping your submission data clean and consistent.
Step 2: Enable campaign tracking for UTM and GCLID data in Framer
Framer can automatically include UTM parameters and Google Ads click IDs in form submission data when campaign tracking is enabled in Site settings → Forms. Availability of this feature may depend on your plan—check Framer's current documentation or your account settings to confirm. If you need additional custom tracking parameters, use hidden fields.
For any lead-gen site that runs paid traffic, enable this if available. Otherwise you may be discarding attribution data. For a complete picture of how users interact with your forms, you can also set up Framer form submission tracking with GTM and GA4 to capture conversion events and user behavior alongside your campaign data.
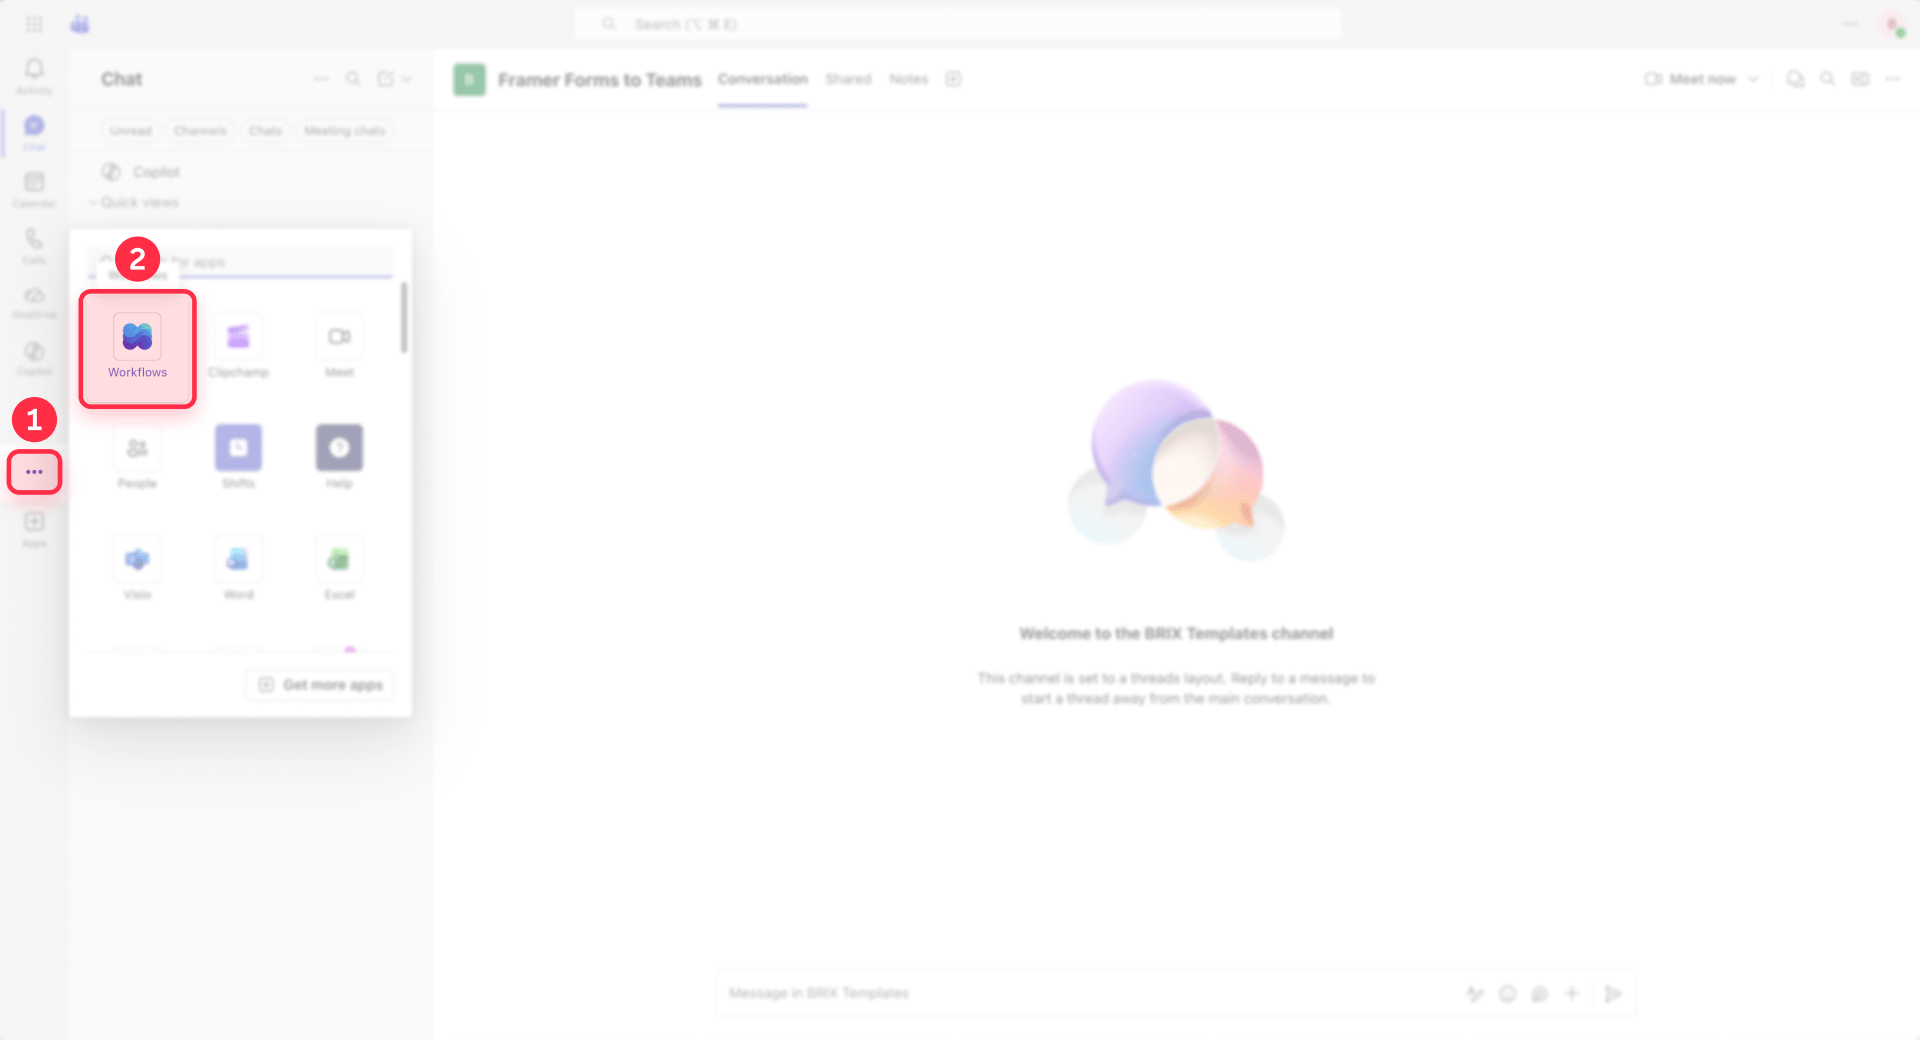
Step 3: Create the workflow starting from Teams
You can start from either the Workflows app in Teams or from a specific channel. Both entry points lead to the same place.
From a channel: Navigate to the channel where you want notifications to appear, click the three-dot menu, and select Workflows.
From the Workflows app: Open the Workflows app directly from the Teams left sidebar.
In either case:
- Click Create and choose to build from scratch
- In the simplified trigger picker, notice that the webhook trigger is not clearly exposed
- Click Build with Power Automate to see more triggers
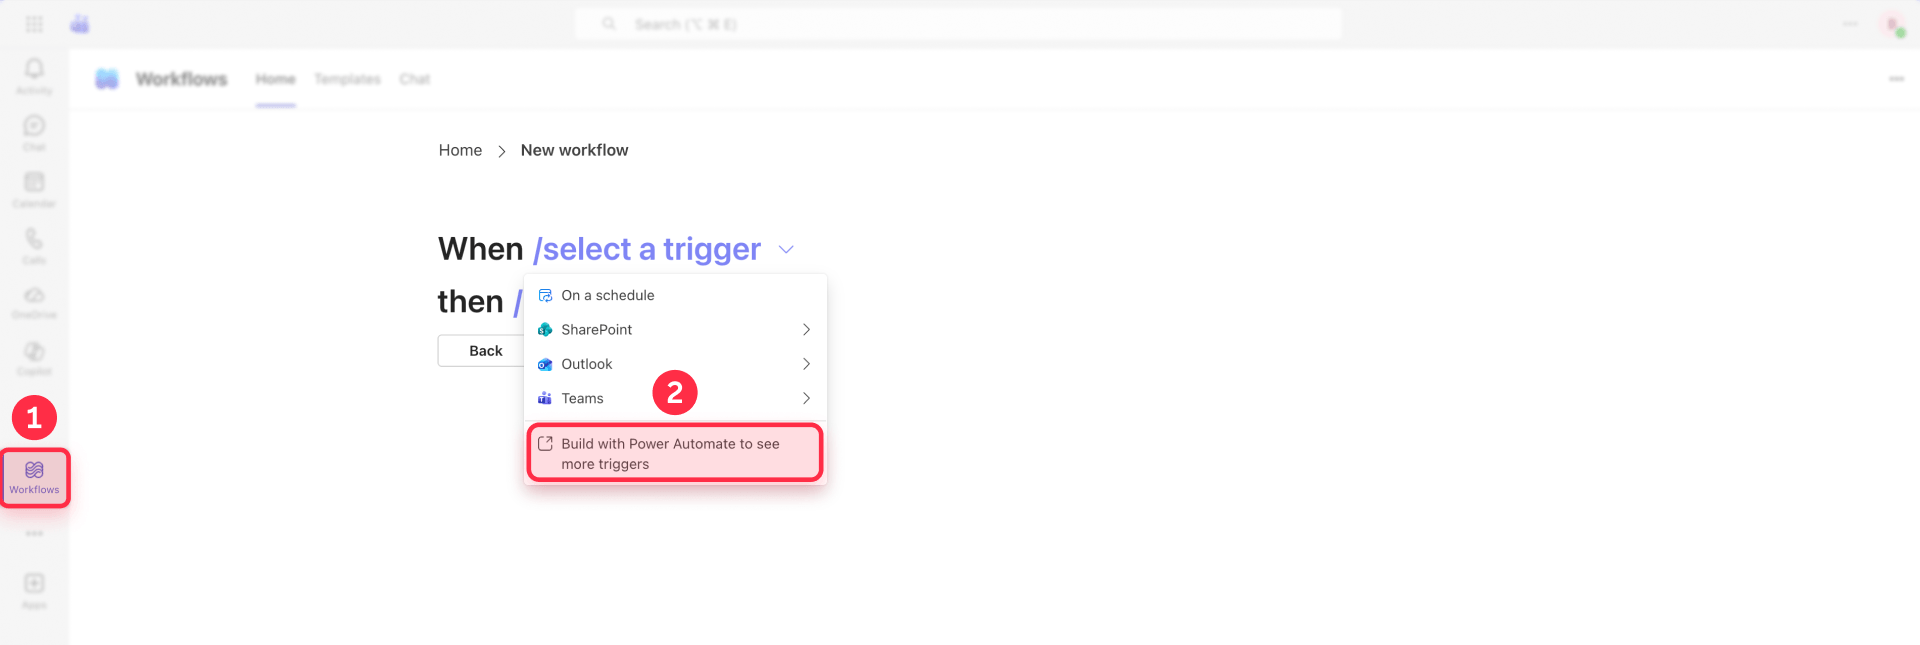
This opens the full Power Automate designer where you can access all available triggers. The simplified Teams builder does not expose the webhook trigger directly, so moving into Power Automate is necessary for this integration.
Step 4: Configure the webhook trigger in Power Automate
In the Power Automate designer:
- Search for webhook in the trigger search
- Select When a Teams webhook request is received
- Set the trigger access to Anyone
- Save the flow so that Power Automate generates the callback URL
- Copy the full callback URL from the trigger
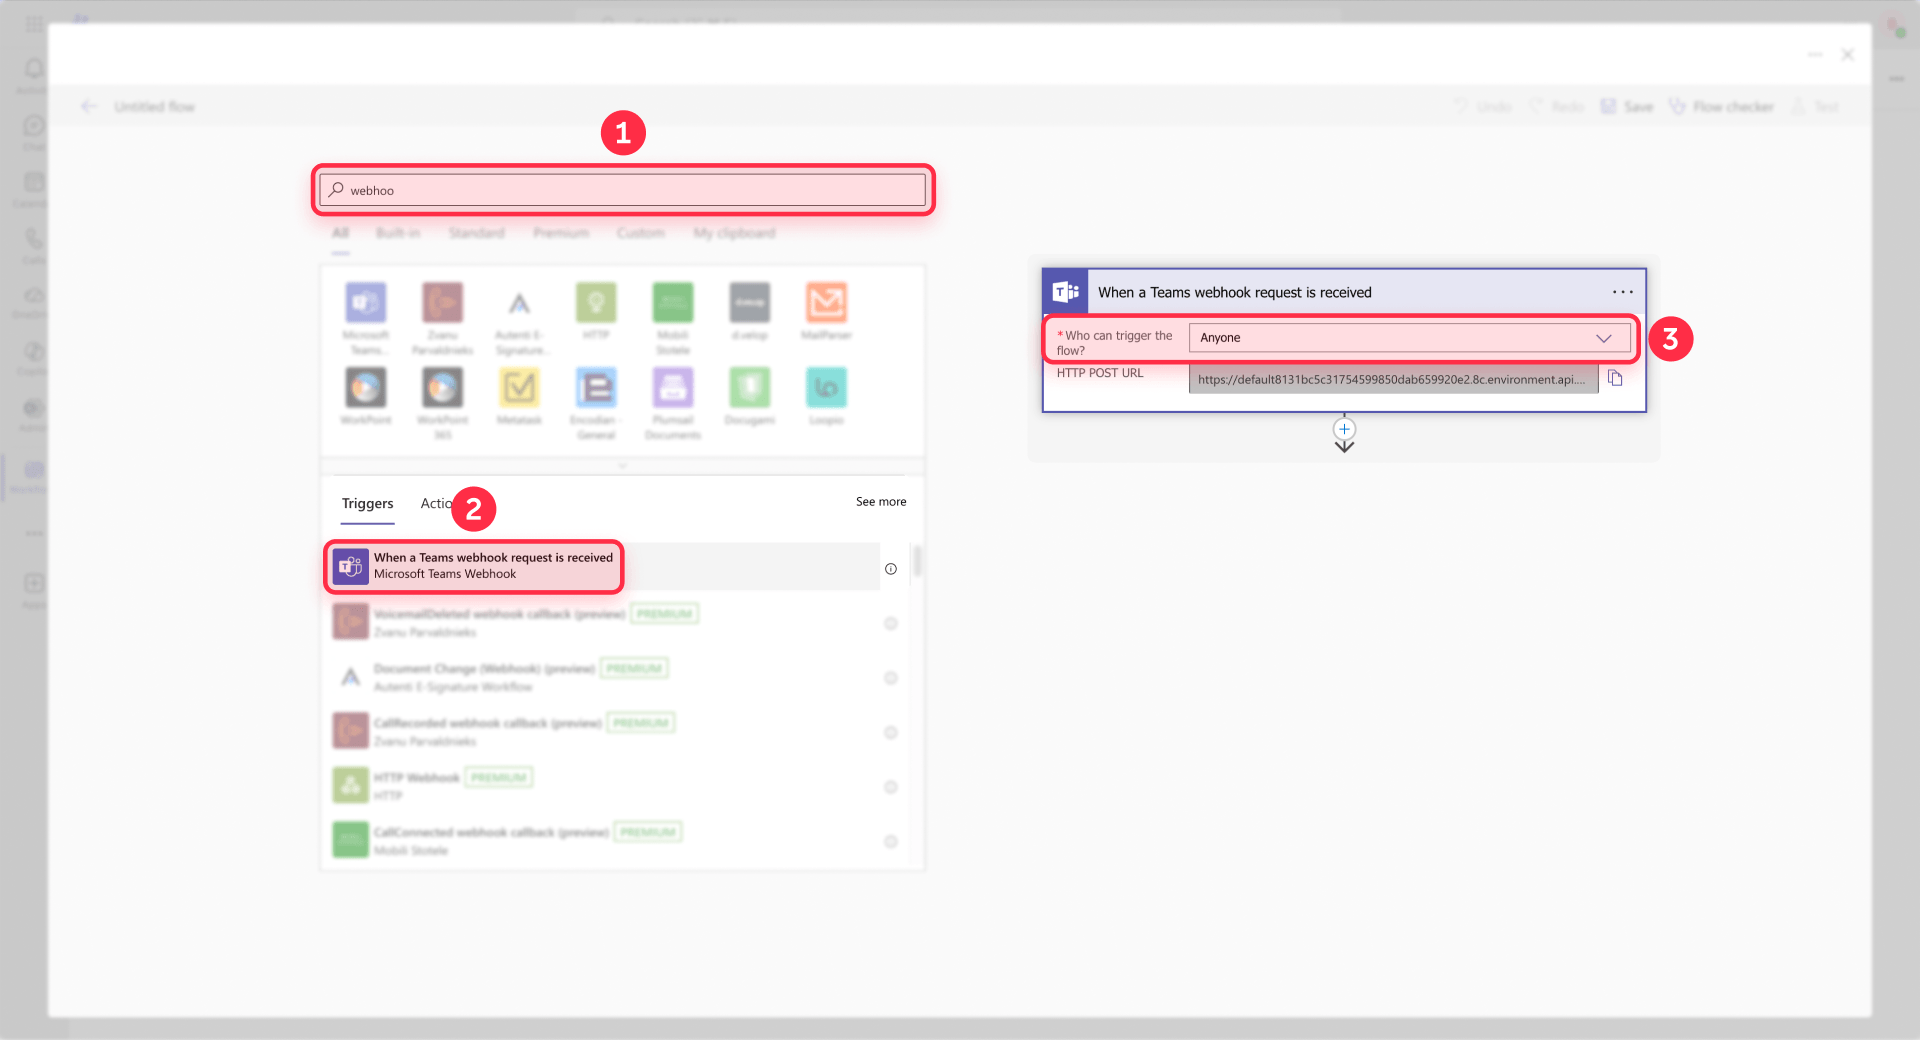
The authentication choice is the core tradeoff of this method. Selecting Anyone means Framer can send requests without Microsoft authentication tokens, which is necessary since Framer's native webhook is not a Microsoft-authenticated client. This keeps the setup simple, but it means the webhook URL is essentially open to anyone who has it.
Step 5: Connect the webhook URL in Framer
In Framer, select your form component, navigate to the submission settings, and choose Send To followed by Webhook. Paste the Power Automate callback URL into the destination field.
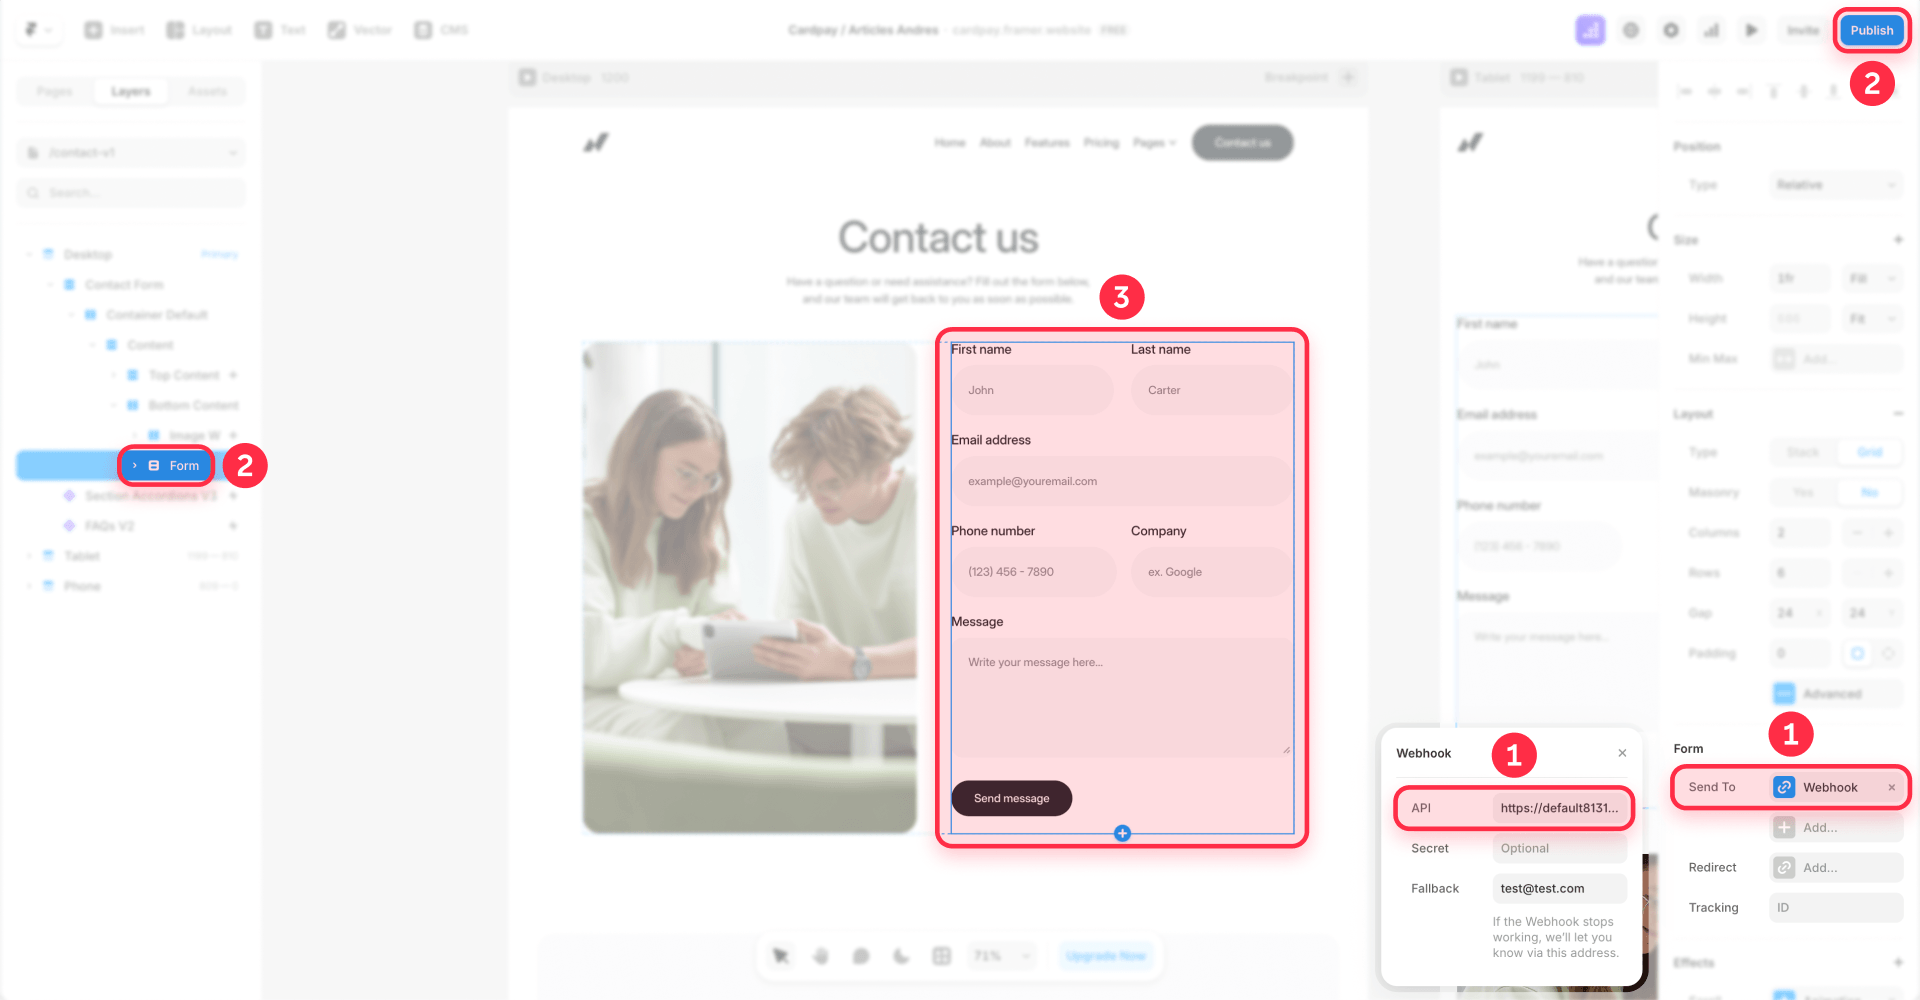
Framer will now send each form submission as a JSON POST request to that endpoint.
Step 6: Add Parse JSON to extract form fields
Add a Parse JSON action immediately after the webhook trigger. This step converts Framer's JSON payload into usable dynamic tokens that you can reference in your Teams message.
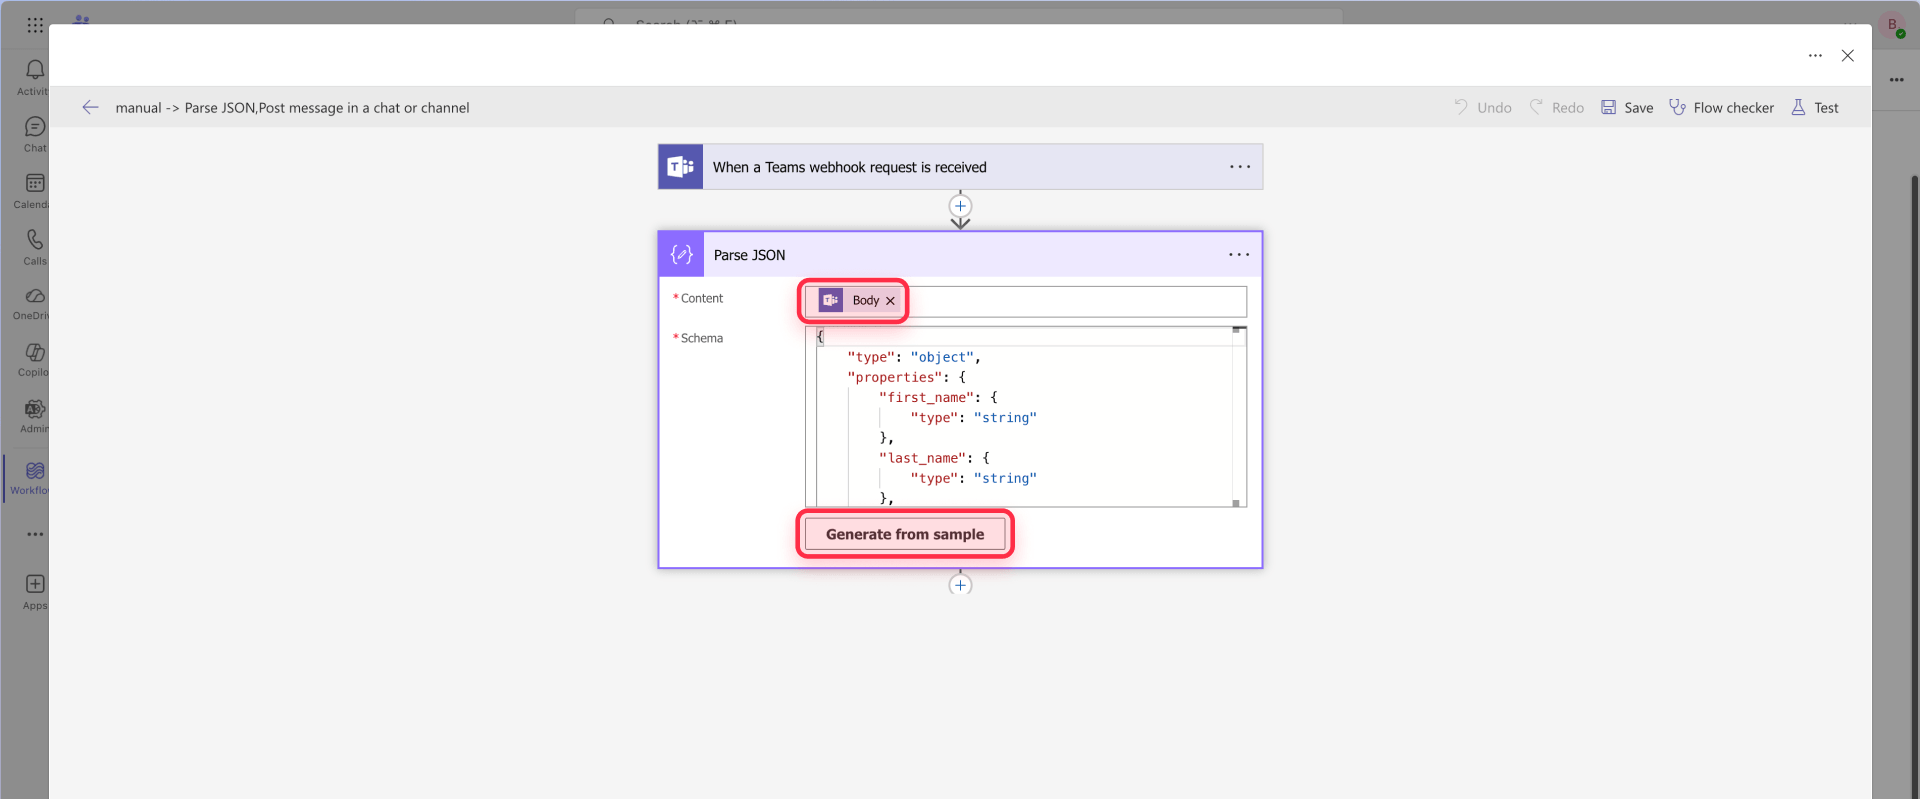
Critical configuration detail: In the Content field of Parse JSON, you must use the trigger Body as dynamic content. Click the Content field, then select Body from the dynamic content panel.
Do not type triggerBody() as plain text. If you type triggerBody() as literal text, Parse JSON will attempt to parse the string "triggerBody()" as if it were JSON and fail with an InvalidJSON-type error. This was a real source of failure during implementation.
For the Schema, click Generate from sample and paste a sample payload that matches your form structure:
After generating the schema, Power Automate converts it into a JSON schema structure like:
This is the correct expected result. After this step, each field becomes a selectable dynamic content token you can insert into your Teams message.
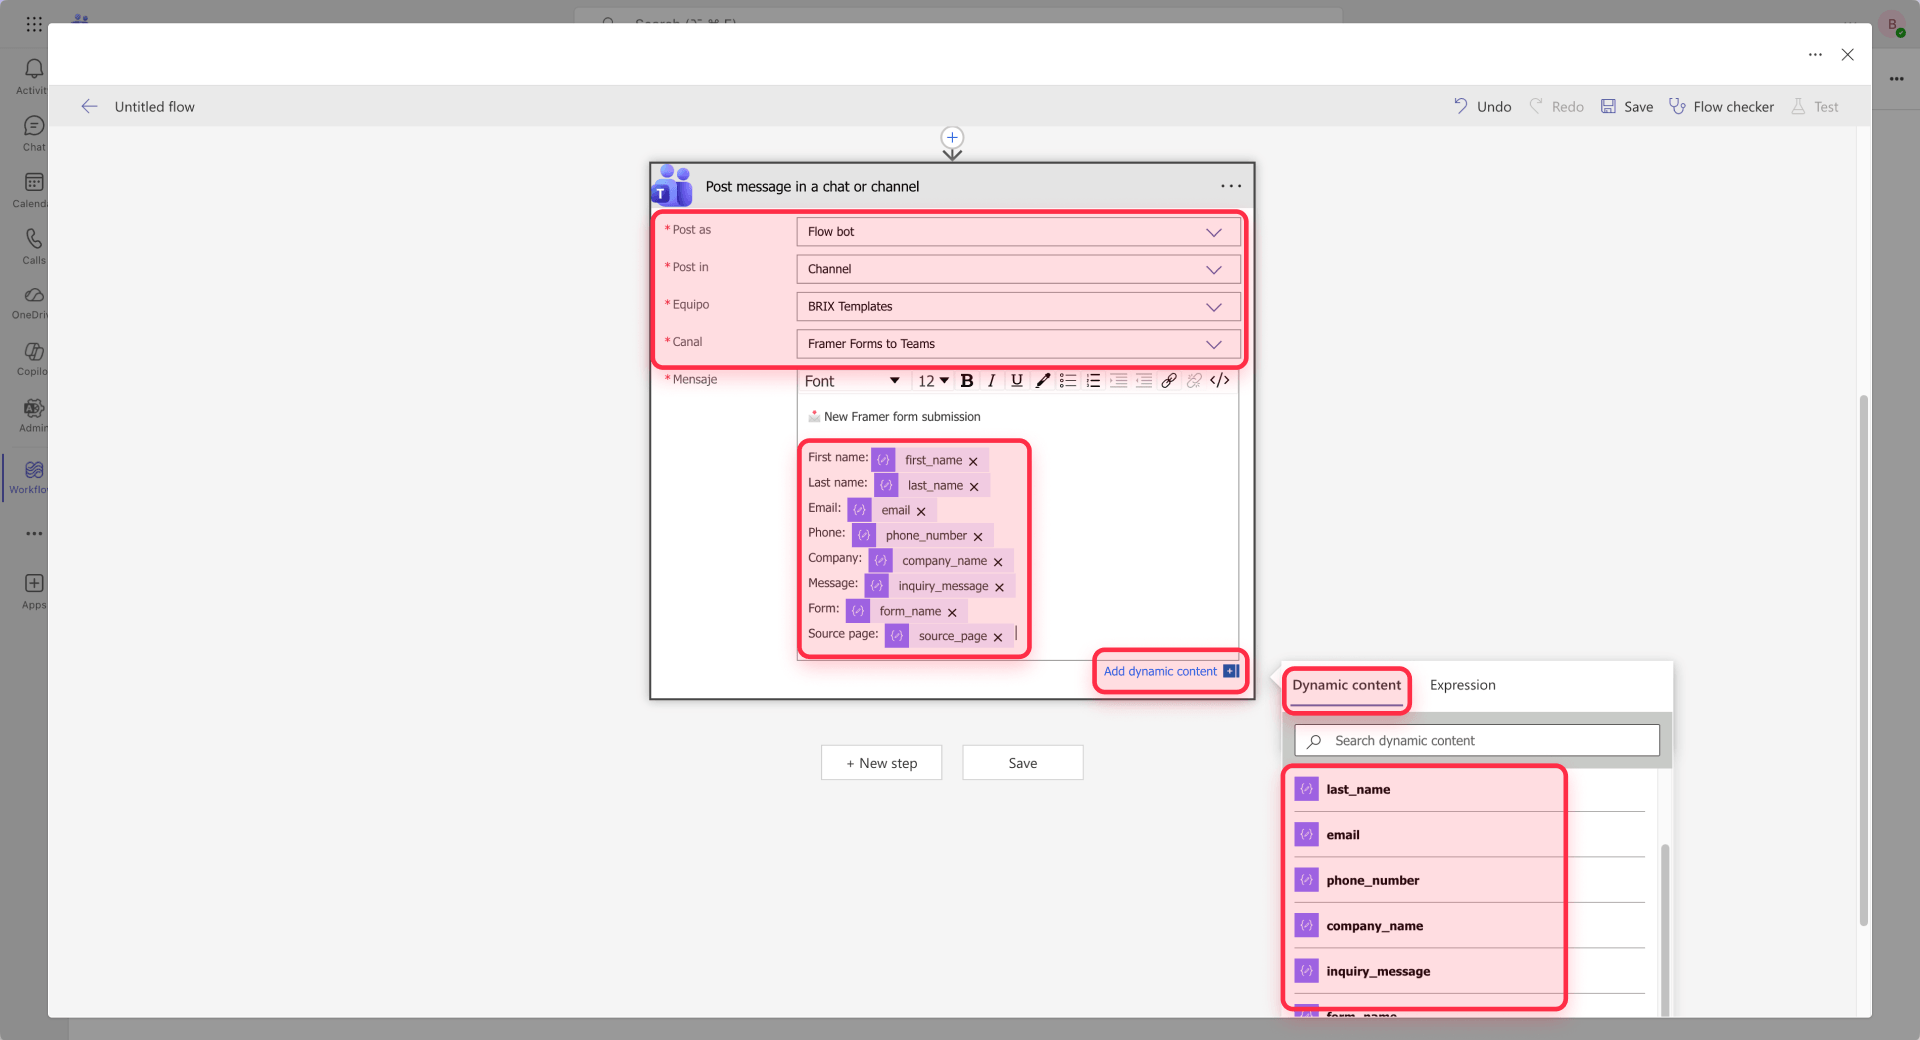
Step 7: Configure the Teams channel notification
After the Parse JSON action, add Post message in a chat or channel.
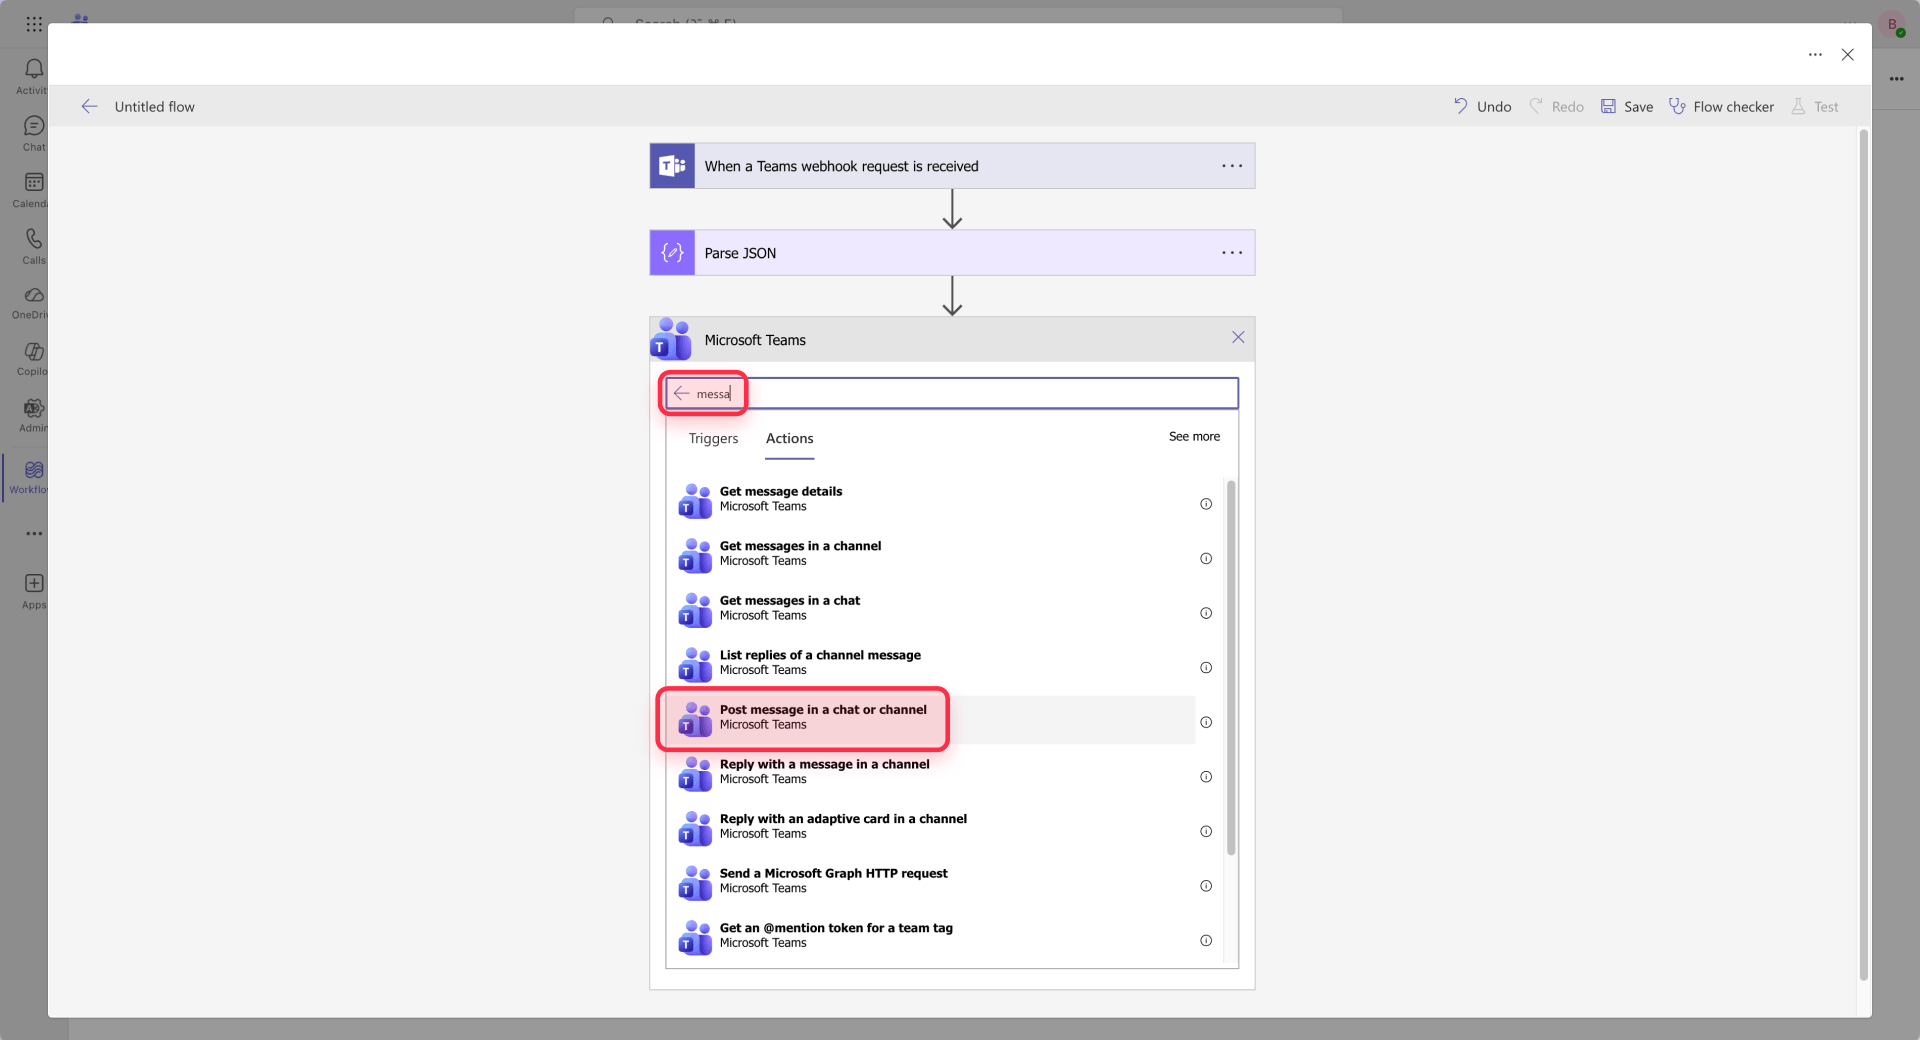
Configure the action:
- Post as: Flow bot
- Post in: Channel
- Team: Select your team
- Channel: Select the target channel
For the Message content, build the message by writing fixed labels and inserting values as dynamic content from Parse JSON. Do not type field names or expressions as plain text.
The correct approach:
- Type the label text (e.g., "First name: ")
- Click where you want the value to appear
- Select the corresponding field from the dynamic content panel (e.g., first_name)
- The value appears as a dynamic content chip inside the message editor
Do not type [first_name] as plain text. Do not type body('Parse_JSON')?['first_name'] as plain text inside the message. Do not insert Body and then add text manually beside it.
The final message structure should look conceptually like this:
Where each bracketed value represents a dynamic content chip inserted from Parse JSON, not literal text.
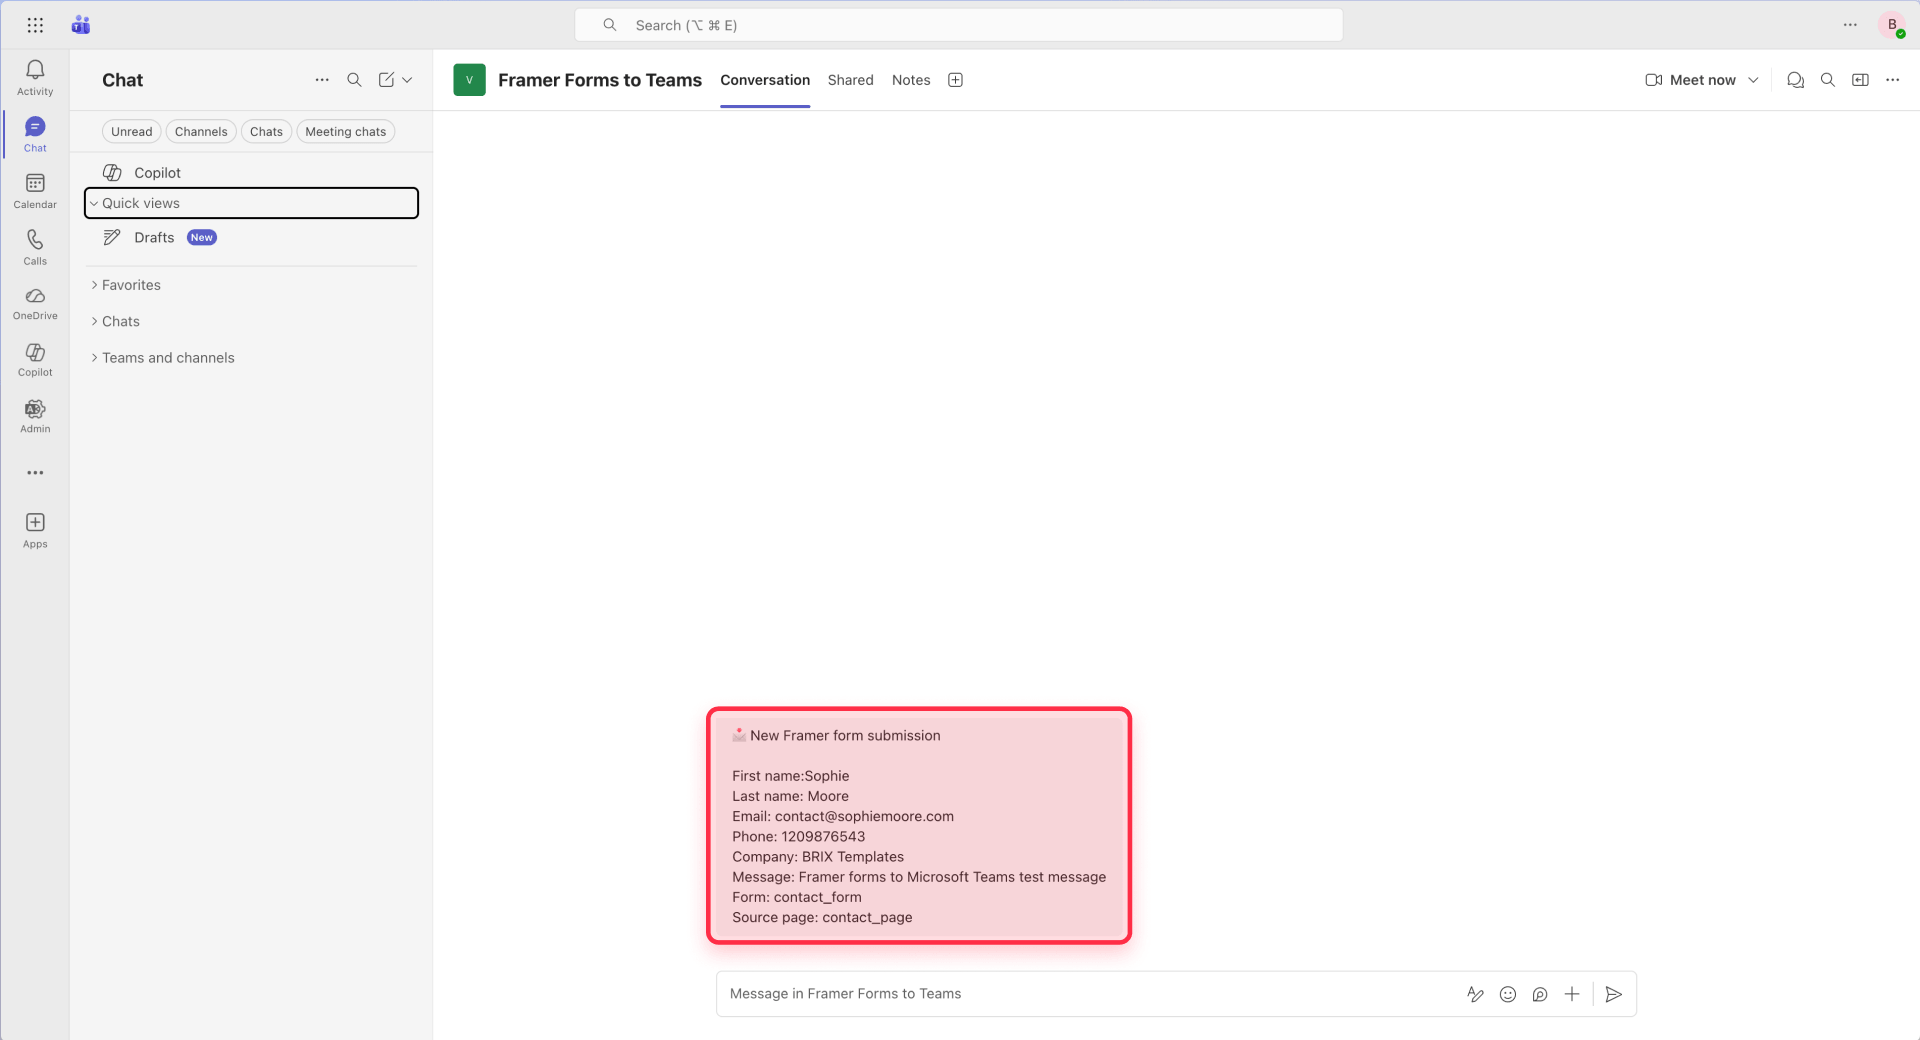
Step 8: Save and test the complete flow
Save the flow in Power Automate, then test the full integration on the published Framer site.
- Publish your Framer site
- Submit a test entry through the live form
- Check the Run history in Power Automate
- Verify the message appeared in the correct Teams channel
- Confirm all fields parsed and displayed correctly
The first test should validate three things: the request reached the trigger, the parsed fields match your expectations, and the final message landed where intended.
Understanding Framer webhook behavior
Several Framer-specific behaviors affect how you design and troubleshoot this integration.
Direct 2xx response requirement: Framer expects the receiving endpoint to return a success response (2xx status code) directly. If the endpoint returns an error or times out, Framer treats the submission as failed.
Retry behavior: When Framer does not receive a 2xx response, it retries the webhook submission up to five times. This provides resilience against temporary failures but can cause duplicate messages if your workflow intermittently fails and then succeeds on retry.
No redirect following: Framer does not follow HTTP redirects. If your webhook URL redirects to another location, the submission fails. Always use the direct endpoint URL.
Field names become payload keys: Your form input names directly determine the JSON structure. Changing field names after setting up the workflow breaks the JSON schema mapping and requires regenerating the schema in Power Automate.
Webhook signatures for security: Framer includes headers like Framer-Signature andamer-Webhook-Submission-Id with each request. In more security-sensitive setups, you can verify these signatures in custom middleware before forwarding data to Teams. The direct Power Automate method does not verify signatures, which is the main security tradeoff of this approach.
Troubleshooting Framer form to Microsoft Teams issues
No runs appear in Power Automate: The request likely never reached the flow. Verify the exact callback URL is pasted into the Framer form webhook field. Confirm the URL is complete and has not been trimmed. If you regenerated the trigger or duplicated the flow, the URL changed and Framer must be updated.
Parse JSON fails with InvalidJSON error: The Content field is likely misconfigured. Check that you used the trigger Body as dynamic content, not triggerBody() typed as plain text.
Teams receives a message with empty values: The labels exist but the message is not using dynamic content correctly. Verify that each value was inserted as a dynamic content chip from Parse JSON, not typed as plain text.
Webhook works manually but not from Framer: Re-check the exact callback URL configured in Framer. Even a single character difference will cause the request to go to the wrong endpoint.
Changed field names causing payload mismatch: If you renamed form fields in Framer after generating the JSON schema in Power Automate, the schema no longer matches the incoming data. Regenerate the schema using a new sample payload that reflects current field names.
Hidden fields not appearing: Ensure you used the actual Hidden property in Framer rather than just toggling visibility. Fields that are merely invisible may be excluded from the submission payload.
Cannot post to private channels: According to current official documentation, the standard Teams Workflow actions do not support posting to private channels. If posting to a private channel is required, you will need to explore alternative solutions or custom development approaches.
When to use Make or Zapier instead
The direct Framer to Power Automate connection handles straightforward notification needs well. Make and Zapier become valuable when your requirements exceed simple alerting.
Conditional routing: If different form types need to go to different channels, or if certain submissions should trigger different workflows based on field values, middleware platforms handle branching logic more elegantly.
Lead enrichment: When you need to look up additional information about a submission, such as company data from Clearbit or existing records from your CRM, before posting the notification, middleware provides those integration capabilities.
CRM updates: If form submissions should create or update records in Salesforce, HubSpot, or another CRM alongside the Teams notification, routing through Make or Zapier lets you accomplish both in a single workflow.
Multi-destination workflows: Sending the same submission to Teams, Slack, a spreadsheet, and an email list simultaneously is more manageable in a dedicated automation platform. For email-only routing without middleware, Framer supports sending form submissions to multiple email addresses natively — a simpler setup if Teams is not your only destination.
Logging and debugging: Make and Zapier provide detailed execution logs that can simplify troubleshooting for complex workflows.
If your only requirement is getting form submissions into Teams, adding middleware introduces unnecessary moving parts and potential failure points. Use the direct method first and add middleware when you actually need the additional capabilities.
Frequently asked questions about sending Framer forms to Microsoft Teams
Can Framer forms send webhook data directly to Microsoft Teams?
Yes. Framer forms can send submissions to a custom webhook URL, and Power Automate can receive that request and post a message to a Teams channel. This creates a direct Framer-to-Teams connection without requiring Make, Zapier, or a custom backend. The setup uses Framer's native webhook destination combined with a Power Automate flow configured with the When a Teams webhook request is received trigger.
Should I use Power Automate instead of legacy Incoming Webhooks for Framer forms?
For new integrations, yes. Microsoft is transitioning users toward Teams Workflows powered by Power Automate as the modern approach, replacing older connector-based webhook patterns. Choosing this method now means better long-term support and avoids future migration work. It also provides more flexibility for message formatting and the option to add follow-up automation steps.
What payload does Framer send to a webhook when a form is submitted?
Framer sends form data as a JSON POST request. The JSON keys match your form input field names, and the values contain the visitor's responses. For the submission to succeed, the receiving endpoint must return a direct 2xx status response. If Framer receives an error or no response, it retries the submission.
Why is my Framer form webhook not triggering a Microsoft Teams notification?
The most common causes are an incorrect webhook URL in Framer, a Parse JSON step misconfigured with literal text instead of dynamic content, or an endpoint that does not return a 2xx response. Check the Run history in Power Automate first. If there are no runs, the request never reached the flow and the issue is the URL in Framer.
Does Framer retry failed webhook submissions to Microsoft Teams?
Yes. When Framer does not receive a direct 2xx response from the webhook endpoint, it retries the submission up to five times. Framer also does not follow HTTP redirects, so the webhook URL must respond directly without redirecting to another location.
Can I send Framer form submissions to a private Microsoft Teams channel?
According to current official documentation, standard Teams Workflow actions do not support posting messages or Adaptive Cards to private channels. If private channel delivery is required for your use case, you will need to explore alternative approaches or custom solutions.
How do I prevent my Power Automate flow from breaking when team members leave?
Add co-owners to important flows before anyone leaves. Microsoft states that flows can become orphaned when the original owner departs and no co-owner exists to maintain them. Co-owners can continue managing the flow, and solution-aware flows can be reassigned to another user or a service account for continuity.
Conclusion
The best default setup for most Framer users is: Framer form → Teams Workflow powered by Power Automate → Teams channel.
Use that when your Teams environment already includes Power Automate access and your notification logic is simple. Use Make or Zapier when you need free-tier compatibility, branching, richer formatting, CRM updates, digests, or more control.
If you need help implementing this integration or want to build more sophisticated automation workflows for your Framer site, the BRIX team can assist with the technical setup and ongoing optimization.


Join readers commenting on this post!