
If you're running a B2B site on Framer, letting visitors submit Gmail, Yahoo, or Outlook addresses into your "Request a demo" form is usually a waste of your sales team's time.
While Framer Forms work great out of the box with destinations, notifications, and spam protection, they don't natively enforce "work email only". You need a thin layer of code on top.
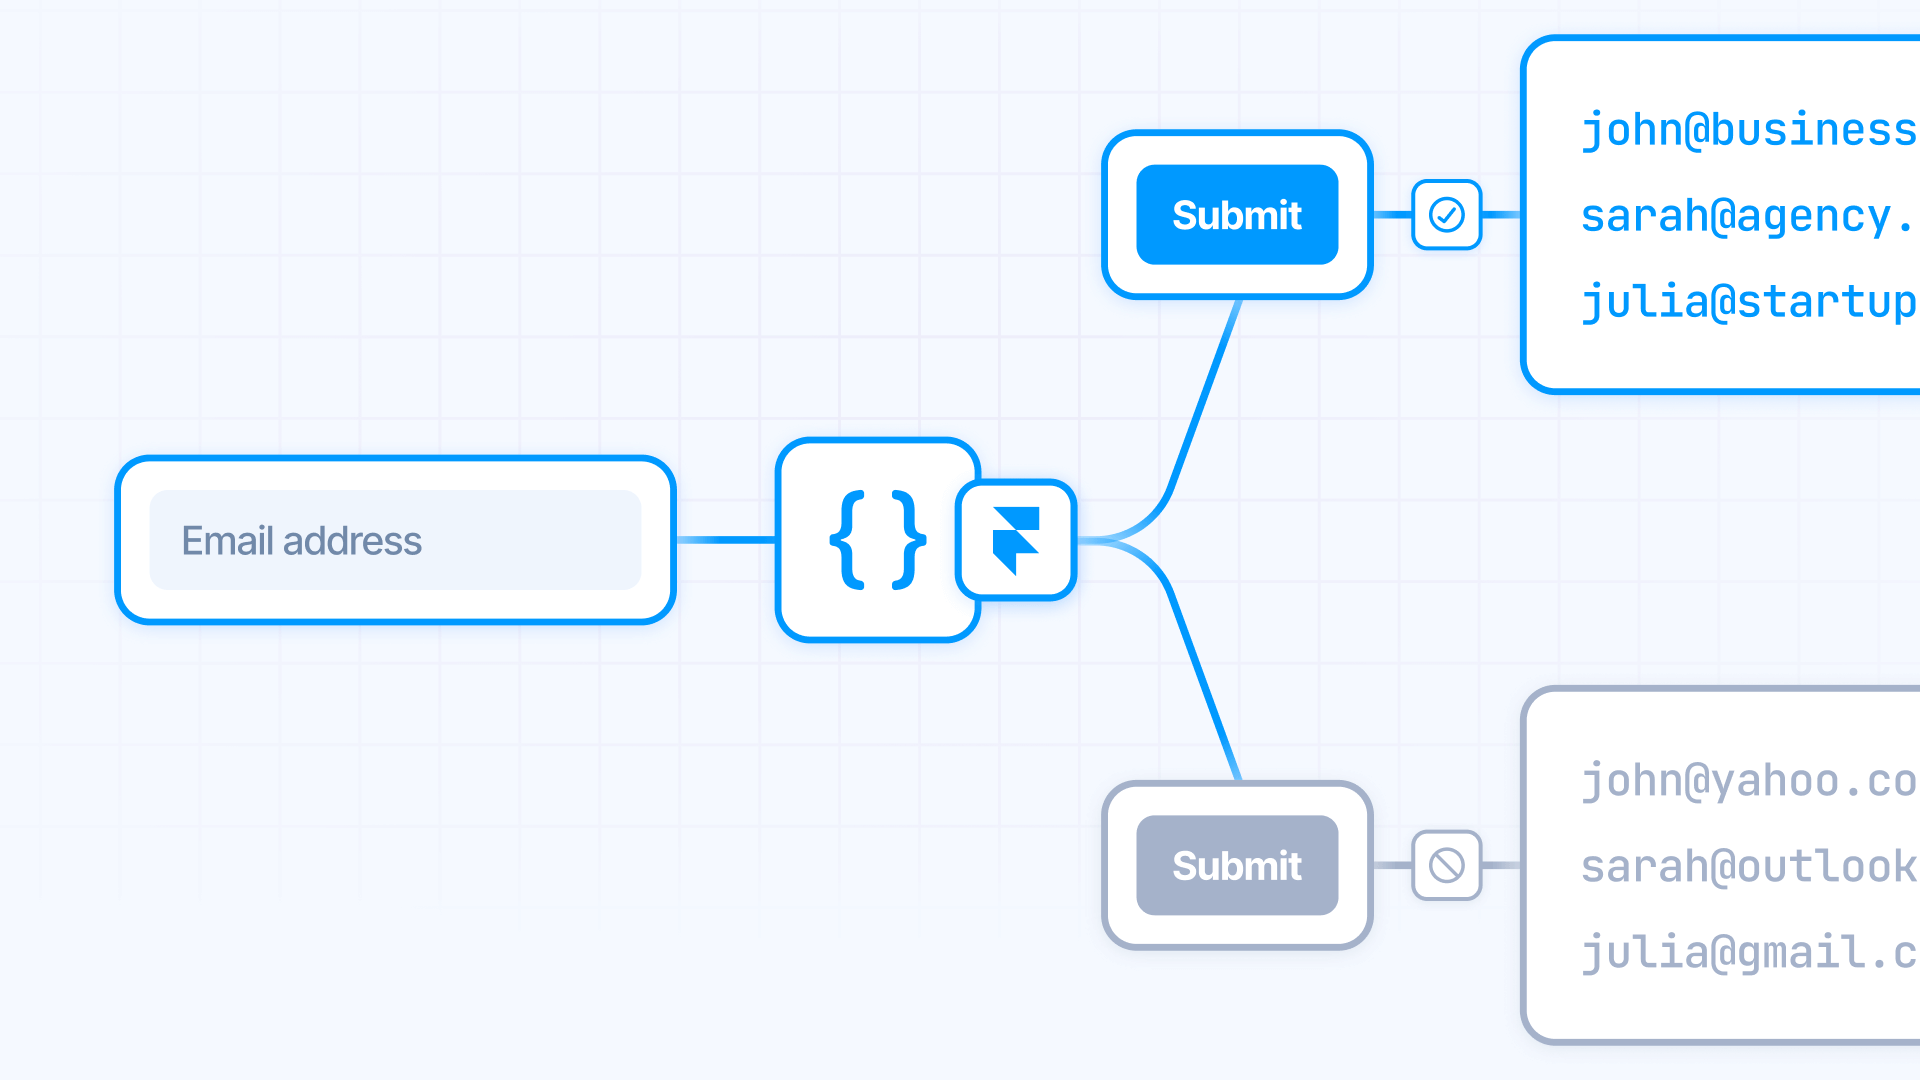
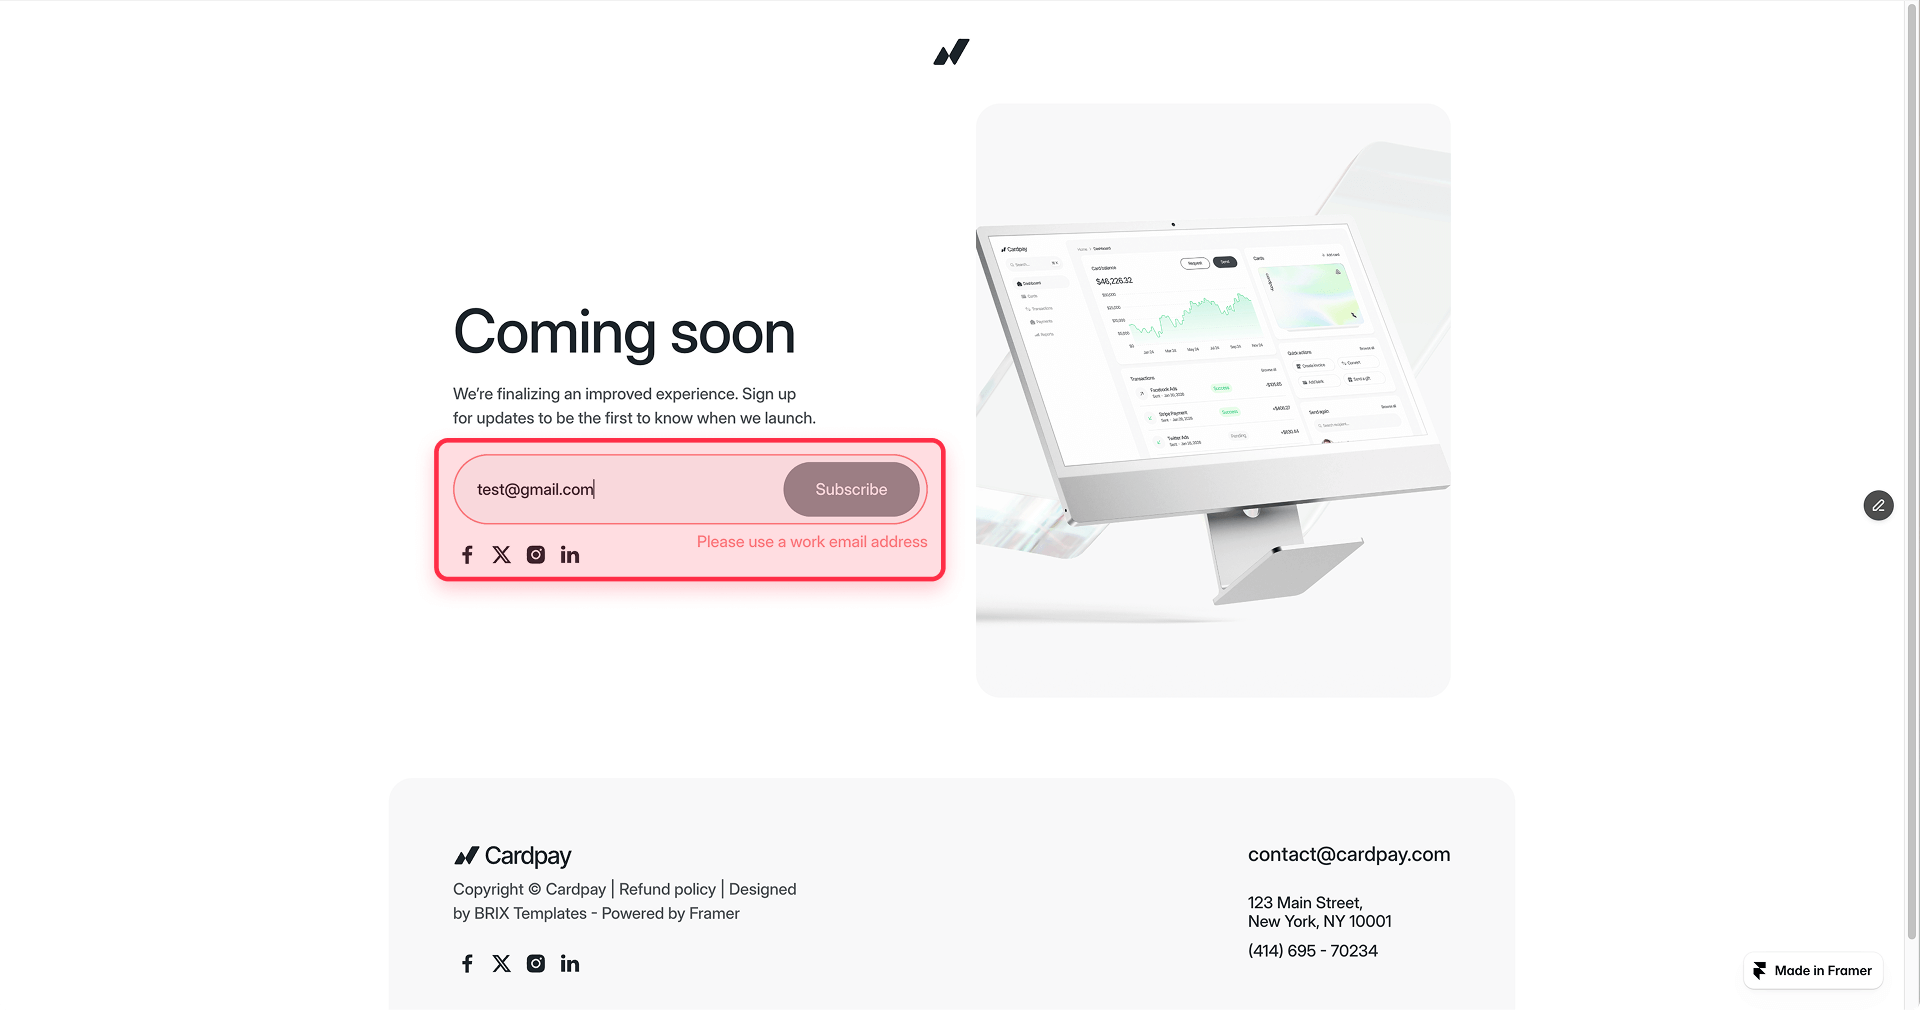
This guide shows you how to block free personal email providers like Gmail, Outlook, and Yahoo while keeping Framer's native form behavior intact. Best of all, you can implement this for free in under 10 minutes.
Why blocking personal emails matters for Framer B2B sites
Understanding when and why to implement email blocking helps you decide if this solution fits your needs:
- Demo request forms for SaaS products: Block personal emails to ensure only qualified business prospects enter your pipeline, reducing time spent on non-serious inquiries and improving sales team efficiency
- Lead generation forms for enterprise sales: Pre-qualify leads at the form level by requiring work emails, which typically indicate decision-makers or employees with purchasing authority
- Gated content downloads for B2B marketing: Capture business emails for whitepapers and case studies to build a higher-quality email list that converts better in nurture campaigns
- Free trial signups for business tools: Reduce abuse and fake signups by requiring work emails, which helps maintain accurate usage metrics and focus onboarding resources on real prospects
Understanding how email blocking works in Framer forms
Framer's native forms already handle form structure, destinations (email, Google Sheets, webhooks), and basic spam protection. What they don't do is validate email domains against a blocklist.
Code Overrides are Framer's way of adding custom behavior to any element without building components from scratch. You don't need to write any code yourself - just copy the code we provide, paste it into a new file, and attach it to your form elements. Framer handles the rest.
Our override watches the email field in real-time. When someone types or autofills an email, it extracts the domain and checks it against a list of personal providers. If blocked, the system marks the field as invalid, disables the submit button, and shows an inline error message - all automatically.
Because we use setCustomValidity(), you integrate with HTML5 validation instead of fighting it. This keeps Framer's form-to-destination pipeline working normally.
1 - Building your Framer form for email validation
Before adding the code, you need a properly structured form in Framer. The setup is straightforward but requires specific elements.
Creating the form structure in Framer
Follow these steps to build your form:
- Add a Form to your page: Drag a Form component from the Insert panel onto your canvas
- Add an Email input: Inside the form, add a Text Input and set its type to Email in the right panel
- Add a Submit button: Add a Button inside the form, then right-click it and select Set as Submit Button so Framer treats it as the form trigger
- Add an error message layer: Create a Text layer below the button with your error message text (e.g., "Please use a work email address")
Keep the error text visible on the canvas so you can style it. The code will handle showing and hiding it based on validation.
2 - Creating the Code Override file in Framer
Now you'll add the code that powers the email validation. Framer's Code Overrides let you add custom behavior to any layer.
Setting up your Framer Code Override
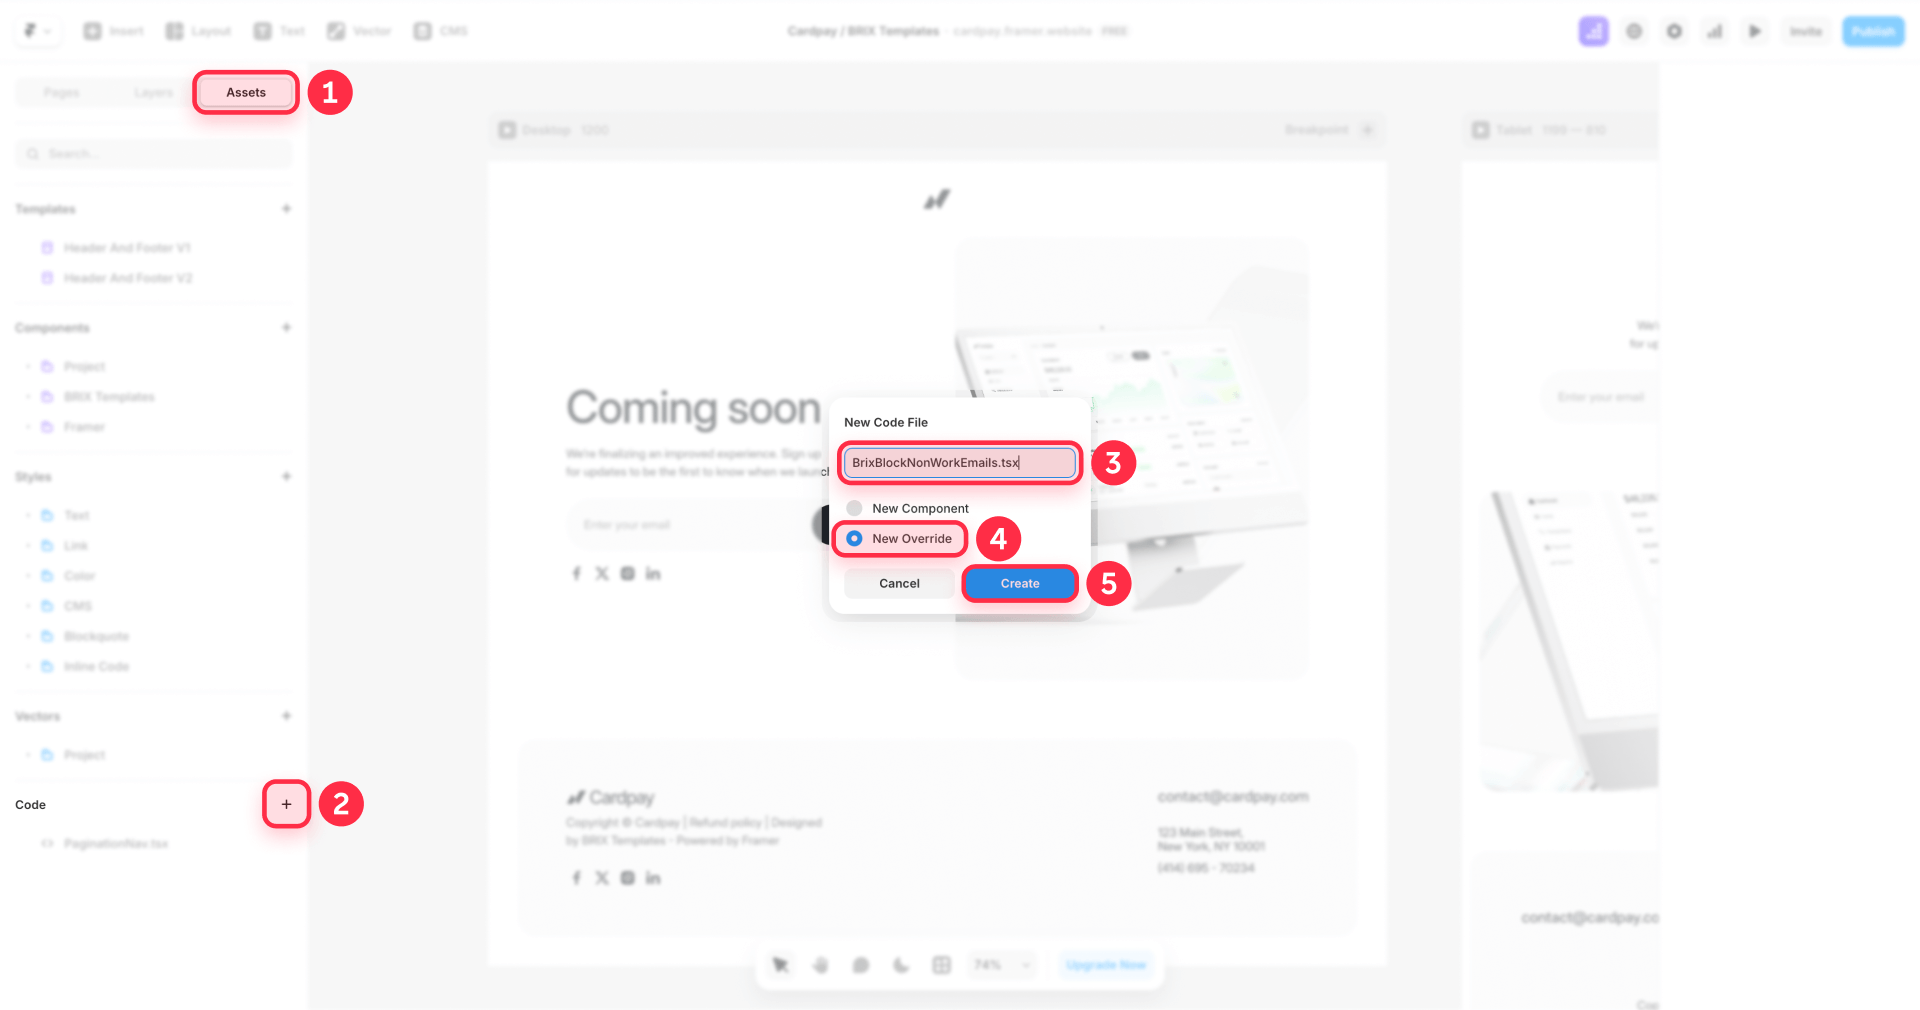
Here's how to create the override file:
- Open your project: Make sure you're in the Framer editor with your form page open
- Access Code Overrides: In the right panel, look for the Code section or click the Code Overrides tab
- Create a new file: Click the + button and select New File
- Name your file: Call it BrixBlockNonWorkEmails.tsx
Now you're ready to paste the validation code.
Adding the email validation code to Framer
Copy and paste the complete code below into your new override file. This code blocks the most common personal email providers:
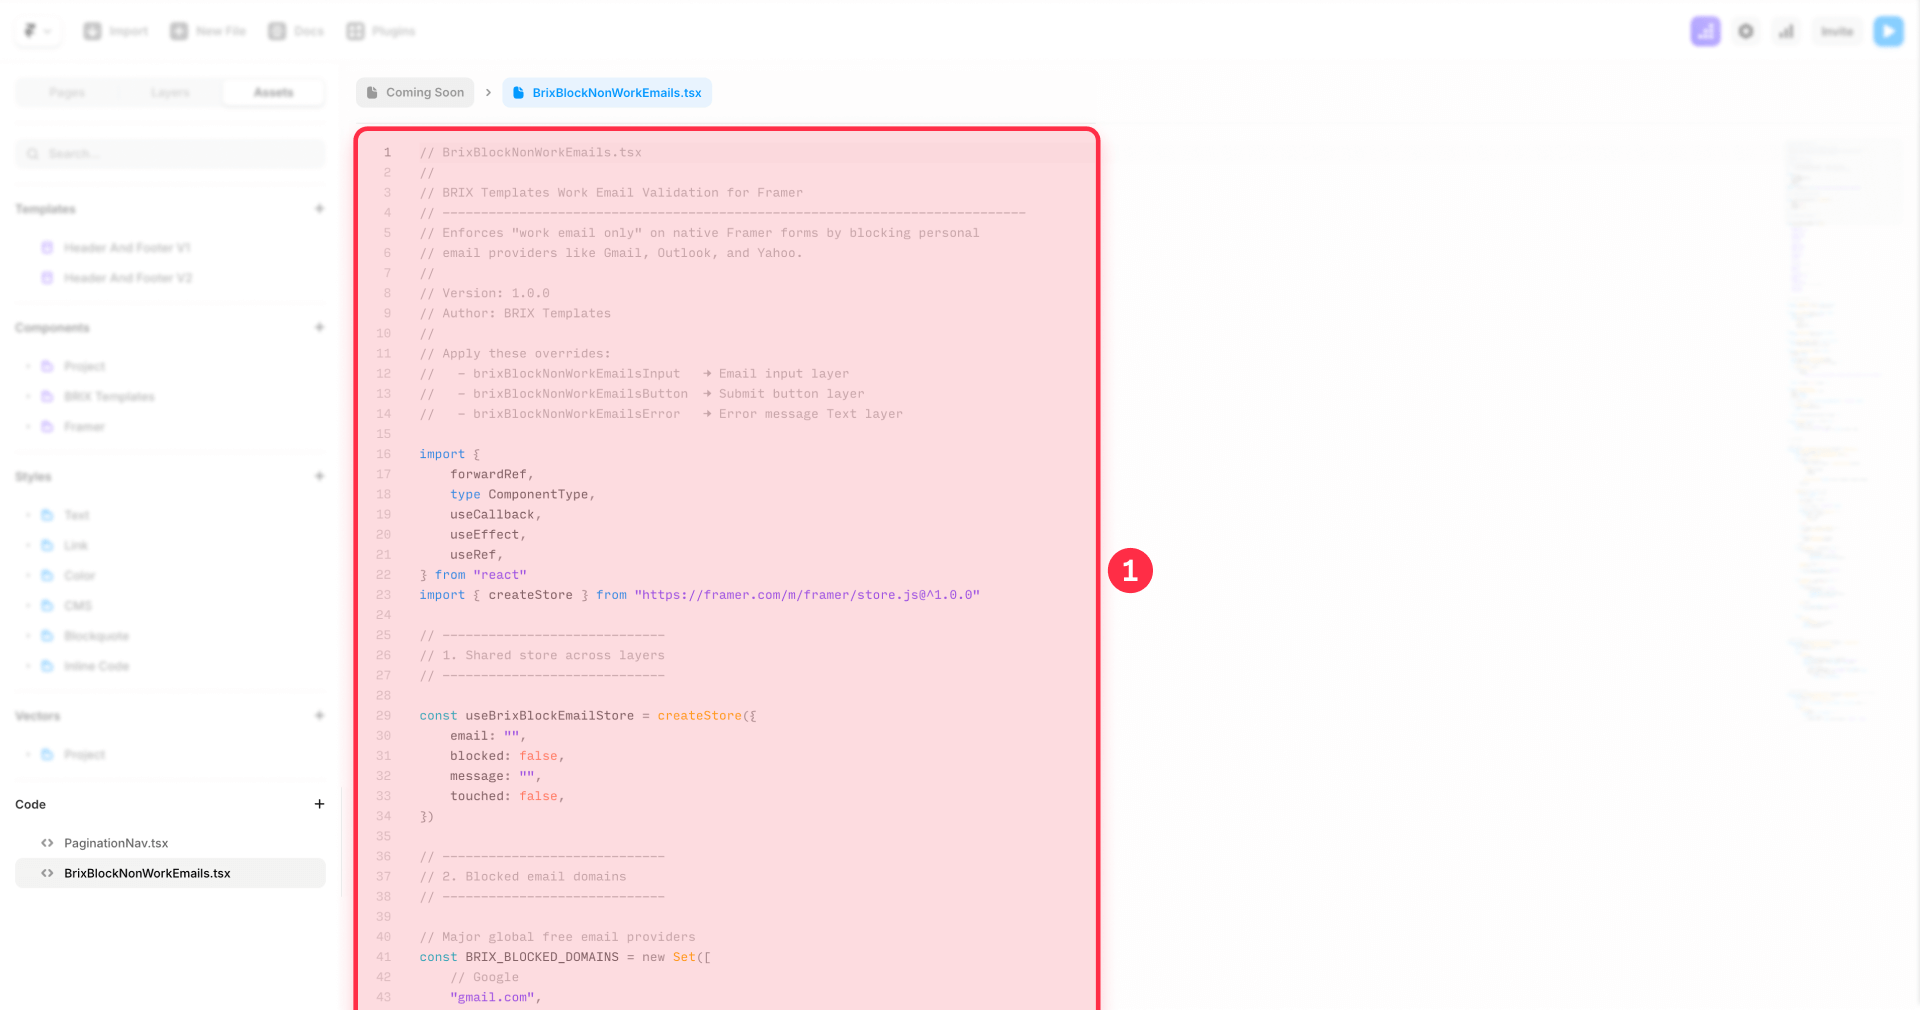
// BrixBlockNonWorkEmails.tsx
//
// BRIX Templates Work Email Validation for Framer
// ----------------------------------------------------------------------------
// Enforces "work email only" on native Framer forms by blocking personal
// email providers like Gmail, Outlook, and Yahoo.
//
// Version: 1.0.0
// Author: BRIX Templates
//
// Apply these overrides:
//   - brixBlockNonWorkEmailsInput   → Email input layer
//   - brixBlockNonWorkEmailsButton  → Submit button layer
//   - brixBlockNonWorkEmailsError   → Error message Text layer

import {
  forwardRef,
  type ComponentType,
  useCallback,
  useEffect,
  useRef,
} from "react"
import { createStore } from "https://framer.com/m/framer/store.js@^1.0.0"

// -----------------------------
// 1. Shared store across layers
// -----------------------------

const useBrixBlockEmailStore = createStore({
  email: "",
  blocked: false,
  message: "",
  touched: false,
})

// -----------------------------
// 2. Blocked email domains
// -----------------------------

// Major global free email providers
const BRIX_BLOCKED_DOMAINS = new Set([
  // Google
  "gmail.com",
  "googlemail.com",
  // Microsoft
  "outlook.com",
  "hotmail.com",
  "live.com",
  "msn.com",
  // Yahoo
  "yahoo.com",
  "yahoo.co.uk",
  "yahoo.co.in",
  "ymail.com",
  // Apple
  "icloud.com",
  "me.com",
  "mac.com",
  // AOL
  "aol.com",
  // German providers
  "gmx.com",
  "gmx.de",
  "web.de",
  // Privacy-focused
  "proton.me",
  "protonmail.com",
  "pm.me",
  "tuta.com",
  "tutanota.com",
  // Other popular free providers
  "zoho.com",
  "mail.com",
  "inbox.com",
])

// -----------------------------
// 3. Helper functions
// -----------------------------

function normalizeEmail(value: string): string {
  return (value || "").trim().toLowerCase()
}

function extractDomain(email: string): string {
  const at = email.lastIndexOf("@")
  if (at === -1) return ""
  return email.slice(at + 1).trim().toLowerCase().replace(/\.$/, "")
}

function looksEmailish(value: string): boolean {
  return /.+@.+\..+/.test(value)
}

function isBlockedDomain(domain: string): boolean {
  if (!domain) return false
  return BRIX_BLOCKED_DOMAINS.has(domain)
}

function computeValidation(email: string): { blocked: boolean; message: string } {
  const normalized = normalizeEmail(email)
  const domain = extractDomain(normalized)
  if (!domain) return { blocked: false, message: "" }

  if (isBlockedDomain(domain)) {
    return {
      blocked: true,
      message: "Please use a work email address (personal email providers are not accepted).",
    }
  }

  return { blocked: false, message: "" }
}

function setNativeValidity(
  inputEl: HTMLInputElement | null,
  email: string,
  blocked: boolean,
  message: string,
) {
  if (!inputEl || typeof inputEl.setCustomValidity !== "function") return

  if (!looksEmailish(email)) {
    inputEl.setCustomValidity("")
    return
  }

  inputEl.setCustomValidity(blocked ? message : "")
}

function mergeRefs(a: any, b: { current: any }) {
  return (node: any) => {
    b.current = node
    if (typeof a === "function") a(node)
    else if (a && typeof a === "object") (a as any).current = node
  }
}

// -----------------------------
// 4. Overrides
// -----------------------------

// EMAIL INPUT
// Attach to the email input field inside your Framer Form.
export function brixBlockNonWorkEmailsInput(Component): ComponentType {
  return forwardRef((props: any, ref) => {
    const [store, setStore] = useBrixBlockEmailStore()
    const inputRef = useRef<HTMLInputElement | null>(null)

    const sync = useCallback(
      (nextEmail: string) => {
        const { blocked, message } = computeValidation(nextEmail)

        setStore({
          email: nextEmail,
          blocked,
          message,
        })

        setNativeValidity(inputRef.current, nextEmail, blocked, message)
      },
      [setStore],
    )

    // Initial sync + autofill guard
    useEffect(() => {
      const el = inputRef.current
      if (!el) return

      const initial = el.value ?? ""
      sync(initial)

      if (typeof window === "undefined") return

      let last = el.value ?? ""
      const interval = window.setInterval(() => {
        const now = el.value ?? ""
        if (now !== last) {
          last = now
          sync(now)
        }
      }, 200)

      const timeout = window.setTimeout(() => {
        window.clearInterval(interval)
      }, 2000)

      return () => {
        window.clearInterval(interval)
        window.clearTimeout(timeout)
      }
    }, [sync])

    const handleChange = (eventOrValue: any) => {
      const value =
        typeof eventOrValue === "string"
          ? eventOrValue
          : eventOrValue?.target?.value ??
            eventOrValue?.currentTarget?.value ??
            ""

      setStore({ touched: true })
      sync(value)

      if (typeof props.onChange === "function") {
        props.onChange(eventOrValue)
      }
    }

    const handleBlur = (eventOrValue: any) => {
      setStore({ touched: true })

      const value =
        typeof eventOrValue === "string"
          ? eventOrValue
          : eventOrValue?.target?.value ??
            eventOrValue?.currentTarget?.value ??
            inputRef.current?.value ??
            ""

      sync(value)

      if (typeof props.onBlur === "function") {
        props.onBlur(eventOrValue)
      }
    }

    return (
      <Component
        {...props}
        ref={mergeRefs(ref, inputRef)}
        onChange={handleChange}
        onBlur={handleBlur}
      />
    )
  })
}

// SUBMIT BUTTON
// Attach to the submit button inside the same Form.
export function brixBlockNonWorkEmailsButton(Component): ComponentType {
  return (props: any) => {
    const [store] = useBrixBlockEmailStore()
    const shouldDisable = store.blocked

    return (
      <Component
        {...props}
        disabled={shouldDisable || props.disabled}
        aria-disabled={shouldDisable || props["aria-disabled"]}
        title={shouldDisable ? store.message : props.title}
        style={{
          ...props.style,
          opacity: shouldDisable ? 0.5 : props.style?.opacity,
          cursor: shouldDisable ? "not-allowed" : props.style?.cursor,
          pointerEvents: shouldDisable ? "none" : props.style?.pointerEvents,
        }}
      />
    )
  }
}

// ERROR MESSAGE TEXT
// Attach to a Text layer under the button that contains your "work email only" message.
export function brixBlockNonWorkEmailsError(Component): ComponentType {
  return (props: any) => {
    const [store] = useBrixBlockEmailStore()

    const show = store.blocked && (store.touched || store.email.length > 0)

    return (
      <Component
        {...props}
        text={show ? store.message : ""}
        style={{
          ...props.style,
          display: show ? props.style?.display ?? "block" : "none",
        }}
      />
    )
  }
}
3 - Connecting the overrides to your Framer form
With the code in place, you need to connect each override to the correct form element.
Attaching overrides to Framer form elements
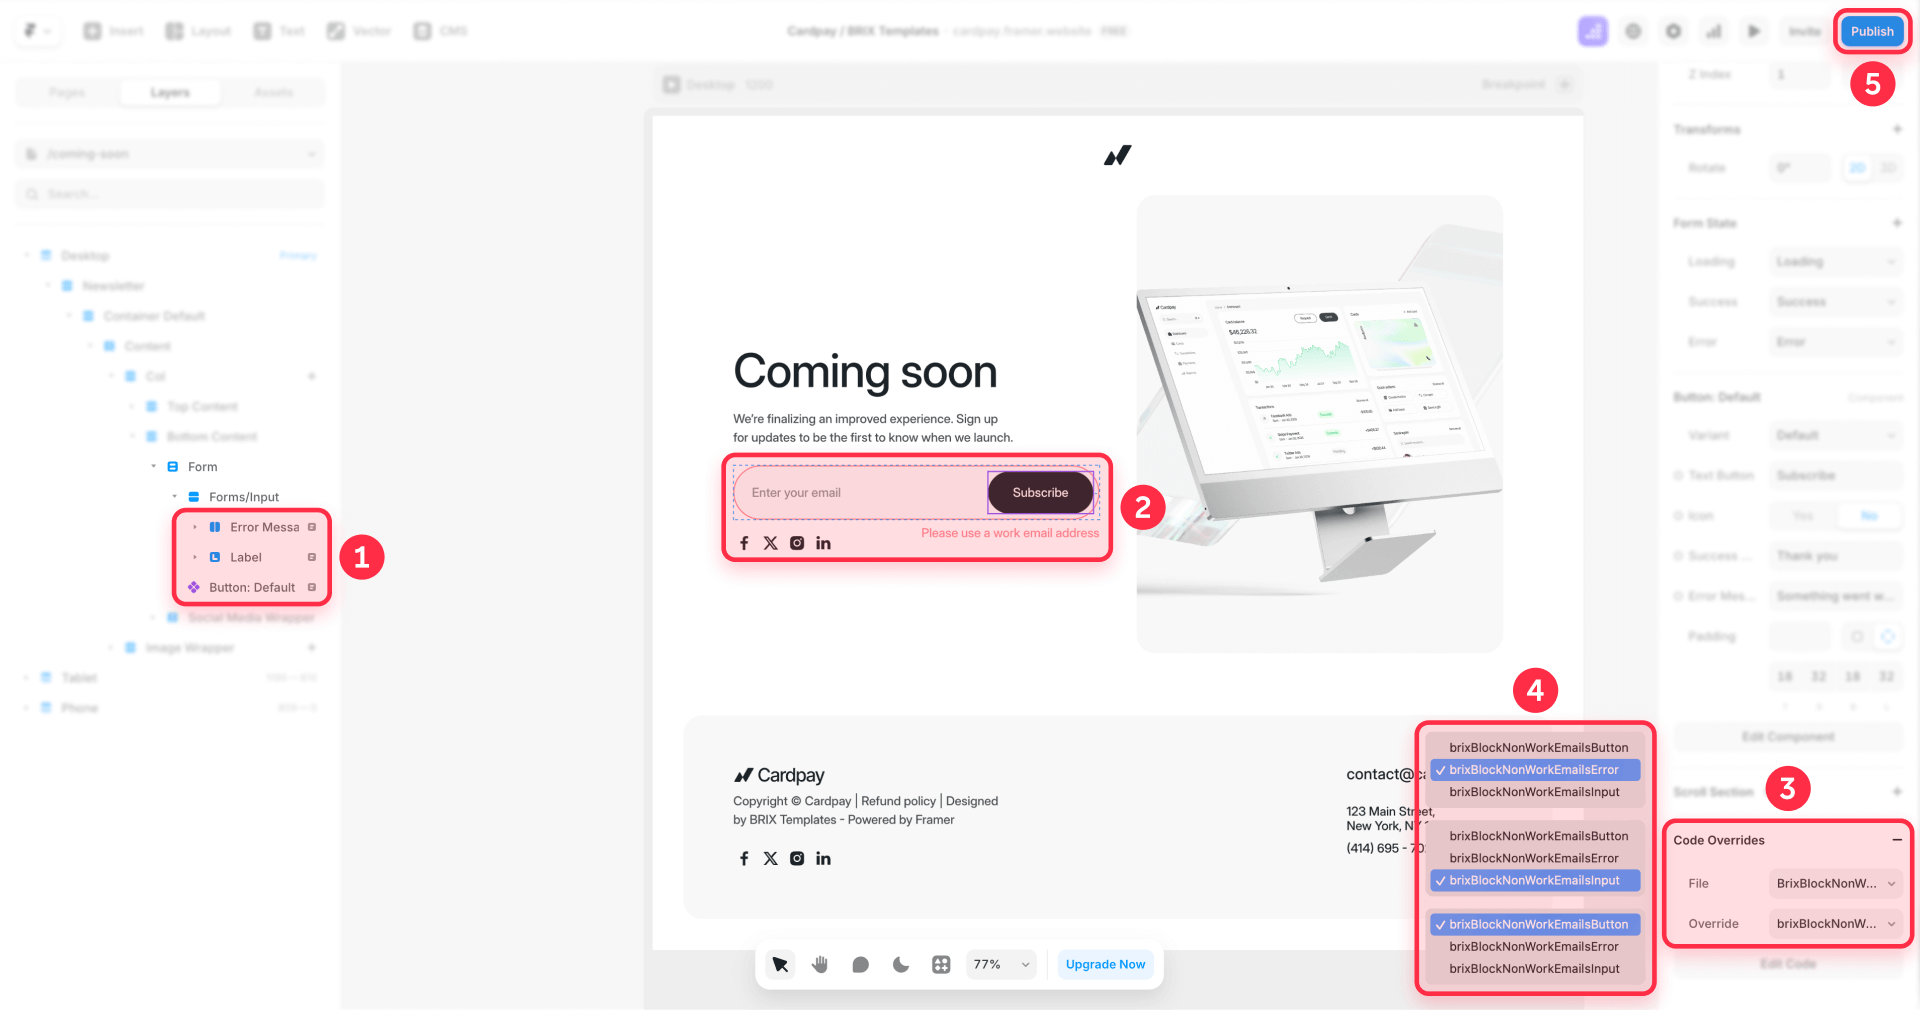
Follow these steps to wire everything together:
- Select your Email input: Click on the email input field in your form
- Apply the input override: In the right panel under Overrides, select brixBlockNonWorkEmailsInput from the dropdown
- Select your Submit button: Click on the submit button
- Apply the button override: Choose brixBlockNonWorkEmailsButton from the override dropdown
- Select your error Text layer: Click on the text layer you created for error messages
- Apply the message override: Select brixBlockNonWorkEmailsError
Remember that overrides only run in Preview mode and on your published site, not on the canvas. You won't see the validation working until you preview or publish.
Optional: Adding Russian and Chinese consumer email providers to your Framer blocklist
If your business doesn't serve Russian or Chinese markets, you may want to block consumer email providers from those regions. These are separate from the core blocklist to give you control over regional filtering.
// Russia & CIS consumer providers (Mail.ru Group, Yandex, Rambler, etc.)
const RUSSIA_CONSUMER_DOMAINS = new Set([
  "mail.ru",
  "bk.ru",
  "inbox.ru",
  "list.ru",
  "rambler.ru",
  "rambler.ua",
  "yandex.ru",
  "yandex.com",
  "yandex.ua",
  "yandex.kz",
  "yandex.by",
])

// China consumer providers (NetEase, QQ, Sina, etc.)
const CHINA_CONSUMER_DOMAINS = new Set([
  "qq.com",
  "vip.qq.com",
  "foxmail.com",
  "163.com",
  "126.com",
  "yeah.net",
  "sina.com",
  "sina.cn",
  "sohu.com",
  "139.com",
])
To add these domains, paste the following set inside your code, right after the BRIX_BLOCKED_DOMAINS definition:
function isBlockedDomain(domain: string): boolean {
  if (!domain) return false
  if (BRIX_BLOCKED_DOMAINS.has(domain)) return true
  if (RUSSIA_CONSUMER_DOMAINS.has(domain)) return true
  if (CHINA_CONSUMER_DOMAINS.has(domain)) return true
  return false
}
Testing your Framer email validation implementation
Before launching, verify that everything works correctly across different scenarios.
Running validation tests on your Framer form
Complete these checks to ensure proper functionality:
- Test personal email blocking: Enter [email protected] in the email field and verify the error message appears and the submit button becomes disabled
- Test work email acceptance: Enter [email protected] and confirm no error appears and the submit button stays enabled
- Test autofill behavior: Let your browser autofill a personal email address and verify the error appears without you typing anything
- Test form submission: Submit the form with a valid work email and confirm data reaches your destination (email, Google Sheets, or webhook)
- Check browser console: Press F12 to open developer tools and look for any JavaScript errors that might indicate problems
Troubleshooting common Framer email validation issues
Here's how to fix the most common problems:
Nothing happens - no validation occurs:
- Verify you're in Preview mode or viewing the published site (overrides don't run on the canvas)
- Check that each override is attached to the correct element
- Open the browser console and look for JavaScript errors
- Make sure you saved the code file after pasting
Submit button stays disabled even for work emails:
- Check that the domain isn't accidentally in your blocklist
- Verify the email format is valid (has @ and a domain)
- Try refreshing the page and entering the email again
Error message doesn't appear:
- Confirm the brixBlockNonWorkEmailsError override is attached to your text layer
- Check that the text layer isn't hidden by other elements
- Verify the text layer has visible styling (not transparent or 0 opacity)
Autofill doesn't trigger validation:
- The code includes a polling mechanism that checks for autofill changes every 200ms for the first 2 seconds
- If autofill happens after this window, users may need to click into the field to trigger validation
- This is expected behavior and covers most autofill scenarios
Frequently asked questions about blocking personal emails in Framer
What is email domain validation in Framer forms?
Email domain validation checks the part after the @ symbol in an email address against a list of blocked domains. When someone enters [email protected], the code extracts gmail.com and compares it to your blocklist. If it matches, the form prevents submission and shows an error message. This happens in real-time as users type, providing immediate feedback without waiting for form submission. The validation uses HTML5's native setCustomValidity() function to integrate properly with browser form handling.
Why should I block personal emails on my Framer B2B website?
Personal email addresses like Gmail and Yahoo typically indicate individual consumers rather than business decision-makers. For B2B companies, lead quality matters more than quantity. Sales teams waste hours qualifying leads from personal addresses that rarely convert. By requiring work emails, you filter out casual browsers, students, and competitors researching your product. Your CRM stays cleaner, your sales metrics become more accurate, and your team focuses on prospects with actual purchasing authority.
How do I add more email domains to the Framer blocklist?
Adding domains is simple. Find the BRIX_BLOCKED_DOMAINS set in your code and add new entries following the existing format. Each domain should be lowercase, without the @ symbol, and wrapped in quotes with a comma after it. For example, to block example.com, add "example.com", as a new line inside the set. Save the file and publish your site for changes to take effect. You can add as many domains as needed without affecting performance.
Does Framer email blocking work with autofill?
Yes. The code includes a polling mechanism that watches for autofill changes during the first two seconds after page load. This catches most browser autofill scenarios where users click a field and their password manager or browser automatically fills the email. When autofill inserts a blocked email address, the error message appears and the submit button disables automatically, even without the user typing anything. This prevents accidental submissions of personal emails.
Can I customize the error message in Framer email validation?
Absolutely. Find the computeValidation function in your code and locate the message property. Replace the default text with whatever message fits your brand voice. Keep it clear and helpful, something like "Please enter your work email address" or "Business email required for demo requests." The message appears both as inline text and as the browser's native validation tooltip. Short, direct messages work best for user experience.
What happens if someone uses a personal email subdomain in Framer?
The current implementation checks exact domain matches, so mail.google.com wouldn't be blocked if only gmail.com is in your list. However, this rarely matters in practice because email services don't use subdomains for user addresses. If you need subdomain matching, you can modify the isBlockedDomain function to walk up parent domains. For most B2B sites, exact matching handles 99% of cases without added complexity.
Is Framer email validation secure and private?
Yes. All validation happens client-side in the user's browser. No email addresses are sent to external servers for checking. The blocklist is embedded in your published site's JavaScript, so validation works offline once the page loads. This approach is faster than API-based validation and doesn't create privacy concerns about storing or transmitting user data to third parties. Users' email addresses stay between them and your form destination.
How many email domains can I block in Framer?
There's no practical limit. JavaScript Sets handle thousands of entries efficiently with near-instant lookup times. You could add 10,000 domains and validation would still feel instantaneous. However, maintaining huge lists manually becomes tedious. For comprehensive blocking, consider integrating with maintained GitHub lists like free-email-domains that the community updates regularly. The code can fetch these lists when the page loads and merge them with your curated blocklist.
Will blocking emails affect my Framer form conversion rate?
It depends on your audience. B2B sites typically see improved conversion rates because you're filtering out low-intent visitors who were never going to become customers. The users blocked by personal email validation weren't your target audience anyway. However, if you serve both consumers and businesses, you might need separate forms or conditional logic. Test with your specific traffic to measure actual impact on qualified leads versus total submissions.
How can I block entire email TLDs like .ru or .cn in Framer?
Add a simple suffix check to your isBlockedDomain function. This blocks all emails ending with specific country-code TLDs regardless of the provider. Add this line to your function: if (domain.endsWith(".ru") || domain.endsWith(".cn")) return true. You can extend this pattern to include other TLDs like .su (Soviet Union legacy) or .by (Belarus). This approach is more aggressive than blocking individual providers but effective if your business exclusively serves Western markets and you're seeing spam from these regions.
Conclusion
Implementing email validation with Framer Code Overrides transforms your forms into qualified-lead-only gates that filter out personal email addresses before they clutter your pipeline. This solution integrates with HTML5 validation, preserves Framer's native form behavior, and handles edge cases like browser autofill.
Start with the core blocklist of global free providers, then add regional email blocking based on your specific needs. Your sales team will spend less time qualifying dead-end leads and more time closing actual business opportunities.
For advanced implementations requiring custom validation rules, multi-step form logic, or integration with CRM systems, our Framer development team can build sophisticated solutions tailored to your exact requirements.


Join readers commenting on this post!