
One of the biggest challenges with collecting Webflow form submissions is ensuring your team actually sees them promptly. Without an automated notification system, valuable leads, support requests, and other important form submissions can sit unnoticed in your dashboard for hours or days, leading to missed opportunities and frustrated visitors.
In this comprehensive guide, you'll discover how to automatically send Webflow form submissions directly to Microsoft Teams channels, ensuring your entire team stays informed and can respond quickly to website inquiries using Make (formerly Integromat)—a powerful automation platform that connects your web applications efficiently.
Why Microsoft Teams notifications matter for Webflow forms
- Rapid lead engagement: When someone submits a contact form on your Webflow site, your sales team receives an instant notification in Microsoft Teams, allowing them to reach out within minutes instead of hours—crucial for converting interested prospects.
- Uninterrupted workflow: Rather than forcing team members to constantly check the Webflow dashboard for new submissions, bring form data directly into Microsoft Teams where they already collaborate throughout the day.
- Smart channel distribution: Direct different Webflow form types automatically to the appropriate Microsoft Teams channels—sending quote requests to #sales-team, technical questions to #support-group, and job applications to #hr-recruitment.
- Complete submission context: View all form field data directly within the Microsoft Teams notification, giving team members the full context they need without leaving their collaboration environment.
- Team-wide visibility: When Webflow form notifications appear in shared Microsoft Teams channels, everyone can see what's being handled and by whom, preventing duplicate responses and ensuring accountability.
Available methods for Webflow-Microsoft Teams integration
Before diving into implementation, it's worth noting that there are two reliable approaches for connecting your Webflow forms with Microsoft Teams:
- Sending Teams notifications with Make (recommended): Our top recommendation with a generous free tier offering 1,000 operations monthly—more than sufficient for most websites with moderate form traffic.
- Zapier integration for Microsoft Teams alerts: A solid option if you're already using Zapier for other workflows, though it comes with a more limited free plan (100 tasks per month).
We'll focus on the Make method as it provides the best combination of capability, reliability, and value for most Webflow projects.
How to send Webflow form submissions to Microsoft Teams using Make
Setting up this integration involves creating a webhook connection between your Webflow forms and Microsoft Teams. We'll walk through preparing your Webflow form, configuring the automation in Make, and setting up the Microsoft Teams notification format.
The entire process should take approximately 15 minutes to complete and works consistently for websites of any size.
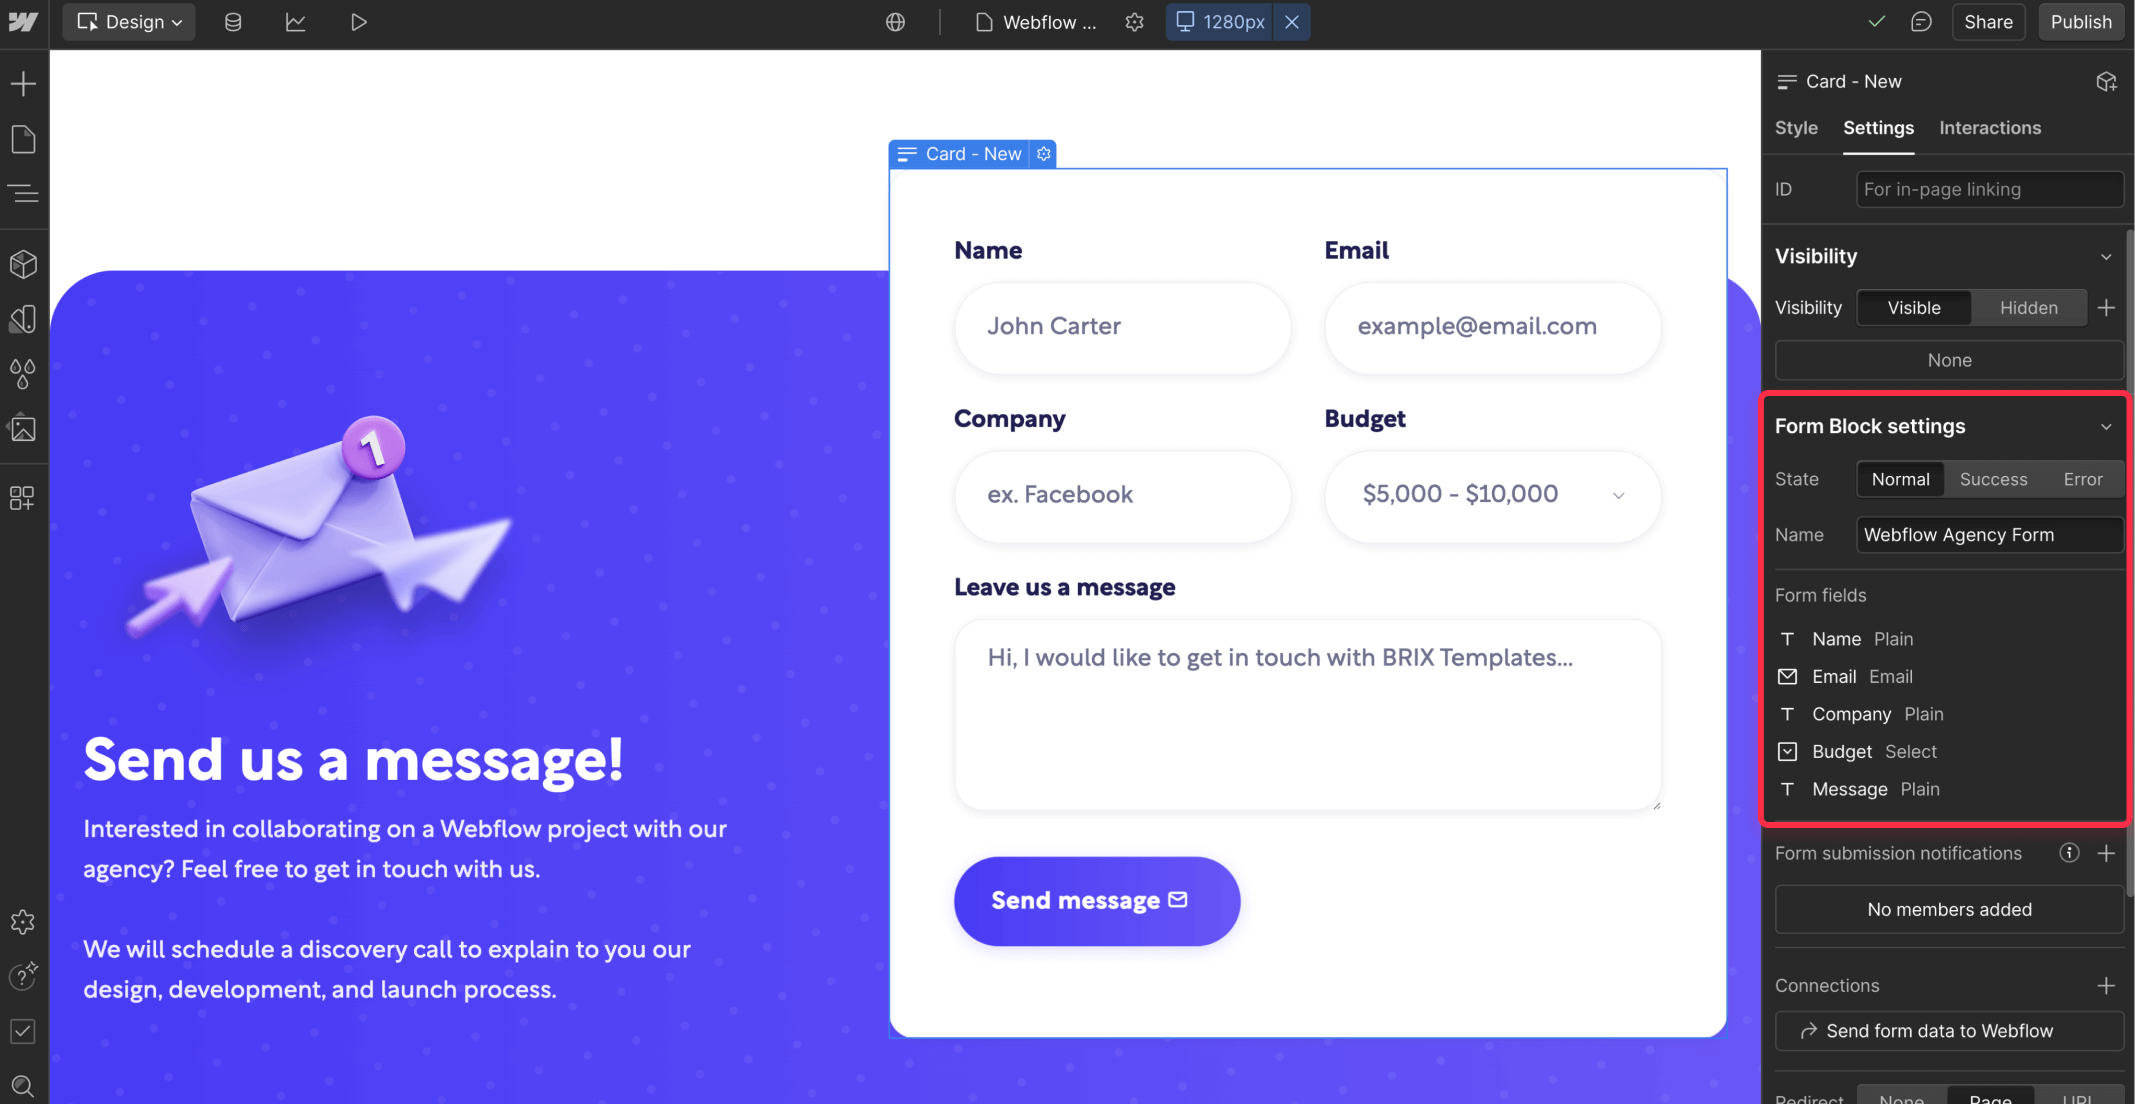
Step 1: Setting up your Webflow form for Microsoft Teams integration
- Navigate to your Webflow project and select the page containing your form (or where you want to add one).
- If you don't already have a form, add a Form element from the Add Elements panel.
- Configure your form fields to collect the necessary information from users.
- Under form settings (gear icon), ensure your Form Name has a clear, descriptive label for easy identification in Make.
- Add appropriate success and error messages.
- Publish your Webflow site with the form. ⚠️ This step is essential—Make can only detect forms on published Webflow sites.
Step 2: Creating a Webflow form automation in Make for Microsoft Teams
- Sign up for a free Make account if you don't have one already.
- From the Make dashboard, click the Create a new scenario button.
- Name your scenario something descriptive like "Webflow Form to Microsoft Teams Notification."
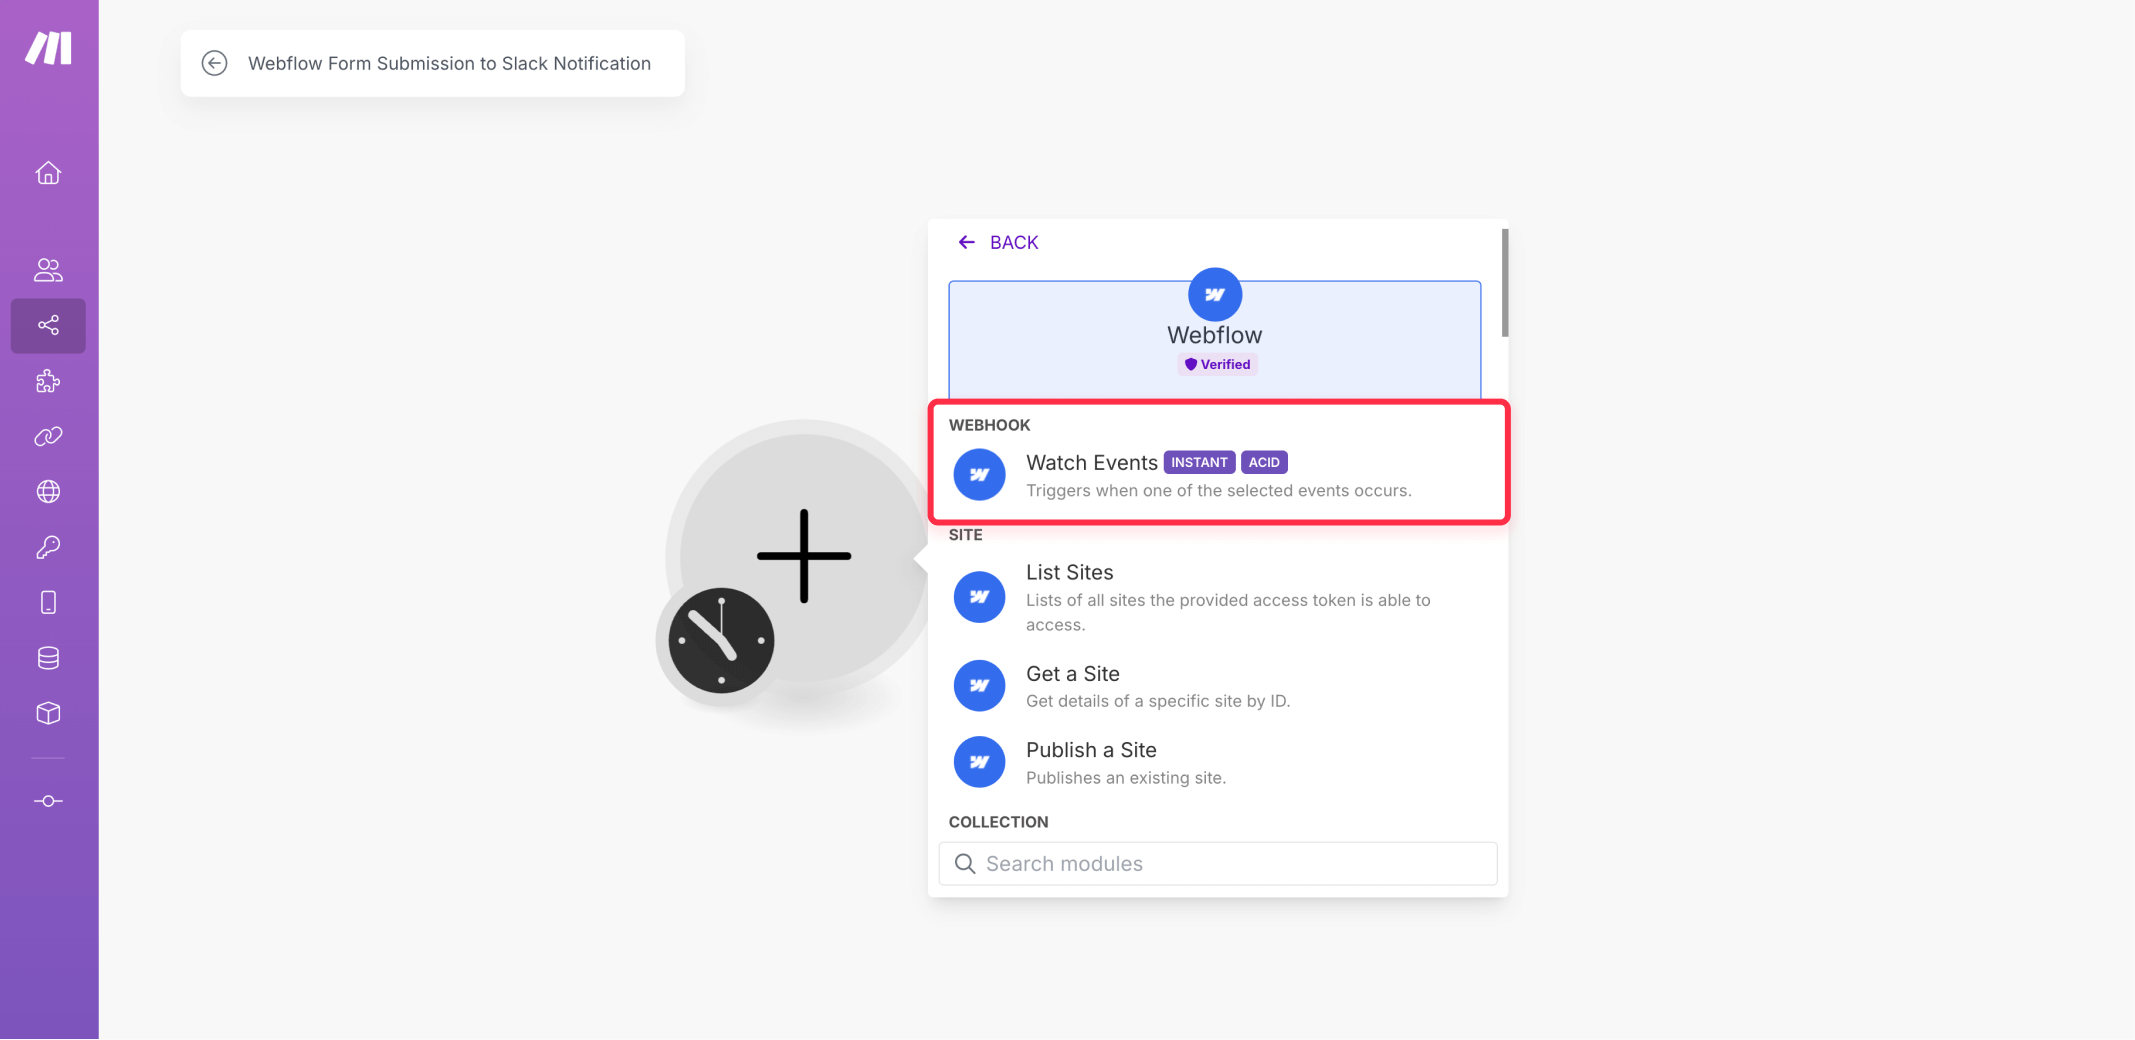
- Click the large + icon in the center of the screen to add your first module.
- Search for and select "Webflow" from the apps list.
- For the trigger, select "Watch Events" (which will detect new form submissions).
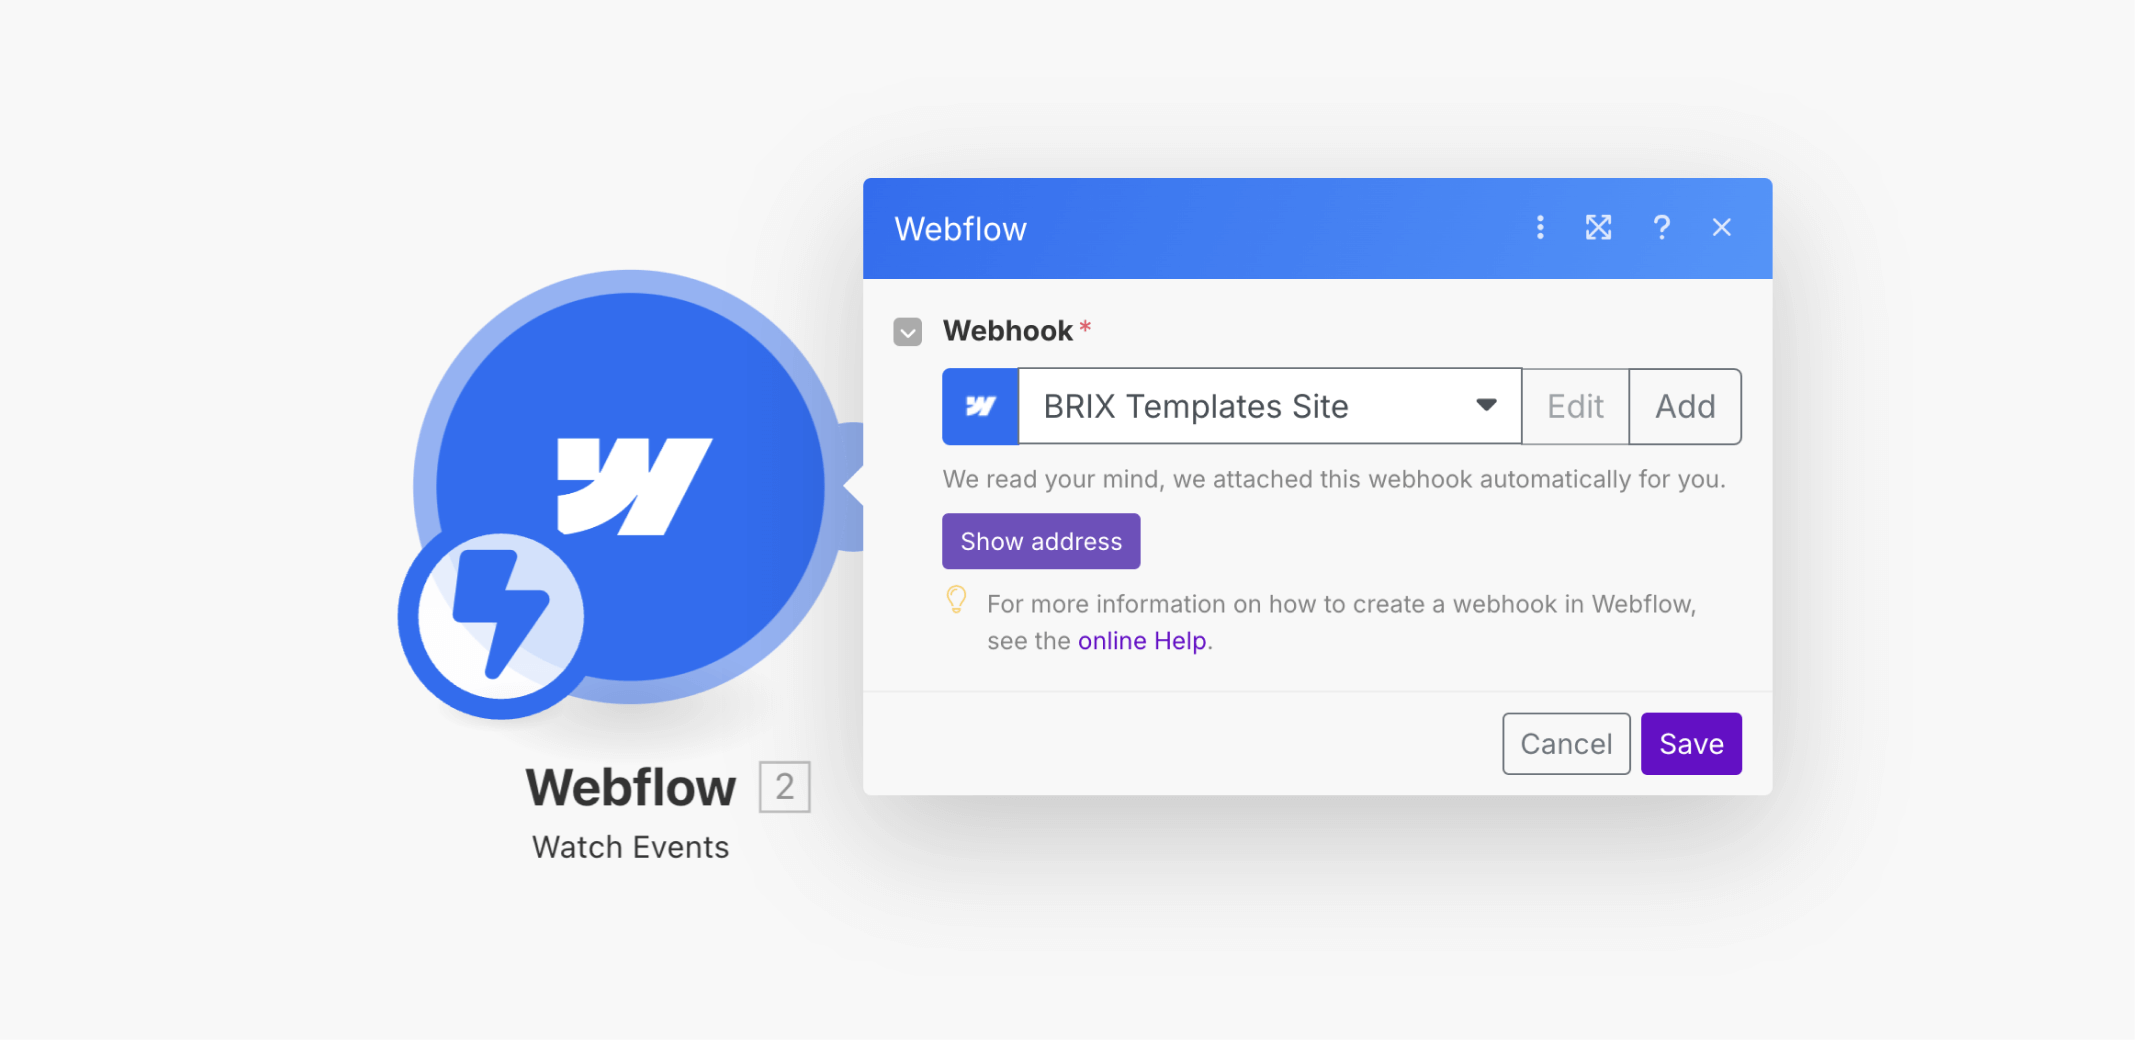
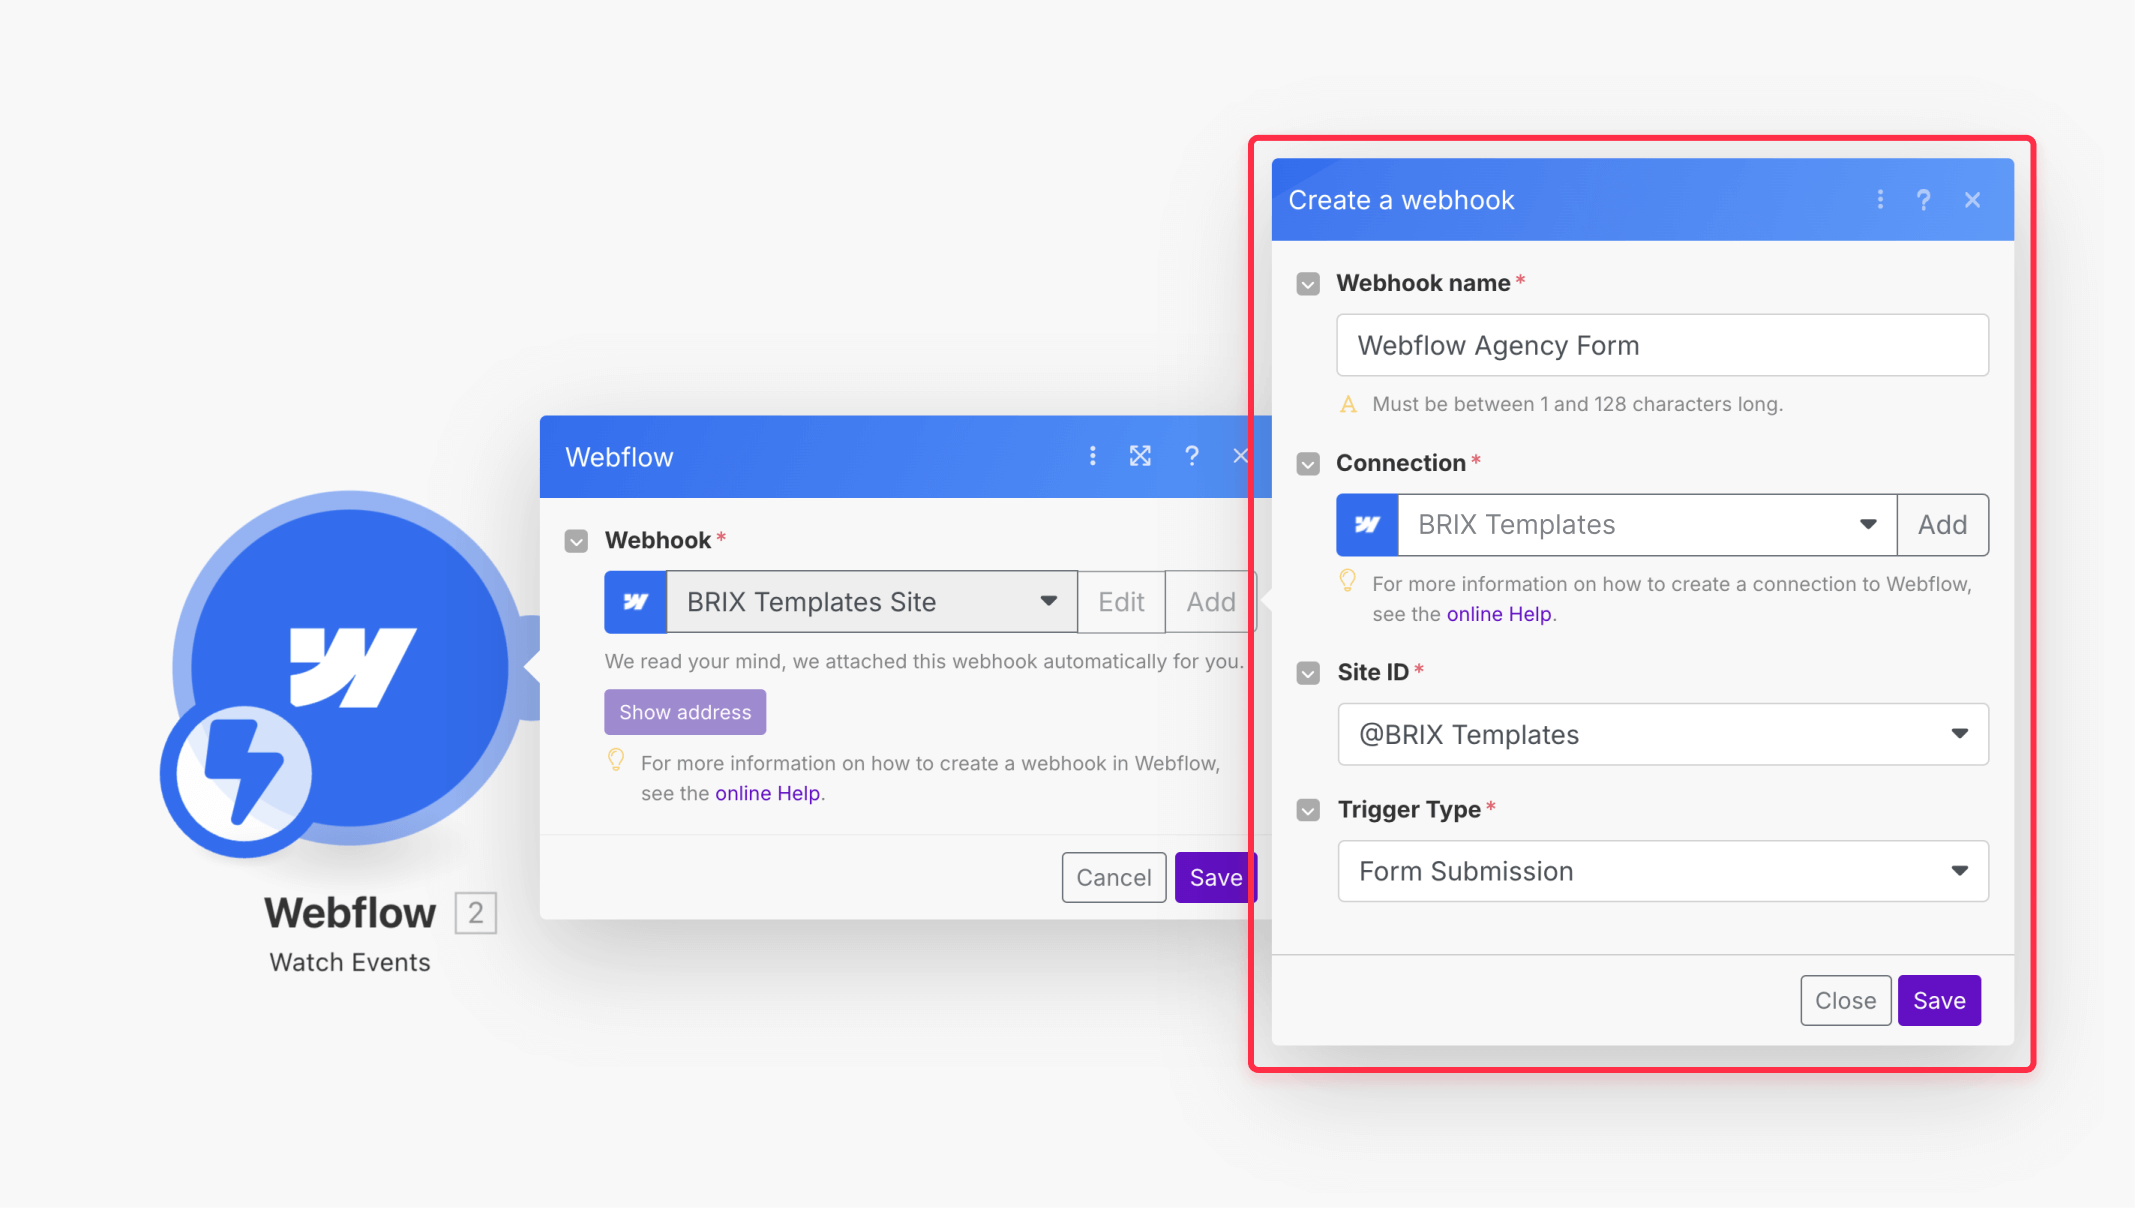
Step 3: Configuring the Webflow webhook in Make
- Click + Add next to the "Webhook" dropdown to create a new webhook.
- For Webhook name, enter a descriptive name (e.g., "Contact Form" or your specific form name).
- Next to Connection, click + Add to create a new connection to your Webflow account.
- Enter a Connection name (e.g., "My Webflow Account").
- Click Save to create the connection.
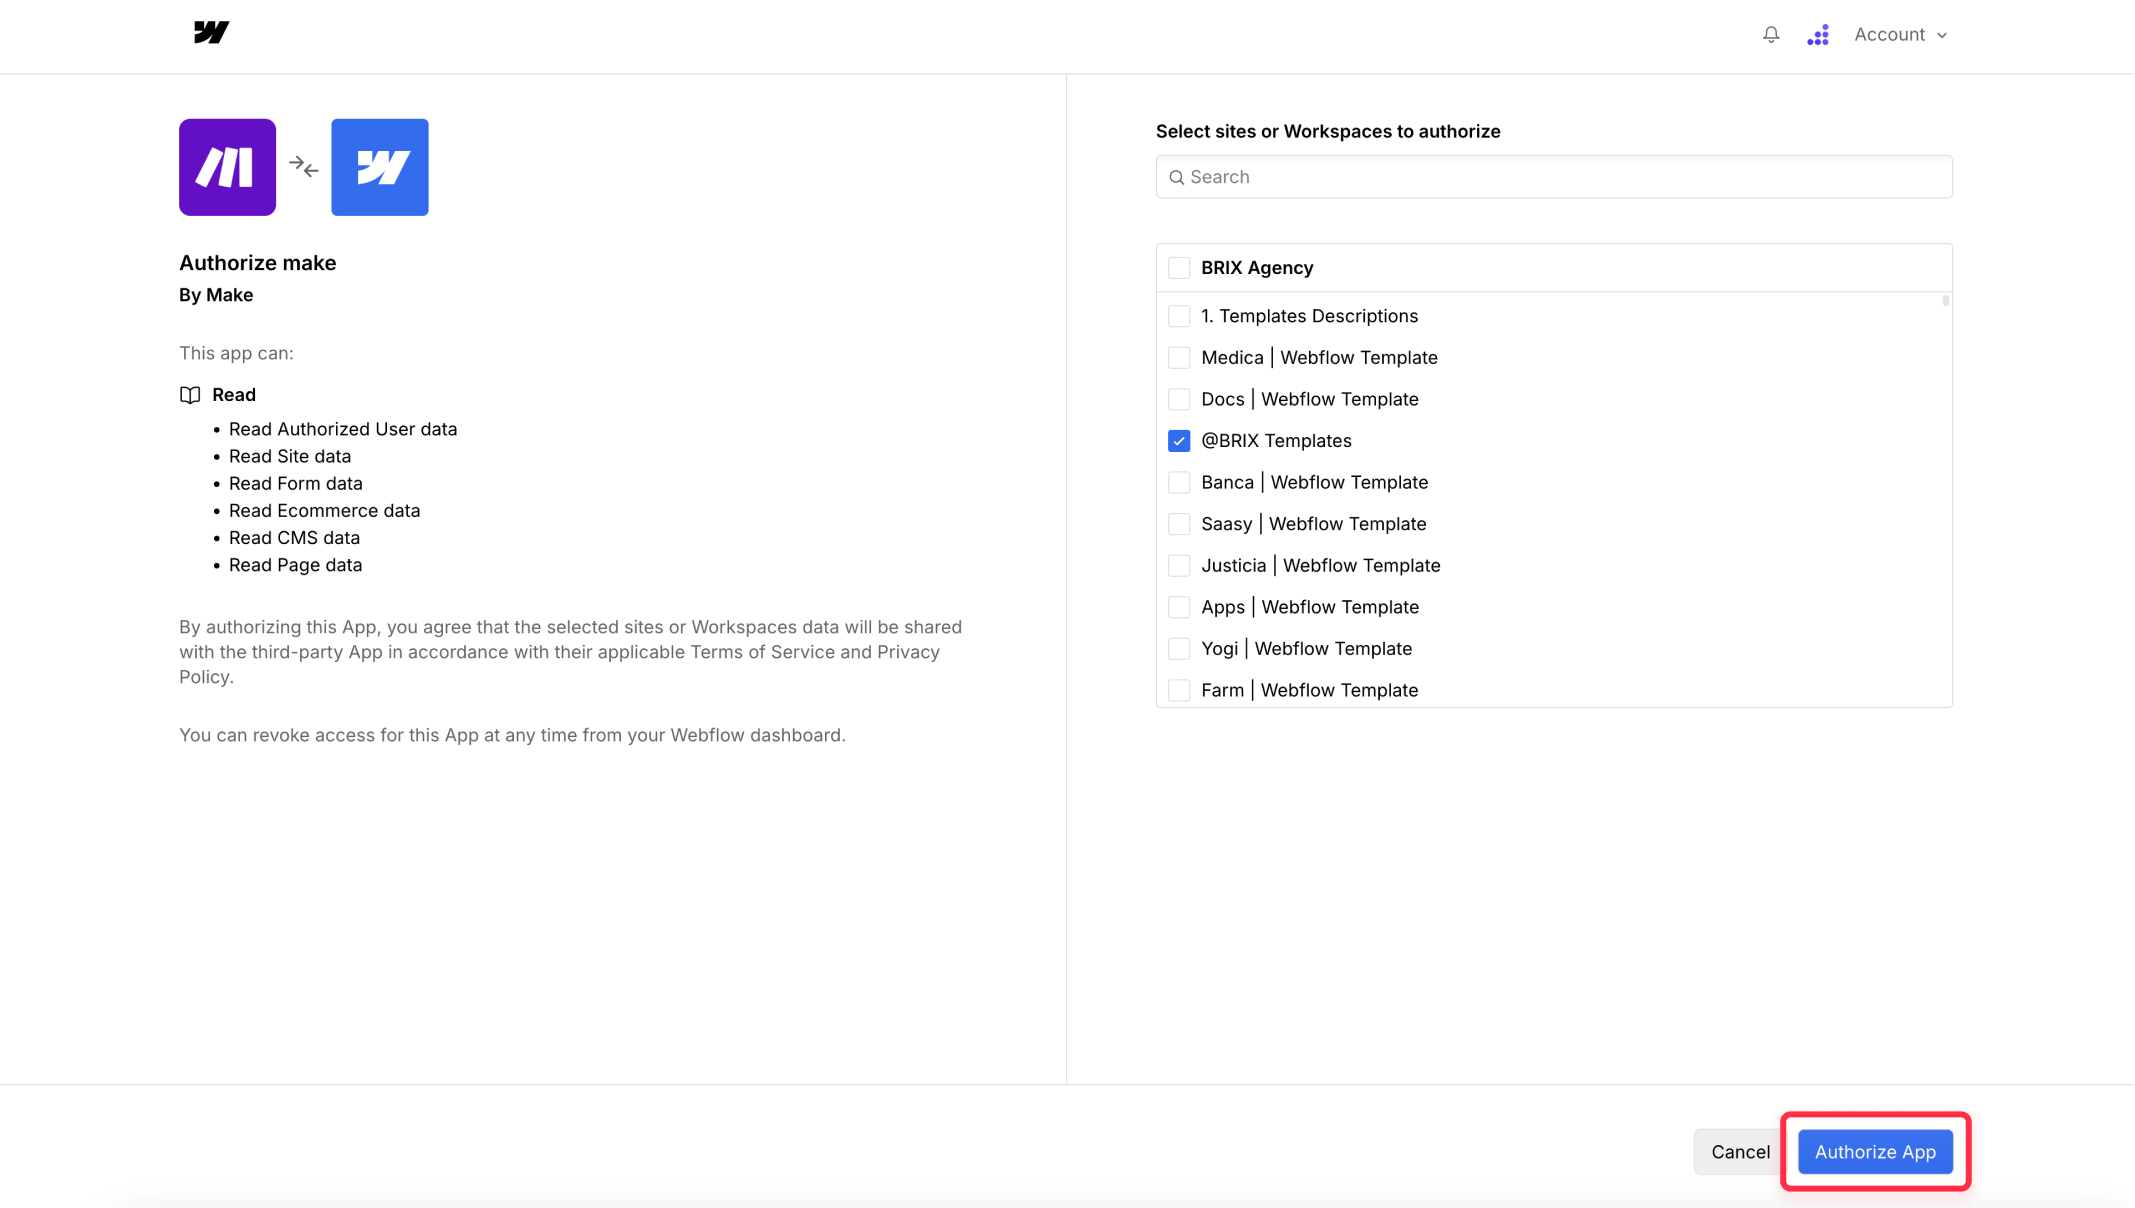
Make will open a new tab/window to Webflow, where you'll need to:
- Authorize Make to access your Webflow account.
- Select the specific Webflow site you want to connect from the dropdown menu.
- Click Authorize App.
[IMAGE: Show the screenshot of the Webflow authorization screen for Make App
Back in Make:
- The Site ID dropdown should now populate with your Webflow site(s). Select the appropriate site.
- For Trigger Type, select Form Submission.
- Click Save to complete the webhook setup.
Step 4: Testing your Webflow form connection with Make
Important: Your Webflow site must be published with the form for Make to detect submissions.
- Click the Run once button at the bottom left of the Make scenario editor. This puts Make into listening mode.
- Go to your published Webflow site and complete your form with test data.
- Submit the form.
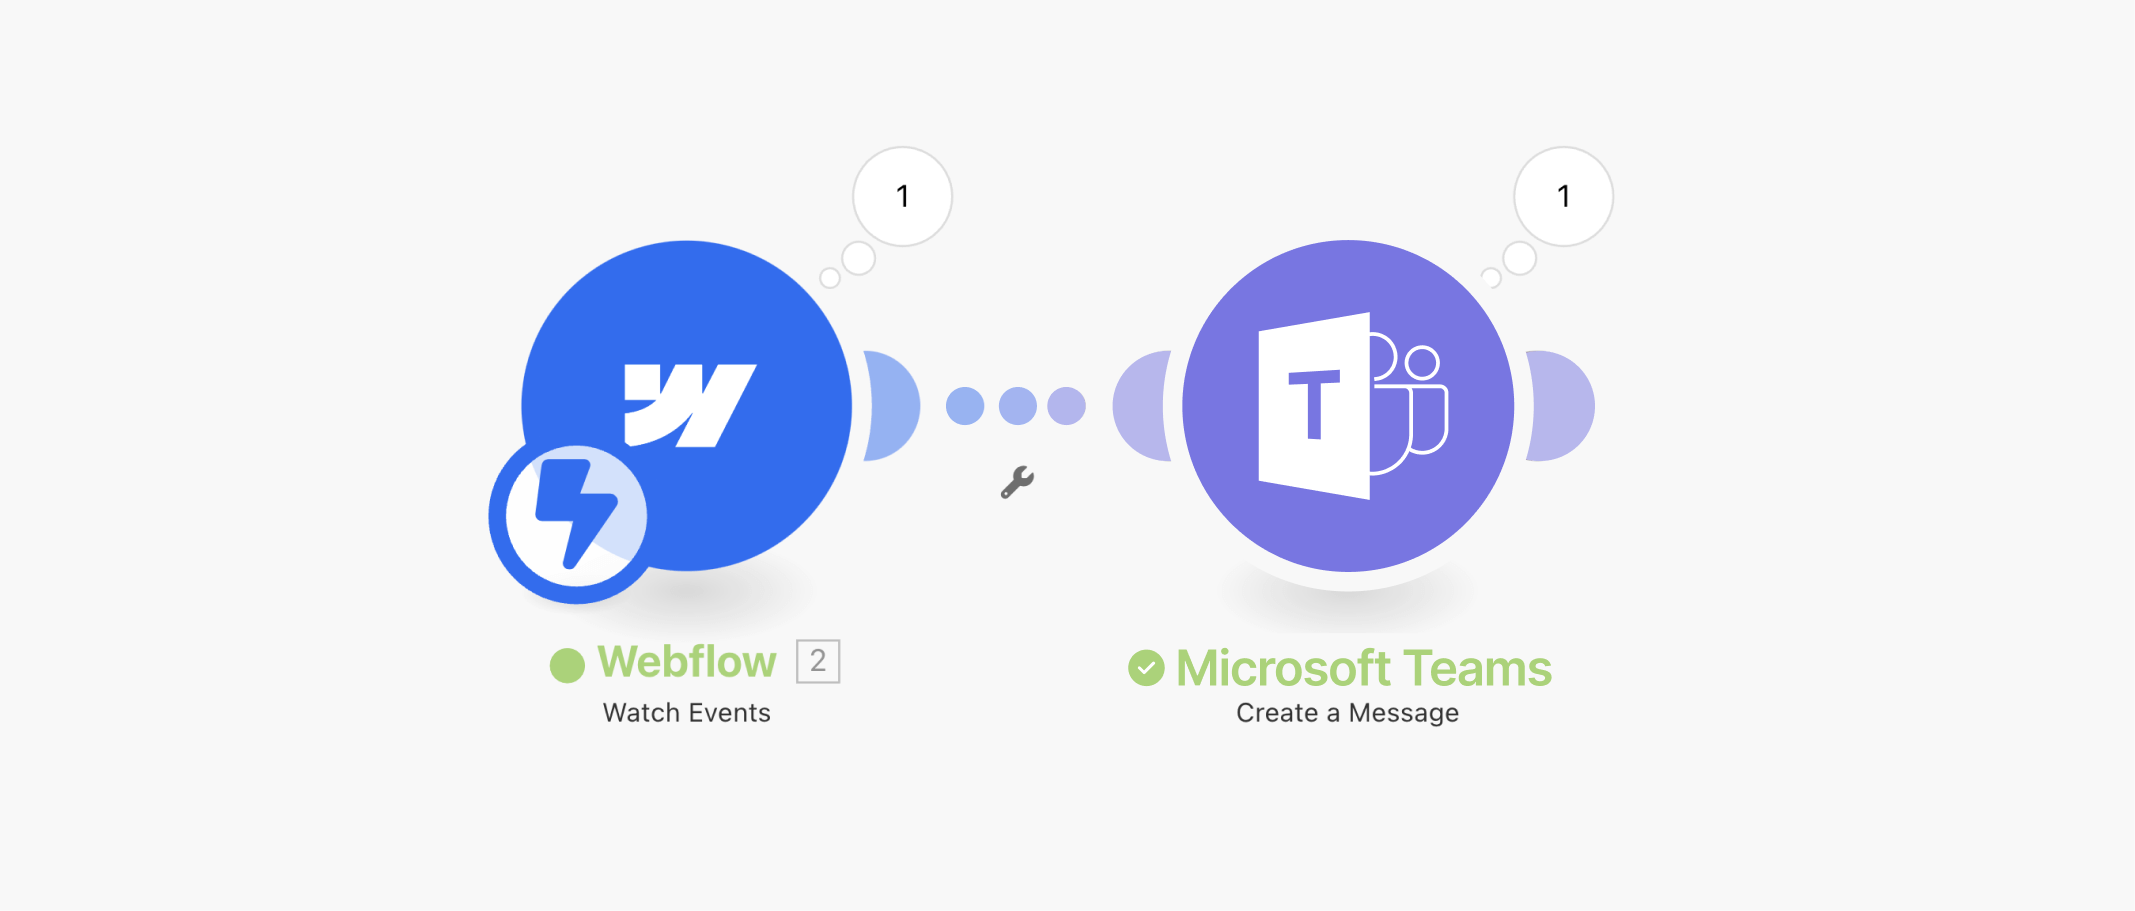
- Return to Make. You should see a green bubble with a "1" appear above the Webflow module, indicating that Make successfully received the form submission data.
- Click the magnifying glass tiny icon on the bubble to inspect the data Make captured from your form submission.
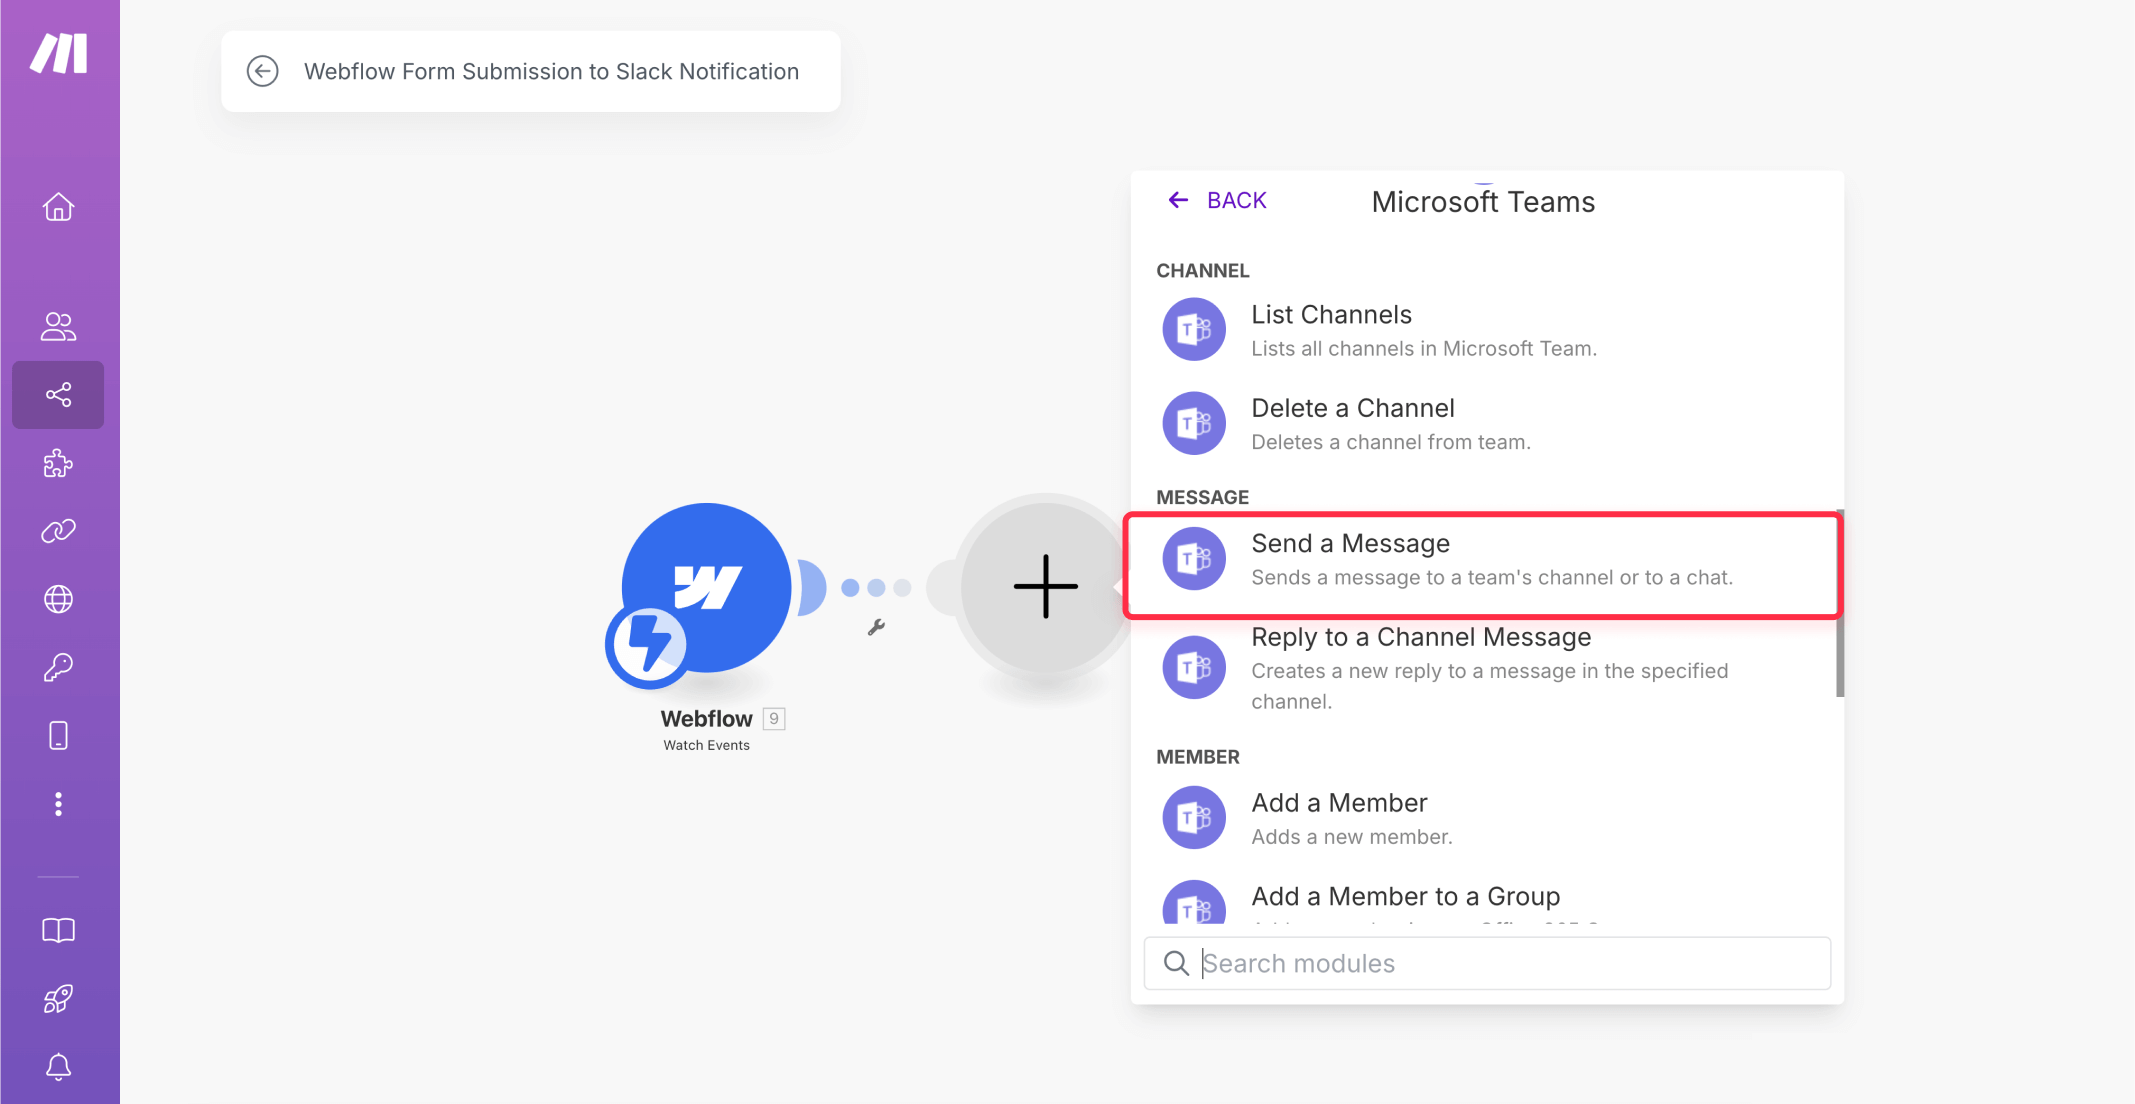
Step 5: Adding the Microsoft Teams module to your Webflow form automation
- Click the + icon to the right of your Webflow module to add another step.
- Search for and select "Microsoft Teams" from the apps list.
- Select "Send a Message" as the action.
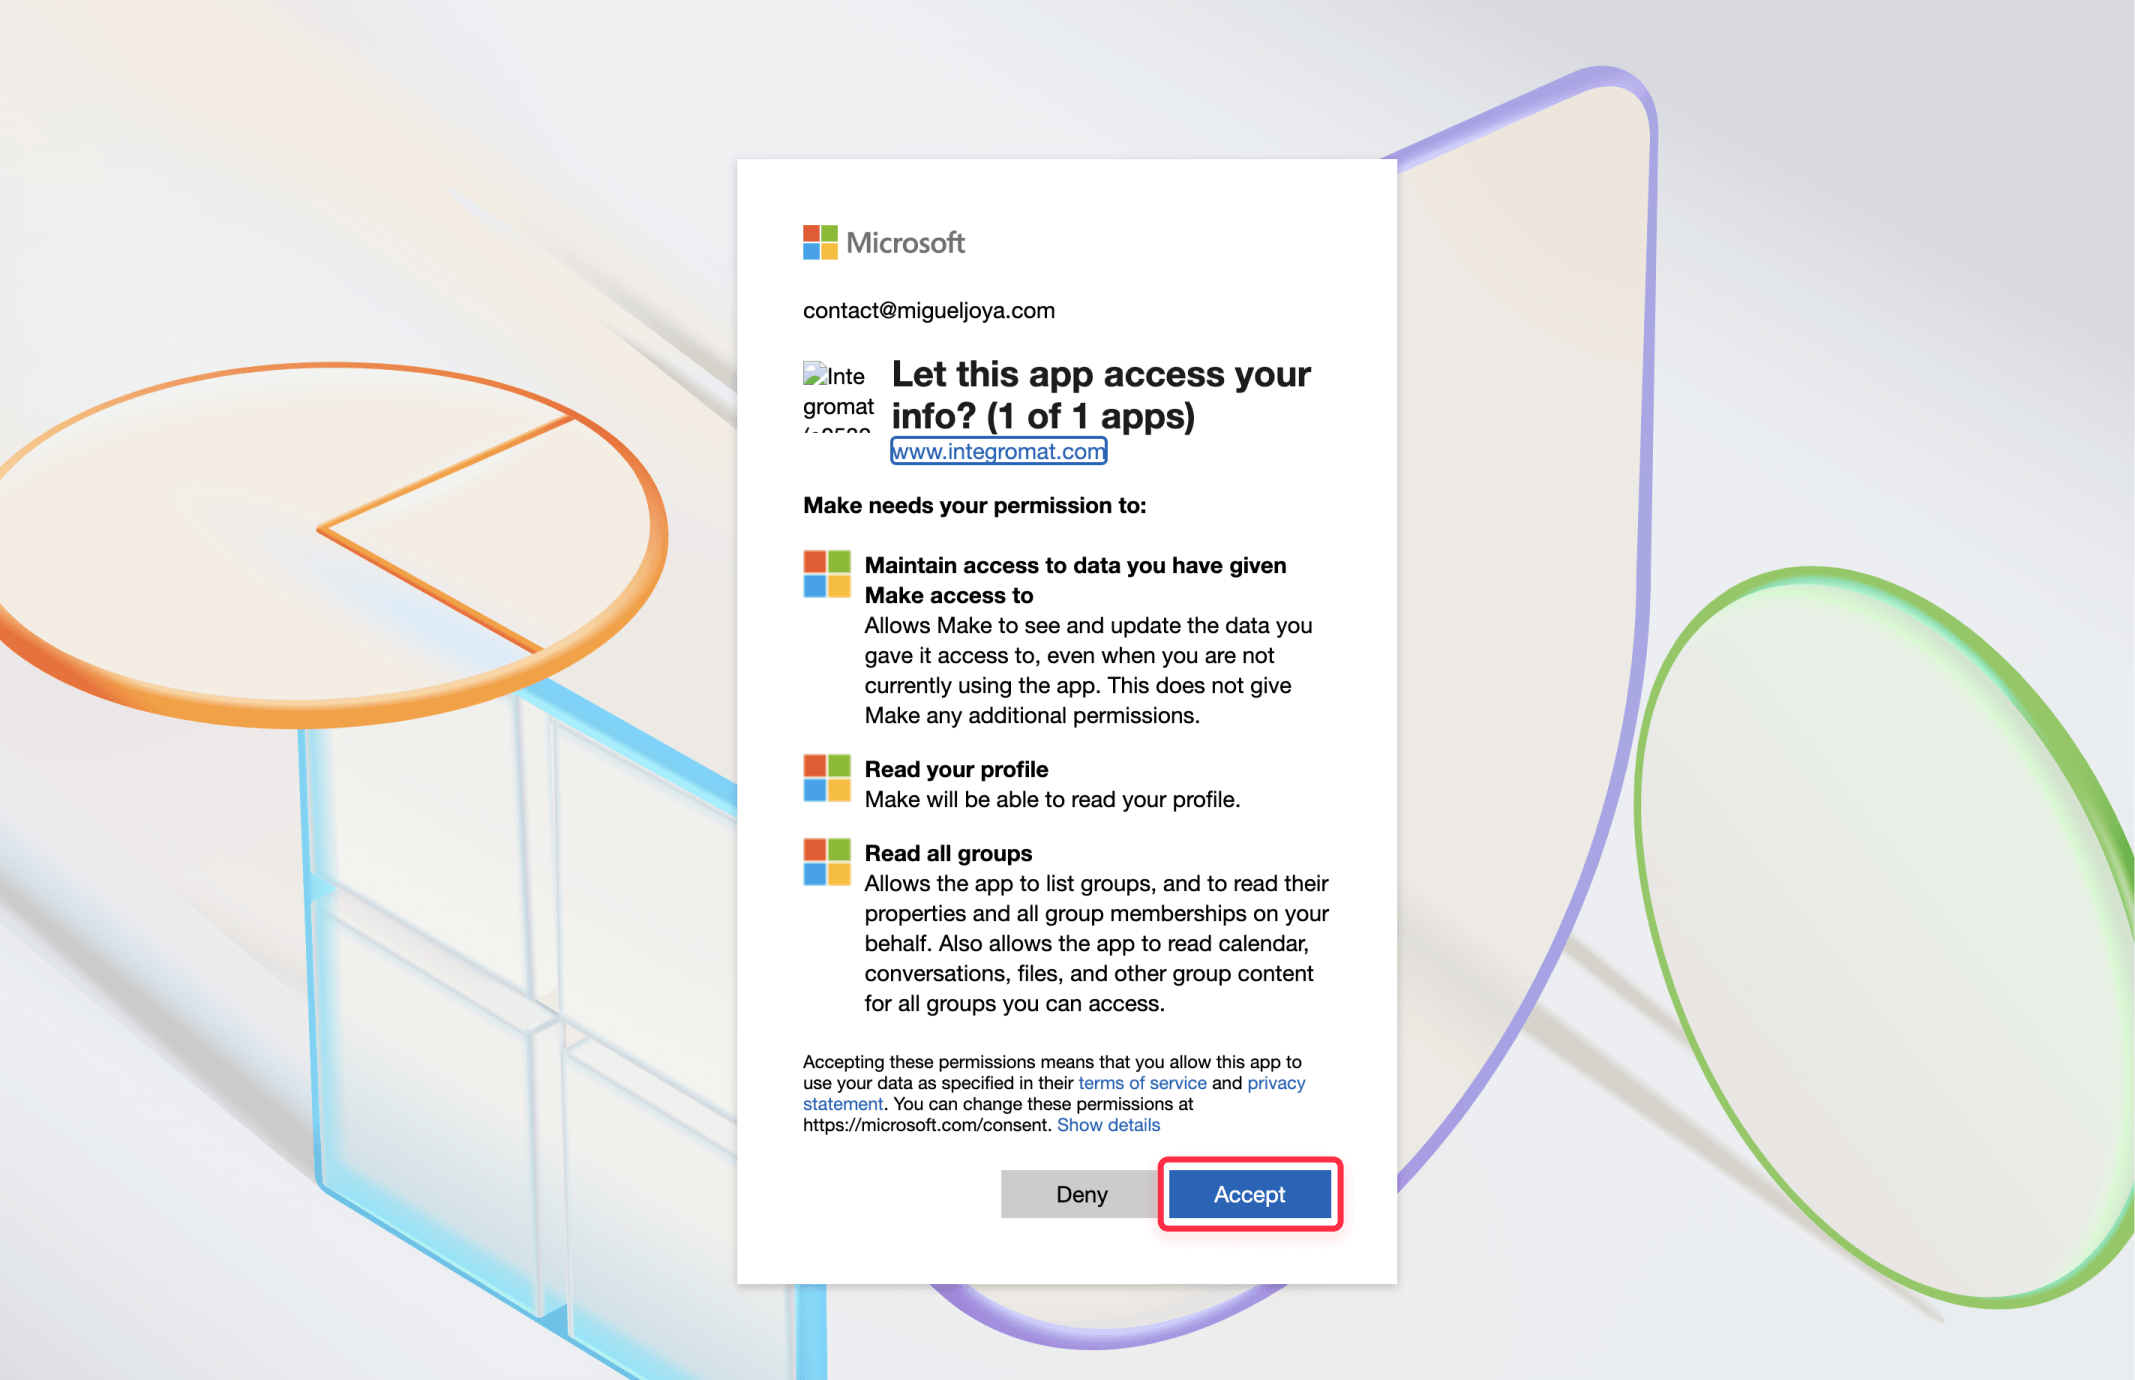
Step 6: Configuring your Microsoft Teams connection in Make
- For Connection, click + Add to create a new Microsoft Teams connection.
- Make will redirect you to Microsoft's authorization page.
- Log in with your Microsoft 365 account if prompted.
- Select the Microsoft Teams workspace where you want to send notifications.
- Review the permissions Make is requesting and click Accept.
- You'll be redirected back to Make with your Microsoft Teams connection established.
Note: This step requires a Microsoft 365 business account, not a personal Microsoft account.
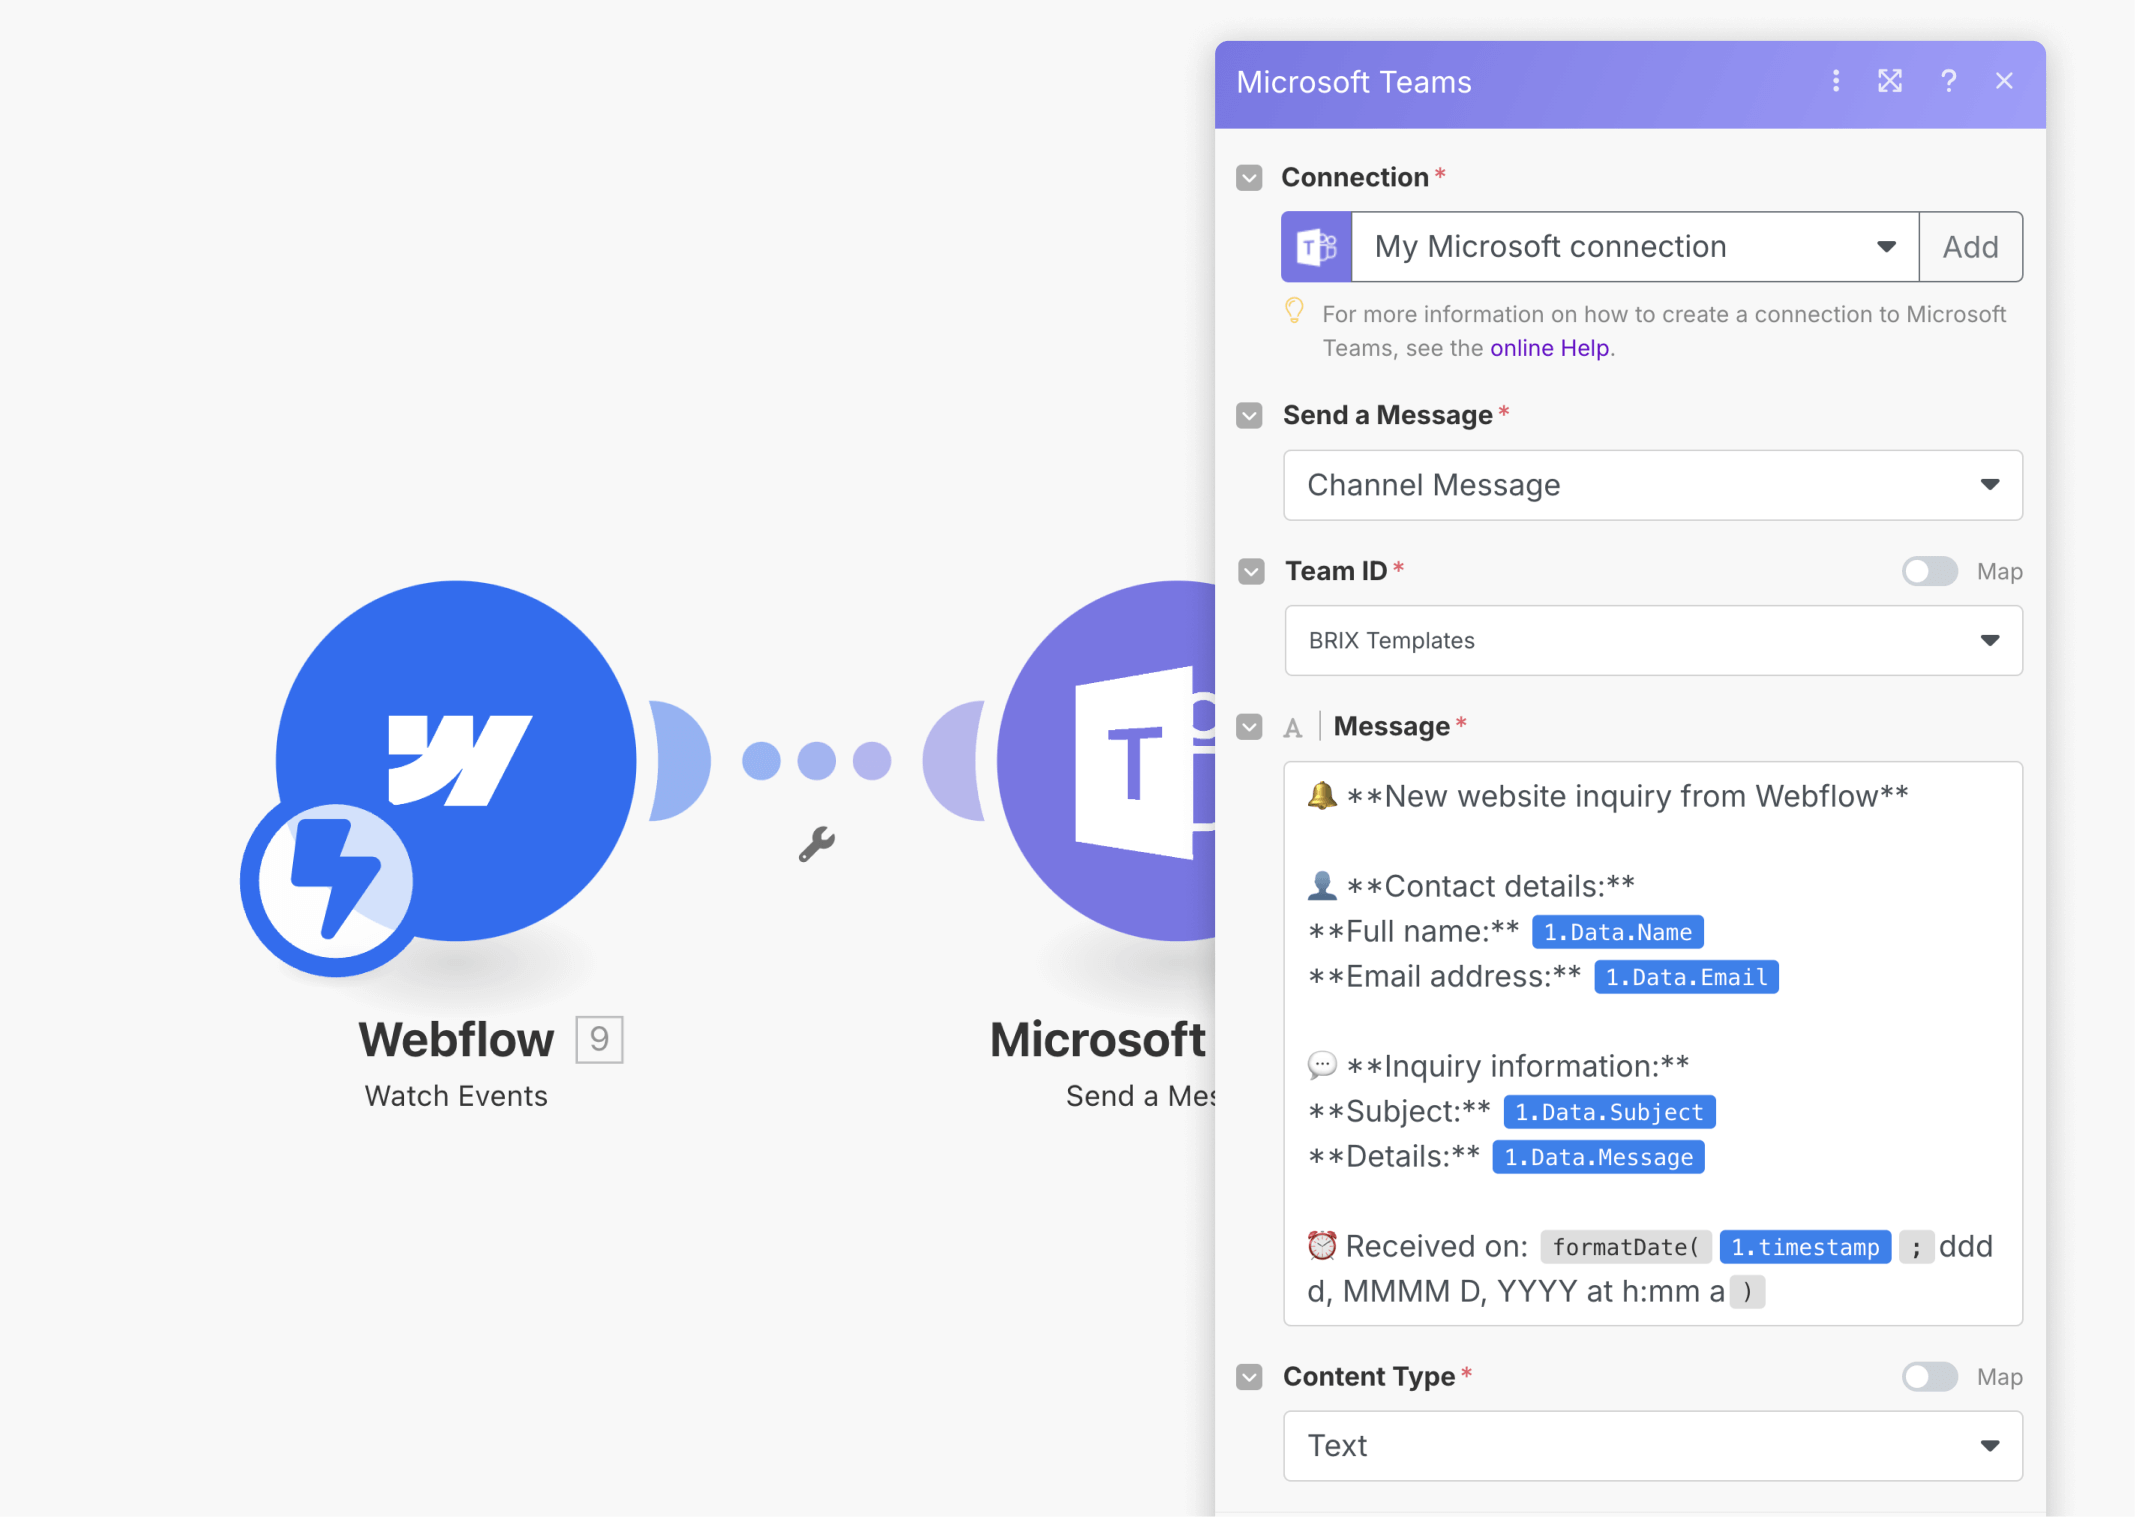
Step 7: Setting up your Microsoft Teams notification template for Webflow form data
Now you'll configure how your Teams notification will appear:
- For Team, select the team where you want notifications to appear.
- For Channel, select the specific channel within that team.
- For Message, click in the field to open the data mapping panel. This is where you'll build your notification with form data.
Here's an example of what your message could look like:
🔔 **New website inquiry from Webflow*
*👤 **Contact details:**
    **Full name:** {{1.Data.Name}}
    **Email address:** {{1.Data.Email}}
💬 **Inquiry information:**
	**Subject:** {{1.Data.Subject}}
	**Details:** {{1.Data.Message}}

⏰ Received on: {{formatDate(1.timestamp; "dddd, MMMM D, YYYY at h:mm a")}}
Notice that we're using {{1.Data.FieldName}} to dynamically insert data from the form submission. The field names should match exactly what you have in your Webflow form.
- Click OK to save your Microsoft Teams message configuration.
Step 8: Activating your Webflow form to Microsoft Teams automation
- Click Save to save your complete scenario.
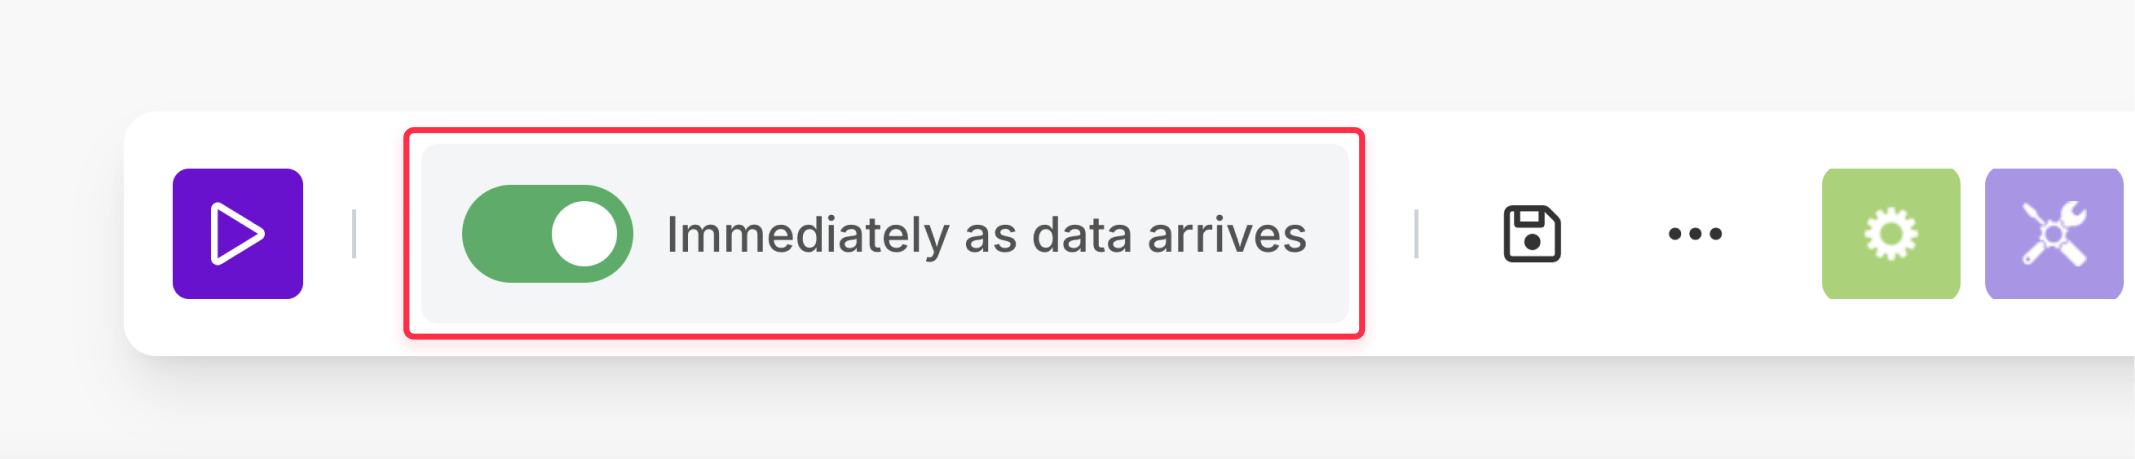
- Toggle the scheduling switch (at the bottom left, next to "Run once") to the ON position.
- The default schedule, "Immediately as data arrives" is the best option for form notifications, ensuring real-time alerts.
- Click OK to activate the scenario.
Step 9: Testing the complete Webflow form to Microsoft Teams workflow
- Go to your published Webflow site.
- Complete and submit another test form with sample data.
- Check your Microsoft Teams channel to confirm that you received the notification with the correct form data.
- If needed, return to Make to adjust the message format or other settings.
Advanced Webflow form to Microsoft Teams notification options
Once you've established the basic integration, you can enhance it with advanced features:
Routing different Webflow form types to specific Microsoft Teams channels
You can create intelligent routing for different form types or contents:
- Click the wrench icon on the connection line between your Webflow and Microsoft Teams modules.
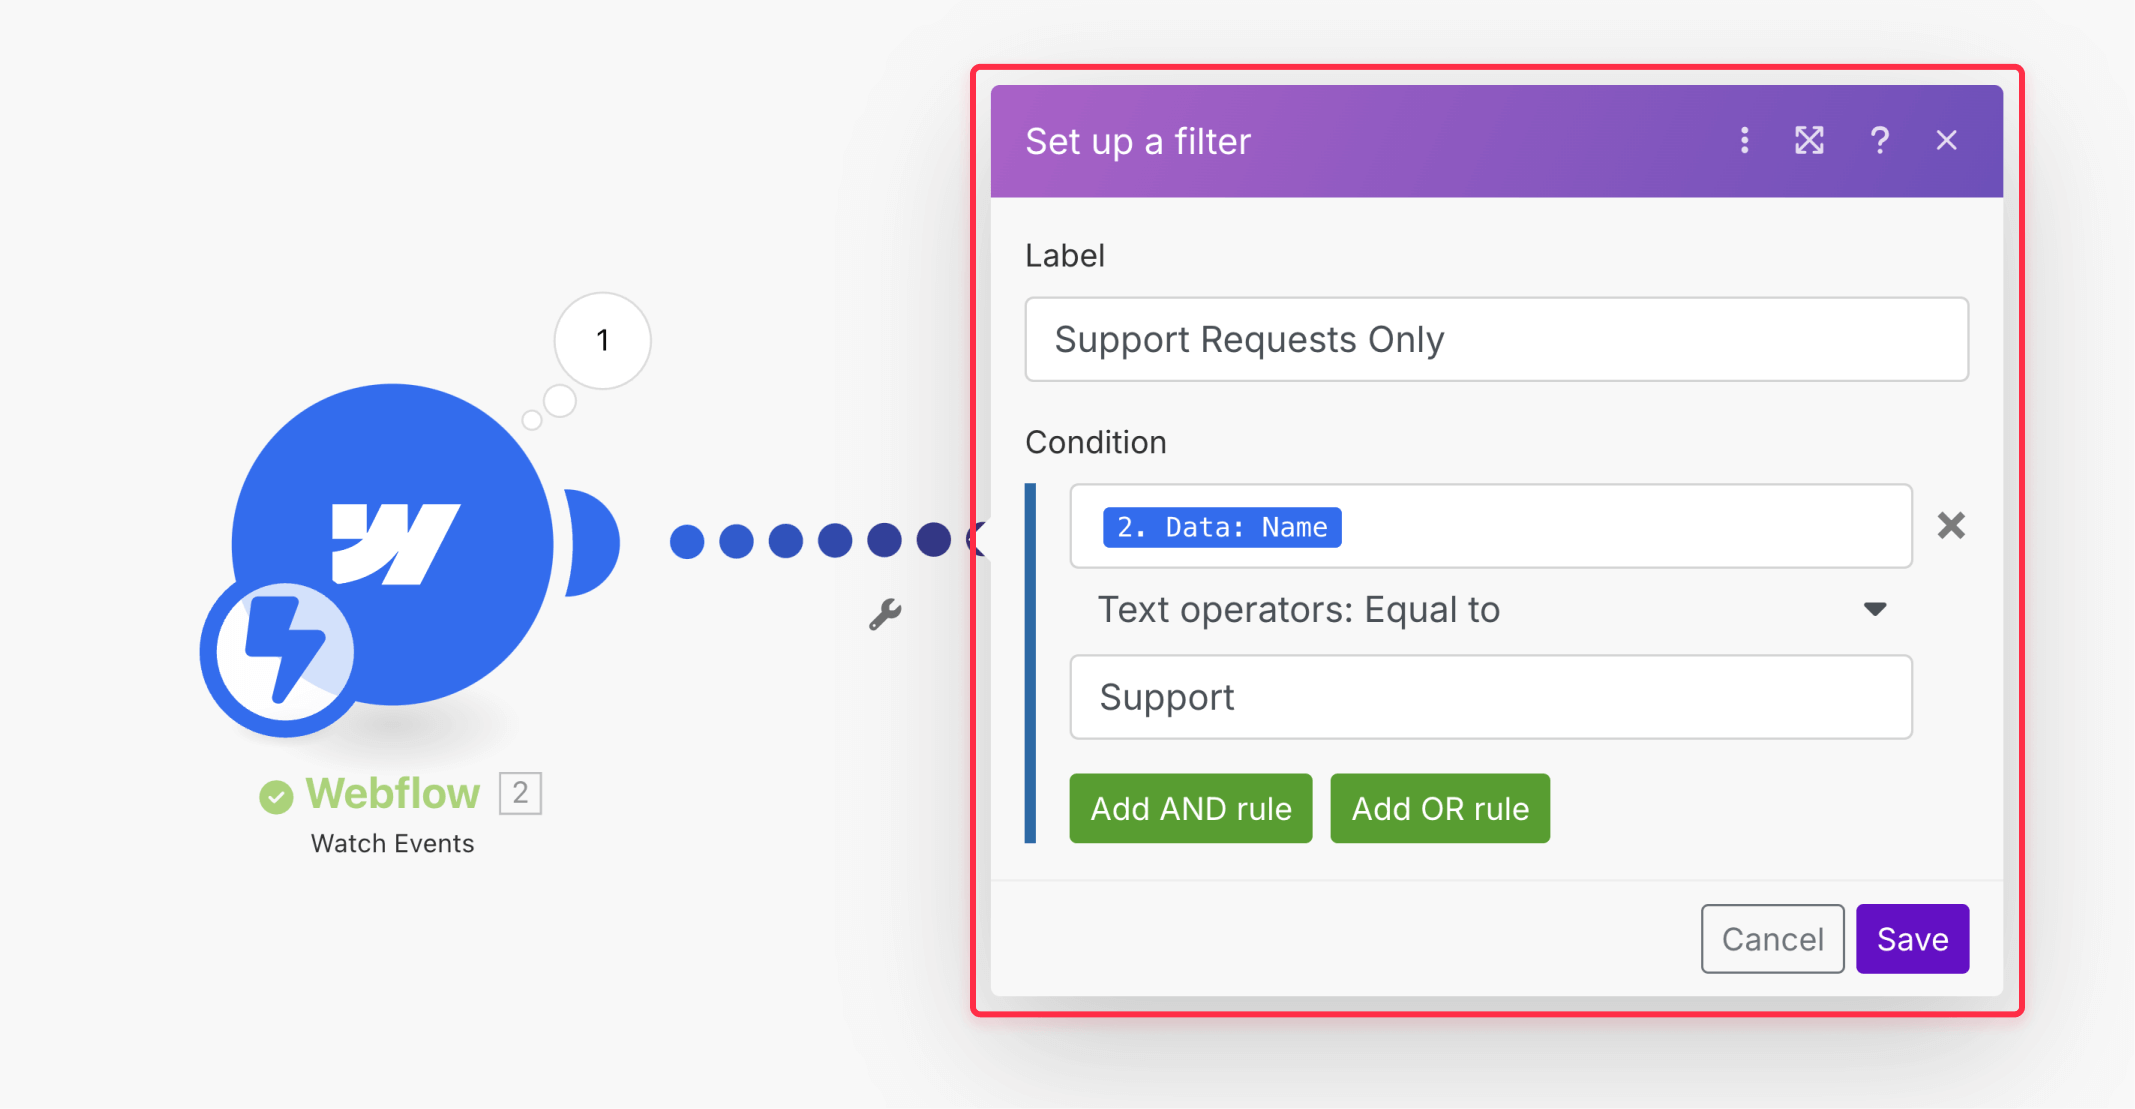
- Select "Set up a filter".
- Give the filter a descriptive label (e.g., "Sales Inquiries Only").
- Set the condition by choosing a form field (e.g., "Inquiry Type"), an operator (e.g., "Equal to"), and the value to match (e.g., "Sales").
- Click Save.
You can then add additional Microsoft Teams modules with different filters to send notifications to various channels based on form content.
Using Zapier as an alternative for Webflow form notifications in Microsoft Teams
While Make is our recommended solution, Zapier provides a viable alternative, especially if you're already using it for other automations:
- Create or log into your Zapier account.
- Click "Create Zap" to begin a new automation.
- For the trigger app, select "Webflow".
- Choose "New Form Submission" as the trigger event.
- Connect your Webflow account when prompted.
- Select your Webflow site and form from the dropdown options.
- Test the trigger to ensure Zapier can detect your form submissions.
- For the action app, select "Microsoft Teams".
- Choose "Send Channel Message" as the action event.
- Connect your Microsoft Teams account when prompted.
- Select the team and channel where you want to post notifications.
- Configure the message content using the available form fields from Webflow.
- Test and publish your Zap.
The primary limitation with Zapier's free plan is the 100 tasks per month cap compared to Make's 1,000 operations. For websites with higher form submission volumes, Make offers better value.
Troubleshooting common Webflow form to Microsoft Teams integration issues
- Webflow form submissions not triggering the automation: Ensure your Webflow site is published after any form changes. Make and other automation platforms can only detect forms on published sites.
- Make not detecting Webflow form submissions: Try clicking "Run once" in Make before submitting your test form to put Make into active listening mode.
- Missing Webflow form fields in Microsoft Teams notifications: Verify that the field names in your Teams message template exactly match your Webflow form field names, including capitalization.
- Microsoft Teams connection errors: Confirm you're using a Microsoft 365 business account, not a personal Microsoft account. Some business accounts may require administrator approval for integrations.
- Message size limit exceeded: Microsoft Teams has an approximate 28 KB limit for messages. If your form collects large amounts of data, consider including only the most important fields in the notification.
- Microsoft Teams notifications not appearing in expected channel: Double-check that you've selected the correct team and channel names in Make. Team and channel names are case-sensitive.
- Webflow form data not properly formatted in Teams message: For basic formatting issues, ensure you're using proper Markdown syntax in your message template.
Conclusion
Connecting your Webflow forms to Microsoft Teams creates a seamless communication flow that ensures your team never misses important form submissions. With real-time notifications delivered directly to your team's collaboration hub, you'll be able to respond faster to leads, support requests, and other important form submissions.
The Make integration offers an exceptional balance of functionality, reliability, and affordability for most Webflow sites. While Zapier and other platforms provide similar capabilities, Make's generous free tier and intuitive interface make it our top recommendation for this integration.
Need assistance with more complex Webflow integrations or custom solutions? Our nocode Webflow agency specializes in creating tailored workflows that enhance your website's functionality and your team's efficiency.


Join readers commenting on this post!