
You've built a beautiful Framer site with lead capture forms. Potential customers are filling them out. But you can't accurately track which forms convert, which traffic sources drive leads, or measure your true ROI.
Framer's Advanced Analytics can help, but it uses event-based pricing. The free tier covers around 25k events per month, after which paid tiers start at roughly $50/month and up depending on your volume.
The alternative? Google Tag Manager + GA4, which is free for the vast majority of Framer sites. The standard version of GA4 has no per-event fees and typically remains free even at very high traffic levels. Only extremely large enterprises with massive data needs would potentially require GA4 360, which is a paid product.
This guide covers two methods to track Framer form submissions with Google Tag Manager and GA4:
Method 1: Thank You pages (Simple) — Best for small Framer sites with 1–3 forms where you just need to count conversions. Setup takes 15–20 minutes and requires no code. Choose this if you're comfortable redirecting users to a Thank You page after submission.
Method 2: Custom listener (Advanced) — Best for agencies, Framer sites with multiple forms on the same page, or anyone who needs granular tracking without redirects. Setup takes 30–45 minutes and involves pasting JavaScript into GTM. Choose this if you use success messages instead of redirects, need to differentiate multiple forms on the same page, or plan to set up Google Ads Enhanced Conversions later.
If you're not sure which to choose, start with Method 1. You can always upgrade to Method 2 later if you hit its limitations.
Why form tracking matters for Framer sites
Tracking form submissions gives you visibility into what's actually driving leads on your Framer site, not just traffic. Here's what proper form tracking enables:
Campaign optimization: See which Google Ads campaigns, Facebook ads, or email campaigns actually generate form submissions instead of just clicks. Stop spending budget on traffic sources that don't convert.
Form performance analysis: Identify which forms convert best and which ones users abandon. Test different form placements, copy, and field configurations based on real conversion data.
Multi-channel attribution: Understand the full customer journey across organic search, paid ads, social media, and direct traffic. Know which channels assist conversions even if they don't get the last click.
Google Ads optimization: Import form submissions as conversions into Google Ads to enable Smart Bidding strategies like Target CPA and Maximize Conversions. Let Google's algorithms optimize toward actual leads instead of just clicks.
Lead quality assessment: Track which traffic sources and landing pages generate the most qualified leads by analyzing form submission patterns alongside your CRM data.
ROI calculation: Calculate true cost per lead and return on ad spend by connecting your marketing costs to actual form submissions in GA4.
Your tracking options for Framer forms
You have two main options for tracking forms on Framer sites: Framer's Advanced Analytics or Google Tag Manager with GA4. Here's how they compare:
Framer Advanced Analytics gives you built-in event tracking directly in the Framer Editor with zero code required. You get visual insights about form submissions, button clicks, and user behavior without leaving Framer's interface. The free tier covers roughly 25k events per month, with paid tiers starting around $50/month and scaling up based on volume. This makes sense for teams that work primarily in Framer, have relatively low form activity, and don't need deep integration with Google's advertising and analytics ecosystem.
Google Tag Manager + GA4 provides enterprise-grade tracking and unlimited form events at no cost for the vast majority of sites. You get deeper integration with Google Ads for conversion import and Smart Bidding, the ability to create complex custom explorations in GA4, cross-domain tracking for multi-site setups, and compatibility with your broader marketing stack including BigQuery, Looker Studio, and third-party tools. The tradeoff is a more technical setup that requires understanding GTM concepts like tags, triggers, and the dataLayer.
Many teams use both: Framer Advanced Analytics for quick in-editor insights about overall engagement, and GTM + GA4 for detailed conversion tracking, Google Ads optimization, and reporting. The two systems can run side by side without conflicts.
Prerequisites for tracking Framer forms with GTM
Before starting either method, ensure you have:
- A GA4 property with your Measurement ID (starts with G-)
- A GTM container installed on your Framer site
- A GA4 base tag in GTM that fires on all pages
- At least one published Framer form on your site
If you haven't set up GTM or GA4 on Framer yet, check out Framer's official guides on how to install Google Tag Manager and how to set up Google Analytics 4.
Quick verification: is GA4 tracking your Framer site?
Before tracking forms, confirm that basic GA4 tracking works on your Framer site:
- In GTM, click Preview to enter debug mode
- Enter your published Framer site URL and click Connect
- Once connected, look for a tag named "Google Tag" or "GA4 Configuration" in the Tags Fired section
- Verify it fires on the Container Loaded event
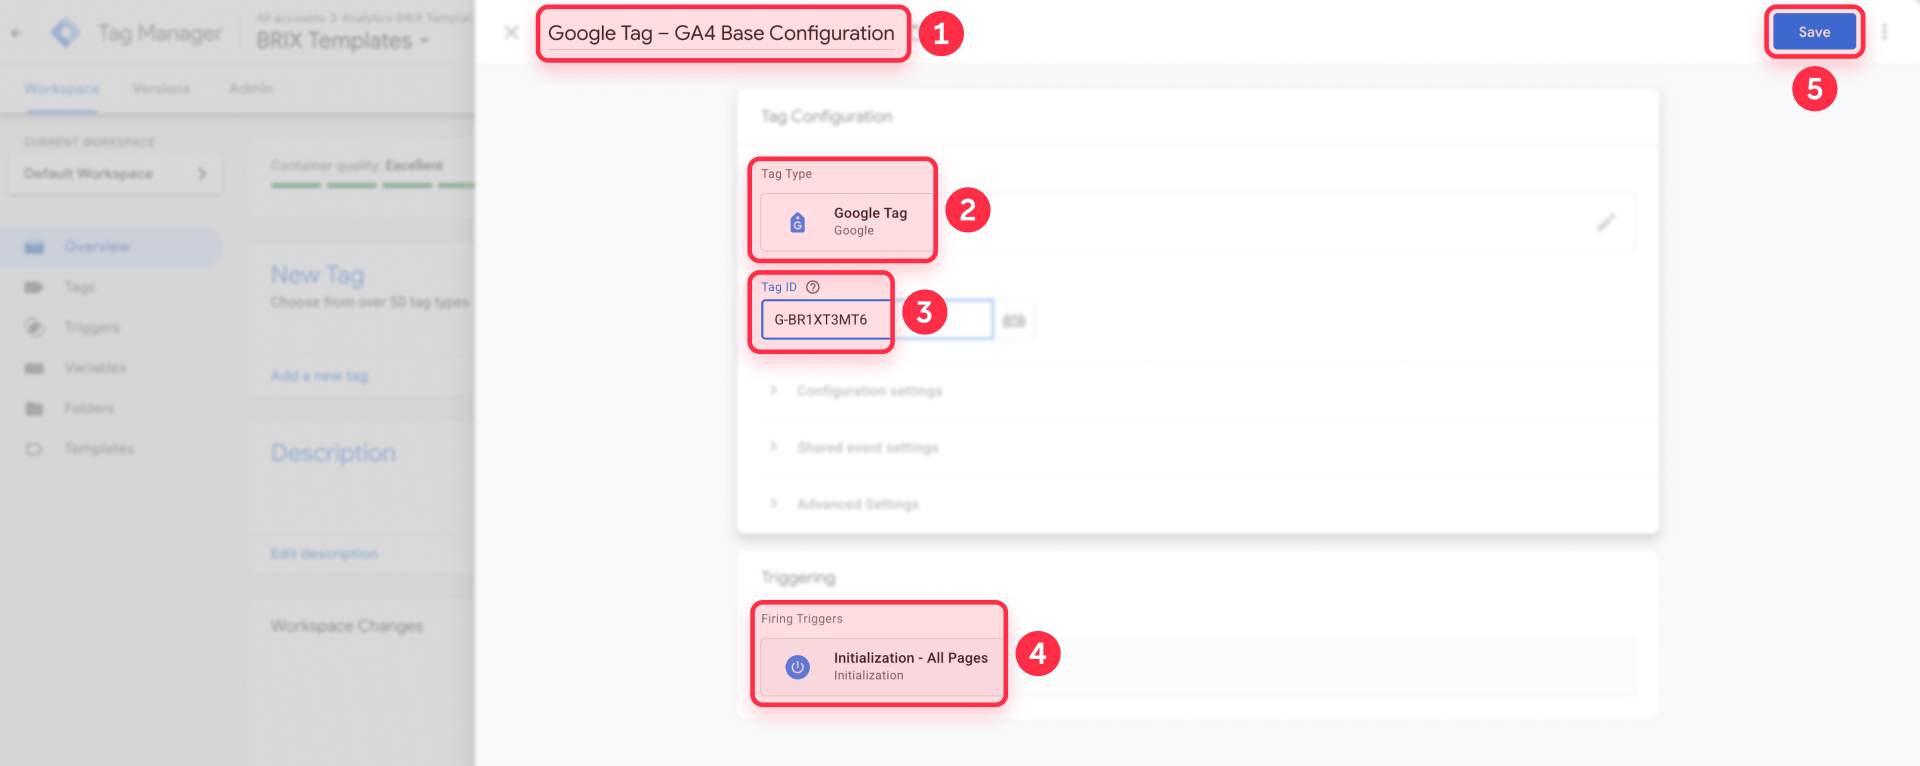
If you don't see a GA4 tag firing, create one now:
- In GTM, go to Tags and click New
- Select Google Tag as the tag type
- Enter your Measurement ID (G-XXXXXXXXXX)
- Set the trigger to All Pages (Optionally, for earlier loading you can use the Initialization – All pages trigger for the GA4 base tag, which follows Framer's own recommendation for GTM setup.)
- Save and publish your container
Important: disable Enhanced Measurement form tracking in GA4
GA4 includes an automatic form tracking feature called Enhanced Measurement. While convenient, it creates conflicts with custom form tracking and can cause double-counting or inaccurate data on Framer sites.
Here's why GA4's automatic form tracking doesn't work well with Framer:
Unreliable detection: GA4's Enhanced Measurement looks for traditional HTML form elements and native browser form submission events. Framer forms are React components that handle submissions through JavaScript, which means GA4 often misses them entirely or captures incomplete data.
No form identification: When Enhanced Measurement does catch a Framer form submission, it can't distinguish between different forms. You'll see generic "form" events without knowing which specific form was submitted.
Double-counting risk: If you implement custom tracking while Enhanced Measurement is enabled, you might count the same submission twice—once from Enhanced Measurement and once from your custom implementation.
Turn off Enhanced Measurement's form tracking before implementing either method in this guide:
- In GA4, go to Admin → Data streams
- Click on your web stream
- Click the gear icon next to Enhanced measurement
- Scroll down to Form interactions and toggle it off
- Click Save
This disables only automatic form tracking. Other Enhanced Measurement features like scroll tracking, outbound clicks, and video engagement remain active.
Method 1: Track Framer forms with Thank You page redirects (Simple)
This method uses Framer's built-in redirect feature to send users to a Thank You page after form submission. GA4 tracks the page view as a conversion. No custom code required.
When Method 1 works best for Framer sites
Method 1 is ideal if your Framer site has:
- Small number of forms (1–3 forms total across your site)
- Unique Thank You pages for each form type that users can be redirected to
- Simple conversion goals where you just need to count submissions without detailed form-level analysis
- No preference for on-page success messages (you're comfortable with redirects)
Choose Method 2 instead if you have multiple forms on the same page that would all redirect to the same Thank You page, need to show success messages without redirecting users, or want detailed form-level data for each submission.
Step 1: Create Thank You pages in Framer
Create a separate Thank You page for each form type you want to track.
In the Framer Editor, create new pages with descriptive slugs:
- /thank-you-contact for your contact form
- /thank-you-demo for demo requests
- /thank-you-newsletter for newsletter signups
Add a simple confirmation message to each page thanking users for their submission.
Important: In each page's SEO settings, add a noindex meta tag or configure your robots settings to prevent Google from indexing these pages. You don't want Thank You pages appearing in search results. Users should only reach these pages through form submissions, not organic search.
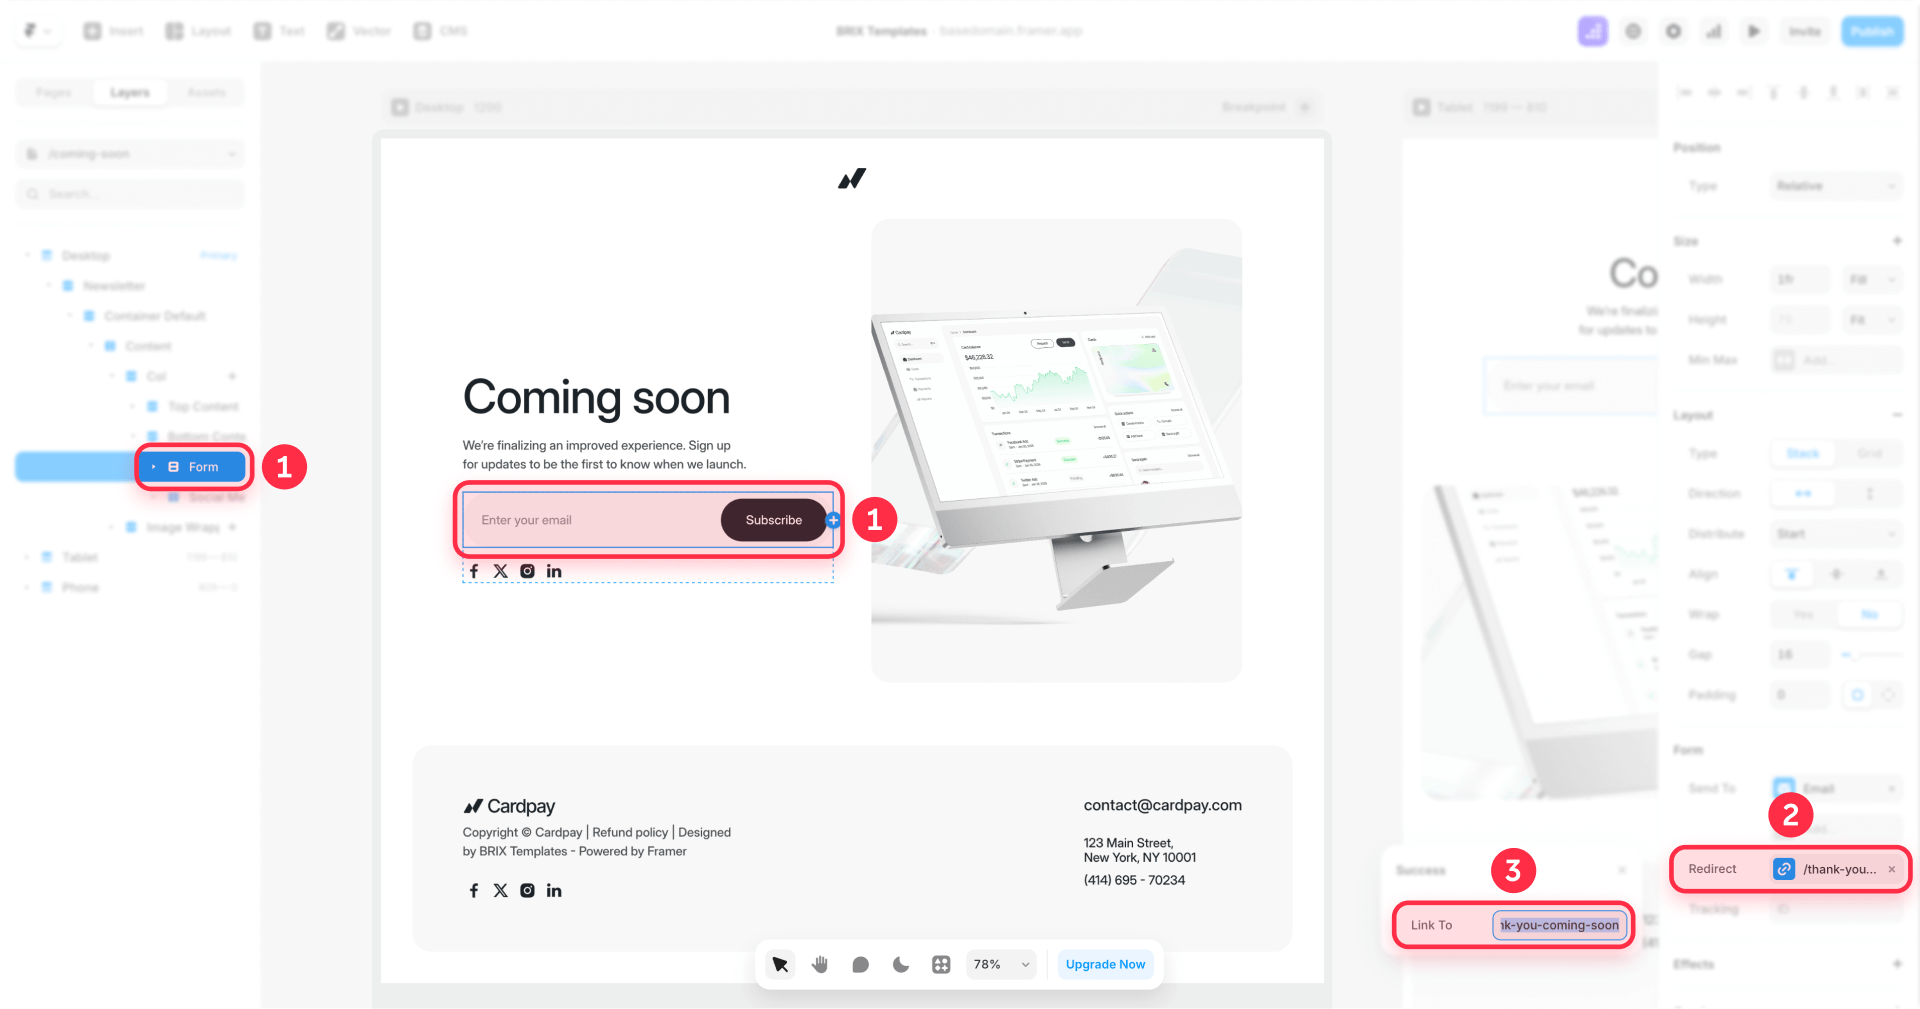
Step 2: Configure form redirects in Framer
For each form on your Framer site:
- Select the form component in the Framer Editor
- In the right sidebar, find the form settings (may be under Properties or Form Settings depending on your Framer version)
- Look for the Redirect URL or Success Redirect field
- Enter the path to the corresponding Thank You page (for example, /thank-you-contact)
- Publish your site
Test each form to confirm it redirects to the correct Thank You page after submission. Fill out the form on your published Framer site (not preview mode) and verify the redirect works as expected.
Step 3: Create Thank You page triggers in GTM
For each Thank You page, create a trigger that fires when users visit that page.
- In GTM, go to Triggers and click New
- Name it something clear like Pageview – Thank You Contact
- Select Custom Event as the trigger type
- In Event name, enter page_view
- Choose Some Custom Events
- Set the condition: Page Path contains /thank-you-contact
- Save the trigger
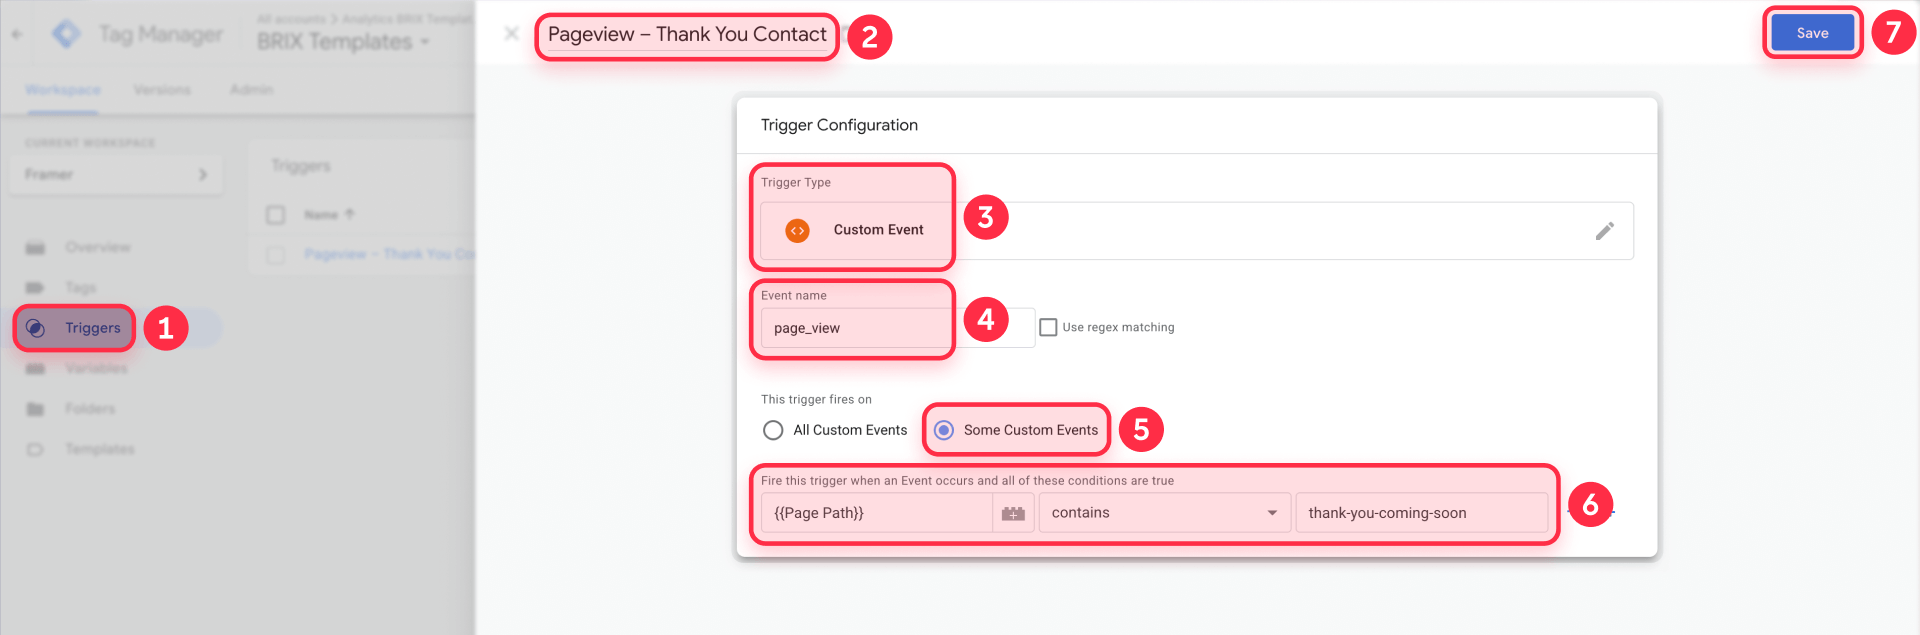
This listens for the page_view event that Framer sends when it navigates to your Thank You page (even when the site behaves like a single-page app).
Step 4: Create the GA4 event tag in GTM
Now create the GA4 event tag that fires when users reach your Thank You page:
- Go to Tags and click New
- Name it GA4 Event – Contact Form Submission
- Select Google Analytics: GA4 Event as the tag type
- Enter your Measurement ID (or select your GA4 Configuration tag)
- Set the Event Name to form_submission_contact
- Optionally add event parameters:
- Parameter name: form_type — Value: contact
- Parameter name: page_location — Value: select the built-in Page URL variable
- In the Triggering section, select your Thank You page trigger
- Save the tag
Repeat this process for each form type, creating a separate tag with a descriptive event name for each Thank You page.
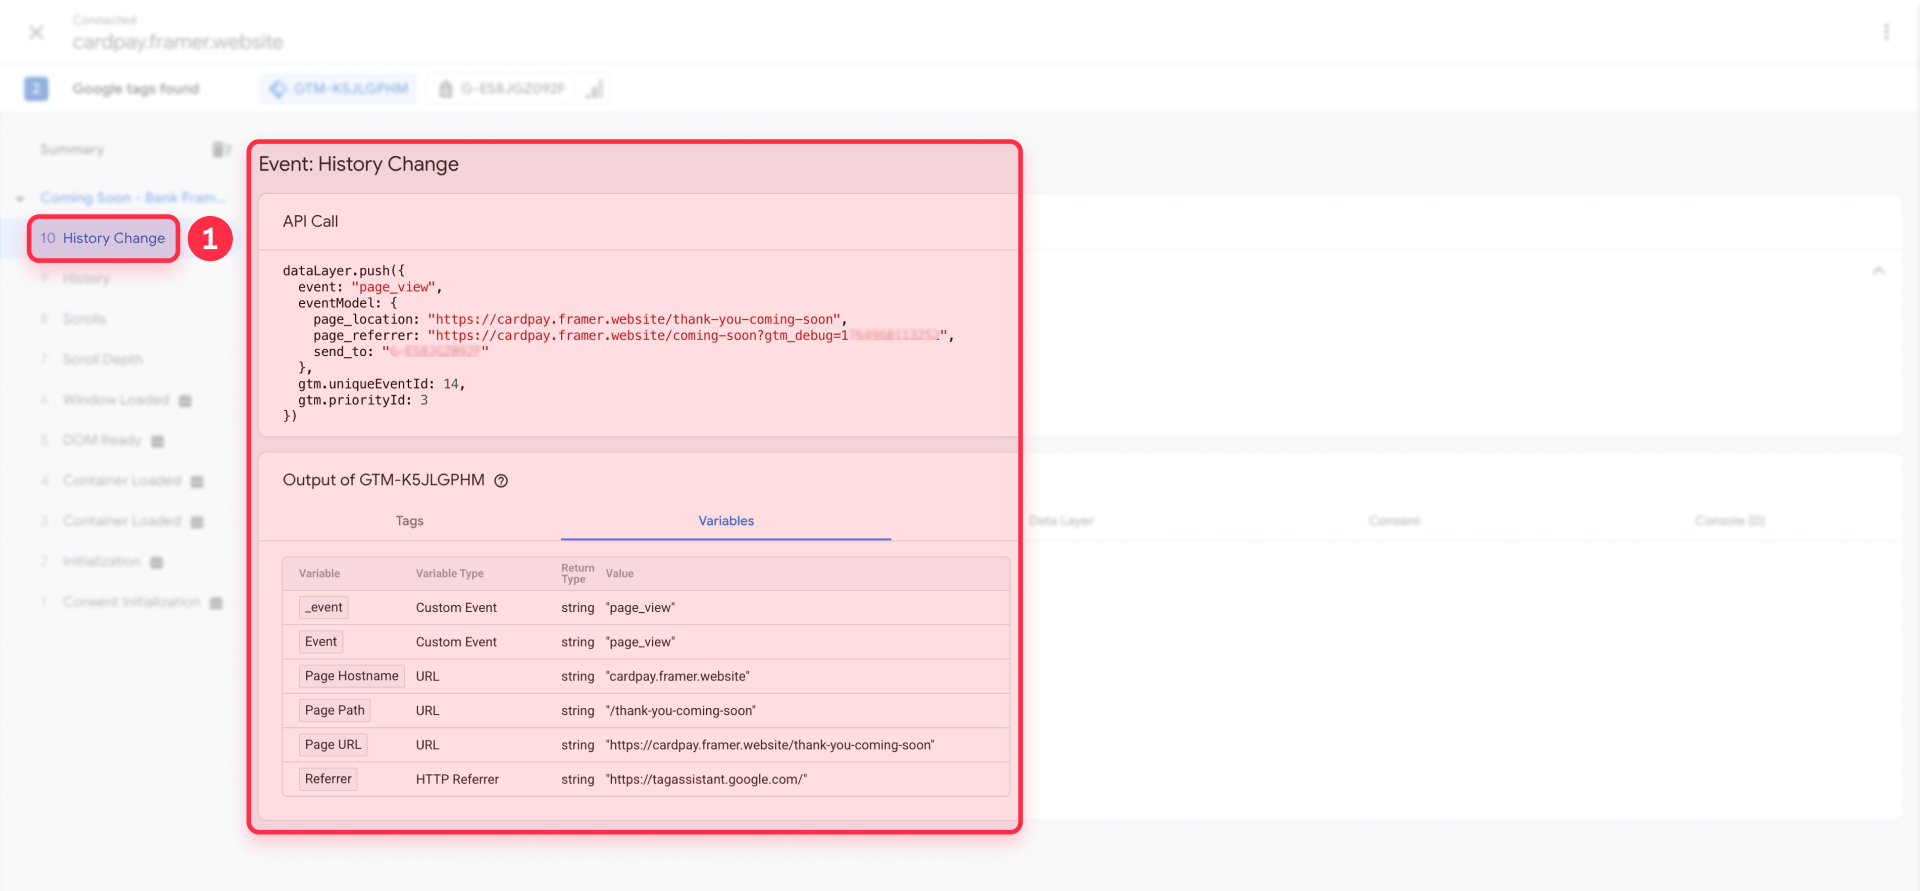
Step 5: Test and publish your Framer form tracking
Test your implementation before publishing:
- Click Preview in GTM to enter debug mode
- Open your published Framer site (not Framer's preview mode—redirects only work on the published site)
- Fill out a form with test data and submit
- Verify you're redirected to the Thank You page
- In the Tag Assistant panel, confirm your GA4 event tag shows as "Fired"
Once everything works correctly, click Submit in GTM to publish your changes.
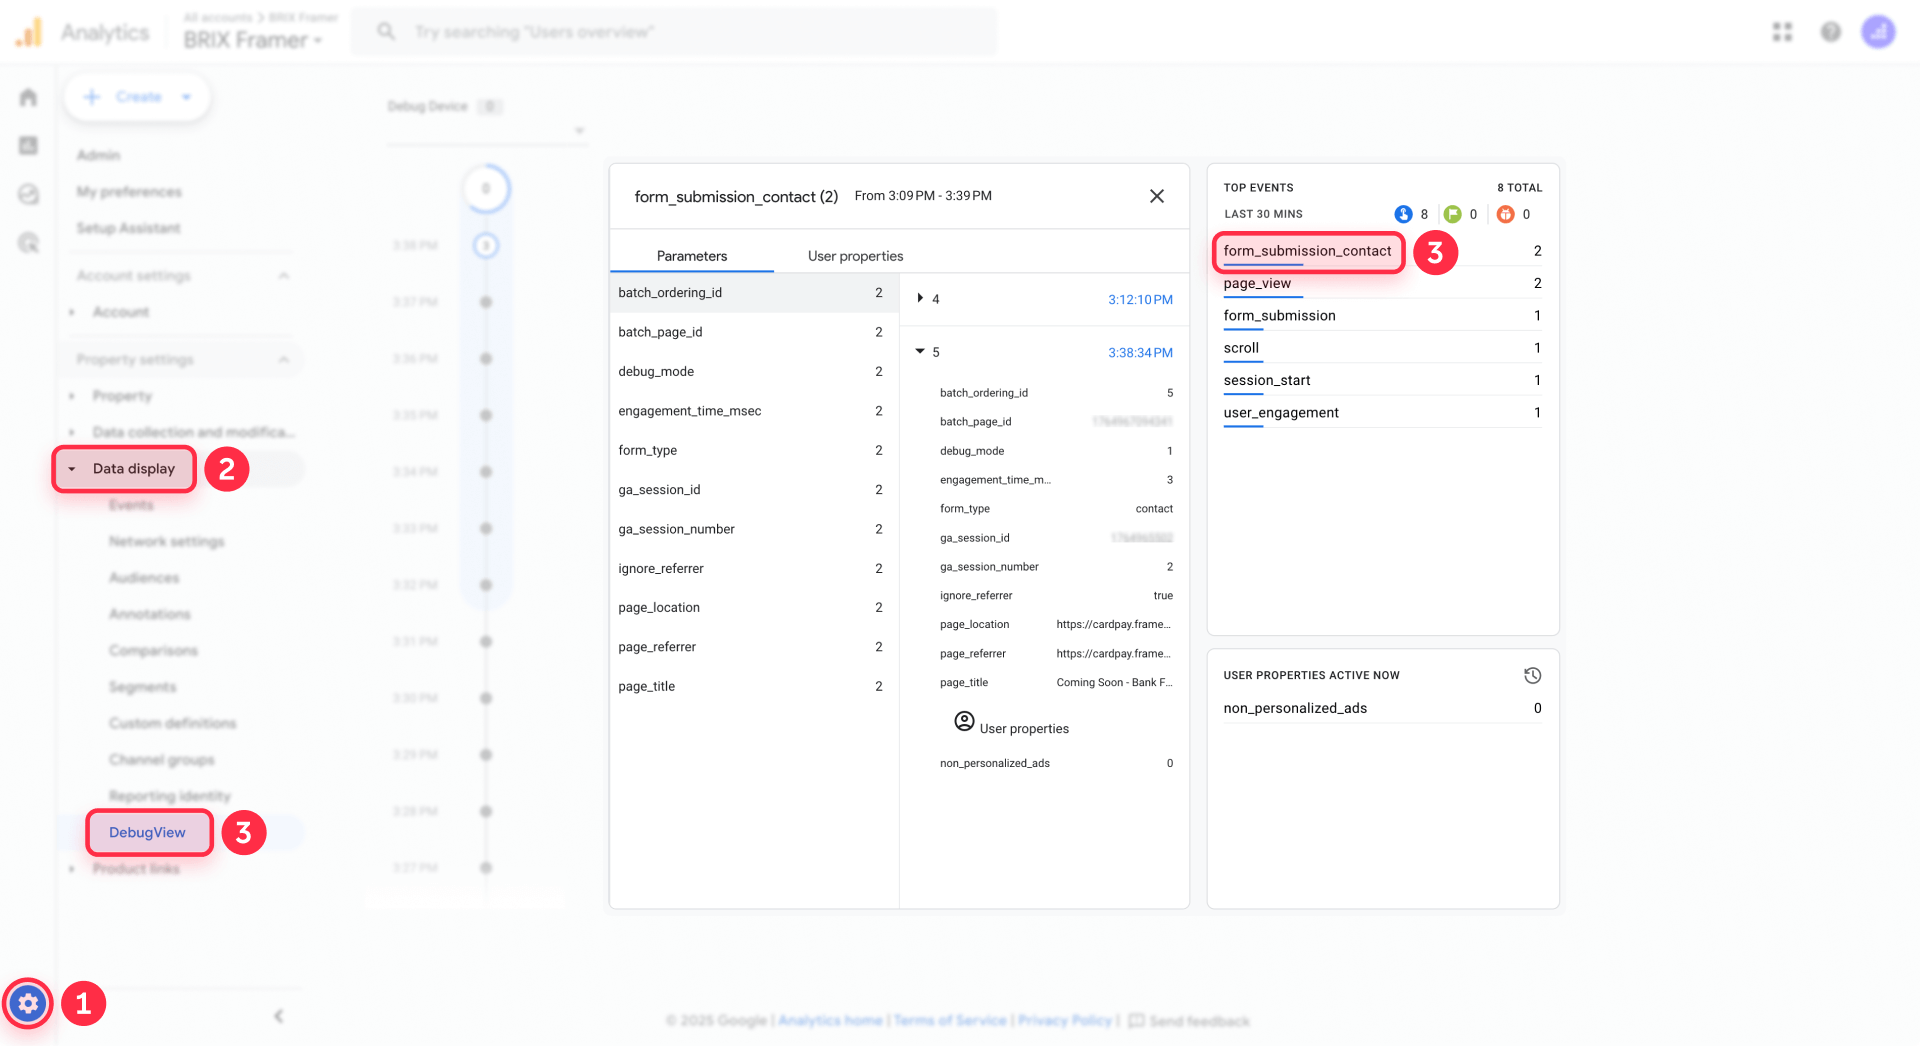
Now verify the event appears in GA4:
- In GA4, go to Admin → Data display → DebugView
- With Preview mode still active, submit another test form
- You should see your custom event (like form_submission_contact) appear in the timeline
- Click on it to verify any parameters you added are present

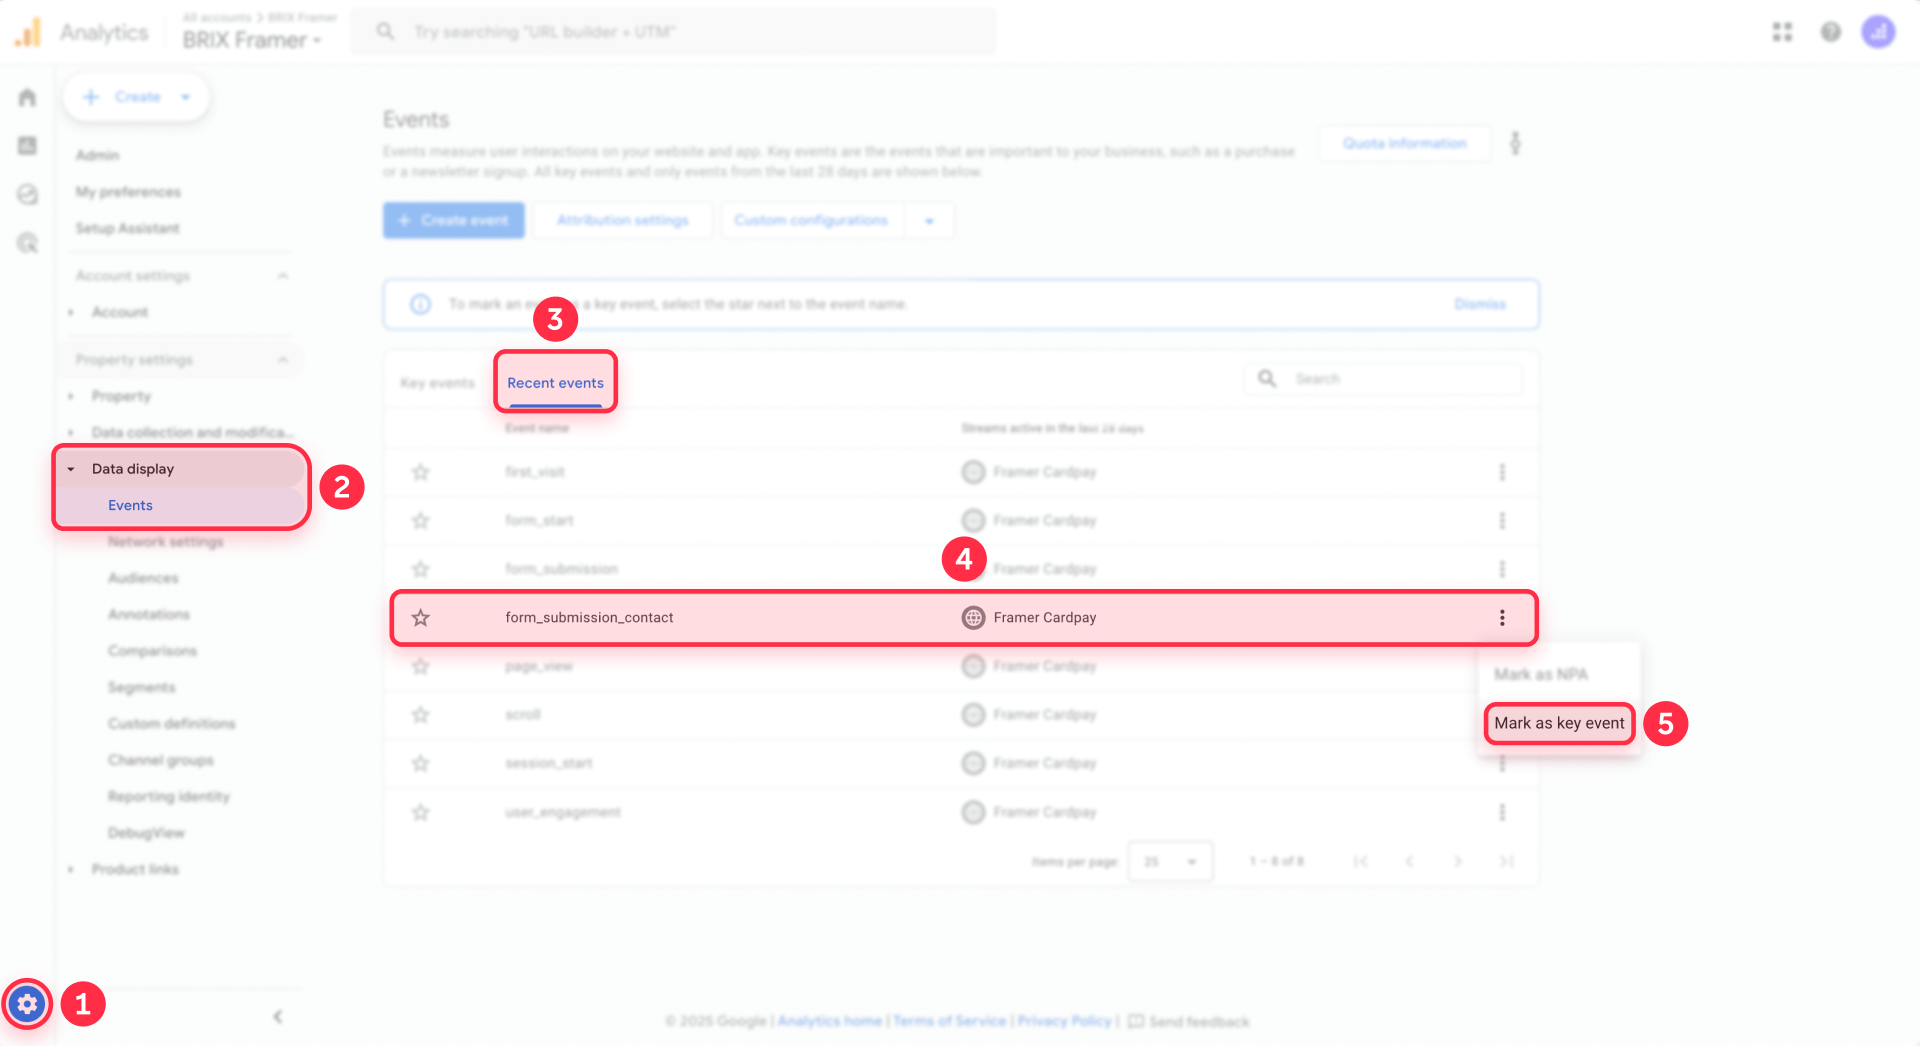
Step 6: Mark Framer form submissions as Key Events in GA4
Once your events are flowing into GA4, mark them as Key Events to use them as conversions:
- In GA4, go to Admin → Data display → Events
- Your custom event will appear here within 24–48 hours of the first submission
- Once it appears, click the toggle or star icon to mark it as a Key Event
- This enables the event to be used as a conversion in reports and imported into Google Ads
To import this conversion into Google Ads:
- Go to Google Ads
- Click Tools & Settings → Conversions → Import
- Select your GA4 property
- Check the box next to your form submission event
- Follow the prompts to complete the import
That's it for Method 1. For most small Framer sites with straightforward forms, this setup is all you need.
Limitations of Thank You page tracking in Framer
Before moving on, consider whether these limitations affect your use case:
Requires page redirects: Users must be sent to a new page after submission. If you prefer showing a success message on the same page without a redirect, this method won't work.
One conversion per Thank You page: If you have multiple different forms that redirect to the same Thank You page, GA4 can't distinguish between them. You'll see all submissions as a single conversion type.
Back button overcounting: If users click the browser back button after reaching a Thank You page and then resubmit the form, GA4 counts both submissions as separate conversions. For most sites this is rare, but it can skew data.
No form-level detail: You track page views, not actual form submissions. If users somehow reach your Thank You page without submitting a form (direct link, bookmark, etc.), it counts as a false conversion.
Difficult multi-form pages: If you have a page with multiple forms—like a contact form and a newsletter signup in the footer—both would redirect to different pages. This creates a disjointed user experience.
If any of these limitations are dealbreakers, use Method 2 instead.
Method 2: Track Framer forms with an advanced GTM listener (Custom listener)
This method uses a JavaScript listener in GTM that monitors Framer's native form events and pushes detailed data to GA4. It requires some code but provides more accurate tracking and works without redirects.
What Method 2 does for Framer form tracking
When you configure a Framer form with a Tracking ID, Framer automatically fires a custom JavaScript event called framer:formsubmit each time that form is successfully submitted.
This method adds a listener to your Framer site that:
- Monitors for the framer:formsubmit event
- Captures the form's Tracking ID and page metadata
- Pushes this data to GTM's dataLayer
- Triggers a GA4 event tag that sends the submission to GA4
The result is accurate, real-time form tracking without redirects, with full visibility into which specific form was submitted even if you have multiple forms on the same page.
Privacy and PII compliance for Framer form tracking
The listener only captures form metadata—never actual form field values.
Here's what the listener does send to GA4:
- form_id: The form's Tracking ID (like contact_form_main)
- form_url: The page URL where the form was submitted
- page_title: The page title
Here's what the listener does not send to GA4:
- Names, emails, phone numbers, addresses
- Messages or comments
- Any text users type into form fields
This is intentional. Google's Terms of Service explicitly prohibit sending personally identifiable information (PII) to GA4. Violations can result in your account being suspended and your historical data deleted. The actual form data users submit goes through Framer's native integrations to your email, Google Sheets, webhooks, or CRM—not to GA4.
What Method 2 doesn't track on Framer sites
While Method 2 handles native Framer forms reliably, it has some limitations:
Embedded third-party forms: Forms embedded via iframe (Typeform, HubSpot, Tally, Calendly, etc.) run in a separate browsing context and cannot be tracked with this listener. You'll need to use each platform's native GA4 integration or their own GTM tag.
Rare server-side errors: The listener fires when Framer's framer:formsubmit event occurs, which happens after client-side validation. If Framer's backend encounters a server error after the event fires, the event still gets tracked even though the submission technically failed. This is extremely rare in practice.
Multi-step form intermediate steps: If you build a multi-step form in Framer, the framer:formsubmit event only fires on the final submission, not intermediate steps. Track those separately if needed.
Step 1: Assign Tracking IDs to Framer forms
For Method 2 to work, each Framer form must have a unique Tracking ID configured. Without a Tracking ID, Framer won't fire the framer:formsubmit event and GTM will receive nothing.
To add Tracking IDs to your Framer forms:
- Select the form component in the Framer Editor
- In the right sidebar, look for the Tracking section or Analytics settings (location varies by Framer version)
- Enter a unique, descriptive Tracking ID for this form
- Use clear naming like contact_form_main, demo_pricing, or newsletter_footer
- Repeat for every form you want to track
- Publish your site
Important: Changes to Tracking IDs only take effect on your published Framer site, not in preview mode. Always republish after adding or modifying Tracking IDs.
Step 2: Create the Framer form listener tag in GTM
This tag contains the JavaScript that listens for Framer's framer:formsubmit event and pushes data to the dataLayer.
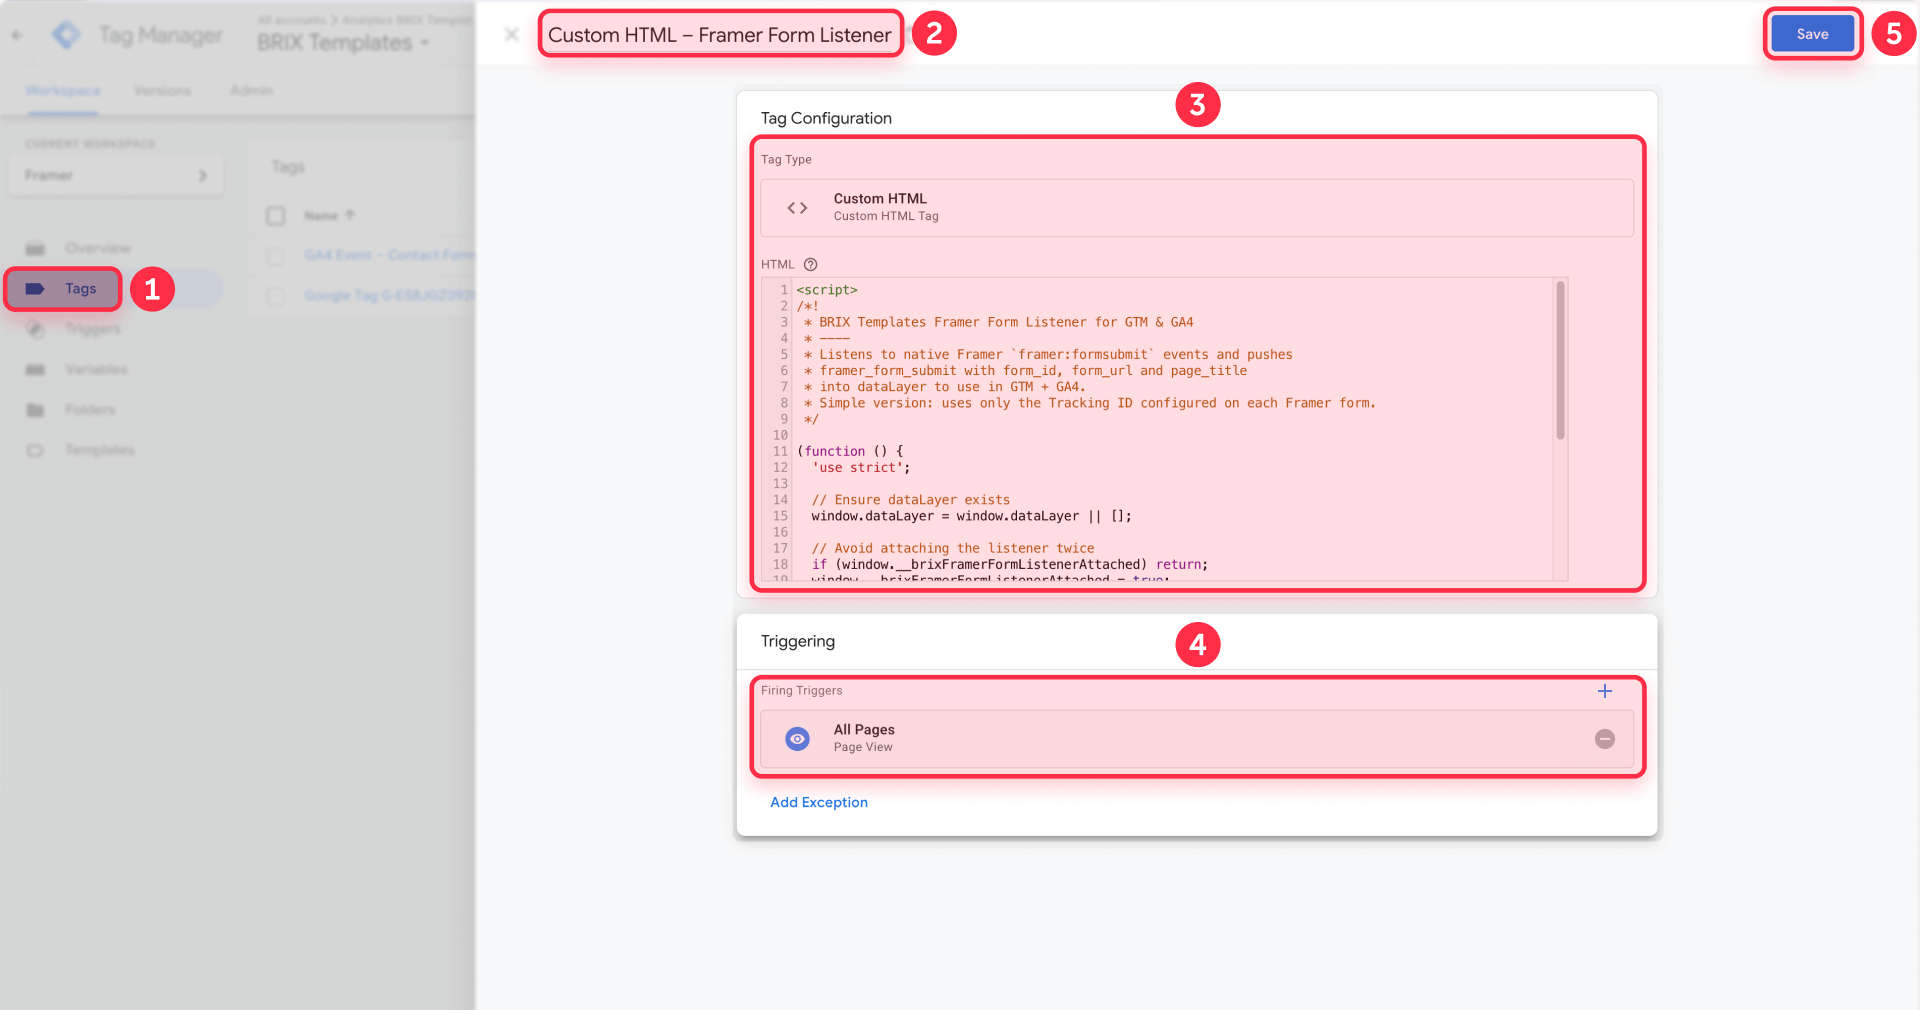
- In GTM, go to Tags and click New
- Name it Custom HTML – Framer Form Listener
- Click Tag Configuration and select Custom HTML
- Paste the following code:
<script>
/*!
 * BRIX Templates Framer Form Listener for GTM & GA4
 * ----
 * Listens to native Framer `framer:formsubmit` events and pushes
 * framer_form_submit with form_id, form_url and page_title
 * into dataLayer to use in GTM + GA4.
 * Simple version: uses only the Tracking ID configured on each Framer form.
 */

(function () {
  'use strict';

  // Ensure dataLayer exists
  window.dataLayer = window.dataLayer || [];

  // Avoid attaching the listener twice
  if (window.__brixFramerFormListenerAttached) return;
  window.__brixFramerFormListenerAttached = true;

  document.addEventListener('framer:formsubmit', function (event) {
    var details = event && event.detail ? event.detail : {};
    var trackingId = details.trackingId || 'unknown';

    window.dataLayer.push({
      event: 'framer_form_submit',
      form_id: trackingId,
      form_url: window.location.href,
      page_title: document.title || ''
    });
  });
})();
</script>
This listener runs once when the page loads and attaches an event listener that waits for the framer:formsubmit event. When it fires, the listener extracts the Tracking ID and pushes it to the dataLayer along with the current page URL and title.
- Under Triggering, select All Pages (or an equivalent early-loading trigger like DOM Ready)
- Save the tag
Step 3: Create the Custom Event trigger in GTM
This trigger fires when the listener pushes the framer_form_submit event to the dataLayer.
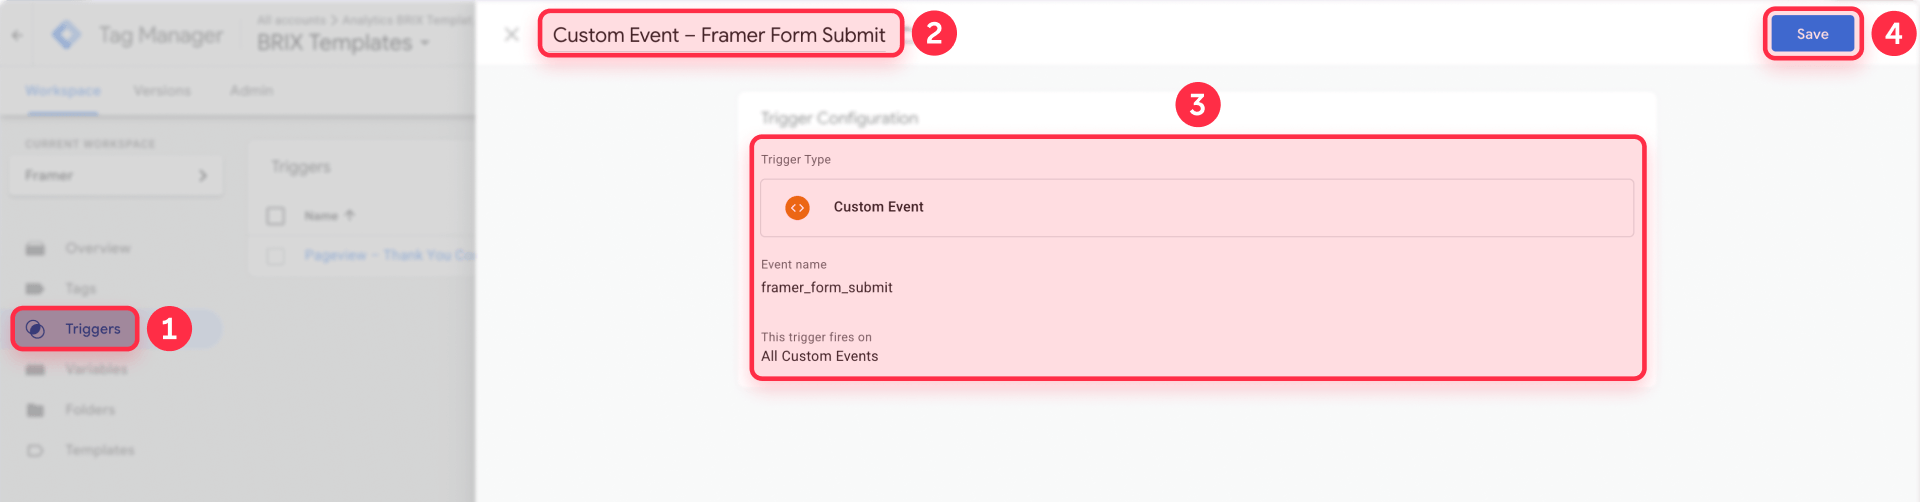
- In GTM, go to Triggers and click New
- Name it Custom Event – Framer Form Submit
- Select Custom Event as the trigger type
- For Event name, enter framer_form_submit
- Set This trigger fires on to All Custom Events
- Save the trigger
Step 4: Create Data Layer Variables for Framer form tracking
These variables extract the form data from the dataLayer so your GA4 tag can access it.
Create three Data Layer Variables:
Variable 1: form_id
- In GTM, go to Variables and click New in the User-Defined Variables section
- Name it DLV - form_id
- Click Variable Configuration and select Data Layer Variable
- For Data Layer Variable Name, enter form_id
- Keep Version 2 selected
- Save the variable
Variable 2: form_url
- Click New to create another variable
- Name it DLV - form_url
- Select Data Layer Variable as the type
- For Data Layer Variable Name, enter form_url
- Save the variable
Variable 3: page_title
- Click New to create the final variable
- Name it DLV - page_title
- Select Data Layer Variable as the type
- For Data Layer Variable Name, enter page_title
- Save the variable
Step 5: Create the GA4 Event tag for Framer form submissions
This tag sends the form submission data to GA4 whenever the framer_form_submit event is pushed into the dataLayer.
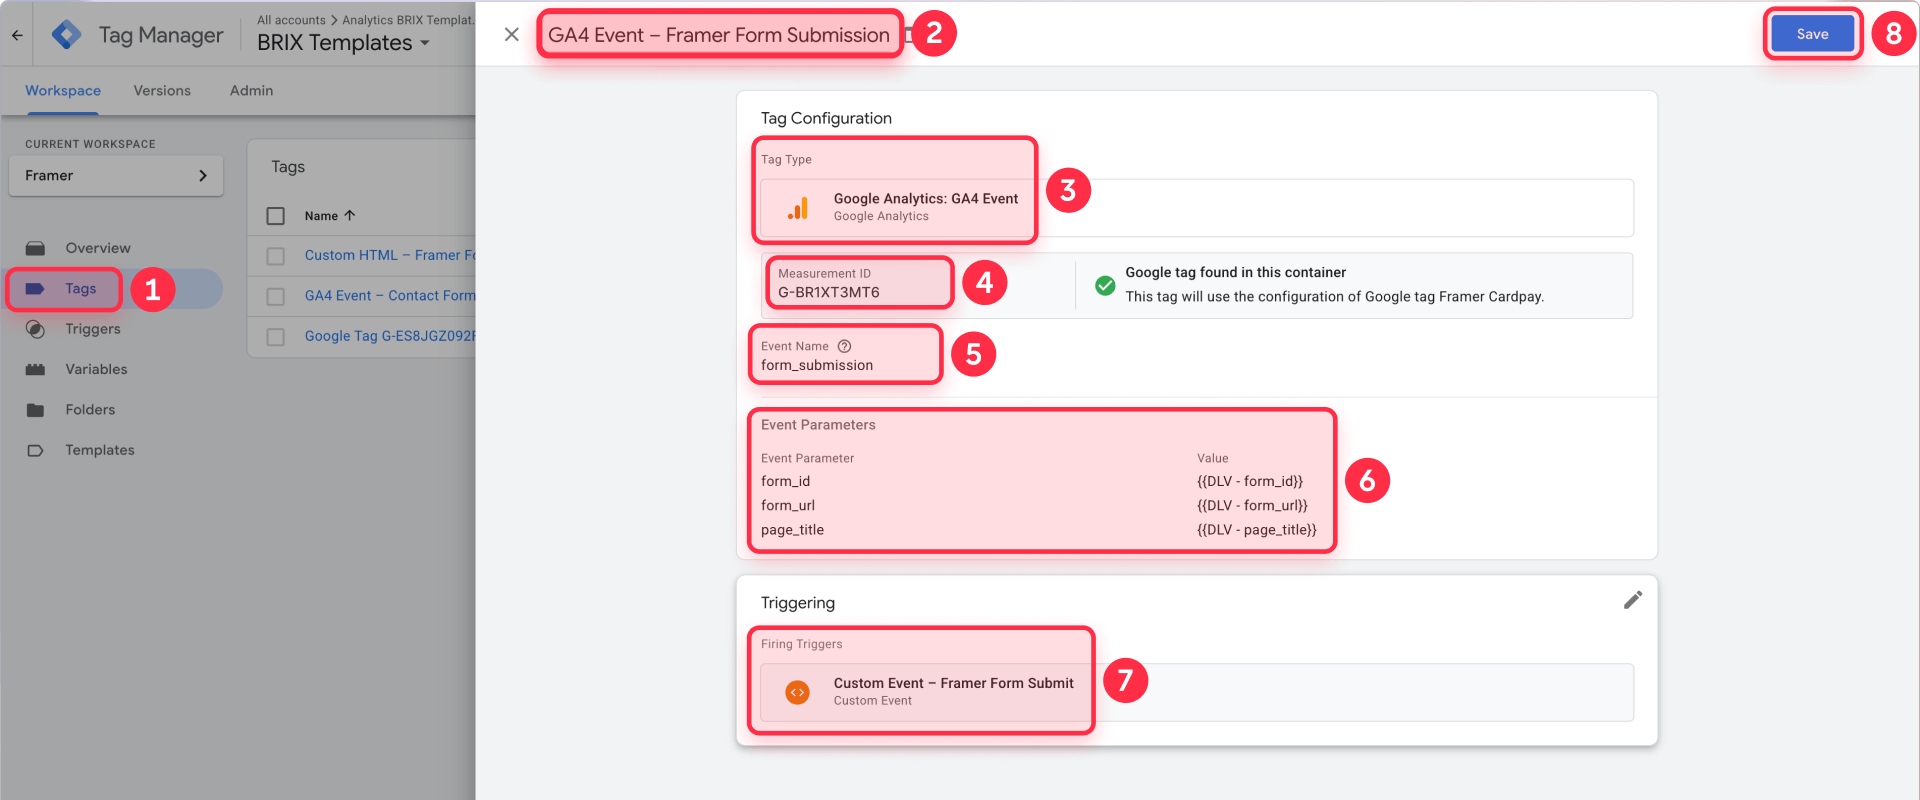
- In GTM, go to Tags and click New
- Name it GA4 Event – Framer Form Submission
- Click Tag Configuration and select Google Analytics: GA4 Event
- Enter your Measurement ID or select your existing GA4 Configuration tag
- Set the Event Name to form_submission (or generate_lead if you prefer)
- Expand the Event Parameters section and add three parameters:
- Parameter name: form_id — Value: {{DLV – form_id}}
- Parameter name: form_url — Value: {{DLV – form_url}}
- Parameter name: page_title — Value: {{DLV – page_title}}
- In the Triggering section, select your Custom Event – Framer Form Submit trigger
- Click Save
Now every time Framer fires framer:formsubmit and your listener pushes framer_form_submit to the dataLayer, this GA4 event will be sent to Analytics.
Privacy note: This listener only captures the form's Tracking ID and page metadata—it does not capture any form field values (names, emails, phone numbers, messages). This is intentional and keeps you compliant with GA4's PII policies.
Alternative event name: You can use generate_lead instead of form_submission if you prefer alignment with GA4's recommended events. Either name works fine as long as you mark it as a Key Event in GA4.
Step 6: Test the complete flow for Framer form tracking
Test your implementation before publishing:
- Make sure you're in GTM Preview mode
- Navigate to your published Framer site (not preview mode)
- Submit a form with test data
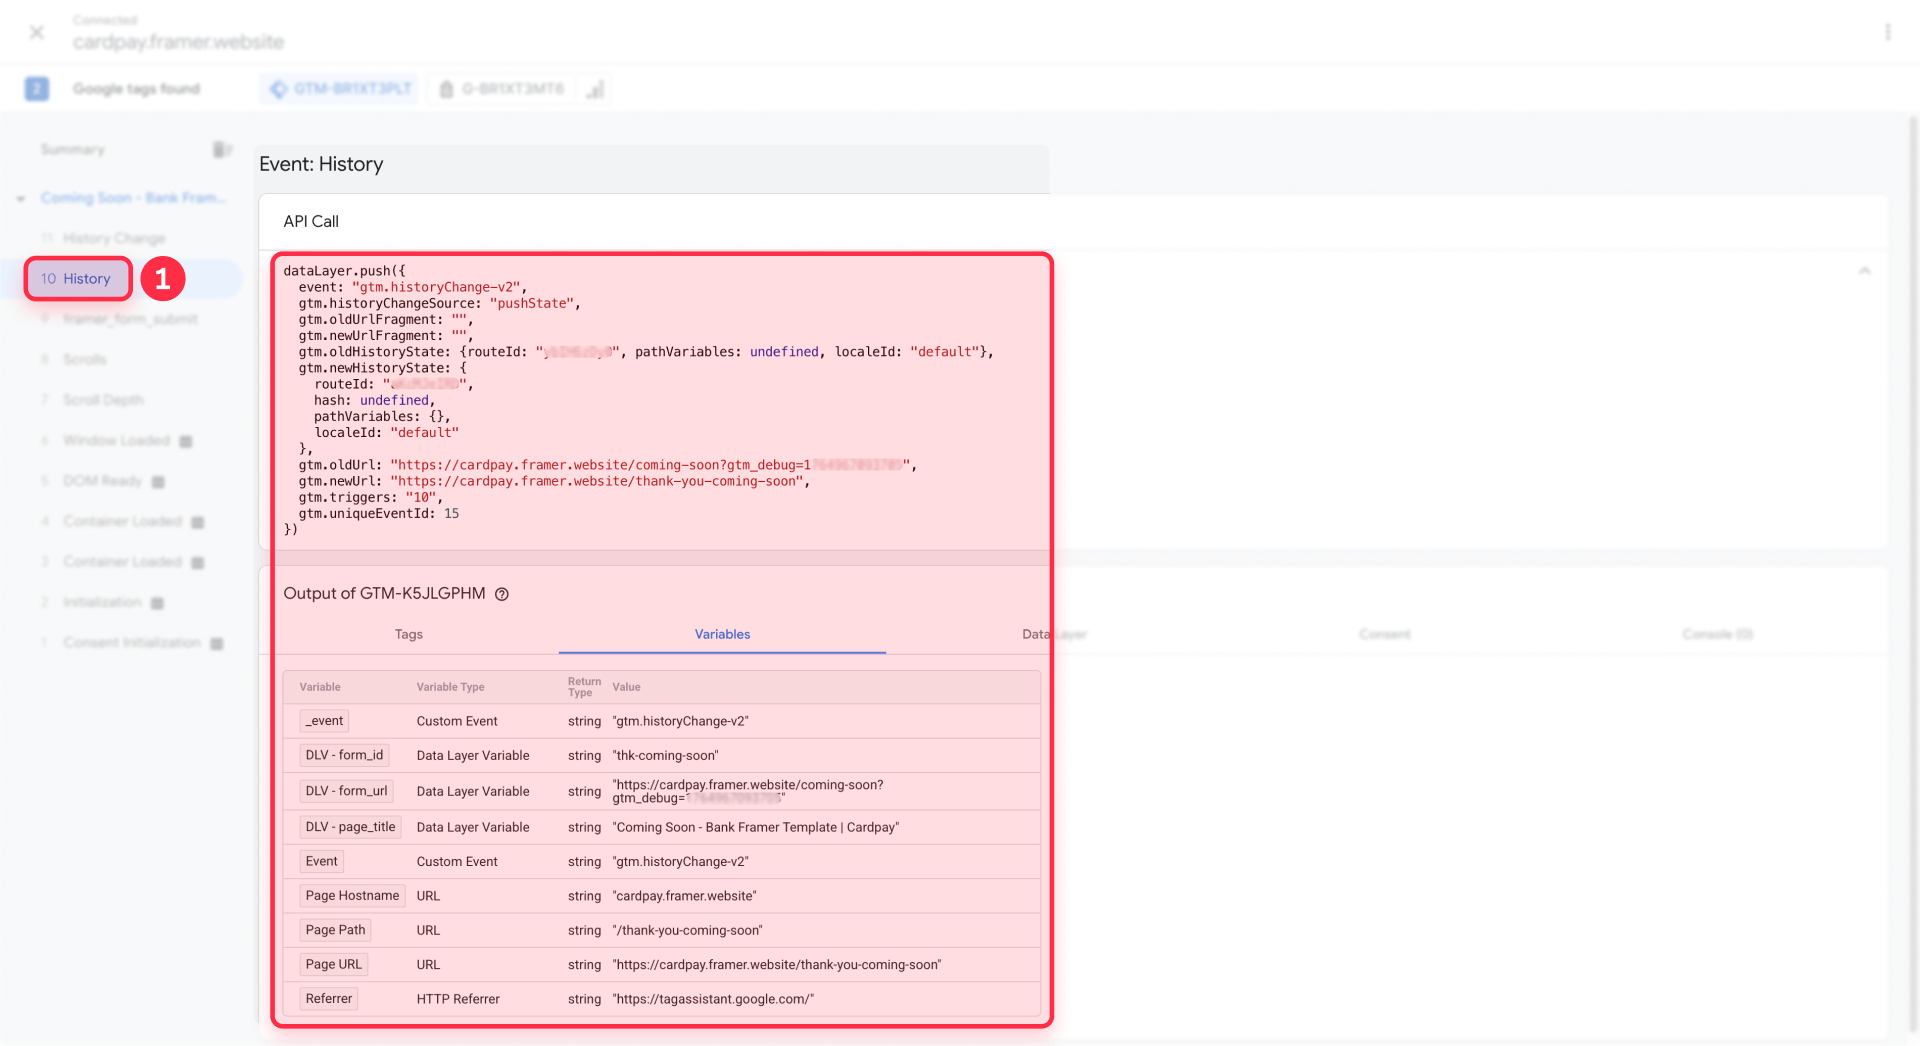
- In Tag Assistant, look for the framer_form_submit event
- Click on it and check the Variables tab to confirm your DLV variables show correct values
- Check the Tags tab to confirm GA4 Event – Framer Form Submission shows as "Fired"
Now verify in GA4 DebugView:
- In GA4, go to Admin → Data display → DebugView
- With Preview mode still active, submit your form again
- You should see a form_submission event appear in the timeline
- Click on it to verify the form_id, form_url, and page_title parameters are present
If everything looks correct, click Submit in GTM to publish your container.
Step 7: Mark as Key Event in GA4
Once your events are flowing into GA4:
- In GA4, go to Admin → Data display → Events
- Wait 24–48 hours for form_submission to appear in the list
- Click the toggle or star icon to mark it as a Key Event
- To import this conversion into Google Ads, go to Google Ads → Tools & Settings → Conversions → Import, and select your GA4 property
Optional: Use GTM lookup tables for cleaner form labels
The primary identifier for forms in Method 2 is the Tracking ID you assign in Framer. For cleaner GA4 reports, use consistent, descriptive Tracking IDs like contact_form, demo_pricing, or newsletter_footer.
For even more readable reports, create a Lookup Table variable in GTM that maps Tracking IDs to human-friendly labels:
- In GTM, go to Variables and click New
- Name it Lookup – Form Label
- Select Lookup Table as the variable type
- For Input Variable, select your DLV – form_id variable
- Add rows mapping each Tracking ID to a label:
- Input: contact_form_main → Output: Contact form – Main page
- Input: demo_pricing → Output: Demo request – Pricing page
- Input: newsletter_footer → Output: Newsletter signup – Footer
- Set Default Value to {{DLV - form_id}} (this ensures unmapped forms still show their Tracking ID)
- Save the variable
Then modify your GA4 Event tag to use this lookup variable instead of the raw form_id:
- Open your GA4 Event – Framer Form Submission tag
- Find the form_id event parameter
- Change its value from {{DLV - form_id}} to {{Lookup – Form Label}}
- Save and publish
Now your GA4 reports will show "Contact form – Main page" instead of "contact_form_main".
Testing and verification for Framer form tracking
Proper testing ensures your tracking works before real users start submitting forms.
Testing Method 1 (Thank You pages) in GTM
- In GTM, click Preview to enter debug mode
- Connect to your published Framer site
- Fill out and submit a form with test data
- Verify the redirect to the Thank You page happens
- In Tag Assistant, confirm your GA4 event tag fired on the Thank You page
- Check that the event name and any parameters are correct
- Exit Preview mode and publish your container if everything works
Testing Method 2 (Custom listener) in GTM
- In GTM, click Preview to enter debug mode
- Connect to your published Framer site
- Fill out and submit a form with test data
- In Tag Assistant, look for the framer_form_submit Custom Event
- Click on it and verify:
- The event appears after form submission
- All three Data Layer Variables show correct values
- The GA4 Event tag fired successfully
- Submit forms with different Tracking IDs to verify each one tracks correctly
- Exit Preview mode and publish your container
Verifying events in GA4 DebugView
After testing in GTM:
- In GA4, go to Admin → Data display → DebugView
- Keep GTM Preview mode active
- Submit a test form on your Framer site
- Look for your custom event (like form_submission_contact or form_submission)
- Click on the event to inspect parameters
- Verify the form_id, form_url, and page_title parameters show correct values
- Test multiple forms if you're tracking more than one
Common testing mistakes with Framer form tracking
Testing in Framer's preview mode instead of the published site: Custom code and redirects only work on your published Framer domain, not in Framer's preview environment. Always test on your live site.
Missing Tracking IDs in Method 2: If forms don't have Tracking IDs configured in Framer, the framer:formsubmit event never fires and GTM sees nothing. Double-check each form has a Tracking ID set.
Forgetting to publish after GTM changes: Changes made in GTM Preview mode don't affect real users until you click Submit to publish the container. Test thoroughly, then publish.
Framer Advanced Analytics vs GTM + GA4: when to use which
GTM + GA4 isn't always the right choice for every Framer site. Here's when Framer's Advanced Analytics (an add-on for Business/paid plans) might make more sense:
Low form activity: If your site stays within Framer's free tier (around 25k events per month), you get analytics without any setup. The convenience might outweigh the GTM implementation effort.
Teams that live in Framer: If your designers and content editors already work in the Framer Editor and don't use Google Analytics, keeping analytics inside Framer means one less tool to learn.
Quick visual insights: Framer's analytics provides visual engagement data that's native to the platform. If you're focused on basic metrics without deep conversion analysis, it's faster to use.
No technical resources: If your team doesn't have anyone comfortable with JavaScript, dataLayer concepts, or tag management, Framer's turnkey approach avoids potential setup errors.
GTM + GA4 makes more sense when:
- You have high form activity that exceeds Framer's free tier
- You run Google Ads and need conversion import for Smart Bidding
- You manage multiple client sites and want reusable GTM containers
- You need to integrate form tracking with your broader marketing stack
- You want to build custom explorations, audiences, and dashboards in GA4
- You need cross-domain tracking or complex measurement scenarios
Many teams use both: Framer Advanced Analytics for quick in-editor insights about overall engagement, and GTM + GA4 for detailed conversion tracking, Google Ads optimization, and reporting. The two systems can run side by side without conflicts.
Troubleshooting Framer form tracking with GTM
Form submissions aren't appearing in GTM Preview at all: Verify that each form has a Tracking ID assigned in Framer. The framer:formsubmit event only fires for forms with Tracking IDs. Also confirm you're testing on your published Framer site, not Framer's preview mode—custom code doesn't execute in preview. Republish your site after setting Tracking IDs.
The form_id shows as "unknown" in GA4: This means the Tracking ID isn't being captured correctly. Ensure each form has a Tracking ID set in Framer's form properties panel. Publish your Framer site after adding or changing Tracking IDs—changes don't take effect until published.
The framer_form_submit event appears but the GA4 tag doesn't fire: Check that your Custom Event trigger is attached to your GA4 Event tag in the Triggering section. Verify that the event name in your trigger (framer_form_submit) exactly matches the event name in the listener code—event names are case-sensitive.
Events show in GA4 DebugView but not in standard reports: DebugView displays real-time data, while standard GA4 reports have a processing delay of 24–48 hours. Check that you're looking at the correct date range in reports. Also verify the event is marked as a Key Event if you want it to appear in conversion reports.
GA4 shows more submissions than expected: Check if GA4's Enhanced Measurement is creating duplicate form events. Go to Admin → Data streams, click on your web stream, then click the gear icon next to Enhanced measurement. Disable Form interactions to prevent GA4 from automatically tracking forms alongside your custom tracking.
The listener doesn't track my embedded form (Typeform, HubSpot, Tally, etc.): Third-party forms embedded via iframe run in a separate browsing context and cannot be accessed by scripts on your main page. You'll need to use the third-party platform's native analytics or their GTM integration. This is a browser security limitation.
Redirect tracking counts duplicate submissions: If users click the browser back button after reaching a Thank You page and resubmit, GA4 counts both submissions. This is rare but can happen. Consider switching to Method 2 if this affects your data significantly.
Multiple forms redirect to the same Thank You page: Method 1 can't distinguish between different forms that share a Thank You page. Switch to Method 2 or create unique Thank You pages for each form type.
Frequently asked questions about tracking Framer form submissions with GTM and GA4
What's the best way to track Framer form submissions with GTM and GA4?
Use a custom JavaScript listener that monitors Framer's native framer:formsubmit event and pushes data to GTM's dataLayer. GTM's built-in Form Submission trigger and GA4's Enhanced Measurement don't work with Framer's React-based forms. The setup includes a Custom HTML tag with the listener, Data Layer Variables for form_id and metadata, and a GA4 Event tag.
Why doesn't GTM's built-in Form Submission trigger work with Framer forms?
GTM's Form Submission trigger relies on native HTML form events that fire when a traditional form element submits. Framer forms are React components that handle submissions through JavaScript without triggering browser-native form events, so GTM never sees them. The custom listener monitors Framer's own framer:formsubmit event instead.
Do my Framer forms need Tracking IDs for this to work?
Yes, absolutely. If a form doesn't have a Tracking ID configured in Framer's form properties, Framer won't emit the framer:formsubmit event and GTM will receive nothing. The Tracking ID is required for Method 2 to work. Method 1 (Thank You pages) doesn't require Tracking IDs since it tracks page views instead of form events.
Should I use generate_lead or form_submission as the GA4 event name?
Both work fine. Use generate_lead if you want alignment with GA4's recommended events and only track lead-generation forms. Use form_submission if you track multiple form types and prefer clarity. Either way, mark it as a Key Event in GA4 for conversion tracking. The event name doesn't affect functionality, only how it appears in reports.
How do I mark Framer form submissions as Key Events in GA4?
Go to Admin → Data display → Events, find your form_submission event (may take 24–48 hours to appear after first submission), and toggle "Mark as key event" next to it. To import into Google Ads: go to Tools & Settings → Conversions → Import → select your GA4 property → check your form_submission event. This enables the event for conversion tracking and Smart Bidding.
How can I track multiple Framer forms separately in GA4?
Give each form a unique Tracking ID in Framer (like contact_form_main, demo_pricing, newsletter_footer). The listener automatically captures this ID and sends it as the form_id parameter. In GA4, create explorations that filter by form_id to analyze each form separately. You can also create conditional GTM triggers based on form_id to fire different events for different form types.
Can I track embedded forms like Typeform, HubSpot, or Tally with this listener?
No. The listener only works with native Framer forms that use Framer's built-in Forms component and fire the framer:formsubmit event. Forms embedded inside iframes can't be tracked this way due to browser security restrictions. For third-party embedded forms, use the platform's native GA4 integration or their official GTM tags.
What data does the listener send to GA4?
The listener only sends metadata: the form's Tracking ID (form_id), the page URL where submission occurred (form_url), and the page title (page_title). It does not capture any form field values like names, emails, phone numbers, or messages. This keeps you compliant with GA4's PII policies. The actual form data goes through Framer's native integrations to your email, CRM, or webhook.
What are the limitations of this tracking approach?
The listener fires when Framer's framer:formsubmit event occurs, which happens after client-side validation and when Framer begins processing the submission. It won't capture rare edge cases where Framer's backend encounters server errors after the event fires. It also won't automatically track intermediate steps in multi-step forms unless you configure those separately.
Does the listener only work on the published site?
Yes. Framer's custom code and the framer:formsubmit event only execute on the published site, not in Framer's preview mode. Always test your tracking on the published domain. Make sure to republish your Framer site after adding Tracking IDs or making form changes—those updates don't take effect in preview mode.
Conclusion
You've implemented professional form tracking that works reliably for most Framer sites without per-event fees. Whether you chose Method 1 (Thank You pages) for its simplicity or Method 2 (custom listener) for its power and flexibility, you now have accurate conversion data flowing into GA4.
Next steps to get more value from your tracking:
Create custom explorations in GA4 to analyze form performance by traffic source, landing page, and device type. Build audiences based on form completers for remarketing campaigns. Import your Key Events into Google Ads to enable Smart Bidding optimization toward actual leads instead of just clicks. Set up custom dashboards in Looker Studio to visualize form conversion trends over time.
Test different form placements, field configurations, and copy to see what drives more submissions. Use GA4's path analysis to understand the journey users take before completing forms. Compare conversion rates across traffic channels to identify your highest-quality lead sources.
For advanced implementations like Enhanced Conversions with hashed email data, CRM integrations via GTM, or custom reporting dashboards, our Framer agency team can help you take your analytics further.


Join readers commenting on this post!