
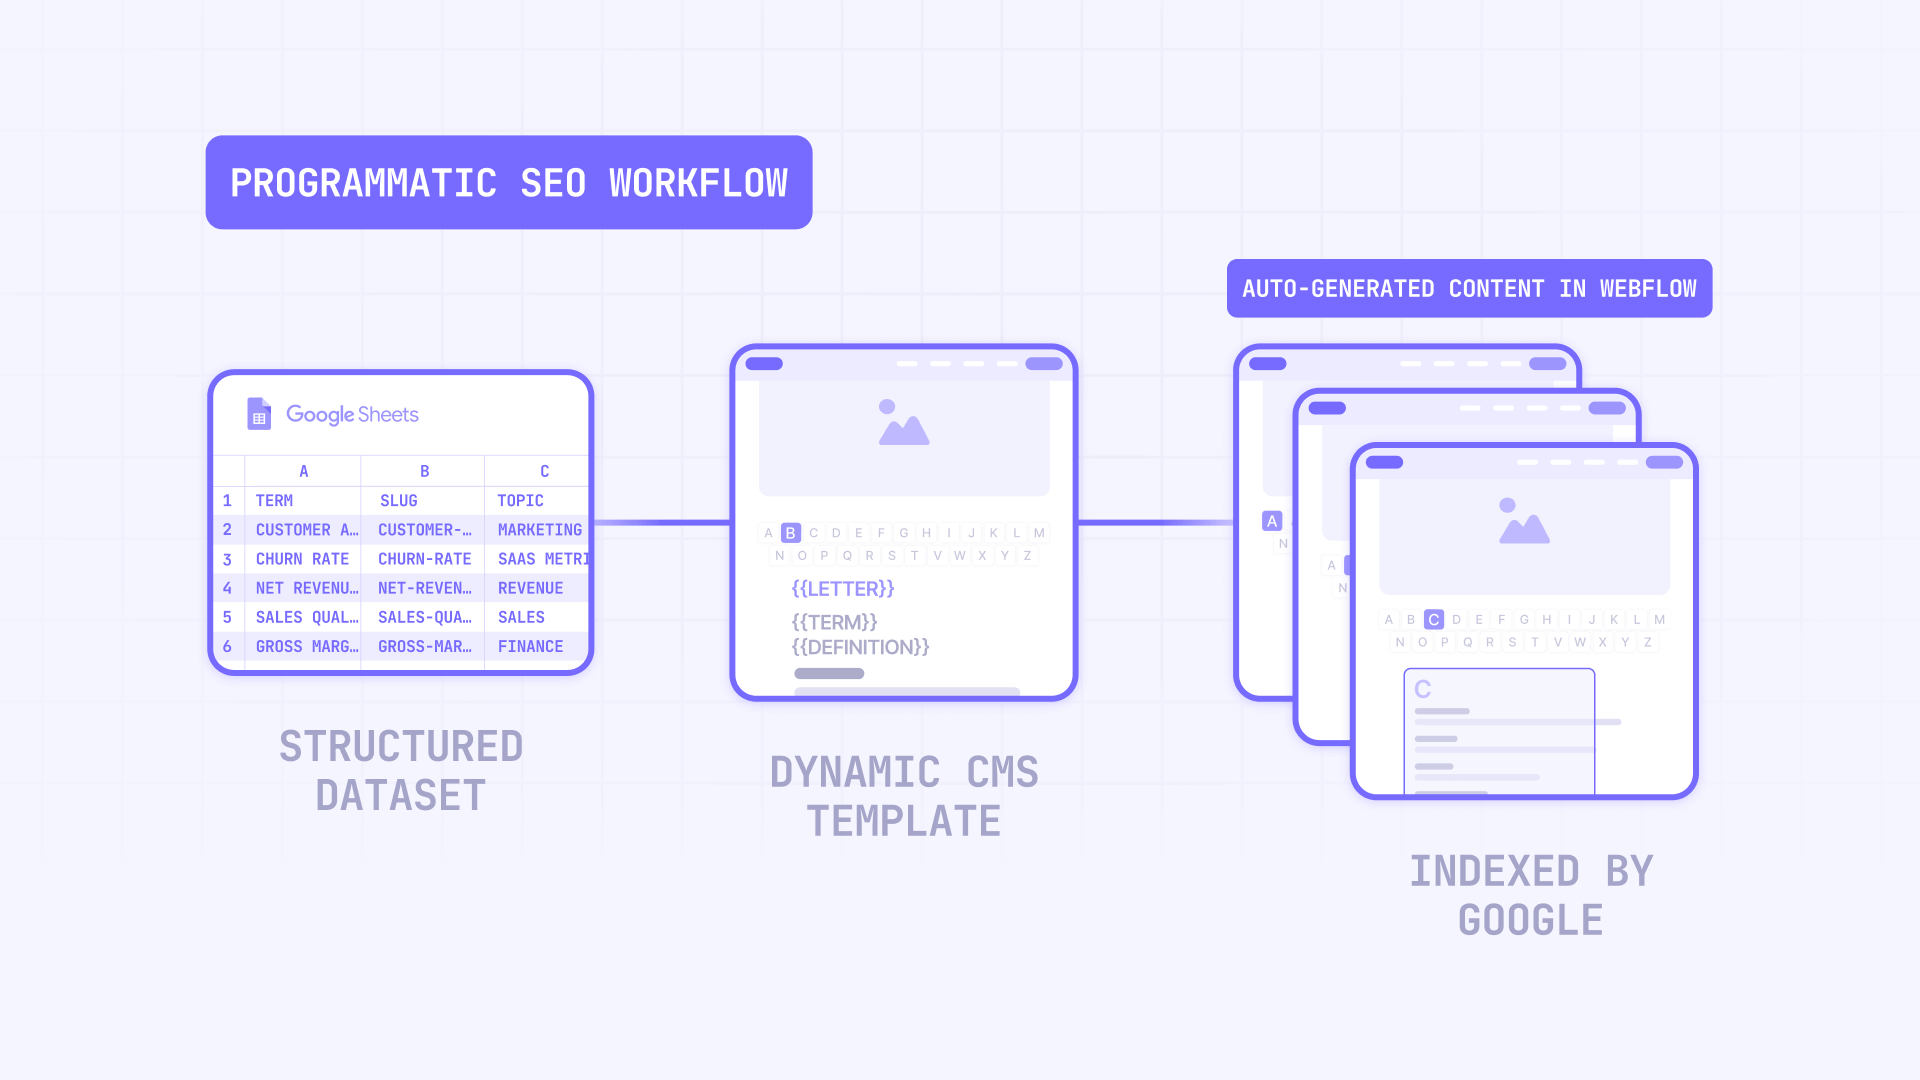
Programmatic SEO sounds technical, but the idea is simple: instead of designing and writing each page on your site one by one, you create one template and fill it with structured data so Webflow generates hundreds (or thousands) of unique pages automatically. Think of a SaaS company that needs a page for every integration they support, or a B2B platform that wants a glossary page for every industry term their audience searches for. Building those pages manually would take months. With programmatic SEO in Webflow, it takes days — or if you already have most of your content ready, it can be done in hours.
The catch? It's easy to start and easy to mess up. If every page looks the same except for the title, Google will treat them as duplicate content and ignore most of them. If you publish thousands of pages at once without checking whether they're actually useful, you'll waste crawl budget and potentially hurt your site's overall SEO.
This guide covers the full system — from planning your first Collection to publishing at scale and monitoring what actually gets indexed. Whether you've never touched Webflow CMS or you've already tried pSEO and hit a wall, you'll find a clear path forward here.
Why programmatic SEO matters for Webflow sites
Understanding the specific situations where pSEO delivers real results helps you decide whether it's right for your project — and how to approach it:
- Scale content without scaling design or development work: Build one Webflow Collection template and ship hundreds of pages with consistent UX. A SaaS company can launch an entire integrations directory from a single template without touching the Designer for each new page.
- Turn existing datasets into organic traffic: If you already have structured data — product specs, feature lists, industry terms, partner directories — Webflow CMS can turn that data into indexable pages that capture search demand you're currently missing.
- Create ranking hubs that push authority to key pages: Webflow Collection lists combined with hub pages can distribute internal link equity across your programmatic pages, helping them rank for competitive terms instead of sitting orphaned in the CMS.
- Support localized content with built-in hreflang controls: Webflow now offers explicit hreflang settings and improved localized sitemap behavior, making multi-language pSEO achievable without custom code workarounds.
1 - Plan your Webflow programmatic SEO pages before you build
If you skip planning, you'll build a CMS structure that forces duplicate pages, messy URLs, and wasted effort. This section is where you decide what pages should exist, what kind of data they need, and whether Webflow can realistically support your project on its current plan.
Define Webflow programmatic SEO page types by intent
Start by defining the types of pages you can actually make useful at scale. The key word is useful — not just possible. Your job is to ensure each page has a unique intent and unique data, not just swapped keywords in the title.
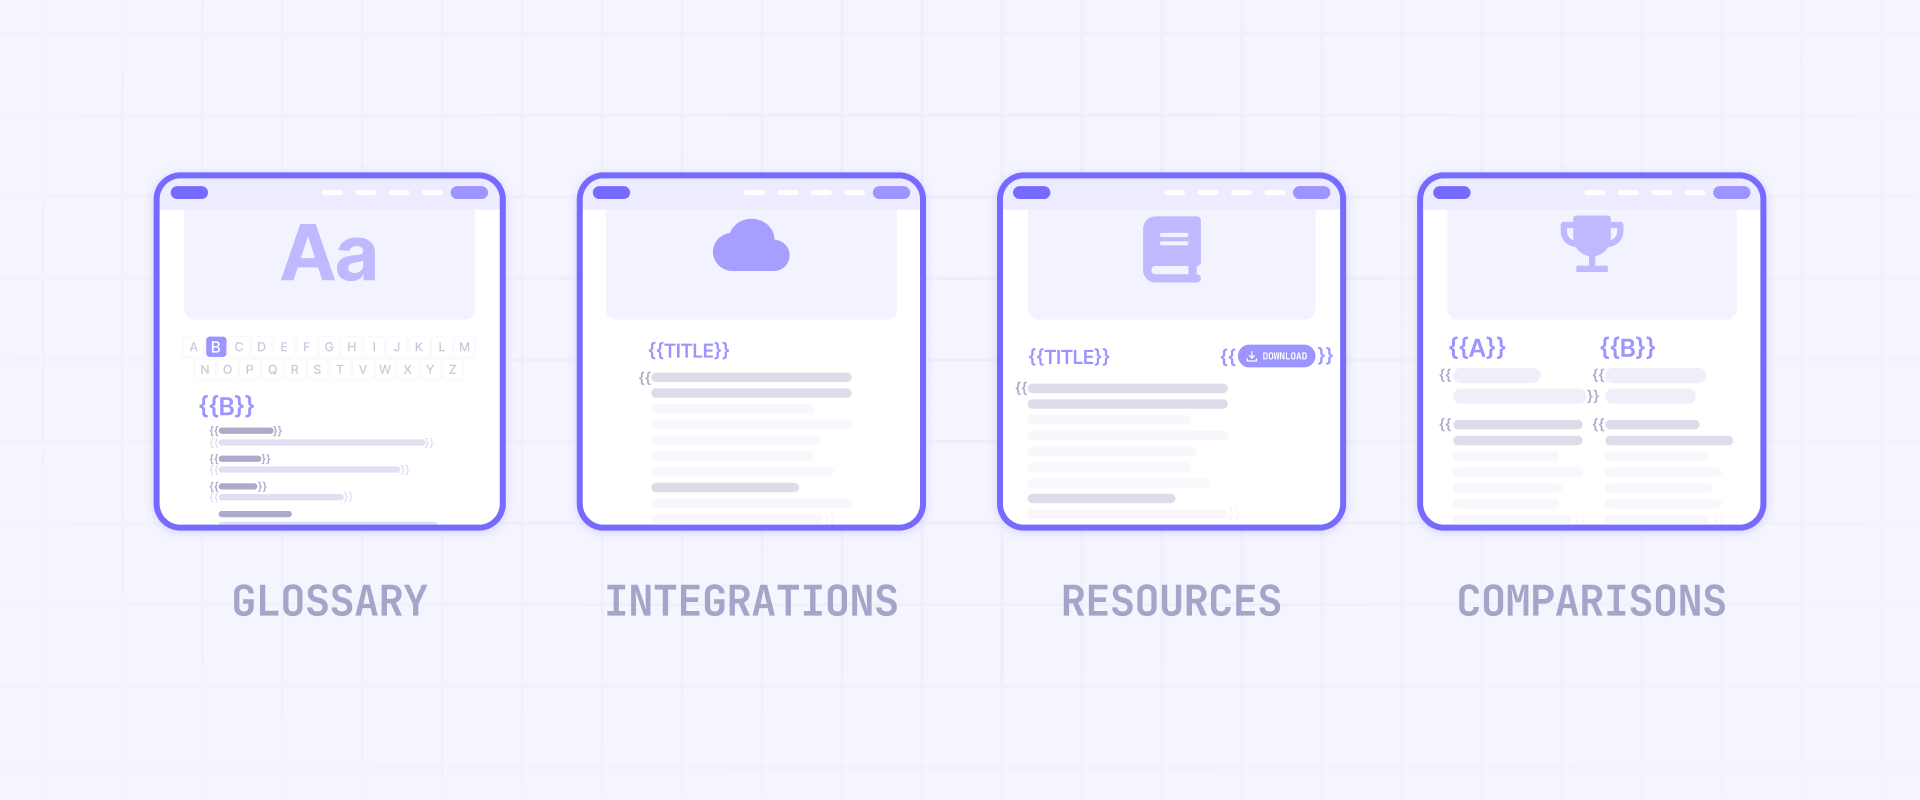
The simplest and most effective approach is to start with single-dimension pages — one Collection, one variable, hundreds of pages:
- Industry glossaries: A B2B SaaS platform creates 300+ pages like "What is employee turnover rate" or "What is customer acquisition cost." Each term gets a unique definition, related terms, and contextual examples. This works because every term answers a distinct search query.
- Integration directories: Pages like "Salesforce integration", "HubSpot integration", "Slack integration" — each with unique setup steps, features, and use cases. Companies like Notion and Zapier have built massive organic traffic with this exact pattern.
- Template and resource libraries: Individual pages for each downloadable asset — "Sales proposal template", "SOW template", "NDA template" — with unique descriptions, preview content, and related resources.
- Comparison pages: "Your Product vs Competitor X" pages where each combination is a CMS item with unique feature comparisons, pricing data, and use-case recommendations.
A practical guardrail: if the page can't contain at least 3 uniquely generated sections (not just a swapped title and H1), don't generate it yet. The fastest way to kill your pSEO project is shipping pages where only the headline and meta description change.
Once single-dimension pages are working and indexed, you can consider multi-dimension combinations — pages that combine two or more variables:
- Feature × Industry: "CRM for real estate agencies", "CRM for consulting firms" — where each combination pulls unique industry context and feature recommendations.
- Service × Vertical: A B2B agency creating "Web design for fintech", "SEO for B2B marketplaces" — with unique case studies and vertical-specific advice per page.
- Integration × Category: A filterable directory where each integration has a type (analytics, payments, communication) and each combination page adds unique content.
Multi-dimension pages are powerful, but only if there's real search volume for those combinations and you already have enough unique content for each one. If you're forcing combinations just because your dataset allows them — say, 50 cities × 20 services = 1,000 pages — but most of those pages would have identical content with only the city name swapped, they won't get indexed.
More importantly, pages like that may actively hurt your site's quality signals. Google sees a thousand pages with the same template and near-identical text, and it concludes your site produces low-quality content. Start with single-dimension pages, prove they work, and only expand to combos when the data justifies it.
One important step before creating any page type: search Google for the exact query that page would target. If the top results are comprehensive guides or established product pages, a thin programmatic page won't compete. Focus your effort on queries where a structured, data-rich page genuinely serves the searcher better than what already exists.
Understand Webflow CMS plan limits and URL constraints for programmatic SEO
Webflow's plan limits and CMS constraints should influence your architecture from the start.
First, the URL limitation: Webflow CMS does not support nested slug segments inside Collection item slugs. If you type / in a slug field, Webflow converts it to -. This means you can't create URL structures like /services/web-design/fintech directly from a CMS Collection — the slug would become services-web-design-fintech instead.
On URL structure, Webflow CMS pages always end up at a path that combines static folders (optional), the Collection URL, and the item slug. The item slug is the only part that changes per CMS item — everything before it is defined once in your project settings and stays the same for every page in that Collection.
However, since Webflow added CMS Folders in April 2023, you can nest your Collection template pages inside static folders for cleaner URL hierarchies.
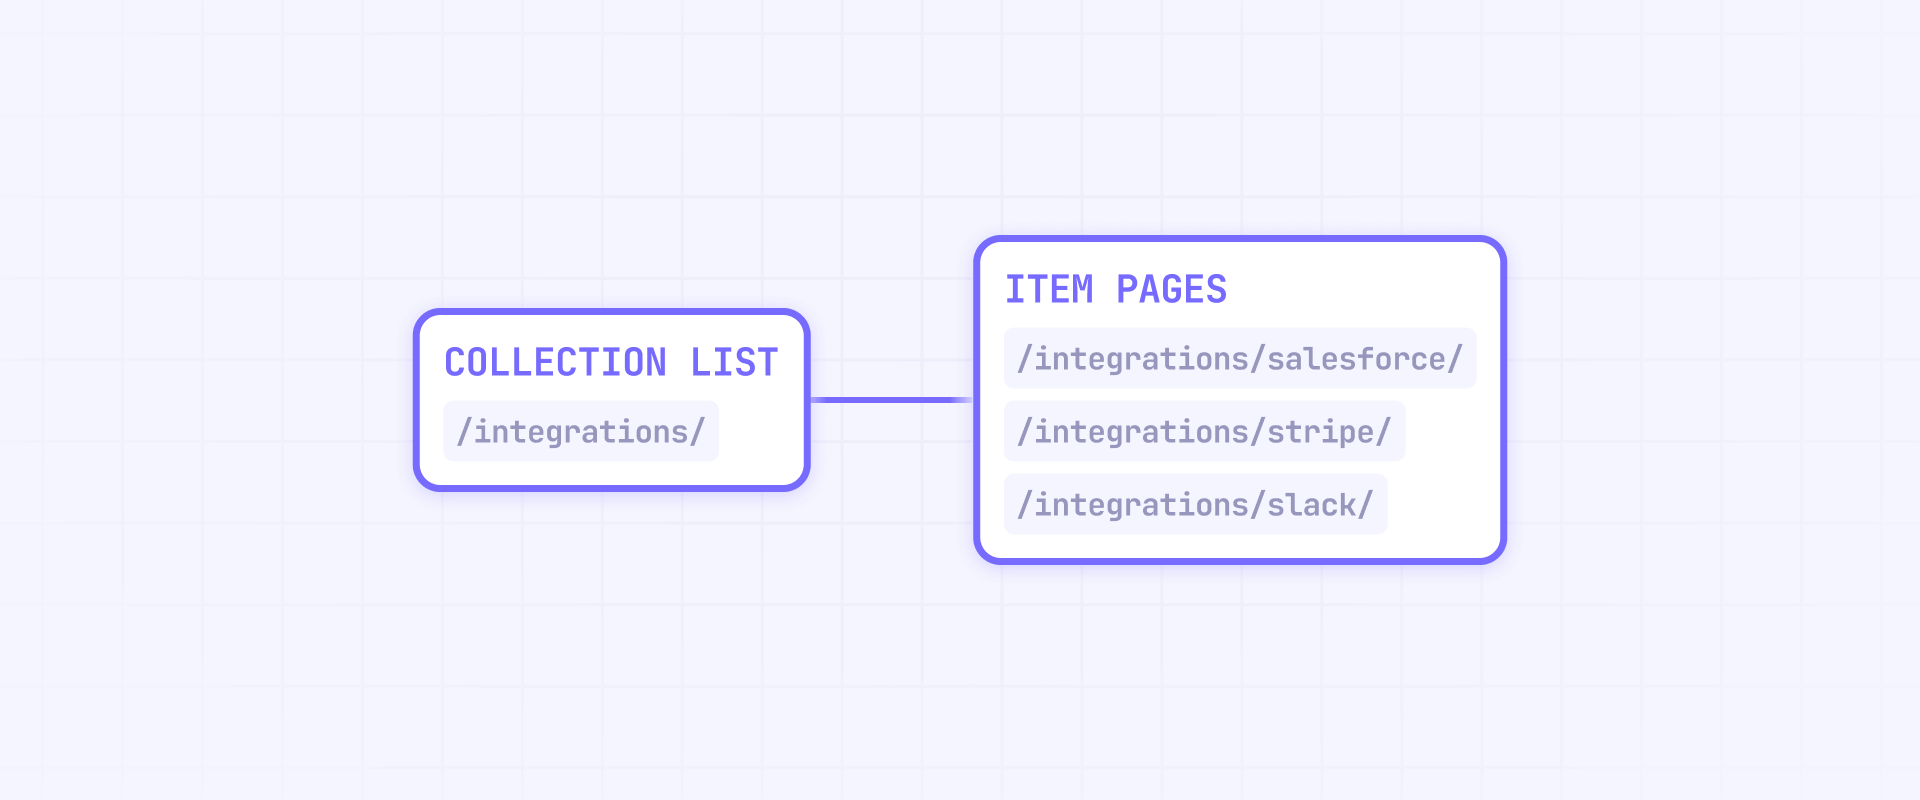
Static nesting + one dynamic slug — works natively:
- /integrations/salesforce — Collection URL + item slug
- /content/blog/post-name — one static folder + Collection URL + item slug
- /services/web-design/projects/project-name — two static folders + Collection URL + item slug
In all of these, the folders (/services/, /web-design/) are created once in Webflow and apply identically to every CMS item in that Collection. Only the last segment — the item slug — changes per page. That's the key constraint: Webflow supports exactly one dynamic segment per URL, and it's always the final one.
Dynamic category segments — not possible natively:
- /services/{category}/{item} — where both {category} and {item} change per page — cannot be built in Webflow without external tooling. This would need two dynamic segments in the same URL, but Webflow only allows one. If you need this kind of structure, you'll need a reverse proxy (Cloudflare Workers, Vercel, or similar) that maps your preferred URLs to Webflow's actual paths.
Now, plan pricing and CMS item limits:
- CMS plan ($29/month): Up to 2,000 CMS items. Enough for most glossaries, integration directories, and comparison libraries.
- Business plan ($49/month): Starts at 10,000 CMS items, with more available through add-ons. Covers serious directory-scale projects.
- Enterprise (starts at $10,000 USD/year): Custom quotation with Webflow's team. Supports well beyond 10,000 items — including 100,000+ with custom configuration.
For the vast majority of B2B pSEO projects, 2,000 to 10,000 items is a lot of pages. A 500-term glossary or a 200-integration directory is already a significant content asset. Only if you truly need tens of thousands of pages — and have the unique content to fill them — should you look at Enterprise or consider a different platform like WordPress or statically generated pages.
Each plan also has dynamic content limits that affect how your templates render:
- Collection lists per page: 20 (non-Enterprise) / 40 (Enterprise)
- Nested Collection lists: 2 (non-Enterprise) / 10 (Enterprise)
- Items per Collection list: 100 (unless pagination is enabled)
- Items per nested list: 10 (non-Enterprise) / 100 (Enterprise)
These limits mean you need to design lean templates that use pagination and hub pages to distribute content, rather than cramming everything onto a single template page.
2 - Structure your data and build your Webflow CMS template for programmatic pages
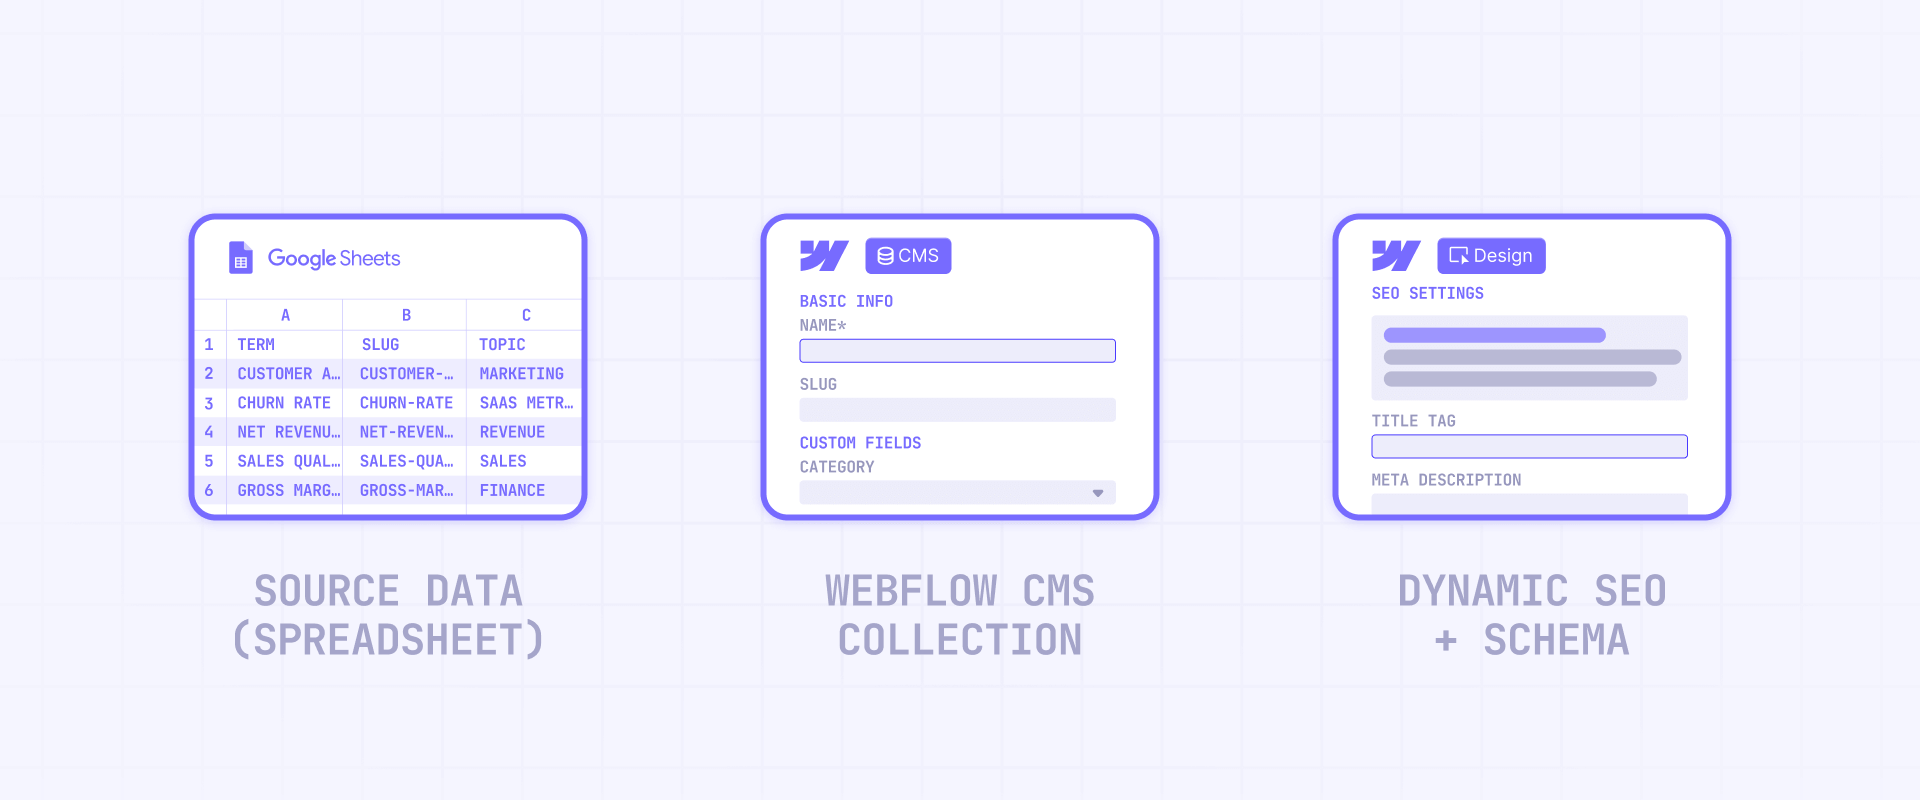
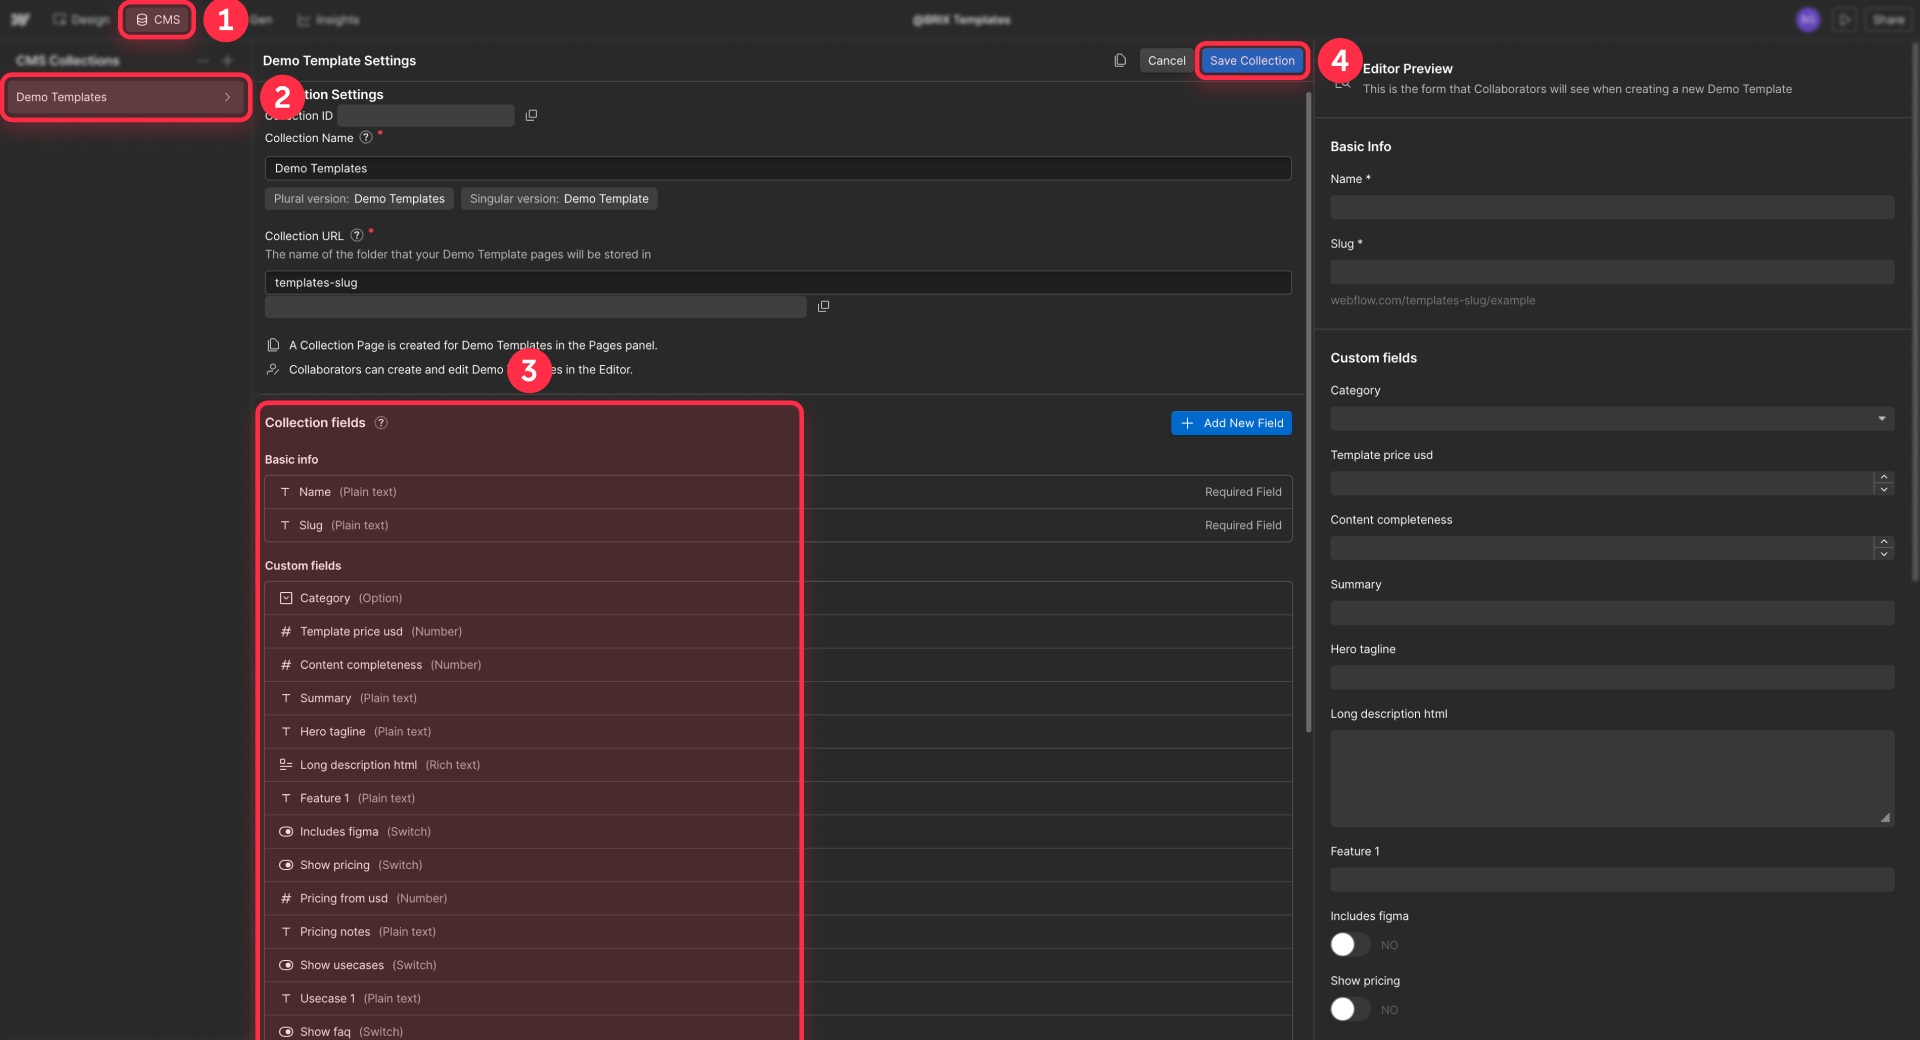
The biggest mistake in Webflow pSEO isn't a bad template or wrong SEO settings — it's importing messy data and hoping the template will fix it. Your data is your content, so getting it right before it touches Webflow saves you from debugging everything downstream. This section covers the full flow: define your fields, create your Collection, configure your template, and validate everything on staging.
Define your fields and prepare your spreadsheet for Webflow programmatic SEO
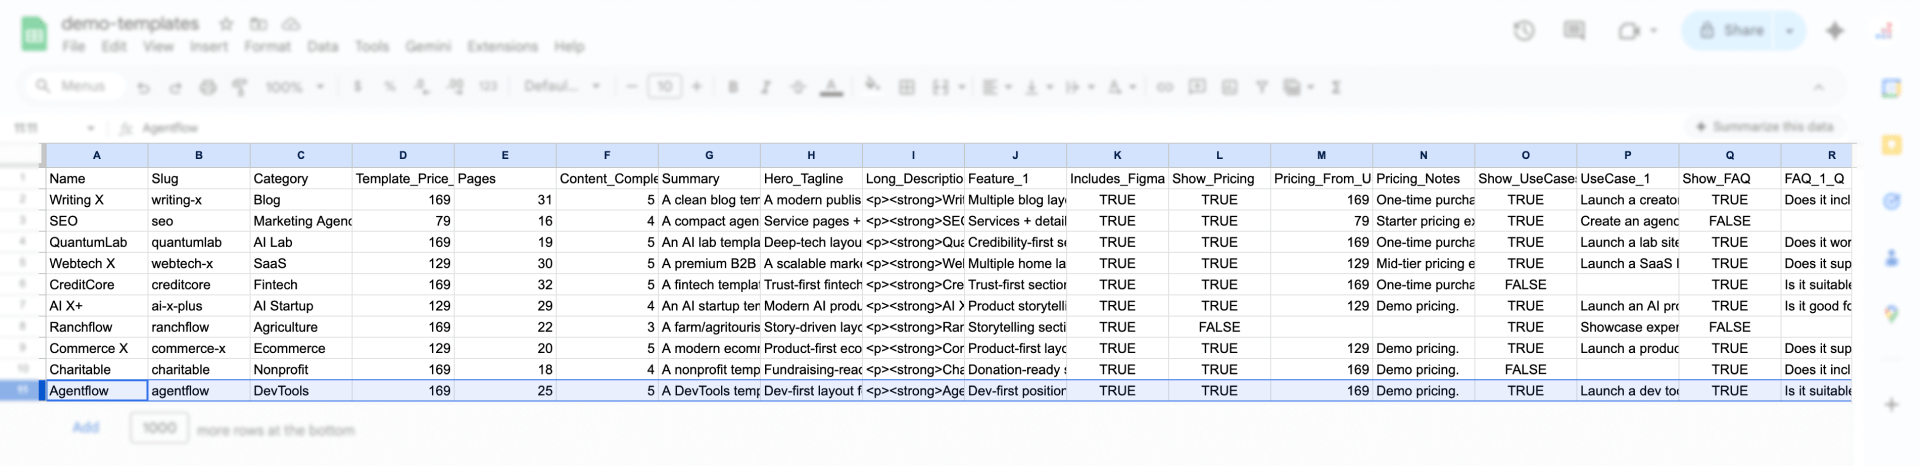
Use Google Sheets or Airtable as your source of truth. Every column in your spreadsheet will map directly to a CMS field in Webflow, so the structure you define here determines what your template can work with.
At minimum, your spreadsheet should include these columns:
- name: The display title for the CMS item (for example, "What is customer acquisition cost" for a glossary term)
- slug: The URL path segment — lowercase, hyphens only, no special characters (for example, customer-acquisition-cost)
- summary: A unique 2-3 sentence description per item — this is not optional for pSEO
- definition (or primary content): The main body content that makes each page genuinely different. For a glossary this is the full definition; for an integration directory it's the setup guide and feature overview
- category: The category or type this item belongs to (this will become a Reference field in Webflow, linking to a Categories Collection)
- related-items: Slugs or names of related items (this will map to a Multi-reference field for cross-linking)
- faq-q1, faq-a1, faq-q2, faq-a2, faq-q3, faq-a3: Unique Q&A pairs per item — these will also be used for FAQPage Schema markup, giving your pages rich results eligibility in Google
- seo-title: A unique meta title per item (for example, "What is Customer Acquisition Cost? | Definition & Formula")
- seo-description: A unique meta description per item
Before importing anything, validate the basics: no duplicate slugs, no empty summary fields, no rows where the only difference is the name. If two rows would produce nearly identical pages, merge them or remove one.
It's also worth adding a "content completeness" score column — even a simple 1-5 rating — to quickly spot which items have enough unique data to publish and which ones need more work first. Items scoring 1-2 stay as drafts; items scoring 4-5 are ready to go live.
Keep in mind that Webflow's CMS schema supports up to 60 fields per Collection. That's plenty for most pSEO use cases, but plan your field structure early so you don't hit this ceiling when adding content types later.
Build your Webflow CMS Collection and import a test batch
Now take your spreadsheet structure and create the matching CMS Collection in Webflow. Each column becomes a CMS field with the appropriate type:
- name → Name field (built-in)
- slug → Slug field (built-in)
- summary → Plain text field
- definition → Rich text field
- category → Reference field (pointing to a Categories Collection you'll create separately)
- related-items → Multi-reference field (pointing back to the same Collection or another related one)
- faq-q1, faq-a1, etc. → Plain text fields (one for each question and answer)
- seo-title → Plain text field
- seo-description → Plain text field
For a B2B glossary, your Glossary Terms Collection would include all of these fields. For an integration directory, you'd swap definition for something like setup-guide and add fields for supported-plans or integration-category — but the pattern is identical.
Don't import your full dataset on day one. Start with a batch of 50 to 200 items that represents the variety in your data:
- Create the CMS Collection with all your fields.
- Import a small CSV into the Collection.
- Publish to your staging domain (not production yet) and verify: do the pages render correctly? Does the layout handle different content lengths? Are any fields missing or mismatched?
This MVP approach saves you from debugging template issues on top of thousands of items. Only scale to your full dataset after the template works with real data on staging.
Set dynamic SEO titles, meta descriptions, and FAQPage Schema on your Webflow template
Once your test batch is imported and the Collection exists, configure the template so each page gets unique SEO metadata and structured data automatically.
Dynamic SEO titles and descriptions:
- Open the Pages panel in the Webflow Designer.
- Click on your Collection template page.
- Click the Page settings icon (gear icon).
- Open SEO settings.
- In the Title tag field, click Add field and bind it to your seo-title CMS field.
- Do the same for Meta description — bind it to your seo-description field.
- Click Save.
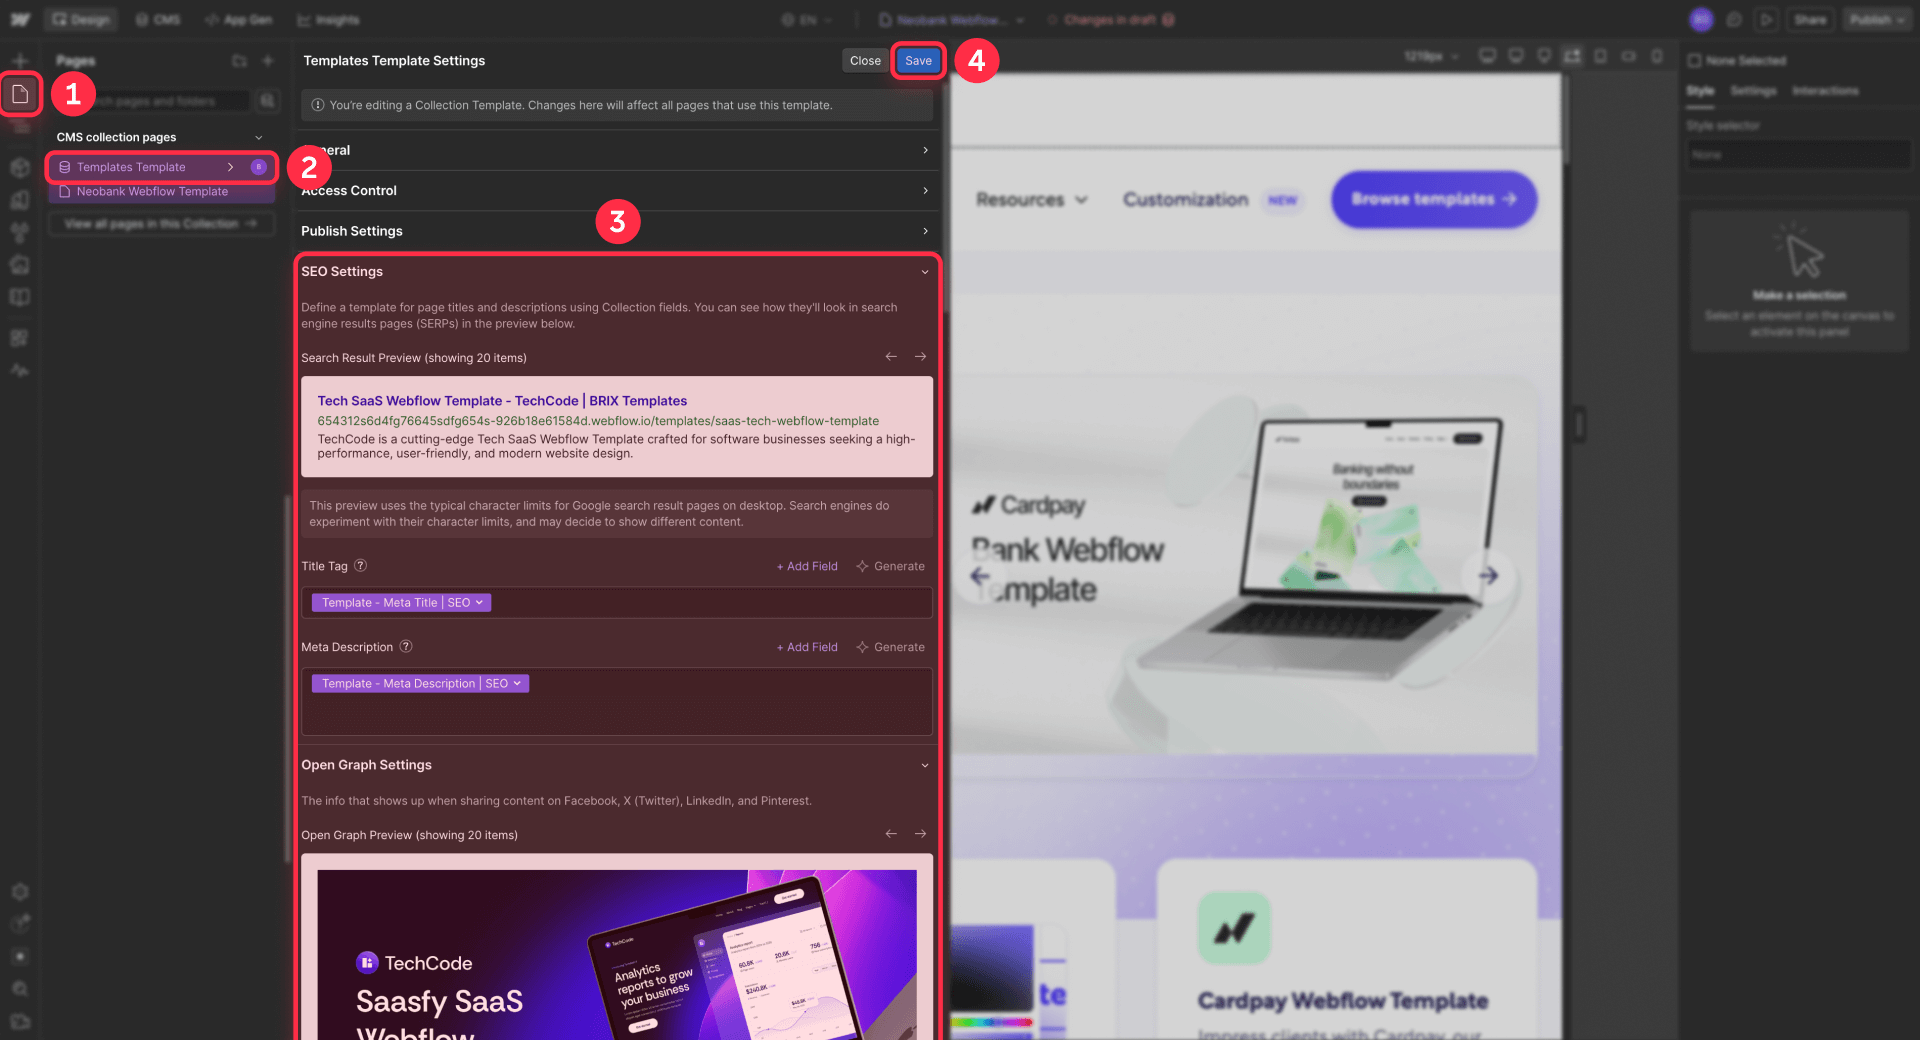
Don't just combine two entity names as your title pattern. Since you created a dedicated seo-title field in your spreadsheet, each page can have a genuinely unique title — something like "What is Customer Acquisition Cost? | Definition & Formula" rather than a generic pattern like "{Term} | Glossary." This small difference has a meaningful impact on how Google perceives each page's uniqueness.
FAQPage Schema markup:
If each CMS item has unique FAQ fields (which it should, based on the spreadsheet structure above), you can add FAQPage Schema to give every programmatic page rich results eligibility — automatically.
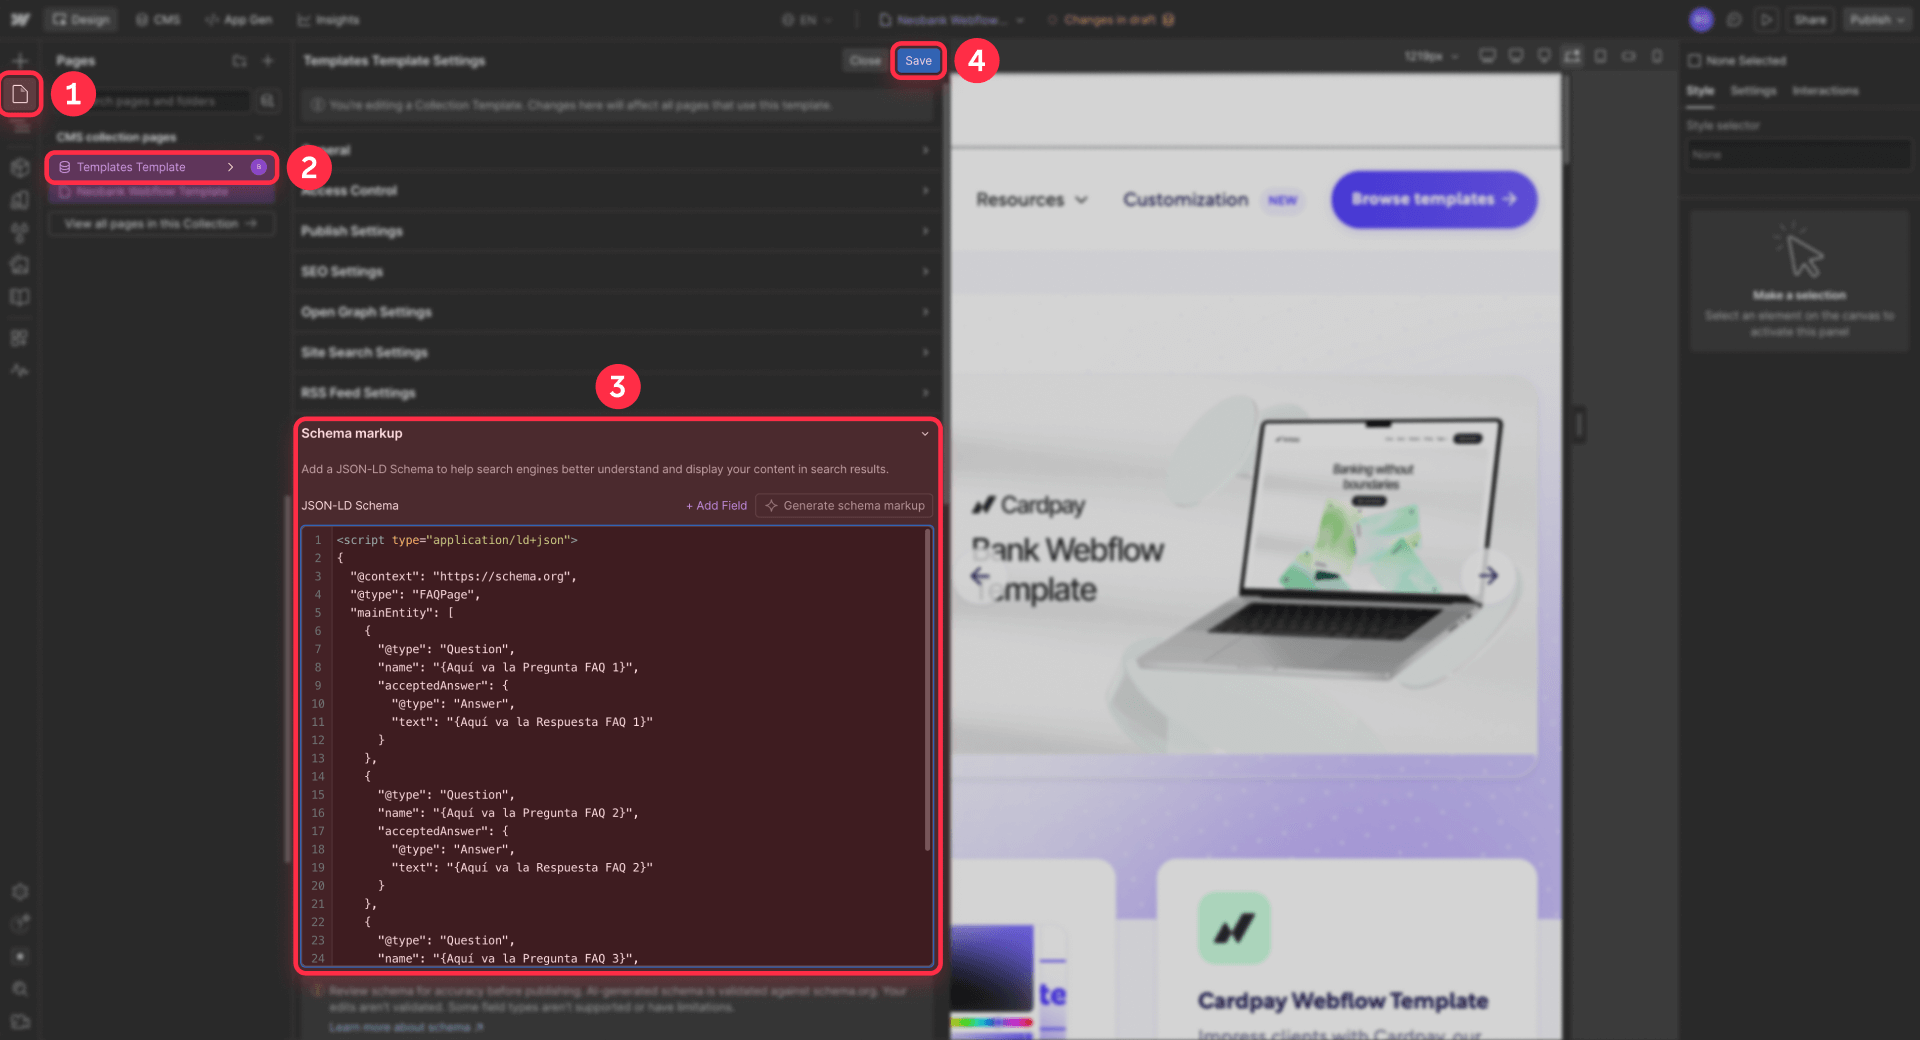
Go to your Collection template's Page settings → Custom Code → Inside head tag, and add a JSON-LD script that references your CMS FAQ fields. Here's the structure:
<script type="application/ld+json">
{
  "@context": "https://schema.org",
  "@type": "FAQPage",
  "mainEntity": [
    {
      "@type": "Question",
      "name": "{FAQ 1 Question goes here}",
      "acceptedAnswer": {
        "@type": "Answer",
        "text": "{FAQ 1 Answer goes here}"
      }
    },
    {
      "@type": "Question",
      "name": "{FAQ 2 Question goes here}",
      "acceptedAnswer": {
        "@type": "Answer",
        "text": "{FAQ 2 Answer goes here}"
      }
    },
    {
      "@type": "Question",
      "name": "{FAQ 3 Question goes here}",
      "acceptedAnswer": {
        "@type": "Answer",
        "text": "{FAQ 3 Answer goes here}"
      }
    }
  ]
}
</script>
In Webflow, you replace each placeholder with a dynamic CMS field embed. When you're inside the Custom Code section of a Collection template, Webflow lets you insert CMS fields using its dynamic field syntax — click the + Add Field option and select the corresponding FAQ field (like faq-q1, faq-a1, etc.). After publishing, each programmatic page outputs its own unique FAQPage Schema with the specific Q&A content from that CMS item.
To verify it's working, open any published programmatic page and run it through Google's Rich Results Test. You should see each FAQ question and answer detected correctly. For a dedicated walkthrough on FAQ Schema in Webflow, see our complete FAQ Schema implementation guide.
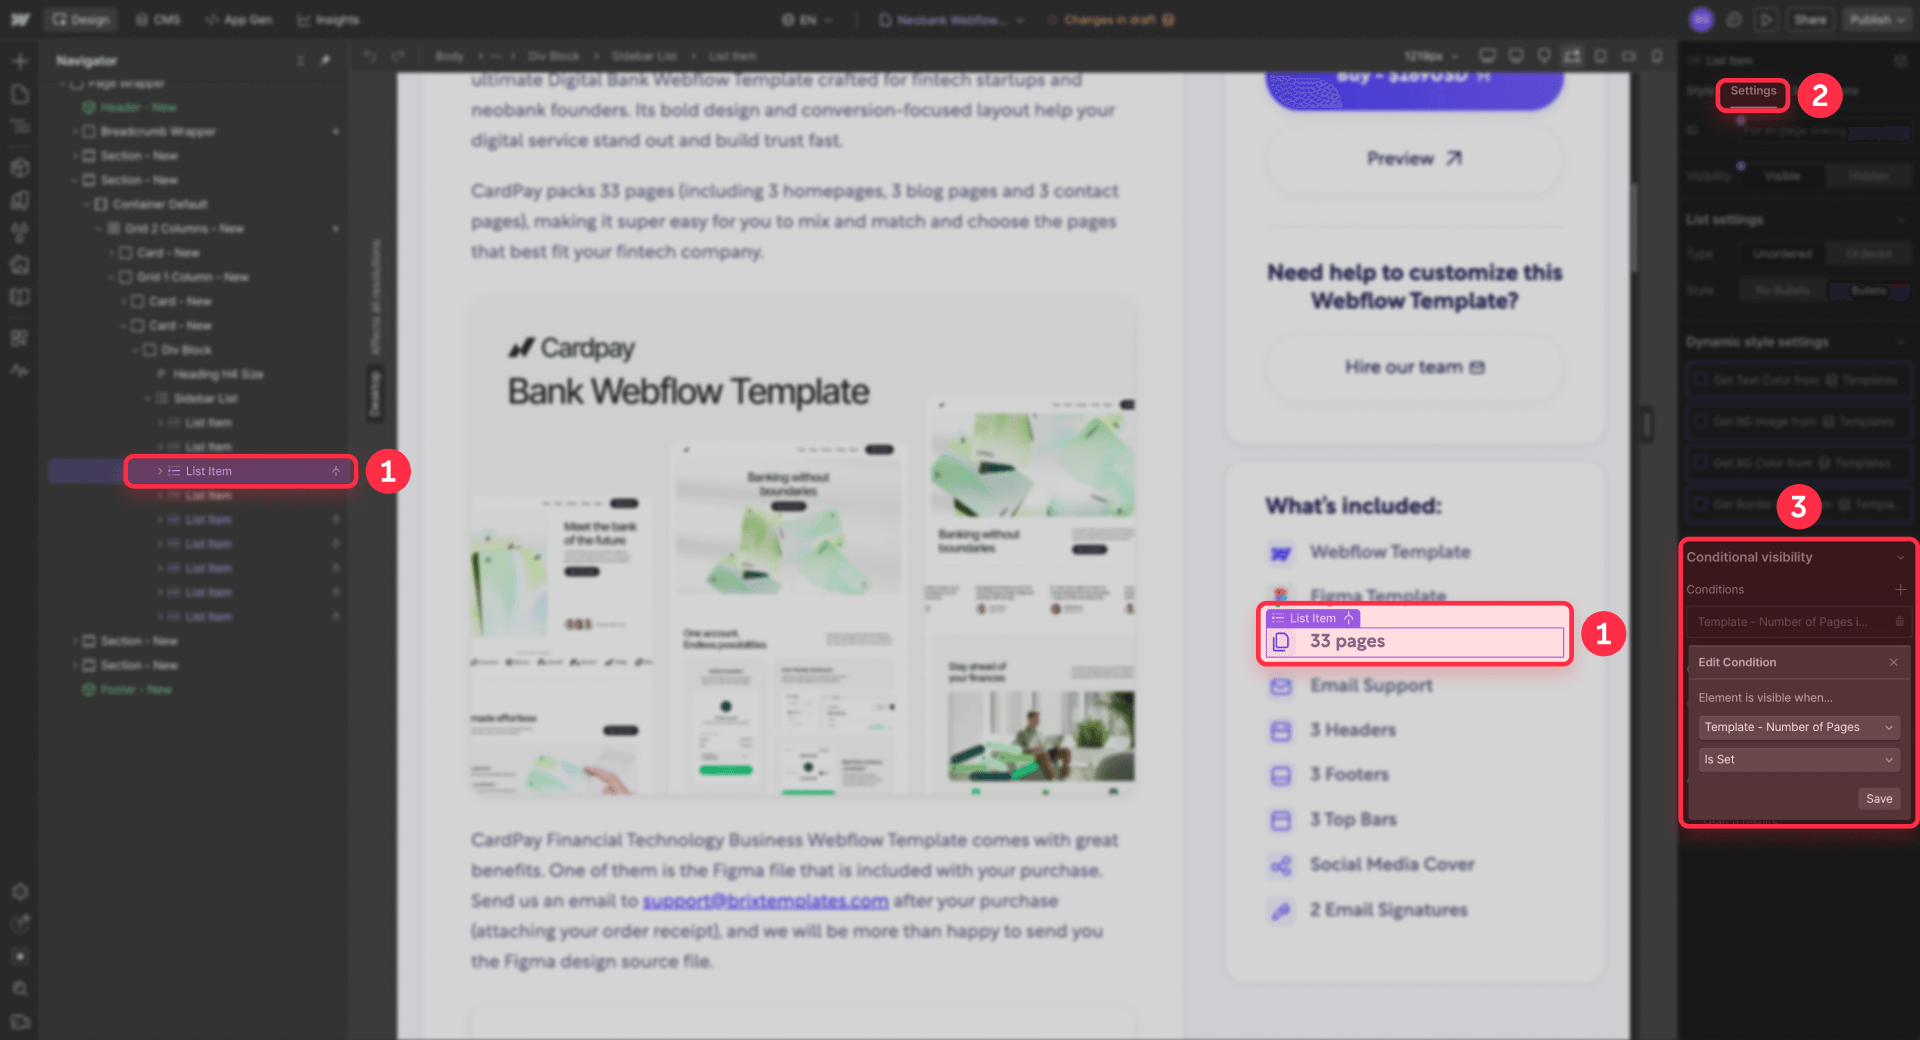
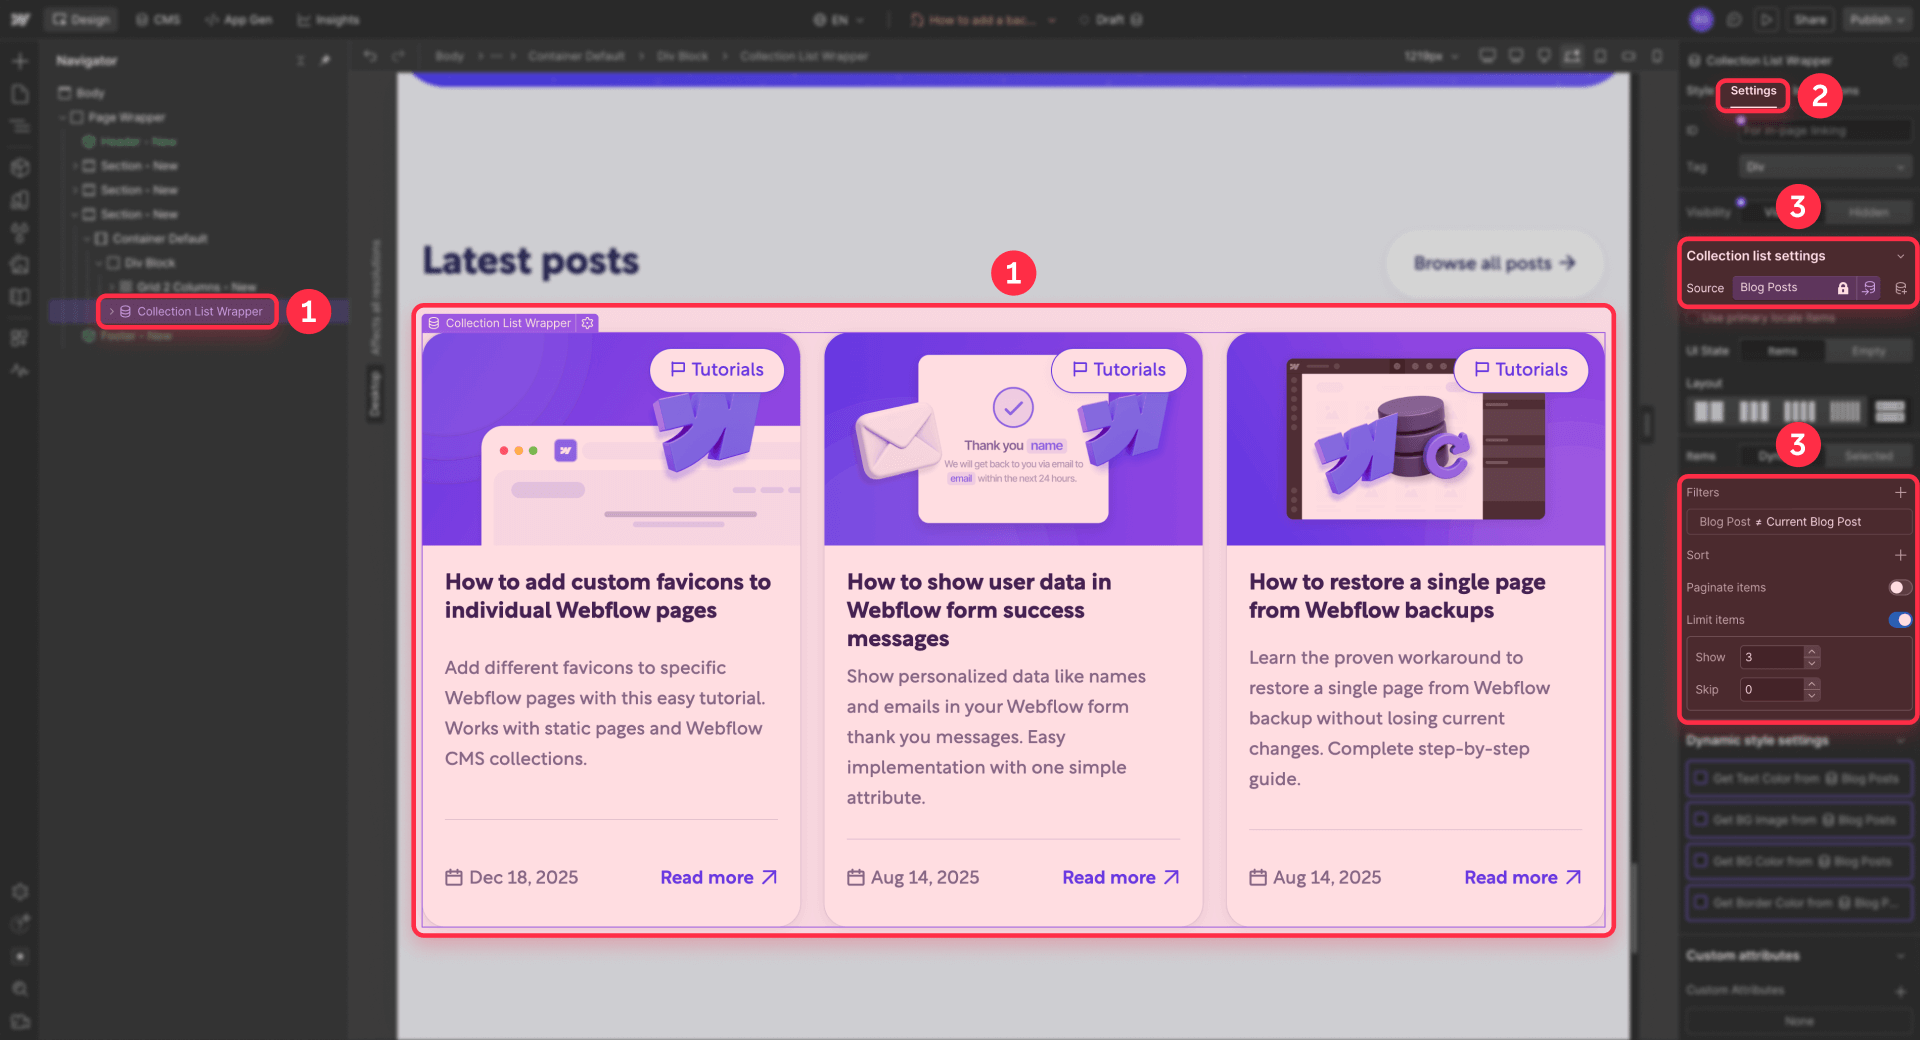
Use conditional visibility in Webflow to make each programmatic page unique
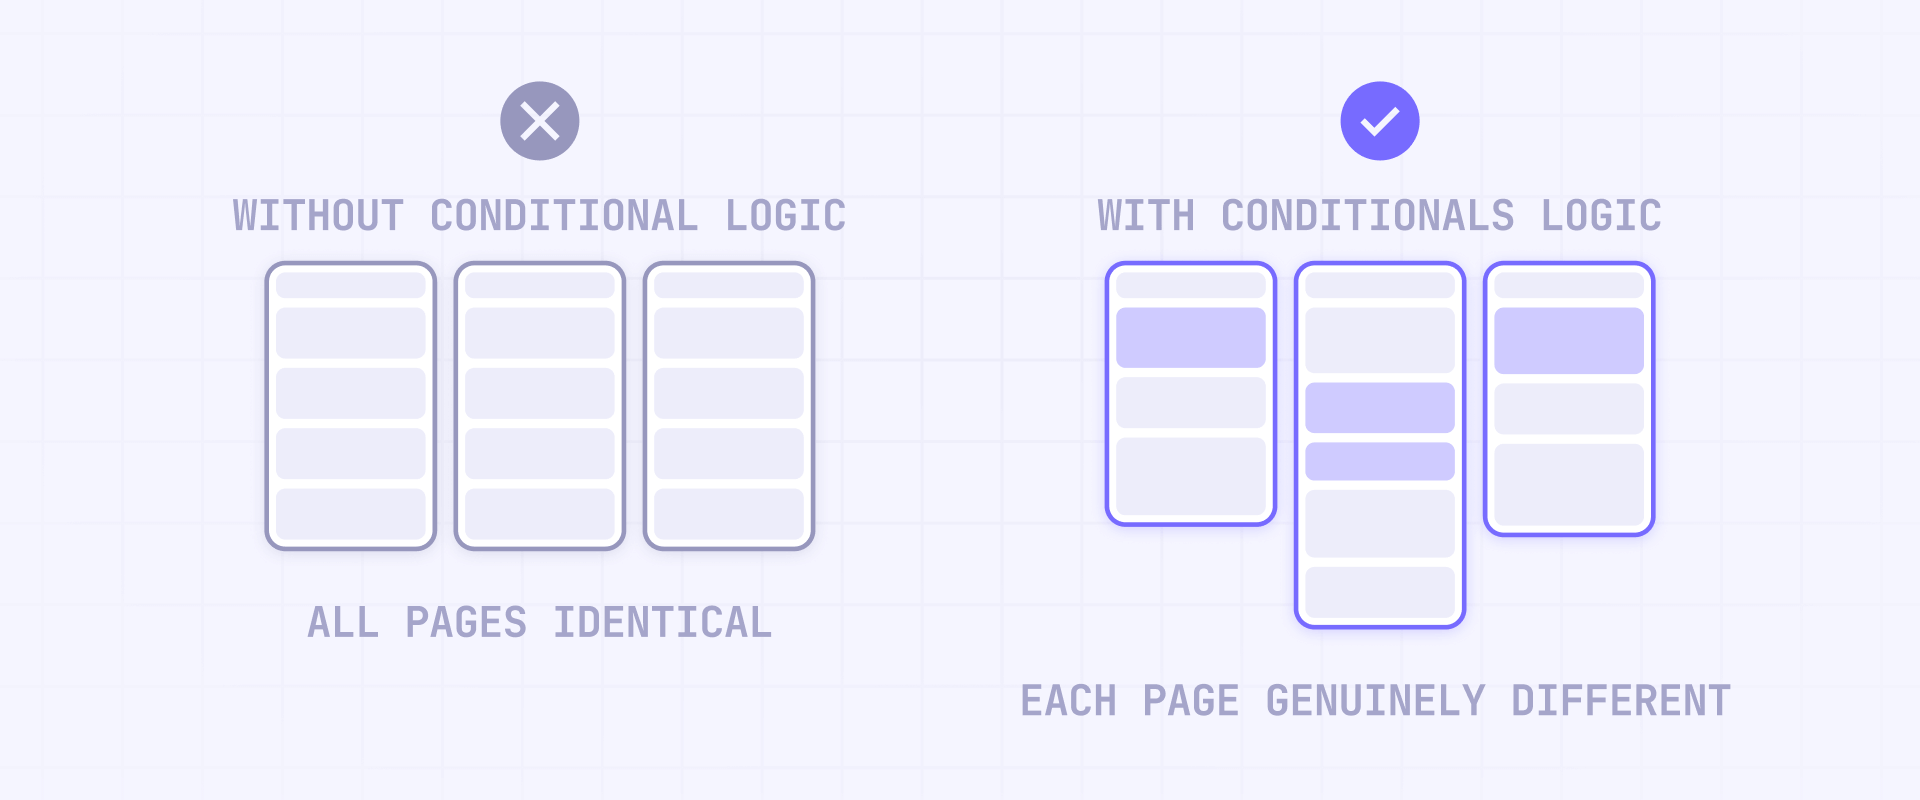
Conditional visibility is what separates a good pSEO template from a thin-content factory. The idea is simple: create template sections that only appear when the CMS data for that section exists. If a CMS item has pricing data, the pricing section shows. If it doesn't, that section simply isn't rendered — and the page looks and feels genuinely different from items that do include it.
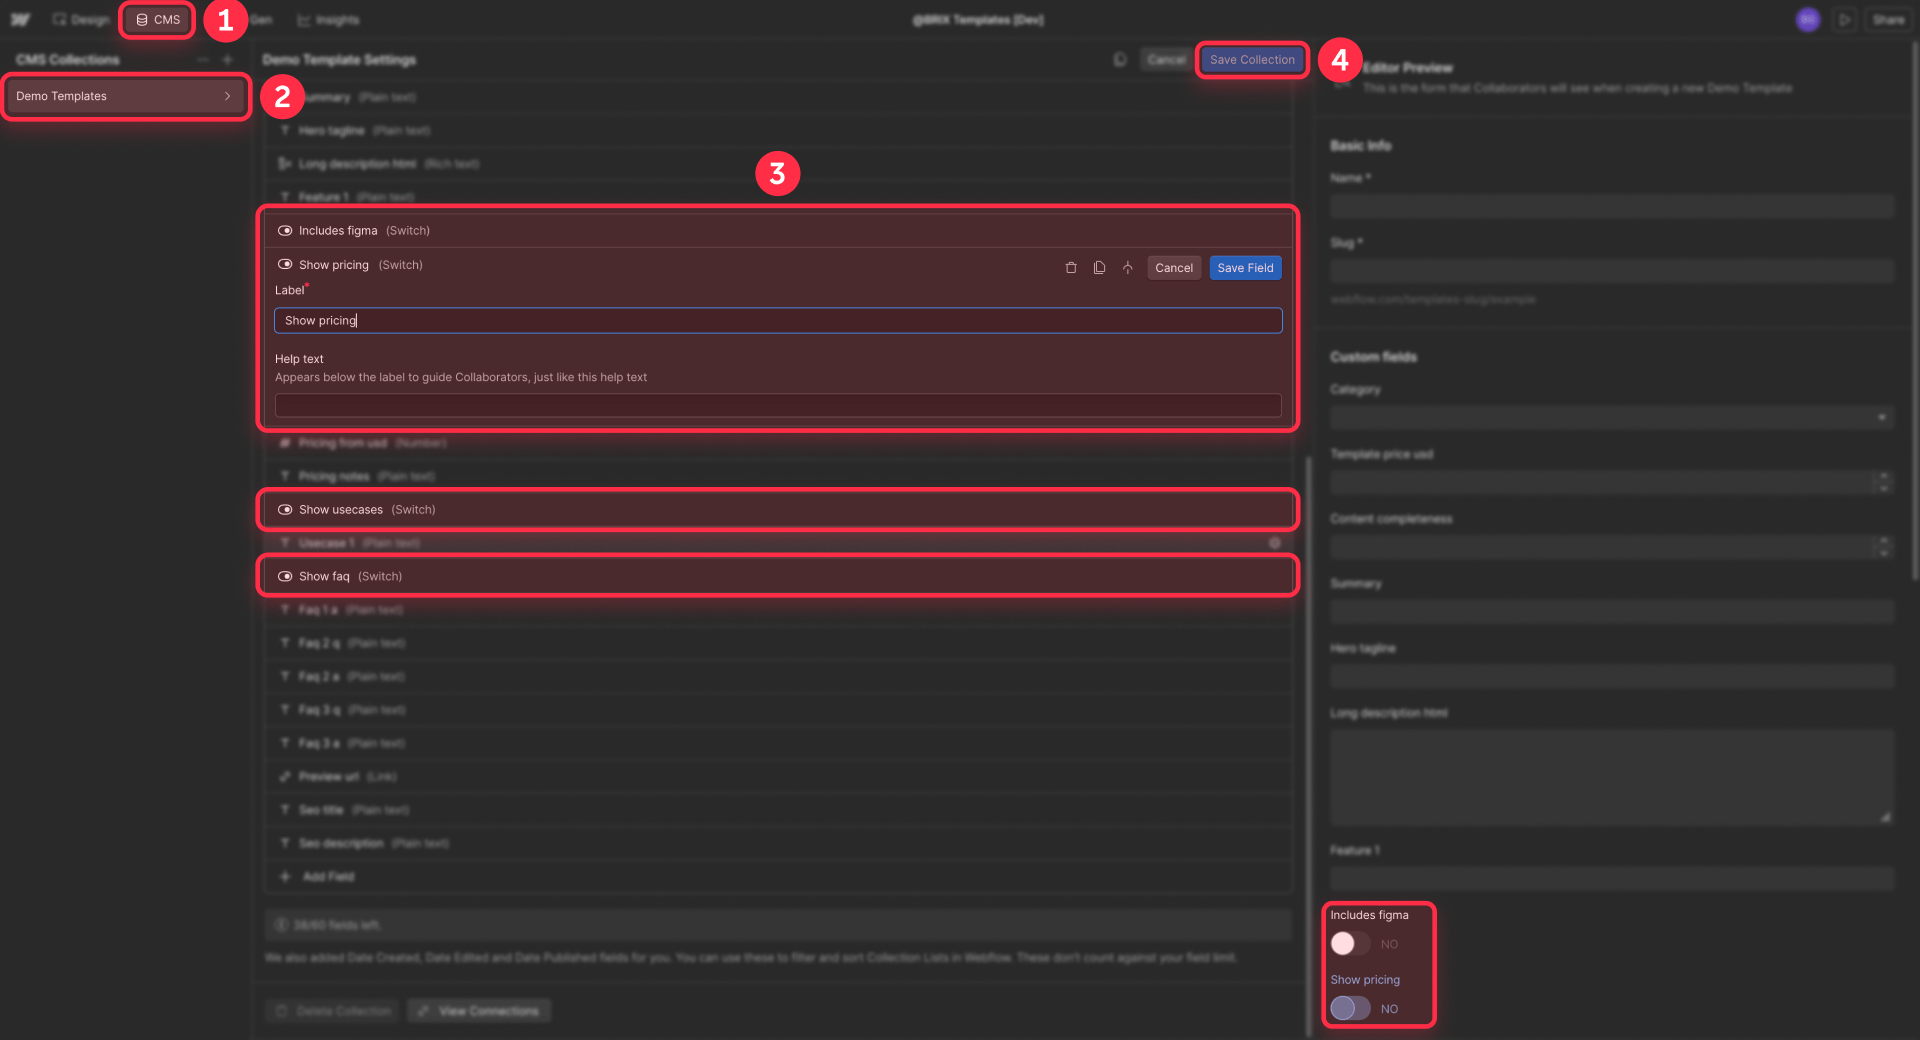
Webflow significantly improved conditional visibility in January 2026 with a complete reimagining of how it works. You can now show or hide elements using conditional logic based on component props, CMS fields, variants, or locale settings. This update also introduced a new Switch prop type for components that need simple on/off values — perfect for pSEO templates where you want certain modules to toggle based on whether data exists.
Here's how to use it in your programmatic template:
- Add a section to your template (for example, a "Pricing overview", "Comparison table", or "FAQ" module).
- Bind the section's content to CMS fields.
- Apply Conditional visibility on the section wrapper — set it to show only when the relevant CMS field is set (not empty).
- For component-based templates, use the new Switch prop to create reusable modules that cleanly toggle on or off per CMS item.
This prevents "empty template pages" that look identical because every section renders regardless of whether there's real content behind it. With conditional visibility, two pages from the same template can have genuinely different layouts — one might show a pricing table, comparison chart, and FAQ section, while another shows only a detailed description and related resources. For a deeper dive on this technique, see our tutorial on hiding empty CMS sections.
Add combo Webflow CMS Collections only if you need multi-dimension pages
When a single Collection isn't enough — typically when you need pages that combine two entities like "Service in City" — you'll use a combo Collection pattern.
The approach that works in Webflow uses three Collections:
- Areas Collection (with fields for city name, state, region data)
- Services Collection (with fields for service name, description, key features)
- Area Services Collection — the combo that references both using two Reference fields
Each item in the Area Services Collection represents one unique combination (like "Web Design in Austin") and has its own curated content, FAQs, and data. The Reference fields pull in shared data from the parent Collections, while the combo-specific fields provide the unique content that prevents pages from looking identical.
Be careful with this approach. Building multi-dimension pages is risky if there's no proven search volume for those combinations, or if you don't already have substantial unique content for each one.
If you're generating 500 city-service combos but each page would just swap the city name in a paragraph of generic text, those pages will likely never get indexed. Worse, they may actively signal to Google that your site produces low-quality content.
Start with your strongest 20-50 combinations where you have real data, validate they get indexed, and only then expand. Multi-dimension pSEO is a tool for when you've already proven single-dimension pages work — not a starting point.
3 - Build internal linking in Webflow for programmatic page discovery
Your sitemap helps Google discover your programmatic pages, but internal links are what help them rank. Webflow pSEO that wins usually has a deliberate hub-and-spoke structure where hub pages concentrate authority and distribute it to individual programmatic pages.
Create Webflow hub pages that link to programmatic pages
Create static hub pages (for example, /integrations/, /glossary/, or /services/) that list your key categories using Collection lists. These hub pages serve as your internal linking engine — they're indexable, they concentrate authority, and they give Google a clear path to every programmatic page.
Keep hubs organized by category or type rather than dumping every item into one giant list. A SaaS integrations directory might have hubs for "Analytics integrations", "Payment integrations", and "Communication integrations" — each linking to the relevant subset of Collection items.
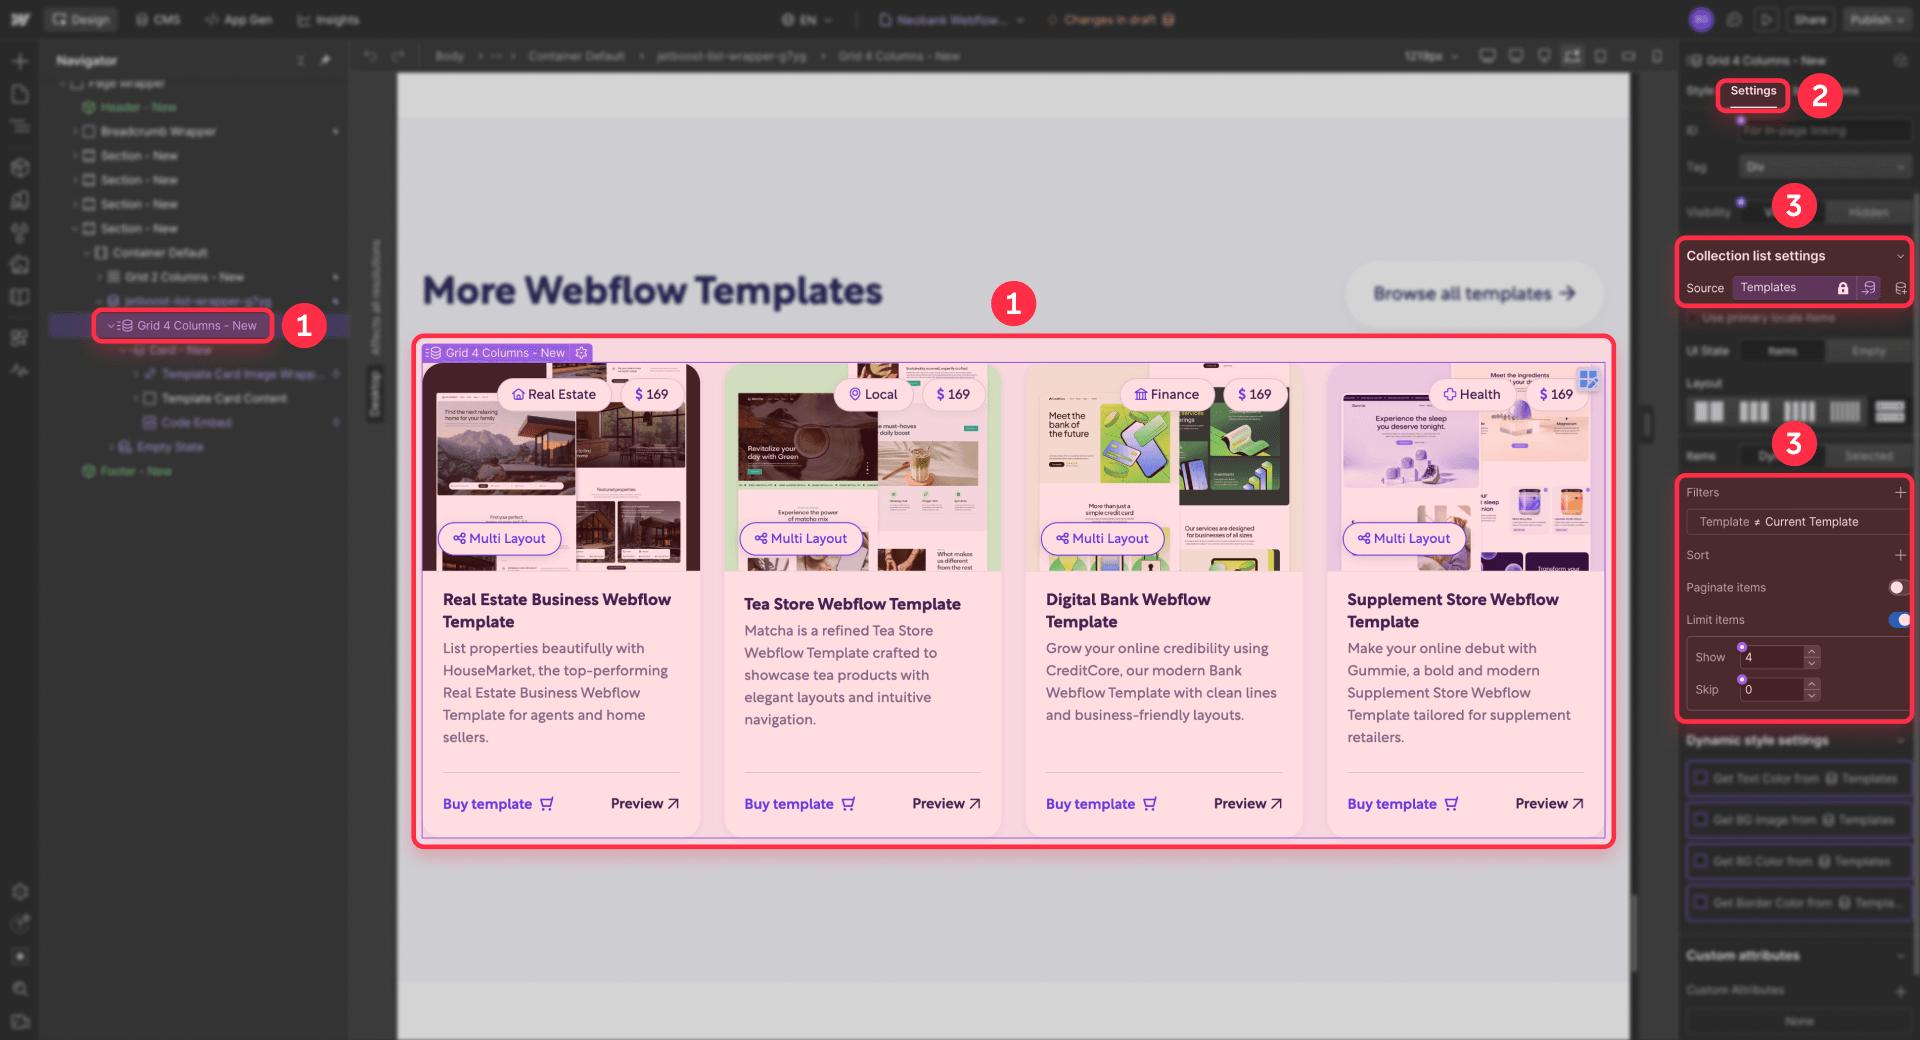
Add related-page modules in Webflow templates using reference fields
On your Collection template, add a "Related items" section:
- Add a Collection list to your template.
- Filter it by a Reference relationship (for example, same category or same service type).
- Cap the list to the most relevant items — 4 to 8 related pages is enough to create predictable crawl paths without bloating the page.
This creates cross-links between your programmatic pages without needing faceted URLs or complex filter systems.
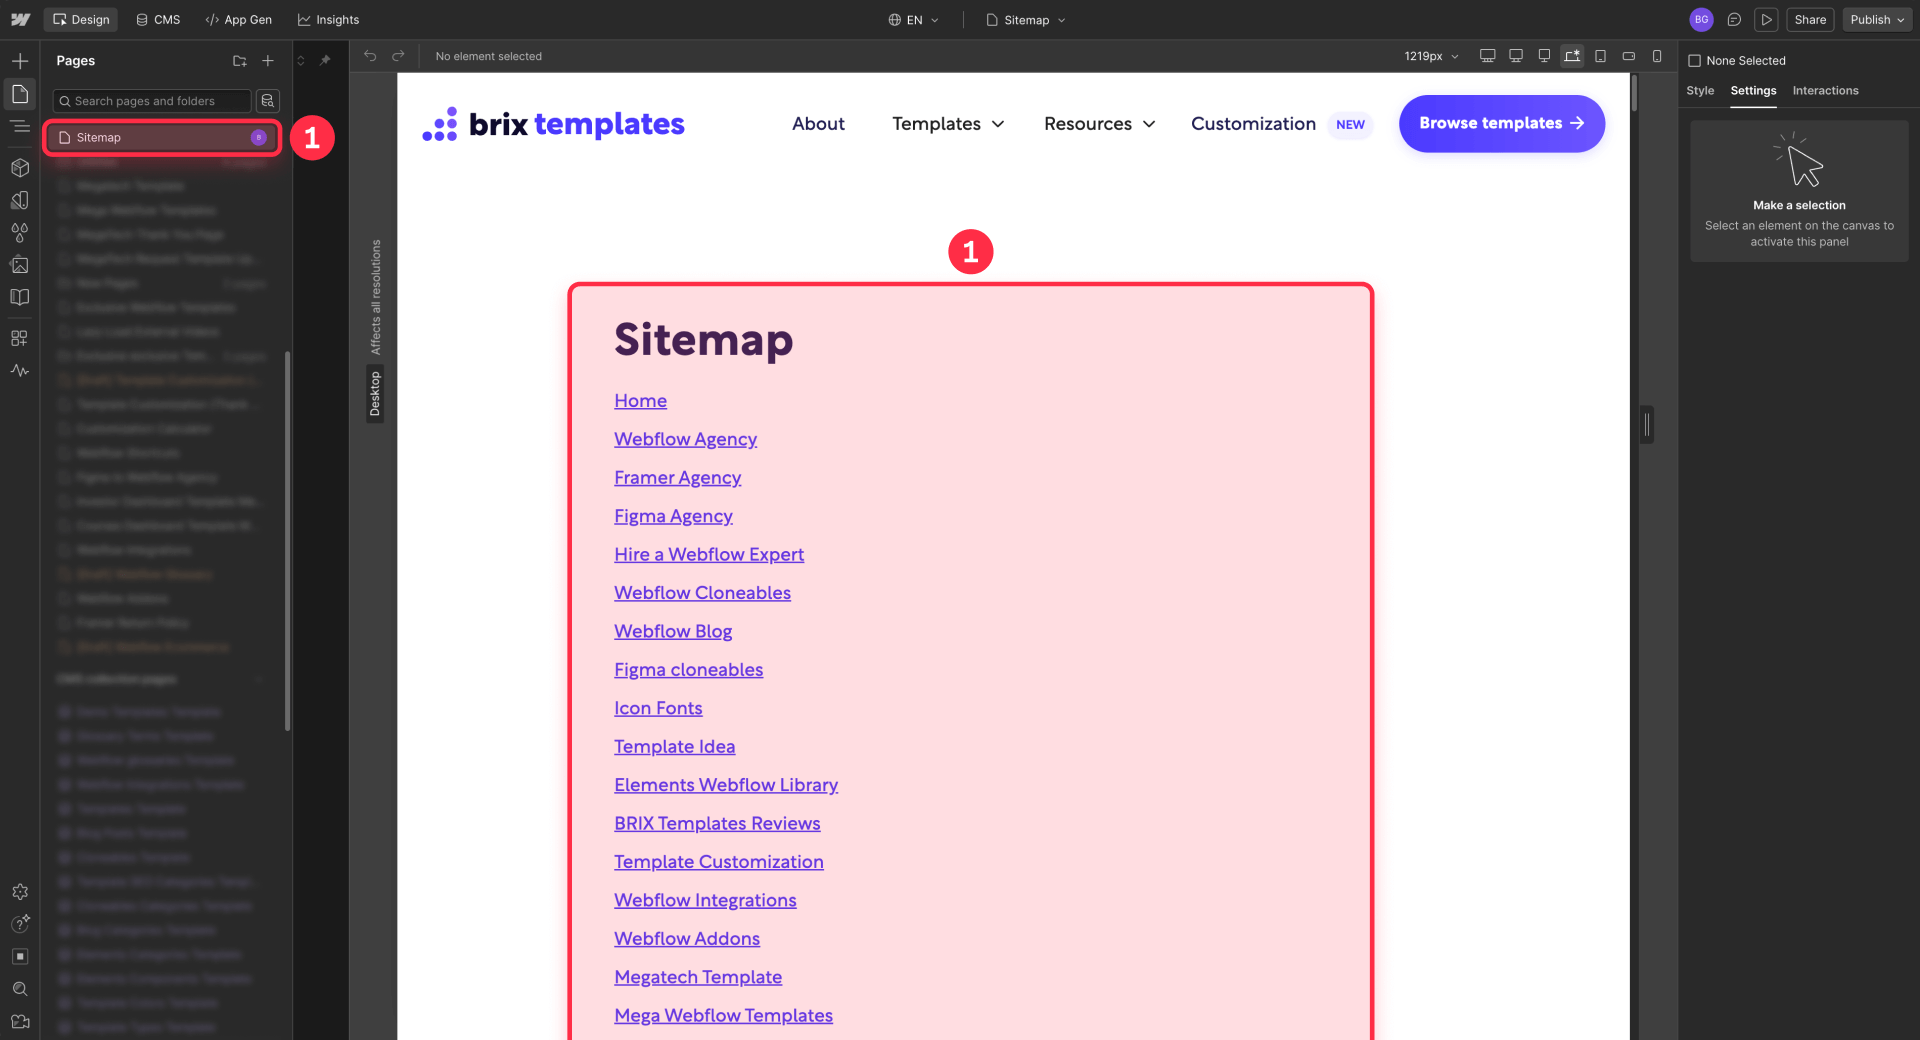
Build an HTML sitemap page in Webflow for programmatic SEO navigation
Separate from your sitemap.xml, create a real page (for example, /sitemap/) that links to your main hubs and top programmatic pages. Add a link to this page labeled Sitemap in your site's footer so it's accessible from every page on your site.
Break the sitemap page into sections (by category, by type, by letter) and use pagination when lists get large so you don't hit Webflow's Collection list limits. This page isn't glamorous, but it's a reliable safety net for pages that might otherwise be too many clicks deep in your site structure — and it gives crawlers another entry point into your programmatic content.
4 - Set canonical tags and manage localization in Webflow for programmatic pages
When you're publishing hundreds of pages from templates, it's important to make sure Google understands which pages are original and how localized versions relate to each other. The good news: if you're following the advice in this guide and only publishing pages with genuinely unique content, most indexation takes care of itself. The two things you do need to configure correctly are canonicals and localization settings.
Set canonical tags in Webflow to prevent duplicate issues
Webflow supports a global canonical and per-page canonical settings. The rules matter for pSEO:
- Always include the protocol (https://).
- Match your default domain (including www if that's what you use).
- Don't add a trailing slash — Webflow warns this can create double slashes like //contact.
To set the global canonical:
- Open Site settings → SEO.
- Find Global canonical tag URL.
- Add your base URL (with protocol, no trailing slash).
- Click Save and Publish.

If you inject canonicals through another tool like Google Tag Manager, don't also set them in Webflow. Multiple canonical tags can confuse search engines and may be ignored entirely — which defeats the purpose.
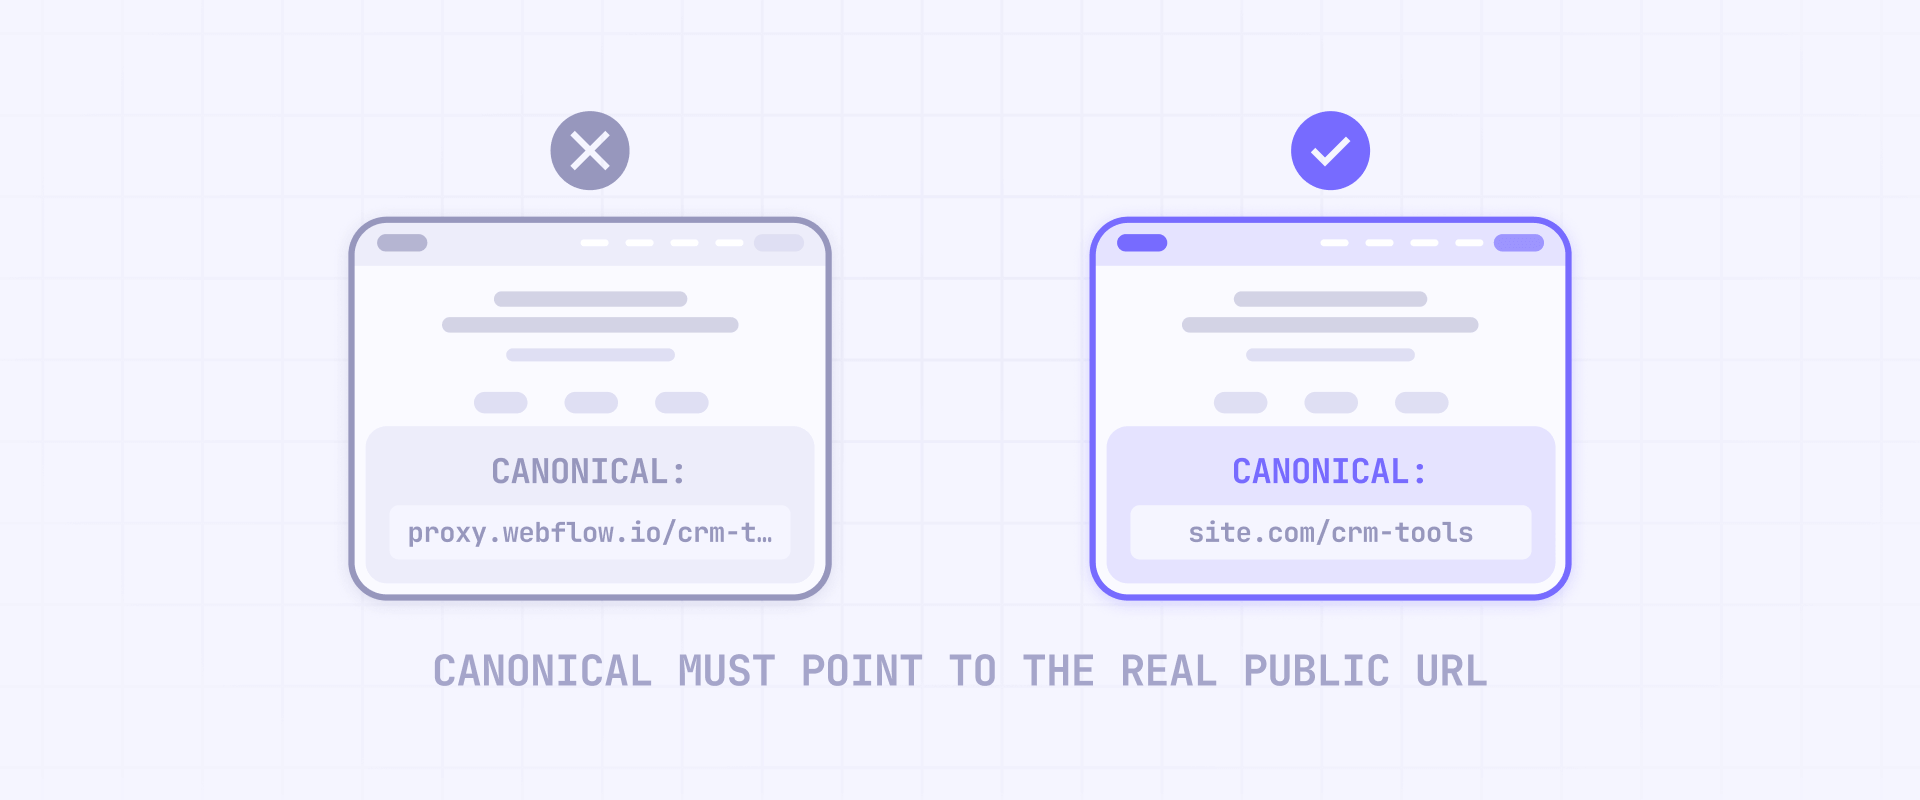
This becomes especially important if you're using a reverse proxy, subdomain setup, or any kind of URL rewriting to serve your Webflow site under a different domain or path. In those scenarios, Webflow might generate canonical tags pointing to the original Webflow staging domain or an unintended URL variation. Always verify by inspecting the **** tag in the page source of your live site after publishing — if it doesn't match the URL where users actually land, search engines may ignore your pages or attribute ranking signals to the wrong domain.
Handle Webflow localization hreflang and sitemaps for programmatic pages
If your business serves multiple markets, translating your programmatic pages into other languages can open up entirely new geographic audiences with content that's already structured and proven. A glossary that ranks well in English can perform just as well in Spanish, German, or Portuguese — especially in B2B niches where localized content is still scarce.
The return on effort is significant: you've already done the hard work of building the data model, the template, and the internal linking structure. Translating 200 glossary terms into Spanish creates 200 new pages targeting a market where your competitors likely haven't invested in this kind of content.
Webflow's localization features have improved significantly for this use case:
- Hreflang settings (launched April 2025): You can now auto-generate, disable, or use a custom base URL for hreflang tags. Configure these settings before you scale localized CMS pages, because changing them later creates inconsistencies that confuse search engines.
- Improved localized sitemaps (September 2025): Auto-generated sitemaps now include all localized routes as individual URL entries with self-referencing hreflang tags — meaning Google can properly discover and associate your translated pages.
Two constraints to keep in mind for localized programmatic content:
- 301 redirects are relative to the root domain and won't automatically apply to localized subdirectories. This means /old-url and /es/old-url need separate redirect rules if you change slugs.
- Locale routing uses 302 redirects, and Webflow doesn't offer a native way to override this behavior.
After publishing any localized programmatic content, always inspect your /sitemap.xml output to confirm that localized entries and hreflang references match your intended structure. Don't treat localization as a checkbox — treat it as a system you need to verify page by page until you're confident it's working correctly across all locales.
5 - Publish, monitor, and scale Webflow programmatic pages
Publishing is where pSEO becomes real — and where most people either rush too fast or don't know what to look for. The key principle: start slow, watch what Google does, and only scale what's working.
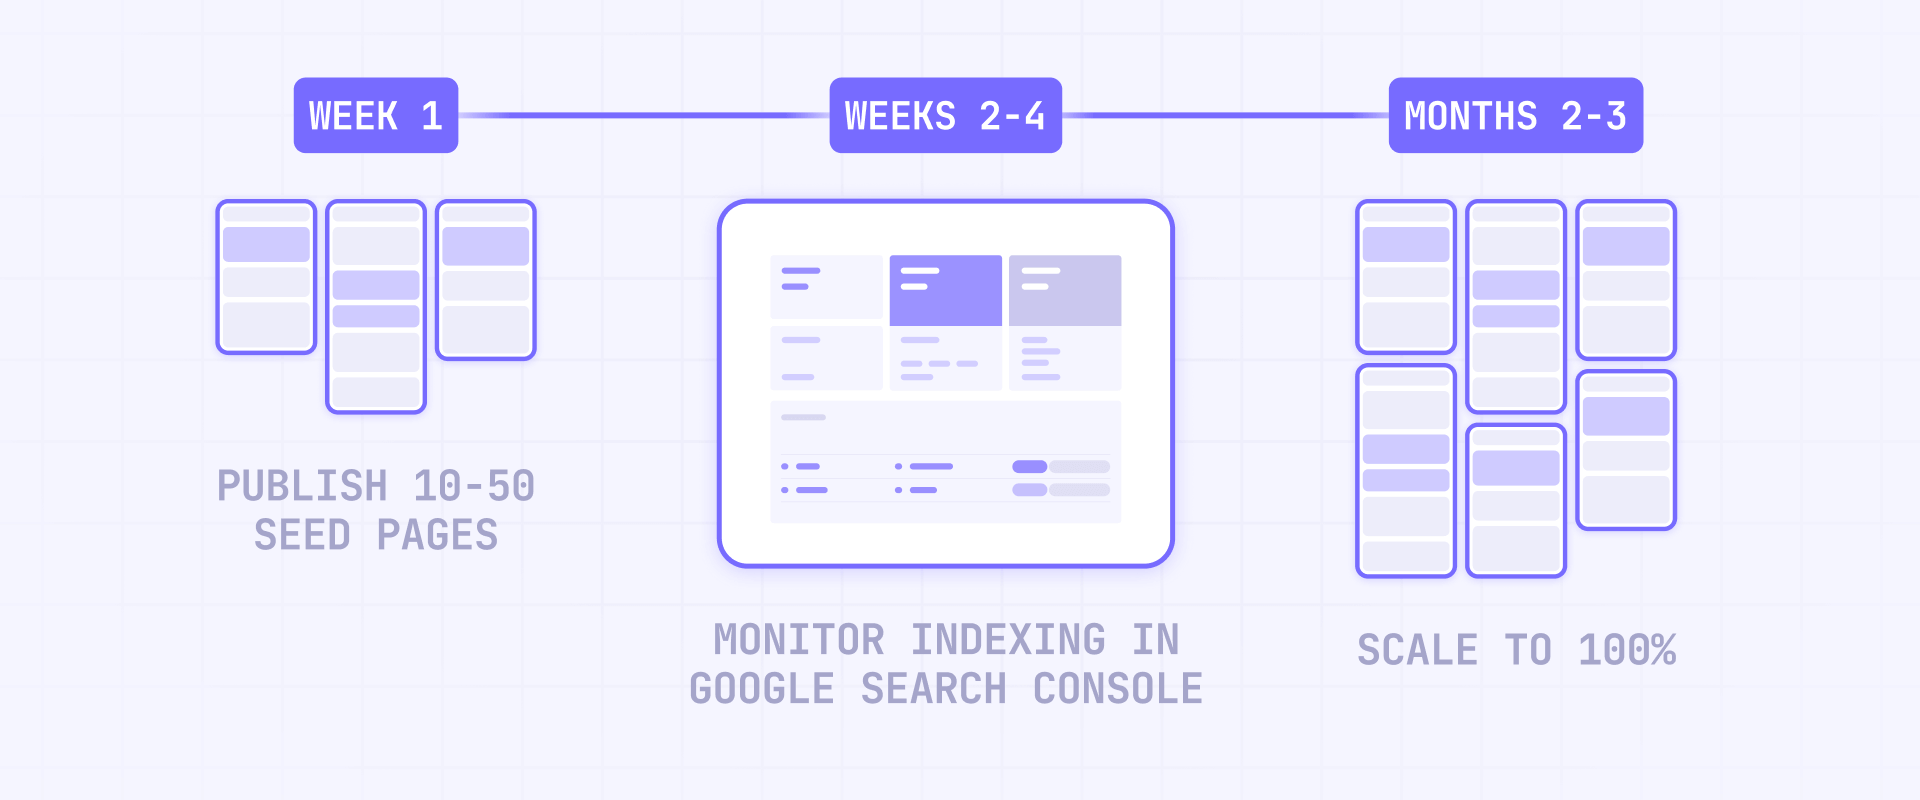
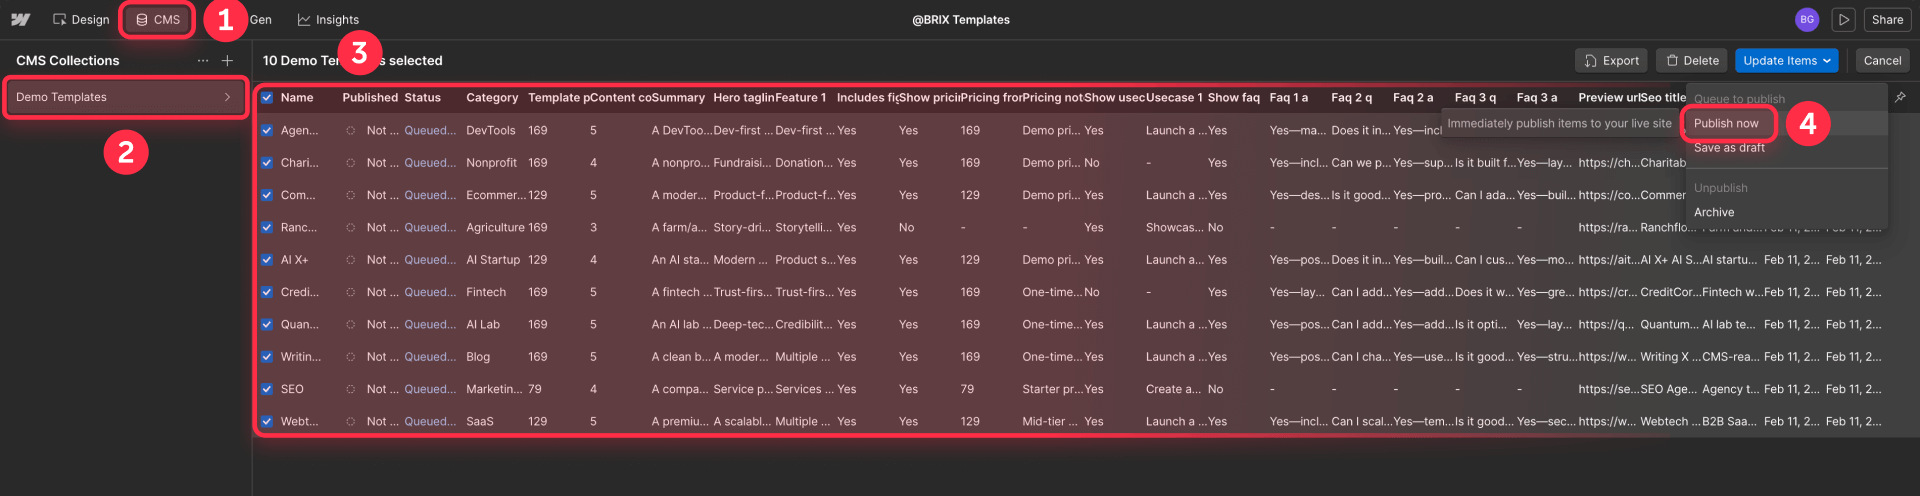
Publish Webflow programmatic pages gradually and monitor indexation
Don't publish your entire dataset at once. A safer approach:
- Publish around 10 pages per day for the first batch. This gives Google time to crawl and evaluate each page individually rather than seeing a sudden flood of template-generated content.
- Check indexation in Google Search Console. After a few days, go to URL Inspection and test several of your published pages. If they're being indexed, you're on the right track.
- If pages aren't getting indexed, use the Request Indexing button in GSC's URL Inspection tool to manually submit them. If they still don't get indexed after a week or two, the problem is likely content quality — the pages may be too thin or too similar to each other.
Unless you're working with thousands of items, we recommend keeping your publishing pace at around 50 pages per day at most. This prevents your programmatic pages from consuming too much of Google's crawl budget for your site, leaving room for your other important pages to be crawled and indexed regularly.
If you haven't connected your site to GSC yet, follow our step-by-step guide to submitting your Webflow sitemap to Google Search Console. You can also submit your sitemap to Bing for additional search coverage.
Use Google Search Console to monitor your Webflow programmatic pages
Google Search Console is your primary tool for understanding how Google is handling your programmatic pages. After publishing your first batches, regularly check the Indexing section to see how many of your pages are actually making it into Google's index — and how many aren't.
Go to Pages (under Indexing) and review the breakdown of indexed vs. not-indexed URLs. Click into the "not indexed" categories to see which specific pages are being left out and the reasons Google gives. This information tells you whether the issue is content quality, crawl access, or something else entirely.
The key habit is checking GSC at least weekly during your first month of publishing. If you see a pattern where a significant portion of your pages aren't getting indexed, pause publishing and investigate before adding more. The answer is almost always in the content — pages that are too similar, too thin, or not well-linked from your hub pages.
Scale Webflow programmatic publishing with sync tools (if needed)
For the vast majority of pSEO projects, manual CSV imports and gradual publishing through the Webflow CMS panel are all you need. But if you're managing ongoing updates to hundreds of items — prices that change weekly, integration statuses that need syncing from an external database — automation tools can help.
- WhaleSync: Offers two-way real-time sync between Webflow CMS and Airtable, Notion, or Google Sheets. Good for teams that want to manage content in a spreadsheet and see it reflected in Webflow automatically.
- Zapier or Make: Both can push data to Webflow via API. Make is generally more capable for CMS work because it supports batching and can handle reference fields correctly — something Zapier's Webflow integration struggles with.
These tools are worth exploring if you're operating at serious scale, but the vast majority of pSEO projects won't need them. Start with manual publishing, prove your pages get indexed, and only add automation when the manual process becomes a genuine bottleneck.
Prune and consolidate underperforming Webflow programmatic pages
After your pages have been live for 2-3 months, it's time to evaluate what's working and cut what isn't. Here's the process:
- Export your GSC performance data. Go to Search Console → Performance → filter by the URL prefix of your programmatic pages (for example, /glossary/ or /integrations/). Export the data to a spreadsheet.
- Identify pages with zero clicks and zero impressions. These are pages Google either isn't indexing or isn't showing to anyone. If a page has had zero impressions for 60+ days, it's not contributing to your SEO.
- Decide: improve or redirect. For each underperforming page, you have two options. If the topic has search volume and you can add better content, update the CMS item with more unique data, better FAQs, and a stronger summary. If the topic doesn't justify its own page, redirect it to a stronger related page or hub.
- Set up 301 redirects in Webflow. Go to Site settings → Publishing → 301 redirects. Enter the old path and the redirect target. For bulk redirects, you can import a CSV (max 16MB). Webflow also supports wildcard patterns using (.*) and %1 for capture groups — see our complete guide to wildcard redirects in Webflow for the full syntax.
- Republish and verify. After setting up redirects, publish your site and test that old URLs correctly resolve to the new targets.
One Webflow constraint to plan around: you can't redirect an existing live page without first deleting, unpublishing, archiving, saving it as a draft, or changing its slug. Make sure to update the CMS item's status before creating the redirect rule.
Troubleshooting programmatic SEO in Webflow
- My Webflow programmatic pages are published but not indexed: Check that Sitemap indexing is enabled for both the CMS items and the Collection template. Submit sitemap.xml in Google Search Console and run URL Inspection on specific pages. If pages still aren't indexing after two weeks, the content is likely too thin or too similar to other pages. Verify: In GSC, the URL shows "Indexing allowed" and can be requested for indexing.
- Webflow sitemap.xml is missing CMS items: Confirm Auto-generate sitemap is enabled in Site settings → SEO. Make sure the CMS items are published (not draft) and Sitemap indexing is enabled per item. Verify: The URL appears in /sitemap.xml after publishing.
- I need nested URLs for Webflow CMS pages but slugs won't allow it: You can't put / inside a CMS item slug, but you can nest your Collection under static folders using CMS Folders. This gives you URLs like /content/blog/post-name. If you need two dynamic segments (like /services/{category}/{item}), that requires a reverse proxy — Webflow only supports one dynamic segment per URL. Verify: Your desired URL structure works using CMS Folders + Collection URL + item slug.
- My Webflow templates look identical across hundreds of pages: Add CMS-driven modules (FAQ sections, comparison tables, data blocks) and apply Conditional visibility so sections vary per item. Use the new Switch prop type for clean on/off toggling of template modules. Verify: Randomly compare 10-20 pages side by side and confirm at least 3 sections differ meaningfully.
- My FAQPage Schema isn't showing in Google's Rich Results Test: Double-check that your CMS field slugs in the JSON-LD code match exactly (including hyphens and casing). Make sure the FAQ fields are filled in for that specific CMS item — empty fields will output blank Schema values that fail validation. Verify: Run the published page URL through Google's Rich Results Test and confirm each Q&A is detected.
- Webflow won't let me add a 301 redirect for an existing live URL: Webflow requires the old page or item to be deleted, unpublished, archived, saved as draft, or have its slug changed before you can create a redirect for that path. Verify: After publishing, the old URL returns a 301 and lands on the target page.
- My Webflow schema markup shows duplicates: Ensure you're keeping Schema in one place — either the Collection template's custom code or Webflow's built-in schema field, not both. Also note that Reference, Multi-reference, and Multi-image fields aren't supported in Webflow's native schema markup. Verify: Use Google's Rich Results Test and confirm only one schema block is detected per type.
- Localized Webflow pages aren't redirecting as expected: Webflow uses 302 redirects for locale routing and doesn't let you override this. Localized paths also need separate 301 redirect rules — /old-url and /es/old-url are treated independently. Verify: Test both root and localized URLs after publishing to confirm correct behavior.
Frequently asked questions about programmatic SEO in Webflow
What is programmatic SEO in Webflow and how does it work?
Programmatic SEO in Webflow means generating many landing pages from structured data using Webflow CMS Collections and Collection template pages. Instead of building each page individually, you create one template, add structured data to a Collection (or import it via CSV), and Webflow renders a unique page per CMS item automatically.
The part most people miss is that generating pages is the easy step — making each page genuinely useful is what determines success. Every CMS item should have unique content across multiple sections: a distinct summary, real data, and unique FAQs. Start with a small batch of 50-200 items to validate your template before scaling. The goal is pages that deserve to be indexed, not just pages that exist.
How do I structure Webflow CMS Collections for programmatic SEO?
Model your Webflow CMS around real entities first — Glossary Terms, Integrations, Services, Industries — then add "combo" Collections only when each combination creates genuinely unique value. A common B2B pattern uses three Collections: the two parent entities plus a combo Collection with Reference fields pointing to both.
The key is designing enough CMS fields to render multiple unique sections per page. Start by defining your spreadsheet with fields for name, slug, summary, primary content, FAQs, and SEO metadata. Then create a matching Webflow Collection where each column maps to the right field type. If an item can't meet a minimum content bar, it shouldn't be published yet.
How do I prevent thin content in Webflow programmatic pages?
Thin content happens when you generate page combinations that don't have enough unique data to stand on their own. Fix this by designing templates that use Conditional visibility — sections only appear when their CMS fields are filled. If a page has no pricing data, the pricing section doesn't render, making the page genuinely different from ones that do.
The most effective prevention is quality control before publishing. Review your spreadsheet and honestly assess: does each item have a unique summary, at least one meaningful data section, and unique FAQs? If not, don't publish it. It's better to have 200 genuinely useful pages indexed than 2,000 thin pages that Google ignores.
Can Webflow handle thousands of CMS items for programmatic SEO?
Yes — the CMS plan ($29/month) supports 2,000 items, the Business plan ($49/month) starts at 10,000, and Enterprise (from $10,000/year) goes well beyond 100,000 with custom configuration. For most B2B programmatic projects, 2,000 to 10,000 items is more than enough to build a significant content asset.
The real constraint isn't item count — it's dynamic content limits. Non-Enterprise plans allow 20 Collection lists per page, only 2 nested lists, and 10 items per nested list. Design lean templates with pagination and use hub pages to distribute content. Webflow can handle the scale, but your template architecture matters more than the raw number.
Should I use CSV import or automation tools for Webflow programmatic pages?
Start with CSV import — always. Import 50-200 items, publish to staging, validate that your template, SEO fields, internal links, and Schema all work correctly. Only after the template is proven should you consider automation for ongoing updates.
For most pSEO projects, manual CSV imports remain the primary method. Tools like WhaleSync or Make become valuable only when you need ongoing sync from an external database — for example, prices that change weekly or integration statuses that update daily. Don't add automation complexity until you actually need it. Start simple and add sophistication only when manual becomes a bottleneck.
How do I add FAQPage Schema to Webflow programmatic pages?
Add dynamic FAQPage Schema by placing JSON-LD code in your Collection template's Custom Code section (inside the head tag) and using Webflow's CMS field embeds to pull FAQ content from each item. Create plain text CMS fields for each question and answer, then insert them into the Schema code using Webflow's + Add Field option.
After publishing, test the output with Google's Rich Results Test to confirm each Q&A pair is detected. This is one of the highest-return Schema types for pSEO because it scales automatically — every CMS item with FAQ data gets structured data without manual work. See the full code example in the Schema section of this guide.
How do I build internal linking for Webflow programmatic pages?
Use a hub-and-spoke model: create static hub pages (like /integrations/ or /glossary/) that link to all relevant CMS items through Collection lists. On each programmatic template page, add a "Related items" section filtered by a Reference field to create cross-links between similar pages.
The combination of hubs linking down and individual pages linking across creates a crawl structure Google can follow efficiently. Also create an HTML sitemap page linked from your footer as Sitemap — it gives crawlers another entry point and helps users navigate your content. Cap related items to 4-8 per page for clean, focused linking.
How do I handle Webflow localization for programmatic SEO pages?
Translating your programmatic pages opens up entirely new markets with content that's already structured and proven. Webflow's hreflang settings (April 2025) let you auto-generate, disable, or customize hreflang tags, and improved localized sitemaps (September 2025) now include all localized routes as individual URL entries.
Configure hreflang settings before scaling localized pages — changing them later creates inconsistencies. After publishing, always inspect /sitemap.xml to verify localized entries. Two gotchas: 301 redirects don't auto-apply to localized subdirectories (you need separate rules), and locale routing uses 302 redirects with no native override.
What are the biggest mistakes to avoid with Webflow programmatic SEO?
The most common failure is shipping hundreds of pages where only the H1 and meta description change. Google recognizes template-generated thin content and will either refuse to index it or devalue your site's quality signals. The second biggest mistake is scaling too fast — publishing thousands of items before validating that even a small batch gets indexed.
Other mistakes that quietly kill projects: importing messy spreadsheet data without validating slugs and content completeness, skipping the staging test entirely, neglecting internal linking from hub pages, and building automation before the manual process is proven. Treat pSEO as a system: plan your data, validate small batches, publish gradually at around 50 pages per day, and monitor GSC patterns before expanding.
How fast should I publish Webflow programmatic pages for best indexing results?
Start by publishing around 10 pages per day and checking Google Search Console after a few days to confirm they're being indexed. If they are, you can increase to roughly 50 per day — which is a good sustained pace for most projects. This rate prevents your programmatic content from consuming too much of Google's crawl budget for your site.
If pages aren't getting indexed even after manual submission through GSC's URL Inspection tool, the issue is almost always content quality, not speed. Pause publishing, go back to your template and CMS data, and improve the uniqueness of each page before adding more. Quality beats quantity — 200 indexed pages generating traffic are worth more than 2,000 that Google ignores.
Conclusion
Programmatic SEO in Webflow works when you treat it like a system: clean data in your spreadsheet, a CMS model that maps to real entities, templates that earn indexation through unique content, and gradual publishing with active monitoring. Start with simple single-dimension pages — a glossary, an integrations directory, a comparison library — and only expand to multi-dimension combos when you have the unique data to justify each page.
The natural next step is adding FAQPage Schema for rich results, expanding into localized versions of your best-performing pages, and building an ongoing pruning strategy based on what Google Search Console tells you about actual indexation and performance.
If you want help designing a scalable Webflow pSEO architecture — from CMS modeling and template design to Schema implementation and publishing strategy — our Webflow agency team can build it with you.


Join readers commenting on this post!