
You publish a Webflow CMS page and notice it: a big colored stripe with nothing inside, a "Testimonials" section with no testimonials, or a blank card where a gallery should be. The CMS item just didn't have content for that area, but the wrapper section still shows up and breaks the layout.
In this guide, you'll learn how to hide those empty Webflow CMS sections using native tools and minimal code. We'll cover both empty CMS fields and empty CMS lists, and walk through practical patterns you can reuse on any project.
Why hiding empty CMS sections matters for Webflow sites
Cleaner layouts on Webflow collection pages: Avoid random blank bands, cards, or grid cells when clients skip optional fields like videos, galleries, or links.
More professional Webflow marketing pages: Service pages, portfolios, and blogs look intentionally designed instead of "broken" when a section is missing content.
Better UX on Webflow job boards and directories: When there are no jobs or no related items, you can show a clear message or remove that block instead of leaving an empty hole.
Less manual editing for Webflow clients: Clients only manage CMS fields and switches – Webflow conditional visibility takes care of what should show or hide automatically.
Responsive layouts that actually hold up: Hiding empty sections at the wrapper level keeps spacing consistent across breakpoints instead of leaving weird gaps on mobile.
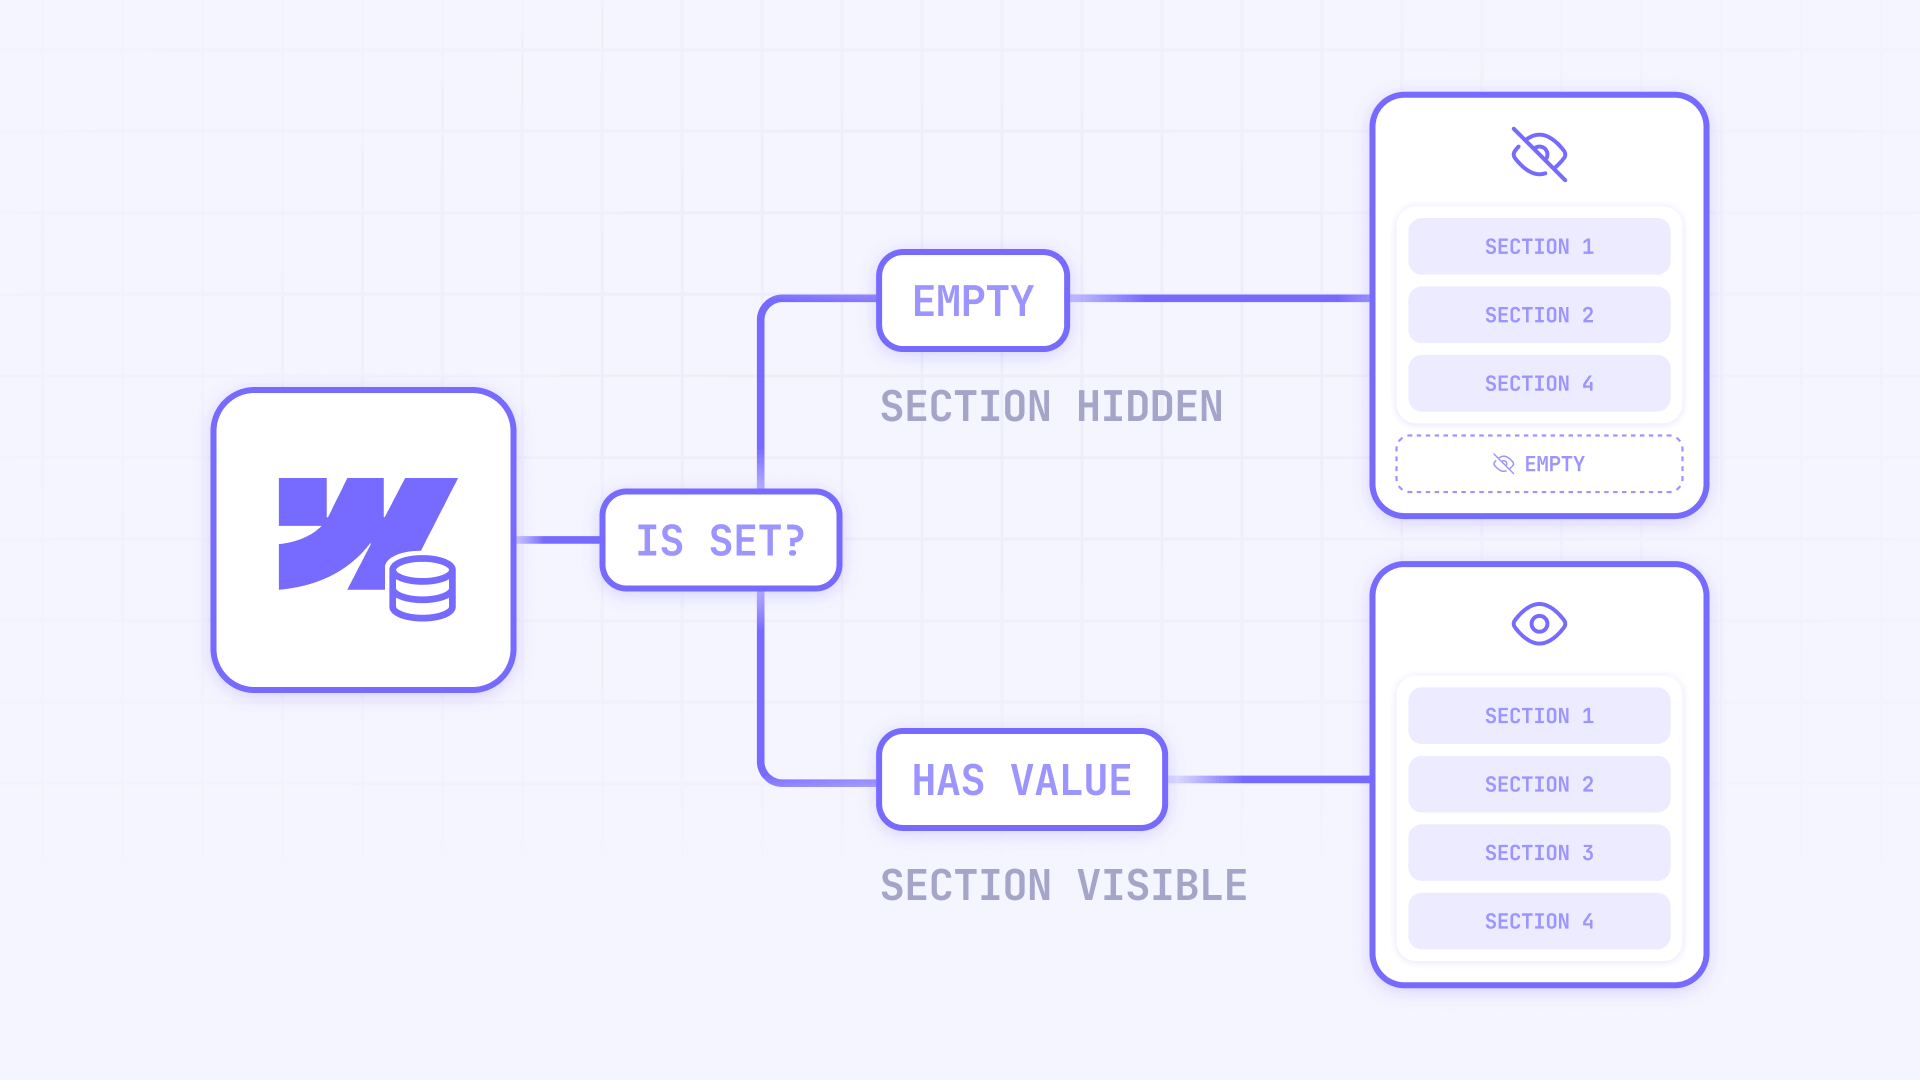
How Webflow conditional visibility works for hiding CMS content in Webflow
Before adjusting your layout, it’s important to understand how Webflow’s conditional visibility works. This feature lets you show or hide elements based on rules tied to CMS fields, ecommerce fields, or user state — and for this article, we’ll focus on CMS fields. Webflow only renders an element when all of its conditions are true. Filters determine which CMS items appear in a Collection List, while conditional visibility controls which elements or sections appear inside those items or on a Collection Page. To apply conditional visibility, you simply select an element, open the Element settings panel, scroll to Visibility & user access, click + Add condition, choose a Collection field, set a rule like Field is set, Field is not set, or Switch is ON, and save your changes.
How to prepare your Webflow CMS structure for conditional visibility
Before building rules, you'll get better results if your CMS is structured with optional content in mind. This is quick, but it saves a lot of pain later.
Key steps for preparing your Webflow CMS collections
- Identify optional sections in your Webflow layouts Go through a typical Collection page (project, service, product, blog post) and list which sections might not always have content: galleries, FAQs, videos, secondary CTAs, social links, testimonials, downloads, etc.
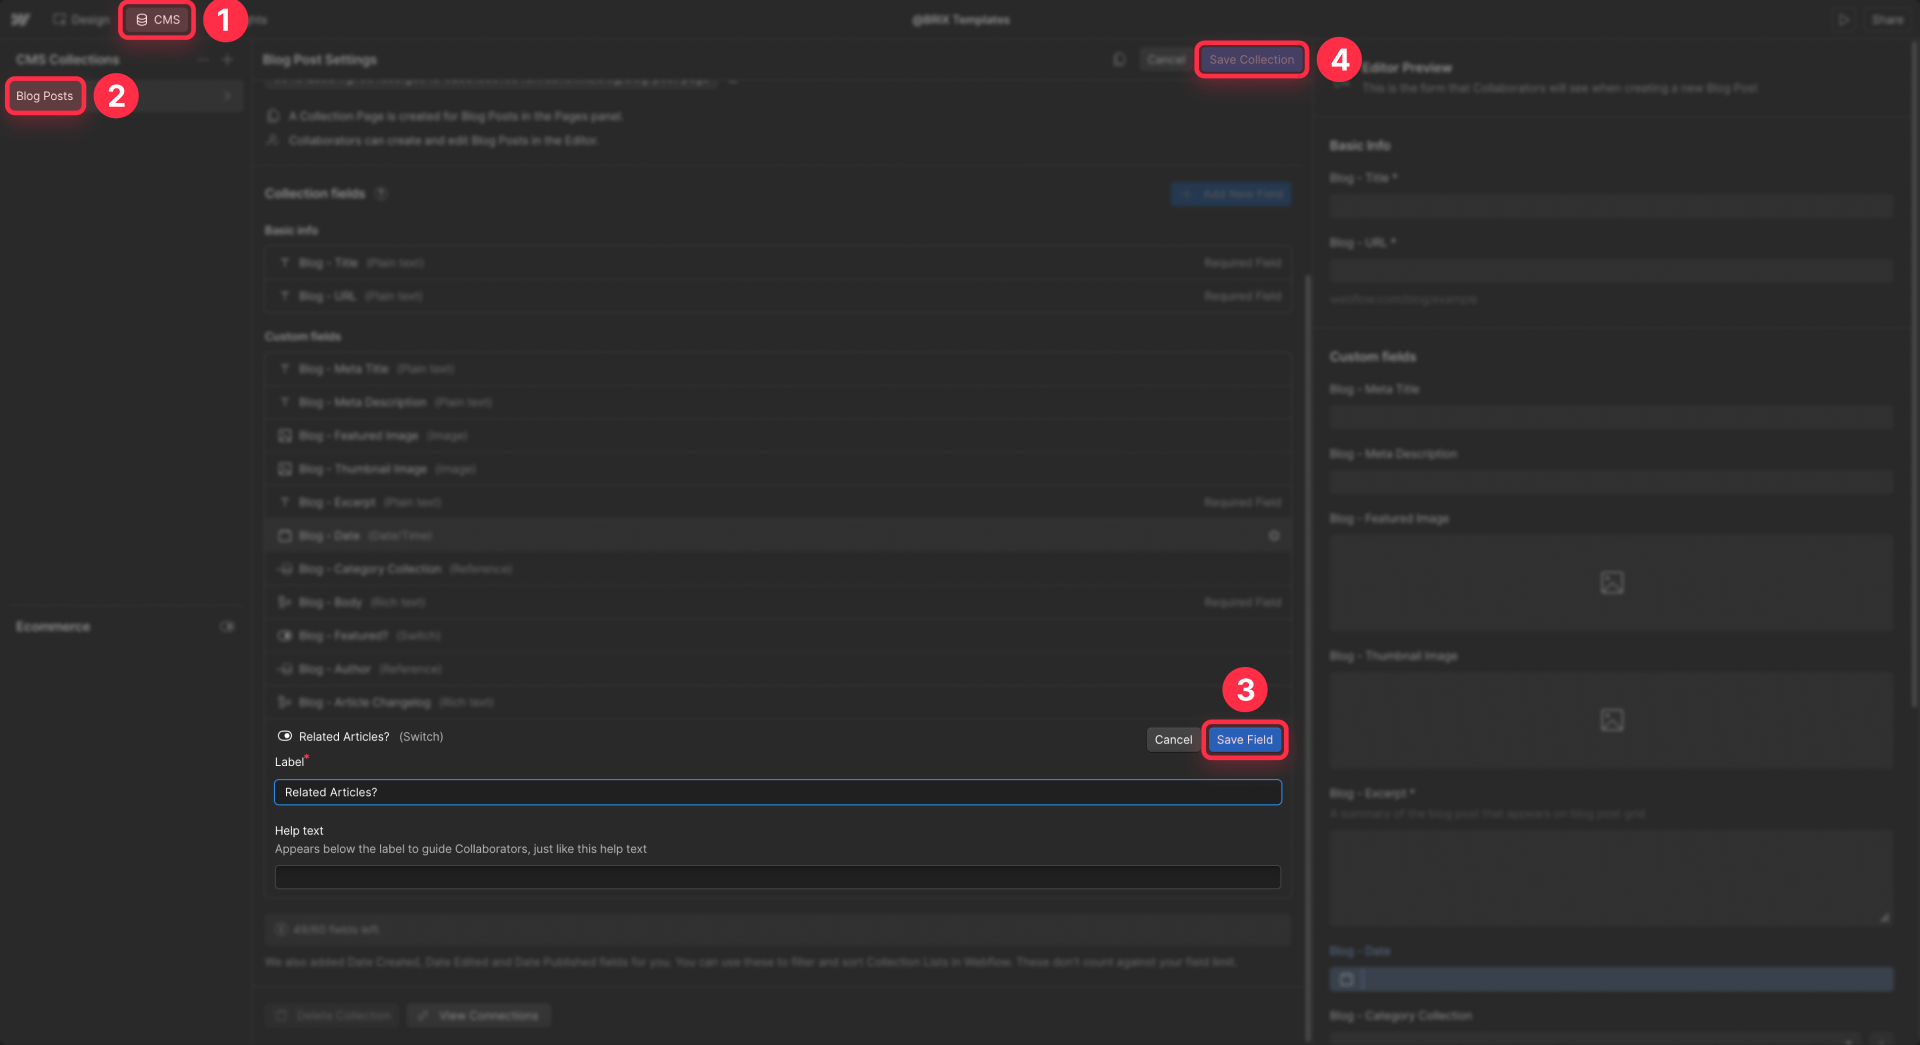
- Add clear "driver" fields in the Webflow CMS For each optional section, decide what will drive visibility:
- A core field that must exist (for example, Gallery image 1, Main testimonial, Video URL)
- Or a dedicated Switch field like Has gallery?, Show testimonials?, Show job board on homepage?
- Group related fields per section in your Webflow collections Keep fields for each section grouped together: all gallery fields next to each other, all testimonials fields together, etc. This makes it easier to see which sections are optional and prevents mistakes when clients edit content.
- Document the rules for clients in Webflow Editor Use the Help text on each CMS field to explain: "Toggle Has gallery? ON to show the Gallery section on the page."
Tip: When in doubt, add a Switch field. Switch fields are reliable triggers for conditional visibility and avoid weird edge cases (especially with rich text).
Method 1 – Use Webflow conditional visibility to hide single CMS blocks when fields are empty
This method is perfect for small CMS-driven blocks: social link rows, "Download brochure" buttons, video embeds, or secondary text areas that are not always filled.
How to bind a Webflow element to a CMS field
- Place your element inside a Collection list item or on a Collection page (for example, a Button, Link block, or Div block with icons).
- With the element selected, click the Add field icon in the element settings or bind via the blue Get text from / Get image from options in the Element settings panel.
- Choose the CMS field (for example, LinkedIn URL, Download URL, Promo text).
Once the element is bound, its visibility can be controlled by that same field.
How to hide a Webflow element when its CMS field is empty
- Select the bound element (for example, your social icon group or button).
- Open Element settings.
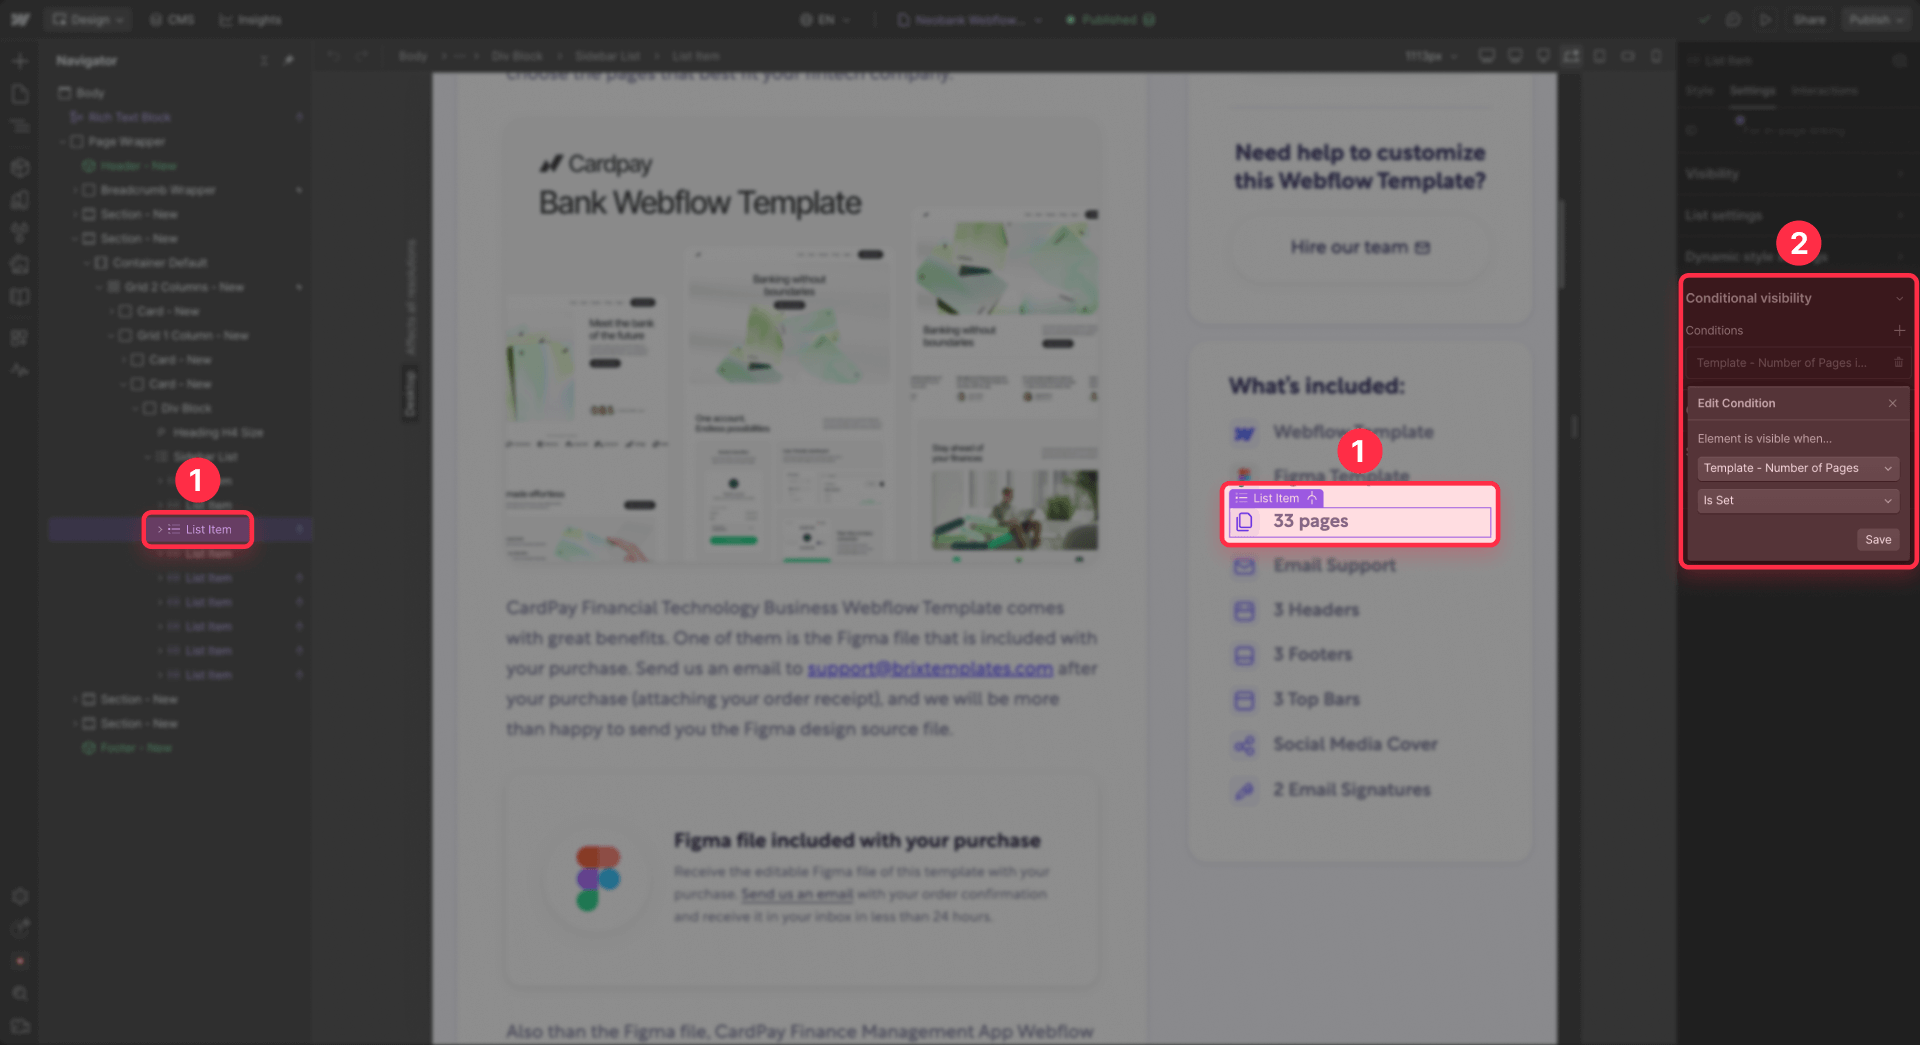
- Under Conditional visibility, click + Add condition.
- Choose the field you care about, like LinkedIn URL.
- Set the rule to LinkedIn URL is set.
- Click Save.
If the field is empty for an item, Webflow simply doesn't render that element at all – no space, no empty icon, nothing.
Tip: If you have a row with several social icons, you can put each icon in its own Link block and give each one its own conditional visibility rule based on its matching URL field. The whole row will naturally shrink when some fields are empty.
How to handle tricky rich text fields in Webflow with conditional visibility
Rich text fields can be a bit confusing: sometimes they look visually empty in the CMS, but technically still contain hidden characters, so Field is set returns true and your block refuses to hide.
To avoid that:
- Add a Switch field to your collection, for example Show rich text block?.
- Use this switch for conditional visibility:
- In Conditional visibility, choose Show rich text block?
- Set the rule to Show rich text block? is ON.
- In your workflow, train editors to:
- Turn the switch OFF when they don't want the block to appear.
- Or, if the text should really be empty, open the rich text editor, select all, delete, and then save.
Tip: Any time conditional visibility does something odd with a field, fall back to a Switch. Switch-based rules are predictable and easy for non-technical editors to understand.
Method 2 – Use Webflow conditional visibility to hide entire sections on collection pages
Now let's move from individual elements to full sections. This is what you need when, for example, a product doesn't have a gallery, or a project doesn't have testimonials, and you want the entire band (heading, content, padding, background color) gone.
How to wrap an optional Webflow CMS section in a parent element
- On your Collection page, select all elements that belong to the optional section:
- Section heading
- Content (cards, list, grid, gallery, etc.)
- Any decorative elements (background divs, gradients, etc.)
- Wrap them in a single parent container:
- Right-click and choose Wrap in div
- Or keep them inside a dedicated Section element.
- Give that wrapper a clear class name like project-testimonials-section or product-gallery-section so you can recognise it easily in the Navigator.
This wrapper is where you'll apply the visibility rule.
How to hide a Webflow section based on a key CMS field
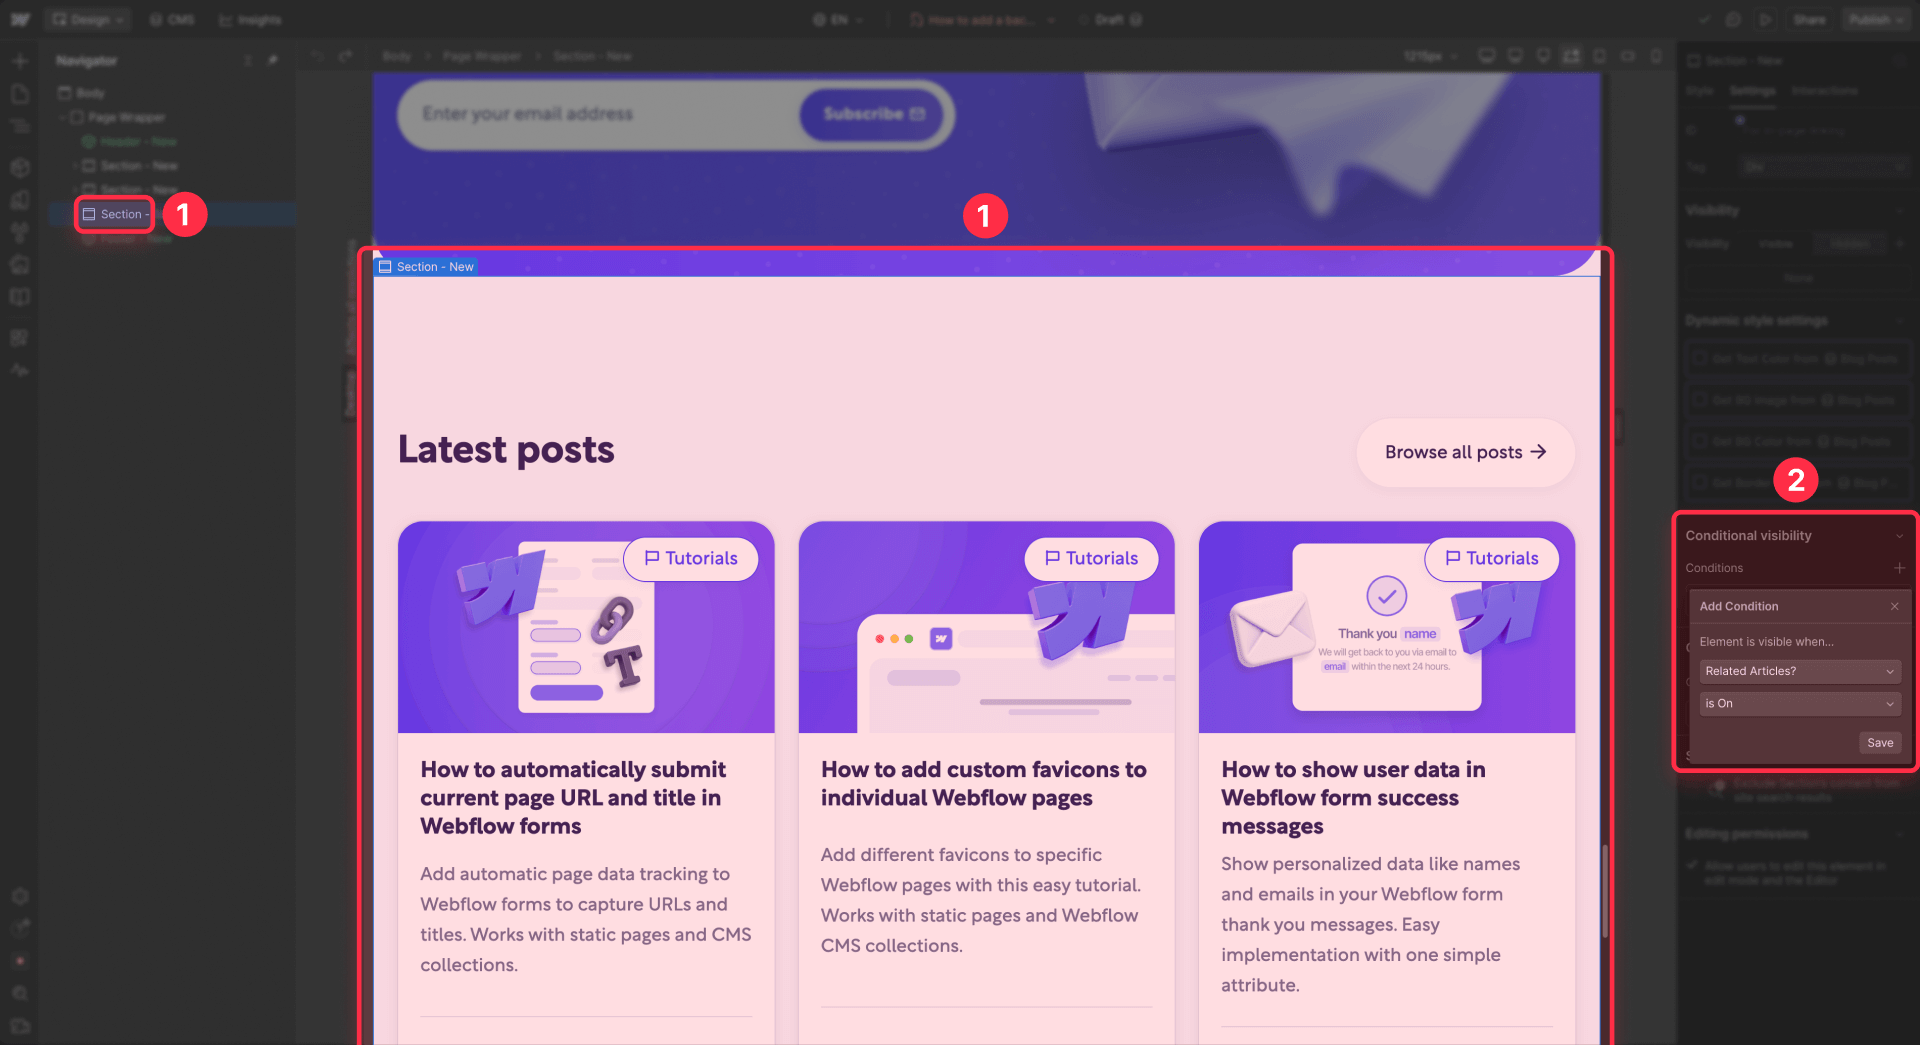
- Select the section wrapper (for example, product-gallery-section).
- Open Element settings.
- Under Conditional visibility, click + Add condition.
- Choose a driver field such as:
- Gallery image 1
- Has gallery? (Switch)
- Main testimonial text
- Set the rule:
- For an image or text field: Gallery image 1 is set
- For a switch: Has gallery? is ON
- Click Save and republish your site.
If that field is empty or the switch is OFF, the entire section wrapper disappears – including its padding and background.
Tip: Always put the condition on the outermost wrapper that controls spacing. If you only hide the inner content, you'll still see an empty colored box or gap.
Method 3 – Handle empty Webflow collection lists with CSS
Sometimes the issue isn't a single field – it's a whole Collection list that has zero items. Typical examples:
- Job board with no open positions yet
- "Related posts" section where no posts match
- Testimonials list for a project with no testimonials
Webflow doesn't have a native "if this list is empty then hide the parent" checkbox, but you can handle this with a simple CSS snippet.
Understanding the .w-dyn-empty class in Webflow
When a Webflow collection list has no items to display (either because the collection is empty or because all items are filtered out), Webflow automatically adds a special element to the list with the class .w-dyn-empty. This element contains the "No items found" message you see in the Designer.
This .w-dyn-empty element is your hook for detecting empty lists. If it exists in the DOM, the list is empty. If it doesn't exist, the list has items.
Adding custom attributes to Webflow sections for targeting
Before you write any CSS, you need a way to target the specific sections you want to hide.
- Select the section element that wraps your collection list.
- Open the Element settings panel and scroll to the Custom attributes section at the bottom.
- Click + to add a new attribute.
- In the Name field, enter data-content-type.
- In the Value field, enter CMS.
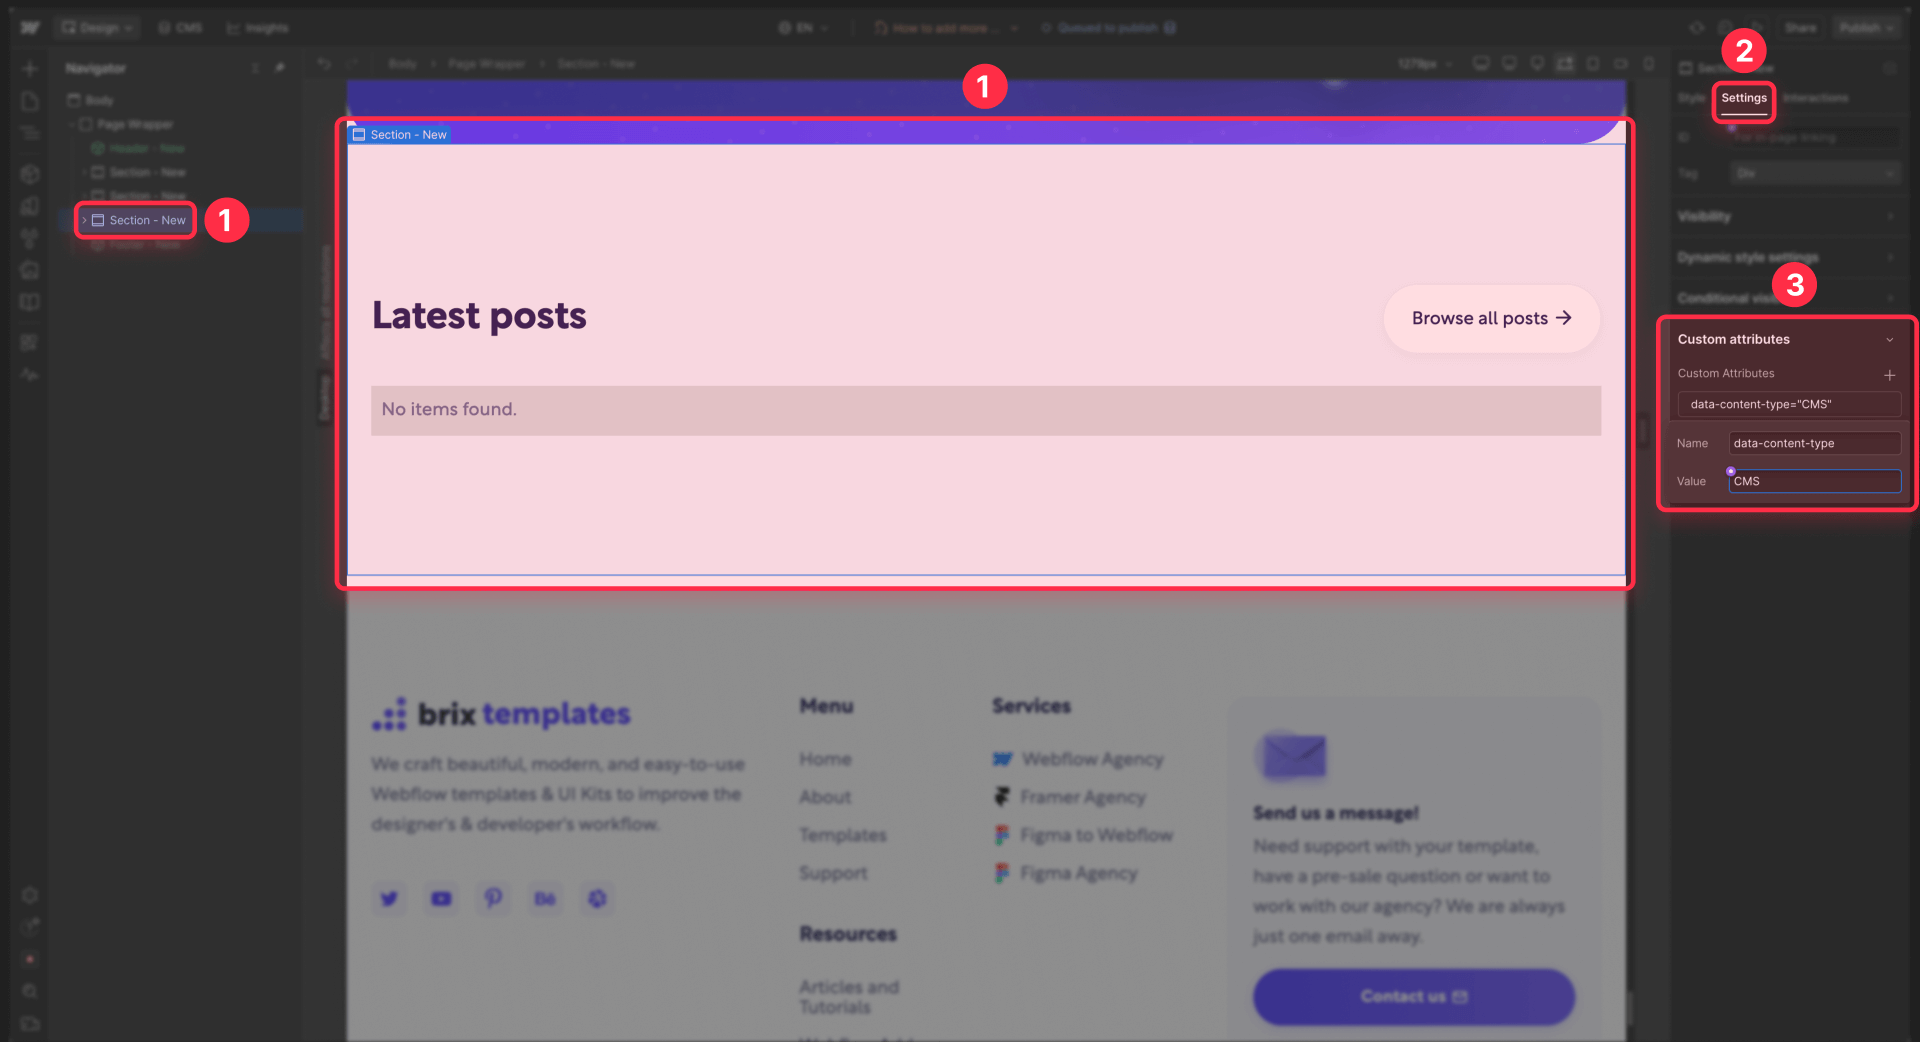
This creates a custom HTML attribute that marks this section as one that should be hidden if it contains an empty collection list.
Repeat this for every section on your site that wraps a collection list and should be hidden when that list is empty.
Writing CSS to hide Webflow sections with empty lists
Now you'll add a small CSS snippet that finds sections with your custom attribute and hides them if they contain the .w-dyn-empty class.
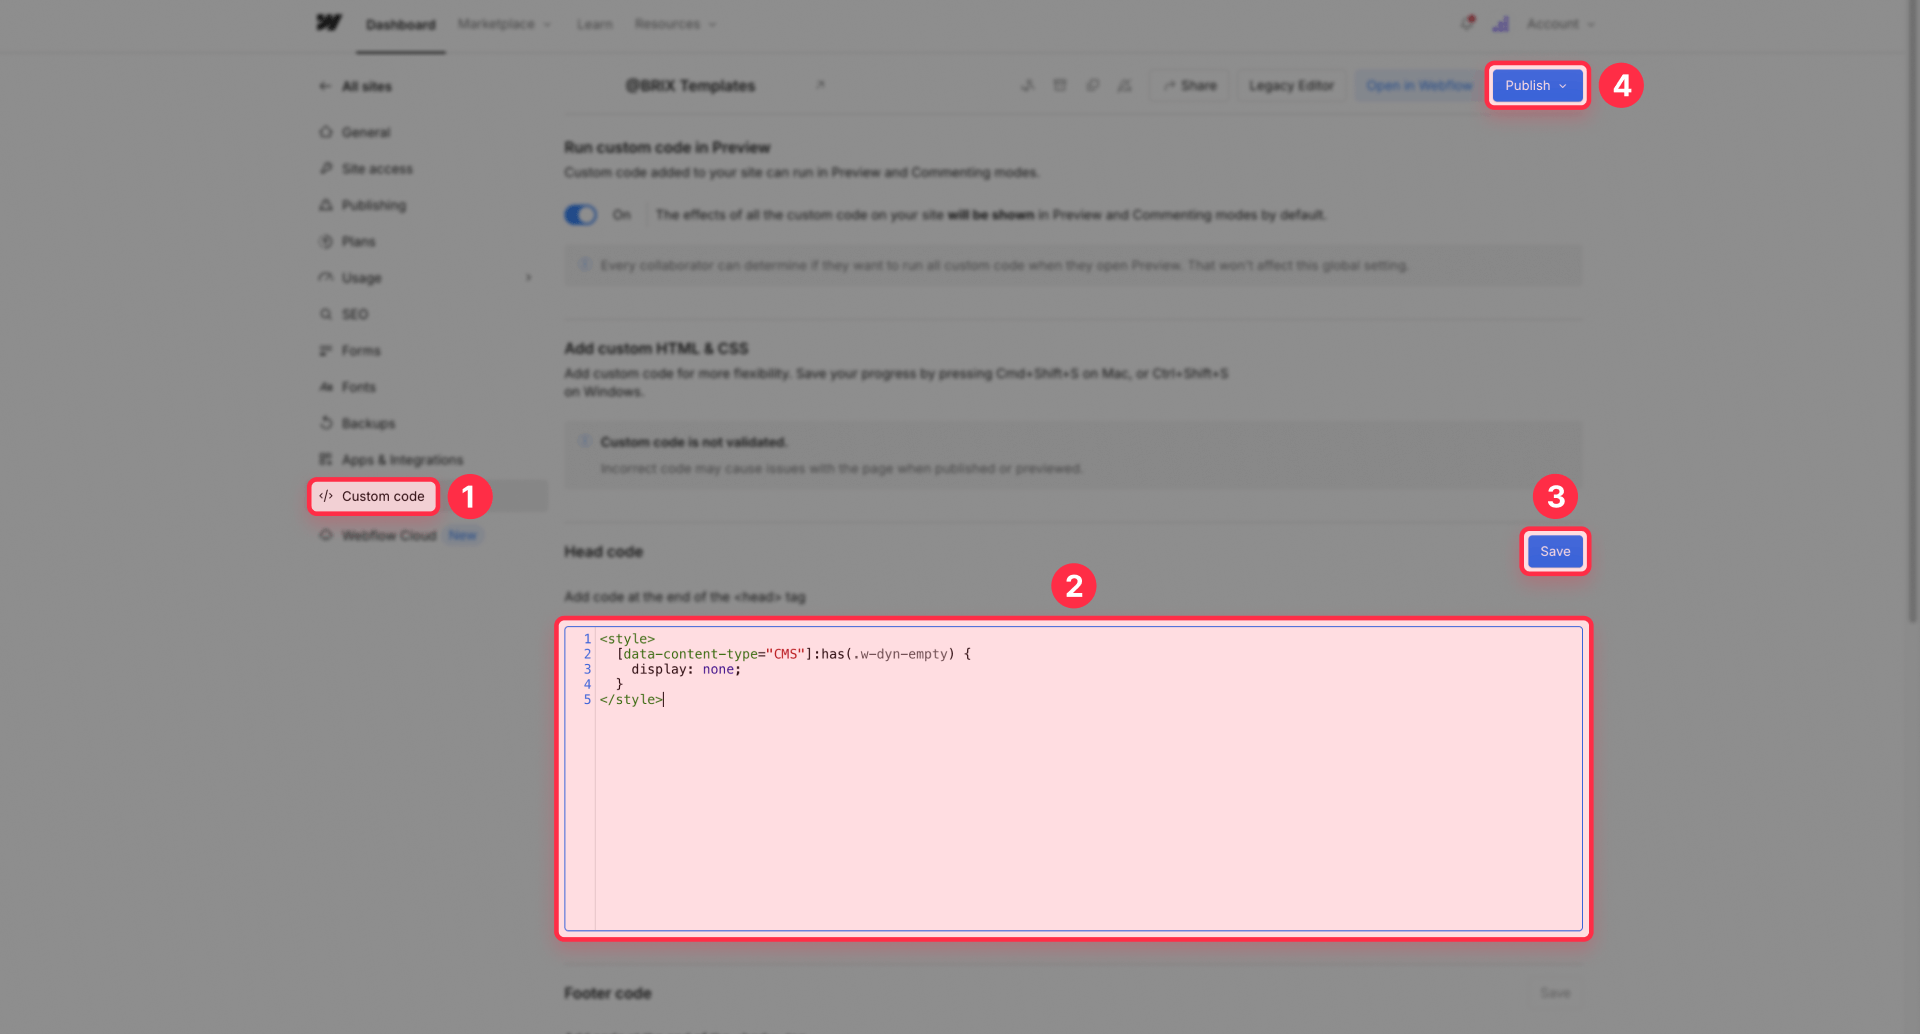
Go to your Project settings (click the gear icon in the left sidebar) → Custom code → scroll to the Head code section.
Add this CSS inside <style> tags:
<style>
  [data-content-type="CMS"]:has(.w-dyn-empty) {
    display: none;
  }
</style>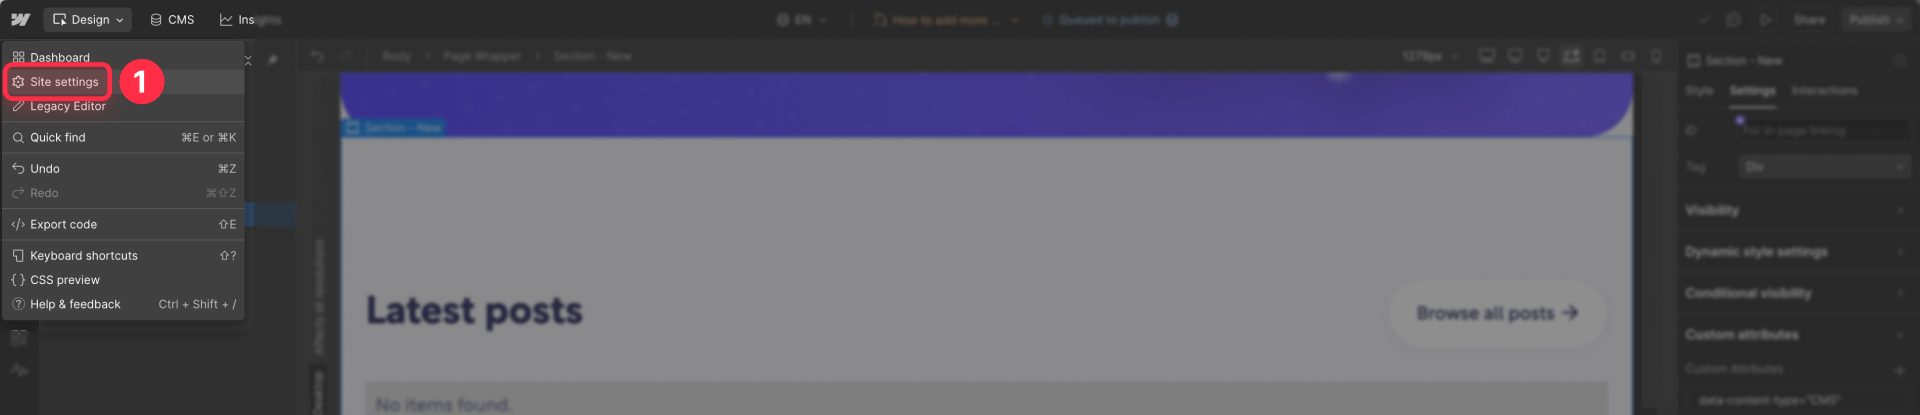
Let's break down what this does:
- section[data-content-type="CMS"] targets any <section> element with your custom attribute.
- The :has(.w-dyn-empty) part means "only select sections that contain an element with the class .w-dyn-empty."
- The display: none; rule completely hides those sections from the page.
Click Save changes, then publish your site. Visit a page where one of your collection lists is empty—the entire section should now be hidden, leaving no gap in your layout.
Browser support notes for :has() selector in Webflow sites
The CSS :has() selector is supported in all modern browsers as of 2024, including Chrome, Safari, Firefox, and Edge. This covers the vast majority of your visitors.
For most Webflow sites, this isn't a concern—your analytics probably show negligible traffic from outdated browsers. In the rare case where a visitor's browser doesn't support :has(), they'll simply see the empty section with the "No items found" message, which is a graceful degradation rather than a broken experience.
How to test hidden CMS sections across breakpoints in Webflow
Once your conditional visibility rules are in place, testing is crucial so you don't ship unexpected layout gaps.
- Create at least two CMS items for each layout type
One item with all optional fields filled out.
One item with key fields empty or switches turned OFF.
- Preview in Webflow Designer
Use the Preview mode and navigate through items with the Collection page settings panel.
Confirm that the section is visible when content is present and fully gone when it is not.
- Test each Webflow breakpoint
Switch between Desktop, Tablet, Landscape, and Portrait breakpoints.
Make sure spacing and backgrounds look intentional with and without the optional section.
- Publish and test on the live Webflow site
Some CMS behaviour is only fully reliable on the published site.
Visit a few live URLs for items with different content combinations.
Troubleshooting hidden CMS sections in Webflow
Section hides but leaves a big empty gap Make sure the conditional visibility is applied to the outermost Section or Div block that controls padding and background, not only to inner text or images. The outer wrapper must have the visibility rule, otherwise you'll see empty colored space even when inner content is hidden.
Webflow rich text CMS block still shows when it looks empty Rich text fields may contain invisible characters even after deletion. Add a Switch field like Show block? and drive conditional visibility from that switch instead of the rich text field. This gives you explicit, reliable control over when sections appear.
Conditional visibility options don't show CMS fields in Webflow Confirm the element lives inside a Collection list item or on a Collection page, and that your page is bound to the correct collection. If the element isn't in a CMS context, CMS fields won't appear as visibility options.
Empty Webflow Collection list shows default "No items" text you don't want Edit the Empty state of the Collection list in the Designer. You can either restyle it with helpful messaging and design that matches your site, or set its Display to None if you prefer showing nothing at all.
Element hides for all items in a Webflow Collection list Double-check your visibility rule and ensure you're targeting the correct field. Conditions use AND logic, so if you add multiple conditions, all must be true. Start with a single condition like Field is set and test before adding more complexity.
Sections hidden on Desktop but visible on Tablet/Mobile Webflow's responsive breakpoints don't affect conditional visibility directly, but they can affect your section structure. If you've used responsive visibility settings at different breakpoints, make sure the outermost section element has the conditional visibility rule applied at every breakpoint where the section exists.
Frequently asked questions about hiding empty CMS sections in Webflow
How do I hide an entire Webflow CMS section when the collection list is empty?
Webflow doesn't offer a direct "hide parent when list is empty" toggle, but you have solid patterns to choose from. The best approach is using CSS with the :has() selector: add a custom attribute like data-content-type="CMS" to your section wrapper, then use CSS to hide sections containing the .w-dyn-empty class. Alternatively, design a good Empty state inside the Collection list so users see a helpful message instead of a broken blank section. For completely no-code solutions, you can wrap the section in a Collection list connected to a small "settings" collection and control visibility with a Switch field. Each method has trade-offs between automation and simplicity.
How do I hide a Webflow CMS div or block if its bound field is empty?
Select the div or block you want to hide, open the Element settings panel, and add conditional visibility based on the field you've bound. Choose the CMS field (for example, Download URL or LinkedIn URL) and set the rule to Field is set. That tells Webflow to render the block only when the field has real data. For social rows with multiple icons, put each icon inside its own Link block and give each one a separate condition. This way, items with partial data automatically show only the icons they need, and items with no data show nothing at all. The element doesn't just hide—it doesn't render in the HTML at all.
How can I hide a section with a background color that still shows when the CMS content is blank in Webflow?
If you're seeing a colored stripe with no content, it usually means you hid the inner elements but not the outer wrapper. Group the entire band—heading, content, and decorative elements—inside a single Section or Div block and apply conditional visibility to that wrapper instead. Use a driver field like Gallery image 1, Main testimonial, or a Switch field such as Has testimonials?. Set the rule so the section is visible only when the field is set or the switch is ON. When the field is empty, Webflow removes the wrapper and its padding, making the colored stripe disappear entirely without leaving any gap in your layout.
How do I use Webflow conditional visibility so a CMS element only shows when a field is set?
In the Element settings panel, scroll to Conditional visibility and click + Add condition. Choose the relevant CMS field, for example Video URL, and set the rule to Video URL is set. This tells Webflow to show that element only when the CMS item includes a real value. You can reuse the same pattern with text, image, number, and switch fields. Remember that multiple conditions stack with an AND logic—all conditions must be true for the element to appear. Start with one simple rule first, test it thoroughly, and only add more complex conditions if your design actually requires them.
Can I hide a whole Webflow Collection page section if a specific CMS field is empty?
Yes. On a Collection page, you can hide an entire section based on any field in the current item. Wrap all elements for that section inside a Section or Div block and select it. Then in Element settings, add a condition such as Gallery image 1 is set or Has gallery? is ON. Webflow then checks that rule for each CMS item when rendering the page. When the field is empty or the switch is OFF, the section doesn't render at all—not even in the HTML. This is perfect for optional galleries, testimonials, video sections, or extra CTAs you only want to show on some collection items.
How do I hide a section heading and its content if there are no CMS items underneath in Webflow?
A common pattern is a heading like "Related posts" above a Collection list that sometimes returns zero items. One solution is to place the heading inside the same wrapper as your collection list and use the CSS method: add data-content-type="CMS" to that wrapper section, then add CSS that hides sections containing .w-dyn-empty. This hides both the heading and the empty list together. Alternatively, use a Switch field in a small "settings" collection—bind a single-item Collection list to those settings, wrap both the heading and "Related posts" list inside it, and apply conditional visibility based on a switch like Has related posts?. When the switch is OFF, both the heading and the list disappear.
How do I hide empty rich text CMS sections that still show up after deleting content in Webflow?
Rich text fields can contain invisible markup even when they look empty. If you rely on Field is set, Webflow may still treat that field as non-empty and keep your section visible. The safest solution is to add a Switch field such as Show extra content? and use that for conditional visibility instead of checking the rich text field directly. Editors then turn the switch OFF when they don't want that block on the page, giving you explicit control. If you really want to rely on the rich text field, open each CMS item, click into the rich text editor, select all content (even if nothing appears), delete it completely, and save. That fully clears the content so the field truly counts as empty.
Why is my Webflow CMS item still visible even though the field is empty and conditional visibility is set?
When a block stays visible unexpectedly, first ensure the condition is targeting the correct Collection field—verify you didn't accidentally choose the wrong collection or a different field with a similar name. Second, check if you have multiple conditions applied; Webflow uses AND logic, so if another condition is always true, it might be keeping the element visible regardless of your empty field. Third, for Rich text fields, invisible characters can make the field count as "set" even when it looks blank. In that case, switch to a Switch field as your visibility trigger instead. After adjusting any conditions, always republish your site and test on the live URL rather than relying only on Designer preview.
Why does Webflow conditional visibility hide my content but still leave an empty gap in my grid or layout?
This usually happens when the visibility rule is attached only to inner elements instead of the container that controls layout spacing. For example, hiding the text inside a grid card but leaving the card wrapper visible will still reserve space in the grid. To fix this, move your conditional visibility up to the card's Div block or Collection item wrapper—the element that actually occupies space in your grid. On full-width bands, apply the rule to the top-level Section instead of just headings or paragraphs. After you move the condition to the correct wrapper element, test again on desktop and mobile breakpoints to make sure the grid or layout reflows naturally with no leftover gaps.
What are the best practices for structuring optional CMS sections in Webflow so they never appear empty?
Start by designing your collections with optional content in mind. Group fields for each section together in the CMS and add Switch fields like Has gallery?, Show testimonials?, or Has open jobs? wherever content might be missing—this gives you explicit control over visibility. Always apply conditional visibility on the outermost wrapper controlling padding and background, not just individual text blocks or images inside. For collection lists that can be empty, design an intentional Empty state with helpful copy instead of leaving the default "No items found" message. Document the rules clearly in CMS Help text so clients understand how switches and fields affect what appears on the live site. If you follow these patterns from the start of your project, empty CMS sections simply won't reach your published site.
Conclusion – cleaner Webflow CMS layouts with smart visibility
Once you start using Webflow's conditional visibility and CSS methods intentionally, those ghost sections and awkward colored stripes disappear. Optional content behaves like it should: when the CMS has data, sections appear; when it doesn't, the layout closes up cleanly.
The key is choosing the right approach for each scenario. Use native conditional visibility for individual elements and sections on collection pages where you're checking specific fields. Use the CSS :has() method when you need to hide entire sections that wrap collection lists on static pages. Both approaches are straightforward to implement and maintain.
From here, you can explore more advanced visibility patterns for ecommerce, user accounts, and filtered lists. And if you ever want an expert team to architect your Webflow CMS, design clean templates, and handle all the edge cases for you, you can reach out to our Webflow agency at BRIX Templates for hands-on help.


Join readers commenting on this post!