
If you manage a Webflow site with dozens or hundreds of CMS items, you've probably been stuck in the export-CSV-edit-reimport loop at least once. Update prices in a spreadsheet, re-import, watch duplicates appear, fix mappings, re-import again — it's slow, error-prone, and completely unnecessary in most cases.
The reality is that Webflow's CMS UI can bulk publish and unpublish, but it still can't bulk-change field values across many items in one shot. That gap is exactly what this guide fills.
Why bulk editing CMS items matters for Webflow sites
Understanding the specific situations where bulk edits save real time helps you pick the right method from the start:
- Pricing and inventory updates: Change price, availability, or stock fields across hundreds of product-like CMS items without manually opening each one — especially useful during seasonal sales or supplier price changes.
- Category and tag cleanups at scale: Add or remove a category reference across many items after a site restructure, without clicking through every single entry in the CMS panel.
- SEO and social metadata refreshes: Bulk update meta title, meta description, or Open Graph fields after a positioning shift or brand update — the kind of change that touches every page but shouldn't take a full day.
- Avoiding CMS UI lag and human error: If your CMS editing feels slow or glitchy with large collections, pushing updates programmatically removes the UI bottleneck entirely.
What Webflow can and cannot bulk edit natively in the CMS
Before diving into methods, it's worth being clear about what Webflow's CMS interface actually supports for bulk operations — because the gap between expectations and reality is where most frustration starts.
Webflow does support bulk actions from the CMS list view. You can select multiple items, open the Update items dropdown, and apply publish, unpublish, draft, archive, or delete actions. These work well for managing publishing state across many items at once.
What Webflow cannot do natively is apply a field value change across selected items. There's no way to say "set this field to X for these 300 items" from the UI. If you need to change actual content — prices, tags, descriptions, status fields — you need one of the methods below.

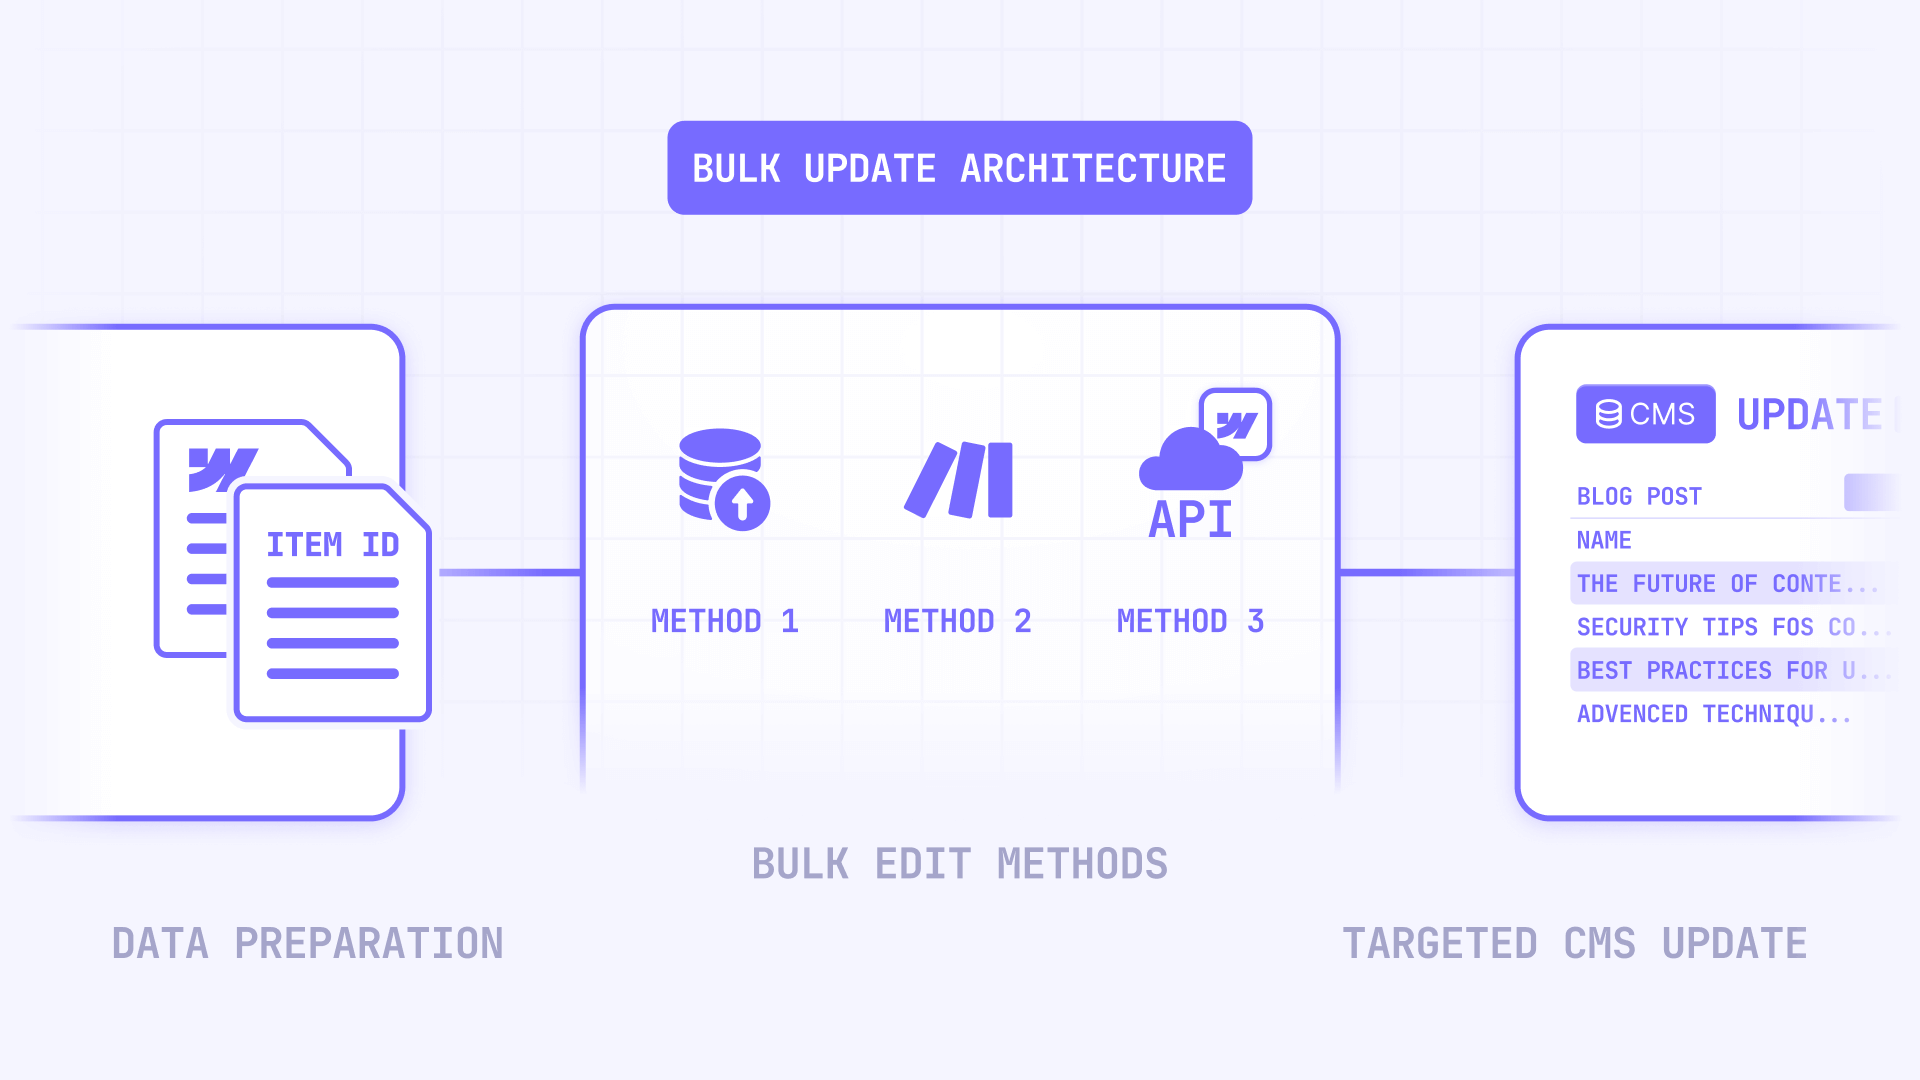
How to choose the right Webflow CMS bulk edit method
Here's the decision breakdown that helps you pick the right approach without over-engineering. Each method serves a different team profile and use case.
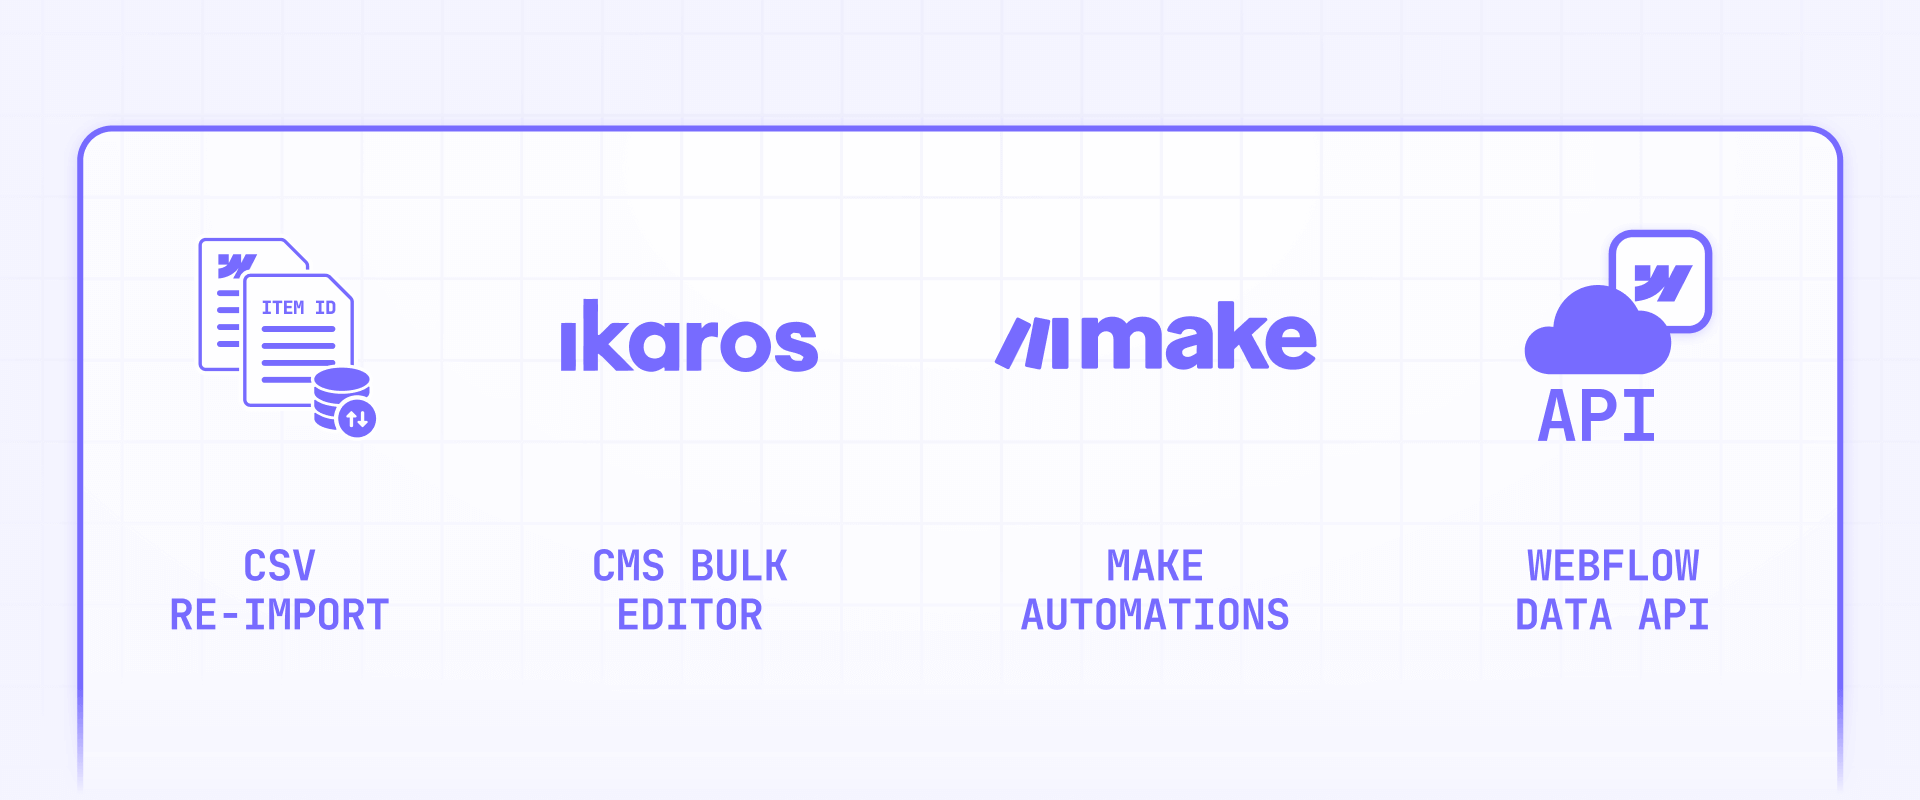
- CSV re-import: Best for quick one-off fixes on small collections. It's familiar and requires no extra tools, but you'll deal with duplicates, broken mappings, and no real update or delete control.
- Ikaros: Best for teams that already work with CSVs but need smarter import behavior. It's free and adds update, delete, and skip toggles that Webflow's native import lacks — but it's still in beta and has unclear publishing behavior.
- Make automations: Best for ongoing, event-driven workflows where updates flow automatically from a spreadsheet or database. Supports real batching and direct API calls, but requires setup time and rate limit management.
- Webflow Data API: Best for dev teams that need full control at scale. It's scriptable, deterministic, and handles up to 100 items per request — but it requires development work and API knowledge.
If you want the one-sentence summary: use CSV only as a last resort, Ikaros when you want a better CSV experience without code, Make when you need automated ongoing sync, and the Webflow Data API when you need complete control over what changes, when it goes live, and how to roll back.
How to prepare your Webflow CMS for safe bulk edits
Regardless of which method you choose, this preparation prevents the most common disasters. It's boring but absolutely essential — especially when working with production content.
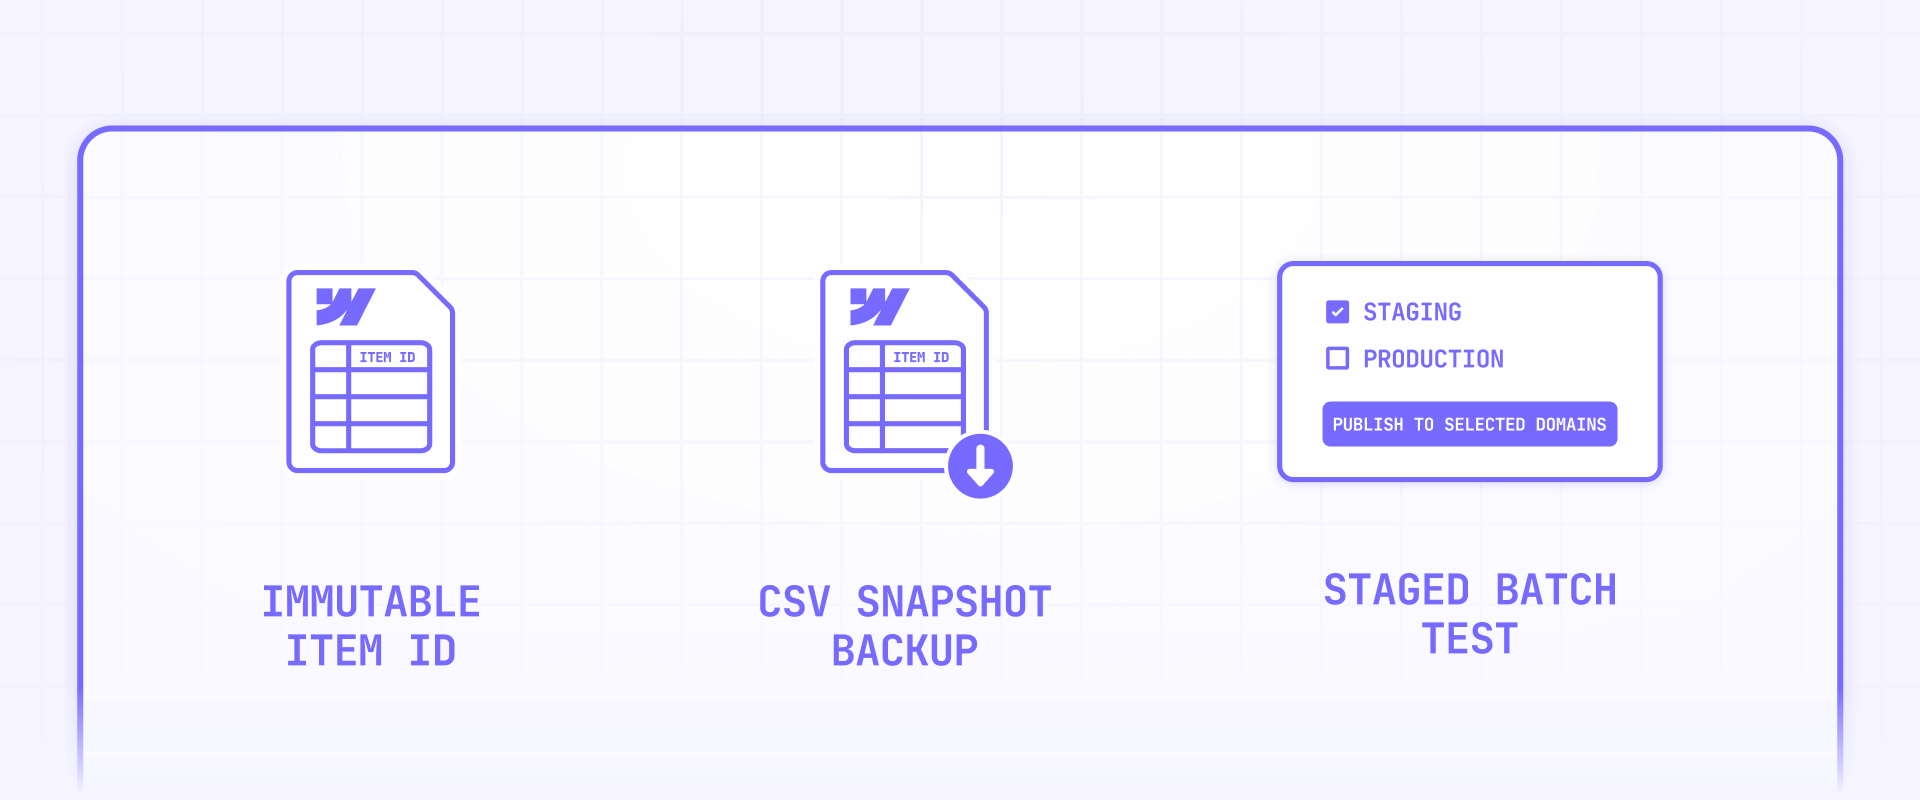
How to pick a stable identifier for Webflow CMS items
You need a durable key so your automation updates the right items every time. Most "it updated the wrong item" bugs are actually "we didn't have stable IDs."
- Choose one source-of-truth key. The best option is the Webflow Item ID — it's immutable and unique. The slug works too, but it can change if someone edits it manually. You can also use an external ID stored as a dedicated CMS field.
- Store the Webflow Item ID in your external table. Whether you use Google Sheets, Airtable, or Notion, keep a column with the Webflow Item ID for every row. This is the single most important step for any bulk edit workflow.

How to decide between staged and live edits in Webflow CMS
Webflow CMS content exists in two states, and choosing the wrong one leads to confusing results.
Staged items contain draft changes that aren't visible on the live site. Choose staged edits when you want a review or QA step before anything goes public. Live items are published and visible immediately. Choose live edits when you need changes reflected on the live site right away.
Most teams should default to staged edits and add a separate publish step — it gives you a safety net without slowing things down much.

How to back up your Webflow CMS before bulk edits
Having a recovery plan is just as important as the edit itself. Here's the minimum you should do before touching any production content:
- Export your collection as CSV — not to re-import later, but as a snapshot you can reference if something goes wrong.
- Keep a log of planned changes — even a simple spreadsheet with "item ID, field name, old value, new value" columns is enough to reverse any mistake.
- Run a small batch test first — update 10–20 items before touching the full collection. Verify the results on both the CMS panel and the live site.

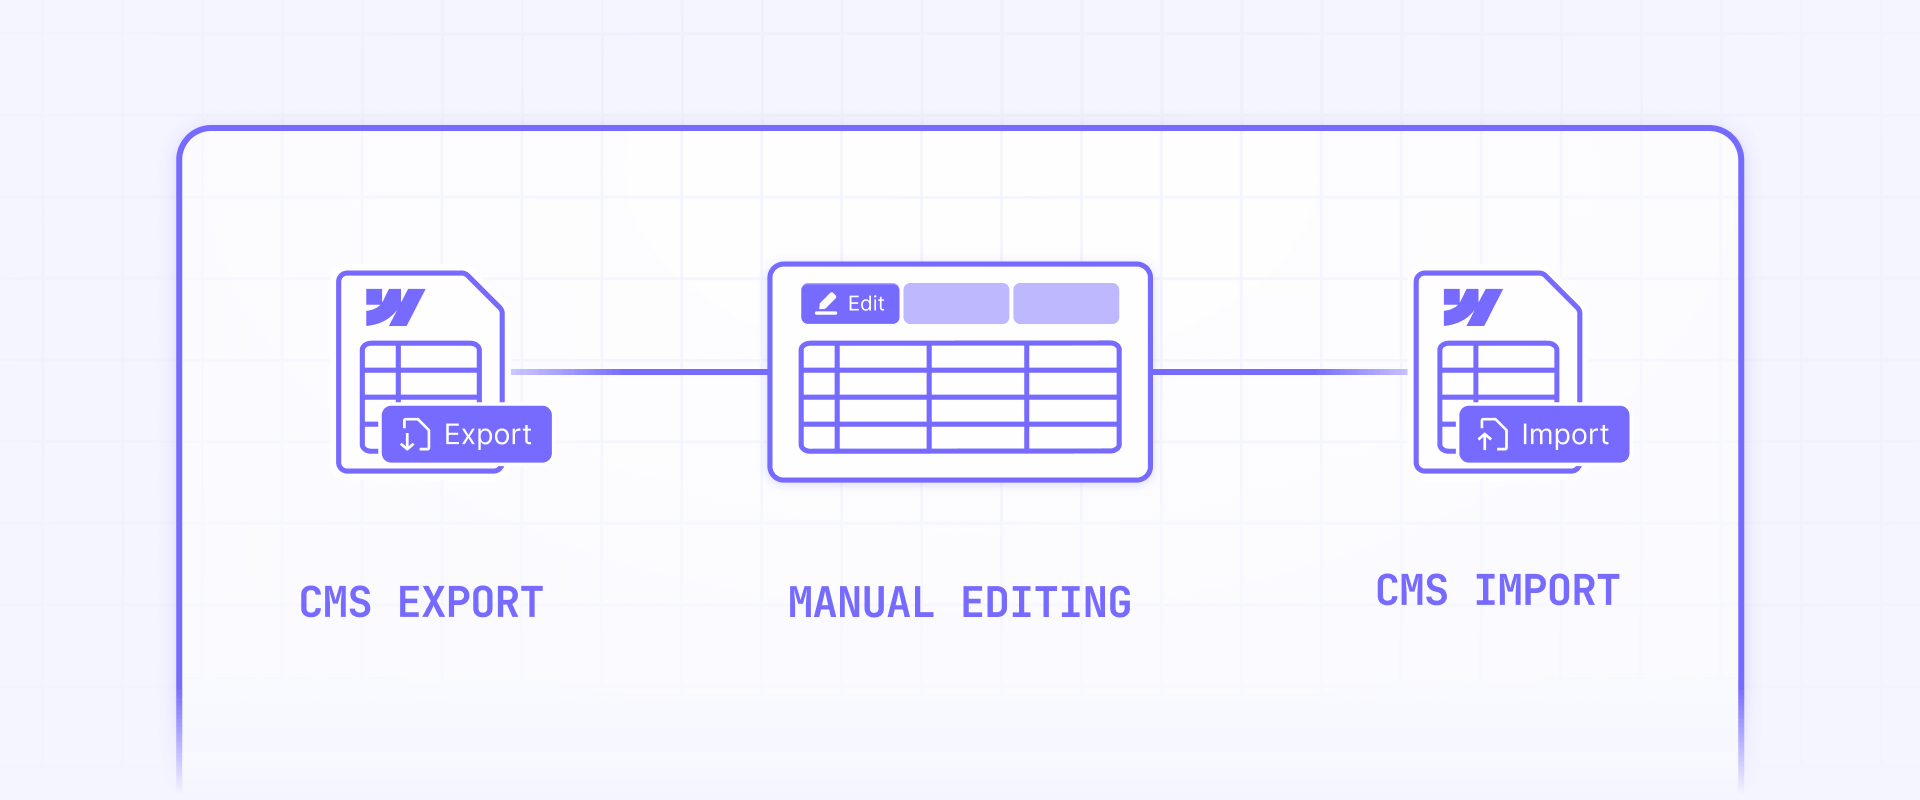
Method 0 — Bulk edit Webflow CMS items with CSV export and re-import
This is likely what you're doing today, and it's worth naming the pain points explicitly so you can decide whether to keep using it or move on.
The workflow is straightforward: export your collection from the Webflow CMS as a CSV file, open it in Google Sheets or Excel, make your changes, and re-import the updated CSV back into Webflow. It requires no additional tools, no API tokens, and no technical setup.
The problem is everything that happens after the import. Webflow's CSV import is designed primarily for creating new items, not updating existing ones. There's no reliable "match this row to that existing item and update only these fields" behavior. This means you'll frequently encounter duplicates when the import creates new items instead of updating existing ones, broken field mappings when column headers don't align perfectly, partial imports that stop mid-way with unclear error messages, and no way to selectively delete or archive items that should no longer exist.
If you're making a one-time change to a small collection (under 20 items), CSV re-import is fine. For anything recurring, large-scale, or involving updates to existing content, the methods below are significantly better.
Method 1 — Bulk edit Webflow CMS items with Ikaros
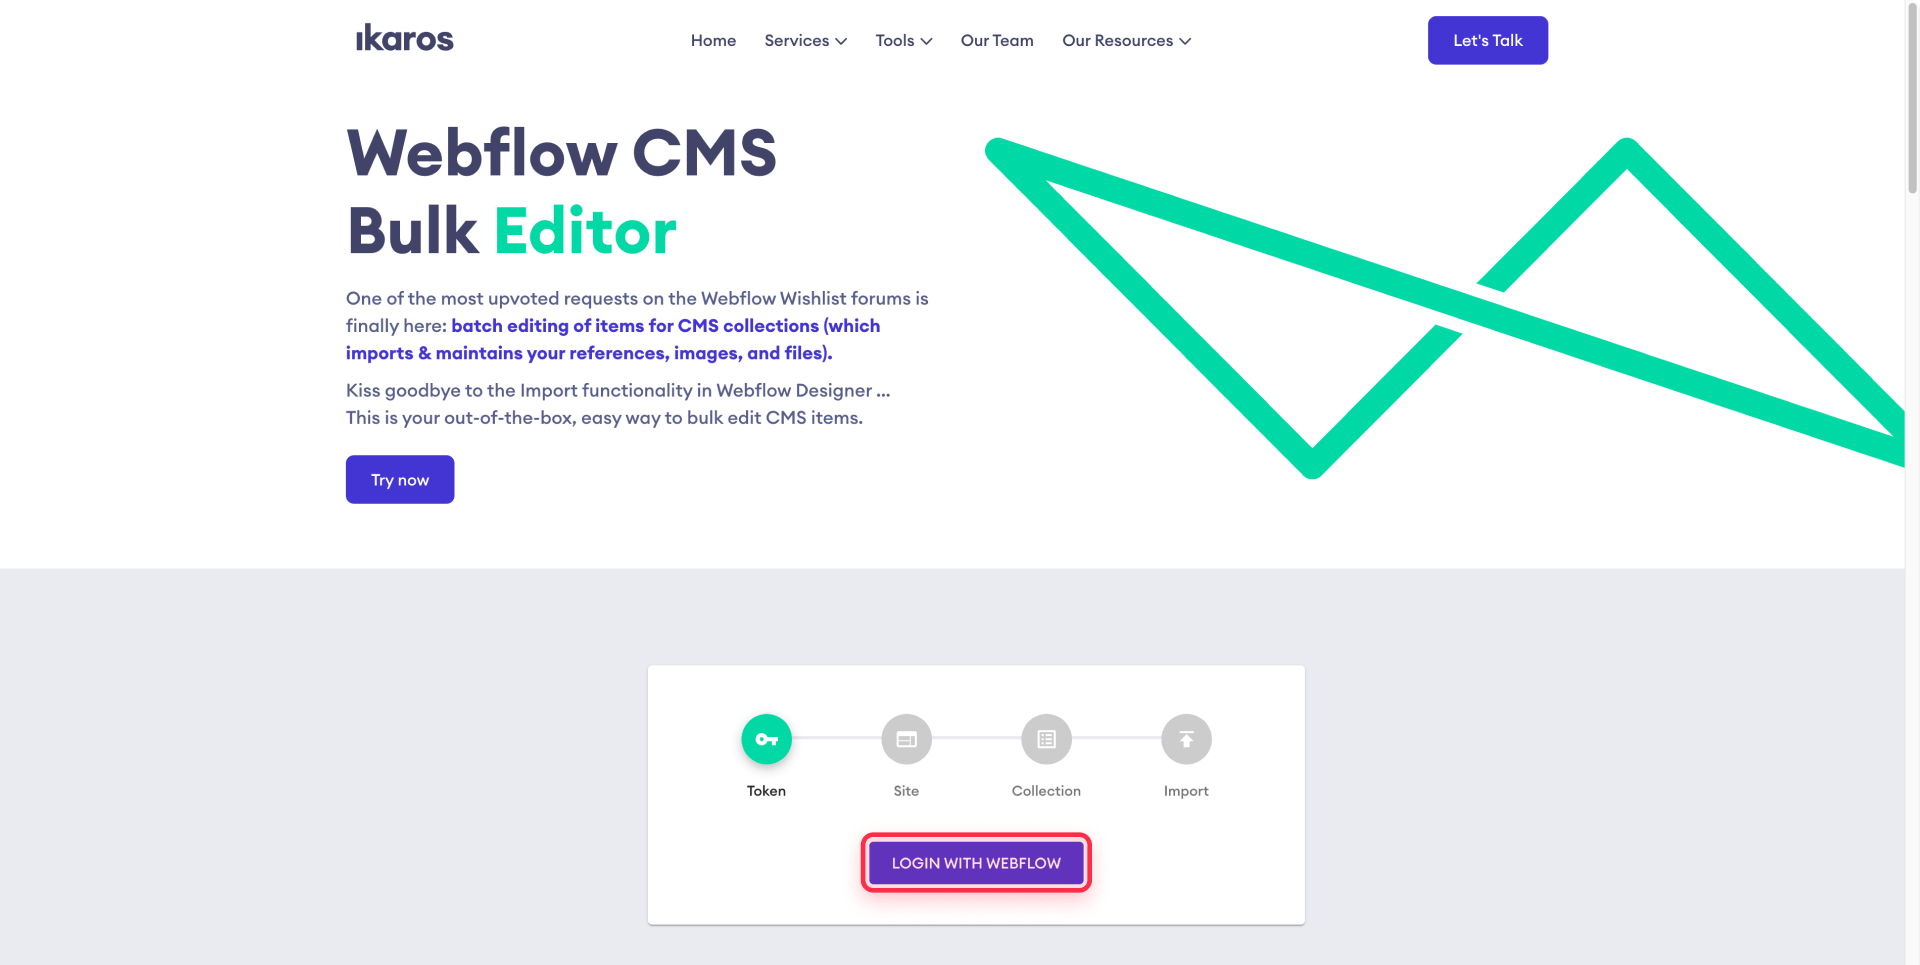
Ikaros is a free web app that connects to your Webflow account via OAuth and lets you upload a CSV to bulk create, update, or delete CMS items. Think of it as a smarter CSV import that actually supports updating and deleting — the two things Webflow's native import can't do well.
What Ikaros does for Webflow CMS bulk editing
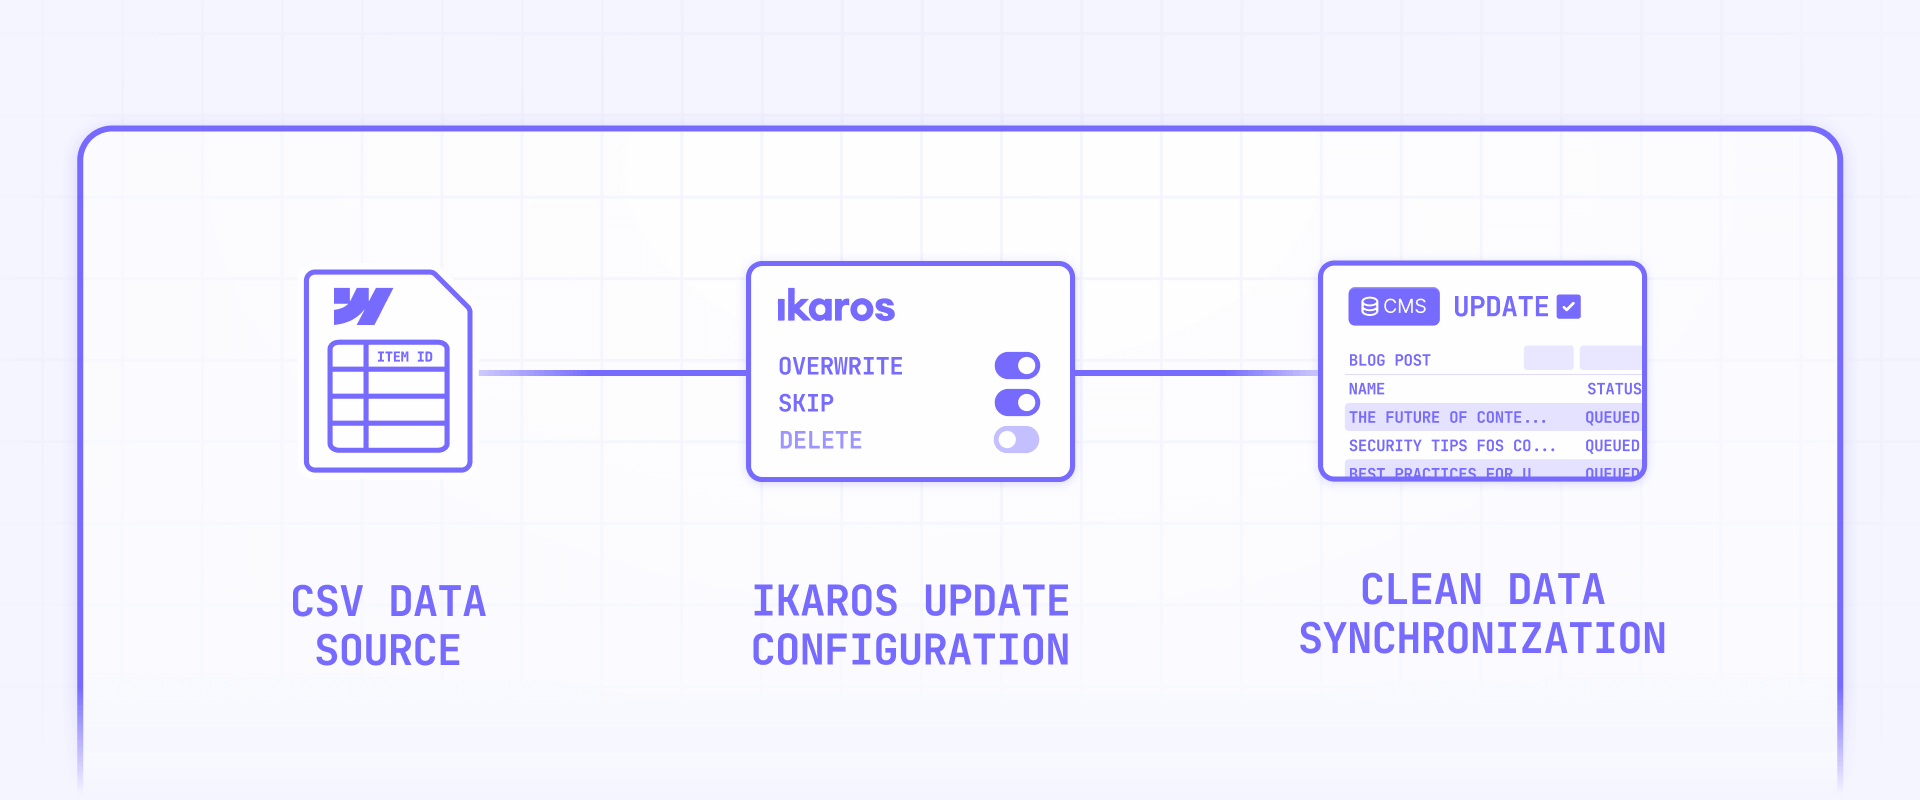
Unlike Webflow's built-in CSV import, Ikaros gives you explicit control over what happens during the import through three toggles:
- Overwrite Items: Updates existing items that match your CSV rows instead of creating duplicates.
- Skip Duplicates: Only adds new items and leaves existing ones untouched — useful for incremental additions.
- Delete Missing: Removes any CMS items not present in your CSV. This is powerful but dangerous — more on that below.
Ikaros supports most Webflow field types including text, rich text, images, files, references, and multi-references. It connects through Webflow OAuth, meaning you authorize it the same way you'd authorize any Webflow app, and you can revoke access anytime from your Webflow integrations settings.
The tool is free, requires no separate account (just Webflow OAuth), and handles the API batching and throttling behind the scenes.
How to set up Ikaros for Webflow CMS bulk edits
Getting started takes just a few minutes:
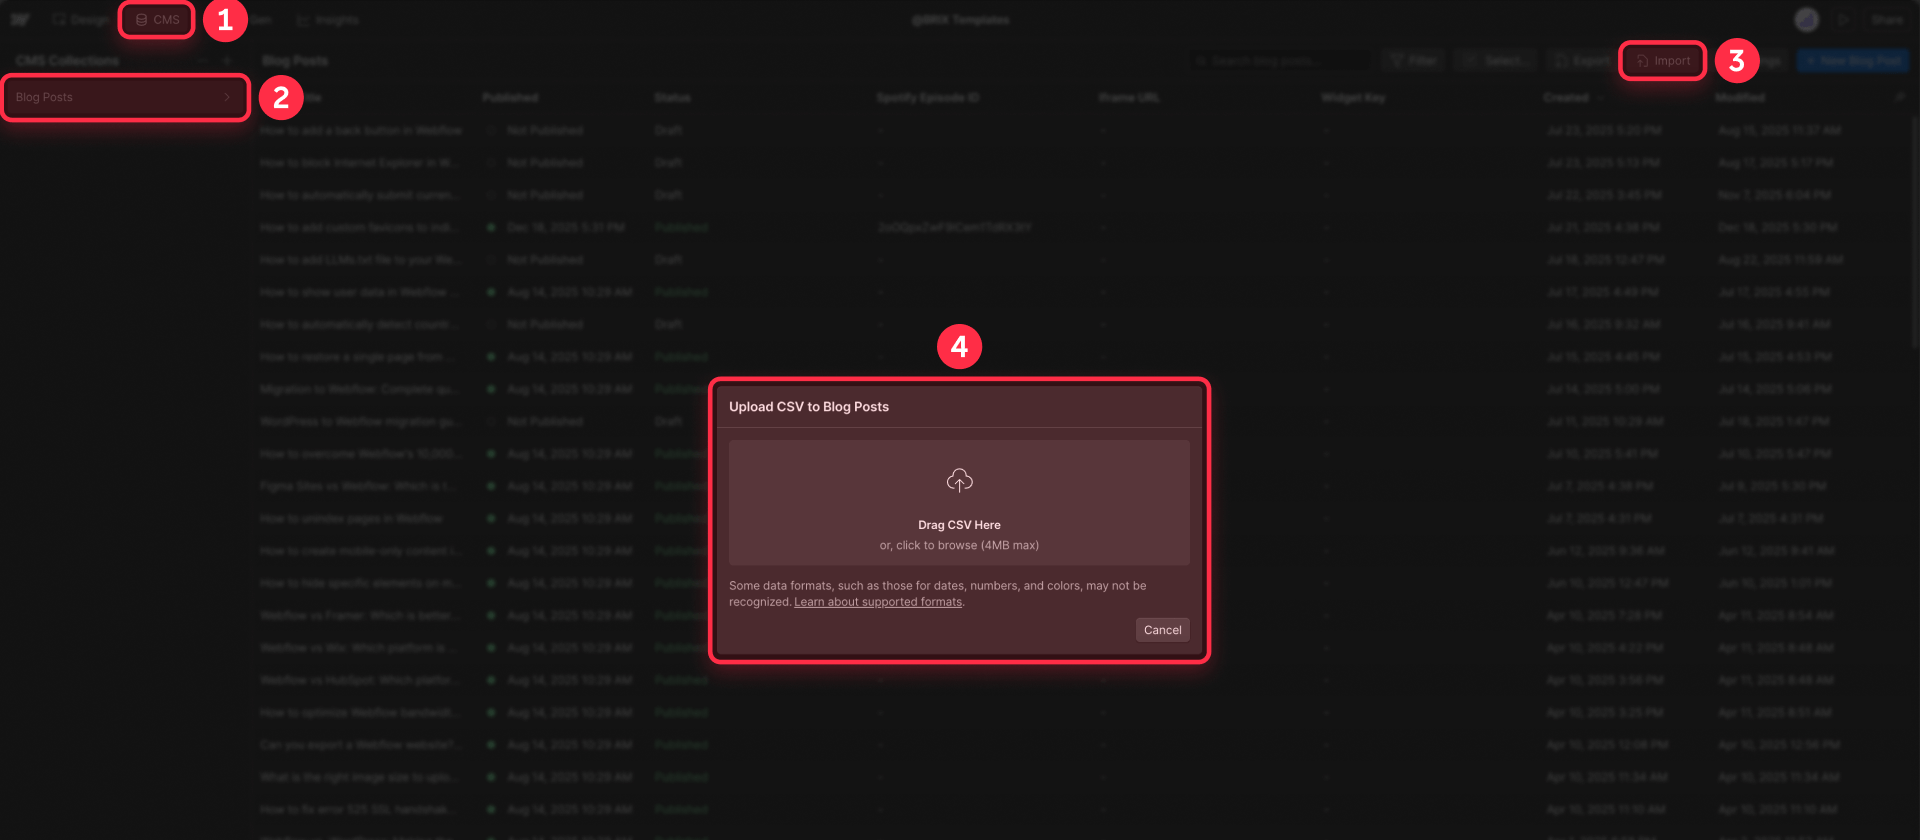
- Visit Ikaros and connect your Webflow account. Go to ikaros.io/webflow-bulk-editor and click the connect button. Authorize the OAuth request in the popup — this gives Ikaros permission to read and write your CMS collections.
- Select your site and collection. Once connected, choose the Webflow site and the specific CMS collection you want to edit.
- Prepare your CSV. Your CSV needs column headers that match your Webflow field names. For reference fields, use the slug of the referenced item (Ikaros maps slugs to Webflow item IDs internally). For image or file fields, provide publicly accessible URLs — no Google Drive share links or URLs behind authentication.
- Configure your import behavior. Choose between Overwrite Items, Skip Duplicates, and Delete Missing based on what you need. Start with Overwrite Items only for your first test.
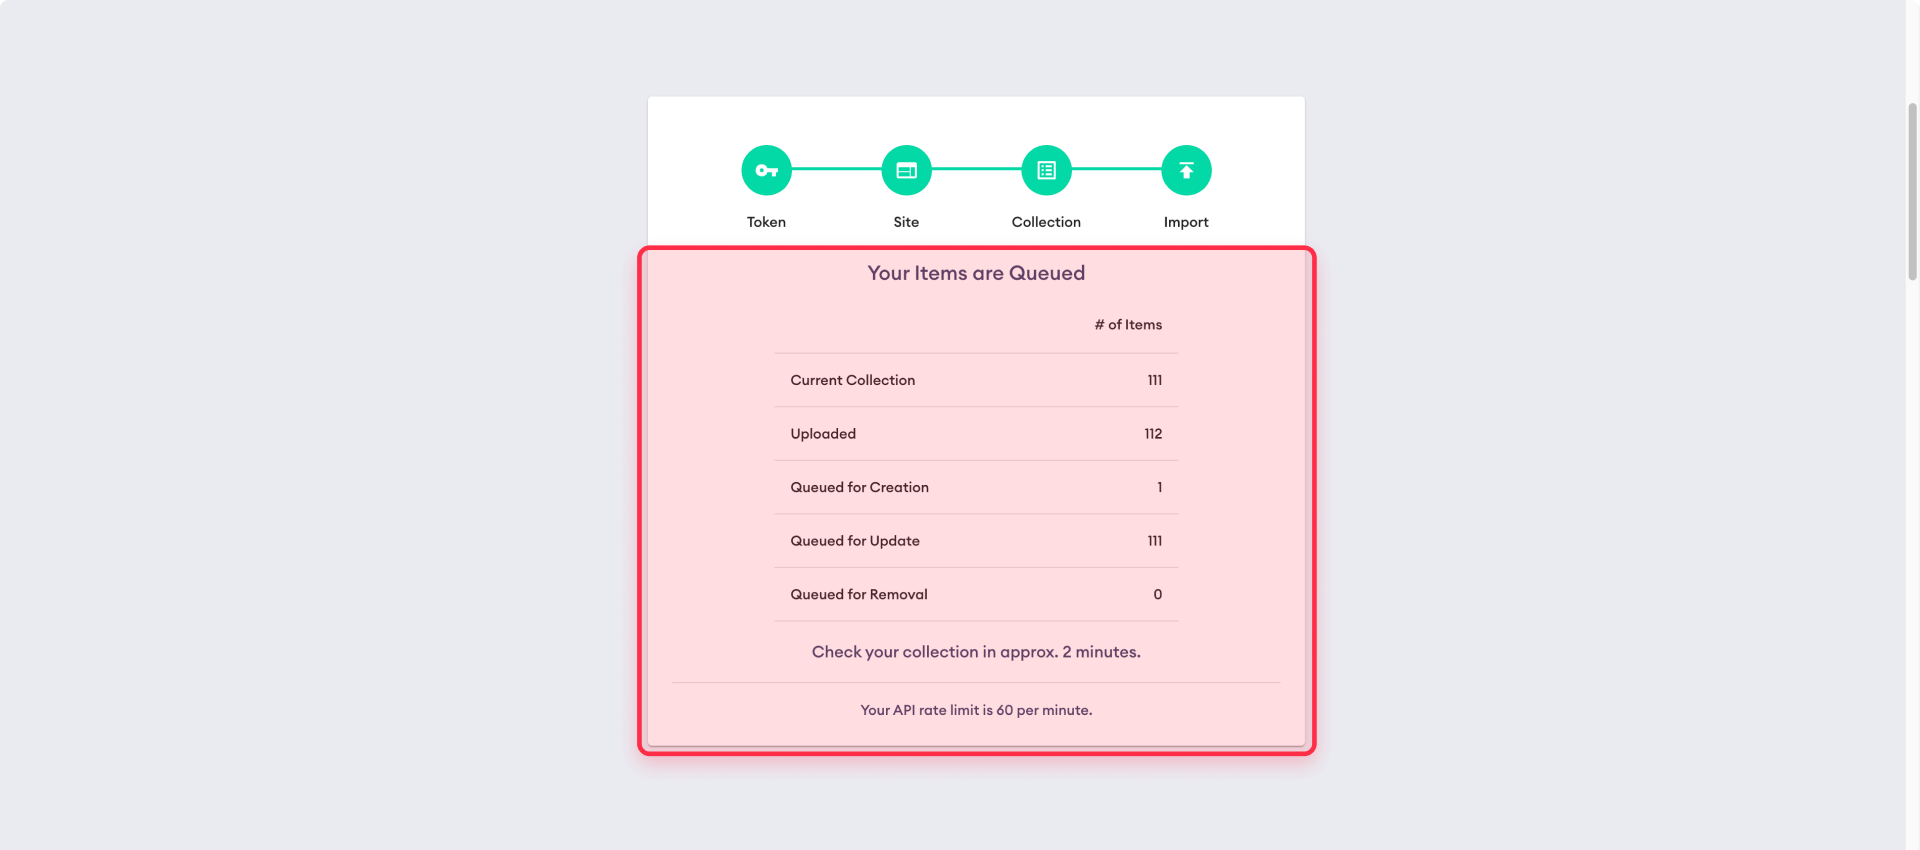
- Upload and run. Upload your CSV and let Ikaros process the batch. It handles the API calls, batching, and rate limiting automatically.

What you should know before relying on Ikaros for Webflow CMS
Ikaros is a useful tool, but it's important to set the right expectations before using it on production content.
The tool is currently labeled as beta with no warranty. It works for standard use cases, but there's limited independent validation — no prominent reviews, detailed forum threads, or published case studies confirming it's been battle-tested at large scale. That doesn't mean it's broken, but it does mean you should validate it yourself before trusting it with critical content.
More importantly, Ikaros doesn't clearly state whether updates go live immediately or remain staged. Webflow's API distinguishes between draft and published content, and the tool's documentation doesn't specify which path it takes. This makes testing on a cloned site essential — you need to know whether your live site will reflect changes the moment Ikaros finishes or whether a manual publish step is still needed.
Beyond those two concerns, there are a few operational limitations worth keeping in mind. Reference and multi-reference field mapping can be fragile at scale because Ikaros resolves references using slugs rather than Webflow item IDs — this works fine when slugs are unique and referenced items already exist, but can produce unexpected results when those conditions aren't met, especially during large imports where you're creating and referencing items in the same run.
Image and file imports require stable, direct URLs that point to publicly accessible files. URLs behind redirects, authentication walls, expiring tokens, or hotlink protection will fail silently or cause the import to skip those fields. Make sure your asset URLs end in a recognizable file extension like .jpg or .png and are hosted somewhere reliable.
Finally, the Delete Missing toggle deserves special caution. When enabled, it removes every CMS item not present in your CSV — which means uploading a filtered or incomplete file can wipe out content you intended to keep. Always verify that your CSV contains all items you want to preserve before enabling this option, and only use it after you've confirmed the matching logic is working correctly with Overwrite Items on a test batch first.
Method 2 — Bulk edit Webflow CMS items with Make automations
When your bulk edits aren't a one-time task but an ongoing operation — updated prices flowing from a spreadsheet, content synced from a database, status changes triggered by approvals — you need automation. Make is the strongest option here because it supports real batching through aggregators and direct HTTP calls to Webflow's bulk API endpoints.
Why Make is the better automation choice for Webflow CMS bulk edits
You might wonder why not Zapier. The short answer: Zapier's Webflow integration cannot map reference or multi-reference fields, which is a hard limitation that breaks most serious CMS sync workflows. Make doesn't have this constraint because you can call Webflow's API endpoints directly using HTTP modules, giving you full control over the request payload.
What you need before setting up Make for Webflow CMS
Before opening Make, gather these prerequisites:
- A Google Sheet (or your preferred data source) with specific columns. At minimum, you need: webflow_item_id (the stable identifier), name, slug, and whatever fields you want to update (for example, price). Add a needs_sync column (TRUE/FALSE) if you want to control which rows get processed.
- A Webflow Site Token. Go to your Webflow Project Settings → Integrations → API Access → Generate Site Token. Select scopes including cms:read and cms:write. Save the token securely.
- Your Webflow Collection ID. You'll paste this into the API URLs inside Make.
How to build the Make scenario for Webflow CMS bulk updates
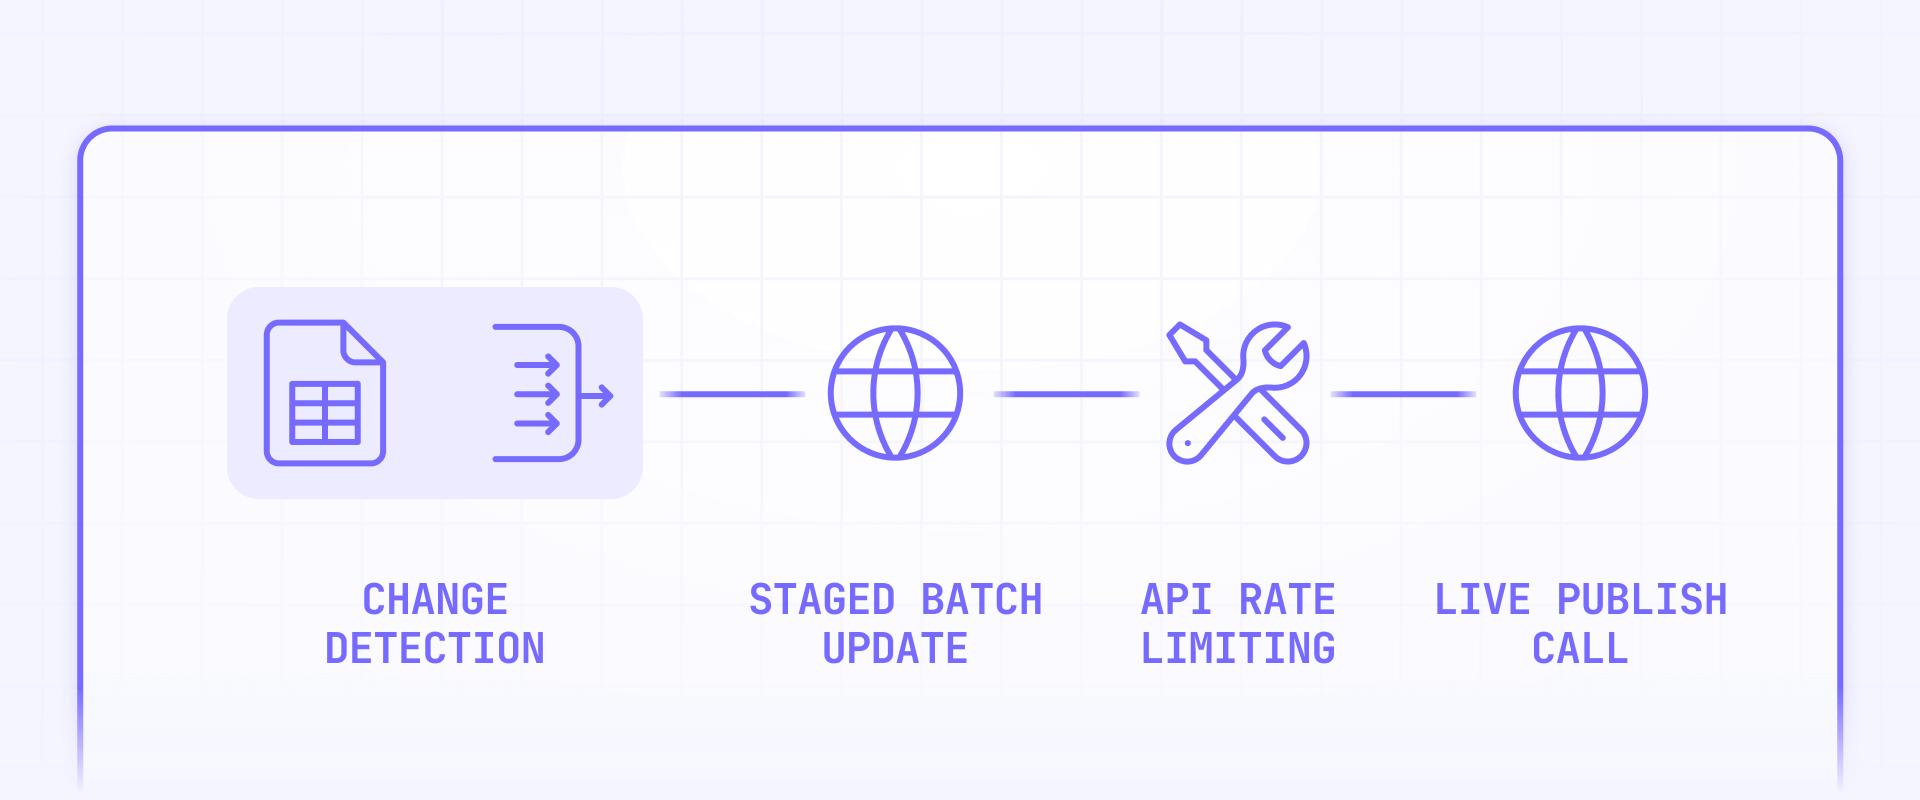
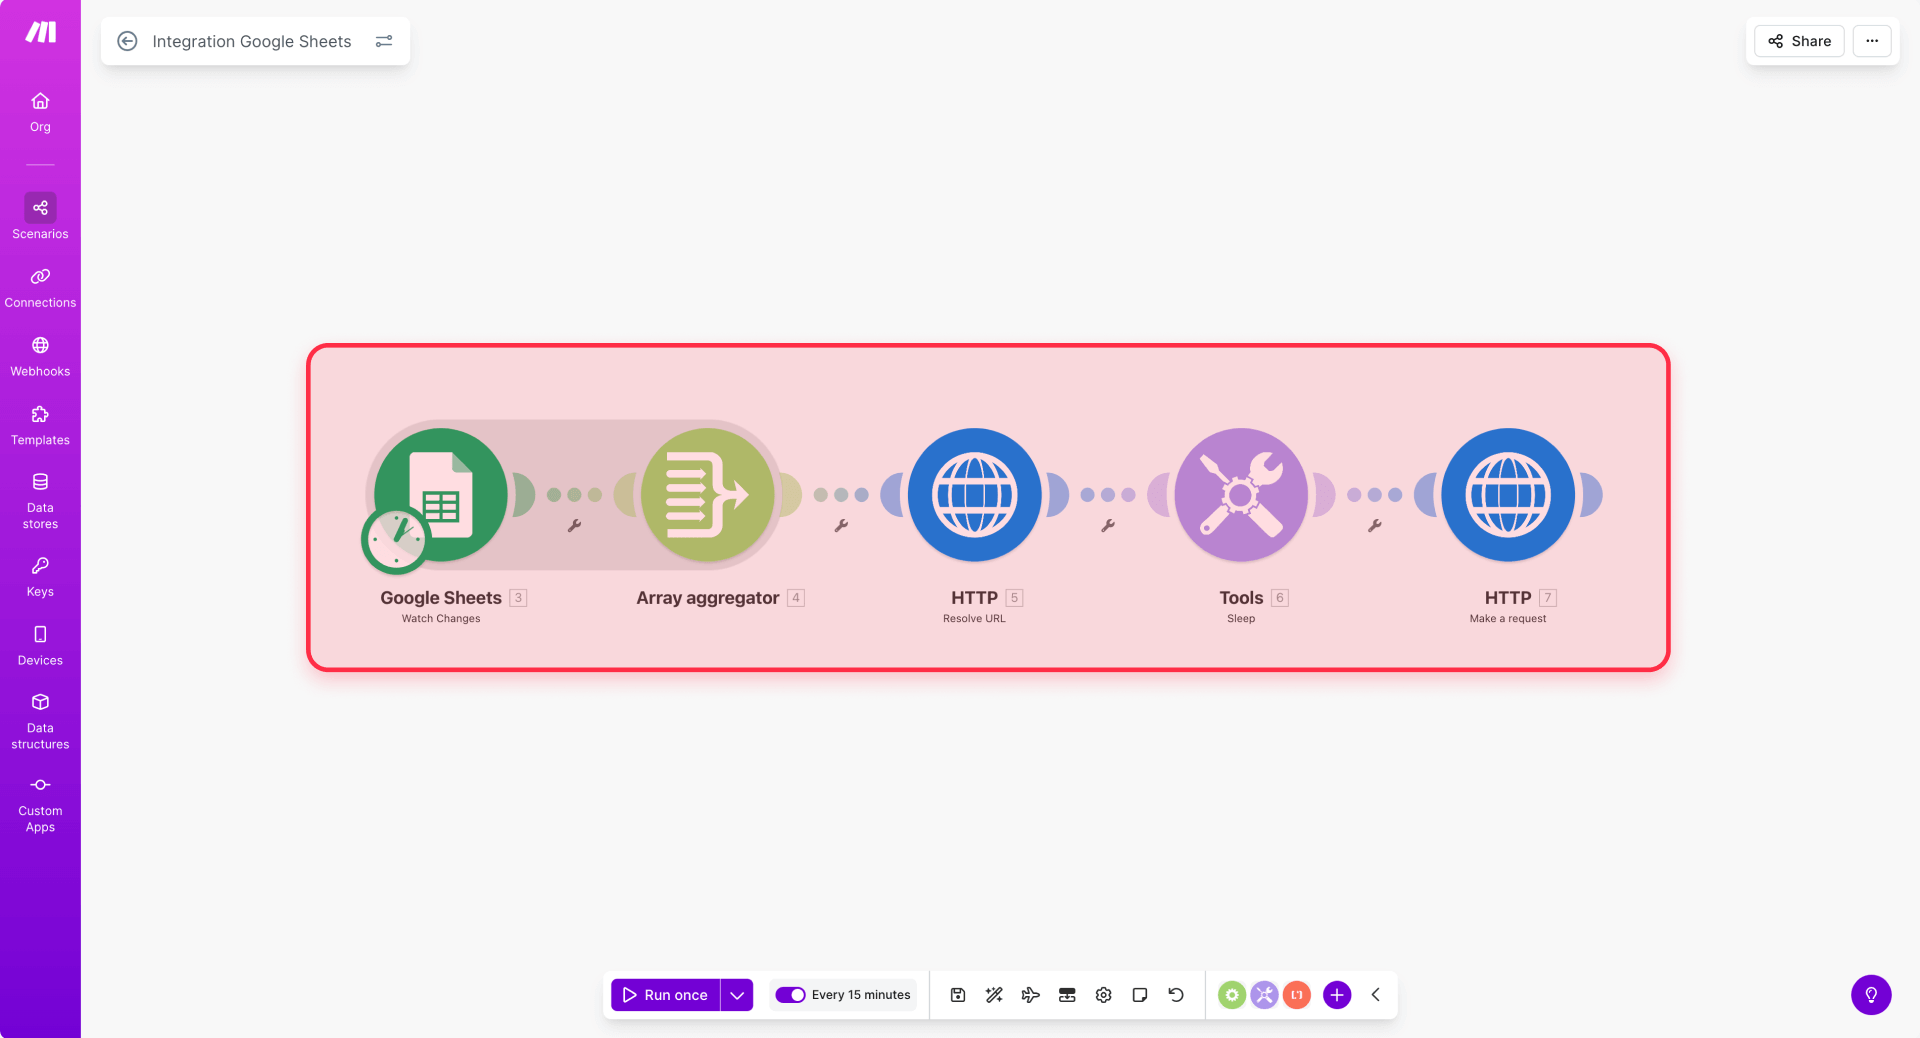
The full module chain looks like this: Google Sheets (trigger) → Filter (only rows with item IDs) → Array Aggregator (batch rows together) → HTTP Request (bulk staged update) → Sleep (throttle) → HTTP Request (publish items). Here's how to set up each piece.
1 — Create a new Make scenario and add the Google Sheets trigger.
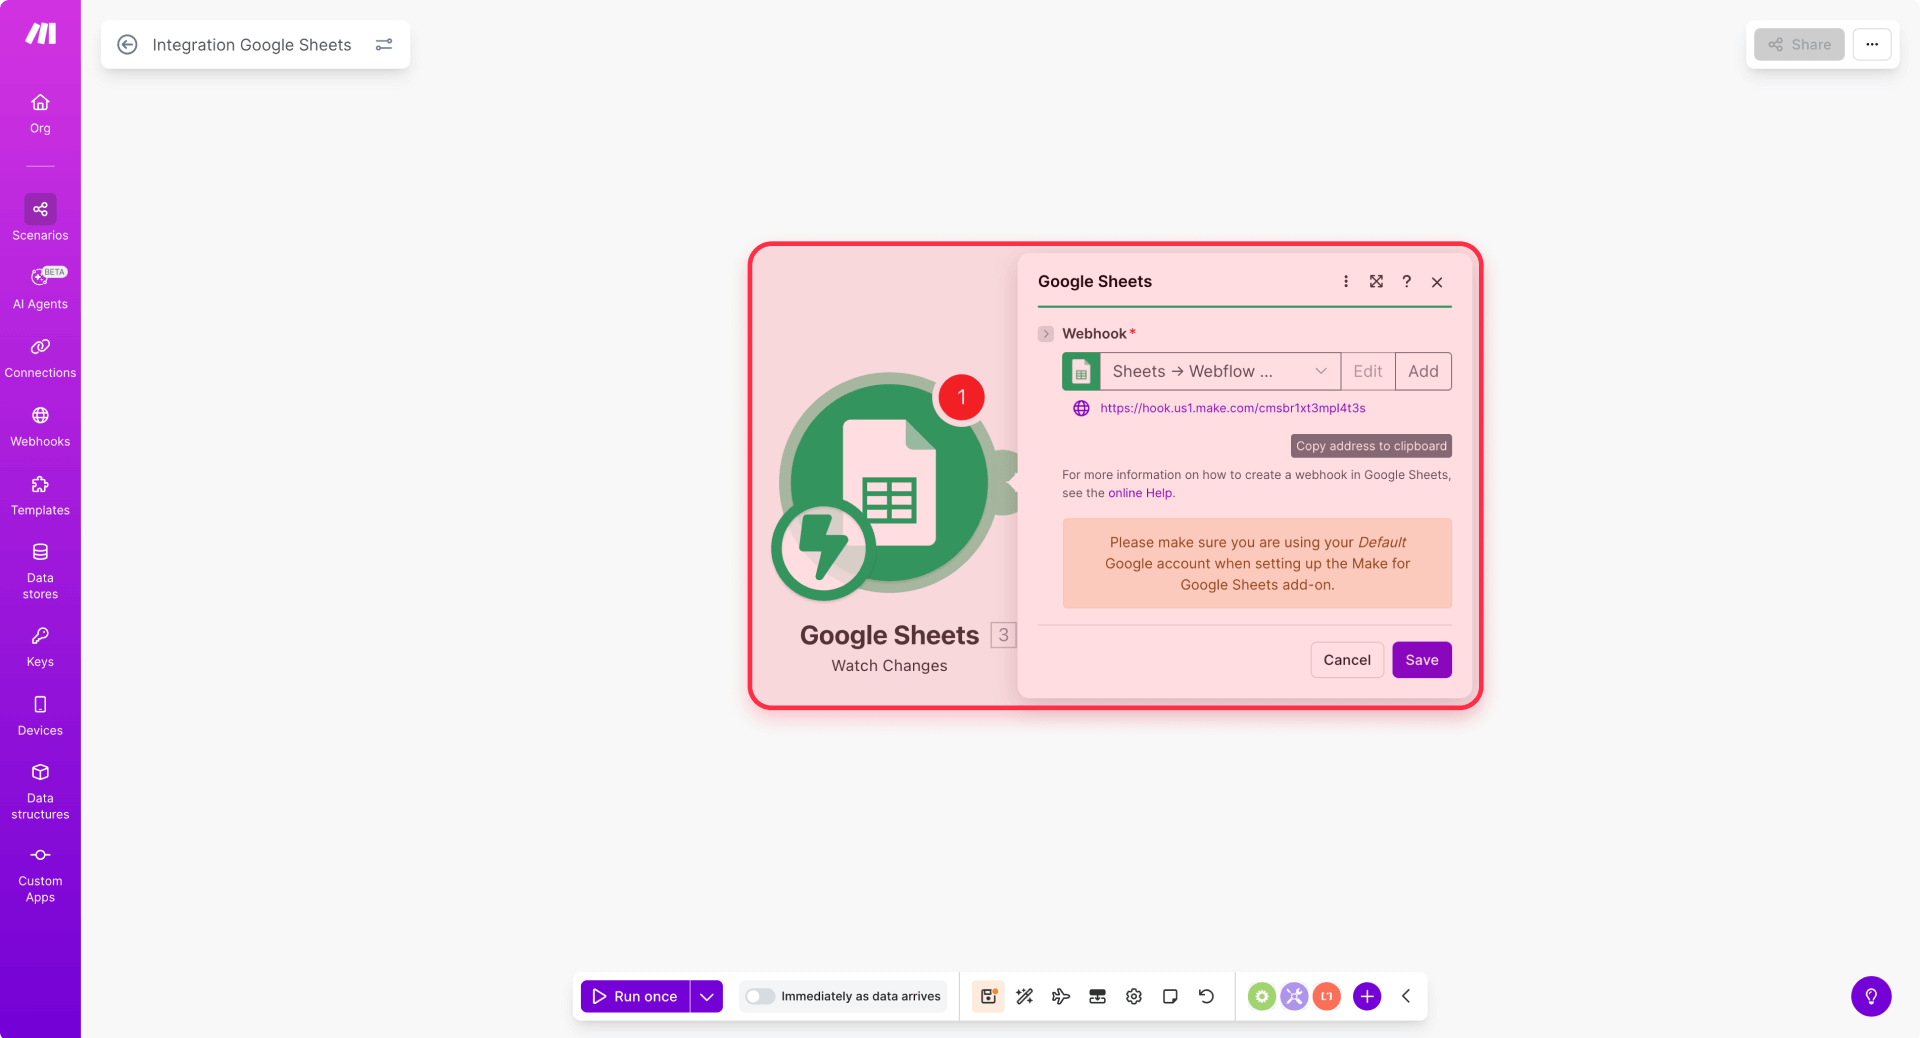
In Make, click Create a new scenario and add the Google Sheets module. Choose the Watch changes trigger, which fires when someone edits a row.
Inside the module, click Add to create a webhook, name it something like "Sheets → Webflow CMS bulk edits," and click Save. Copy the webhook URL — you'll need it in the next step.
Important: Make's interface updates frequently, so exact labels may shift. Look for the equivalent option if a name differs slightly from what's described here.
2 — Enable instant triggers in Google Sheets.
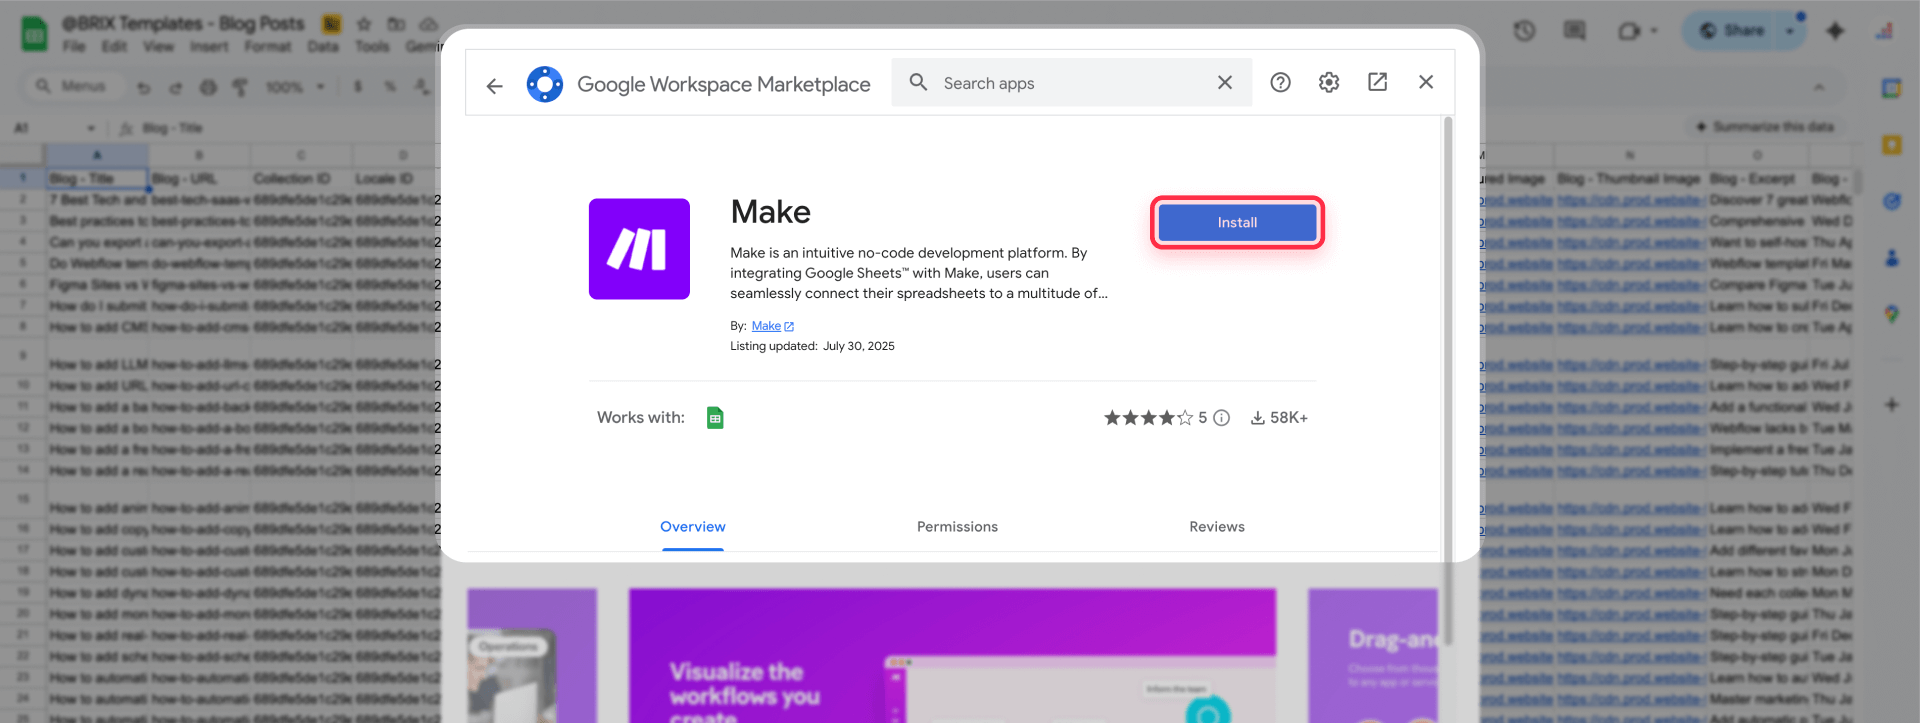
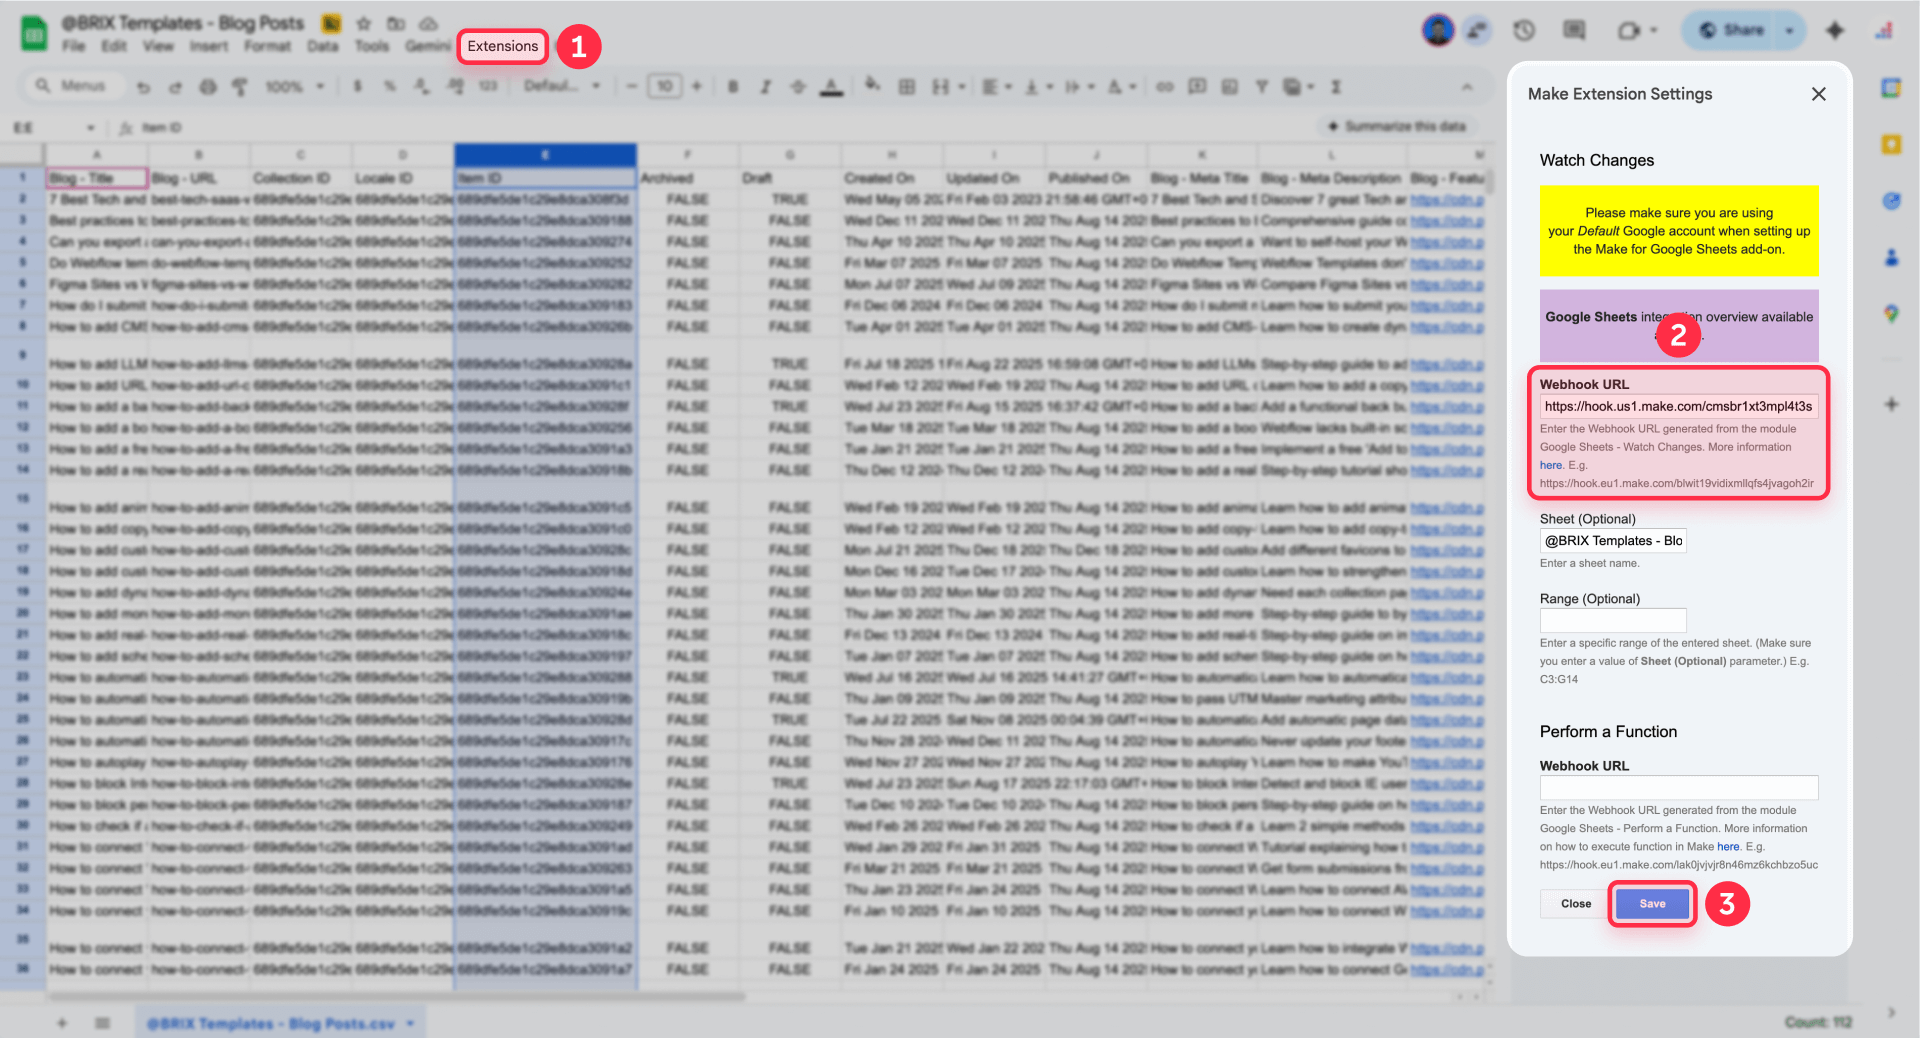
This step is required for Watch changes to work. Open your Google Sheet, go to Extensions → Add-ons → Get add-ons, search for Make and install it. Then open Extensions → Make to access the Make sidebar, and paste the webhook URL into the Watch Changes → Webhook URL field. Save your settings.

There's one critical limitation to know: Watch changes only triggers on manual edits in Google Sheets. Changes made by scripts, API calls, or other automations won't fire the trigger. If your sheet is updated programmatically, switch to a Google Sheets → Search rows module on a schedule, filtering for rows where needs_sync = TRUE.
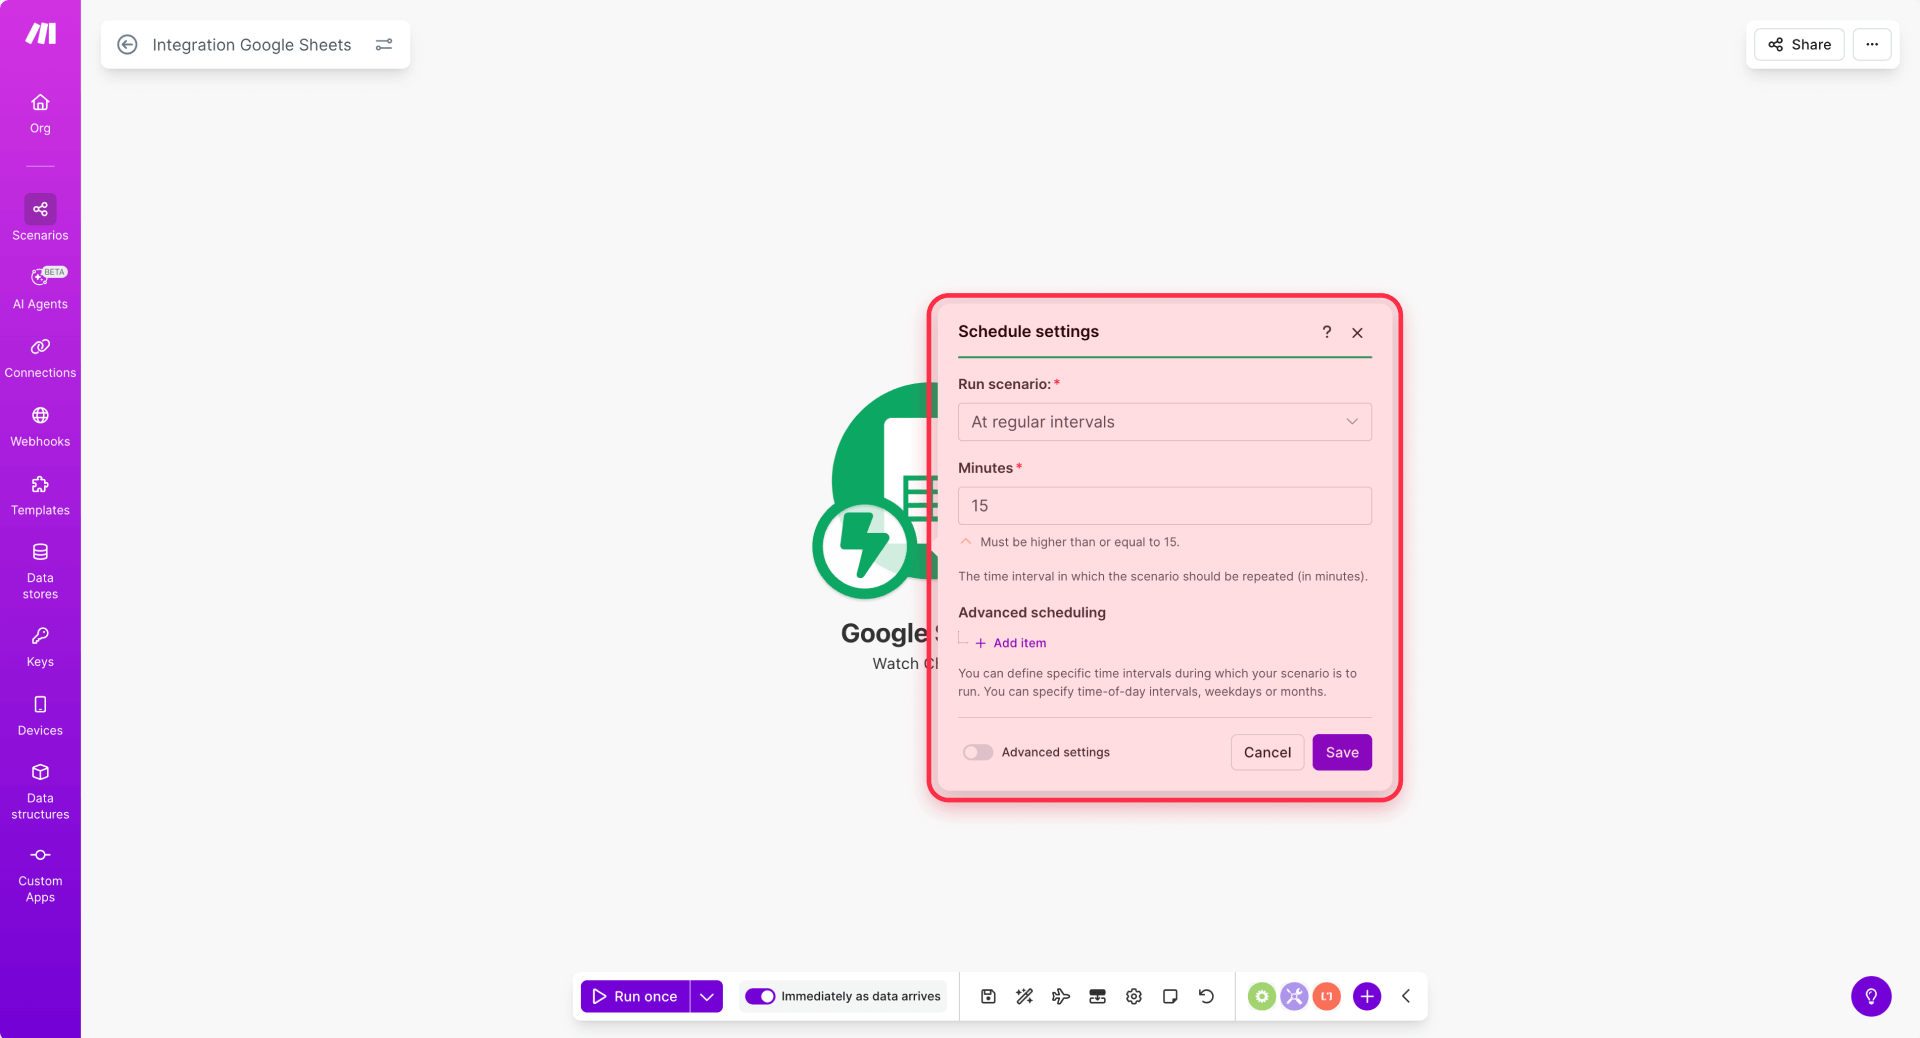
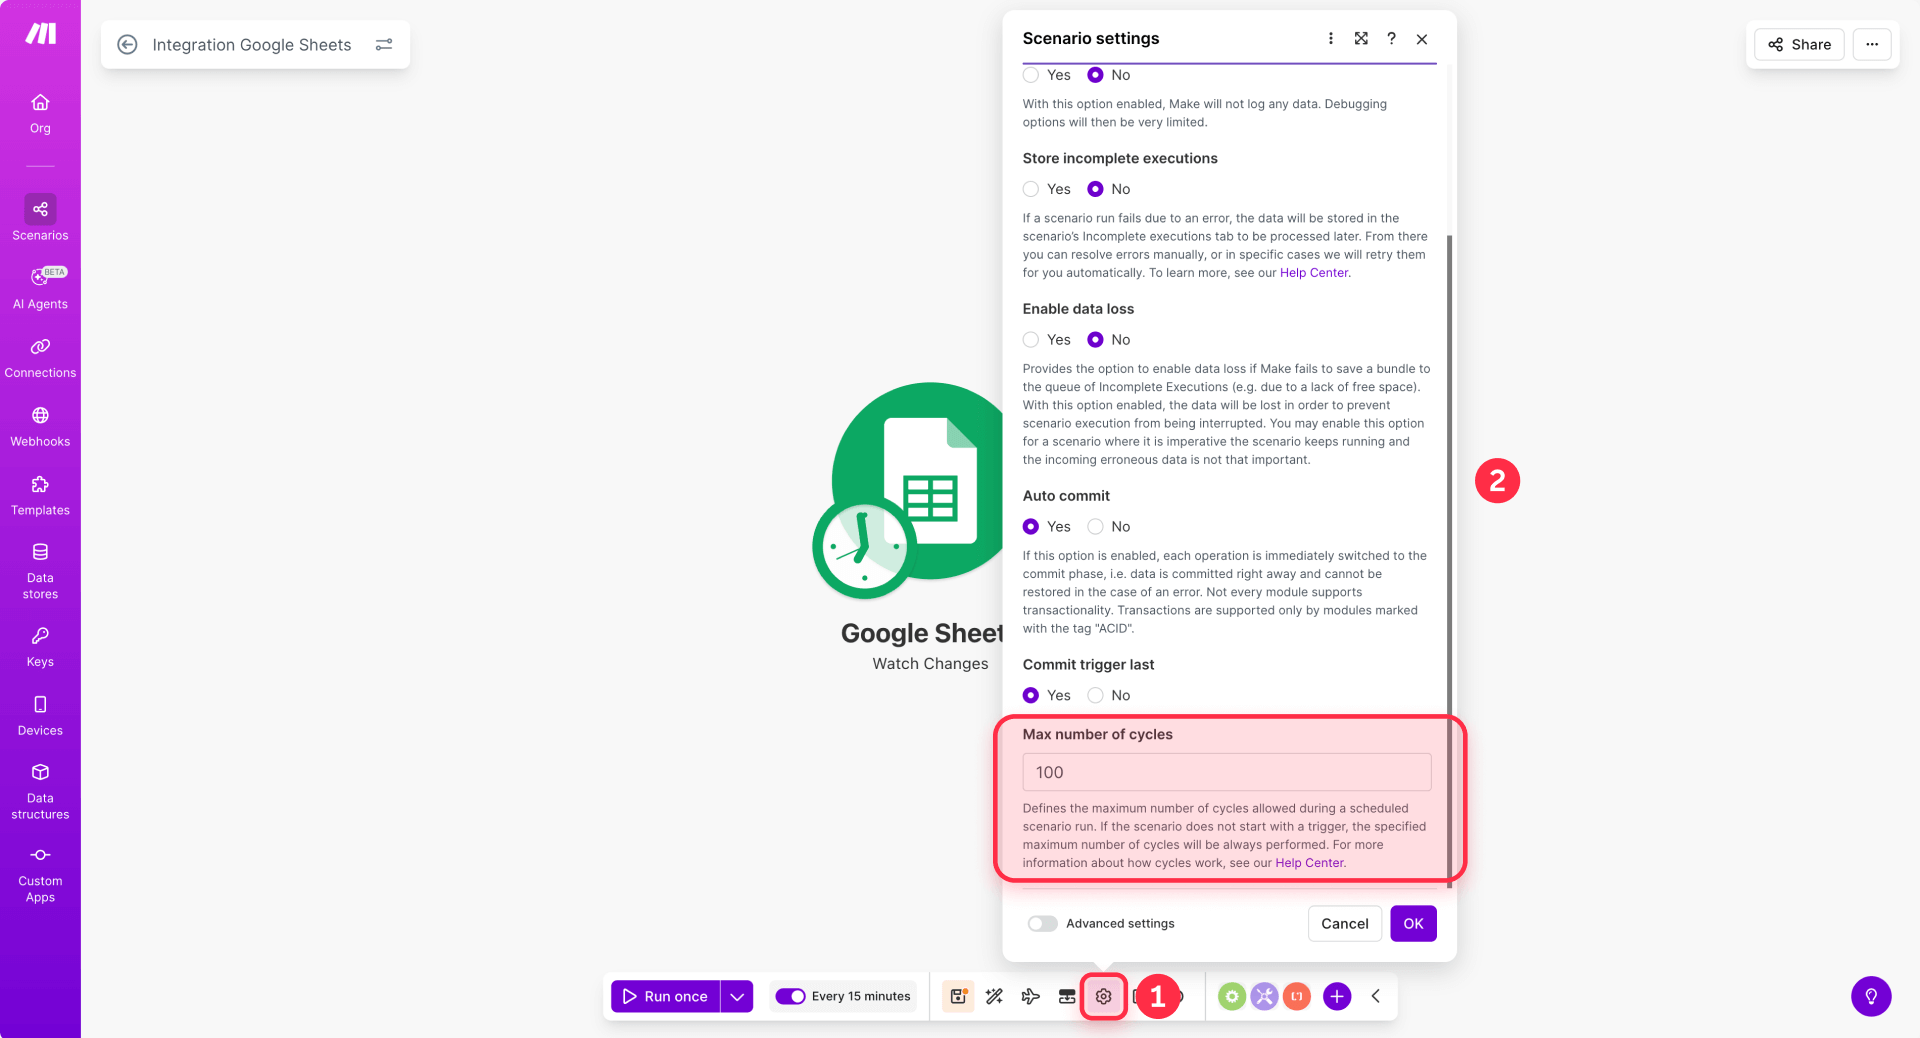
3 — Configure batching so you don't overwhelm Webflow's rate limits.
Open the scenario's Scheduling settings and set it to run periodically (every 5 minutes is a safe default). Inside the Google Sheets module, set Maximum number of cycles to 100 — this processes up to 100 queued changes per run. In scenario Settings, enable Sequential processing so runs don't overlap.
4 — Add a filter to skip rows without a Webflow item ID.
Click the wrench icon on the connection after the trigger module to add a filter. Name it "Has Webflow item ID" and set the condition to: Row values → webflow_item_id is not empty. Rows without an item ID get skipped — this prevents accidental creates or failed updates.
5 — Add the Array Aggregator to batch items together.
Add a Flow Control → Array Aggregator module. Set the Source module to your Google Sheets trigger, choose Custom for target structure, and add these aggregated fields mapped from your row values: id (from webflow_item_id), name, slug, and your update fields (like price). This produces a single array of up to 100 update objects per run.
6 — Add the HTTP module for Webflow's bulk staged update.
Add an HTTP → Make a request module. This calls Webflow's bulk staged update endpoint, which accepts up to 100 items per request.
Configure the module with Method set to PATCH and the following URL (replace YOUR_COLLECTION_ID with your actual collection ID):
https://api.webflow.com/v2/collections/YOUR_COLLECTION_ID/items?skipInvalidFiles=trueAdd two headers: Authorization with value Bearer YOUR_WEBFLOW_SITE_TOKEN, and Content-Type with value application/json.
Set the body type to Raw and use this JSON structure, mapping the values from your Array Aggregator output:
{
  "items": [
    {
      "id": "ITEM_ID_FROM_AGGREGATOR",
      "fieldData": {
        "name": "NAME_FROM_AGGREGATOR",
        "slug": "SLUG_FROM_AGGREGATOR",
        "price": "PRICE_FROM_AGGREGATOR"
      }
    }
  ]
}
In Make's mapper, replace the static values with the corresponding fields from your aggregated array. Each item in the array needs an id and a fieldData object containing only the fields you want to change.
7 — Add the publish step.
Add another HTTP → Make a request module to publish the updated items. Set Method to POST and use this URL:
https://api.webflow.com/v2/collections/YOUR_COLLECTION_ID/items/publishUse the same authorization header, and in the body, map the itemIds array from your aggregated output:
{
  "itemIds": ["ITEM_ID_1", "ITEM_ID_2"]
}
Use a map function over the Array Aggregator output to extract just the id values into this array.
How to handle Webflow API rate limits in Make
Webflow's API rate limits are plan-based: 60 requests per minute on Starter/Basic plans, and 120 requests per minute on CMS, Business, and eCommerce plans.
Add a Tools → Sleep module right after the bulk update PATCH call. Set the sleep time to 1.2 seconds for Starter/Basic plans or 0.6 seconds for higher-tier plans. This prevents burst collisions when multiple runs stack.
For handling 429 Too Many Requests responses, right-click the HTTP module, add an error handler, and inside the error route add a Tools → Sleep module with the duration set to the Retry-After value from Webflow's response header. Then retry the same request. Webflow explicitly expects clients to respect this header.
Tip: Don't publish after every single item. Batch your updates first (up to 100 per request), then publish all of them in a single call. This reduces your total API call volume drastically.
Webflow-specific limitations of Make automations you should know
- Watch changes only sees manual edits. If your Google Sheet is updated by scripts or other automations, switch to a scheduled Search rows module filtering by a needs_sync flag.
- Reference fields require Webflow item IDs, not names. Keep referenced item IDs in your sheet, or add a preliminary lookup step that resolves them once and writes them back.
- Locale updates need extra configuration. Bulk update endpoints only affect the primary locale unless you include a cmsLocaleId parameter for each item.
If you want to implement a Make workflow like this but need help customizing it for your specific CMS structure — field mappings, conditional logic, or multi-collection sync — our Webflow team can set it up for you.
Method 3 — Bulk edit Webflow CMS items with the Webflow Data API
The Webflow Data API is the most powerful and flexible approach to bulk editing. It gives you deterministic, scriptable control over exactly what changes, when it goes live, and how to roll back if something breaks. This section explains what the API offers and how it works at a high level — enough for your development team to implement it or for you to understand what's involved.
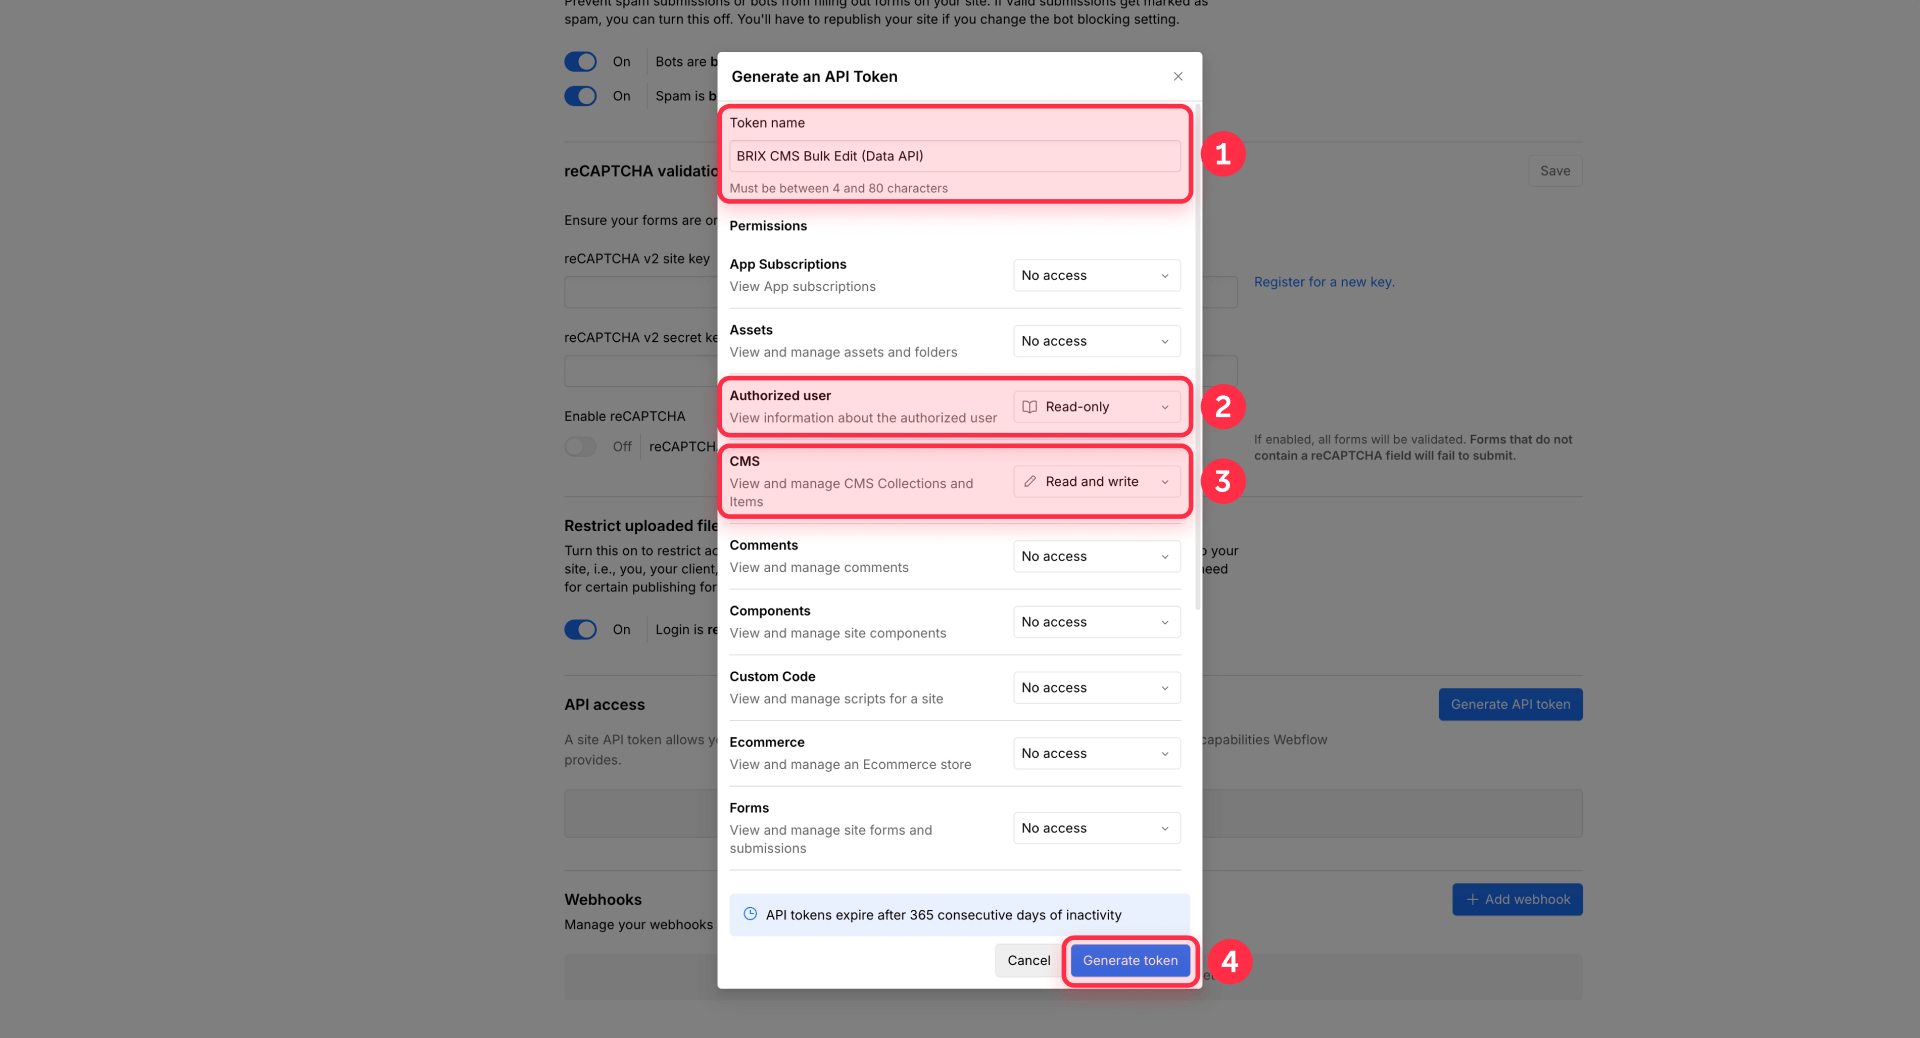
How to create a Webflow site token for API bulk editing
You need a site token with the right permissions to make API calls.
- In your Webflow Workspace, open Site Settings (gear icon).
- Go to Apps & integrations → scroll to API Access.
- Click Generate API Token.
- Select scopes including cms:read and cms:write at minimum.
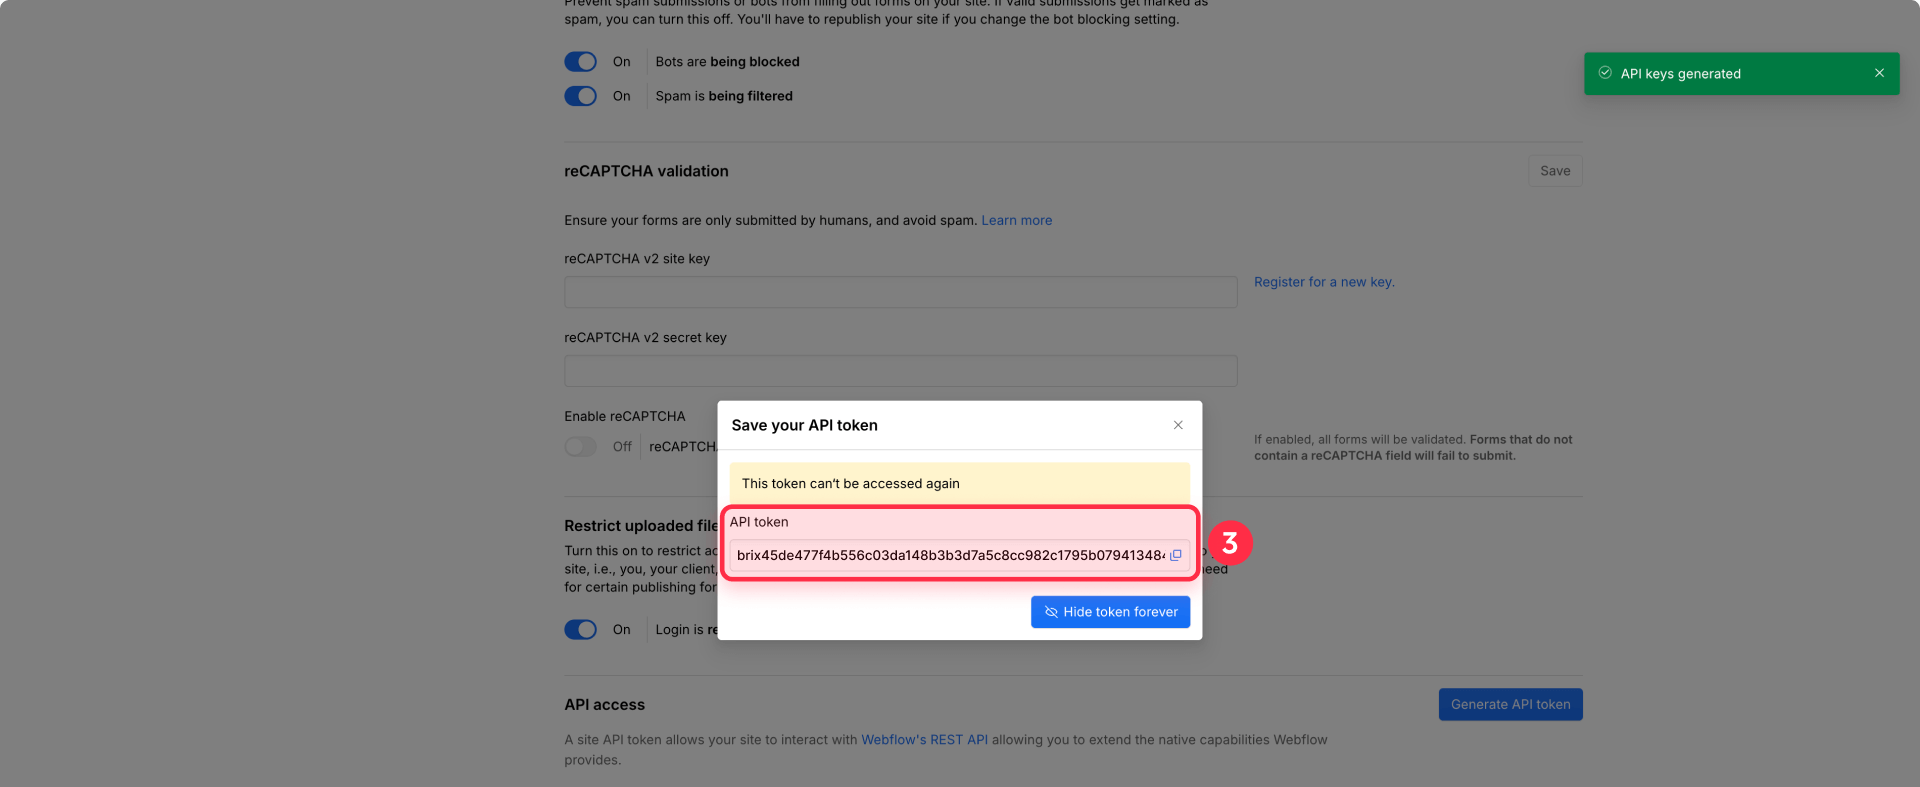
- Save the token securely — you won't see it again after closing the modal.

A few limits to keep in mind: tokens expire after 365 days of inactivity, and you can have a maximum of 5 tokens per site.
How Webflow's bulk update endpoints work (staged vs live)
Webflow's Data API supports bulk updates of up to 100 items per request through two separate endpoints:
- Staged bulk update — modifies draft content that isn't visible on the live site. Use this endpoint: PATCH /v2/collections/:collection_id/items
- Live bulk update — changes published content immediately. Use this endpoint: PATCH /v2/collections/:collection_id/items/live
Both endpoints accept the same payload structure: an items array where each object contains an id and a fieldData object with only the fields you want to change. Both support the skipInvalidFiles parameter (to keep batches moving when a file field fails) and the cmsLocaleId parameter (for targeting specific locales).
Here's what the request body looks like for either endpoint:
{
  "items": [
    {
      "id": "ITEM_ID_1",
      "fieldData": {
        "name": "Updated title",
        "featured": false
      }
    },
    {
      "id": "ITEM_ID_2",
      "fieldData": {
        "price": 49.99
      }
    }
  ]
}
The key principle is simple: you only send the fields you want to change, and the API leaves everything else untouched. This makes partial updates safe and predictable.
How publishing and unpublishing works in the Webflow CMS API (post-2025)
If you use staged updates, you need a separate publish step to push changes live. This is an important distinction that breaks many older tutorials.
Publishing items (staged → live): Use the publish endpoint POST /v2/collections/:collection_id/items/publish with an itemIds array. The response includes publishedItemIds and errors, which is perfect for logging and verification.
Unpublishing items (live → draft): As of July 7, 2025, setting isDraft to true on a live item no longer unpublishes it. You must use the dedicated unpublish endpoint: DELETE /v2/collections/:collection_id/items/live with an items array containing the IDs to unpublish. This endpoint handles up to 100 items per request.
This is a breaking change. If you have existing scripts that use isDraft=true to unpublish items, they will silently fail. Update them to use the dedicated unpublish endpoint.
How to handle Webflow API rate limits and batching at scale
Webflow's Data API rate limits vary by plan:
- Starter/Basic: 60 requests per minute
- CMS/eCommerce/Business: 120 requests per minute
- Enterprise: custom limits
Every API response includes headers you should respect: X-RateLimit-Remaining (how many calls you have left), X-RateLimit-Limit (your total cap), and Retry-After (how long to wait after a 429 response).
The practical batching strategy is straightforward: chunk your updates into groups of 100 items, send one PATCH request per batch, wait an appropriate interval between batches, and publish all updated items in a single call at the end. Don't publish after every batch — that multiplies your API calls unnecessarily.
For rollback safety, capture the "before values" for every field you change (a simple API read before the update) and keep a change log with item IDs, old values, and new values. If something breaks, you can run a reverse bulk update to restore previous state.
Why the Webflow Data API is the most robust bulk edit method
The API gives you capabilities that no other method can match: you can script complex conditional logic (if field X equals Y, then update Z), control exactly when changes go live through the staged/publish workflow, build idempotent retries that safely resume after failures, handle every field type including references and multi-references without workarounds, and create reusable automation scripts with built-in dry-run modes and change logging.
The tradeoff is that it requires development work to implement — writing scripts, managing tokens, handling error cases. For teams that do this regularly, the upfront investment pays for itself many times over. For teams that need it done once or want a production-hardened workflow built right the first time, working with an experienced development team is the faster path. At BRIX Templates, we build custom bulk update workflows tailored to your CMS structure — including ID mapping, publish strategies, rollback logic, and monitoring. If that's what you need, our Webflow agency can handle it.
Troubleshooting Webflow CMS bulk edits without CSV re-import
Here are the most common problems teams run into across all bulk edit methods, with specific fixes for each:
- "429 Too Many Requests" from the Webflow API: Read the Retry-After header value, pause that many seconds, then retry. Reduce concurrency and batch up to 100 items per request. Verify your rate limit is recovering by checking X-RateLimit-Remaining in response headers.
- Updates only affect the primary locale: Include the cmsLocaleId parameter for each item when updating localized content. Verify by checking the localized variant in the CMS after the update completes.
- "I set isDraft=true but the item is still live": This behavior changed in July 2025. Use the dedicated unpublish endpoint (DELETE /v2/collections/:collection_id/items/live) instead. Verify by checking the item's published status in the CMS panel.
- Make or Ikaros updates the CMS but changes don't appear on the live site: You likely performed a staged update without a publish step. Add a publish call after your update, or switch to the live update endpoint. Verify by loading the live URL directly, not the Designer preview.
- Bulk update fails because of a bad image or file field: Add skipInvalidFiles=true to your API call to keep the batch moving. Inspect which items were skipped in the response, then re-run only those after fixing the file URLs.
- Wrong items updated or duplicates created: Your identifier mapping is wrong. Always update by Webflow Item ID, not by name or slug. Store the Item ID in your external table and verify by updating a single known row first.
- Ikaros "Delete Missing" removed items it shouldn't have: You uploaded a filtered subset of your CSV. Always verify your CSV contains all items you want to keep before enabling this toggle. Restore from your pre-edit CSV export if needed.
- Make scenario runs but no items are processed: Check that the filter after your trigger isn't blocking all rows. Verify that webflow_item_id values exist in your sheet and that the Watch changes trigger is properly connected to the Integromat add-on.
- Reference fields fail or map to wrong items: Reference fields require Webflow Item IDs, not names or slugs. If you're using Ikaros (which maps by slug), ensure slugs are unique and that referenced items already exist before running the import.
- Webflow Site Token stopped working: Tokens expire after 365 days of inactivity. Generate a new token from Project Settings → Integrations → API Access and update it in all your automations.
Frequently asked questions about bulk editing CMS items in Webflow
What does bulk editing actually mean in Webflow CMS?
In Webflow, "bulk editing" is used loosely and often causes confusion. The CMS interface supports bulk actions — selecting multiple items and applying publish, unpublish, archive, or delete — but it does not support bulk field edits. You can't select 200 items and change their price field from the UI.
When people say they need to "bulk edit" Webflow CMS items, they usually mean changing field values across many items at once. This requires an external method: a tool like Ikaros, an automation platform like Make, or direct calls to the Webflow Data API. The key distinction is publishing state changes (native UI) versus field value changes (external tools). If you're not sure which you need, check whether your change involves clicking into individual item fields — if yes, you need an external bulk edit method.
Can I bulk update Webflow CMS items without writing any code?
Yes — two of the four methods in this guide require zero code. Ikaros lets you upload a CSV with update/delete toggles through a visual interface, and it handles all the API work behind the scenes. For ongoing automations, Make offers a visual scenario builder where you connect modules by dragging and dropping instead of writing scripts.
The tradeoff is flexibility. No-code tools work well for straightforward field updates (changing text, numbers, toggles) but can struggle with complex logic like "only update items where field A equals X and field B is empty." If your bulk edits involve conditional logic or multi-step dependencies, the Webflow Data API gives you that control — but it does require scripting. Start with the no-code option that fits your workflow, and graduate to the API only when you hit real limits.
How many Webflow CMS items can I update in a single API request?
Webflow's bulk update endpoints accept up to 100 items per request. This applies to both staged updates and live updates. If you need to update more than 100 items, you send multiple requests in sequence with appropriate throttling between them.
The practical approach is to chunk your total update set into batches of 100, send one PATCH request per batch, respect the rate limits for your plan (60 requests/min on Starter/Basic, 120/min on higher plans), and publish all items in a single call at the end. Don't publish after every batch — that doubles your API calls for no benefit. A well-batched script can update 1,000 items in under 2 minutes on a CMS plan.
What's the difference between staged and live bulk updates in Webflow?
Staged updates modify draft content that visitors can't see until you explicitly publish it. Live updates change published content immediately — visitors see the new values as soon as the API call completes. Webflow's CMS API is built around this staging model, and understanding it prevents most "my changes aren't showing up" confusion.
Default to staged updates for most bulk edit workflows. They give you a natural QA checkpoint: make all your changes, spot-check a few items in the Webflow Designer, then publish everything in one batch. Use live updates only when you need instant changes on the production site — for example, emergency price corrections or real-time inventory sync. The staged approach also makes rollback easier because you can simply not publish if something looks wrong.
Is Ikaros safe to use for Webflow CMS bulk edits in production?
Ikaros is functional and technically sound — it uses Webflow's official OAuth and Data API correctly. However, it's labeled as beta with no warranty, and there's limited independent evidence (reviews, forum discussions, case studies) confirming it works reliably at large scale. For standard use cases with straightforward field types, it works well.
The smart approach is to never run Ikaros on production without testing first. Duplicate your Webflow site, run a CSV with 10–20 items, confirm the matching logic works, check whether changes go live automatically, and test reference fields with at least one bad slug. Only after this validation should you touch production content. Also, always start with Overwrite Items only — enable Delete Missing only after you've proven the matching is correct.
Why does Make work better than Zapier for Webflow CMS bulk edits?
The critical difference is that Zapier's Webflow integration cannot map reference or multi-reference fields — that's a hard limitation documented in Webflow's own Zapier guide. For many CMS collections, references are core fields (categories, authors, related items), so this gap makes Zapier unusable for serious bulk sync workflows.
Make avoids this problem because you can call Webflow's API endpoints directly through HTTP modules, giving you full control over the request payload including reference field IDs. Make also supports Array Aggregators for true batching (sending 100 items in one request) instead of making individual API calls per item, which is critical for staying under rate limits. If your CMS doesn't use reference fields and your volumes are low, Zapier works fine — but for anything beyond basic text updates, Make is the more capable choice.
How do I find Webflow CMS item IDs for all items in a collection?
You have three practical options depending on your technical comfort level. The simplest is to export your collection as CSV from the Webflow CMS panel — the export includes item IDs for every row. Copy those IDs into your external spreadsheet or database as a permanent column.
For a more automated approach, use Webflow's list items API endpoint to pull all items in a collection and save the results as a mapping of slug → item ID. Once you have this mapping, store the ID next to each record in your external table and never re-derive it unless necessary. This 30-minute investment saves hours every month because every bulk edit method — Ikaros, Make, and direct API calls — works most reliably when you update by item ID rather than by slug or name.
How do I avoid losing data during Webflow CMS bulk edits?
Data loss during bulk edits almost always comes from one of three causes: wrong identifier mapping (updating the wrong items), missing backup (no way to revert), or premature use of destructive operations (like Ikaros Delete Missing on an incomplete CSV).
Prevention is straightforward. Before any bulk edit: export a CSV snapshot, log your planned changes with before/after values, and run on a test batch of 10–20 items first. During the edit: always update by Webflow Item ID (never by name alone), use staged updates with a separate publish step so you can review before going live, and add skipInvalidFiles=true to prevent partial failures. After the edit: verify a sample of updated items on the live site. If something went wrong, restore from your change log by running a reverse bulk update with the original values.
Can I bulk edit Webflow CMS items directly from Google Sheets?
Yes, and it's one of the most popular workflows. The most common approach is using Make as the bridge: Google Sheets serves as your editing interface, and Make watches for changes (or runs on a schedule), batches the updates, and pushes them to Webflow's API. The key is storing the Webflow Item ID in a dedicated column so every row maps to exactly one CMS item.
For teams that prefer something simpler, Ikaros also accepts CSV files exported from Google Sheets — you just download the sheet as CSV and upload it. The Make approach is better for ongoing sync (changes flow automatically), while Ikaros is better for periodic batch updates (you run it manually when needed). In both cases, the sheet becomes your source of truth, and Webflow reflects whatever the sheet says.
What are the best practices for rolling back a Webflow CMS bulk update?
Rollback is easy only if you plan for it before the edit. The most reliable method is to capture "before values" for every field you change — either through an API read or a CSV export — and store them alongside your update log. If something goes wrong, you run a reverse bulk update that restores the previous values, then publish.
This is especially effective when combined with staged updates, since unpublished changes don't affect the live site and you can review everything before committing. The key is treating rollback as part of the process, not an afterthought — capture your baseline, log every change, and always test on a small batch before scaling to the full collection.
Conclusion
Bulk editing Webflow CMS content doesn't have to mean fighting with CSV re-imports. Whether you start with Ikaros for a smarter CSV experience, graduate to Make for automated ongoing sync, or go straight to the Webflow Data API for full scriptable control, each method eliminates the duplicate-creation and broken-mapping pain that comes with traditional imports.
The natural next step is building a reusable internal workflow — with dry-run mode, change logging, and rollback baked in — that your team can use safely on every project. And if you'd rather have this set up as a hardened, production-ready system tailored to your CMS structure, our Webflow development team can build it for you.


Join readers commenting on this post!