
You've installed Google Tag Manager and Google Analytics 4 on your Webflow site, but there's a critical gap in your data: you don't know which buttons people actually click.
Are visitors engaging with your hero "Get started" CTA or scrolling past it? Does your pricing page "Book a demo" button outperform the one in your navigation? Without button click tracking, you're designing and optimizing based on assumptions rather than evidence.
This guide shows you how to track specific button clicks in Webflow using Google Tag Manager, sending detailed events to GA4 without writing any custom code.
Required setup Before starting, you need:
- Google Tag Manager installed on Webflow → Installation guide
- GA4 configured through GTM, not Webflow's native integration → GA4 setup guide
- Optional but helpful: Experience with form submission tracking in Webflow
Why tracking button clicks matters for Webflow sites
Button click tracking transforms vague engagement metrics into actionable intelligence about user behavior.
Measure CTA performance across contexts: You can finally compare how your hero CTA performs against your footer buttons, or see whether your pricing page "Contact sales" button gets more clicks than the same button in your navigation. This granular data reveals which placements and contexts drive the most engagement.
Map the user journey: Understanding where users click but don't convert helps you identify friction points in your funnel. Maybe visitors click "Learn more" enthusiastically but rarely reach your pricing page, signaling a disconnect between expectations and reality.
Validate design decisions with data: When you redesign a landing page or change button copy, click tracking shows whether engagement actually improved or if you just think it did. No more wondering if "Start free trial" performs better than "Get started"—you'll have concrete numbers.
Create conversion events that matter: GA4 lets you mark important button clicks as key events and conversions. That "Schedule demo" button click can become a tracked conversion you optimize for in Google Ads, rather than only tracking form completions that happen later in the funnel.
Maintain clean Webflow projects: Instead of sprinkling onclick handlers throughout your Webflow custom code, you centralize all tracking logic in GTM. This makes tracking easier to audit, update, and scale as your site grows.
How button click tracking works in GTM and Webflow
The process leverages GTM's built-in click detection capabilities. When anyone clicks anything on your Webflow site, GTM automatically captures information about that click—the text inside the element, CSS classes applied to it, the URL it links to, and which page the click happened on.
Your role is identifying the specific pattern that distinguishes your target button from everything else clickable on your site. Maybe it's the unique combination of button text plus page location. Perhaps it's a specific CSS class you assigned in Webflow. Or it could be an ID attribute you explicitly set.
Once you've identified that pattern using GTM's Preview mode, you create a click trigger that fires only when those exact conditions match. You then attach a GA4 event tag to that trigger, which sends structured data to Google Analytics every time someone clicks that button.
The beauty is that you test everything in a sandboxed environment before publishing. GTM's Preview mode lets you click around your site and verify that events fire correctly, while GA4's DebugView confirms the data arrives with proper parameters. Only after confirming everything works do you hit Submit to make the tracking live for all visitors.
Prerequisites for Webflow button tracking
Your Webflow site must be published to a real domain for testing. This could be your site.webflow.io staging environment or your custom domain. GTM fundamentally doesn't work in the Webflow Designer preview mode since the JavaScript container can't load there.
You need GTM properly installed and functional. Open Preview mode and confirm you see Container Loaded when connecting to your site. If you haven't installed GTM yet, start with our guide on adding Google Tag Manager to Webflow.
GA4 should be running through a GA4 Configuration tag in GTM that fires on all pages. Don't use Webflow's native GA4 field for this—managing everything through GTM gives you much more control and flexibility. Our GA4 installation guide walks through the proper setup.
Finally, you should understand GTM's basic concepts around tags, triggers, and variables. If you've already implemented form submission tracking, you'll recognize many patterns here since the methodology is similar.
Enable click variables in Google Tag Manager for Webflow
GTM needs specific variables enabled to capture click information. Navigate to Variables in GTM's sidebar and click Configure under the Built-in Variables section.
Enable these five essential click variables: Click Element, Click Classes, Click ID, Click Text, and Click URL. Also verify that Page URL and Page Path are enabled, since combining page location with click properties creates precise, reliable triggers.
Understanding what each variable captures helps you choose the right identification strategy. Click Text reveals the visible text inside whatever someone clicked, perfect for buttons with unique labels like "Schedule consultation" or "Download guide". Click Classes exposes the CSS classes Webflow assigned, useful when you've created specific button styles like btn-primary-hero or cta-pricing-main.
Use GTM Preview to inspect your Webflow button
Preview mode reveals exactly what GTM sees when someone clicks your button. Click Preview in GTM's top-right corner, paste your published Webflow site URL, and click Connect. Your site opens in a new tab with Tag Assistant running alongside it.
Navigate to whichever page contains your target button. This might be your homepage hero, your pricing page, or a specific landing page. Click that button to generate clear click events for GTM to capture.
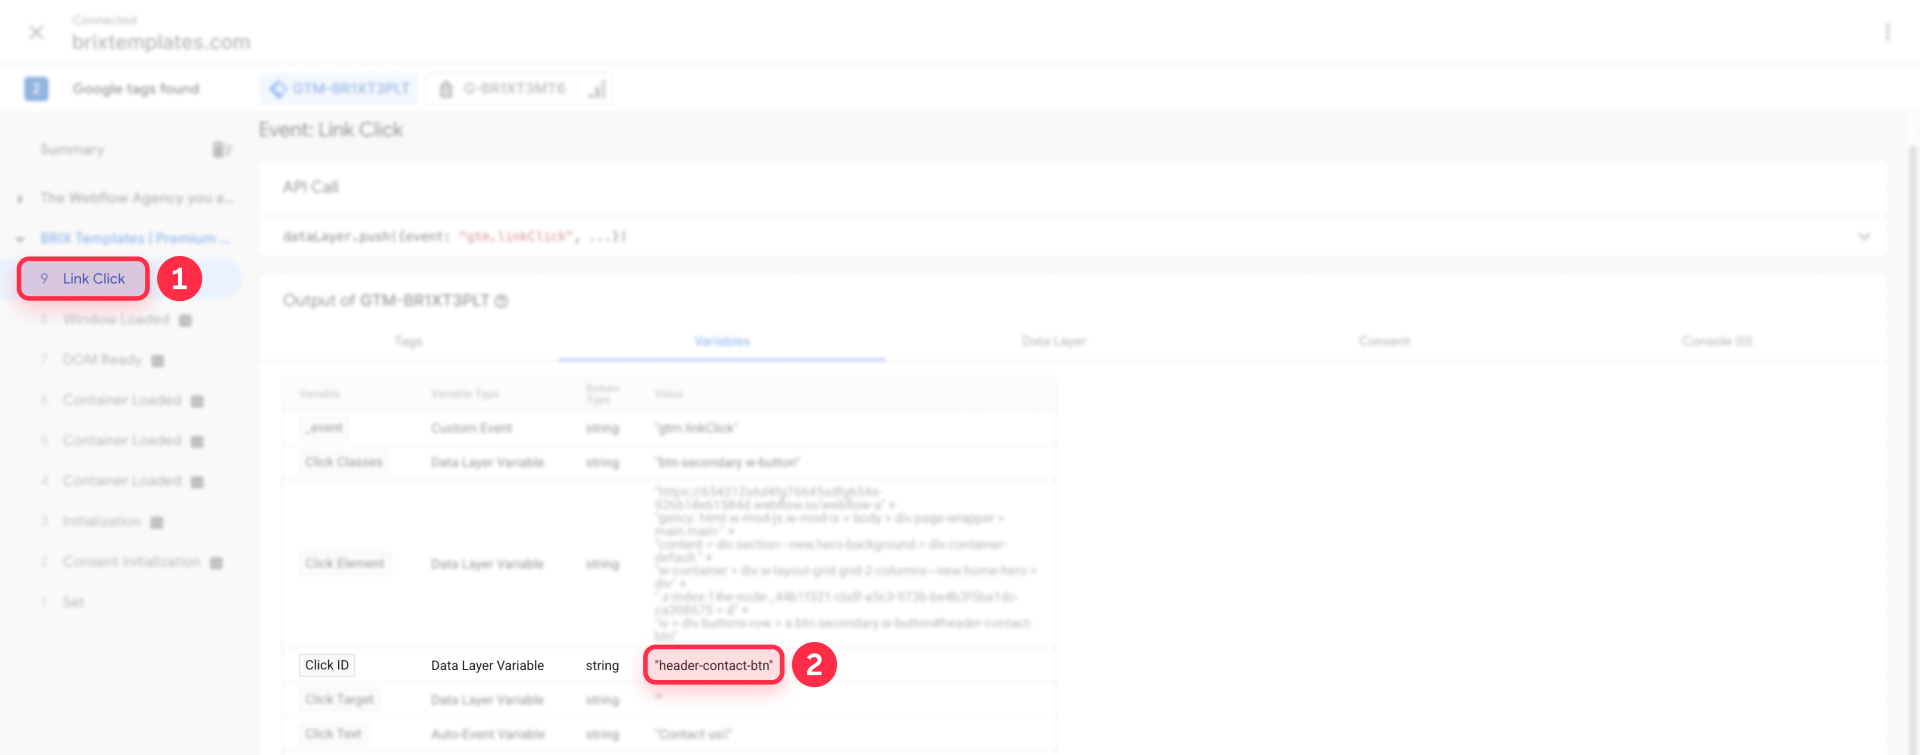
Switch to the Tag Assistant window and scan the left sidebar for Click events, typically labeled gtm.click. Select the event corresponding to your button click and open the Variables tab.
Here's where detective work begins. You're looking for values that uniquely identify this specific button. Note the Click Text—maybe it says "Contact us" or "Get started". Check Click Classes for values like button, btn-primary, or w-button. Look at Page Path to see the current page, which might be / for the homepage or /pricing for your pricing page.
Your goal is finding a combination that matches only your target button, not every similar button across your site. The combination Click Text = "Contact us" AND Page Path = "/" specifically identifies your homepage contact button, distinguishing it from contact buttons in your footer or other pages. The pattern Click Classes contains "hero-cta" AND Page Path = "/landing" might perfectly isolate a landing page button if you've used descriptive class names in Webflow.
Create a click trigger in GTM for your Webflow button
Armed with your button’s identifying characteristics, you’ll build a trigger that fires exclusively for that element. Go to Triggers in GTM and create a new trigger with a descriptive name like “Click – Homepage Hero CTA” or “Click – Pricing Demo Button”. Six months from now, you’ll thank yourself for using clear naming conventions.
Click Trigger Configuration and select Click – All Elements. This works for any clickable element in Webflow, whether it’s a standard link, a div styled as a button, or a button element. While Click – Just Links exists for standard anchor tags, All Elements provides broader compatibility.
Under This trigger fires on, choose Some Clicks to add filtering conditions. This is where you apply the values discovered in Preview mode. You might start with conditions like Click Text equals Contact us combined with Page Path equals / for a homepage button, or Click Classes contains btn-hero plus Page Path equals /pricing for a pricing page CTA. These patterns work, but they depend on text and classes that are likely to change over time.
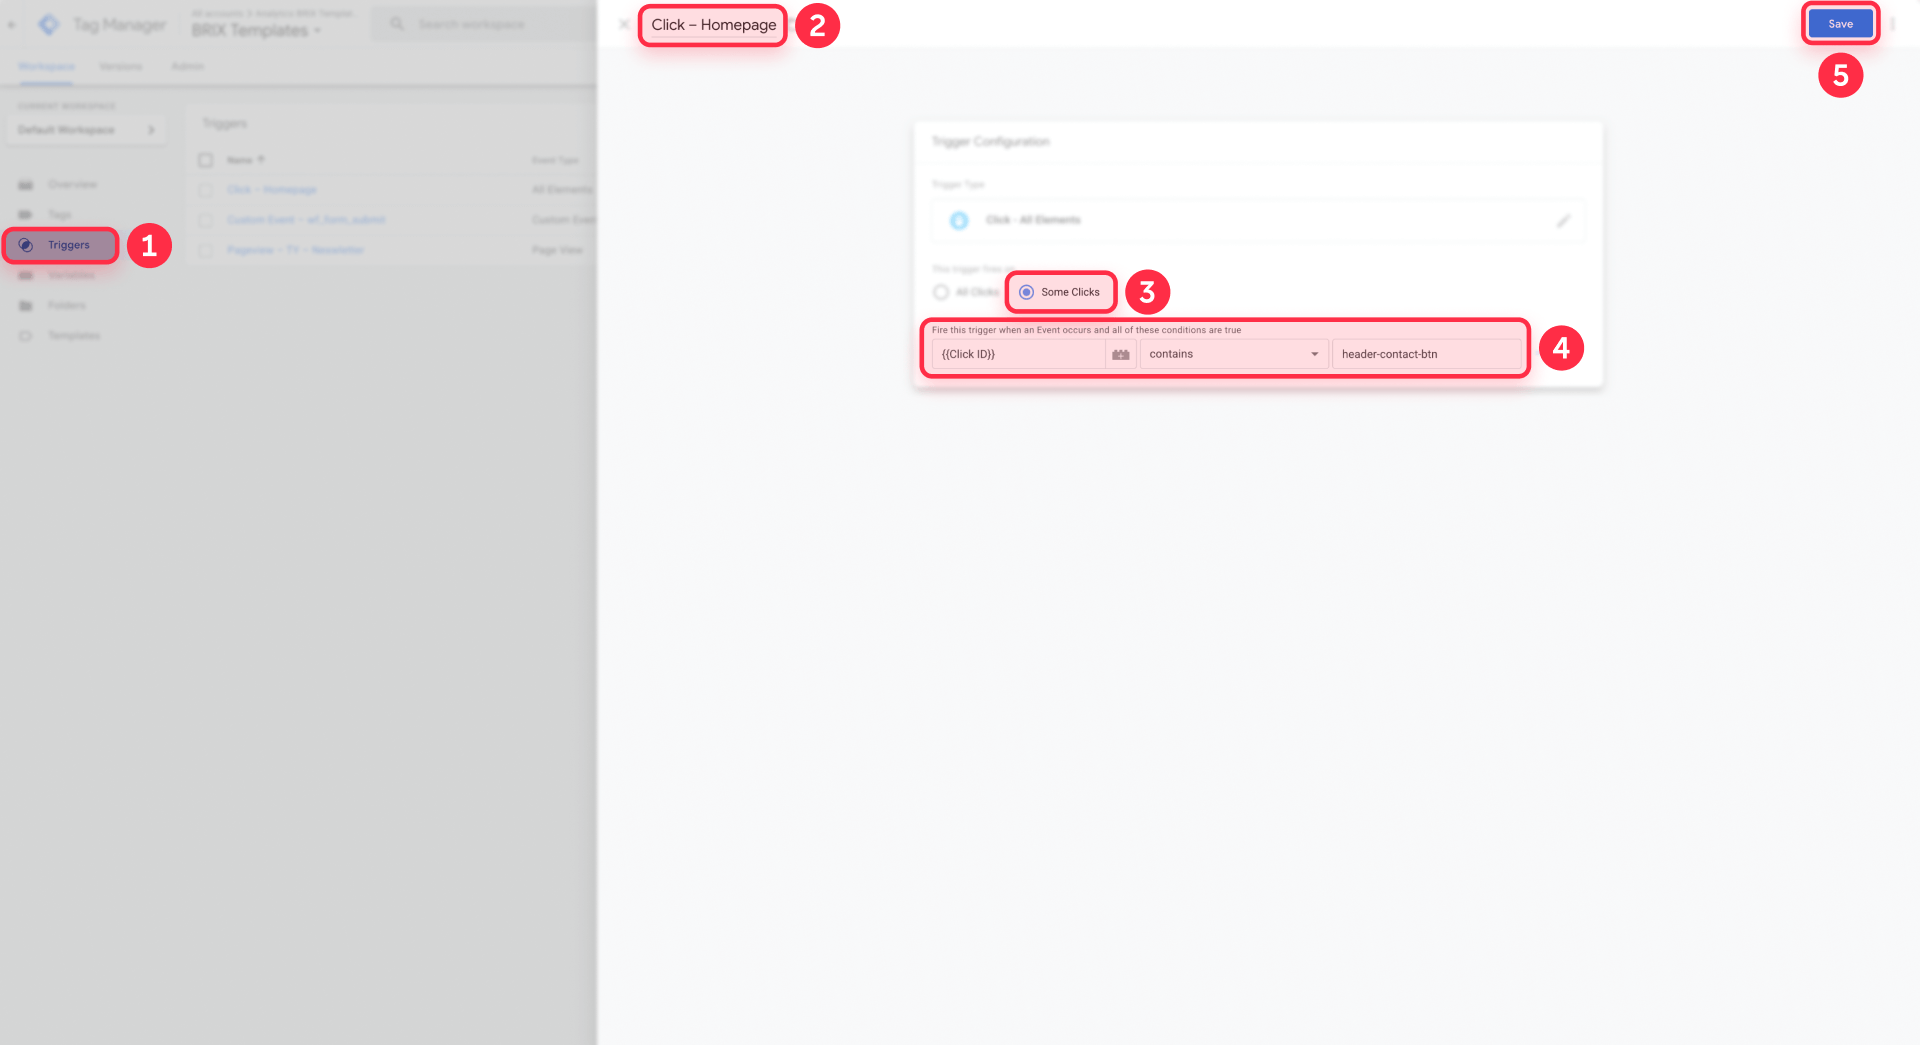
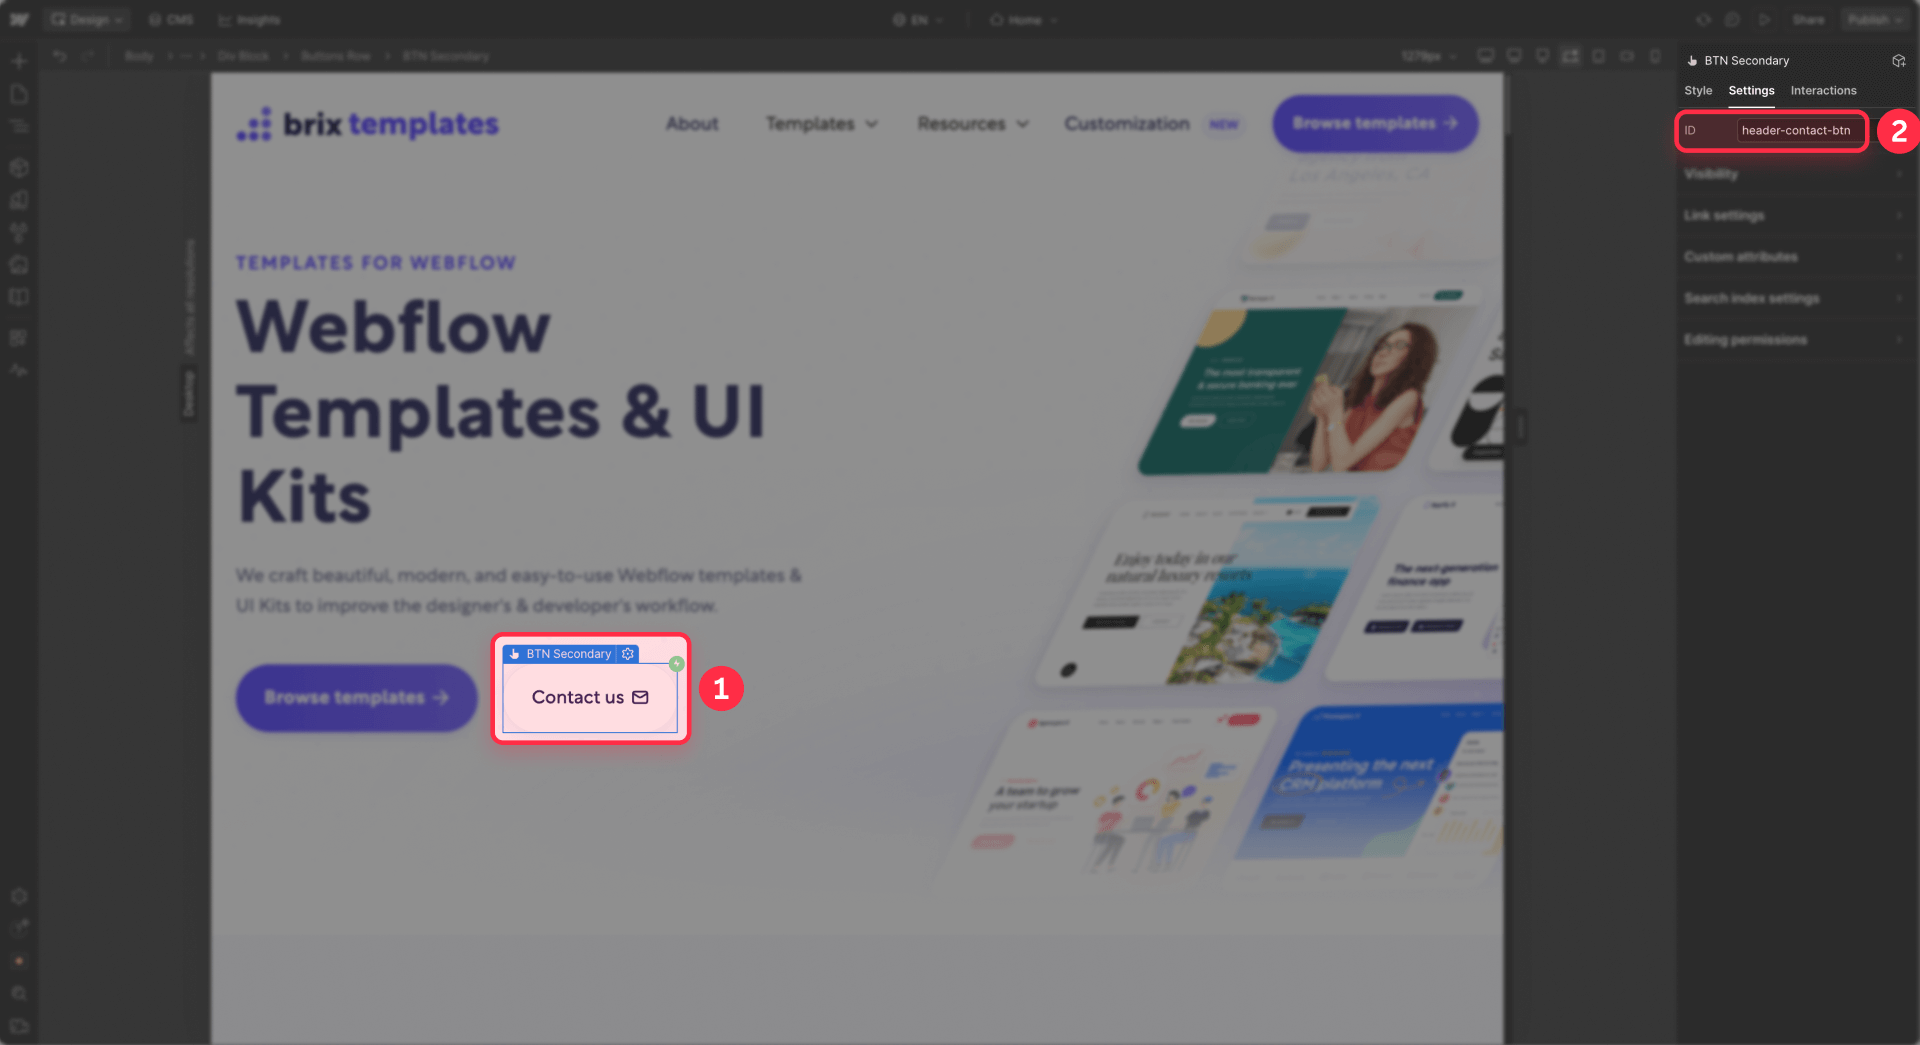
Buttons with unique tracking IDs offer the simplest and cleanest targeting. If, in Webflow, you set something like id="gtm-header-contact" in the Element Settings panel, in GTM you can use Click ID equals gtm-header-contact as your only condition. This completely removes ambiguity, doesn’t require you to add extra CSS classes just for analytics, and helps keep your Webflow class list tidy. Because IDs must be unique on the page, they make it very clear which exact button is being tracked.
The critical principle is avoiding overly generic conditions. Using only Click Text = "Learn more" fails spectacularly when you have five “Learn more” buttons distributed across different pages and sections. Always layer in Page Path, specific Click Classes, or unique Click IDs so your trigger only fires for the one button you actually care about.
Create a GA4 event tag for Webflow button clicks
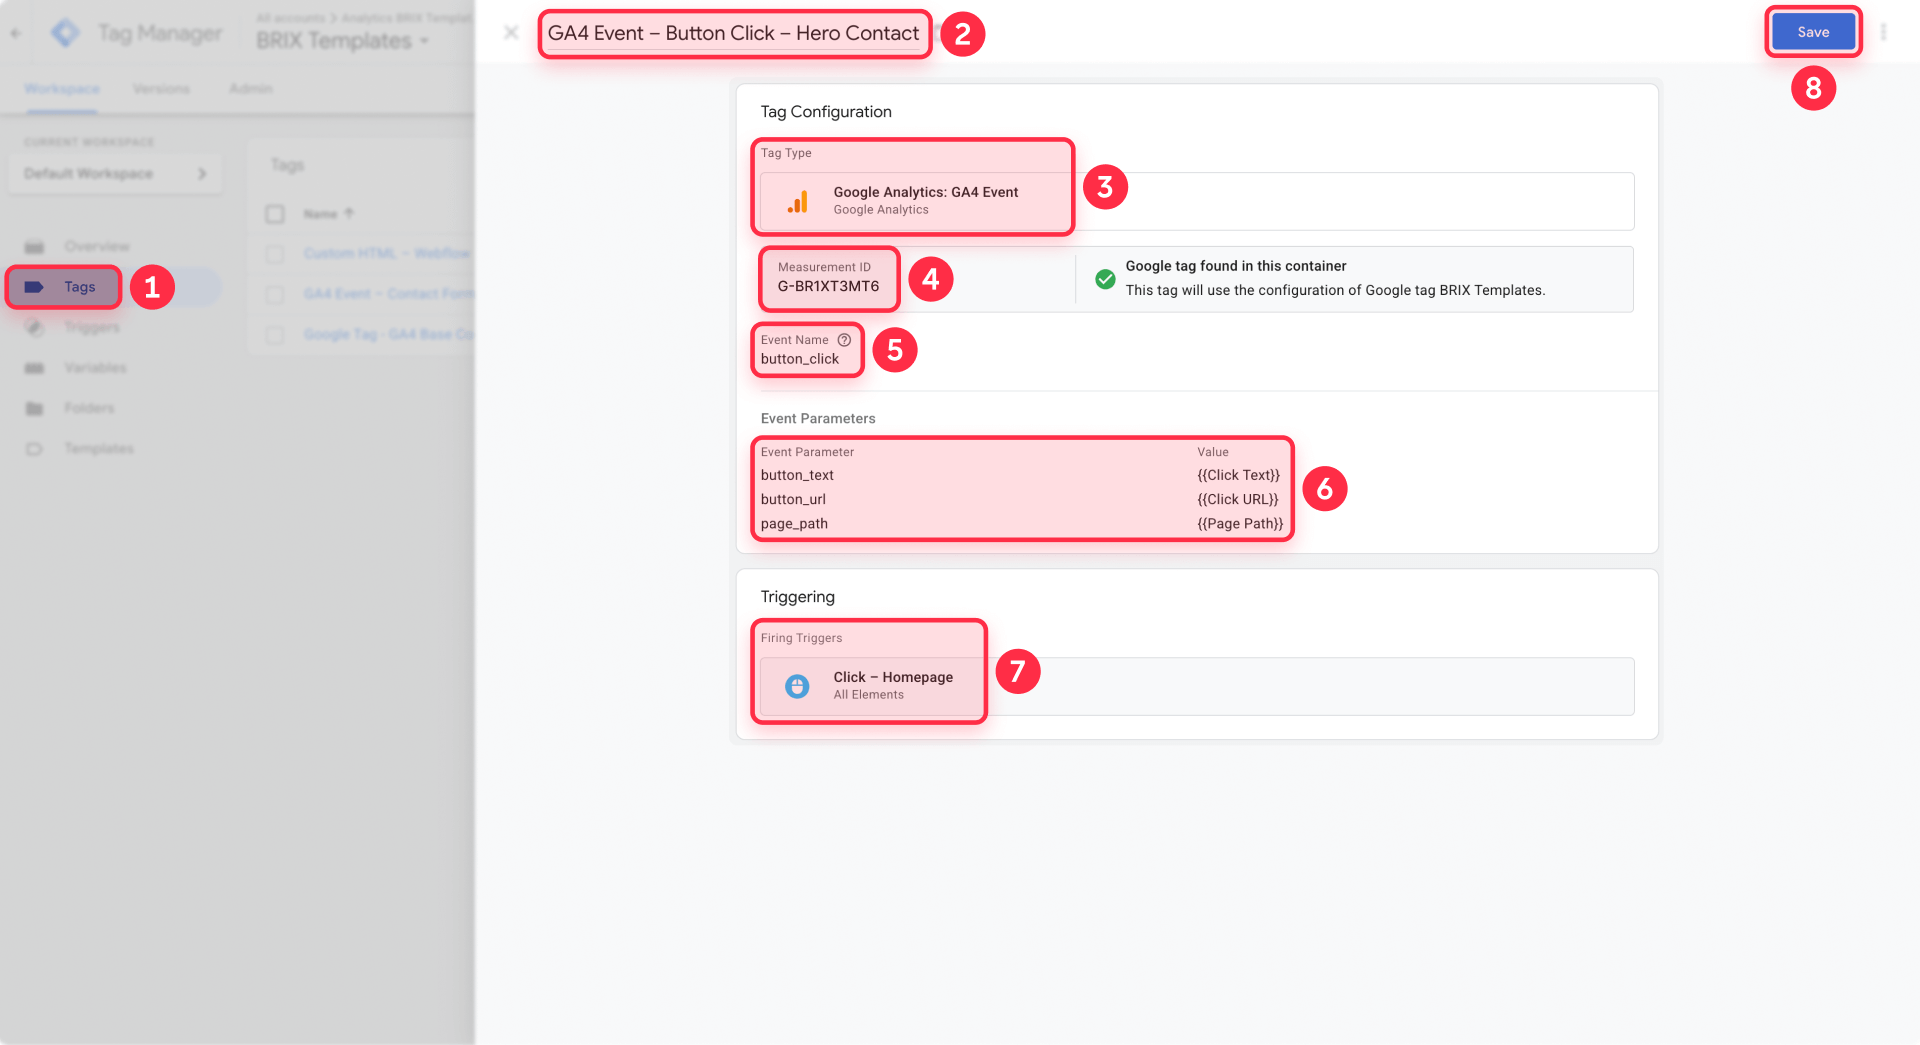
Now you'll send data to GA4 whenever your trigger fires. Create a new tag in GTM with a name like "GA4 Event – Button Click – Hero Contact" that clearly indicates both the platform and what's being tracked.
Click Tag Configuration and select Google Analytics: GA4 Event. If you're using GTM's updated interface, this might appear as Google Tag with an event type selection. Choose your existing GA4 configuration tag under Configuration Tag or Measurement ID—this should be the tag that already fires on all pages.
Set your Event Name to something consistent across all button tracking. Most implementations use button_click as a generic event name for all buttons, then differentiate using event parameters. Some prefer cta_click for call-to-action buttons specifically or link_click for navigation elements. Choose whatever makes sense for your reporting needs, but stay consistent.
Event parameters transform generic clicks into meaningful data. Add button_text set to {{Click Text}} to capture what the button says. Include button_url as {{Click URL}} to record where it leads. Add page_path as {{Page Path}} to know which page the click happened on. Consider adding click_classes as {{Click Classes}} if you want to analyze button styling patterns.
You might also create custom parameters like button_location with hardcoded values like "hero", "navigation", or "footer" to group buttons by page section. Or button_type with values like "primary", "secondary", or "tertiary" to analyze performance by visual hierarchy.
Under Triggering, attach the click trigger you created earlier. This connection ensures the tag fires only when that specific button gets clicked, not for every click across your entire site.
The pattern of one consistent event name differentiated by parameters keeps GA4's event reporting clean and scannable. You'll see one button_click event rather than dozens of uniquely named events, making analysis and debugging significantly easier.
Test button tracking in GTM Preview and GA4 DebugView
Testing before publishing prevents bad data from polluting your analytics. Activate Preview mode again if you closed it, connect to your published Webflow site, and click your target button multiple times.
In Tag Assistant, select the Click event for your button and navigate to the Tags tab. Your GA4 event tag should appear under Tags Fired. If it shows there, GTM successfully detected the click and fired your tag.
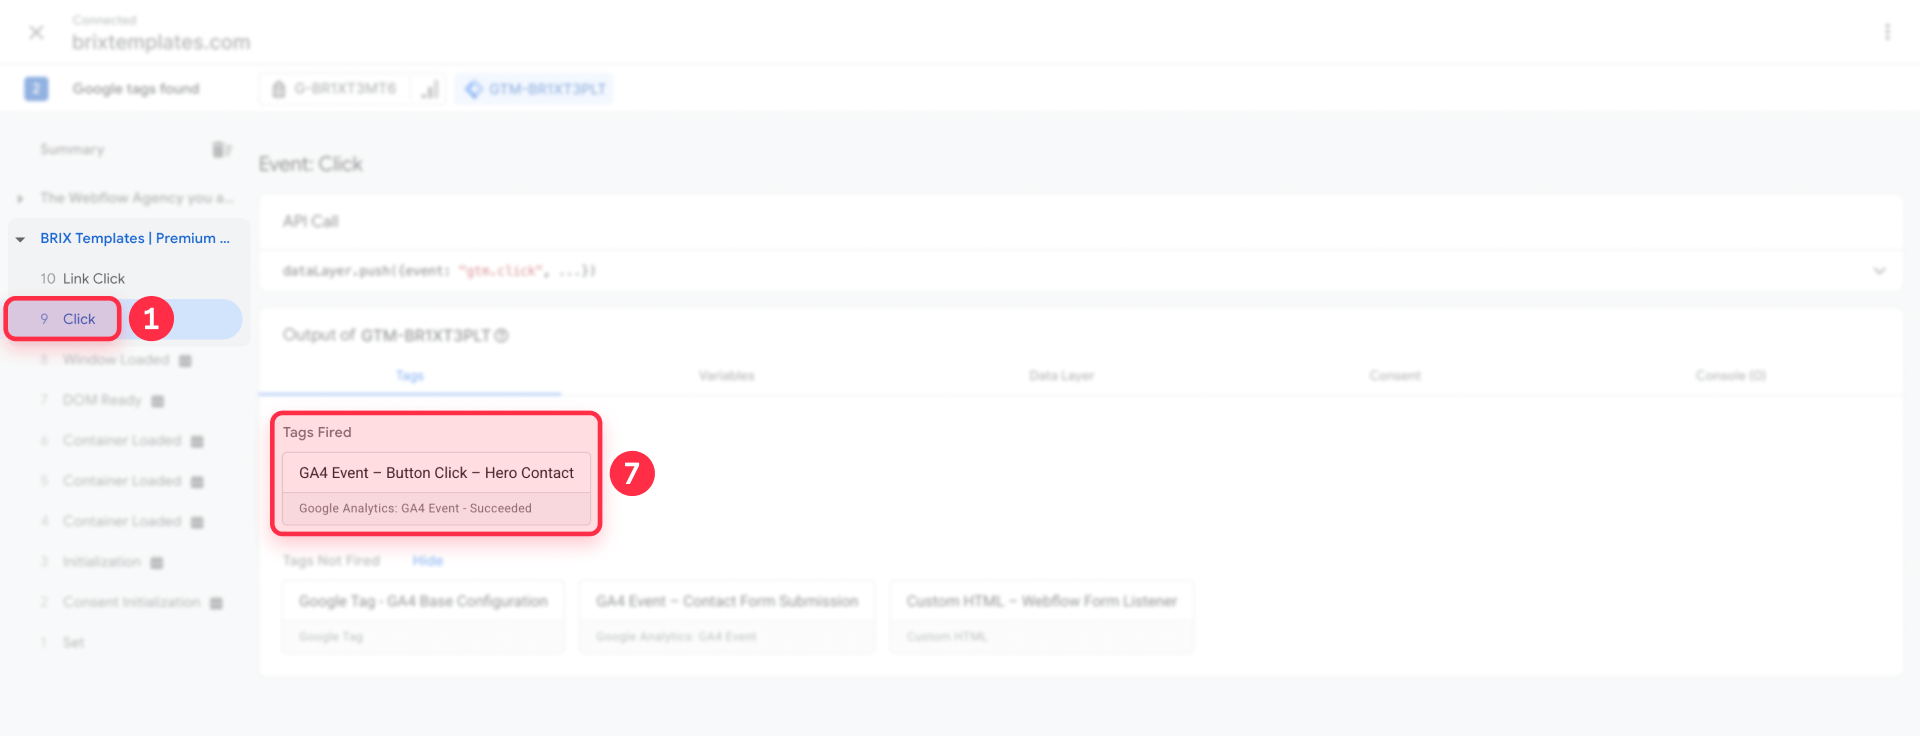
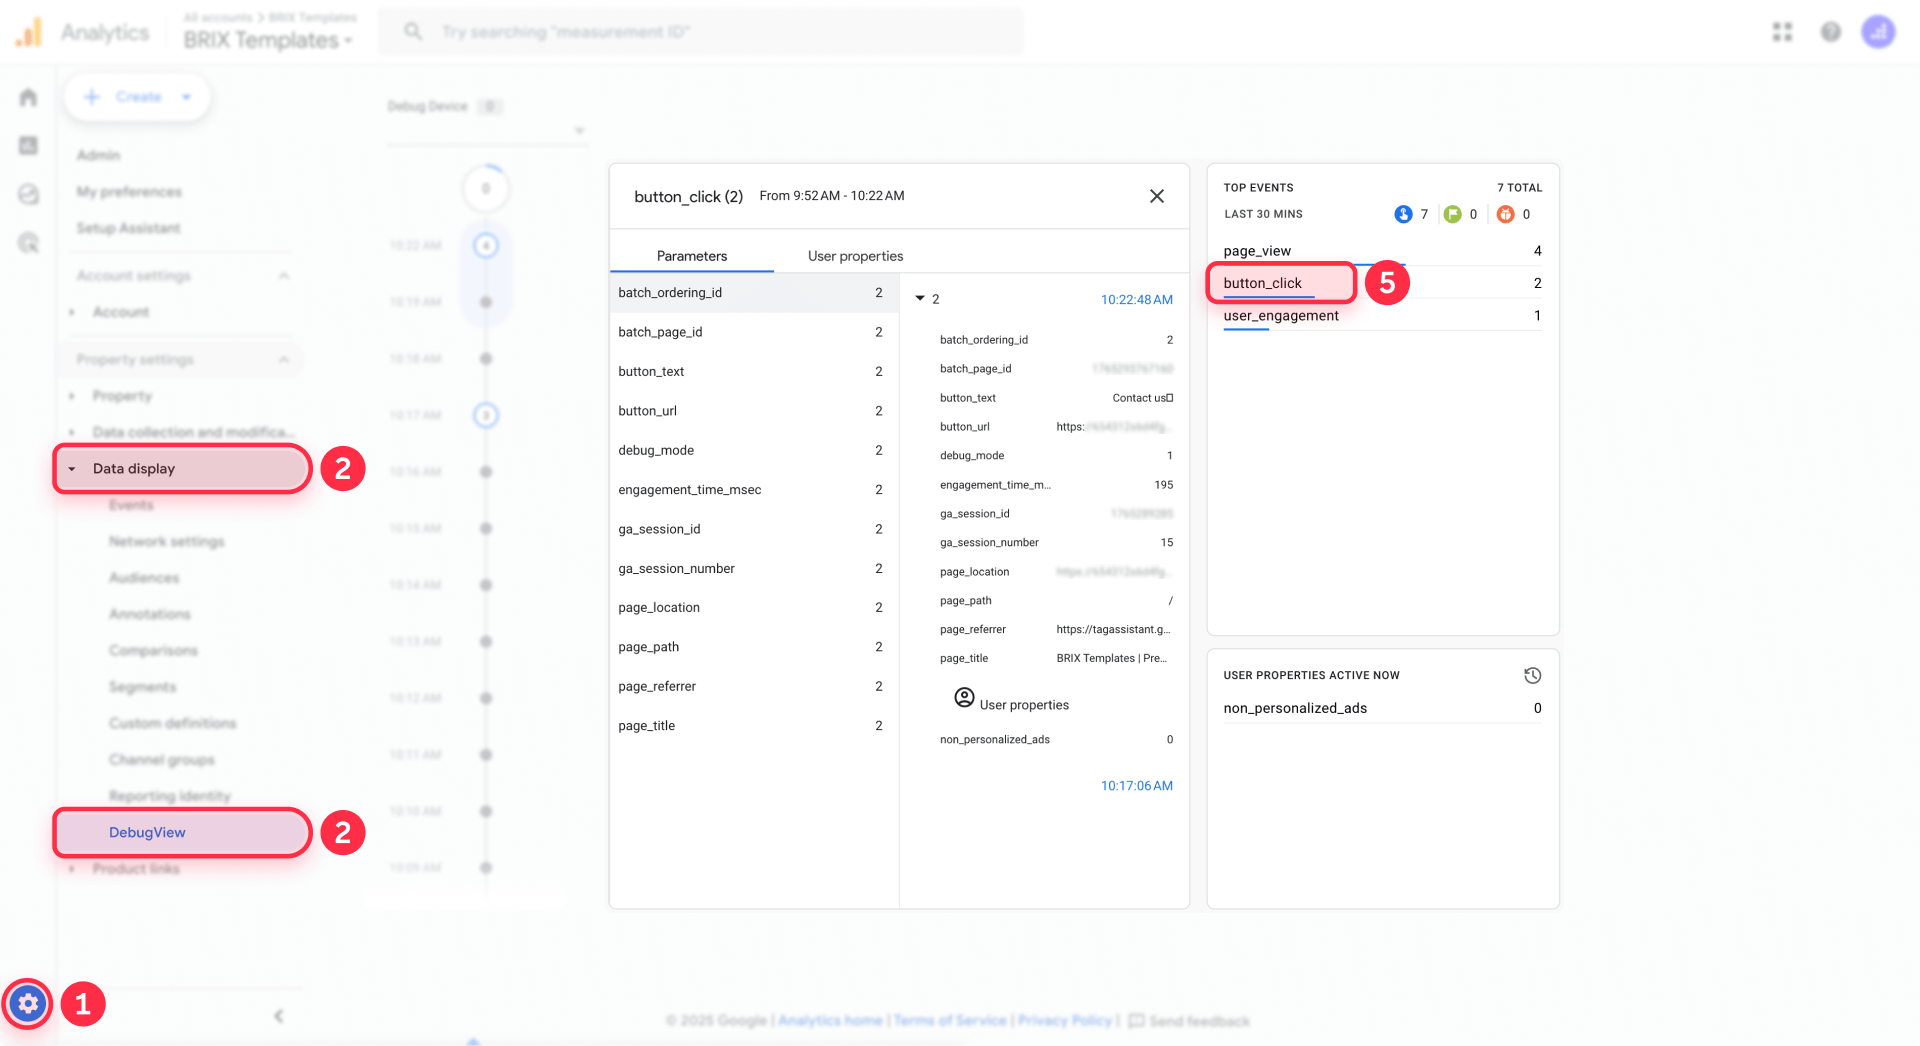
But GTM firing a tag doesn't guarantee GA4 received the data correctly. With Preview mode still running, open Google Analytics, navigate to Admin → DebugView, and perform a few more test clicks. Within seconds, you should see your event name appear in DebugView's event stream.
Click that event in DebugView to inspect its parameters. Verify that button_text shows the correct text, page_path reflects the right page, and all other parameters contain expected values. This confirms data is flowing from Webflow through GTM into GA4 with proper formatting.
If both Tag Assistant and DebugView show correct data, your implementation is solid. Remember that Preview mode changes remain invisible to real users until you publish. Return to GTM's workspace, click Submit in the top right, add a descriptive version name like "Button tracking – Homepage hero CTA", and publish your changes.
Make Webflow button clicks GA4 conversions
Important button clicks deserve recognition as conversion events in GA4. If your button represents meaningful intent—scheduling demos, starting trials, downloading resources—mark it as a key event to track it as a conversion.
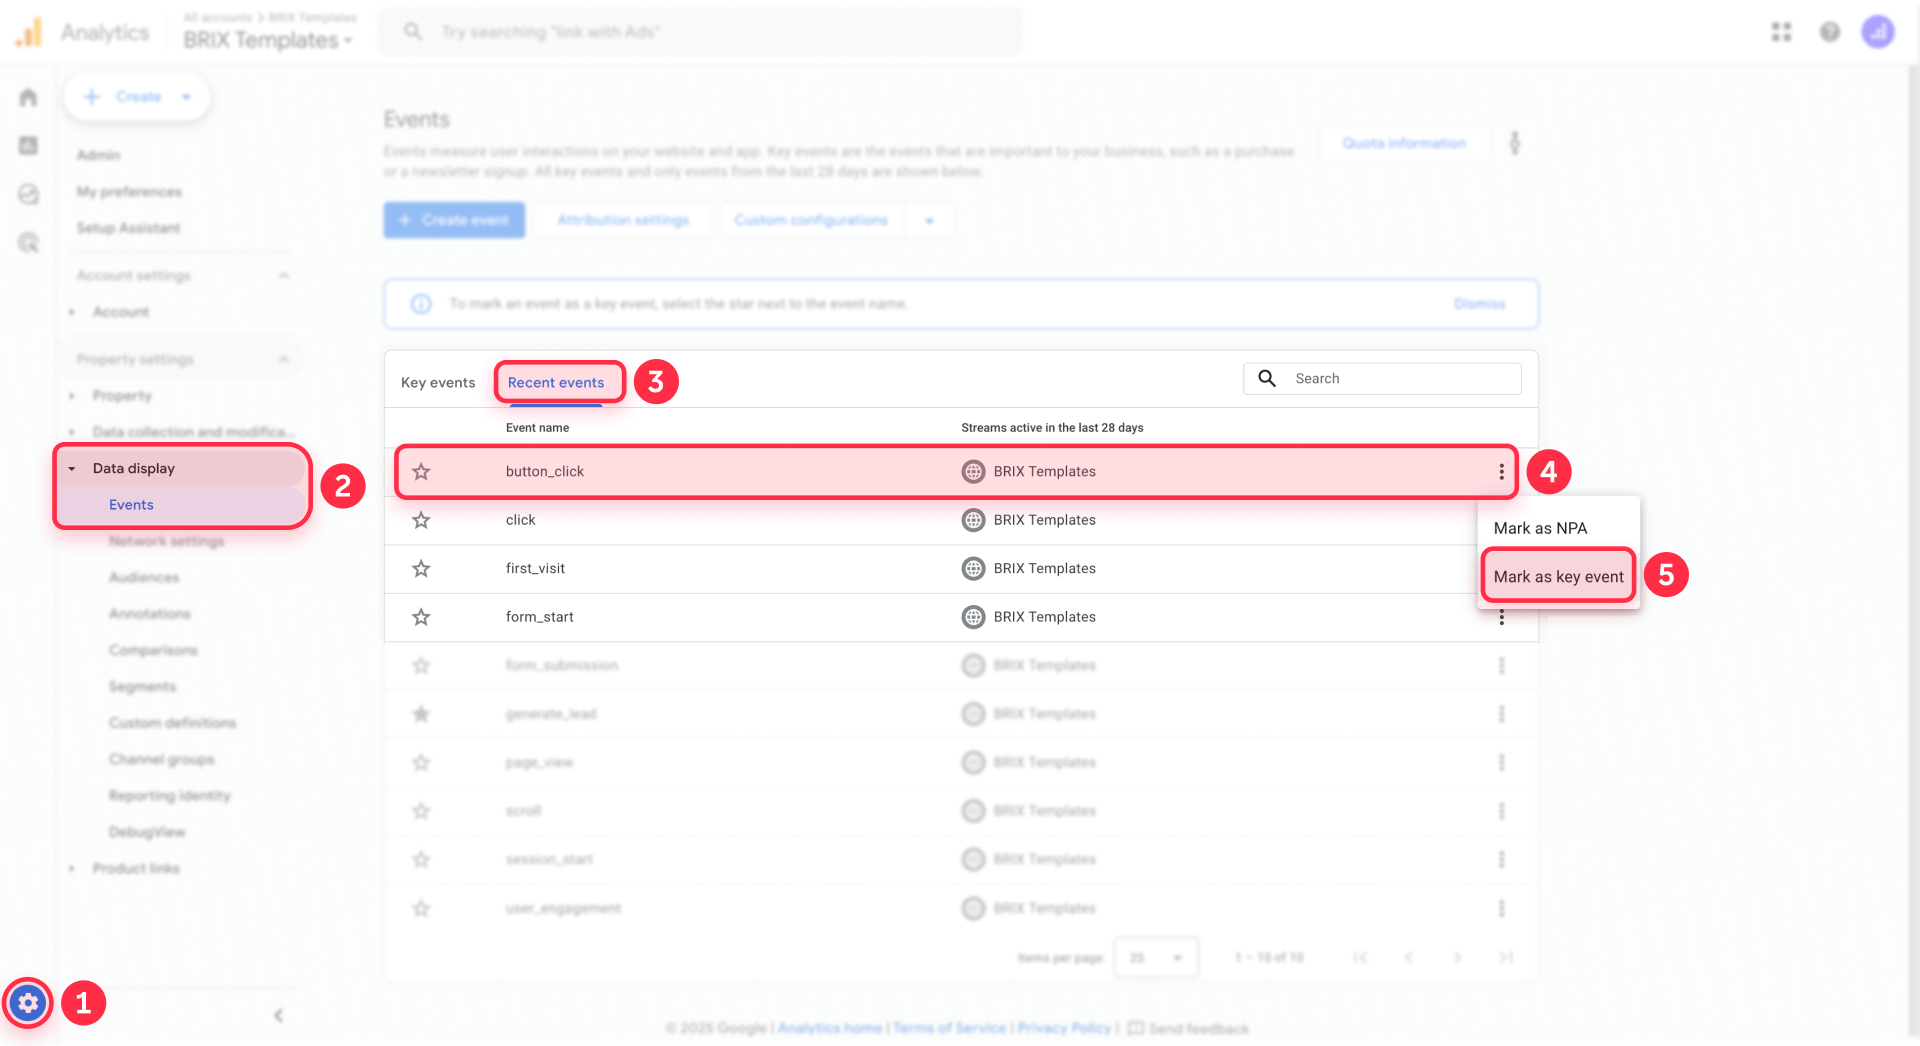
Open GA4 and navigate to Admin → Data display → Events. Find your event name in the list, probably button_click. Toggle Mark as key event to enable it as a conversion. GA4 will now count this event in conversion reports and funnel visualizations.
This becomes especially powerful when you want different conversion values for different buttons. You can create separate events like demo_request_click and pricing_view_click rather than using generic button_click, giving you granular control over which actions you optimize for.
Key events flow into Google Ads through the conversions import feature. Navigate to Tools & Settings → Conversions → Import in Google Ads and select your GA4 key events. This lets you optimize ad campaigns for specific button clicks like "Schedule call" or "Get quote" rather than just tracking page visits or form submissions.
If you've previously set up form tracking for Webflow, this process should feel familiar since both use the same key event mechanism in GA4.
Advanced button tracking patterns for Webflow
Once you've mastered basic button tracking, several advanced patterns unlock deeper insights.
Unified tracking across multiple buttons: Instead of creating separate tags for every button, build one comprehensive trigger that matches multiple buttons using OR conditions. For example, Click Text equals Get started OR Click Text equals Start free trial OR Click Text equals Try now. Your event parameters like button_text and page_path automatically differentiate between them in GA4 reports.
Section-based grouping: Add a custom parameter called button_section with values like "hero", "navigation", "pricing-table", or "footer". You can hardcode these values in separate tags or derive them from CSS classes if you've used naming conventions like btn-hero- or btn-footer- in Webflow.
Outbound link tracking: Buttons linking to external sites like Calendly, partner tools, or social platforms need special handling. Create a trigger where Click URL does not contain your domain name to catch outbound clicks. Add a parameter like link_type with value "outbound" or destination_domain to identify where users exit your site.
Scroll-depth-aware tracking: Combine button clicks with scroll depth data to understand engagement context. Did users click your CTA immediately upon landing, or after reading 75% of your content? This requires additional GTM configuration using scroll depth triggers but provides powerful behavioral insights.
A/B test tracking: When running button copy or design tests in Webflow, include a parameter like button_variant with values like "control" or "variant-a". This lets you compare conversion rates between versions directly in GA4 without complex segmentation.
All these patterns follow the same core methodology: identify the pattern, build the trigger, attach the event tag, test thoroughly, and publish.
Troubleshooting Webflow button click tracking
Implementation issues usually stem from a handful of common problems.
Tag doesn't fire in Tag Assistant: First, verify GTM is properly installed and the container is published. If you're testing in Webflow's Designer preview mode, tracking will never work—always test on the published site. Check that your trigger conditions exactly match the values shown in Preview mode's Variables tab. Even small mismatches like "Contact Us" versus "Contact us" will prevent triggering.
Wrong buttons trigger the event: This indicates your conditions are too generic. If multiple buttons share the same Click Text, add Page Path or unique Click Classes to narrow the match. Consider assigning unique IDs to important buttons in Webflow's element settings to enable precise targeting.
Events appear in Tag Assistant but not GA4: You might be viewing the wrong GA4 property or data stream in Google Analytics. Verify your GA4 Measurement ID matches between GTM and the property you're checking. Look for typos in event names between your tag configuration and what you're searching for in DebugView. Confirm you actually published your GTM container—Preview mode changes don't affect production tracking.
Duplicate events in GA4: You probably have multiple tags firing on the same click, or you've implemented GA4 both through GTM and Webflow's native integration field. Choose one implementation method and remove duplicates. Search your GTM workspace for other tags that might match the same click pattern.
Buttons in Webflow interactions don't track: If your button triggers a Webflow interaction without being a standard link, you might need Click – All Elements instead of Click – Just Links in your trigger configuration. Webflow interactions sometimes wrap elements in ways that standard link detection misses.
Class names change after republishing Webflow: If you're using automatically generated Webflow classes in your triggers, they might change when you redesign. Always use custom class names you manually add in Webflow's class selector, not the auto-generated ones. Better yet, use the ID attribute for important buttons that need tracking.
Frequently asked questions about tracking Webflow button clicks with Google Tag Manager
What is button click tracking in Webflow and why should I implement it?
Button click tracking captures granular interaction data that pageview analytics completely miss. While basic analytics show you which pages visitors view, button tracking reveals which specific elements drive engagement and which ones get ignored. This matters because two identical pages can have radically different conversion rates based on button placement, copy, and design. With button tracking, you'll know whether your hero CTA outperforms your sticky navigation button, whether "Book demo" converts better than "Schedule call", and which page sections actually generate clicks. This intelligence transforms guesswork into data-driven optimization, letting you iterate designs based on evidence rather than assumptions. Most Webflow sites waste potential conversions because designers and marketers don't know which buttons work and which ones fail.
How do I track Webflow button clicks without writing custom code?
Google Tag Manager eliminates the need for custom JavaScript in your Webflow project. GTM's built-in click variables automatically capture information about every click—text content, CSS classes, element IDs, destination URLs, and page locations. You enable these variables in GTM's settings, use Preview mode to identify your specific button's characteristics, create a click trigger that matches those characteristics, and attach a GA4 event tag that fires when the trigger activates. This entire process happens in GTM's visual interface without touching Webflow's custom code panel. You maintain clean Webflow projects while achieving sophisticated tracking that's easy to update, audit, and scale. The GTM container on your Webflow site handles all the technical implementation automatically once you configure the tags and triggers.
What makes Webflow button tracking different from form submission tracking?
Button clicks and form submissions measure different stages of user engagement. Form submission tracking captures completed conversions when users fill out and submit contact forms, signup forms, or registration forms. These represent bottom-of-funnel actions where users have committed to sharing information. Button click tracking measures top and mid-funnel engagement when users interact with CTAs, navigation links, or action buttons—even if they never complete a form afterward. A user might click "Get pricing" ten times across multiple sessions before eventually submitting a contact form. Button tracking shows you which CTAs generate initial interest, which pages lose engagement, and where users drop out of your funnel. Both tracking types use similar GTM methodologies with triggers and tags, but button tracking provides earlier funnel visibility while form tracking confirms actual conversions. Implementing both gives you comprehensive insight into the entire user journey through your Webflow site.
Can I track multiple Webflow buttons with a single GTM configuration?
Yes, and using one event name for all buttons with differentiating parameters is actually the recommended approach. Create a button_click event tag that fires for multiple buttons, using event parameters like button_text, page_path, button_url, and button_section to distinguish between them in your GA4 reports. Your GTM trigger can use OR conditions to match multiple buttons, or you can create a trigger that fires on all clicks and filter in GA4 during analysis. This unified approach keeps your GTM container cleaner and more maintainable than creating dozens of unique events like hero_cta_click, footer_cta_click, pricing_button_click, and so on. In GA4, you'll see one button_click event with high volume, then segment by parameters to analyze performance of specific buttons. This pattern scales much better as you add tracking to more buttons across your Webflow site.
How do I verify that Webflow button tracking works correctly before going live?
Verification requires testing in both GTM Preview mode and GA4 DebugView before publishing any changes. Activate Preview mode in GTM, connect to your published Webflow site, and click your target button several times. In Tag Assistant, verify your GA4 event tag appears under Tags Fired for the click event. This confirms GTM detected the click and fired your tag successfully. Then check GA4 DebugView to ensure data arrives correctly with proper parameters. Look for your event name in the real-time event stream and click it to inspect parameters like button_text, page_path, and button_url. Verify all values match your expectations. Only after confirming both GTM and GA4 show correct data should you click Submit in GTM to publish changes. This testing workflow prevents broken tracking from reaching production and polluting your analytics with bad data. Never skip testing—fixing tracking issues after publishing takes significantly more time than getting it right initially.
Which Webflow button properties work best for creating reliable GTM triggers?
The most reliable targeting strategy depends on how you've structured your Webflow project. Click ID provides the most precise targeting if you manually assign unique IDs to important buttons in Webflow's element settings—something like id="hero-contact-button". This eliminates all ambiguity since IDs should be unique site-wide. Click Classes works well when you've used descriptive, custom class names like cta-hero-primary or btn-pricing-demo rather than relying on Webflow's auto-generated classes. Combining Click Text with Page Path creates reliable triggers for buttons with unique labels, like tracking "Schedule consultation" buttons that only appear on your services page. Avoid relying solely on Click Text for generic labels like "Learn more" or "Get started" that appear on multiple pages. The best practice is layering multiple conditions—perhaps Click Text plus Page Path, or Click Classes plus Page Path—to create triggers that fire only for your specific target button while avoiding false matches.
How do I convert Webflow button clicks into Google Analytics conversions?
Converting button clicks to GA4 key events (formerly called conversions) takes just a few steps. First, ensure your button tracking sends events to GA4 with a consistent event name like button_click. Navigate to Admin → Data display → Events in GA4, find your event in the list, and toggle Mark as key event to enable it. From that point forward, GA4 counts every instance of that event as a conversion in your reports. You can then import these conversions into Google Ads through Tools & Settings → Conversions → Import to optimize ad campaigns for button click actions rather than just pageviews. This proves especially valuable for high-intent buttons like "Request quote", "Schedule demo", or "Start trial" that indicate serious purchase intent even when users don't immediately complete forms. If you track multiple button types, consider creating separate event names like demo_request_click and pricing_view_click so you can assign different conversion values and optimize for specific actions. This approach lets you treat early-funnel engagement as meaningful conversions rather than waiting for form submissions.
What's the best way to organize button tracking across a large Webflow site?
Large Webflow sites need consistent naming conventions and logical grouping to keep tracking manageable. Use one event name like button_click for all buttons, then differentiate with parameters: button_text for the label, page_path for location, button_section for areas like "hero", "navigation", "pricing", "footer", and button_type for classifications like "primary", "secondary", "tertiary". This structure keeps your GA4 event list clean while enabling powerful segmentation. In GTM, name your triggers and tags descriptively—"Click – Homepage Hero CTA" beats "Button Trigger 1"—so you can audit and update tracking six months later. Consider maintaining a spreadsheet that documents which buttons you're tracking, what triggers fire for them, what event parameters they send, and what business questions they answer. This documentation becomes invaluable as your implementation grows. For sites with dozens of tracked buttons, create a GTM folder structure that groups related triggers and tags by page or section, making your container easier to navigate. Strategic organization at the start prevents the chaotic "tracking debt" that plagues many analytics implementations as they scale.
Can I track Webflow buttons that link to external websites or tools?
External link tracking requires slightly different GTM trigger configuration but follows the same core methodology. Create a click trigger where Click URL does not contain your domain name, which catches all clicks leading off your site. This captures buttons linking to scheduling tools like Calendly, external applications, partner websites, or social media profiles. Add event parameters like button_url to see destination URLs, destination_domain to group by external site, and link_type with value "outbound" to distinguish from internal navigation. You might discover that your "Book a call" button linking to Calendly gets significantly more clicks than you realized, or that footer social media icons generate negligible engagement compared to in-content placement. External link tracking also helps you understand where users leave your site in their journey and whether those exits lead to conversions on external platforms. This data informs decisions about which external integrations drive value and which ones you might replace with native Webflow solutions.
Why don't my Webflow button clicks appear in Google Analytics reports?
Missing events usually trace back to a few specific issues. First, confirm you're testing on your published Webflow domain, not in the Designer preview where GTM cannot function. Verify that you actually clicked Submit in GTM to publish your container—Preview mode changes remain invisible to everyone else until you publish. Check that you're examining the correct GA4 property and data stream since many accounts have multiple properties. Look for exact matches between your tag's event name and what you're searching for in GA4, as even small typos like button_click versus buttonclick prevent events from appearing. Confirm your GA4 tag in GTM fires on all pages by checking Tag Assistant. If events appear in Tag Assistant but not GA4, you might have configuration issues in your GA4 tag itself—verify your Measurement ID matches your property. Also check whether you've accidentally implemented GA4 both through GTM and Webflow's native integration field, which will inflate your metrics and make your reports unreliable. Finally, verify your trigger conditions in GTM actually match your button's properties in Preview mode—mismatches between expected and actual values silently prevent triggers from firing.
Conclusion
Tracking Webflow button clicks with Google Tag Manager transforms vague engagement metrics into precise behavioral data. You now understand how GTM captures click information, how to identify buttons using Preview mode, how to build reliable triggers, how to send structured events to GA4, and how to turn important clicks into tracked conversions.
The real power emerges from the scalable pattern you've learned. Adding tracking for additional buttons means identifying their characteristics in Preview mode, adjusting trigger conditions, and republishing your GTM container with Submit. No code changes in Webflow, no complex custom scripts—just systematic configuration in GTM.
If you haven't yet established the foundation, start with installing Google Tag Manager in Webflow and setting up Google Analytics 4 through GTM. For comprehensive conversion tracking, pair button clicks with form submission tracking to measure both engagement and conversions.
With this GTM and GA4 foundation in place, you'll finally answer the question that drives meaningful optimization: which parts of your Webflow site actually generate engagement? If you need help implementing advanced tracking strategies, optimizing conversion funnels, or building custom GTM configurations for complex user journeys, our agency specializes in Webflow analytics implementations that transform data into actionable business intelligence.


Join readers commenting on this post!