
You've built a stunning Webflow site, but now you need to track conversions, add marketing pixels, and understand how visitors interact with your pages. Installing each tracking script manually is tedious and error-prone. Google Tag Manager (GTM) solves this problem by giving you a central hub to manage all your tracking codes without touching your Webflow project every time you need to add a new pixel or event.
Google Tag Manager acts as a container for all your marketing and analytics tags, from Google Analytics 4 to Facebook Pixel and beyond. Instead of cluttering your Webflow custom code with multiple scripts, you install GTM once and manage everything from a single dashboard. This guide walks you through the complete process: creating your GTM account, setting up your first container, and installing it on your Webflow site
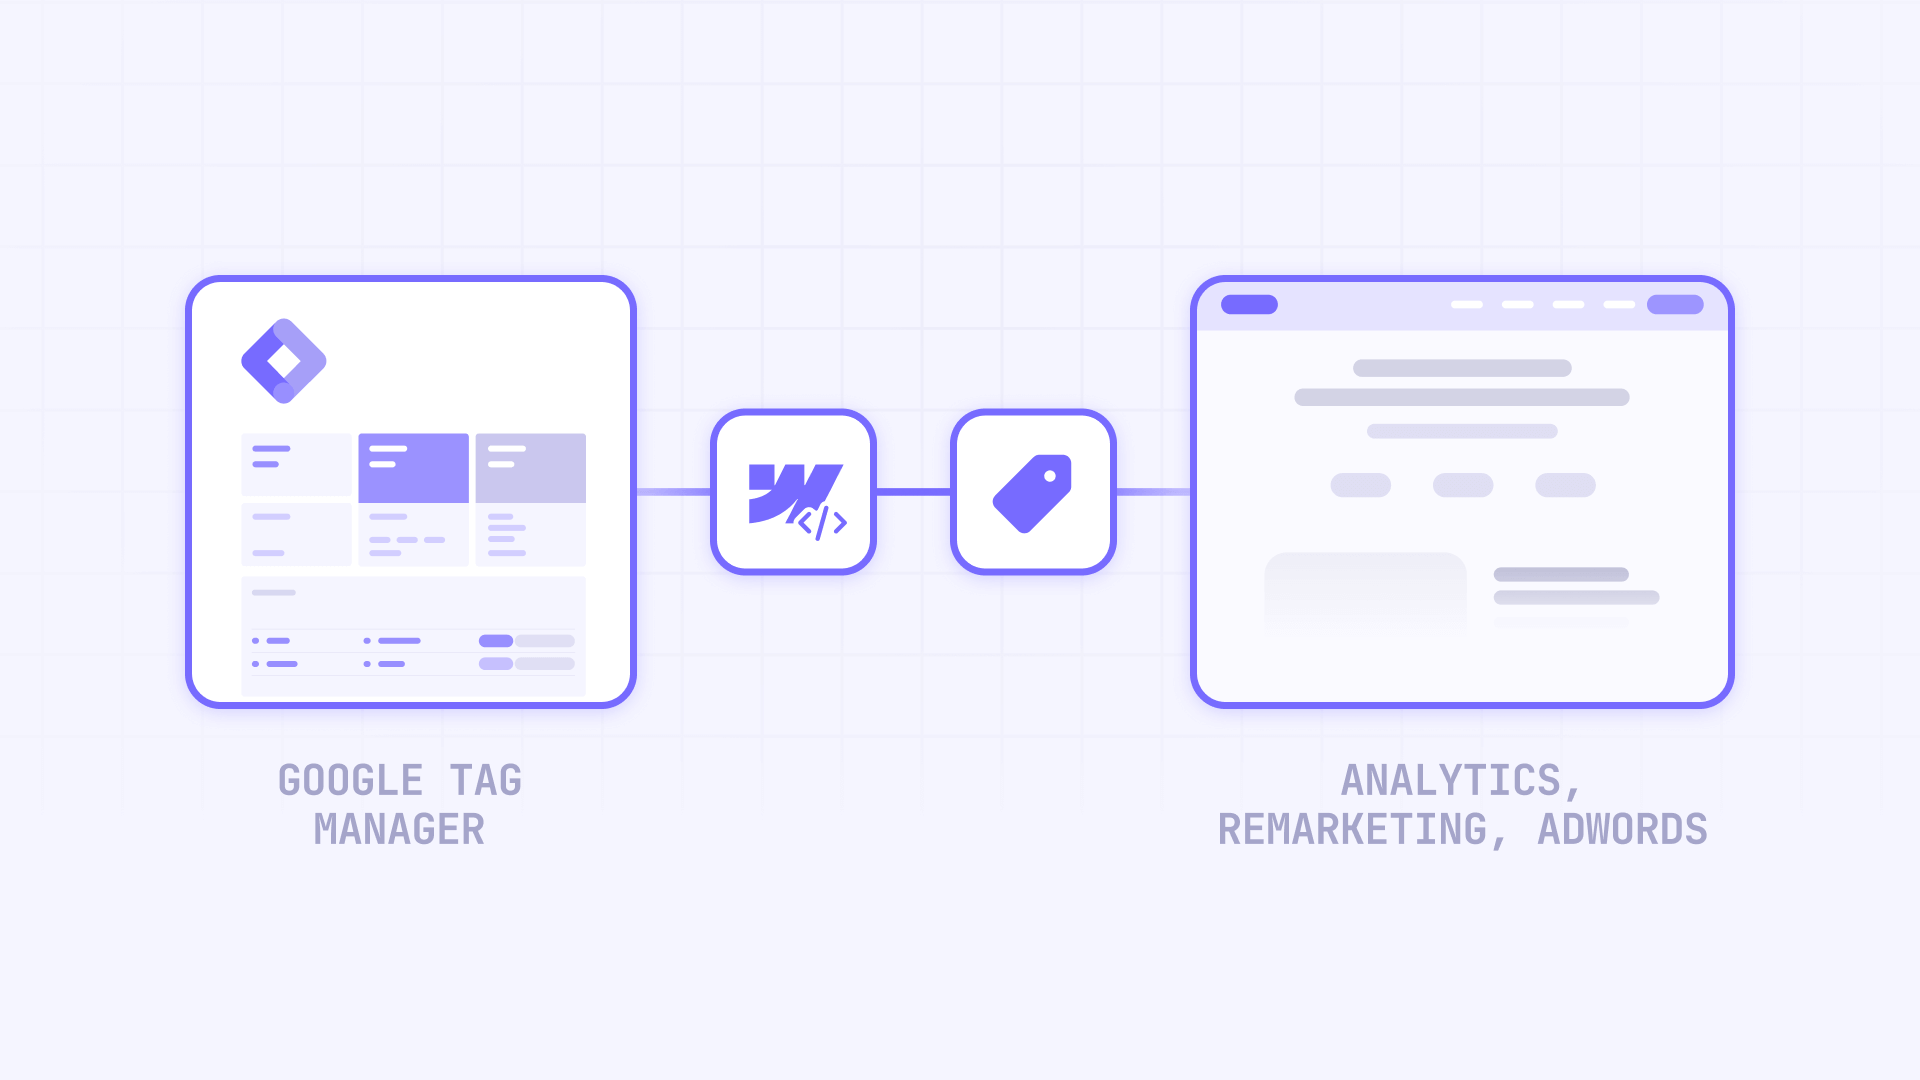
Why Google Tag Manager matters for Webflow sites
Adding tracking scripts directly to your Webflow site might seem straightforward, but it quickly becomes unmanageable. Here's why GTM is the better approach for serious Webflow projects:
Centralized tag management in Webflow: Instead of editing Webflow custom code every time marketing requests a new pixel, you add and modify tags directly in GTM without republishing your site
Faster implementation cycles for Webflow projects: Launch new tracking within minutes rather than waiting for a developer to add code, test, and publish changes
Advanced event tracking in Webflow: Track button clicks, form submissions, scroll depth, and video engagement without writing custom JavaScript for each interaction
Version control and rollback in GTM: Every change in GTM is saved with version history, so you can instantly revert if something breaks
Reduced code conflicts on Webflow sites: Keep your Webflow custom code clean and avoid conflicts between multiple tracking scripts competing for resources
Cookie consent integration for Webflow: Manage GDPR and privacy compliance by controlling which tags fire based on user consent, all from one interface
Before you start: requirements and Webflow plan limitations
Before diving into the installation process, make sure you have everything in place to avoid frustration halfway through.
What you need to install GTM in Webflow
You'll need a Google account (the same one you use for Gmail or Google Analytics works fine), access to your Webflow project with editor permissions, and depending on your installation method, either a paid Webflow plan or access to the Apps panel.
Understanding Webflow plan restrictions for GTM
The default free combination of Starter Workspace + Starter Site is very limited when it comes to custom code and GTM installation. In practice, to install GTM via custom code you should have at least a paid Site plan (such as Basic, CMS, Business, or higher) and/or a paid Workspace plan (such as Core or Growth).
Tip: Webflow's pricing and plan features can change over time. Always check Webflow's current pricing page to confirm exactly which plans support custom code before starting your implementation.
Step 1: Create your Google Tag Manager account and container
Before you can install anything in Webflow, you need a GTM account with a container configured for your website.
Access Google Tag Manager and sign in
Navigate to tagmanager.google.com and sign in with your Google account. If you've never used GTM before, you'll see a welcome screen prompting you to create your first account.
Set up your GTM account
- Click the Accounts tab in the top left corner
- Click Create Account in the top right
- Under Account Setup, enter your Account name (typically your company or client name)
- Select your Country from the dropdown
- Optionally check the box to share data anonymously with Google for benchmarking


Create your GTM container for your Webflow site
The container holds all your tags and is specific to one website or app.
- Under Container Setup, enter your Container name (use your domain, like www.yoursite.com)
- For Target platform, select Web since you're working with a Webflow website
- Click Create
- Review and accept the Google Tag Manager Terms of Service
After accepting the terms, GTM immediately shows you the installation code snippets. Don't close this window yet—you'll need these codes for the installation.
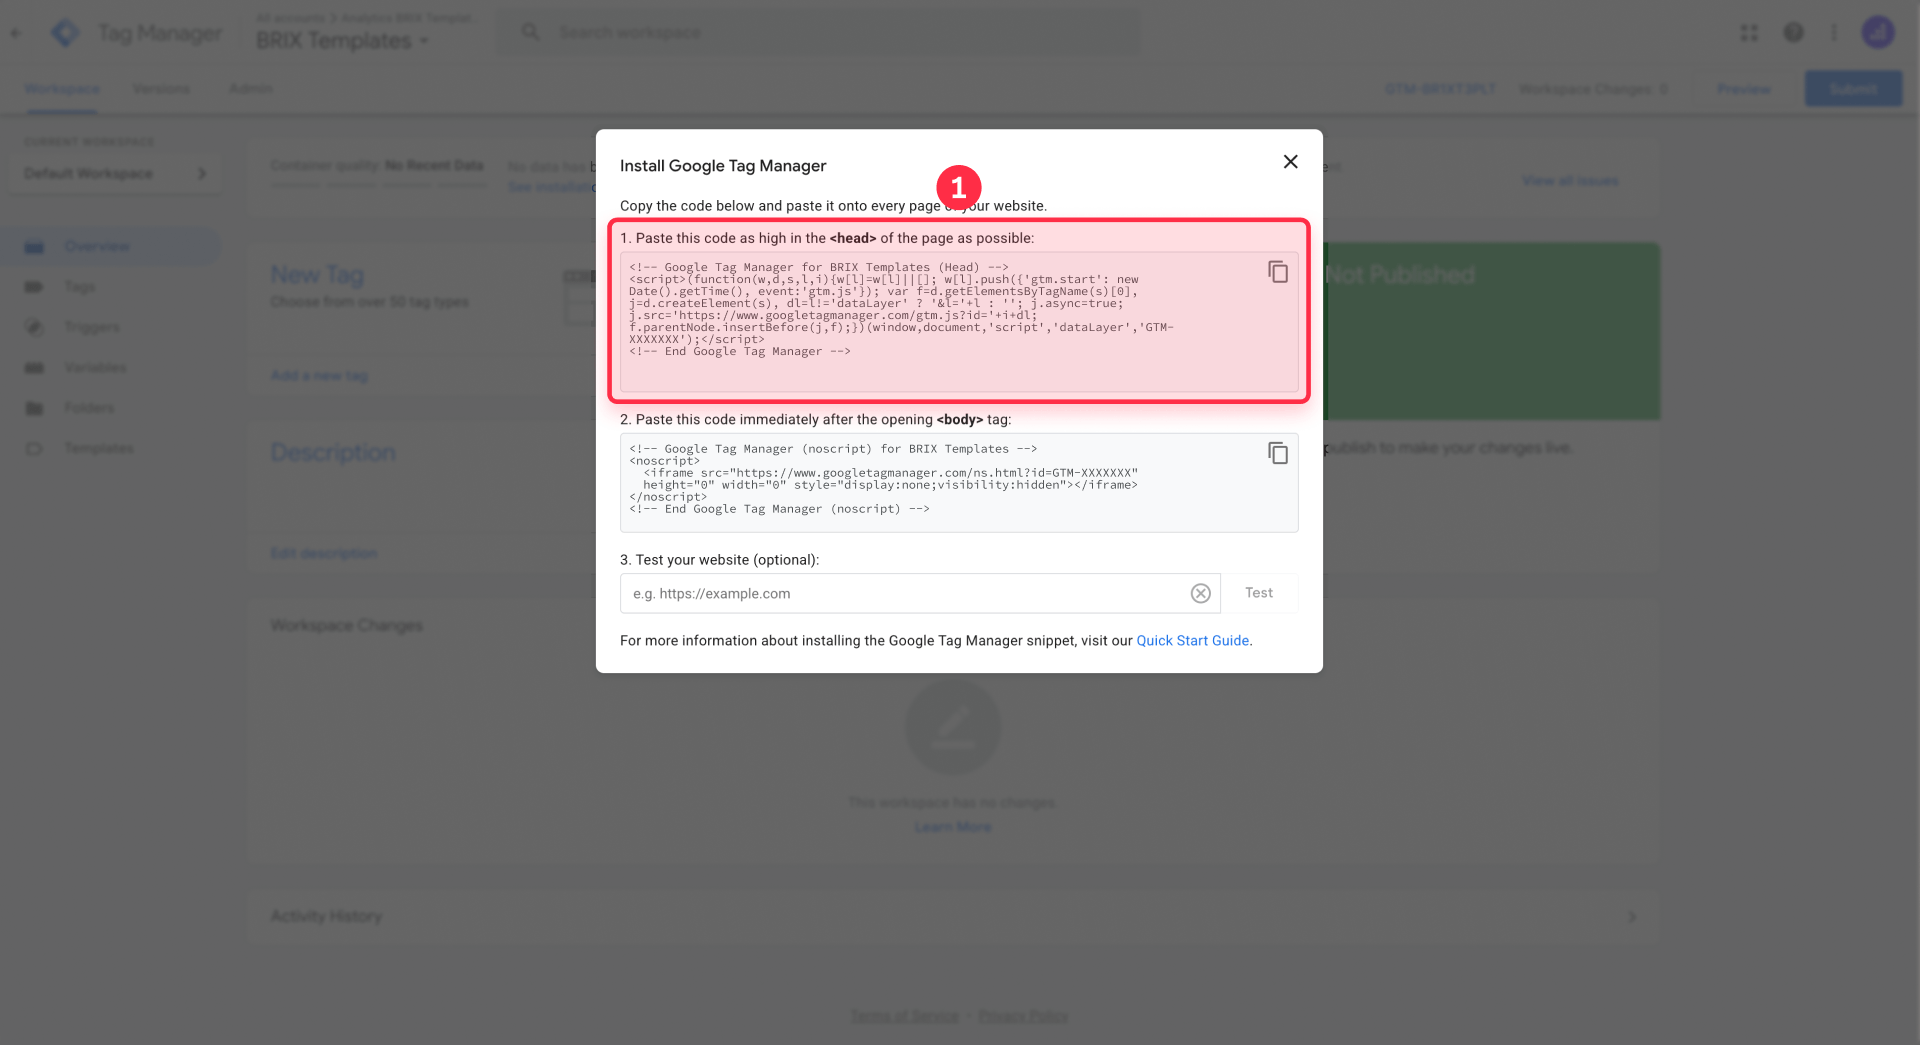
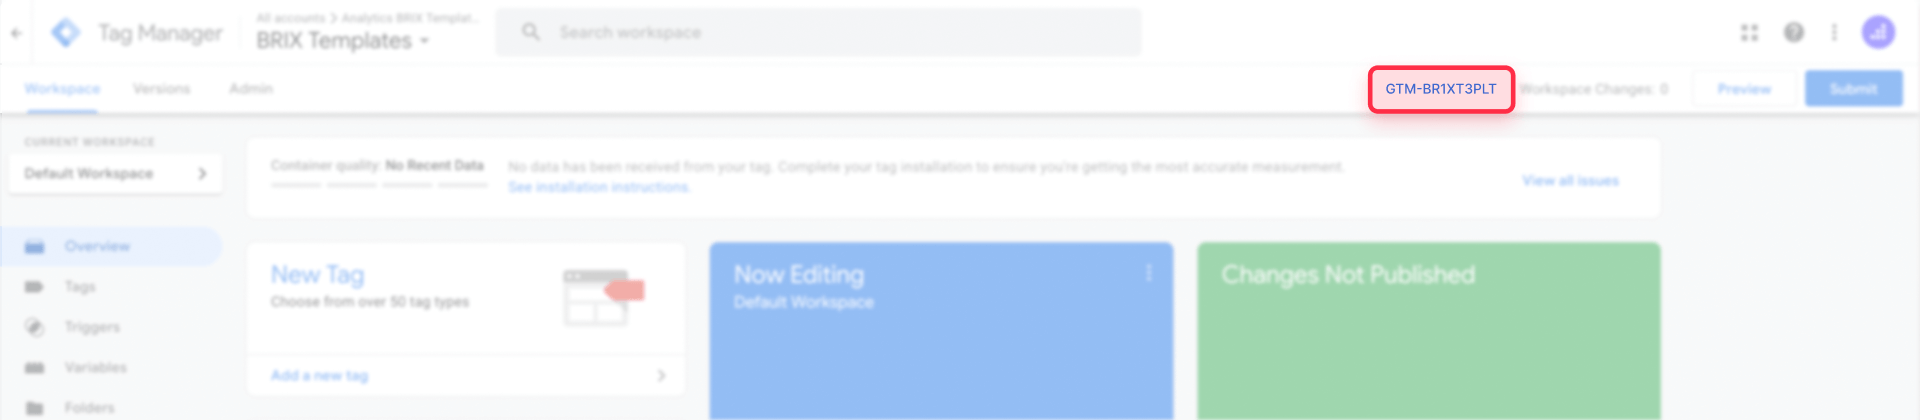
Find your GTM container ID for Webflow installation
Your container ID appears in the format GTM-XXXXXXX at the top of your workspace. This ID is unique to your container and appears in all your installation snippets. You can always access your installation code again by clicking your container ID in the workspace header, which opens the Install Google Tag Manager dialog.
Step 2: Install GTM in your Webflow site
Now that you have your GTM account and container ready, it's time to connect it to your Webflow site. There are two methods to install GTM in Webflow, and choosing the right one depends on your needs and technical comfort level.
Comparing the two GTM installation methods for Webflow
Before jumping into the installation, here's a quick comparison to help you decide which method is best for your situation:
Method A: Manual installation with custom code in Webflow
- Full control over code placement and configuration
- Works with exported Webflow sites hosted elsewhere
- Better for advanced setups like server-side GTM, custom data layers, or consent-based tracking
- Ideal for developers and agencies managing multiple Webflow projects
- You manage everything directly from Google Tag Manager—no dependency on third-party apps
Method B: Google site tools app for Webflow
- Easiest setup—no manual code editing required
- Connects GTM, GA4, and Search Console in one flow
- Best for beginners or non-technical Webflow users
- Limited flexibility for page-specific or advanced configurations
- Relies on Webflow's app marketplace
Which method should you choose for your Webflow GTM installation?
For this guide, we recommend Method A (custom code) because it gives you complete control over your tracking setup and lets you manage everything directly from Google Tag Manager. This approach is more flexible, works regardless of how you host your site, and doesn't tie you to a specific app that could change or be discontinued.
That said, if you're a complete beginner and just want the fastest path to a working setup, Method B with the Google site tools app is perfectly valid. Both methods result in a functional GTM installation—the difference is in control versus convenience.
Method A: Install GTM manually in Webflow with custom code
This method gives you complete flexibility and control over your GTM implementation. You'll paste the GTM code snippets directly into your Webflow project settings.
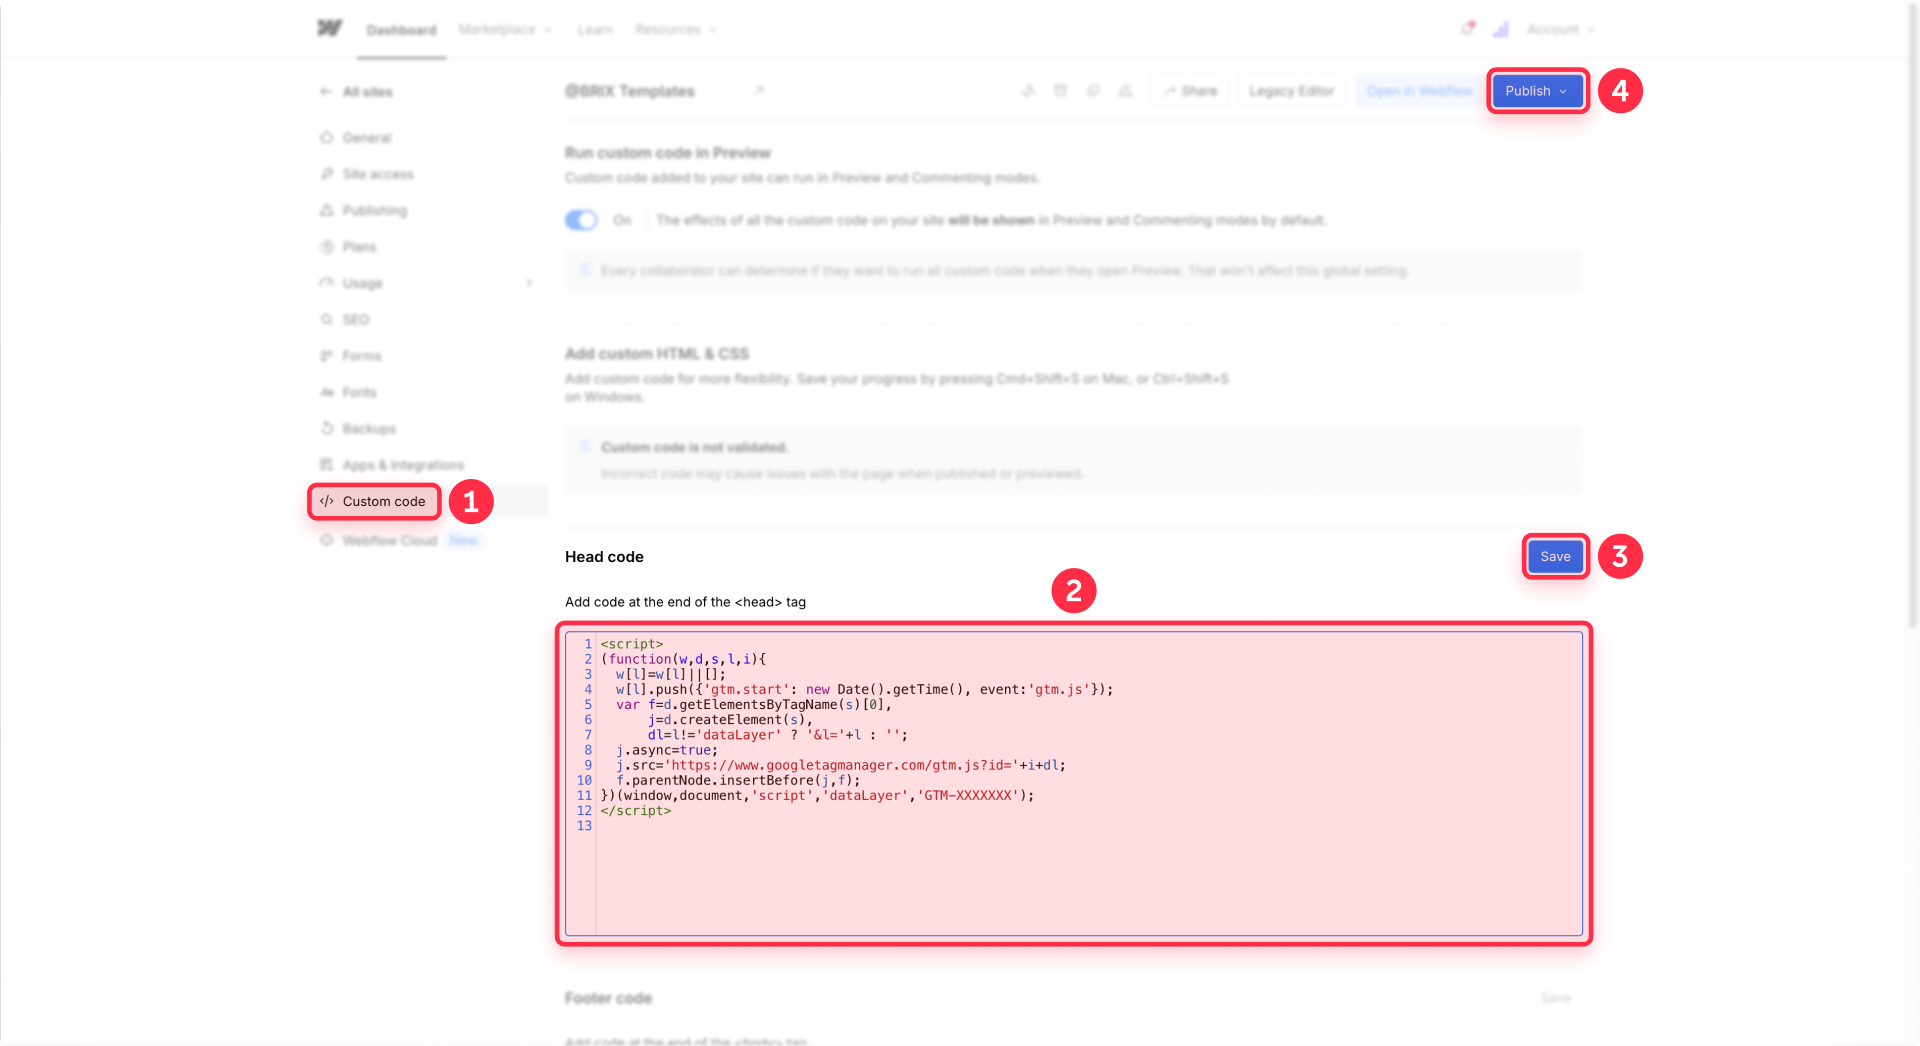
Add the GTM head script to your Webflow site
- In your Webflow project, go to Site settings (gear icon)
- Click Custom Code in the left sidebar
- In the Head code field, paste the first GTM snippet
- Click Save to store your changes
<!-- Google Tag Manager -->
<script>(function(w,d,s,l,i){w[l]=w[l]||[];w[l].push({'gtm.start':
new Date().getTime(),event:'gtm.js'});var f=d.getElementsByTagName(s)[0],
j=d.createElement(s),dl=l!='dataLayer'?'&l='+l:'';j.async=true;j.src=
'https://www.googletagmanager.com/gtm.js?id='+i+dl;f.parentNode.insertBefore(j,f);
})(window,document,'script','dataLayer','GTM-XXXXXXX');</script>
<!-- End Google Tag Manager -->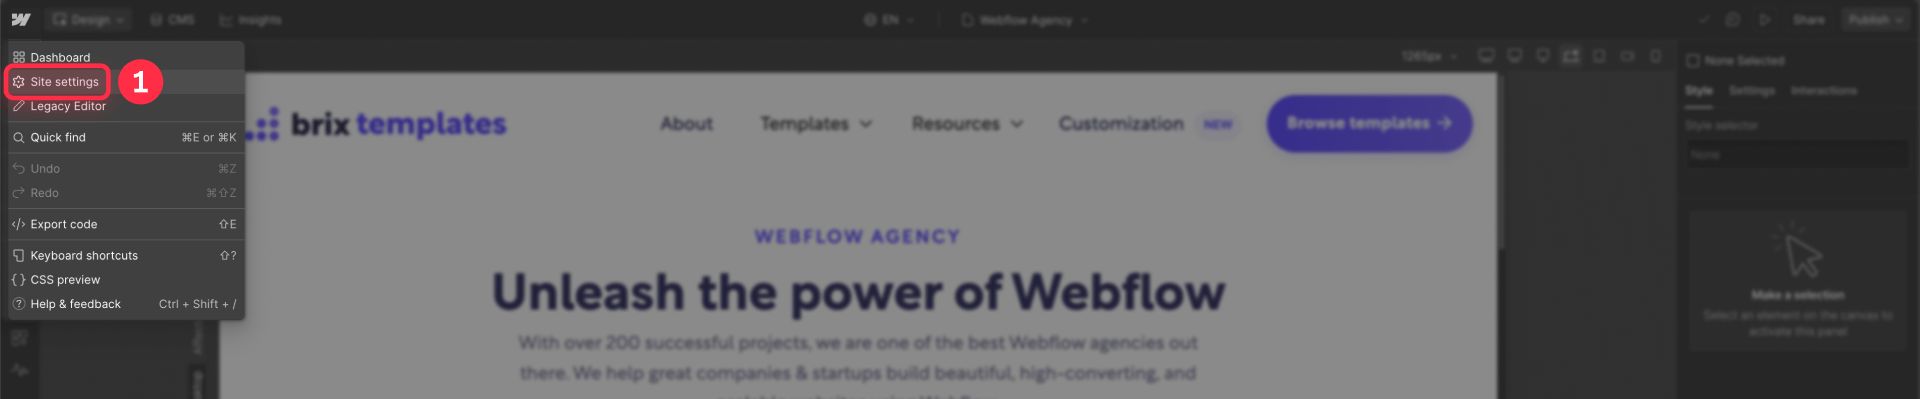
Add the GTM noscript code to your Webflow site
Google's documentation specifies that the noscript snippet should appear immediately after the opening body tag. Webflow's global Footer code field actually injects code before the closing body tag, not after the opening tag. For most tracking purposes, this works fine, but there are two approaches:
Option A: Use the Footer code field (simpler)
- Still in Site settings → Custom Code
- In the Footer code field, paste the second GTM snippet
- Replace GTM-XXXXXXX with your container ID
- Click Save
<!-- Google Tag Manager (noscript) -->
<noscript><iframe src="https://www.googletagmanager.com/ns.html?id=GTM-XXXXXXX"
height="0" width="0" style="display:none;visibility:hidden"></iframe></noscript>
<!-- End Google Tag Manager (noscript) -->
Option B: Use a Code Embed element for proper body placement
For strict compliance with Google's placement guidelines:
- In the Webflow Designer, add a Code Embed element from the Add panel
- Place it at the very top of your page structure in the Navigator, as high as possible after the body opens
- Paste the noscript snippet into the embed
- Convert this embed to a Symbol so you can reuse it across all pages
- Add the symbol to every page on your site
Tip: The noscript snippet only affects users who have JavaScript disabled, which is a tiny percentage of web traffic. For most Webflow sites, using the Footer code field is perfectly acceptable.
Publish your Webflow site after adding GTM code
Your custom code only appears on the live site after publishing. Click Publish and select the appropriate domain.
With only Starter plans (Starter Workspace + Starter Site), custom code can be restricted or may not publish at all. However, once your project has a paid Site plan (and/or is in a paid Workspace), your custom code—including the GTM snippets—will publish and run on:
- The .webflow.io staging domain, and
- Your connected custom domain
A custom domain is not required just to make custom code execute. The real factor is whether you have a paid plan that enables custom code publishing.
Method B: Install GTM in Webflow using the Google site tools app
If you prefer a code-free approach, Webflow offers an official app that connects Google Tag Manager, Google Analytics 4, and Google Search Console simultaneously.
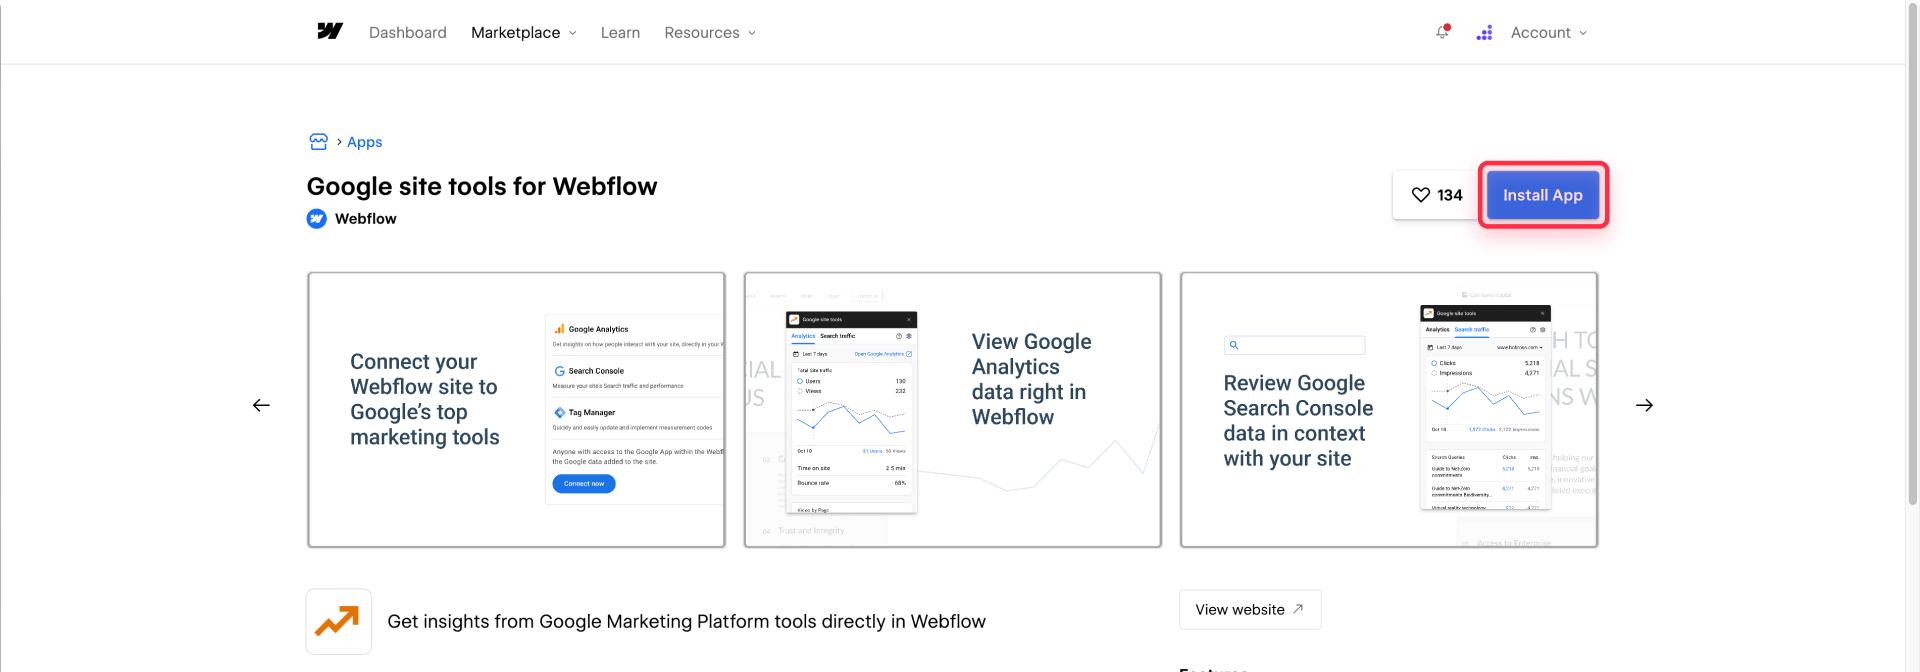
Why choose the Google site tools app for GTM installation
The app handles all the technical code placement automatically, reducing the chance of installation errors. It also lets you create a new GTM account during setup if you don't already have one, making it a zero-to-working solution for beginners.
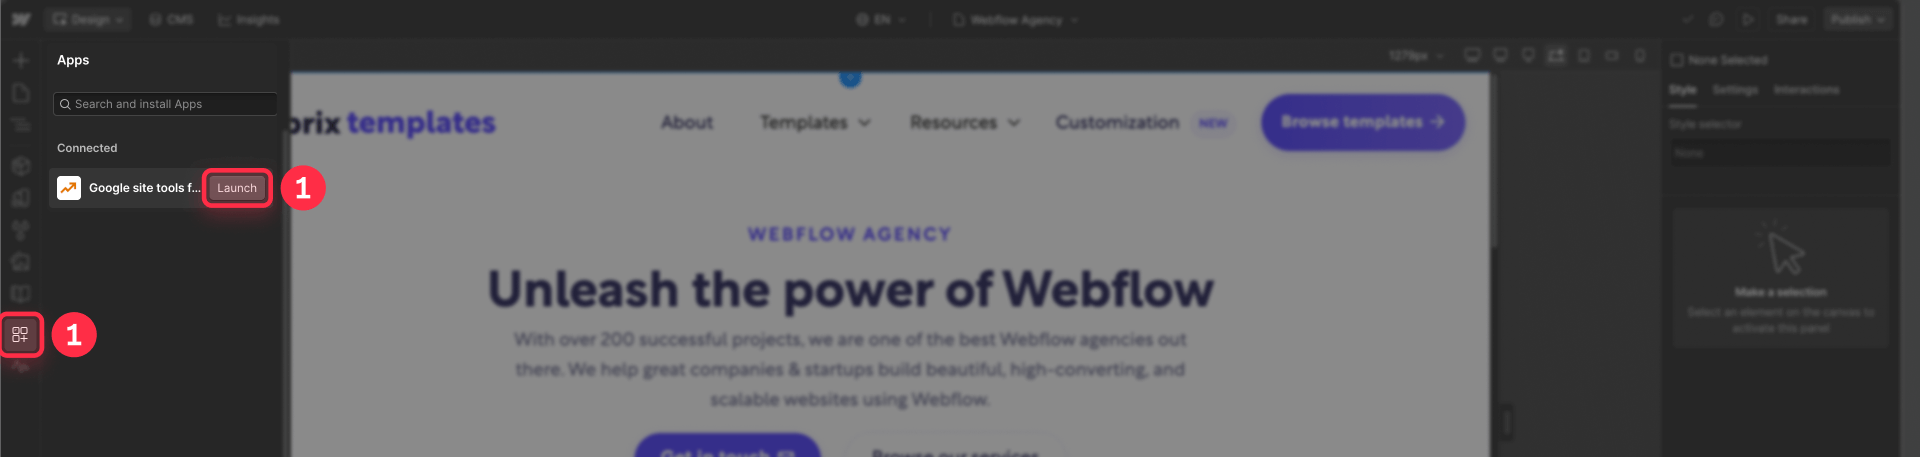
Install the Google site tools app in Webflow
- Open your Webflow project and navigate to the Apps panel
- Search for Google site tools for Webflow or find it in the marketplace
- Click Add to site and select the site you want to connect
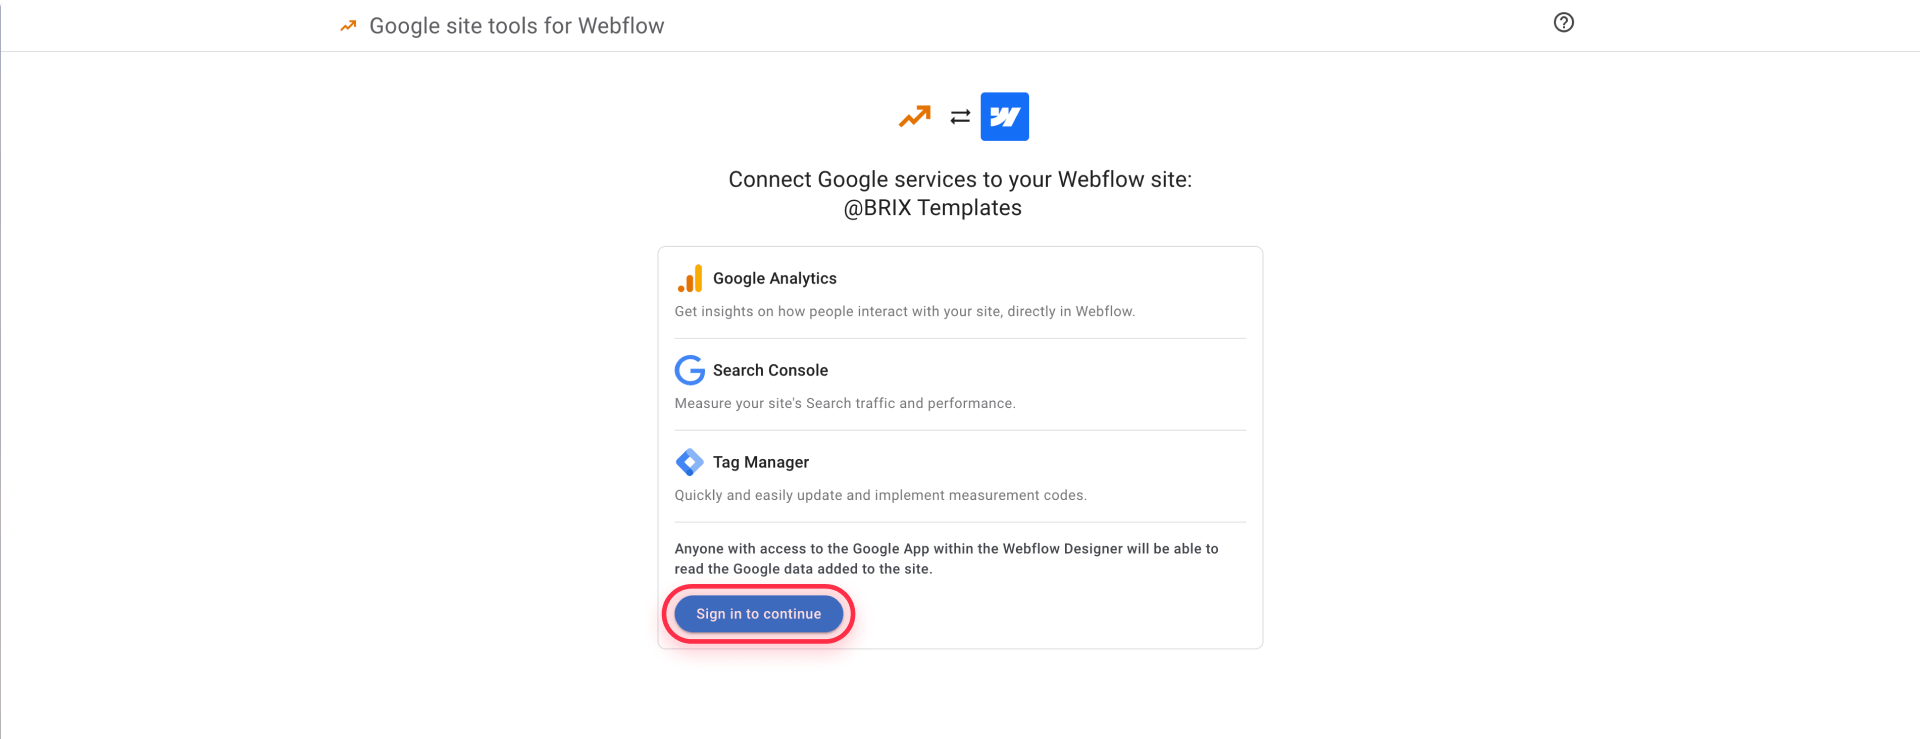
- Sign in with your Google account when prompted
- Click Start to begin the setup wizard
Connect your GTM container through the Webflow app
- The app first asks you to confirm domains for Search Console — select your domains and click Next
- On the Tag Manager step, choose your existing Tag Manager Account and Container from the dropdowns
- If you don't have a GTM account yet, select the option to create one during this flow
- Click Next to proceed to Google Analytics setup
- Select your Google Analytics Account and Property, or skip this step if you prefer to manage GA4 through GTM
- Click Add to site to complete the installation
- Click Back to Webflow to return to the Designer
Publish your Webflow site to activate GTM via the app
The app installation isn't complete until you publish your site. Click Publish and select your production domain. The GTM container code is now automatically injected into every page of your site.
Warning: If you connected GA4 through the Google site tools app, do not also create a GA4 tag inside GTM with the same Measurement ID. Using both will cause double-counting of all your pageviews and events.
Step 3: Verify your GTM installation is working in Webflow
Installing the code is only half the job. You need to confirm that GTM is actually loading and firing correctly on your live site.
Use GTM Preview mode to test your Webflow installation
- Go to tagmanager.google.com and open your container
- Click the Preview button in the top right corner of your workspace
- Tag Assistant opens in a new browser tab
- Enter your Webflow site's URL (use your custom domain or the .webflow.io staging URL if on a paid plan)
- Click Connect or Start
- A new tab opens with your website and a debug panel at the bottom
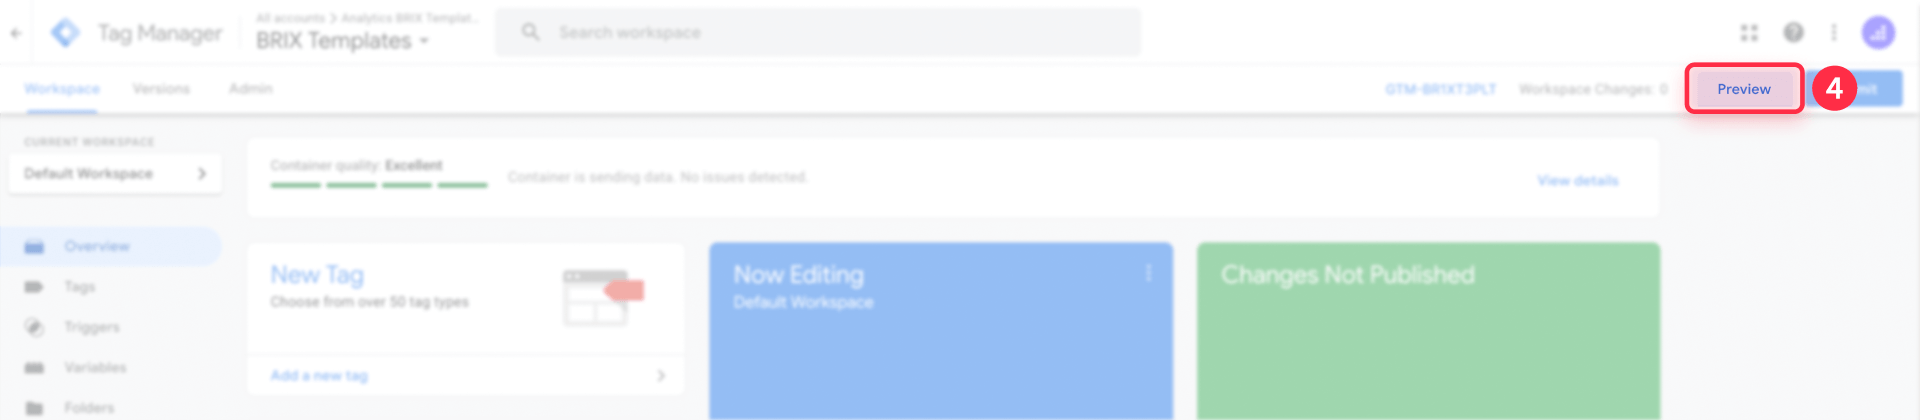

If everything is configured correctly, you'll see Tag Manager Found and your container ID listed in Tag Assistant.
Verify GTM is firing on your Webflow pages
In the Tag Assistant debug panel, you should see:
- Your container ID listed under connected tags
- A Container Loaded event showing GTM initialized successfully
- Any tags you've configured (like GA4) appearing in the Tags Fired section
If the panel shows no container found or an error, double-check that you published your site after adding the code and that you're testing on the correct domain.
Test GA4 data flow after GTM installation in Webflow
If you've added a GA4 tag inside GTM:
- Open Google Analytics and go to Reports → Realtime
- Browse your Webflow site in another tab
- You should see your session appear in the realtime report within seconds
Alternatively, use GA4's DebugView for more detailed event-level inspection. You'll need to enable debug mode either through the GA Debugger browser extension or by adding a debug parameter to your GTM tag.
Once you're satisfied that your tags are firing correctly in Preview and data is arriving in GA4, go back to GTM and click Submit to publish your latest container version. Changes made in GTM are not live for real visitors until you publish them.
Important: Since you're using GTM to manage all your tags (including GA4), make sure you don't also have GA4 configured in Webflow's Site settings or via the Google site tools app. Having GA4 in both places causes double-counting of all your traffic and events.
Looking to set up Google Analytics 4? We have a separate guide that walks you through how to configure GA4 in Webflow step by step. Check it out after you've finished installing GTM.
What to do after installing GTM on your Webflow site
With GTM successfully installed, you're ready to start adding tags and tracking user behavior.
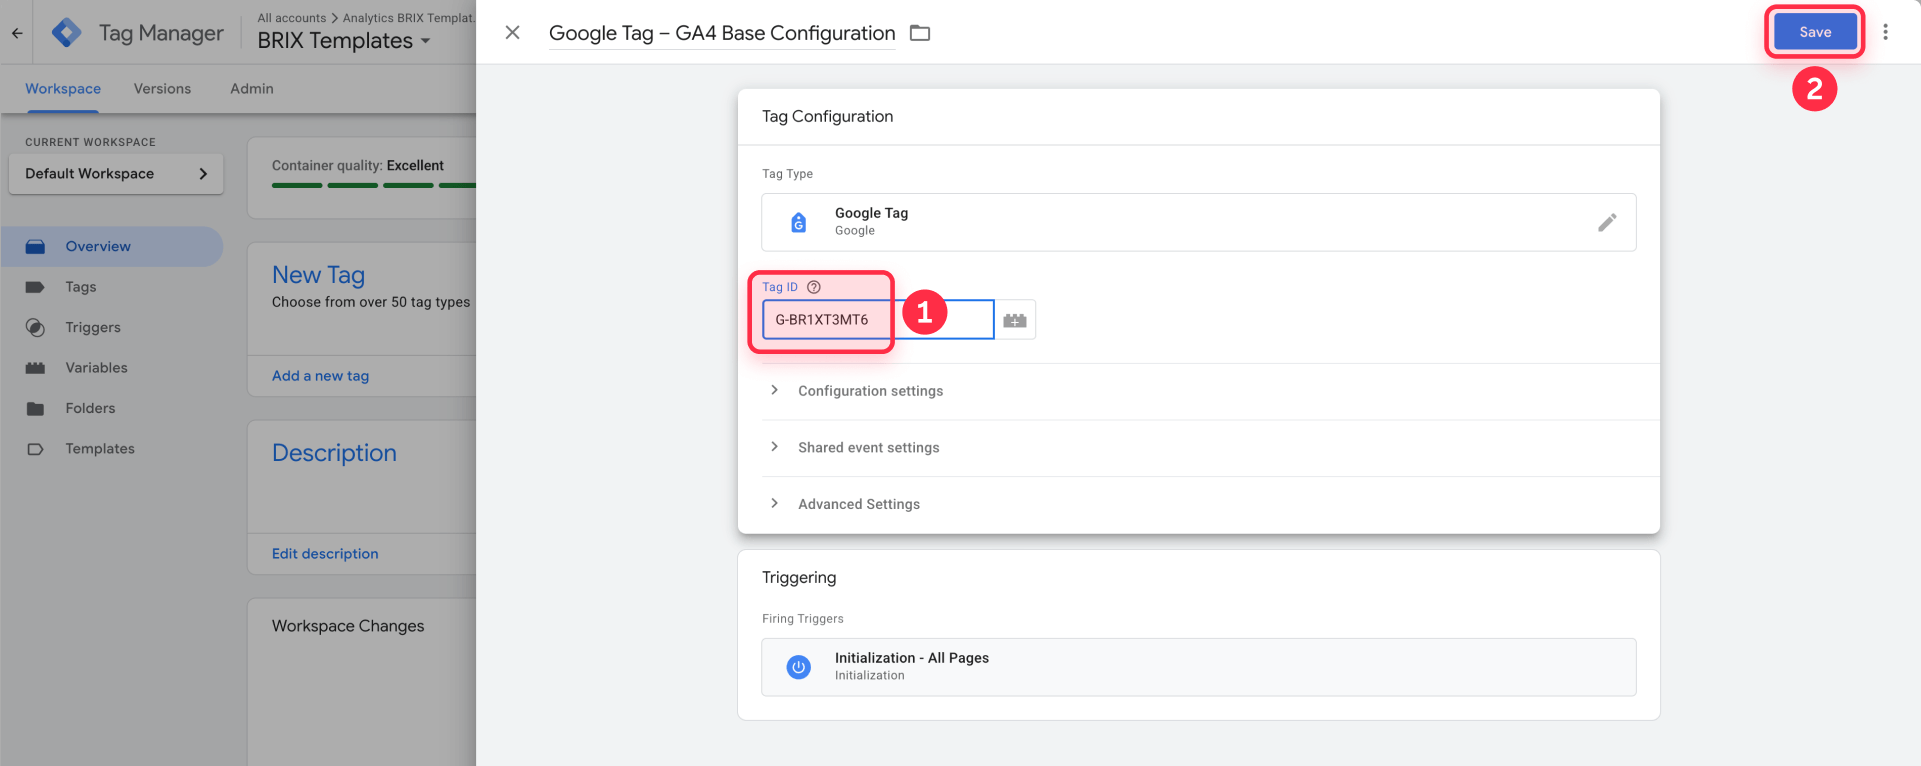
Add your first GA4 tag in Google Tag Manager for Webflow
Since you're managing everything from GTM, here's how to add Google Analytics 4:
Important: Only add this GA4 tag if you're not already using Webflow's native Google Analytics field or the Google site tools app to connect GA4. If GA4 is already configured and working through those methods, skip this step to avoid double-counting all pageviews and events.
- In GTM, go to Tags → New
- Choose Google Tag as the tag type
- Enter your GA4 Measurement ID (starts with G-)
- Set the trigger to Initialization - All Pages
- Save the tag, then click Submit to publish your GTM container
Explore advanced Webflow tracking with GTM
Now that your foundation is set, consider implementing:
- Form submission tracking for your Webflow forms
- Button click tracking for CTAs and navigation
- Scroll depth measurement to understand content engagement
- Video tracking if you have embedded content
- Custom events for specific user interactions
Each of these requires configuring triggers and tags within GTM but no additional code changes to your Webflow site.
Troubleshooting common GTM installation issues in Webflow
Even with careful implementation, things can go wrong. Here are the most common problems and how to fix them.
GTM container not detected in Preview mode: Verify you published your site after adding the code. Check that you're testing on the correct domain. Ensure your container ID matches exactly—even a missing character breaks the installation.
Double-counting sessions in Google Analytics: This happens when you have GA4 configured both in Webflow's native integration (or the Google site tools app) and as a tag inside GTM. Remove your Measurement ID from Site settings → Apps & Integrations → Google Analytics, save, and republish.
Custom code not saving or publishing in Webflow: This usually means your site is on a Starter Site plan, or your project is in a free Workspace with limited features. Upgrade to at least one paid Site plan and/or a paid Workspace to ensure GTM custom code can be added and published reliably.
GTM works on staging but not production: Make sure you published to your custom domain, not just the .webflow.io staging site. Also verify your GTM container isn't restricted to specific domains in its settings.
Tags not firing despite container loading: Check your trigger configuration in GTM. The most common issue is triggers set to fire only on specific pages or events that don't match your actual page URLs.
GTM script removed but still appearing on site: Browser caching and CDN caching can cause old code to persist. Clear your browser cache, wait for CDN propagation (usually 5-10 minutes), and check again.
Ad blocker preventing GTM from loading: Many ad blockers and privacy extensions block GTM by default. Test in incognito mode with extensions disabled to isolate this issue.
Frequently asked questions about Google Tag Manager in Webflow
What is Google Tag Manager and why do I need it for my Webflow site?
Google Tag Manager is a free tool that lets you manage all your tracking codes from one central dashboard without editing your website's code directly. For Webflow sites, GTM eliminates the need to add custom code for each analytics tool or marketing pixel, making it easier for marketing teams to add or modify tracking without developer involvement.
Do I need a paid Webflow plan to install Google Tag Manager?
Yes, in most cases. To reliably add GTM via custom code, you need at least a paid Site plan (Basic, CMS, Business, or higher). The default Starter plan is too limited for custom code features.
What's the difference between installing GTM with the app versus manual custom code in Webflow?
The Google site tools app handles everything automatically, while manual installation gives you complete control over code placement. For most users, the manual custom code method is recommended because it offers more flexibility and works with exported sites hosted elsewhere.
Can I use Google Tag Manager and Webflow's native GA4 integration at the same time?
You can, but you shouldn't add GA4 tracking in both places—this will double-count every pageview and event. Pick one method: handle GA4 entirely through GTM and remove any existing GA4 Measurement ID from Webflow's integration settings.
Where do I paste the GTM noscript code in Webflow if there's no option for after the body tag?
Webflow's global Footer code field injects code before the closing body tag, which works fine for most tracking purposes. The noscript snippet only affects users with JavaScript disabled (under 1% of traffic), so footer placement has minimal practical impact.
How do I verify that Google Tag Manager is installed correctly on my Webflow site?
Use GTM's built-in Preview mode—click Preview in your GTM workspace, enter your website URL, and Tag Assistant will show whether the container loaded successfully. You should see your container ID listed and a Container Loaded event in the debug panel.
Why is my GTM container not firing even though I added the code to Webflow?
The most common cause is forgetting to publish your Webflow site after adding the custom code. Other frequent issues include typos in the container ID, ad blockers blocking GTM scripts, and browser caching showing old page versions.
Can I use the same GTM container for multiple Webflow sites?
Technically yes, but it's not recommended. Managing different sites with different tracking requirements in one container becomes confusing, and tags may accidentally fire on the wrong site. Best practice is to create separate containers for each website.
How do I track Webflow form submissions using Google Tag Manager?
After installing GTM, create a Form Submission trigger in GTM and a GA4 Event tag that fires when forms are submitted. You may need to add custom attributes to your forms in Webflow's Designer to reliably target them in GTM triggers.
Should I hire someone to install Google Tag Manager on my Webflow site or do it myself?
For basic GTM installation and GA4 setup, most Webflow users can handle it themselves. However, if you need advanced event tracking, ecommerce integration, or cross-domain tracking, working with a specialist saves time and prevents costly tracking errors.
Conclusion
Installing Google Tag Manager on your Webflow site opens up a world of tracking possibilities without the headache of managing multiple code snippets. Whether you choose the manual custom code method for full control or the Google site tools app for a faster setup, you now have a central hub for all your marketing and analytics tags.
The key takeaway: manage everything from GTM. Avoid double-tracking by not adding GA4 or other tracking codes in both Webflow and GTM—pick one place and stick with it.
With GTM in place, your next steps might include configuring custom events for form submissions, setting up conversion tracking for ad campaigns, or implementing scroll and engagement tracking to understand how visitors interact with your content.
If you need help implementing advanced tracking or want to ensure your analytics setup is bulletproof from the start, BRIX Templates' Webflow agency specializes in complex Webflow projects and can handle your GTM configuration alongside your site build.


Join readers commenting on this post!