
You just launched your Webflow site, but without analytics, you're flying blind. You have no idea where your visitors come from, which pages they love, or why they leave. Google Analytics 4 (GA4) solves this problem by giving you comprehensive insights into your website traffic, but setting it up from scratch can feel overwhelming, especially if you've never created a Google Analytics account before.
This guide walks you through the complete process of installing Google Analytics 4 on your Webflow site, starting from zero. You'll learn how to create a Google Analytics account, set up a GA4 property, find your Measurement ID, and connect everything to Webflow using the native integration. By the end, you'll have a fully functional analytics setup tracking every visitor to your site.
Why Google Analytics 4 matters for Webflow sites
Understanding your website's performance is essential for making informed decisions about your design, content, and marketing efforts. Here's why GA4 is the go-to solution for Webflow users:
Understand your traffic sources with GA4 on Webflow: GA4 shows you exactly where visitors come from, whether that's organic search, social media, paid ads, or direct visits, helping you focus your marketing efforts on channels that actually work.
Track user behavior across your Webflow site: See which pages visitors engage with most, how long they stay, and where they drop off, giving you concrete data to improve your site's user experience.
Measure conversions and goals in Webflow: Track form submissions, button clicks, purchases, and other key actions to understand what drives results for your business.
Make data-driven design decisions for Webflow: Instead of guessing what works, use real visitor data to inform changes to your Webflow site's layout, content, and navigation.
Connect with other Google tools from Webflow: GA4 integrates seamlessly with Google Search Console, Google Ads, and other marketing platforms, creating a unified view of your online presence.
Future-proof your analytics on Webflow: GA4 is Google's current analytics platform, as Universal Analytics has been fully deprecated. Starting fresh with GA4 ensures you're using the most up-to-date tracking technology.
Before you start: requirements and key concepts for Webflow Google Analytics setup
Before diving into the setup process, make sure you have these prerequisites in place and understand the basic terminology you'll encounter.
What you need to install GA4 in Webflow
You'll need a Google account (any Gmail or Google Workspace account works), access to your Webflow site's Site settings with permission to publish changes, and ideally a custom domain connected to your Webflow site, though you can also use the default .webflow.io staging domain for testing.
Key terminology for GA4 in Webflow
Understanding these terms will make the setup process much clearer:
GA4 Account: The top-level container in Google Analytics that holds all your properties. Think of it as a folder that can contain multiple websites or apps.
Property: A specific website or app you want to track. Each Webflow site should have its own property within your GA4 account.
Web Data Stream: The connection point between your website and GA4. This is where your Measurement ID comes from.
Measurement ID: A unique identifier that looks like G-XXXXXXXXXX. This is the code you'll paste into Webflow (or into GTM) to connect your site to GA4.
Google tag (gtag.js): The JavaScript code that sends data from your website to Google Analytics. Webflow handles this automatically when you use the native integration.
Important note about Universal Analytics in Webflow
If you've used Google Analytics before, you might remember Tracking IDs that started with UA-. Universal Analytics stopped processing new data on July 1, 2023, and Google removed access to UA properties and their historical data in July 2024. GA4 is now the only option, and it uses Measurement IDs starting with G- instead. Any tutorials referencing UA codes are outdated.
Step 1: Create your Google Analytics account in Google Analytics
The first step is creating a Google Analytics account if you don't already have one. This account will house all your analytics properties and is created inside Google Analytics, not in Webflow.
Navigate to Google Analytics
- Open your browser and go to analytics.google.com
- If you're not already signed in, log in with your Google account. This is where you'll create and manage your GA4 account—Webflow is only used later to paste your Measurement ID.
Start the account creation process
Click the Start measuring button on the welcome page. This launches the setup wizard that will guide you through creating your account and first property within Google Analytics.
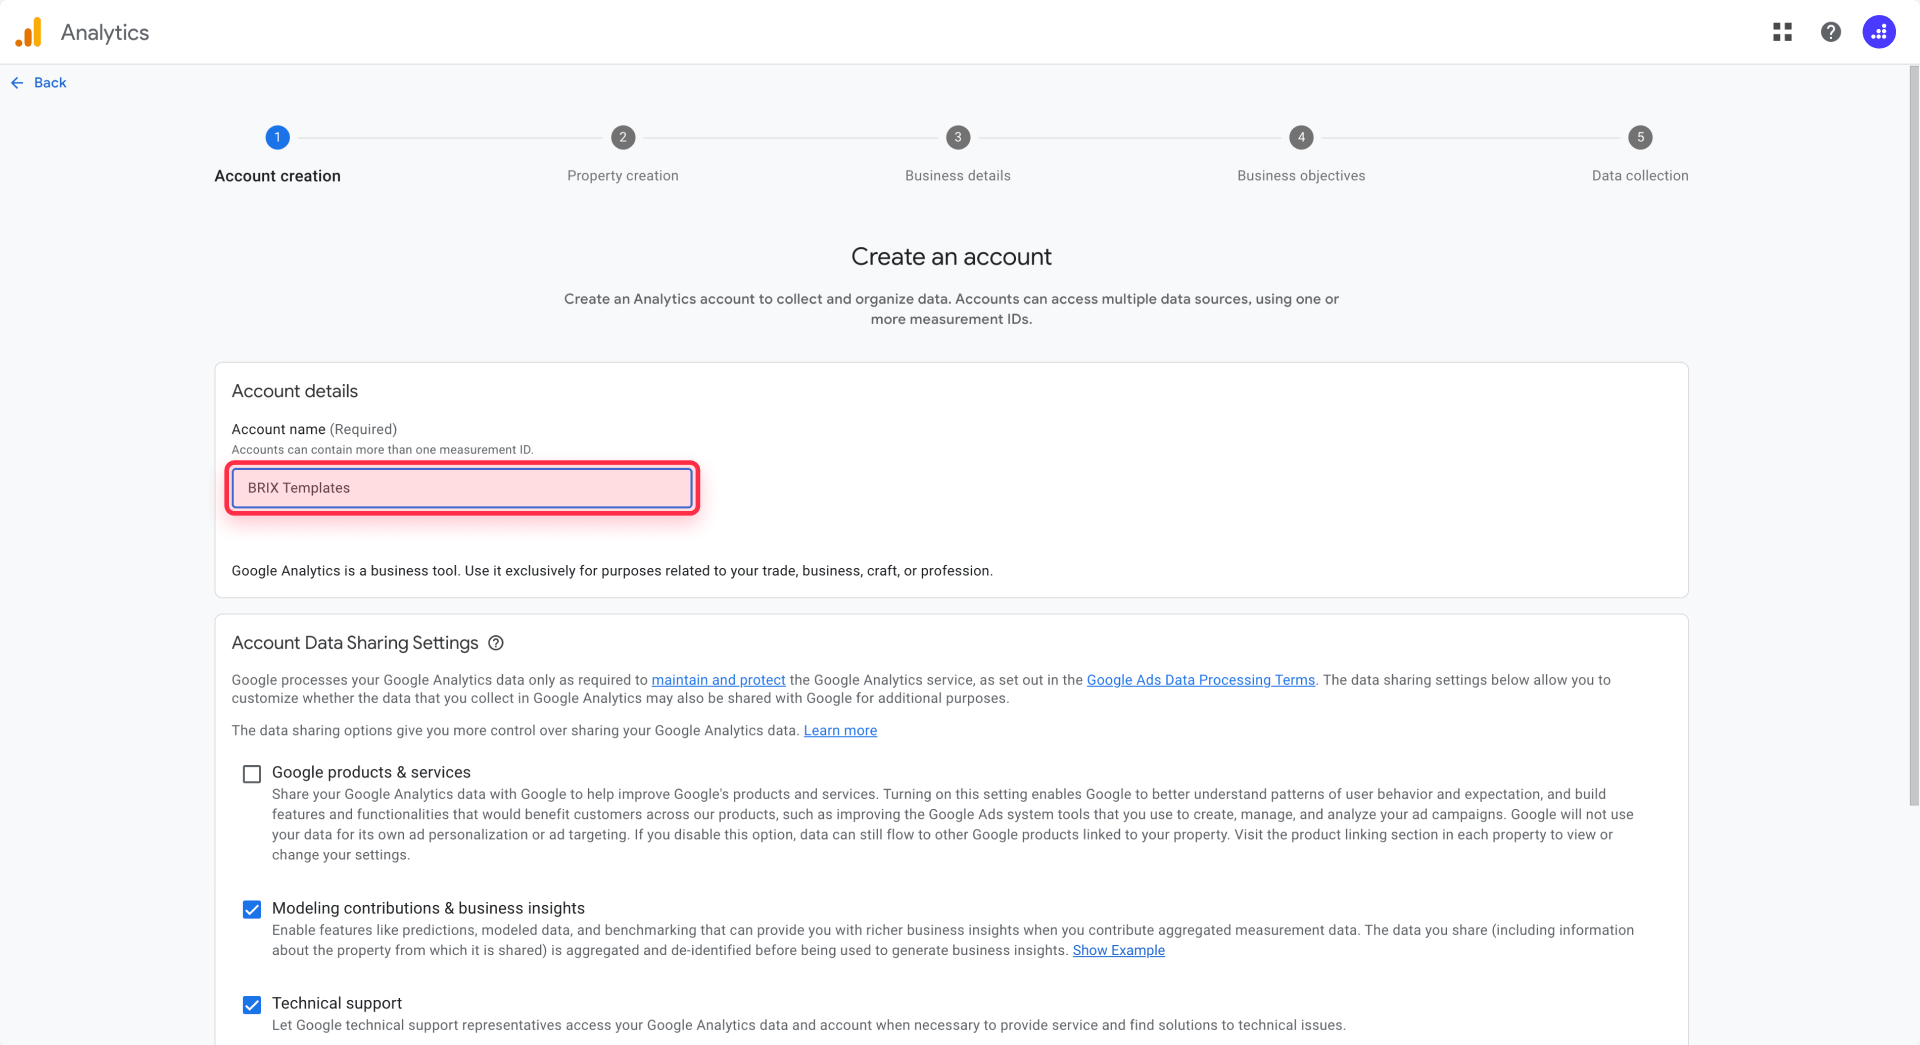
Configure your account settings for Webflow
- Enter an Account name in the provided field. This can be your company name, your personal name, or any identifier that makes sense for organizing your analytics.
- Below the account name, you'll see data sharing settings. These control what information Google can use for benchmarking and technical support. Review each checkbox and enable the ones you're comfortable with, then click Next.
Step 2: Create a GA4 property for your Webflow site
After setting up your account, you'll immediately create your first property. This property represents your Webflow website in Google Analytics.
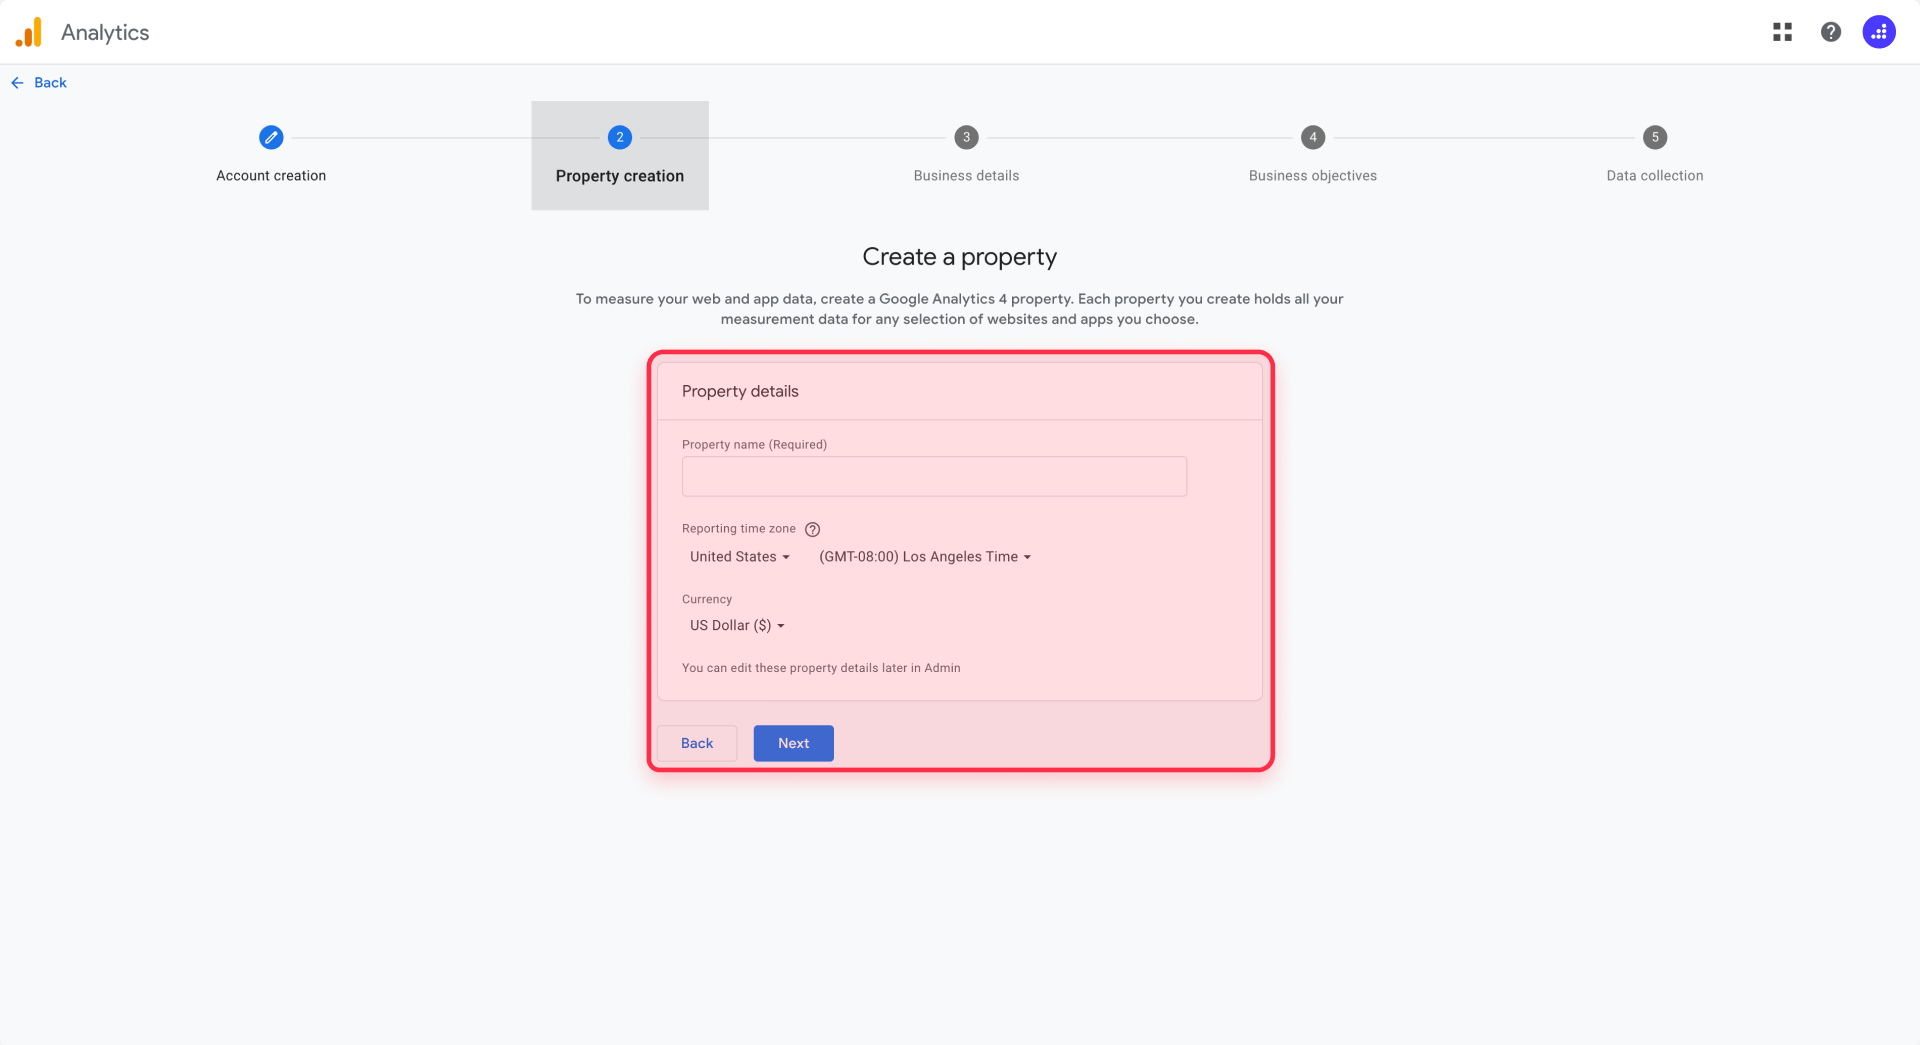
Enter your property details
In the Property name field, enter a descriptive name for your Webflow site. Using your website's name or domain makes it easy to identify later, especially if you add more properties in the future.
Select your Reporting time zone from the dropdown. Choose the time zone where most of your visitors are located or where your business operates. This affects how daily data is calculated in your reports.
Choose your Currency for any revenue tracking you might set up later. Click Next to continue.
Provide business information
Select your Industry category from the dropdown menu. This helps Google provide relevant benchmarks and insights for your type of business.
Choose your Business size based on the number of employees in your organization.
Select your Business objectives by checking the boxes that best describe what you want to achieve with analytics. Common choices include generating leads, examining user behavior, and measuring brand awareness. Click Create to proceed.
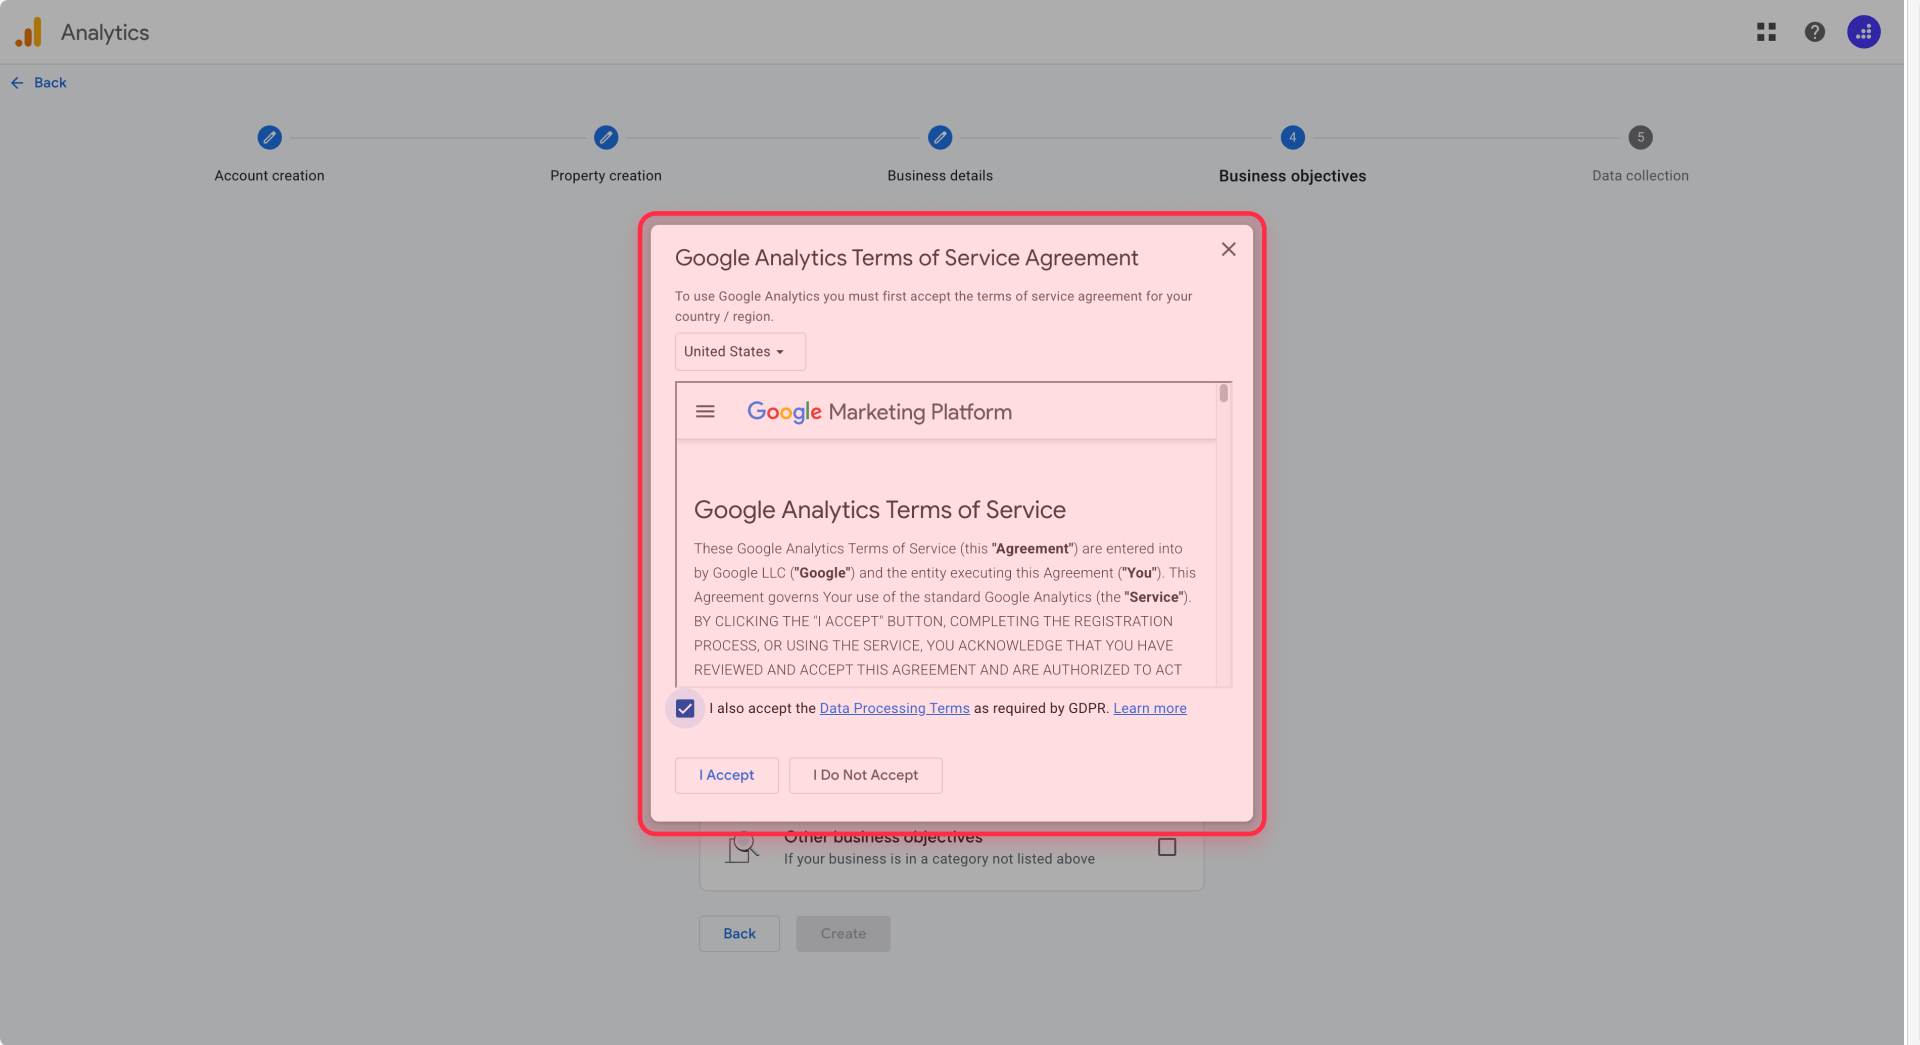
Accept the terms of service
Review the Google Analytics Terms of Service Agreement that appears. If you're in the EU or handling EU visitor data, you'll also see a Data Processing Amendment checkbox related to GDPR compliance. Check the required boxes and click I Accept to create your property.
Configure email preferences
Finally, choose which email communications you want to receive from Google Analytics, such as product updates and tips. Make your selections and click Save.
Step 3: Create a web data stream and find your Webflow Measurement ID
With your property created, you now need to set up a web data stream. This stream creates the connection between your Webflow site and GA4.
Add a web data stream in Google Analytics
After accepting the terms, GA4 typically prompts you to choose a platform. Select Web to set up tracking for your Webflow website.
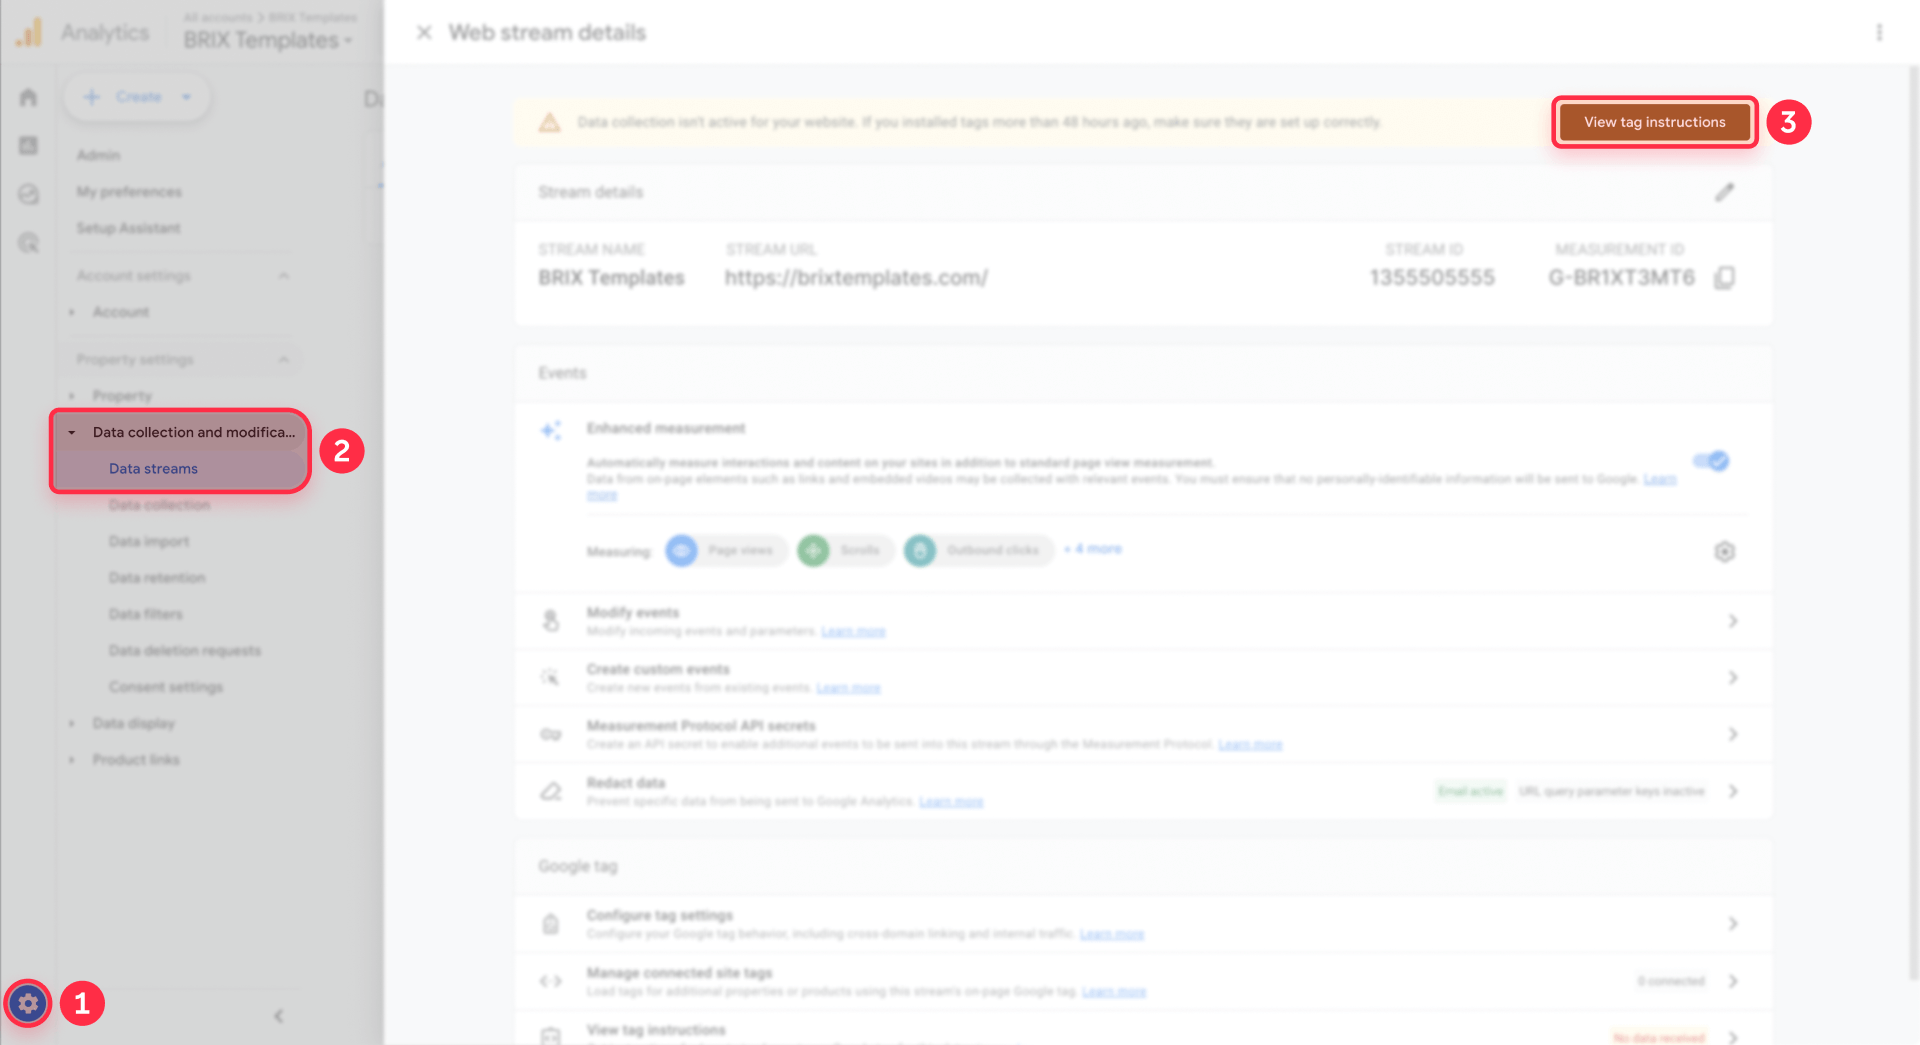
If you're not automatically prompted, navigate to Admin (gear icon in the bottom left), then under your property, click Data Streams under the Data collection and modification section. Click Add stream and select Web.
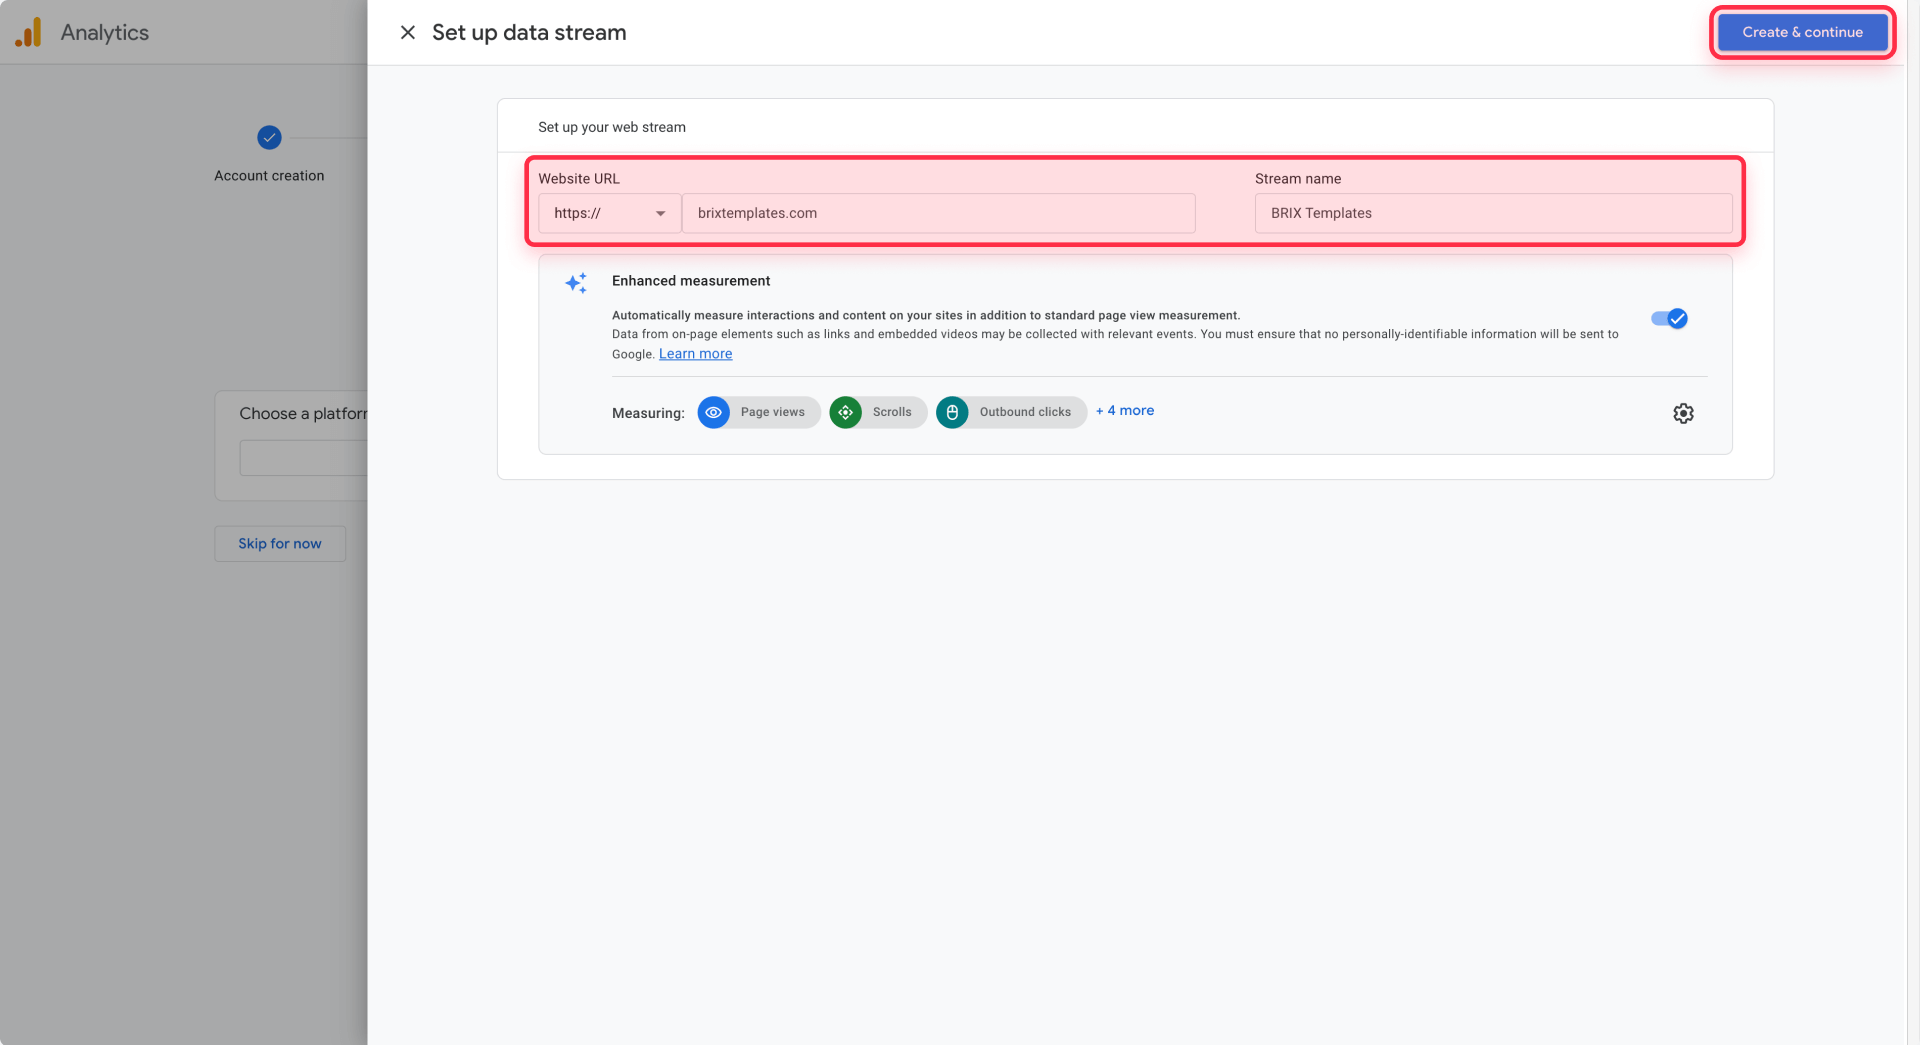
Configure your data stream settings
In the Website URL field, enter your Webflow site's domain without the https:// prefix. For example, if your site is https://mywebsite.com, just enter mywebsite.com.
Enter a Stream name to identify this data stream. Something like "Main Website" or your domain name works well.
Enable enhanced measurement in Webflow's GA4 setup
You'll see an Enhanced measurement toggle that's enabled by default. Keep this on. Enhanced measurement automatically tracks common interactions like page views, scrolls, outbound link clicks, site search, video engagement, and file downloads without requiring any additional code.
Click Create stream to finish setting up your data stream.
Copy your Measurement ID for Webflow
After creating the stream, you'll see the Web stream details page. Look for the Measurement ID at the top, which displays in the format G-XXXXXXXXXX.
Click the copy icon next to the Measurement ID to copy it to your clipboard. Keep this value safe because you'll paste it into Webflow in the next step.
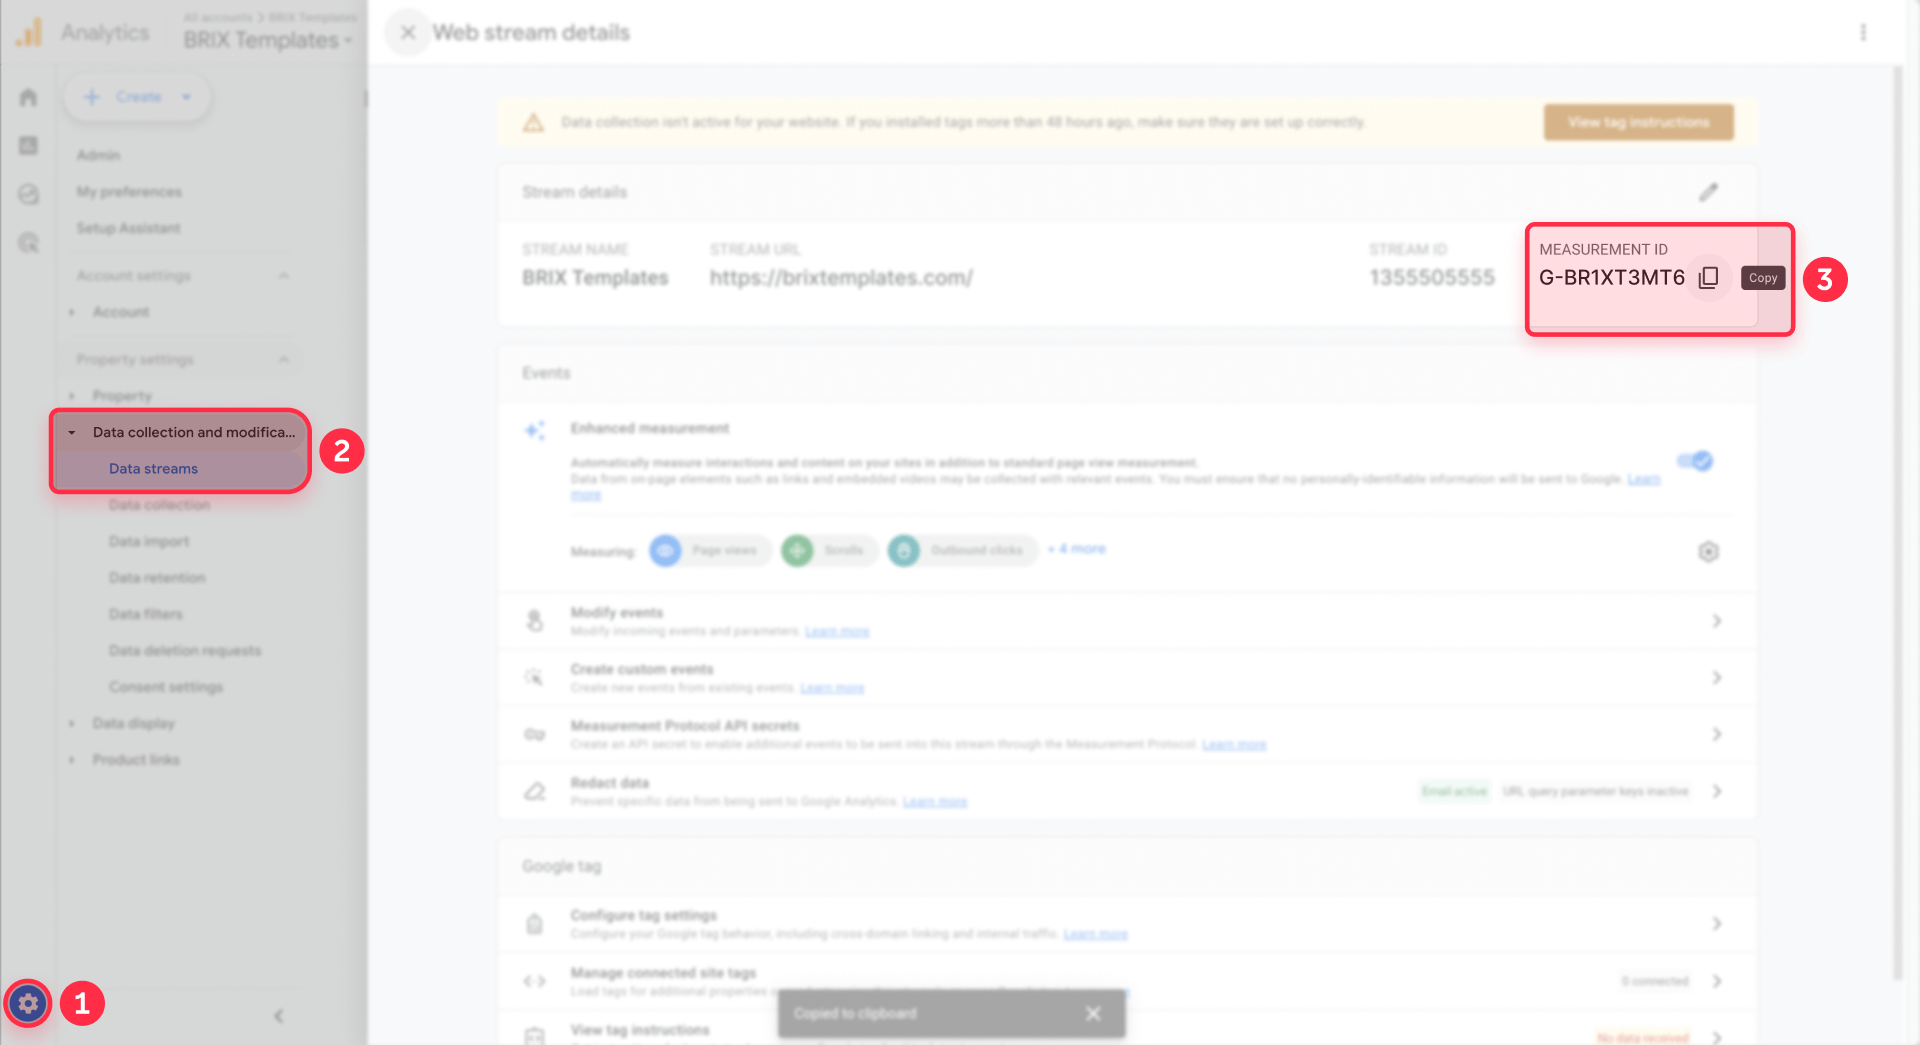
Tip: The Measurement ID is case-sensitive. Always copy and paste it rather than typing it manually to avoid errors.
Choose how you want to install GA4 on your Webflow site
Before you connect GA4 to Webflow, decide which installation method you want to use. There are two valid approaches, and you should pick one to avoid duplicate tracking:
Method 1 – GA4 via Google Tag Manager in Webflow (advanced / if you already use GTM)
Install Google Tag Manager on your Webflow site (follow our guide: How to install Google Tag Manager in Webflow).
Inside GTM, create a Google Tag (GA4) with your Measurement ID:
- Go to Tags → New → Google Tag.
- Paste your Measurement ID.
- Set the trigger to Initialization – All Pages.
- Save and Publish your GTM container.
With this method, GA4 is fully managed through GTM. You do not paste your Measurement ID into Webflow's native Google Analytics field.
Method 2 – Native GA4 integration in Webflow (simple)
This is the method covered in detail in the next step. You paste your Measurement ID directly in Webflow and let Webflow handle the Google tag for you.
Important: Use only one of these methods at a time.
- If you've added GA4 as a tag in GTM (Method 1), do not also paste your Measurement ID in Webflow's Google Analytics field.
- If you prefer the simple native integration (Method 2), skip the GA4 tag in GTM.
Step 4: Connect Google Analytics to your Webflow site (Method 2 – native integration)
Now comes the part where you actually connect GA4 to Webflow. The native integration is the recommended method for most users because it's simple, doesn't require a paid plan, and now uses Google Tag Gateway to improve data accuracy.
If you chose Method 1 (GA4 via GTM) above, you can skip this step and instead manage GA4 entirely through your GTM tag.
Access your Webflow site settings
- Log in to your Webflow account and open the project you want to track.
- Click the Webflow icon in the top left corner of the Designer, then select Site settings from the dropdown menu.
Alternatively, you can access Site settings directly from your Webflow dashboard.
Navigate to the integrations tab in Webflow
In your Site settings, click on the Integrations tab (sometimes labeled Apps & Integrations depending on your Webflow version). Scroll down until you see the Google Analytics section.
Paste your GA4 Measurement ID in Webflow
- In the Measurement ID field, paste the GA4 Measurement ID you copied earlier. It should start with G- followed by a string of letters and numbers.
Make sure you're pasting only the Measurement ID, not the entire gtag.js code snippet. Webflow handles the tracking code automatically when you use this integration field.
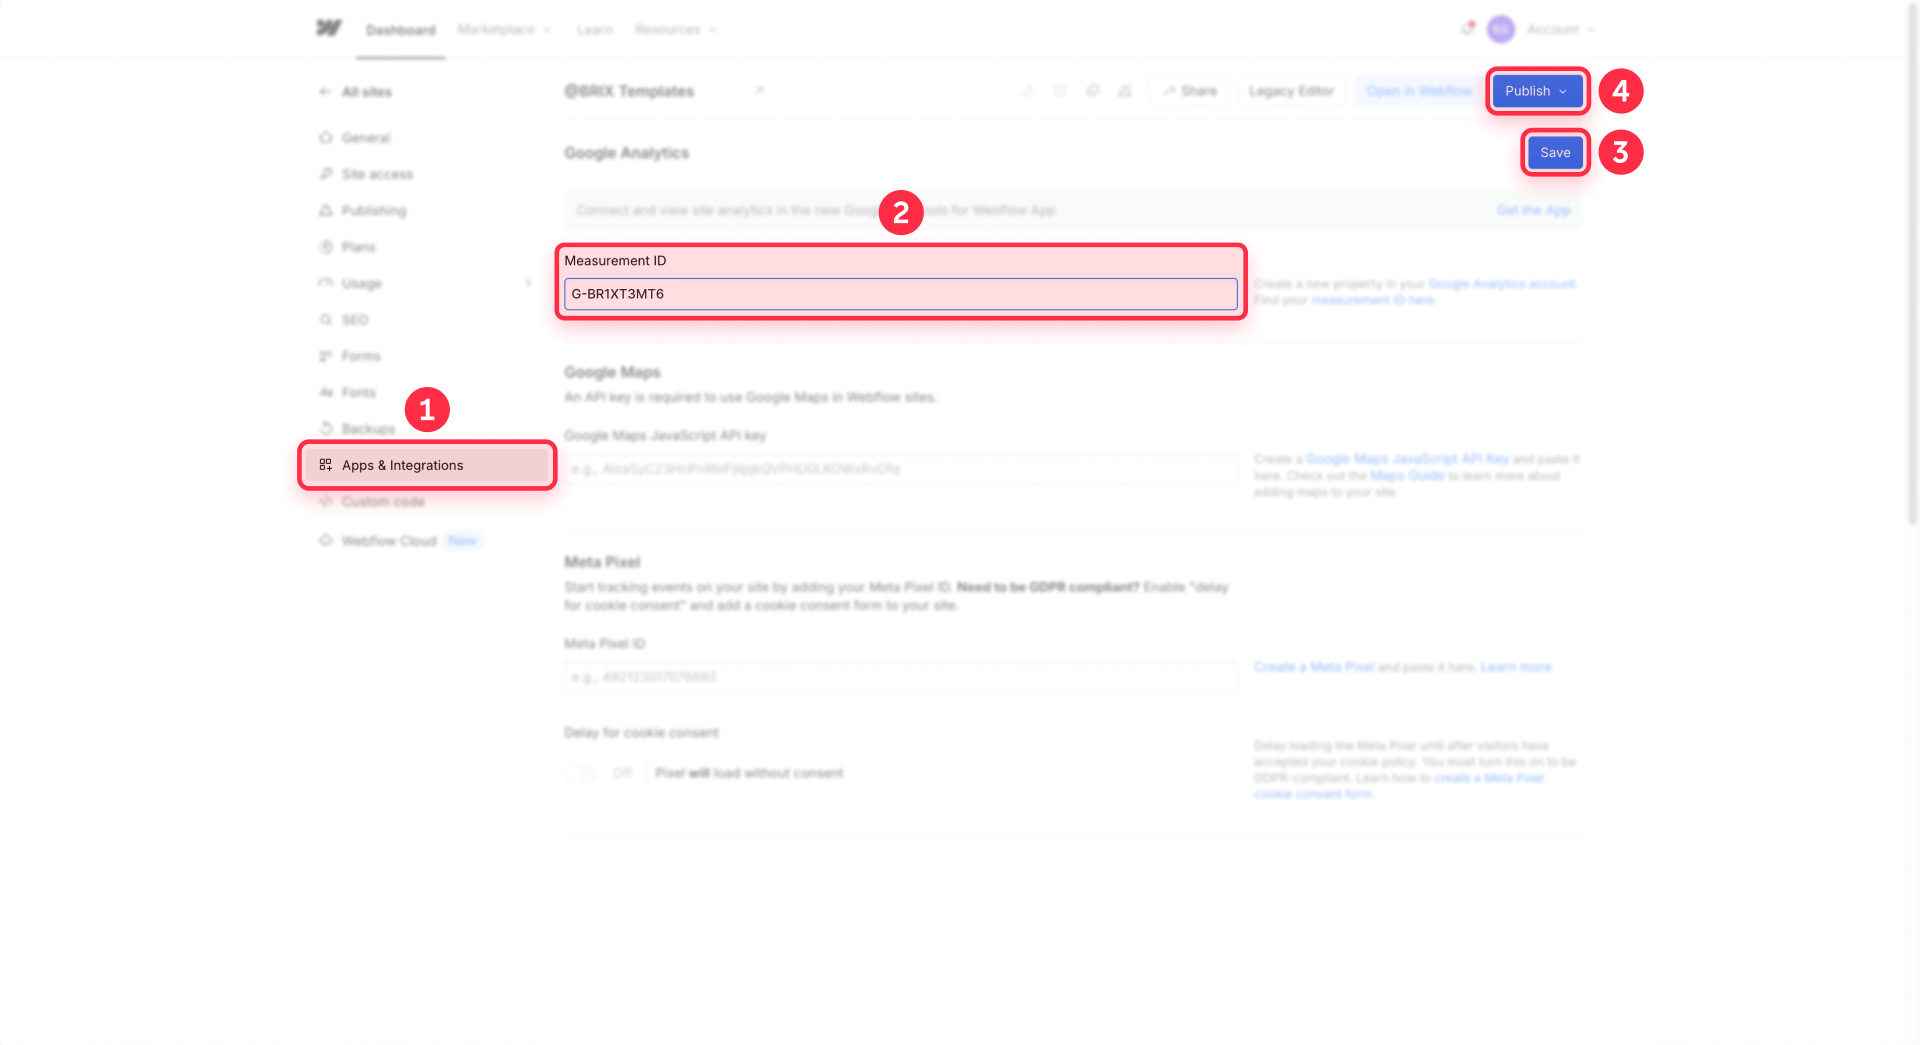
Save and publish your Webflow site with Google Analytics
- Click Save changes to store your Measurement ID.
- Then, crucially, you must Publish your site for the analytics tracking to go live.
Go back to the Designer and click the Publish button in the top right corner, then publish to your desired domain.
Tip: Webflow's native GA integration uses Google Tag Gateway, which helps reduce the impact of ad blockers and improves data accuracy compared to traditional tracking methods.
Step 5: Verify that GA4 is tracking your Webflow site
After publishing, you should verify that Google Analytics is actually receiving data from your Webflow site. GA4 provides real-time reporting that lets you confirm everything is working.
Open the Realtime report in GA4
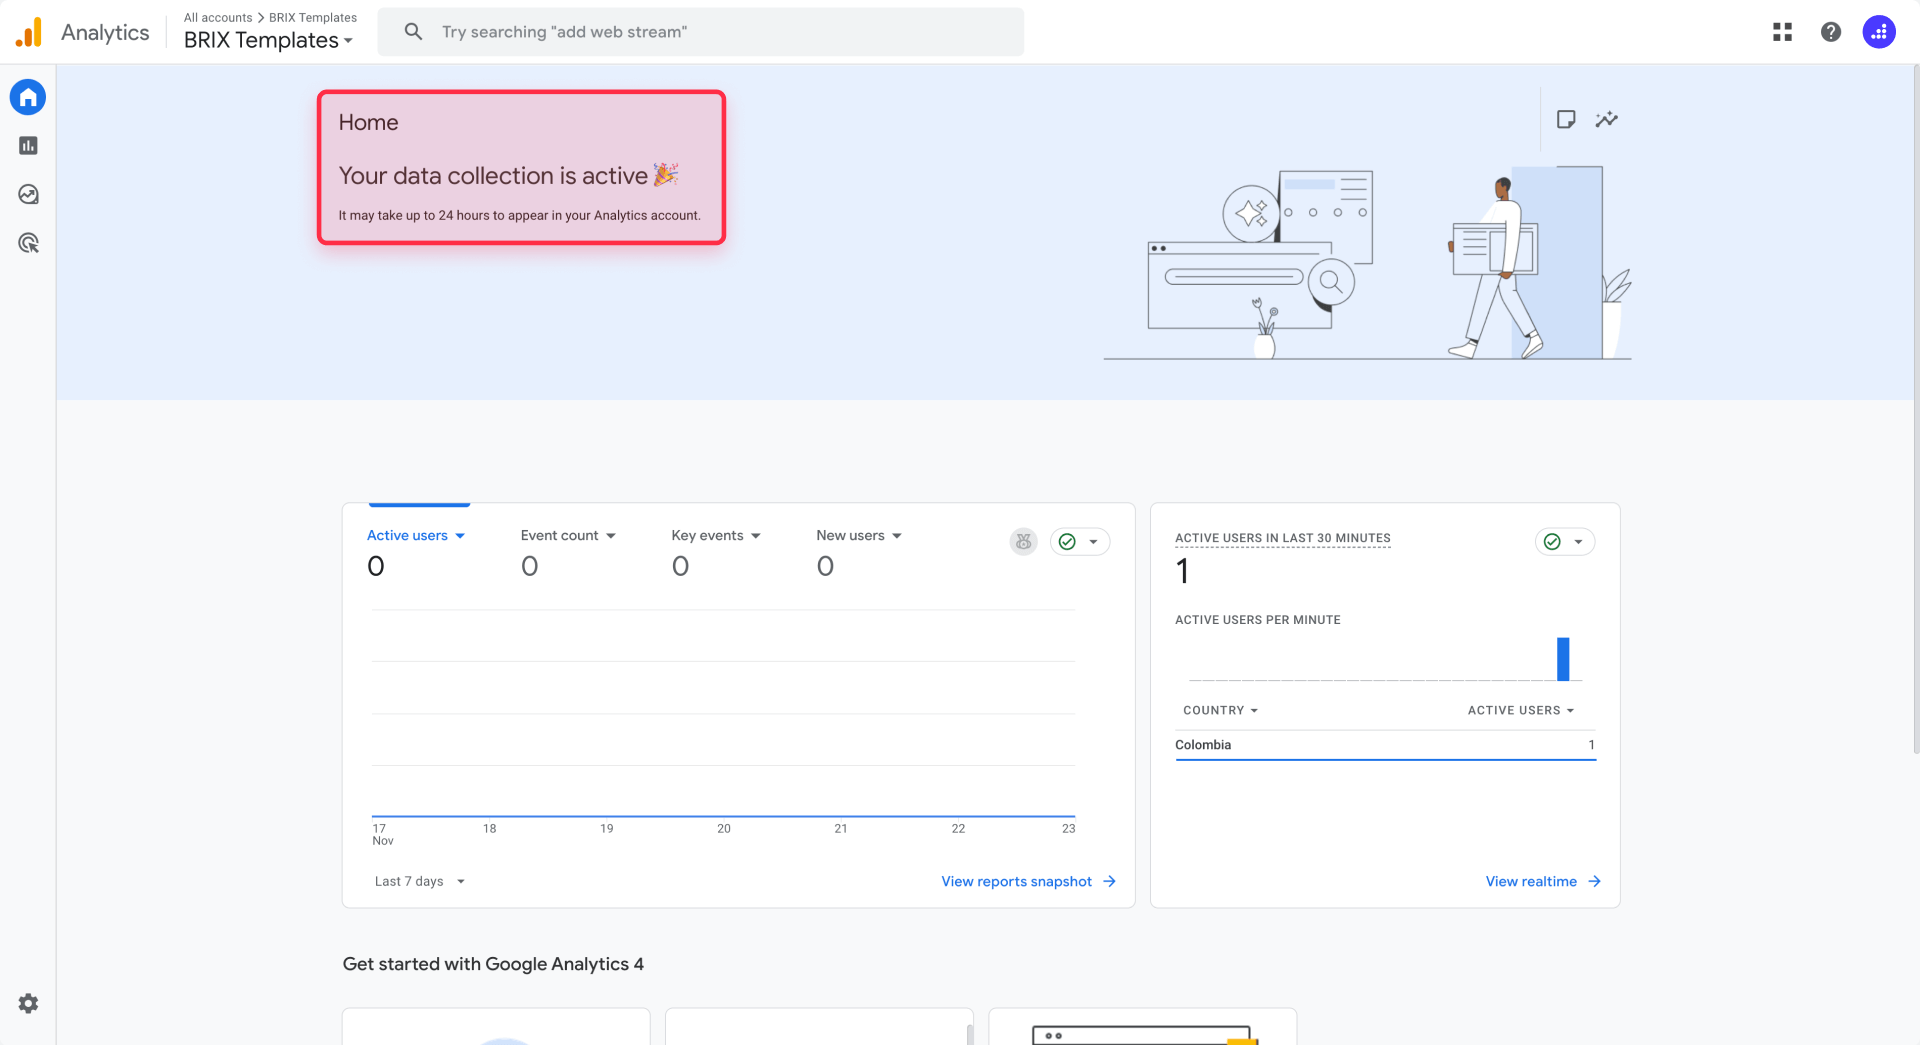
Go back to analytics.google.com and select your property. In the left sidebar, click Reports, then click Realtime. This report shows visitors currently on your site.
Visit your Webflow site to test tracking
Open a new browser tab, preferably in an incognito or private window to avoid any caching issues. Navigate to your published Webflow site and browse a few pages.
Confirm data is appearing in Google Analytics
Switch back to your GA4 Realtime report. Within a few seconds, you should see at least one active user (that's you). The report will show the page you're viewing and any events being tracked.
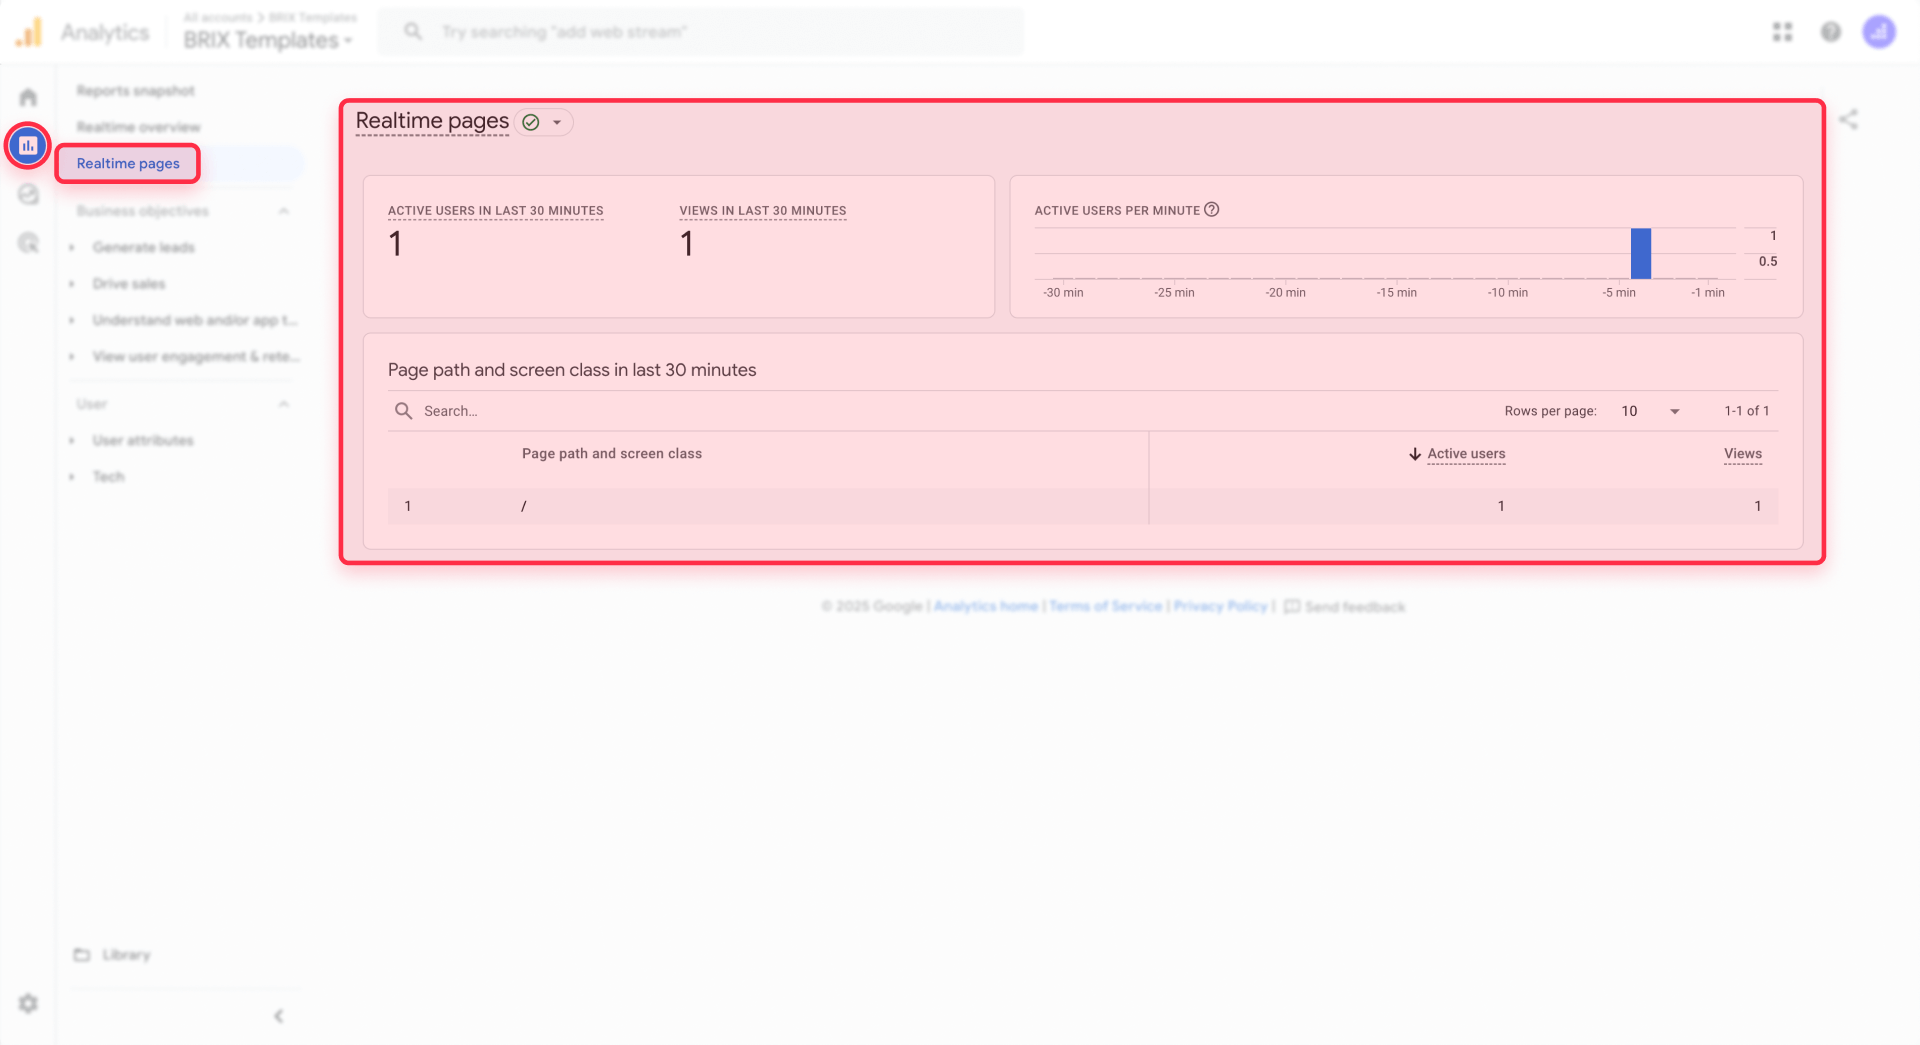
If you see activity in the Realtime report, congratulations! Your GA4 integration with Webflow is working correctly.
Use DebugView for detailed verification
For more detailed testing, you can use GA4's DebugView along with Tag Assistant or the Google Analytics Debugger browser extension to send debug events from your browser. Enable one of these tools, then visit your Webflow site. In GA4, navigate to Admin > DebugView to see individual events as they fire in real time.
Tip: Standard reports in GA4 can take up to 24-48 hours to populate with data. Realtime and DebugView are the fastest ways to confirm your setup is working.
Alternative installation methods for Google Analytics in Webflow
While the native integration is the recommended approach, there are situations where you might need alternative methods. Here's a brief overview of your options.
Manual gtag.js installation in Webflow custom code
If you need more control over your GA4 implementation, such as adding custom configuration parameters, you can paste the gtag.js snippet directly into Webflow's custom code settings.
This method requires a paid Webflow Site plan because custom code is a premium feature. You would copy the entire Google tag snippet from GA4 (found in Data Streams → your stream → View tag instructions → Install manually) and paste it into Site settings → Custom code → Head code.
If you use this method, do not also add your Measurement ID to the native Google Analytics field. Using both will cause duplicate tracking.
Important: If you already have Google Tag Manager installed on your Webflow site (via custom code or the Webflow app), skip this manual gtag.js method entirely. Instead, configure GA4 as a tag inside GTM (Method 1 above), or simply use the native Webflow integration field (Method 2). Installing gtag.js manually when GTM is already present creates unnecessary code duplication and potential conflicts.
If you already have Google Tag Manager installed in Webflow
If you installed Google Tag Manager on your Webflow site but followed Step 4 of this guide (using the native Measurement ID field), there's no conflict by default. GTM by itself doesn't send data to GA4—it only does so if you configure a GA4 tag inside GTM.
- If you decide to use GA4 via GTM (Method 1), create a GA4 tag in GTM and then remove your Measurement ID from Webflow's native GA field.
- If you prefer to keep GA4 in Webflow (Method 2), don't create a GA4 tag in GTM.
Google site tools for Webflow app
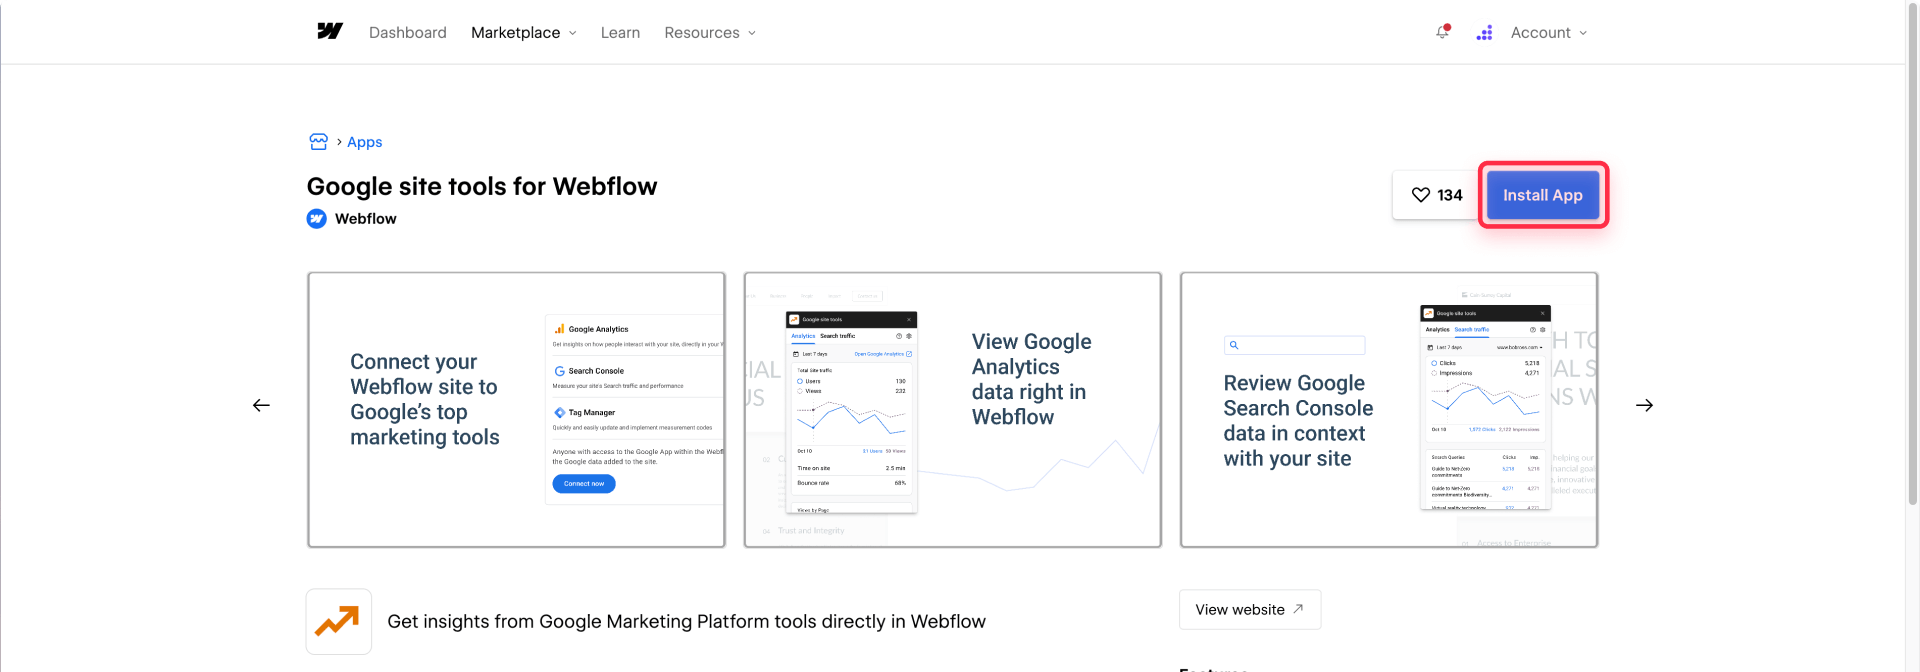
This is an official Webflow app that connects your site to Google Analytics 4 (GA4) and other Google tools. The app automatically configures the GA4 scripts for you after you authorize your Google account and select your property—no need to manually paste code.
You can find this app in the Webflow Apps marketplace. The setup process involves authorizing your Google account, selecting your GA4 property, and publishing your site.
If you previously used the standard Site settings GA integration and switch to this app, remove your Measurement ID from Site settings to avoid duplicate GA scripts, inflated pageview counts, and unnecessary extra load on your site.
Troubleshooting common Google Analytics issues in Webflow
Even with a straightforward setup, you might encounter issues. Here are the most common problems and their solutions.
No data showing in GA4 Realtime: First, confirm you've published your Webflow site after adding the Measurement ID. Then verify you're checking the correct GA4 property. Try visiting your site in an incognito window to rule out browser extensions or caching issues.
Measurement ID not being accepted in Webflow: Make sure your ID starts with G- and not UA-. Universal Analytics IDs are no longer supported. Also verify you're pasting just the ID, not the full gtag.js code.
Duplicate pageviews in GA4 reports: This happens when GA4 is installed multiple ways on the same site. Check that you're using only one method: either the native Webflow integration field, custom code gtag.js, or GTM, but not multiple at once. Remove any redundant implementations.
Santa Clara traffic appearing in reports: Some Webflow users notice traffic from Santa Clara in their GA4 data. This is often Webflow's infrastructure when you're editing in the Designer. Consider setting up internal traffic filters in GA4 using your IP address to exclude your own visits.
Enhanced measurement events not tracking: Verify that Enhanced measurement is enabled in your GA4 data stream settings. Some events like site search require specific URL parameters that your Webflow site might not be generating.
Data discrepancy after WordPress to Webflow migration: If you migrated from another platform and see lower reported traffic, check that your tracking implementation is identical across all pages and that you haven't inadvertently changed domain configurations that affect session counting.
Frequently asked questions about Google Analytics in Webflow
What is GA4 and why do I need it for my Webflow site?
GA4, or Google Analytics 4, is Google's current analytics platform that provides essential insights into who visits your website, how they found you, and what actions they complete. Without analytics, you're making decisions based on guesswork rather than data. GA4 is free and integrates natively with Webflow.
Can I use Google Analytics 4 with a free Webflow plan?
Yes, you can use GA4 with a free Webflow plan. Webflow's native Google Analytics integration works on all plans. Simply paste your GA4 Measurement ID into the integration field in Site settings > Integrations and publish your site.
What's the difference between a Measurement ID and a Tracking ID in Webflow?
Measurement IDs belong to GA4 and start with G- (like G-ABC123XYZ), while Tracking IDs belonged to Universal Analytics and started with UA-. Webflow's current integration only accepts GA4 Measurement IDs. Universal Analytics stopped working in July 2023, so only GA4 IDs will track anything.
How long does it take for GA4 data to appear after installing on Webflow?
Realtime data appears within seconds. You can verify your setup immediately by checking the Realtime report in GA4. However, standard reports like traffic acquisition and demographics can take 24-48 hours to populate with meaningful data.
Should I use Webflow's native GA integration or Google Tag Manager?
For most Webflow users, the native GA integration is the better choice—it's simpler, doesn't require a paid plan, and works reliably. Google Tag Manager becomes valuable when you need advanced capabilities like tracking complex custom events, managing multiple marketing pixels, or implementing consent mode for GDPR compliance.
How do I avoid duplicate tracking when setting up GA4 in Webflow?
Choose only one installation method: use the native integration field, OR paste gtag.js in custom code, OR implement via Google Tag Manager. Never use more than one simultaneously. Duplicate tracking inflates your pageview counts and corrupts your analytics data.
Can I track Webflow form submissions as conversions in GA4?
Yes. If Enhanced measurement is enabled (the default), GA4 automatically tracks form_submit events. To mark these as conversions, go to Admin > Events in GA4, find the form_submit event, and toggle the Mark as conversion switch.
What privacy considerations should I know about when using GA4 on a Webflow site?
If your site receives EU visitors, you should be aware of GDPR regulations. GA4 collects data that may be considered personal information, which means you might need a cookie consent banner. Webflow doesn't include built-in consent management, so you'd need a third-party solution.
How do I connect GA4 to Google Search Console for my Webflow site?
First, verify your Webflow site in Google Search Console. Then in GA4, go to Admin > Product links > Search Console links and click Link. Select your Search Console property and choose which GA4 web stream to connect. This integration helps you understand which search queries bring visitors to your site.
Conclusion
Installing Google Analytics 4 on your Webflow site opens the door to understanding your visitors in ways that transform how you approach your website. With the setup complete, you now have access to traffic insights, engagement metrics, and conversion tracking that inform every decision about your site's design and content.
From here, consider configuring key conversions like form submissions, linking GA4 with Google Search Console for search query insights, and exploring GA4's exploration reports for deeper analysis. As your needs grow, you might explore custom event tracking or integration with advertising platforms.
If you'd rather focus on building your business while experts handle the technical setup, our experienced Webflow agency team at BRIX Templates can configure GA4 and other integrations to match your specific goals.


Join readers commenting on this post!