
If you're running lead generation campaigns on Webflow, you've probably wondered which forms actually convert and which traffic sources drive real submissions. Without proper tracking, you're essentially flying blind—spending money on campaigns without knowing if they're generating leads or just sessions.
The frustrating part? Webflow's native form system uses AJAX submissions that don't reload the page, which means standard analytics tools often miss these events entirely. You need a tracking setup that actually works with how Webflow forms function.
Why form tracking matters for Webflow sites
Tracking form submissions isn't just about counting conversions—it's about understanding your entire lead generation funnel. Here's what proper form tracking enables:
Campaign optimization: See which Google Ads campaigns, social media posts, or email newsletters actually drive form submissions, not just clicks. This lets you allocate budget to channels that generate real leads.
Form performance analysis: Identify which forms convert best and which ones need improvement. If your pricing page form converts at 8% but your homepage form converts at 1%, that's actionable data.
Multi-channel attribution: Understand the full customer journey from first visit to form submission. Did they come from organic search, return via a retargeting ad, then convert? You need to know.
Google Ads optimization: Import form submissions as conversions into Google Ads and let Smart Bidding optimize for actual leads instead of just website visits.
Lead quality assessment: Compare form submission rates across landing pages, traffic sources, and campaigns to identify which channels bring qualified leads versus tire-kickers.
ROI calculation: Finally answer the question "what's our cost per lead?" by connecting ad spend directly to form submissions.
Your tracking options for Webflow forms
You have two main approaches to track Webflow form submissions:
Webflow Analyze is Webflow's paid, native analytics add-on. It's billed per site, starting around $9/month and scaling with your traffic volume. The advantage is simple setup—everything lives inside Webflow's interface with no code required. The downside is cost multiplies across sites and you get limited integration with external tools like Google Ads.
GTM + GA4 is free for the vast majority of websites and offers deep integration with the entire Google marketing stack. The initial setup requires more effort, but once configured, you get enterprise-grade tracking with full control over events, parameters, and cross-channel attribution.
This guide focuses on GTM + GA4 because it gives you professional-grade tracking without recurring per-site costs. We'll cover two proven methods that handle Webflow's unique form behavior.
Prerequisites for tracking Webflow forms with GTM
Before implementing either tracking method, ensure you have these three components in place:
A GA4 property with Measurement ID: You need an active GA4 property and its Measurement ID (formatted as G-XXXXXXXXXX). If you don't have one, create it in your Google Analytics account under Admin → Create Property.
GTM container on your Webflow site: Install Google Tag Manager by adding the container snippet to your Webflow site. Place the <head> portion in Site Settings → Custom Code → Head Code, and the <body> portion in Body Code. If you need detailed installation instructions, check out our complete guide on how to install Google Tag Manager in Webflow.
GA4 base tag firing on all pages: Your GTM container needs a GA4 Configuration tag that loads on every page. This is your baseline tracking before adding form-specific events.
Quick verification: is GA4 tracking your Webflow site?
Open Google Tag Manager and click Preview. Enter your Webflow site URL and click Connect. When the page loads, look in Tag Assistant—you should see a "Google Tag" or "GA4 Configuration" tag firing on the page view event.
If you don't see it, create one now: In GTM, go to Tags → New. Select tag type Google Tag (or GA4 Configuration in older interfaces). Enter your Measurement ID in the configuration. Set the trigger to All Pages. Save and click Submit to publish your container.
Important: disable Enhanced Measurement form tracking
Once you set up custom form tracking (either method below), you must disable GA4's automatic form tracking to prevent double-counting. In GA4, navigate to Admin → Data streams → select your web stream → Enhanced measurement. Toggle off Form interactions.
GA4's automatic form detection is notoriously unreliable with Webflow's AJAX forms and tends to miscount or miss submissions entirely. That's why we're building custom tracking.
Method 1: Track Webflow forms with Thank You page redirects
This method treats the Thank You page URL as your conversion signal. When someone submits a form, Webflow redirects them to a dedicated confirmation page. GTM then fires a GA4 event when that specific URL loads.
The beauty of this approach is simplicity—no JavaScript, no dataLayer manipulation, no form field parsing. You're just saying "if someone lands on this specific URL, count it as a form submission."
This works with native Webflow forms and any third-party form tool that supports post-submission redirects (HubSpot, Salesforce, JotForm, Typeform with redirect enabled, etc.).
When Method 1 works best for Webflow
Use Thank You page tracking when:
- You're comfortable redirecting users after form submission rather than showing an in-page success message
- Each important form type can have its own unique Thank You URL
- You want dead-simple setup with no custom code
- You're using third-party forms (like HubSpot or Salesforce) that support redirect URLs
Skip to Method 2 if you prefer AJAX-style success messages with no page reload, or if you have multiple forms per page that need separate tracking.
Step 1: Create Thank You pages in Webflow
You have two approaches depending on how many forms you manage.
Option A: Static Thank You pages in Webflow
For a handful of forms, create individual static pages:
In Webflow Designer, add a new page for each form type. Use clear URL slugs like /thank-you-contact, /thank-you-demo, or /thank-you-newsletter.
Add confirmation content to each page—a clear "Thank you" message, any next steps, links to resources, or an embedded calendar for demo bookings.
Hide these pages from normal site navigation. Don't add them to your navbar or footer. In Page Settings → SEO, enable "Exclude this page from search results" to prevent accidental organic traffic that would create false conversions.
The goal is making these pages accessible only via form redirect, not through natural browsing or search.
Option B: CMS-based Thank You pages in Webflow
If you manage many forms across multiple projects, a CMS collection scales better:
Create a new CMS collection named "Form Thank You Pages" with these fields: Name (internal reference), Slug (for the URL), Heading (optional), and Body (optional confirmation message).
Design the Collection Template page with URL structure /thank-you/[slug]. Bind your heading and body fields to the template. In the template's SEO Settings, set it to be excluded from search engines.
Add one CMS item per form type: Contact form gets slug contact (URL becomes /thank-you/contact), Demo request gets slug demo, Newsletter gets slug newsletter, and so on.
Now when you need to track a new form, just add a CMS item—no new static pages required.
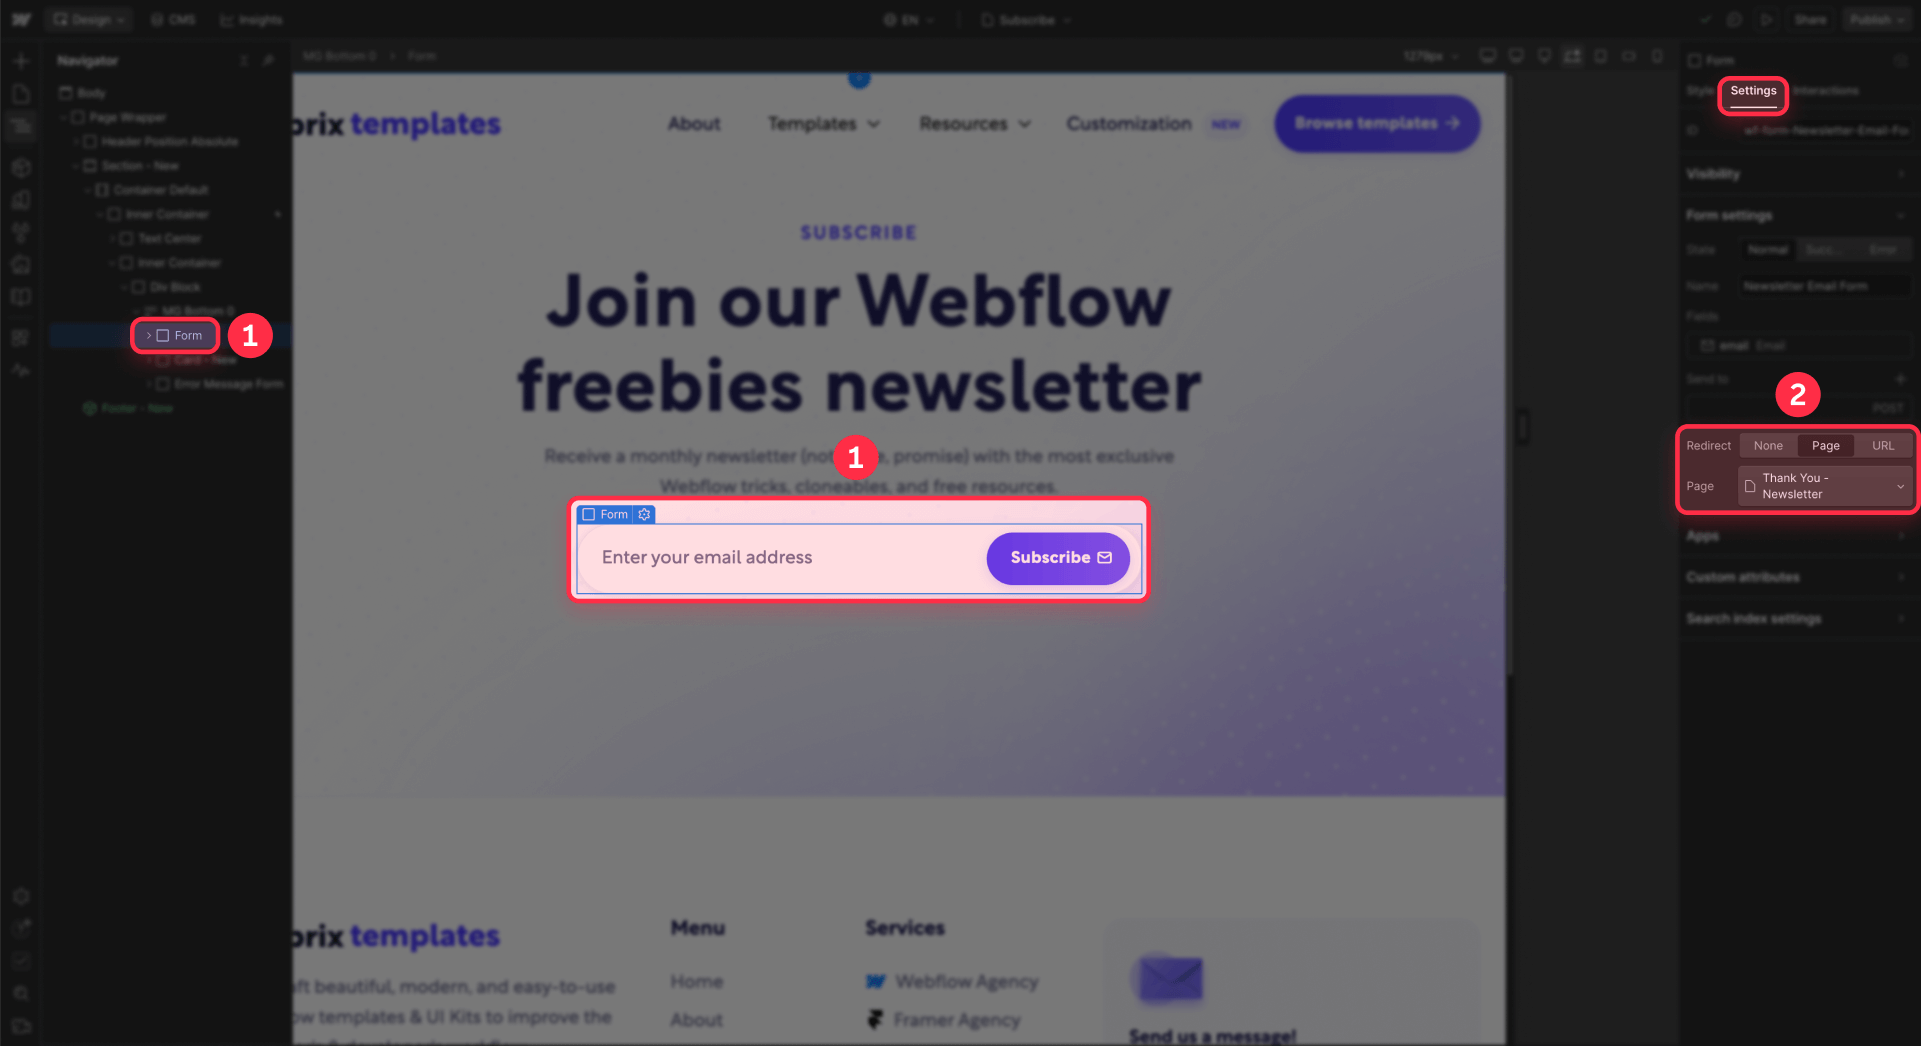
Step 2: Configure form redirects in Webflow
For native Webflow forms
Select the Form Block element in Designer (not an individual input field). Open the Element Settings panel by clicking the gear icon. Find the Redirect URL field and enter the path to your Thank You page, such as /thank-you-contact or /thank-you/demo.
Publish your site and test—submit the form with valid data and confirm you land on the correct Thank You page.
For third-party forms embedded in Webflow
If you're using HubSpot forms, Salesforce Pardot, JotForm, or similar tools that allow post-submit redirects:
Create the Thank You page inside Webflow using either approach above. In the third-party form platform's settings, set the Redirect URL field to your full Webflow Thank You URL, like https://yourdomain.com/thank-you/demo.
Keep that Thank You page hidden from navigation and deindexed to prevent direct traffic from inflating your conversion numbers.
This lets you track forms managed outside Webflow without building custom listeners or dealing with embed limitations.
Step 3: Create Thank You page triggers in GTM for Webflow
Now we'll tell GTM to fire a GA4 event whenever someone views a Thank You page.
Create the trigger in GTM
In Google Tag Manager, go to Triggers → New. Name it descriptively, like "Pageview – TY – Contact".
Set Trigger type to Page View. Choose "This trigger fires on: Some Page Views".
Add a condition: Page Path (built-in variable) contains /thank-you-contact (or whatever your Thank You URL slug is).
Save the trigger.

Create one trigger per form type, or use a more generic rule if all Thank You URLs share a common pattern like /thank-you/.
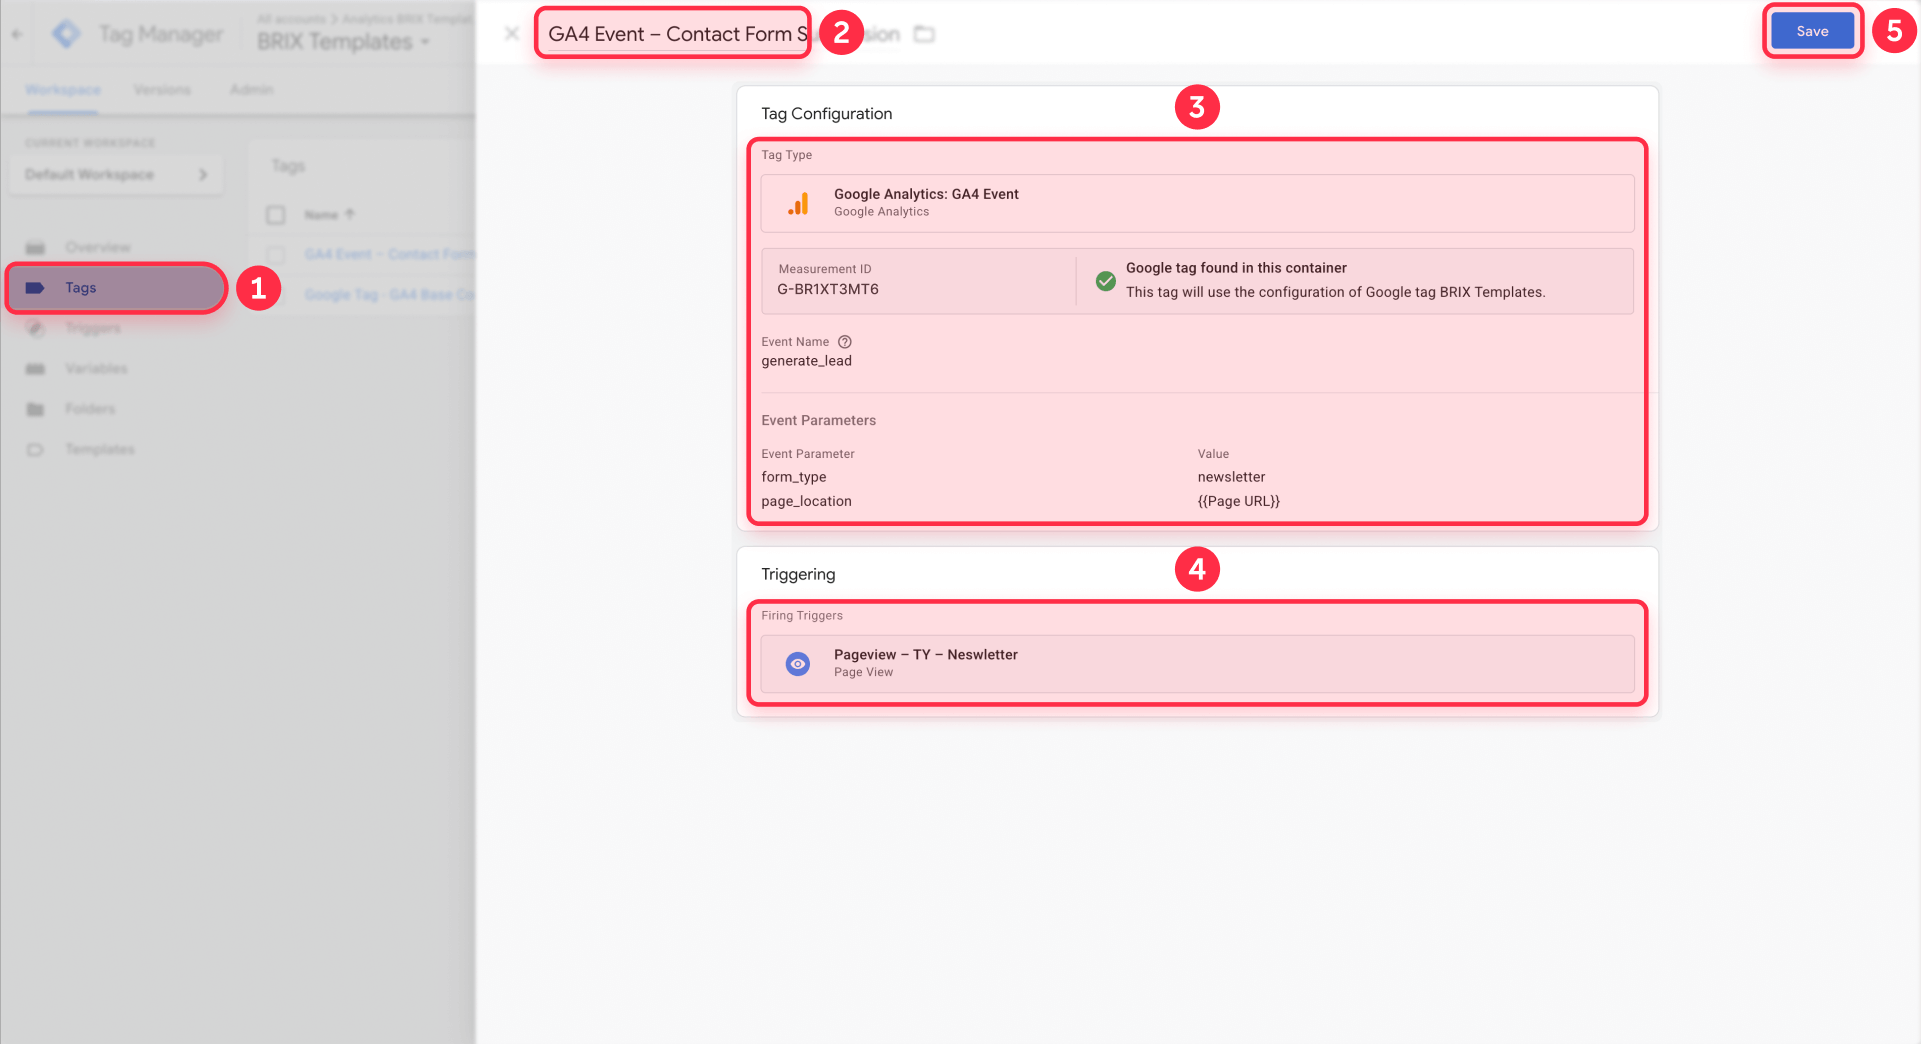
Create the GA4 event tag in GTM
Go to Tags → New. Name it clearly: "GA4 Event – Contact Form Submission".
Choose tag type Google Analytics: GA4 Event. Select your existing GA4 Configuration tag in the Configuration Tag dropdown.
For Event Name, choose one of these approaches:
- Simple descriptive name: form_submission_contact
- GA4's recommended event name for leads: generate_lead
Add Event Parameters (optional but recommended):
- Parameter Name: form_type | Value: contact
- Parameter Name: page_location | Value: {{Page URL}} (built-in variable)
Set the Triggering condition to your "Pageview – TY – Contact" trigger created above.
Save the tag. Repeat this process for each form type you want to track.
Limitations of Thank You page tracking in Webflow
This method works well for many use cases, but understand the trade-offs:
Requires page redirects: If you prefer Webflow's AJAX success messages that don't reload the page, Method 1 won't fire. The conversion signal depends on loading a new URL.
Potential overcounting: Refreshing the Thank You page, bookmarking it, or sharing the link creates additional conversion events. Keep URLs obscure and unlisted to minimize this.
Multiple forms per page are harder to distinguish: If you have three different forms on one landing page, you'd need each to redirect to a different Thank You page. This gets messy fast.
If any of these limitations are deal-breakers for your setup, Method 2 provides a more sophisticated solution.
Method 2: Track Webflow forms with an advanced GTM listener
Webflow's native forms submit via JavaScript and display success messages without page reloads. This creates excellent user experience but breaks traditional form tracking methods.
The problem: GTM's built-in Form Submission trigger was designed for old-school HTML forms that POST to a new page. It doesn't reliably detect Webflow's AJAX submissions. Similarly, GA4's automatic Enhanced Measurement form tracking miscounts or misses Webflow forms entirely.
Method 2 solves this by implementing a custom listener that watches for Webflow form submissions and pushes clean conversion events to GTM's dataLayer.
What Method 2 does for Webflow form tracking
A single Custom HTML tag in GTM performs these actions:
Watches all <form> elements on the page using JavaScript event listeners. When any form passes browser validation and fires its submit event, the script reads the form's ID attribute, computes a human-friendly label for reporting, and captures the page URL and page title.
Then it pushes a clean event to the dataLayer:
{
  event: 'wf_form_submit',
  form_id: 'contact-form',
  form_name: 'Contact form - Pricing page',
  page_location: 'https://example.com/pricing',
  page_title: 'Pricing – Example'
}
GTM detects wf_form_submit in the dataLayer and fires a GA4 event like form_submission or generate_lead, sending only the metadata—no form field values.
Privacy and PII compliance with Webflow form tracking
This method is PII-safe by design. The script never reads, stores, or transmits any form field values—no email addresses, no names, no phone numbers, no message content.
GA4 only receives:
- Form ID (the element's ID attribute)
- Form name (a label for reporting)
- Page URL where the form lives
- Page title
You're tracking that a submission happened and which form was submitted, but nothing about the actual data submitted.
What Method 2 doesn't track in Webflow
This approach has limitations you should know upfront:
Forms inside iframes: If you embed Typeform, Calendly, HubSpot forms when added as iframes, or similar tools via iframe, this script cannot see them. Iframes create separate browsing contexts that your site's JavaScript cannot access for security reasons (This is a browser limitation).
Dynamically injected forms: If a third-party script adds a form to the page after load (without re-triggering the listener), the basic implementation won't detect it. Handling this reliably requires additional code like a MutationObserver, which is beyond this guide's scope. If you are using a native Webflow form, this is not a problem.
Use Method 2 for native Webflow forms that exist in the DOM when the page loads. For iframe embeds, use Method 1 with redirect URLs instead.
Step 1: Add unique IDs to Webflow forms
For the listener to identify which form fired, each form needs a unique ID attribute.
In Webflow Designer, select a Form Block element. In the Element Settings panel on the right, locate the ID field near the top. Enter a clear, descriptive ID like contact-form, demo-request-form, or newsletter-form-footer.
Repeat for every form you want to track. Forms without IDs will appear in reports as unnamed_form, which is useless for analysis.
Use consistent naming conventions across your site—it makes reporting cleaner and easier to understand.
Step 2: Create the Webflow form listener tag in GTM
In GTM, navigate to Tags → New. Name the tag "Custom HTML – Webflow Form Listener (wf_form_submit)".
Choose tag type Custom HTML. Paste this complete script into the HTML field:
<script>
/*!
 * BRIX Templates Webflow Form Listener for GTM & GA4
 * ----
 * Listens to native Webflow form submissions and pushes
 * wf_form_submit with form_id, form_name, page_location and page_title
 * into dataLayer to use in GTM + GA4.
 * Simple version: uses only the brix-data-ga-form-track attribute
 */

(function () {
  'use strict';

  // Ensure dataLayer exists
  window.dataLayer = window.dataLayer || [];

  function attachWebflowFormListeners() {
    var forms = document.querySelectorAll('form');
    if (!forms || !forms.forEach) return;

    forms.forEach(function (form) {
      // Avoid attaching the listener twice to the same form
      if (form.dataset.wfGtmListenerAttached === 'true') return;
      form.dataset.wfGtmListenerAttached = 'true';

      form.addEventListener('submit', function () {
        var formId = form.id || 'unnamed_form';

        // Optional label from the attribute:
        // Name in Webflow: brix-data-ga-form-track
        // Value: for example "Newsletter – Subscribe"
        var attrLabel = form.getAttribute('brix-data-ga-form-track');
        var labelFromAttribute =
          attrLabel && attrLabel.trim ? attrLabel.trim() : '';

        // Fallback label: "[Form ID] - [Page Title]"
        var fallbackLabel = formId + ' - ' + (document.title || '');

        var formName = labelFromAttribute || fallbackLabel;

        window.dataLayer.push({
          event: 'wf_form_submit',
          form_id: formId,
          form_name: formName,
          page_location: window.location.href,
          page_title: document.title || ''
        });
      });
    });
  }

  // Run on DOM ready
  if (document.readyState === 'loading') {
    document.addEventListener('DOMContentLoaded', attachWebflowFormListeners);
  } else {
    attachWebflowFormListeners();
  }

  // Also hook into Webflow's on-ready queue if available
  if (window.Webflow && Array.isArray(window.Webflow)) {
    window.Webflow.push(function () {
      attachWebflowFormListeners();
    });
  }
})();
</script>
Set the Triggering condition to All Pages (or create a more specific trigger if forms only exist on certain URLs).
Save the tag. This script listens passively—it doesn't prevent or interfere with form submission, it just records that a submission happened.
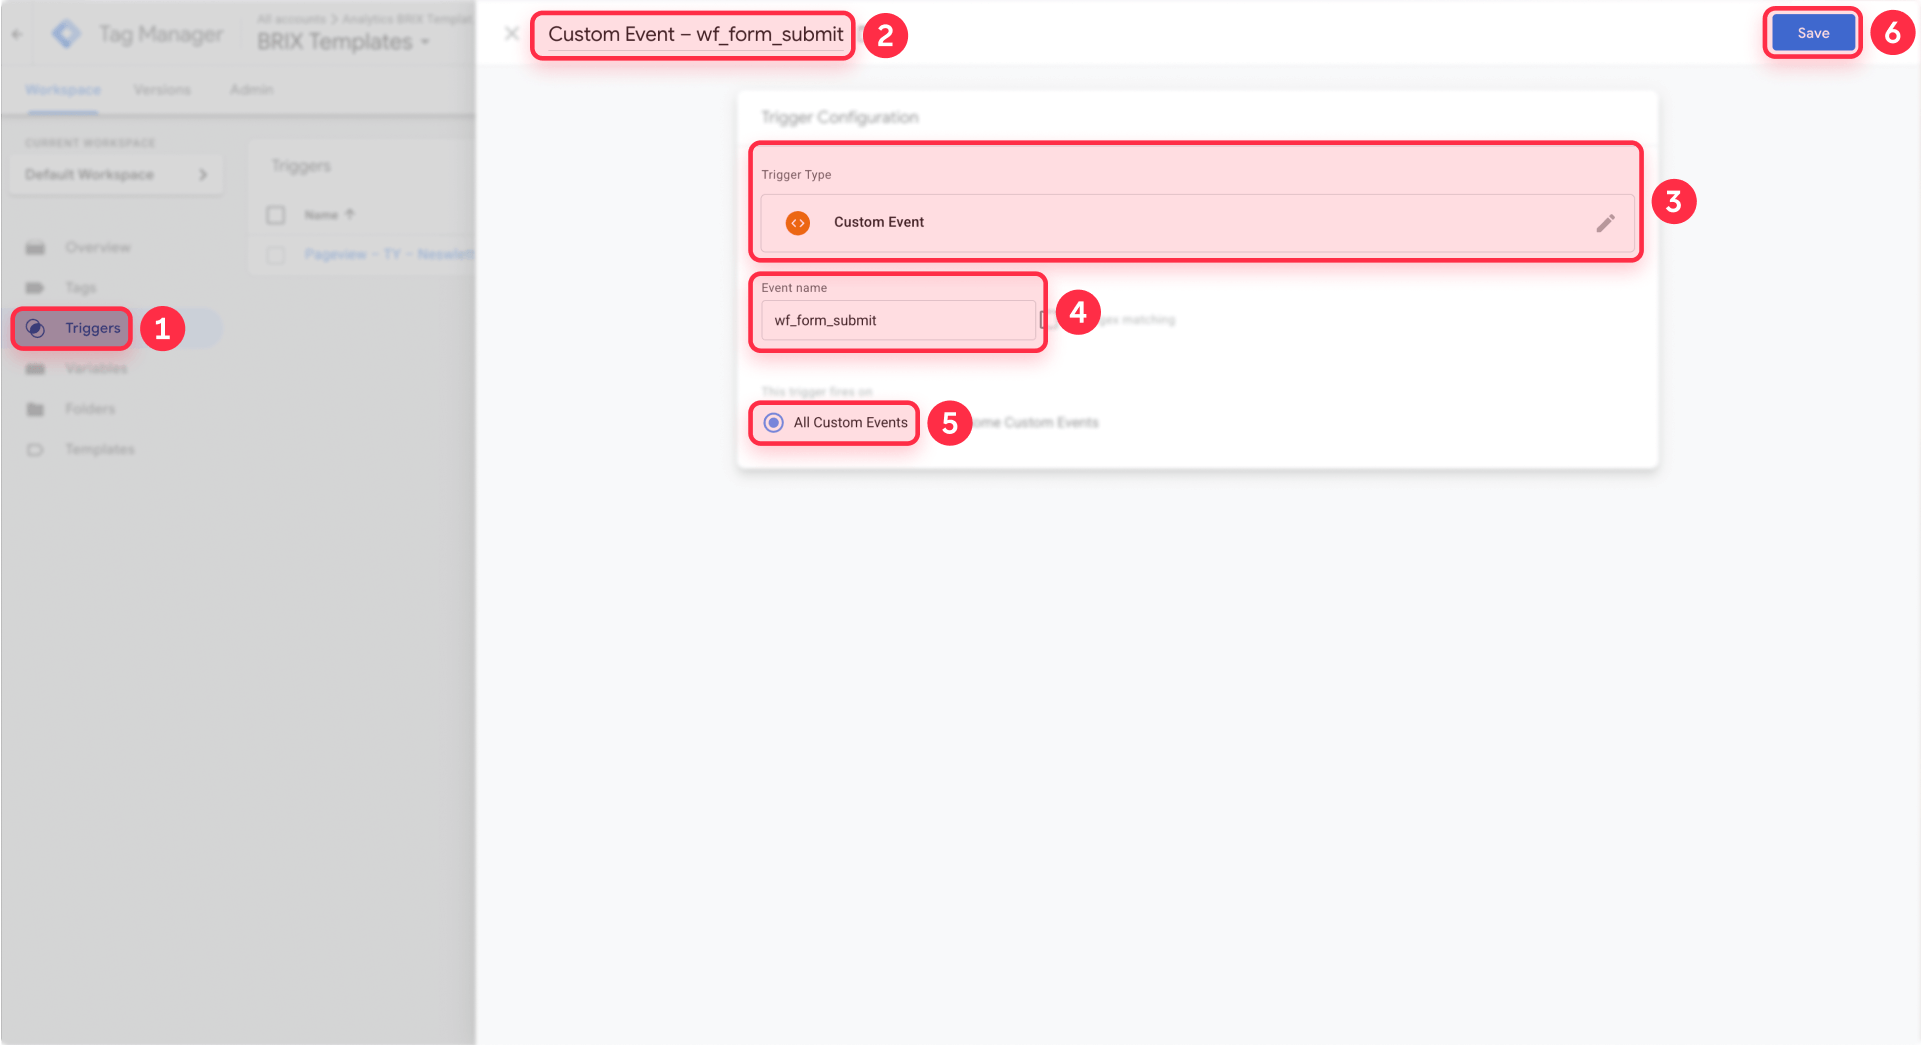
Step 3: Create Custom Event trigger for Webflow forms in GTM
Now tell GTM to react when wf_form_submit appears in the dataLayer.
Go to Triggers → New. Name it "Custom Event – wf_form_submit".
Set Trigger type to Custom Event. Enter Event name: wf_form_submit (exact match, case-sensitive).
Choose "This trigger fires on: All Custom Events".
Save the trigger. This will activate whenever the listener script pushes the wf_form_submit event.
Step 4: Create Data Layer Variables in GTM for Webflow
We need four variables to pass form metadata from the dataLayer to GA4.
For each variable below, go to Variables → User-Defined Variables → New and select type Data Layer Variable.
Variable 1: dlv - form_id
- Data Layer Variable Name: form_id
Variable 2: dlv - form_name
- Data Layer Variable Name: form_name
Variable 3: dlv - page_location
- Data Layer Variable Name: page_location
Variable 4: dlv - page_title
- Data Layer Variable Name: page_title
Save each variable. These will pull the values from the dataLayer event and make them available to your GA4 tag.
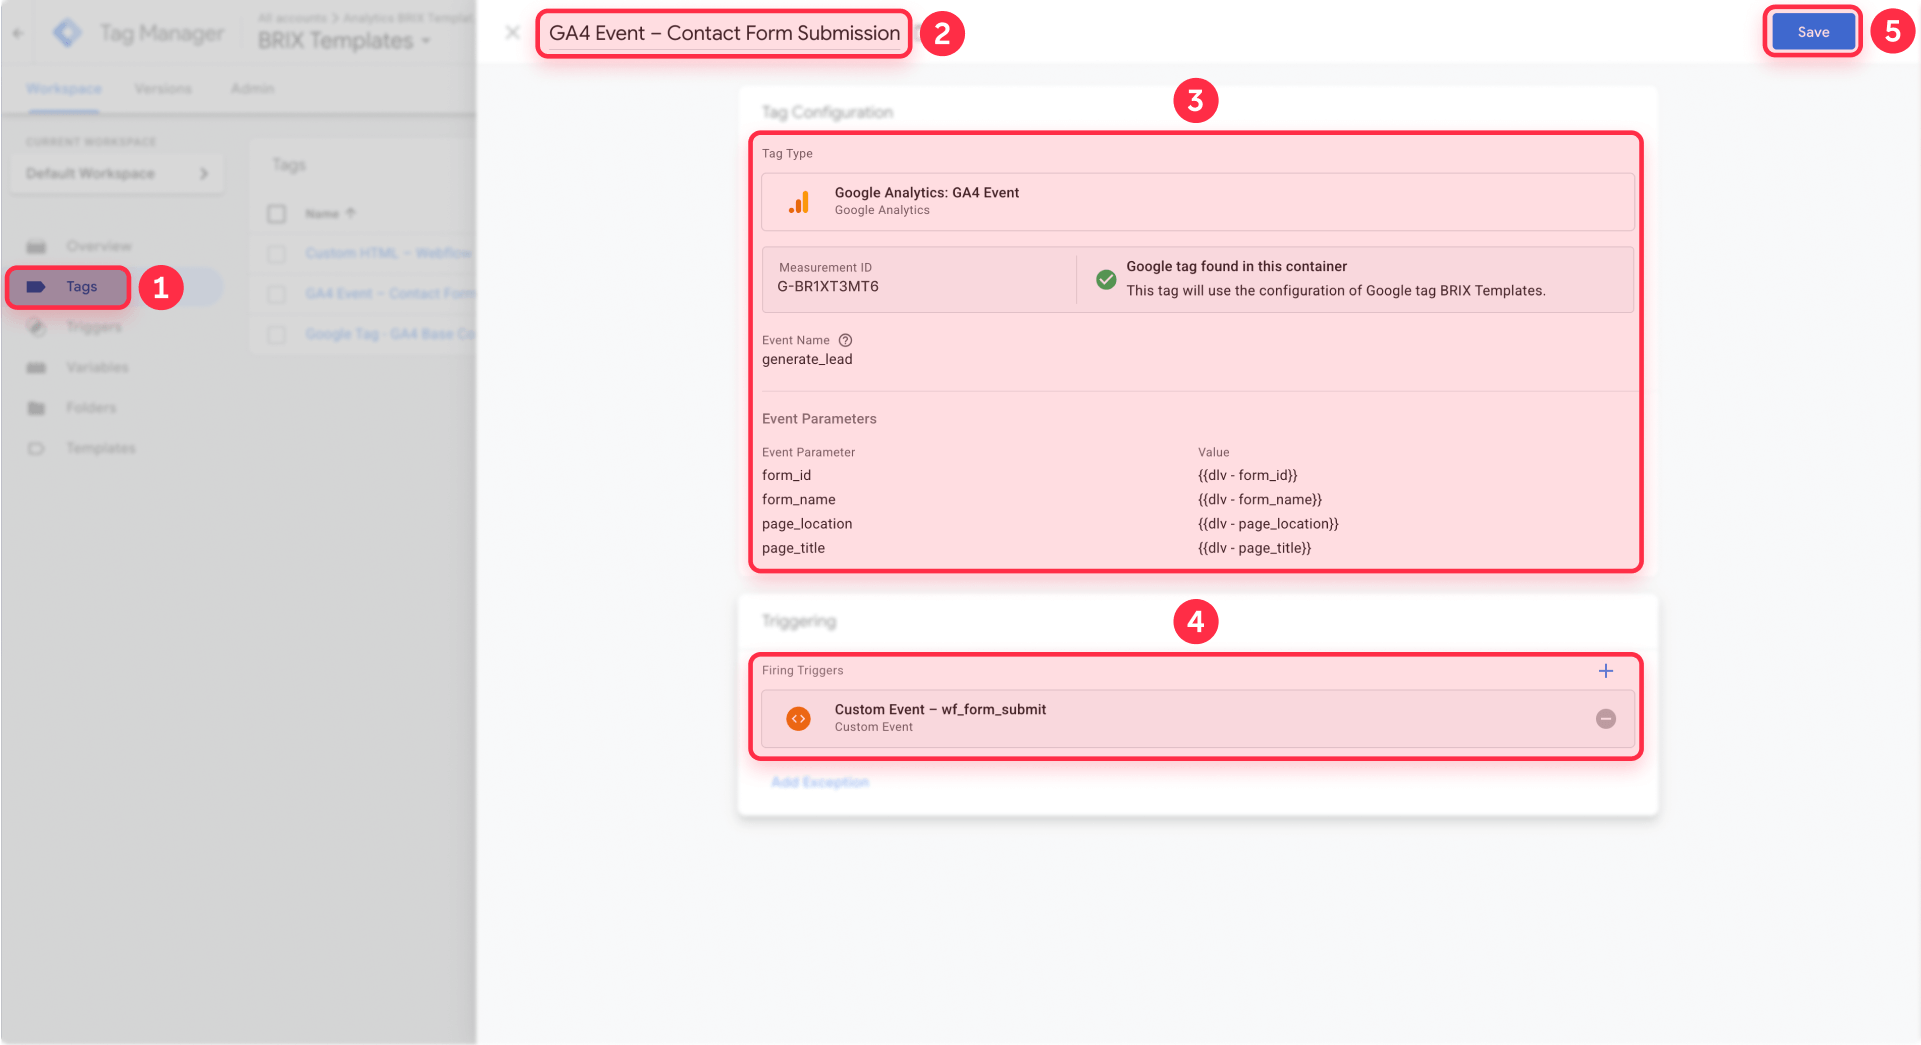
Step 5: Create the GA4 event tag for Webflow form submissions
This tag sends the conversion event to GA4 whenever wf_form_submit fires.
In GTM, go to Tags → New. Name it "GA4 Event – Webflow Form Submission (wf_form_submit)".
Choose tag type Google Analytics: GA4 Event. Select your GA4 Configuration tag in the dropdown.
For Event Name, choose your naming strategy:
- Generic option: form_submission
- GA4's recommended lead event name: generate_lead
Add these Event Parameters:
- Parameter Name: form_id | Value: {{dlv - form_id}}
- Parameter Name: form_name | Value: {{dlv - form_name}}
- Parameter Name: page_location | Value: {{dlv - page_location}}
- Parameter Name: page_title | Value: {{dlv - page_title}}
Set Triggering to "Custom Event – wf_form_submit" (created in Step 3).
Save the tag.
Important distinction: GA4 Key Events (what you'll mark as conversions) use the event name you specified here (form_submission or generate_lead). The internal GTM event wf_form_submit only exists in the dataLayer and never reaches GA4.
Optional: Add custom form labels in Webflow for cleaner reporting
By default, the listener creates form names using this pattern: [Form ID] - [Page Title]. So a form with ID contact-form on your Pricing page becomes "contact-form - Pricing | Your Brand".
That's functional, but you can make GA4 reports cleaner by adding a custom attribute to forms.
How custom form labels work in Webflow
If a form element has the attribute brix-data-ga-form-track with a value like "Contact – Pricing page", the listener uses that exact string as the form name in reports.
If the attribute doesn't exist, it falls back to the default ID + title pattern.
Setting custom form labels in Webflow
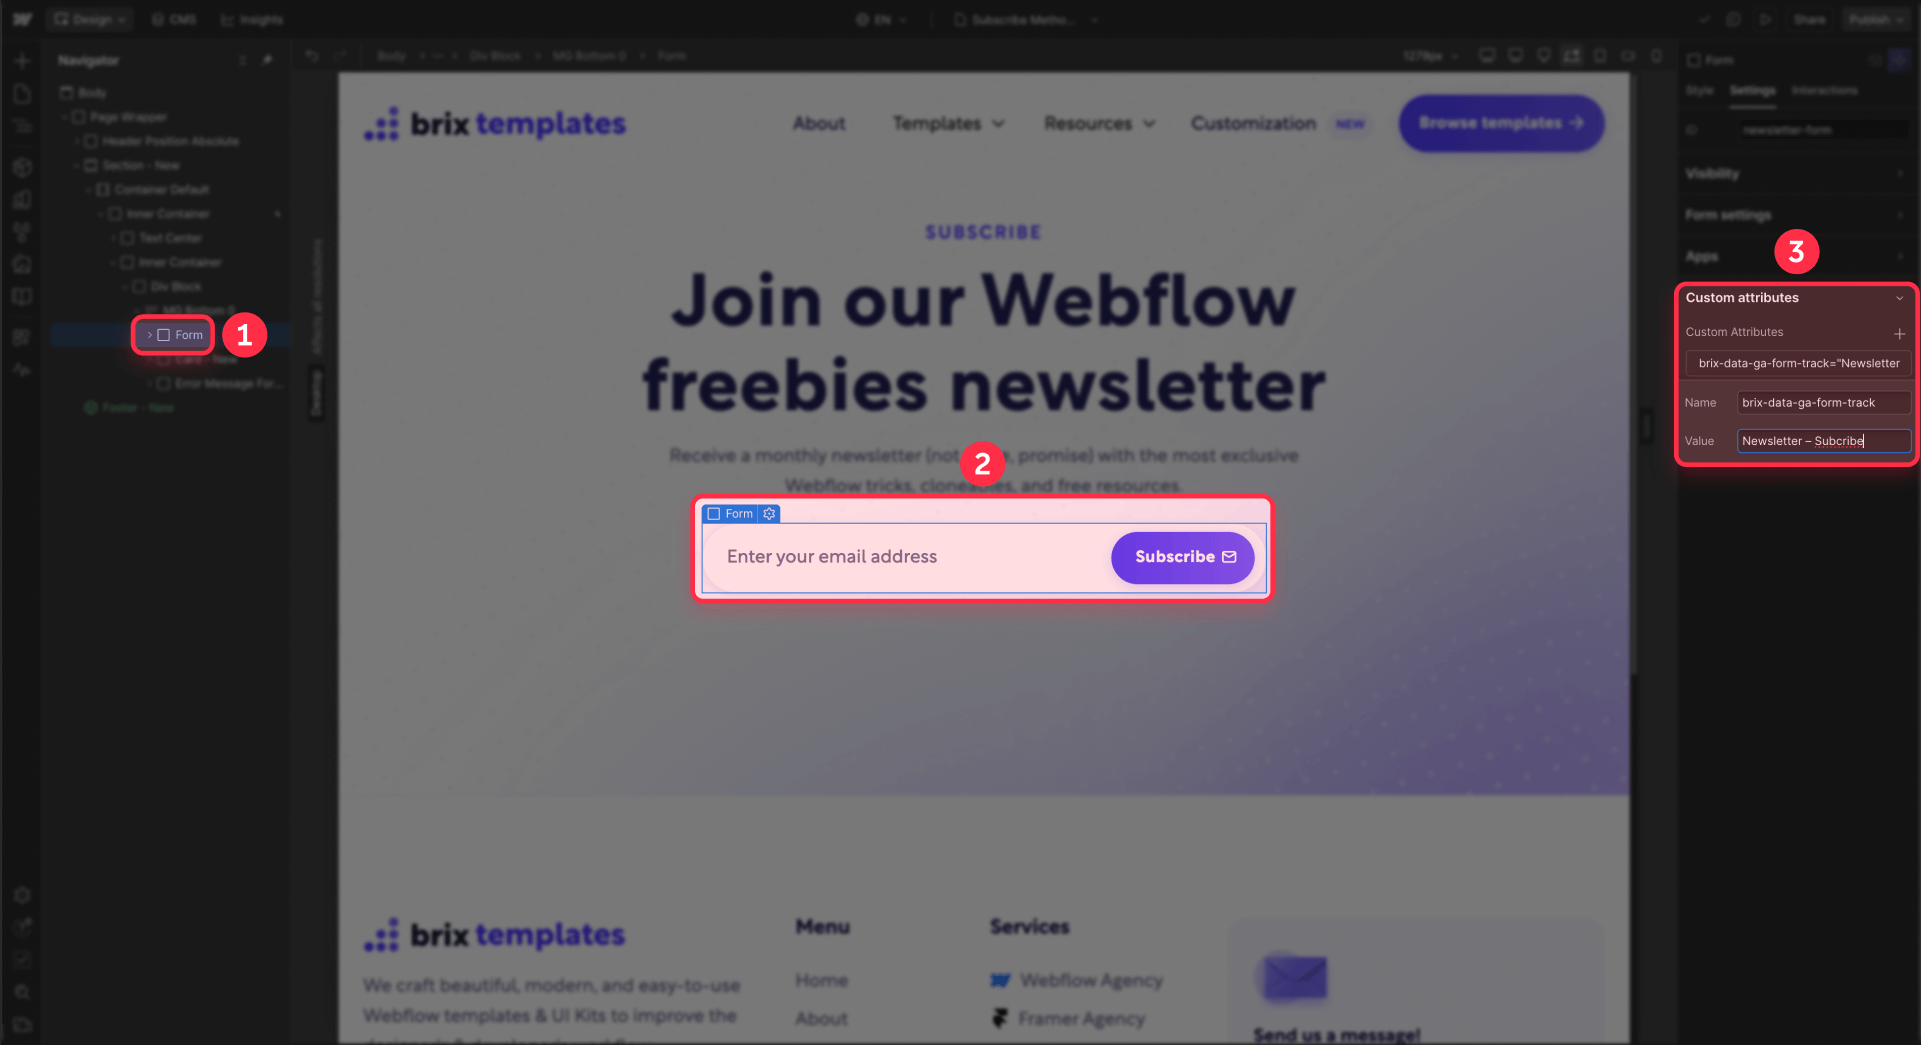
Select the Form Block in Webflow Designer. In the Element Settings panel, scroll to Custom Attributes and click + Add Custom Attribute.
Set Name to brix-data-ga-form-track (exact spelling, case-sensitive). Set Value to a descriptive label like:
- Contact – Pricing page
- Demo – SaaS Enterprise
- Footer newsletter – Blog
Publish your site. Now your GA4 reports will show readable, meaningful form names instead of technical IDs.
Using CMS to power Webflow form labels
If forms live on CMS template pages, you can dynamically populate the label:
Place your form on the CMS template. Add the brix-data-ga-form-track custom attribute to the form. Instead of a static value, bind it to a CMS field (create a field called "Form tracking label" in your collection).
Each CMS item then defines its own tracking label while the GTM setup remains unchanged. This scales beautifully for blogs, case studies, or product pages.
Testing and verification for Webflow form tracking
Once everything is configured, thorough testing ensures your data is accurate before you rely on it for decisions.
Test in GTM Preview mode for Webflow
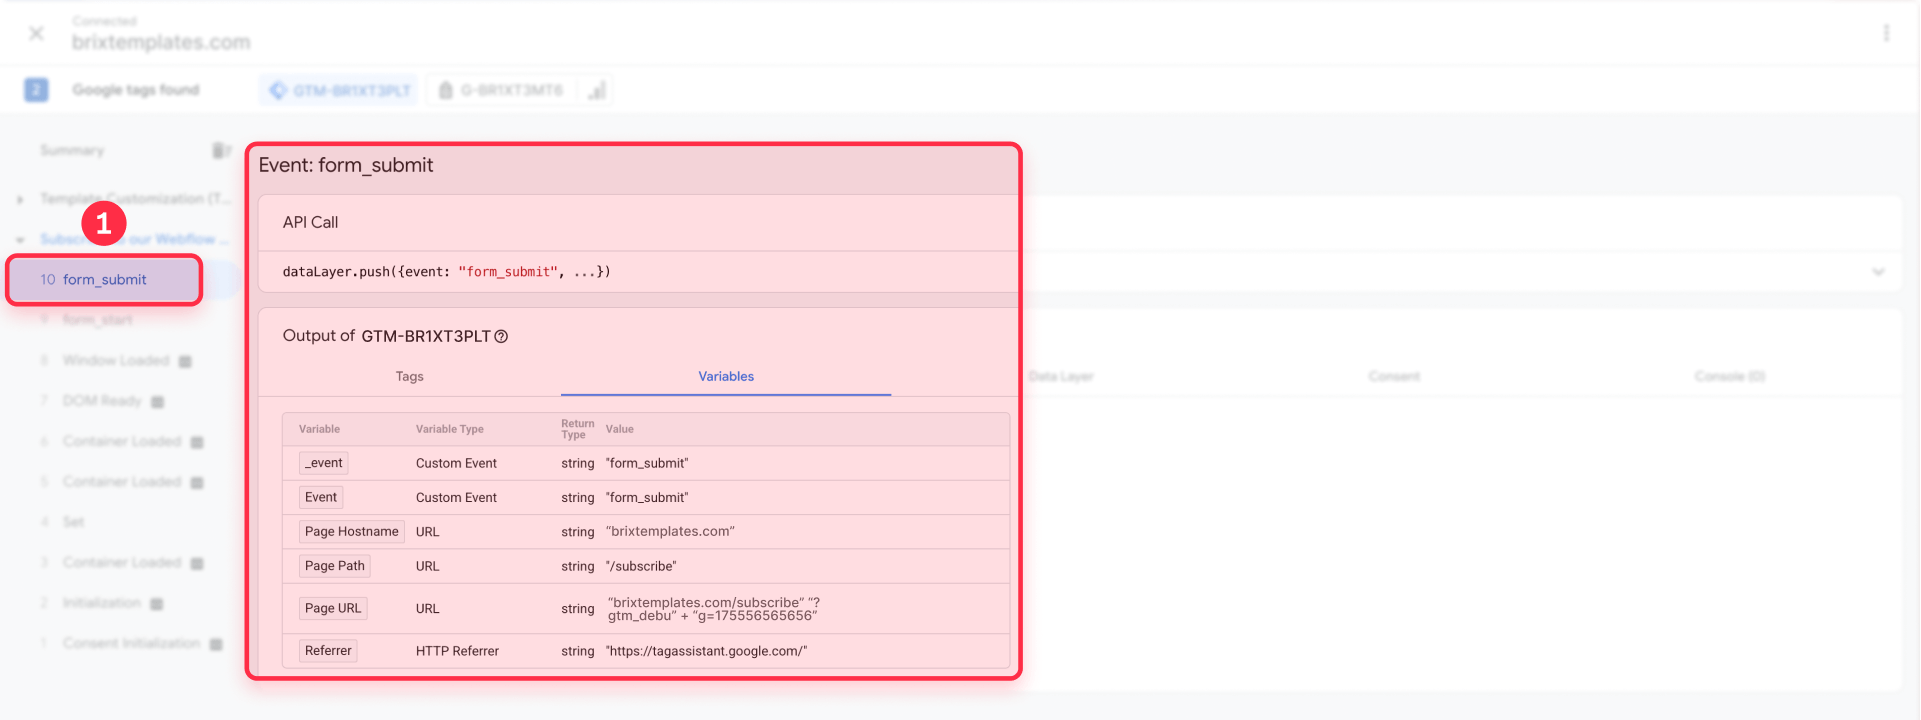
In GTM, click Preview to enter debug mode. Enter your Webflow site URL and click Connect. The site loads in a new tab with Tag Assistant active.
Testing Method 1: Thank You page tracking in Webflow
Submit a form that redirects to a Thank You page. In Tag Assistant's left sidebar, click the Page View event for your Thank You URL.
In the Tags panel on the right, confirm that your GA4 event tag (like "GA4 Event – Contact Form Submission") shows as Fired with a green checkmark.
If it didn't fire, check your trigger conditions—the Page Path might not match your actual Thank You URL.
Testing Method 2: wf_form_submit tracking in Webflow
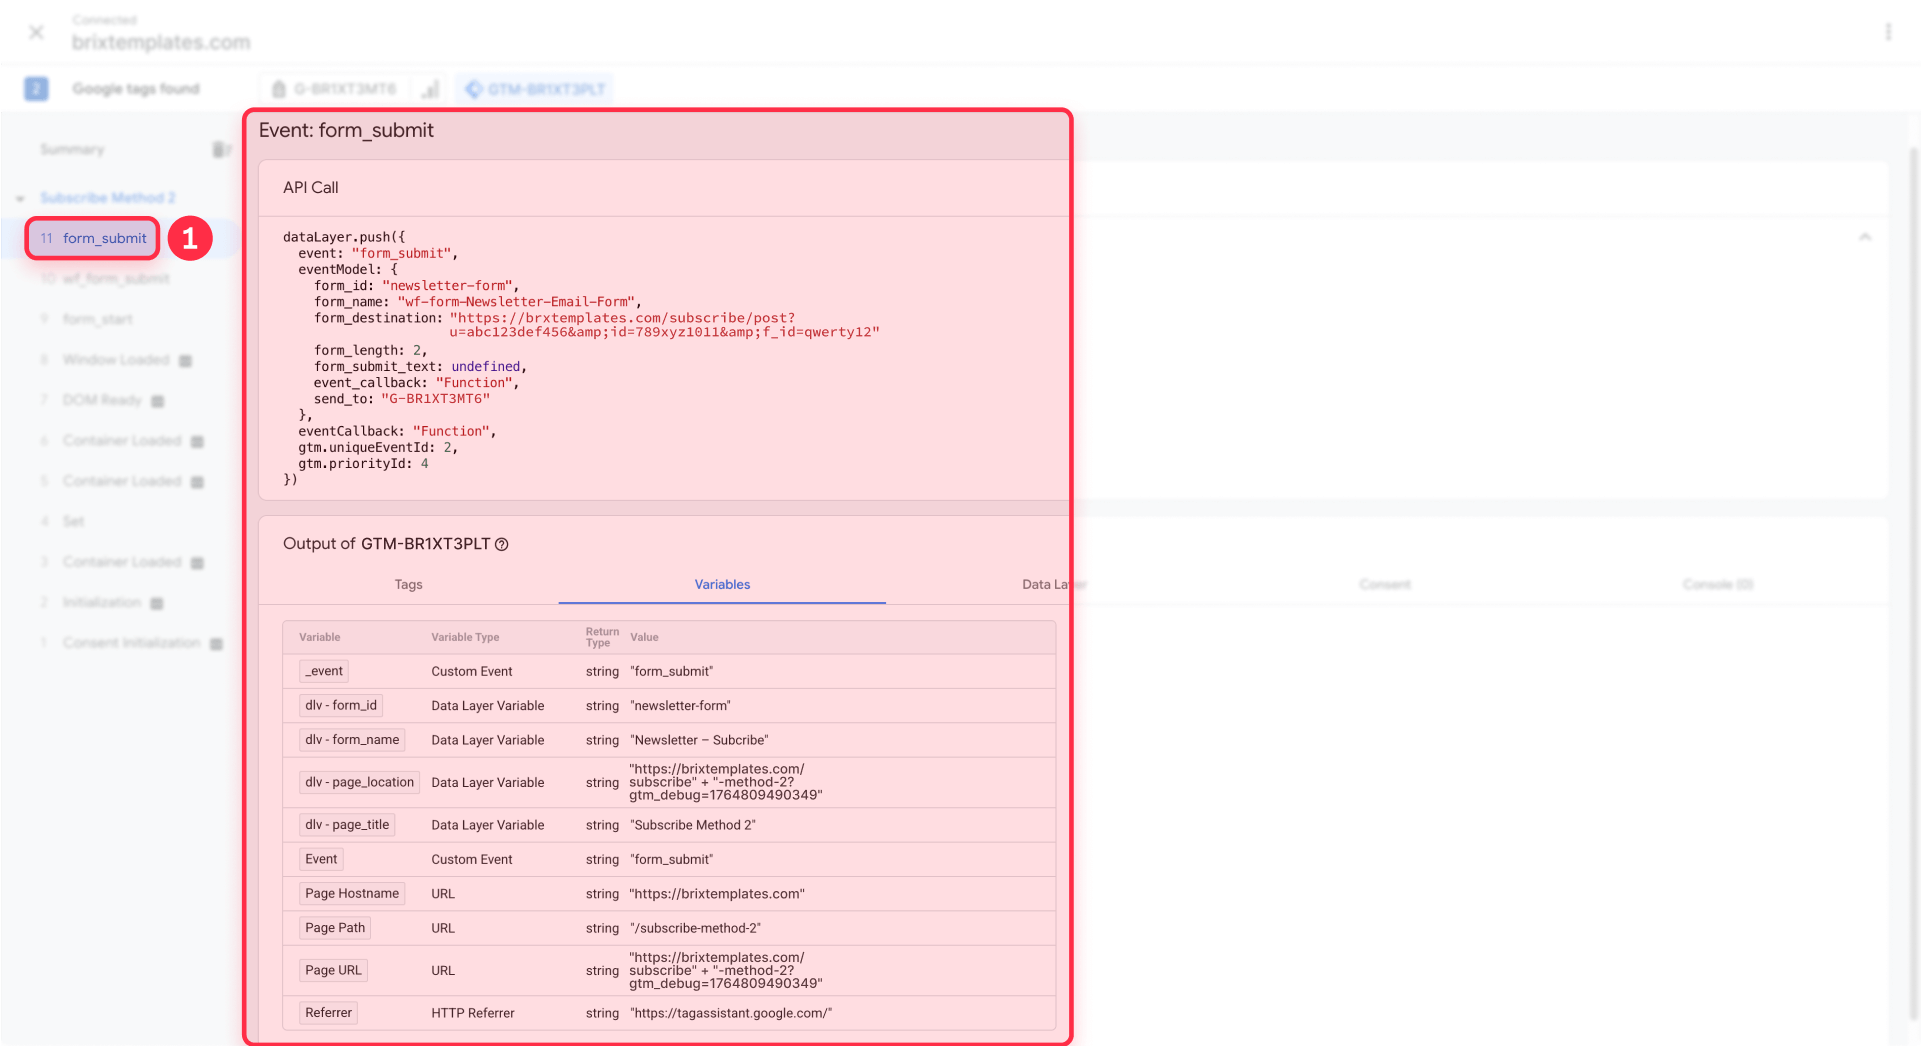
Navigate to any page with a Webflow form. Fill it out with valid data and submit it.
In Tag Assistant's left sidebar, look for a new event called wf_form_submit (it appears below the page view events).
Click that event. In the Data Layer tab, verify you see:
- event: wf_form_submit
- form_id: contact-form (or your actual ID)
- form_name: Contact – Pricing page (or your label)
- page_location: https://yourdomain.com/pricing
- page_title: Pricing – Your Brand
Switch to the Tags tab for the wf_form_submit event. Your GA4 event tag should show as Fired.
If wf_form_submit doesn't appear at all, check the browser console for JavaScript errors, or verify the Custom HTML tag is firing on page load.
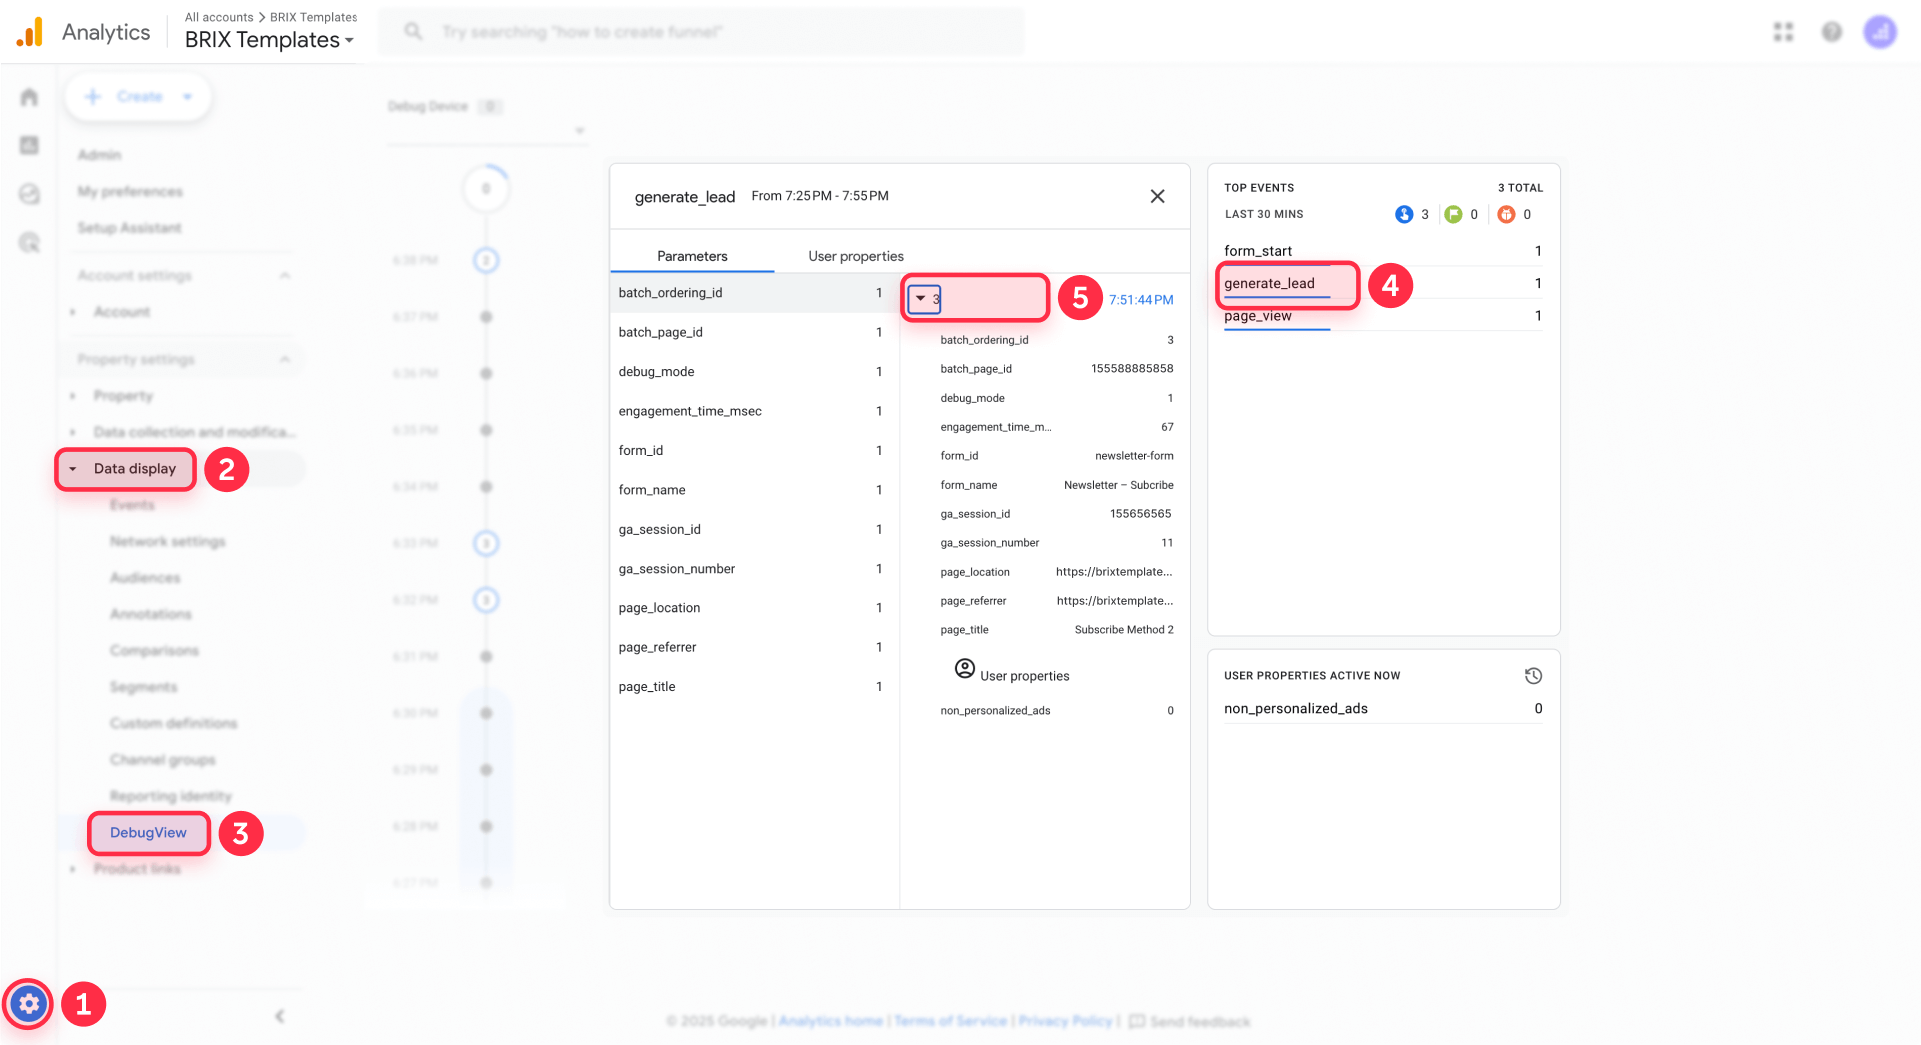
Test in GA4 DebugView for Webflow
GTM Preview mode tells you if tags are firing, but DebugView confirms data is reaching GA4.
In GA4, navigate to Admin → Data display → DebugView. With GTM Preview still active in another tab, submit your form again.
In DebugView's event timeline, you should see your event (form_submission or generate_lead) appear within a few seconds. Click the event name to expand it and verify these parameters exist:
- form_id
- form_name
- page_location
- page_title
If DebugView shows the event, your tracking is working end-to-end. If not, double-check your Measurement ID in the GTM GA4 Configuration tag.
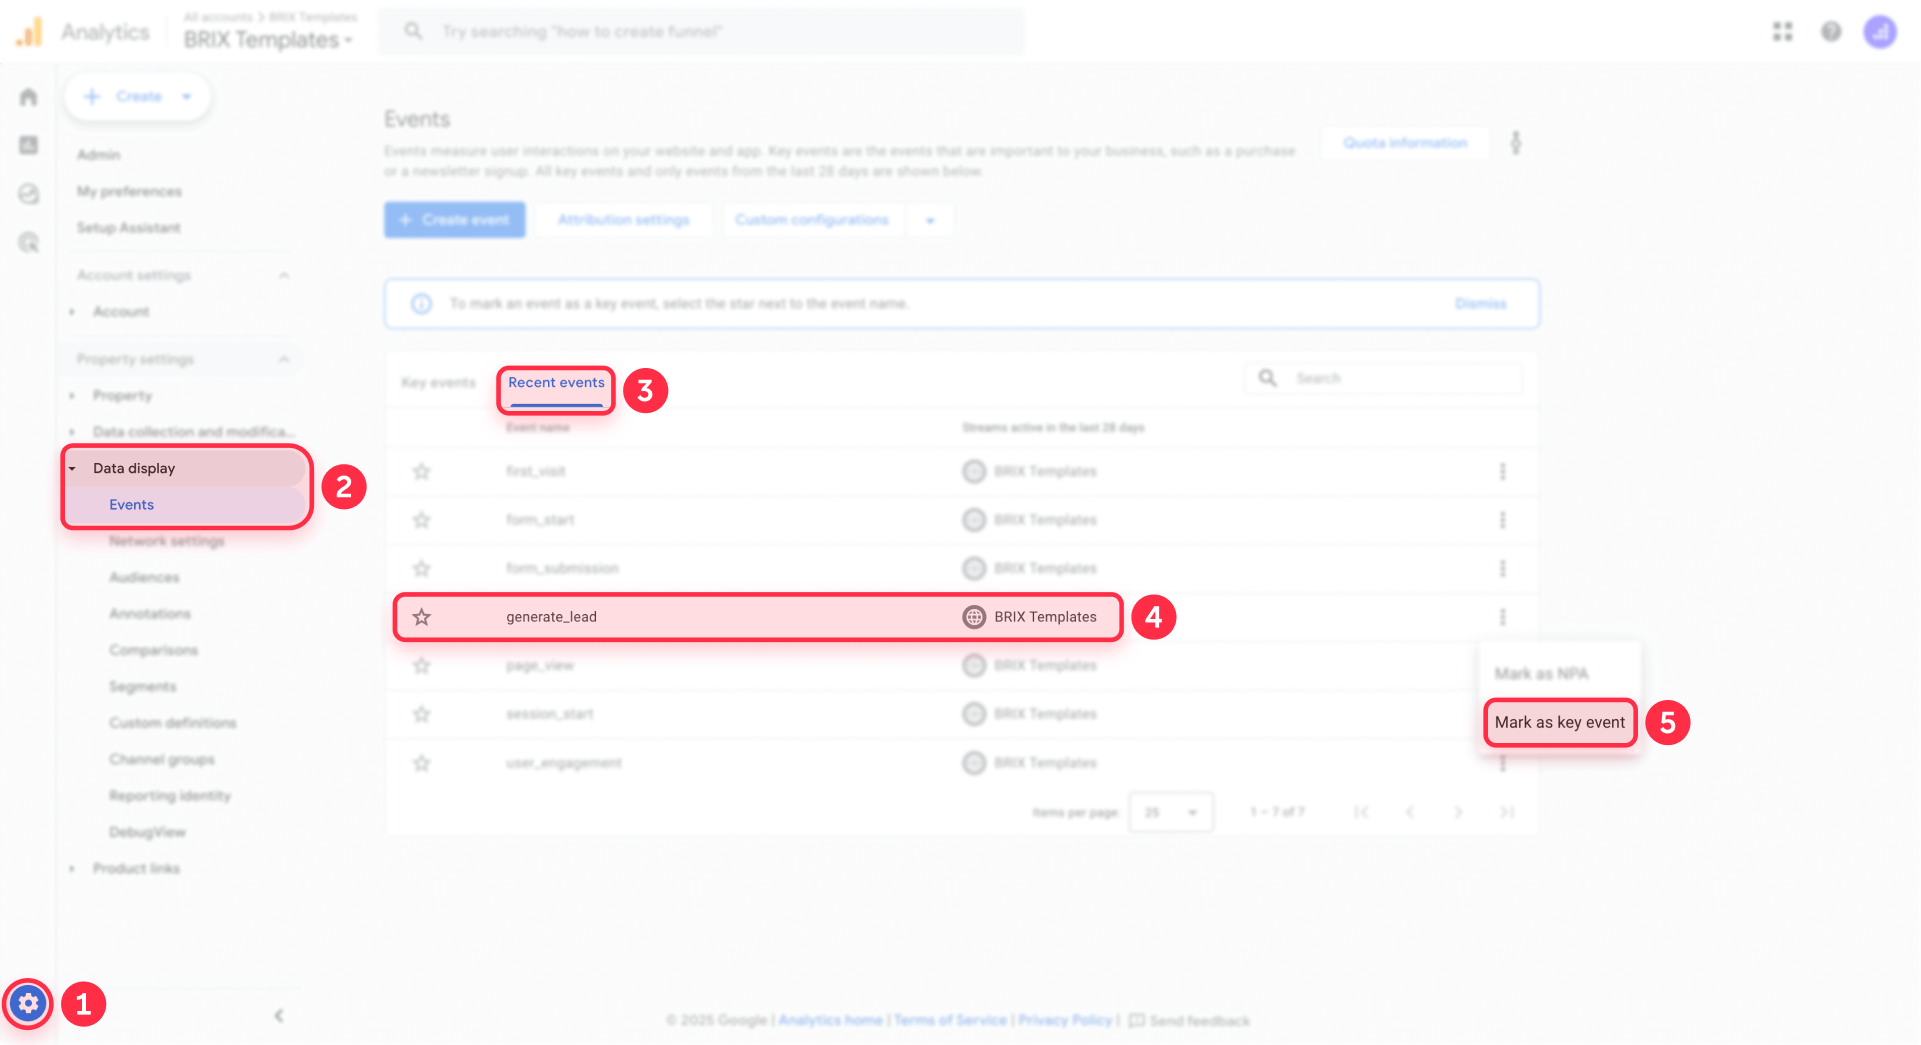
Mark form submissions as Key Events in GA4 for Webflow
Once events are flowing to GA4, you need to designate them as conversions (called "Key Events" in current GA4 terminology).
In GA4, go to Admin → Data display → Events. Your event name (form_submission or generate_lead) might take 24-48 hours to appear in this list even though DebugView shows it immediately.
Once visible, toggle the switch in the Mark as key event column to On.
Now the event appears as a conversion metric throughout GA4 reports, and you can import it into Google Ads under Tools & Settings → Conversions → Import → Google Analytics 4 properties.
Webflow Analyze vs GTM + GA4: When to use which
Here's how these tracking options compare for real-world Webflow projects:
Pricing: Webflow Analyze is a paid add-on billed per site with pricing based on monthly sessions:
- 2,000 sessions/month: $9/month (billed annually) or $12/month (billed monthly)
- 5,000 sessions/month: $19/month (billed annually) or $25/month (billed monthly)
- 10,000 sessions/month: $29/month (billed annually) or $38/month (billed monthly)
- 25,000 sessions/month: $59/month (billed annually) or $78/month (billed monthly)
- 50,000 sessions/month: $99/month (billed annually) or $132/month (billed monthly)
- 100,000 sessions/month: $169/month (billed annually) or $225/month (billed monthly)
- 250,000 sessions/month: $349/month (billed annually) or $465/month (billed monthly)
- 500,000+ sessions/month: Custom enterprise pricing
GTM and GA4 are free for normal websites. Only extremely high-volume enterprises need GA4 360, which is paid.
Setup complexity: Webflow Analyze requires no technical setup—you enable it in Webflow settings, define goals visually, and start tracking. GTM + GA4 requires installing GTM, configuring the GA4 property, and building tags and triggers. Initial effort is higher.
Form tracking accuracy: Webflow Analyze uses goal-based tracking built into the platform, perfect for quick insights without GTM knowledge. GTM Method 2 handles Webflow's AJAX forms with full precision and gives you custom event parameters for deeper analysis.
Reporting depth: Webflow Analyze provides UX-focused insights like page-level heatmaps and scroll tracking inside Webflow's interface. GA4 offers enterprise analytics: funnels, multi-channel attribution, audience building, BigQuery export, and cross-domain tracking.
Multi-site scalability: Webflow Analyze costs multiply per site, and each site manages tracking independently. GTM + GA4 patterns can be replicated across unlimited sites with one container export, making it highly scalable for enterprise multi-sites.
Integrations: Webflow Analyze integrates primarily within the Webflow ecosystem. GTM + GA4 connects natively with Google Ads, Looker Studio, BigQuery, Search Console, and hundreds of third-party tools.
Many teams use both strategically: Webflow Analyze for on-page UX insights and interaction heatmaps, GTM + GA4 for conversion tracking, campaign attribution, and advertising optimization.
Troubleshooting Webflow form tracking with GTM
Here are solutions to the most common issues you'll encounter.
wf_form_submit event doesn't appear in GTM Tag Assistant: First, confirm the Custom HTML listener tag is firing on page load by checking the Tags panel in the initial Page View event. If it's not firing, check your trigger conditions. Second, open the browser console and look for JavaScript errors—a syntax error anywhere in the listener prevents it from running. Third, verify you're testing a native Webflow form, not an iframe embed like Typeform or Calendly, which the script cannot access.
GA4 event not appearing in DebugView but wf_form_submit exists in GTM: Check that your GA4 event tag's trigger is set to "Custom Event – wf_form_submit". Verify the Measurement ID in your GA4 Configuration tag is correct. Check that you published the GTM container after making changes—Preview mode shows unpublished edits, but live traffic uses the last published version.
Double-counting form conversions in Webflow: First, disable Enhanced Measurement form tracking in GA4 (Admin → Data streams → your stream → Enhanced measurement → toggle off Form interactions). GA4's automatic detection runs in parallel with your custom tracking and causes duplicates. Second, confirm you don't have multiple GA4 event tags firing on the same trigger. Third, for Method 1, check if users are landing on Thank You URLs via email links, bookmarks, or internal site links—any direct visit counts as a conversion.
Thank You page conversions look inflated in Webflow: This is a classic Method 1 issue. Any direct visit to the Thank You URL triggers a conversion. Keep Thank You pages hidden from navigation, exclude them from sitemaps, and consider migrating that form to Method 2 for in-page success messages without redirects.
Form tracking works in GTM Preview but fails on the live Webflow site: First, ensure you published the container after testing—unpublished changes only work in Preview mode. Second, hard refresh the live site or test in an incognito window to bypass cached JavaScript. Third, check the browser console on the live site for JavaScript errors from other scripts that might break execution after the listener loads.
Some Webflow forms track correctly while others don't: Confirm every form has a unique ID set in Webflow Designer. Forms without IDs fall back to unnamed_form but should still fire the event. Check if the non-tracking forms use custom JavaScript that replaces Webflow's default form handling. If a form is injected into the DOM after page load by a third-party script, the basic listener won't detect it—you'd need a MutationObserver implementation, which is more complex.
Error: "This action is not supported" when submitting forms in Webflow: This error is unrelated to GTM tracking. It usually means the form's action attribute points to an invalid URL or the form method is incorrectly configured. In Webflow, forms should use Webflow's built-in submission handling, not custom action URLs.
Frequently asked questions about tracking Webflow forms with GTM
What is the best way to track Webflow form submissions?
The best method depends on your specific needs. If you prefer simple setup and are comfortable with post-submission redirects, use Thank You page tracking (Method 1). If you need accurate event-based tracking without page reloads, multiple forms per page, or want AJAX-style success messages, use the GTM listener method (Method 2). Most professional setups use Method 2 because it handles Webflow's native form behavior precisely and provides cleaner user experience. Both methods work reliably—Method 1 is simpler to implement, while Method 2 is more powerful and flexible.
Why doesn't GA4 Enhanced Measurement track Webflow forms accurately?
GA4's Enhanced Measurement form tracking was designed for traditional HTML forms that POST data and reload the page. Webflow forms use JavaScript and AJAX to submit data without page reloads, which Enhanced Measurement struggles to detect consistently. It often miscounts, misses submissions entirely, or fires multiple times for a single submission. This is widely documented as one of Enhanced Measurement's least reliable features, which is why custom tracking with GTM provides far more accurate data for Webflow sites.
How do I track multiple Webflow forms on the same page?
Method 2 (the GTM listener) automatically handles multiple forms on a single page. Each form needs a unique ID attribute set in Webflow Designer. When any form submits, the listener captures which specific form fired using its ID. Your GA4 reports will show each form separately via the form_id and form_name parameters. Method 1 can also handle multiple forms per page, but you'd need each form to redirect to a different Thank You URL, which becomes messy at scale.
What's the difference between wf_form_submit and form_submission in Webflow tracking?
wf_form_submit is an internal GTM dataLayer event name that only exists within Google Tag Manager. The listener script pushes this event to the dataLayer when a form submits. form_submission (or generate_lead) is the event name sent to GA4. Users never see wf_form_submit—it's just the trigger mechanism inside GTM. When you mark Key Events in GA4 or import conversions to Google Ads, you use the GA4 event name (form_submission), not wf_form_submit.
Is form tracking with GTM GDPR compliant for Webflow sites?
Yes, when implemented correctly. Method 2 specifically never collects or transmits any form field values—no email addresses, names, phone numbers, or message content. It only sends metadata: form ID, form name, page URL, and page title. This means no PII enters GA4, making it compliant with GDPR and most privacy regulations. You should still have proper cookie consent in place for GA4 tracking itself. If you need to track specific form fields for business reasons, you'd need additional consent mechanisms and careful PII handling.
Can I track third-party forms like HubSpot or Typeform in Webflow?
Method 1 (Thank You pages) works perfectly with third-party forms that support post-submission redirects. Create a Thank You page in Webflow, then configure the redirect URL in HubSpot, Salesforce, JotForm, or similar platforms. Method 2 doesn't work with forms embedded via iframe (most Typeform, Calendly, and some HubSpot embeds) because iframes create separate browsing contexts that JavaScript cannot access. For iframe embeds, use Method 1 with redirects or check if the platform offers direct GA4 integration.
How long does it take for Webflow form events to appear in GA4?
DebugView shows events within seconds during testing with GTM Preview active. For standard reporting, new event names can take 24-48 hours to appear in the GA4 Events list under Admin → Events, even though DebugView shows them immediately. Once an event name appears in the Events table, you can toggle it as a Key Event. After marking it as a Key Event, it typically appears in standard reports and the Conversions section within a few hours.
Which GA4 event name should I use for Webflow form submissions?
Google recommends using generate_lead for forms that capture lead information (contact forms, demo requests, quote requests), as it's a predefined event that integrates well with Google's standard reporting. Use form_submission as a generic name if you're tracking various form types (newsletters, file downloads, feedback) and want one consolidated event. You can also create multiple event names for different form types (form_submission_contact, form_submission_newsletter) if you want separate Key Events, though this is less common. Most implementations use either generate_lead for lead forms or form_submission for everything.
What are the best practices for naming Webflow forms for GTM tracking?
Use descriptive, consistent IDs in Webflow Designer that indicate the form's purpose and location: contact-form-pricing, demo-request-saas, newsletter-footer-blog. Avoid generic IDs like "form-1" or "form-2" because they're meaningless in GA4 reports. For cleaner reporting, add the data-brix-ga-form-track custom attribute with human-readable labels like "Contact – Pricing page" or "Demo Request – Enterprise solution." This makes GA4 reports immediately understandable without decoding technical IDs. Maintain naming conventions across your entire site for consistency.
How do I prevent Webflow Thank You pages from inflating conversion numbers?
Keep Thank You URLs obscure and hard to guess—avoid simple paths like /thanks or /success. Exclude them from navigation menus, footer links, and sitemaps. In Webflow Page Settings, enable "Exclude this page from search results" to prevent organic traffic. If users frequently access Thank You pages via email links or bookmarks, consider adding a parameter check in GTM: only fire the conversion tag if the HTTP referrer matches your form pages. For the most accurate tracking, migrate to Method 2, which doesn't use Thank You pages and tracks submission events directly without redirects.
Next steps for optimizing Webflow form tracking
Now that your Webflow forms are tracking properly, focus on turning data into insights. Create custom dimensions in GA4 for form_name so you can segment performance by specific forms. Build Explorations that break down form submissions by traffic source, medium, campaign, landing page, and device to identify your highest-converting channels.
Import your Key Events into Google Ads and enable Smart Bidding strategies like Target CPA or Maximize Conversions to let Google's algorithms optimize for actual leads instead of just clicks. Set up Looker Studio dashboards that show form conversion rates, cost per lead, and lead volume trends over time.
Test different form placements, field requirements, and copy variations using your new data. If your homepage contact form converts at 1% but your pricing page form converts at 8%, that tells you where to focus traffic.
If you're managing multiple Webflow sites or running complex multi-channel campaigns and need help implementing advanced tracking strategies, our agency specializes in Webflow analytics implementation. We've built tracking systems for hundreds of Webflow sites and can ensure your data is accurate from day one.


Join readers commenting on this post!