
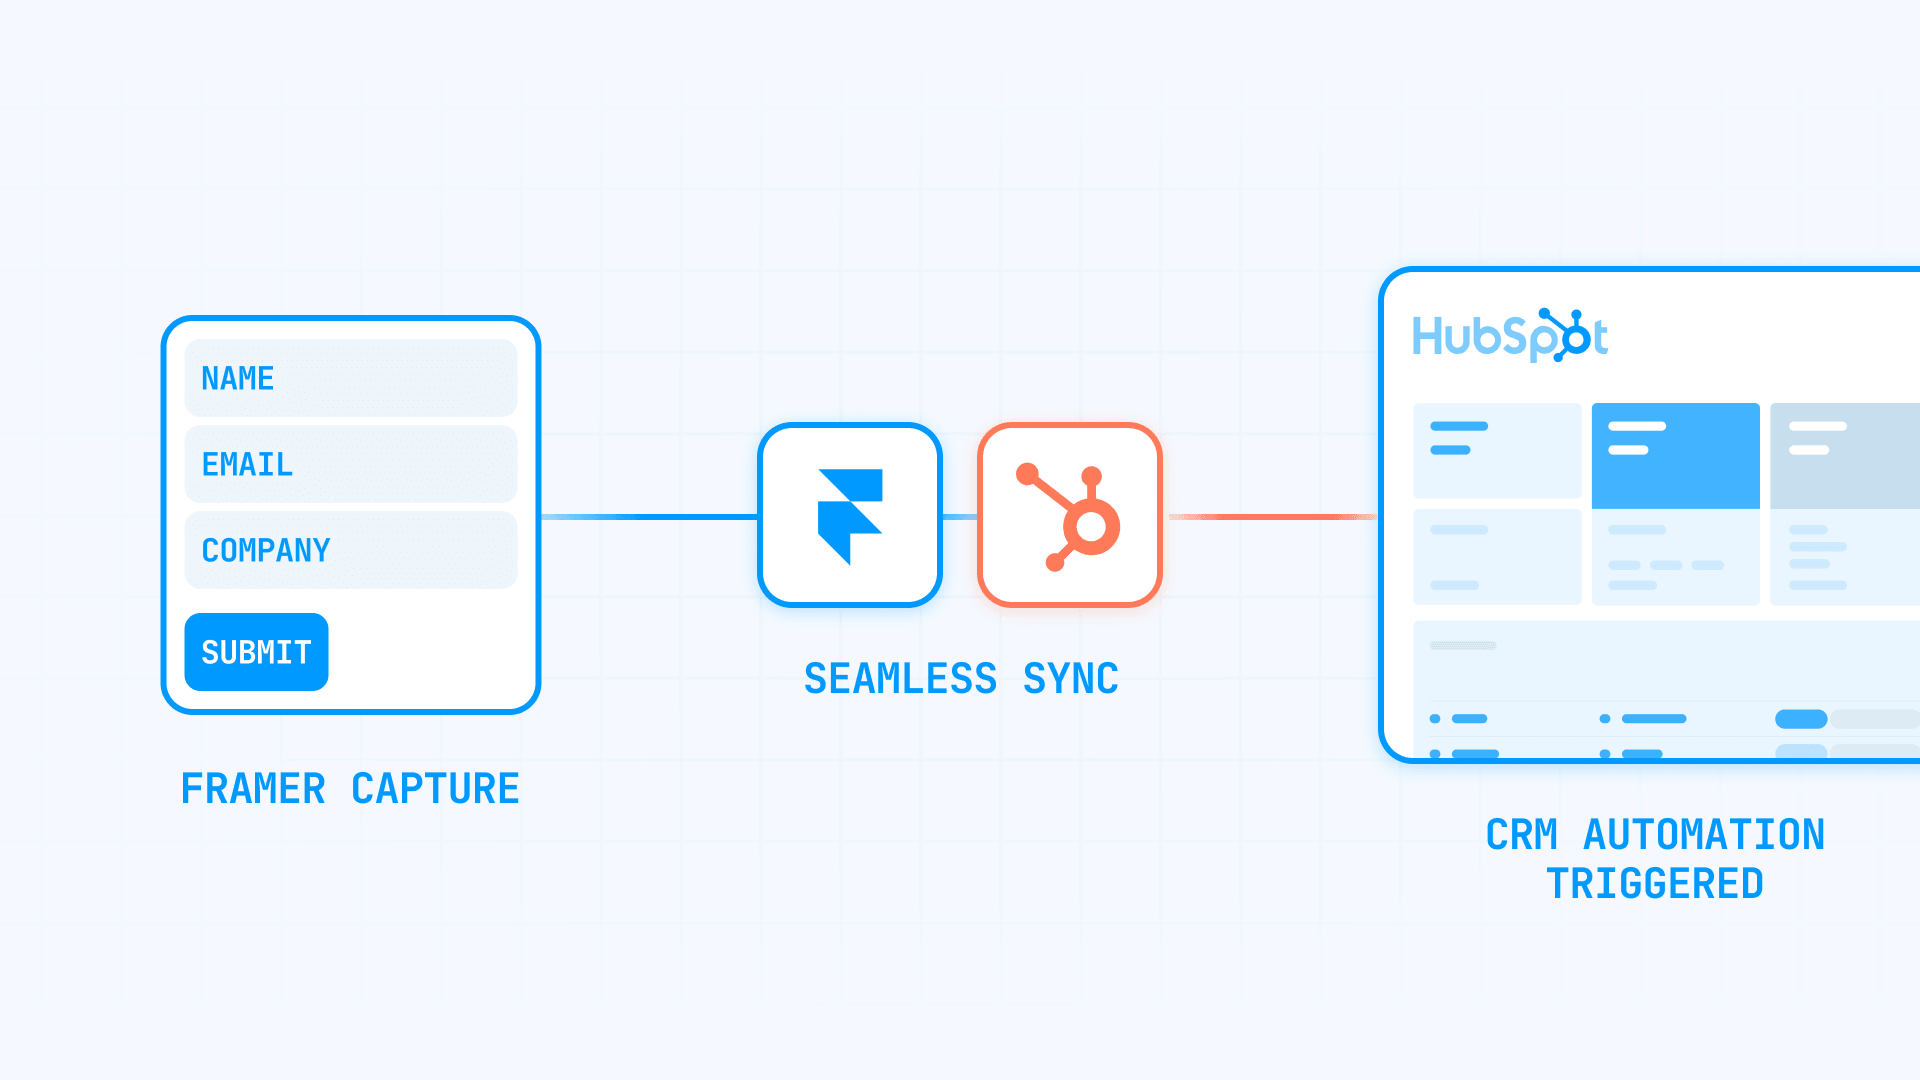
Getting leads from your Framer site into HubSpot should be straightforward—but the integration options can be confusing. Should you use Framer's built-in HubSpot component? Send data through webhooks? Embed HubSpot forms manually? The right answer depends on one fundamental question: do you want HubSpot to own the form, or Framer? Connecting Framer forms to HubSpot requires understanding where control should live. Framer offers an official HubSpot component for embedding HubSpot-managed forms directly. It also has a native form builder that sends submissions through webhooks, letting you design forms entirely in Framer while pushing data into HubSpot through automation.
This guide covers three practical integration methods, explains the tradeoffs of each, and helps you choose the right approach for your team. If your site runs on Webflow instead of Framer, see our complete guide to connecting Webflow forms to HubSpot.
Why connecting Framer forms to HubSpot matters
Pushing form data into HubSpot transforms isolated submissions into structured CRM records your team can act on.
- Centralized lead management: Every submission creates or updates a contact record, giving sales a single source of truth instead of fragmented email notifications.
- Marketing automation triggers: Submissions can enroll contacts in email sequences, assign them to reps, or update lifecycle stages automatically.
- Attribution and analytics: HubSpot tracks which pages, campaigns, and sources generated each lead—but only when tracking is configured correctly.
- Lead scoring: HubSpot scores contacts based on form responses, page visits, and engagement, helping your team prioritize follow-up.
- Multi-touch visibility: Properly connected forms let you see the full journey from first visit to conversion across sessions and touchpoints.
- Sales handoff workflows: Qualified leads can trigger tasks, notifications, or outreach sequences the moment they submit.
Quick comparison of Framer to HubSpot methods
Before diving into implementation, here's how the three methods compare across the most important decision factors.
Method 1: Official Framer HubSpot component is the fastest option when you want HubSpot to own the form. Fields, logic, and styling are managed in HubSpot, implementation is low effort, and native HubSpot form submission triggers work automatically. You'll still need the HubSpot tracking code for attribution. This is best for speed-focused teams that are comfortable letting HubSpot control the form experience.
Method 2: Framer webhook automation is often the best default for teams that chose Framer for design control. Framer owns the form, so you get full control over styling and behavior, while submissions are sent to HubSpot through a webhook and automation layer. Implementation is more involved, and workflow behavior depends on whether you create contacts directly or submit to a HubSpot form. This is best for Framer-first teams that want forms to feel native to the site.
Method 3: Manual HubSpot embed works well when you want HubSpot-managed form logic but need more styling flexibility than the official component offers. HubSpot still owns the form, but you embed it in Framer and customize the appearance with CSS. Implementation is more technical, and you'll still need the HubSpot tracking code for attribution. This is best for teams that want HubSpot's form features and have developer support for custom styling.
Method 1: Framer's official HubSpot component
This is the fastest way to get a HubSpot form onto a Framer page.
Framer lets you place it, but fields, logic, styling, and submission handling are all configured in HubSpot. This makes it ideal when setup speed matters more than visual integration.
Step 1: Create the form in HubSpot
Build your form in HubSpot first. Configure fields, conditional logic, multi-step structure, pre-population behavior, and submit actions here. Changes you make in HubSpot sync automatically to the embedded form.
- Navigate to Marketing → Forms in your HubSpot account.
- Click Create form and select your form type.
- Add and configure your fields using the drag-and-drop editor.
- Set up any conditional logic or multi-step flows.
- Configure the Options tab for submission behavior, notifications, and redirects.
- Click Publish when ready.


Step 2: Copy the portalId and formId from HubSpot
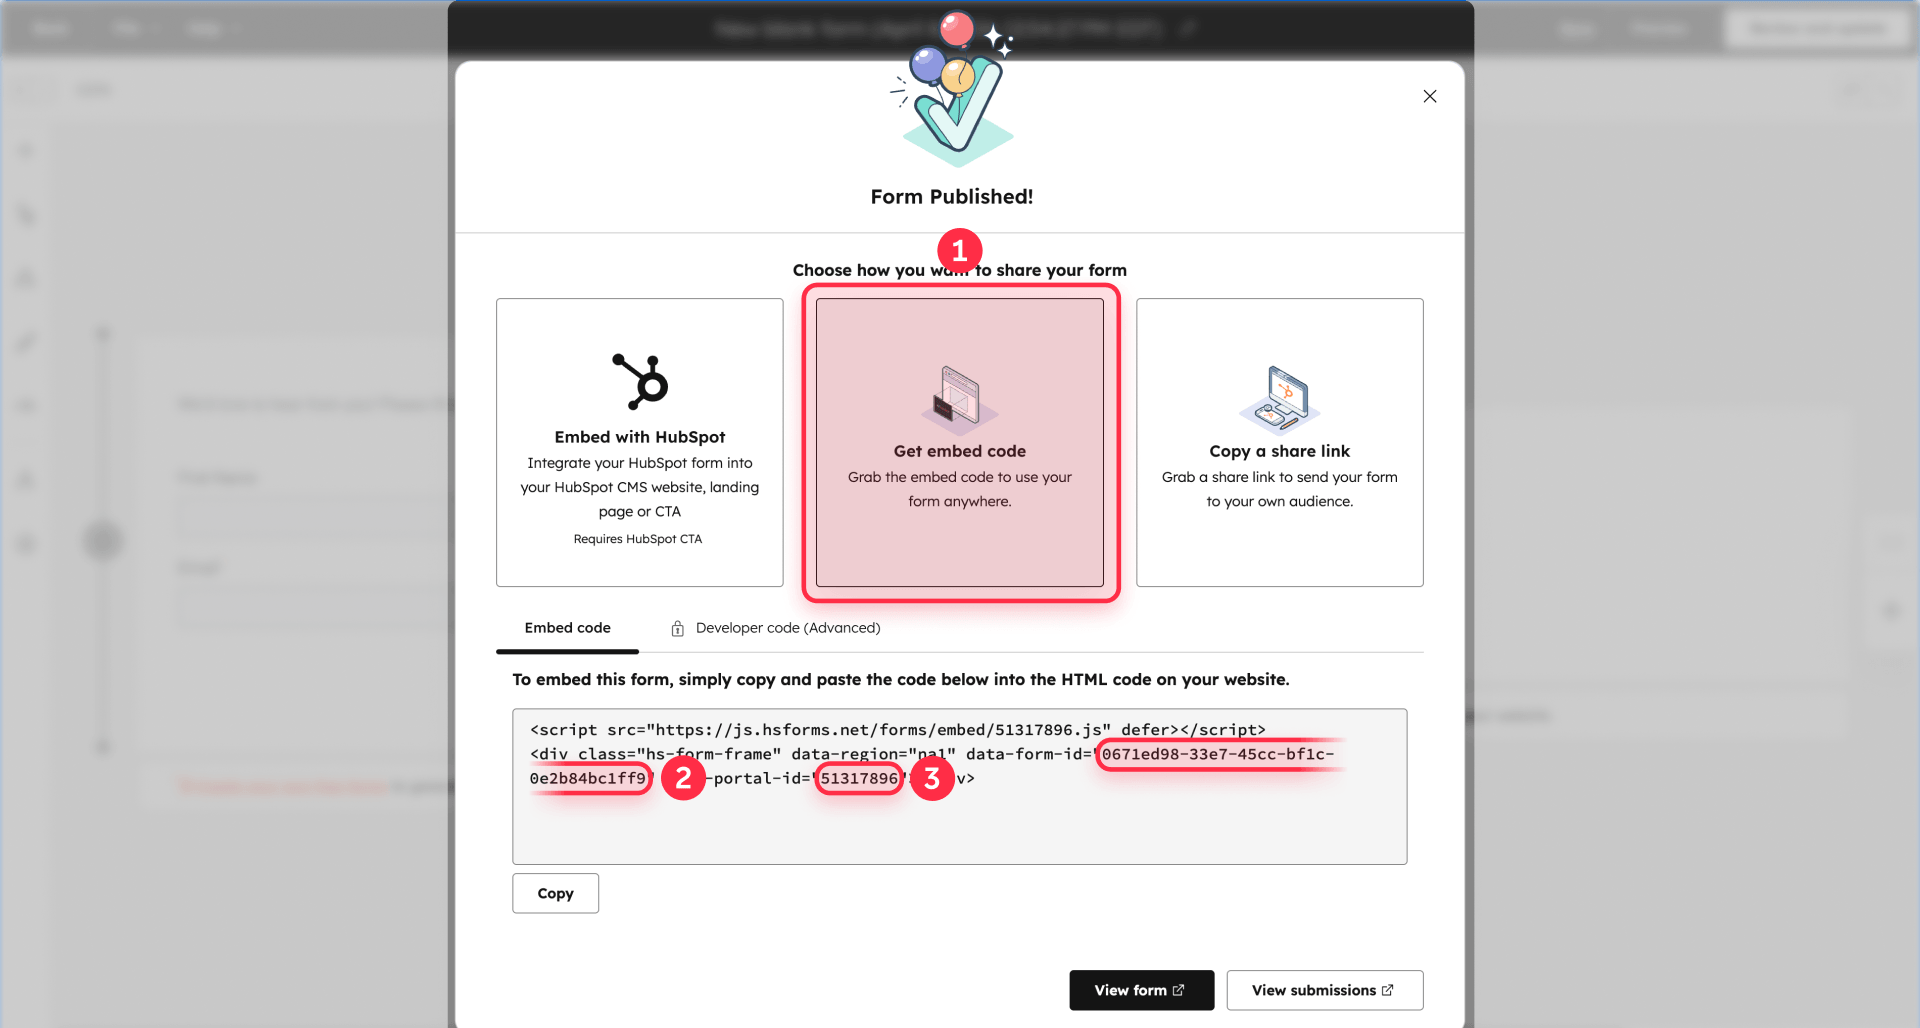
Open the form in HubSpot and click Embed. In the embed code, locate and copy the portalId and formId values. These two identifiers connect Framer's component to the correct form.
The embed code looks something like this—you need the values after portalId and formId:
Step 3: Add the HubSpot component in Framer
In Framer, open the Insert panel, scroll to Forms, and drag the HubSpot component onto your page.
- Select the HubSpot component on your canvas.
- In the properties panel on the right, paste your portalId value.
- Paste your formId value in the corresponding field.
- Preview the page to confirm the form loads correctly.
- Publish your site to test the live form.

Step 4: Configure tracking for attribution and analytics in Framer
Your Framer site is external to HubSpot, so you need to configure tracking properly. Without this setup, attribution breaks, analytics remain incomplete, and HubSpot cannot associate submissions with visitor history or campaign sources.
- In HubSpot, go to Settings → Tracking & Analytics → Tracking Code.
- Add your Framer site domain to the allowed domains list.
- Copy the HubSpot tracking code.
- In Framer, go to Site Settings → Custom Code.
- Paste the tracking code in the Head section.
- Publish your site.
Framer's HubSpot integration may also offer options to simplify tracking setup, depending on your configuration. For deeper tracking of form interactions—submission events, button clicks, and drop-off points in GA4—see our guide to tracking Framer form submissions with GTM and GA4.
When to use the official HubSpot component in Framer
Best for: Teams prioritizing speed, teams comfortable with HubSpot managing the form experience, situations where HubSpot's form editor provides sufficient design control.
Strongest at: Fast implementation, native HubSpot features like conditional logic and pre-population, automatic form-based workflow triggers.
Consideration: When using the HubSpot component in Framer, part of the design and customization is shaped by the options available in HubSpot, and some visual adjustments may be needed to ensure a smooth mobile experience.
Method 2: Framer native form + webhook automation to HubSpot
This approach keeps the form inside Framer's design system. You build the form natively in Framer, style it like any other component, then send submissions to HubSpot through a webhook and automation layer.
For teams that chose Framer for design control, this is often the strongest default.
Step 1: Build the form in Framer
Create the form using Framer's native form builder. You get full access to Framer's input types, custom states for success/error/loading, hidden fields, and styling controls.
- In Framer, open the Insert panel and add a Form component.
- Add input fields for the data you want to collect.
- Name each input field clearly—these names become the keys in your webhook payload.
- Add hidden fields for attribution data like page URL or campaign source.
- Style the form to match your site design.
- Configure success, error, and loading states.

For UTM tracking, you can use hidden fields to capture campaign parameters. Framer may offer built-in UTM capture depending on your plan, or you can pass values into hidden fields using a code override.
Step 2: Understand the flow from Framer to HubSpot
Here is how the connection works at a high level:
Framer form → webhook → automation platform (Zapier or Make) → HubSpot
Framer sends each submission as a JSON payload to a webhook URL. Your automation platform receives that data and forwards it into HubSpot. The result inside HubSpot depends on how you configure that last step—which is where the next step comes in.
Step 3: Set up your automation platform
Your automation platform receives the webhook from Framer and pushes the data into HubSpot. Set up both the trigger and the action before connecting anything to Framer.
First, create the webhook trigger. Then choose how data enters HubSpot:
Recommended: submit to a HubSpot form
The automation forwards each submission to a HubSpot form through the Forms API. HubSpot treats it as a native form submission, which means everything works as expected—form-based workflows trigger correctly, submission reports include the data, and attribution connects to the specific form.
Alternative: create or update a contact directly
For simpler CRM-only use cases where you just need leads in HubSpot, the automation can create or update a contact record through the Contacts API. This skips the form layer entirely, so the submission will not appear as a form submission in HubSpot and form-based workflows will not trigger.
For Zapier:
- Create a new Zap.
- Choose Webhooks by Zapier as the trigger. Select Catch Hook.
- Copy the webhook URL Zapier provides—you'll paste it into Framer in Step 4.
- For the action step, search for HubSpot:
Recommended: Use a Custom Request to submit data to HubSpot's Forms API (POST https://api.hsforms.com/submissions/v3/integration/submit/{portalId}/{formId}). Map your Framer fields to the HubSpot form fields.
Alternative: Select Create or Update Contact to push data directly to a contact record—simpler, but skips form-level workflows and reporting.
- Submit a test form to capture sample data and verify the field mapping works.
For Make:
- Create a new scenario.
- Add a Custom webhook module as the first step. Copy the webhook URL—you'll paste it into Framer in Step 4.
- For the second module, search for HubSpot:
Recommended: Use an HTTP Make a Request module pointing to HubSpot's Forms API endpoint. Include the portalId, formId, and map your Framer fields to the form's field names.
Alternative: Select Create or Update a Contact to push data directly to a contact record—simpler, but skips form-level workflows and reporting.
- Submit a test form to establish the data structure and verify field mapping.
Step 4: Connect your Framer form to the webhook
Now paste the webhook URL from your automation platform into Framer. Framer sends submissions as JSON via HTTP POST, using your input names as keys.
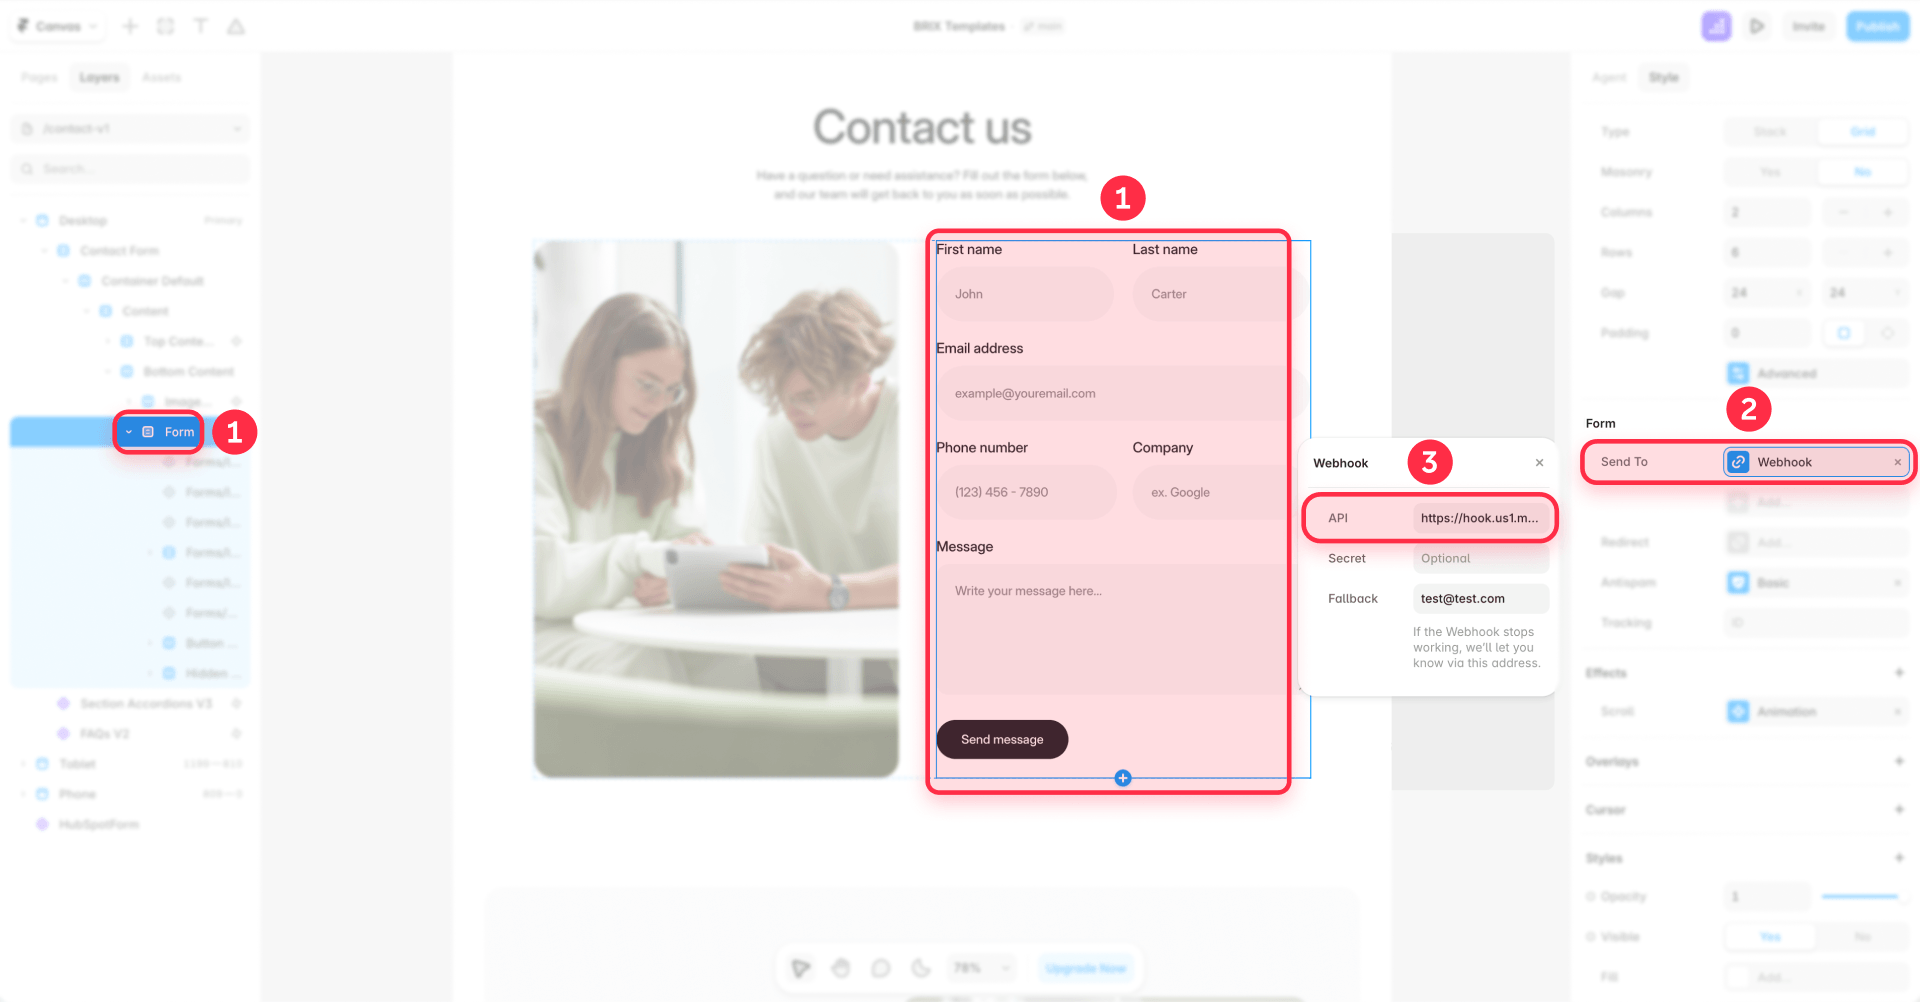
- Select your form component in Framer.
- In the properties panel, find Send To and click Add….
- Select Webhook.
- Paste the webhook URL from Zapier or Make.
- The endpoint must return a 2xx response—Framer retries up to five times if it does not.
Step 5: Test the complete Framer to HubSpot flow
Submit a test entry through the full pipeline, then verify every step.
- Fill out your Framer form with test data.
- Check your automation platform for the incoming webhook payload.
- Verify all fields mapped correctly to the corresponding HubSpot properties.
- Confirm the contact or form submission appears in HubSpot with the correct data.
- Test again after publishing your Framer site—some behaviors only work on the live page.
For additional security, Framer provides a Framer-Signature header for webhook verification.
When to use webhook automation for Framer to HubSpot
Best for: Teams that prioritize Framer-native design, marketing sites where form appearance matters, situations requiring hidden-field attribution or enrichment steps.
Strongest at: Full design control, forms that feel native to the site, flexible automation logic between submission and CRM.
Tradeoff: Adds a dependency on an automation platform. The recommended setup—submitting to a HubSpot form—takes a few extra configuration steps but keeps workflows and attribution working as expected. For simpler delivery needs without a CRM, our guide to sending Framer forms to multiple email addresses covers the built-in email routing options.
Method 3: Manual HubSpot embed or developer code inside Framer
This method is for teams that want HubSpot-managed forms—with HubSpot's conditional logic, pre-population, and field management—but need more styling control than Framer's official component provides.
You paste HubSpot's embed script into a Framer Embed component, then customize the appearance through CSS. Embedded HubSpot forms typically don't match your Framer site styling out of the box, so achieving visual consistency requires technical implementation work.
Step 1: Create the form in HubSpot
Build and configure the form in HubSpot. This is where fields, logic, and submit behavior live. Follow the same process as Method 1, Step 1.
Step 2: Get the embed code from HubSpot
In HubSpot, navigate to your form and click Embed. Depending on your HubSpot plan and form editor version, you may see different options.
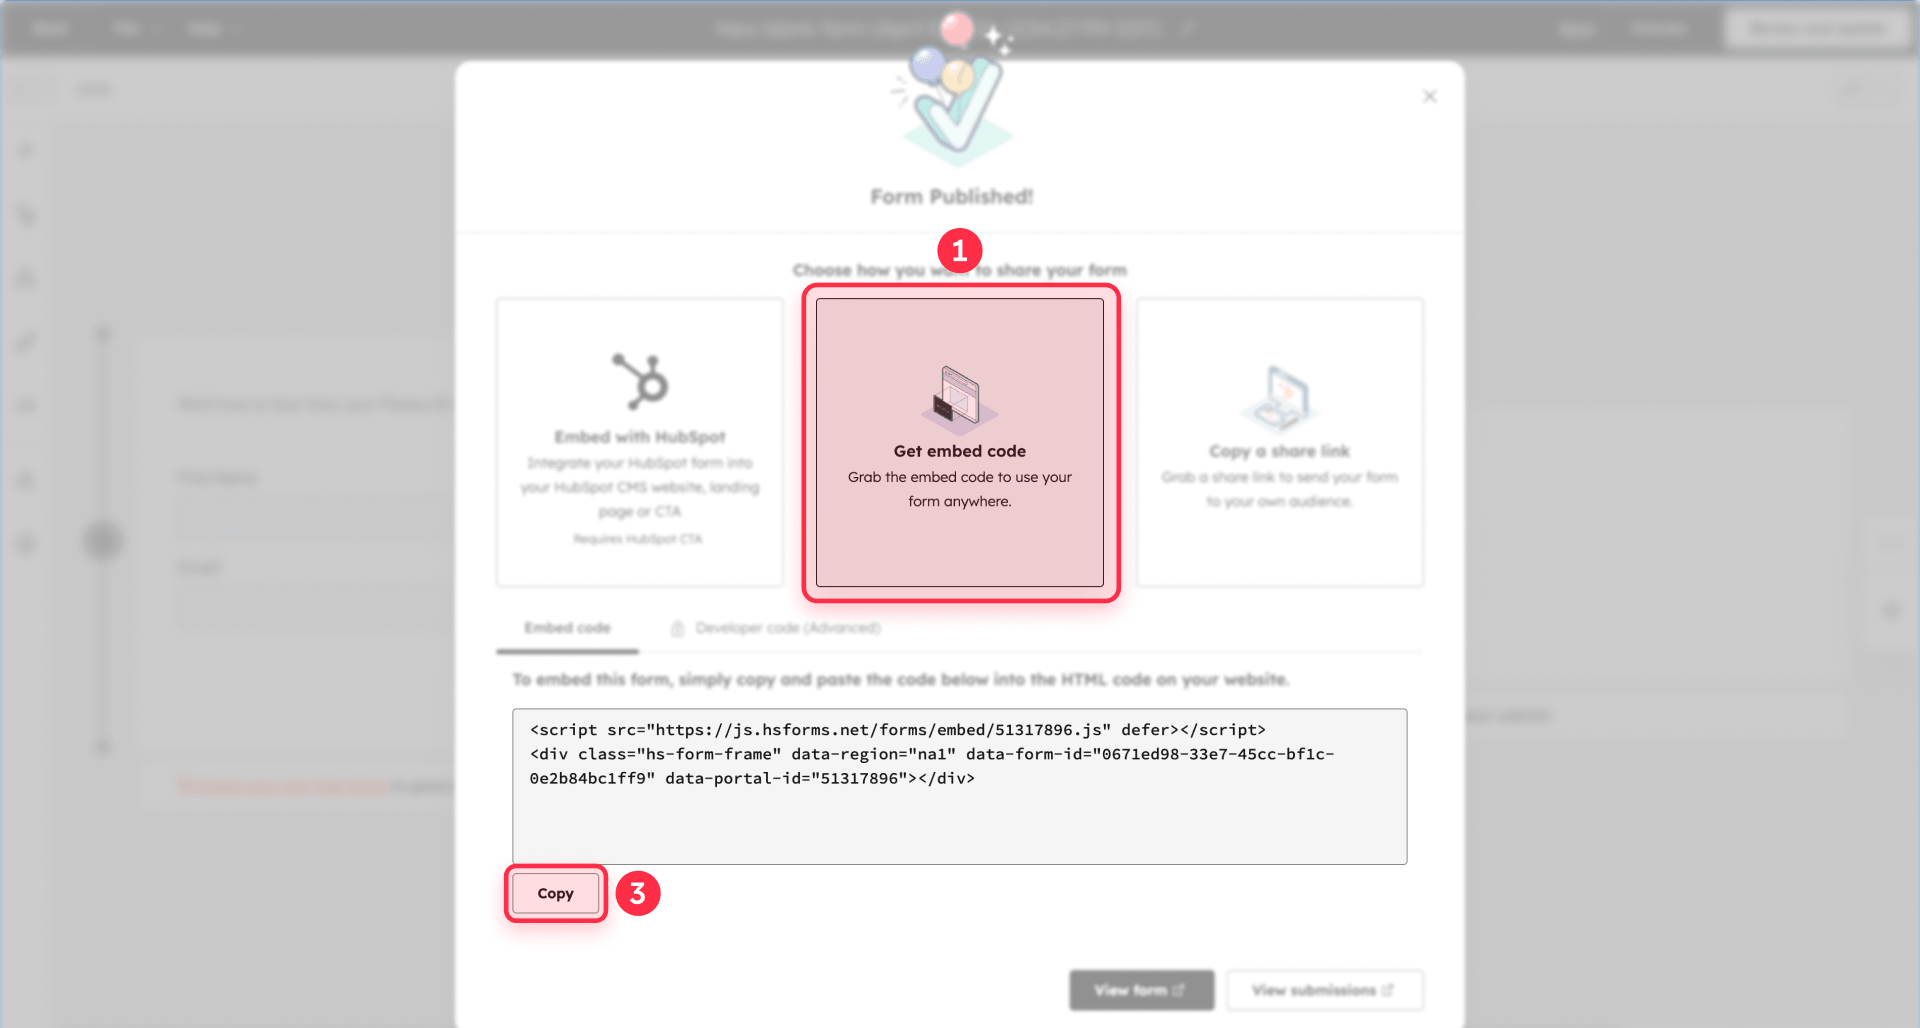
Standard embed code: Copy the script block provided. This is available on all plans.
Advanced embed options: Some HubSpot plans offer additional developer-oriented embed options with more control over form behavior and styling hooks. Check the embed modal for available options in your account.
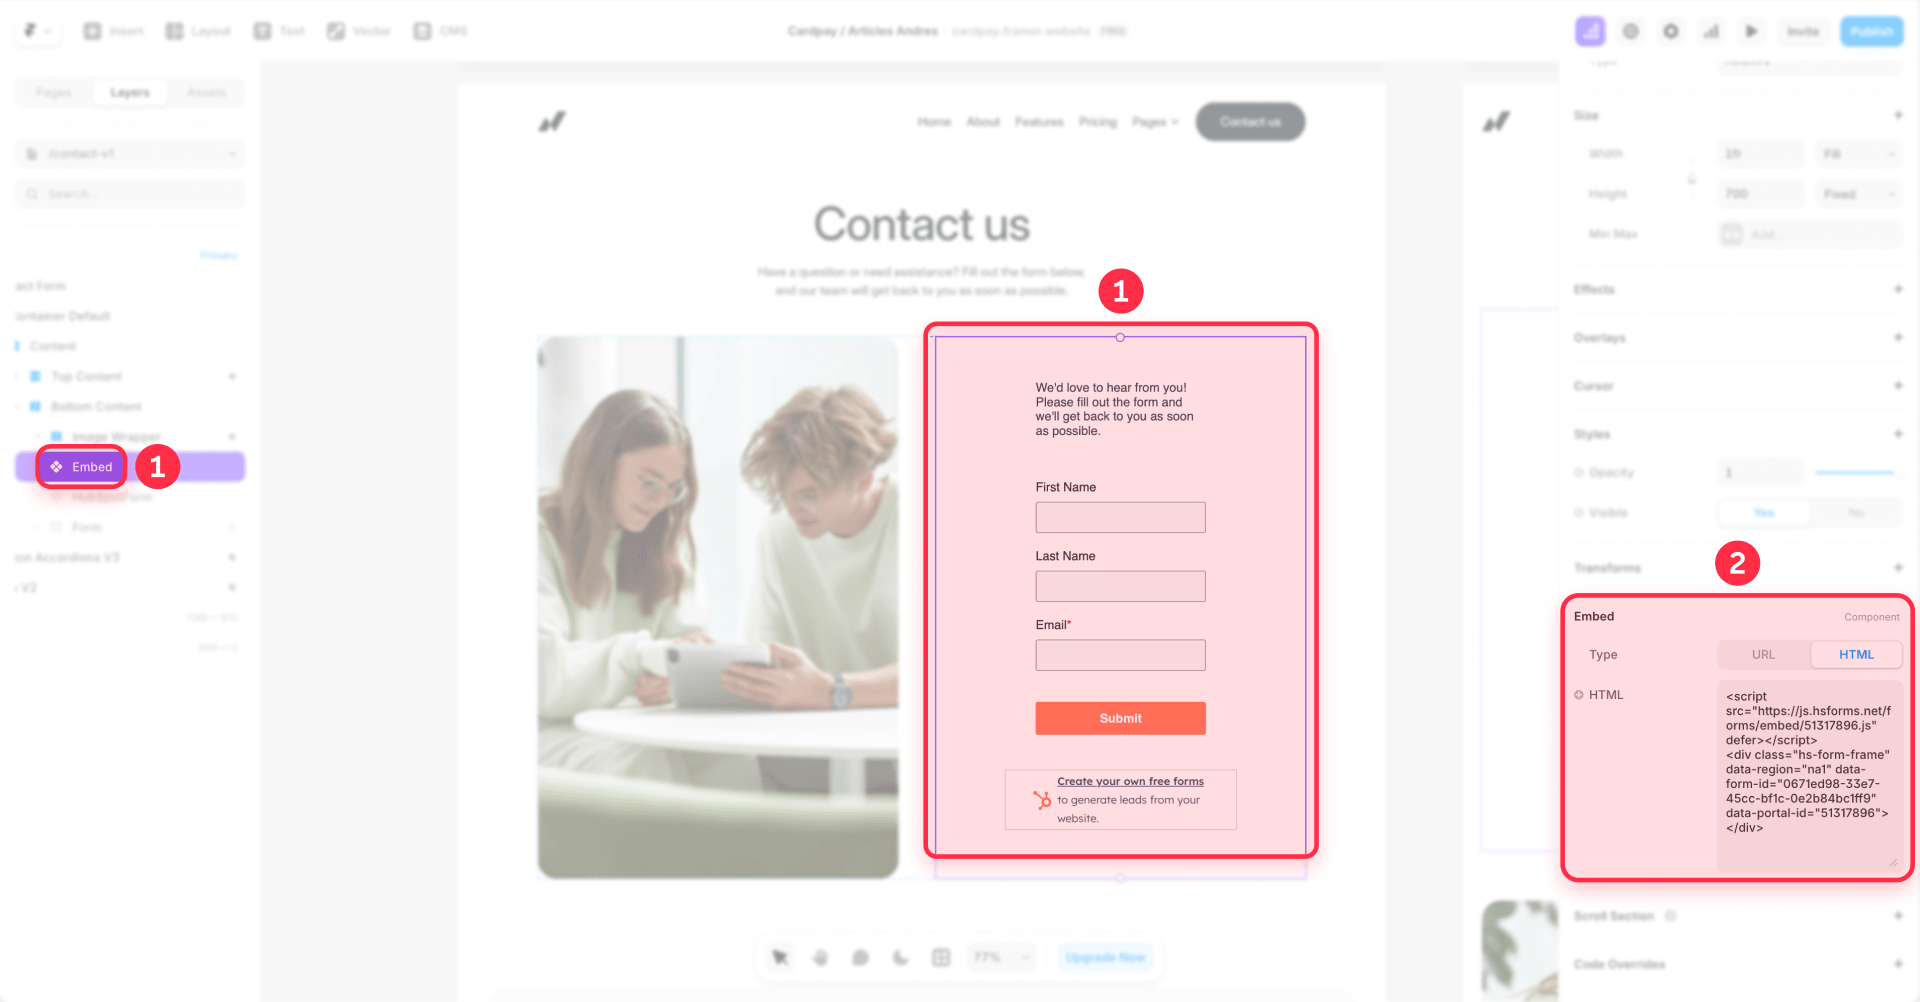
Step 3: Add an Embed component in Framer
In Framer, add an Embed component and paste the HubSpot script into the HTML area.
- Open the Insert panel in Framer.
- Add an Embed component to your page.
- Select the Embed component.
- In the properties panel, paste the HubSpot embed code into the HTML field.
- Resize the component to fit your layout.
Step 4: Configure tracking for your Framer site in HubSpot
Same as Method 1: add your domain to HubSpot's tracking settings and install the tracking code on your Framer site. Without this, attribution and analytics will not work correctly.
Step 5: Style the HubSpot form to match your Framer site
Embedded HubSpot forms do not match your Framer site styling out of the box. Achieving visual consistency requires technical work using CSS overrides or, where supported, CSS variables.
HubSpot's documentation describes options for styling embedded forms. You can override colors, fonts, and spacing using custom CSS in Framer's custom code settings.
This customization is more technical than building forms natively in Framer, but substantial visual customization is achievable for teams willing to invest the implementation effort.
If your developers need support customizing HubSpot embeds inside Framer, our Framer agency can assist.
Step 6: Use HubSpot form events for advanced behavior in Framer
HubSpot supports multiple ways to react when an embedded form loads or submits. Depending on how you implement the embed, you may work with embed-level callbacks or HubSpot's newer form event system.
These hooks are useful for:
- Custom analytics tracking
- Conditional redirects after submission
- Updating the UI after a successful submit
- Triggering custom JavaScript when the form finishes rendering
Because the available event options can vary depending on the embed method and HubSpot setup, check HubSpot's current developer documentation before implementation. If you need advanced behavior, treat this as a developer-oriented enhancement rather than a default setup step.
Step 7: Test mobile carefully for HubSpot embeds in Framer
Mobile layout issues are common with embedded forms. Problems like forms being cut off or buttons hidden are often caused by container height settings.
- Test all mobile breakpoints in Framer's preview.
- Check on actual mobile devices, not just browser resize.
- Avoid fixed heights that can clip the form.
- Keep the embed structure as simple as possible.
When to use manual HubSpot embeds in Framer
Best for: Teams that need HubSpot-managed form logic, including conditional fields or pre-population, and have developer support for styling adjustments.
Strongest at: HubSpot-native form features, form-based workflow triggers, and greater visual customization for teams comfortable with CSS.
Tradeoff: Styling usually requires technical implementation. As with most external embeds, performance may require some attention, and more customized setups can need a bit more care than the official component.
Troubleshooting common Framer to HubSpot issues
- HubSpot form does not load in Framer: Verify the portalId and formId are correct with no extra spaces. Publish the site—some components only render on the live page. Check the browser console for JavaScript errors.
- Form submissions missing attribution data: Install the HubSpot tracking code on your Framer site and add your domain to HubSpot's tracking settings under Settings → Tracking & Analytics → Tracking Code. Submit a test lead and check the contact record in HubSpot for source and campaign data.
- Leads appear as Direct Traffic instead of correct source: Install the HubSpot tracking code and pass the hutk cookie value with API submissions if using Method 2 with form submission. Check the contact's source property in HubSpot after a test submission.
- HubSpot form has layout issues on mobile in Framer: Check container height settings in Framer. Ensure the component or embed has adequate space on mobile breakpoints. Avoid fixed heights that can clip the form. Test on actual mobile devices, not just browser resize.
- Duplicate contacts created in HubSpot: HubSpot deduplicates by email address. Ensure the email field is named consistently and mapped correctly across all forms and automations. Search for the test email in HubSpot and confirm only one contact exists.
Frequently asked questions about Framer and HubSpot integration
What is the simplest way to connect Framer forms to HubSpot?
For most teams, the simplest option is Framer's native HubSpot component. You just add the component in Framer and connect it using your HubSpot portalId and formId. If you need more control over the form's visual design, use Framer's native form builder and send submissions to HubSpot through a webhook automation instead.
Do I need the HubSpot tracking code on my Framer site?
Yes—if your Framer site is hosted outside HubSpot and you want HubSpot to register visits and report analytics from those pages, you should install the HubSpot tracking code on the site. HubSpot also recommends adding your external domain in Tracking & Analytics > Tracking Code > Additional site domains; otherwise, submissions from external pages with embedded HubSpot forms can be filtered into spam.
What is the difference between Framer's HubSpot component and embedding a HubSpot form manually?
Framer's HubSpot component is the faster no-code setup: drop the component onto the page and connect it with your portalId and formId. Manual embedding uses HubSpot's embed code or developer code on an external page, which gives you more flexibility for advanced styling and custom implementation details, but it also requires a more hands-on setup.
How do I capture UTM parameters from Framer forms into HubSpot?
If you're using Framer's native forms, enable Campaign tracking in Site settings > Forms so Framer includes UTM parameters and GCLID in the submission data. Then map those values into HubSpot through your webhook automation. If you're using HubSpot forms on your Framer site, install the HubSpot tracking code and add your site domain in HubSpot so attribution and external-page reporting work properly.
Can I trigger HubSpot workflows from Framer form submissions?
Yes—when the submission is recorded in HubSpot as a HubSpot form submission, you can use the form as a workflow trigger in HubSpot. In the form editor, HubSpot lets you create automation based on "A contact submitted a form." Just don't confuse that with HubSpot's separate "When a webhook is received" enrollment trigger, which is a different feature and is limited to Data Hub Professional or Enterprise.
Why are my Framer form submissions not appearing in HubSpot?
The answer depends on how the connection is set up. If you're using Framer's HubSpot component, first check that the portalId and formId are correct. If you're using a webhook flow from Framer to HubSpot, make sure your endpoint returns a 2xx response—Framer requires that for successful delivery and retries failed requests up to five times. If HubSpot forms are embedded on an external Framer site, also verify that the site domain has been added in HubSpot, because external-page submissions from unlisted domains can be marked as spam.
Can I use multiple HubSpot forms on the same Framer page?
Yes, but the setup matters. HubSpot documents that when the same form is embedded multiple times on an external page, each embed should use a unique formInstanceId; otherwise, forms can render side by side or in the wrong location. If you're working with multiple HubSpot forms on one Framer page, publish and test the live page carefully to confirm each form renders and submits as expected.
Conclusion
The right Framer to HubSpot integration depends on where you want control to live.
Method 1—Framer's official HubSpot component—is the fastest path when HubSpot should own the form and design flexibility is secondary. You get HubSpot's full feature set with minimal configuration.
Method 2—native Framer forms with webhook automation—is often the strongest choice for teams that chose Framer for its design system. Your forms look and feel native to your site while still feeding data into HubSpot.
Method 3—manual embeds with custom styling—works well when you need HubSpot-managed form logic but want more styling control than the official component allows. It requires more technical effort but keeps HubSpot's conditional logic and pre-population features intact.
Most Framer marketing sites will find Method 2 the right balance between design control and CRM integration. If you need HubSpot's advanced form features, Method 1 or 3 may fit better depending on your comfort with styling constraints versus technical implementation.
If you need help implementing any of these integration methods or want guidance on which approach fits your specific situation, our Framer agency can assist with setup and optimization.


Join readers commenting on this post!