
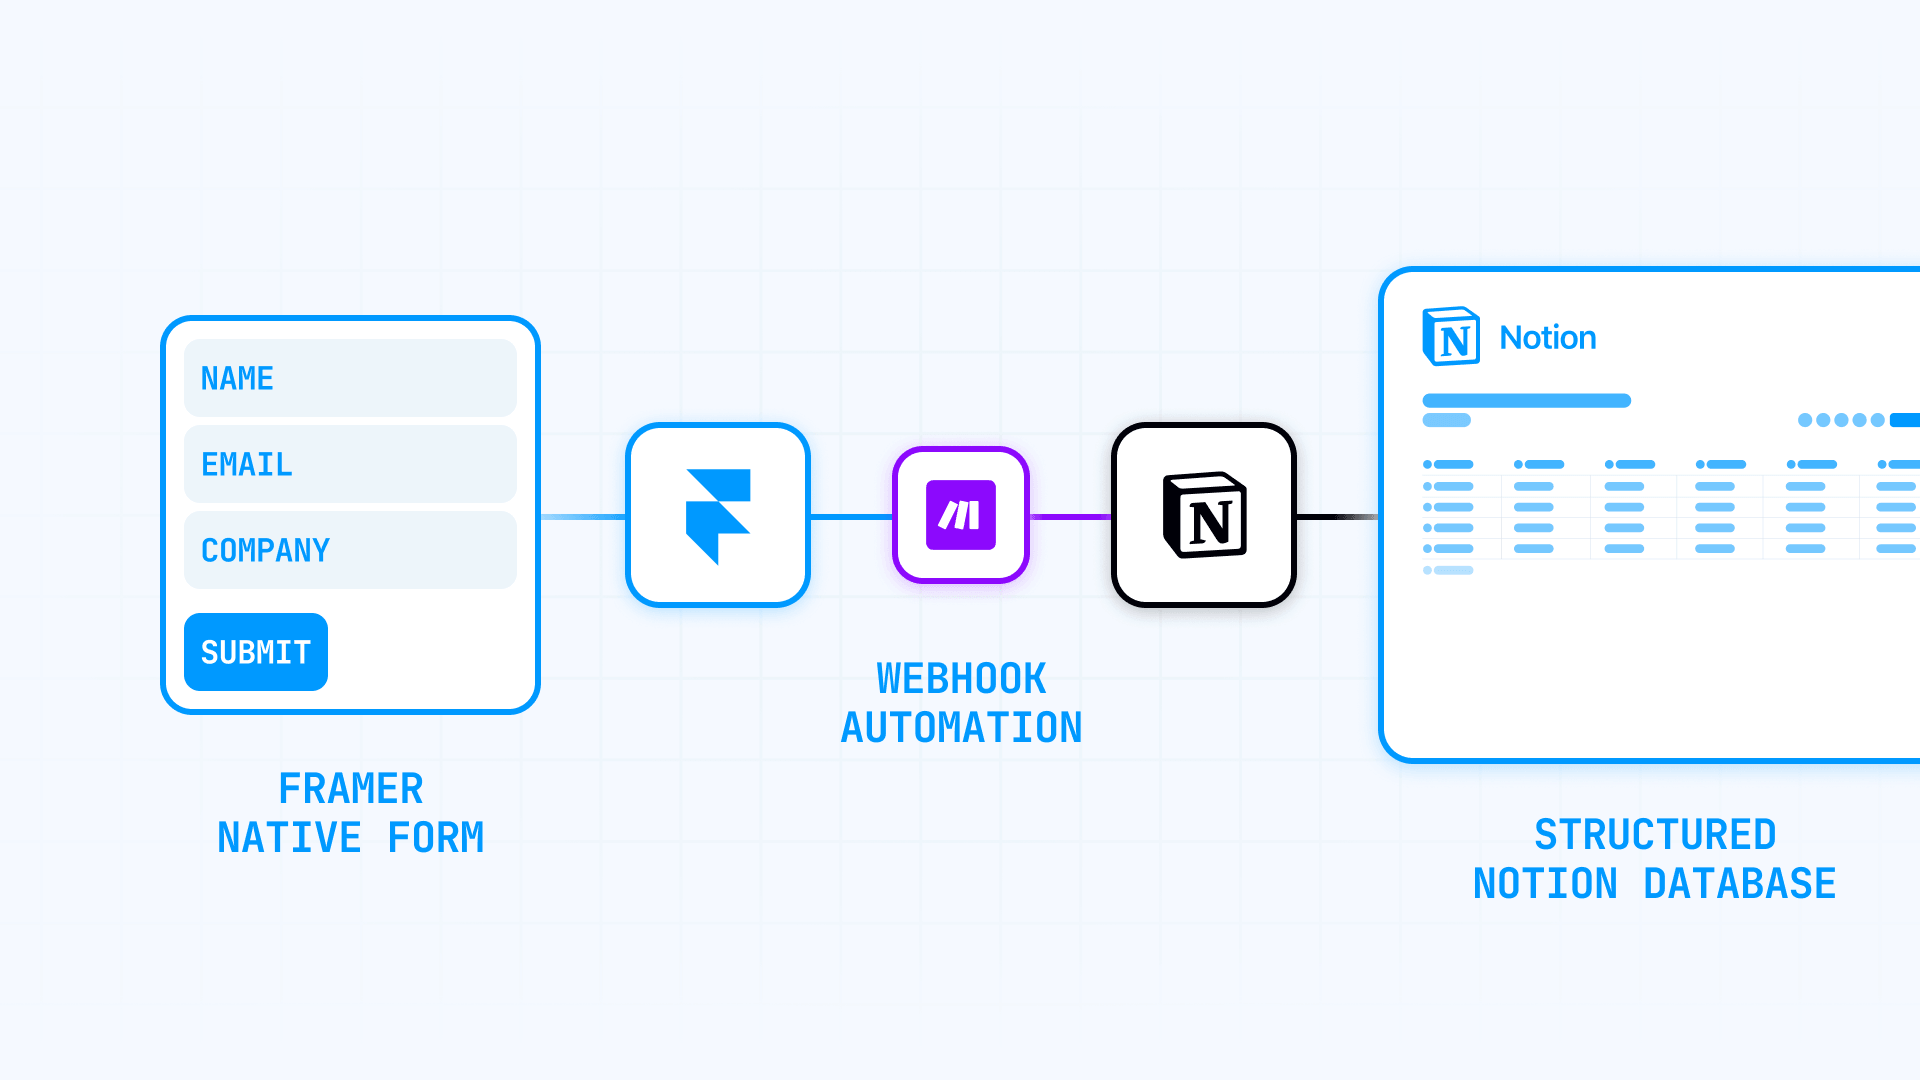
Framer does not send form submissions to Notion natively—its form system is built around email, Google Sheets, and webhooks. While Framer has a Notion plugin, that plugin syncs Notion content into Framer CMS, not the other way around. If you want Framer form data in Notion, you need a middleware layer.
The correct Framer-first architecture is: Framer native form → Webhook → Make → Notion. This guide walks you through the complete setup, from building your Framer form to creating automated workflows in Make that populate your Notion database with every submission.
Why sending Framer form submissions to Notion matters
Notion gives you a real operating layer instead of a pile of notifications. Each submission becomes a page inside a structured database with properties that match your schema. This makes Notion a strong destination for any workflow where submissions need statuses, owners, notes, or later follow-up.
Here are the most valuable use cases for connecting Framer forms to Notion:
- Contact form management: Route inquiries into a structured database where team members can claim, respond to, and track each conversation.
- Lead qualification workflows: Add status properties like New, Qualified, and Replied to systematically move leads through your pipeline.
- Quote request tracking: Capture project details and attach notes, files, or follow-up tasks directly to each submission record.
- Support intake organization: Turn support requests into assignable items with priority levels and resolution statuses.
- Job application processing: Store candidate information with interview stages, feedback notes, and hiring decisions in one place.
- Event registration management: Track RSVPs with attendance status, dietary preferences, and communication history.
For Framer specifically, this matters because the platform focuses on capture and presentation—not on maintaining a heavy native submissions workspace. If your team wants operational structure, pushing data into Notion is the right architectural decision.
What you need before starting the Framer to Notion setup
Before building the automation, make sure you have these prerequisites in place.
Framer requirements: A Framer site with a native form. Framer's native forms support 10+ input types, custom success/error/loading states, hidden fields, and webhook delivery. Check your specific plan for any submission or feature limits. If your workflow also needs native email delivery alongside Notion, our guide to sending Framer forms to multiple email addresses covers that setup.
Make requirements: A Make account with access to the Webhooks app. Make offers a free plan that includes up to 1,000 operations per month; each module execution typically counts as one operation, though certain modules or data handling may consume additional operations depending on the scenario. You will need to create a scenario with a custom webhook trigger.
Notion requirements: A Notion workspace where you have admin permissions to establish the connection. You will also need a database prepared to receive form submissions, with properties that match the fields you want to capture.
How Framer native forms send data to webhooks
Understanding how Framer handles form submissions helps you debug issues and map fields correctly.
When a visitor submits a Framer form configured with a webhook destination, Framer sends the submission as JSON via HTTP POST. The JSON keys are the input names you defined in the form builder, and the values are whatever the visitor entered.
For example, if your form has fields named full_name, email, and message, Framer sends a payload like this:
How to send Framer form submissions to Notion using Make
This section covers the complete recommended setup. Follow each step in order to build a reliable automation.
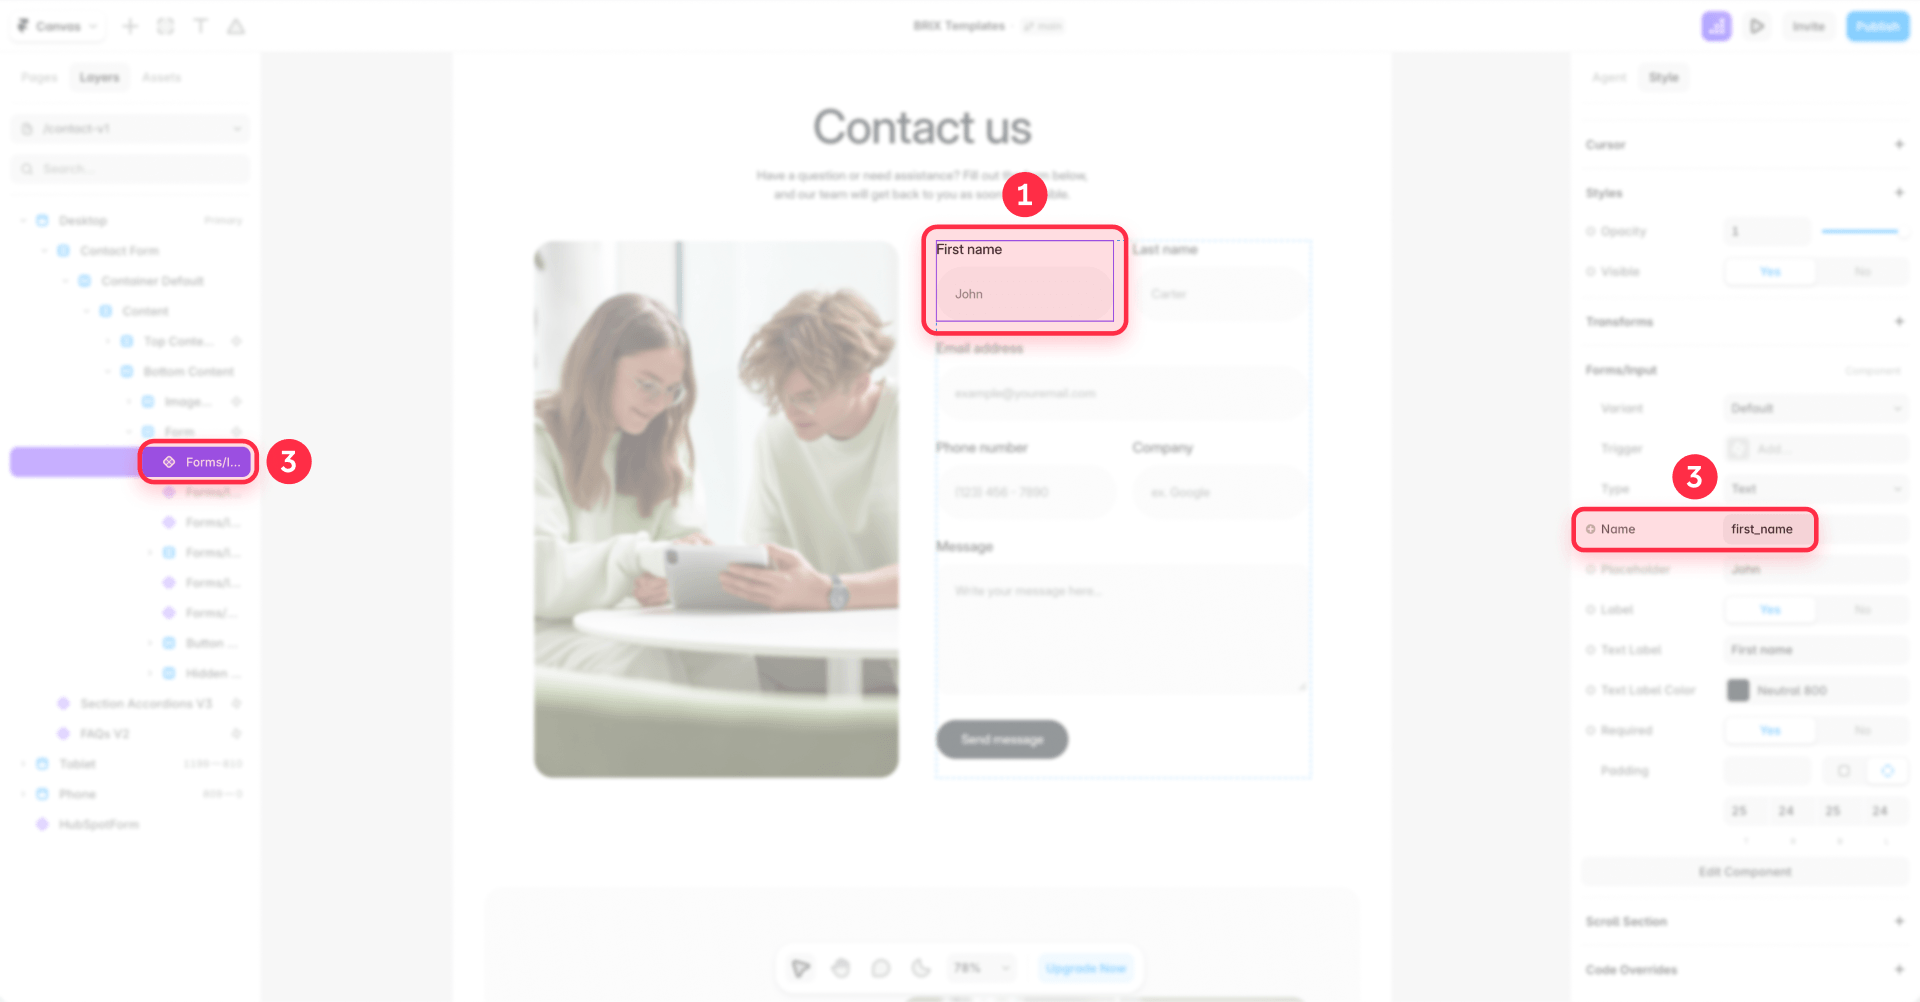
Step 1: Build the form natively in Framer
Start by adding a form to your Framer project. Navigate to Insert → Forms and drag a form component onto your page. Framer's form system supports text inputs, email fields, textareas, checkboxes, select dropdowns, and more. For better data quality, our guide to adding a phone number mask to Framer forms explains how to format phone inputs.
The most important configuration decision happens here: use clean, stable input names.
Framer's webhook payload uses your input names as JSON keys. Sloppy field names create sloppy automations. Use names like full_name, email, company, message, and source_page.
This naming discipline is not cosmetic. It determines how easy your Make mapping will be later.
Step 2: Add hidden fields for operational context in Framer
If you want to know which landing page, campaign variant, or form version created a submission, add hidden fields directly in Framer. Framer recommends hidden fields for tracking where submissions come from, especially when multiple landing pages send data to the same webhook.
Add fields like:
- source_page
- form_name
- offer_name
- traffic_bucket
Important detail: Do not hide the field with the normal Visible property. Framer excludes invisible inputs from submissions. You must use the Hidden field setting so the value still gets submitted.
Step 3: Enable campaign tracking for UTM and GCLID data in Framer
Framer can automatically include UTM parameters and Google Ads click IDs in form submission data when campaign tracking is enabled in Site settings → Forms. This feature may be limited to certain paid plans—check Framer's current documentation or your account settings to confirm availability. If you need additional custom tracking parameters, use hidden fields.
For any lead-gen site that runs paid traffic, enable this if available. Otherwise you may be discarding attribution data.
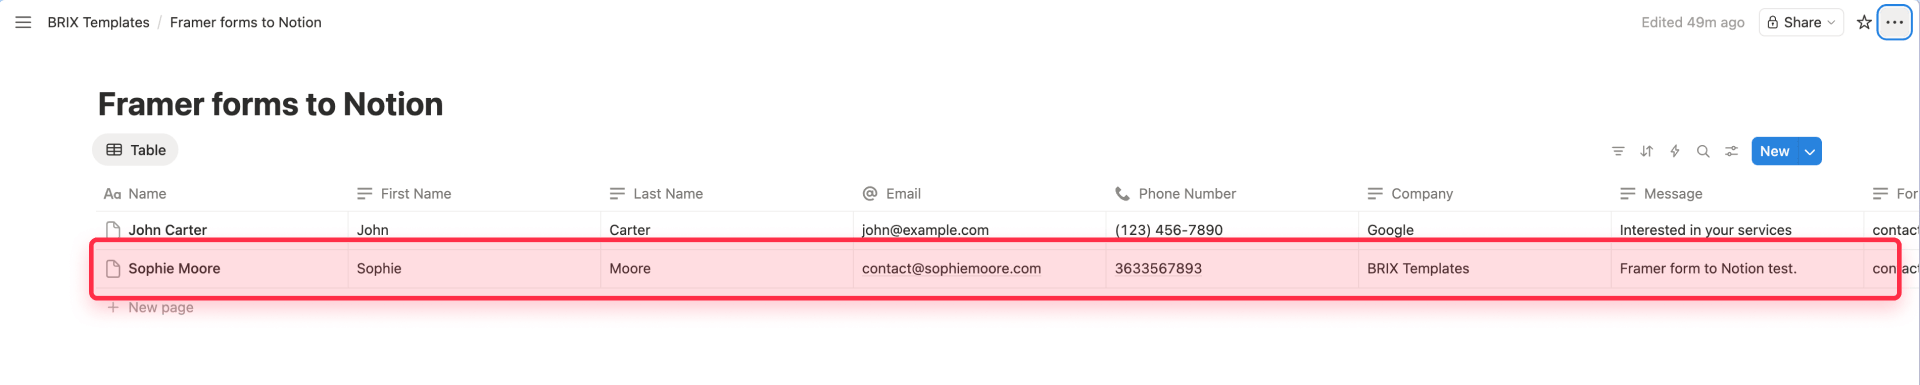
Step 4: Create the Notion database structure
In Notion, create the database that will hold your form submissions. Build this structure before connecting Make so your field mappings are obvious rather than chaotic.
A solid starter schema for contact or lead forms includes:
- Name (Title): Required title property—use name or email.
- Email (Email): Contact email address.
- Company (Text): Organization name.
- Message (Text): Form message content.
- Source Page (Select or Text): Which page generated the submission.
- UTM Source (Text): Campaign attribution.
- Submitted At (Date): Timestamp of submission.
- Status (Status): Workflow state such as New, Qualified, or Replied.
Every Notion database must have exactly one title property. Choose something stable and human-readable.
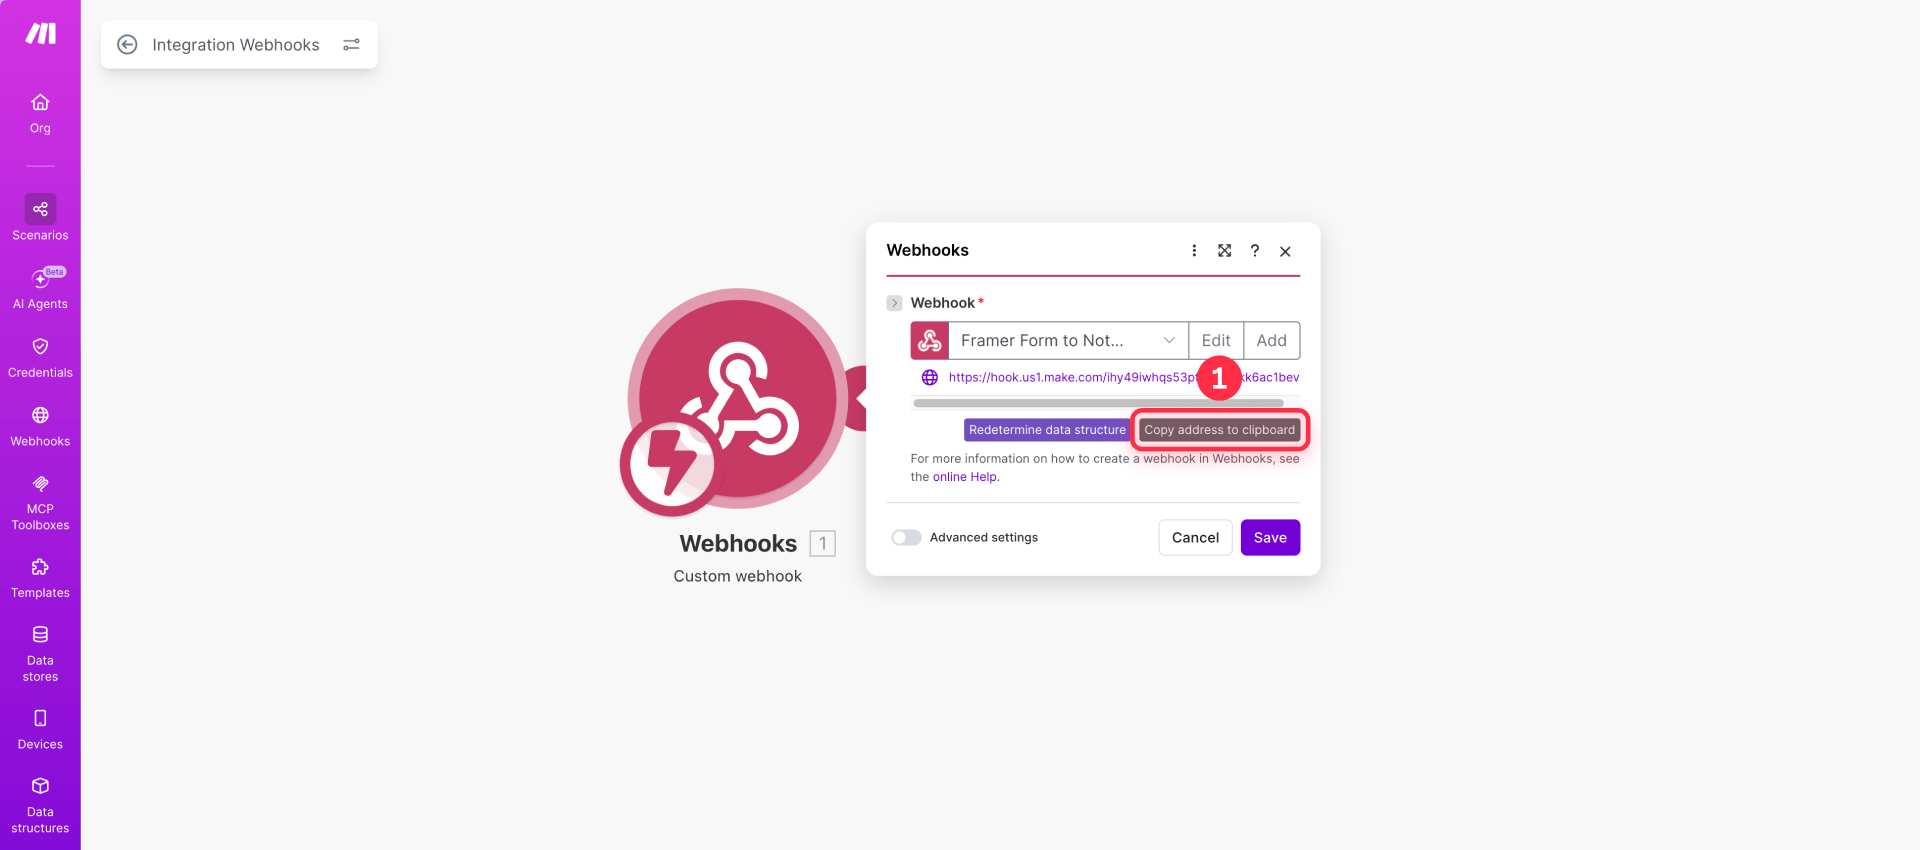
Step 5: Create a custom webhook in Make
In Make, create a new scenario and add the Webhooks app with a Custom webhook module as the trigger. Each scenario must use its own webhook—you cannot share webhooks between scenarios.
Make generates a unique webhook URL for that scenario. Once the scenario is configured and active, the webhook can receive requests for testing and live submissions. Copy this URL; you will paste it into Framer in the next step.
Important: Make processes incoming webhook requests in parallel by default. If your submissions must be processed in order, enable sequential processing in the scenario settings.
Step 6: Connect your Framer form to the Make webhook
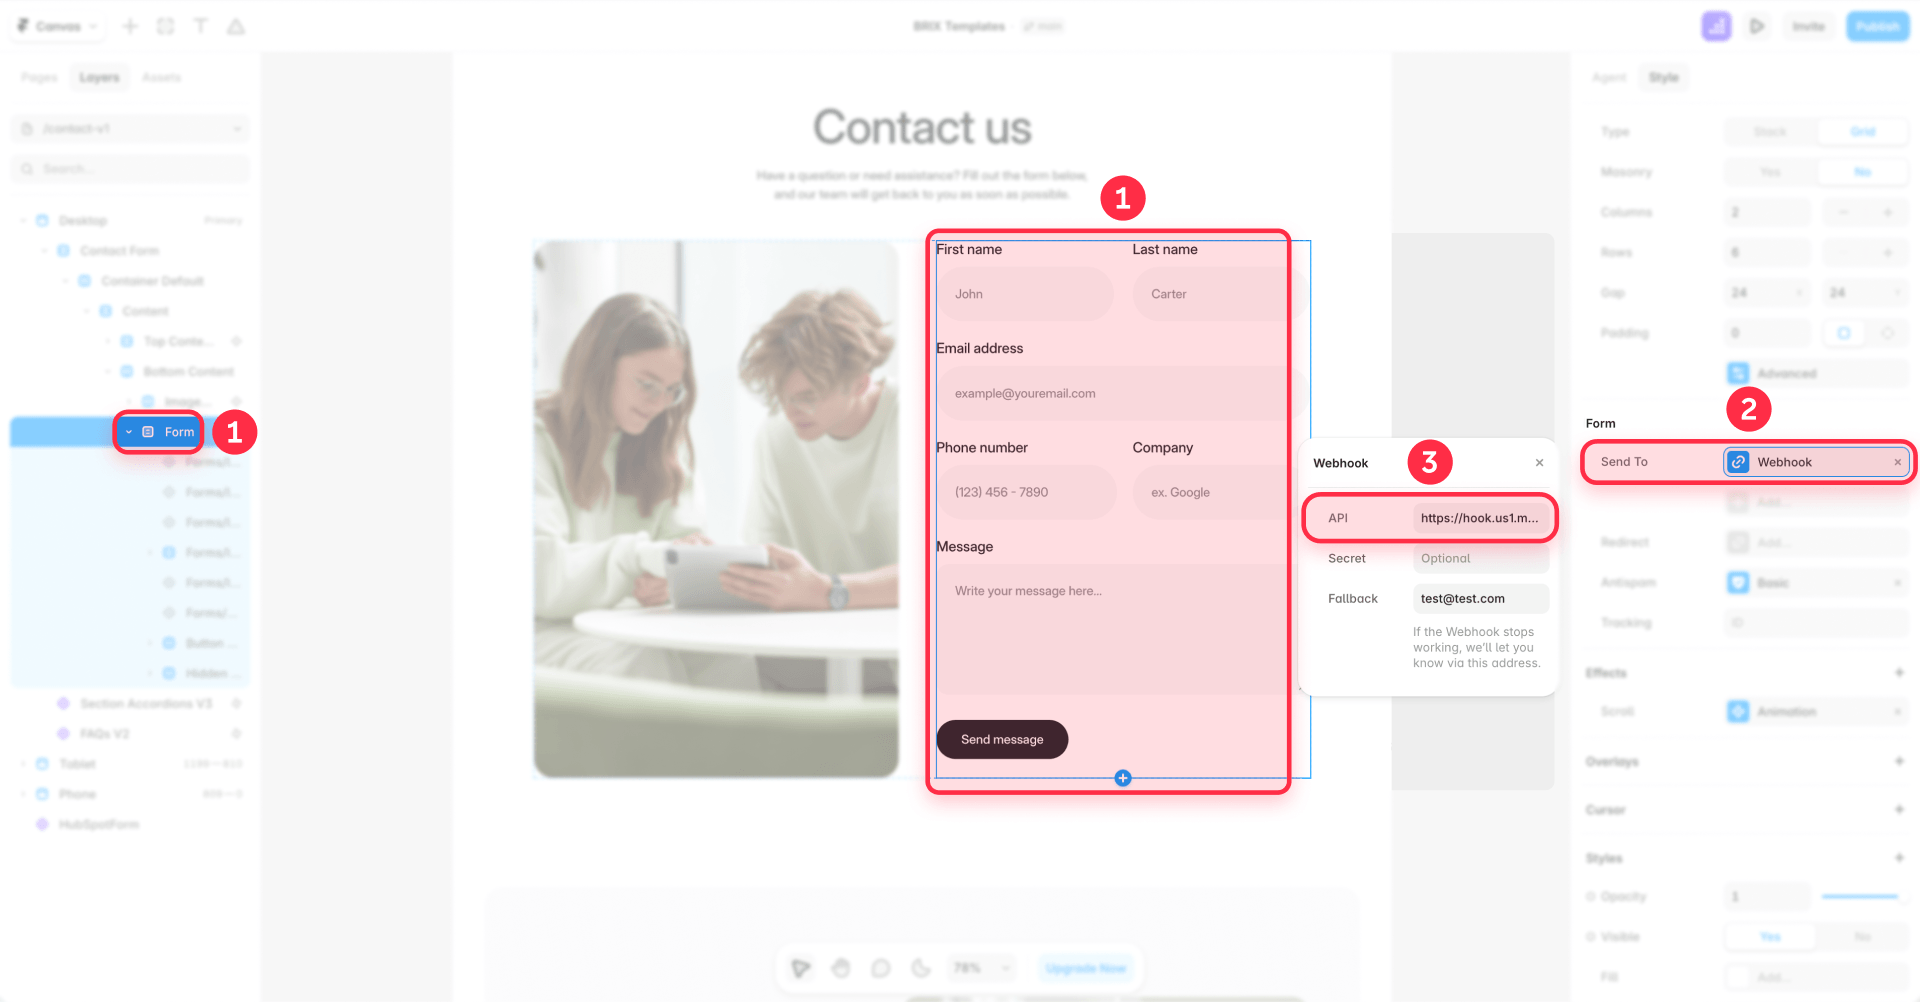
Return to your Framer project and select the form on the canvas. In the right sidebar, click Add… next to Send To and choose Webhook.
Paste the Make webhook URL into the URL field. Framer requires the URL to start with https://.
At this point, your form is configured to send submissions to Make, but Make does not yet know what data to expect.
Step 7: Publish and send sample data from Framer to Make
Framer forms must have a valid destination configured, and once the site is published, submissions are sent to that destination automatically. A form with no configured destination will trigger publishing errors.
Publish your Framer site, then fill out and submit the form with realistic test data. In Make, you should see the webhook module register the incoming request.
Click on the webhook module to inspect the received payload. Verify that all your form fields appear with the correct names and values. If fields are missing or named incorrectly, fix them in Framer and resubmit.
Step 8: Connect Notion to Make
Make supports both internal and public Notion connections. For most workflows, internal integrations offer more explicit control.
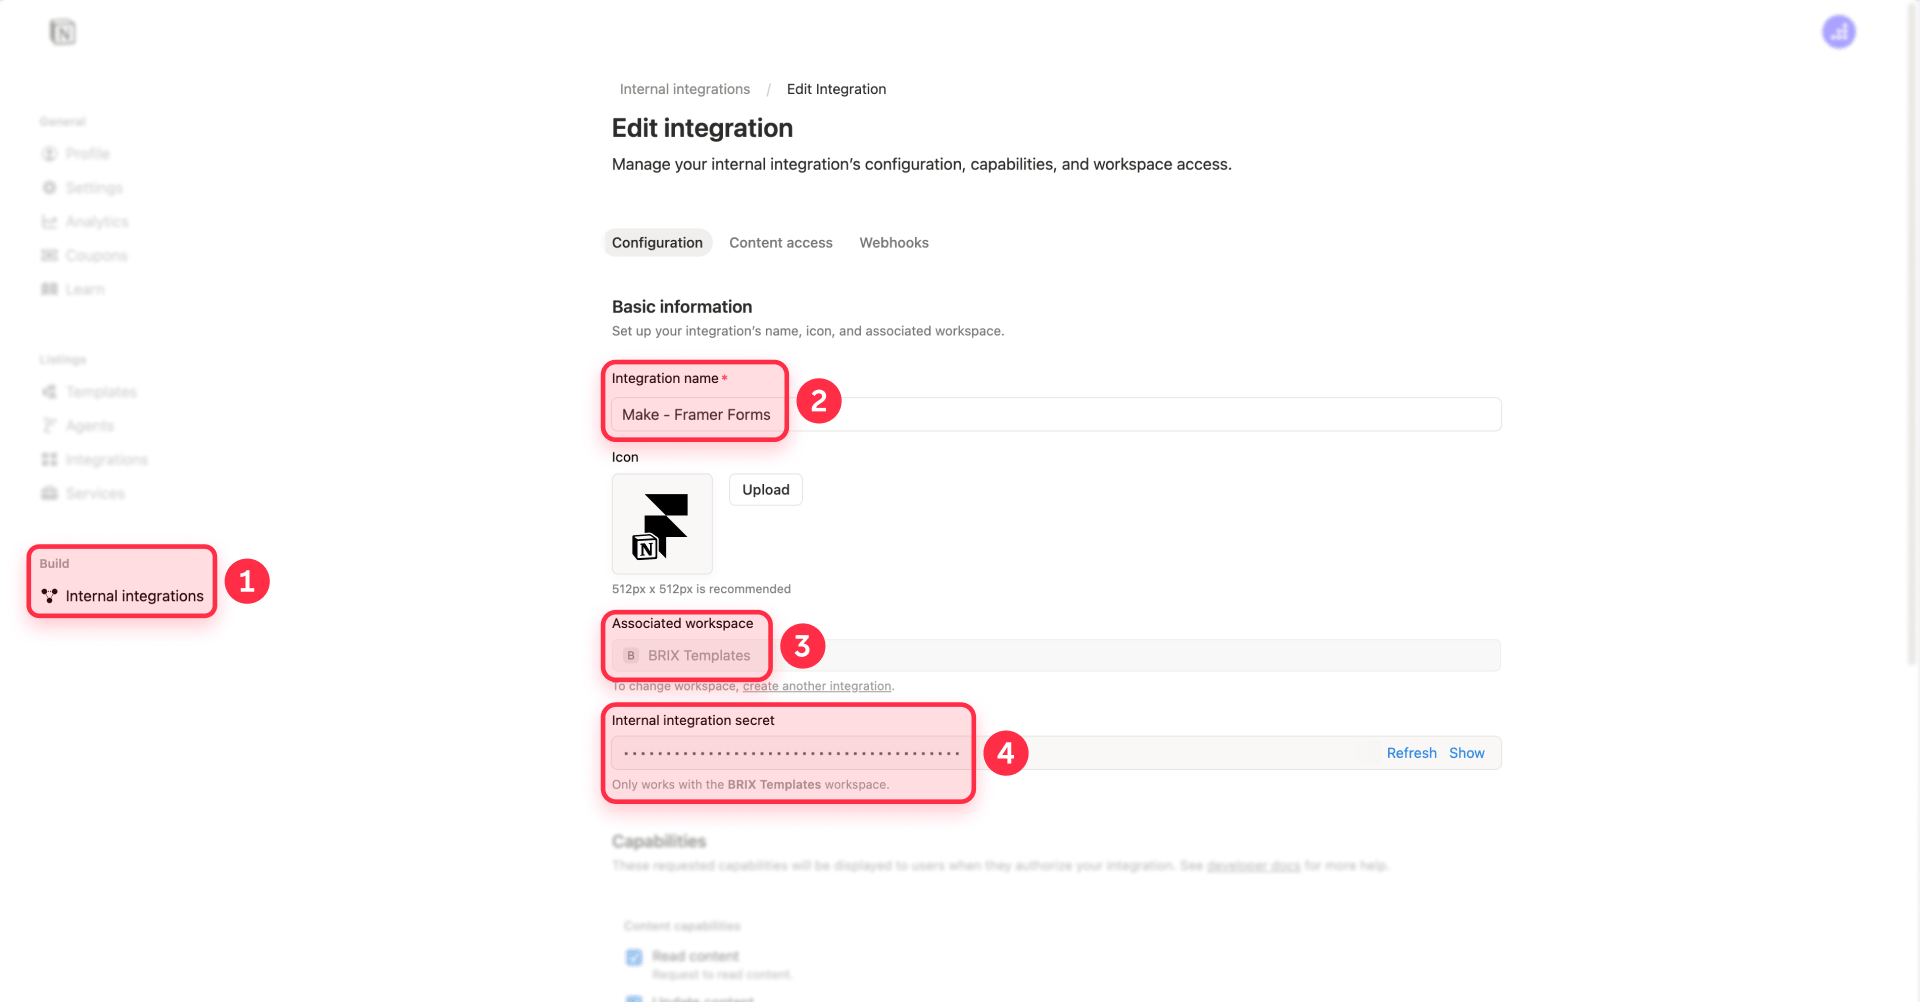
To set up an internal integration:
- Go to Notion's Settings & members → Integrations area.
- Create a new internal integration.
- Set the Capabilities to include content insertion (required for creating pages).
- Copy the Internal Integration Token.
- In Make, add a Notion module to your scenario and create a new connection using the token.
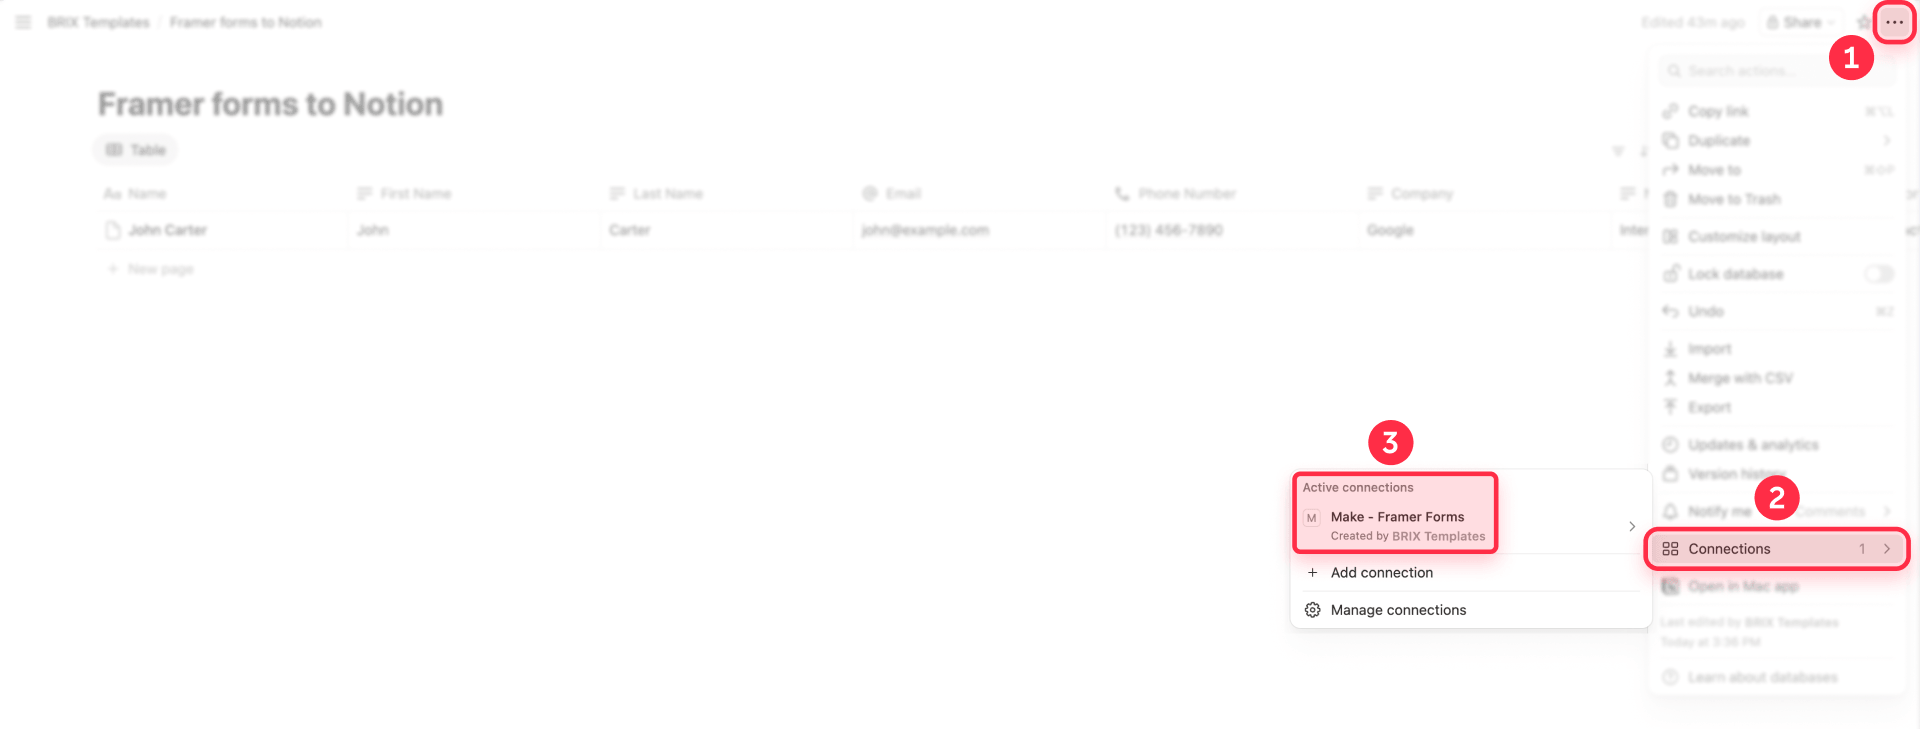
Critical step: After creating the connection, you must manually share your target Notion database with the integration. In Notion, open the database page, click the options menu (•••) in the top right, select Add connections, and choose your integration. If you skip this step, Make cannot see or write to the database, and API requests will fail with permission errors.
Step 9: Add the Notion action module in Make
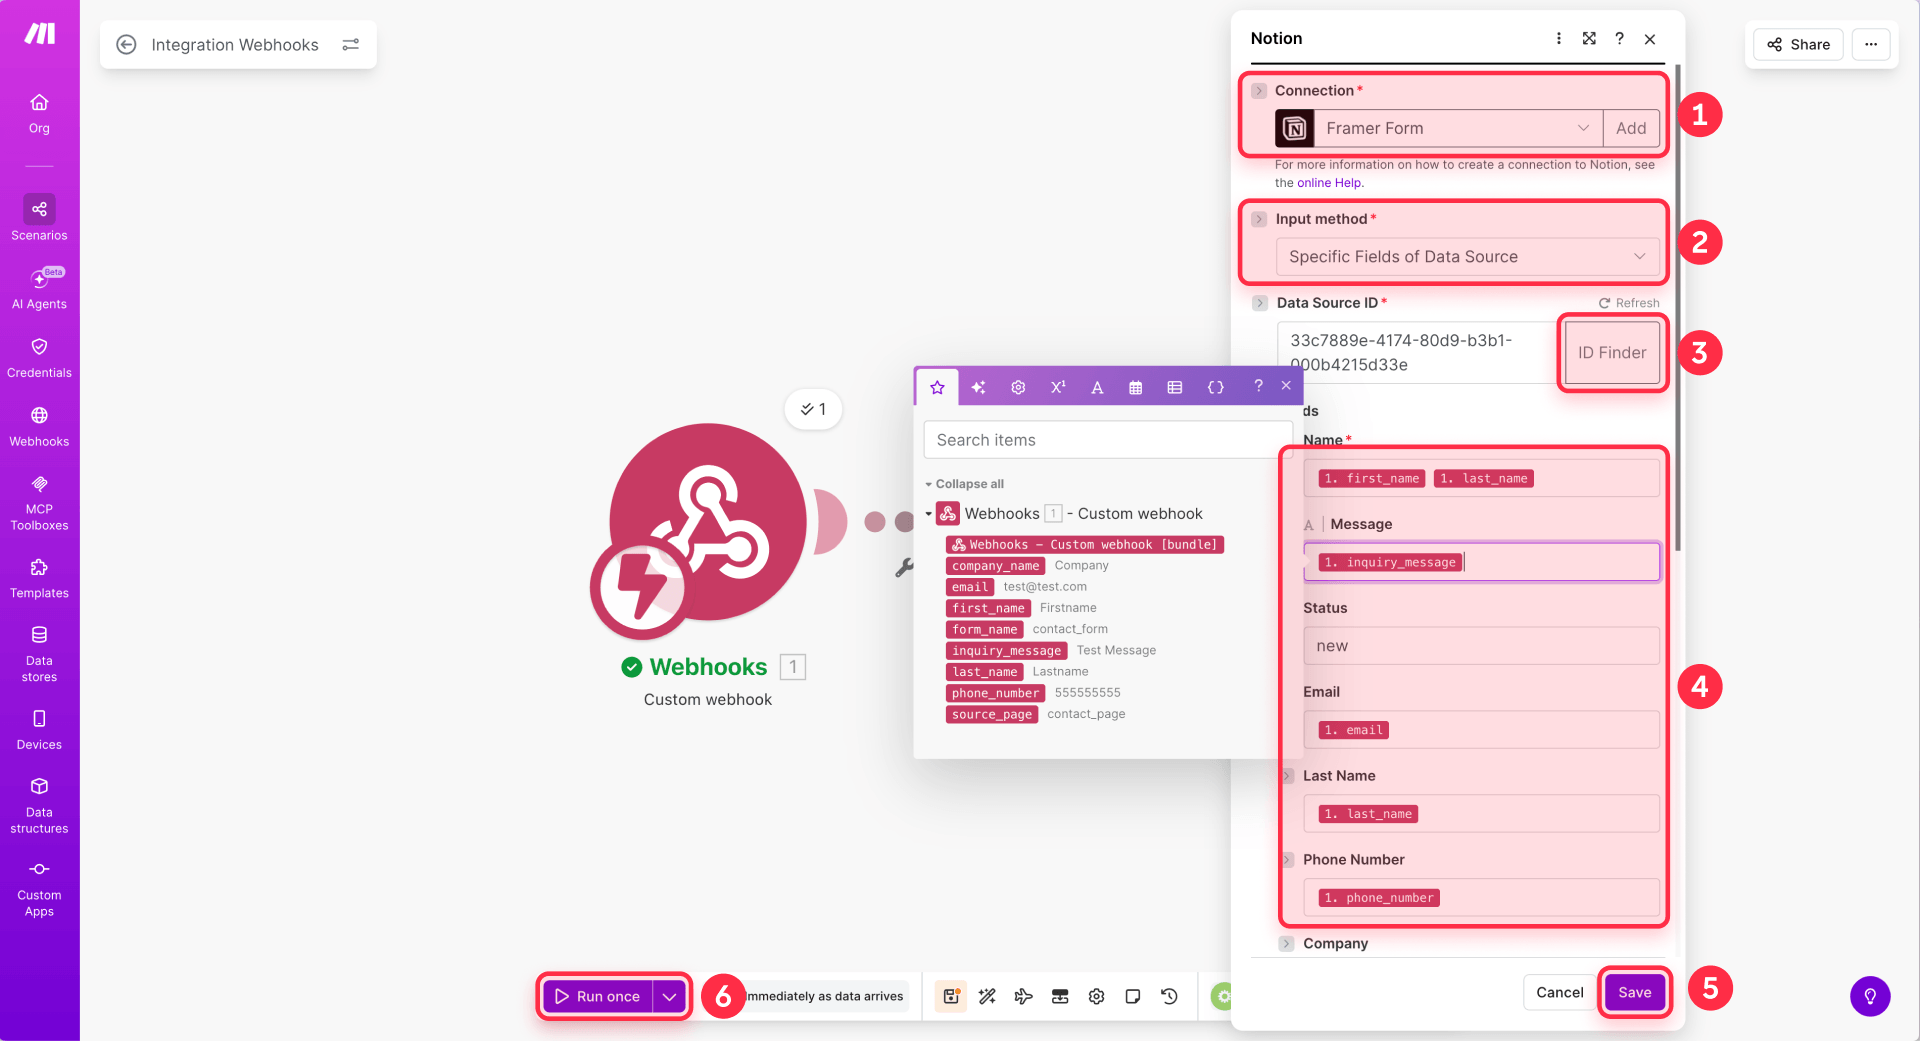
Add the Notion module that writes submissions to your database. In Make's Notion app, use Create a Data Source Item for new setups.
Make marks Create a Database Item as legacy because Notion's newer API introduced multi-source databases. The current module family is built around data sources, and using legacy modules can cause mapping failures or unexpected behavior in newer Notion configurations.
If Make does not list your Notion database in the picker, verify that you shared the database with the integration via Add connections. If you added new databases after creating the Make connection, you may need to reauthorize the connection to refresh available databases.
Step 10: Map Framer form fields to Notion properties
Map each field from your Framer webhook payload to the appropriate Notion property.
Two practical rules matter here:
Map the title property intentionally. Since Notion requires exactly one title property, use something stable and readable—the person's name, email, or a combined label.
Match property types correctly. Notion has specific payload formats for different property types:
- Email: Expects a string value.
- Phone number: Expects a string. Notion does not enforce format validation.
- Number: Expects a numeric value, not a string.
- Date: Expects an object with a start key containing an ISO date string.
- Status: Expects an object with a name key matching an existing status option.
- Select: Expects an object with a name key. Commas are not valid in select values.
- Multi-select: If the option name does not exist, Notion can add it if the integration has write access.
- Rich text: Expects an array of rich text objects, not a plain string.
Tip: Add a Submitted At property in Notion and populate it from Make at runtime using the now function. This gives you a consistent timestamp even if you later change form structure.
Step 11: Test the complete Framer to Notion workflow
Turn on your Make scenario. Submit a test entry through your live Framer form.
Verify that:
- The webhook receives the payload (check Make's execution history).
- The Notion module creates a new item in your database.
- All fields map correctly with proper values.
Test at least three cases before trusting the automation:
- A normal submission with all fields completed.
- A submission with missing optional fields.
- A submission from a different page or campaign where hidden/UTM fields should vary.
This testing catches fragile mappings before real leads hit your system.
Alternative methods for Framer to Notion connections
Framer form → Google Sheets → secondary automation → Notion
Only use this if you actually want Google Sheets.
Some teams take this route because Framer supports Google Sheets natively, and community discussions about Framer to Notion often mention a Sheets middle layer. But this is only useful if you intentionally want a spreadsheet mirror, backup log, or reporting layer. If Notion is your real destination, adding Sheets just adds friction.
External form tool embedded in Framer → Make/Zapier → Notion
Use this for complex forms.
Framer's native forms are strong for standard lead capture. But if you need heavier conditional logic, multi-step application flows, or more advanced validation behavior, consider embedding a dedicated form tool.
Recommended tools:
- Tally: Free-tier friendly, embeds cleanly in Framer, and has native Notion integration.
- Jotform: A more traditional form builder with extensive field types and integrations, typically connected to Notion through Zapier or another automation layer.
The integration pattern is the same regardless of which tool you choose: build your form in the external tool, embed it in Framer (usually via embed code or iframe), and connect the form tool to Notion through Make, Zapier, or the tool's native integration. You lose some of Framer's native form design flexibility, but gain much more powerful form logic.
Advanced tips for Framer to Notion workflows
- Add tracking IDs to your Framer forms as an operational best practice—this can help you manually correlate conversion data with leads in Notion when reviewing analytics separately. For a complete analytics setup alongside your Notion workflow, see our guide to tracking Framer form submissions with GTM and GA4.
- Use hidden fields strategically with values like page_source, form_name, and campaign_variant to make your Notion database filterable and useful for analysis.
- Pass the page URL to Notion by adding a hidden field that captures the current page URL. This makes it easy to trace exactly where each lead came from, especially when running multiple landing pages.
- Set up a backup destination using Framer's fallback email feature, if available in your setup, for mission-critical forms so you have an additional layer of protection if Make has issues.
When to use Make vs other automation tools
Make is the recommended path for most Framer to Notion workflows because it generally balances simplicity, reliability, and cost. However, other options exist.
Direct Notion API: Fewer moving parts, but requires managing authentication, permissions, payload mapping, rate limits (Notion typically allows an average of 3 requests per second per integration), and API version changes yourself. Best for teams with engineering resources who want full control.
Zapier: Workable, but Zapier's official Notion + Webhooks integration templates are often marked as Premium, which can increase cost for basic workflows.
n8n: Offers more webhook and authentication control than Make, plus a higher payload limit (16 MB vs Make's 5 MB). The trade-off is additional workflow hosting and operational complexity.
For most Framer marketing sites, Make with Framer native webhooks remains a strong default because it typically requires no code, uses officially supported integrations, and keeps costs low for typical form volumes.
Troubleshooting common Framer to Notion connection issues
- Form submits but Make receives nothing: Verify the site is published, the form has a webhook destination configured, the webhook URL starts with https://, and the Make scenario is active. Also check that the webhook has not been inactive for more than 5 days—Make automatically deactivates unused webhooks and returns 410 Gone.
- Make receives data but fields are missing or named wrong: Framer uses input names as JSON keys. Check your field naming in the Framer form builder. If you hid a field with Visible instead of Hidden, it will be excluded from the submission entirely. If fields are missing from Make's mapping panel, resend a test submission and click Re-determine data structure in the webhook module.
- Make cannot find the Notion database: Confirm the database is shared with your integration via the options menu (•••) → Add connections in Notion. If you added the database after creating the Make connection, reauthorize the connection in Make to refresh available databases.
- Notion returns permission errors or 404: The database must be shared with your integration, and the integration must have content insertion capability enabled. Querying an unshared database returns 404, not a permissions error. Also verify you are using the correct identifier—newer Notion modules generally require data_source_id rather than database_id.
- Select or multi-select values not mapping correctly: Notion does not allow commas in select values. If your form data includes commas, clean the data in Make before sending to Notion, or use a different property type.
Frequently asked questions about Framer and Notion integration
What is the simplest Framer workflow for sending form submissions to Notion?
The simplest setup uses Framer native form submissions sent to a custom webhook, instantly triggering Make, which then creates a new page/item in Notion. This direct workflow avoids unnecessary tools.
Can Framer native forms send data directly to Notion?
No. Framer's native forms can send submissions via email, Google Sheets, or a custom webhook. Framer's official Notion plugin is for syncing Notion databases into Framer CMS, not for sending form submissions back into Notion. If you want Framer form data in Notion, you need a middleware layer such as Make or your own backend.
How do I connect a Framer form to a Notion database with Make?
Build your form in Framer, set its destination to a custom webhook, create a custom webhook in Make, send a test submission from Framer, and then add your Notion action in Make to create the new record in the target Notion data source. In Notion, make sure the integration has access to the original database/data source, not just a linked view, because Notion's API does not support linked data sources the same way the UI does.
Why is my Framer form webhook not reaching Make?
Start by checking the webhook URL itself, whether the Make webhook is still active, and whether the endpoint returns a direct 2xx response. Framer treats non-2xx responses as failures, does not follow redirects, and retries failed deliveries. On the Make side, custom webhooks that are not connected to any scenario for more than 5 days (120 hours) are automatically deactivated and return 410 Gone.
Does Framer retry failed webhook submissions to Make?
Yes. Framer expects a direct 2xx response from the webhook endpoint. If it gets anything else, it retries the submission up to 5 times, and it does not follow 3xx redirects. Make's webhook docs also note default and error responses such as 200 Accepted, 400 when the queue is full, and 429 for rate limiting, so those non-2xx cases can trigger Framer retries.
How do I map Framer form fields to Notion properties in Make?
Framer sends webhook submissions as JSON, using your form input names as the keys. In Make, you can inspect the parsed webhook payload and map each incoming field to the matching Notion property. Keep the property types aligned—for example, emails should go to Email properties, dates to Date properties, and choice-based fields to Select or Multi-select properties.
How do I find the correct Notion data source ID for a Framer-to-Notion Make setup?
This matters more now because Notion's newer API model separates databases and data sources in many contexts. In the Notion app, open the database, go to Manage data sources, and use Copy data source ID. You can also retrieve the database first and inspect its data_sources array. In the current API model, new pages are typically created under a data source parent, not the old database parent structure.
Conclusion
Connecting Framer forms to Notion gives you the operational infrastructure to turn website visitors into organized, actionable leads. The webhook-to-Make-to-Notion architecture is the cleanest path because it uses Framer's native capabilities, Make's free tier, and Notion's current API model.
The key insight is understanding the Framer-first approach: Framer handles form UX and capture, Make handles webhook automation and routing, and Notion handles storage and operations. This separation works with each tool's strengths rather than against them.
If you need help implementing this workflow or want to explore more advanced automation patterns for your Framer site, our agency team can assist with the technical setup and ongoing optimization.


Join readers commenting on this post!