
Adding a Back-to-Top button on a single Webflow page is straightforward. The confusing part starts when you place that button inside a reusable footer Component and it starts pointing to the wrong page — or when you publish a CMS blog post and the button does nothing at all.
This article covers three ways to set it up: on a normal Webflow page, inside a reusable footer Component, and on CMS Collection template pages. All three methods use the same #top URL pattern, so you can keep the setup simple and avoid custom code.
Why add a Back-to-Top button in Webflow
- Long-form content: Blog posts, documentation, and case studies often run well past the viewport. Scrolling back to the top is repeated friction — especially on mobile.
- Mobile usability: Thumb stretching, multiple swipes, and lost momentum make returning to the top a pain point on smaller screens. A single tap is faster.
- Deep-link entry points: Visitors landing in the middle of a page via search results, anchor links, or shared URLs need a quick way back to the hero, navbar, or main navigation.
- Reusable Component compatibility: When the button lives inside a footer Component, it needs to work across every page type without per-instance configuration — which is where most setups break.
How the #top pattern works in Webflow
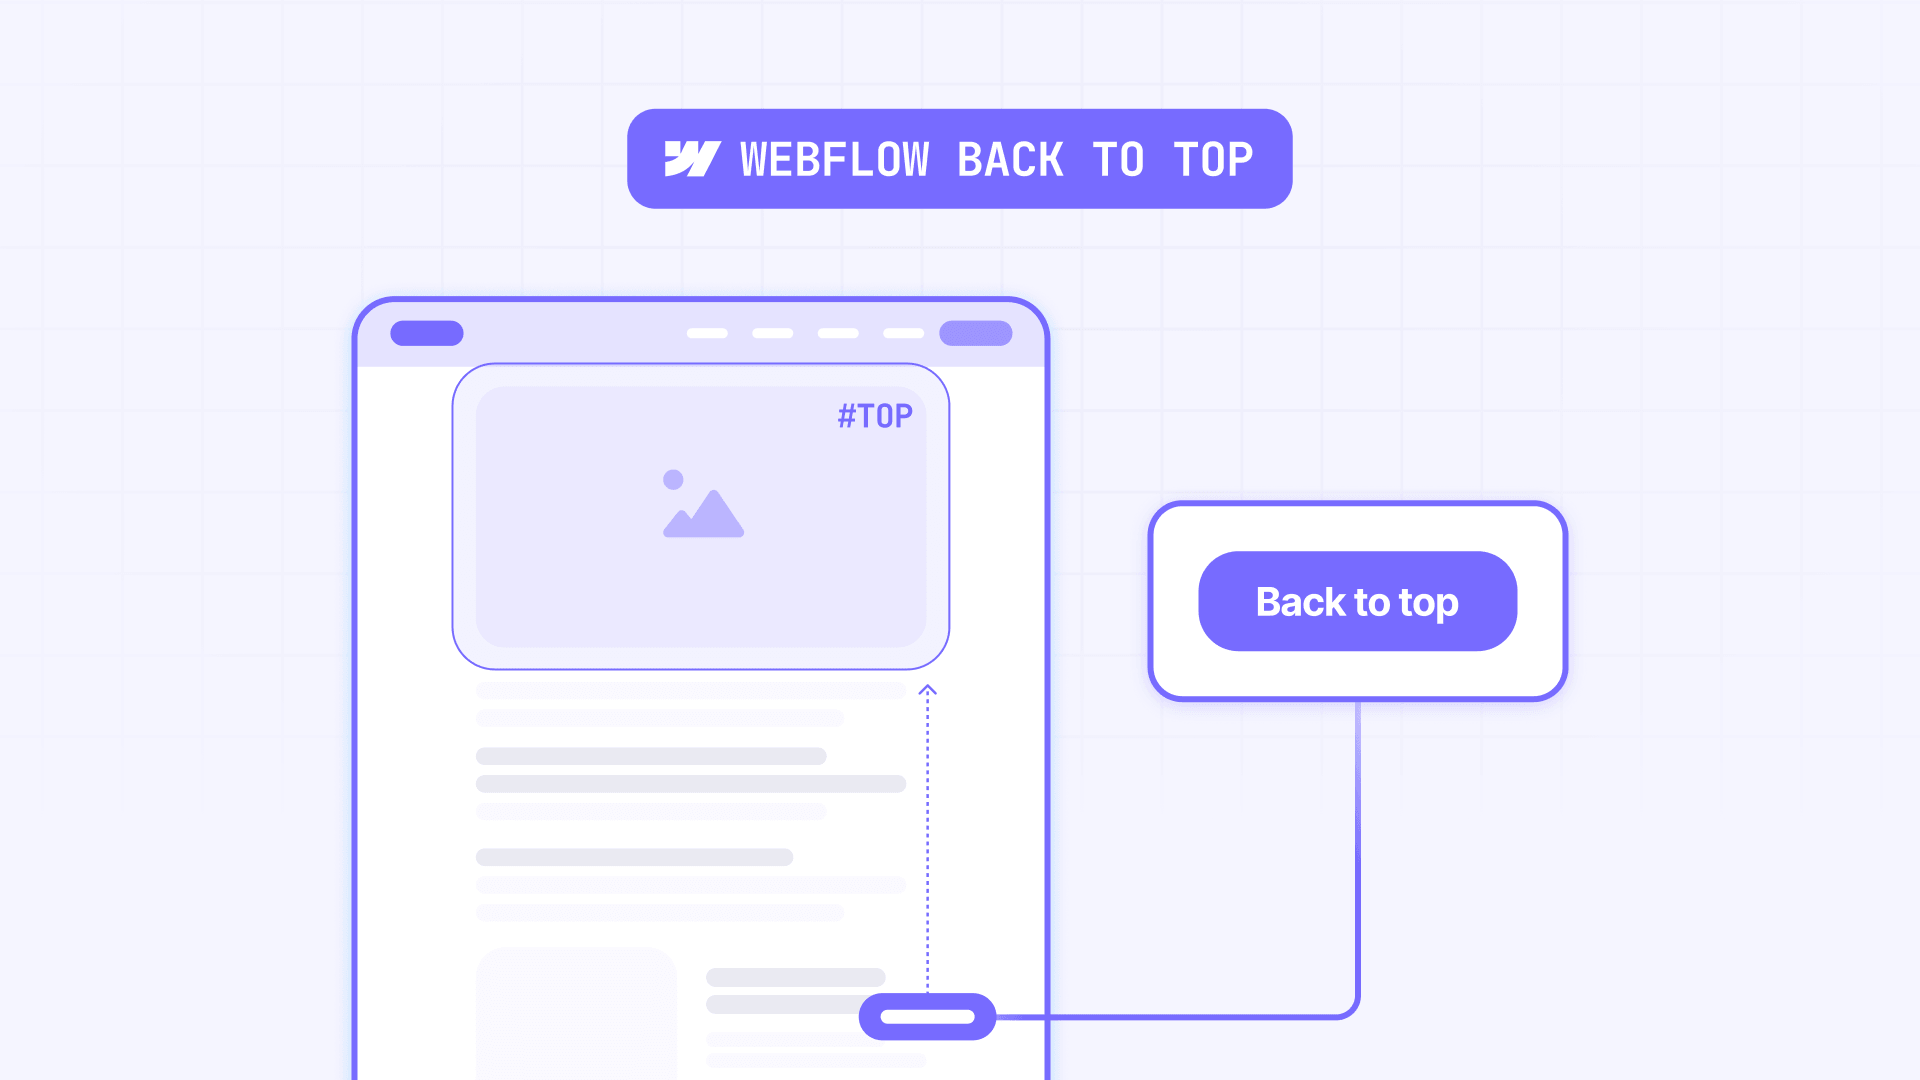
Webflow uses Element IDs for anchor links. You assign an ID to an element, then create a link that points to that ID. When the visitor clicks the link, the browser scrolls to the element with the matching ID.
The key to making a Back-to-Top button scalable: set the link type to URL and enter #top. This is a URL fragment that resolves relative to whatever page the visitor is currently on.
Do not use the Page Section link type for the Back-to-Top button. Page Section links reference a specific page's element. When the button is inside a reusable Component, that reference hardcodes to one page — which is why the button breaks. The URL link type with #top avoids this problem entirely.
Every page that uses the button needs an element with the ID top near the top of the page. The browser then scrolls to that element when the visitor clicks the button. For more patterns using anchor links in Webflow — including linking to sections on other pages — see our guide on how to create cross-page anchor links in Webflow.
Method 1 — Add a Back-to-Top button on a normal Webflow page
This is the base setup. If you only have a single page or do not use reusable Components, this is all you need.
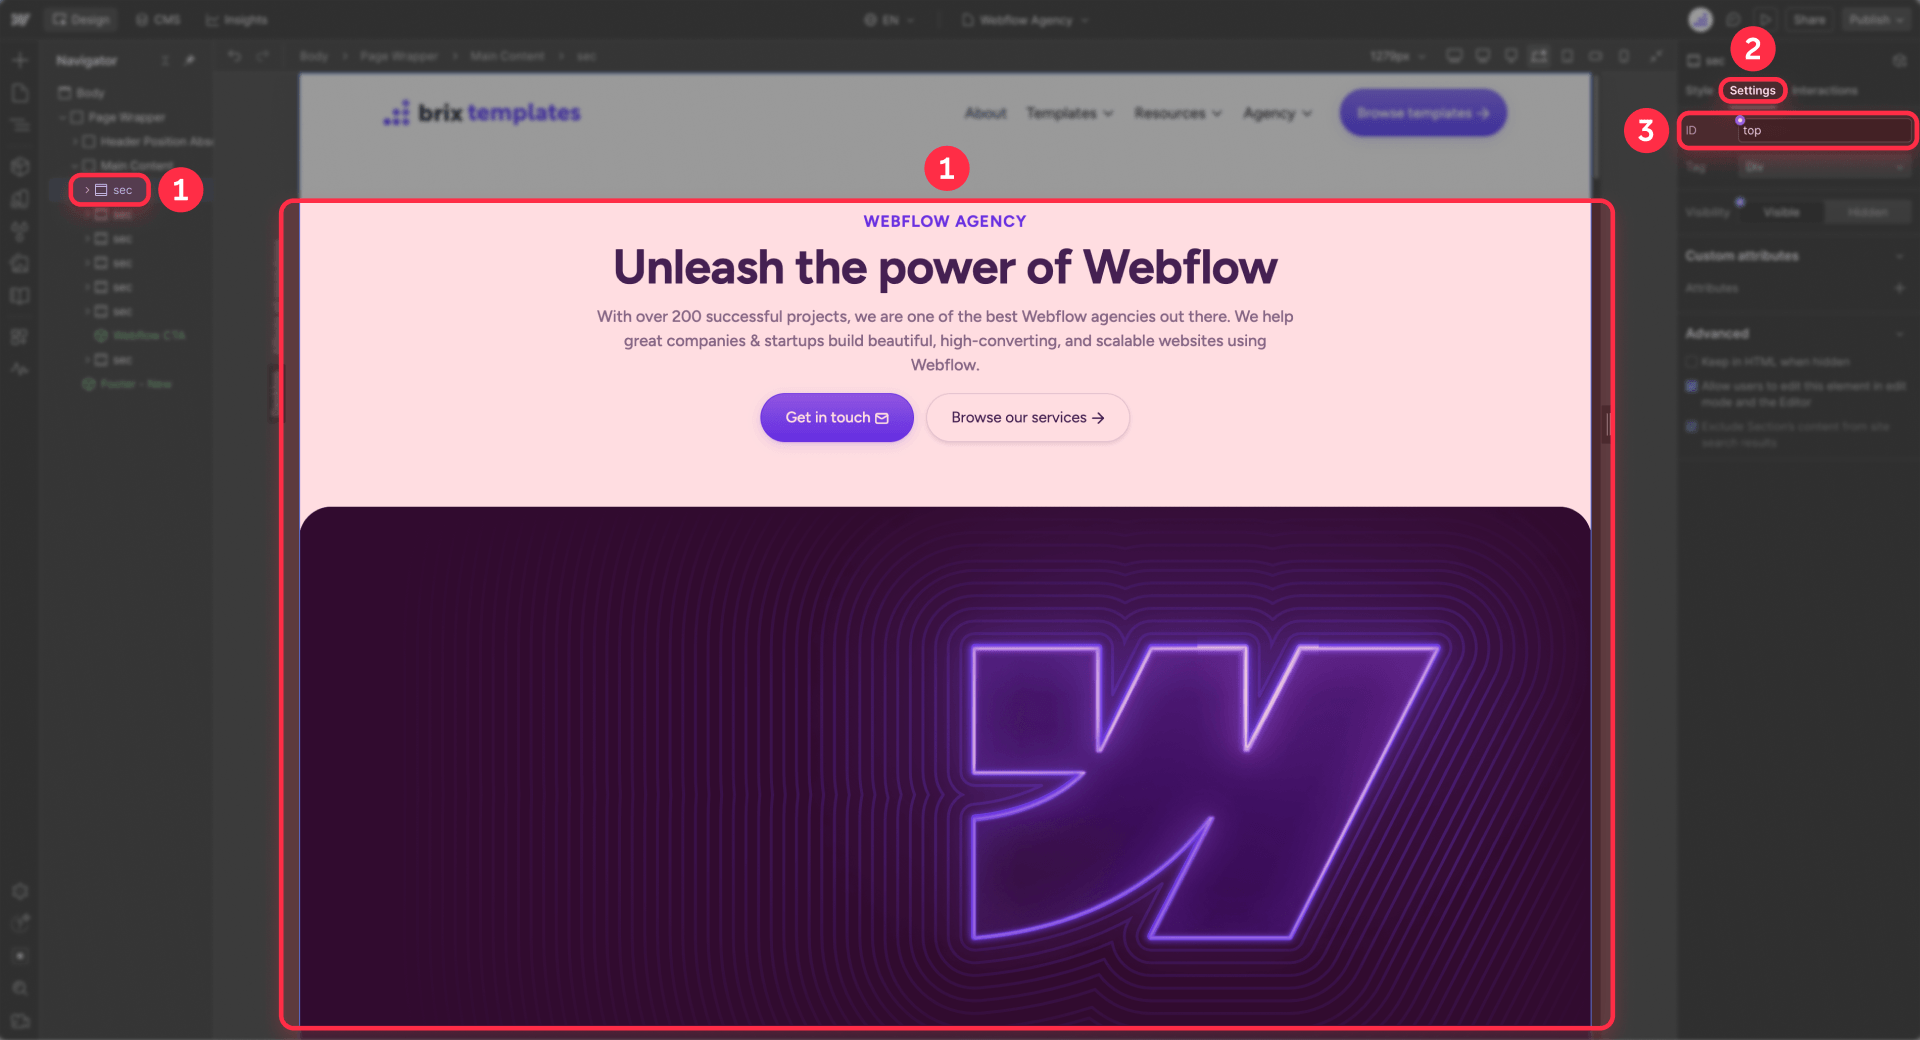
- Add the top ID
Select the hero section, top wrapper, or a dedicated div at the top of your page. In the Settings panel, enter top in the ID field. This is the element the button will scroll to.
- Create the button
Add a Button or Link Block to your page. Style it as a Back-to-Top button using text, an arrow icon, or both. If the button only uses an icon, add aria-label="Back to top" so screen readers understand its purpose.
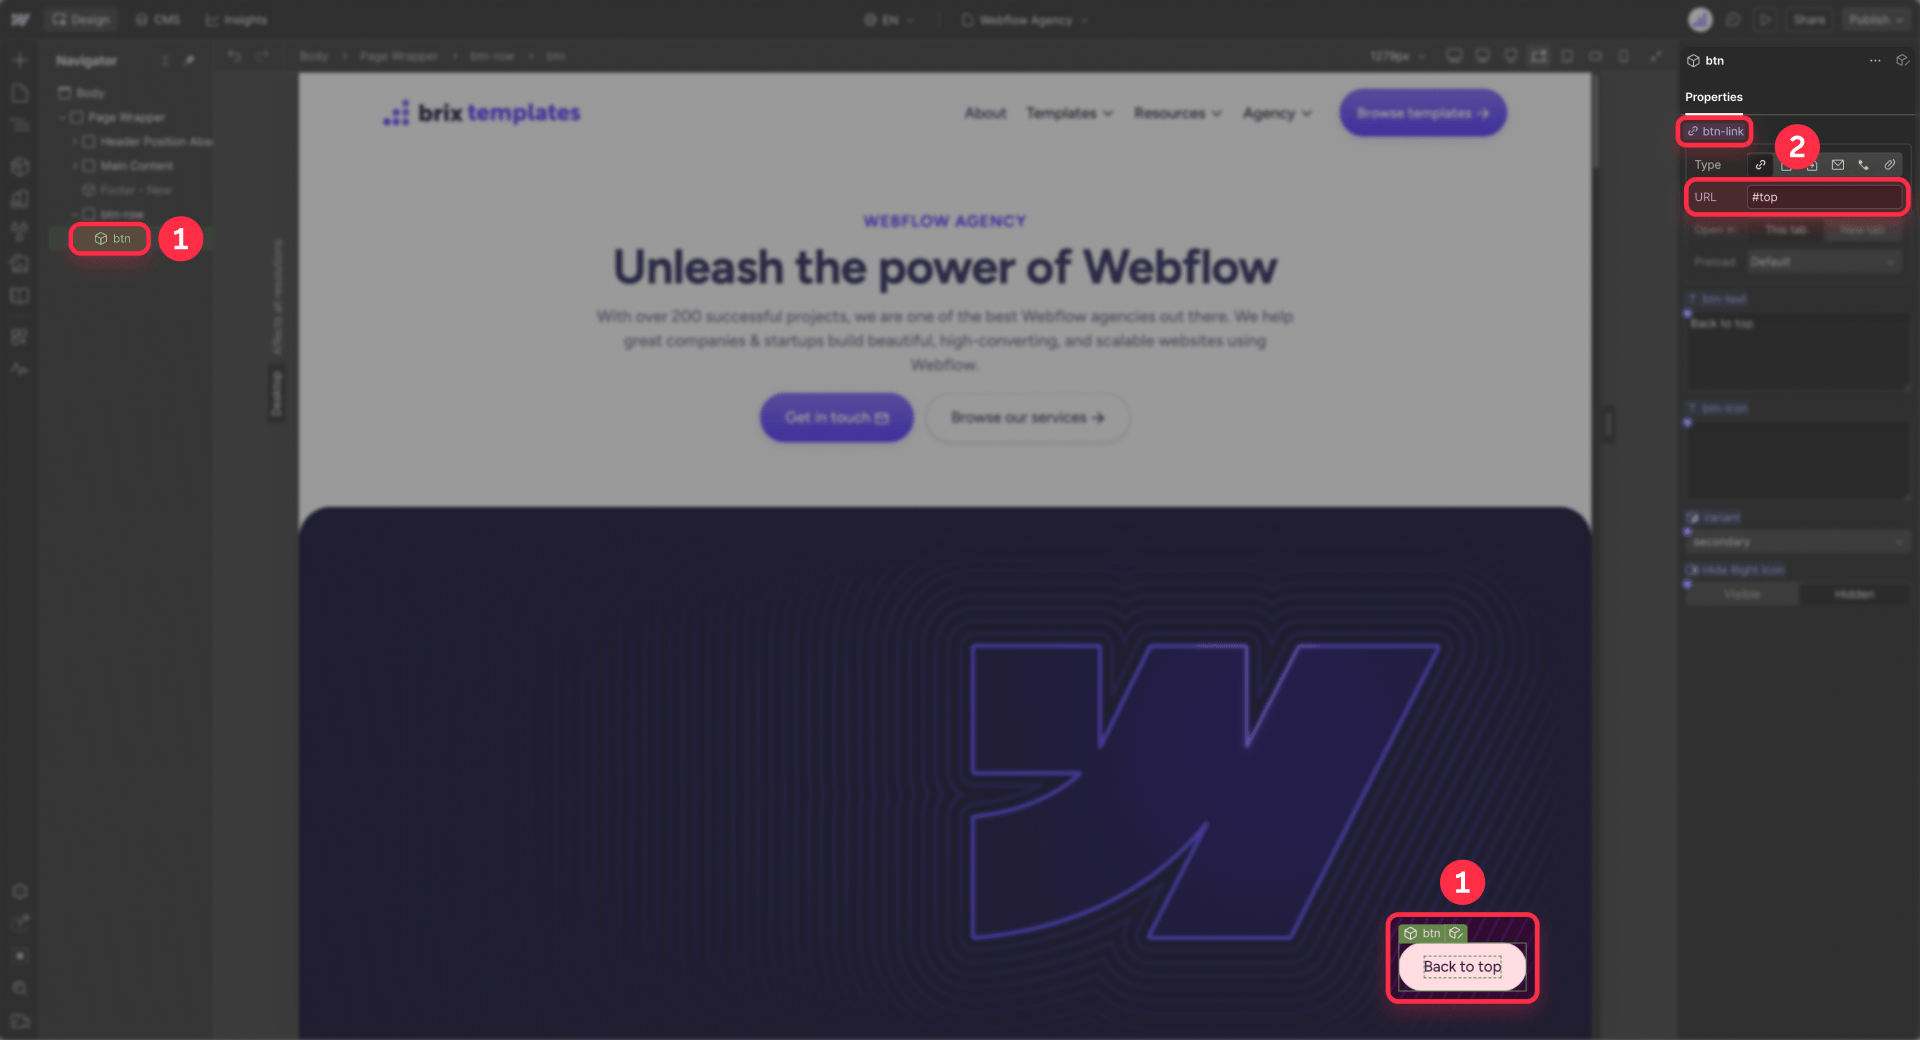
- Link the button to #top
Select the button, set the link type to URL, and enter #top. For this reusable setup, avoid using Page Section as the link type. A Page Section link can work on a single page, but #top is the better pattern if you want the same button to work later inside reusable Components.
- Set the button to fixed position
To keep the button visible while users scroll, set the button or its wrapper to Position: Fixed. Place it where it fits your layout, usually near the bottom-right corner. You can use pixel, rem, or percentage values depending on your design; just test the placement across desktop, tablet, and mobile breakpoints.
- Publish and test
Publish the page and click the button on the live or staging site. It should scroll to the element with the ID top. On mobile, keep the clickable area at least 44px × 44px so the button is easy to tap.
Method 2 — Add the button inside a reusable footer Component
This is where most Back-to-Top setups break. When you place the button inside a reusable footer Component and link it to a Page Section, the link can point to the page where it was originally configured. Every other page that uses that footer Component may end up with a button that scrolls to the wrong page — often the homepage.
The fix is to use the same #top URL pattern inside the Component.
- Open the footer Component
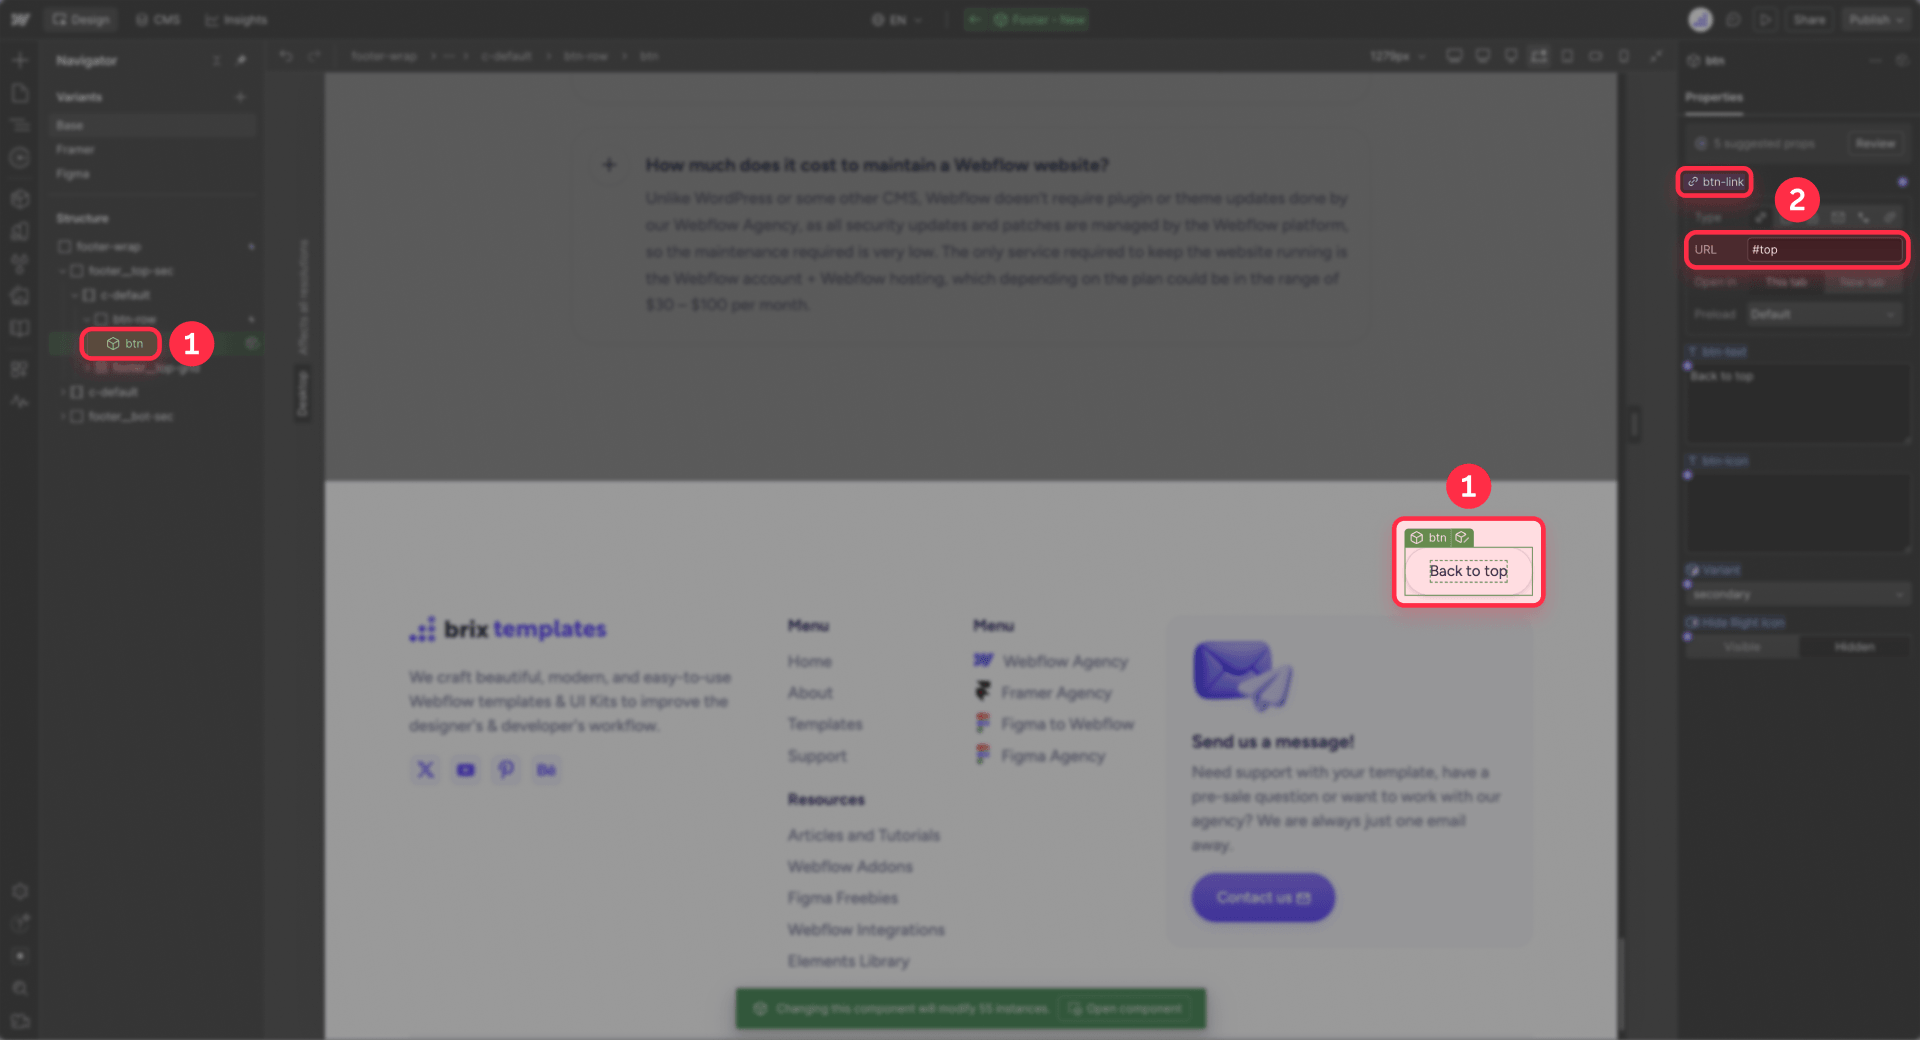
Open the footer Component in the Designer and select the Back-to-Top button inside it.
- Set the link to URL #top
Set the button’s link type to URL and enter #top. Because #top is a URL fragment, the browser resolves it relative to the current page instead of hardcoding the button to one specific page section.
- Save the Component
Save the Component. The same footer can now be reused across pages without changing the Back-to-Top link on each instance.
- Verify every page has the top ID
Each page that uses the footer Component should have an element with the ID top near the top of the page. In many browsers, #top may still scroll to the document top even without a matching ID because top can behave like a special fragment value. However, for a precise scroll target and consistent behavior, add an explicit top ID on every static page.
No Component Properties needed. No unlinking or detaching. No per-page configuration.
Method 3 — Add the button on CMS Collection template pages
CMS Collection templates generate pages dynamically. Each blog post, case study, or portfolio item is built from the same template, so the anchor target needs to live in the template — not in individual CMS items.
- Open the CMS Collection template
Open the CMS Collection template in the Designer, such as the Blog Post template, Case Study template, or Portfolio Item template.
- Add the top ID to the template
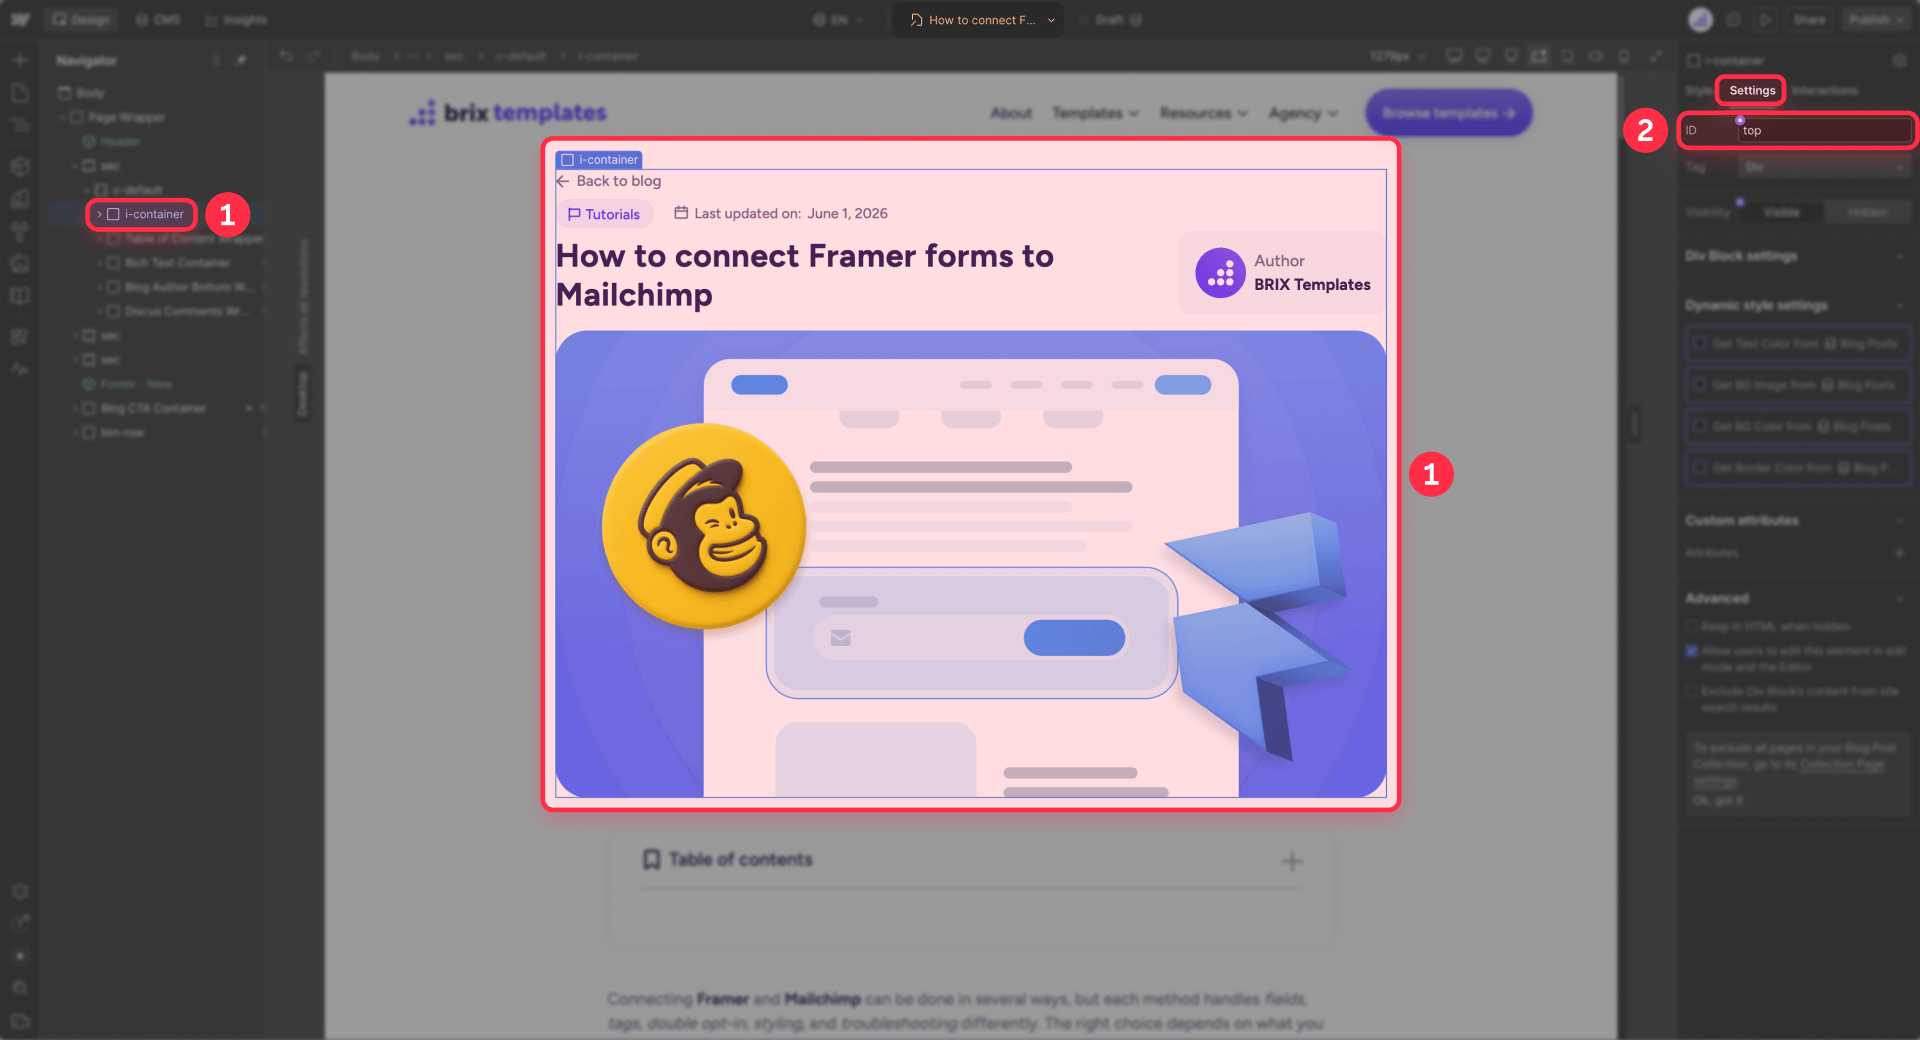
Select the hero section, top wrapper, or a dedicated div at the top of the template. In the Settings panel, enter top in the ID field. Every page generated from this template now has its own top anchor target.
- Use the same footer Component
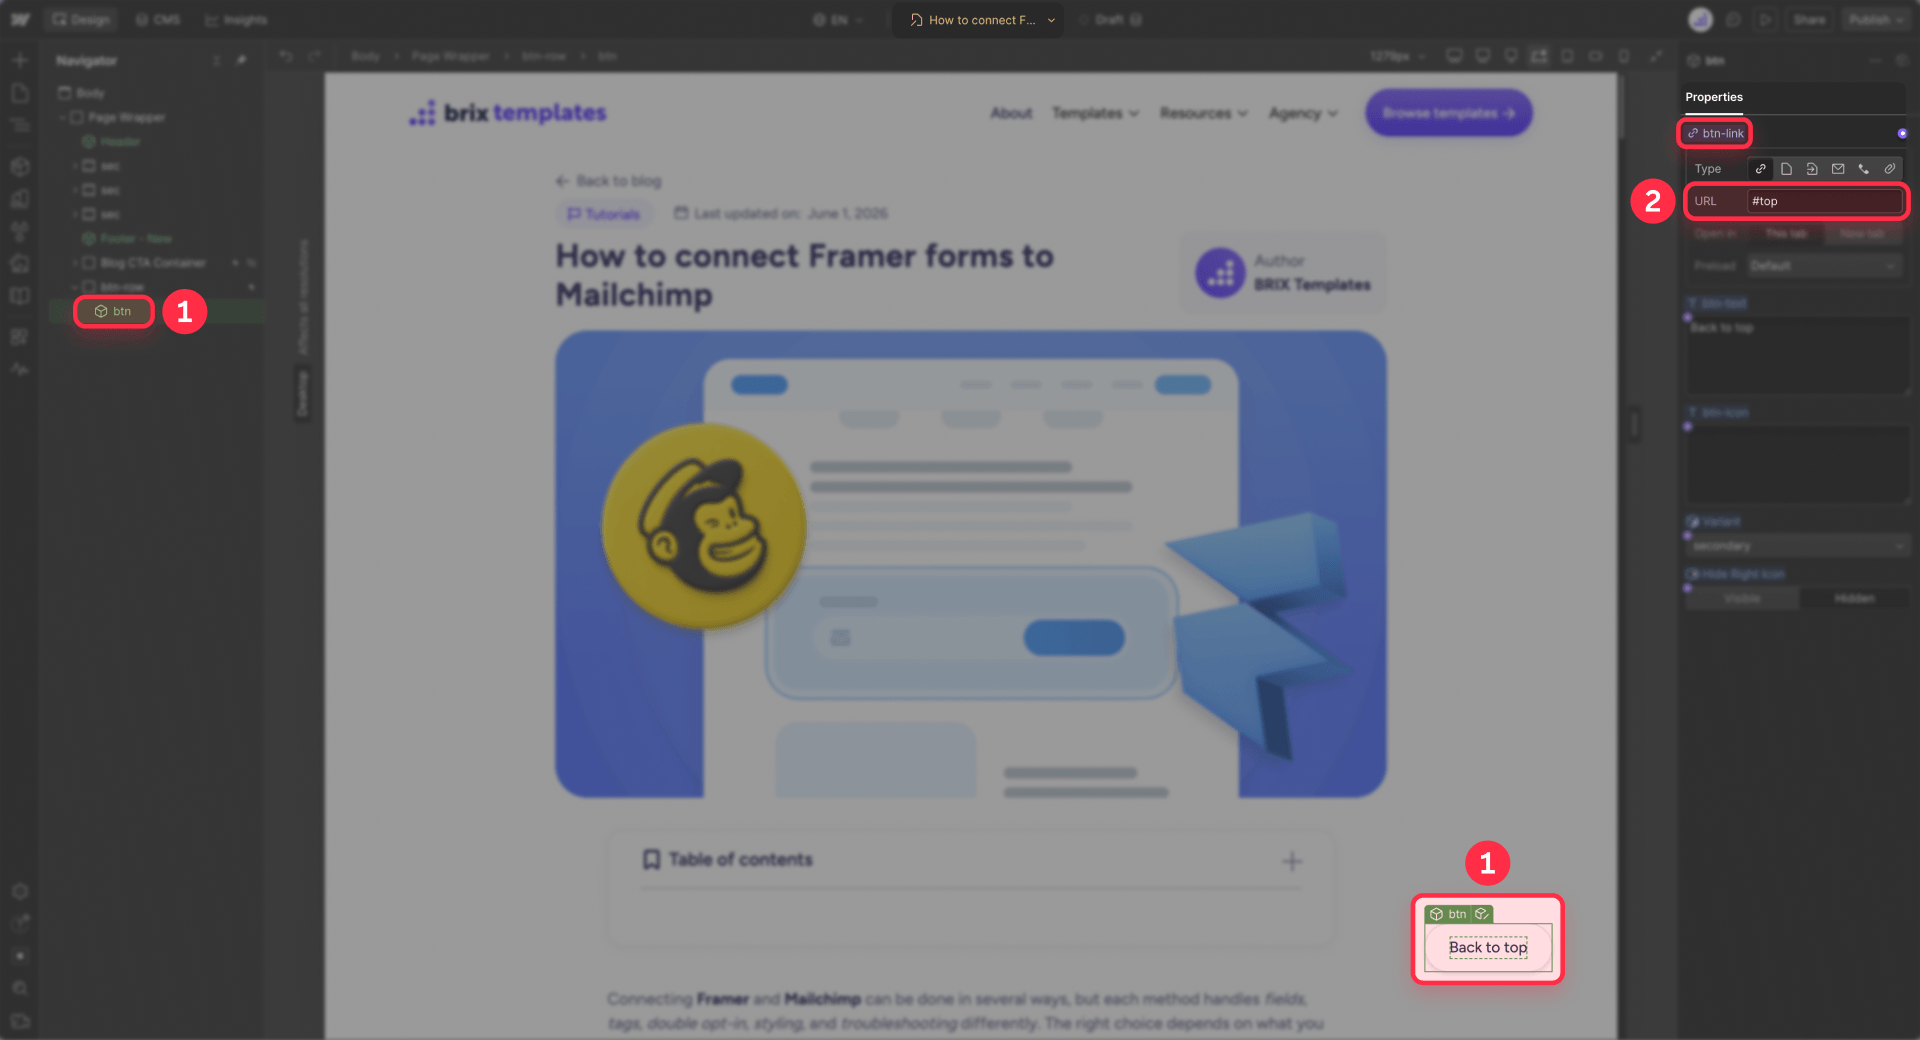
If your CMS template uses the same footer Component from Method 2, the Back-to-Top button already works. The #top URL resolves to the current CMS page’s top element.
- Publish and test a CMS item
Publish the site and test the button on at least one CMS item. Every CMS item inherits the template-level top anchor, so there is no per-post setup needed.
Do not create a manual CMS field like “Top URL” for every post. The template-level ID solves it automatically with zero per-item work.
Optional — Show the button only after scrolling down
A Back-to-Top button does not need to be visible when the visitor is already at the top of the page. In Webflow, you can hide the fixed button wrapper by default and reveal it smoothly after the user scrolls down.
- Hide the fixed button wrapper by default
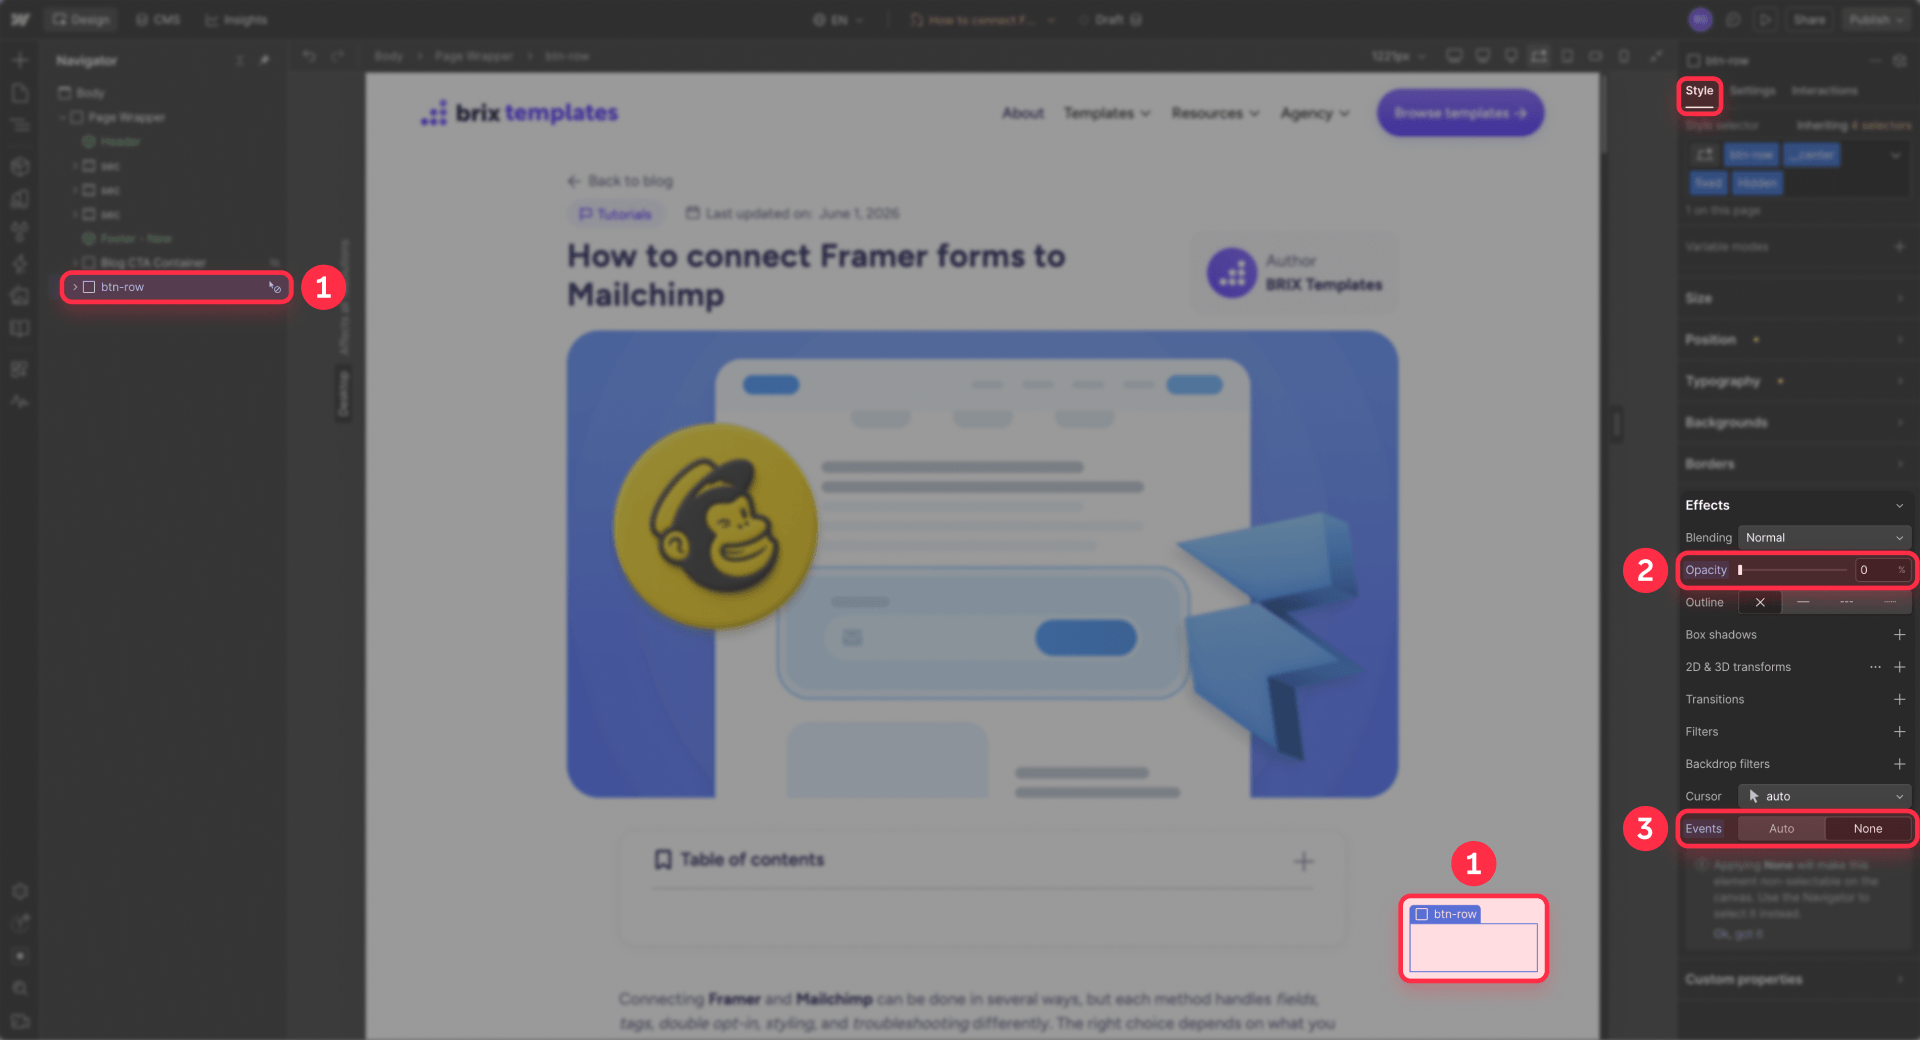
Select the wrapper that controls the fixed position of the button, such as btn-row. Set it to display: none, opacity: 0%, and events: none. This keeps the button hidden, non-clickable, and out of the way when the page first loads.
- Create a scroll interaction on the top section
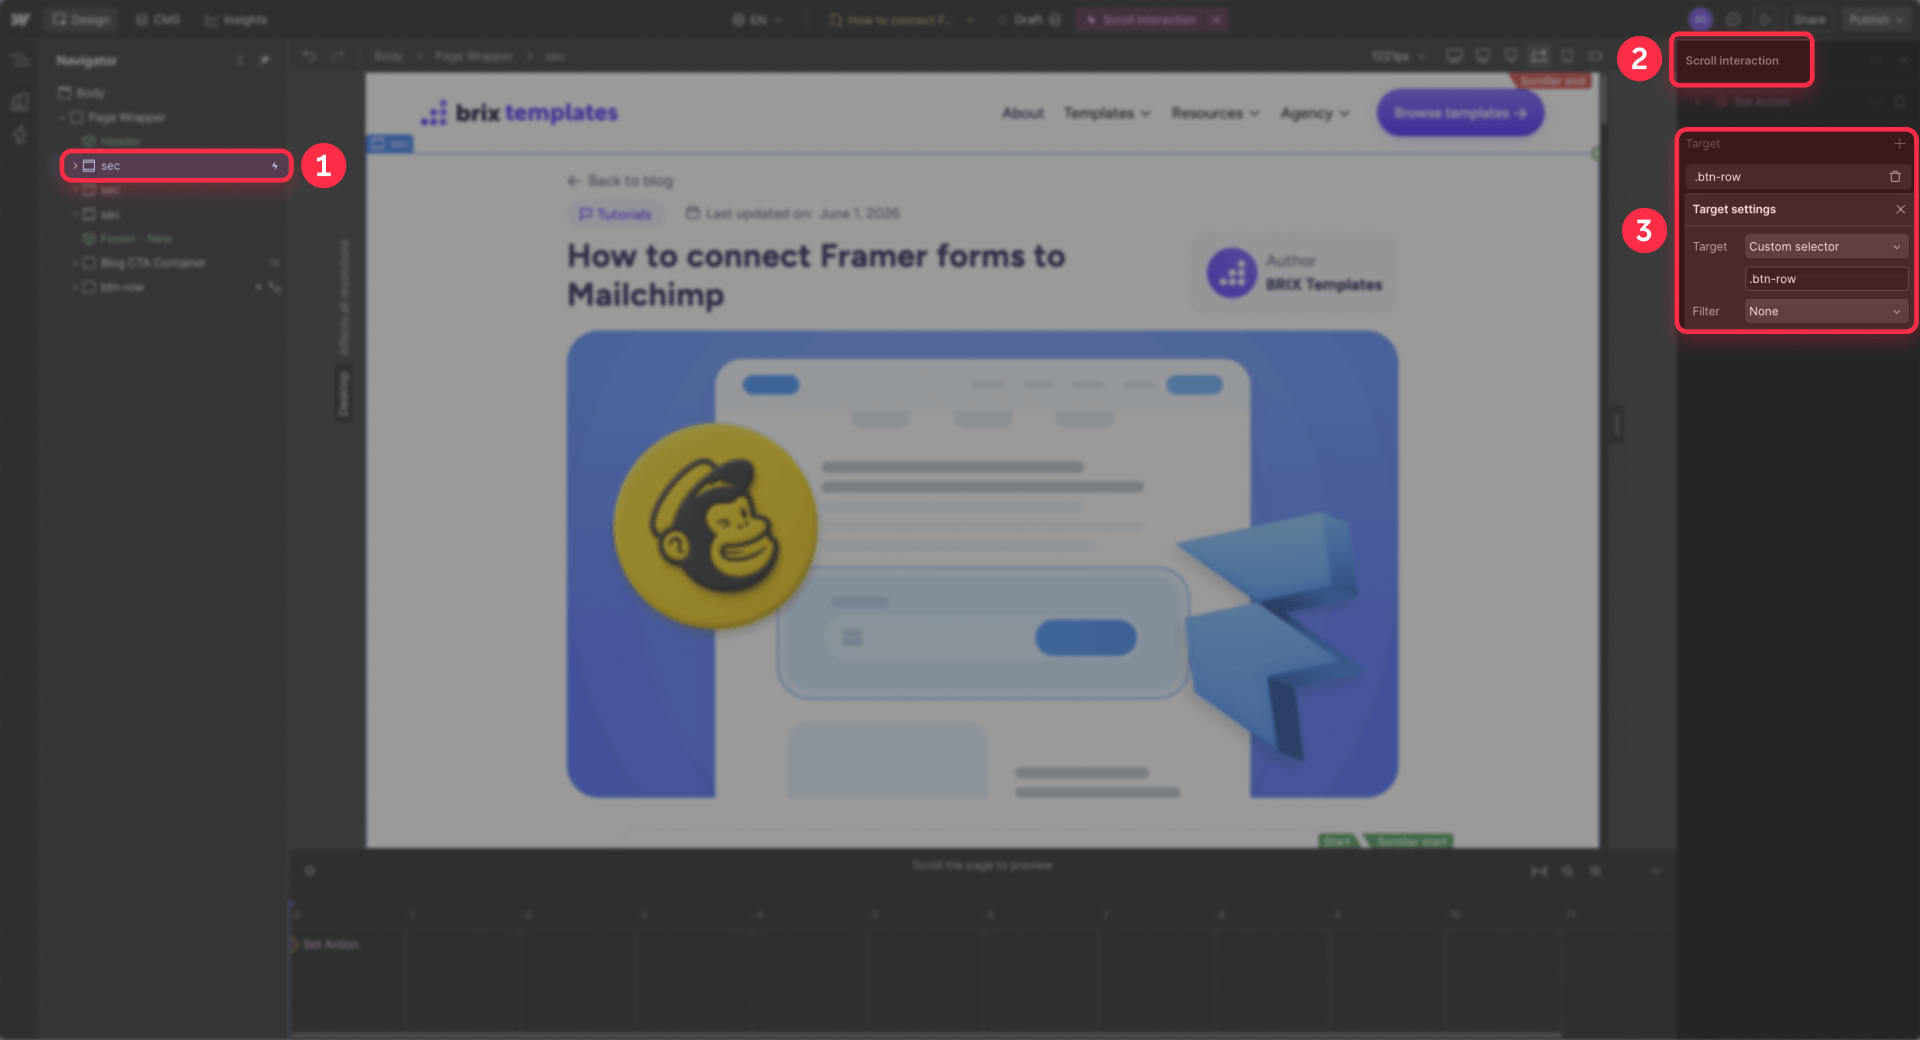
Select the top section or hero section of the page and create a Scroll interaction. In Webflow’s newer Interactions with GSAP panel, the trigger is the section being scrolled, but the action target should be the fixed button wrapper.
- Target the fixed button wrapper
In the interaction action, set the target to the button wrapper using a custom selector such as .btn-row. Use no filter so Webflow targets the button wrapper anywhere on the page, not only inside the trigger section.
- Prepare the button before it appears
Add a Set action for .btn-row with display: flex, opacity: 0%, and events: auto. This makes the button available again, but still visually hidden.
- Animate the button into view
Add an Animate action right after the Set action and animate .btn-row from opacity: 0% to opacity: 100%. A short duration, such as 0.2s or 0.3s, is usually enough for a smooth fade-in.
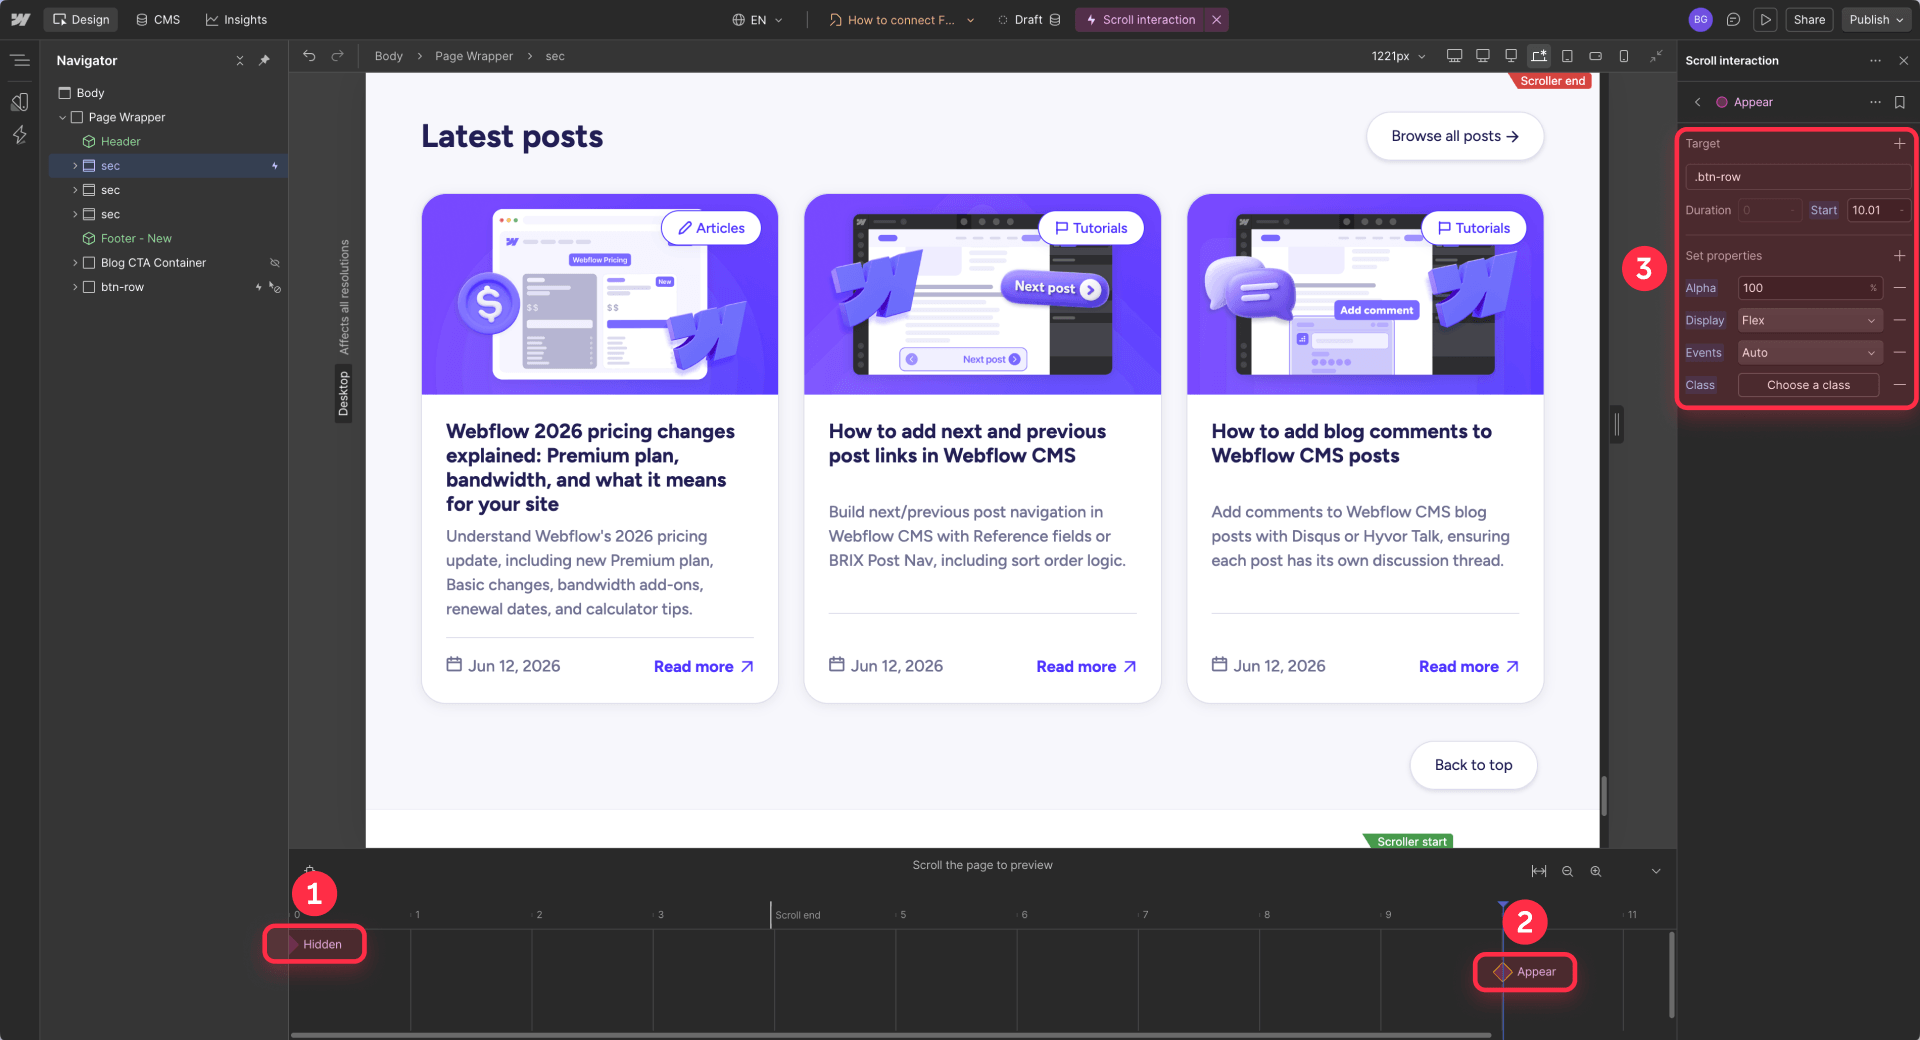
Do not hide the button with opacity alone. Use display: none for the hidden state, then switch to display: flex before animating the opacity. This prevents the hidden button from being accidentally clickable or reachable via keyboard.
For a deeper walkthrough on timing element visibility with scroll triggers, see our tutorial on how to control element visibility timing in Webflow. In older projects that still use Classic Interactions, this can be done with Page scrolled, While page is scrolling, or Scroll into view on a marker element.
Quick troubleshooting
- Button scrolls to the homepage: Use URL #top, not Page Section, inside reusable Components.
- Button does not work consistently: Make sure the page or template has an element with ID top.
- Button is invisible but still clickable: Do not hide it with opacity alone. Use display: none or visibility: hidden plus pointer-events: none.
- Sticky navbar covers the target: Place the top ID on an inner wrapper slightly below the navbar.
- Scroll lands in the wrong place on image-heavy pages: Check lazy-loaded images, missing image dimensions, or layout shifts. For a full walkthrough on fixing this, see our guide on how to fix layout shift by setting image dimensions in Webflow.
Conclusion
The #top URL pattern works the same way on normal pages, reusable footer Components, and CMS Collection templates. Use the Page Section link type only for simple one-page cases. For any scalable setup, use the URL link type with #top, add the top ID to every static page and CMS template, and optionally use Webflow Interactions to show the button after scrolling.
One pattern, three contexts, no custom code. If you are also building in Framer, we cover the equivalent setup in our guide on how to add a Back-to-Top button in Framer with smooth scroll. If you need help implementing this or any other Webflow feature, our Webflow agency can assist with the full build.



Join readers commenting on this post!