
A back-to-top button gives visitors a quick way to return to the top of a long page. In Framer, you can build one using a named Scroll Section and a Link — no code required. But when that button lives inside a reusable footer or navbar shared across many pages, you need a way to set the Link target per page without duplicating the component. And on CMS collection pages, the setup works differently than on regular pages.
This article covers how to add a back-to-top button for three scenarios: a single page, a reusable Layout Template shared across pages, and CMS single collection pages.
Why add a back-to-top button
- Faster navigation on long pages. Visitors reading a tutorial, comparison, or documentation page can jump back to the top without manually scrolling.
- Better mobile experience. On smaller screens, scrolling back to the top requires more effort — a single tap is faster and more comfortable.
- Improved accessibility. A visible button provides a clear, predictable way to navigate without relying on keyboard shortcuts or gesture-based scroll.
- Reduced friction on content-heavy sites. Blog posts, documentation, and long-form landing pages keep visitors engaged longer when navigation feels effortless. Smooth interactions also contribute to how fast your site feels — for a full breakdown, see our Framer speed and performance analysis.
How Framer's Scroll Section method works
Framer's Scroll Sections are named anchor points on a page. You give a section a name, then pick that name from a dropdown when configuring a Link element. When a visitor clicks that link, the page scrolls to the named section — fully visual, no code needed. For cross-page anchor navigation, see our guide on how to create anchor links between pages in Framer.
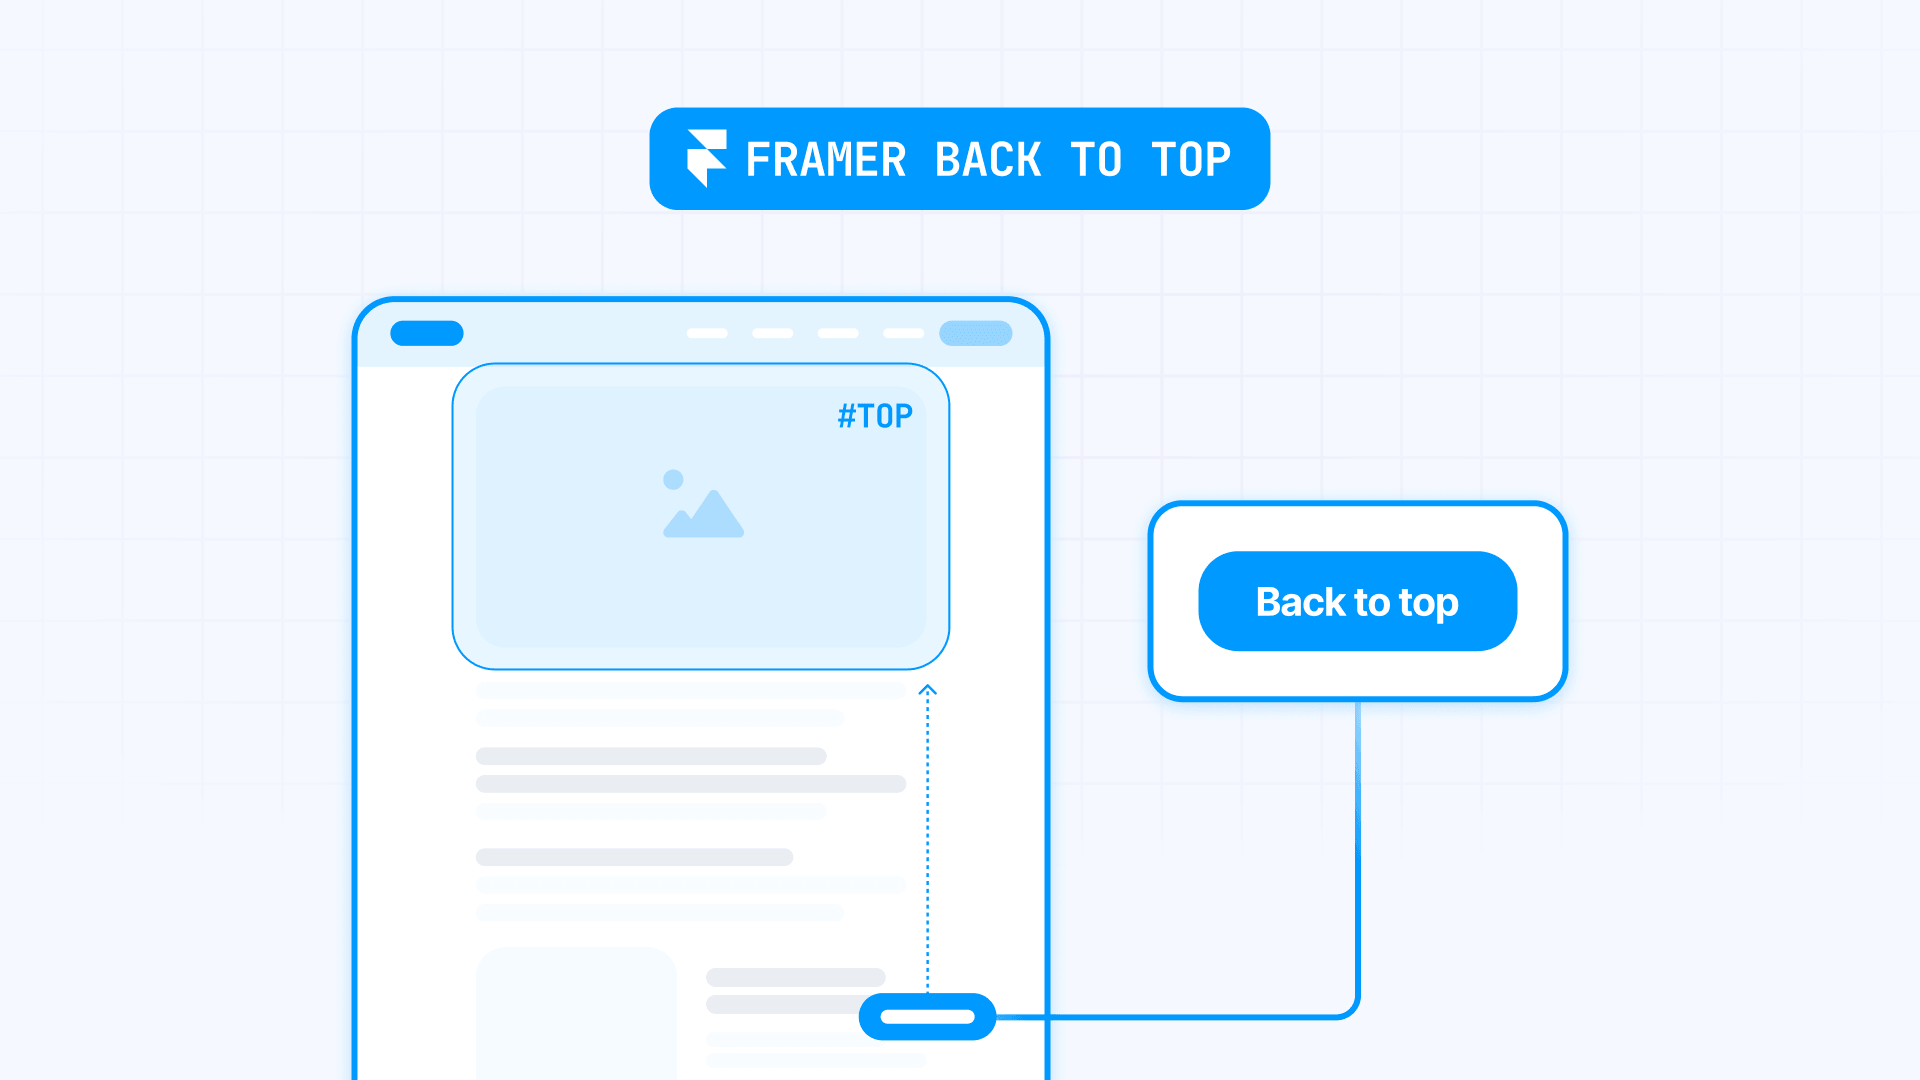
How to add a back-to-top button with Scroll Section and Link
Here's the full process using Framer's native tools:
Step 1 — Place the button
Add the back-to-top icon or button where you want it — usually at the bottom of the page or inside a footer. You can use any frame, text element, or icon from Framer's component library.
Step 2 — Set the button to fixed positioning
If the button should stay visible while the visitor scrolls, set it to position: fixed in the properties panel. This keeps it pinned to the viewport regardless of scroll position. (Positioning details are covered in the next section.)
Step 3 — Create or select a top section
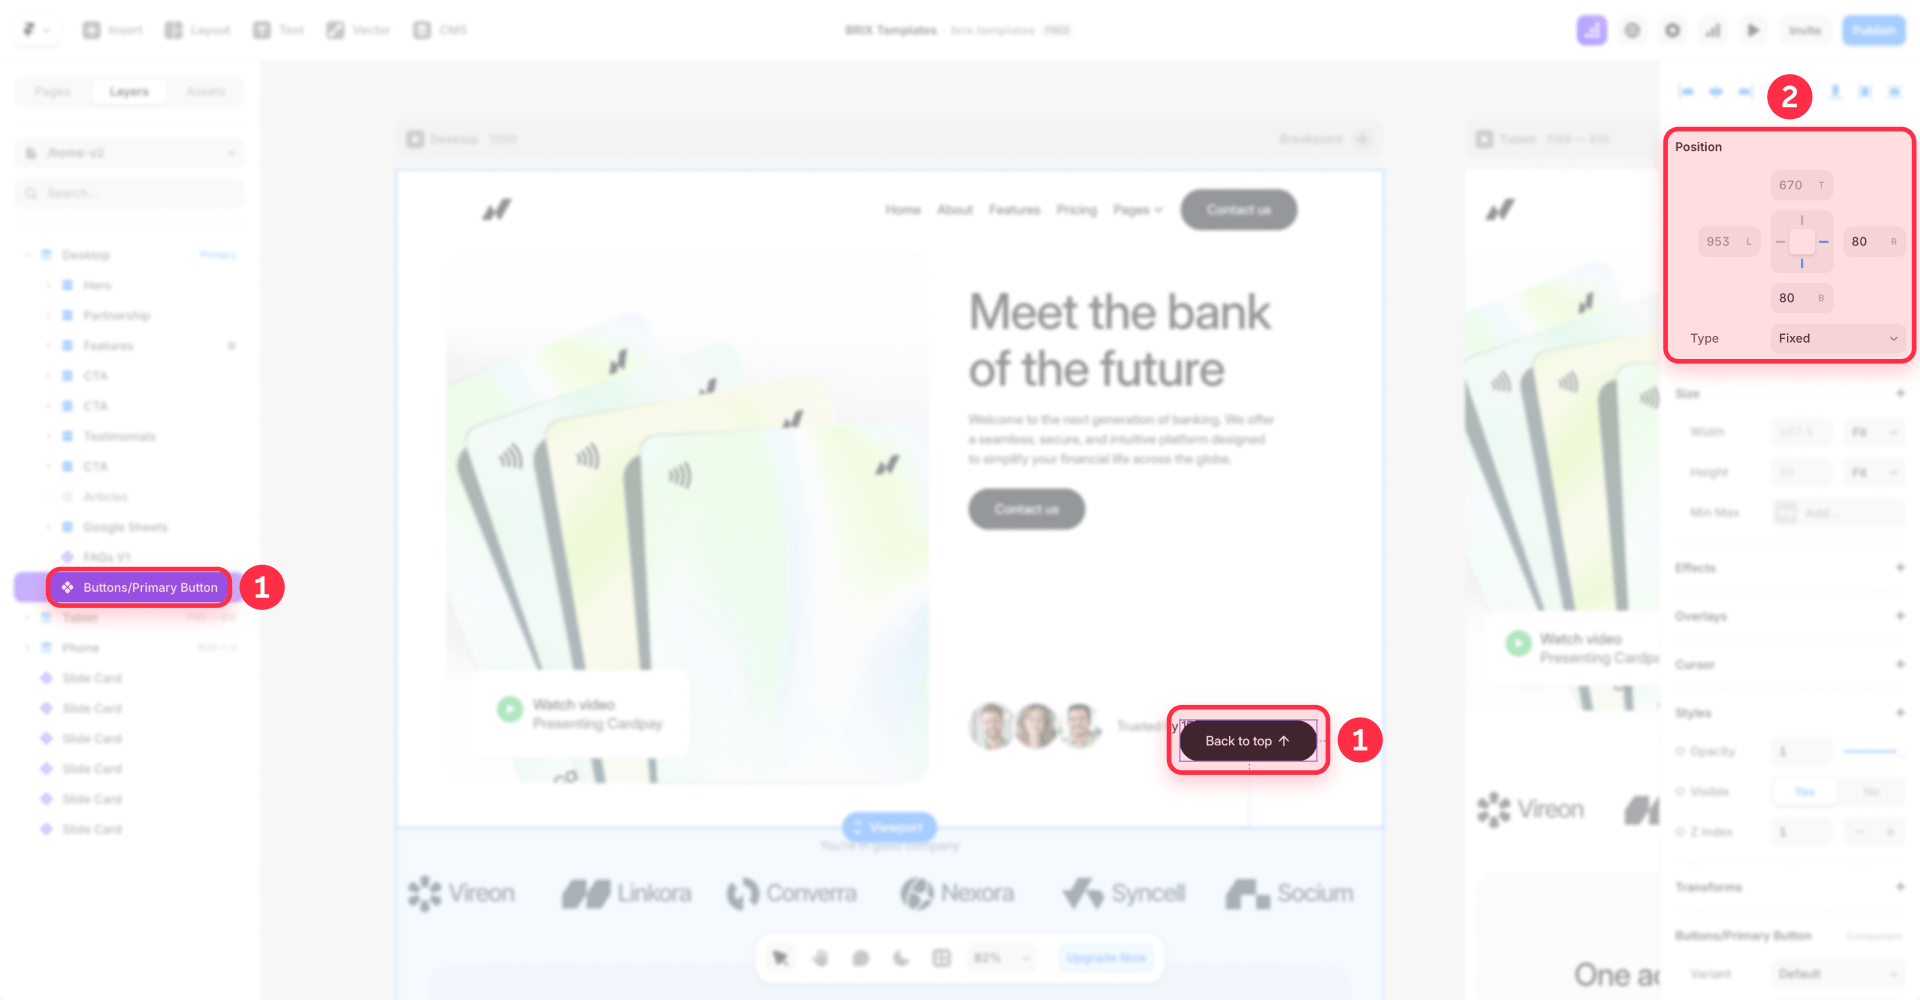
Go to the top of your page. This can be the hero section, the navbar wrapper, or a dedicated empty section you create specifically for this purpose. Select it.
Step 4 — Add a Scroll Section name
With the top section selected, open the section's settings and add a Scroll Section name — for example, top. This name is what the button will target.
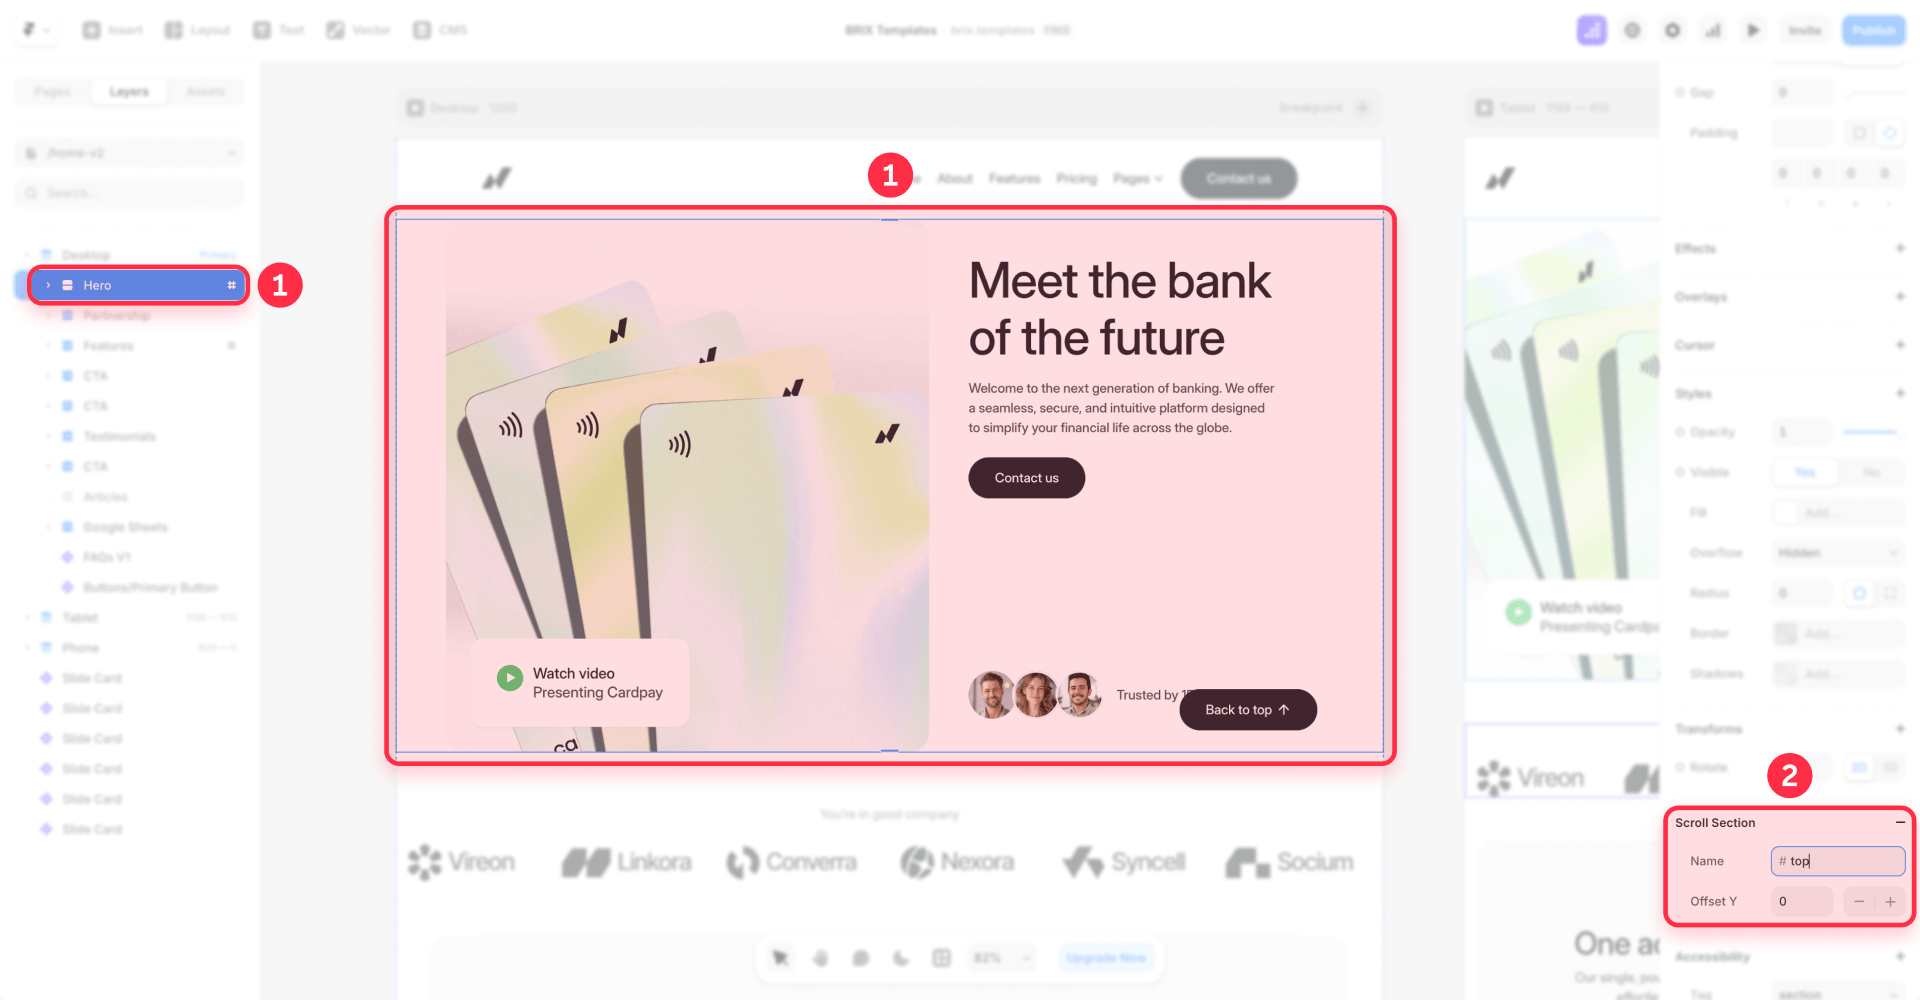
Step 5 — Link the button to the Scroll Section
Select your back-to-top button. Add a Link interaction, set the target to the current page, and choose the Scroll Section name (top) from the dropdown.
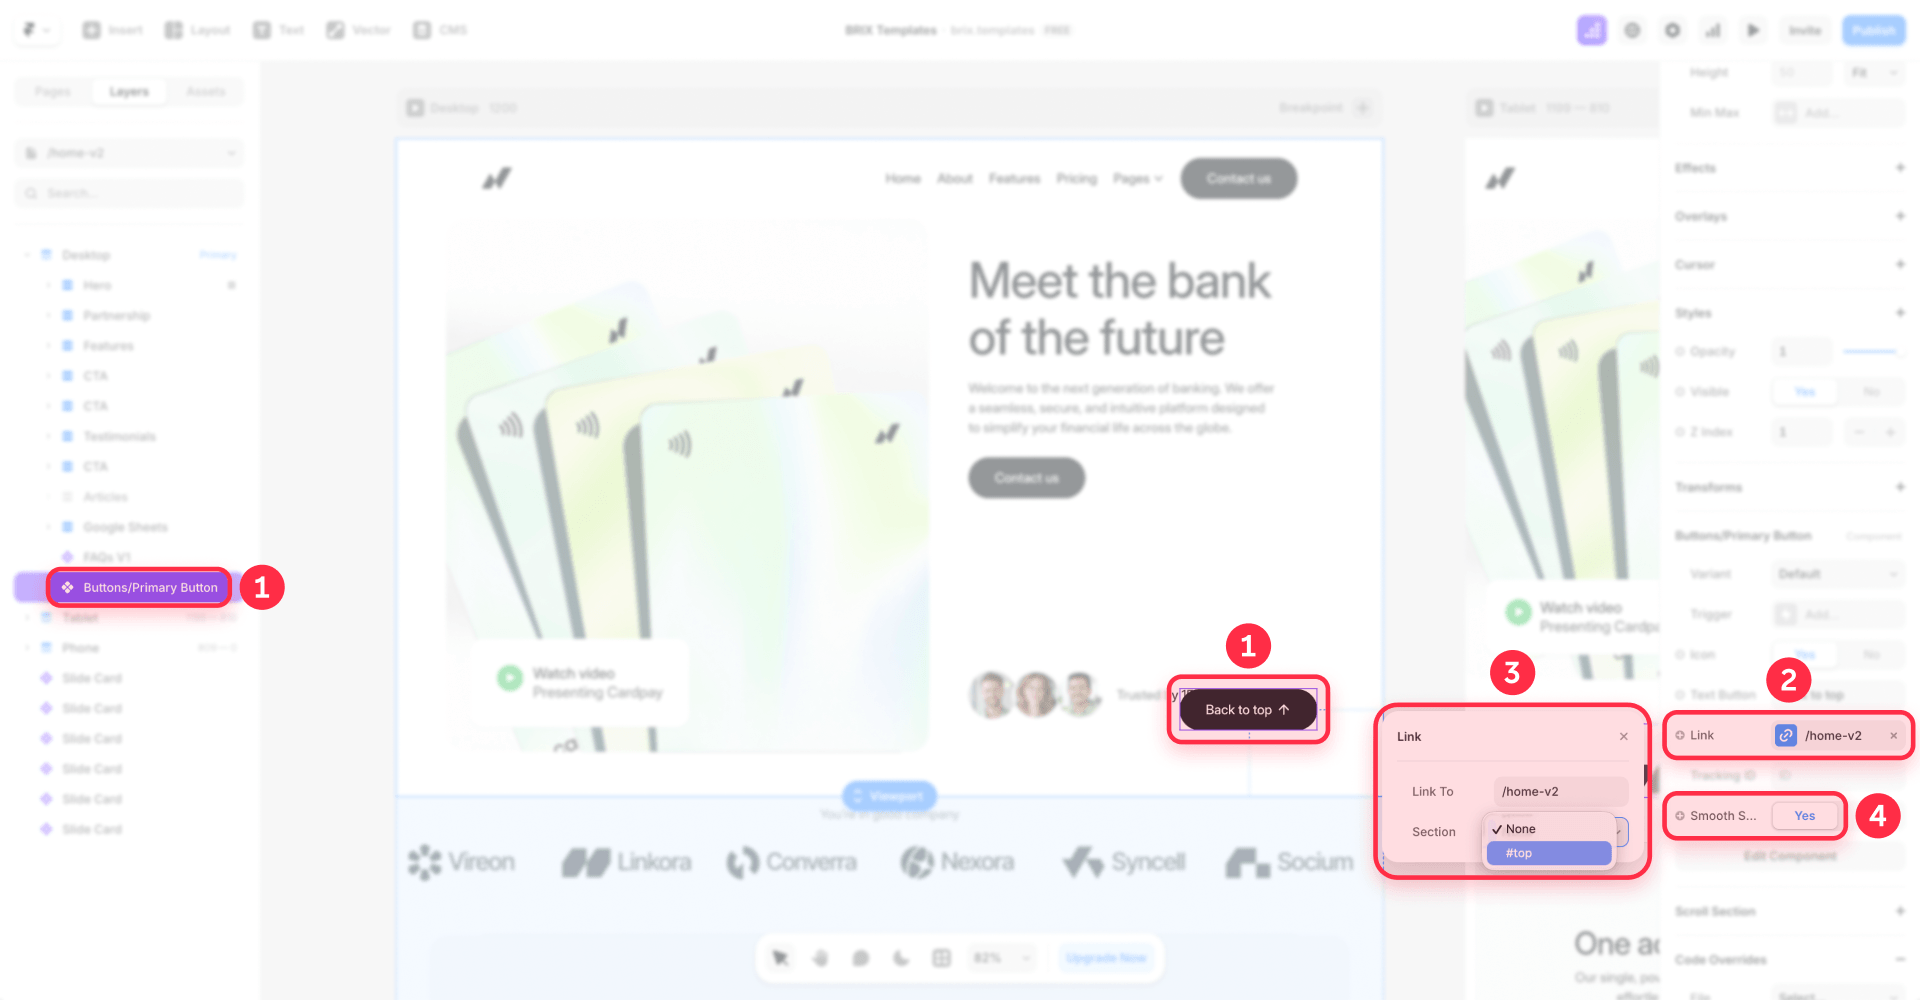
Step 6 — Enable smooth scrolling
In the link behavior or animation settings, enable smooth scrolling. This makes the page glide to the top instead of jumping instantly.
That's it. This method is ideal for individual pages and landing pages where the button is placed directly on the page.
Positioning the button and controlling when it appears
A back-to-top button should stay visible while the page scrolls — but only when the visitor has scrolled far enough for the button to be useful. Showing it at the very top of the page is redundant.
Fixed positioning in the bottom-right corner
- Place the button frame outside any scroll container in Framer's layer tree. If it sits inside a Stack that scrolls with the page content, the fixed behavior won't work.
- Set the frame to
position: fixedin the properties panel. - Configure the pin settings to anchor it to the bottom-right corner — typically
bottom: 24pxandright: 24px.
A common mistake is placing the button inside a content Stack that scrolls. When this happens, the button scrolls away instead of staying pinned. Make sure the button is a sibling of your main content frame, not a child of a scrollable container.
Showing the button only after scrolling down with Scroll Animation
Instead of showing the button immediately, you can use Framer's Scroll Animation to reveal it only when the visitor scrolls past a specific section — for example, after the hero area. You'll need a section on each page to act as the trigger point:
- Create a trigger section on each page — add a section where you want the button to start appearing (e.g., right after the hero). This section needs to exist on every page where the back-to-top button is used.
- Set the button to hidden by default — in the properties panel, set its opacity to
0. - Add a Scroll Animation to the button — select the button, open the Scroll Animation settings, and set the trigger to the section you created. Add a keyframe that animates opacity from
0to1when that section scrolls into view. - Reverse on scroll up — when the visitor scrolls back up past the trigger section, the animation reverses and the button fades out automatically.
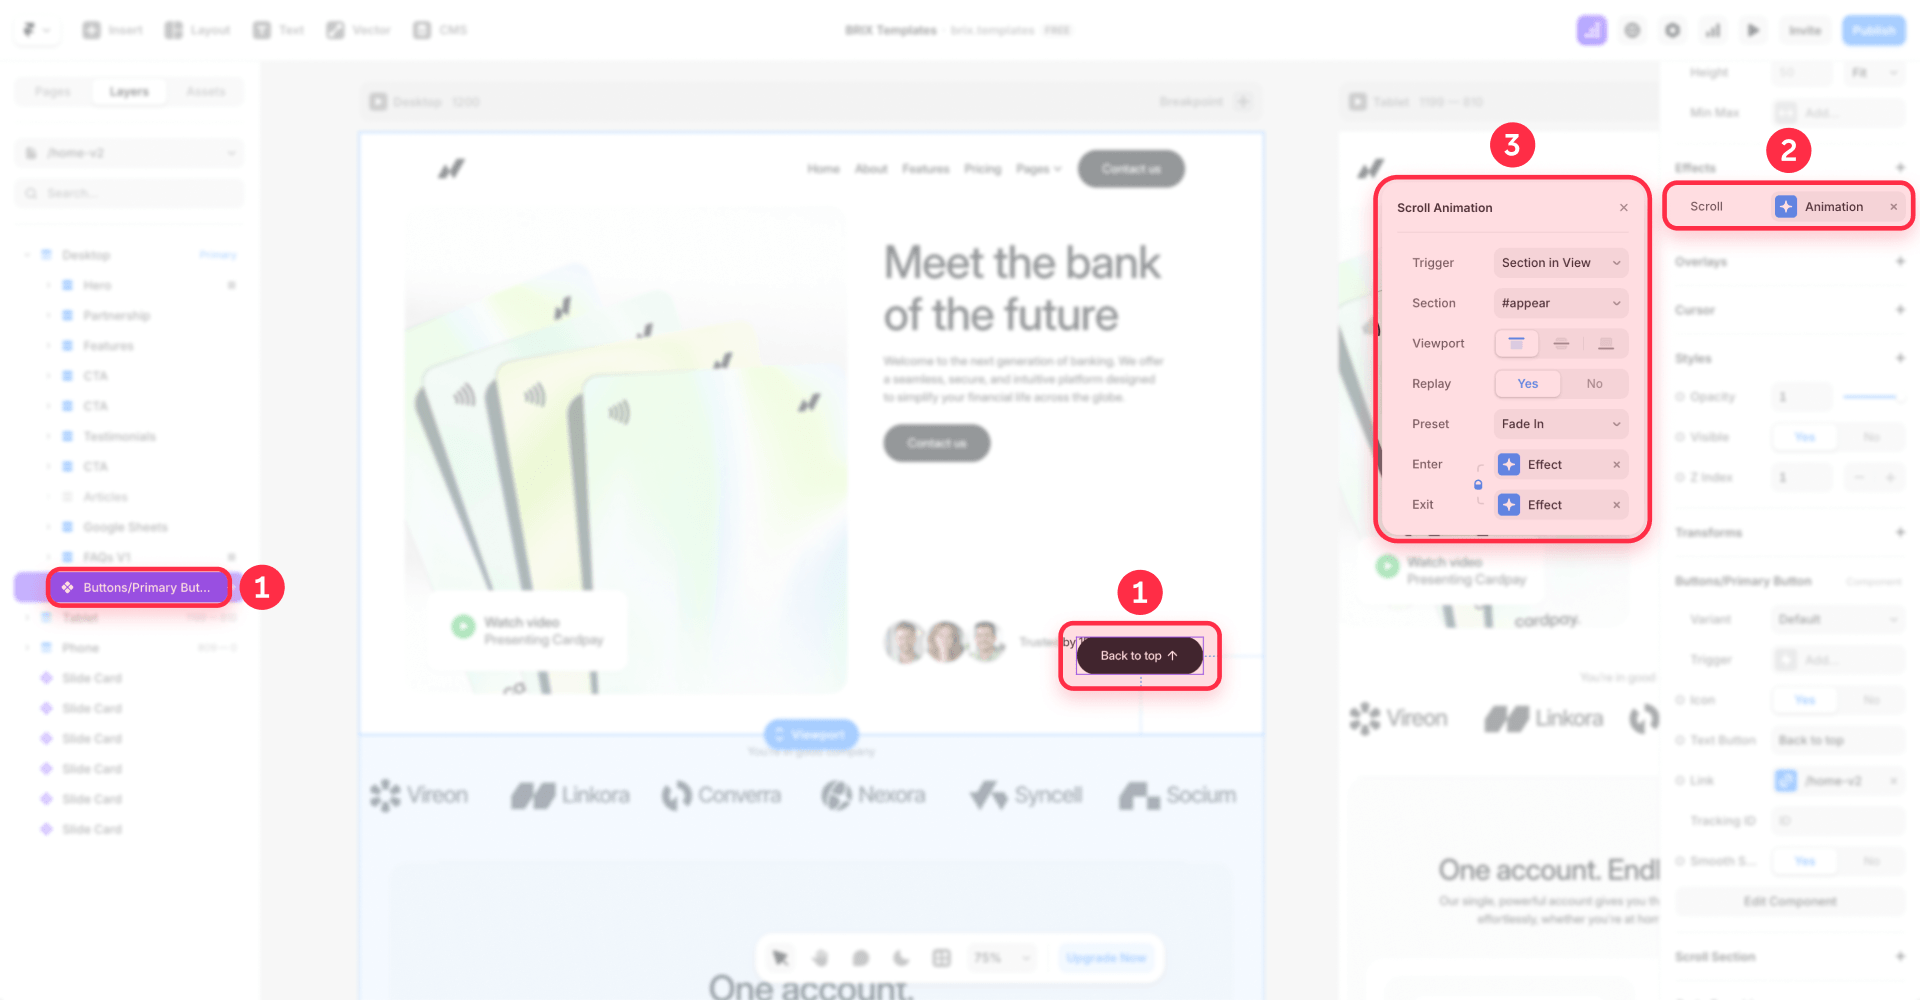
This keeps the button out of the way at the top of the page and only reveals it when the visitor has scrolled deep enough for it to be useful.
If your site has elements that cause layout shifts — such as images without set dimensions — the button's fixed position can feel unstable. For tips on preventing this, see our guide on how to fix layout shift by setting image dimensions in Framer. For more ways to optimize what loads and when on your Framer site, see our guide to click-to-load for heavy embeds in Framer.
Using Layout Templates with Link Variables for reusable components
When the back-to-top button lives inside a reusable footer or navbar shared across many pages, the single-page method still works — but you need a way to set the Link target per page without detaching the component.
The recommended no-code solution is to use a Layout Template with a Link Variable:
Step 1 — Connect the footer button to a Link Variable. Build your footer or navbar as a Layout Template, place the back-to-top button inside it, select the button, and expose its Link property as a variable.
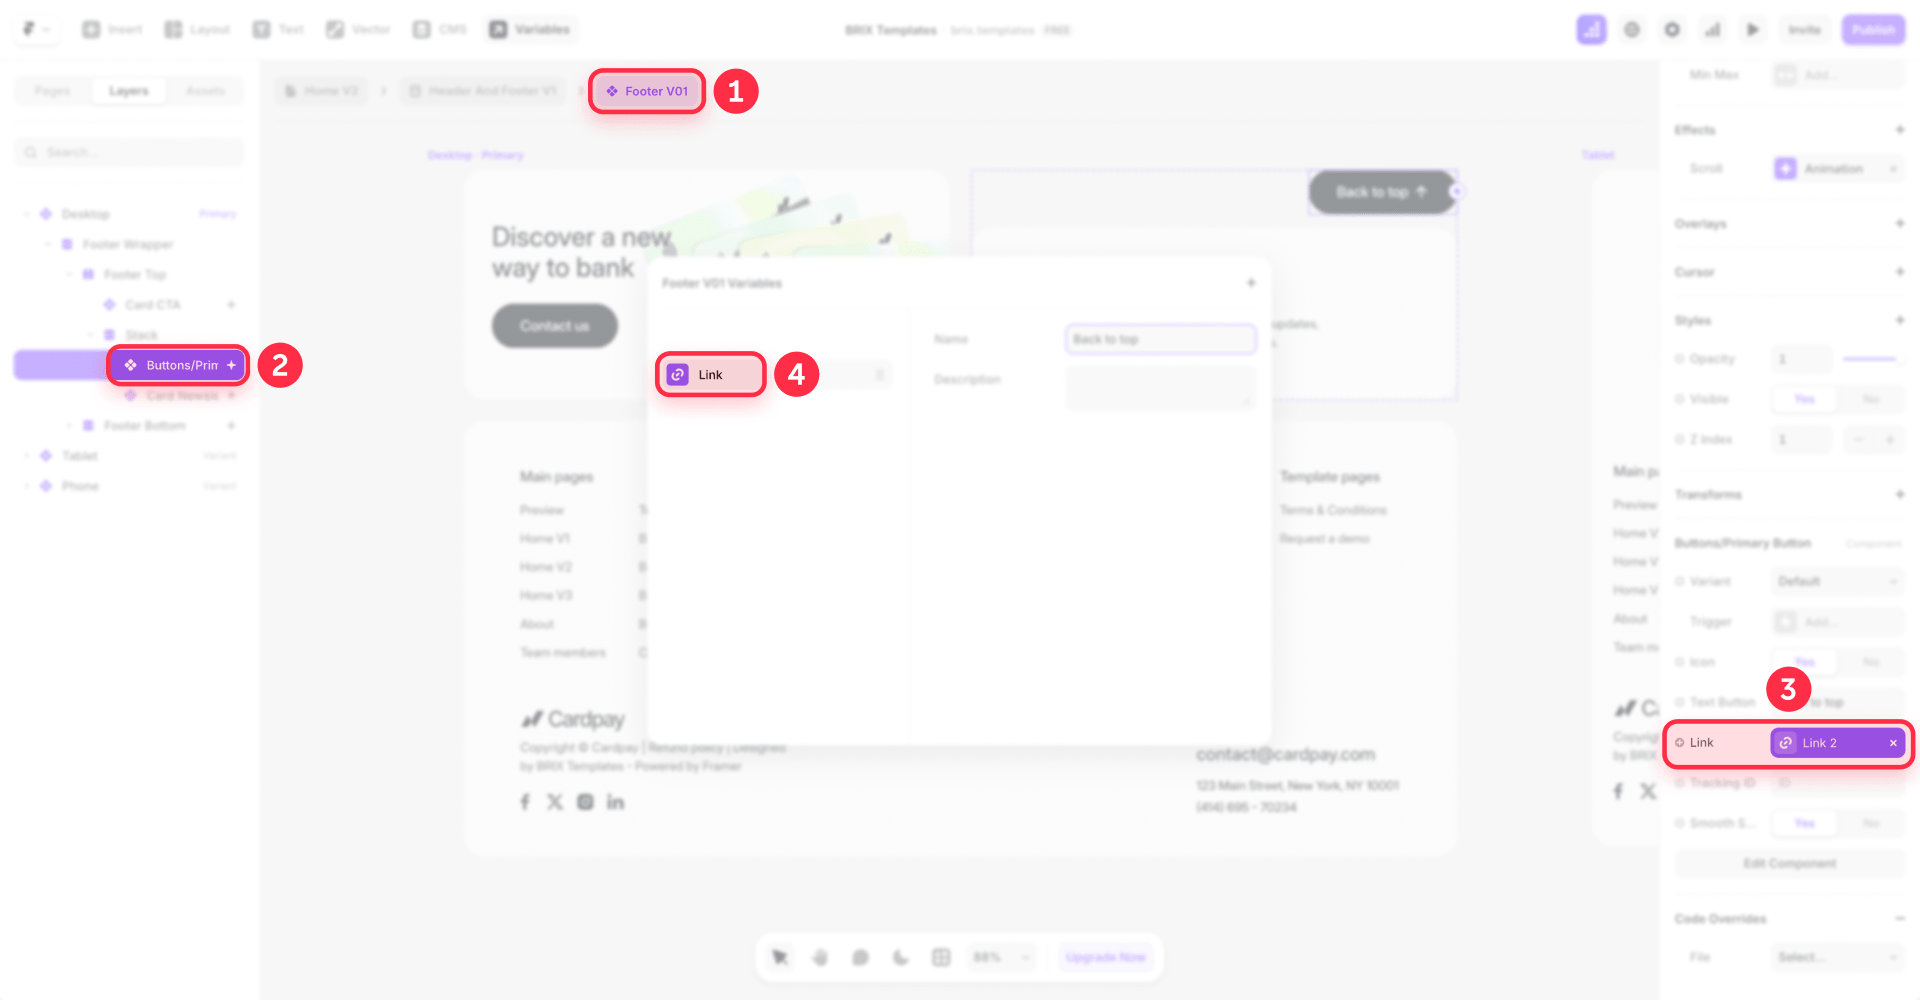
Step 2 — Create the back-to-top variable in the Layout Template. Name the new Link Variable clearly, such as Back To Top, and connect it to the footer component instance used by the Layout Template.
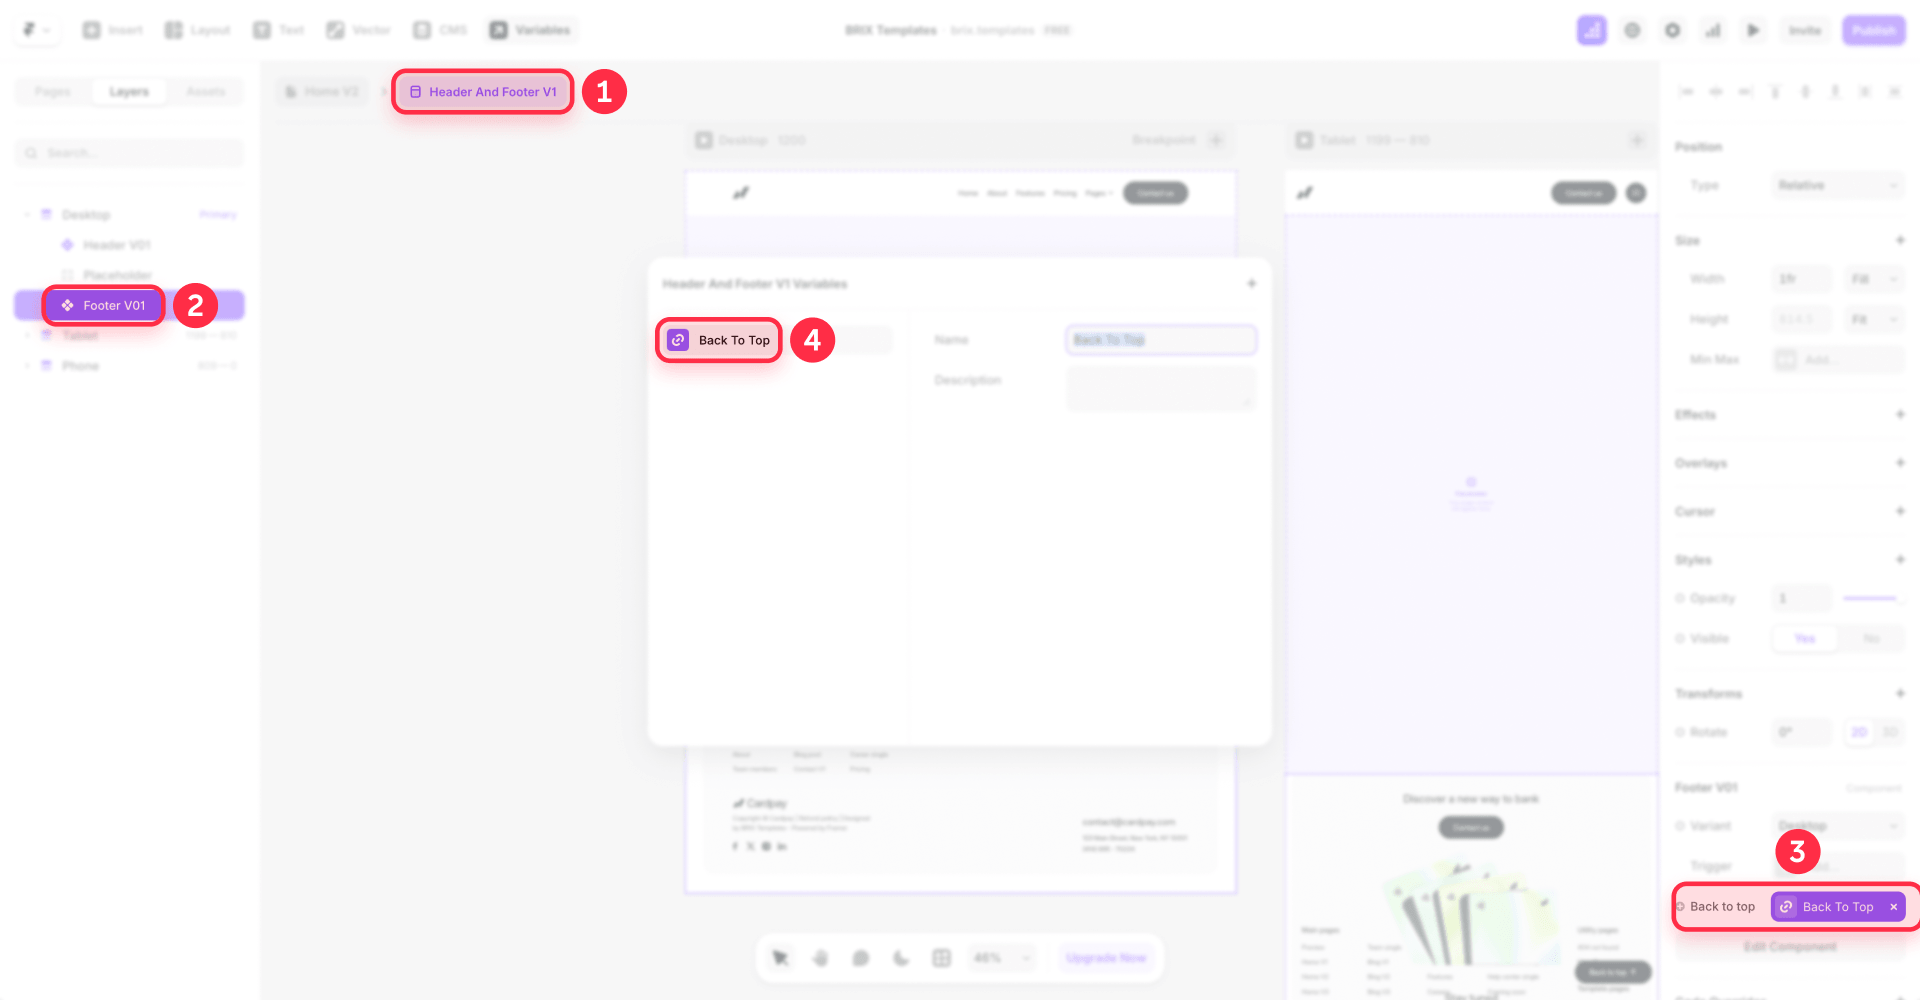
Step 3 — Set the variable on each page. On every page that uses the Layout Template, set the Back To Top variable to that page's own top Scroll Section.
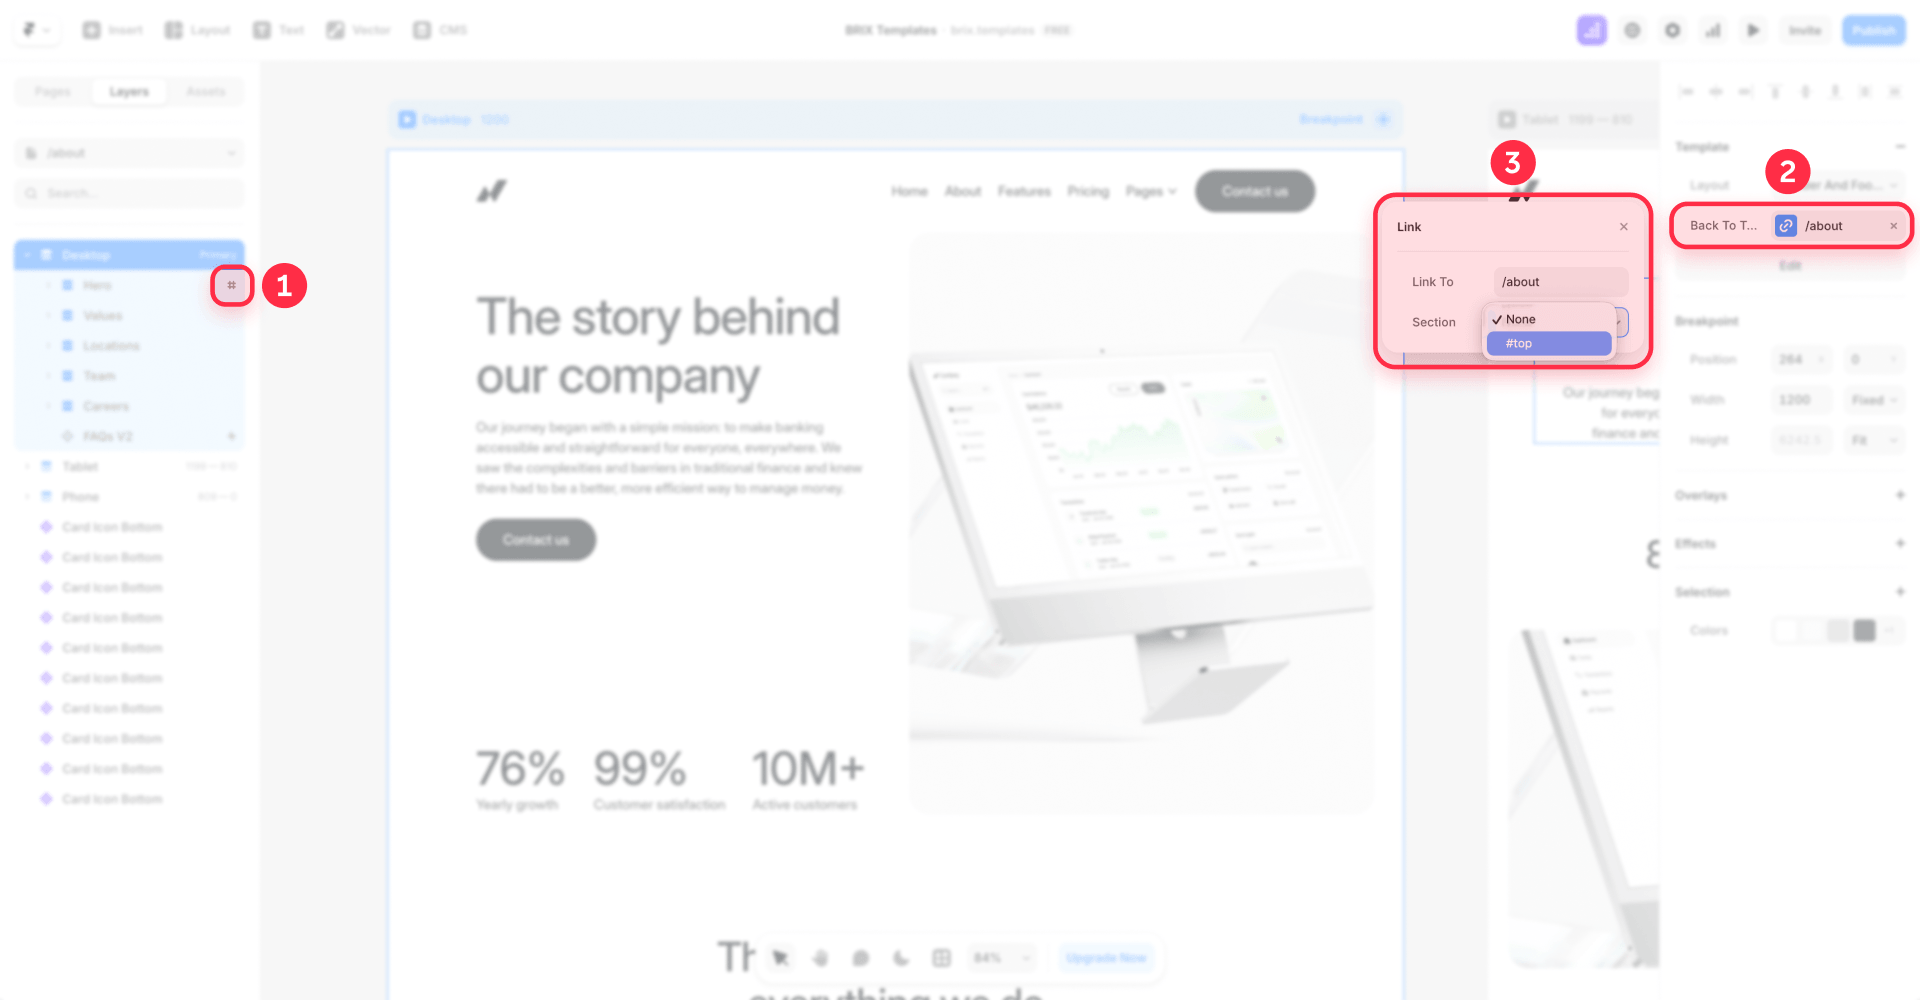
This keeps the footer or navbar global and editable from one place, while allowing each page to have its own correct Link target. No code, no detaching, no per-page duplication.
In a reusable Layout Template, you do not need a code override if you expose the button's Link as a template variable. Each page sets that variable to its own top Scroll Section, keeping the setup no-code and aligned with Framer's native workflow.
Adding a back-to-top button on CMS single collection pages
CMS single collection pages in Framer — such as individual blog posts — work differently from regular pages. The page template is shared across all items in the collection, and the button's Scroll Section target needs to exist on each dynamically generated page.
There are two approaches:
Approach 1 — Place the button directly on the CMS page template
Add the back-to-top button directly to the CMS single collection page template — not inside a Layout Template component like a footer or navbar. If the button lives inside a Layout Template, the Link Variable setup requires configuration per CMS item, which defeats the purpose of a dynamic template.
On the CMS page template:
- Add an empty section at the very top of the template and name it as a Scroll Section (
top). - Place the back-to-top button on the page (fixed or at the bottom of the content).
- Link the button to the
topScroll Section.
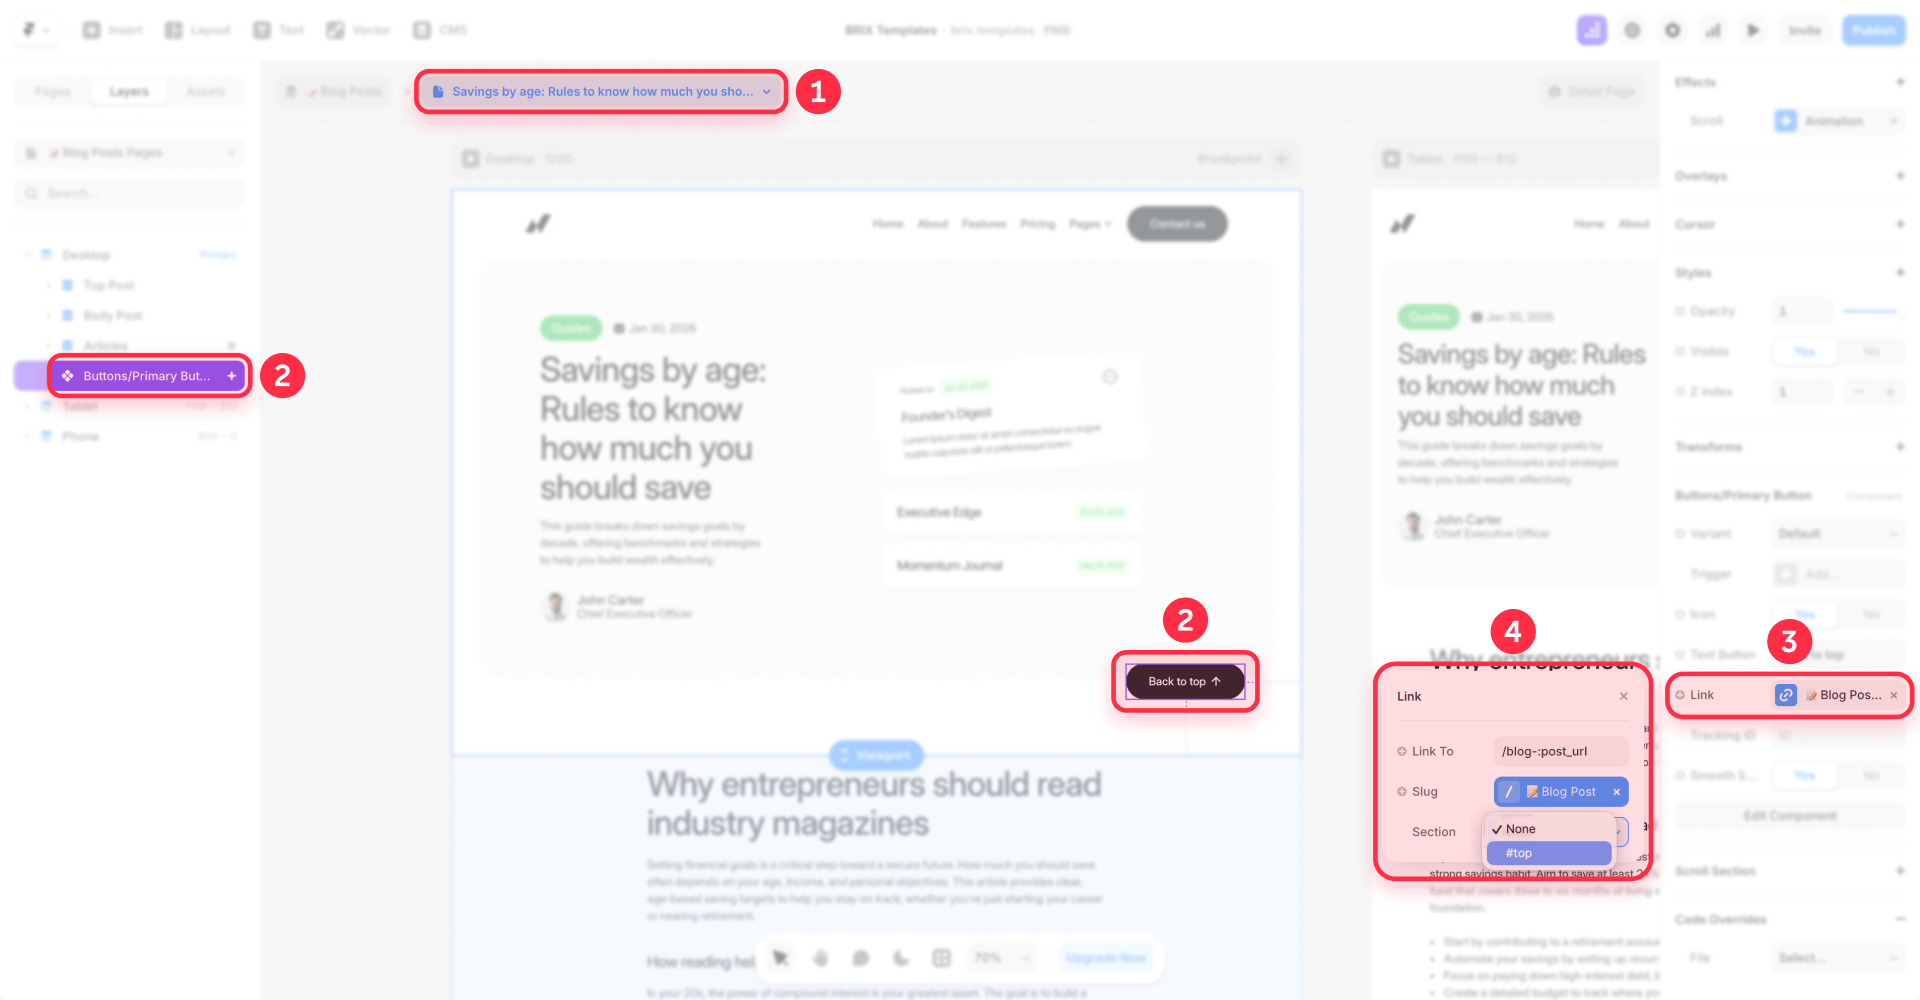
Because the button and the target section live on the same CMS template, every dynamically generated page — every blog post, every project page — automatically gets a working back-to-top button without additional configuration.
Approach 2 — Fixed button with the Scroll Section on the CMS template
If you prefer the button to float in the bottom-right corner on CMS pages:
- Add a Scroll Section named
topto the CMS page template (top of the page). - Place a fixed-position button directly on the CMS template — outside any Layout Template component.
- Link it to the
topScroll Section.
Do not place the button inside a Layout Template component for CMS single pages. Layout Template Link Variables would need to be configured per CMS item, which doesn't scale for collections with dozens or hundreds of items. Keep the button on the CMS page template itself.
Troubleshooting common back-to-top button issues in Framer
Button scrolls away instead of staying fixed. The button is inside a scroll container in the layer tree. Move it outside any Stack or container that scrolls with the page content, set it to position: fixed, and make sure it is a sibling of the main scrollable content — not a child.
Smooth scroll jumps instantly instead of animating. The Link target may not be set to a named Scroll Section, or smooth scrolling is not enabled in the link behavior settings. Confirm the Link targets a Scroll Section on the current page, enable smooth scrolling, and test on the published site — Framer's canvas preview does not always reflect live scroll behavior.
Scroll Section offset lands in the wrong position. A parent container likely has overflow: hidden. Change it to overflow: visible and verify the target section is positioned where you expect. If using offsets with sticky headers, confirm the offset value accounts for the header height.
Button does not work on CMS collection pages. The button is probably inside a Layout Template instead of directly on the CMS page template. Place the button on the CMS template itself, add a Scroll Section at the top, and link them — this way every dynamically generated page gets a working button automatically.
Layout Template Link Variable does not connect to the right section. The variable name may not match the Scroll Section name on each page. Confirm every page has a Scroll Section assigned, re-select the variable in the Layout Template, and verify it points to the correct Link property on the button.
Frequently asked questions about back-to-top buttons in Framer
Adding FAQ structured data can help these answers appear directly in search results — learn how in our guide to adding FAQ schema to your Framer site.
Can I create a back-to-top button in Framer without code?
Yes. Use a named Scroll Section at the top of the page and link your button to it with smooth scrolling enabled. Fully visual, no code required.
Do I need a code override for a reusable footer button?
No. If the button lives inside a Layout Template, you can expose the button's Link as a variable and set that variable on each page to point to that page's top Scroll Section.
Will the button work on CMS collection pages?
Yes — as long as the button is placed directly on the CMS page template, not inside a Layout Template component. Add a Scroll Section at the top of the CMS template and link the button to it. Every dynamically generated page will get a working button automatically.
Can I make the button appear only after scrolling down?
Yes. Use Framer's Scroll Animation to fade the button in when the visitor reaches a specific section, and reverse the animation when they scroll back up. This is fully visual and requires no code.
Why doesn't my Scroll Section offset work correctly?
Check if a parent container has overflow: hidden. Changing it to overflow: visible often resolves it. Also verify the section is positioned where you expect in the layout.
Conclusion
Adding a back-to-top button in Framer follows a straightforward pattern: name a Scroll Section at the top of your page, link a button to it, and enable smooth scrolling. For reusable components inside a Layout Template, expose the Link as a variable so each page can set its own target — keeping the component global and editable from one place. On CMS collection pages, place the button directly on the CMS template so every dynamically generated page works without per-item configuration.
You now have a back-to-top button that works on every page type — smooth scroll, fixed positioning, and show-on-scroll — all without writing code or installing third-party plugins.
If you need a more advanced setup with custom scroll behavior, component variants, or a fully built Framer site with polished UX patterns, BRIX Templates' Framer team can help.





Join readers commenting on this post!