
While Webflow offers powerful design and interaction capabilities, it currently lacks built-in controls for scheduling when elements appear or managing their visibility timing. This limitation often creates challenges when you need to show elements on specific schedules or control how often they reappear for returning visitors.
This guide will walk you through implementing a powerful, attribute-based solution that gives you flexible control over when elements appear and reappear on your site.
Why implement scheduled visibility controls in Webflow
Here are some common scenarios where visibility timing control proves invaluable:
- Popup notifications: Display important announcements, new feature alerts, or special offers that appear once and don't annoy returning visitors.
- Header notification bars: Show important updates or promotional banners on a schedule, like weekly specials or time-sensitive announcements.
- Cookie consent banners: Present privacy notices just once per user, maintaining compliance without disrupting return visits.
- Feature announcement modals: Introduce new functionality to users on a controlled schedule, avoiding overwhelming them with information.
- Newsletter signup forms: Time the appearance of subscription prompts to optimize engagement while respecting user experience.
- Limited-time offer cards: Display special promotions that appear periodically, like monthly deals or seasonal offerings.

Understanding the Webflow element timing visibility attribute by BRIX Templates
Our solution introduces a powerful custom attribute (brix-element-timing-visibility="pattern") that gives you precise control over element visibility timing. This attribute-based approach offers several advantages:
- No complex coding: Simple attribute configuration handles all timing logic
- Flexible scheduling: Choose between one-time display or periodic reappearance
- Multi-element support: Apply timing controls to multiple elements independently, each with its own schedule
- User-specific timing: Uses local storage to track individual user interactions
- Smooth animations: Built-in fade effects for seamless appearance
- Multiple timing patterns: Support for hours, days, weeks, months, and even before/after and between
How to implement visibility timing controls in Webflow
Let's break down the implementation process into clear, manageable steps.
1. How to add the timing control script to your Webflow project
1. Access your Webflow project settings
2. Navigate to the Custom Code section
3. Locate the "Before </body> tag" field
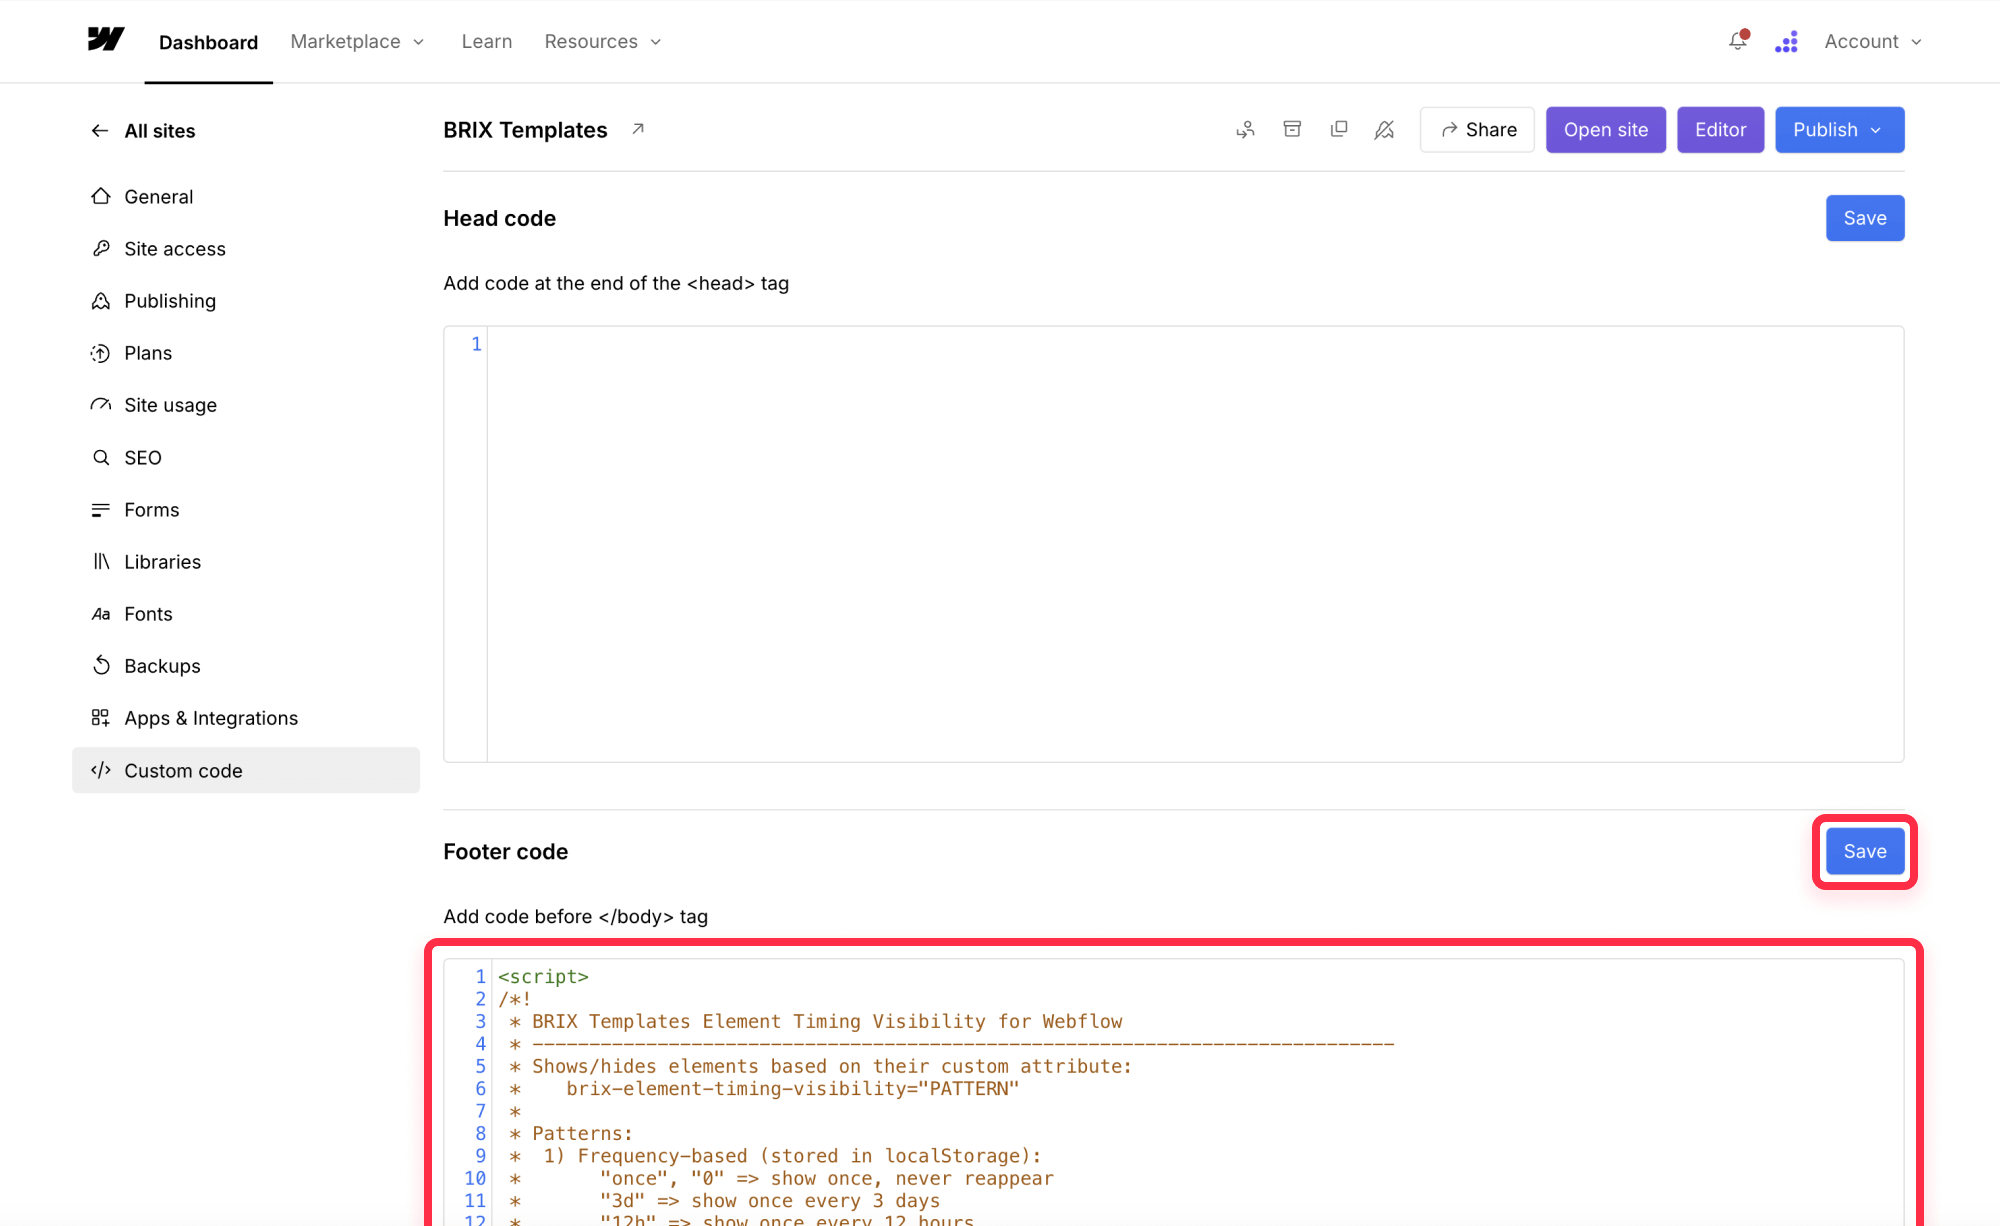
4. Insert the following code:
<script>
/*!
 * BRIX Templates Element Timing Visibility for Webflow
 * ----------------------------------------------------------------------------
 * Shows/hides elements based on their custom attribute:
 *    brix-element-timing-visibility="PATTERN"
 *
 * Patterns:
 *  1) Frequency-based (stored in localStorage):
 *       "once", "0" => show once, never reappear
 *       "3d" => show once every 3 days
 *       "12h" => show once every 12 hours
 *       "2w" => show once every 2 weeks
 *       "1m" => show once every 1 month (30 days)
 *  2) Date-based (no localStorage):
 *       "before:YYYY-MM-DDThh:mm:ssZ"  => show only before a certain date/time
 *       "after:YYYY-MM-DDThh:mm:ssZ"   => show only after a certain date/time
 *       "between:START,END"           => show only between two date/times
 *
 * The script logs a summary in the console, listing how many elements were found,
 * how they're categorized, and any relevant IDs or patterns.
 *
 * For each element that qualifies to be shown, we fade it in by switching
 * from display:none to display:block and animating opacity over 0.5s.
 *
 * Usage steps:
 *  1. Give your element an initial display:none in Webflow.
 *  2. Add the attribute: brix-element-timing-visibility="PATTERN"
 *  3. Publish your site.
 *  4. The script automatically decides whether to show the element or not.
 *
 * Version: 1.0.0
 * Author: BRIX Templates
 */

(function() {
  'use strict';

  //--------------------------------------------------------------------------
  // 1) Fade animation duration (milliseconds)
  //--------------------------------------------------------------------------
  const FADE_DURATION = 500;

  //--------------------------------------------------------------------------
  // 1.1) Safe localStorage helpers
  //--------------------------------------------------------------------------
  function safeGetItem(key) {
    try {
      return localStorage.getItem(key);
    } catch (err) {
      console.warn('localStorage getItem failed:', err);
      return null;
    }
  }

  function safeSetItem(key, value) {
    try {
      localStorage.setItem(key, value);
    } catch (err) {
      console.warn('localStorage setItem failed:', err);
    }
  }

  function safeRemoveItem(key) {
    try {
      localStorage.removeItem(key);
    } catch (err) {
      console.warn('localStorage removeItem failed:', err);
    }
  }

  //--------------------------------------------------------------------------
  // 2) Wait for DOM ready
  //--------------------------------------------------------------------------
  if (document.readyState === 'loading') {
    document.addEventListener('DOMContentLoaded', initBrixTiming);
  } else {
    initBrixTiming();
  }

  //--------------------------------------------------------------------------
  // 3) Main entry point
  //--------------------------------------------------------------------------
  function initBrixTiming() {
    const allElements = document.querySelectorAll('[brix-element-timing-visibility]');
    const total = allElements.length;

    // Categorize each element
    const frequencyElems = [];
    const dateElems = [];
    const onceElems = [];

    let freqCount = 0;
    let dateCount = 0;
    let onceCount = 0;

    allElements.forEach((elem, index) => {
      const rawPattern = (elem.getAttribute('brix-element-timing-visibility') || '').trim();

      // Determine the identifier for console logging:
      // ID > joined class list > fallback element-N
      let identifier = '';
      if (elem.id) {
        identifier = elem.id;
      } else if (elem.classList && elem.classList.length > 0) {
        identifier = Array.from(elem.classList).join('_');
      } else {
        identifier = `element-${index + 1}`;
      }

      if (isDatePattern(rawPattern)) {
        // It's date-based
        dateCount++;
        dateElems.push({ elem, rawPattern, identifier, index });
      } else if (rawPattern === 'once' || rawPattern === '0') {
        // It's a single-time display
        onceCount++;
        onceElems.push({ elem, rawPattern, identifier, index });
      } else {
        // It's a frequency-based pattern
        freqCount++;
        frequencyElems.push({ elem, rawPattern, identifier, index });
      }
    });

    // Build console summary log:
    console.log('------------------------');
    console.log(`BRIX Templates Element Timing Visibility for Webflow is activated, and has found ${total} element${total !== 1 ? 's' : ''} to manage:`);

    // Frequency-based summary
    if (freqCount > 0) {
      console.log(`- ${freqCount} element${freqCount > 1 ? 's' : ''} scheduled by frequency:`);
      frequencyElems.forEach(({ rawPattern, identifier }) => {
        const friendly = getFriendlyFrequency(rawPattern);
        console.log(`  - ${friendly} (${identifier})`);
      });
    }

    // Date-based summary
    if (dateCount > 0) {
      console.log(`- ${dateCount} element${dateCount > 1 ? 's' : ''} scheduled by date:`);
      dateElems.forEach(({ rawPattern, identifier }) => {
        const friendly = getFriendlyDateString(rawPattern);
        console.log(`  - ${friendly} (${identifier})`);
      });
    }

    // Once-based summary
    if (onceCount > 0) {
      console.log(`- ${onceCount} element${onceCount > 1 ? 's' : ''} set to show only once:`);
      onceElems.forEach(({ identifier }) => {
        console.log(`  - once (${identifier})`);
      });
    }

    console.log('------------------------');

    // Now process them all for actual show/hide logic
    dateElems.forEach(({ elem, rawPattern }) => handleDateBased(elem, rawPattern));
    onceElems.forEach(({ elem, rawPattern, index }) => handleFrequencyBased(elem, rawPattern, index));
    frequencyElems.forEach(({ elem, rawPattern, index }) => handleFrequencyBased(elem, rawPattern, index));
  }

  //--------------------------------------------------------------------------
  // 4) Distinguish date vs frequency patterns
  //--------------------------------------------------------------------------
  function isDatePattern(str) {
    return (
      str.startsWith('before:') ||
      str.startsWith('after:') ||
      str.startsWith('between:')
    );
  }

  //--------------------------------------------------------------------------
  // 5) Handle date-based pattern:
  //    e.g. "before:2024-12-31T23:59:59-0500"
  //         "after:2024-01-01T00:00:00Z"
  //         "between:2024-01-01T00:00:00Z,2024-12-31T23:59:59Z"
  //--------------------------------------------------------------------------
  function handleDateBased(elem, pattern) {
    const now = new Date();

    // BEFORE:
    if (pattern.startsWith('before:')) {
      const dateStr = pattern.replace('before:', '').trim();
      const cutoff = new Date(dateStr);
      if (isNaN(cutoff)) return; // invalid => don't show

      if (now < cutoff) fadeInElement(elem);
      return;
    }

    // AFTER:
    if (pattern.startsWith('after:')) {
      const dateStr = pattern.replace('after:', '').trim();
      const cutoff = new Date(dateStr);
      if (isNaN(cutoff)) return;

      if (now > cutoff) fadeInElement(elem);
      return;
    }

    // BETWEEN:
    if (pattern.startsWith('between:')) {
      const range = pattern.replace('between:', '').trim();
      const [startStr, endStr] = range.split(',');
      if (!startStr || !endStr) return;

      const startDate = new Date(startStr.trim());
      const endDate = new Date(endStr.trim());
      if (isNaN(startDate) || isNaN(endDate)) return;

      // New check: If start > end, warn and never show
      if (startDate > endDate) {
        console.warn(`"between:" pattern has startDate > endDate (${startStr} > ${endStr}). Element will not show.`);
        return;
      }

      if (now >= startDate && now <= endDate) {
        fadeInElement(elem);
      }
      return;
    }
  }

  //--------------------------------------------------------------------------
  // 6) Handle frequency-based pattern:
  //    e.g. "3d", "12h", "2w", "1m", "once"/"0"
  //--------------------------------------------------------------------------
  function handleFrequencyBased(elem, pattern, index) {
    const key = generateKey(elem, pattern, index);
    const now = Date.now();

    // Try to read existing data from localStorage (safely)
    let storedData = null;
    const rawStored = safeGetItem(key);
    if (rawStored) {
      try {
        storedData = JSON.parse(rawStored);
      } catch (err) {
        // If JSON parse fails, remove the item so we don't block
        safeRemoveItem(key);
      }
    }

    // If there's stored data but the pattern is different, reset it
    if (storedData && storedData.pattern !== pattern) {
      storedData = null;
      safeRemoveItem(key);
    }

    // Decide if we can show
    let canShow = false;
    if (!storedData) {
      // No data => never shown before
      canShow = true;
    } else {
      const storedNextShow = storedData.nextShow;
      if (typeof storedNextShow === 'number' && now >= storedNextShow) {
        // Next show time has passed
        canShow = true;
      }
    }

    if (canShow) {
      fadeInElement(elem);

      // Compute new nextShow time
      const nextShow = computeNextShow(pattern, now);

      // If the pattern is "once"/"0" or invalid, we store a huge number
      // Otherwise store the actual nextShow time
      const finalNextShow = Number.isFinite(nextShow) ? nextShow : Number.MAX_SAFE_INTEGER;

      // Save back to localStorage (safely)
      const newData = {
        pattern: pattern,
        nextShow: finalNextShow
      };
      safeSetItem(key, JSON.stringify(newData));
    }
  }

  //--------------------------------------------------------------------------
  // 7) Generate localStorage key for a frequency-based element
  //--------------------------------------------------------------------------
  function generateKey(elem, pattern, index) {
    // 1) If there's an ID, use: "brix-timing-{id}-{pattern}"
    if (elem.id) {
      return `brix-timing-${elem.id}-${pattern}`;
    }

    // 2) If there's at least one class, join them all + pattern
    if (elem.classList && elem.classList.length > 0) {
      const classString = Array.from(elem.classList).join('_');
      return `brix-timing-${classString}-${pattern}`;
    }

    // 3) Fallback: "brix-timing-element-{index+1}-{pattern}"
    console.warn(`No ID or classes found for element #${index+1}. Using index-based fallback key. If the DOM order changes, localStorage tracking might change.`);
    return `brix-timing-element-${index + 1}-${pattern}`;
  }

  //--------------------------------------------------------------------------
  // 8) Compute the next show time for a frequency pattern
  //--------------------------------------------------------------------------
  function computeNextShow(pattern, nowMillis) {
    // "once" / "0" => indefinite
    if (pattern === 'once' || pattern === '0') {
      return Infinity;
    }

    // Attempt to parse "3d", "12h", "2w", "1m", etc.
    const numeric = parseInt(pattern, 10);
    if (isNaN(numeric) || numeric <= 0) {
      console.warn(`Invalid frequency pattern "${pattern}". Defaulting to never show again.`);
      return Infinity;
    }

    const lastChar = pattern.slice(-1).toLowerCase();
    let multiplier = 0;
    switch (lastChar) {
      case 'h':
        multiplier = 60 * 60 * 1000; // hours
        break;
      case 'd':
        multiplier = 24 * 60 * 60 * 1000; // days
        break;
      case 'w':
        multiplier = 7 * 24 * 60 * 60 * 1000; // weeks
        break;
      case 'm':
        multiplier = 30 * 24 * 60 * 60 * 1000; // approx months
        break;
      default:
        // fallback => treat as days
        multiplier = 24 * 60 * 60 * 1000;
        break;
    }

    return nowMillis + numeric * multiplier;
  }

  //--------------------------------------------------------------------------
  // 9) Fade element in
  //--------------------------------------------------------------------------
  function fadeInElement(el) {
    el.style.opacity = '0';
    el.style.display = 'block';
    el.style.transition = `opacity ${FADE_DURATION}ms ease`;
    // Force reflow to ensure transition triggers (some browsers require reading offsetHeight)
    // eslint-disable-next-line no-unused-expressions
    el.offsetHeight;
    el.style.opacity = '1';
  }

  //--------------------------------------------------------------------------
  // 10) Convert a frequency pattern to a friendly label, e.g. "Every 3 days"
  //--------------------------------------------------------------------------
  function getFriendlyFrequency(pattern) {
    if (pattern === 'once' || pattern === '0') {
      return 'once';
    }

    const numeric = parseInt(pattern, 10);
    if (isNaN(numeric) || numeric <= 0) {
      return 'once';
    }

    // e.g. "3d", "12h", "2w", "1m"
    const lastChar = pattern.slice(-1).toLowerCase();
    switch (lastChar) {
      case 'h':
        return `Every ${numeric} hour${numeric > 1 ? 's' : ''}`;
      case 'd':
        return `Every ${numeric} day${numeric > 1 ? 's' : ''}`;
      case 'w':
        return `Every ${numeric} week${numeric > 1 ? 's' : ''}`;
      case 'm':
        return `Every ${numeric} month${numeric > 1 ? 's' : ''}`;
      default:
        return `Every ${numeric} day${numeric > 1 ? 's' : ''}`;
    }
  }

  //--------------------------------------------------------------------------
  // 11) Convert date-based pattern to a friendly label
  //--------------------------------------------------------------------------
  function getFriendlyDateString(pattern) {
    // "before:2024-12-31T23:59:59-0500"
    if (pattern.startsWith('before:')) {
      const dateStr = pattern.replace('before:', '').trim();
      return `Before ${dateStr}`;
    }
    // "after:2024-01-01T00:00:00Z"
    if (pattern.startsWith('after:')) {
      const dateStr = pattern.replace('after:', '').trim();
      return `After ${dateStr}`;
    }
    // "between:DATE1,DATE2"
    if (pattern.startsWith('between:')) {
      const range = pattern.replace('between:', '').trim();
      const [startStr, endStr] = range.split(',');
      if (!startStr || !endStr) return `Between ???`;
      return `Between ${startStr.trim()} and ${endStr.trim()}`;
    }
    return pattern;
  }

})();
</script>
If you only need element timing control on a specific page rather than your entire site, you can add the script to individual page settings instead. Navigate to Pages in the Webflow Designer sidebar, select the desired page, click the gear icon to open Page Settings, then add the code to the Custom Code section in the Before </body> tag field.
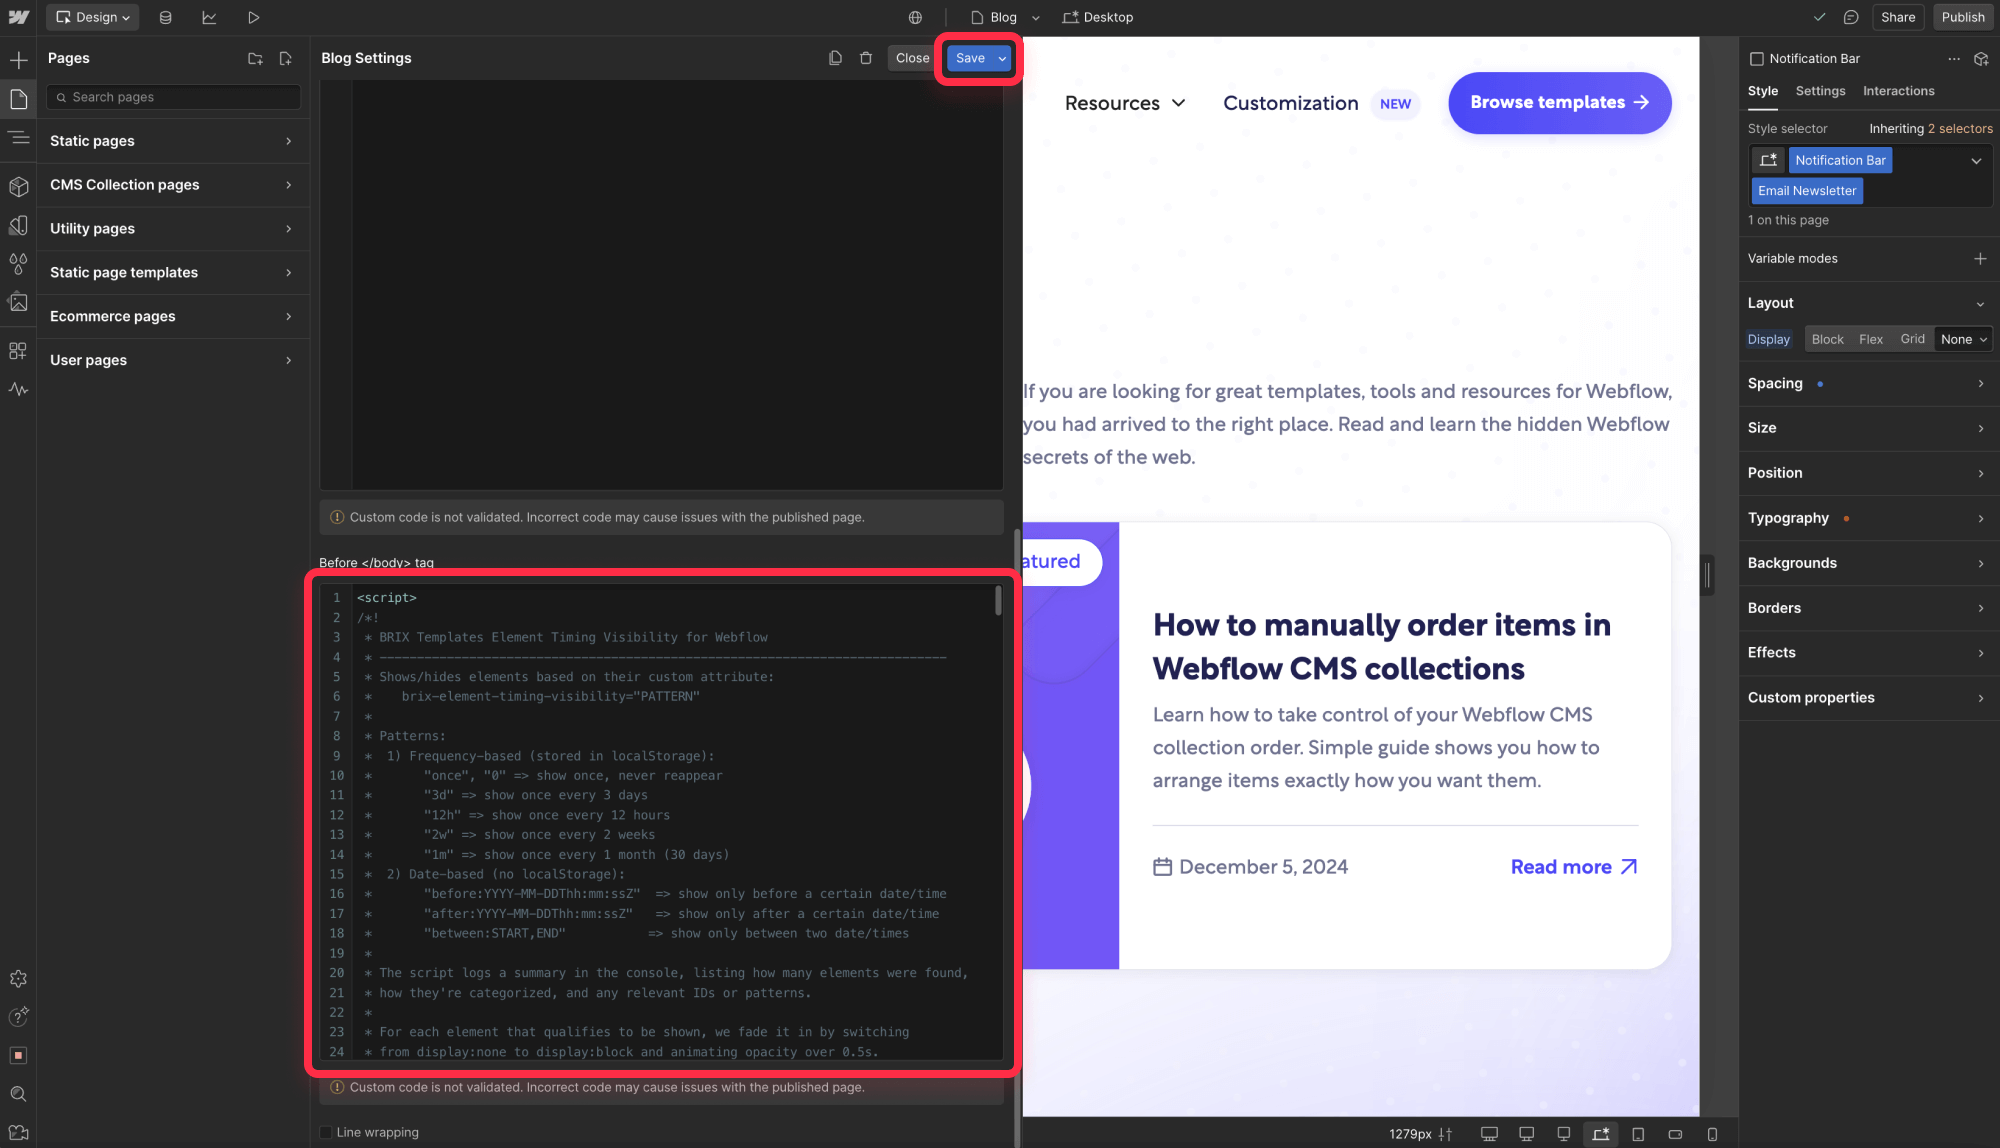
The functionality will work exactly the same, but will only be active on that specific page.
2. How to configure element timing in Webflow
After adding the script, you can set up your elements:
- Select your target element in the Webflow Designer
- Open the element's Settings panel (gear icon)
- Locate the Custom Attributes section
- Add the timing configuration:
For basic timing control:
- Name: brix-element-timing-visibility
- Value: Your desired timing pattern (i.e. 4w, 1d, etc)

3. Understanding timing patterns for our Webflow attribute
The brix-element-timing-visibility attribute accepts several timing patterns:
Frequency-based patterns
- Xh: Show once every X hours (e.g., 12h = every 12 hours)
- Xd: Show once every X days (e.g., 3d = every 3 days)
- Xw: Show once every X weeks (e.g., 2w = every 2 weeks)
- Xm: Show once every X months (e.g., 1m = every month)
- once or 0: Show only once, never reappear
Date-based patterns
- before:YYYY-MM-DDThh:mm:ssZ: Show only before specified date/time (e.g., before:2024-12-31T23:59:59-0500 for Dec 31, 2024, 11:59 PM EST)
- after:YYYY-MM-DDThh:mm:ssZ: Show only after specified date/time (e.g., after:2024-01-01T00:00:00-0500 for Jan 1, 2024, 12:00 AM EST)
- between:YYYY-MM-DDThh:mm:ssZ,YYYY-MM-DDThh:mm:ssZ: Show only between specified dates/times (e.g., between:2024-01-01T00:00:00-0500,2024-12-31T23:59:59-0500 for the full year 2024 EST)
Date-based patterns use ISO 8601 format with timezone offset. The 'T' separates the date and time, and the timezone offset (e.g., '-0500' for EST) ensures precise timing across different regions.
For easier implementation, use our timing parameter generator below. This tool will help you create correctly formatted date-based parameters without worrying about ISO 8601 syntax or timezone calculations:
Need custom timing logic?
While these timing patterns cover many common scenarios, you might need more sophisticated controls for your specific use case. Whether you need conditional timing based on user behavior, complex scheduling patterns, or integration with your business logic, our Webflow agency can help create custom solutions tailored to your needs. Feel free to reach out to discuss your requirements.
4. How to handle initial element visibility on Webflow
To ensure smooth element appearance:
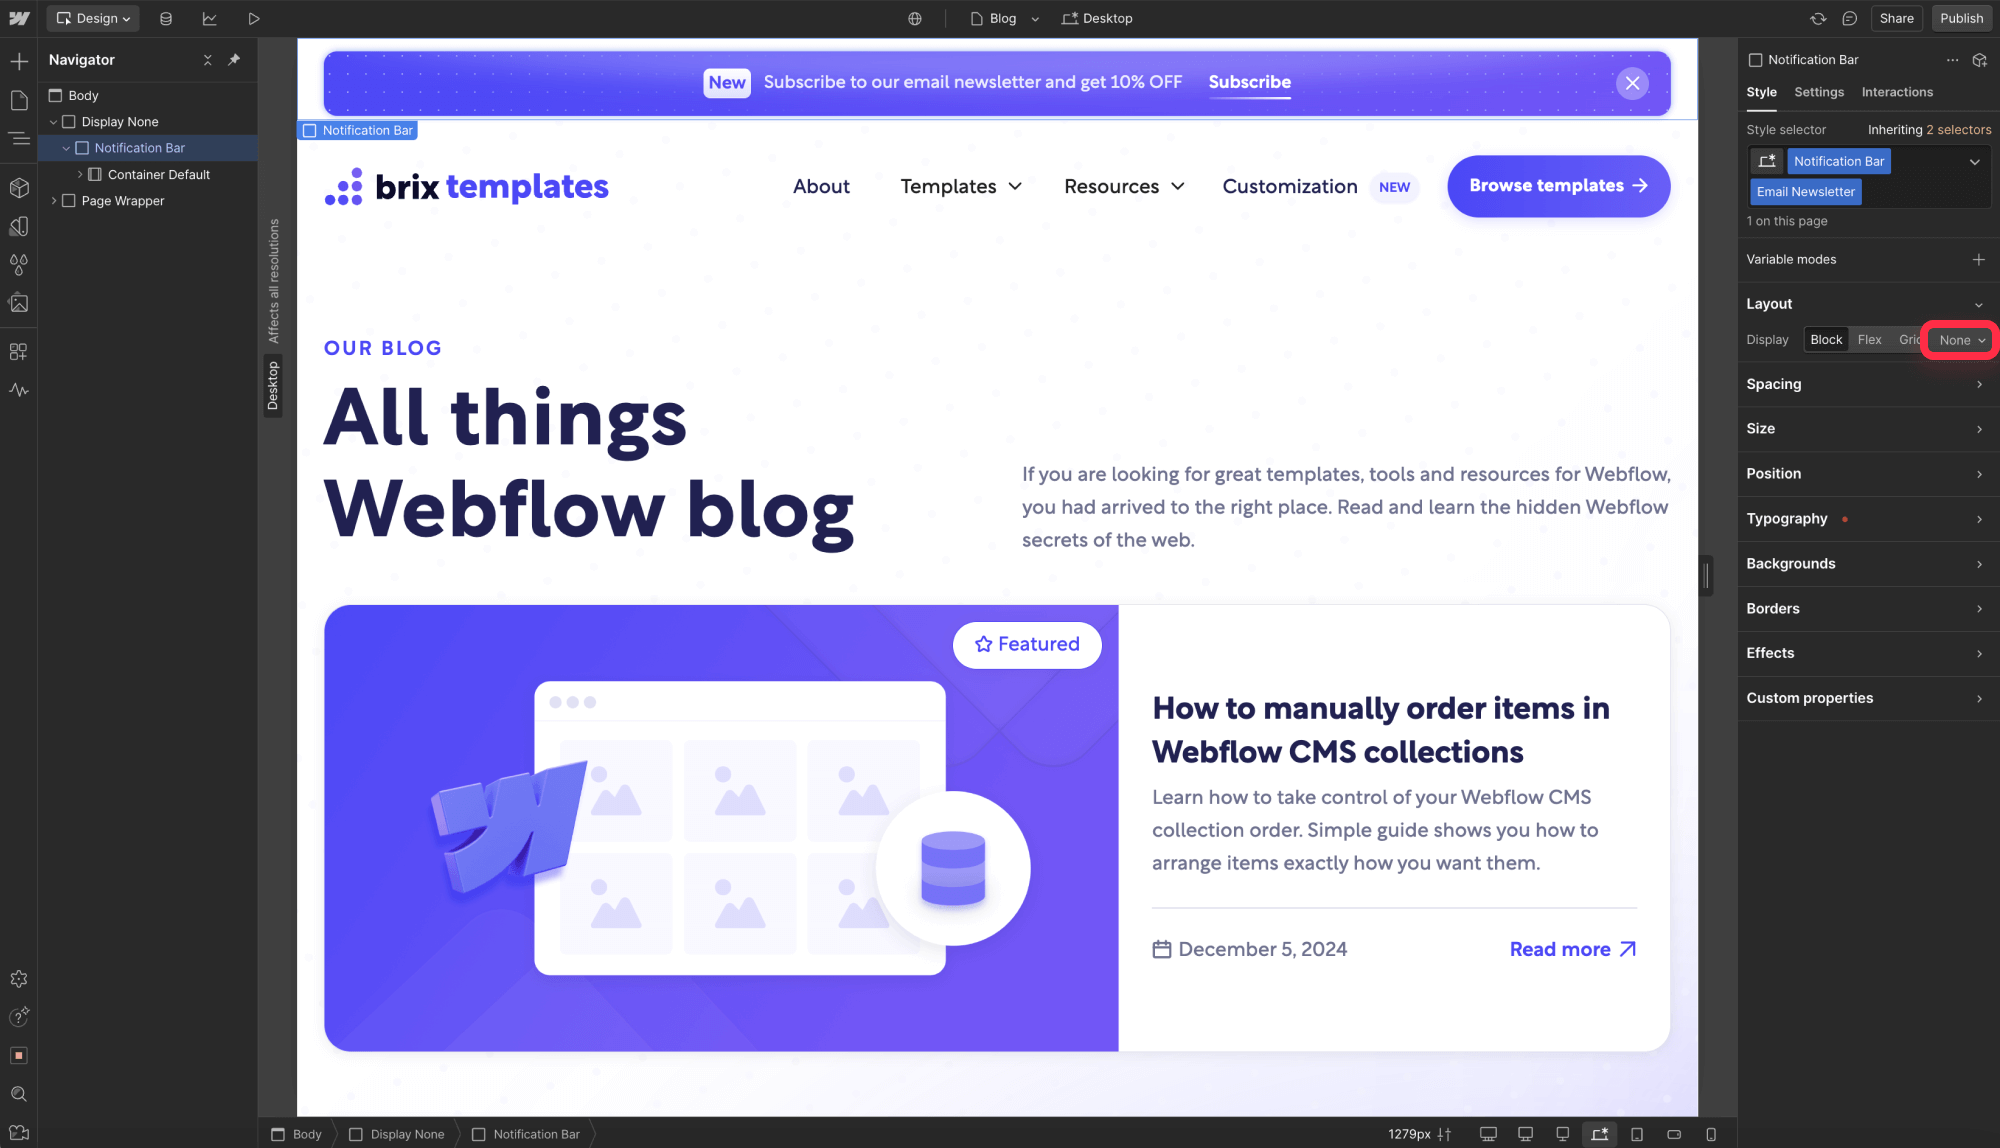
- Set your element's initial display state to none in Webflow
- The script will automatically handle showing the element when appropriate
- A built-in fade animation will smoothly reveal the element
- The timing will be tracked per user using local storage
5. Steps before publishing your Webflow site with the new timing visibility option
- Verify all elements have proper brix-element-timing-visibility attributes with valid timing patterns
- Test the implementation on your staging environment (i.e. yourdomain.webflow.io)
- Check element behavior across different scenarios:
- First-time visits
- Return visits within the timing window
- Return visits after the timing window
- Clear your browser's local storage to simulate fresh visits
- Once all tests pass, publish to your live domain (i.e. domain.com)
6. Common troubleshooting steps
If elements aren't appearing as expected:
- Confirm your timing pattern format matches exactly (3d, 2w, etc.)
- Verify the script is properly placed in your project's custom code section
- Check that elements are set to display: none by default
- Ensure you've published your site after making changes
- Clear browser local storage to reset timing
Frequently asked questions about our Webflow attribute
Some of the most common questions we get are around specific use cases for element timing in Webflow sites. Here are clear, practical answers to help you implement the most requested timing patterns:
How to show a Webflow popup only once?
Add the brix-element-timing-visibility="once" attribute to your popup div block in the Webflow Designer's custom attributes panel. Set the popup's initial display state to none, and it will show exactly once per user, then never appear again.
How to make a notification bar appear on your Webflow site every 7 days?
Add the brix-element-timing-visibility="7d" attribute to your notification bar element in Webflow. The notification will appear once every week for each user, automatically handling the timing and reappearance schedule.
How to show a Webflow banner after a specific date?
Use the brix-element-timing-visibility="after:2024-12-31T00:00:00-0500" attribute on your banner element, adjusting the date and timezone as needed. The banner will remain hidden until the specified date, then appear automatically.
How to display a Webflow cookie consent banner only on first visit?
Apply the brix-element-timing-visibility="once" attribute to your cookie consent banner element. It will appear on the user's first visit and never show again, providing a clean experience for returning visitors.
How to manage seasonal content timing in your Webflow site?
Use the brix-element-timing-visibility="between:[dates]" attribute with appropriate date ranges for each seasonal element. Create separate elements for each season and set their visibility windows accordingly.
Conclusion
Implementing scheduled visibility controls in Webflow gives you powerful tools to create more dynamic, engaging user experiences. Whether you're managing promotional content, user notifications, or progressive feature reveals, this solution provides the flexibility and reliability you need while maintaining clean, professional designs.
Need help implementing advanced visibility patterns or exploring custom timing solutions? Our experienced Webflow development agency specializes in creating tailored solutions that enhance your site's functionality while maintaining optimal performance. Feel free to reach out to discuss how we can help optimize your Webflow project.


Join readers commenting on this post!