If you've tried to "just connect Stripe" in Webflow, you've probably hit the same wall: the native payment provider connection lives inside Webflow Ecommerce—so without a Webflow Ecommerce plan, there's no built-in cart or checkout.
The good news is you can still accept payments reliably. The bad news is that "payments" can mean very different things depending on your business: a single checkout link, recurring subscriptions, a multi-item cart, gated content access, or invoice-style B2B payments. Picking the right integration upfront means you won't need to switch tools as your needs grow.
This guide covers the most practical ways to accept Stripe-powered payments on a Webflow site without upgrading to Webflow Ecommerce, mapped to real business scenarios with honest trade-offs.
Why accepting payments matters for Webflow sites without Webflow Ecommerce
Many businesses don't need a full online store—they need a way to collect money from a well-designed Webflow page. Here's where this applies most.
- Service sales without store complexity: Sell a consultation, project deposit, or retainer from a Webflow landing page using a simple hosted checkout
- Digital products without inventory headaches: Take payment and deliver a file, link, or access code without setting up a product catalog or shipping system
- Subscription pricing pages: Recurring billing needs Stripe Billing-style flows, not a traditional "add to cart" checkout
- B2B payments with fewer steps: Send checkout links after a Webflow form submission for high-ticket projects or custom quotes
- Multi-product checkout without switching platforms: Keep your Webflow design and layer a cart on top when you genuinely need multi-item purchasing
- Booking-based businesses: If you sell appointments or sessions, you might need a booking system alongside or instead of a payment link
What to decide before choosing a Webflow payment method without Webflow Ecommerce
If you want to accept payments on Webflow without the Webflow Ecommerce plan, you'll need to choose and connect an external checkout tool. But before picking one, answer these questions—they'll point you to the right section of this guide:
- Are you selling one thing at a time or do you need a cart with multiple items?
- Is the payment one-time or recurring?
- Do you need to gate access to content after payment (members-only pages, course access, SaaS features)?
- Do you need tax calculation, discounts, shipping, or inventory tracking?
- What needs to happen after payment—deliver a file, send an email, create an account, notify your team?
Taking a few minutes here saves you from outgrowing your setup and switching tools later.
Choosing the right Webflow payment option without Webflow Ecommerce
There isn't one "best" integration—there's a best option for each business model. Here's how to match your situation to the right tool:
- Selling a single product, service, deposit, or simple subscription: Use Stripe Payment Links—fastest setup, reliable hosted checkout, works with a simple Webflow button
- Want to manage Stripe products directly from Webflow: Use the Stripe App for Webflow—create and embed payment links without switching between tools
- Running a membership site with gated access: Use Memberstack or Outseta + Stripe—handles authentication, page gating, and recurring billing together
- Need a multi-item cart or subscription billing without Webflow Ecommerce: Use Foxy—adds a complete cart, checkout, and recurring billing layer on top of your Webflow design
The fastest path for most businesses is Stripe Payment Links. The most "store-like" path is Foxy. And if you need subscriptions with gated content, tools like Memberstack or Outseta handle both billing and access control.
How to set up Stripe Payment Links in Webflow without the Webflow Ecommerce plan
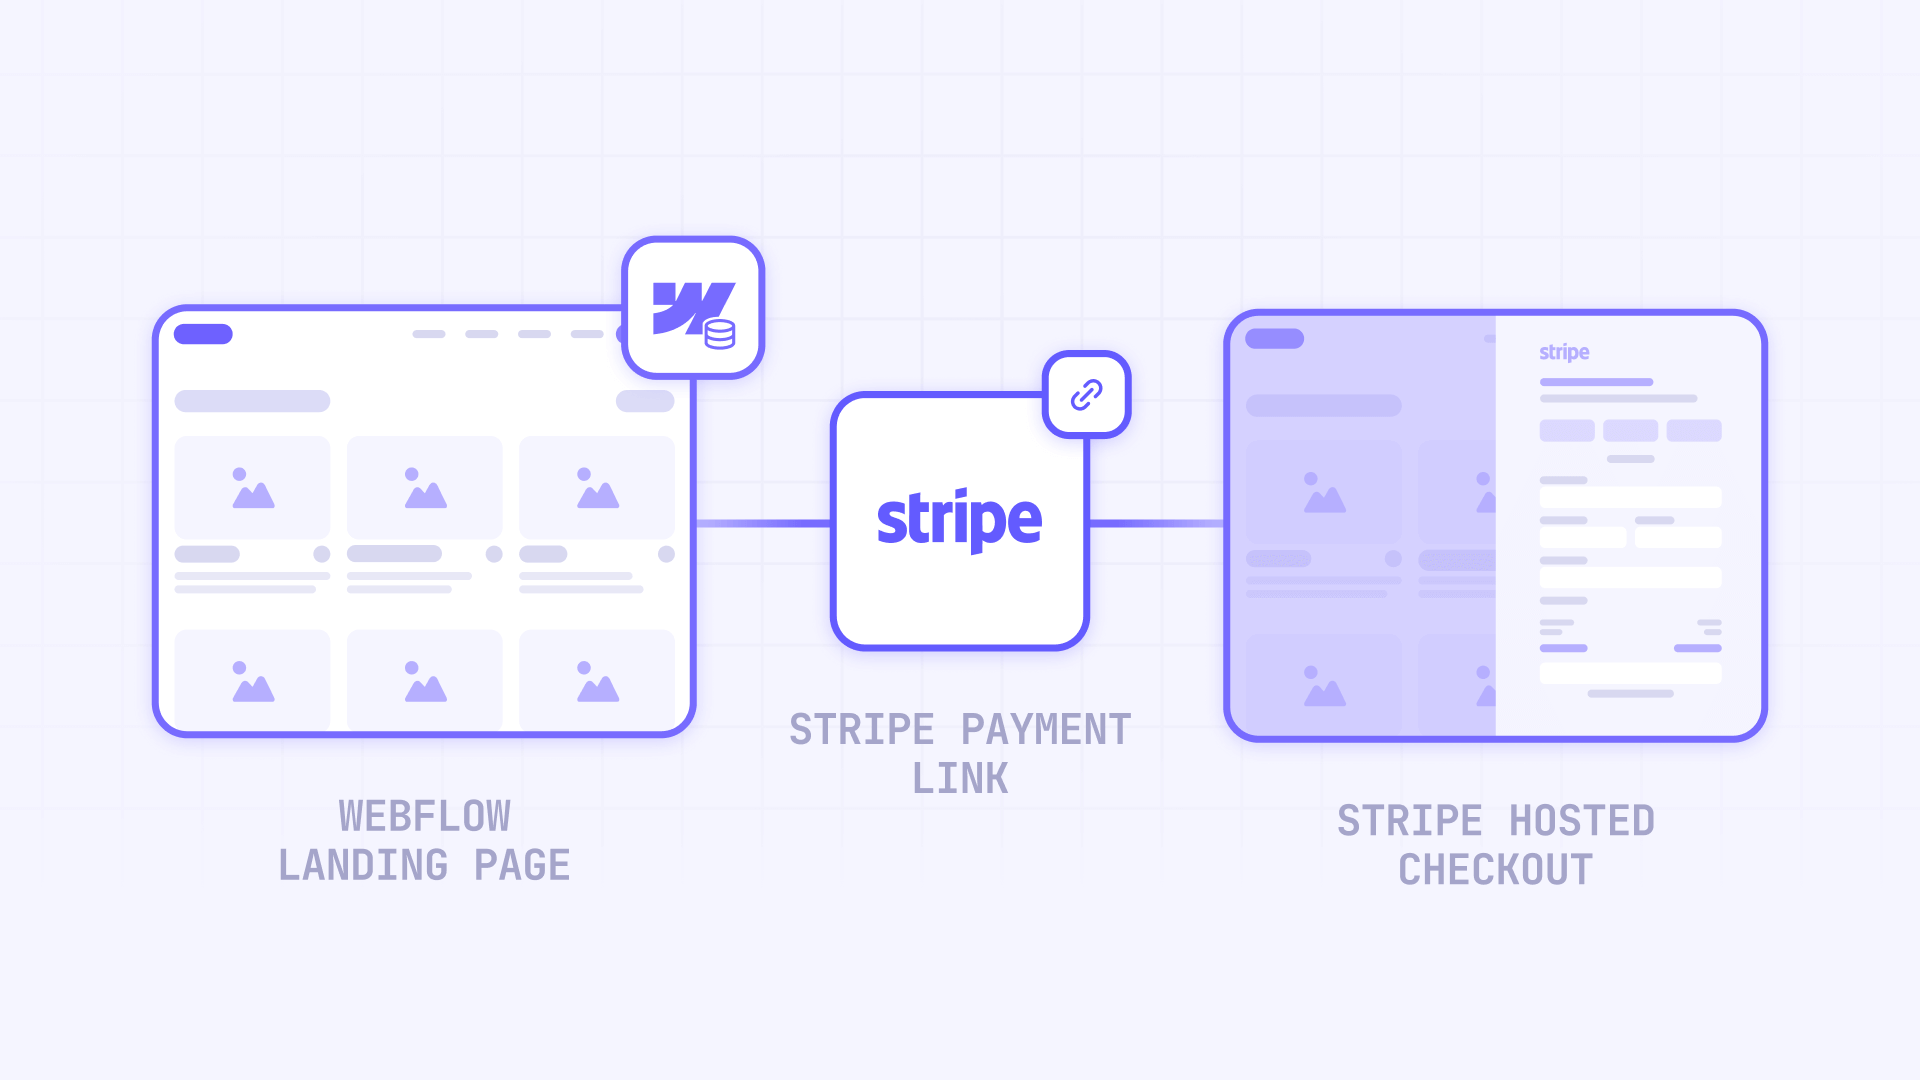
Stripe Payment Links are the simplest "accept money now" option: Stripe hosts the entire checkout experience, and you just link to it from your Webflow site. This works for goods, services, subscriptions, tips, and donations.
Creating a Stripe Payment Link for your Webflow offer
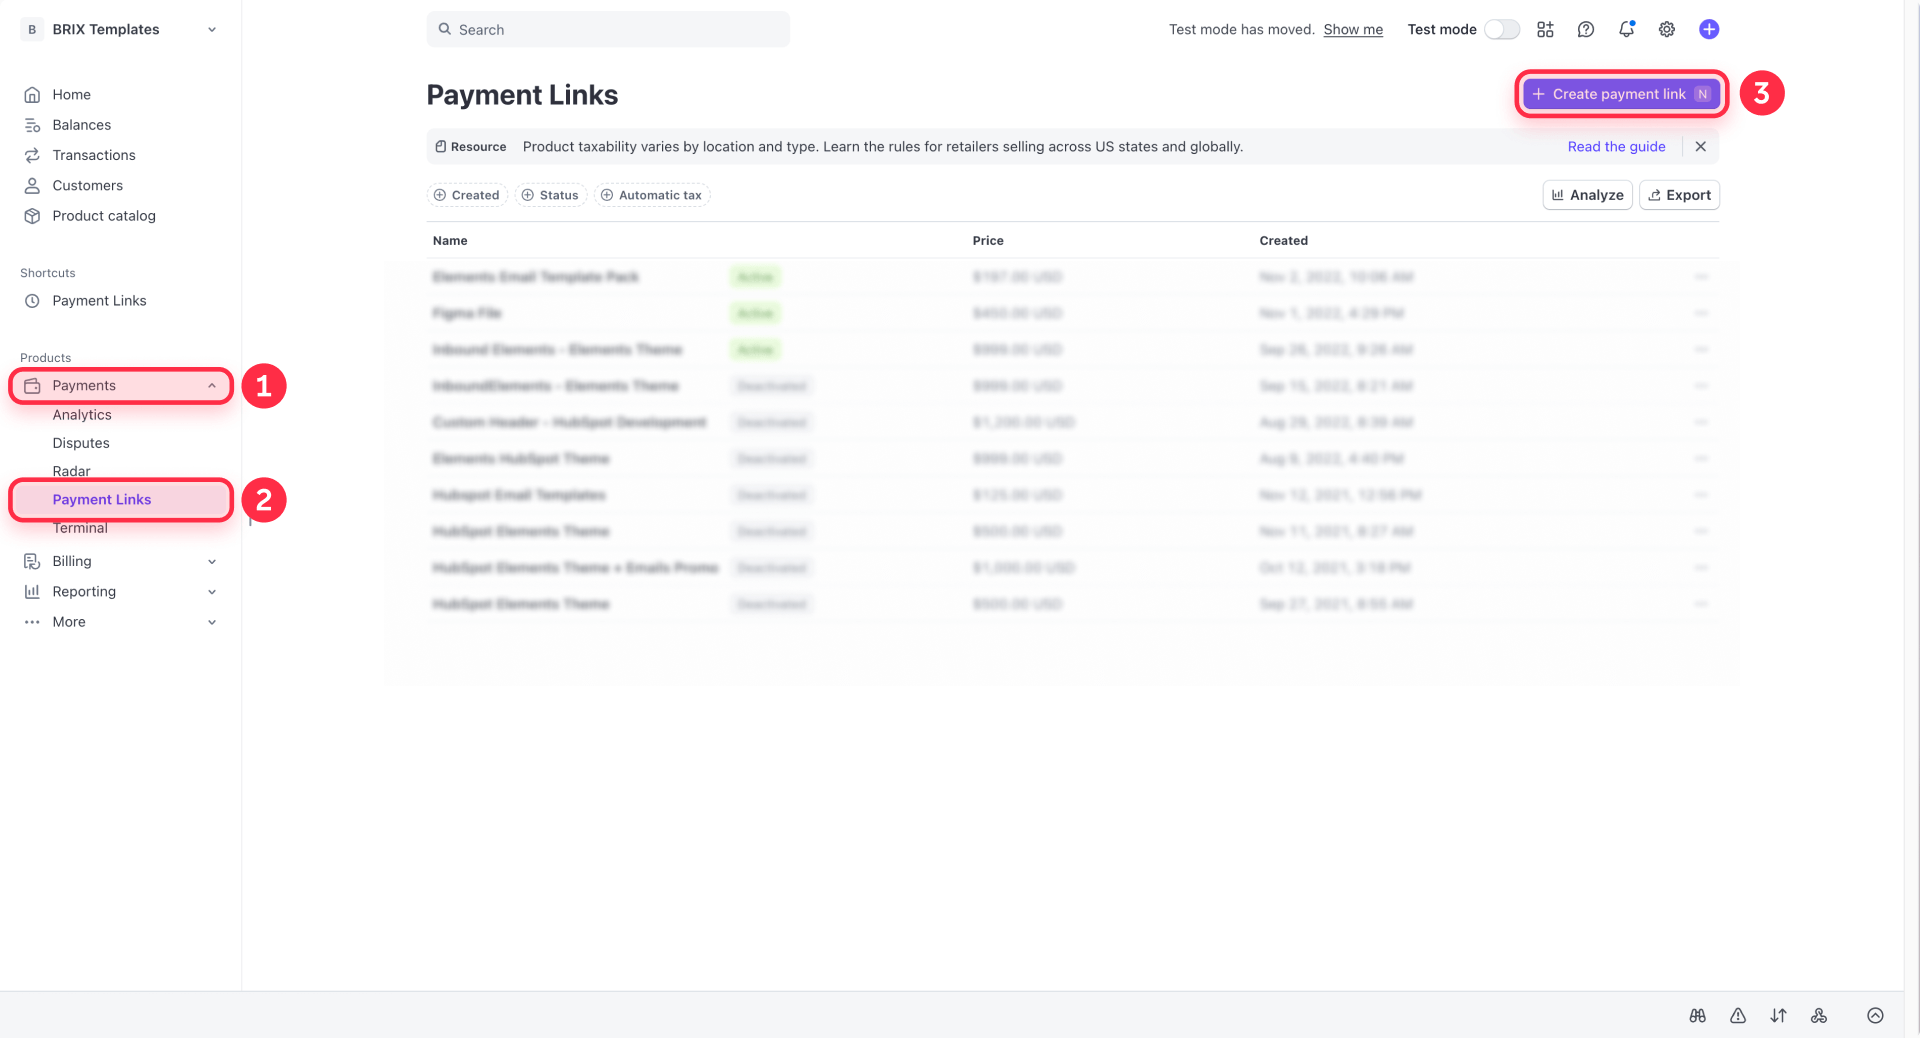
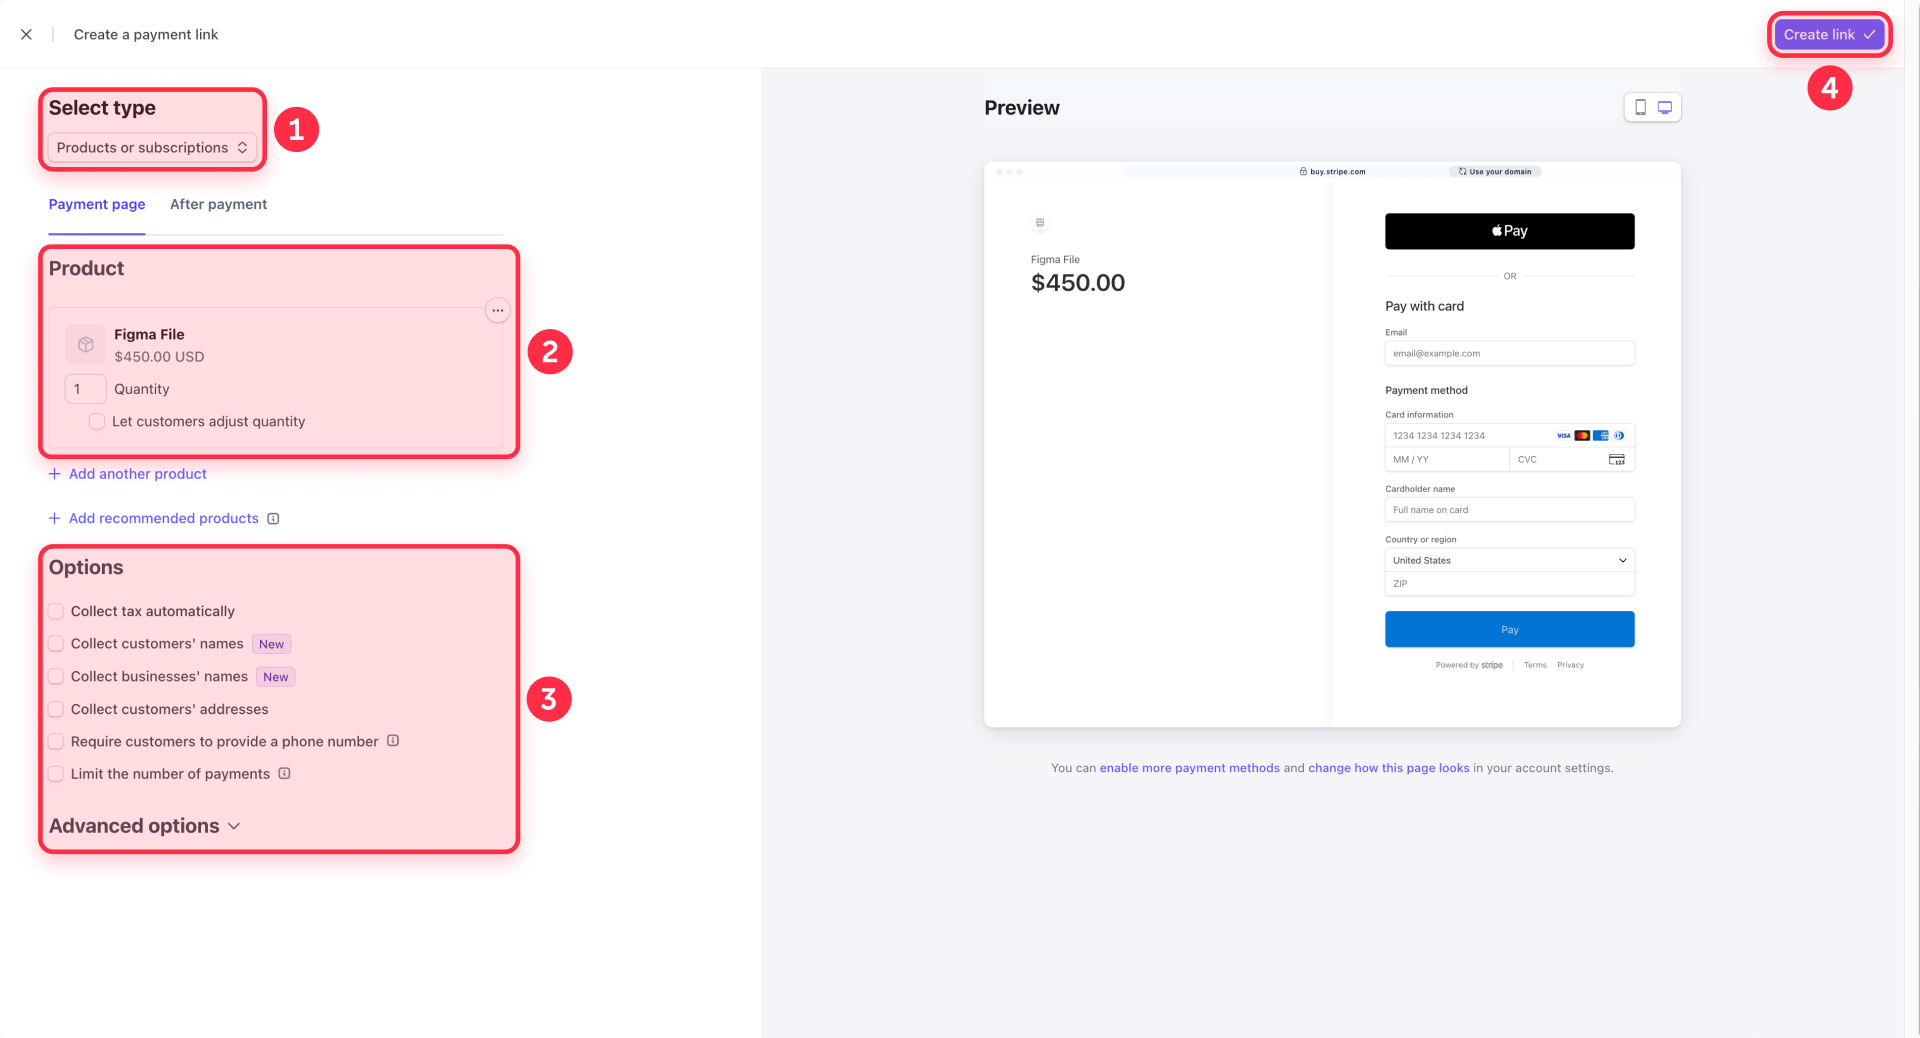
- In the Stripe Dashboard, go to Payment Links and click + New
- Choose between Products or subscriptions (fixed price) or Customers choose what to pay (great for donations and tips, but doesn't support recurring)
- Configure your product name, price, and any options you need
- Create the link and copy the URL
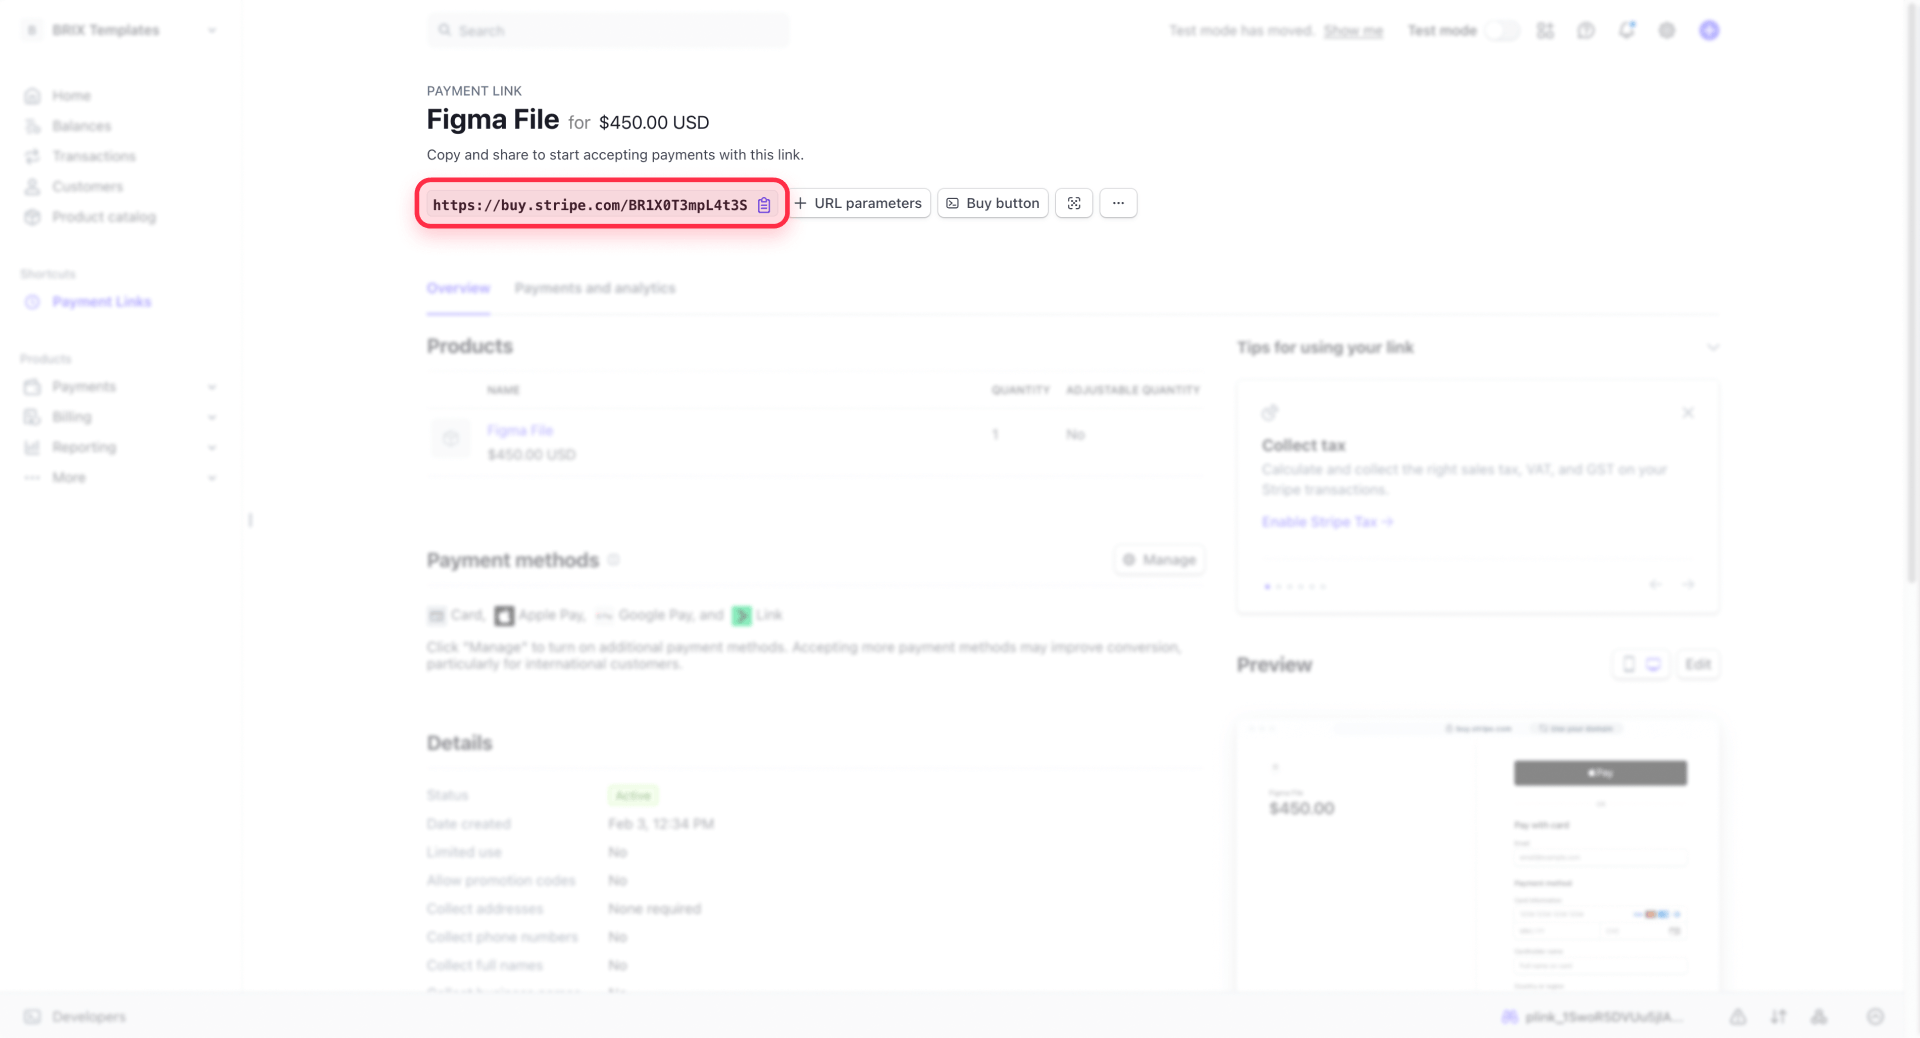
Stripe automatically shows the most relevant payment methods for each customer—including Apple Pay and Google Pay—so you get modern checkout without extra configuration.
Adding a Stripe Payment Link to a Webflow button
This is the zero-code approach that works for most single-product scenarios.
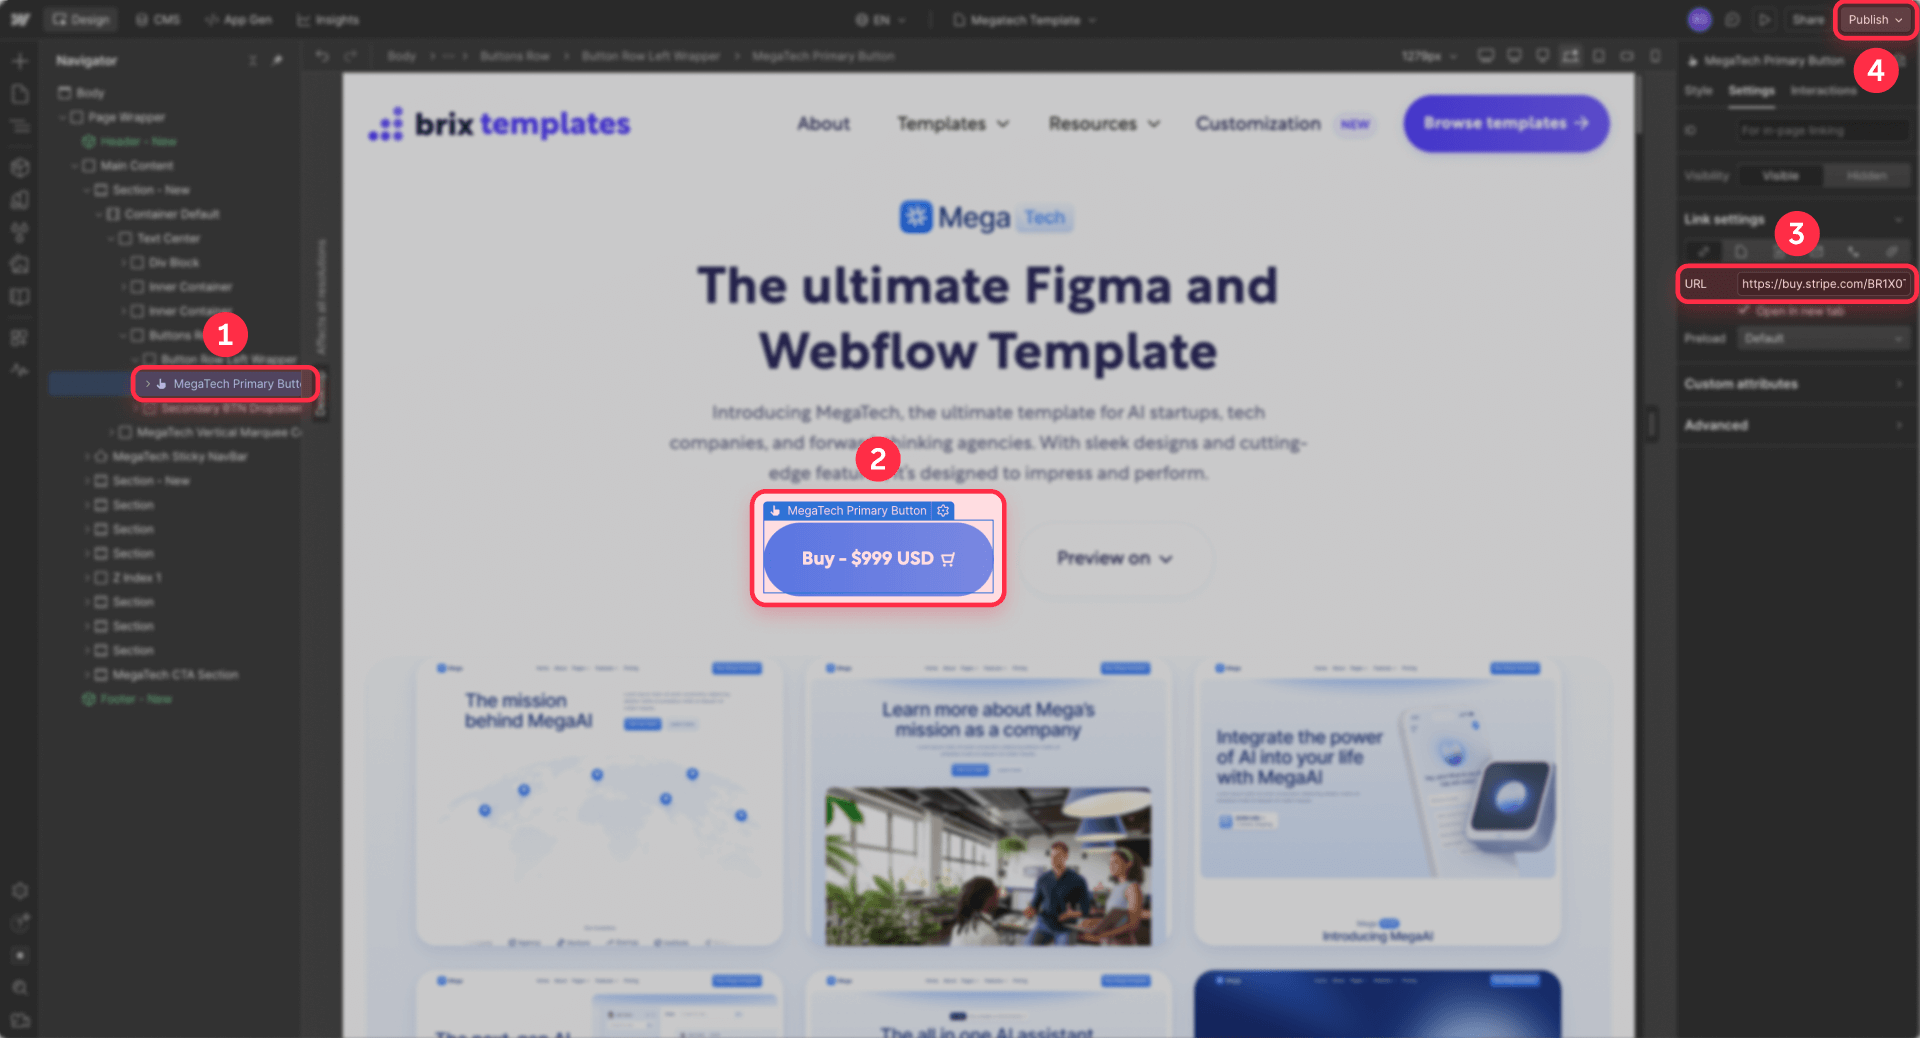
- In the Webflow Designer, add a Button element where you want the call-to-action
- Select the button and open Element settings
- In Link settings, choose URL
- Paste your Stripe Payment Link
- Decide whether to enable Open in new tab (often better for hosted checkout—users don't lose your page)
- Publish your site
That's it. You now have Stripe payments on a Webflow site without Webflow Ecommerce.
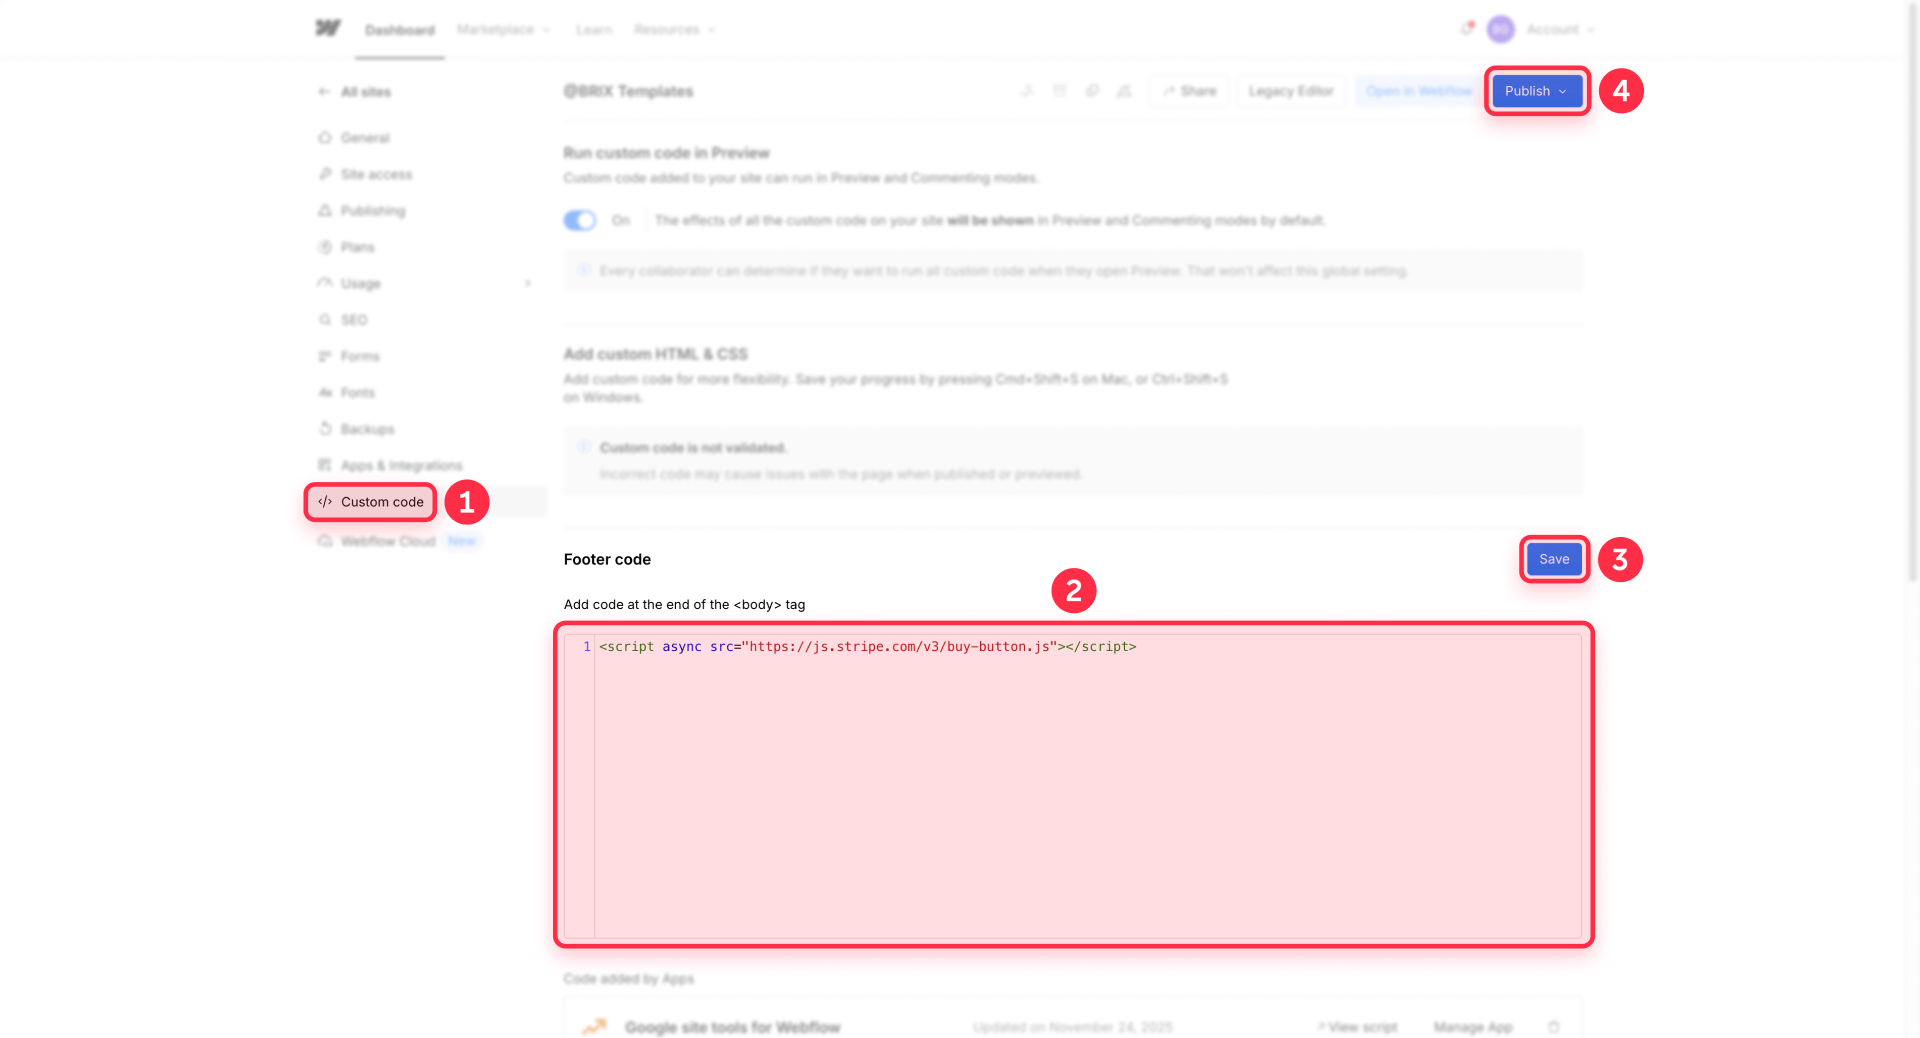
Embedding a Stripe Buy Button in Webflow
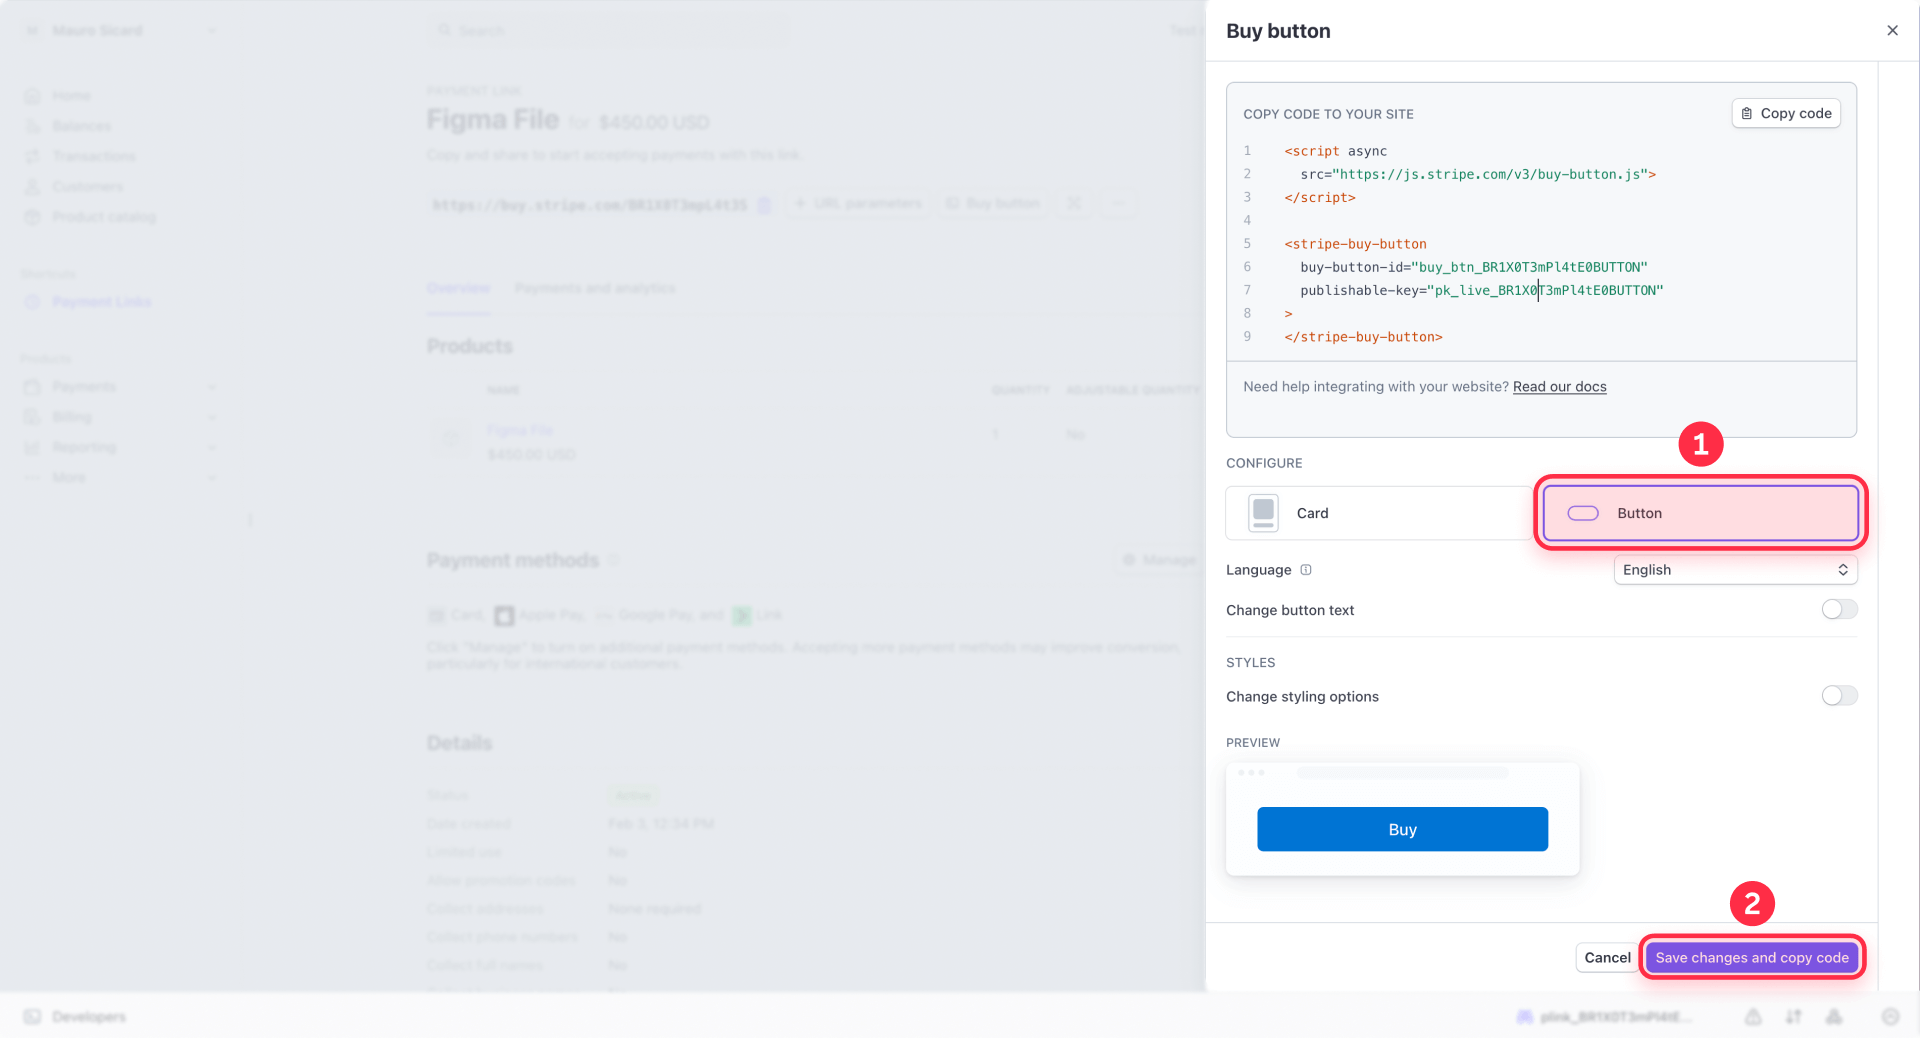
If you want a checkout widget embedded directly on your page instead of a link, Stripe lets you generate an embeddable Buy Button for any Payment Link.
To embed it in Webflow:
- In the Stripe Dashboard, find your Payment Link and generate the Buy Button code
- In Webflow, add an Embed element where you want the button to appear
- Paste the Buy Button code Stripe provides into the embed
- Publish your site and test (many scripts won't run in Designer preview—you need to check the published site)
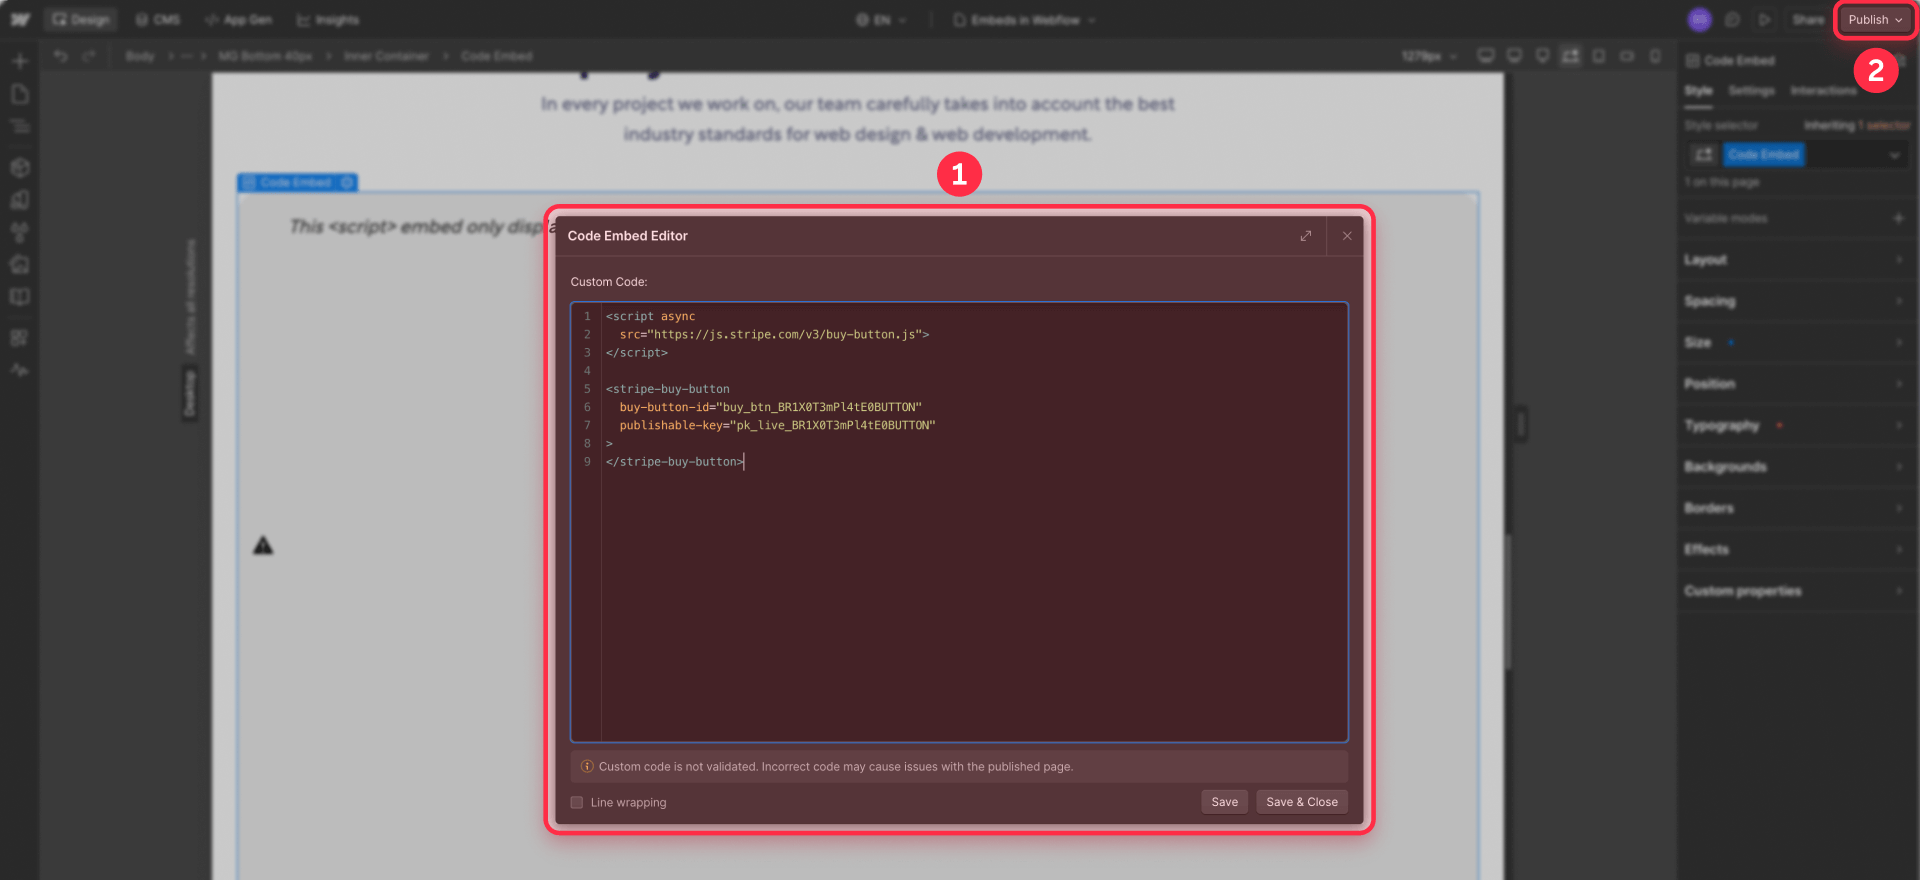
Requirements to know: You need a paid Webflow Workspace tier or an active Site plan to use embed elements. Embeds support HTML, CSS, and JavaScript only, with a 50,000 character limit—and you must not include html, body, or head tags inside them.
If you're placing multiple Buy Buttons across your site, add the Stripe script once in Site settings → Custom code → Footer code to avoid loading it multiple times. Each individual embed then only needs the button element itself.
Scaling Stripe Payment Links with Webflow CMS
If you're selling multiple services or products, don't copy-paste links into every page manually. Use Webflow CMS to keep things manageable.
- Create a CMS Collection (for example, "Offers" or "Services")
- Add a Plain text field called something like Stripe payment link URL
- On the Collection template page, bind your Button link to that CMS field
- Now each CMS item gets its own Stripe Payment Link, and your template page stays reusable
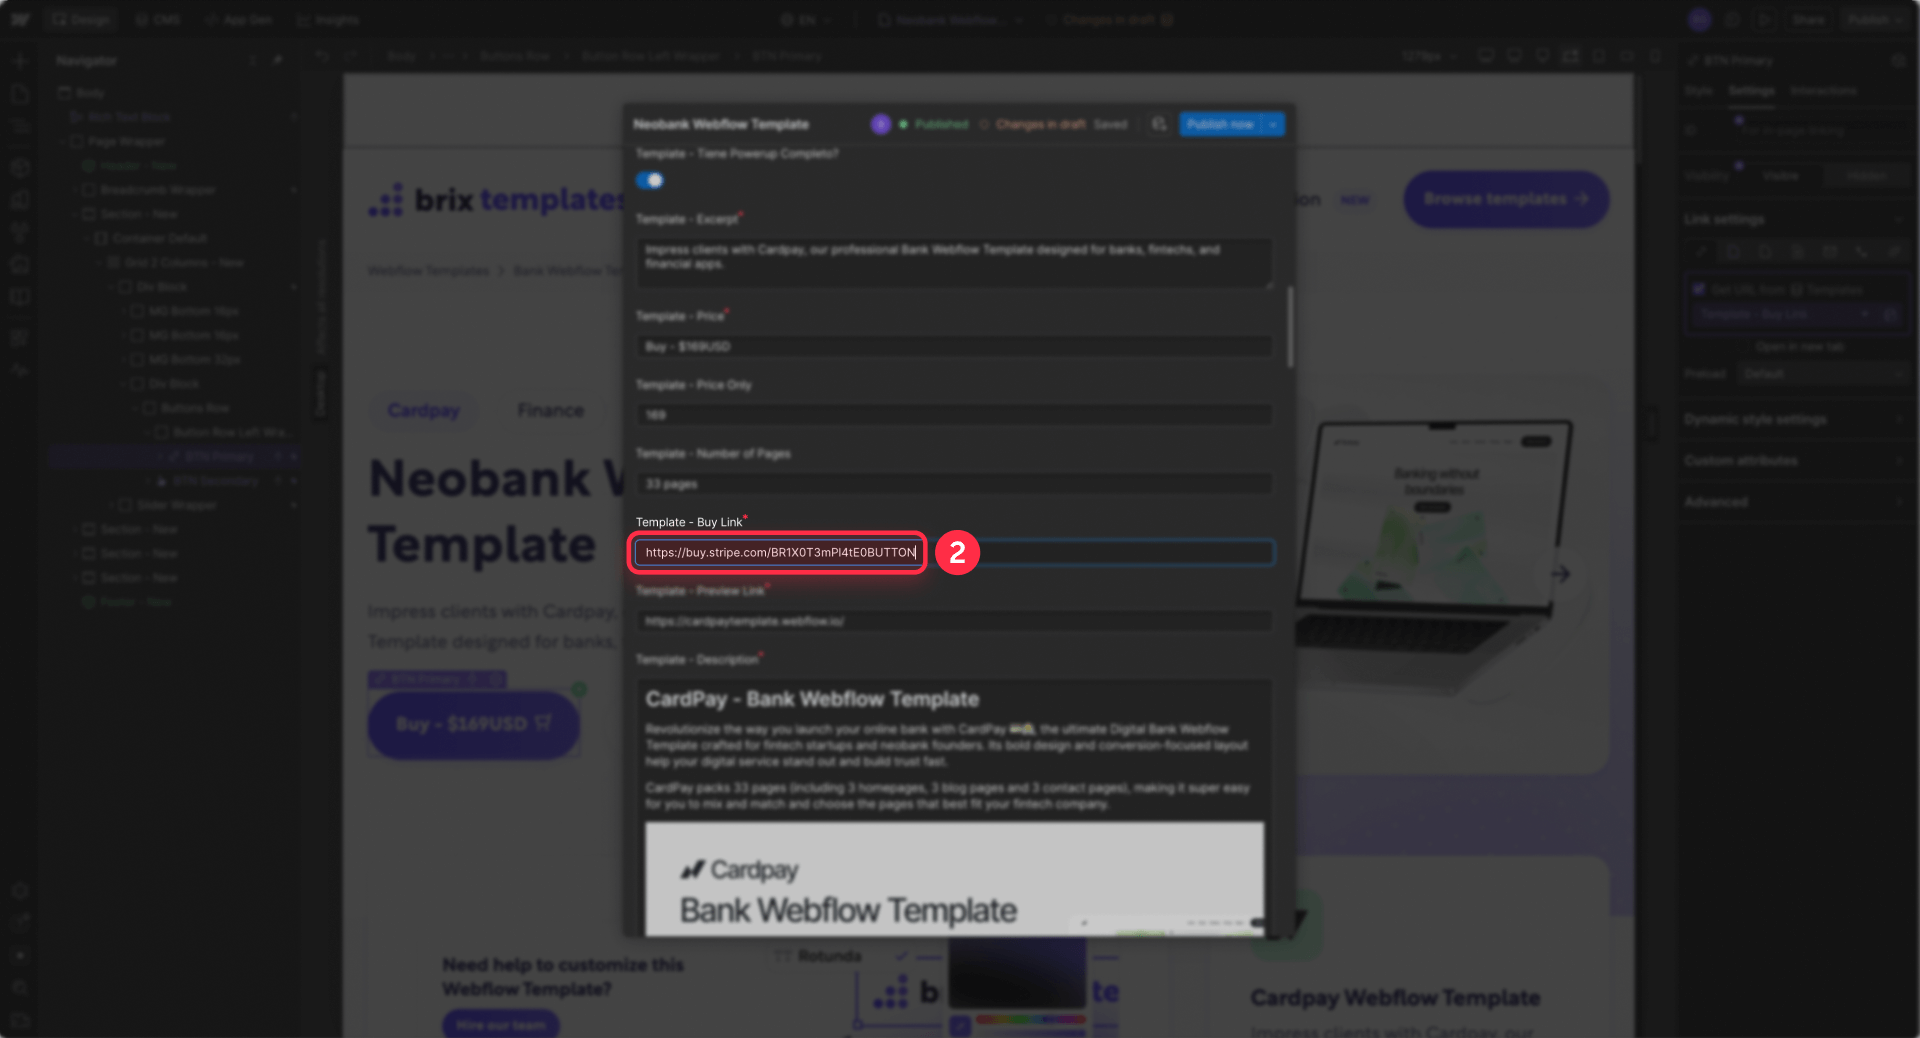
This pattern scales cleanly—add a new offer in the CMS, paste in its Stripe link, and it's live. No Webflow Designer changes needed.
If you also need structured data for your product pages, our guide on how to add product Schema in Webflow covers that setup.
Handling emails and delivery after Stripe payments in Webflow
Here's the part people forget: when you bypass Webflow Ecommerce, Webflow won't send order confirmation emails because no Webflow order exists. There's no order record, no fulfillment workflow, no automated email from Webflow's side.
Your options:
- Stripe receipts: Enable email receipts in your Stripe settings—they're clean, immediate, and require zero extra setup
- Stripe's post-payment page: Configure a success URL in your Payment Link settings to redirect customers to a thank-you page on your Webflow site
- Third-party automation: If you need more (deliver a file, invite to a platform, notify your team), you can easily connect Stripe to tools like Zapier or Make, and from there trigger actions in Mailchimp, Google Sheets, Slack, or almost any other service
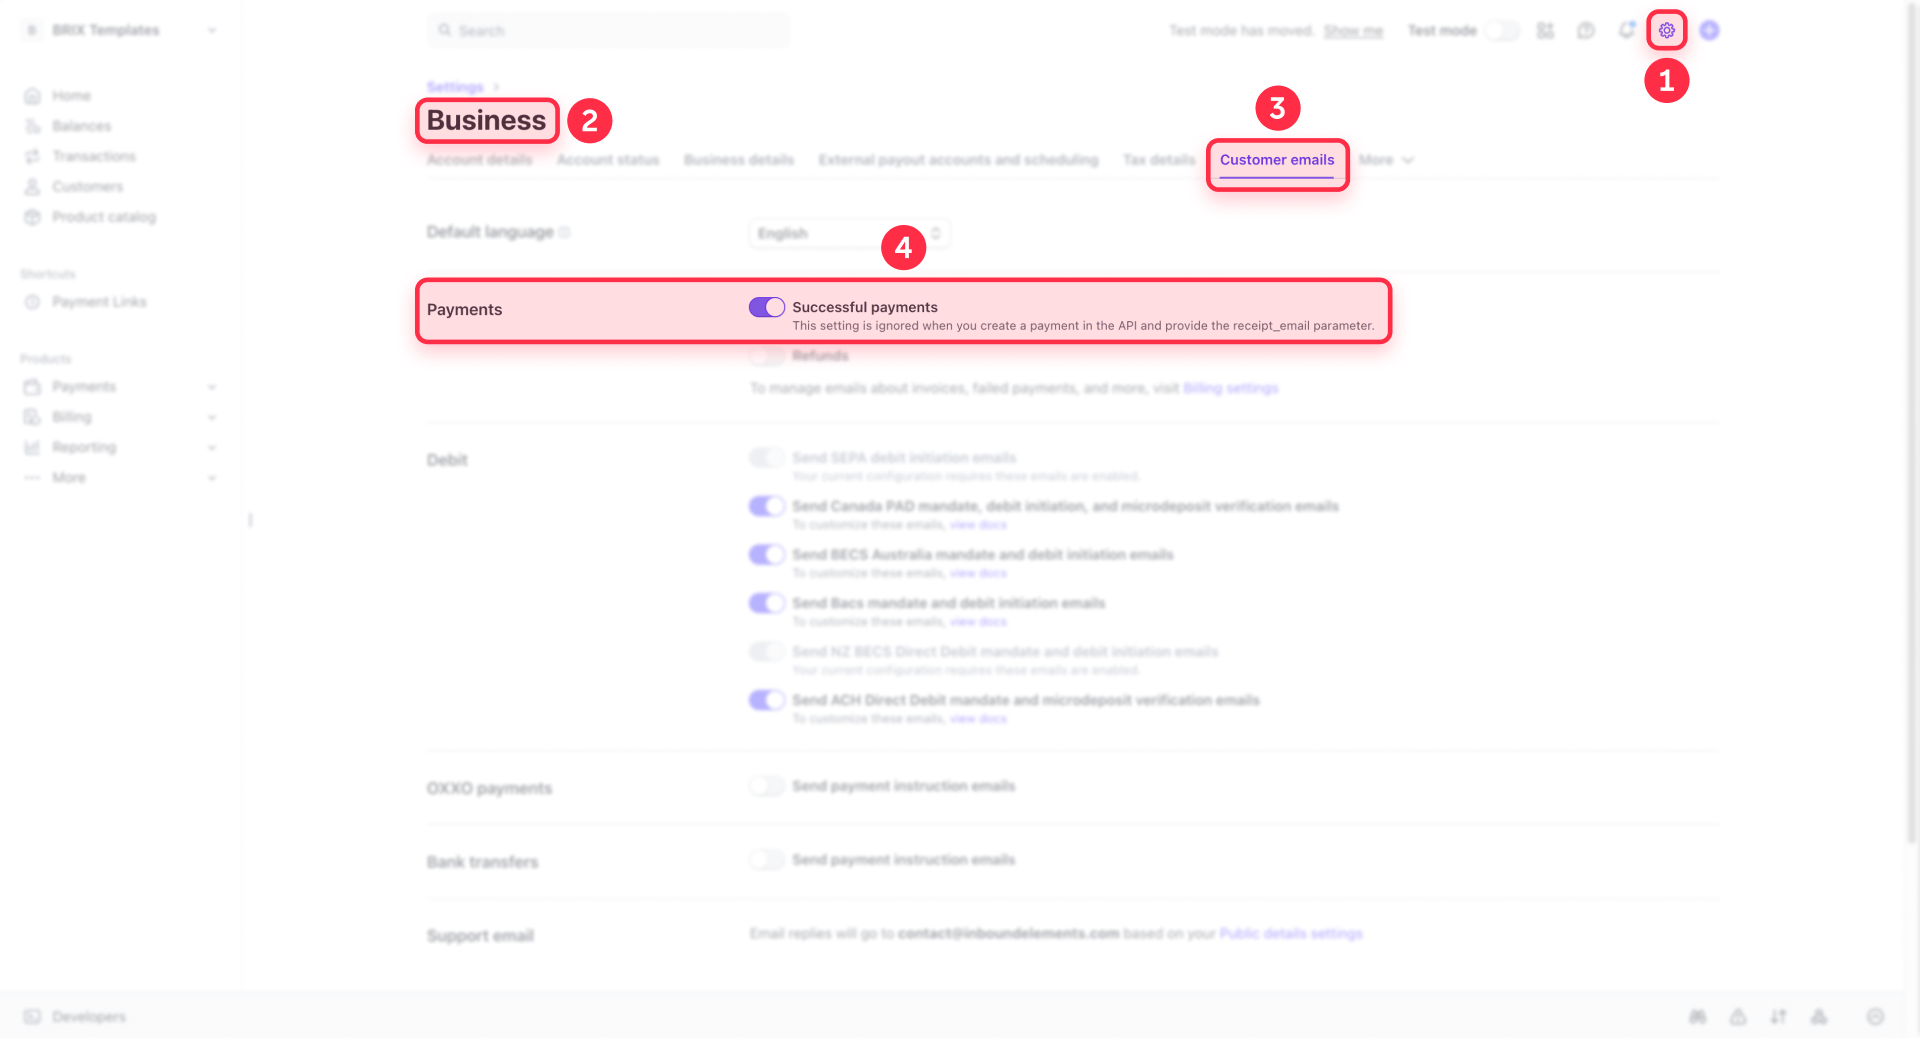
For digital products specifically, don't rely on a "secret download URL" that anyone could share. Use a proper delivery mechanism—either a membership system that gates access after payment, or an automation that sends a unique link per purchase.
Using the Stripe App in Webflow without the Webflow Ecommerce plan
The Stripe App is Webflow's built-in integration for managing Stripe products and payment links directly inside the Webflow interface. It's essentially Payment Links with less context-switching.
Installing the Stripe App in Webflow
- In your Webflow project, open Apps
- Find Stripe and click Install
- Follow the prompts to connect your Stripe account
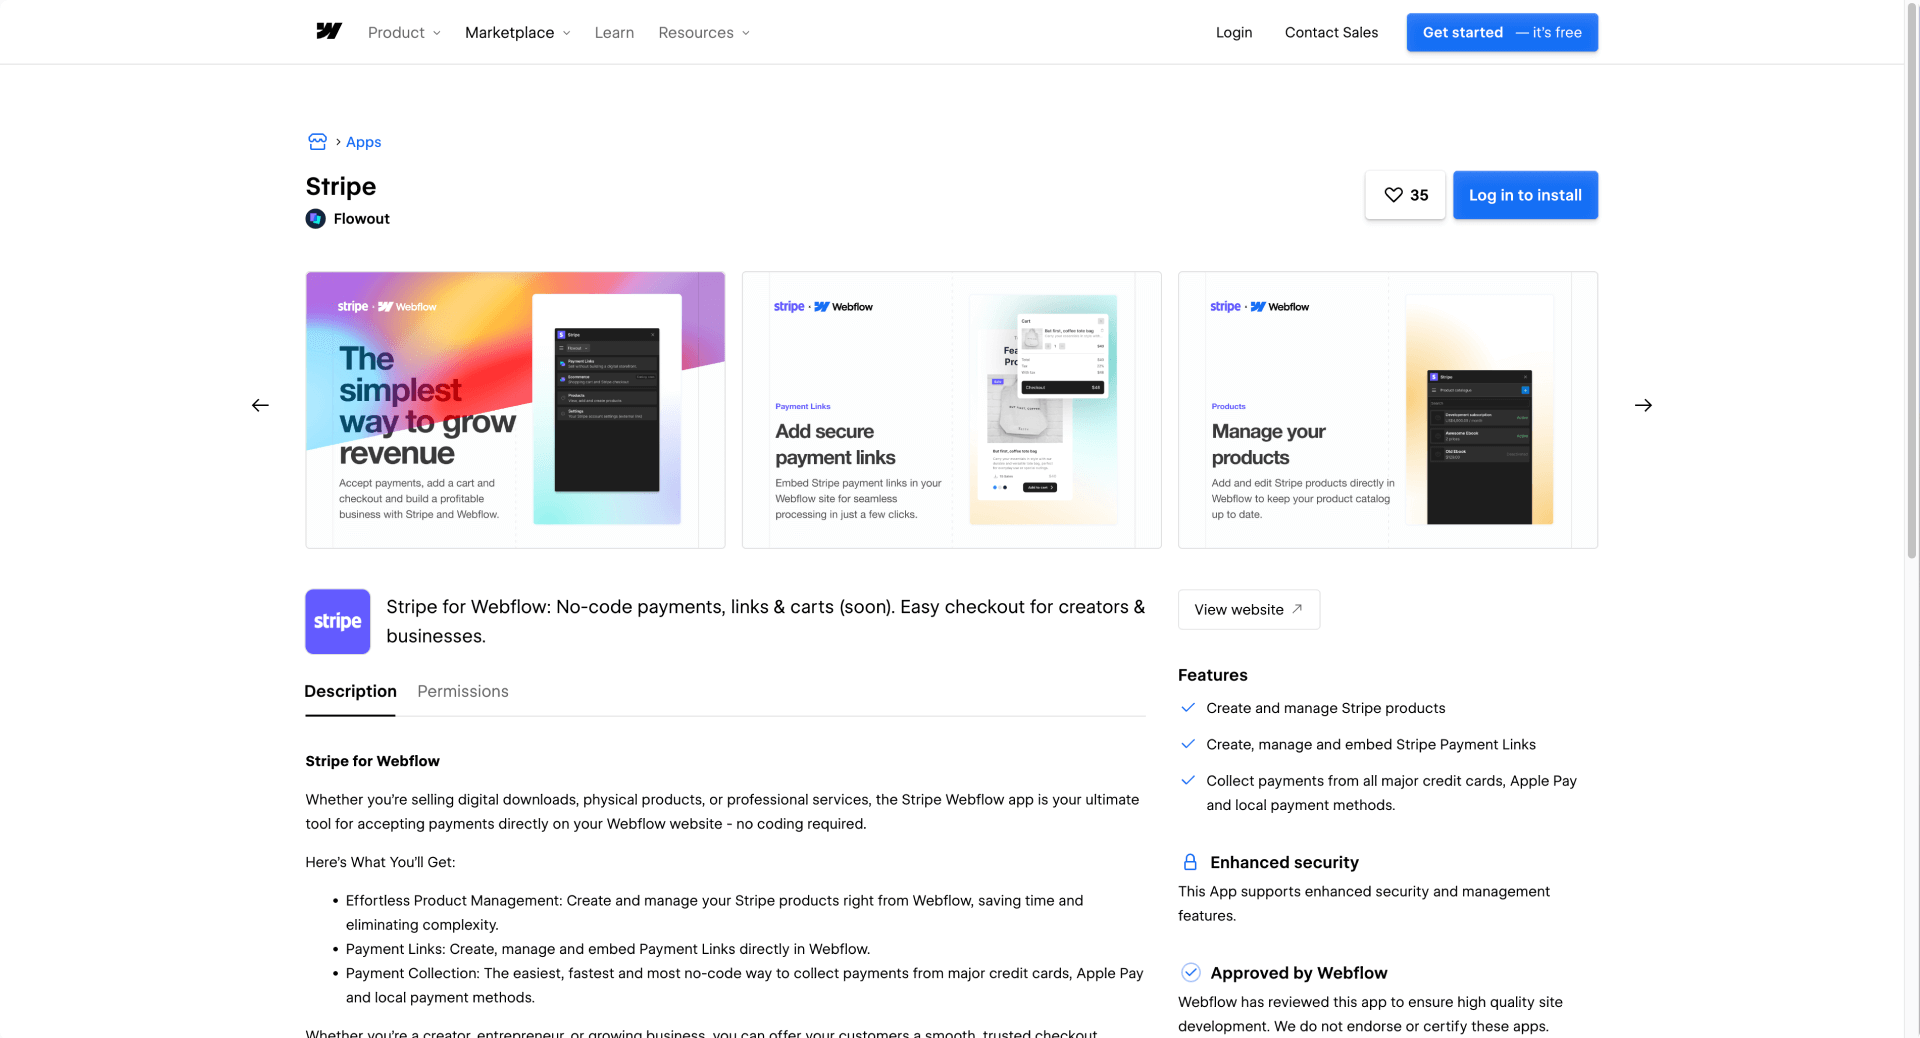
The app lets you create products, generate payment links, and manage them without leaving Webflow.
Adding Stripe App payment links to Webflow pages
- In the Stripe App panel, create or select a product and its payment link
- Copy the link or embed option
- In Webflow, either paste the link into a Button (via Link settings → URL) or paste embed code into an Embed element
Understanding Stripe App limitations in Webflow
The Stripe App is payments-focused, not a complete store solution. It doesn't currently offer cart functionality, order management, or post-purchase workflows inside Webflow.
The app listing mentions "carts (soon)," but treat that as not guaranteed until it ships. If you need a real cart experience today, look at Foxy (covered later in this guide).
Taking recurring payments on Webflow using Memberstack or Outseta without Webflow Ecommerce
When your product is access to something—a course, a community, premium content, SaaS-style features—you need two things working together: billing (collecting recurring payments) and access control (deciding who sees what). Webflow alone won't give you both.
When to use Memberstack for Webflow subscriptions

Memberstack connects directly to Stripe and manages authentication, page gating, and recurring billing from a single tool. It's the most popular membership solution in the Webflow ecosystem.
Here's how it works:
- You create membership plans in Memberstack that map to Stripe prices
- Install Memberstack on your Webflow site via a site-wide script in Site settings → Custom code
- Define which Webflow pages or elements are visible to which plans
- Members sign up, pay through Stripe, and automatically get access to gated content
Memberstack handles the full flow: signup forms, login, password reset, subscription management, and page-level access control. You design everything in Webflow—Memberstack just controls who sees what based on their subscription status.
When to use Outseta for Webflow subscriptions

Outseta takes a broader approach by combining billing, CRM, and authentication in one platform. It connects to Stripe with a toggle between test and live modes.
Outseta is better suited when you want billing plus customer relationship management—not just a paywall. If you're tracking customer lifecycle, sending targeted emails based on plan status, or managing support alongside subscriptions, Outseta covers more ground than a pure membership tool.
Choosing between Memberstack and Outseta for Webflow
The decision comes down to scope:
- Use Memberstack when your primary need is gating content behind paid plans—it's focused, well-documented for Webflow, and has the largest community
- Use Outseta when you need billing, CRM, and customer management in a single tool—it does more, but the learning curve is steeper
If you're building anything where "who paid" determines "what they can see," either tool will get you there. Memberstack is the simpler starting point for most Webflow projects.
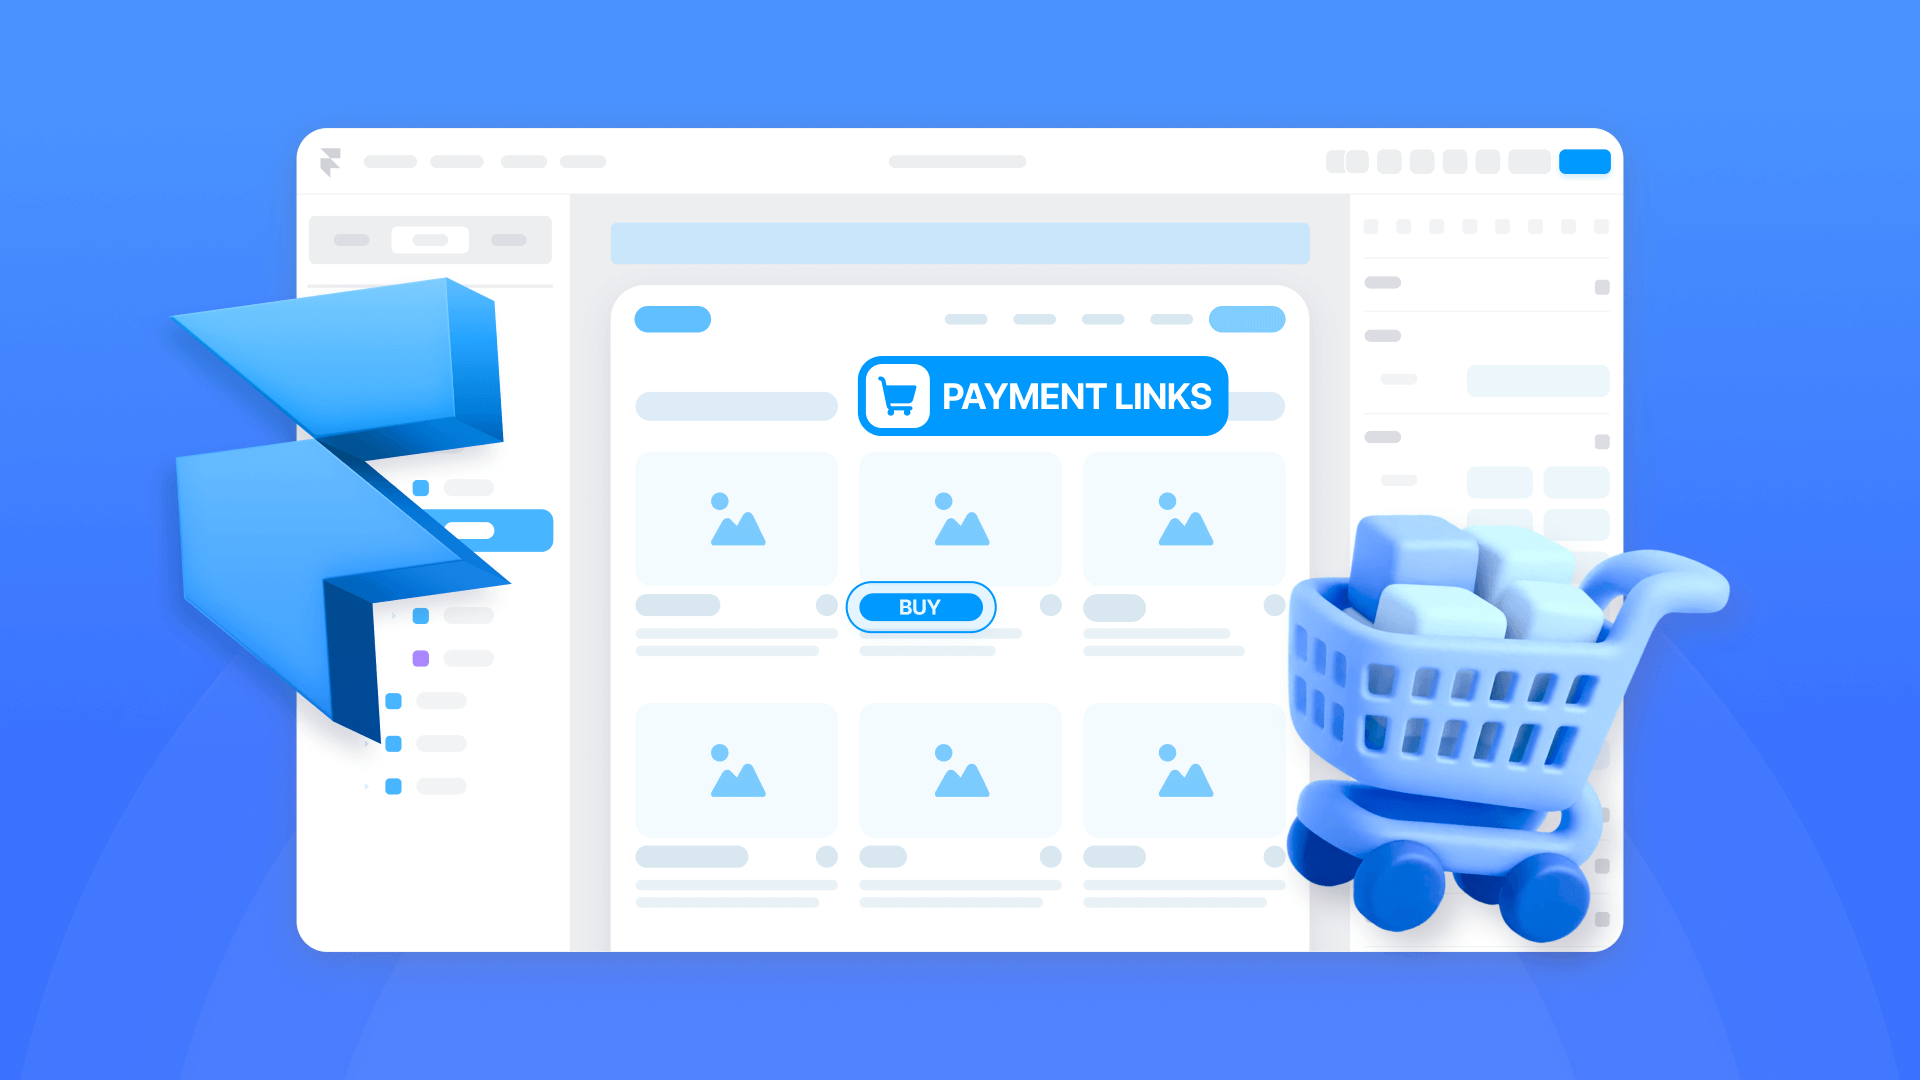
Adding a cart to Webflow without Webflow Ecommerce using Foxy
When you're selling multiple products and customers need to add several items before checking out, Stripe Payment Links won't cut it. Foxy adds a complete cart and checkout experience on top of your Webflow design.
When Foxy makes sense for Webflow sites
Foxy is a good fit when:
- Customers need to browse and add multiple items before checking out
- You need a full checkout flow with shipping, tax calculation, and order management
- You need subscription or recurring billing built into the checkout process
- You want transactional emails handled automatically—Foxy sends receipts and confirmations by default, so you don't face the "who sends the email?" problem that comes with Payment Links
How Foxy connects to Webflow
The integration works through two pieces:
- A loader script added to your Webflow site via Site settings → Custom code → Footer code—this powers the cart and checkout functionality site-wide
- Product buttons or forms on your Webflow pages that link to Foxy with product details (name, price, quantity)
Foxy also supports building purchase forms using Webflow's native form builder, where you set the form Action to Foxy's endpoint and use hidden fields for product data like name, price, and subscription frequency.
The trade-off is added complexity: you're maintaining a separate commerce layer alongside Webflow, with its own dashboard, settings, and fees. For sites that genuinely need cart functionality without Webflow Ecommerce, that trade-off is worth it.
Frequently asked questions about accepting payments in Webflow without Webflow Ecommerce
Can I accept Stripe payments on Webflow without a Webflow Ecommerce plan?
Yes—but not through Webflow's native checkout. Without the Webflow Ecommerce plan, your best option is hosted checkout that lives outside Webflow's order system. The most common approach is Stripe Payment Links, where Stripe hosts the entire checkout and you send users there from a Webflow button.
The trade-off is you won't get Webflow's order management or order emails, because no Webflow order is created. If you need carts or subscriptions with gated access, you'll want a different tool from the options in this guide.
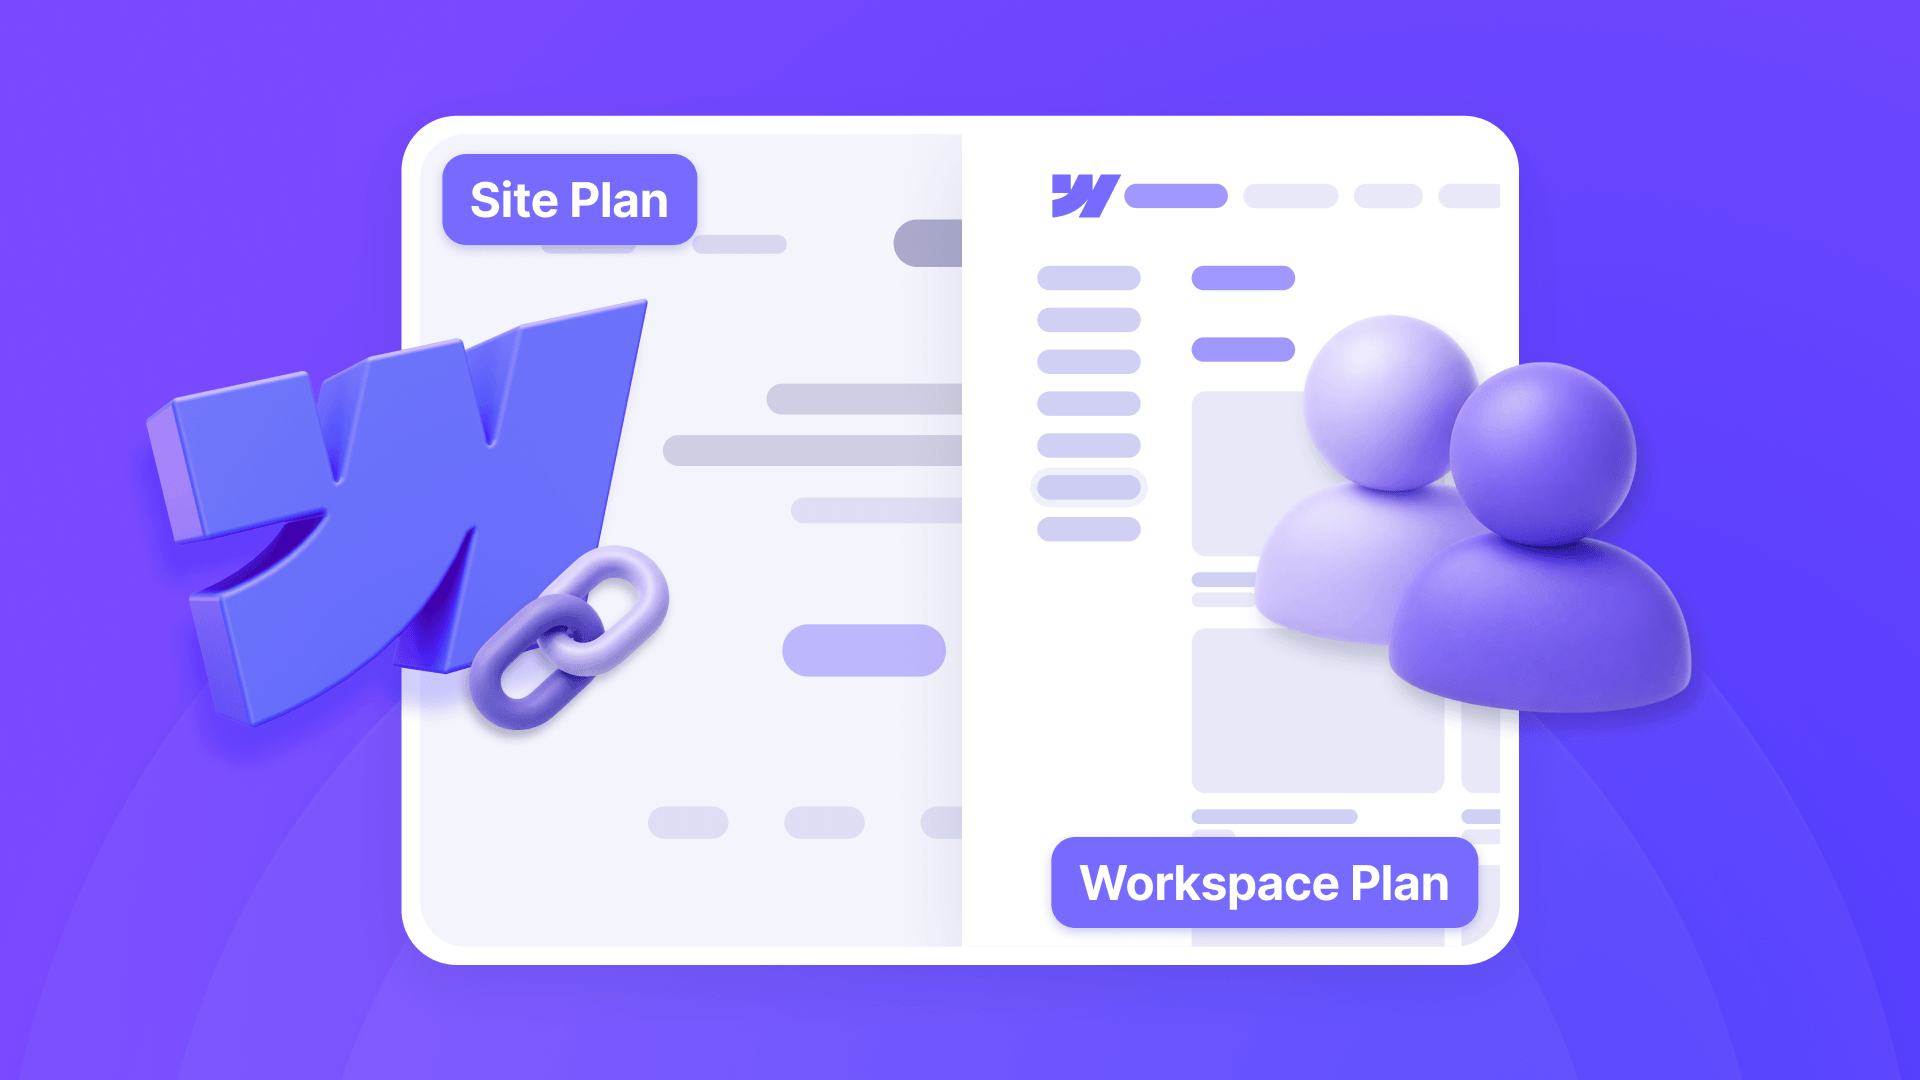
Do I need a Webflow Ecommerce plan to connect Stripe at all?
If you want to connect Stripe inside Webflow's settings and use Webflow's built-in checkout, yes—you need the Webflow Ecommerce plan with checkout enabled. That's a hard requirement from Webflow.
But "connecting Stripe" through external methods (Payment Links, Buy Buttons, the Stripe App) works on any Webflow plan that supports custom code and embeds. You're not connecting Stripe to Webflow Ecommerce—you're linking to Stripe-hosted checkout from your Webflow pages.
What's the easiest way to accept Stripe payments on a Webflow CMS site?
Store your Stripe Payment Link URL in a CMS text field and bind it to a button on your Collection template page. This way, each CMS item gets its own payment link without you touching the Webflow Designer every time you add a product.
This pattern is the cleanest approach for service businesses selling multiple fixed-price offers. Add a new CMS item, paste in the Stripe link, and it's live. No template changes needed.
How do I embed a Stripe Buy Button on my Webflow site?
Add an Embed element in Webflow and paste the Buy Button code that Stripe generates for your Payment Link. Publish your site to test—Designer preview won't run the script.
Make sure your Webflow plan supports embeds, and follow the embed rules: no html/body/head tags, under 50,000 characters. If you have multiple Buy Buttons across your site, place the Stripe script once in your footer code and keep each page embed lightweight.
How do I sell subscriptions on Webflow without the Webflow Ecommerce plan?
You have several options depending on your needs. Stripe Payment Links support recurring payments, so for simple subscriptions you can create a recurring Payment Link and add it to a Webflow button. Foxy also handles subscription billing as part of its cart and checkout system.
But if your product requires access control (gated pages, member-only content, login), you'll need a membership tool like Memberstack or Outseta that connects to Stripe and manages both billing and page gating together.
What's the difference between Stripe Payment Links and the Stripe App for Webflow?
Stripe Payment Links are created and managed in the Stripe Dashboard—you copy a URL and paste it into Webflow. The Stripe App lets you do this directly inside Webflow's interface, reducing context-switching between tools.
Functionally, both use Stripe's hosted checkout. The Stripe App is more convenient if you're managing products frequently and want everything in one place. If you just need a checkout link for a few offers, manual Payment Links work fine.
Does Webflow send order emails when I use Stripe Payment Links?
No. When you bypass Webflow Ecommerce, Webflow has no order record, so it can't send confirmation emails, receipts, or fulfillment notifications. This surprises many people at first.
Your options are enabling Stripe's built-in email receipts (simplest), redirecting to a Webflow thank-you page after payment, or connecting Stripe to an automation tool like Zapier or Make for custom emails. For most small businesses, Stripe receipts are sufficient.
When should I use Foxy instead of Stripe Payment Links on Webflow?
Use Foxy when customers need to add multiple items to a cart before checking out, or when you need built-in subscription billing with a full checkout flow. Stripe Payment Links handle one product per checkout—if someone wants to buy three different things, they'd need three separate checkouts.
Foxy adds a complete cart, checkout, and transactional email system on top of Webflow. It's more complex to set up, but it's the right tool when your business model genuinely requires multi-item purchasing or recurring billing.
Can I gate Webflow pages based on Stripe subscription status?
Not with Stripe alone. Stripe handles billing, but it doesn't know anything about your Webflow pages. You need a membership tool like Memberstack or Outseta that connects to Stripe and translates "this customer has an active subscription" into "show them this page."
Without a membership tool, there's no mechanism to check subscription status and control page access. Stripe billing alone won't gate content.
How do I deliver digital products on Webflow after a payment without Webflow Ecommerce?
Don't use a "secret download URL" that anyone could share. The proper approaches are: using a membership tool to gate a download page behind login, setting up Stripe webhooks that trigger an automation to email a unique download link, or redirecting to a time-limited access page after successful checkout.
The simplest secure setup is a membership tool where access itself is the delivery mechanism. For one-off digital purchases without memberships, webhook-based email delivery with unique links is the standard approach.
Conclusion
Accepting payments on a Webflow site without the Webflow Ecommerce plan comes down to choosing the right external checkout for your business model. Stripe Payment Links cover most single-product and service scenarios. Membership tools like Memberstack and Outseta add the access control layer for subscriptions. And Foxy fills the gap when you genuinely need a multi-item cart or built-in recurring billing.
The key is matching the tool to what happens after payment—not just the checkout itself. Emails, delivery, access gating, and order tracking all need answers when Webflow's native Ecommerce isn't handling them for you.
If you'd rather have this implemented end-to-end with the right stack for your business model, our Webflow team at BRIX can help you ship it correctly the first time.


Join readers commenting on this post!