
Webflow is an excellent platform for creating beautiful, responsive websites, but it has one notable limitation: it doesn't include a native booking or scheduling system. This gap forces many business owners and professionals to rely on manual methods for arranging appointments with clients.
Fortunately, there are several effective solutions that can be integrated with your Webflow site to enable automated scheduling. Research shows that adding online scheduling capability can boost revenue by up to 120% by allowing visitors to book appointments 24/7 without the usual back-and-forth communication.
Why booking systems matter for Webflow sites
Without a booking system, your Webflow site forces potential clients to contact you manually, creating unnecessary friction that reduces conversions. Instead, by having a booking system you get many benefits, including:
- Instant conversion opportunities: Capture leads when interest is highest rather than making them wait for business hours
- Drastically reduced admin work: End the email or phone tag that eats up hours of your week and delays client onboarding
- Streamlined client onboarding: Collect important information upfront through booking forms so you're prepared for every meeting
- Automatic reminder systems: Decrease no-shows by up to 80% with automated email and SMS reminders
- Calendar protection: Prevent double-bookings and maintain control over your schedule with calendar sync features
- Booking data insights: See which services get booked most often and track conversion patterns to optimize your offerings
Understanding your booking system options in Webflow
Before choosing a solution, it's important to determine your specific needs.
Are you a freelancer needing basic meeting scheduling? A multi-staff salon requiring service bookings with payments? Or a consultancy wanting deep CRM integration? Your specific requirements will point to the right solution.
Let's explore the three most effective options for adding booking functionality to your Webflow site, and their unique benefits.
Option 1: Embedding Calendly in Webflow for simple scheduling
Calendly is the quickest way to add appointment scheduling to your Webflow site. It's ideal for consultants, coaches, and small teams who need a straightforward scheduling solution without complex customization requirements.
Strengths: Calendly excels at simple calendar integration, preventing double-bookings, and creating a clean scheduling experience. It offers easy setup with multiple calendar connections (Google, Outlook, etc.) and automated notifications.
Limitations: Calendly's customization is limited to color changes and basic branding. The embedded calendar always keeps the Calendly interface style, which might not perfectly match your site's design.
Pricing:
- Free Plan: 1 meeting type, basic scheduling with Calendly branding
- Standard: $12/month per seat - unlimited event types, multiple calendar connections, integrations
- Teams: $20/month per seat - all Standard features plus Salesforce integration, round-robin meetings, lead qualification
- Enterprise: Starts at $15k/year - advanced security, custom integrations, dedicated support
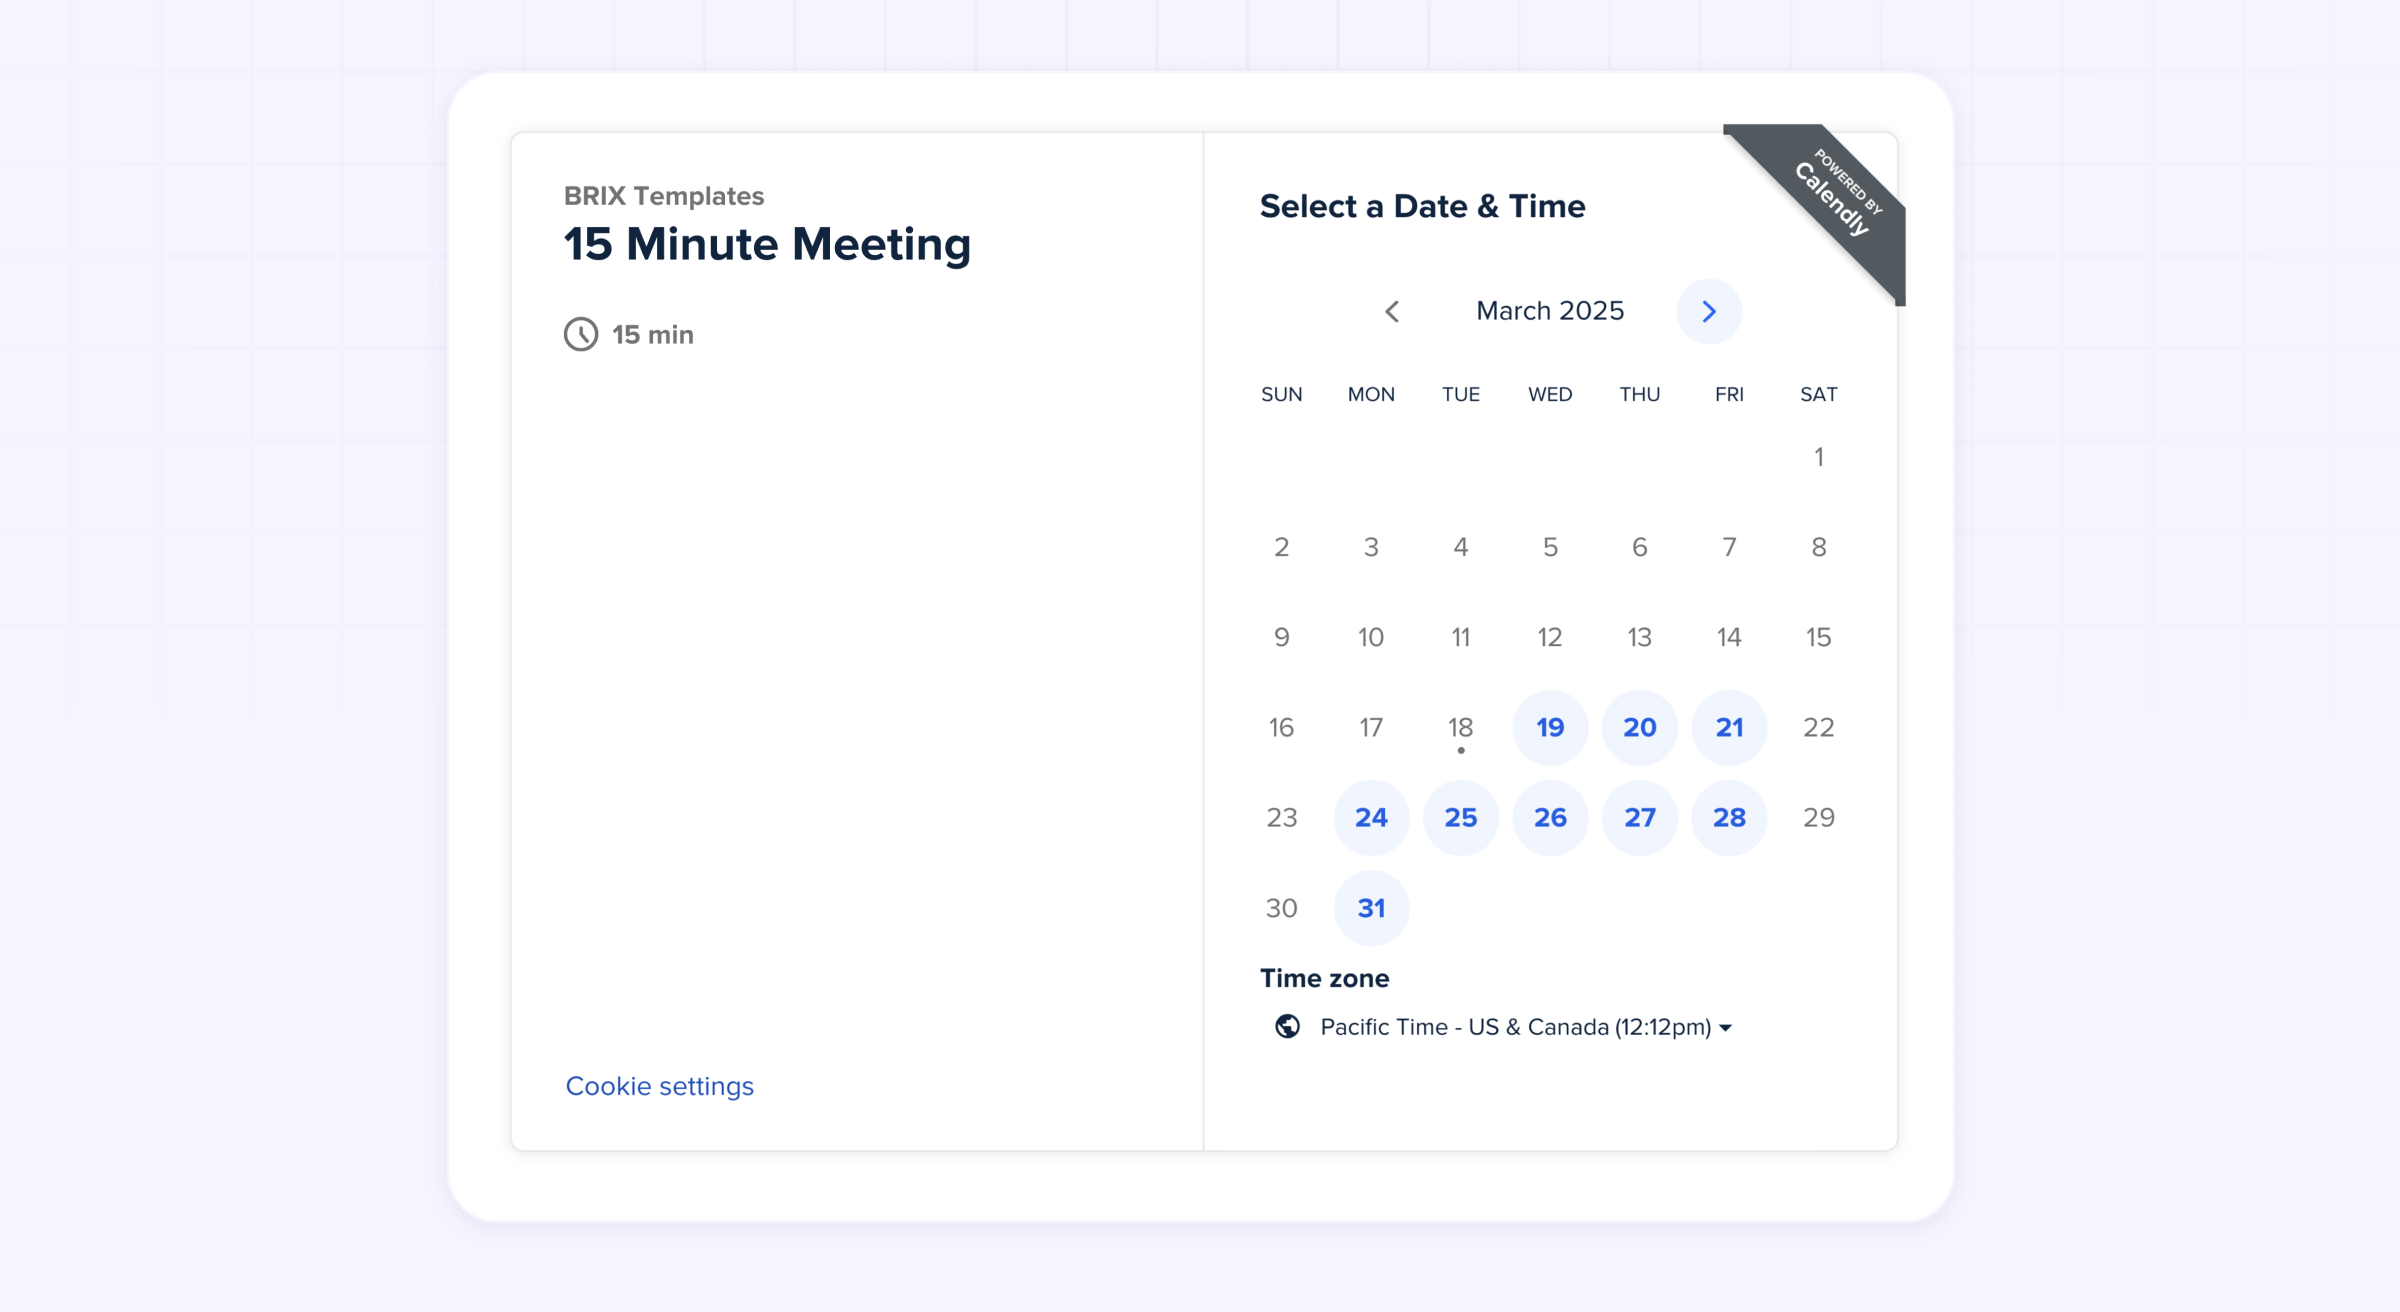
How to add Calendly to your Webflow site
1. Set up your Calendly account
- Visit Calendly and create an account if you don't already have one
- Connect your calendar (Google, Office 365, Outlook, etc.)
- Create your event types (e.g., "30-minute consultation," "60-minute strategy session")
- Customize your availability and notification settings
2. Get your Calendly embed code
- In Calendly, go to the event type you want to embed
- Click Share
- Select the Add to website tab
- Choose your embed type:
- Inline embedding shows the full calendar on your page
- Popup widget adds a floating button visitors can click
- Popup text allows you to trigger Calendly from any text or button
- Copy the provided embed code
3. Add Calendly to your Webflow page
- In the Webflow Designer, navigate to the page where you want to add booking
- Add an Embed element from the Add panel to the location you want the calendar to appear
- Click on the embed element and select Edit Custom Code
- Paste the Calendly embed code
- Click Save & Close
- For popup widgets, you may need to add the code to the Before </body> tag section in your page settings instead
4. Test and optimize your integration
- Publish your site to test the integration
- Complete a test booking to ensure notifications and calendar updates work properly
- If the page loads slowly, consider using the popup version which only loads when clicked
Calendly customization tips for Webflow
- Match your Webflow branding by adjusting Calendly's color scheme in your account settings
- For an even more seamless experience, you can use our Calendly pre-fill add-on to automatically pass data from Webflow forms to Calendly, eliminating the need for users to enter information twice
Option 2: Using FlowBookings for native Webflow integration
FlowBookings is built specifically for Webflow users who want complete design control over their booking experience. Unlike embedded solutions, FlowBookings uses native Webflow forms, allowing your booking interface to match your site design perfectly.
Strengths: FlowBookings offers complete design flexibility since it uses Webflow's form elements rather than iframes. Your booking forms look and feel like the rest of your site with no third-party branding. It also offers built-in payment processing via Stripe with zero commission fees.
Limitations: As a newer tool, FlowBookings may not have all the advanced features of established platforms. The interface for managing bookings is less mature than competitors like Calendly, though it's improving rapidly.
Pricing:
- Standard: $24/month - 10 services, 1000 bookings per month, payments with 0% commission
- Premium: $49/month - 50 services, 5000 bookings per month, all Standard features
- Power: $99/month - Unlimited services, unlimited bookings, priority support
Calendar Sync: FlowBookings syncs with Google Calendar and Outlook to prevent double-bookings. Events booked through FlowBookings automatically appear in your connected calendar, and it checks your existing calendar events to avoid scheduling conflicts.
How to implement FlowBookings in your Webflow project
1. Install the FlowBookings app
- Visit the Webflow App Marketplace
- Search for FlowBookings and click Install
- Follow the authorization process to connect FlowBookings to your Webflow site
- Create a FlowBookings account when prompted
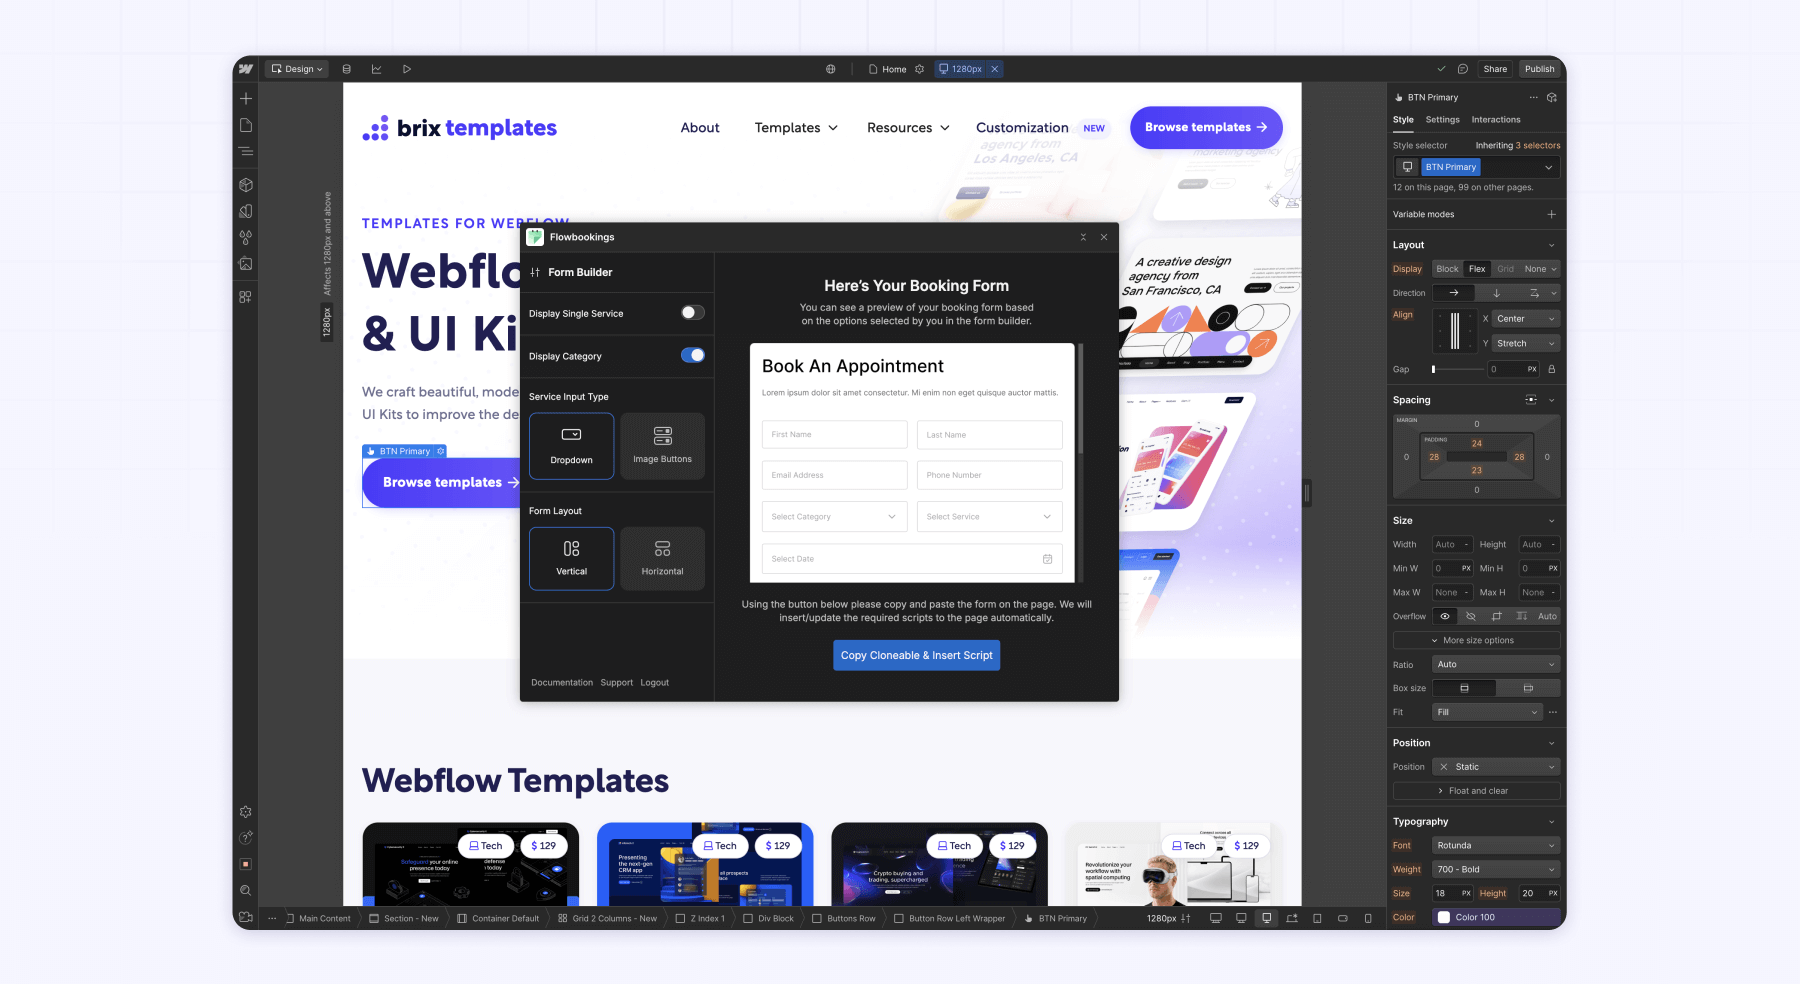
2. Set up your services and availability
- In the FlowBookings dashboard, navigate to Services
- Click Add New Service and enter details:
- Service name
- Duration
- Price (if applicable)
- Description
- Set your availability hours and any scheduling rules (buffer times, advance notice requirements)
- Configure your notification settings for email confirmations
3. Create your booking form in Webflow
- In the Webflow Designer, add a Form element to your page
- Create fields for essential booking information:
- Name
- Phone (optional)
- Additional questions (optional)
- Open the FlowBookings panel from the right sidebar
- Select the service this form will book
- Connect your form fields to FlowBookings fields
- Add the date/time selector to your form by clicking Add Date/Time Field
4. Configure payment settings (optional)
- If charging for appointments, connect your Stripe account in FlowBookings settings
- Enable payments for specific services
- Set deposit amounts or full payment requirements
5. Style your booking form
- Use Webflow's styling tools to make your form match your site design
- Customize the date picker appearance through the FlowBookings panel
- Add custom success and error messages
Option 3: Implementing Square Appointments for service-based businesses
For businesses that already use Square for payments – like salons, spas, workshops, or consultants – Square Appointments provides a robust booking solution that integrates with your existing systems. It's particularly valuable if you need to manage staff schedules, service inventory, and in-person payments.
Strengths: Square Appointments offers a free tier for individuals and integrates seamlessly with the Square payment ecosystem. It includes powerful features like automated SMS reminders (even on the free plan), inventory management, and point-of-sale integration for businesses that collect payments in person.
Limitations: The embed options lack the design flexibility of FlowBookings, as you're working with Square's interface. The scheduling system is excellent but primarily designed for service businesses rather than simple consultations.
Pricing:
- Free Plan: $0 for a single location, 1 staff member, unlimited appointments, basic features
- Plus: $29/month per location - 2-5 staff members, class booking, waitlist, cancellation fees
- Premium: $69/month per location - 6-10 staff members, resource management, custom contracts
- Custom: For businesses processing over $250K per year
Calendar Sync: Square Appointments syncs with Google Calendar, Office 365, and Apple Calendar. The sync is two-way, meaning appointments booked in Square show up in your calendar and events in your calendar block those times in your Square availability.
Setting up Square Appointments on your Webflow site
1. Create your Square Appointments account
- Sign up for Square Appointments
- Set up your business profile and services
- Add staff members if applicable (free plan includes one staff member)
- Configure your service menu with duration, pricing, and description
- Set your availability and business hours
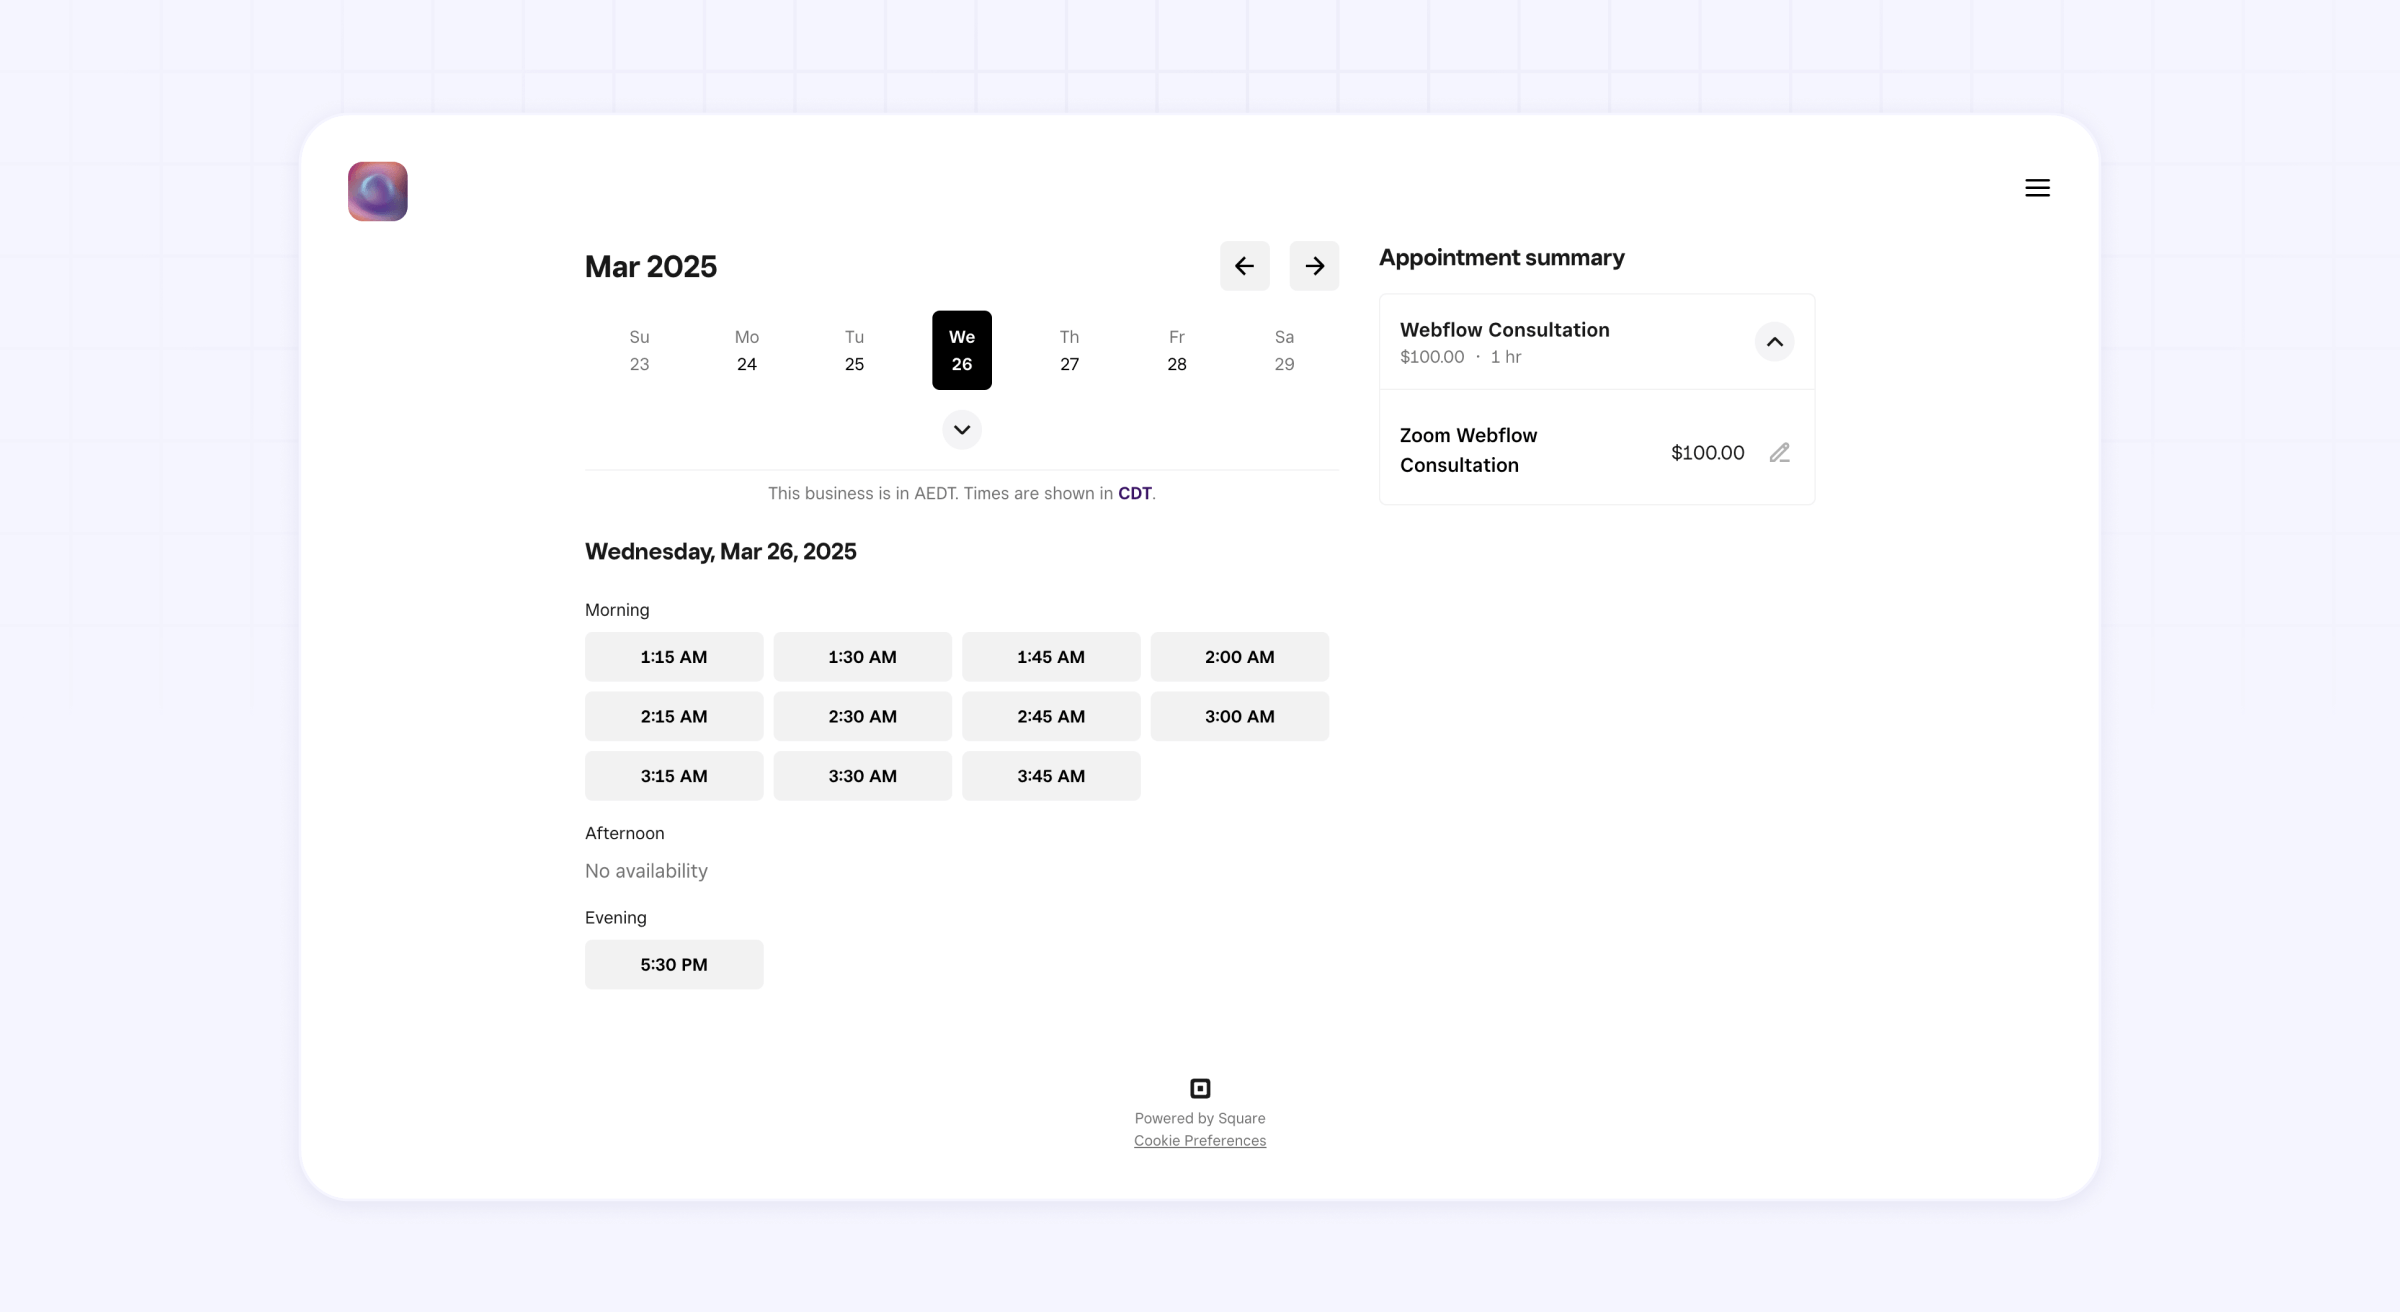
2. Get your booking widget code
- In your Square Dashboard, go to Online Booking Site
- Click Booking Button or Booking Page
- Choose Booking Widget to embed the calendar directly
- Customize the appearance options to match your site
- Click Create and copy the generated code
3. Add the Square booking widget to Webflow
- In Webflow Designer, add an Embed element where you want the booking form
- Select Edit Custom Code and paste the Square widget code
- Adjust the container size as needed to properly display the widget
- Add a heading above the widget like "Book Your Appointment"
4. Configure advanced settings
- Return to your Square Dashboard to set up:
- SMS/Email reminders for clients
- Cancellation policy
- Required deposits or card-on-file settings
- Staff assignments (for team accounts)
Conclusion
Adding a booking system to your Webflow site transforms it from a passive portfolio into a client-generating machine that works around the clock. The key is choosing the right tool for your specific needs:
- Calendly offers the quickest setup for freelancers and small teams needing simple scheduling
- FlowBookings provides the best design integration for Webflow sites where brand consistency is critical
- Square Appointments delivers robust features for service businesses already using Square payments
Whichever option you choose, online scheduling will capture more leads, streamline your workflow, and create a more professional experience for your clients. The hours saved from eliminating scheduling emails alone makes implementation worthwhile.
If you'd like help implementing a more complex booking solution or need assistance with custom integration challenges, our Webflow agency can help build a system tailored to your exact business requirements.


Join readers commenting on this post!