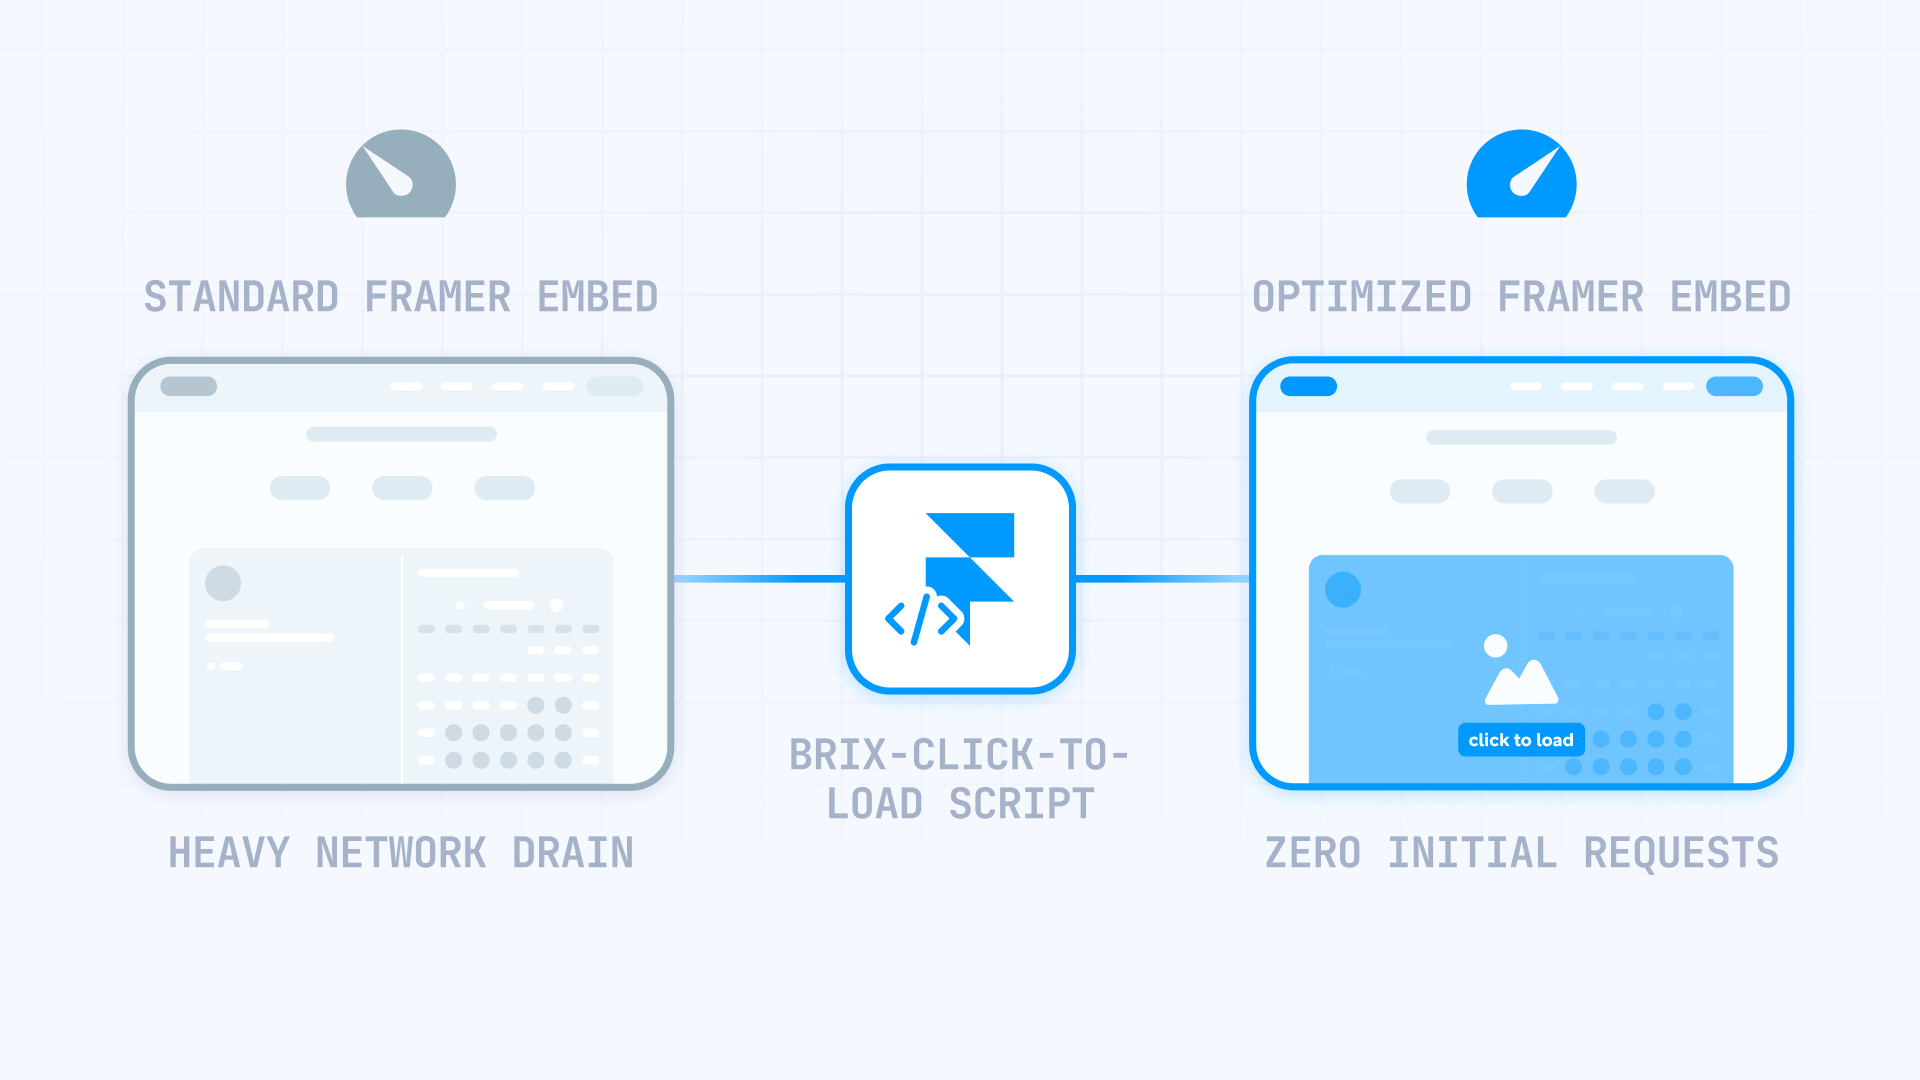
Heavy third-party embeds can destroy your Framer page's performance. Many third-party iframes start downloading resources the moment your page loads, creating massive network waterfalls, slow interaction times, and poor Lighthouse scores—even for something as simple as a calendar or map.
Click-to-load is a straightforward performance pattern: don't let the browser load the embed until the user explicitly requests it. Instead of an iframe rendering immediately, visitors see a fast placeholder with a clear "Click to load" action. This tutorial shows you how to implement this pattern in Framer using an Embed layer and a Code Override, verify it works using Chrome DevTools, and fix the most common failure modes.
Why click-to-load embeds matter for Framer sites
- Above-the-fold booking widgets: When a Calendly calendar loads instantly, it can dominate your initial page load. Click-to-load keeps your hero section fast until users are ready to book.
- Multiple embeds on one page: Pages with several calendars, maps, and other iframe embeds often stack multiple heavy requests. Click-to-load prevents "death by a thousand widgets."
- Embeds inside modals and overlays: Some browsers don't reliably initialize third-party widgets when they start inside hidden Framer elements. Loading on click (after the modal opens) avoids this initialization problem.
- Performance triage when you can't remove the embed: If the embed is non-negotiable (booking, maps), click-to-load is a realistic way to reduce initial load impact without removing functionality.
- Cleaner UX control: You can match the placeholder's dimensions to the embed to avoid layout shift and keep the page stable during loading.
Add an Embed layer and paste iframe HTML in Framer
The click-to-load pattern in Framer uses an Embed element with custom iframe HTML, combined with a Code Override. You paste iframe HTML with special attributes, then apply the override to gate loading until click.
Add an Embed element to your Framer page
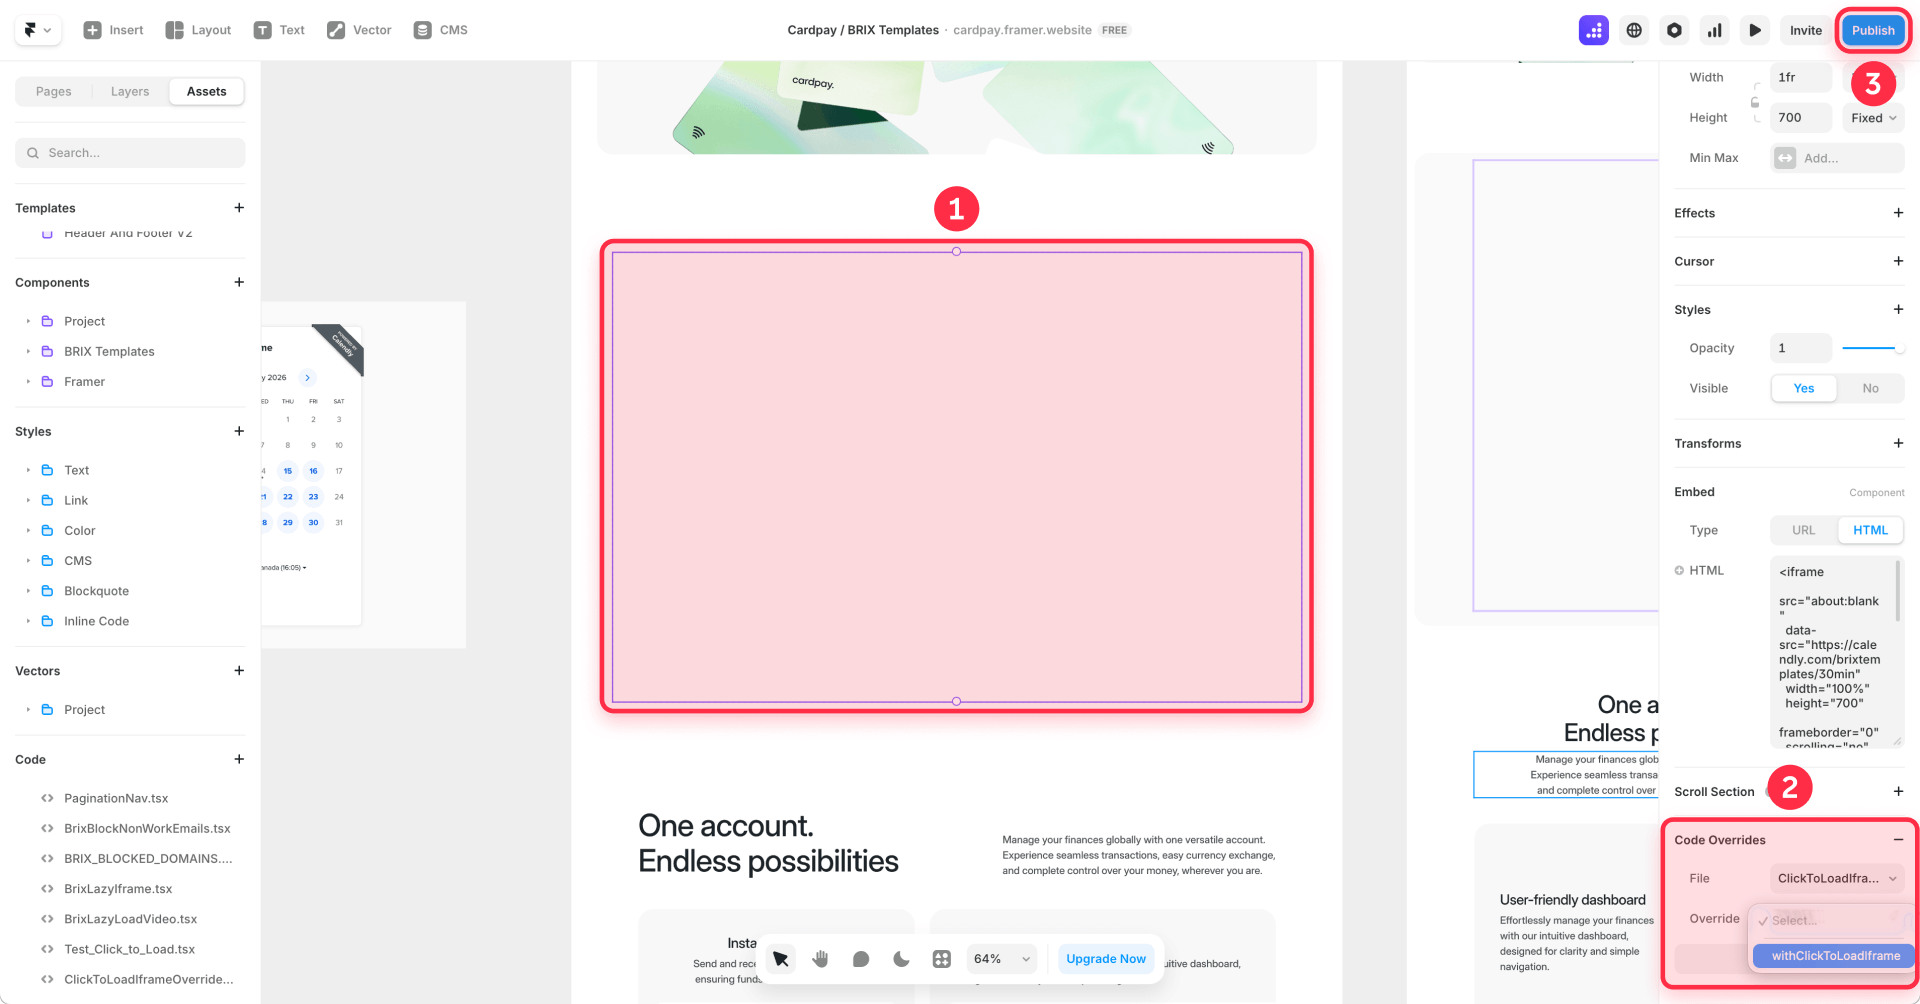
In Framer Designer, open the Insert menu (press I or click the + icon in the toolbar). Search for Embed and drag it onto your canvas where you want the embed to appear.
Select the Embed element. In the right sidebar, find the Embed section. Set the Type dropdown to HTML.
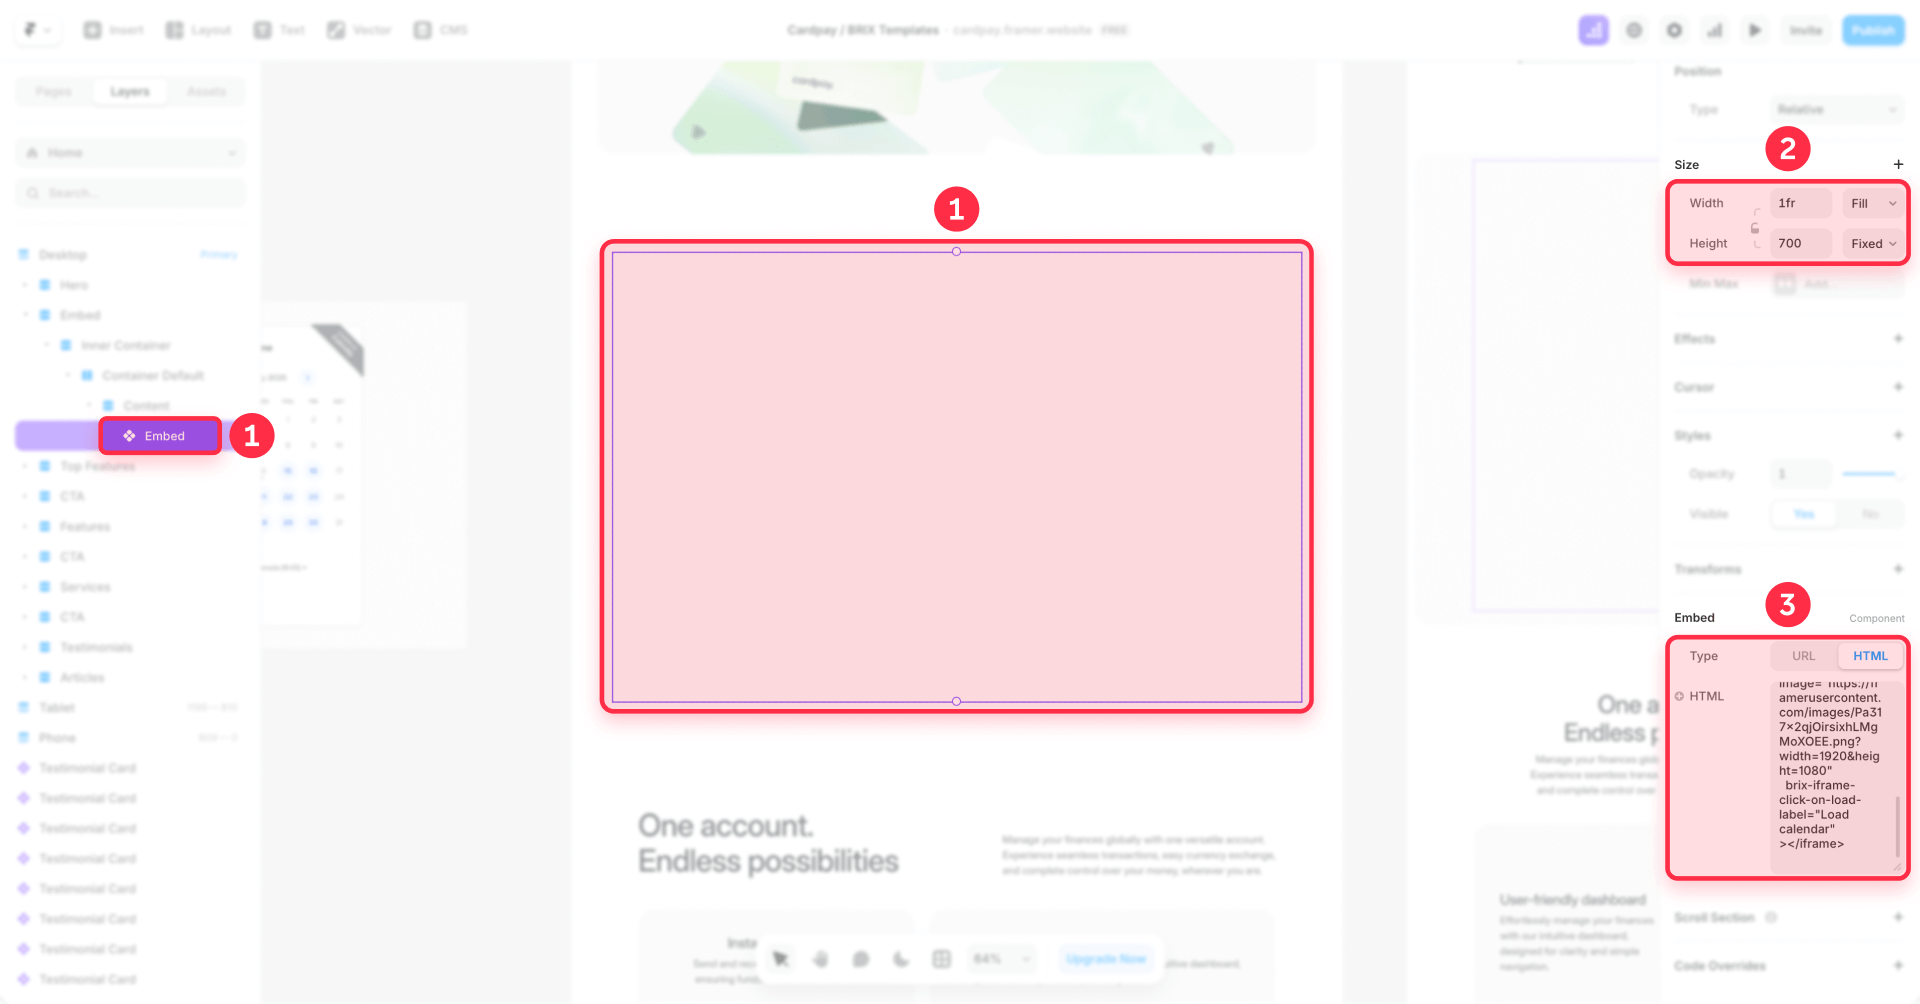
Paste the click-to-load iframe HTML in Framer
In the HTML editor area that appears below the Type dropdown, paste your iframe code with the BRIX attributes. Here's the template structure you need to follow:
<iframe
  src="about:blank"
  data-src="https://calendly.com/your-scheduling-link"
  width="100%"
  height="700"
  frameborder="0"
  scrolling="no"
  title="Book a call"
  brix-iframe-click-on-load="on"
  brix-iframe-click-on-load-image="YOUR_FRAMER_PLACEHOLDER_URL"
></iframe>
The critical attributes for click-to-load are:
src="about:blank": The iframe starts with a blank source, which means zero network requests to the embed provider on page load.
data-src: This holds the real embed URL. The override will copy this value to src when the user clicks.
brix-iframe-click-on-load="on": Marks the iframe so the override can detect and apply click-to-load behavior.
brix-iframe-click-on-load-image: Provides the placeholder image URL. This must be a publicly accessible URL hosted on Framer (see next section).
brix-iframe-click-on-load-label (optional): Customize the button text. Default is "Click to load".
Example iframe HTML for Calendly in Framer
Here's a complete example for a Calendly booking embed:
<iframe
  src="about:blank"
  data-src="https://calendly.com/your-username/30min"
  width="100%"
  height="700"
  frameborder="0"
  scrolling="no"
  title="Book a call"
  brix-iframe-click-on-load="on"
  brix-iframe-click-on-load-image="https://framerusercontent.com/images/your-placeholder.png"
  brix-iframe-click-on-load-label="Load calendar"
></iframe>
Example iframe HTML for Google Maps in Framer
Here's a complete example for a Google Maps embed:
<iframe
  src="about:blank"
  data-src="https://www.google.com/maps/embed?pb=YOUR_EMBED_PARAMETERS"
  width="100%"
  height="450"
  frameborder="0"
  style="border:0"
  allowfullscreen=""
  referrerpolicy="no-referrer-when-downgrade"
  title="Location map"
  brix-iframe-click-on-load="on"
  brix-iframe-click-on-load-image="https://framerusercontent.com/images/your-map-placeholder.png"
  brix-iframe-click-on-load-label="Show map"
></iframe>
Get a Framer-hosted placeholder image URL
For the placeholder to display, you need a publicly accessible image URL. Framer hosts uploaded images on framerusercontent.com, which is perfect for this pattern.
Upload and place your placeholder image in Framer
First, add an Image layer to your Framer project (it can be on any page or even off-canvas). Drag your placeholder image file into Framer or use the Image section in the right panel to select a file from your computer.
Use a lightweight image (under 100KB) that represents what the embed will show—a screenshot of your Calendly page or a static map preview.
Important: Do not use thumbnail URLs from the same provider you're gating. For example, don't use a Calendly-hosted image or a Google Maps thumbnail as your placeholder—that would create third-party requests on page load, defeating the purpose.
Get the hosted image URL using DevTools in Framer
Framer doesn't provide a direct "Copy URL" option for images in the Assets panel. To get the framerusercontent.com URL:
- Preview or publish your Framer site (the image must be rendered on a live page)
- Open the page in Chrome and right-click on the image
- Select Inspect to open DevTools
- In the Elements panel, find the img tag
- Copy the URL from the src attribute—it will look like https://framerusercontent.com/images/abc123...
Alternatively, right-click the image directly on the page and select Open image in new tab, then copy the URL from the browser address bar.
Paste this URL into the brix-iframe-click-on-load-image attribute in your iframe HTML.
After you copy the framerusercontent.com URL, you can remove the Image layer from the canvas if you don't want it visible.
Create and apply the Code Override in Framer
With the Embed layer configured, you now need to create and apply a Code Override to enable the click-to-load behavior.
Create the Code Override file in Framer
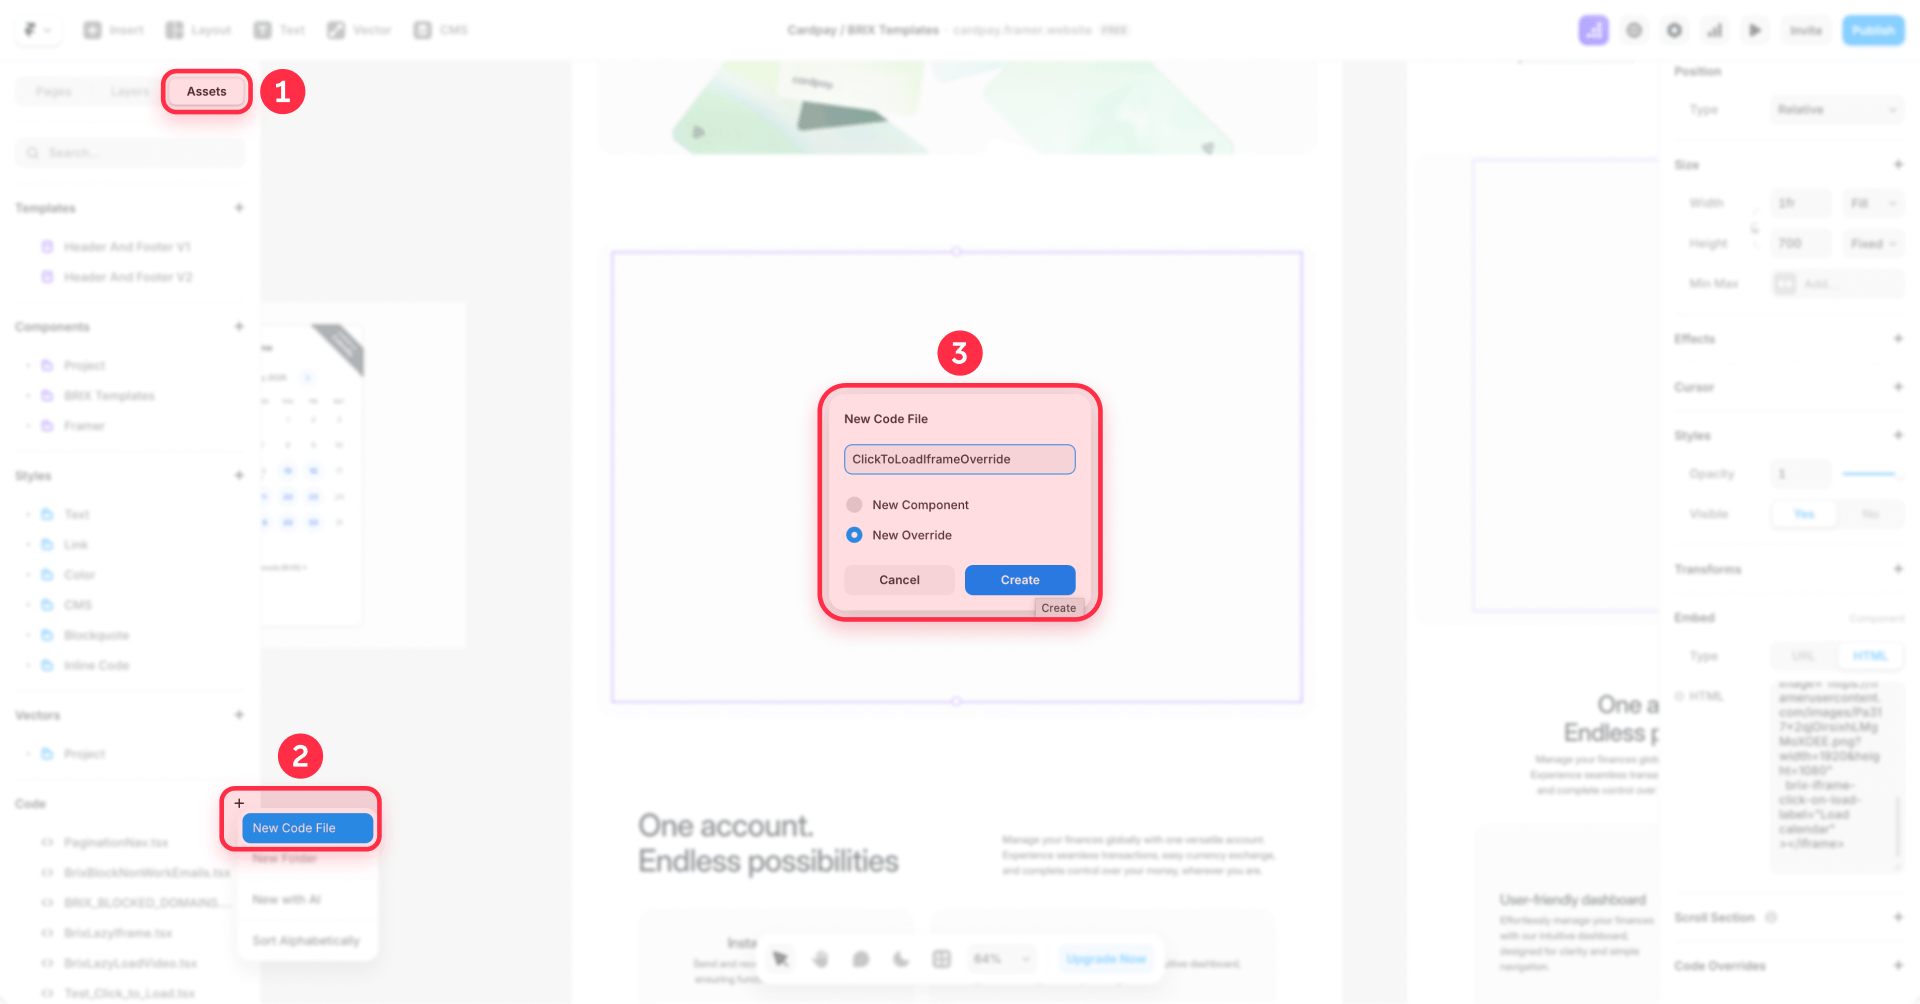
With your Embed layer selected on the canvas, look at the right sidebar (Properties panel). Scroll down to find the Code Overrides section.
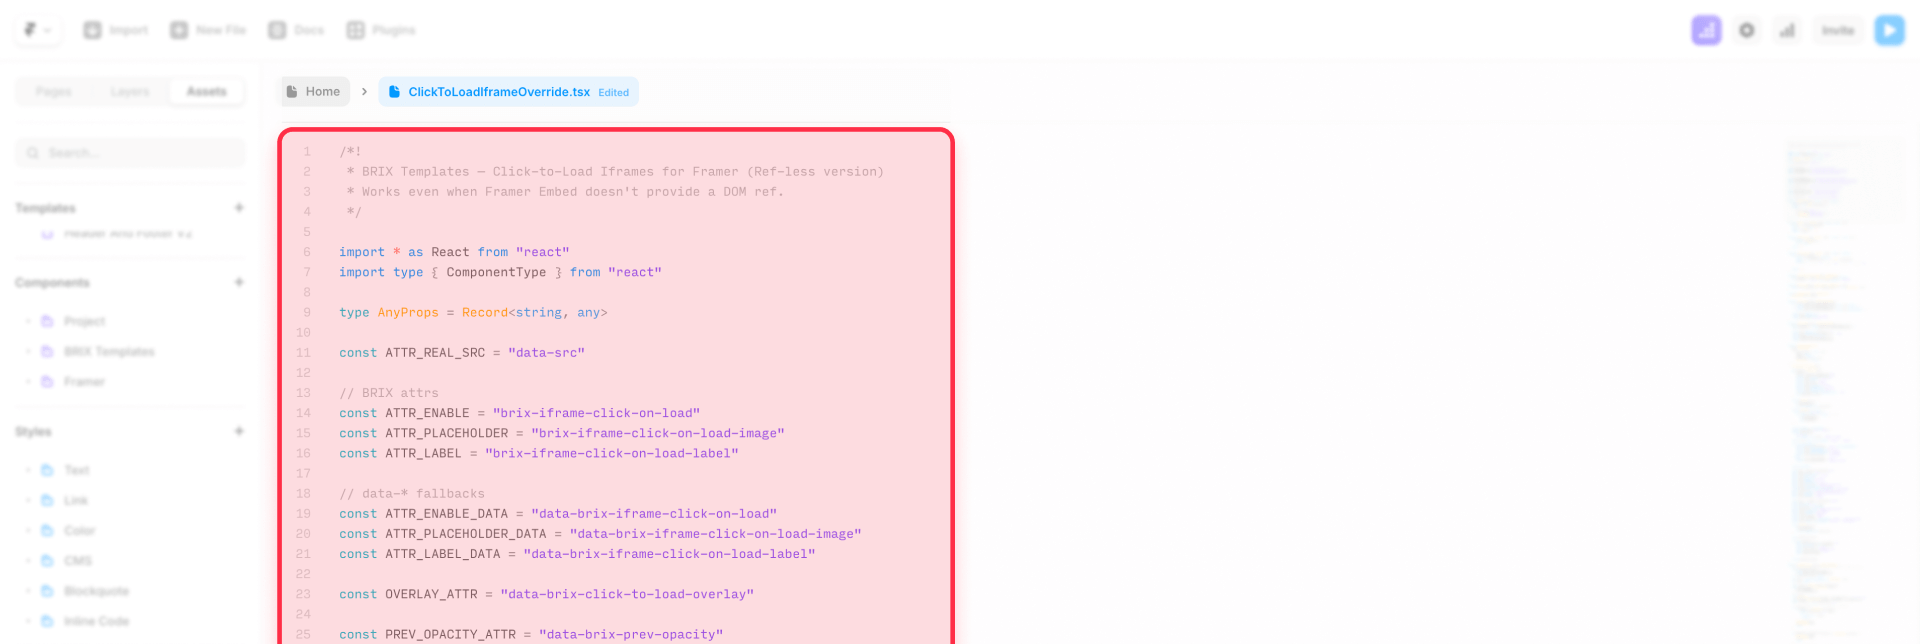
Click the File dropdown. At the bottom of the dropdown, click New File to create a new override file. Name the file ClickToLoadIframeOverride and press Enter.
Framer will open a code editor panel. Delete any placeholder code and paste the complete override code provided below:
/*!
 * BRIX Templates — Click-to-Load Iframes for Framer (Ref-less version)
 * Works even when Framer Embed doesn't provide a DOM ref.
 */

import * as React from "react"
import type { ComponentType } from "react"

type AnyProps = Record<string, any>

const ATTR_REAL_SRC = "data-src"

// BRIX attrs
const ATTR_ENABLE = "brix-iframe-click-on-load"
const ATTR_PLACEHOLDER = "brix-iframe-click-on-load-image"
const ATTR_LABEL = "brix-iframe-click-on-load-label"

// data-* fallbacks
const ATTR_ENABLE_DATA = "data-brix-iframe-click-on-load"
const ATTR_PLACEHOLDER_DATA = "data-brix-iframe-click-on-load-image"
const ATTR_LABEL_DATA = "data-brix-iframe-click-on-load-label"

const OVERLAY_ATTR = "data-brix-click-to-load-overlay"

const PREV_OPACITY_ATTR = "data-brix-prev-opacity"
const PREV_POINTER_ATTR = "data-brix-prev-pointer"

const GLOBAL_KEY = "__BRIX_CLICK_TO_LOAD_IFRAMES__"

function isBlankLike(src: string | null): boolean {
  if (!src) return true
  const s = src.trim().toLowerCase()
  return (
    s === "" ||
    s === "about:blank" ||
    s.startsWith("about:blank#") ||
    s.startsWith("about:blank?") ||
    s.startsWith("about:blank/")
  )
}

function getAttr(el: Element, name: string): string | null {
  const v = el.getAttribute(name)
  if (v == null) return null
  const t = v.trim()
  return t.length ? t : null
}

function getFirstAttr(el: Element, names: string[]): string | null {
  for (const n of names) {
    const v = getAttr(el, n)
    if (v) return v
  }
  return null
}

function truthyAnyAttr(el: Element, names: string[]): boolean {
  for (const n of names) {
    if (!el.hasAttribute(n)) continue
    const v = (el.getAttribute(n) || "").trim().toLowerCase()
    return v === "" || v === "on" || v === "true" || v === "1" || v === "yes"
  }
  return false
}

function ensureHostIsPositioned(host: HTMLElement) {
  const computed = window.getComputedStyle(host).position
  if (computed === "static") host.style.position = "relative"
}

function getOverlay(host: HTMLElement): HTMLElement | null {
  return host.querySelector(`[${OVERLAY_ATTR}="1"]`) as HTMLElement | null
}

function removeOverlay(host: HTMLElement) {
  getOverlay(host)?.remove()
}

function hideIframe(iframe: HTMLIFrameElement) {
  if (!iframe.hasAttribute(PREV_OPACITY_ATTR))
    iframe.setAttribute(PREV_OPACITY_ATTR, iframe.style.opacity || "")
  if (!iframe.hasAttribute(PREV_POINTER_ATTR))
    iframe.setAttribute(PREV_POINTER_ATTR, iframe.style.pointerEvents || "")

  iframe.style.opacity = "0"
  iframe.style.pointerEvents = "none"
  iframe.setAttribute("tabindex", "-1")
}

function showIframe(iframe: HTMLIFrameElement) {
  const prevOpacity = iframe.getAttribute(PREV_OPACITY_ATTR) || ""
  const prevPointer = iframe.getAttribute(PREV_POINTER_ATTR) || ""

  iframe.style.opacity = prevOpacity || "1"
  iframe.style.pointerEvents = prevPointer || "auto"
  iframe.removeAttribute("tabindex")
  iframe.removeAttribute(PREV_OPACITY_ATTR)
  iframe.removeAttribute(PREV_POINTER_ATTR)
}

function buildOrUpdateOverlay(
  host: HTMLElement,
  opts: {
    placeholderUrl: string | null
    label: string
    enabled: boolean
    statusText?: string | null
    onActivate: () => void
  }
) {
  ensureHostIsPositioned(host)

  let overlay = getOverlay(host)
  if (!overlay) {
    overlay = document.createElement("div")
    overlay.setAttribute(OVERLAY_ATTR, "1")
    overlay.style.position = "absolute"
    overlay.style.inset = "0"
    overlay.style.zIndex = "9999"
    overlay.style.display = "flex"
    overlay.style.alignItems = "center"
    overlay.style.justifyContent = "center"
    overlay.style.userSelect = "none"
    ;(overlay.style as any).webkitUserSelect = "none"
    host.appendChild(overlay)
  }

  overlay.onclick = (e) => {
    e.preventDefault()
    e.stopPropagation()
    if (opts.enabled) opts.onActivate()
  }
  overlay.onkeydown = (e: any) => {
    if (!opts.enabled) return
    if (e.key === "Enter" || e.key === " ") {
      e.preventDefault()
      e.stopPropagation()
      opts.onActivate()
    }
  }

  overlay.tabIndex = opts.enabled ? 0 : -1
  overlay.setAttribute("role", "button")
  overlay.setAttribute("aria-label", opts.enabled ? opts.label : "Embed not ready")
  overlay.style.cursor = opts.enabled ? "pointer" : "default"

  if (opts.placeholderUrl) {
    overlay.style.backgroundImage = `url("${opts.placeholderUrl}")`
    overlay.style.backgroundSize = "cover"
    overlay.style.backgroundPosition = "center"
    overlay.style.backgroundRepeat = "no-repeat"
    overlay.style.backgroundColor = "transparent"
  } else {
    overlay.style.backgroundImage = "none"
    overlay.style.backgroundColor = "rgba(0,0,0,0.06)"
  }

  overlay.innerHTML = ""

  const panel = document.createElement("div")
  panel.style.display = "flex"
  panel.style.flexDirection = "column"
  panel.style.gap = "10px"
  panel.style.alignItems = "center"
  panel.style.padding = "14px"
  panel.style.borderRadius = "14px"
  panel.style.background = "rgba(255,255,255,0.92)"
  panel.style.backdropFilter = "blur(10px)"
  ;(panel.style as any).webkitBackdropFilter = "blur(10px)"
  panel.style.border = "1px solid rgba(0,0,0,0.08)"
  panel.style.boxShadow = "0 10px 30px rgba(0,0,0,0.12)"
  panel.style.maxWidth = "320px"
  panel.style.textAlign = "center"

  const button = document.createElement("button")
  button.type = "button"
  button.textContent = opts.label
  button.disabled = !opts.enabled
  button.style.border = "1px solid rgba(0,0,0,0.14)"
  button.style.borderRadius = "999px"
  button.style.padding = "10px 14px"
  button.style.fontSize = "14px"
  button.style.fontWeight = "600"
  button.style.background = opts.enabled ? "white" : "rgba(0,0,0,0.06)"
  button.style.cursor = opts.enabled ? "pointer" : "not-allowed"

  button.onclick = (e) => {
    e.preventDefault()
    e.stopPropagation()
    if (opts.enabled) opts.onActivate()
  }

  panel.appendChild(button)

  if (opts.statusText) {
    const status = document.createElement("div")
    status.textContent = opts.statusText
    status.style.fontSize = "12px"
    status.style.color = "rgba(0,0,0,0.65)"
    status.style.lineHeight = "16px"
    panel.appendChild(status)
  }

  overlay.appendChild(panel)
}

function setupOneIframe(iframe: HTMLIFrameElement) {
  // Only touch explicitly marked iframes (prevents affecting other site iframes)
  const enabledAttrPresent =
    iframe.hasAttribute(ATTR_ENABLE) || iframe.hasAttribute(ATTR_ENABLE_DATA)
  if (!enabledAttrPresent) return

  const host = iframe.parentElement as HTMLElement | null
  if (!host) return

  const realSrc = getAttr(iframe, ATTR_REAL_SRC)
  const placeholderUrl = getFirstAttr(iframe, [ATTR_PLACEHOLDER, ATTR_PLACEHOLDER_DATA])
  const label = getFirstAttr(iframe, [ATTR_LABEL, ATTR_LABEL_DATA]) || "Click to load"
  const enabled = truthyAnyAttr(iframe, [ATTR_ENABLE, ATTR_ENABLE_DATA])
  const currentSrc = iframe.getAttribute("src")

  // If "disabled", load immediately (no gating)
  if (!enabled) {
    if (realSrc && isBlankLike(currentSrc)) {
      iframe.setAttribute("src", realSrc)
      try {
        iframe.src = realSrc
      } catch {}
    }
    showIframe(iframe)
    removeOverlay(host)
    return
  }

  // If already loaded, remove overlay
  if (realSrc && currentSrc === realSrc && !isBlankLike(currentSrc)) {
    showIframe(iframe)
    removeOverlay(host)
    return
  }

  // Ensure initial blank src
  if (currentSrc == null) iframe.setAttribute("src", "about:blank")

  // Missing data-src => show disabled overlay + message
  if (!realSrc) {
    hideIframe(iframe)
    buildOrUpdateOverlay(host, {
      placeholderUrl,
      label,
      enabled: false,
      statusText: 'Missing data-src (add data-src="https://…")',
      onActivate: () => {},
    })
    return
  }

  // Not loaded yet => show active overlay
  hideIframe(iframe)
  buildOrUpdateOverlay(host, {
    placeholderUrl,
    label,
    enabled: true,
    statusText: null,
    onActivate: () => {
      iframe.setAttribute("src", realSrc)
      try {
        iframe.src = realSrc
      } catch {}
      showIframe(iframe)
      removeOverlay(host)
    },
  })
}

function initGlobalScanner() {
  const w = window as any
  if (w[GLOBAL_KEY]?.inited) return

  const state = {
    inited: true,
    scheduled: false,
    scheduleScan: () => {},
    scan: () => {},
    observer: null as MutationObserver | null,
  }

  state.scan = () => {
    const nodes = Array.from(
      document.querySelectorAll(`iframe[${ATTR_ENABLE}], iframe[${ATTR_ENABLE_DATA}]`)
    )
    for (const n of nodes) {
      if (n instanceof HTMLIFrameElement) setupOneIframe(n)
    }
  }

  state.scheduleScan = () => {
    if (state.scheduled) return
    state.scheduled = true
    requestAnimationFrame(() => {
      state.scheduled = false
      state.scan()
    })
  }

  state.scan()

  const root = document.body || document.documentElement
  state.observer = new MutationObserver((mutations) => {
    for (const m of mutations) {
      const target = m.target as Element | null
      // Ignore mutations inside the overlay to avoid loops
      if (target && target.closest?.(`[${OVERLAY_ATTR}="1"]`)) continue
      state.scheduleScan()
      break
    }
  })

  state.observer.observe(root, { childList: true, subtree: true })
  w[GLOBAL_KEY] = state
}

export function withClickToLoadIframe<T extends AnyProps>(
  Component: ComponentType<T>
): ComponentType<T> {
  const Wrapped = (props: T) => {
    React.useEffect(() => {
      if (typeof window === "undefined") return
      initGlobalScanner()
    }, [])

    return <Component {...props} />
  }

  Wrapped.displayName = `withClickToLoadIframe(${Component.displayName || Component.name || "Component"})`
  return Wrapped as ComponentType<T>
}
After pasting, press Cmd+S (Mac) or Ctrl+S (Windows) to save.
This override works by finding the iframe inside your Embed layer, hiding it, and showing a placeholder overlay until the user clicks. On click, it swaps src from about:blank to the real URL stored in data-src.
Apply the Code Override to the Embed layer in Framer
After saving the override file, connect it to your Embed layer.
Select the Embed element on your canvas. In the right sidebar (Properties panel), scroll to the Code Overrides section. Click the File dropdown and select ClickToLoadIframeOverride (the file you just created).
A second dropdown will appear for selecting which override function to use. Select withClickToLoadIframe.
Important: Code Overrides run in Preview mode and on your published site. They may not fully execute on the design canvas. Always test in Preview mode (click the Play button) or publish your site to verify behavior.
Set a fixed height to prevent layout shift in Framer
To prevent Cumulative Layout Shift (CLS), ensure the Embed layer has a consistent height before and after the iframe loads.
Select the Embed element on your canvas. In the right sidebar, find the Size section. Set a fixed Height value that matches the height in your iframe HTML.
Recommended heights:
- 700px for Calendly scheduling pages
- 450px for Google Maps
The height in the Framer layer should match the height attribute in your iframe HTML. This ensures the placeholder and loaded embed occupy the exact same space.
Verify click-to-load works in Chrome DevTools in Framer
After publishing your Framer site (or using Preview mode), use Chrome DevTools to confirm the pattern is working correctly. This verification is critical because incorrect configurations often fail silently.
Remember: Code Overrides do not fully execute on the Framer design canvas. You must test in Preview mode or on your published site.
Pre-click verification checklist in Framer
- Open your published Framer page or Preview in Chrome
- Open DevTools (Cmd+Option+I on Mac, Ctrl+Shift+I on Windows)
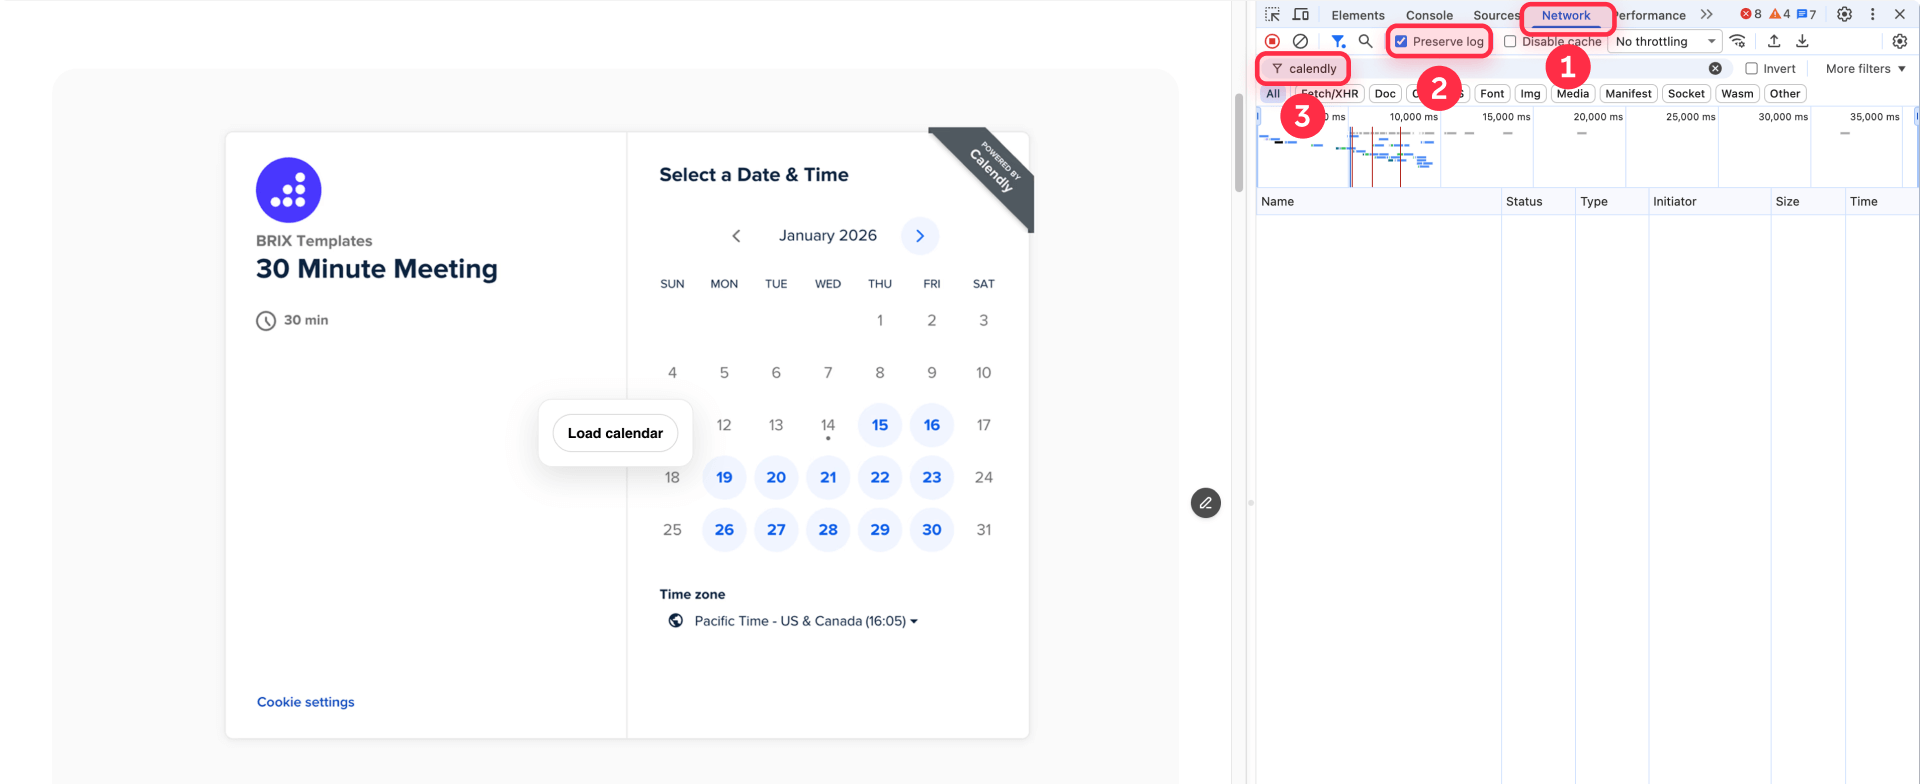
- Go to the Network tab
- Enable Preserve log and Disable cache
- Perform a hard reload (Cmd+Shift+R or Ctrl+Shift+R)
Filter for provider domains:
- For Calendly: filter calendly or assets.calendly.com
- For Google Maps: filter google, gstatic, or maps
Expected result: Zero requests to these domains before clicking the placeholder.
Check the Elements tab:
- Search for iframe
- The src attribute should be about:blank
- The real URL should be in data-src
Post-click verification checklist in Framer
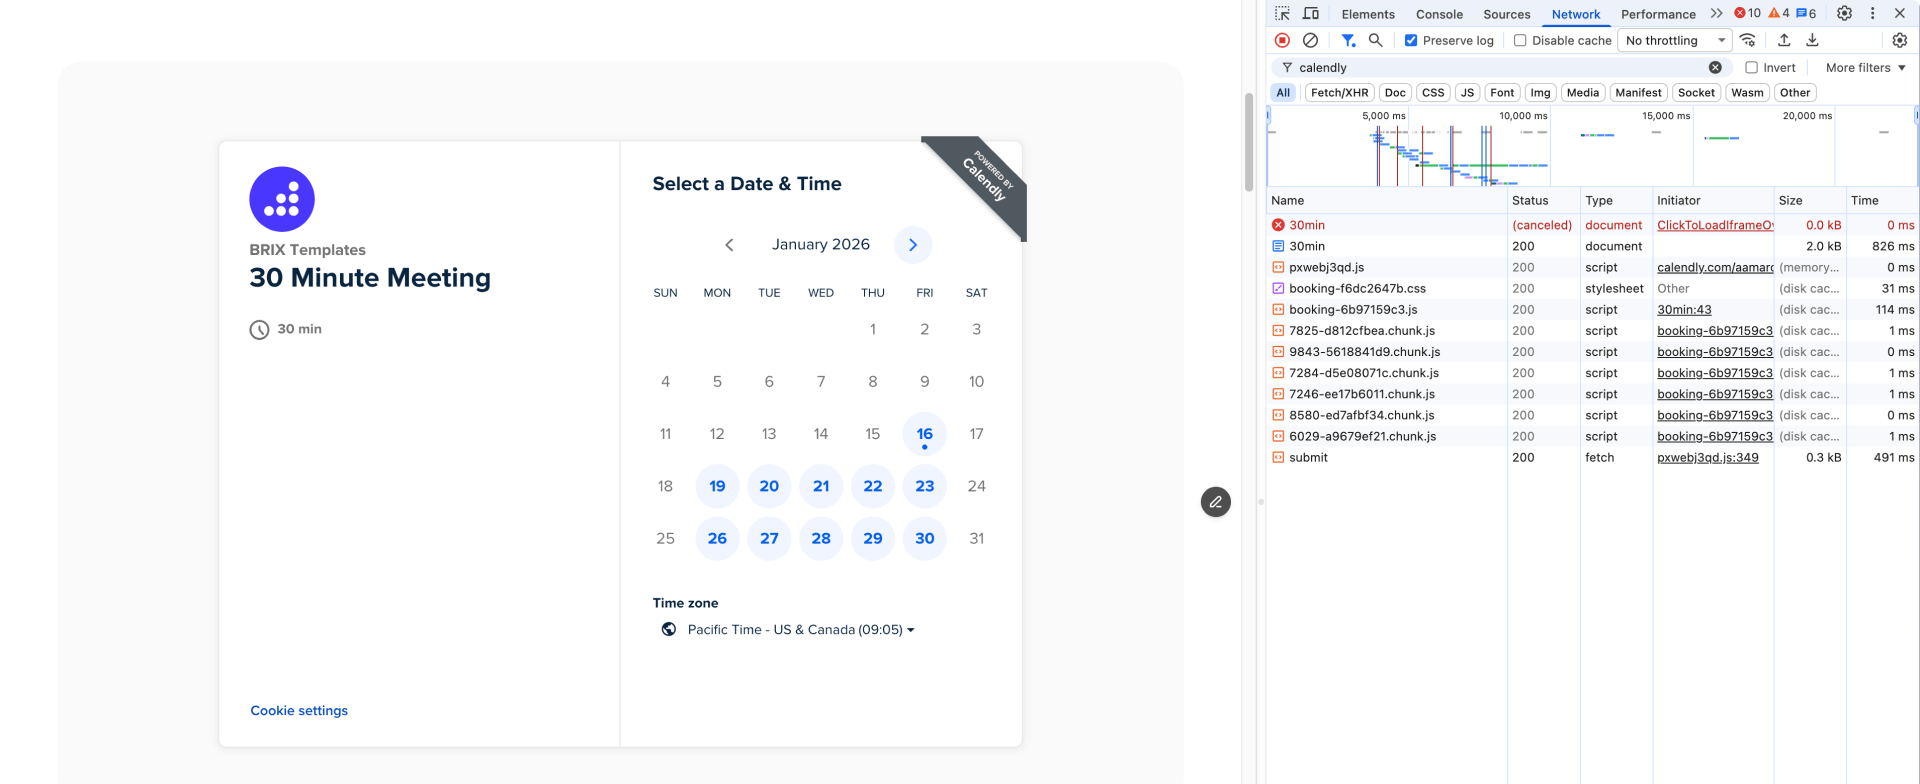
- Click the placeholder on your page
- Network panel: Requests to the provider domains should immediately appear
- Elements panel: The iframe src should now contain the real embed URL
If the iframe src shows the real URL before you click, the browser has already made requests—double-check that your HTML has src="about:blank".
Troubleshooting click-to-load embeds in Framer
Provider requests happen before click: The iframe has the real URL in src instead of about:blank. Fix your iframe HTML markup—ensure src="about:blank" and the real URL is only in data-src. Hard reload and verify in the Network tab.
Overlay not showing or override not working: The override isn't applied to the correct layer. Confirm the Embed layer is selected (not a parent Frame), and check the Code Overrides section shows both the file and withClickToLoadIframe function. Test in Preview mode—overrides don't run reliably on the canvas. Check console for warnings starting with [BRIX click-to-load].
Placeholder image missing or broken: The brix-iframe-click-on-load-image URL is incorrect. Open the URL directly in a browser tab to verify it loads. Get the correct framerusercontent.com URL by inspecting the image in DevTools on your published/preview site.
"Refused to connect" or blank iframe after click: The embed provider blocks iframe embedding via X-Frame-Options or CSP headers. This is a provider restriction. Try an alternative embed URL format if available, or add a fallback link below the embed: "Having trouble? Open in new tab".
Scale click-to-load embeds across your Framer site
Once the pattern works for one embed, reuse the same Code Override across your entire site.
Apply click-to-load to multiple embeds in Framer
The override file is saved in your project, so you can apply withClickToLoadIframe to any Embed layer on any page:
- Add an Embed element and set Type to HTML
- Paste iframe HTML with src="about:blank", data-src, and the BRIX attributes
- Apply the withClickToLoadIframe override from the Properties panel
- Set a fixed height
Each Embed layer operates independently—clicking one won't affect the others.
Frequently asked questions about click-to-load embeds in Framer
What is click-to-load for heavy embeds in Framer?
Click-to-load shows a lightweight placeholder first, then loads the actual embed only after the user clicks. This prevents third-party iframes from impacting your initial page load. In Framer, you implement this using an Embed layer with src="about:blank" and a Code Override that swaps to the real URL on click.
Why do iframe embeds slow down Framer pages?
An iframe loads a separate webpage with all its dependencies—scripts, styles, fonts, and tracking pixels. For Calendly, this can mean dozens of requests before your visitor even scrolls to the booking section. Click-to-load delays these requests until the user actually wants to interact.
How do I verify click-to-load is working in Framer?
Use Chrome DevTools in Preview mode or on your published site. Filter the Network panel by the provider domain (like calendly.com). Before clicking, you should see zero requests. After clicking, requests should immediately appear and the iframe src should change from about:blank to the real URL.
Why is my embed still loading immediately in Framer?
The most common cause is having the real URL in src instead of about:blank. Check your iframe HTML—the real URL should only be in data-src. Also verify the override is applied in the Code Overrides section, and test in Preview mode (not on the canvas).
Does click-to-load affect SEO for embeds in Framer?
Click-to-load delays embed content until user interaction, and crawlers typically don't execute clicks. However, most embeds (calendars, maps) don't contain indexable content—they're functional elements. Keep critical SEO content as native Framer text.
How do I customize the placeholder button text in Framer?
Add brix-iframe-click-on-load-label to your iframe HTML. For example: brix-iframe-click-on-load-label="Load calendar" changes the button text from "Click to load" to "Load calendar".
Conclusion
Click-to-load is one of the most practical ways to protect Framer performance when you can't avoid heavy third-party embeds. You reduce initial network requests, keep the page responsive, and give users a clear, intentional interaction before loading expensive widgets.
Next steps: apply the pattern to your heaviest embed first, verify it works in DevTools (using Preview mode or your published site), then expand to other embeds across your site. The Code Override provided here is reusable across your entire Framer project—just paste the iframe HTML with the BRIX attributes, apply the override, and publish.
If you want a reusable, scalable solution across a large site build or need help optimizing performance comprehensively, our agency can help.


Join readers commenting on this post!