You publish a Webflow page, traffic shows up in GA4… and you still don't know if people actually read it. GA4's default scroll tracking only fires once (around 90%), so it can't tell you whether users reached 25%, 50%, or your key sections.
This tutorial walks you through a clean, GA4-first setup using Google Tag Manager (GTM) on Webflow—without double-counting pageviews or creating messy scroll events you can't trust.
Scroll depth tracking solves a simple problem: you want to know how far users scroll on your Webflow pages, not just whether they landed. It's valuable because it helps you measure content engagement and make UX decisions based on actual behavior.
You'll learn how to install GTM on Webflow (app-first, manual fallback), set up GA4 correctly inside GTM, configure a Scroll Depth trigger for 25/50/75/90/100%, and verify everything in GTM Preview and GA4 DebugView.
Let's start by choosing the right approach for your goals.
Why scroll depth tracking matters for Webflow sites
- Validate content engagement: If your Webflow blog post gets sessions but most users never reach 50%, your intro and structure need work.
- Compare page performance fairly: Scroll depth lets you compare a long-form landing page vs. a short one without guessing from time-on-page alone.
- Optimize section placement: If only 20% of users reach your Webflow pricing section, move key CTAs higher or restructure the layout.
- Improve UX decisions with real data: You can test whether sticky elements, animations, or long hero sections reduce scrolling on specific Webflow pages.
- Build better audiences later: Scroll thresholds become useful signals for remarketing or lead scoring once your tracking foundation is reliable.
Choose your scroll tracking approach in Webflow (GA4 vs GTM)
Before you touch Webflow or GTM settings, decide what "scroll tracking" should mean for your site. This prevents the most common mess: duplicate scroll events and inconsistent thresholds.
Use GA4 Enhanced Measurement scroll for Webflow (simple, 90% only)
GA4 can automatically collect a scroll event when a user reaches about 90% of the page. It's the fastest setup because you don't need a custom GTM trigger.
Use this if:
- You only need a "did they reach near the bottom?" signal.
- You don't care about 25/50/75% checkpoints.
- You want the least setup possible.
Use GTM scroll depth tracking for Webflow (custom thresholds + more control)
GTM's Scroll Depth trigger supports multiple thresholds and can fire once per threshold per page. This is what you want if your goal is true scroll depth tracking (25/50/75/90/100% or custom sets), or if you need stronger control over where and when tracking runs.
Use this if:
- You need multiple thresholds (most teams do).
- You want to track only certain page types (blog posts, landing pages, etc.).
- You care about clean event naming and deduping.
My recommendation for most Webflow setups
If you're reading this tutorial, you probably want the GTM approach. GA4's built-in scroll is fine as a baseline, but it's not scroll depth analytics.
Prerequisites for Webflow scroll depth tracking with GTM
Before you configure scroll depth tracking, you need GTM installed on Webflow and GA4 set up inside GTM. This guide follows a clean, single-source approach: Webflow → GTM → GA4.
If you haven't done this yet, complete these steps first:
- Install Google Tag Manager on Webflow: Follow our complete guide on how to install Google Tag Manager in Webflow. This covers both the Google site tools app method and manual installation.
- Set up GA4 via GTM (not in Webflow Site settings): Follow our guide on how to install Google Analytics 4 in Webflow, but use the GA4 via GTM method (creating a Google Tag in GTM). Do NOT add your GA4 Measurement ID directly in Webflow's Site settings → Integrations. The guide covers both approaches—make sure you follow the GTM route for this scroll depth tutorial.
- Confirm GA4 is not duplicated in Webflow: Check Webflow's Site settings → Integrations and ensure no GA4 Measurement ID is added there. If you see one, remove it to prevent duplicate tracking.
Warning: If GA4 is installed in Webflow and also in GTM, you'll get duplicate page_view events and unreliable scroll depth data. This guide assumes GA4 is installed via GTM only.
What you should have before continuing
Before moving to Step 1, verify you have:
- ✓ GTM installed on Webflow (via app or manual custom code)
- ✓ A base GA4 Google tag in GTM firing on Initialization – All Pages (or All Pages)
- ✓ Confirmed page_view fires once in GTM Preview / Tag Assistant (not twice)
If you're missing any of these, complete the prerequisites first.
Decision checkpoint: where is GA4 currently installed?
Before continuing, verify where GA4 is installed on your site:
- If GA4 is already installed in Webflow (Measurement ID in Site settings): Remove it and switch fully to GTM.
- If GA4 is already installed via GTM: You're ready to proceed with scroll depth tracking.
- If GA4 isn't installed anywhere: Follow the prerequisites above to install it via GTM first.
This guide assumes GA4 will be installed and managed through GTM only—not through Webflow's native integration.
Decide thresholds and naming before you build anything
Pick thresholds that match your pages. A common set is 25, 50, 75, 90, 100.
Also decide your event naming strategy now. A clean default is:
- Event name: scroll_depth
- Parameter: scroll_percent (value: 25 / 50 / 75 / 90 / 100)
You'll implement this in the following steps.
Why install GA4 via GTM for scroll depth tracking in Webflow
This guide recommends installing GA4 through GTM (not directly in Webflow) for several practical reasons:
- One source of truth: All tags and events are managed in a single place (GTM), making it easier to audit, update, and troubleshoot your tracking setup.
- Easier scroll threshold management: GTM gives you full control over scroll depth triggers and custom event parameters without touching Webflow code.
- Reduces duplication risk: Running GA4 in both Webflow and GTM doubles your pageviews and events, making your data unreliable from day one.
- Cleaner debugging: GTM Preview mode and GA4 DebugView work seamlessly together, letting you verify scroll events fire correctly before publishing.
For teams serious about accurate analytics, GTM-to-GA4 is the cleaner, more scalable approach.
Step 0: Create the base GA4 tag in GTM for Webflow (if not already done)
If you already have a GA4 Google Tag in GTM that fires on all pages, skip to Step 1. If you're setting this up fresh, follow these steps to create the foundation tag that connects GTM to GA4.
- In GTM, click Tags.
- Click New.
- Name your tag (for example, "GA4 - Google Tag").
- Click Tag Configuration.
- Select Google Tag (this is Google's newer tag type for GA4).
- In the Tag ID field, enter your GA4 Measurement ID (it looks like G-XXXXXXX).
- Under Triggering, choose Initialization – All Pages (or All Pages if you don't see Initialization).
- Click Save.
Tip: The Google Tag is the base tag for GA4. All other GA4 events (like scroll depth) will reference this tag.
Verify the GA4 tag fires once on Webflow
Before moving forward, confirm your setup is clean and not duplicated:
- In GTM, click Preview.
- Enter your live Webflow URL and click Connect.
- In Tag Assistant (the debug panel), find the Page View event in the timeline.
- Click it and confirm your Google Tag fired exactly once.
- If it fired twice (or you see multiple GA4 tags), you likely have GA4 installed in both GTM and Webflow. Remove the duplicate before continuing.
Tip: Seeing the tag fire once is critical. If you skip verification here, you'll waste hours debugging scroll events that seem to fire twice or not at all.
Step 1: Enable GTM scroll variables for Webflow tracking
Before creating triggers and tags, you need to enable the built-in scroll variables in GTM. These variables capture scroll data that you'll send to GA4.
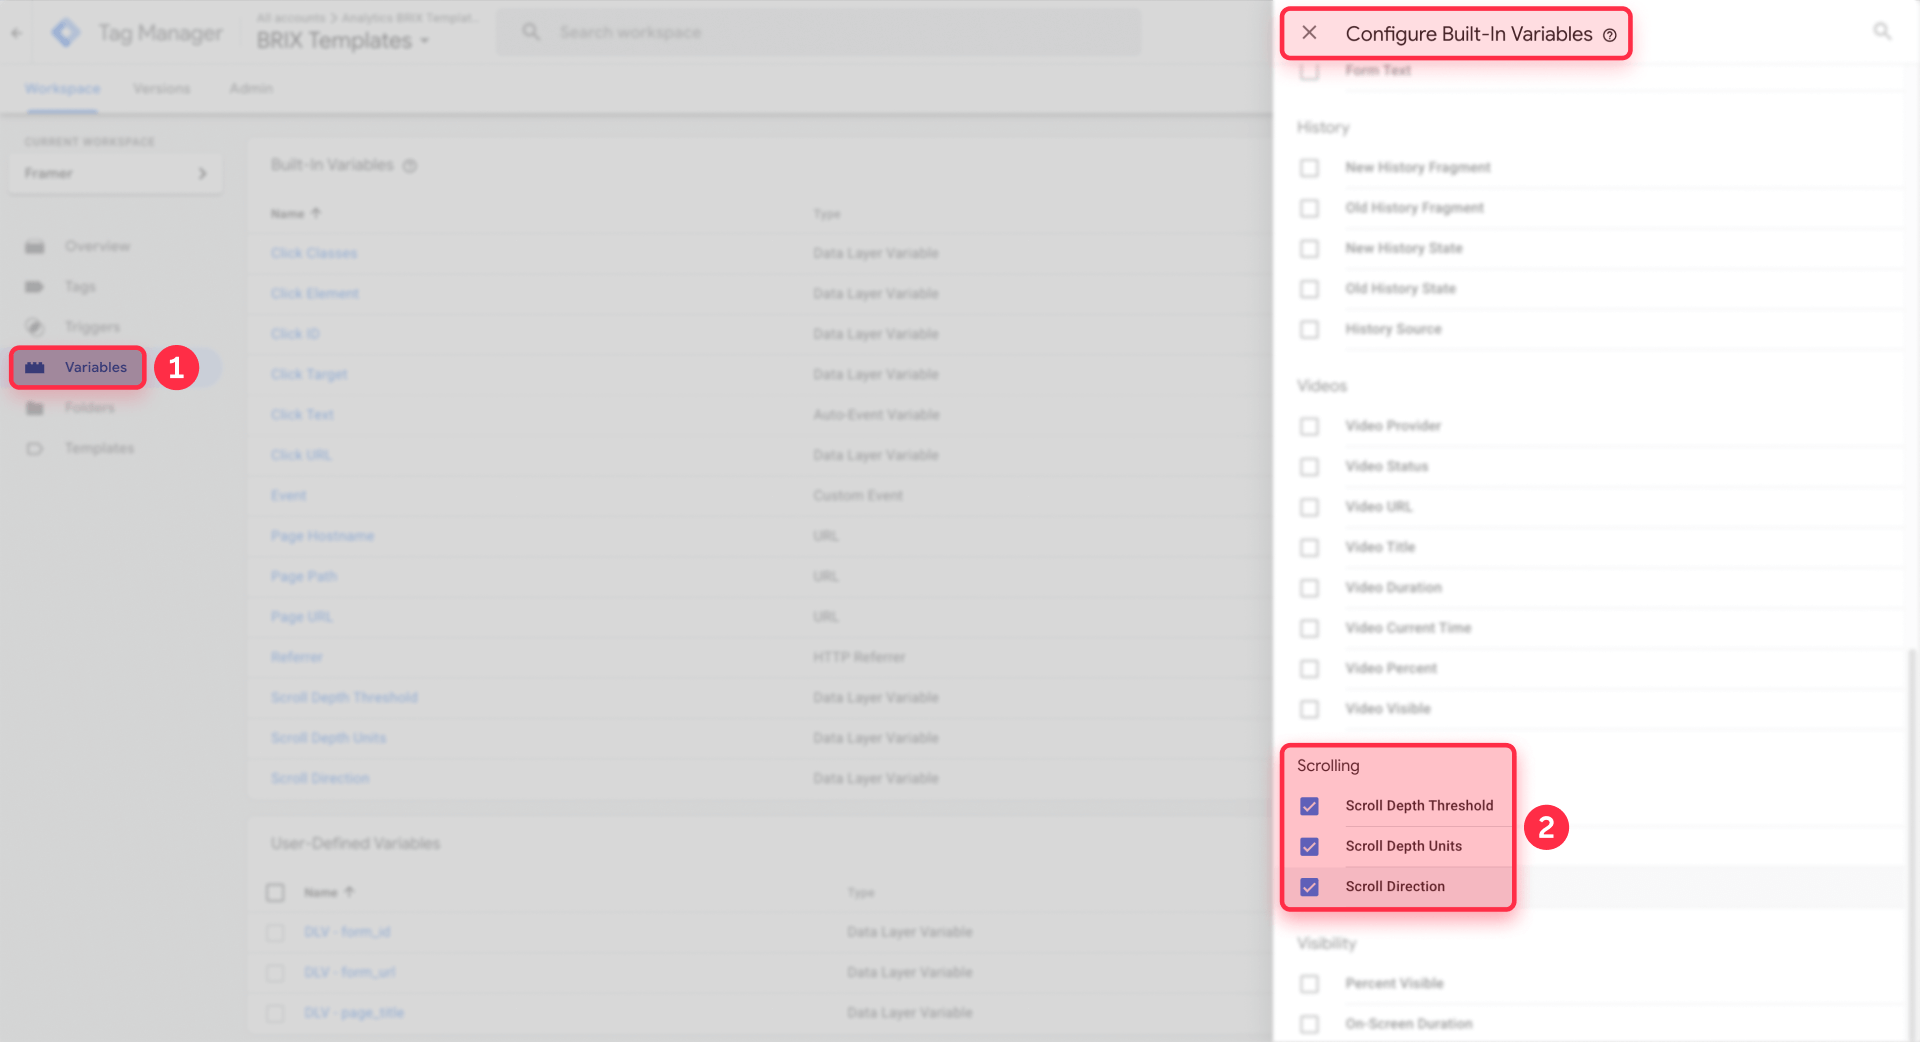
- In GTM, click Variables.
- Under Built-in Variables, click Configure.
- Enable these three variables:
- Scroll Depth Threshold
- Scroll Depth Units
- Scroll Direction
- Close the configuration panel.
These variables let you pass scroll details into GA4 as event parameters.
Step 2: Create a Scroll Depth trigger in GTM for Webflow
Now you'll create a trigger that fires when users reach specific scroll thresholds on your Webflow pages.
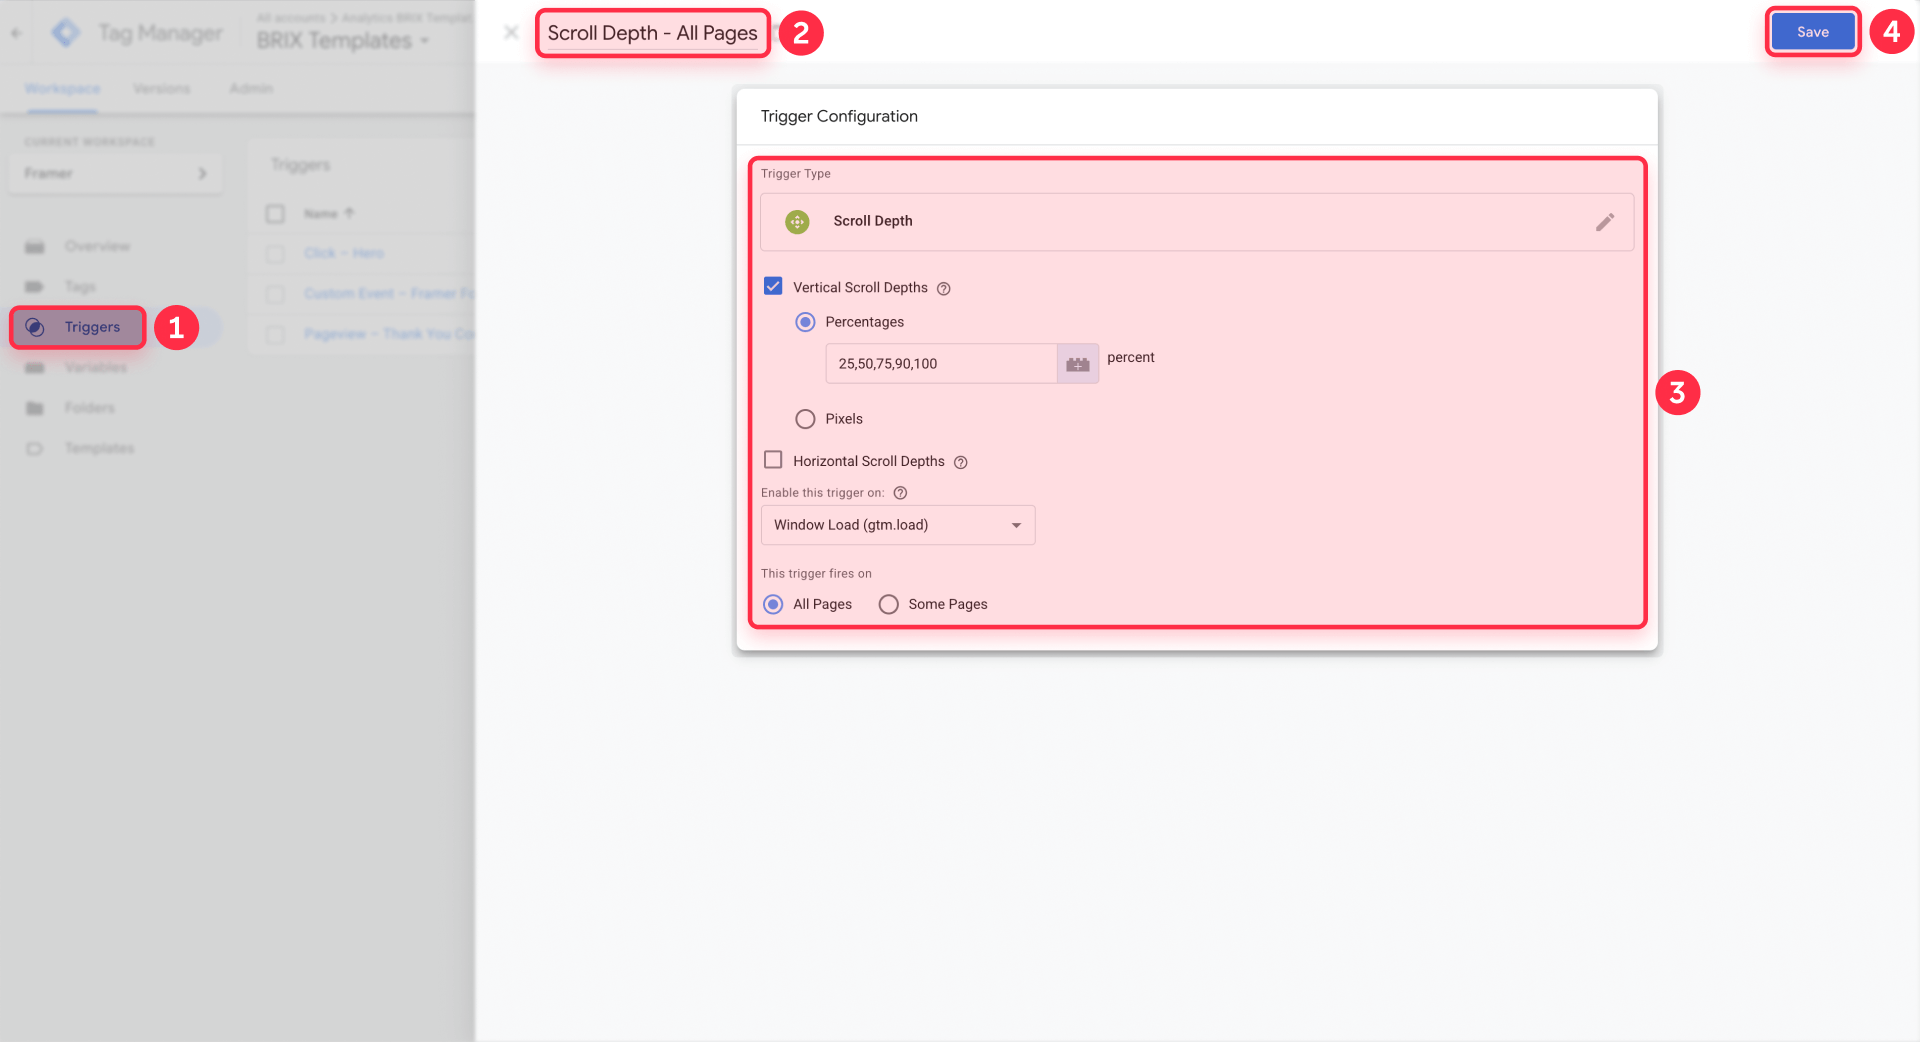
- In GTM, click Triggers.
- Click New.
- Name your trigger (for example, "Scroll Depth - All Pages").
- Click Trigger Configuration.
- Choose Scroll Depth.
- Under Vertical Scroll Depths, select Percentages.
- In the thresholds field, enter: 25,50,75,90,100
- Set This trigger fires on to All Pages (or use Some Pages if you want to limit it).
- Open Advanced Settings (if visible).
- Set Enable this trigger when to Window Loaded (often labeled gtm.load).
- Click Save.
Tip: Enabling on Window Loaded improves accuracy because the trigger calculates page dimensions after the page fully loads. On Webflow pages with late-loading CMS images, fonts, or embeds, earlier timing can produce inaccurate thresholds.
Optional: Track scroll depth only on specific Webflow pages
If you want to track scroll depth only on certain page types (like blog posts), you can narrow the trigger:
- Open your Scroll Depth trigger.
- Change This trigger fires on to Some Pages.
- Add a condition. For example, to track only blog posts:
- Page Path starts with /blog/
- Click Save.
You can apply the same logic for landing pages, product pages, or to exclude utility pages like /privacy and /terms.
Step 3: Create a GA4 event tag for Webflow scroll depth
Now you'll create a GA4 event tag that fires whenever the scroll trigger hits a threshold and sends the data to GA4.
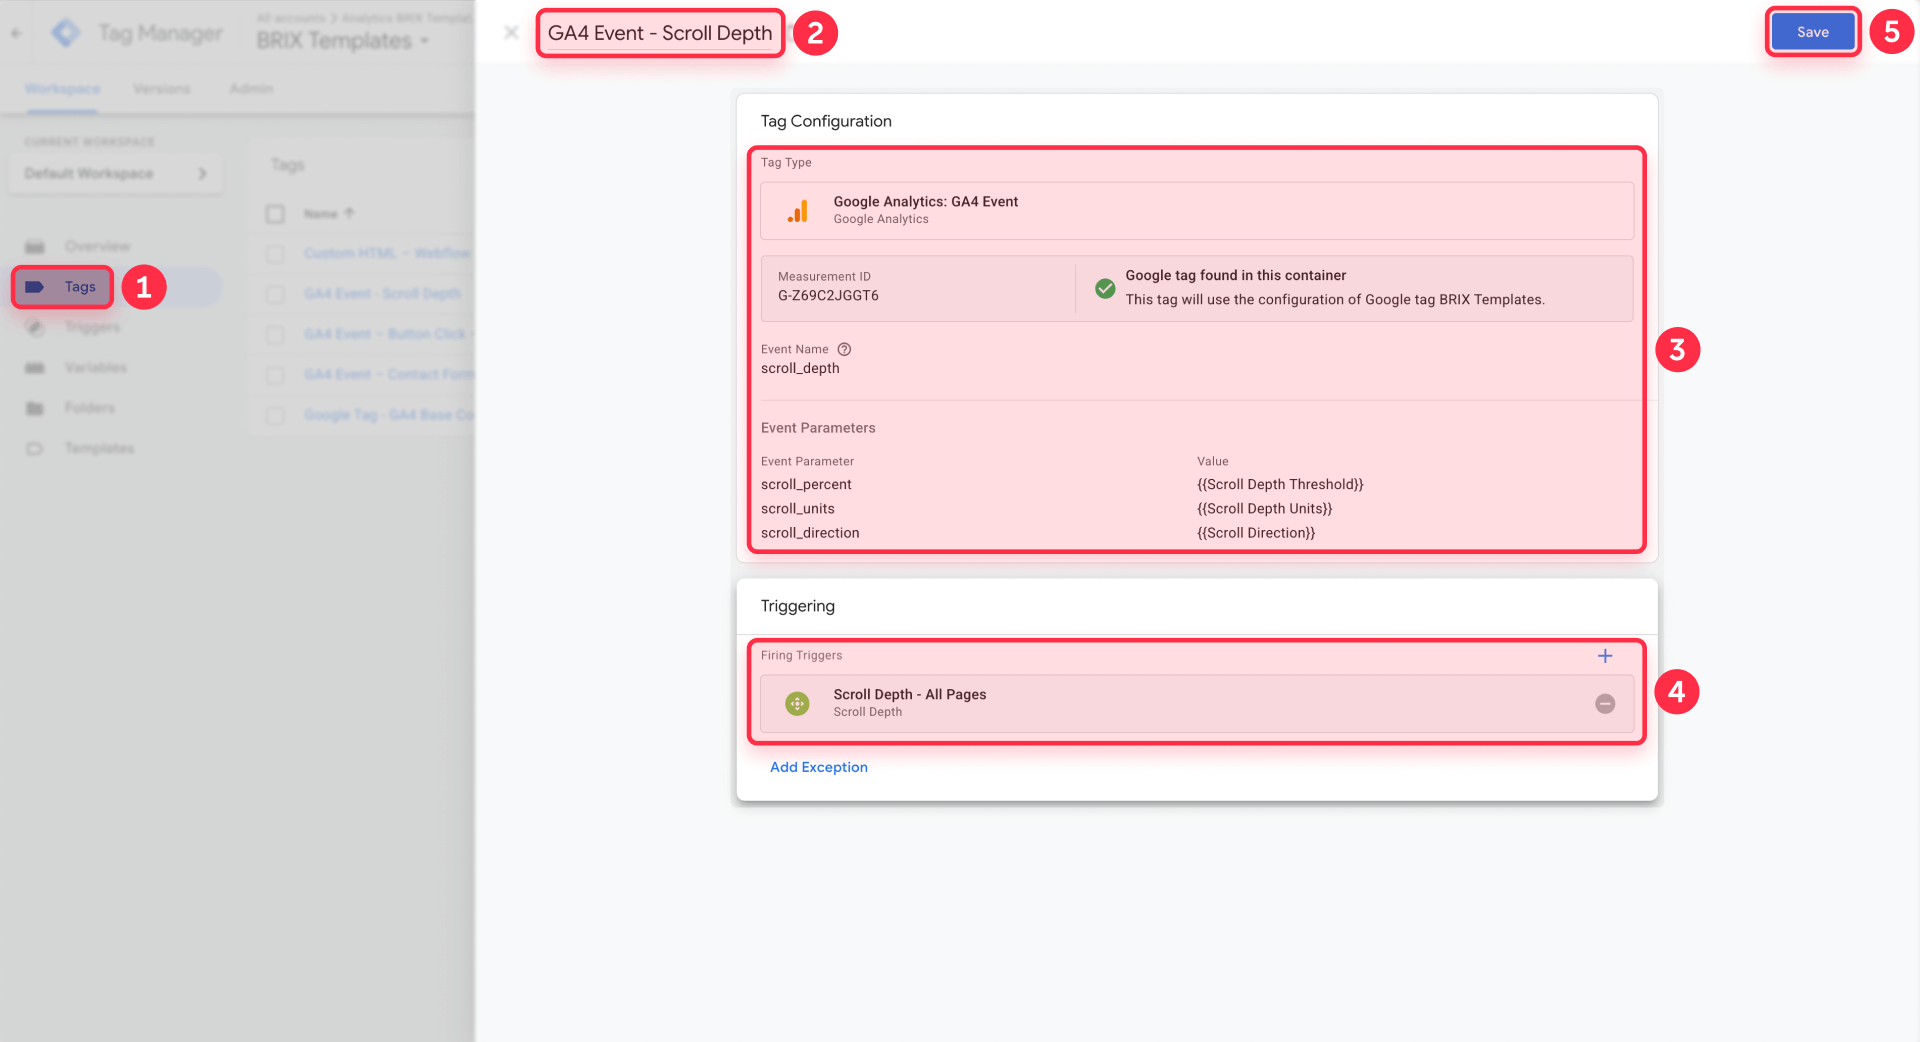
- In GTM, click Tags.
- Click New.
- Name your tag (for example, "GA4 Event - Scroll Depth").
- Click Tag Configuration.
- Select Google Analytics: GA4 Event.
- Connect this event to your GA4 property using one of these methods (depending on your GTM UI):
- If you see Measurement ID, enter your GA4 Measurement ID (looks like G-XXXXXXX).
- If you see Configuration Tag or Google tag selector, select the base Google Tag you created in Step 0.
- In Event Name, enter: scroll_depth
- Under Event Parameters, click Add Row and add these three parameters:
- Parameter name: scroll_percent
Value: {{Scroll Depth Threshold}} - Parameter name: scroll_units
Value: {{Scroll Depth Units}} - Parameter name: scroll_direction
Value: {{Scroll Direction}}
- Parameter name: scroll_percent
- Under Triggering, select your Scroll Depth trigger from Step 2.
- Click Save.
Tip: GTM's GA4 Event UI varies—use Measurement ID if shown; otherwise link the event to your base Google tag. Either approach connects the scroll_depth event to your GA4 property. Don't set a threshold of 0—GTM can report it as "(not set)" in GA4, making analysis painful.
Step 4: Avoid duplicate scroll events in Webflow (GA4 built-in vs GTM custom)
This is where most scroll tracking setups go wrong. The fix is simple: decide whether GA4's built-in scroll should exist alongside your custom GTM scroll depth events.
Since GA4 is installed via GTM in this guide (not separately in Webflow), you'll manage Enhanced Measurement settings directly in GA4. Do not add GA4 separately in Webflow—this would create duplicate tracking.
Decide whether to keep GA4 Enhanced Measurement scroll
GA4's built-in scroll event:
- Fires once per page at about 90%
- Uses the event name scroll
If you keep it enabled and also run GTM thresholds, you'll have:
- A GA4 scroll event at 90%
- A GTM scroll_depth event at 25/50/75/90/100
That's not "wrong," but it's easy to confuse stakeholders.
Recommended options:
- Keep GA4 scroll enabled and use scroll_depth for GTM thresholds (clean separation).
- Disable GA4 scroll and rely only on GTM thresholds (single source of truth).
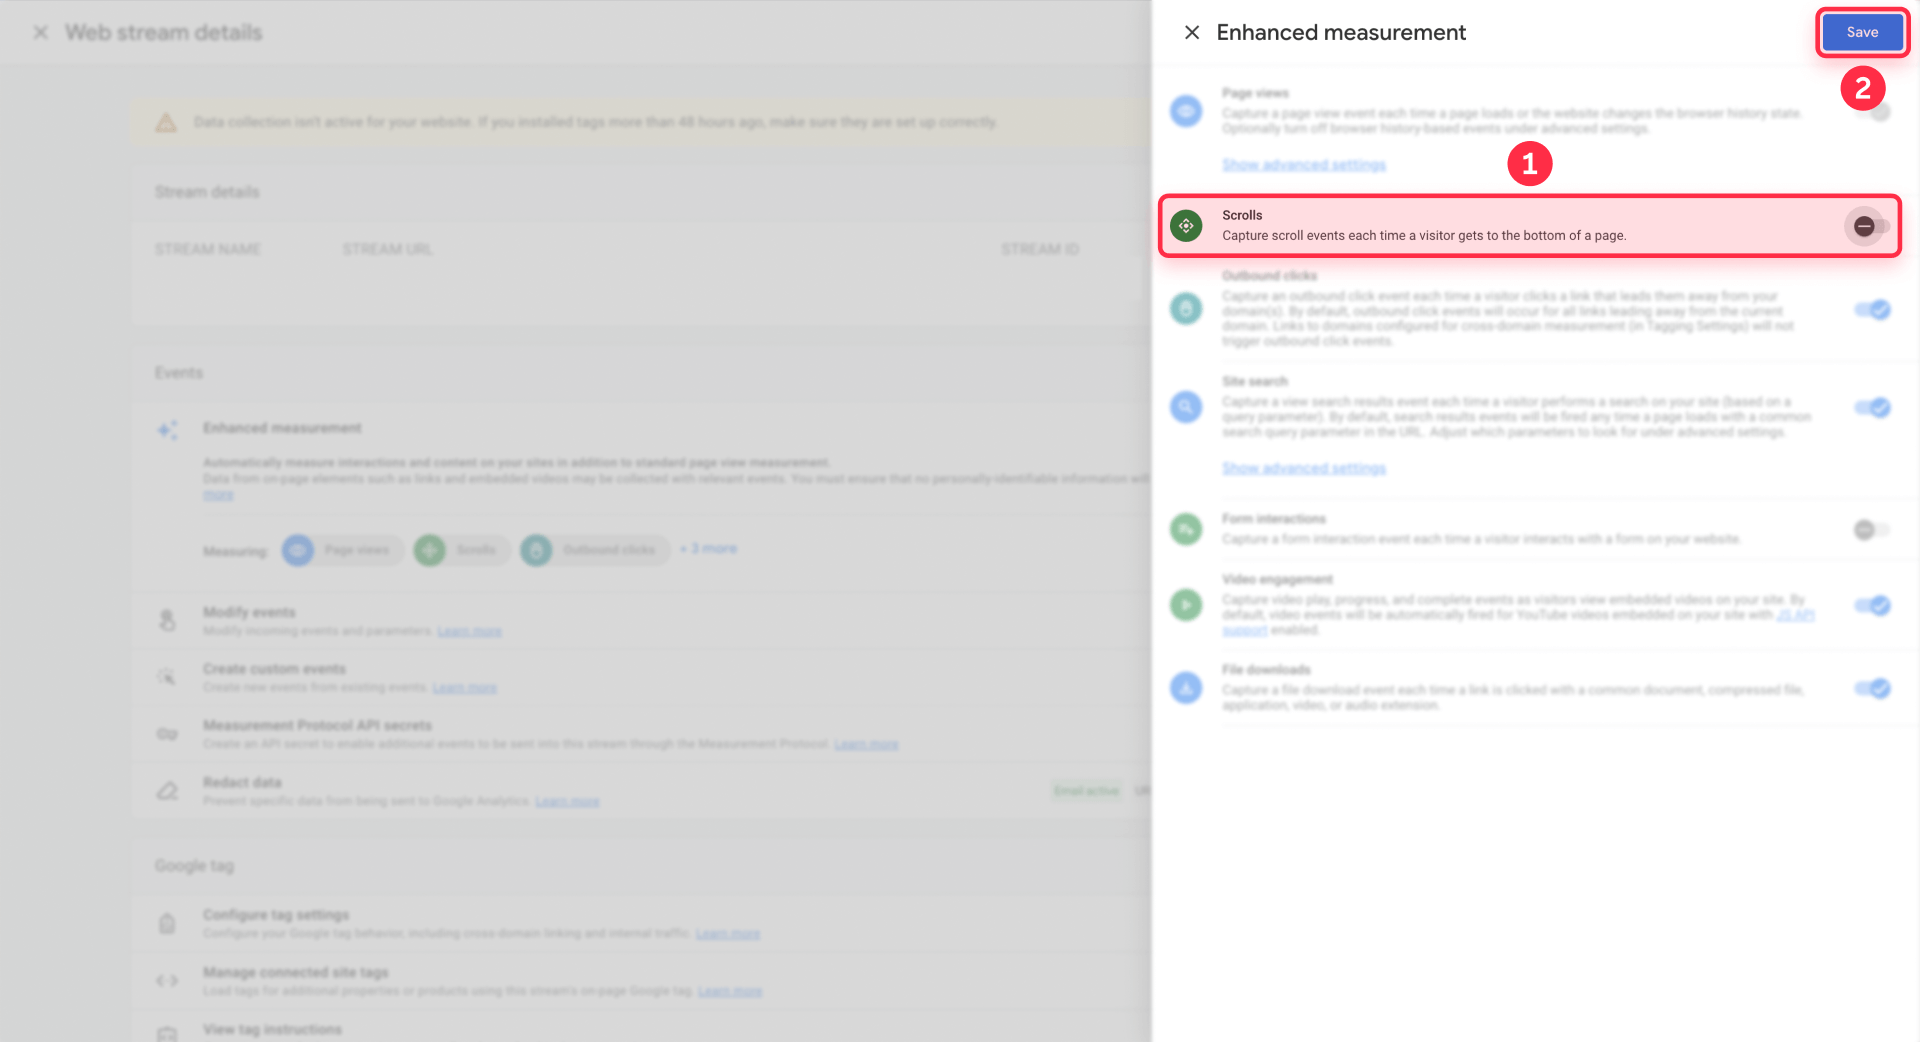
To disable in GA4:
- Go to GA4 Admin.
- Open Data streams.
- Click your Web stream.
- Click Enhanced measurement.
- Toggle Scrolls off.
Use a clean Webflow scroll depth naming strategy in GA4
Two common strategies:
Strategy A: one event + one parameter (recommended)
- Event: scroll_depth
- Parameter: scroll_percent = 25 / 50 / 75 / 90 / 100
This scales well and keeps GA4 tidy.
Strategy B: separate event names per threshold
- Events: scroll_25, scroll_50, etc.
This is easier to read at a glance, but it creates more event names and gets messy fast.
Tip: GA4's built-in "Percent scrolled" dimension is tied to GA4's own scroll event. If you want reports on your GTM percent values, register scroll_percent as a custom dimension in GA4. Keep the naming consistent and you'll thank yourself later.
Step 5: Test scroll depth tracking in Webflow like a pro
The fastest way to waste time is to publish blindly and hope GA4 "eventually shows it." Test in GTM first, then validate in GA4.
Test Webflow scroll tracking in GTM Preview (Tag Assistant)
- In GTM, click Preview.
- Enter your live Webflow URL and click Connect.
- Scroll the page past 25%, then 50%, then 75%.
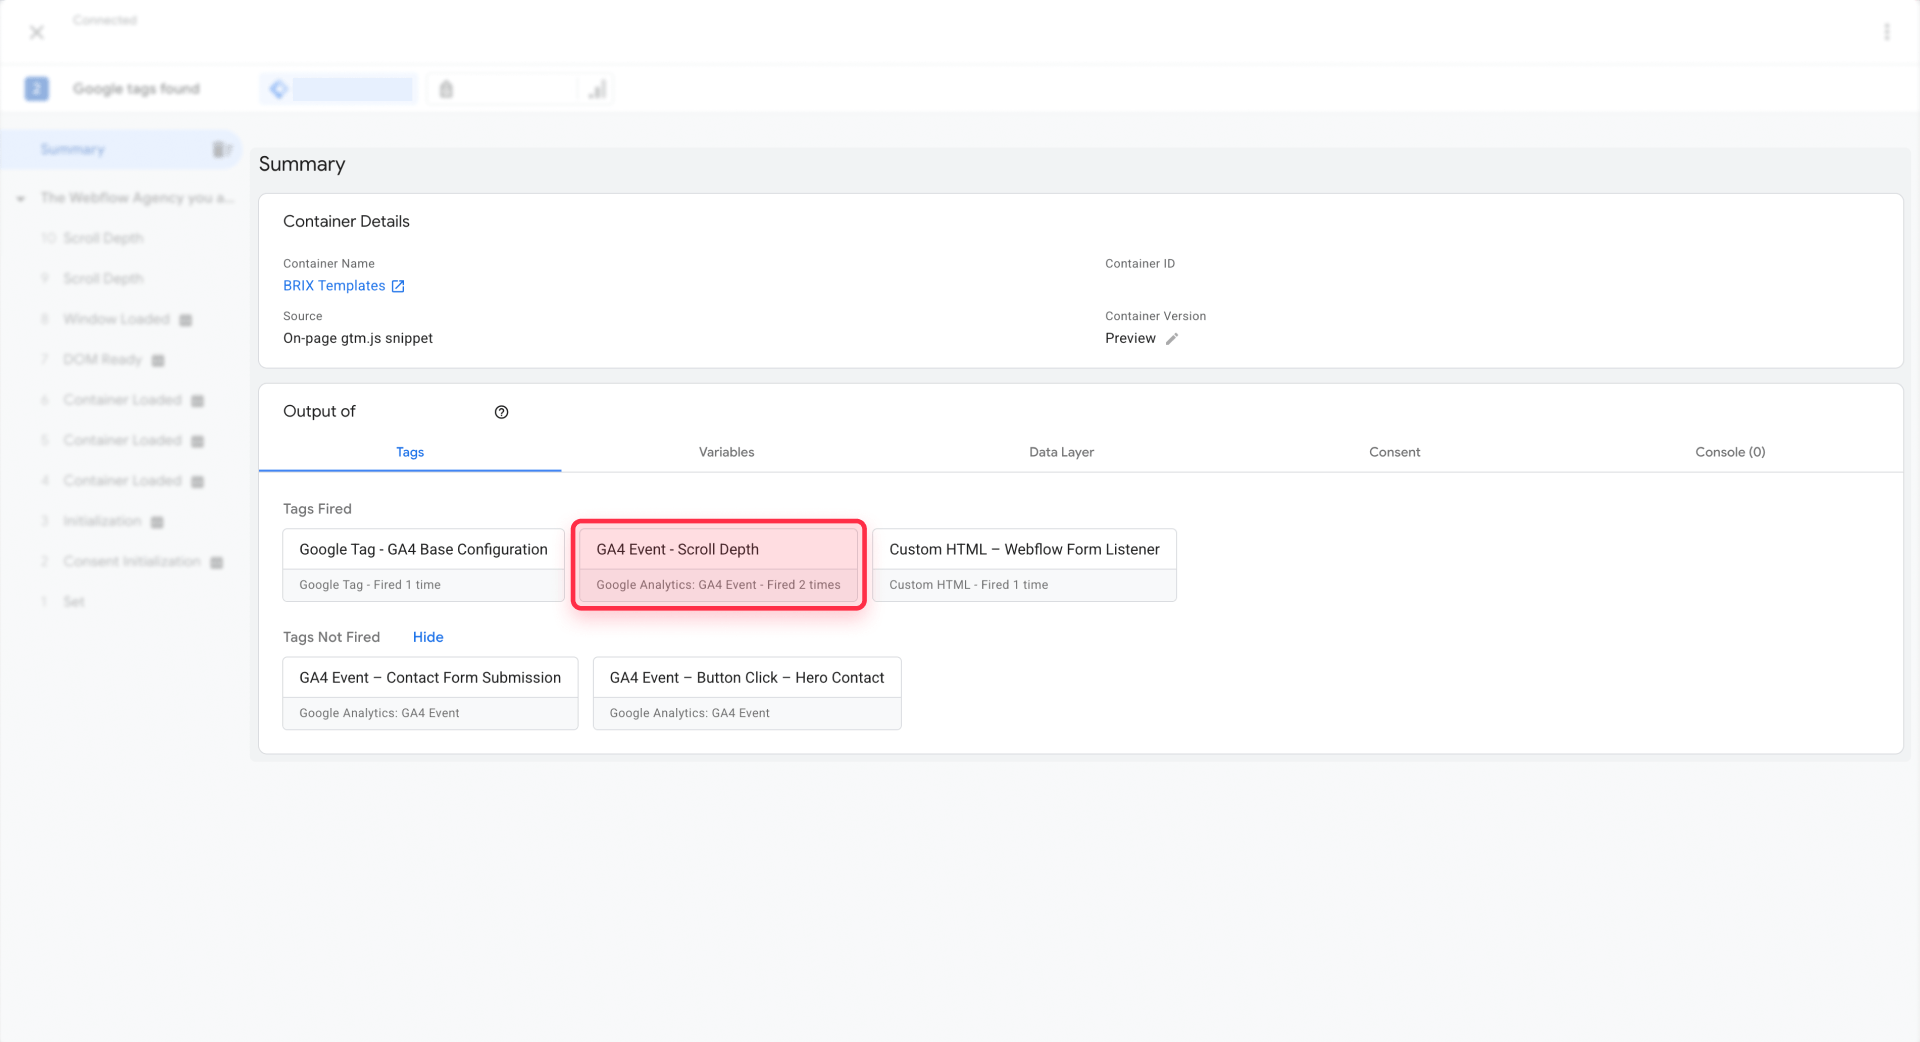
- In Tag Assistant, click each scroll event and confirm:
- The Scroll Depth trigger fired
- The GA4 Event tag fired
- Scroll Depth Threshold shows the expected value
Verification check:
- Each threshold should fire once per page load.
Verify Webflow scroll events in GA4 DebugView
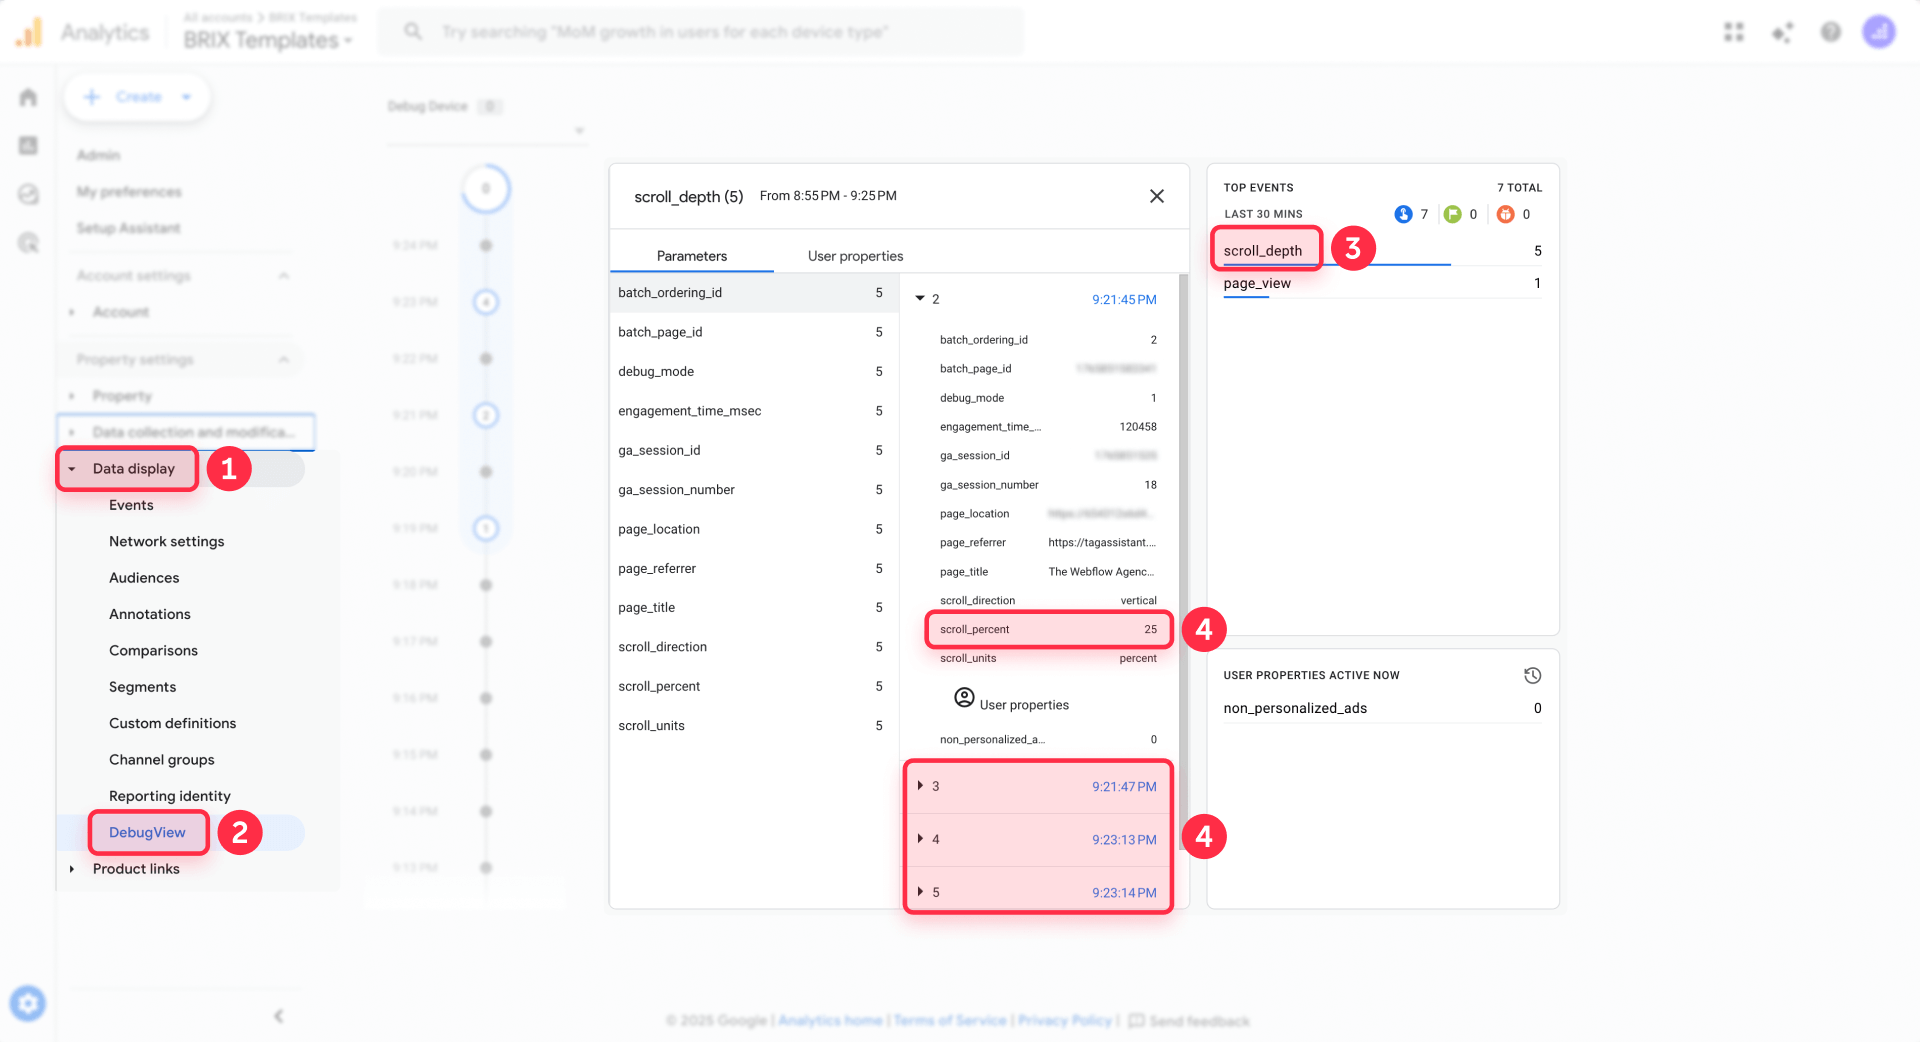
- Open GA4.
- Go to Admin.
- Open DebugView.
- With GTM Preview still connected, scroll again.
- Confirm you see scroll_depth events.
- Click an event and verify parameters like scroll_percent.
Tip: Seeing events in DebugView is the best "is this wired correctly?" signal. Standard GA4 reports can take time to populate, especially for brand-new custom events.
Publish and re-test on your Webflow production domain
- In GTM, click Submit and Publish your container.
- In Webflow, click Publish (if you changed site code).
- Visit the production domain (not the Designer preview).
- Re-test scroll thresholds without GTM Preview, using GA4 Realtime.
If you use Webflow staging domains, decide whether to exclude them before you start collecting serious data.
Troubleshooting scroll depth tracking in Webflow with GTM
- My GTM Scroll Depth trigger fires on page load (even if I didn't scroll): This happens when the threshold is already visible at load (common on short pages). Raise your lowest threshold, switch to pixel thresholds, or use Window Loaded timing. Verify by reloading and checking Tag Assistant scroll events again.
- My 25%/50% scroll events are missing on short Webflow pages: If the page is short, multiple thresholds can be "hit" immediately, or the user can reach the bottom without crossing thresholds cleanly. Try using fewer thresholds (like 50/90/100) or use pixels for those pages. Verify by testing on both desktop and mobile.
- My scroll depth events never fire in GTM Preview: Confirm GTM is installed on the published Webflow domain, not just staging. Check that your trigger is set to All Pages (or your conditions match). Verify by seeing a gtm.js event and a Page View event in Tag Assistant.
- My scroll depth events show in DebugView but not in GA4 reports: DebugView is real-time debugging; standard reports can lag. Also, parameters like scroll_percent won't show in most reports until you register a custom dimension. Verify the event exists in Realtime, then check Events after processing.
- I'm getting duplicate page_view or duplicate scroll events: You're likely running GA4 via Webflow and GTM at the same time. Pick one install method for GA4 and remove the other (then Publish). Verify by confirming only one Google tag fires on page load in Tag Assistant.
- I don't know where to paste the second GTM snippet in Webflow: Use the Google site tools app if possible. If you're installing manually, Webflow's common approach is placing the second snippet in Footer Code. Verify GTM loads by checking Tag Assistant shows your container connected.
- My Webflow interactions or animations break scroll tracking: Heavy animations can cause layout shifts that affect scroll calculations. Enable the Scroll Depth trigger on Window Loaded and reduce layout shifts by setting explicit image dimensions. Verify threshold values again in Tag Assistant.
- Anchor links on a one-page Webflow site fire multiple scroll thresholds at once: This is expected because smooth scrolling crosses multiple thresholds quickly. If you need "section reached" tracking instead, use an Element Visibility trigger on key section IDs. Verify by triggering the anchor and confirming only the section event fires.
- I have infinite scroll or dynamically loaded Webflow content: Scroll depth percentages become unreliable when page length changes. Use GTM Element Visibility triggers for meaningful sections instead. Verify by ensuring the element becomes visible and only fires once per page.
- Staging traffic is polluting my GA4 data: Add hostname logic to your triggers or tags so they only fire on your production domain. Verify by loading staging and confirming the tag does not fire in Tag Assistant.
Frequently asked questions about scroll depth tracking in Webflow
What's the difference between GA4 scroll and GTM scroll depth tracking in Webflow?
GA4 Enhanced Measurement collects a built-in scroll event when a user reaches roughly 90% of a page, and it only fires once per page. GTM scroll depth tracking lets you fire multiple thresholds (like 25/50/75/90/100%) and pass the exact threshold value as a parameter. A practical tip: if you want multiple checkpoints, don't rely on GA4 alone—set up custom thresholds in GTM and send them as a single event with a percent parameter. For most Webflow teams, scroll depth tracking is more actionable when it's multi-threshold and controlled in GTM.
Which is better for Webflow: GA4 Enhanced Measurement scroll or a GTM Scroll Depth trigger?
Use GA4 Enhanced Measurement if you only need one engagement checkpoint and want the simplest setup. Use GTM if you need custom thresholds, page-type targeting, or clean event design. The best practice tip: if you implement GTM thresholds, either disable GA4's built-in scroll or use a different event name so you don't confuse reports. For most marketing and UX use cases, the GTM Scroll Depth trigger is the better choice on Webflow because it gives you real control and cleaner data.
How do I install GTM on Webflow before setting up scroll tracking?
Before you can configure scroll depth tracking, you need GTM properly installed on your Webflow site. We have a complete step-by-step guide that covers both the Google site tools app method (recommended) and manual installation using custom code. The guide walks you through the entire process, from creating your GTM container to verifying the installation. Follow our tutorial on how to install Google Tag Manager in Webflow to get GTM running on your site first, then return to this guide to configure scroll depth tracking.
How do I set up GA4 via GTM for a Webflow site before configuring scroll depth events?
Before configuring scroll depth tracking, you need a base GA4 Google tag in GTM that fires on all pages. In GTM, create a new tag, select Google Tag, enter your GA4 Measurement ID (G-XXXXXXX), and set the trigger to Initialization – All Pages. Do not paste your GA4 Measurement ID in Webflow's Site settings → Integrations—this creates duplicate tracking. After saving the tag, use GTM Preview mode to verify the page_view event fires exactly once in Tag Assistant. Our guide on how to install Google Analytics 4 in Webflow covers the GTM method in detail—follow that approach to ensure clean, single-source GA4 tracking.
How do I track 25%, 50%, 75%, and 100% scroll depth in GA4 using GTM on a Webflow site?
Create a Scroll Depth trigger with percentage thresholds (25,50,75,100), then fire a GA4 Event tag that sends one event name and one percent parameter. The best tip is to use a single event like scroll_depth and a parameter like scroll_percent so you don't create five separate event names. Then verify in GTM Preview and GA4 DebugView before publishing. If you want reliable analysis later, register the percent parameter as a custom dimension. This approach is the cleanest way to do GA4 scroll depth thresholds from Webflow via GTM.
How do I disable GA4's built-in scroll event to avoid double-counting with GTM in Webflow?
In GA4, go to Admin, open Data streams, click your Web stream, open Enhanced measurement, and toggle Scrolls off. You'll need Editor-level access to change this setting. The practical tip: disable it only after you've confirmed your GTM scroll_depth event is firing correctly, so you don't create a temporary tracking gap (use the testing section to verify). If your GTM event uses a different name, you can also leave GA4's scroll enabled, but keep reporting clear. To prevent confusion, disable GA4 scroll when GTM thresholds are your primary source of truth.
Can I use GTM Preview mode on a Webflow staging domain to test scroll tracking?
Yes, you can connect GTM Preview to any accessible URL, including a Webflow staging domain, as long as GTM is actually installed on that environment. The actionable tip: don't assume your staging domain has the same scripts as production—verify by checking Tag Assistant shows your container and you can see Page View events. If you plan to keep staging traffic out of GA4, add hostname conditions so your GA4 tags only fire on production (see the troubleshooting section). For fast iteration, GTM Preview mode on staging is useful, but always re-test on the real production domain before you consider it done.
How do I verify scroll depth events in GA4 DebugView for a Webflow site?
First, connect GTM Preview so events are sent with debug context. Then open GA4 Admin and go to DebugView. Scroll your Webflow page past your thresholds and look for your custom event (like scroll_depth) in the timeline. The best tip: click the event inside DebugView and confirm your percent parameter (like 25/50/75) is present—this proves the tag is configured correctly. If you don't see parameters in standard reports later, register them as custom dimensions. For troubleshooting and confidence, GA4 DebugView is the fastest way to validate scroll depth on Webflow.
Why aren't my scroll depth events showing up in GA4 after publishing GTM on Webflow?
Most "missing events" issues come from one of three causes: GTM wasn't actually published, the Webflow site wasn't published after code changes, or a tag/trigger condition prevents firing on the current page. Start by verifying the tag fires in Tag Assistant without Preview (production check), then verify it appears in GA4 Realtime. The actionable tip: DebugView confirms wiring, but GA4 reports can lag—don't judge success solely by standard reports immediately. Also confirm you're not filtered out by GA4 data filters or browser blockers. If you want fast answers, Webflow GA4 scroll events should be verified in GTM first, then GA4 Realtime, then reports.
Conclusion: implement scroll depth tracking in Webflow with GTM
Once GTM is installed cleanly on Webflow and GA4 is firing once, scroll depth tracking becomes a reliable engagement signal instead of a vague guess. With a Scroll Depth trigger and a single GA4 event design, you can track meaningful thresholds (25/50/75/90/100%) and avoid duplicate events that ruin reporting.
If you want to go further, consider tracking "section reached" with Element Visibility triggers, building scroll-based audiences, or implementing consent-aware tagging (without overcomplicating your baseline setup). If you'd rather have a team set this up end-to-end and QA it properly, our Webflow team at BRIX Templates can help—see our Webflow agency services.


Join readers commenting on this post!