

Your team already keeps the truth in a spreadsheet — job openings, event schedules, pricing, directories, testimonials — but the matching Webflow table or list goes stale the moment someone has to copy a row across by hand. Webflow has no native Google Sheets connection, so you need a bridge (and the same is true in reverse — to send form submissions into a sheet instead, see how to connect Webflow forms to Google Sheets).
This guide covers three real ways to do that: sync Google Sheets to the Webflow CMS with a sync app like Whalesync, render public Sheet data in a custom Webflow section with JavaScript, or build a custom sync with Make. Before any of them, it sets the rules on what is safe to publish and where this approach should stop.
Why sync Google Sheets to a Webflow website
A spreadsheet is where non-developers already edit data; the Webflow CMS is where that data needs to appear. Connecting the two keeps them in step without anyone retyping rows.
- One source of truth: every title, price, and status lives in the sheet, so the page reflects it instead of duplicating it.
- No manual rebuilds: a new row appears on the next refresh or sync, not after a copy-paste ticket.
- Non-developers stay in control: recruiting, ops, or marketing edit the sheet directly, no Webflow access needed.
- Faster than the CMS: for fast-moving data like availability or schedules, editing a row beats publishing a CMS item every time.
The tradeoff: a sheet is not a database. It suits data that is small enough to scan and safe to show publicly — which the rest of this guide helps you decide.
When to use Google Sheets as live data (and when not to)
This approach shines for data that is safe to show publicly and changes often enough that manual CMS edits become a chore.
Good fits:
- Simple public tables — partner lists, comparisons, reference grids.
- Review and testimonial walls curated by marketing.
- Event schedules, pricing matrices, availability lists that shift on a cadence.
- Lightweight directories — team, vendors, speakers — with a few fields each.
Stop here, though:
- Private, personal, or customer data — and any credentials or secrets.
- High-volume datasets (thousands of rows) — they slow client rendering and bloat CMS syncs.
- SEO-critical content or anything needing approval before it goes public.
Treat the sheet as already public the moment you connect it, and only connect what you would show a stranger.
How to prepare the Google Sheet before connecting it
The setup only works if the sheet is structured for the web, not for internal notes:
- Clean headers — one short, consistent header per column, no merged header cells.
- Stable columns — don't reorder or rename columns after connecting; the rendering or sync maps fields by position or name.
- Public-only fields — keep only what the site needs.
- A row ID or unique key — so a CMS sync can tell which row is which across runs.
- Dedicated sort/filter columns (e.g., a Sort order number or Category label) instead of visual grouping.
- Image and link columns with full URLs in their own columns.
- A separate public output — a dedicated public workbook, or at minimum a safe public tab. Never expose your working spreadsheet.
The dedicated public output — ideally a separate workbook, or at minimum a safe public tab — is the single most important habit here. It is what makes the workflow safe to run unattended.
How to publish the sheet safely
If your method reads a published Google Sheets endpoint — like Method 2's JavaScript rendering — publish the sheet through File → Share → Publish to web. (Sync apps such as Whalesync and Sheetflow use an authorized Google connection instead, so they don't need this step.) Treat publishing as public exposure, not access control — the moment a sheet is published, anyone with the link can read it, so it's a visibility decision, not a permissions system.
In the dialog, choose a Specific sheet (not the whole workbook), pick the format your method needs (CSV/TSV for a client-side fetch, or a separate endpoint/API if you need JSON), keep Automatically republish when changes are made on, and copy the link or published ID. Even with auto-republish on, changes can take a few minutes to appear — so test the real delay before promising a specific update window.
Three real ways to use Google Sheets data in Webflow
There are three real ways to put Google Sheets data into Webflow, from fastest to most flexible. The quick rule: start with a sync app when the destination is the Webflow CMS; render with JavaScript when you only need a custom public section and SEO is not critical; build a custom Make sync when you need logic no app provides.
Embedding a published Google Sheet is display-only, not true sync, so this guide focuses on methods that either render Sheet data into a custom Webflow section or sync rows into Webflow CMS.
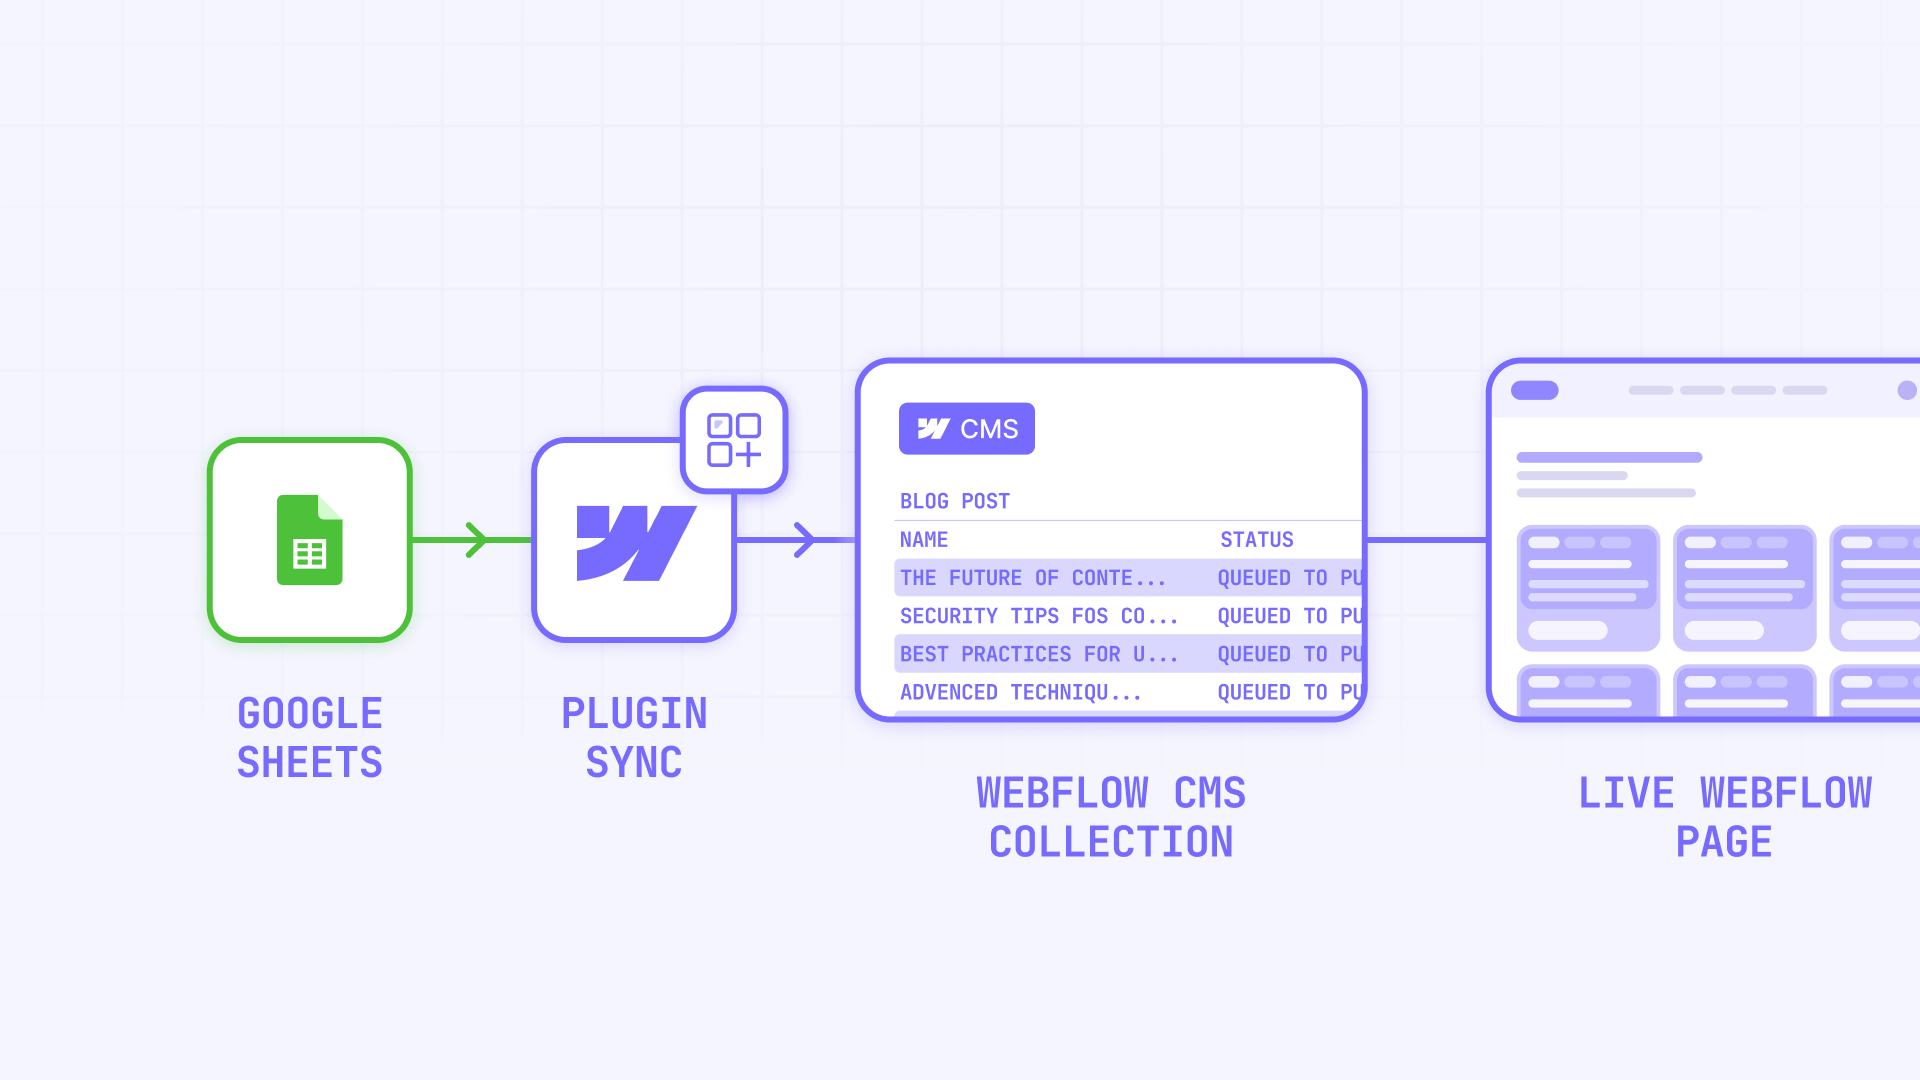
Method 1: Use Whalesync to sync Google Sheets to Webflow CMS
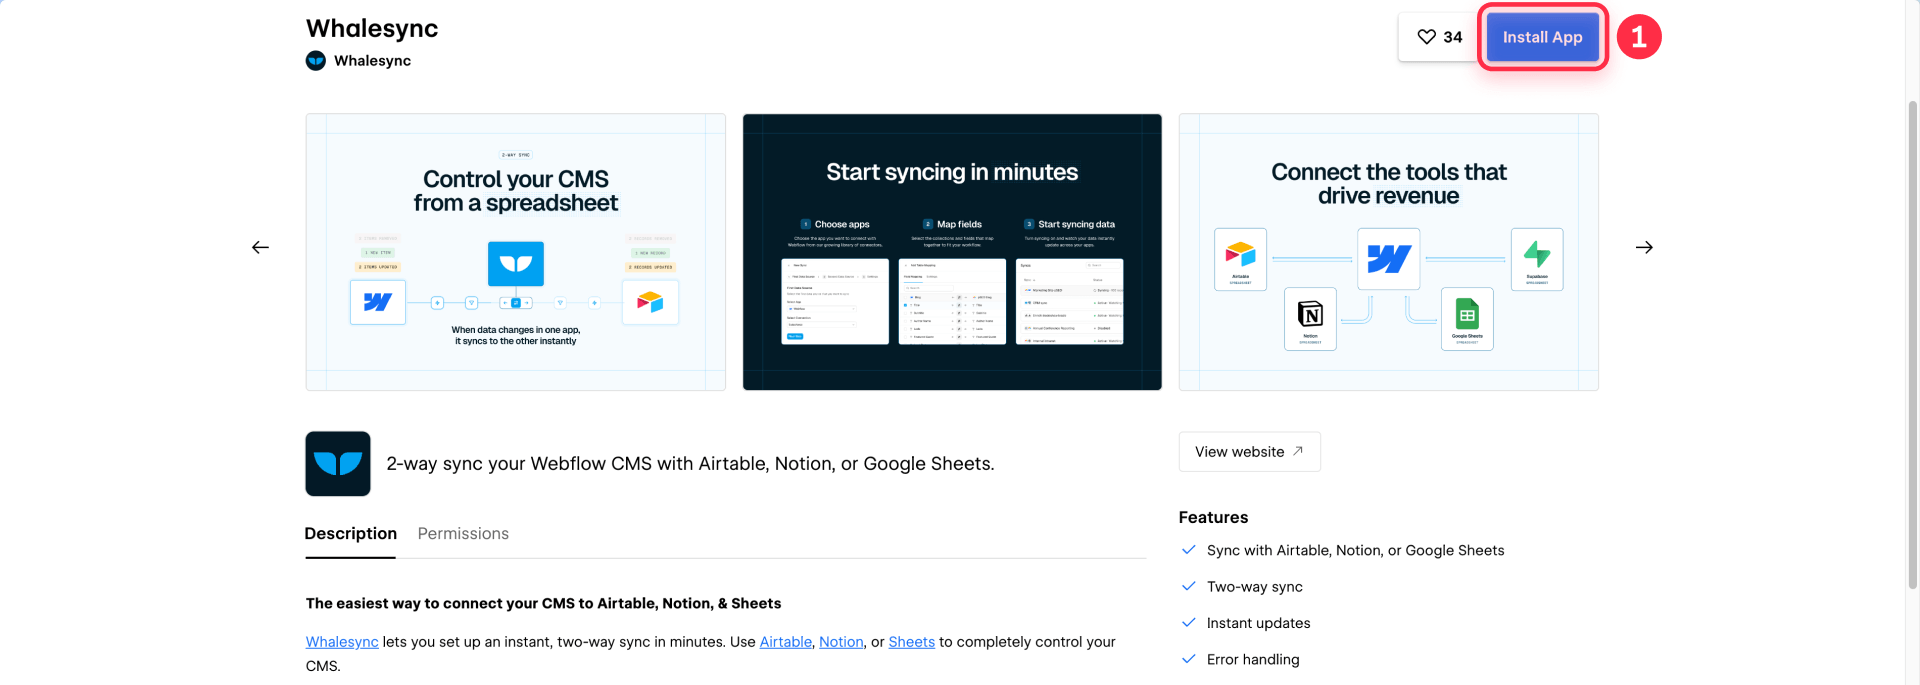
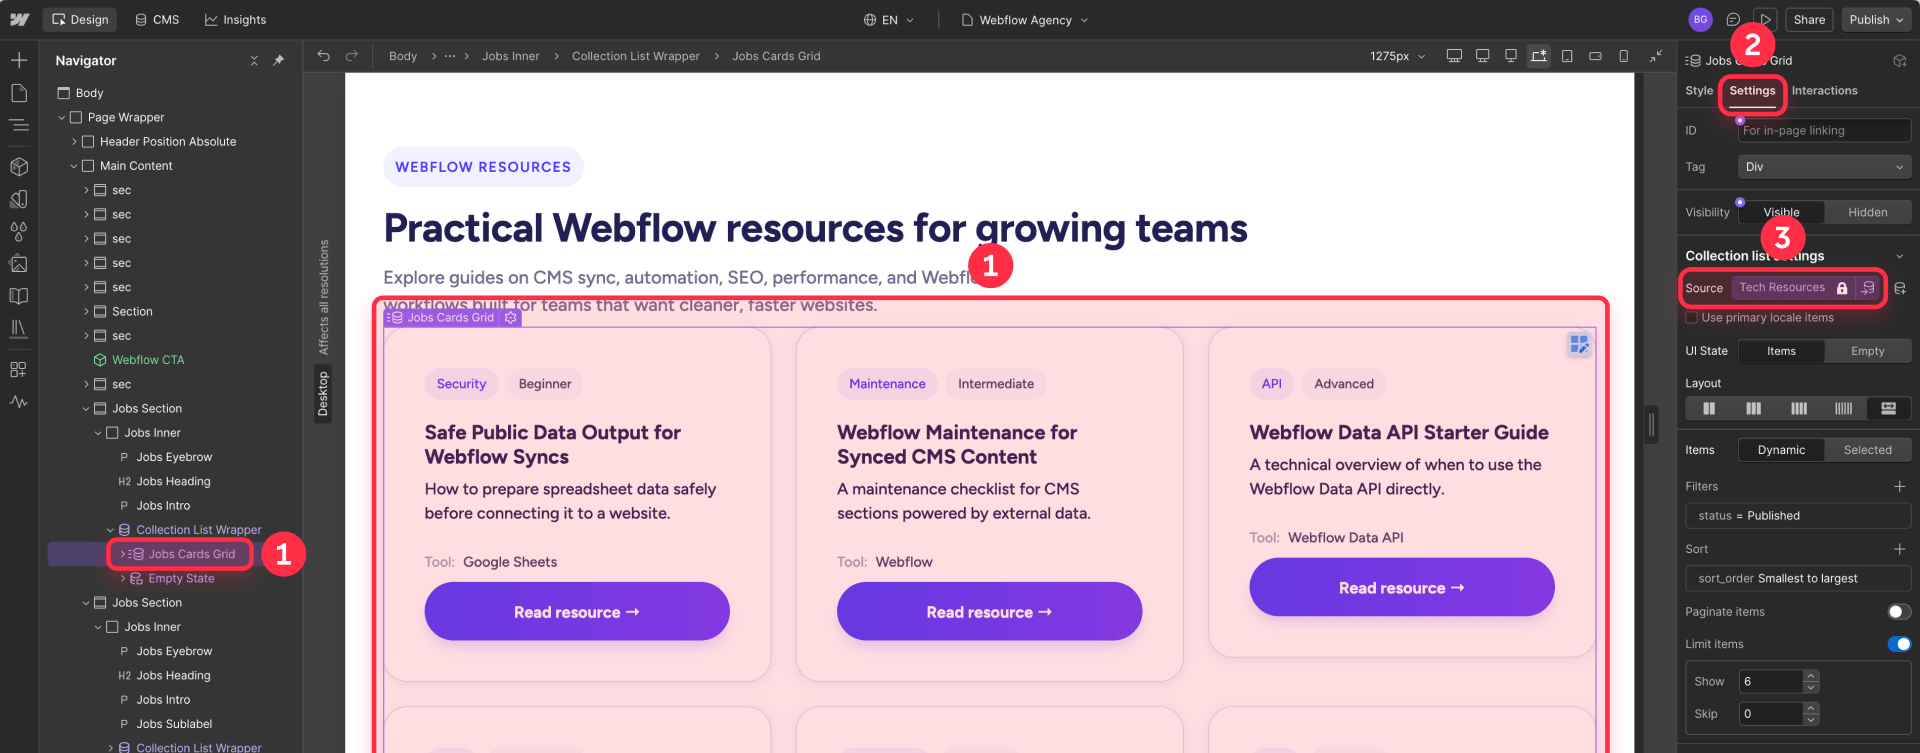
Whalesync is a third-party sync platform for the Webflow CMS and tools like Google Sheets, Airtable, and Notion — not a native, first-party Webflow feature. It creates and updates real Webflow CMS items, so this is true CMS sync, not an iframe or embed. It is a strong option when Google Sheets is the editing surface and the Webflow CMS is the publishing destination, and it works well for directories, job boards, resource libraries, event listings, catalogs, programmatic SEO content, and other structured CMS sections.
Pricing: Whalesync has a free trial, but Google Sheets \+ Webflow sync requires a paid Whalesync plan. At the time of writing, Whalesync lists its Starter plan at $20/month, with Google Sheets and Webflow included and up to 500 records in sync. Pricing can change, so confirm the current plan before building around it.
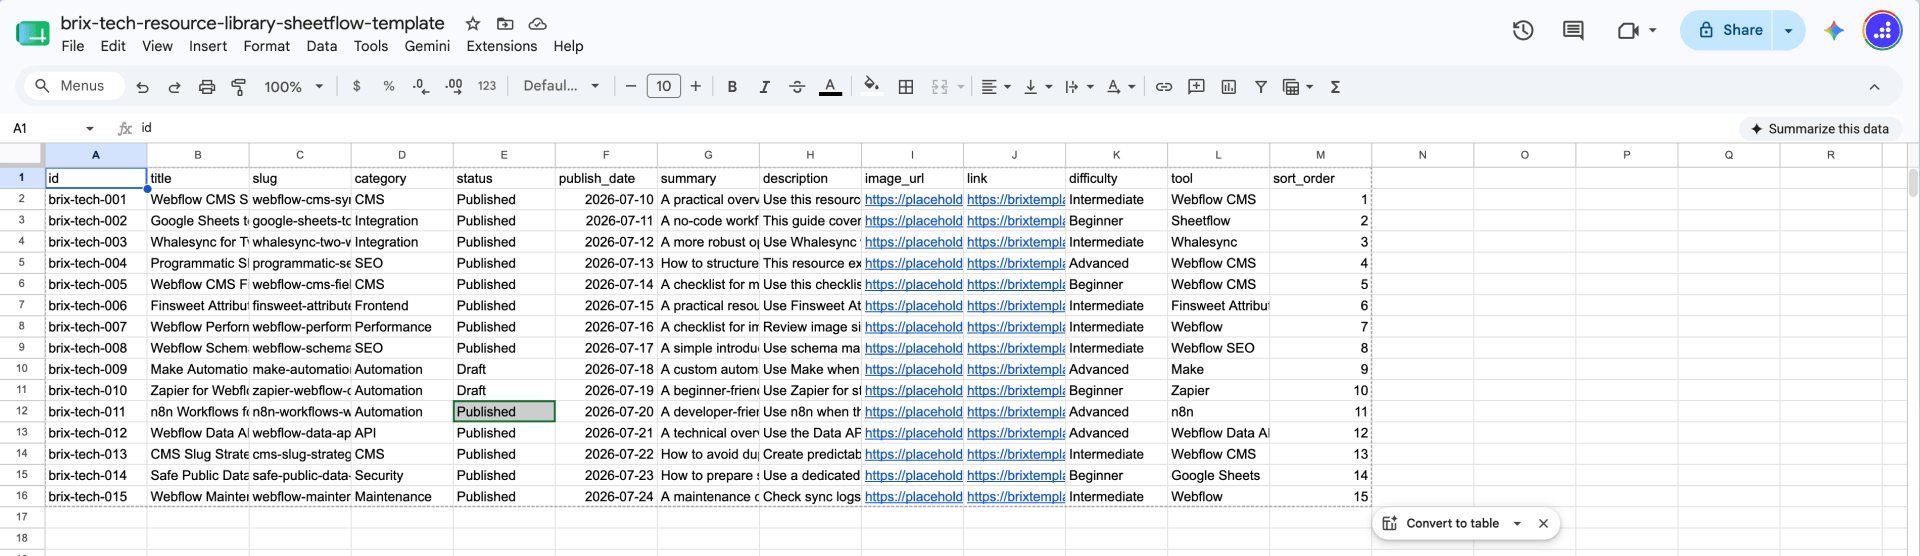
Step 1: Prepare the Google Sheet
Use clean headers, include only fields that are safe to publish, and add a stable unique-ID column such as id. Useful fields:
- id — stable unique key.
- title — the item title.
- slug — the URL slug.
- category — for filtering.
- status — e.g., Active or Draft.
- publish\_date — for scheduling and sorting.
- summary — a short intro.
- description — the full body.
- image\_url — full image URL.
- link — full link URL.
- difficulty — optional tag or level.
- tool — optional tag.
- sort\_order — a number for manual ordering.
Step 2: Prepare the Webflow CMS Collection
Create or choose a CMS Collection, add fields that match your Sheet, and add a custom field like row\_id to store the Google Sheet id. Use Webflow's native Name and Slug fields for the title and slug.
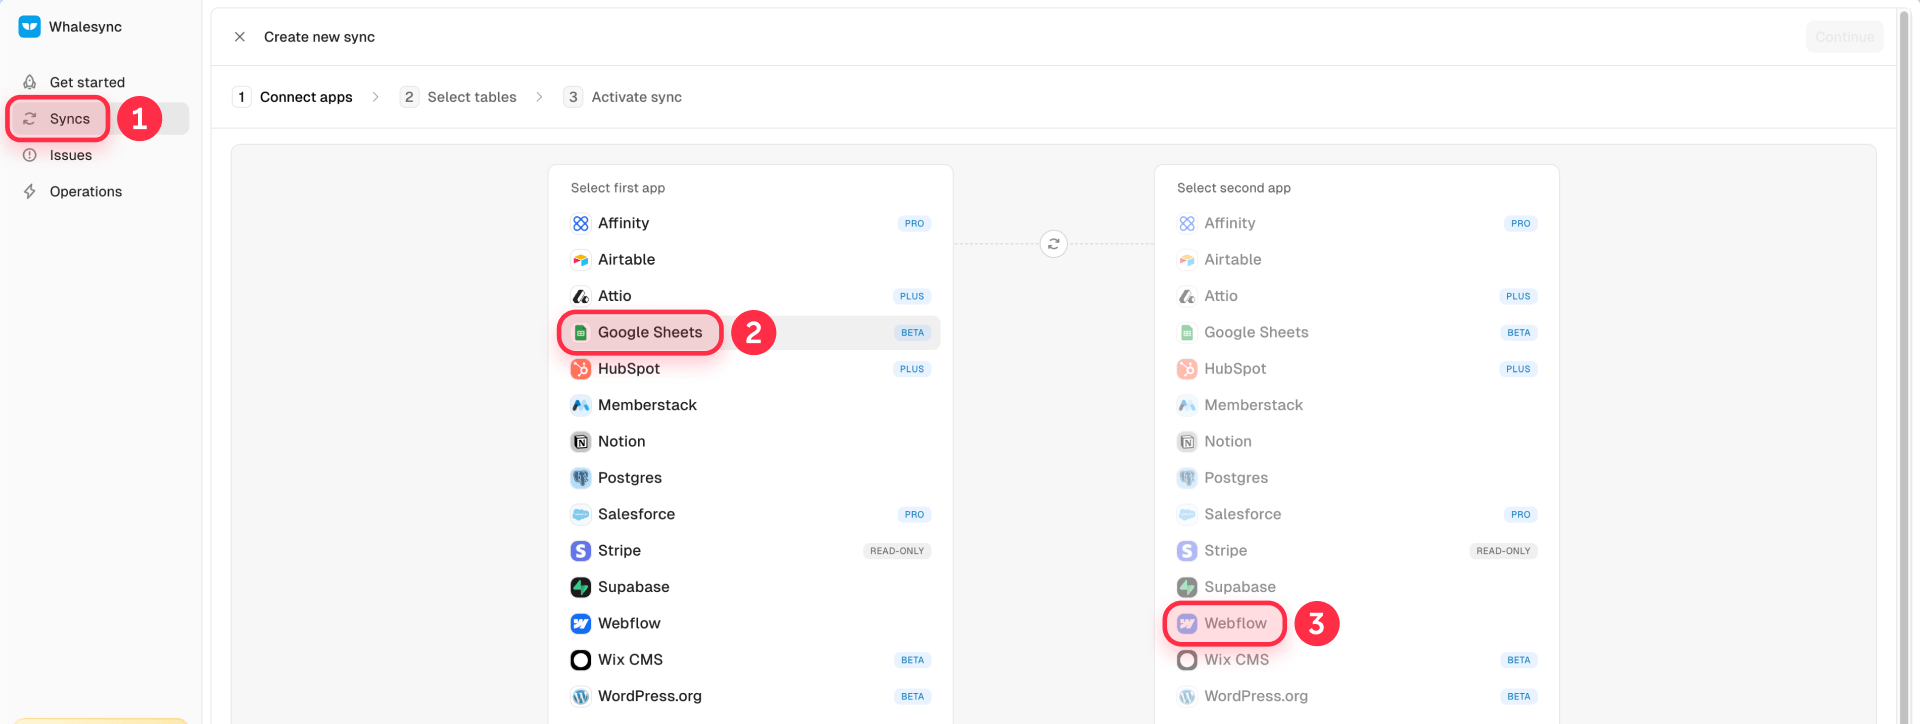
Step 3: Create a Whalesync sync
Connect Google Sheets, connect Webflow, select the correct spreadsheet, and select the correct Webflow site and CMS Collection. Make sure the destination is the intended Collection — not an existing blog or an unrelated Collection.
Step 4: Map the fields
A typical mapping:
- id → row\_id
- title → Name
- slug → Slug
- category → category
- status → status
- publish\_date → publish\_date
- summary → summary
- description → description
- image\_url → image\_url
- link → link
- difficulty → difficulty
- tool → tool
- sort\_order → sort\_order
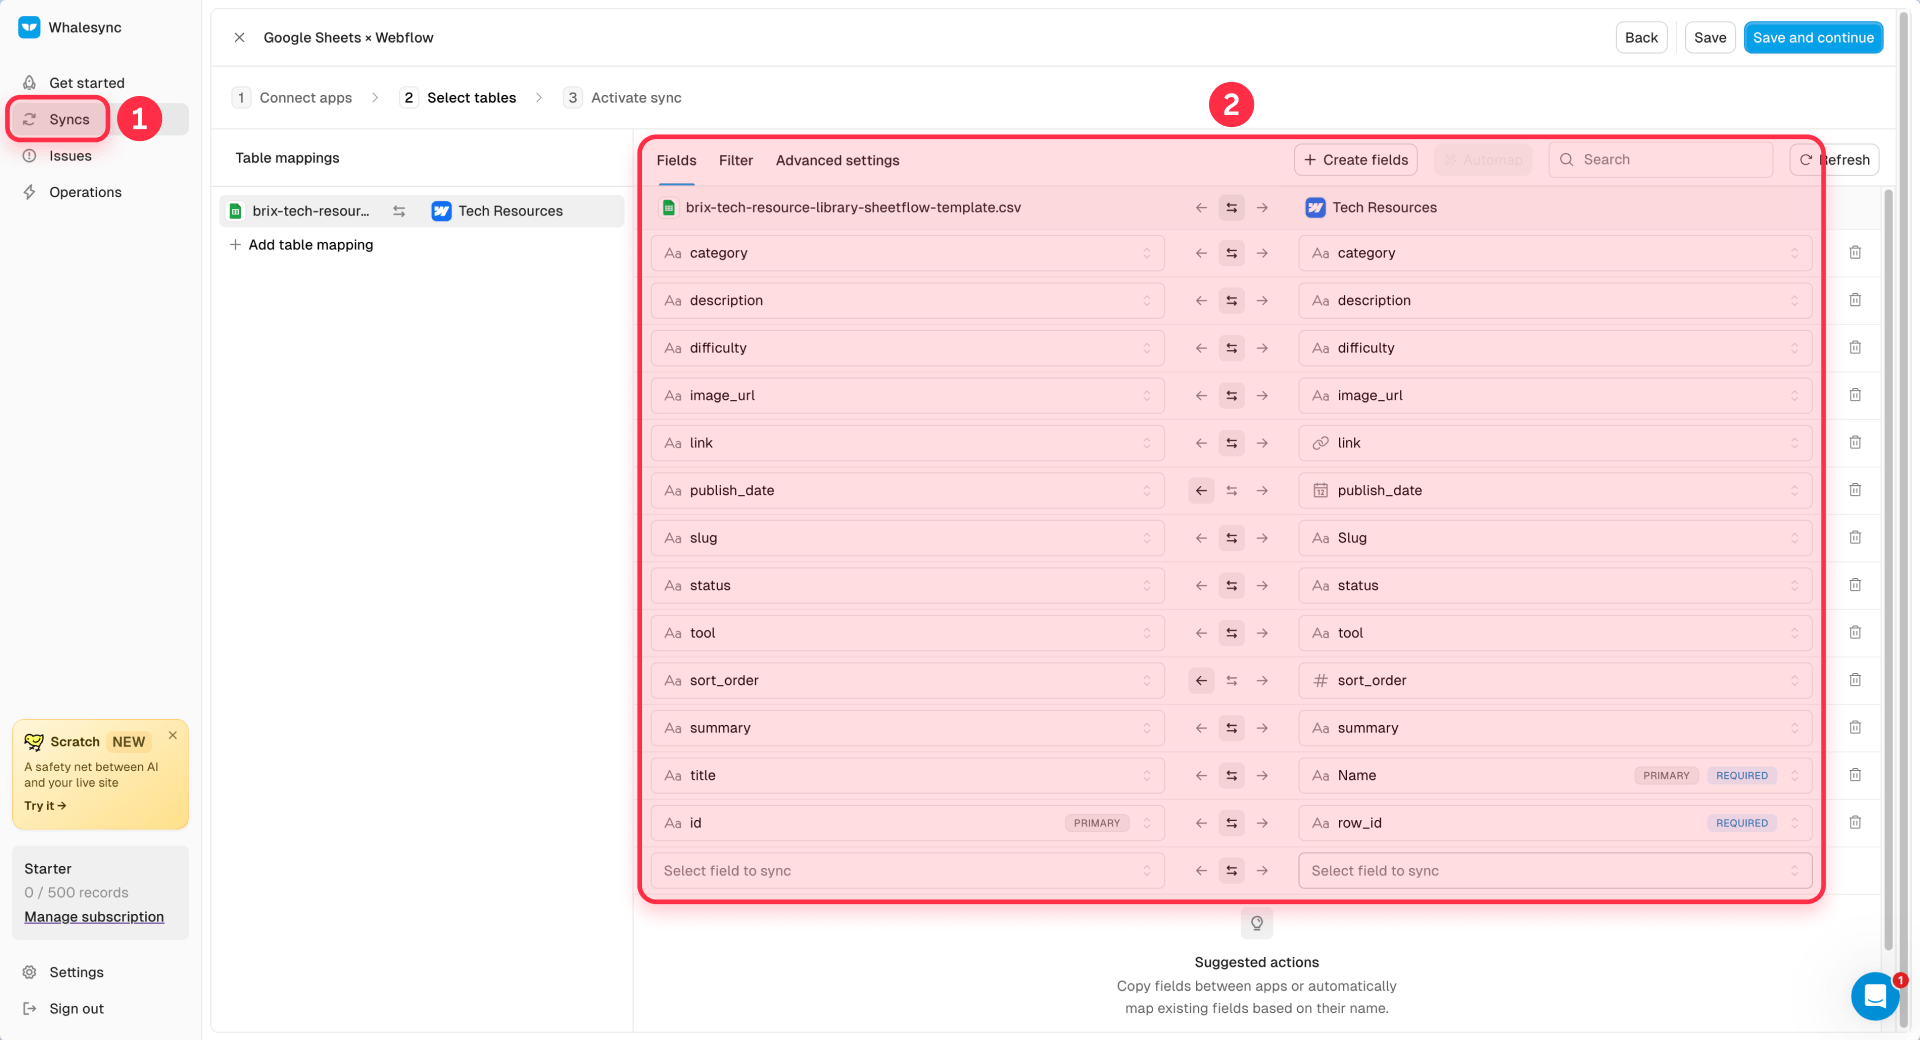
Do not map id to Name. Use title for Name and id for the stable row ID.
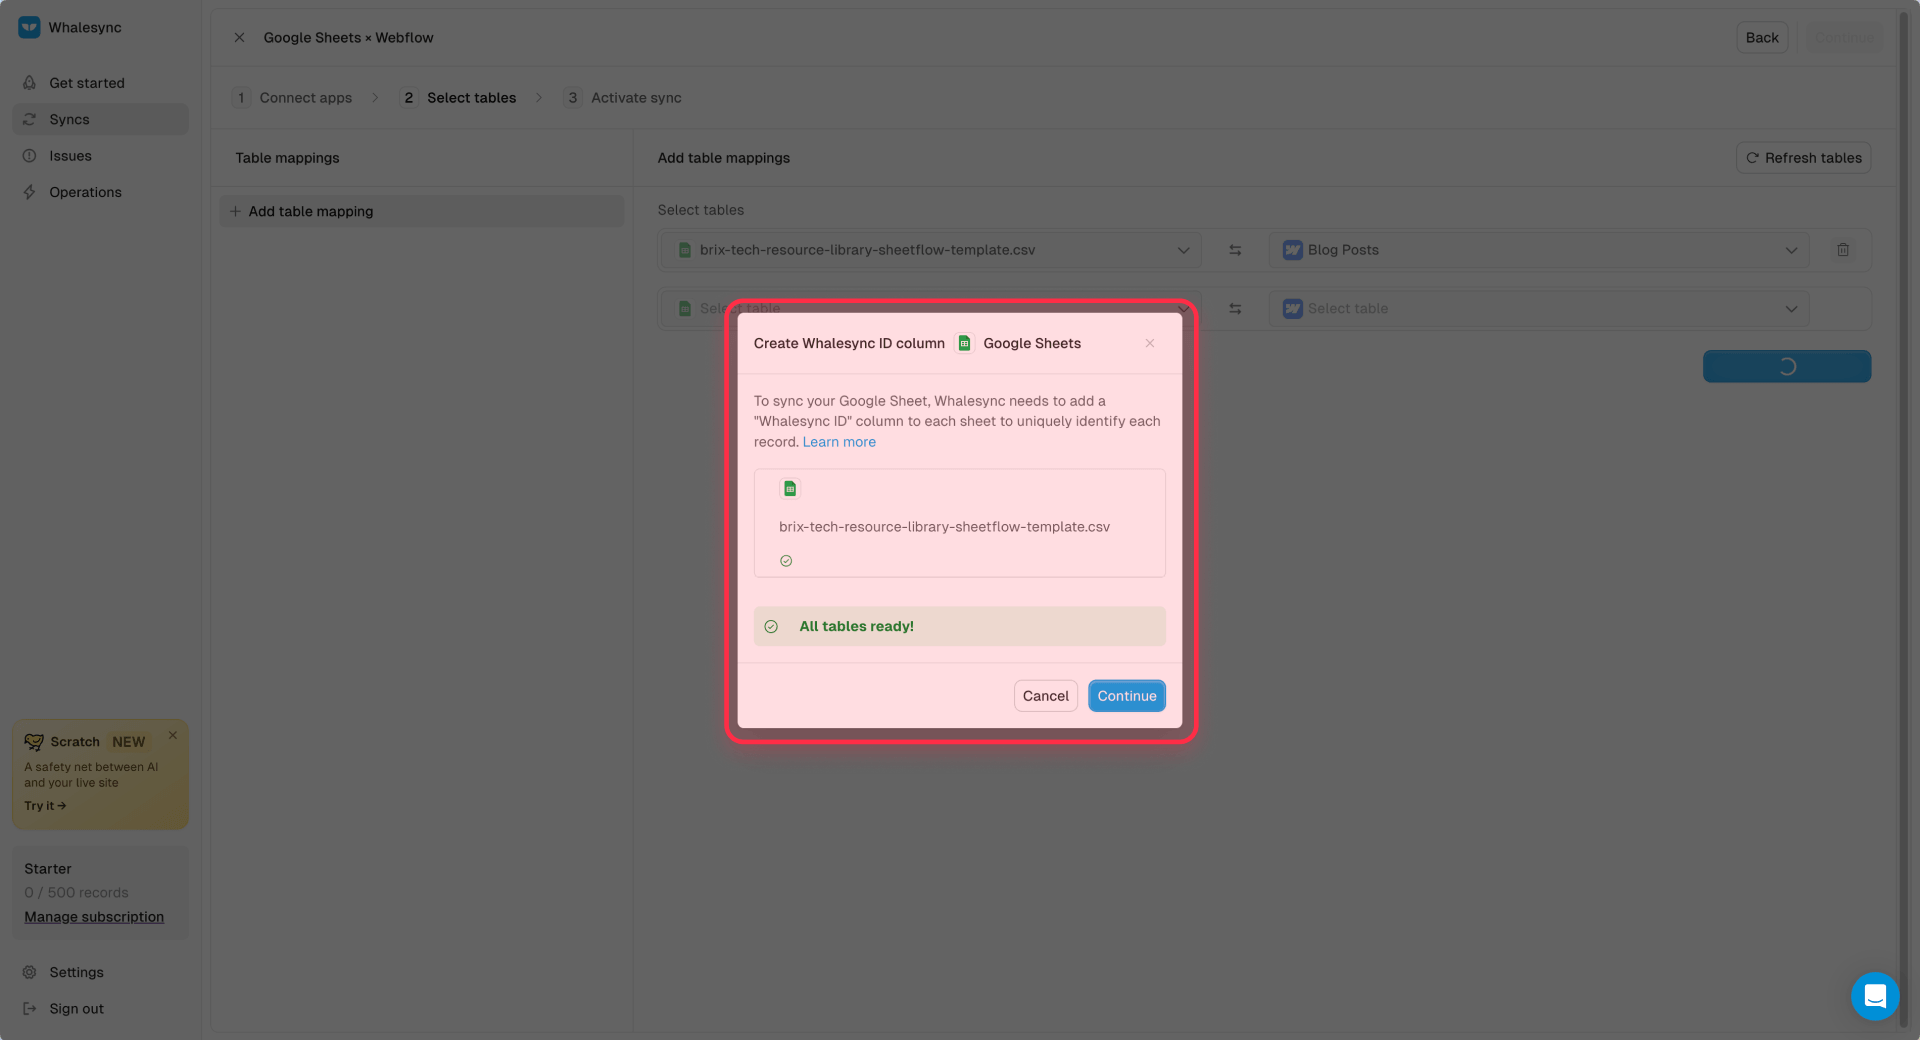
Step 5: Activate and test the sync
Activate the sync. If Webflow reports that the Collection does not exist, republish the Webflow site and retry in Whalesync. Check Whalesync's Issues and Operations to confirm items were created, then edit one row in Google Sheets and confirm the same CMS item updates instead of duplicating.
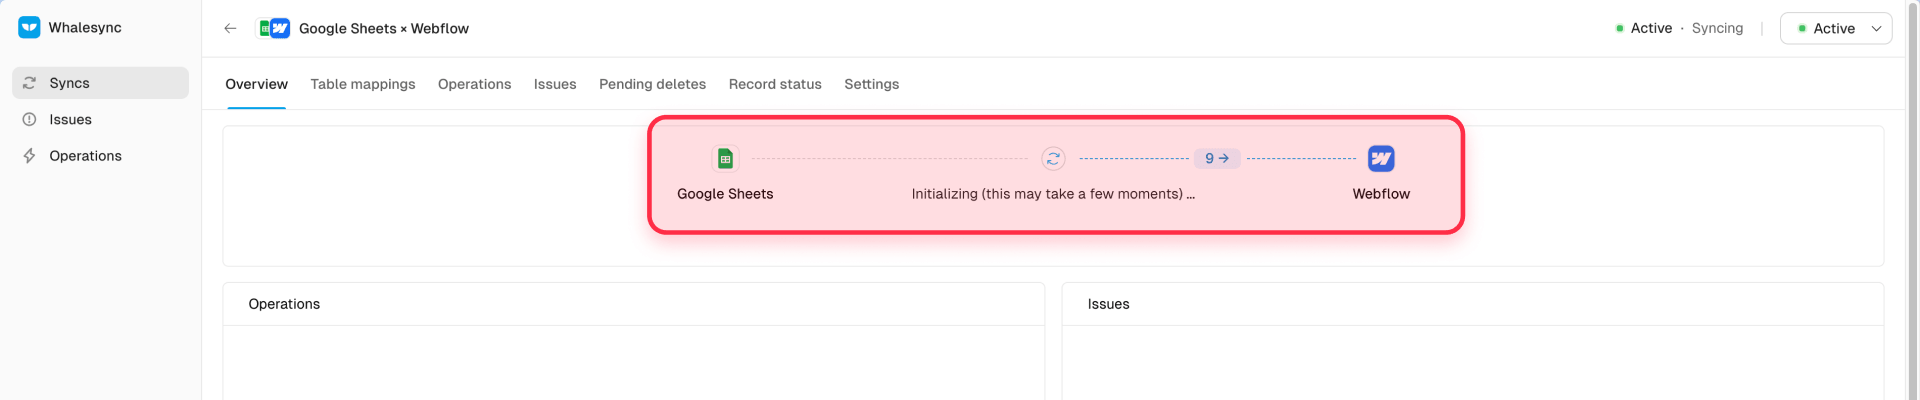
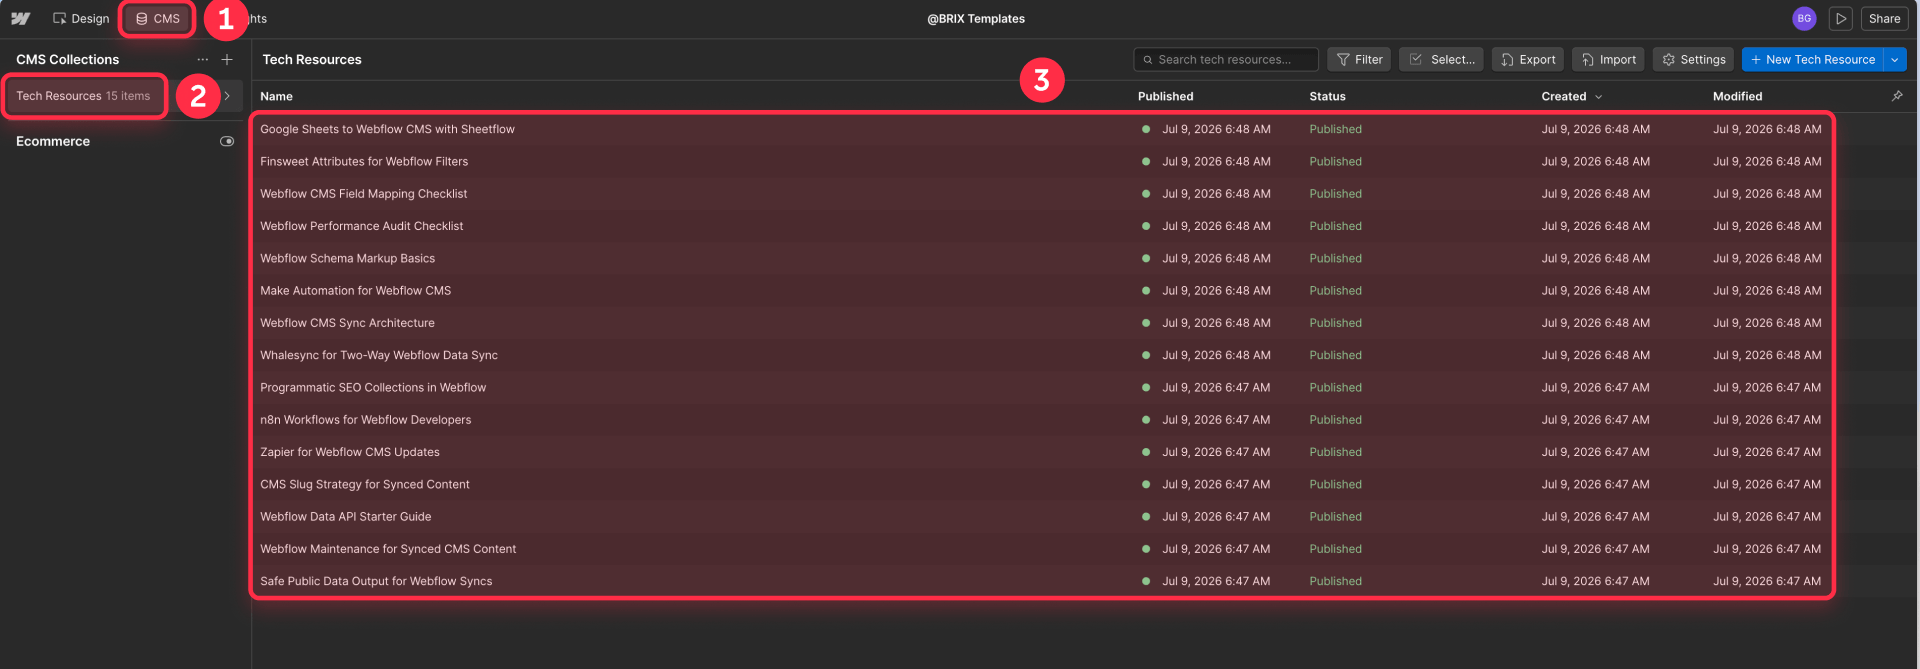
Best for: no-code CMS sync, Google Sheets → Webflow CMS workflows, structured content, programmatic SEO, resource libraries, directories, catalogs, and teams that prefer editing in spreadsheets.
Not ideal for: complex custom approval logic, advanced transformations, private data that should not touch a public or shared sheet, or workflows that require full backend control.
Sheetflow is another third-party Webflow app for Google Sheets sync, but Whalesync is the primary recommendation here because it handled this workflow more reliably in our testing.
Safety reminders: do not sync private or sensitive data unless the setup is secure, keep stable IDs to avoid duplicate CMS items, test the field mapping and publishing behavior before relying on it, and republish Webflow after any CMS structure change if the sync app reports Collection or schema errors.
Method 2: Fetch Google Sheet data and render it with JavaScript
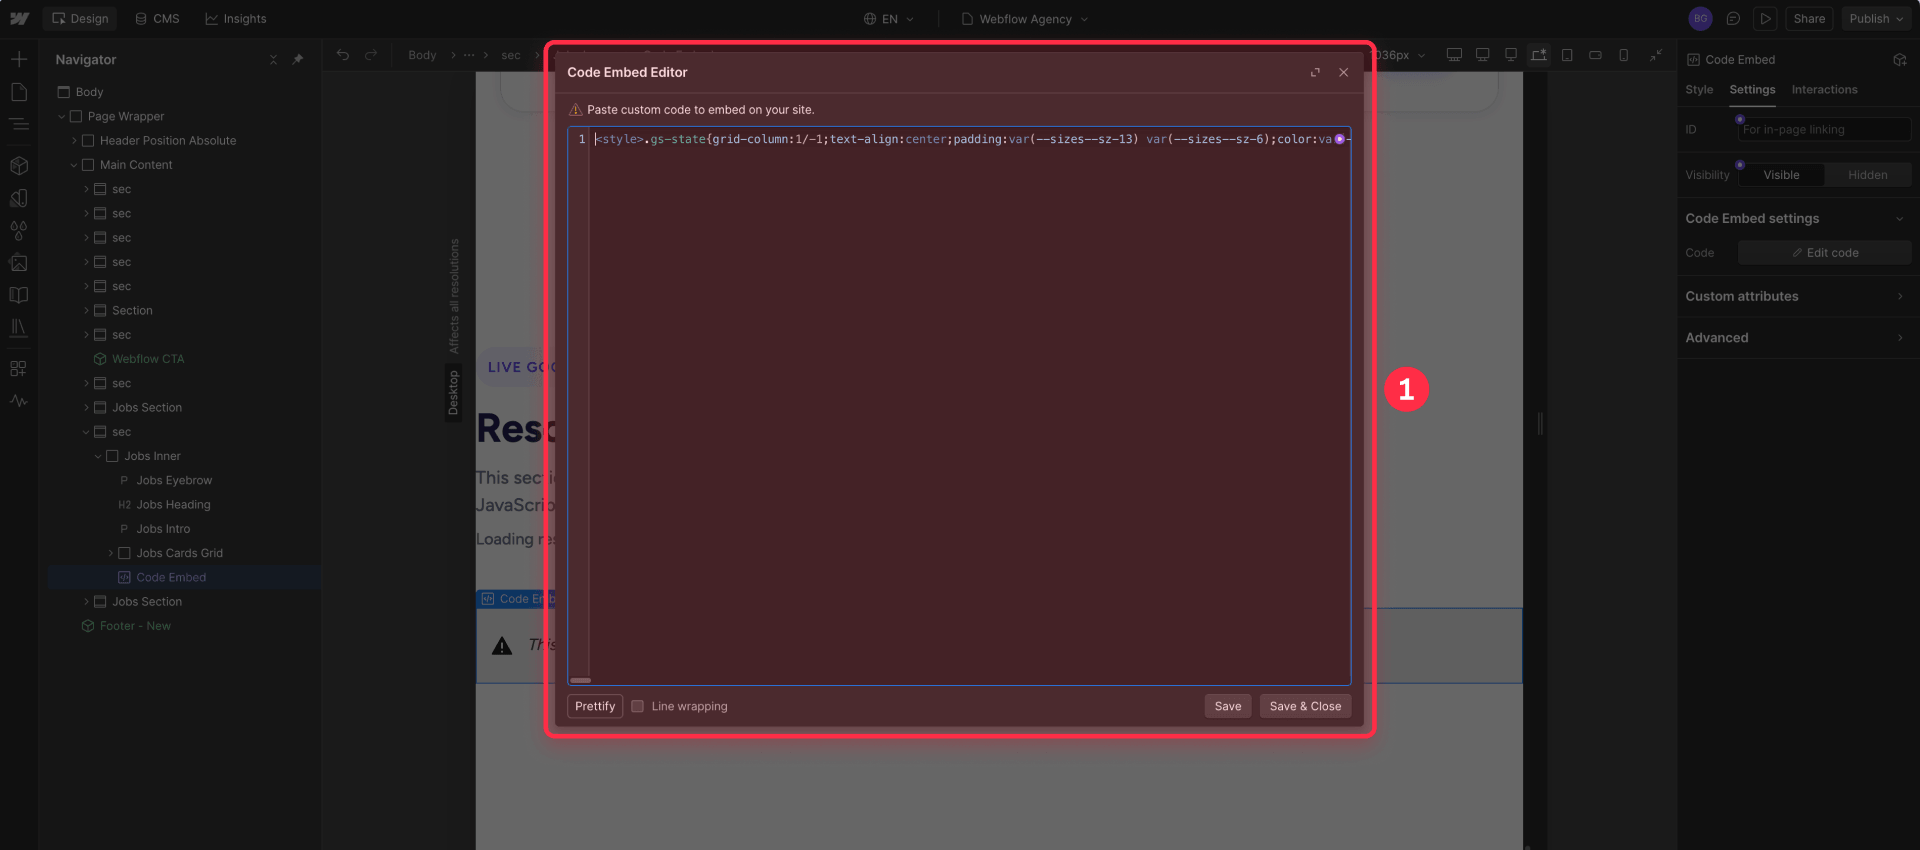
Method 2 does not create CMS items. It reads a published Google Sheet CSV URL and uses JavaScript to fetch the data and inject HTML into the page — a good fit for public data where SEO is not critical. The styling comes from Webflow, not from Google Sheets: JavaScript only fetches the data and writes markup into a target container.
This is not a Google Sheets iframe. A Webflow Code Embed (or custom code block) may be used, but only to place the target container and the JavaScript that renders your own HTML.
Step 1: Publish a safe Sheet tab as CSV
Use File → Share → Publish to web, choose the specific tab (not the whole workbook), choose CSV/TSV, keep auto-republish on, and copy the published CSV URL. Only publish safe public fields — the full guidance is in How to publish the sheet safely above.
Step 2: Build the section style in Webflow
Design the look in Webflow first: the wrapper, grid, card, badges, typography, and buttons. Reuse existing classes so the injected cards match the site. Then add a target container where the cards will appear:
<div data-google-sheet-resources></div>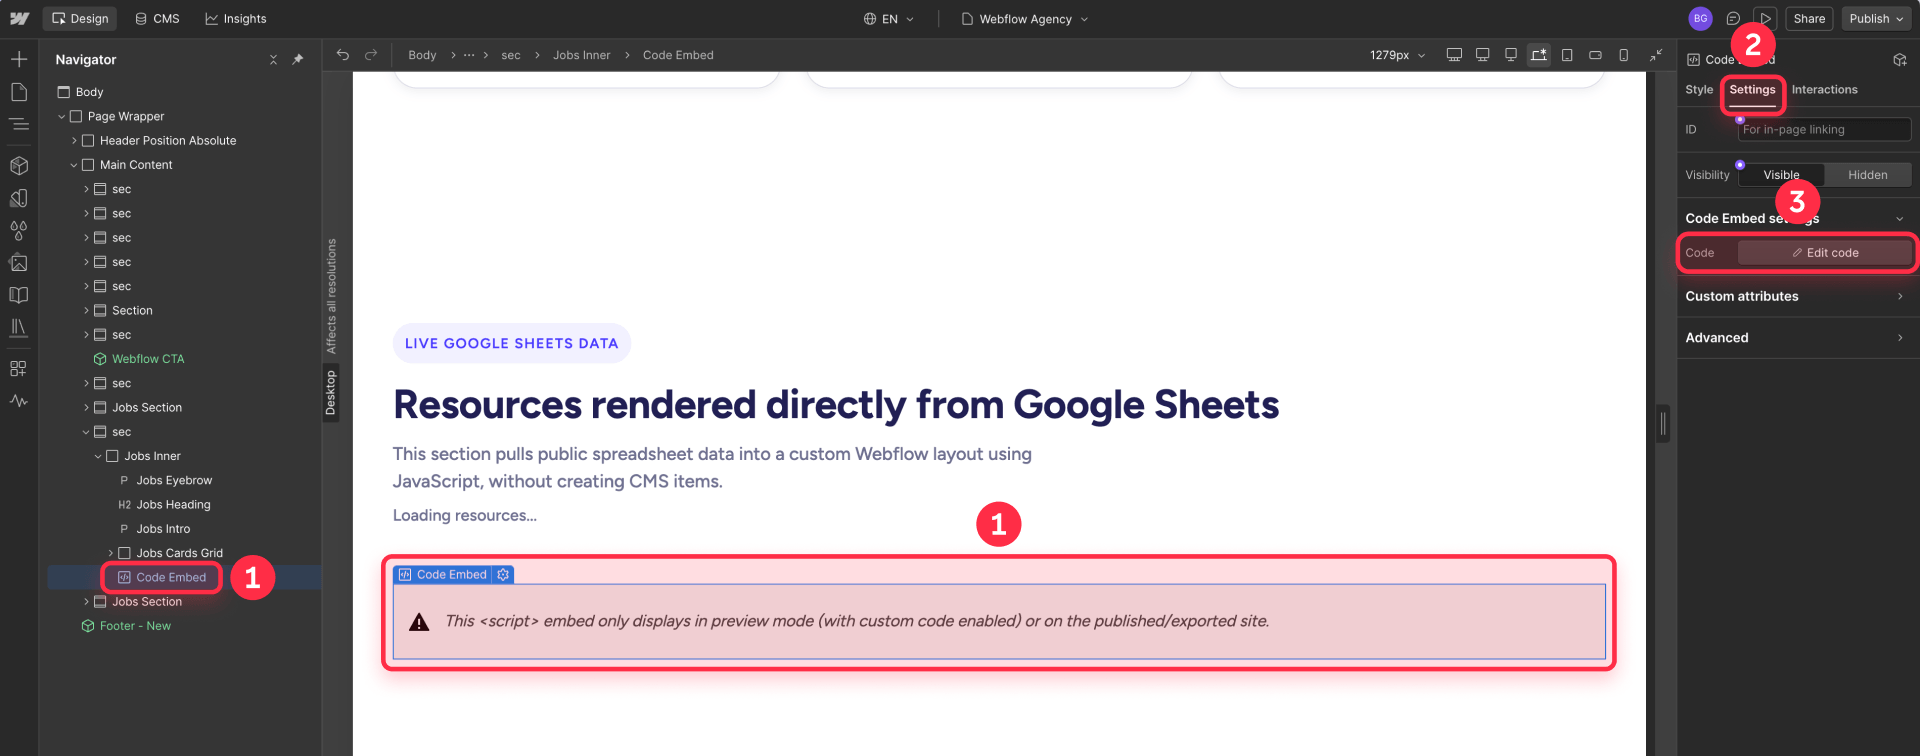
JavaScript injects the cards into that container. If the script renders plain HTML without Webflow classes, it will not automatically inherit the page's card and button styles — so have the developer create a visual card template in Webflow and clone/fill it with JavaScript, or generate markup that reuses the existing classes.
Step 3: Use JavaScript to fetch and render
Fetch the CSV, keep only Published rows, sort them, and write the cards into the target:
const CSV_URL = "PASTE_CSV_URL_HERE";
const target = document.querySelector("[data-google-sheet-resources]");

fetch(CSV_URL)
  .then((res) => res.text())
  .then((csv) => {
    const records = parseCsvToObjects(csv);
    const visible = records
      .filter((row) => row.status === "Published")
      .sort((a, b) => Number(a.sort_order) - Number(b.sort_order));

    target.innerHTML = visible.map(buildResourceCard).join("");
  })
  .catch(() => {
    target.innerHTML = "Could not load resources.";
  });
In production, make sure the script parses the CSV safely, escapes text before injecting HTML, renders markup with existing Webflow classes, handles loading/empty/error states, hides empty links, never prints undefined, and is tested on the live domain.
Step 4: Test the update behavior
Publish the Webflow page, edit a row in Google Sheets, wait for the published CSV to update, then reload the page and confirm the card changed. This is not instant real-time unless you add polling.
Best for: public data, custom-designed sections, lightweight resource lists, and content where SEO is not critical.
Not ideal for: private data, SEO-critical pages, workflows that need approval, or content that should become CMS items.
If the public CSV is not enough, use the Google Visualization endpoint or the Sheets API through a backend/proxy — but never expose OAuth secrets, service account keys, or unrestricted API keys in front-end code.
Method 3: Build a custom CMS sync with Make
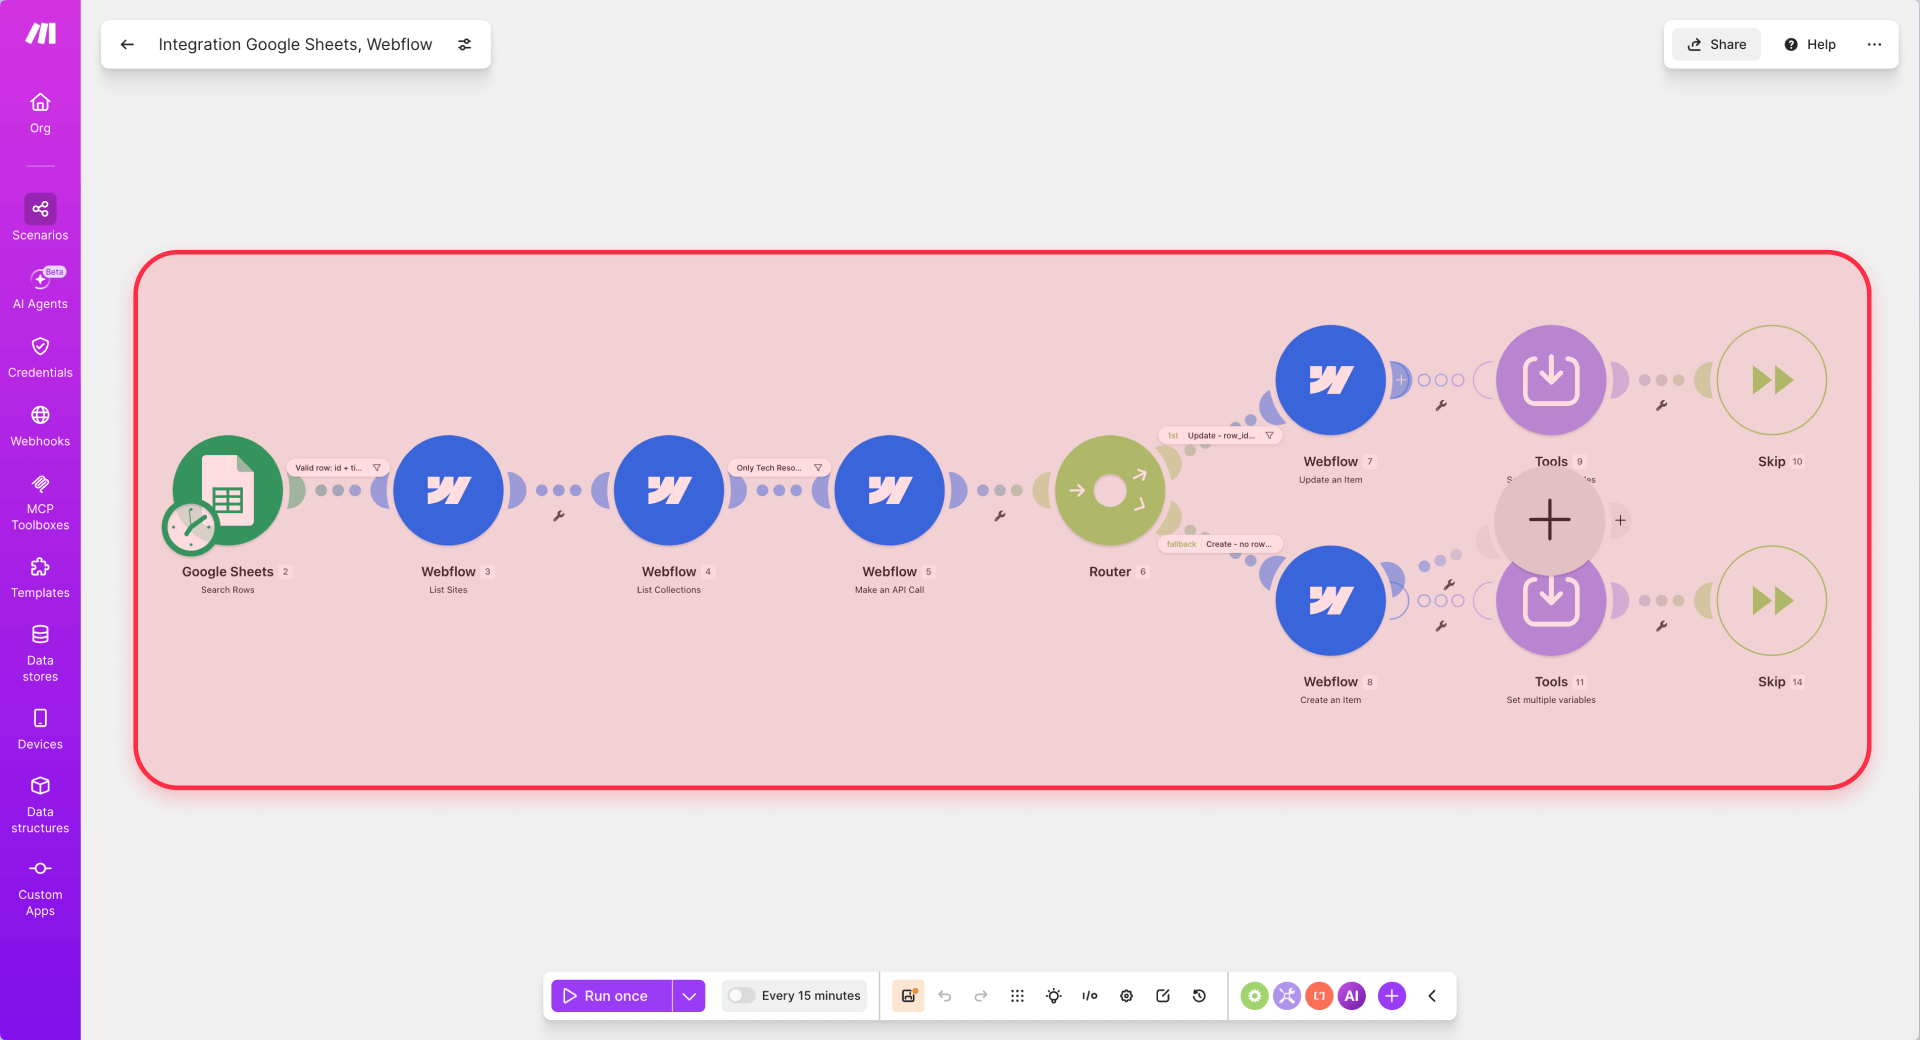
When a sync app like Whalesync isn't enough, build a custom CMS sync with Make that runs Google Sheets → Make → Webflow CMS. It uses Make's Google Sheets and Webflow modules/connectors, so you configure it visually in Make — no custom API code to write. Behind the scenes, Make still talks to Webflow through its Webflow connector, but you never handle that layer directly. The result is the same as Method 1 — real CMS items — but you control every step, which makes this more complex than Whalesync because you build the sync logic yourself.
A reliable Make scenario follows this flow:
- Read rows from Google Sheets.
- Ignore helper columns like a Whalesync ID if present.
- Use
idas the stable key to match each row to a CMS item. - List existing Webflow CMS items in the target Collection.
- Compare the Google Sheets
idwith the Webflowrow_id. - If the item exists, update it.
- If it does not exist, create it.
- Use
statusto decide whether to publish, stage, skip, or leave it for review. - Add error handling so one bad row does not stop the whole scenario.
- Test with 2–3 rows before processing the full sheet.
CMS sync needs a Webflow plan that includes the CMS; collection sizes and API limits vary by plan and over time, so confirm current limits rather than quoting a number. To compare which plans include the CMS and what each costs, see our Webflow pricing breakdown. (See our guide to overcoming the Webflow CMS item limit.)
Best for: advanced workflows that need custom logic, transformations, approvals, conditional publishing, or special error handling.
Other tools or direct API builds can follow the same logic, but this method focuses on Make.
How to design and test the live section
Build the front-end structure before wiring data: a container that receives the output, a row or card template with field placeholders, responsive table behavior for mobile, sort/filter controls driven by sheet columns, and explicit loading, error, and empty states so the section never looks broken while it waits or fails.
Then validate the real update path before shipping:
- Edit an existing row and confirm it appears after the expected delay.
- Add and remove a row to confirm new items show and closed items hide or unpublish.
- Change a header and check field mapping still works.
- Leave fields empty to confirm they're handled, not printed as "undefined."
- Measure the real update delay and set honest expectations.
- Test on mobile and a slow network, and confirm no private information is exposed.

Common issues when syncing Google Sheets to Webflow
- Old data still showing: the published version lags; wait a few minutes, republish, and check Automatically republish when changes are made.
- Sheet or tab not public: confirm the specific public tab is published, not the whole private workbook.
- Exposed private fields: you published the working sheet. Switch to a dedicated public output and recheck the endpoint.
- Broken columns after a header change: lock headers and columns once the connection is live.
- Endpoint or CORS errors: test on the real domain and route through a backend or proxy.
- Duplicate CMS items: add a stable row ID and match on it, not the title.
- Slug conflicts: make slug generation unique and resolve collisions before publishing.
- Items created but not live: decide your staging flow explicitly — drafts for review or auto-publish.
Frequently asked questions about Google Sheets and Webflow
Can Webflow show Google Sheets data live?
Yes, but only through a bridge, since Webflow has no native Sheets connection. A sync app (like Whalesync) or a Make sync updates Webflow CMS items after a sync runs, while JavaScript rendering updates on page load or with custom polling. None are guaranteed real-time, because a sync or a published sheet can take a few minutes to reflect edits. Match the method to the freshness you actually need, then test the delay.
Is a published Google Sheet safe for a public website?
Only if every field is safe for the public. Treat Publish to web as public exposure, not access control — once published, anyone with the link can read it. Never publish private, sensitive, or credential data. The safe habit is a dedicated public tab (or a separate output workbook) holding only the fields the site needs. Open the published endpoint yourself and confirm only safe data is visible before connecting it.
Should I use Whalesync, JavaScript rendering, or Make?
It depends on the destination and the control you need. Use Whalesync when you want the fastest, most reliable no-code Google Sheets → Webflow CMS sync. Use JavaScript rendering when you only need to show public Sheet data in a custom-designed section and SEO is not critical. Use Make when you need custom logic, transformations, approvals, private data handling, or advanced publishing control. Other automation tools exist, but this guide's Method 3 focuses on Make. Embedding a published Sheet is display-only and is not treated as a sync method in this guide.
Is there a Google Sheets plugin for Webflow?
Webflow does not have a native, first-party Google Sheets sync feature built into the designer. But there are third-party apps that connect Google Sheets with the Webflow CMS: Whalesync is the recommended option in this guide, and Sheetflow is another app worth considering. Confirm current Marketplace options before building, since the app ecosystem changes.
Will Google Sheet data loaded with JavaScript be good for SEO?
Not reliably. Search engines may process JavaScript sometimes, but client-rendered content is less dependable than content in the HTML, synced into the CMS, or rendered server-side. For SEO-critical rows or pages, use CMS sync or server-side rendering so the content is in the source. Reserve client-side rendering for sections that serve visitors but don't need to rank.
Can I use a private Google Sheet?
Yes, but never directly from browser-only Webflow code. Private sheets require real authentication — OAuth, a service account, a secure backend or proxy, or an automation that stores credentials outside the browser. The safe pattern is a small backend that authenticates with Google, reads the private data, and returns only the safe fields. Never put Google API keys or OAuth credentials in front-end code.
How often does a published Google Sheet update on a Webflow site?
It depends on the method, not one number. A published sheet can take a few minutes to reflect an edit even with auto-republish on; a client-side render refreshes on page load or your own polling; a CMS sync updates only when the automation runs. There is no instant real-time guarantee out of the box. Measure the real delay on your setup and set expectations to match.
Why is my Google Sheet not updating on my Webflow page?
Check four things: the publish delay (edits can take minutes, so reload and wait), that the correct public tab is published with Automatically republish when changes are made on, the browser console for a CORS or fetch error (which usually means you need a backend), and — for CMS syncs — whether the automation ran and items are stuck as drafts. These four checks resolve most stale-data reports.
Conclusion
Connecting a Google Sheet to Webflow turns the spreadsheet your team already edits into the source of truth for directories, job boards, schedules, catalogs, and status sections — without the manual copy-paste that lets pages go stale. For most teams, Method 1 (Whalesync) is the fastest way to sync Sheets into the Webflow CMS; Method 2 (JavaScript rendering) is the lighter option for custom public sections where SEO is not critical; and Method 3 (Make) is the flexible choice when you need logic no app provides. Whichever path you take, a dedicated safe-output sheet, stable row IDs, and honest expectations about update timing keep the setup safe and reliable — and like any integration, it benefits from ongoing Webflow maintenance as your sheet and site evolve.
If you'd rather skip the trial and error, our experienced Webflow development team can design the section and build the Sheets-to-Webflow connection end to end.









Join readers commenting on this post!