
Webflow makes it easy to create powerful forms, but its built-in submission management can be limiting when handling and analyzing large amounts of data. Sending your Webflow form submissions to Google Sheets allows for easier collaboration, better filtering, and custom automation beyond Webflow’s built-in capabilities. This integration helps you keep all your form data organized in one place!

This guide will show you two simple ways to make this happen:
- Zapier: Ideal for a fast setup without any coding. Zapier makes it easy to connect different apps and automate data transfer.
- Custom code: If you're comfortable with some copy-pasting and want a free solution that works without third-party tools, this method is a good fit. No programming experience required.
Why connect your Webflow forms to Google Sheets?
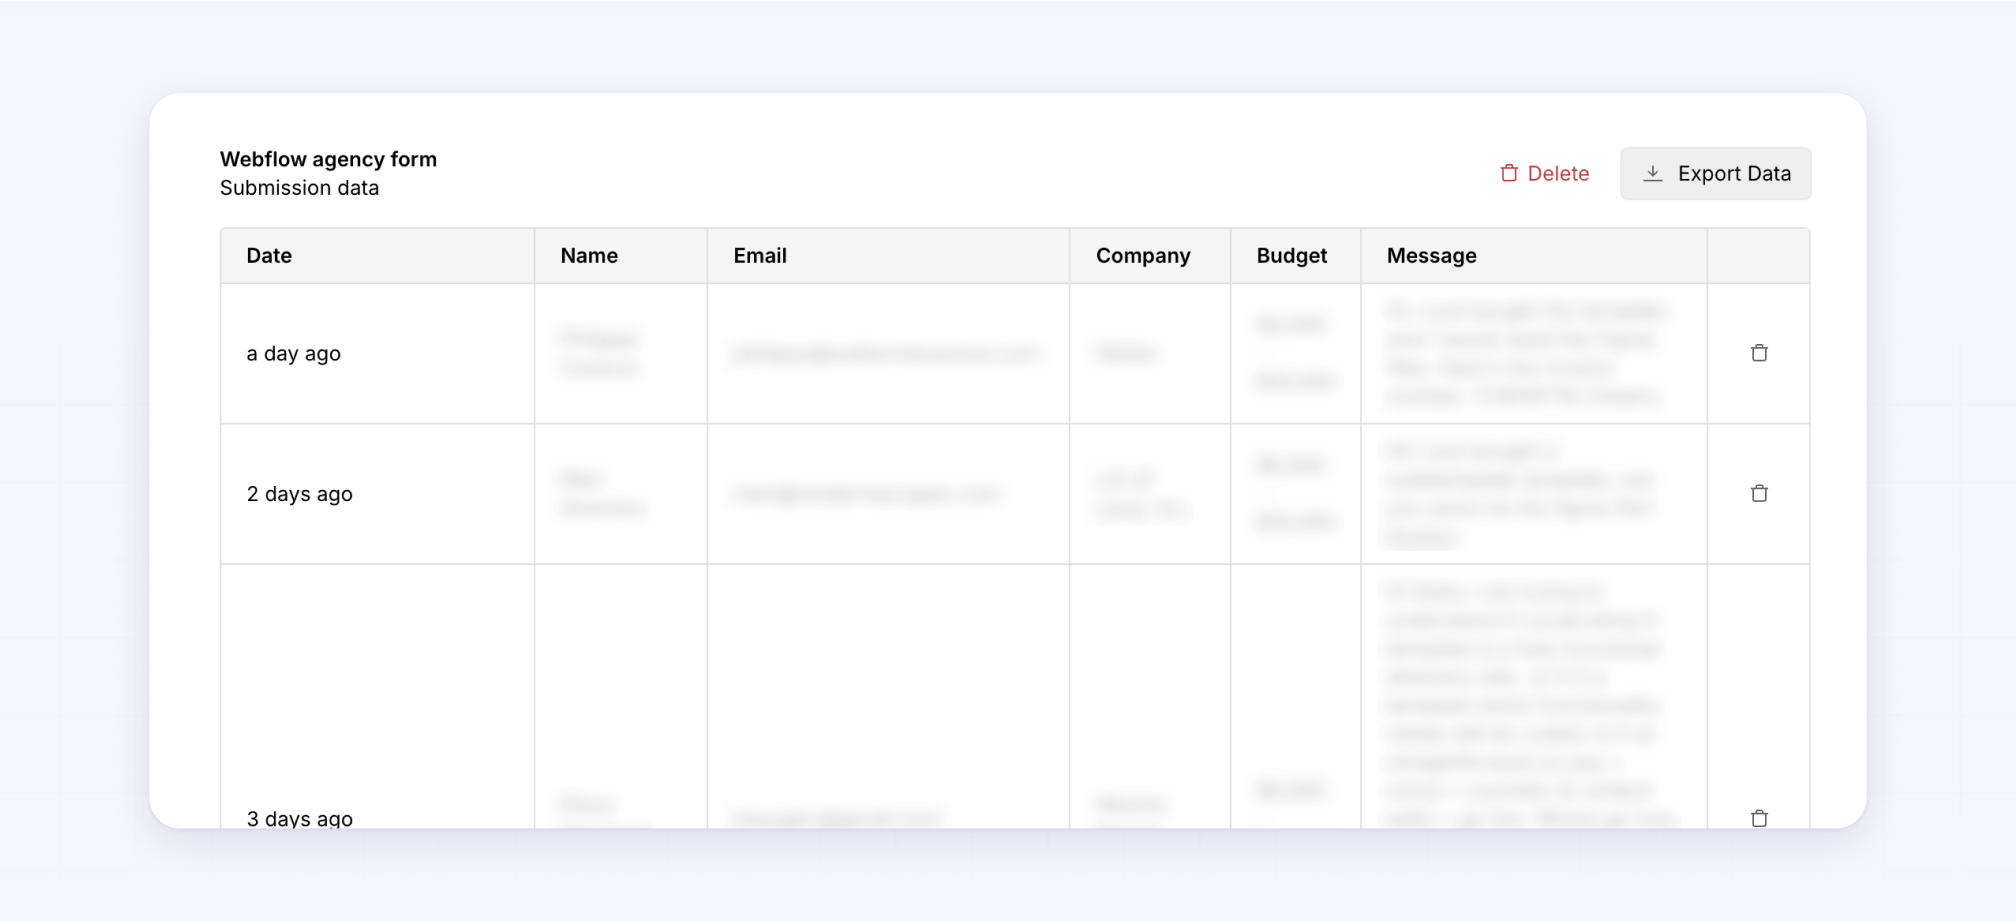
You might be wondering, “If Webflow already collects form submissions, why connect it to Google Sheets?” While Webflow does store your form responses, its built-in submission management is limited:
- Hard to share: Not everyone can access form submissions at the same time using a single Webflow account. In many cases, multiple team members may need their own accounts, and adding more users to your workspace can increase costs.
- Difficult to organize: Webflow doesn’t offer advanced sorting, filtering, or search functions, making it harder to manage large amounts of data.
- No analysis tools: There’s no built-in way to create reports, charts, or automated workflows based on your form data.
Google Sheets makes everything easier
By integrating Webflow with Google Sheets, you get:
- Easy access & sharing: Anyone can view a Google Sheets file without a Webflow account. Editing and collaboration typically require a free Google account, but sharing is much more flexible.
- Better organization: You can easily sort, filter, and analyze form submissions with more advanced options.
- Scalability: As your website and form submissions grow, Google Sheets can handle large datasets more efficiently than Webflow’s built-in system.
Method 1: How to connect Webflow forms to Google Sheets using Zapier
For teams looking for a quick, no-code solution, Zapier provides an excellent way to connect your Webflow forms with Google Sheets while maintaining complete design control.
What you'll need:
- A Webflow account with a form-enabled site
- A Google account
- A Zapier account (free plan available)
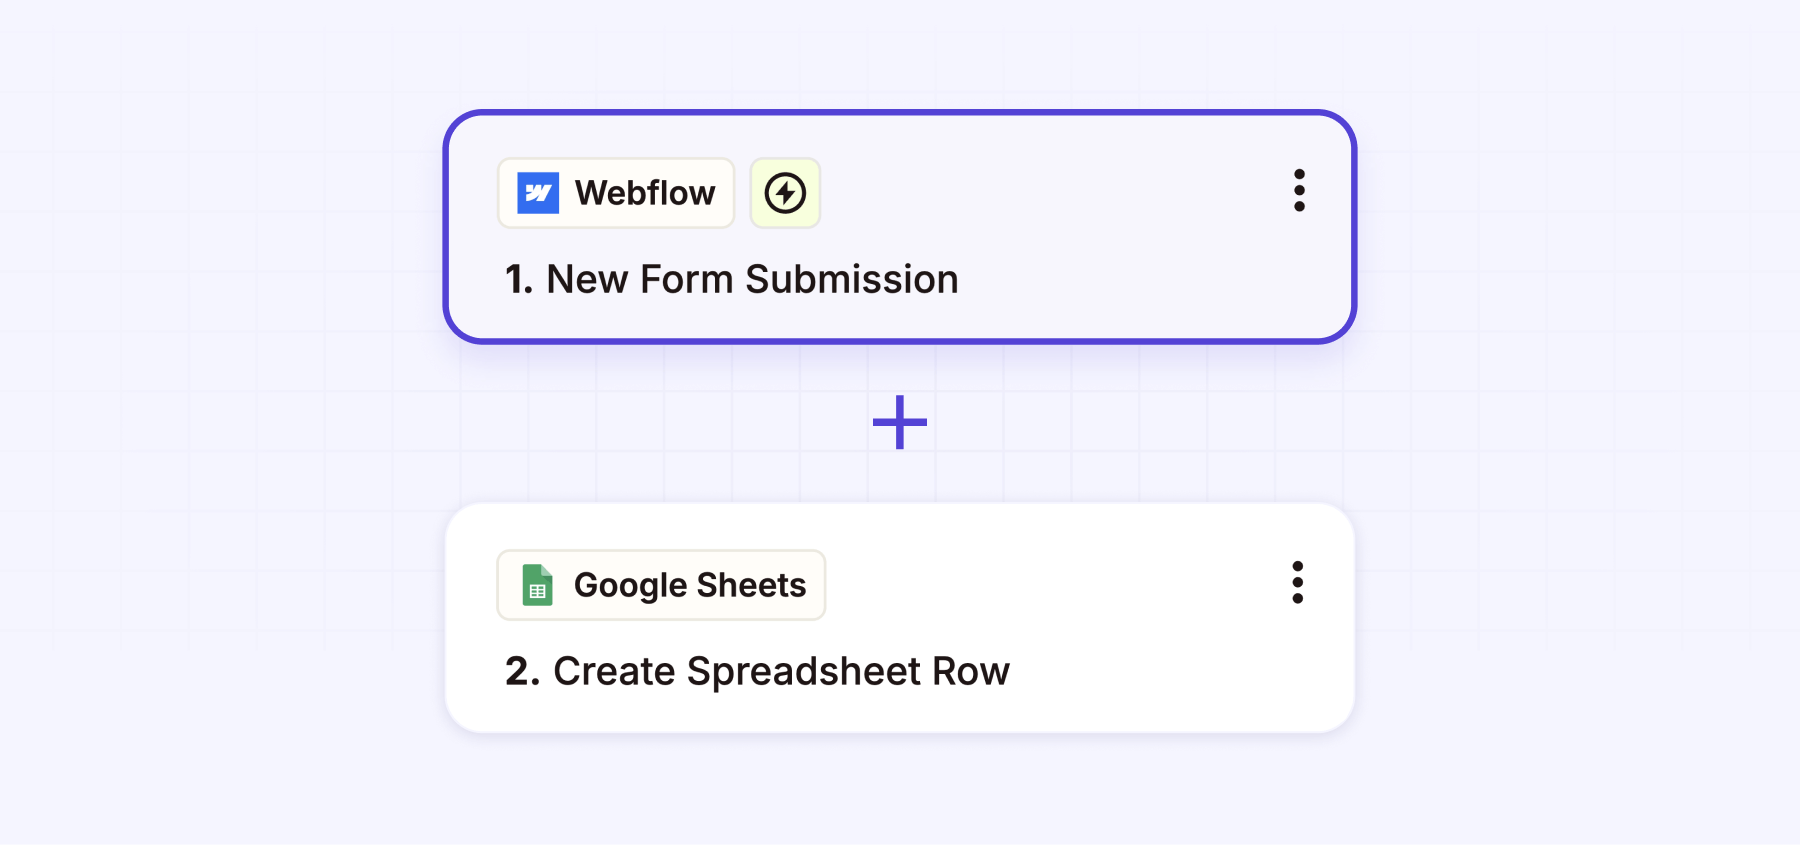
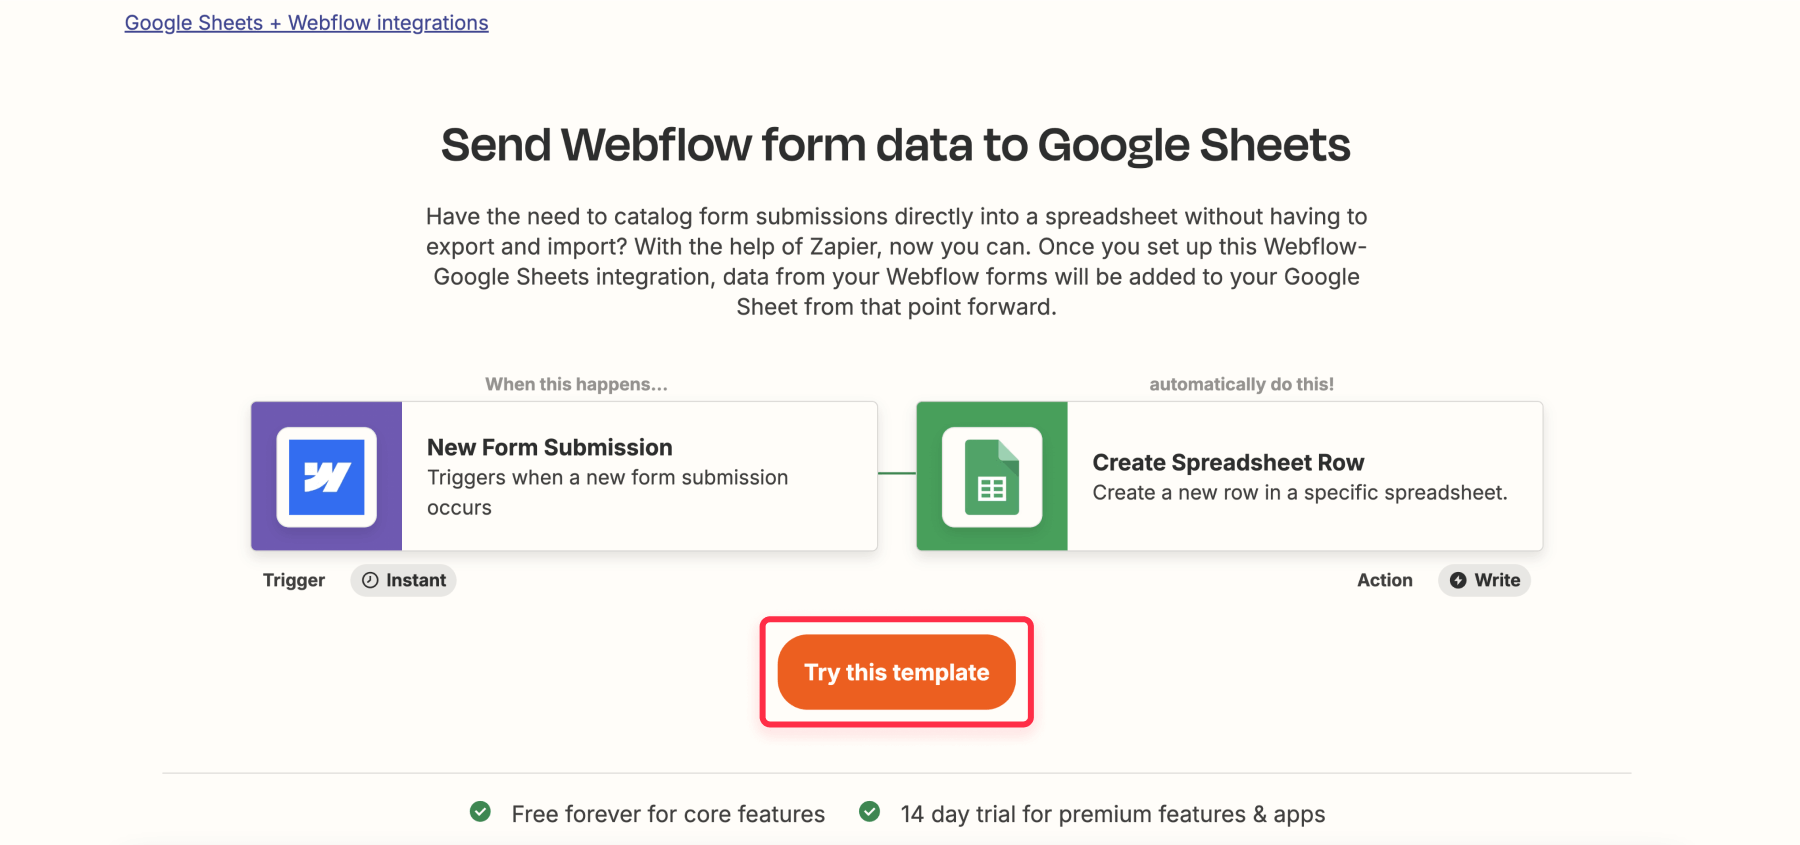
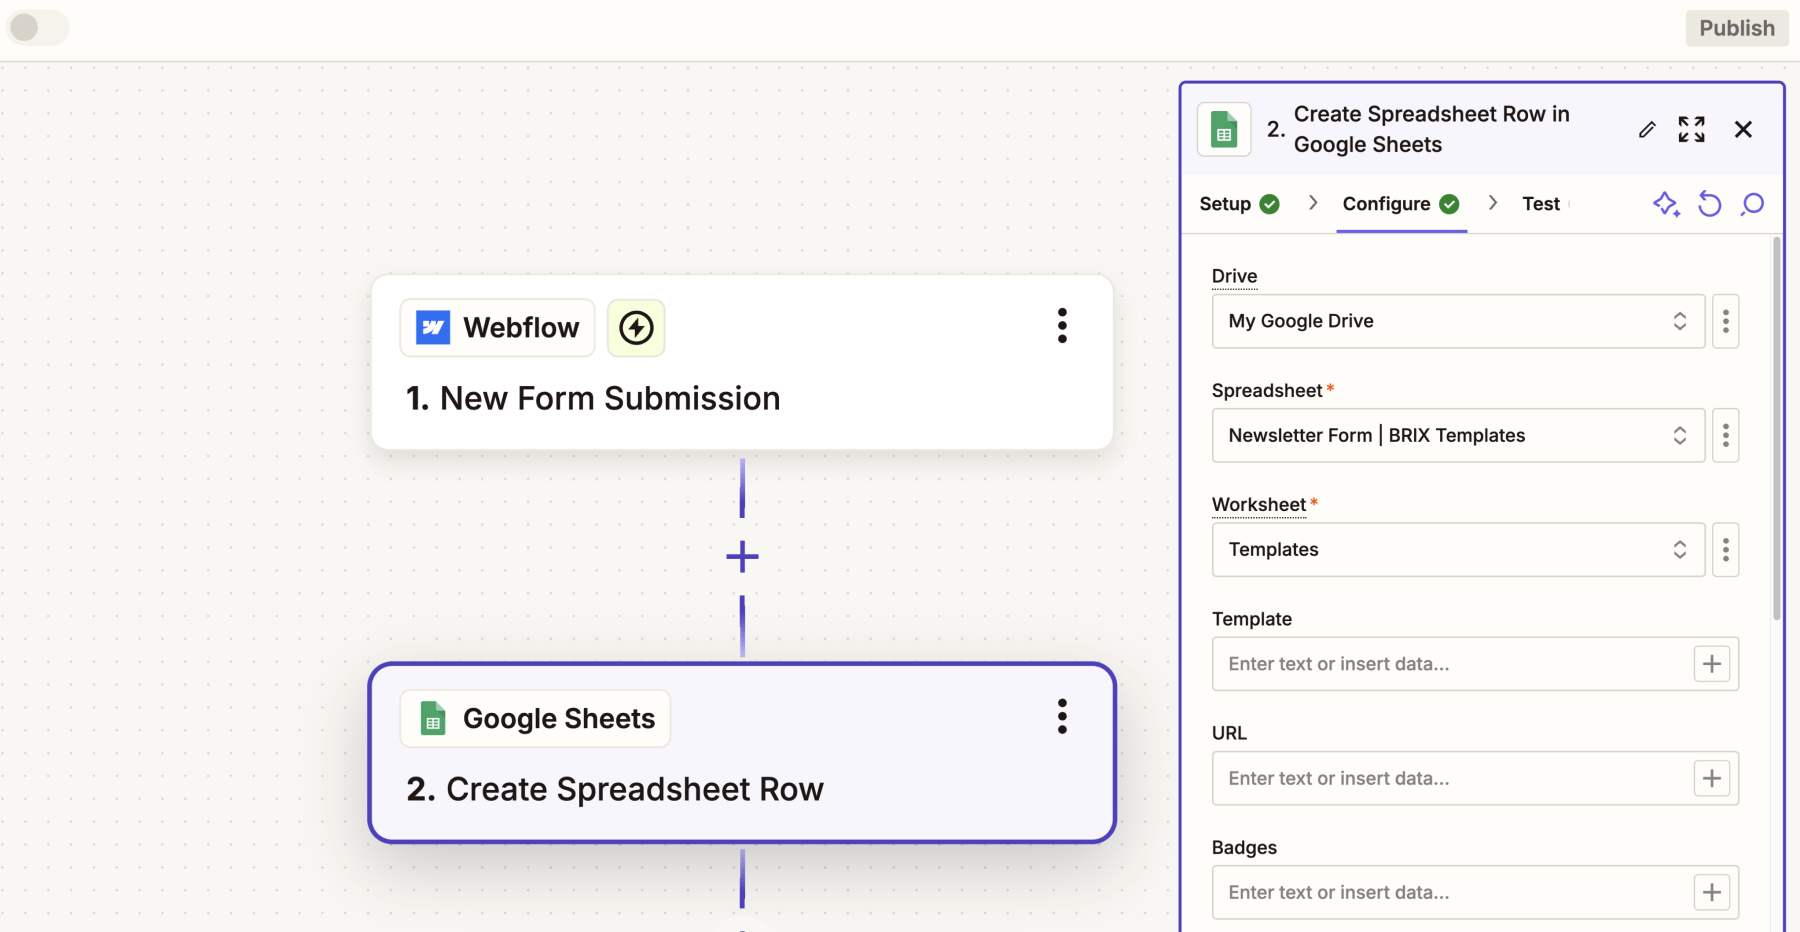
Step 1: Create your Zapier automation
- Log into your Zapier account
- Use this Zapier template: "Send Webflow form data to Google Sheets"
- Select "Try it" to begin with the template
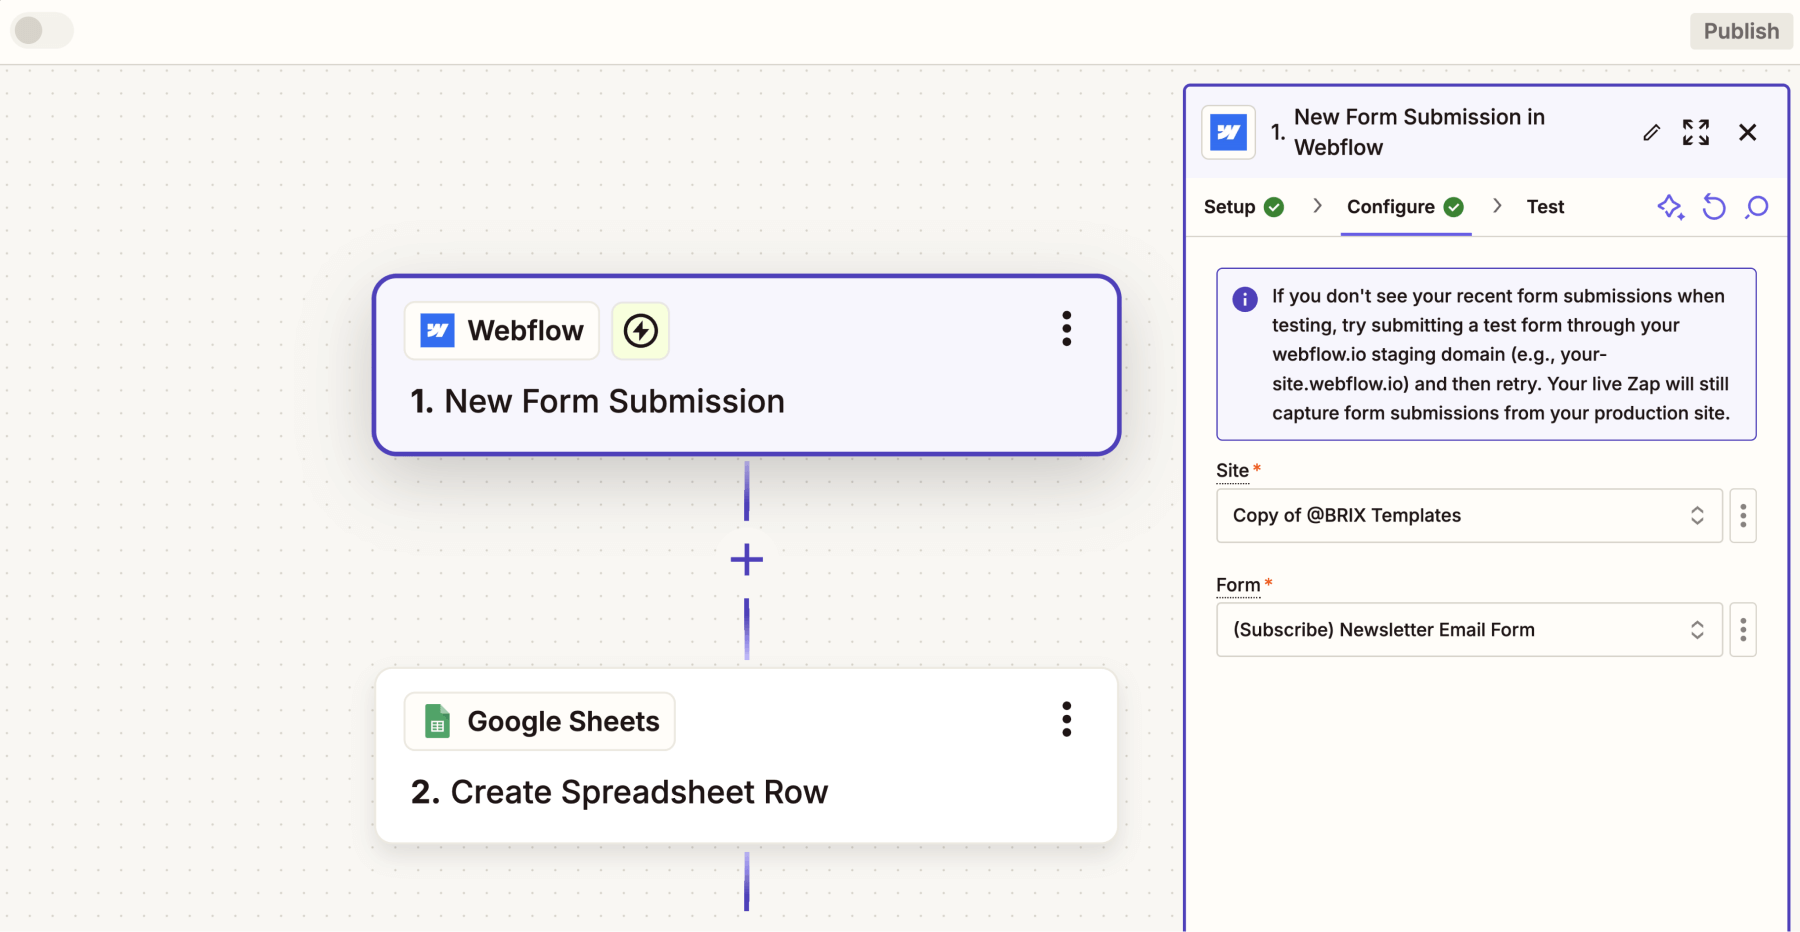
Step 2: Configure your Webflow connection
- Connect your Webflow account when prompted
- Select your specific Webflow site
- Choose the form you want to connect
- Submit a test entry to verify the connection
Step 3: Set up Google Sheets integration
- Connect your Google account
- Select the destination spreadsheet
- Choose the specific sheet tab
- Map your Webflow form fields to spreadsheet columns
- Run a test to verify data flow
Step 4: Activate and verify
- Review all field mappings
- Submit a test through your live Webflow form
- Verify the data appears in your Google Sheet
- Toggle the Zap to "On"
You’ve seen how quickly Zapier allows you to send Webflow form submissions directly to Google Sheets. For many businesses, especially those with moderate form volume, Zapier’s simplicity and free plan option make it an ideal choice.
If your form submissions are high-volume or you want to avoid recurring subscription costs, Method 2 offers a cost-effective alternative. This custom code approach directly connects Webflow with Google Sheets, making it ideal for scaling without relying on third-party tools.
Method 2: How to connect Webflow forms to Google Sheets using custom code
In this method, we’ll set up a direct connection between your Webflow forms and Google Sheets using custom code. This involves adding a JavaScript snippet to your Webflow site and creating a Google Apps Script to process form submissions. Unlike third-party tools, this approach gives you full control over how your form data is handled and eliminates ongoing subscription costs.
This method automatically adds your Webflow form entries to a Google Sheet. The process uses a bit of pre-written code that handles the transfer behind the scenes. All you need to do is set things up correctly, and each new form submission will appear as a new row in your sheet.
What you'll need:
- A Google account
- Your Webflow site with a form
- 15-20 minutes of setup time
Important concepts before starting
Before we set everything up, let’s go over a few key concepts to make sure the process is smooth and successful. Don’t worry—while some of these terms might be new, the ideas behind them are simple and easy to follow.
What is Google Apps Script and why do you need it?
Google Apps Script is a built-in extension that allows Google Sheets to do things automatically. In this case, we will use Apps Script to automatically send form responses from Webflow into Google Sheets—so you don’t have to do it manually. Here is how it works:
- A user fills out your Webflow form and clicks submit
- Apps Script instantly sends the data to your Google Sheet
- The new response appears in your spreadsheet—without you doing anything
Now that you understand the basics, let’s move on to making sure your form data flows correctly!
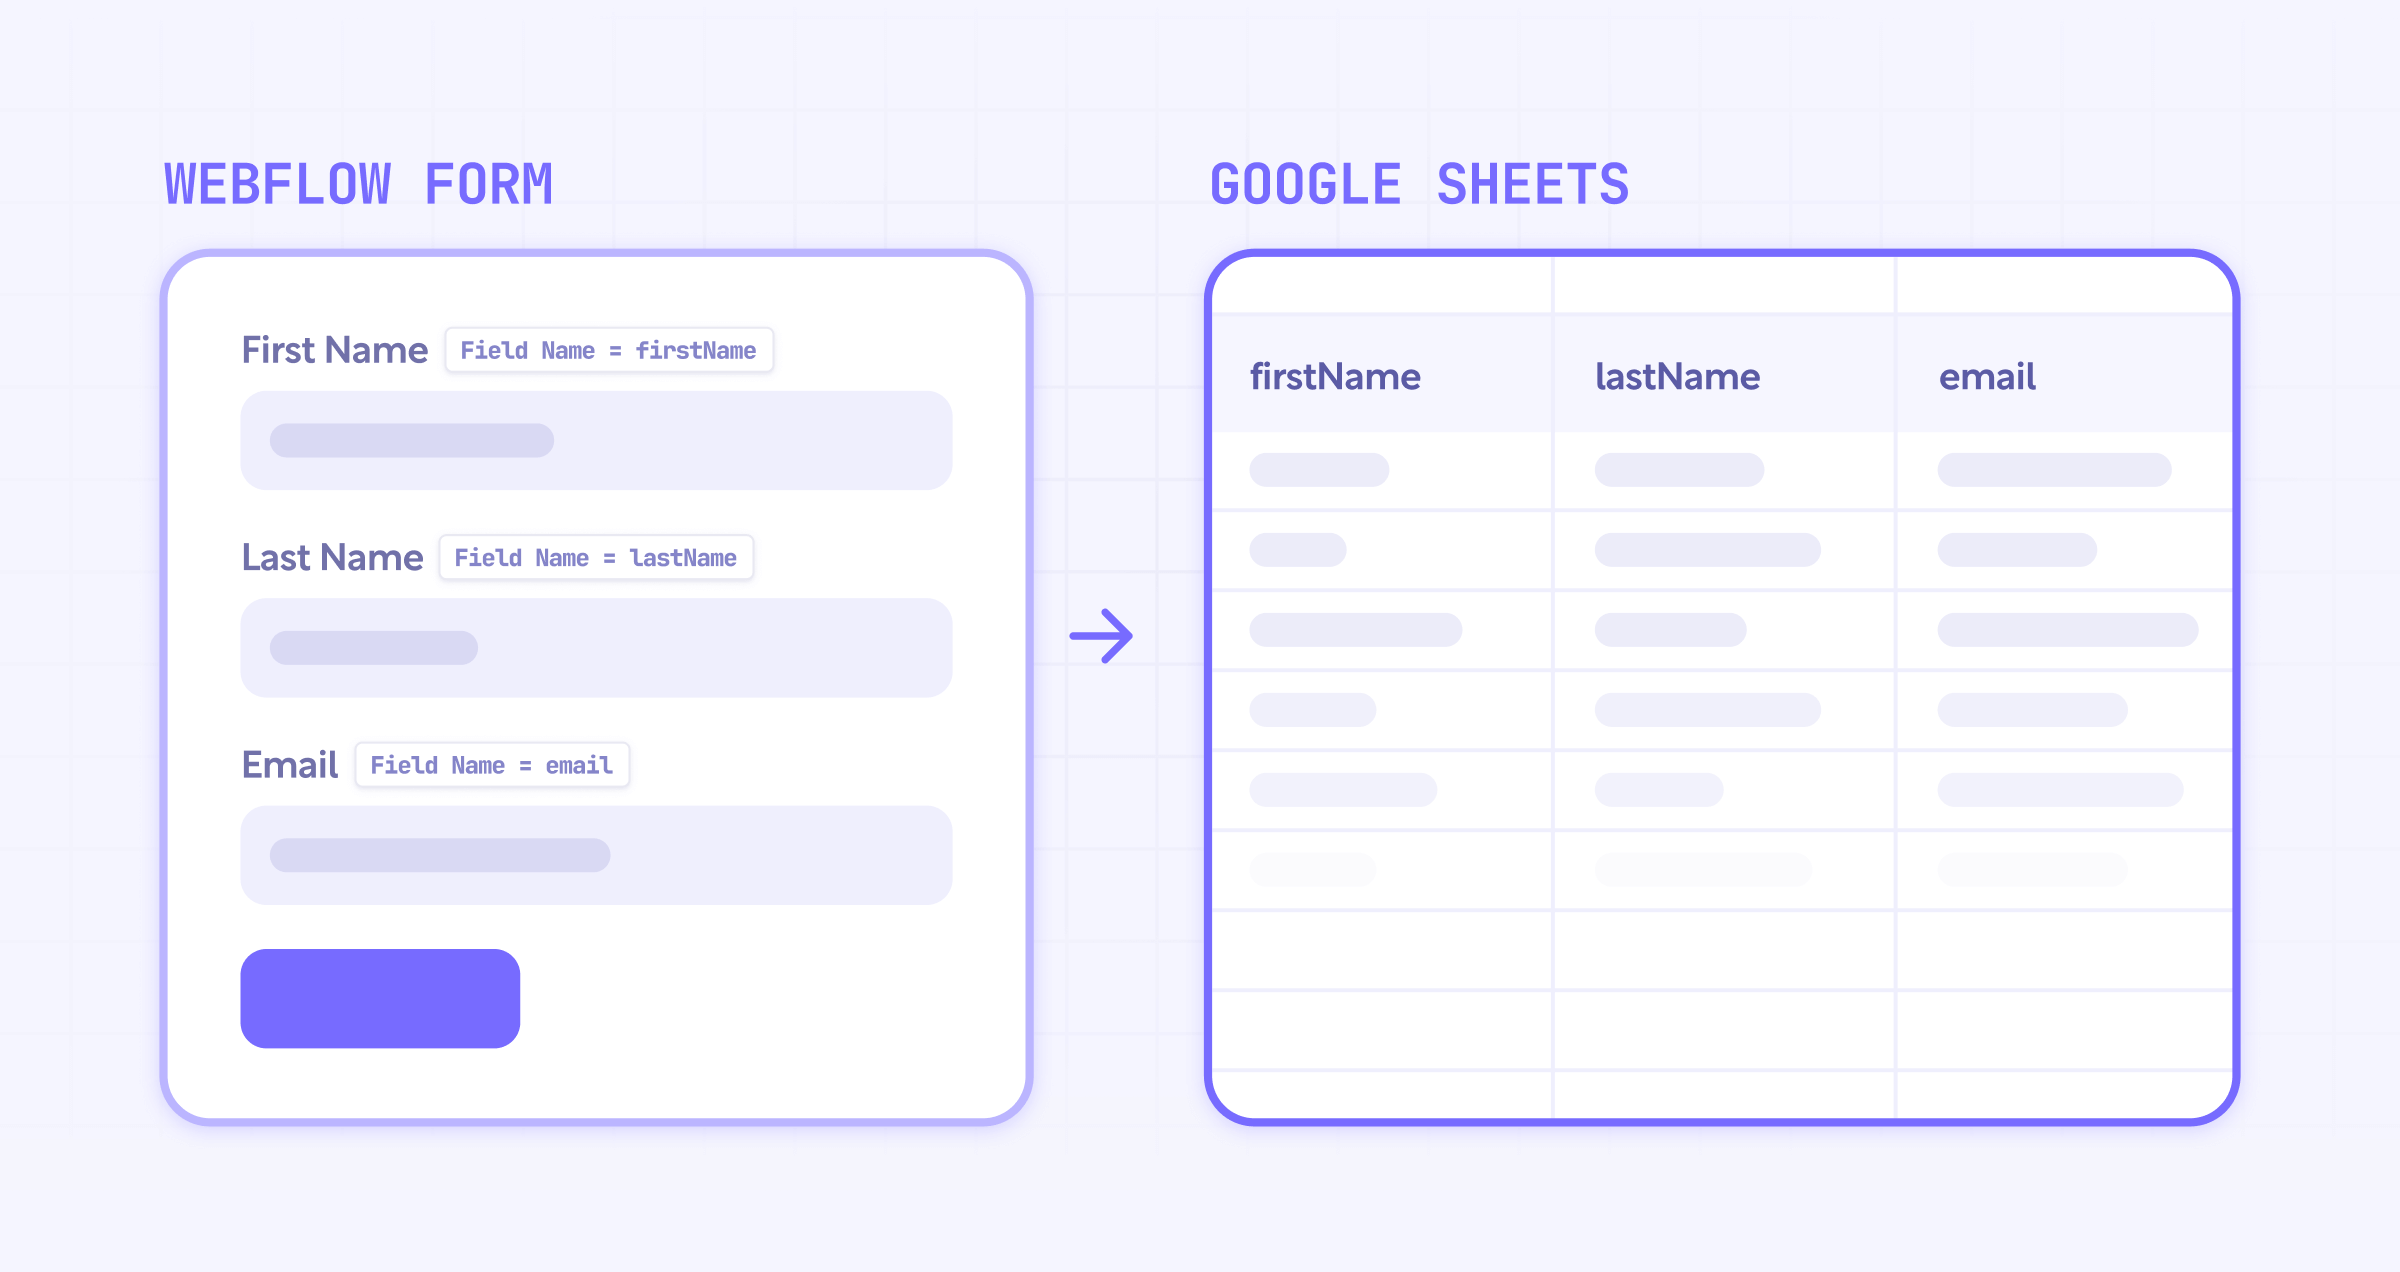
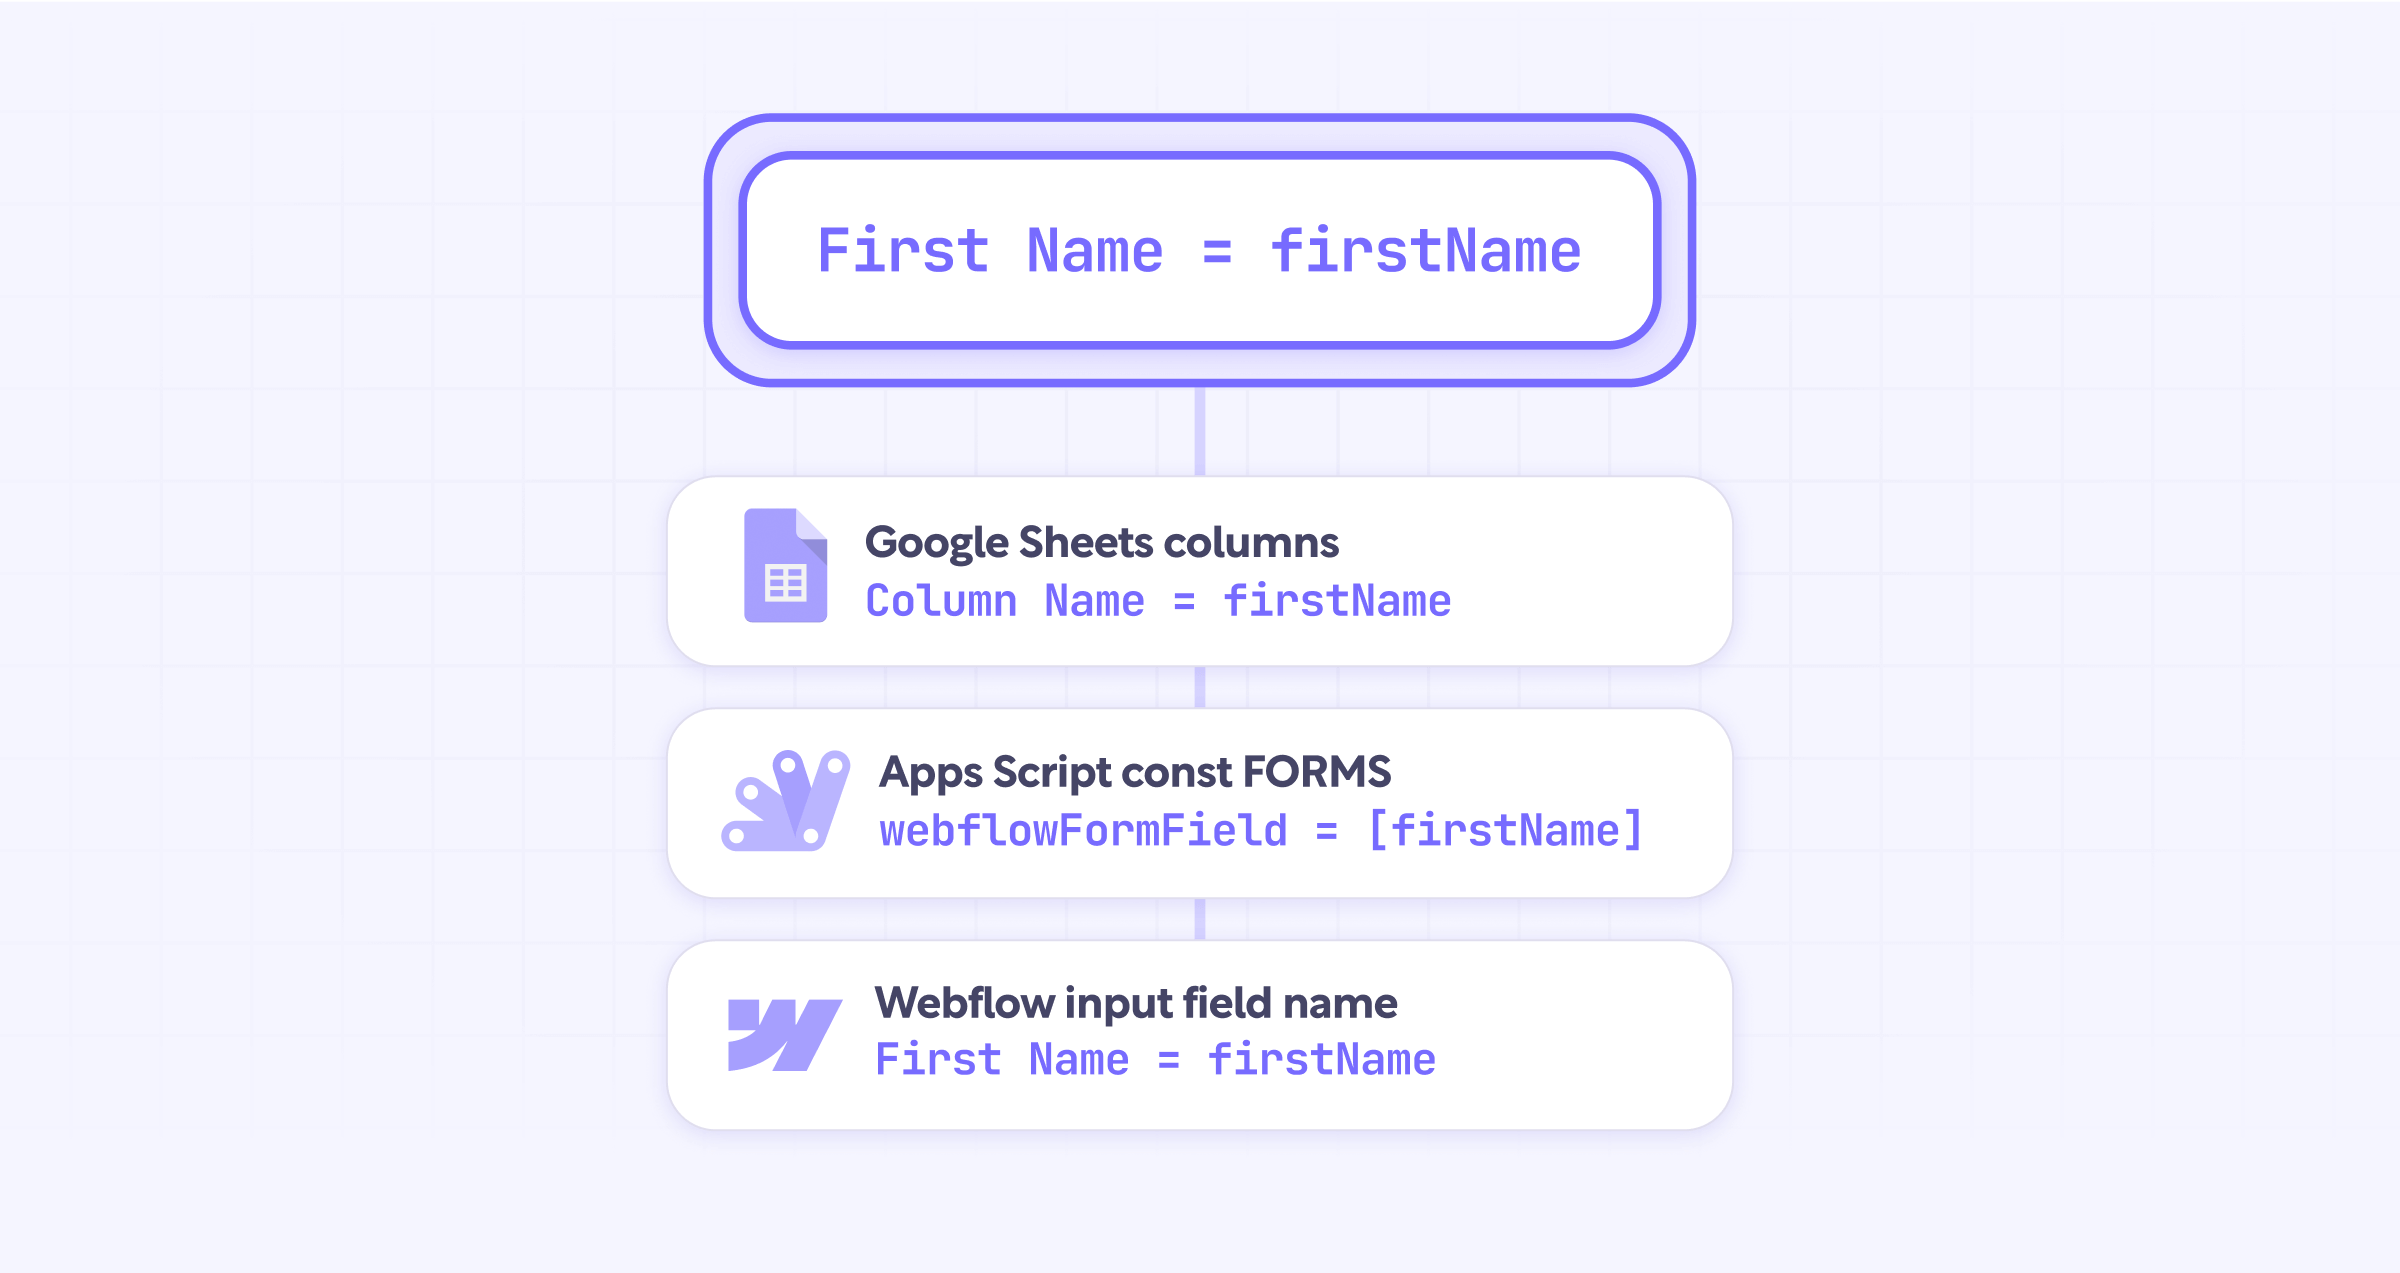
How to ensure your form data transfers correctly (Field Name Matching)
For your Webflow form submissions to be correctly stored in Google Sheets, the system needs to know exactly where each piece of data should go. To make this happen, the names of your form fields must be identical in these three places:
- Webflow form field names – Where users enter their information
- Google Sheet column headers – Where the data will be stored
- Apps Script code – The script that moves data from Webflow to Google Sheets
If the names don’t match exactly, Apps Script won’t recognize the data, and it won’t be saved correctly. Here is how to name fields correctly:
Correct setup:
- Webflow Form Field: "firstName"
- Google Sheet Column Header: "firstName"
- Apps Script Code: "firstName"
Wrong setup:
- "firstname" (missing capital letter)
- "first_name" (using an underscore)
- "First Name" (has a space)
Field naming rules:
- Use camelCase (e.g., firstName, email, phoneNumber).
- Names must match exactly—capitalization matters.
- No spaces or special characters—only letters.
How to set up multiple forms
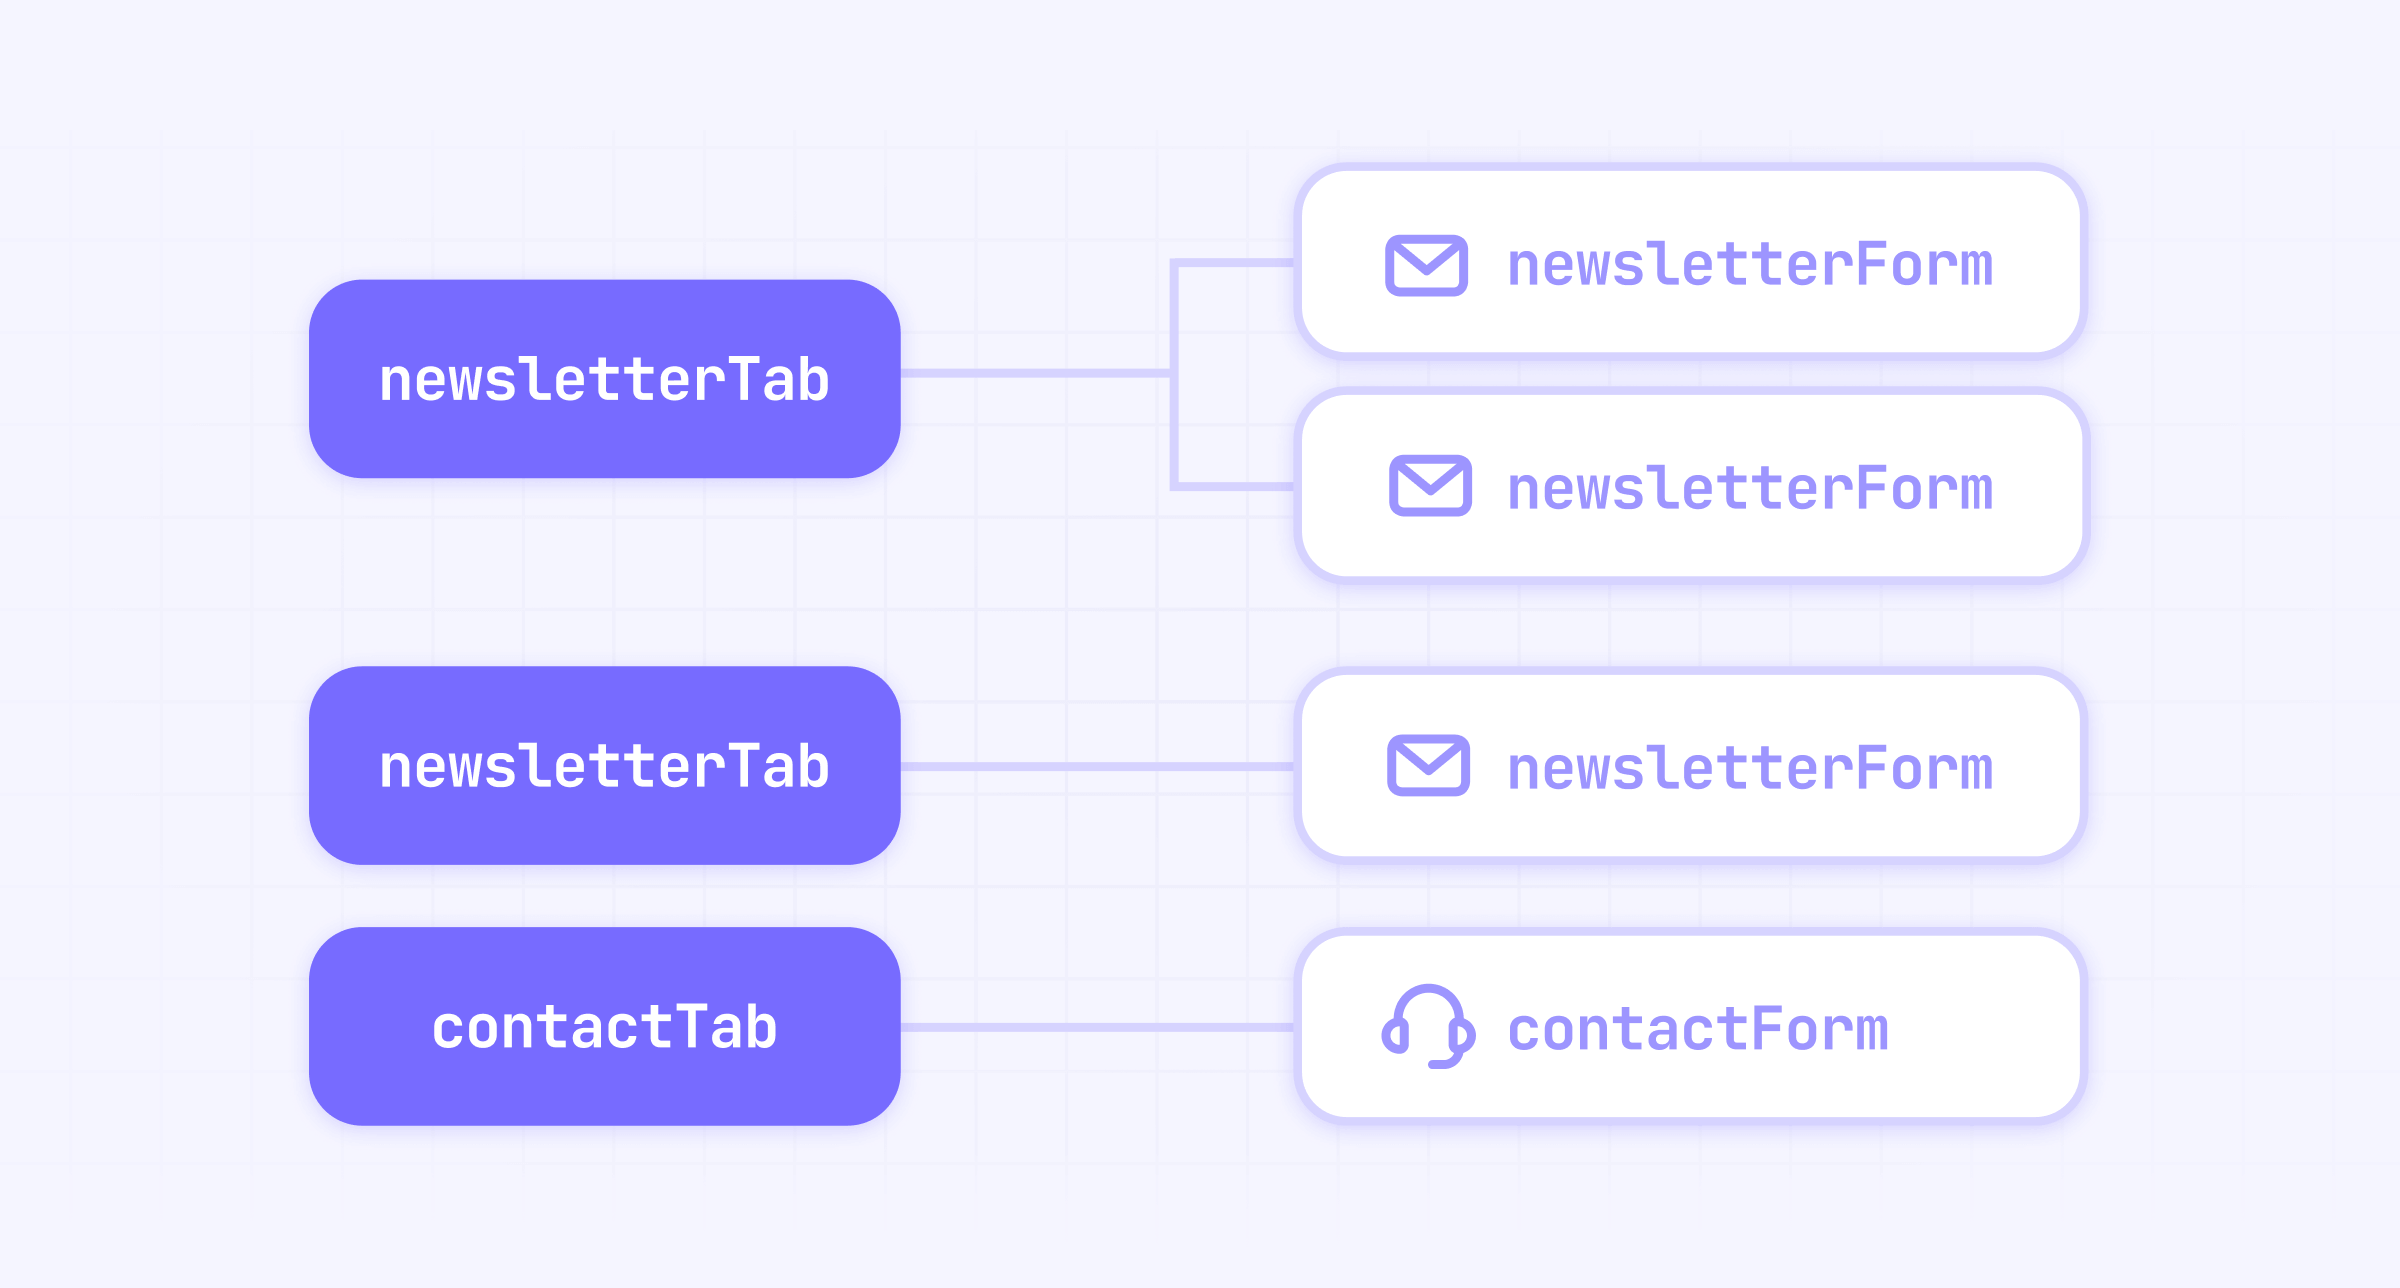
Now that you understand how Webflow forms connect to Google Sheets, let’s go over how to organize multiple forms properly. There are different ways to organize your data, and while we suggest a structured approach, it’s completely flexible depending on your needs:
- If you have the same form on multiple pages (like a “Newsletter Signup” form appearing across different landing pages), you should store all responses in the same tab of your Google Sheet. This keeps similar data together and makes analysis easier.
- If you have different types of forms (for example, a “Newsletter Signup” form and a “Contact Us” form), you should store them in separate tabs within the same Google Sheet. This prevents mixing different types of data.
- If you want form responses to go into a different Google Sheet file, you’ll need to set up a separate script for that file. Each sheet file requires its own Apps Script configuration.
At the end of the day, the best approach depends on your specific needs. If you’re working, for example, with two different forms that collect different types of data, keeping them in separate tabs (or even separate Google Sheets) might make more sense.
Later in this guide, we’ll walk you through the step-by-step process of setting up multiple forms as part of the integration.
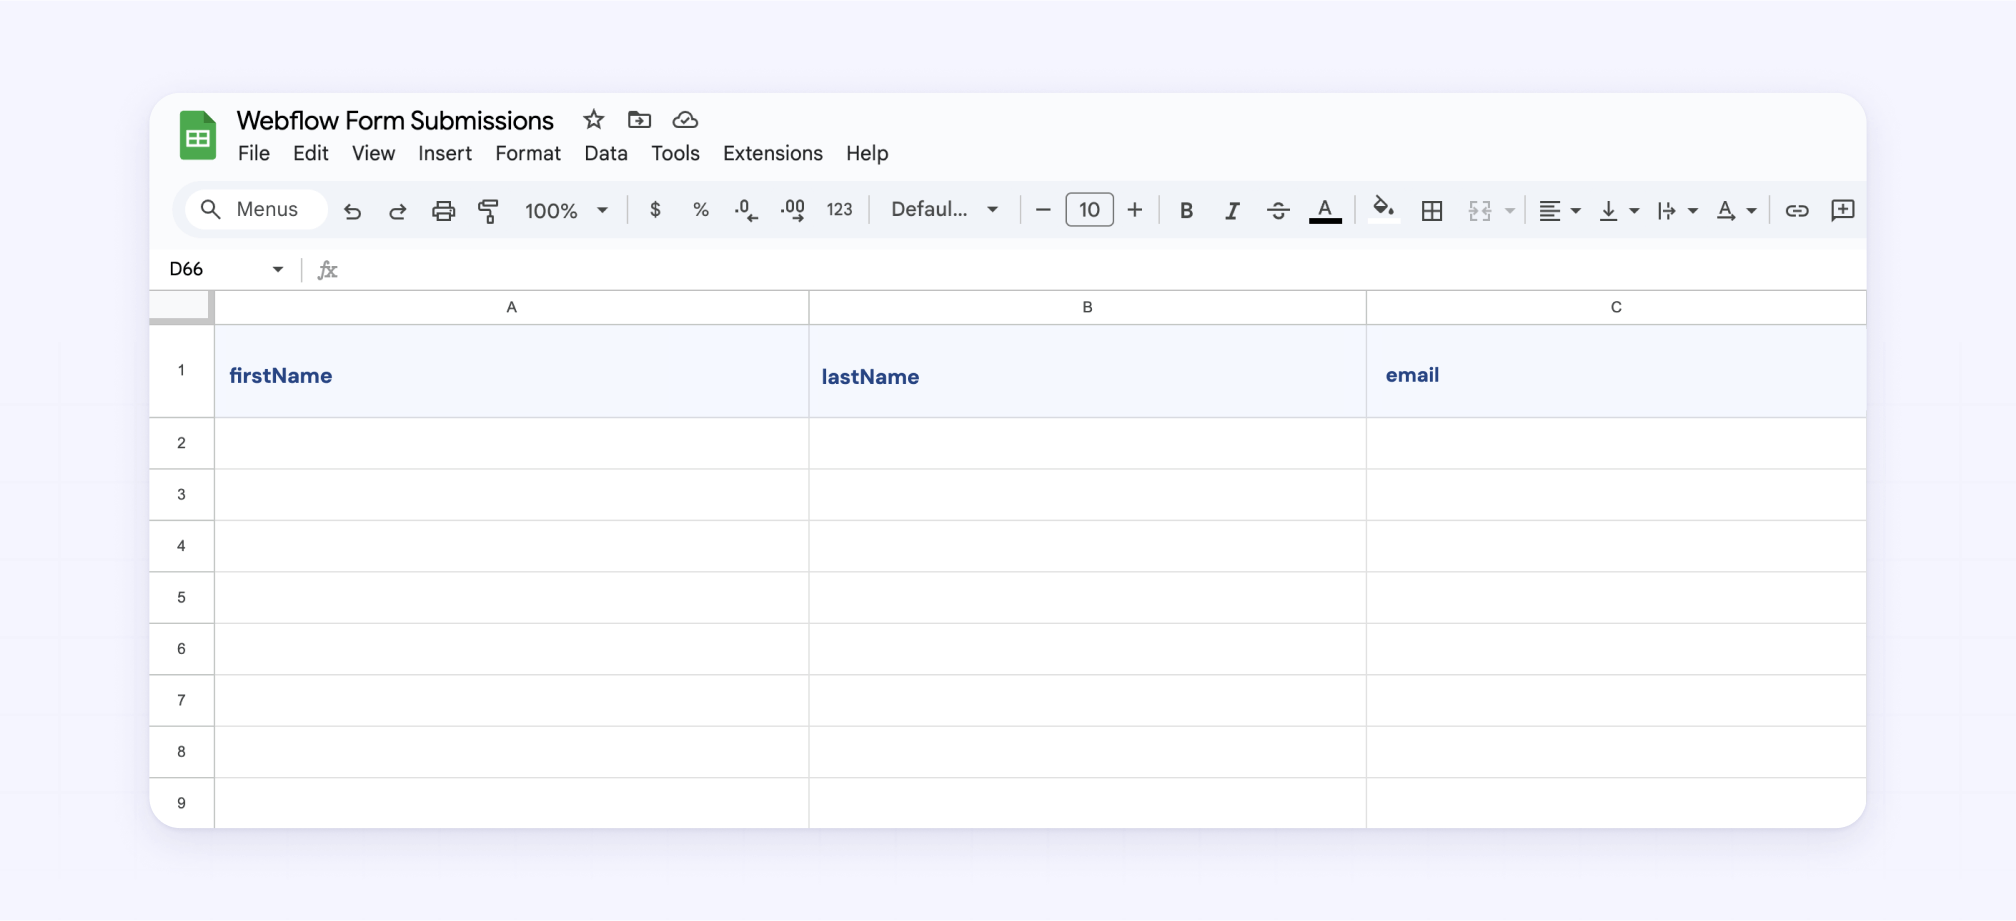
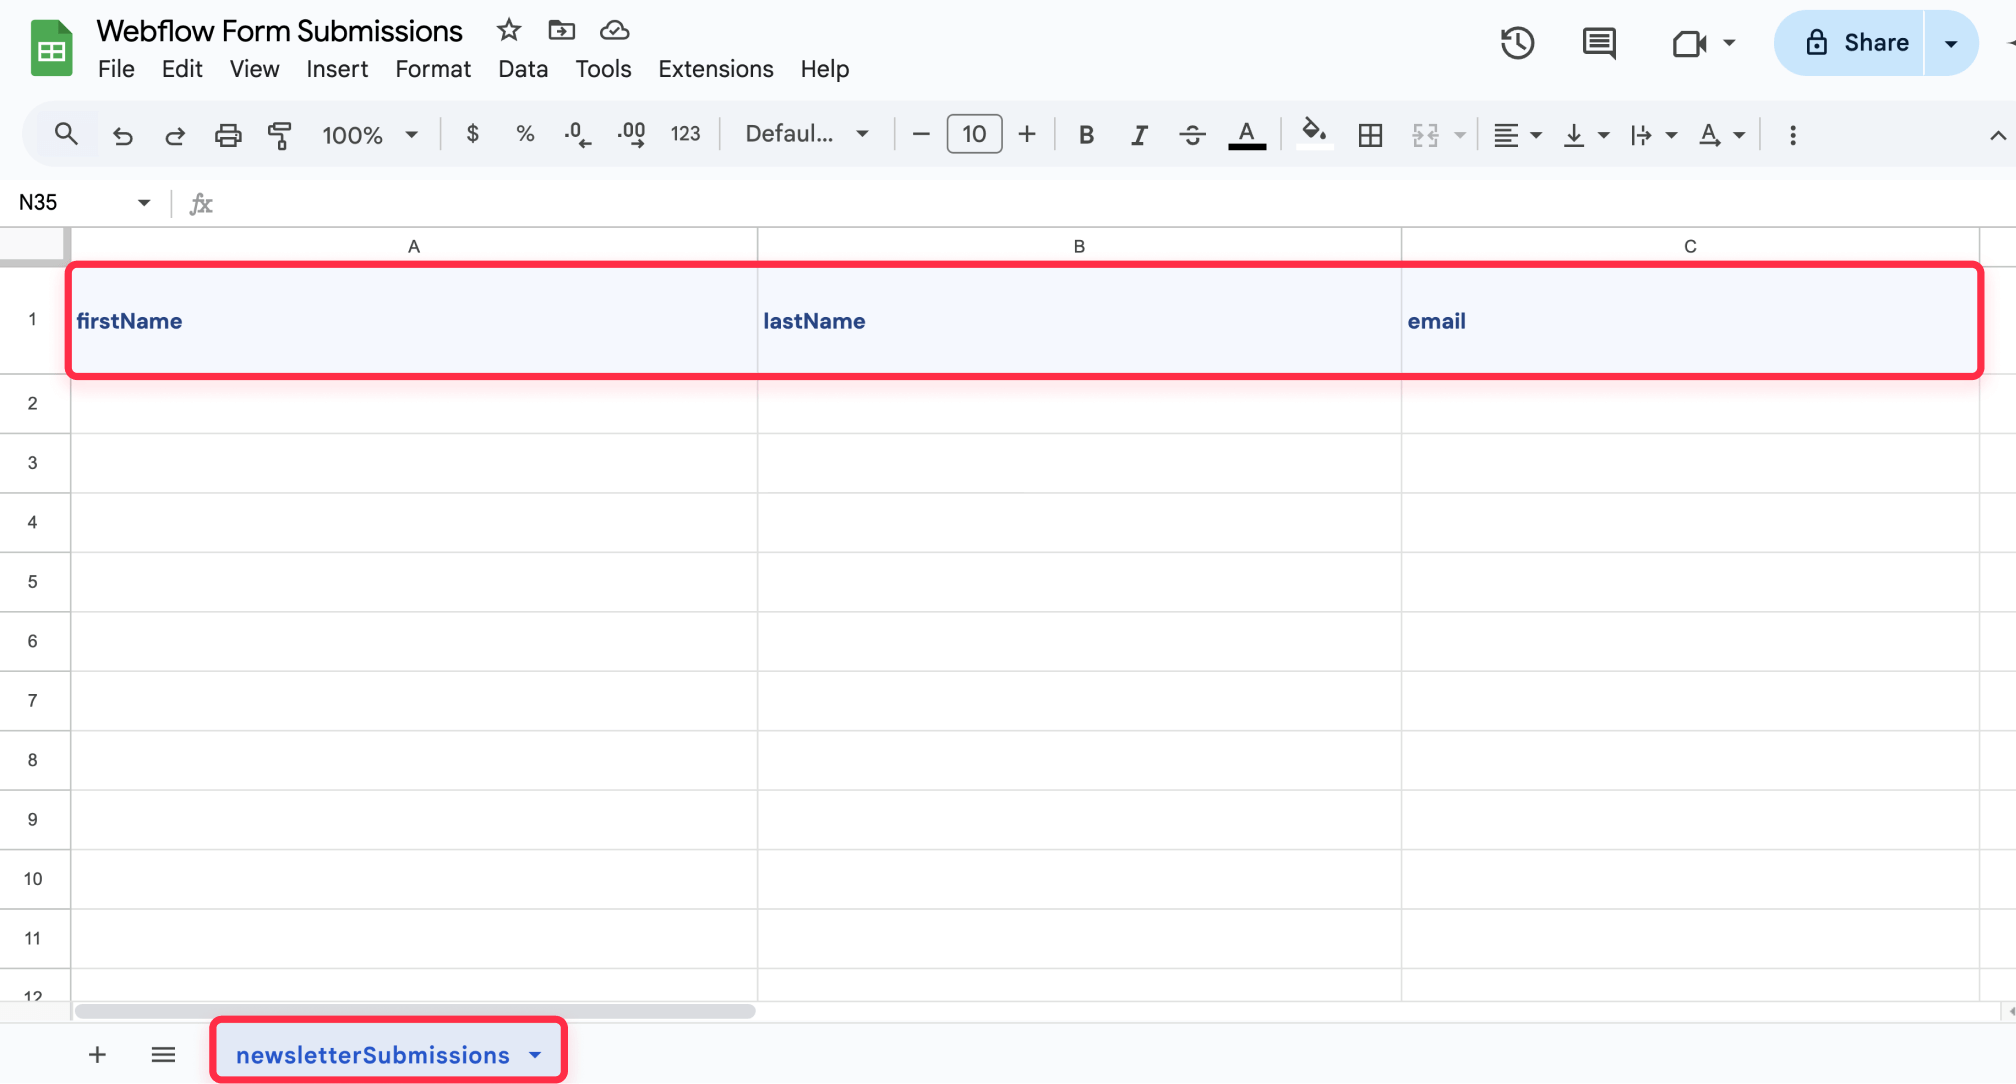
Step 1: Prepare your Google Sheet
- Create a new Google Sheet or open an existing one
- Rename the default tab to match the script configuration. We’ll use “newsletterSubmission” in this tutorial, but you can choose any name that fits your needs
- (Optional) Add more tabs for other forms, for example “contactSubmissions”. We’ll show you how to configure them in the script later
- Add column headers that match your form fields exactly:
- Use camelCase (e.g., firstName, lastName, email)
- The order of columns matters—it follows a left-to-right structure (A, B, C, D, etc.). Keep this in mind for later reference
Step 2: Set up Google Apps Script
- Open your Google Sheet where you want to store form responses
- In your Google Sheet, navigate to Extensions → Apps Script
- Name your project (e.g., "Webflow Form Connector")
- Delete any existing code and paste the provided script:
/**
* Webflow to Google Sheets Connector by BRIX Templates
*
* This script handles form submissions and sends them to specified tabs in your Google Sheet.
*/
/**
* Form configurations
* Add additional configurations following the same structure
* @version 1.0.3
* @author BRIX Templates
* @license MIT
*/
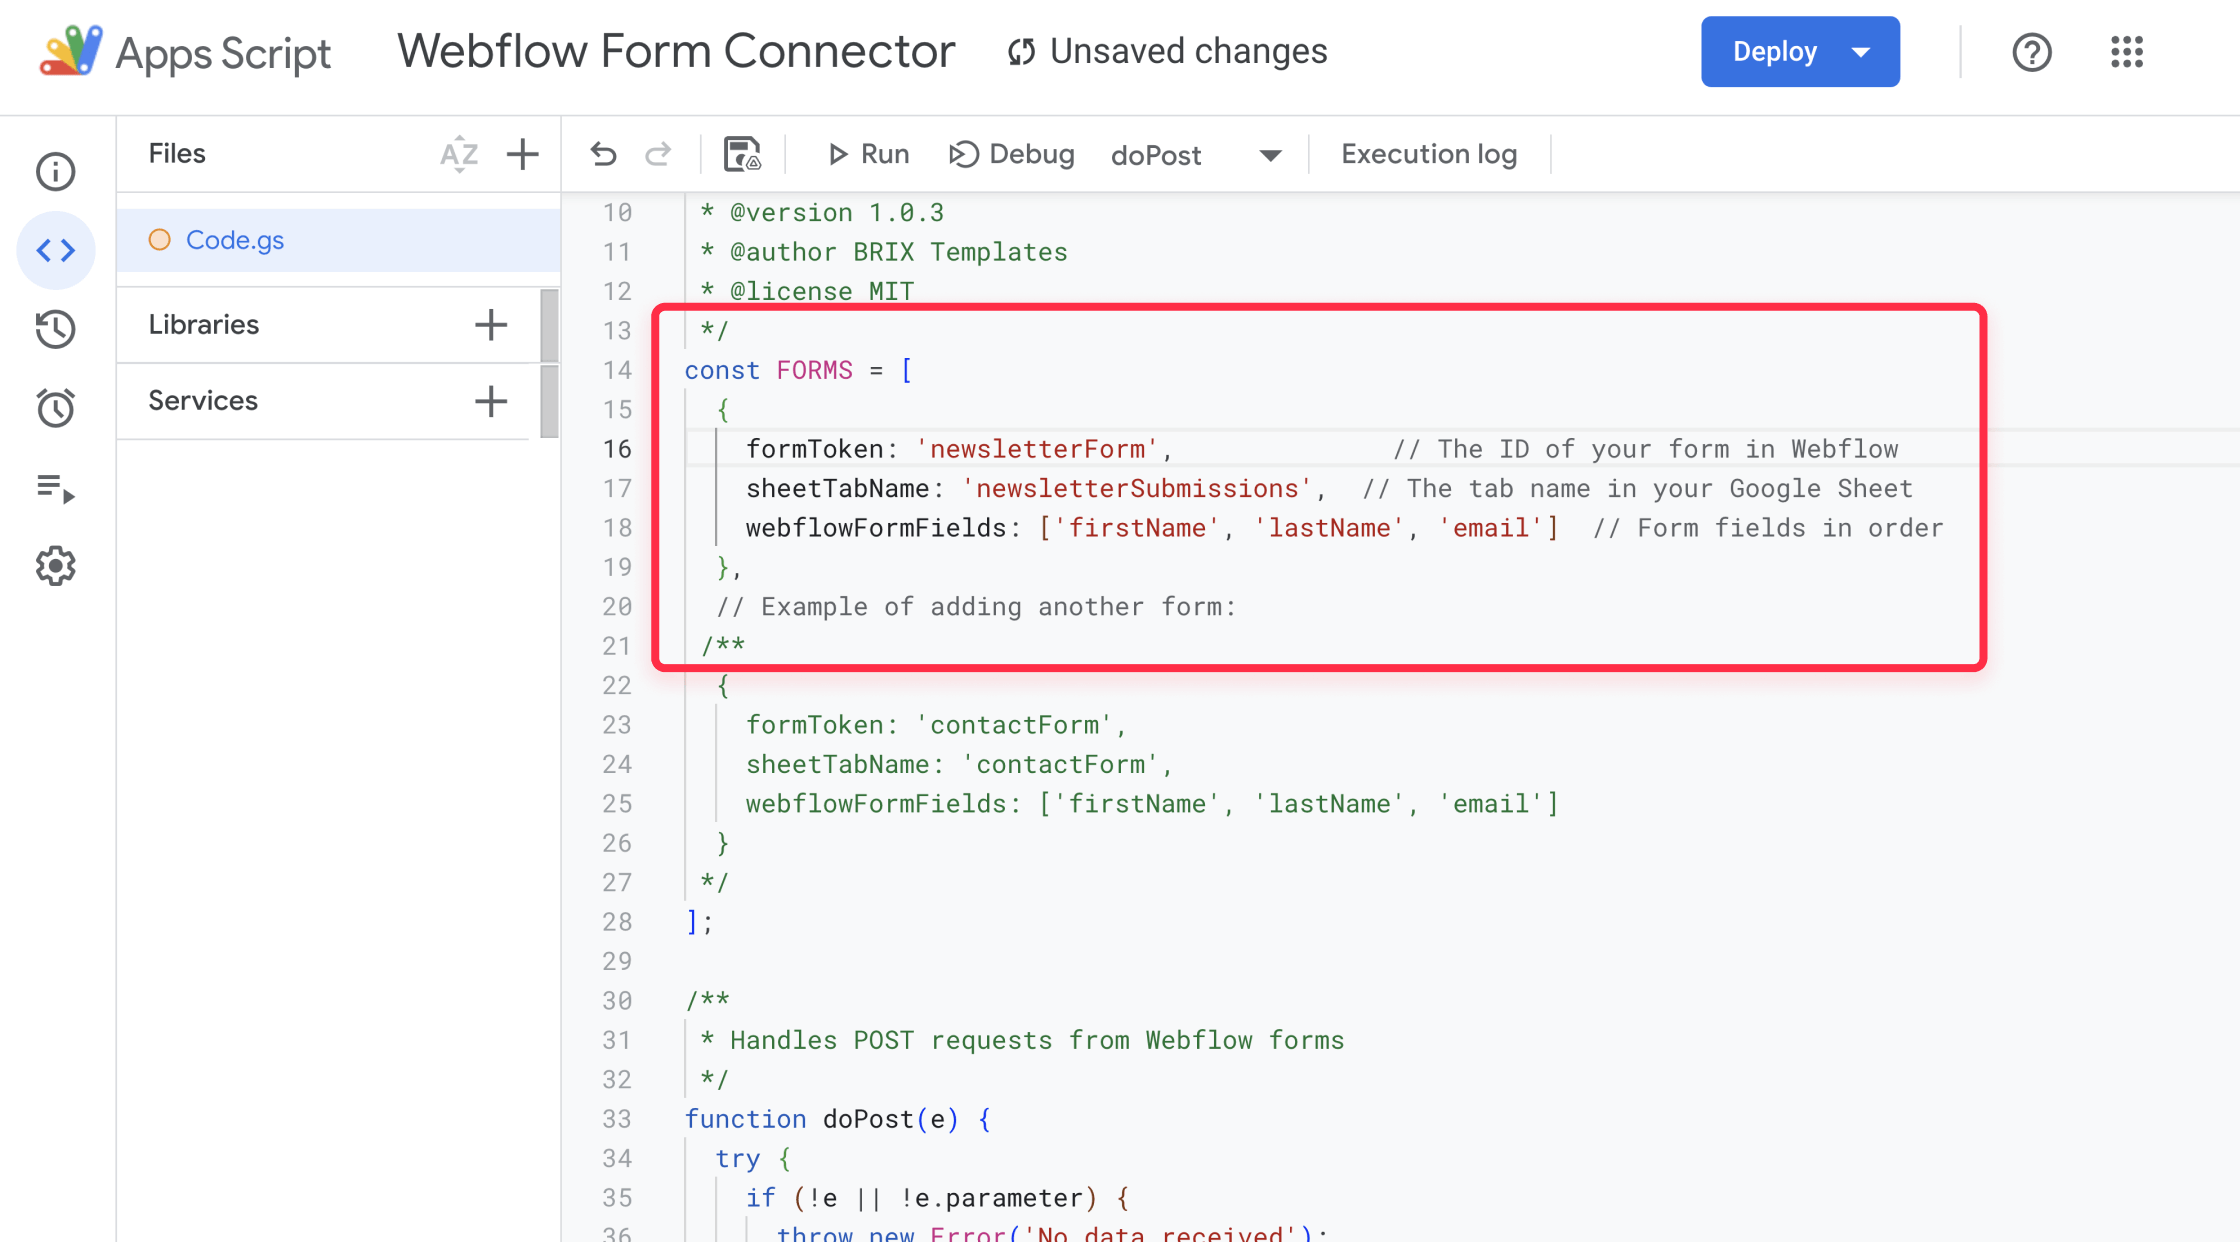
const FORMS = [
{
formToken: 'newsletterForm', // The token of your form in Webflow
sheetTabName: 'newsletterSubmissions', // The tab name in your Google Sheet
webflowFormFields: ['firstName', 'lastName', 'email'] // Form fields in order
},
// Example of adding another form:
/**
{
formToken: 'contactForm',
sheetTabName: 'contactForm',
webflowFormFields: ['firstName', 'lastName', 'email']
}
*/
];
/**
* Handles POST requests from Webflow forms
*/
function doPost(e) {
try {
if (!e || !e.parameter) {
throw new Error('No data received');
}
// Get the form identifier from the request
const formToken = e.parameter.formToken;
if (!formToken) {
throw new Error('Missing form token');
}
// Find the matching form configuration
const formConfig = FORMS.find(config => config.formToken === formToken);
if (!formConfig) {
throw new Error(`No configuration found for form: ${formToken}`);
}
// Get the specified sheet
const sheet = SpreadsheetApp.getActiveSpreadsheet()
.getSheetByName(formConfig.sheetTabName);
if (!sheet) {
throw new Error(`Sheet tab "${formConfig.sheetTabName}" not found`);
}
// Get form data from request
const data = e.parameter;
// Map form fields to columns in order
const row = formConfig.webflowFormFields.map(field => sanitizeInput(data[field]));
// Add the data as a new row
sheet.appendRow(row);
return createResponse('success', 'Form submission successful');
} catch (error) {
Logger.log(`Error: ${error.message}`);
return createResponse('error', error.message);
}
}
/**
* Creates a JSON response
*/
function createResponse(status, message = '') {
return ContentService.createTextOutput(
JSON.stringify({ result: status, message: message })
).setMimeType(ContentService.MimeType.JSON);
}
/**
* Sanitizes input data
*/
function sanitizeInput(input) {
if (typeof input !== 'string') return '';
return input.trim().replace(/"/g, '""');
}In the script, you’ll find a section called const FORMS = []. This is where we define how each form connects to Google Sheets. Each form requires three pieces of information:
- formToken: The unique identifier for your Webflow form
- sheetTabName: The name of the tab in Google Sheets where data should go
- webflowFormFields: A list of field names (must match Webflow exactly)
If you need to connect another form, simply copy and paste another {} object inside the FORMS array. Example of adding a job application form:
const FORMS = [
{
formToken: 'newsletterForm',
sheetTabName: 'newsletterSubmissions',
webflowFormFields: ['firstName', 'lastName', 'email']
},
{
formToken: 'contactForm',
sheetTabName: 'contactForm',
webflowFormFields: ['firstName', 'lastName', 'email', 'phoneNumber', 'message']
},
{
formToken: 'jobApplicationForm',
sheetTabName: 'jobApplications',
webflowFormFields: ['fullName', 'email', 'phoneNumber', 'resumeLink', 'linkedinLink']
}
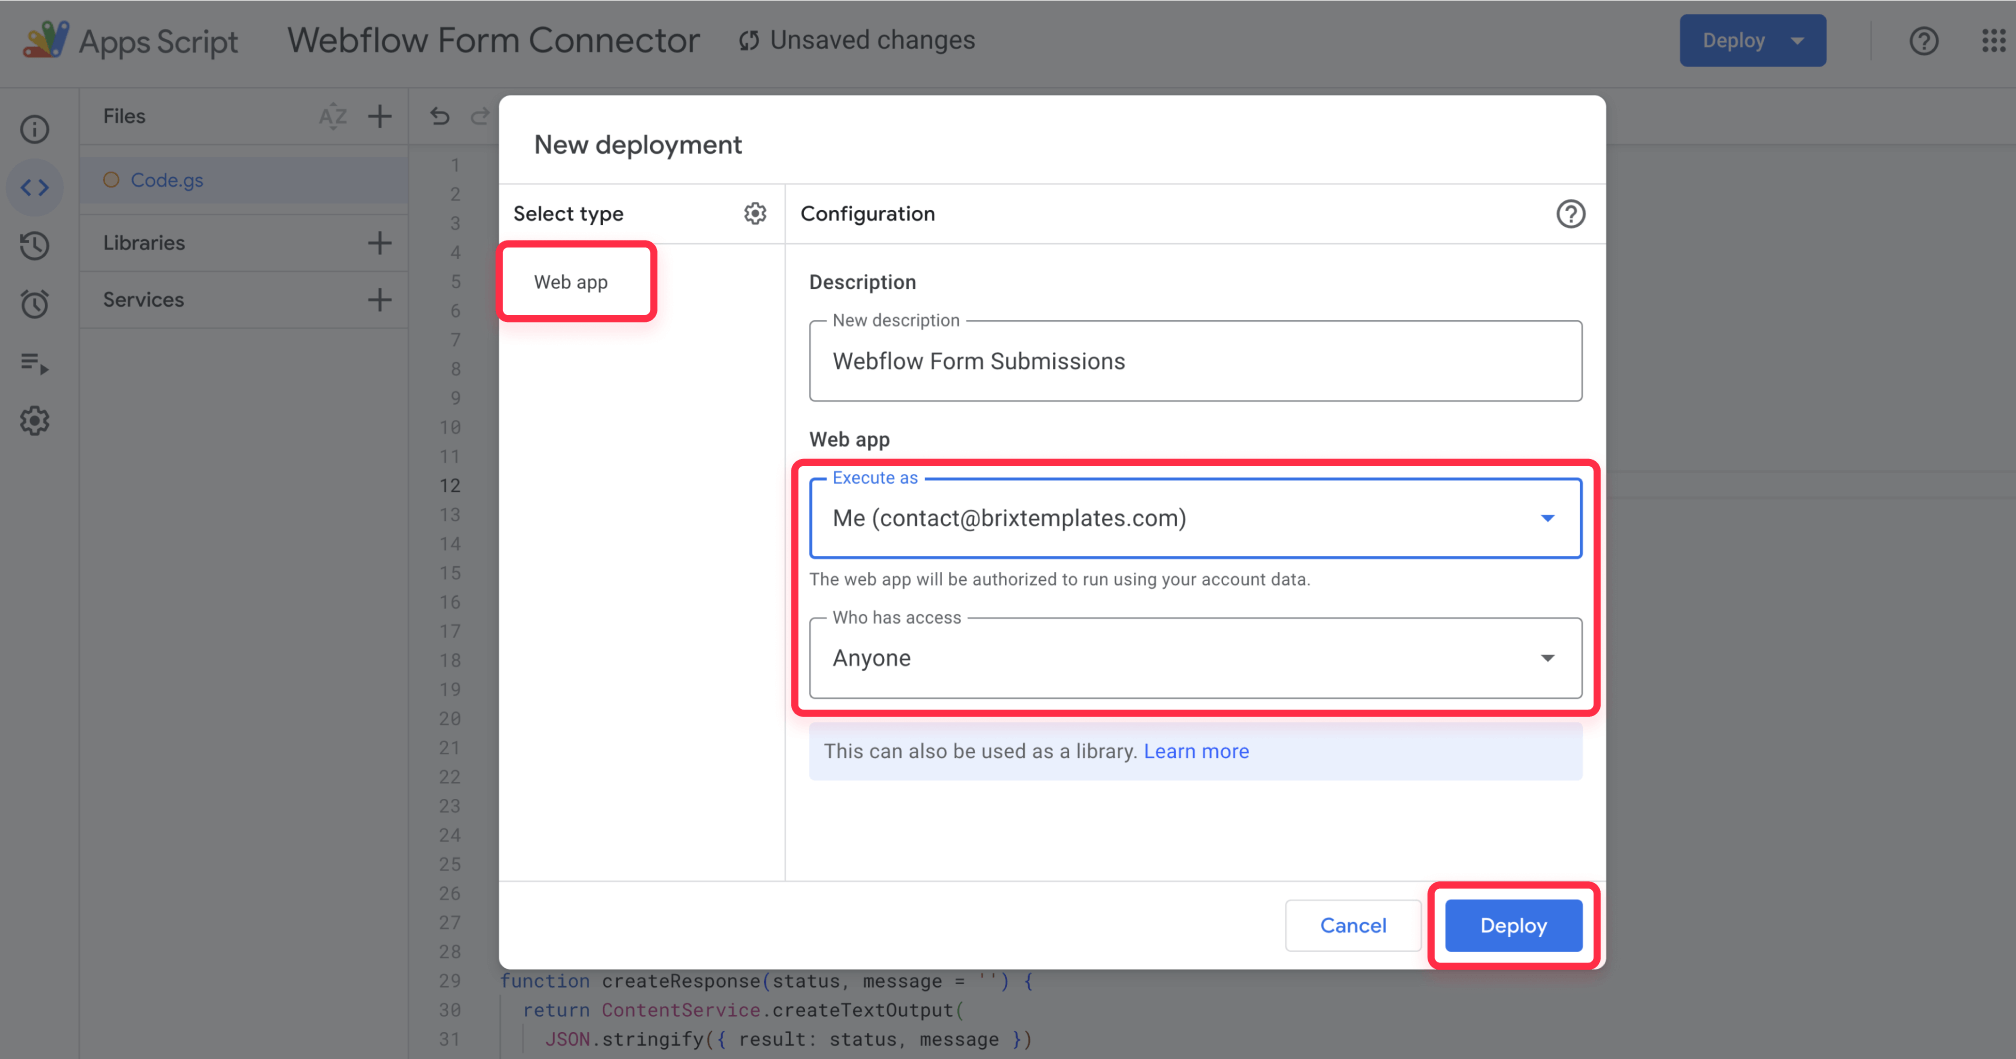
];Step 3: Deploy your Google Script
- Click the "Deploy" button (top right)
- Select "New deployment"
- Click "Select type" (gear icon)
- Choose "Web app" from the options
- Execute as: Select "Me"
- Who has access: Choose "Anyone"
- Click "Deploy"
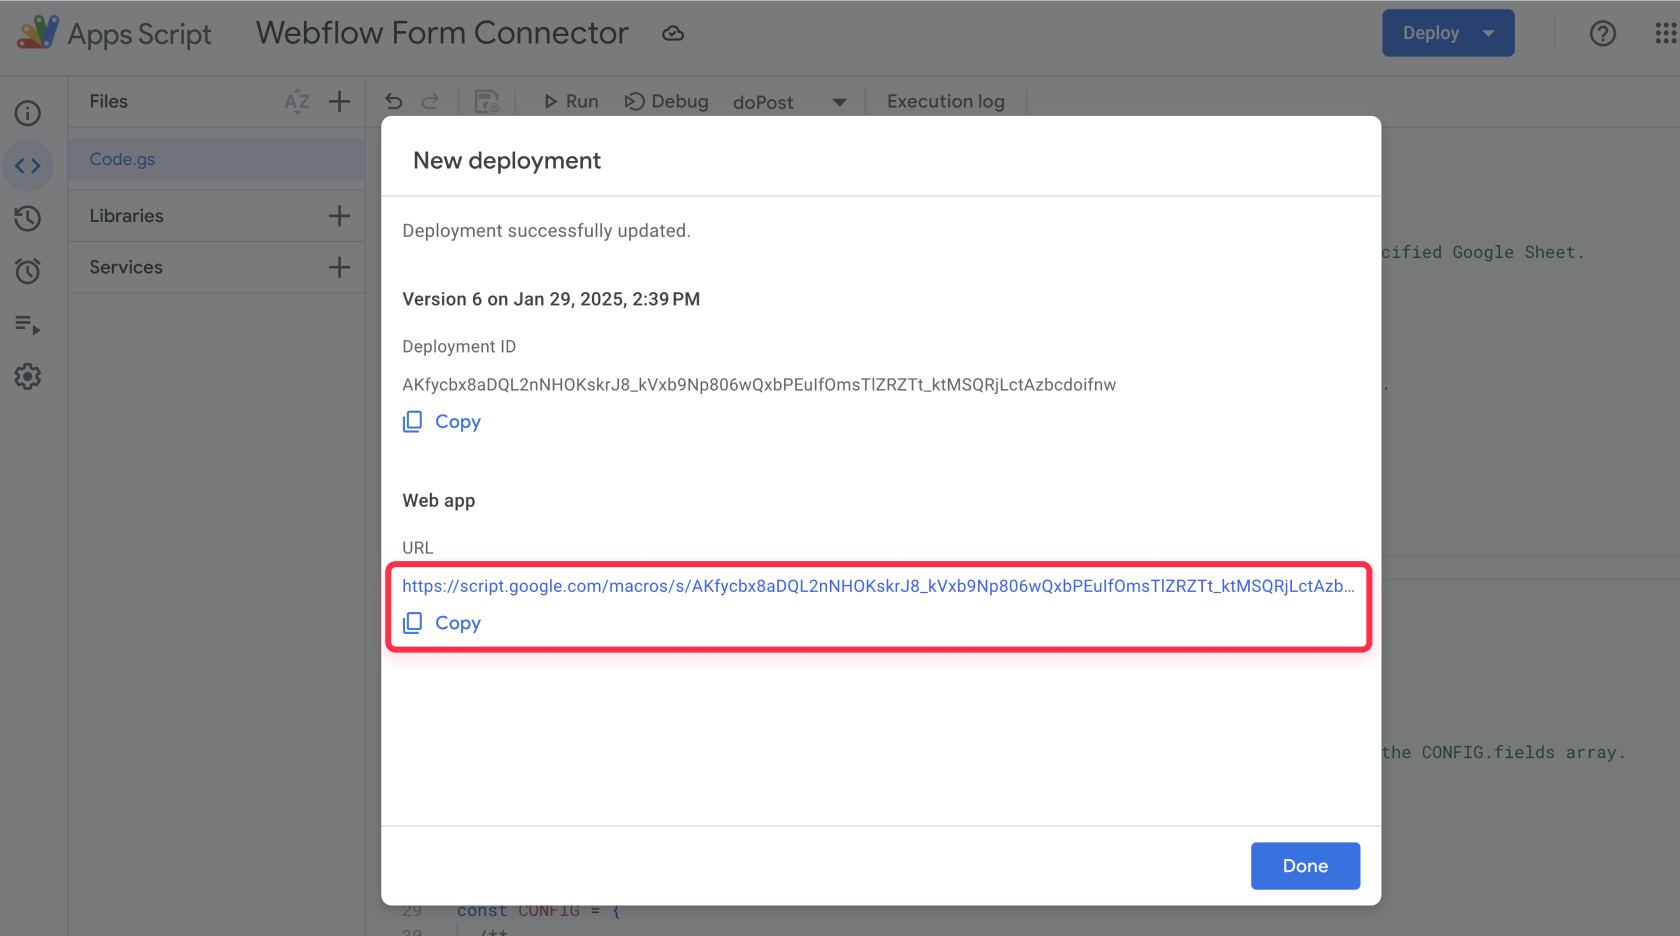
Step 4: Get your deployment URL:
- After deploying the Web app, a "Web App URL" will be displayed on the screen.
- Click "Copy" to save your Web App URL
- Keep this tab open or save the URL somewhere easy to find—you can always access it later in the Apps Script dashboard if needed.
Step 5: Set up your Webflow form structure
- Create or select your form in the Webflow Designer
- Click on the form element (the inner container)
- In the Settings panel (gear icon), scroll to "Custom Attributes"
- Add the following custom attributes:
- brix-sheets-form="enable" (This tells the script to process this form and send data to Google Sheets.)
- brix-form-token="newsletterForm" (This is the Token you configured in the Apps Script.)
- brix-sheets-script-url="[Your Script URL]" (This is the URL you get after deploying the Apps Script.)
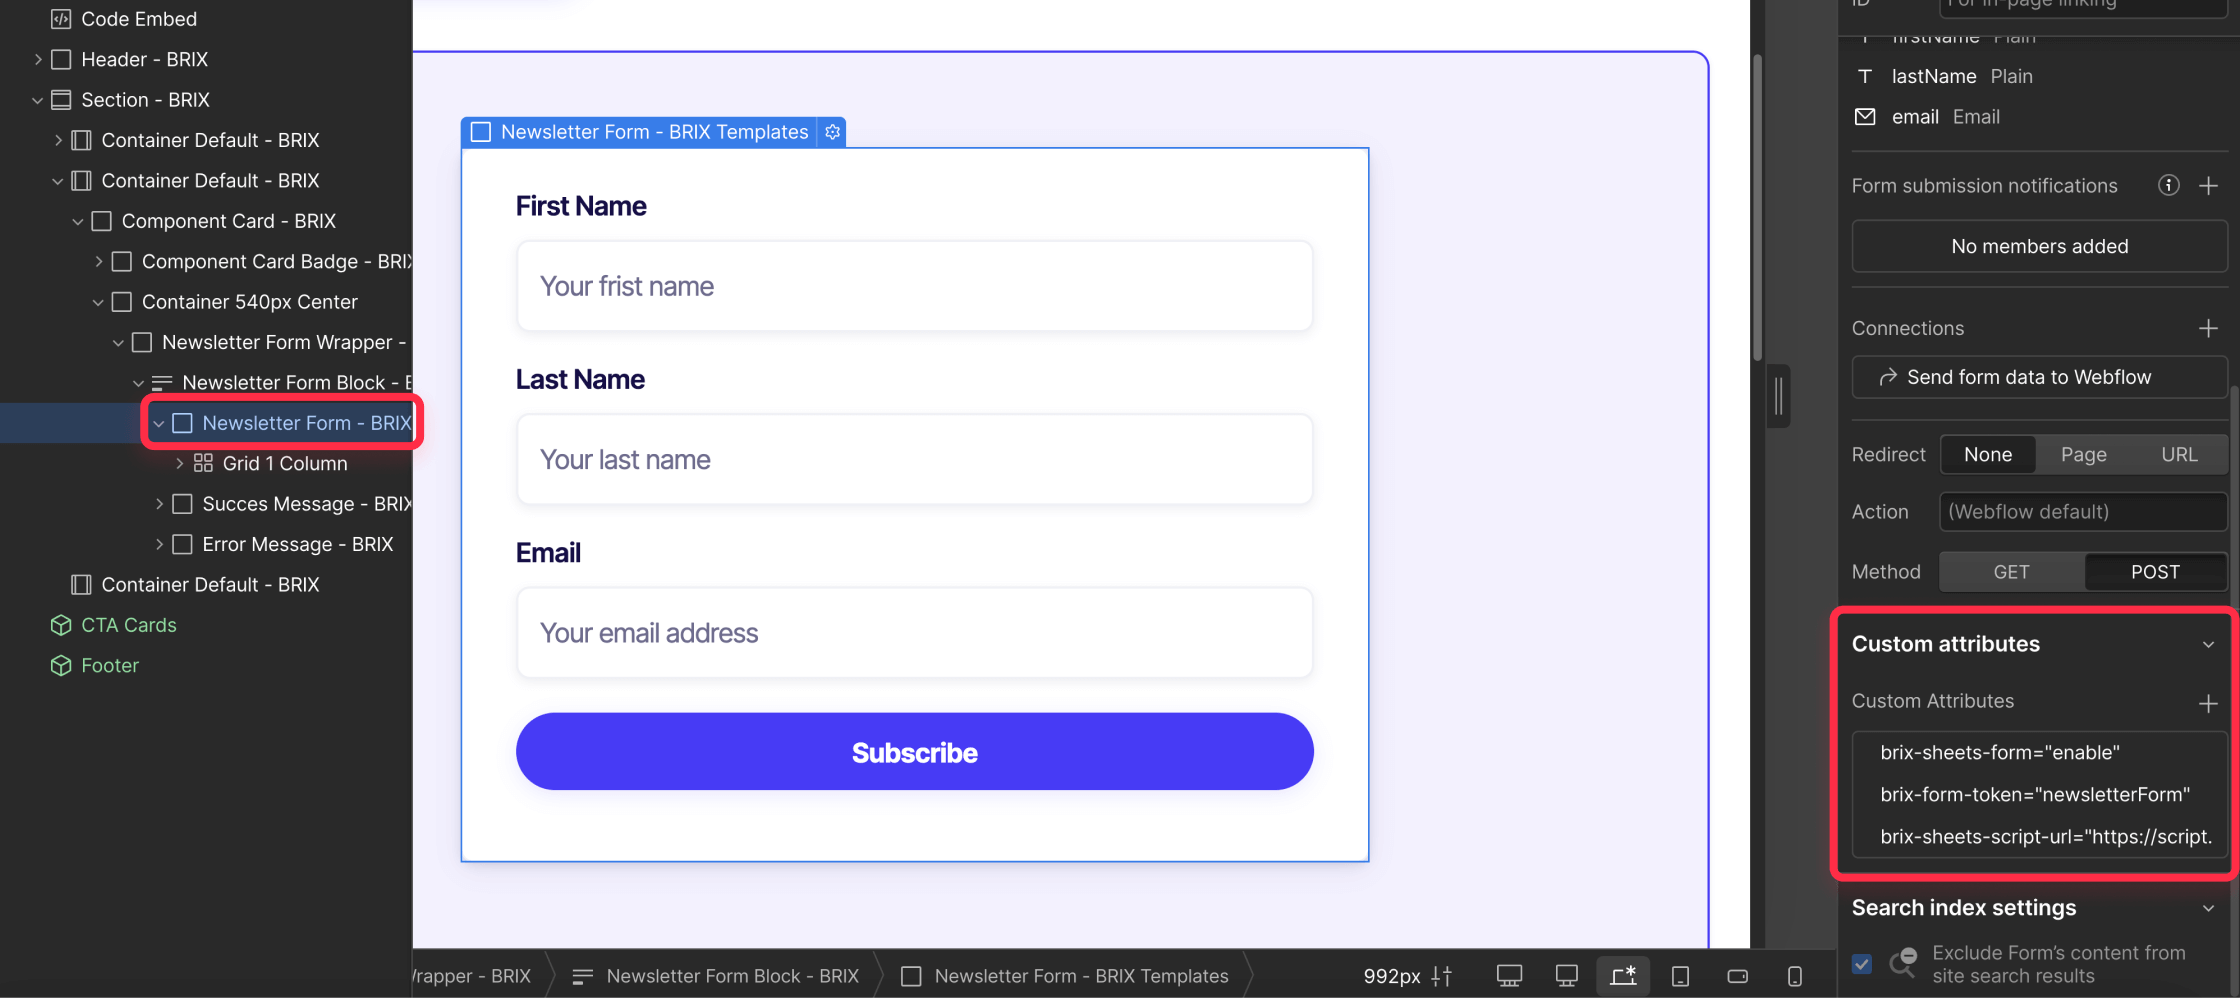
Important:
- Make sure the form ID (brix-form-id) matches exactly what you defined in Apps Script
- Ensure you paste the correct script URL from Step 4
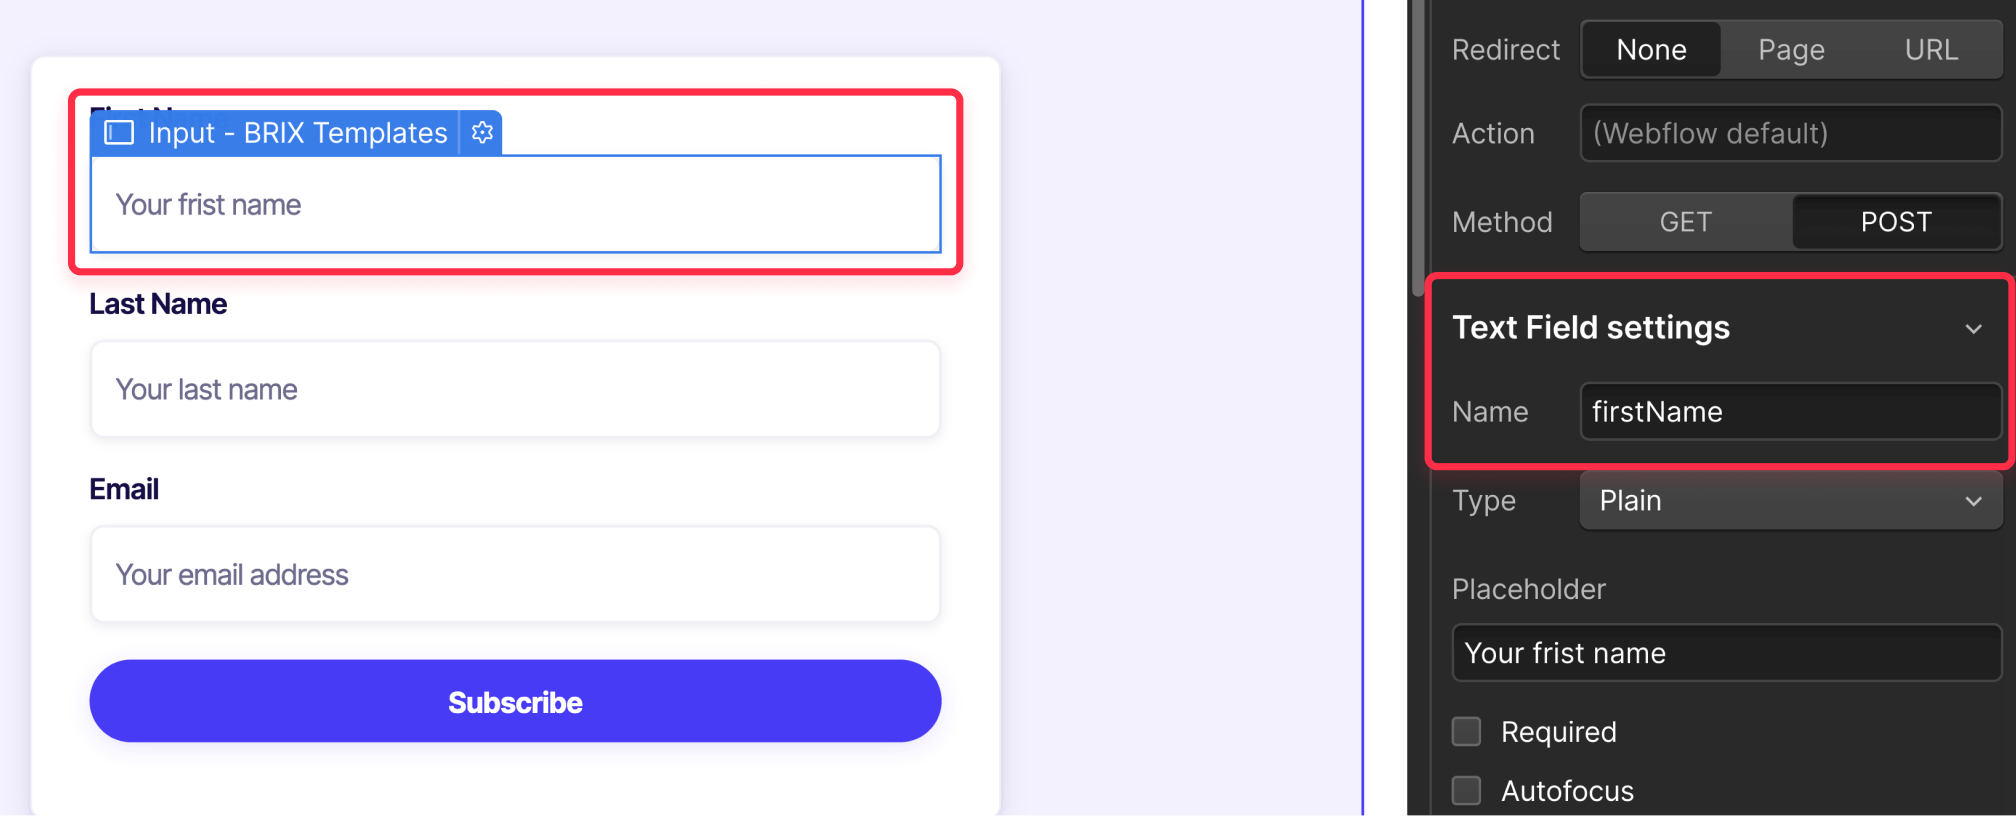
Step 6: Configure your form inputs
- Select each form input field in your form
- For each input, in the Settings panel (gear icon):
- Under Text Field Settings, find the Name field. ( Not the placeholder text!)
- Set the name to match exactly what you defined in the Google App Script FORM configuration:
- Example: firstName, lastName, email
- Double-check that all input names:
- Match your Google Script config exactly
- Use camelCase for multiple words
- Contain no spaces or special characters
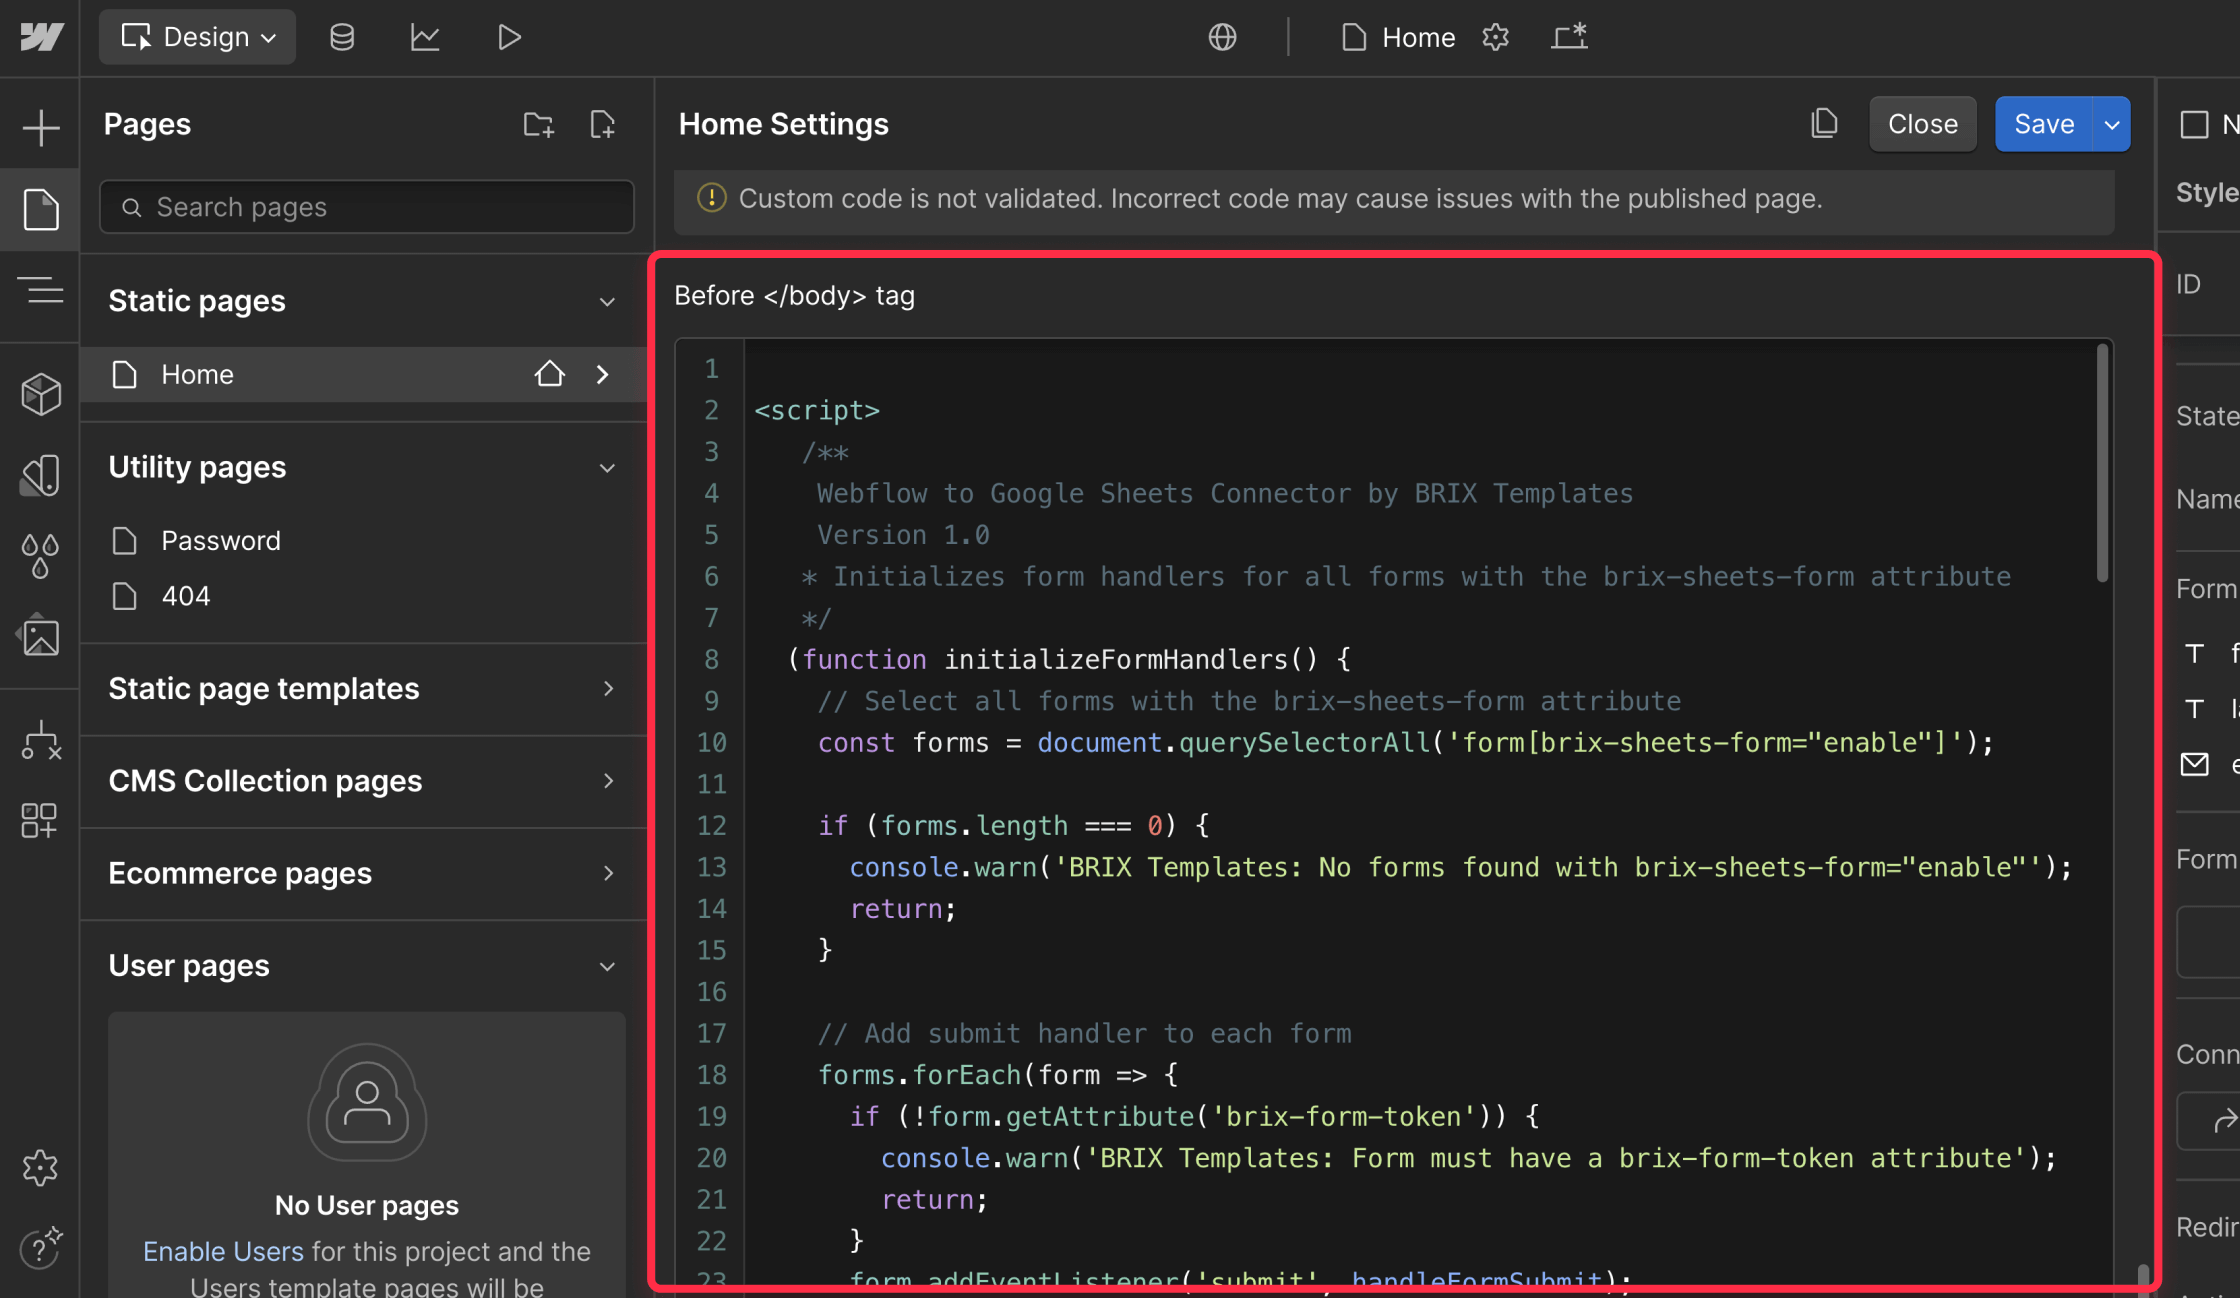
Step 7: Add the connector code
- In the Webflow Designer, go to:
- For all pages: Pages → Settings → Custom Code → Before </body> tag
- For a single page: Open page settings → Custom Code → Before </body> tag
- Paste the following code:
<script>
   /**
    Webflow to Google Sheets Connector by BRIX Templates
    Version 1.0
   * Initializes form handlers for all forms with the brix-sheets-form attribute
   */
  (function initializeFormHandlers() {
    // Select all forms with the brix-sheets-form attribute
    const forms = document.querySelectorAll('form[brix-sheets-form="enable"]');

    if (forms.length === 0) {
      console.warn('BRIX Templates: No forms found with brix-sheets-form="enable"');
      return;
    }

    // Add submit handler to each form
    forms.forEach(form => {
      if (!form.getAttribute('brix-form-token')) {
        console.warn('BRIX Templates: Form must have a brix-form-token attribute');
        return;
      }
      form.addEventListener('submit', handleFormSubmit);
    });
  })();

  /**
   * Handles form submission
   * @param {Event} event - Form submission event
   */
  async function handleFormSubmit(event) {
    event.preventDefault();

    const form = event.target;
    const formWrapper = form.closest('.w-form');
    const successDiv = formWrapper.querySelector('.w-form-done');
    const errorDiv = formWrapper.querySelector('.w-form-fail');

    // Get the required attributes
    const scriptUrl = form.getAttribute('brix-sheets-script-url');
    const formToken = form.getAttribute('brix-form-token');

    if (!scriptUrl || !formToken) {
      console.error('BRIX Templates: Missing required attributes. Form needs both brix-sheets-script-url and brix-form-token.');
      displayMessage(successDiv, false);
      displayMessage(errorDiv, true);
      return;
    }

    try {
      // Collect form data
      const formData = new FormData(form);

      // Add the form token to the data
      formData.append('formToken', formToken);

      // Convert to URL-encoded string
      const urlEncodedData = new URLSearchParams(formData).toString();

      const response = await fetch(scriptUrl, {
        method: 'POST',
        headers: { 'Content-Type': 'application/x-www-form-urlencoded' },
        body: urlEncodedData
      });

      if (!response.ok) {
        throw new Error('Network response was not OK');
      }

      const result = await response.json();

      if (result.result === 'success') {
        form.reset();
        displayMessage(successDiv, true);
        displayMessage(errorDiv, false);
      } else {
        throw new Error(result.message || 'Unknown error');
      }
    } catch (error) {
      console.error('BRIX Templates: Submission error:', error);
      displayMessage(successDiv, false);
      displayMessage(errorDiv, true);
    }
  }

  /**
   * Displays or hides a message div
   * @param {HTMLElement} messageDiv - Message element to toggle
   * @param {boolean} show - Whether to show or hide the message
   */
  function displayMessage(messageDiv, show) {
    if (messageDiv) {
      messageDiv.style.display = show ? 'block' : 'none';
    }
  }
</script>
And just like that, your Webflow form is now connected for direct data submission to your Google Sheet file. Before launching your form, take a moment to ensure everything works smoothly:
Testing your setup
Submit test entries through your form Verify that:
- Data appears in the correct Google Sheet tab
- Fields map to the correct columns
- Success/error messages display properly
Troubleshooting Common Issues
Form submissions not appearing:
- Verify your Google Apps Script URL
- Check that form field names match exactly
- Ensure the sheet tab name matches your configuration
Wrong data placement:
- Verify the order of fields in your webflowFormFields array
- Check column headers in your Google Sheet
Enhancing security with Cloudflare Workers (optional)
For form submissions requiring advanced security measures, Cloudflare Workers can be configured as a proxy layer to protect your Google Apps Script URL and add customizable security features. By setting up Cloudflare Workers, you can enable additional layers of security, such as:
- Google Script URL masking: Hides your Google Apps Script URL from direct exposure in website code.
- Spam and bot protection: Enables integration of reCAPTCHA or honeypot techniques to mitigate spam submissions.
- Rate limiting and IP filtering: Provides controls to prevent form flooding and restrict submissions based on IP address criteria.
- Data validation: Allows for server-side data validation within the Cloudflare Worker environment before data reaches Google Sheets.
Setting up Cloudflare Workers does require some technical know-how. If you need help with advanced security configurations, feel free to reach out to our team—we’re here to provide personalized support and make the process easier for you!
Conclusion
By connecting your Webflow forms to Google Sheets, you've set up a powerful system that can handle all your form submission needs. This approach gives you the flexibility to manage your data effectively while keeping everything organized and easily accessible.
Remember to maintain consistent naming across your form fields and sheet columns, and periodically check your form submissions to ensure data is flowing correctly. As your website grows, this setup can easily accommodate new forms and fields by following the same structure we've covered.
Need help with more advanced connections between Webflow and Google Sheets, or looking to integrate other services with your Webflow site? Our team of Webflow experts is here to help – just reach out to us at BRIX Templates, and we'll help you create the perfect solution for your needs.


Join readers commenting on this post!