

You added a cookie consent banner to your Webflow site, and your GA4 reports started showing less data for European visitors. Your Google Ads conversion counts from the EEA may have dropped too. The banner is doing its job — but your Google tags don't automatically know what each visitor chose.
Google Consent Mode is a mechanism that communicates visitor consent choices to your Google tags so they can adjust their behavior accordingly. Webflow doesn't have native support for it, so you need to add custom code. This tutorial walks you through three implementation methods — from the easiest to the most involved — so you can pick the right one for your setup.
What Google Consent Mode does (and what it does not do)
Google Consent Mode communicates visitor consent choices to your Google tags — GA4, Google Ads, and Floodlight — so they adjust their behavior based on whether the visitor has granted or denied consent.
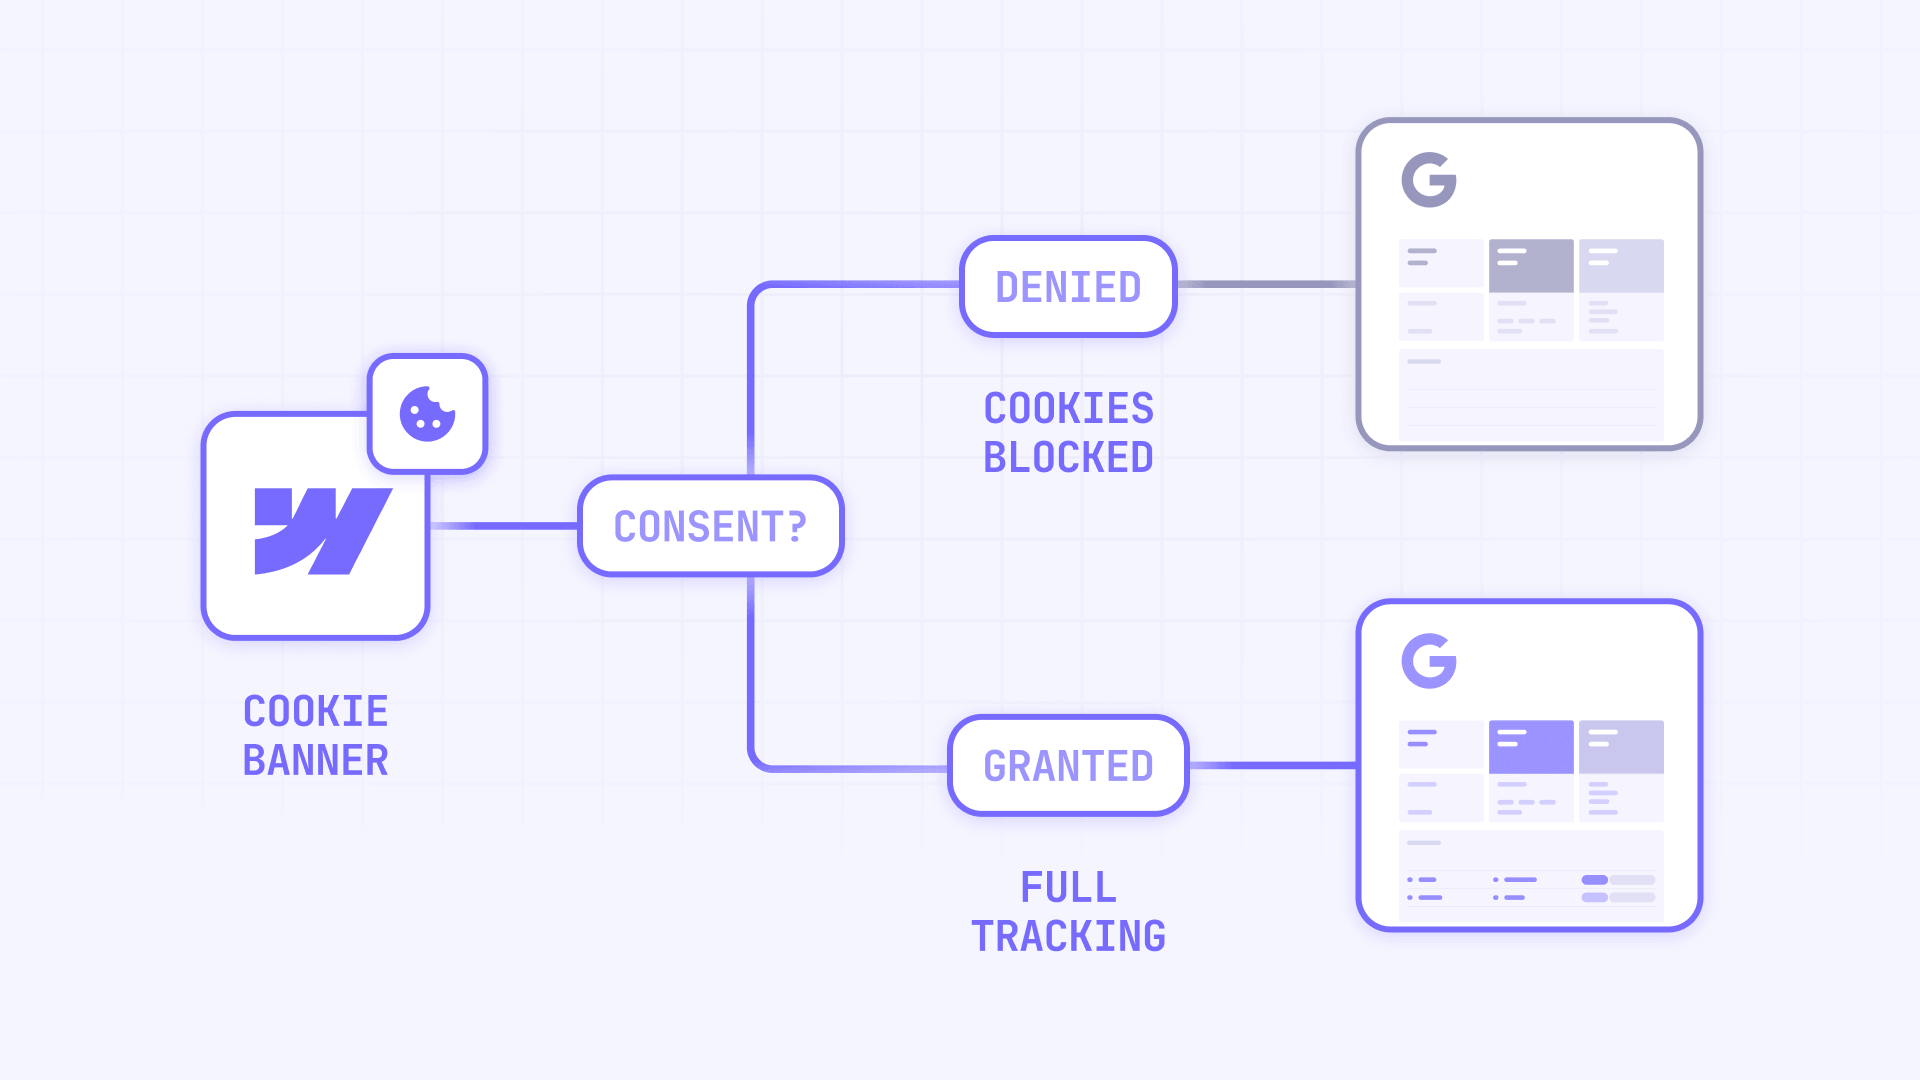
There are two implementations:
Basic consent mode: Tags do not load until a user interacts with the consent banner. No data is sent before consent, and conversion modeling uses a general model based on aggregated data from other sites.
Advanced consent mode: Tags load with denied defaults and send cookieless pings before consent is given. When consent is granted, tags switch to full tracking. Conversion modeling can use an advertiser-specific model because the cookieless pings provide additional signals for Google to learn from.
Advanced consent mode can improve conversion modeling — but it should only be used if your organization's legal or privacy team approves. Loading Google tags before consent may not align with every interpretation of GDPR or ePrivacy.
Important: Consent Mode is a technical signal layer — it does not replace a consent banner, a CMP, a privacy policy, cookie disclosure, or legal review.
The four main Consent Mode v2 parameters (and three optional ones)
Consent Mode uses parameters to communicate the visitor's consent state for different categories of data processing. Most Webflow sites need to configure four primary consent types:
ad\_storage: Enables or disables advertising-related cookies and device identifiers. When denied in an Advanced Consent Mode implementation, Google Ads and Floodlight tags send cookieless pings instead of writing cookies.
analytics\_storage: Enables or disables analytics-related cookies. When denied in an Advanced Consent Mode implementation, GA4 sends cookieless pings and does not store visitor-level data in cookies.
ad\_user\_data: Sets consent for sending user data (such as email addresses or phone numbers) to Google for advertising purposes. Added in Consent Mode v2, released in November 2023\.
ad\_personalization: Sets consent for personalized advertising — using visitor data to show tailored ads based on behavior and interests. Also added in v2.
There are three optional parameters that some configurations use:
functionality\_storage: Enables storage for site preferences like language, region, and accessibility settings.
personalization\_storage: Enables storage for content personalization, such as video recommendations.
security\_storage: Enables storage for authentication, fraud prevention, and security-related functionality.
Consent Mode v2 introduced ad\_user\_data and ad\_personalization in November 2023, following Google's strengthened enforcement of its EU User Consent Policy. Google's EU User Consent Policy applies to users in the EEA, the UK, and Switzerland. Sites that use Google Ads or other Google advertising features should send Consent Mode v2 signals for users in those regions to avoid degraded measurement or personalization limitations.
Defaults are typically set to denied for GDPR-related regions until the user consents. The actual default configuration depends on your organization's legal requirements and the regions you target — there is no single correct global default.
Which method should you choose?
- Method 1 — Cookiebot if you want the simplest setup, already use Cookiebot, and do not need advanced control over many third-party scripts.
- Method 2 — GTM \+ Cookiebot CMP if you use multiple marketing and analytics tags, want better control inside Google Tag Manager, or need a scalable setup for a client or growing business.
- Method 3 — Custom banner via gtag.js if you already have a custom Webflow cookie banner, do not want a full CMP, and are comfortable adding custom attributes and JavaScript.
Most non-technical Webflow users should choose Method 1 or Method 2\. Method 3 is best for custom implementations where you want full control over the code.
Three ways to implement Consent Mode in Webflow
Before you choose a method, keep one rule in mind: your consent defaults must be set before your Google tags load. If tags fire before they know the visitor's consent state, the whole setup breaks. Each method below handles this differently.
Method 1 — Cookiebot
Cookiebot handles consent state updates automatically, which means less custom code. Set it up in the Cookiebot dashboard, then add two scripts to Webflow.
In the Cookiebot dashboard:
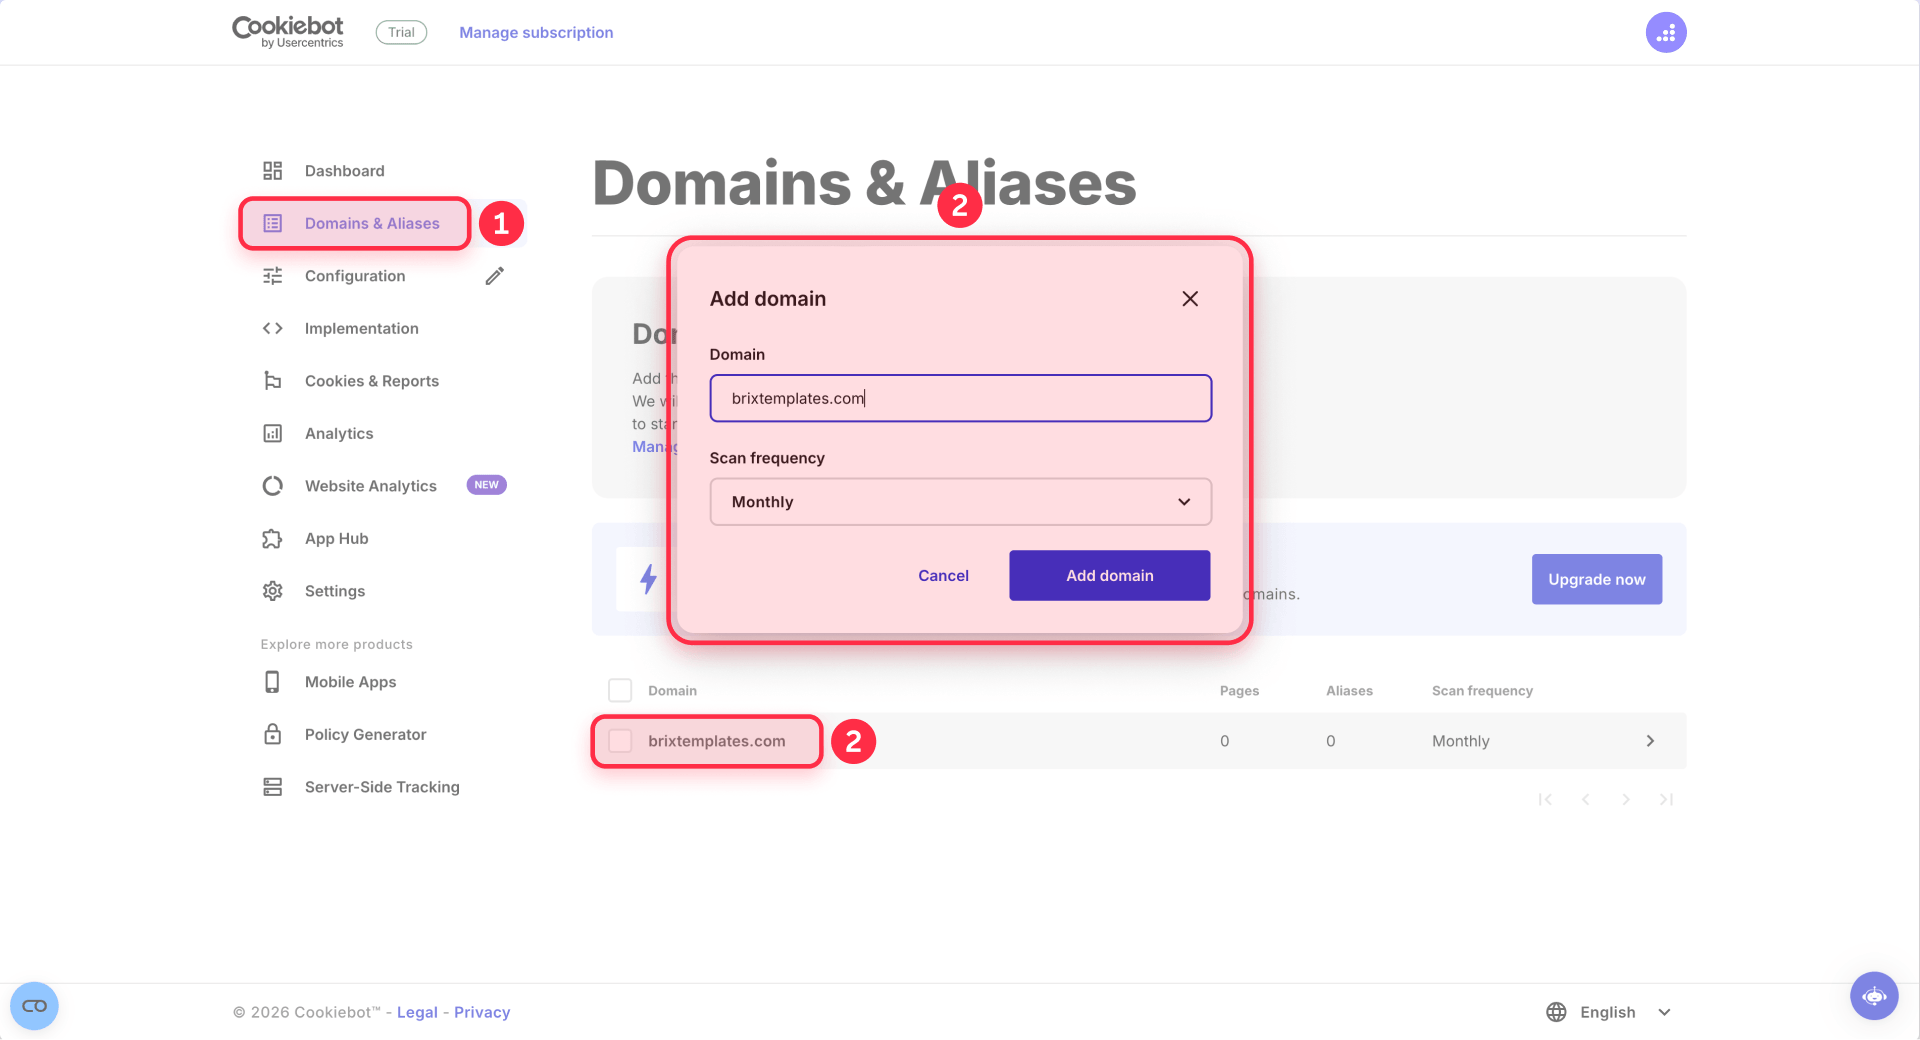
- Create or open a domain group and add your production domain and aliases (e.g., yoursite.com and www.yoursite.com).
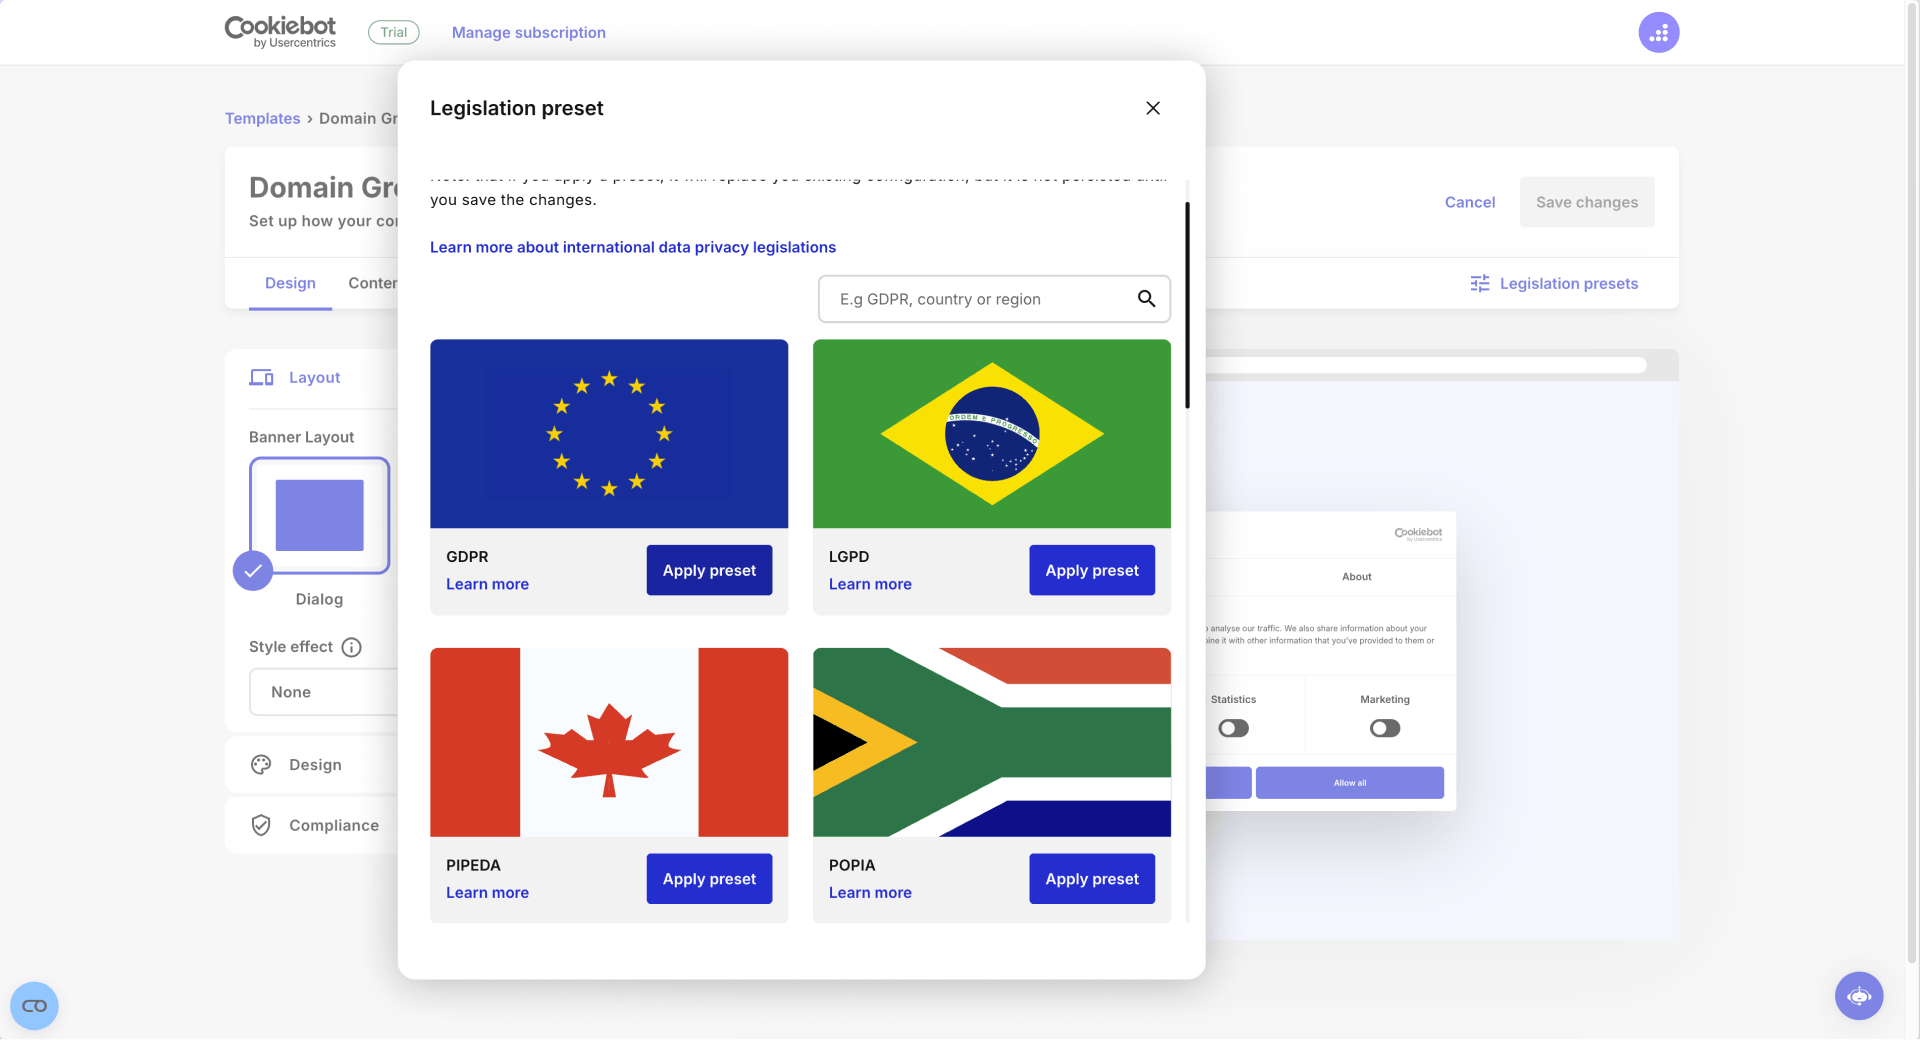
- Configure the banner design, language, consent method, and legislation preset. Use Explicit Consent when the goal is to ask visitors before optional tracking begins.
- Save the configuration.
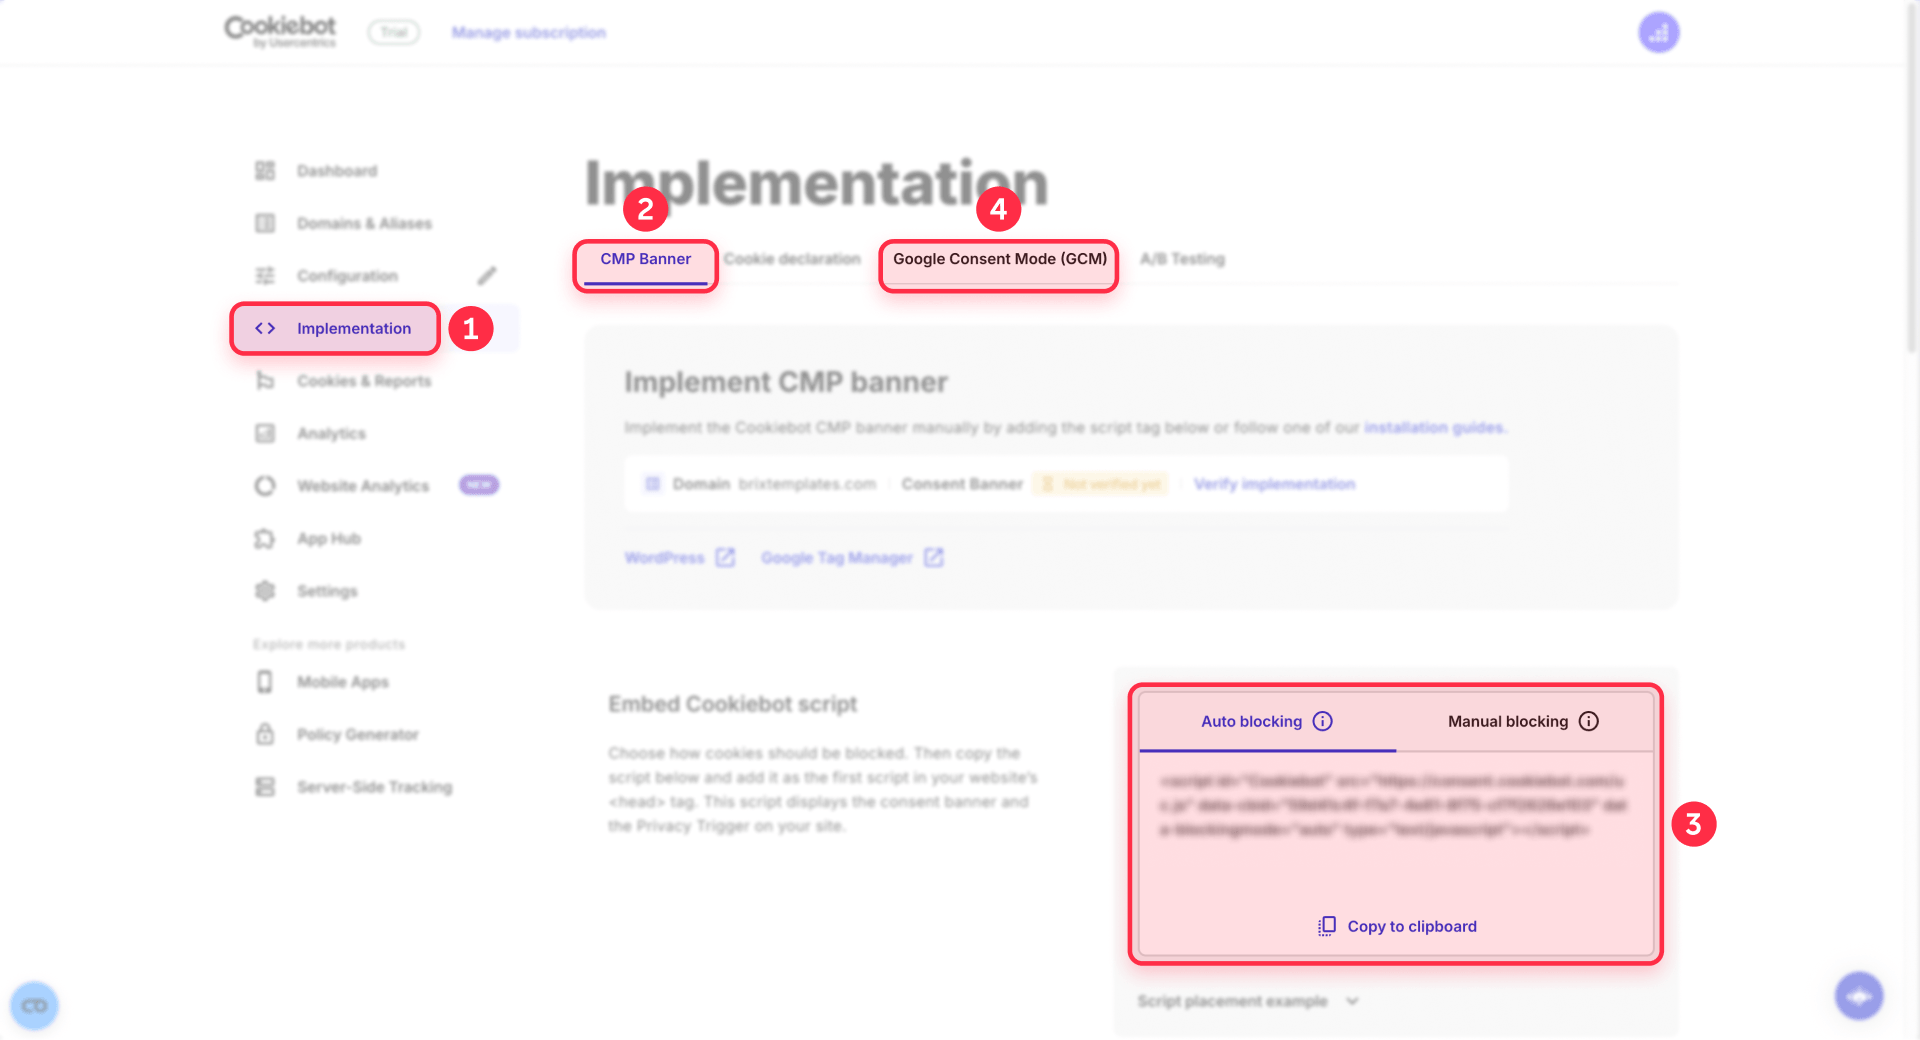
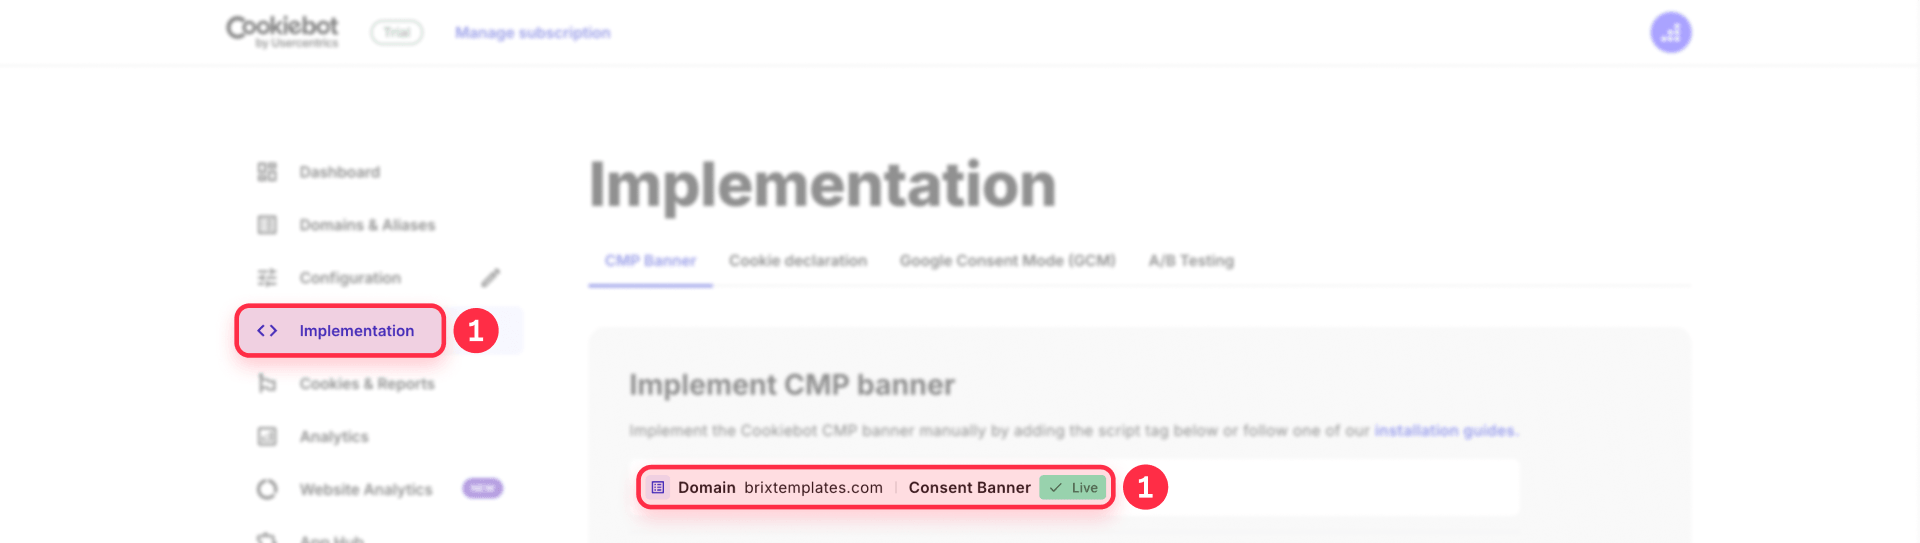
- From the Implementation area, copy the CMP Banner script and the Google Consent Mode (GCM) default snippet. Do not paste all tabs globally — the Cookie Declaration tab is only for privacy policy pages, and A/B Testing is not needed for this setup.
In Webflow (Site settings \> Custom code \> Head code), place the scripts in this order:
- Cookiebot CMP Banner script
- GCM default snippet
- Existing GA4 or GTM tags — do not duplicate if already installed through Webflow's native integration or an existing GTM container.
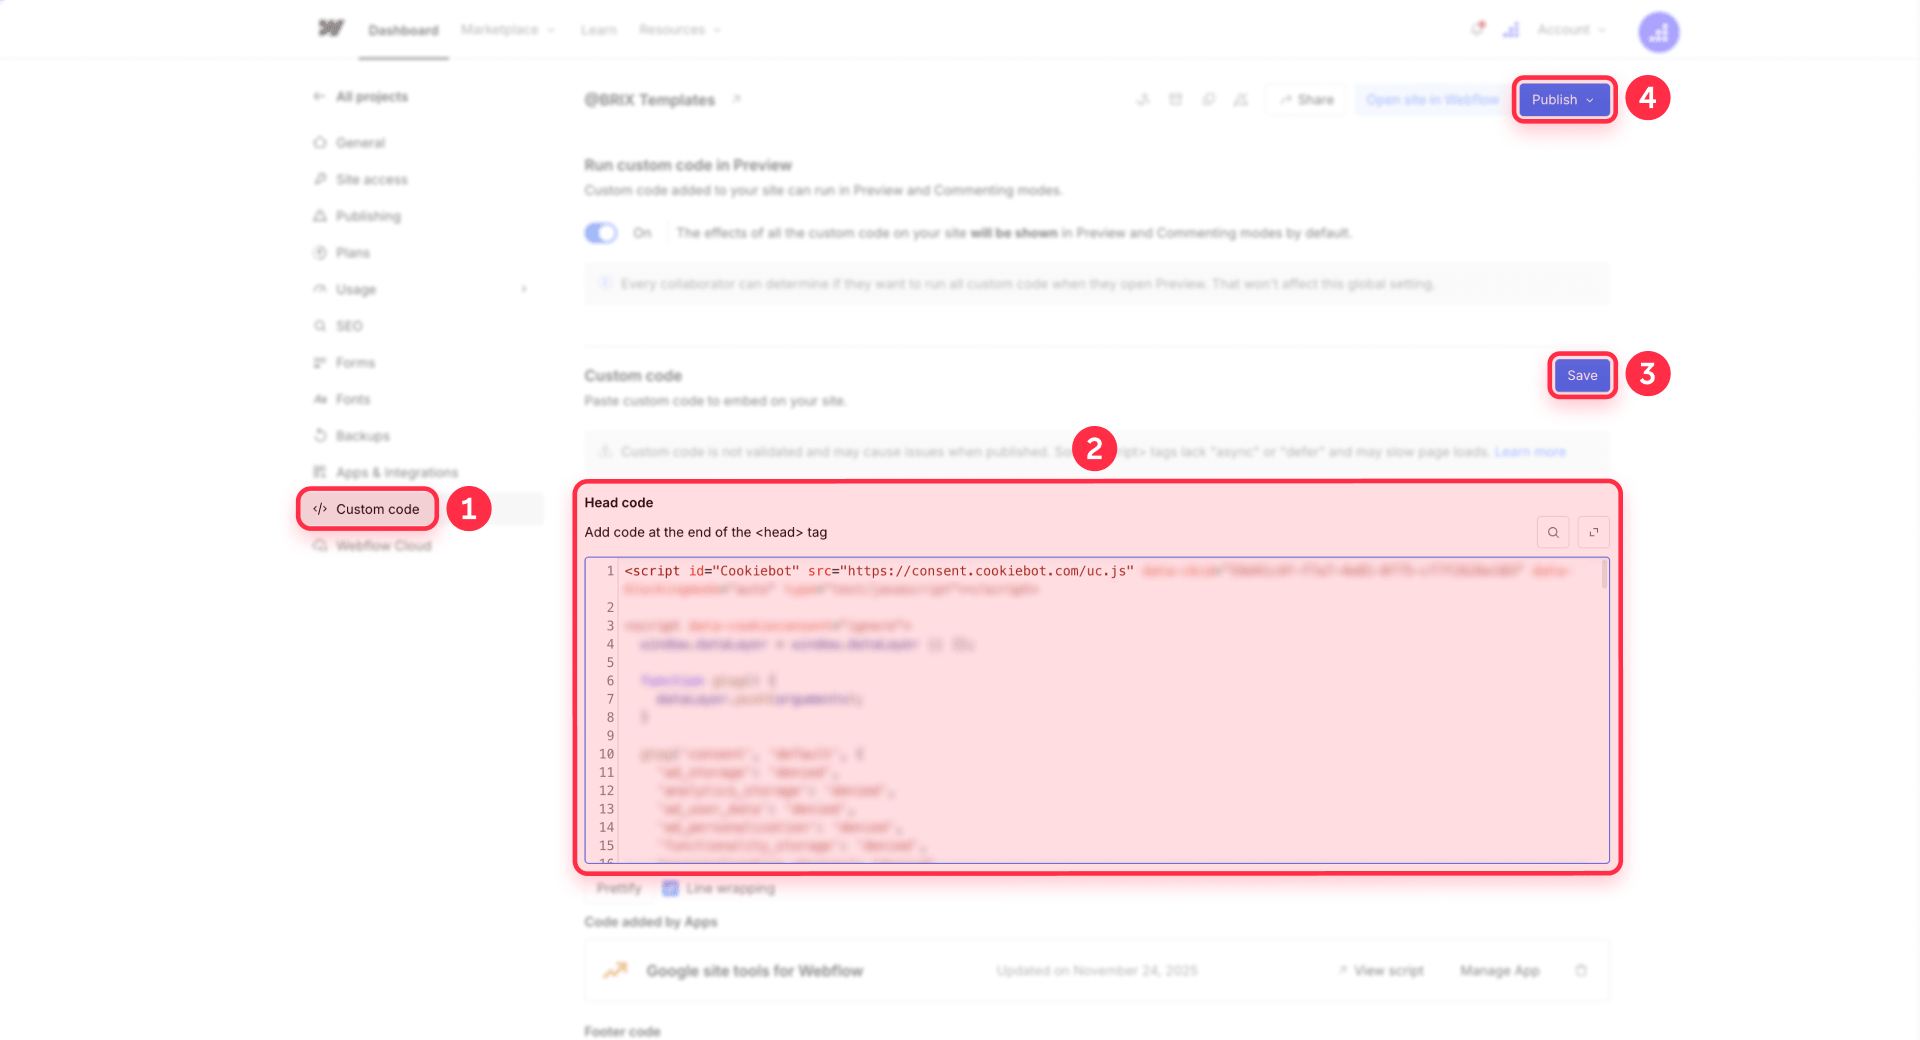
Publish the site and confirm in Cookiebot that the implementation status is Live.
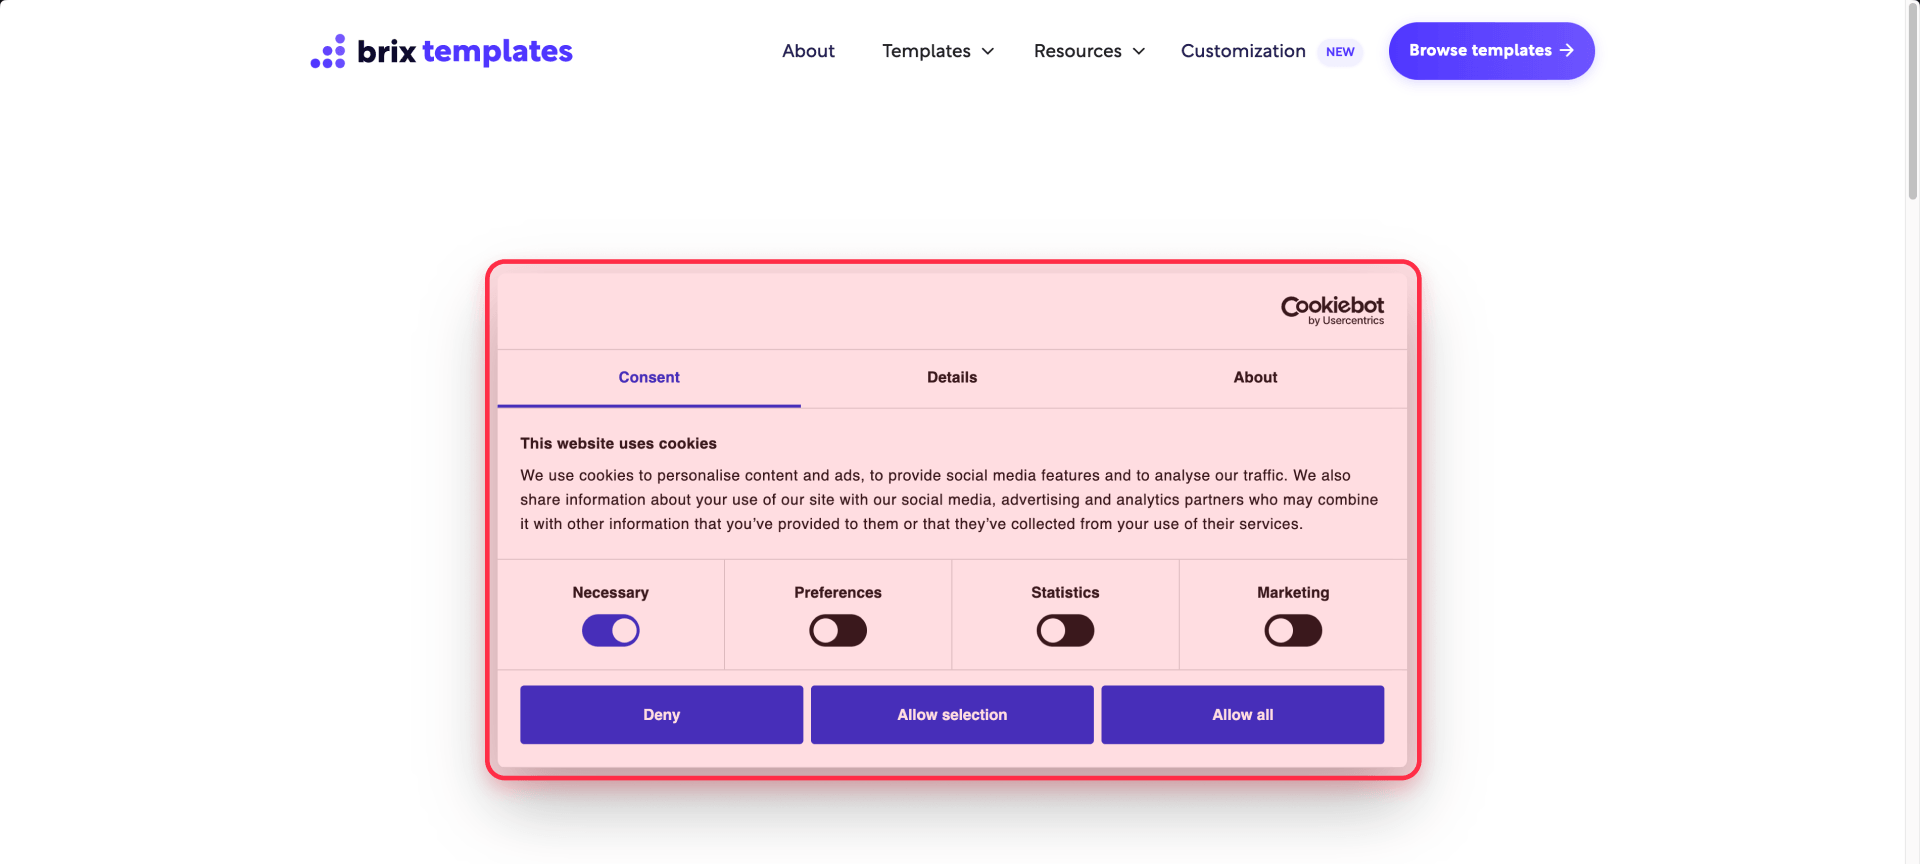
Open the published Webflow site and confirm that the Cookiebot banner appears and responds to each consent choice.
Verify with Google Tag Assistant that consent defaults are set on page load and the v2 parameters (ad\_user\_data and ad\_personalization) are being sent. For different consent experiences per country, see the region-specific section.
Method 2 — Google Tag Manager \+ Cookiebot CMP
This method is not "GTM alone." It uses GTM plus a CMP template, with Cookiebot as the example. GTM loads Cookiebot, Cookiebot shows the banner, and Cookiebot sends consent updates to GTM. You need a GTM container installed in Webflow, a Cookiebot account with a domain group set up, and the Cookiebot Domain Group ID.
In the Cookiebot dashboard: Create or open a domain group, add your site domain and aliases, configure the banner and legislation settings, and copy the Domain Group ID. Do not paste the direct Cookiebot script into Webflow — it loads through GTM.
In Webflow (Site settings \> Custom code \> Head code): Keep only the GTM container snippet. Remove any direct Cookiebot CMP script or gtag.js Consent Mode snippet. Publish the site.
In GTM:
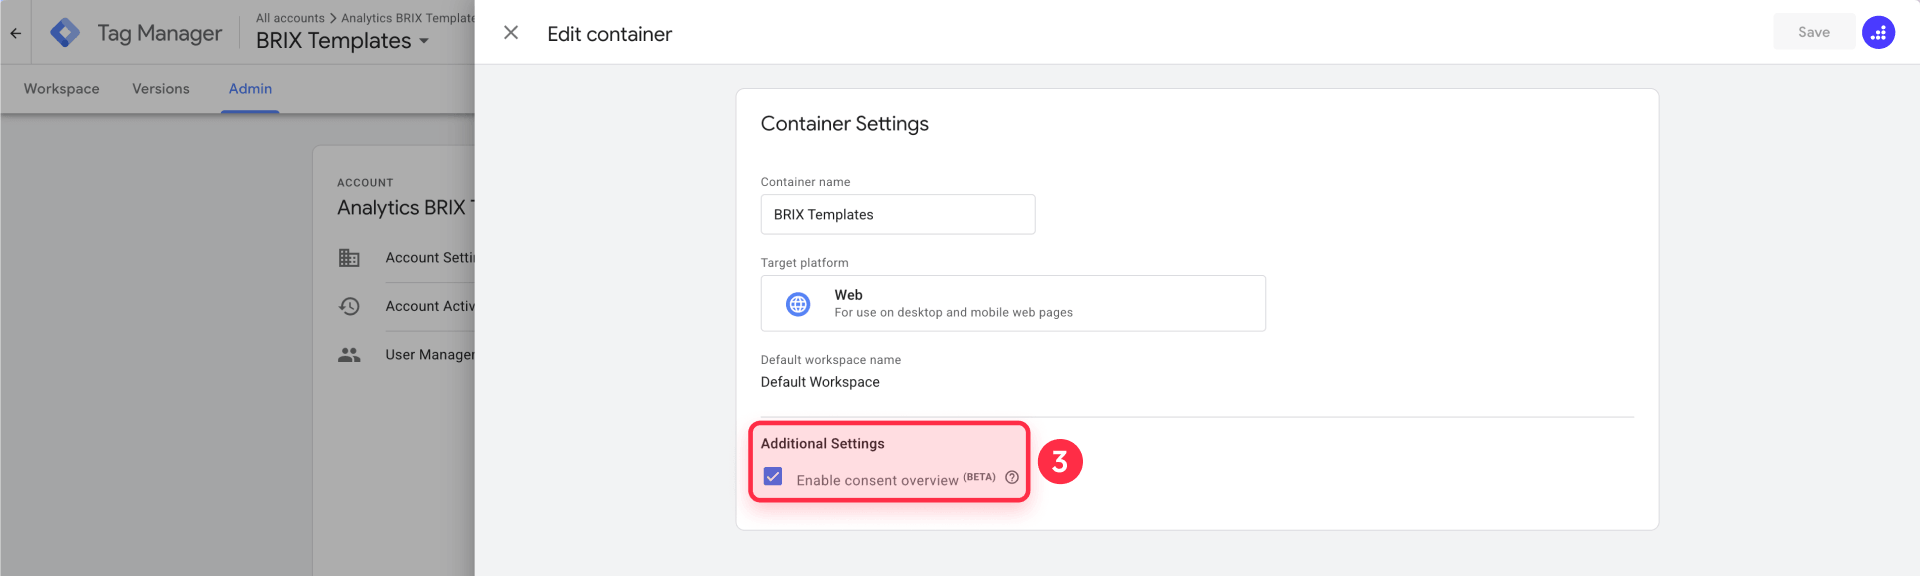
Step 1 — Enable the consent overview. Go to Admin \> Container Settings.
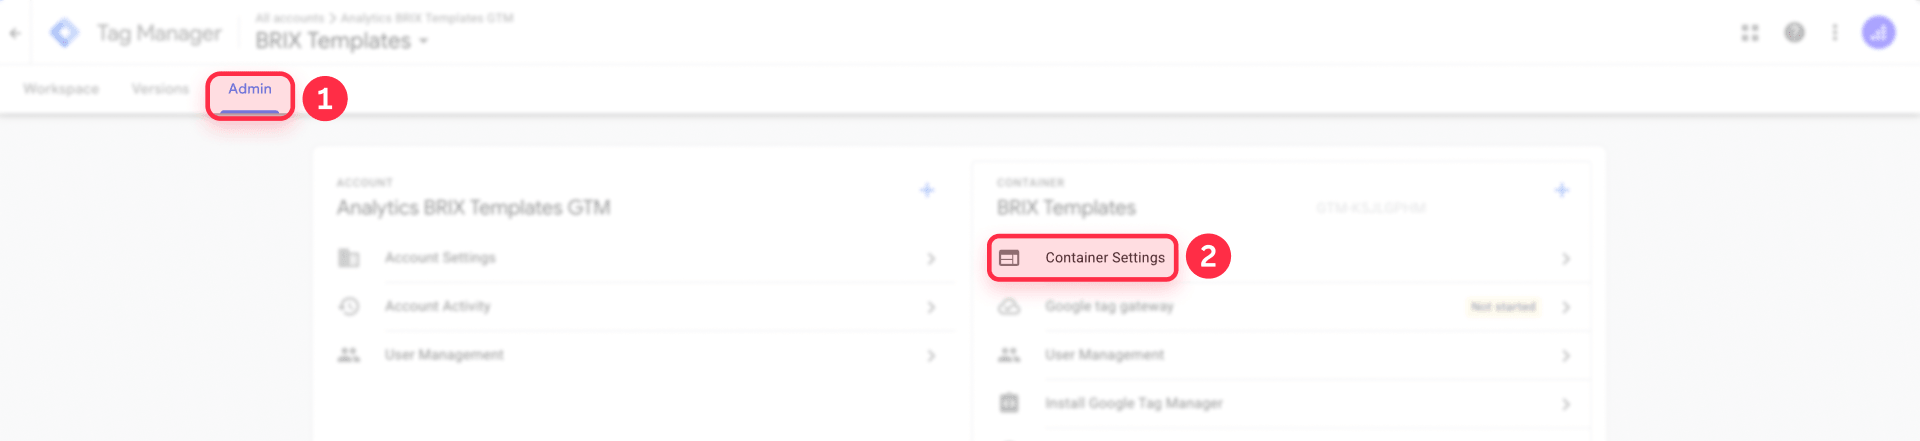
Under Additional Settings, check Enable consent overview and save the container settings.
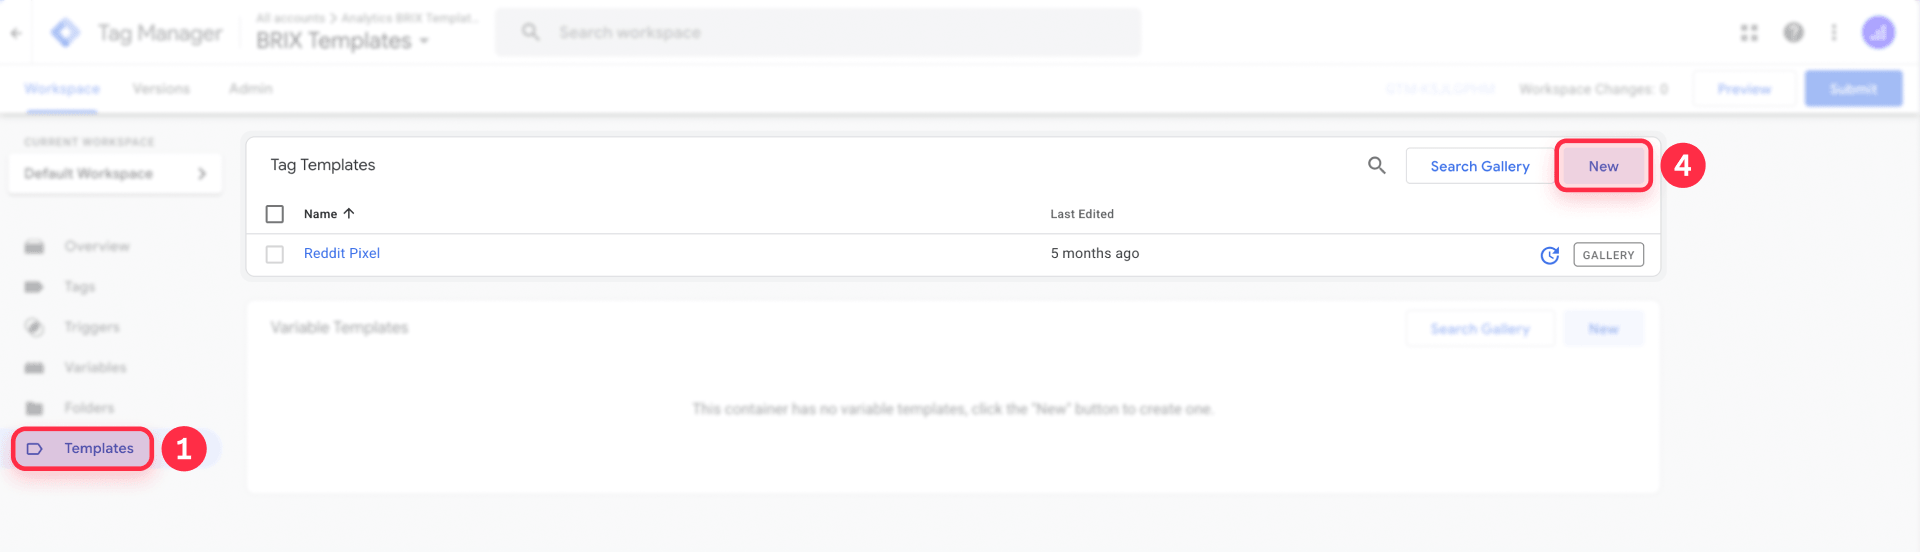
Step 2 — Add the Cookiebot CMP template. Open Templates, select Search Gallery, and start a new tag template search.
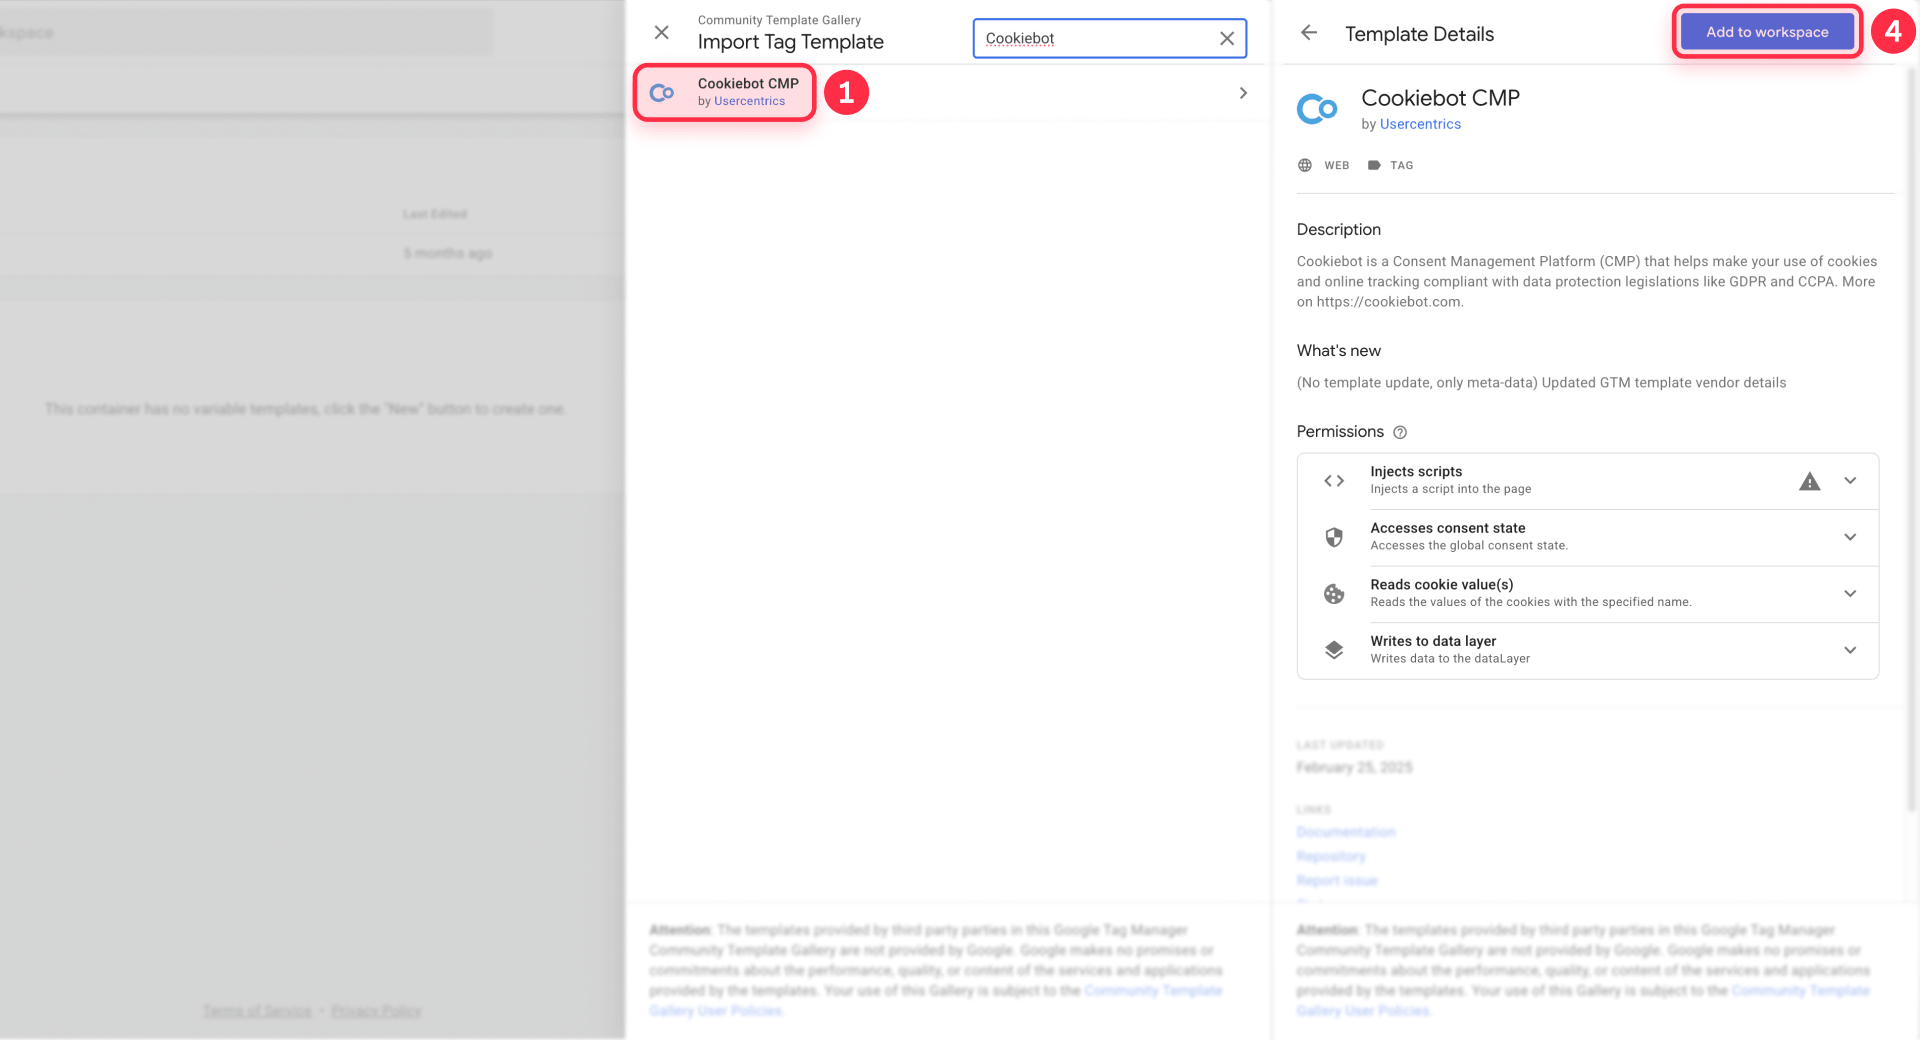
Find Cookiebot CMP by Usercentrics in the gallery and add it to the workspace.
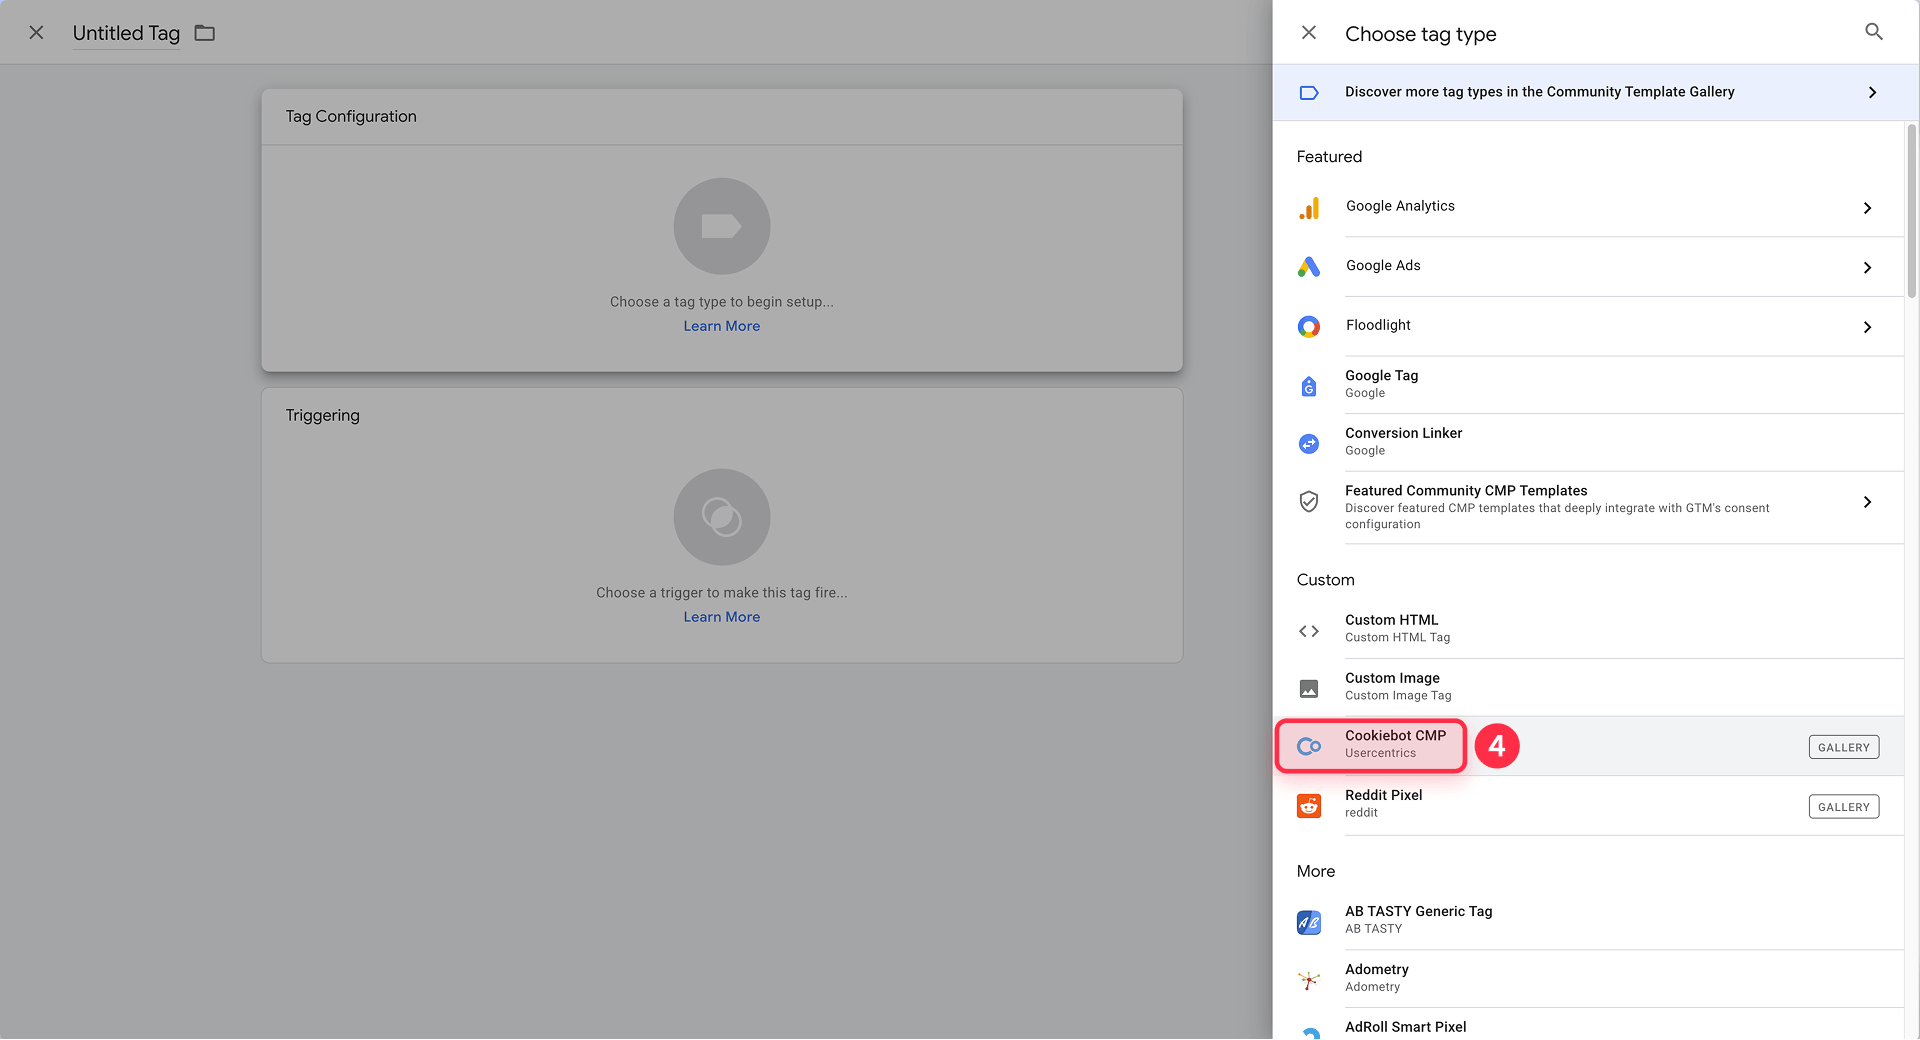
Step 3 — Create the Cookiebot consent tag. Create a new tag and select the imported Cookiebot CMP template as its tag type. Name it CMP \- Cookiebot \- Consent Initialization.
Paste the Cookiebot Domain Group ID from your dashboard and turn on Enable Google Consent Mode so the template sends v2 signals automatically. Set Preferences, analytics\_storage, ad\_storage, ad\_user\_data, and ad\_personalization to denied. Set security\_storage to granted. Use Consent Initialization \- All Pages as the trigger so it fires before regular tags.
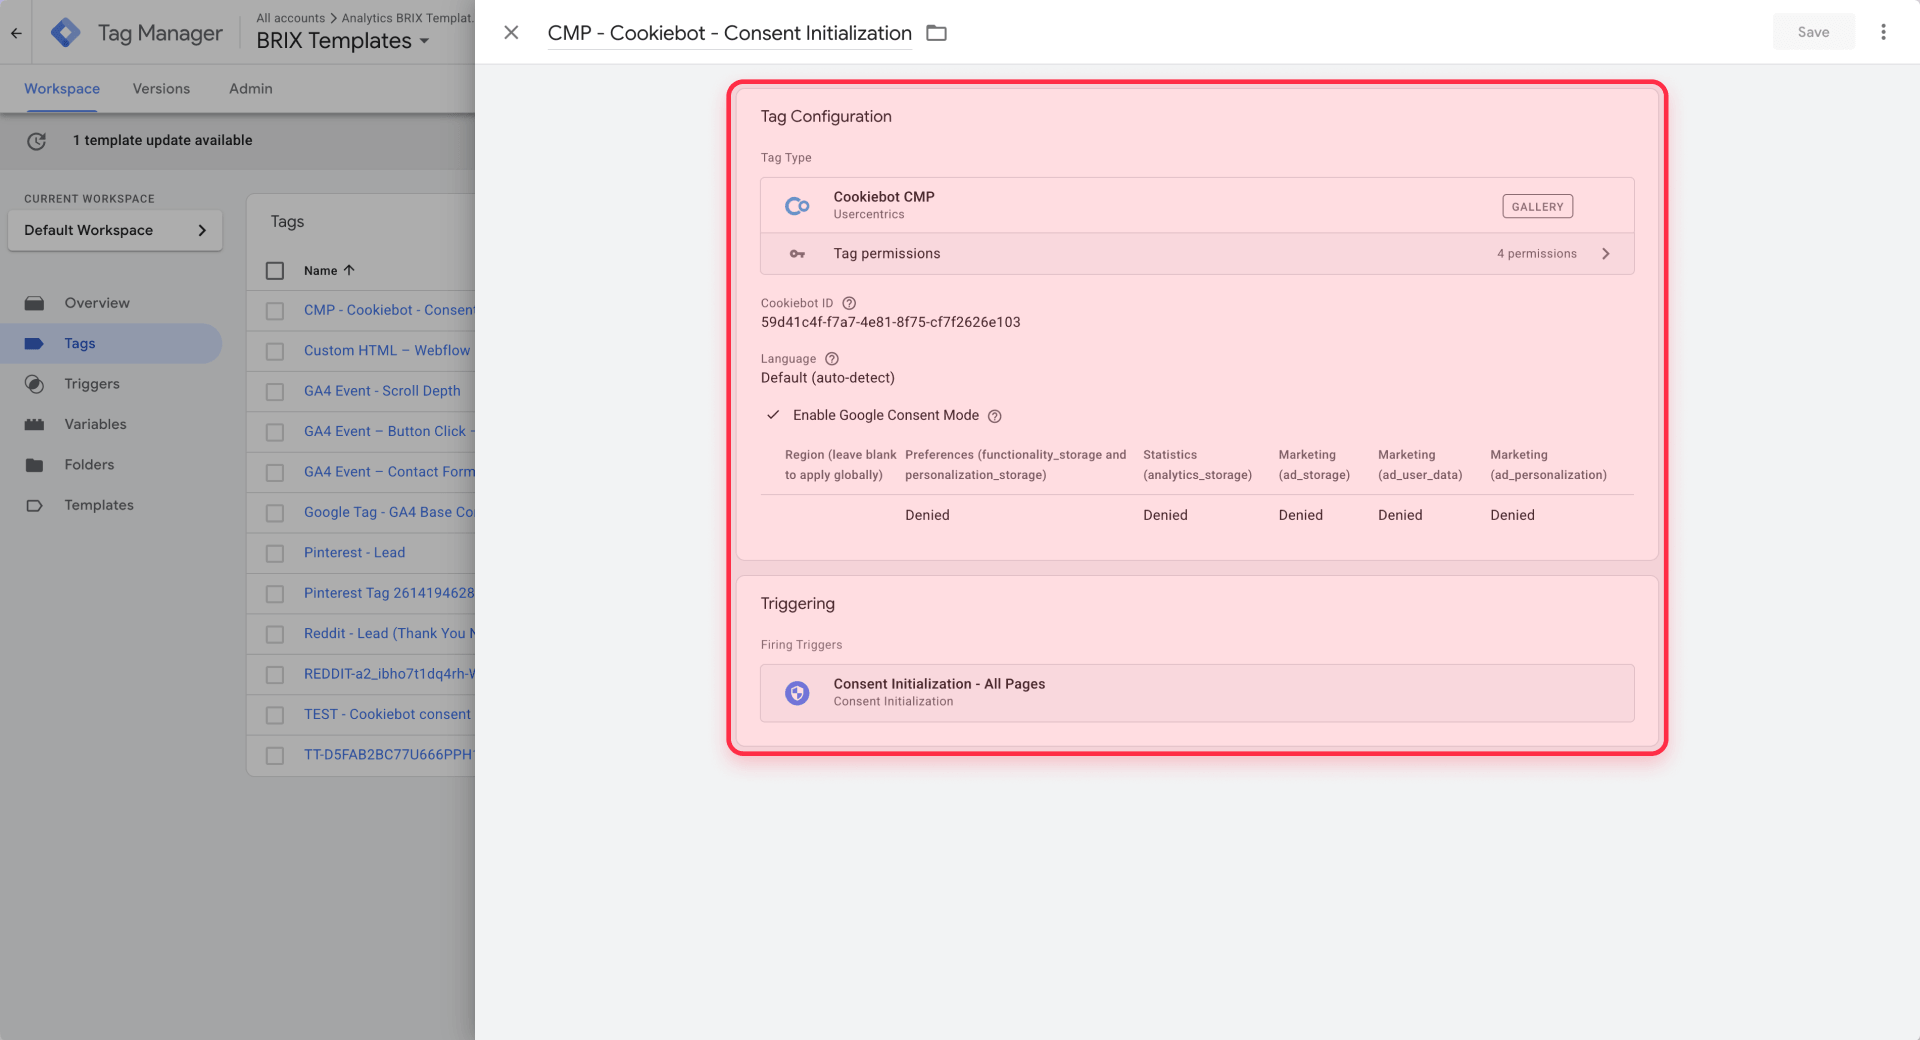
Step 4 — Review and test the setup. Review your GA4, Google Ads, and other tags. Use GTM's built-in consent settings so each tag requires the right consent type (ad\_storage for ads, analytics\_storage for analytics). Do not use gtag('consent', 'update', ...) inside GTM — the CMP template handles updates.
Open the published Webflow site and confirm that the Cookiebot consent dialog appears.
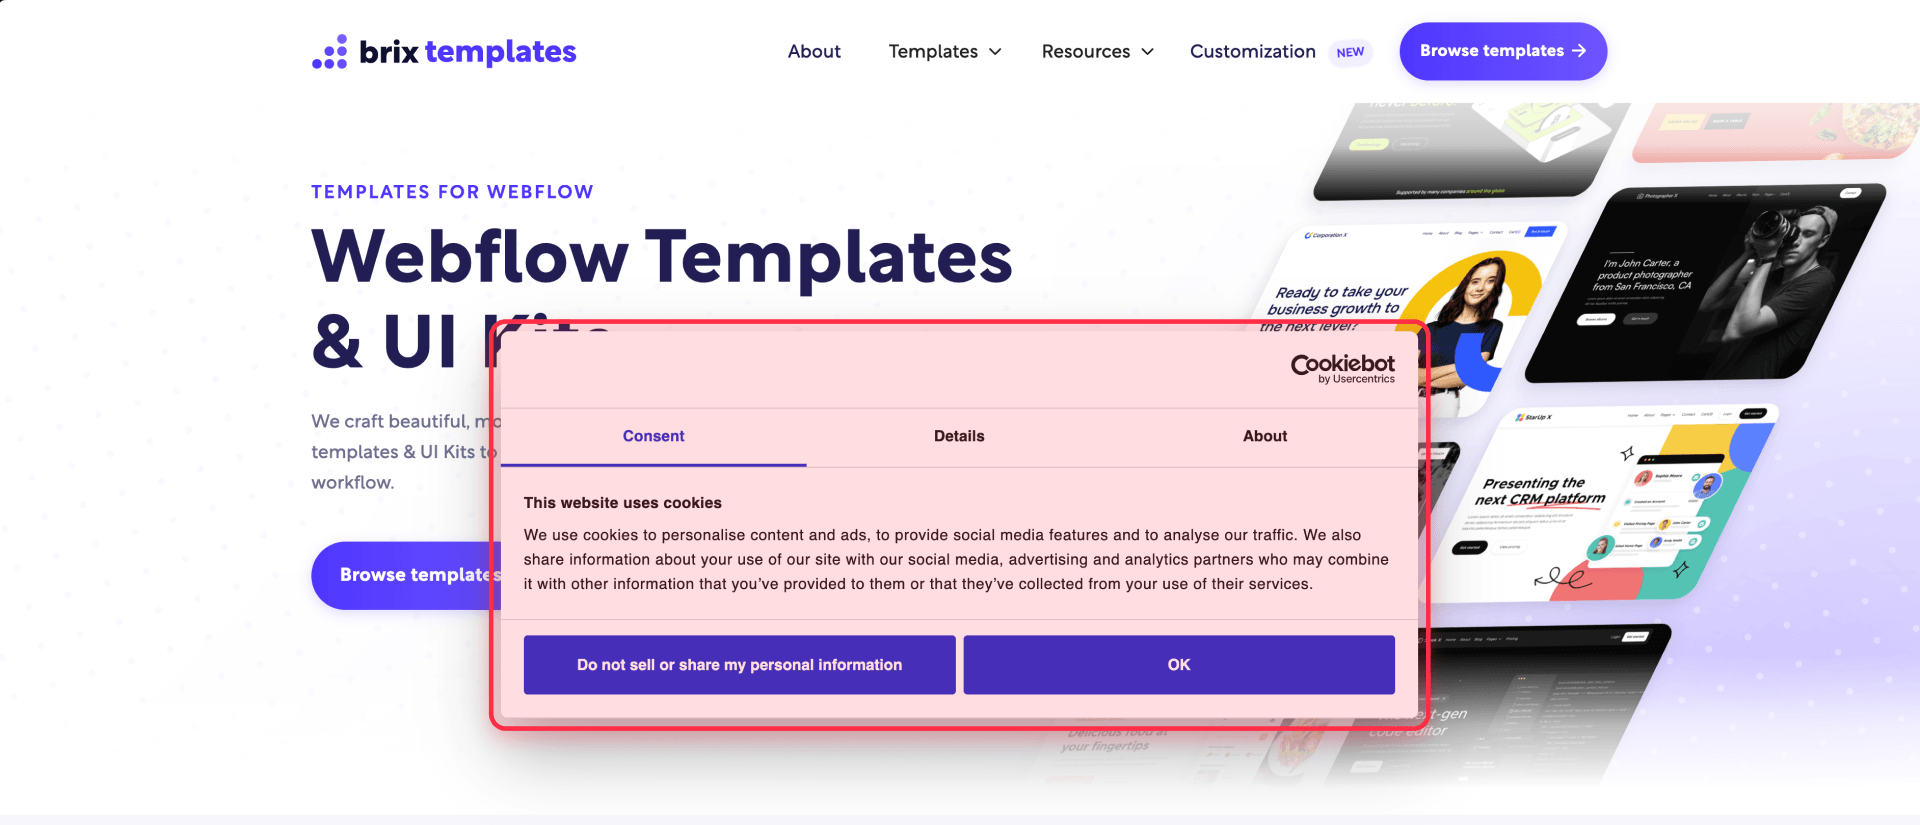
Test in GTM Preview or Google Tag Assistant: confirm the CMP tag fires on Consent Initialization, the banner appears, and consent state changes when you interact with it. Publish the GTM container after testing. For region-specific rules, see the region-specific section.
Method 3 — Custom banner via gtag.js
For Webflow users who already have a custom cookie banner and want to connect it to Consent Mode without a full CMP. You need a banner with Accept and Reject buttons, a real GA4 Measurement ID, and no duplicate GA4/GTM tags.
Step 1 — Add custom attributes in Webflow. In the Designer, select each element and add brix-consent as a custom attribute:
- Banner wrapper: value banner
- Accept button: value accept
- Reject/close button: value reject
These are custom data attributes that help the script find your banner elements.
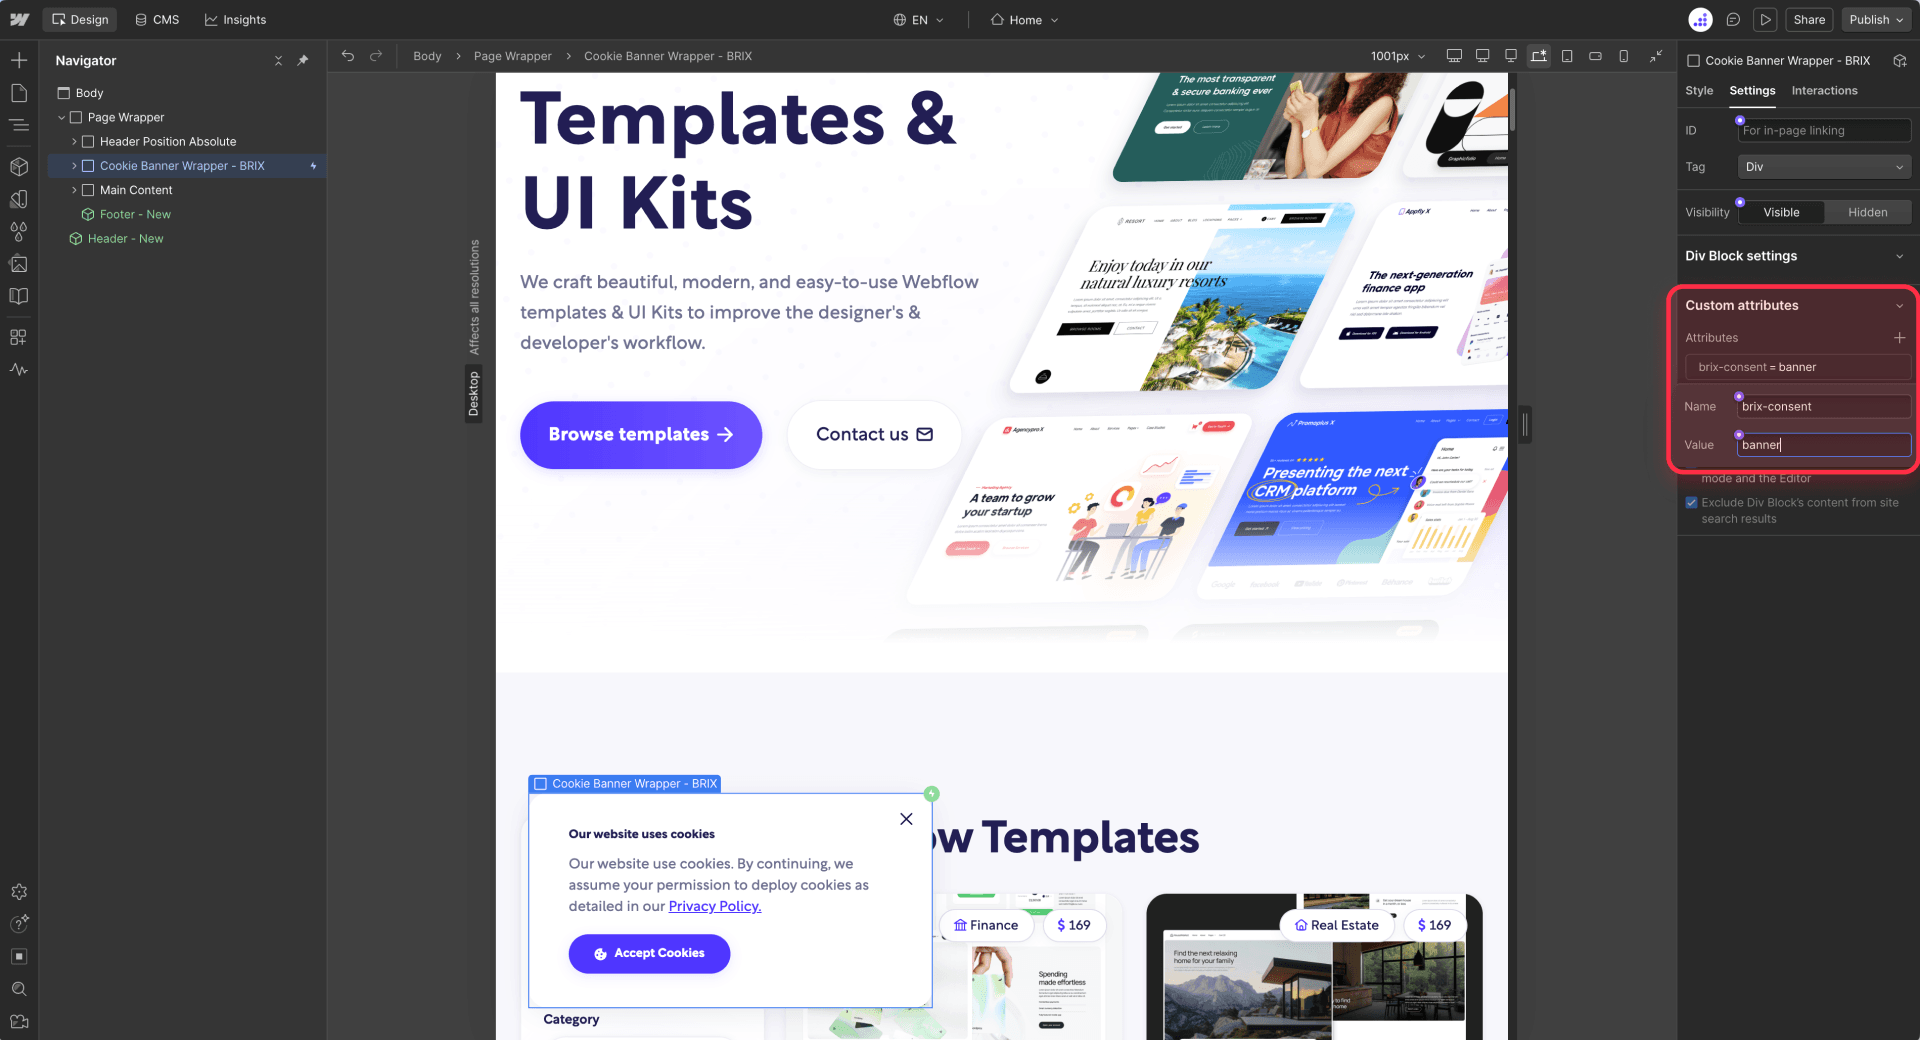
Step 2 — Add these two snippets to your Head code (Site settings \> Custom code \> Head code), in this order:
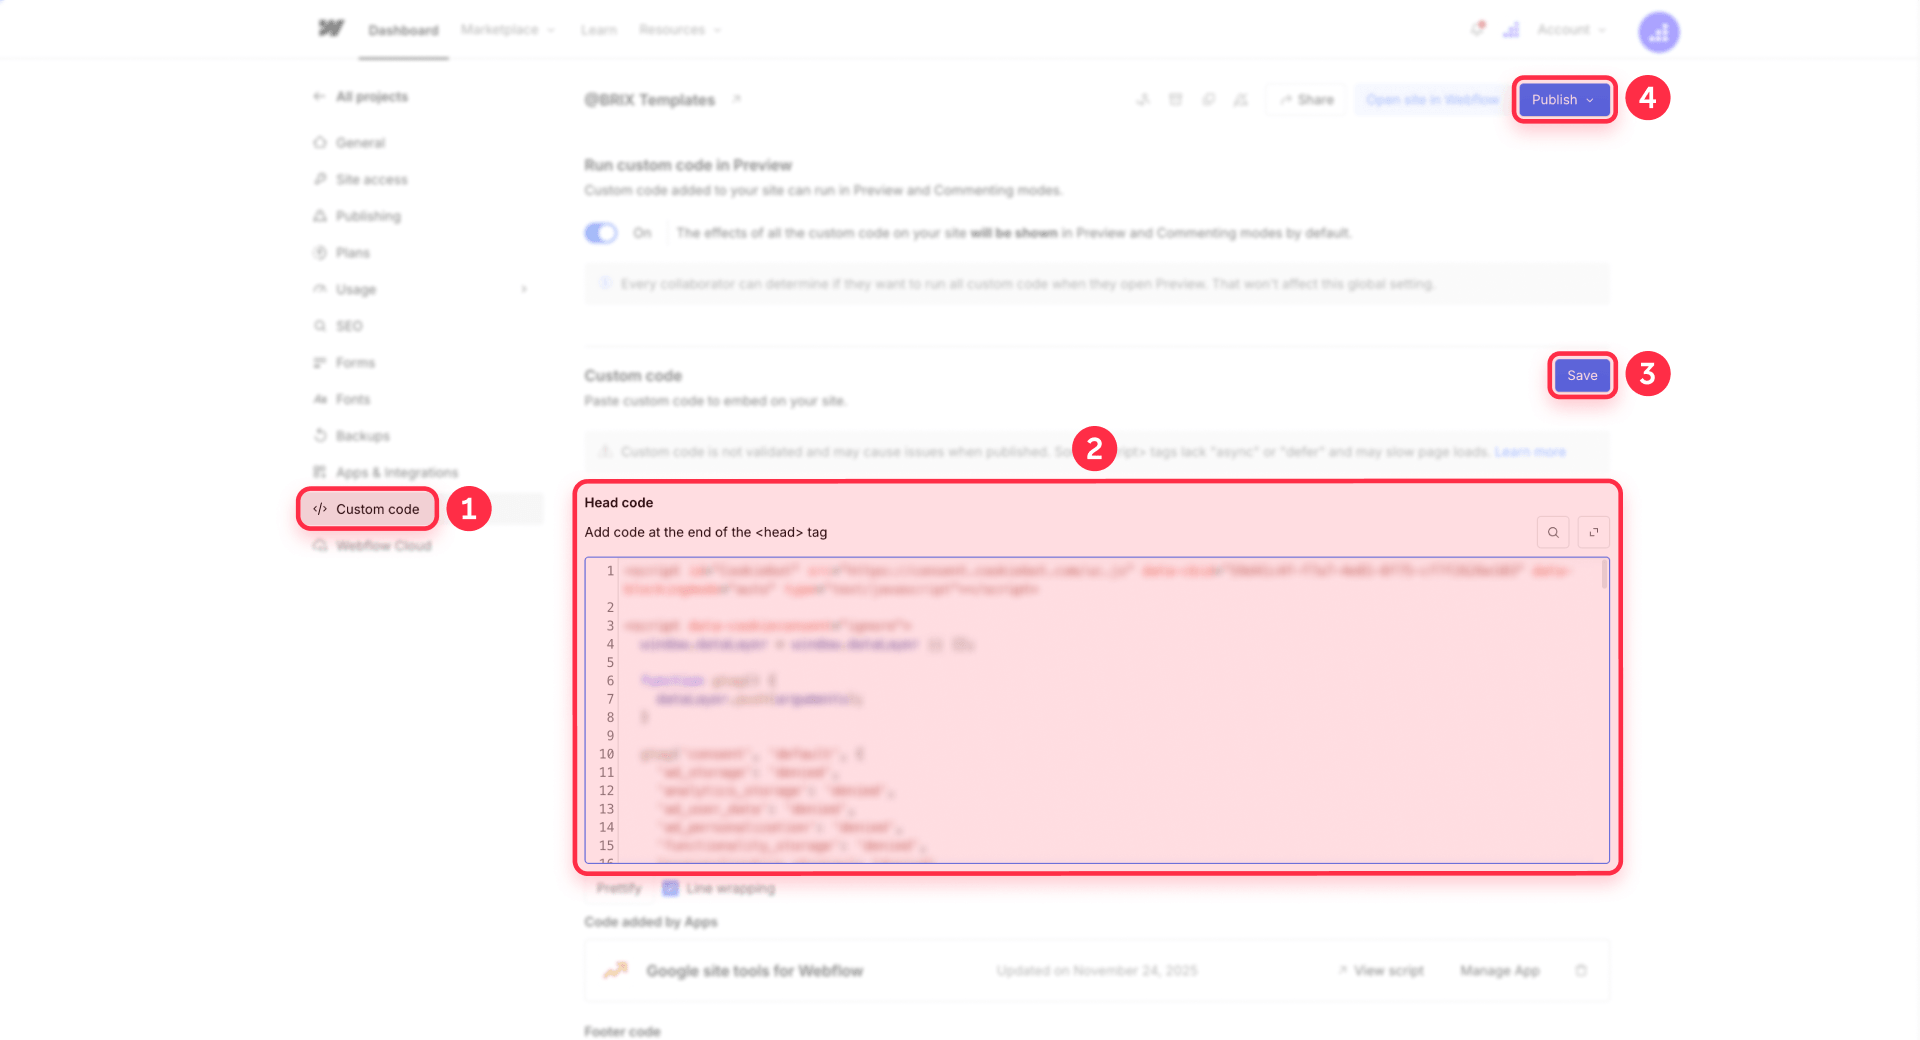
Consent defaults (reads from localStorage for returning visitors):
<script>
  window.dataLayer = window.dataLayer || [];
  function gtag(){dataLayer.push(arguments);}

  var storedConsent = localStorage.getItem('consentGranted');
  var defaultState = storedConsent === 'true' ? 'granted' : 'denied';

  gtag('consent', 'default', {
    'ad_storage': defaultState,
    'analytics_storage': defaultState,
    'ad_user_data': defaultState,
    'ad_personalization': defaultState
  });
</script>
GA4 tag (replace G-XXXXXXXXXX with your real Measurement ID):
<script async src="https://www.googletagmanager.com/gtag/js?id=G-XXXXXXXXXX"></script>
<script>
  window.dataLayer = window.dataLayer || [];
  function gtag(){dataLayer.push(arguments);}
  gtag('js', new Date());
  gtag('config', 'G-XXXXXXXXXX');
</script>
If you already have GA4 installed in Webflow, just make sure the consent defaults appear above your existing gtag.js snippet.
Step 3 — Add the banner wiring script to your Footer code (Site settings \> Custom code \> Footer code):
<script>
  (function() {
    var banner = document.querySelector('[brix-consent="banner"]');
    var acceptBtn = document.querySelector('[brix-consent="accept"]');
    var rejectBtn = document.querySelector('[brix-consent="reject"]');

    if (localStorage.getItem('consentGranted') && banner) {
      banner.style.display = 'none';
    }

    if (acceptBtn) {
      acceptBtn.addEventListener('click', function() {
        gtag('consent', 'update', {
          'ad_storage': 'granted',
          'analytics_storage': 'granted',
          'ad_user_data': 'granted',
          'ad_personalization': 'granted'
        });
        localStorage.setItem('consentGranted', 'true');
        if (banner) banner.style.display = 'none';
      });
    }

    if (rejectBtn) {
      rejectBtn.addEventListener('click', function() {
        gtag('consent', 'update', {
          'ad_storage': 'denied',
          'analytics_storage': 'denied',
          'ad_user_data': 'denied',
          'ad_personalization': 'denied'
        });
        localStorage.setItem('consentGranted', 'false');
        if (banner) banner.style.display = 'none';
      });
    }
  })();
</script>
The script hides the banner if consent was already stored, and sends the correct update to Google on Accept or Reject.
Publish and test with Google Tag Assistant: denied defaults on load, granted after Accept, persistence on reload, denied after Reject. Confirm that the custom banner displays correctly on the published Webflow site.
For region-specific defaults, see the region-specific section.
How to set region-specific consent defaults in Webflow
Many Webflow sites need different consent behavior depending on the visitor's location — for example, deny consent by default for visitors from EEA countries, the UK, and Switzerland, and set different defaults for other regions. How you handle this depends on which method you chose:
- Method 1 — Cookiebot: Manage regional rules, legislation presets, and banner behavior directly inside the Cookiebot dashboard. Cookiebot detects the visitor's location and applies the correct consent experience automatically.
- Method 2 — GTM \+ Cookiebot CMP: Manage regional behavior through Cookiebot and/or the Cookiebot CMP template settings in GTM, depending on your setup.
- Method 3 — Custom gtag.js: Use the gtag.js region parameter in your consent default snippet to set different defaults for specific countries.
Region-specific defaults with gtag.js (Method 3\)
If you are using Method 3, the region parameter uses ISO 3166-2 geographic codes. Here is an important caveat: using region: ['EU'] is not a valid ISO code — it will not match any region. You need to list specific country codes. Below is a working list of EEA countries plus the UK and Switzerland based on current documentation — verify these codes before publishing, as regions and policies can change:
AT, BE, BG, HR, CY, CZ, DK, EE, FI, FR, DE, GR, HU, IS, IE, IT, LV, LI, LT, LU, MT, NL, NO, PL, PT, RO, SK, SI, ES, SE, CH, GB
Your consent default snippet would look like this:
<script>
  window.dataLayer = window.dataLayer || [];
  function gtag(){dataLayer.push(arguments);}

  // Denied defaults for EEA, UK, and Switzerland
  gtag('consent', 'default', {
    'ad_storage': 'denied',
    'analytics_storage': 'denied',
    'ad_user_data': 'denied',
    'ad_personalization': 'denied',
    'region': ['AT', 'BE', 'BG', 'HR', 'CY', 'CZ', 'DK', 'EE', 'FI', 'FR', 'DE', 'GR', 'HU', 'IS', 'IE', 'IT', 'LV', 'LI', 'LT', 'LU', 'MT', 'NL', 'NO', 'PL', 'PT', 'RO', 'SK', 'SI', 'ES', 'SE', 'CH', 'GB']
  });

  // Granted defaults for all other regions
  gtag('consent', 'default', {
    'ad_storage': 'granted',
    'analytics_storage': 'granted',
    'ad_user_data': 'granted',
    'ad_personalization': 'granted'
  });
</script>
The second gtag('consent', 'default', ...) call without a region parameter acts as a catch-all for any country not listed in the first call.
Practical recommendations
If your site only needs a simple global setup — denied defaults everywhere — that may be easier than maintaining region-specific rules. If your site needs different behavior for GDPR, the UK, Switzerland, CCPA, or other privacy frameworks, a CMP like Cookiebot is usually safer and easier to maintain than hardcoding country lists in gtag.js. The CMP handles region detection and consent defaults for you — which is less error-prone than keeping a hardcoded list of ISO codes up to date.
If you need a multi-country Consent Mode setup across GDPR, the UK, Switzerland, CCPA, or other regional requirements, contact our Webflow agency for help configuring the CMP, GTM, gtag.js defaults, regional rules, and verification.
How to upgrade from Consent Mode v1 to v2 in Webflow
If you already have Consent Mode set up on your Webflow site but implemented it before November 2023, you are likely missing the two v2 parameters. Here is what changed and how to update.
Google added ad\_user\_data and ad\_personalization in November 2023 as part of Consent Mode v2. Google's EU User Consent Policy applies to users in the EEA, the UK, and Switzerland. Sites that use Google Ads or other Google advertising features should send Consent Mode v2 signals for users in those regions to avoid degraded measurement or personalization limitations.
To upgrade, add the two new parameters to your existing default and update calls. Here is a before and after comparison.
v1 defaults (two parameters only):
<script>
  gtag('consent', 'default', {
    'ad_storage': 'denied',
    'analytics_storage': 'denied'
  });
</script>
v2 defaults (four parameters):
<script>
  gtag('consent', 'default', {
    'ad_storage': 'denied',
    'analytics_storage': 'denied',
    'ad_user_data': 'denied',
    'ad_personalization': 'denied'
  });
</script>
The same change applies to your consent update calls — add ad\_user\_data and ad\_personalization wherever you call gtag('consent', 'update', ...).
Most major CMPs updated their Consent Mode integrations to support v2 in early 2024\. If you use a CMP like Cookiebot, OneTrust, or Osano, check your CMP's documentation to confirm v2 support is enabled.
How to test if Consent Mode is working on your Webflow site
After implementing Consent Mode, you need to verify that it is working correctly.
Primary method — Google Tag Assistant
Use Google Tag Assistant — either the web version or GTM's built-in preview mode — to verify consent state in real time. Tag Assistant shows consent state changes as they happen, making it the recommended verification tool per Google's documentation.
Open Tag Assistant, enter your Webflow site URL, and interact with your consent banner. You should see consent state change from denied to granted (or vice versa) when you click "Accept" or "Reject."
Secondary method — DevTools Network tab
You can also inspect network requests in Chrome DevTools. Look for requests to google-analytics.com and googletagmanager.com and check for the gcs and gcd parameters in the query string. These parameters encode the current consent state.
However, the internal encoding of gcs and gcd may change over time and should not be treated as stable public documentation. Do not attempt to decode specific parameter values. Use Google Tag Assistant as your primary tool and treat DevTools as supplementary information only.
Why did my GA4 data drop after adding a cookie banner in Webflow?
This is the most common complaint after setting up a cookie consent widget in Webflow. A data drop does not necessarily mean something is broken — but it can indicate a configuration issue. Here are the three most common scenarios.
Scenario 1 — Banner blocks tags entirely, no Consent Mode
Your banner prevents Google tags from firing for visitors who do not consent, but there is no Consent Mode in place. Tags never fire, and no data is sent for those visitors.
Fix: Implement Consent Mode to enable conversion modeling and partially fill measurement gaps. If you implement Advanced Consent Mode, tags can also send cookieless pings when consent is denied — but this depends on your organization's approach and should be approved by your legal or privacy team.
Scenario 2 — Consent defaults in the wrong order
Consent Mode is configured, but the consent defaults are placed after the GTM or gtag.js snippet. Tags fire before they know the visitor's consent state.
Fix: Move the consent default snippet above the GTM or gtag.js snippet in Site settings \> Custom code \> Head code.
Scenario 3 — CMP not sending consent updates
Your CMP is installed, but its Consent Mode integration is not enabled or not working. Tags stay in a denied state permanently because the update never fires.
Fix: Verify that your CMP's Consent Mode integration is enabled in the CMP dashboard. Use Google Tag Assistant to confirm that consent state changes when you interact with the banner.
Important context about data drops
Even with correctly configured Consent Mode, some data reduction for non-consenting visitors is expected. Consent Mode fills gaps through behavioral modeling and conversion modeling, but modeled data is not identical to fully consented data. The modeling depends on meeting certain data thresholds and eligibility criteria — it does not appear immediately, and it is not visible in GA4 Realtime reports.
For GA4 behavioral modeling, check your standard reports after a few days. For Google Ads conversion modeling, check the conversions diagnostics in your Google Ads account — not GA4 Realtime.
5 common mistakes when setting up Google Consent Mode in Webflow
- Putting consent code after tags in the head. Tags may fire without consent signals on the first page load if the defaults come after the tag snippet. This is the most common failure point. Always place consent defaults before your GTM or gtag.js snippet.
- Forgetting to persist consent choices. Without persistence — using localStorage or a first-party cookie — consent resets to denied on every page load. Returning visitors who already consented will see the banner again and tags will fire in denied state.
- Using Consent Mode v1 without v2 parameters. If your calls only include ad\_storage and analytics\_storage, you are missing ad\_user\_data and ad\_personalization. Sites targeting users covered by Google's EU User Consent Policy may see degraded ad measurement without these parameters.
- Using gtag('consent', 'update') inside GTM. The gtag call gets queued in GTM's pipeline and may fire after tags have already executed. Use GTM's native setDefaultConsentState and updateConsentState APIs instead.
- Assuming a cookie banner alone communicates consent to Google. A cookie banner manages the visual interface. Consent Mode is the mechanism that communicates the visitor's choice to Google tags. They are separate systems that need to be connected. Whether a banner without Consent Mode is sufficient for compliance depends on your legal context and should be assessed by your organization's legal counsel.
Frequently asked questions about Google Consent Mode in Webflow
Does Webflow have built-in Google Consent Mode support?
No. Webflow does not have native consent mode support. You need to add custom code to your site's Site settings \> Custom code \> Head code section, or use a CMP that handles consent mode automatically. Cookiebot, Google Tag Manager with a CMP template, or a custom gtag.js implementation are the three most common approaches — each covered in this tutorial.
What is the difference between basic and advanced consent mode?
Basic consent mode blocks tags from loading until the visitor interacts with the banner. No data is sent before consent, and conversion modeling uses a general model based on aggregated data from other sites. Advanced consent mode loads tags immediately with denied defaults and sends cookieless pings before consent is given, allowing conversion modeling to use an advertiser-specific model. Advanced mode can improve measurement but requires legal approval — loading Google tags before consent may not comply with every interpretation of GDPR or ePrivacy.
Do I need Consent Mode if I only use GA4 and no Google Ads?
Consent Mode can help preserve GA4 measurement through behavioral modeling when visitors deny consent. However, the impact is more significant for Google Ads conversion tracking because Google uses consent signals to model conversions for campaigns targeting users in the EEA. If you only use GA4, Consent Mode still provides value through modeling, but the urgency depends on your traffic mix from regions covered by Google's EU User Consent Policy.
What happens if I do not set up Consent Mode?
For users covered by Google's EU User Consent Policy (EEA, UK, and Switzerland), Google tags may either fire without consent signals or not fire at all. Sites that use Google Ads or other Google advertising features should send Consent Mode v2 signals for users in those regions to avoid degraded measurement or personalization limitations. Without Consent Mode, you also lose the ability to use conversion modeling and behavioral modeling to partially recover measurement data for non-consenting visitors. Consult legal counsel for guidance on your specific obligations.
Can I use a free cookie banner widget with Consent Mode?
Yes — but you need to wire the consent update calls yourself or verify that the widget supports Google Consent Mode natively. Most free banner widgets display a consent interface but do not communicate consent state to Google tags. If your widget lacks built-in Consent Mode support, follow the custom gtag.js method in this tutorial and connect your banner's buttons to gtag('consent', 'update', ...) calls.
Will Consent Mode slow down my Webflow site?
The consent default snippet itself is lightweight — it sets a few variables before tags load and does not perform network requests on its own. However, the overall performance impact depends on your full setup. A CMP script, GTM container, or Cookiebot widget added to Webflow's head code loads external resources and can affect page load times. Test your site's real performance after implementing the full stack — banner, CMP, and tag loader — rather than assuming there is no impact.
Is Cookiebot the only CMP that works with Webflow?
No. Several CMPs integrate with Webflow, including OneTrust, Osano, Termly, and Usercentrics. Cookiebot is one of the most commonly used options for Webflow sites, but it is not the only choice. When evaluating CMPs, check each one's current Google Consent Mode v2 support and Webflow integration documentation — the specifics vary between providers and may have changed since your last review.
Conclusion
Setting up Google Consent Mode in Webflow requires connecting your cookie banner or CMP to communicate consent state to your Google tags. With Cookiebot, most of the work happens in the CMP dashboard. With GTM, consent state is managed inside GTM's Consent Initialization trigger. With a custom gtag.js setup, the consent default snippet must load before the Google tag and you handle updates and persistence manually.
Consent Mode communicates visitor consent choices to Google tags so they can adjust their behavior — enabling modeling to partially fill measurement gaps, and in Advanced Consent Mode implementations, sending cookieless pings when consent is denied. It works alongside your consent banner, privacy policy, and legal review.
Verify your setup with Google Tag Assistant to confirm that consent defaults fire before tags and that consent state updates correctly when visitors interact with your banner. If you need help implementing Consent Mode on your Webflow site, our Webflow agency can assist with the full setup — from choosing the right CMP to wiring consent signals and testing everything end to end.








Join readers commenting on this post!