Running Google Ads campaigns without proper conversion tracking means you're spending money without clear visibility into which clicks lead to actual customers. You're investing in ads but lack the data to understand which campaigns, keywords, and ad copy drive real business results.
While Google Ads offers powerful targeting capabilities, the real value comes from understanding which ads drive meaningful actions on your Webflow site. Conversion tracking bridges this gap by connecting ad clicks to specific outcomes like form submissions, purchases, or sign-ups.
Setting up this tracking might seem technical, but it's actually straightforward when you break it down into clear steps. This guide walks you through the complete process of installing Google Ads conversion tracking on your Webflow site using a dedicated thank you page.
Why conversion tracking matters for Webflow sites
Proper conversion tracking transforms your Google Ads campaigns from guesswork into a data-driven system:
- Accurate attribution: Know exactly which keywords, ads, and campaigns generate leads or sales, allowing you to make informed decisions about where to invest your budget based on actual performance data
- ROI measurement: Calculate your true return on investment by connecting ad spend directly to conversions, helping you determine which campaigns are profitable and which need optimization or should be paused
- Campaign optimization: Use conversion data to improve targeting, adjust bids automatically with Smart Bidding strategies, and refine ad copy based on what actually drives results rather than just clicks
- Budget allocation: Shift spend from underperforming campaigns to high-converting ones, ensuring every dollar works harder toward your business goals
Understanding Google Ads conversion tracking requirements for Webflow
Google Ads conversion tracking requires the Google tag (formerly called the global site tag) installed site-wide on your Webflow project. For thank you page conversions, you can choose between a codeless URL-based method or a manual event snippet method. The codeless approach simply tells Google Ads to count visits to a specific URL as conversions, while the manual method adds a JavaScript snippet that fires when someone loads your thank you page.
To implement tracking, you need a paid Webflow Site plan (Basic, CMS, or Business) since custom code insertion requires this level of access. You'll also need to create a dedicated thank you page where visitors land after completing your desired action, and configure your forms to redirect to this page upon successful submission.
Modern prerequisites for accurate Google Ads tracking in Webflow
Before setting up conversion tracking, verify these essential configurations are in place to ensure accurate data collection and compliance.
1. Create a dedicated thank you page in Webflow
A thank you page is essential for conversion tracking. This page is where visitors land after completing your desired action:
- Create a new page in Webflow: In your Webflow Designer, click Pages and create a new page
- Name it appropriately: Use a clear name like "Thank You" or "Success"
- Design the page: Add a confirmation message, next steps, or resource links
- Set the URL path: Use something clear like /thank-you or /success
- Publish the page: Make sure it's live and accessible
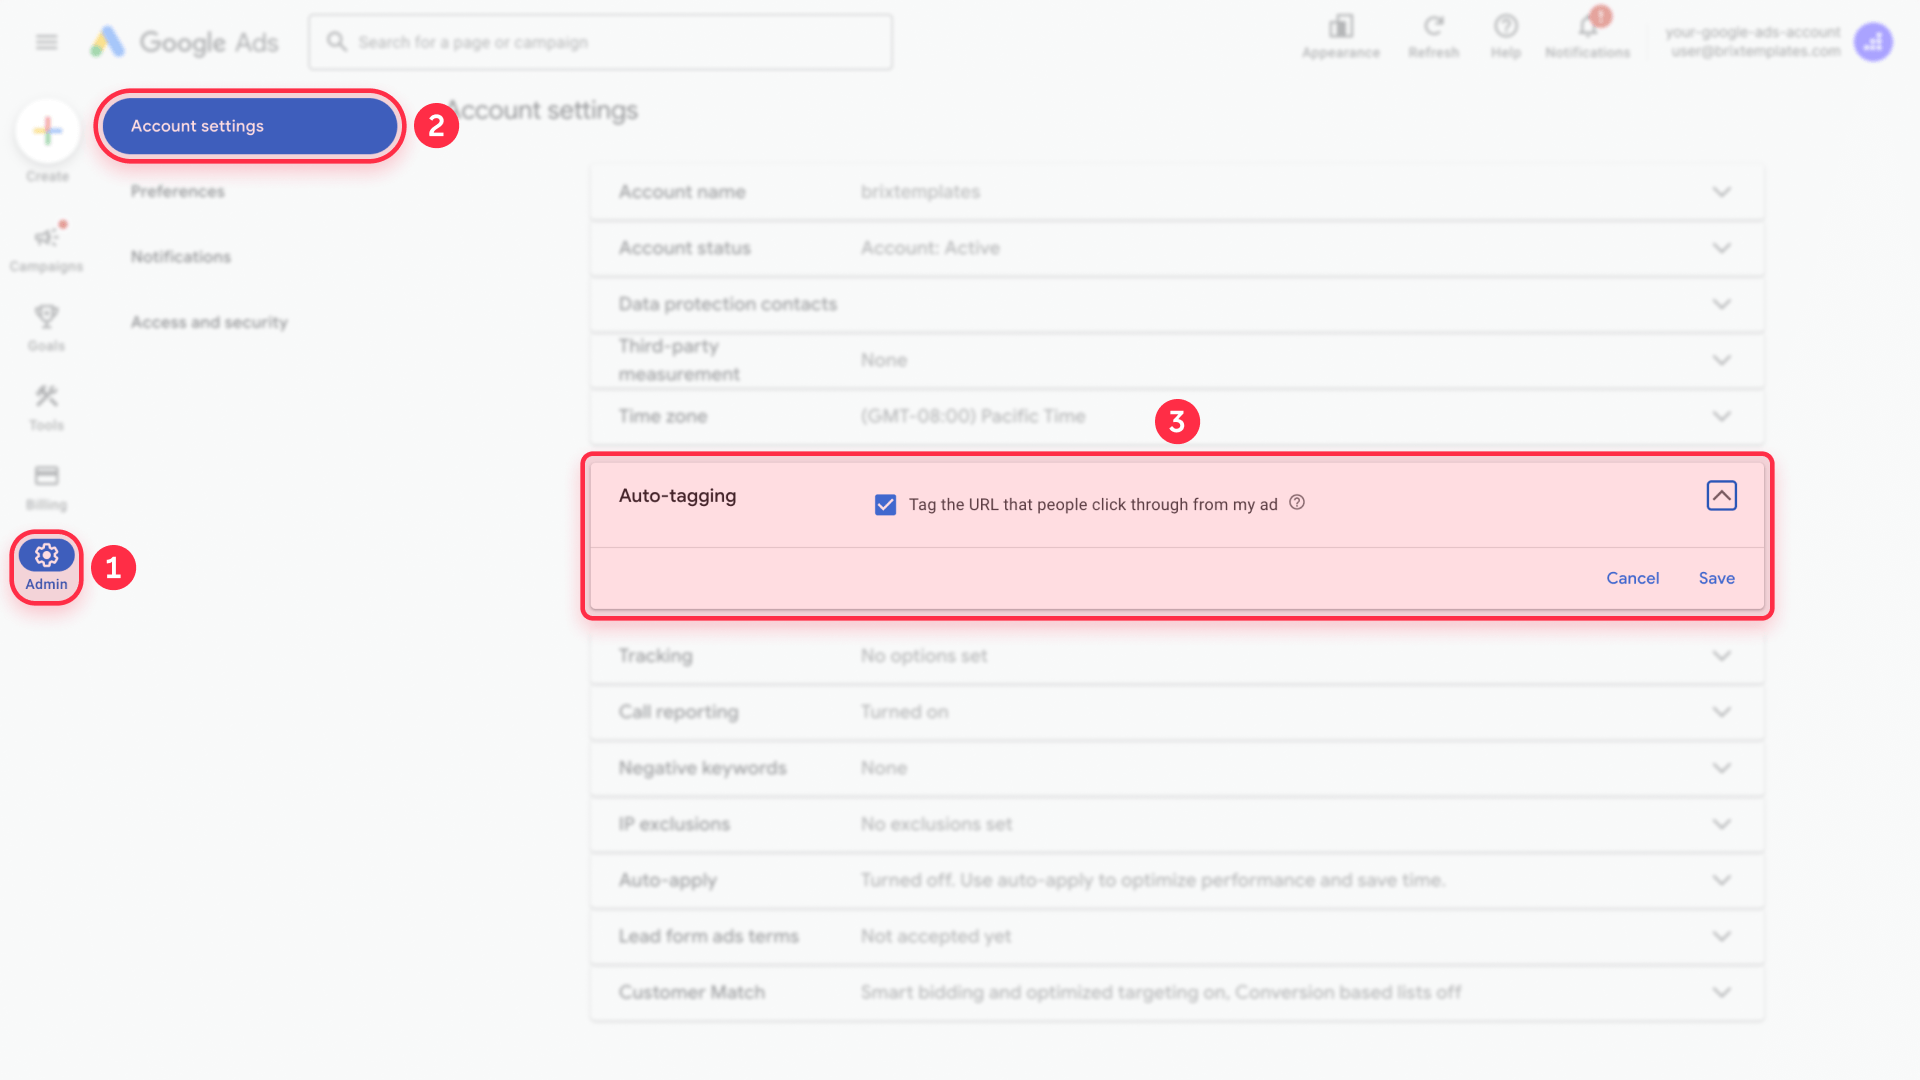
2. Enabling auto-tagging in your Google Ads account
Auto-tagging is effectively required for conversion tracking to work properly. It appends a gclid parameter to your ad URLs so Google can match clicks to conversions:
- Navigate to account settings: In Google Ads, go to Admin → Account settings → Auto-tagging
- Verify it's enabled: Ensure Tag the URL that people click through from my ad is turned ON
- Preserve gclid through redirects: Make sure any redirects on your site preserve the gclid parameter in the URL
Auto-tagging is enabled by default for new accounts, but it's essential to verify this setting before launching campaigns with conversion tracking.
1 - Creating your conversion action in Google Ads
Setting up conversion tracking starts in your Google Ads account, where you'll define what action you want to track and choose your setup method.
Accessing the conversions section in Google Ads
Follow these steps to navigate to the conversion creation area:
- Sign in to your Google Ads account: Go to ads.google.com and log in with your credentials
- Open the Goals menu: Click Goals in the top right corner of the dashboard
- Navigate to conversions: Select Conversions from the dropdown, then click Summary
- Start creating: Click the blue + Create conversion action button to begin setup
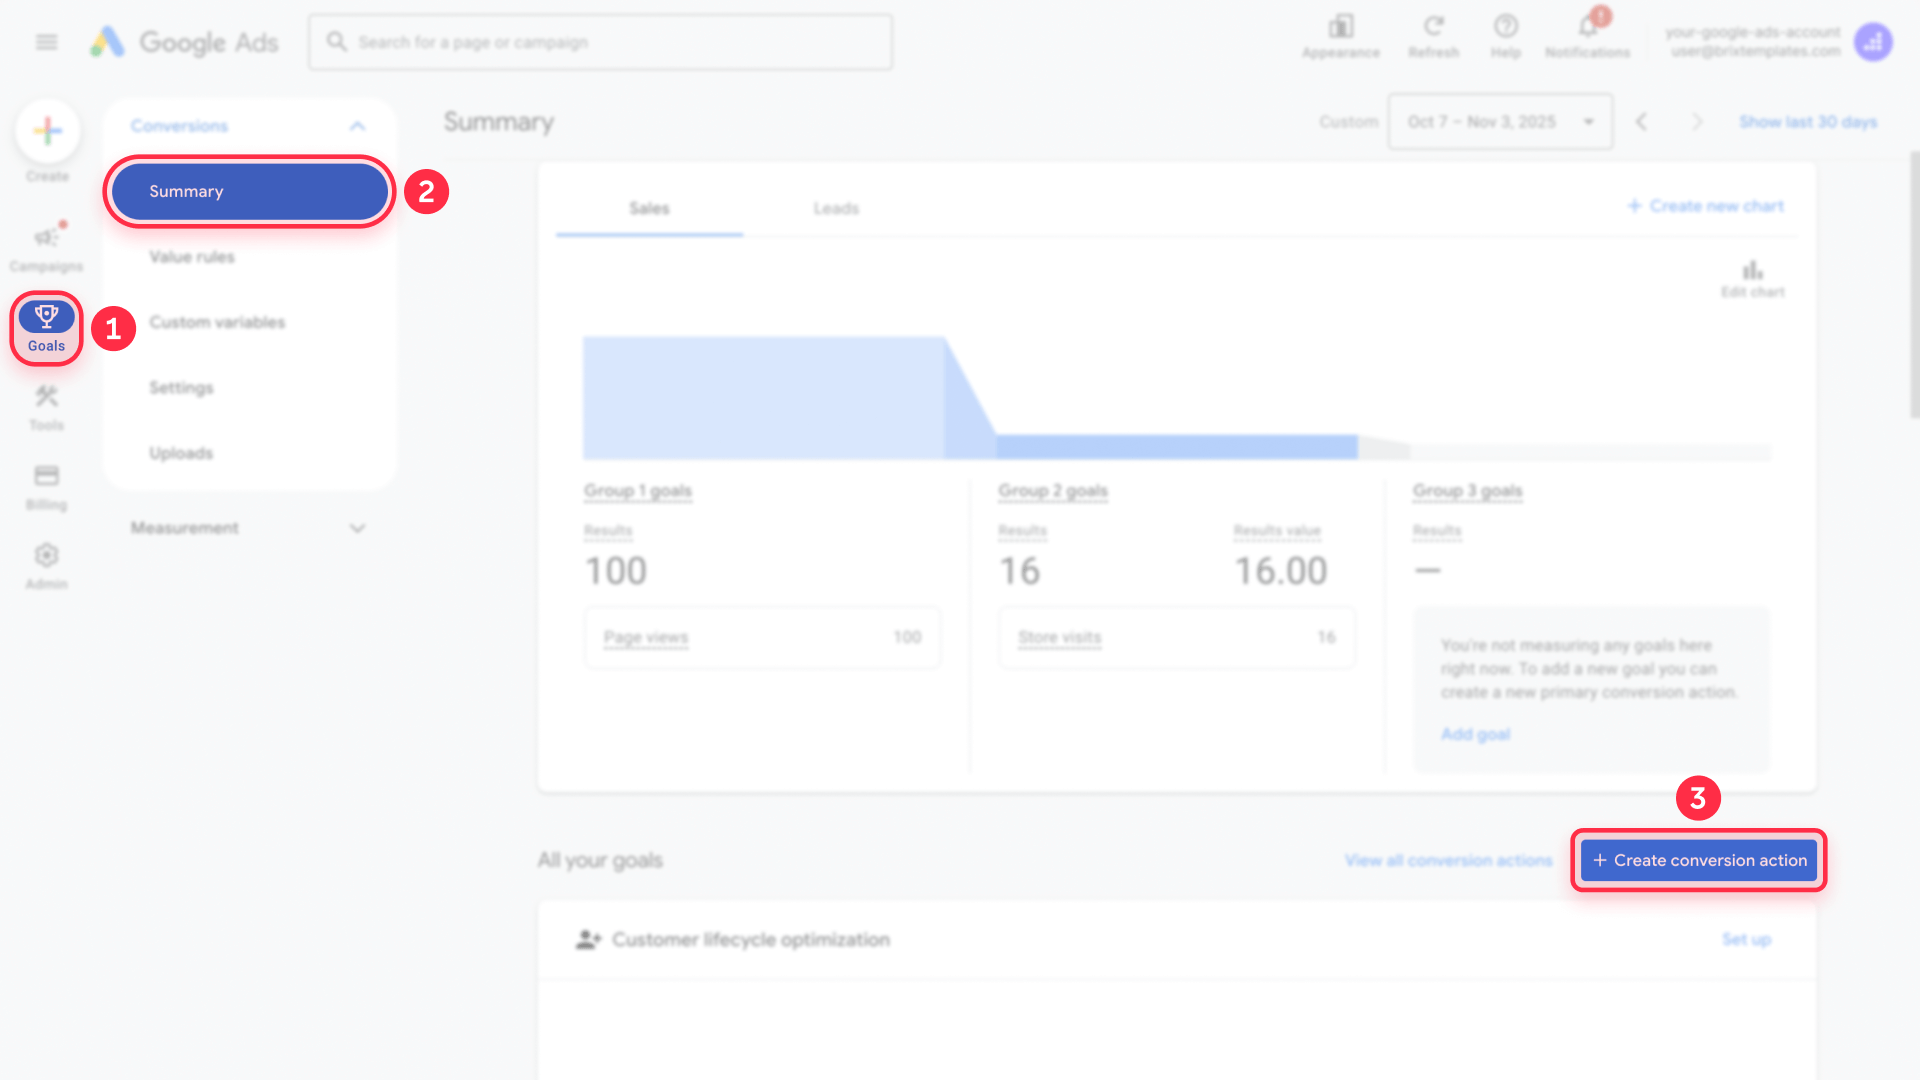
If you're using an older account layout, you may still see Tools & Settings (wrench icon) → Measurement → Conversions. Both paths work, but Google's current documentation uses the Goals path.
Configuring your Webflow website conversion action in Google Ads
Now you'll specify the details of what you want to track:
1 - Select conversion source: Choose Conversions on a website from the options presented
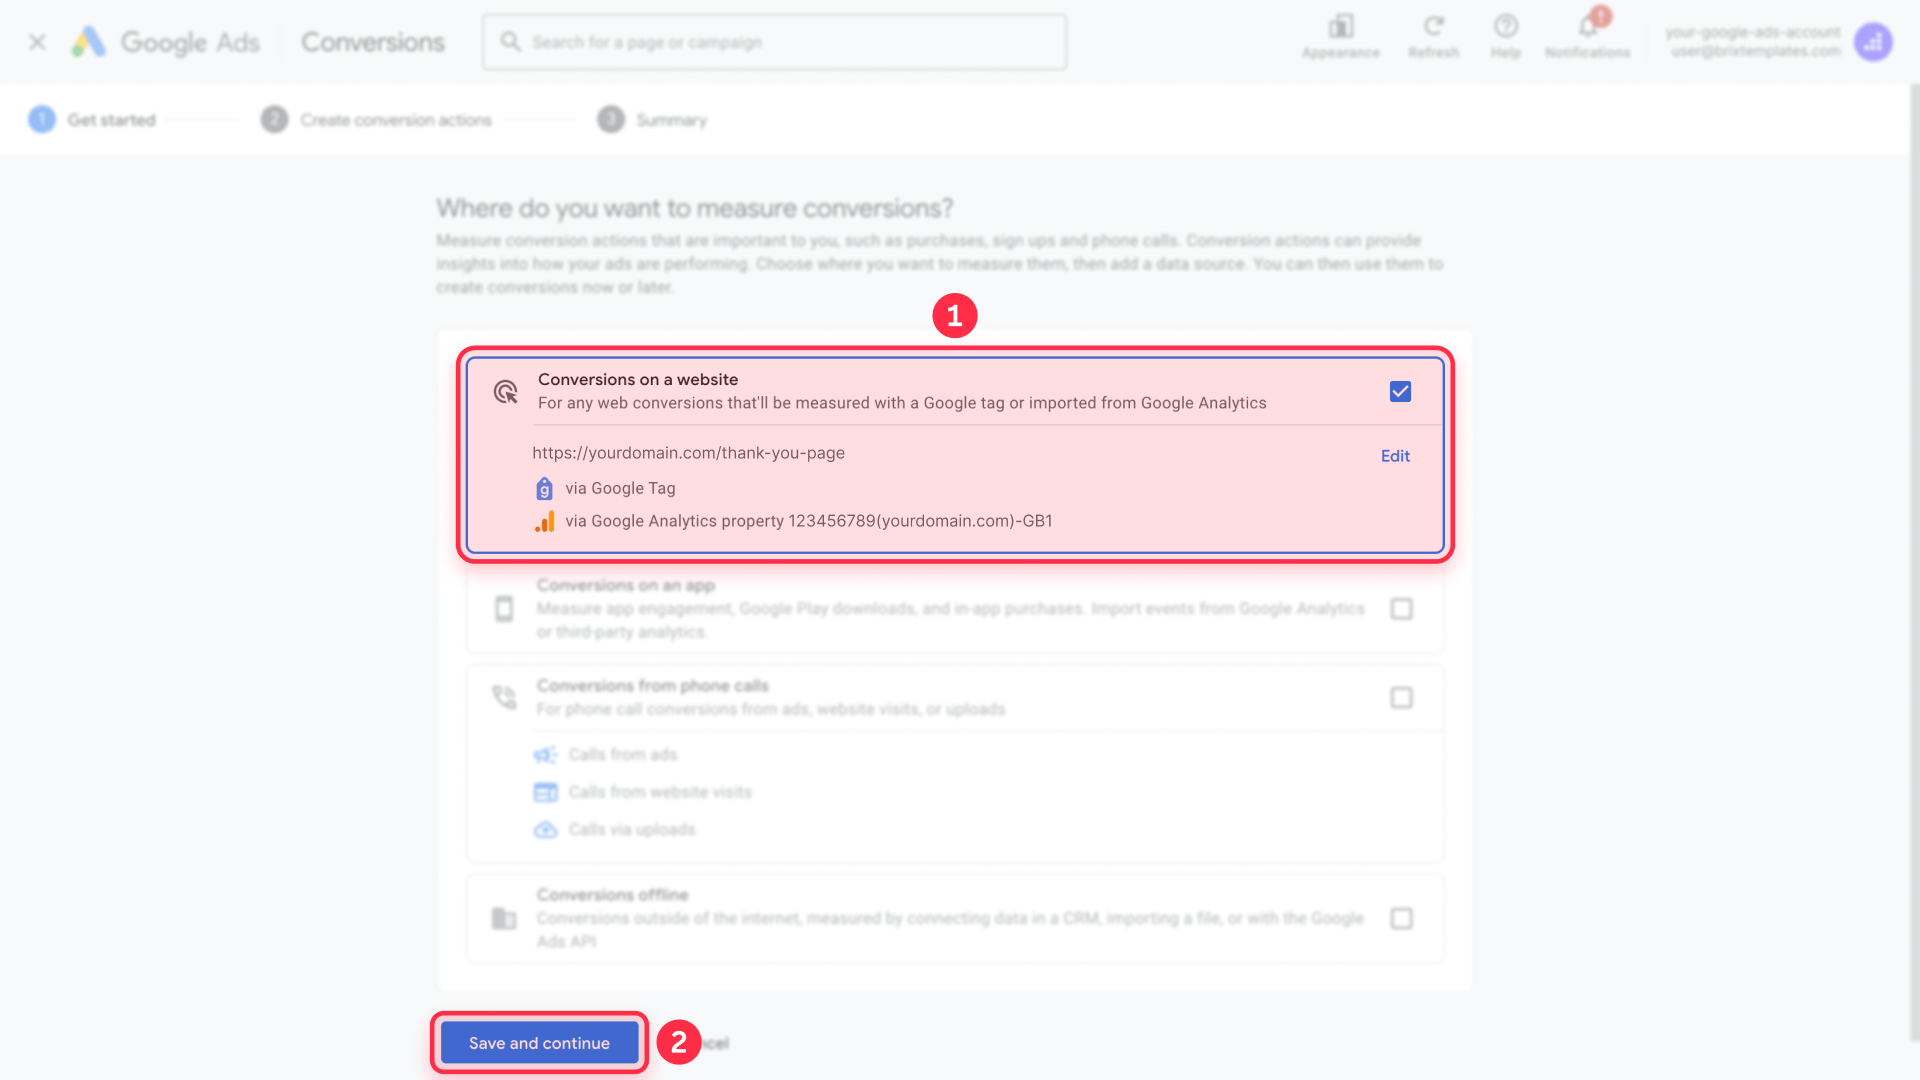
2 - Choose your tracking method: You'll see two main options for tracking conversions
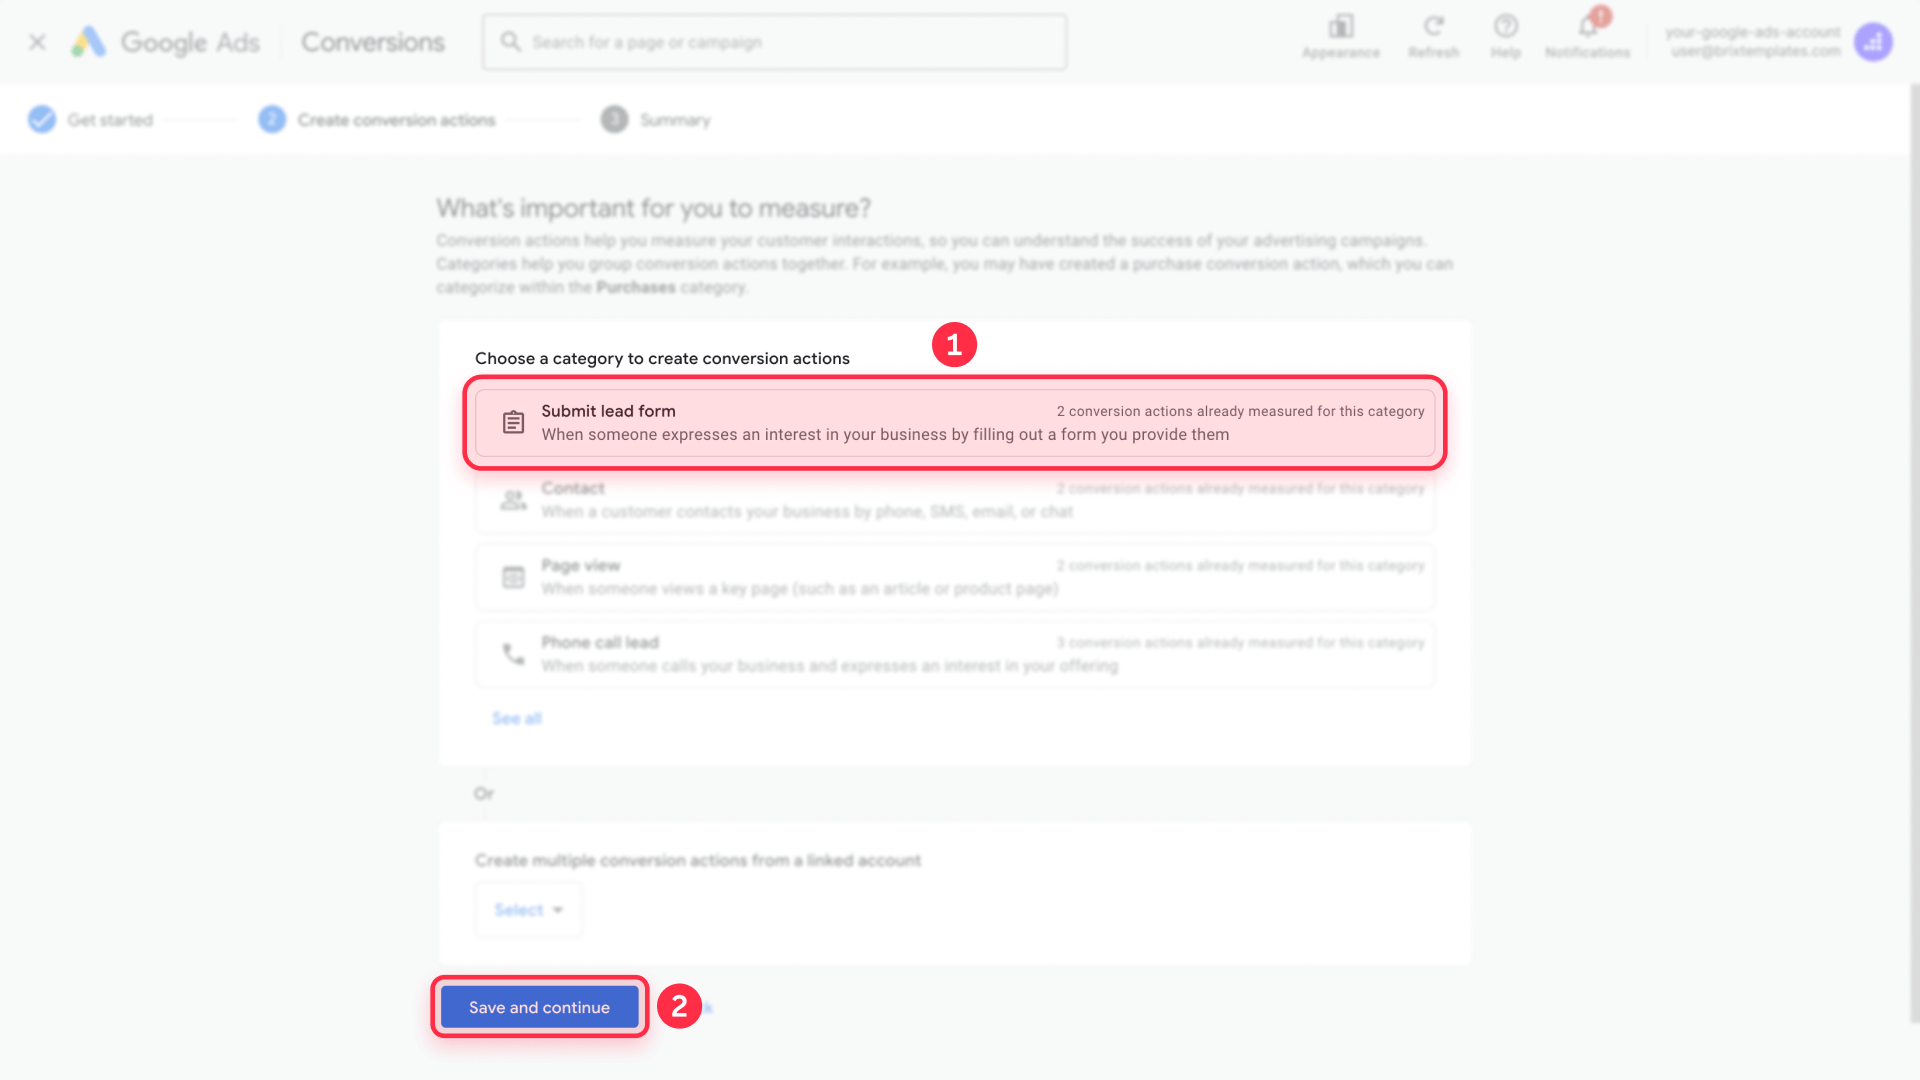
3 - Select category: Choose the category that best describes your conversion - Submit lead form is most common for contact forms
For thank you page tracking, you have two methods to choose from in the next steps.
2 - Choose Your Installation Method
Method 1: Codeless URL conversion tracking for Webflow (Recommended)
The codeless method is the simplest and most reliable option for tracking thank you page loads. With this method, Google Tag automatically installs on your entire website when you provide your thank you page URL.
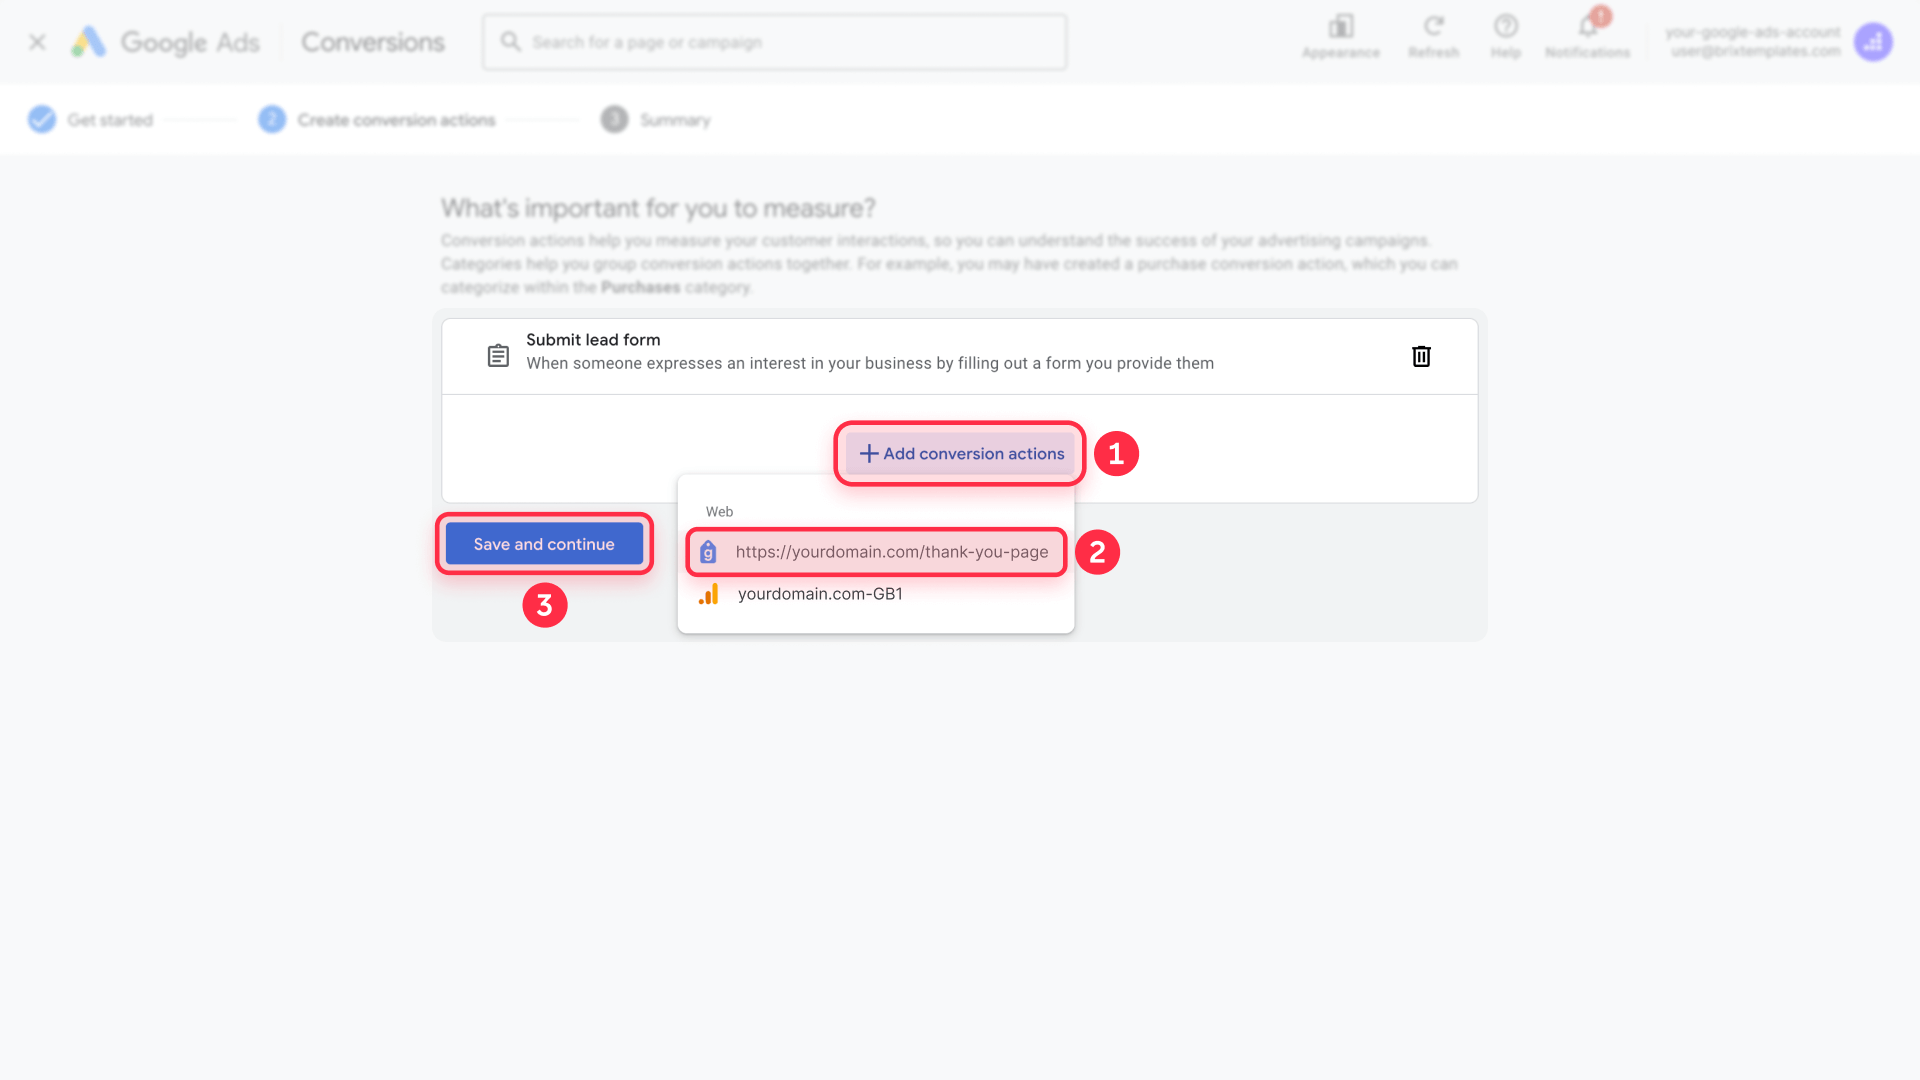
1 - Select "Enter the URL where the conversion is completed": This option tracks conversions without adding any event code to your thank you page
2 - Configure the URL tracking:
- Event type: Select Page load
- Match when: Choose URL starts with
- URL: Enter your thank you page path (like yourdomain.com/thank-you)
- You'll see: "It's a Submit lead form conversion when someone visits a page that starts with https://yourdomain.com/thank-you"
3 - Configure conversion settings:
- Action optimization: Submit lead forms, Primary action
- Conversion name: Enter a descriptive name like "Contact Form Submission"
- Value: Set to $1 or your preferred value per lead
- Count: Choose One conversion (recommended for lead forms)
- Click-through conversion window: 90 days (recommended)
- View-through conversion window: 3 days (default)
- Attribution model: Select Data-driven (recommended)
- Enhanced conversions: Not configured (optional)
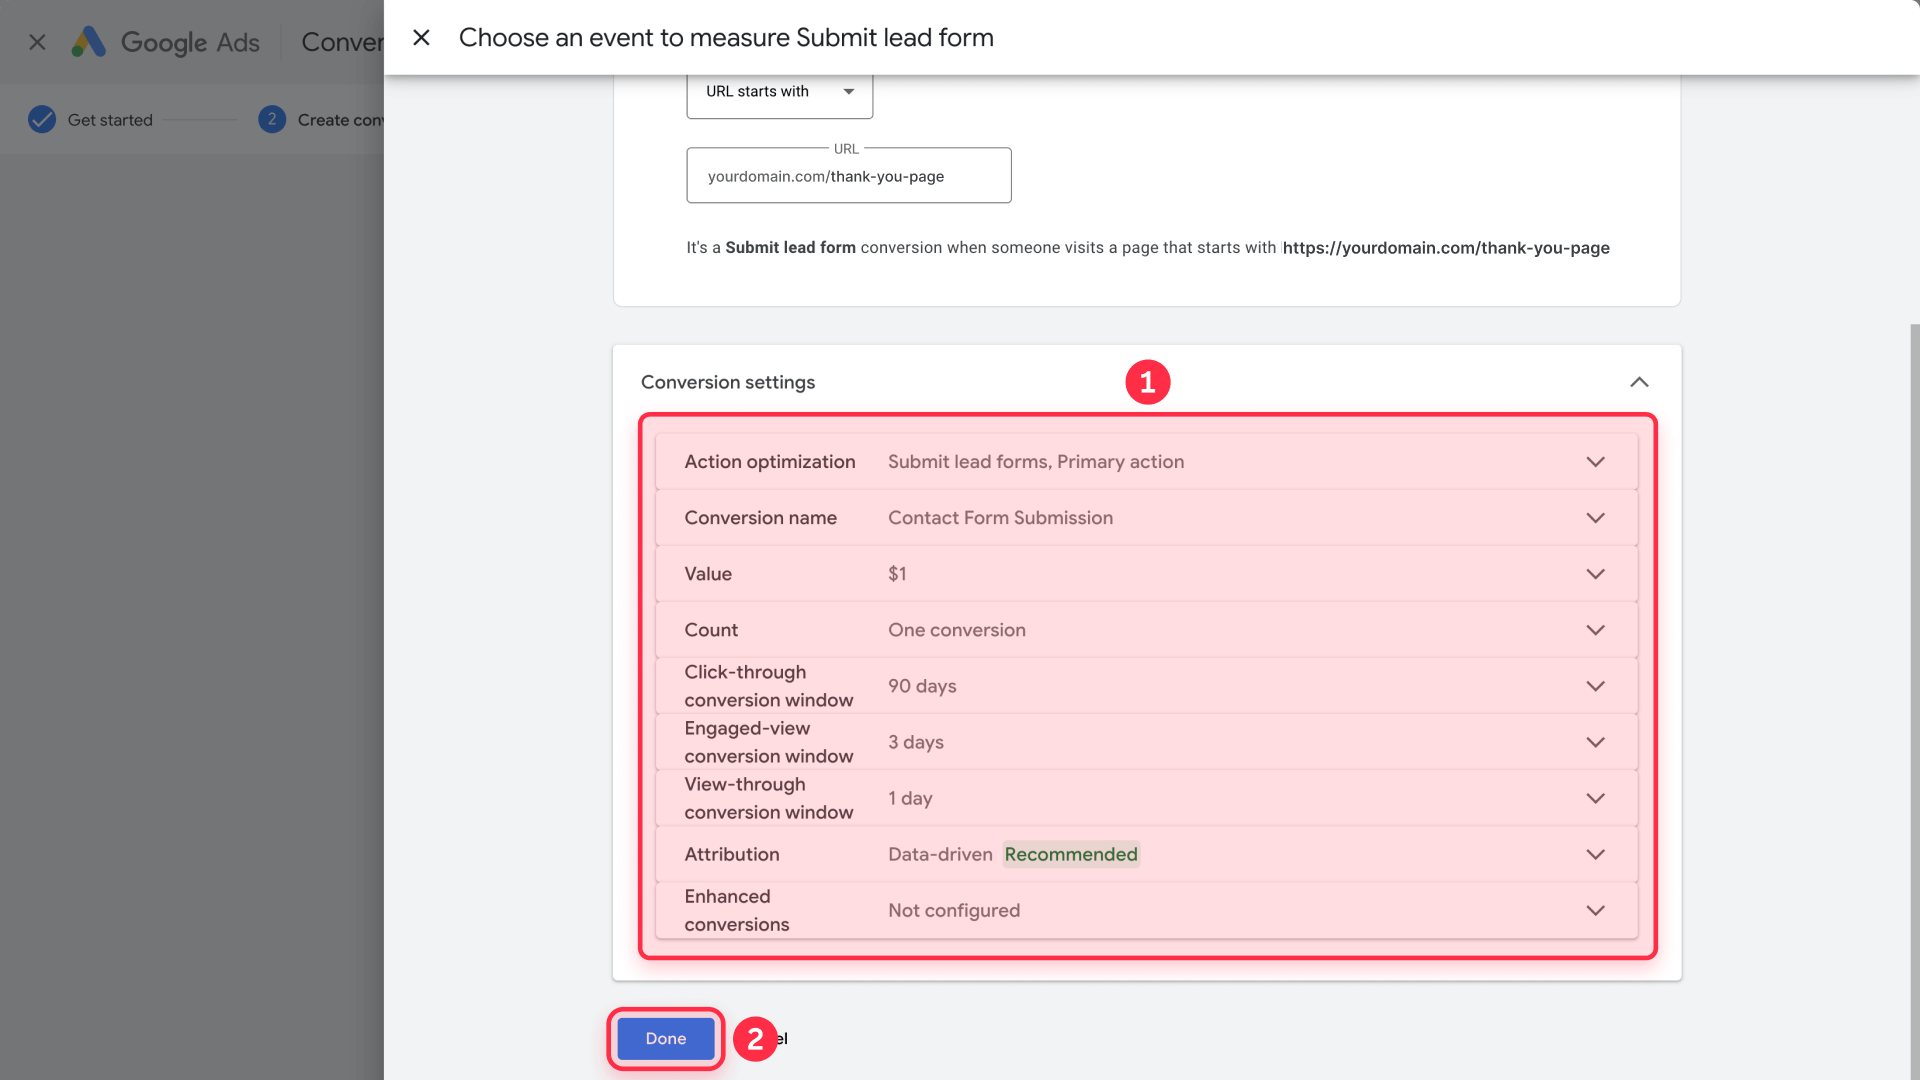
4 - Click Done: Your conversion action is now configured
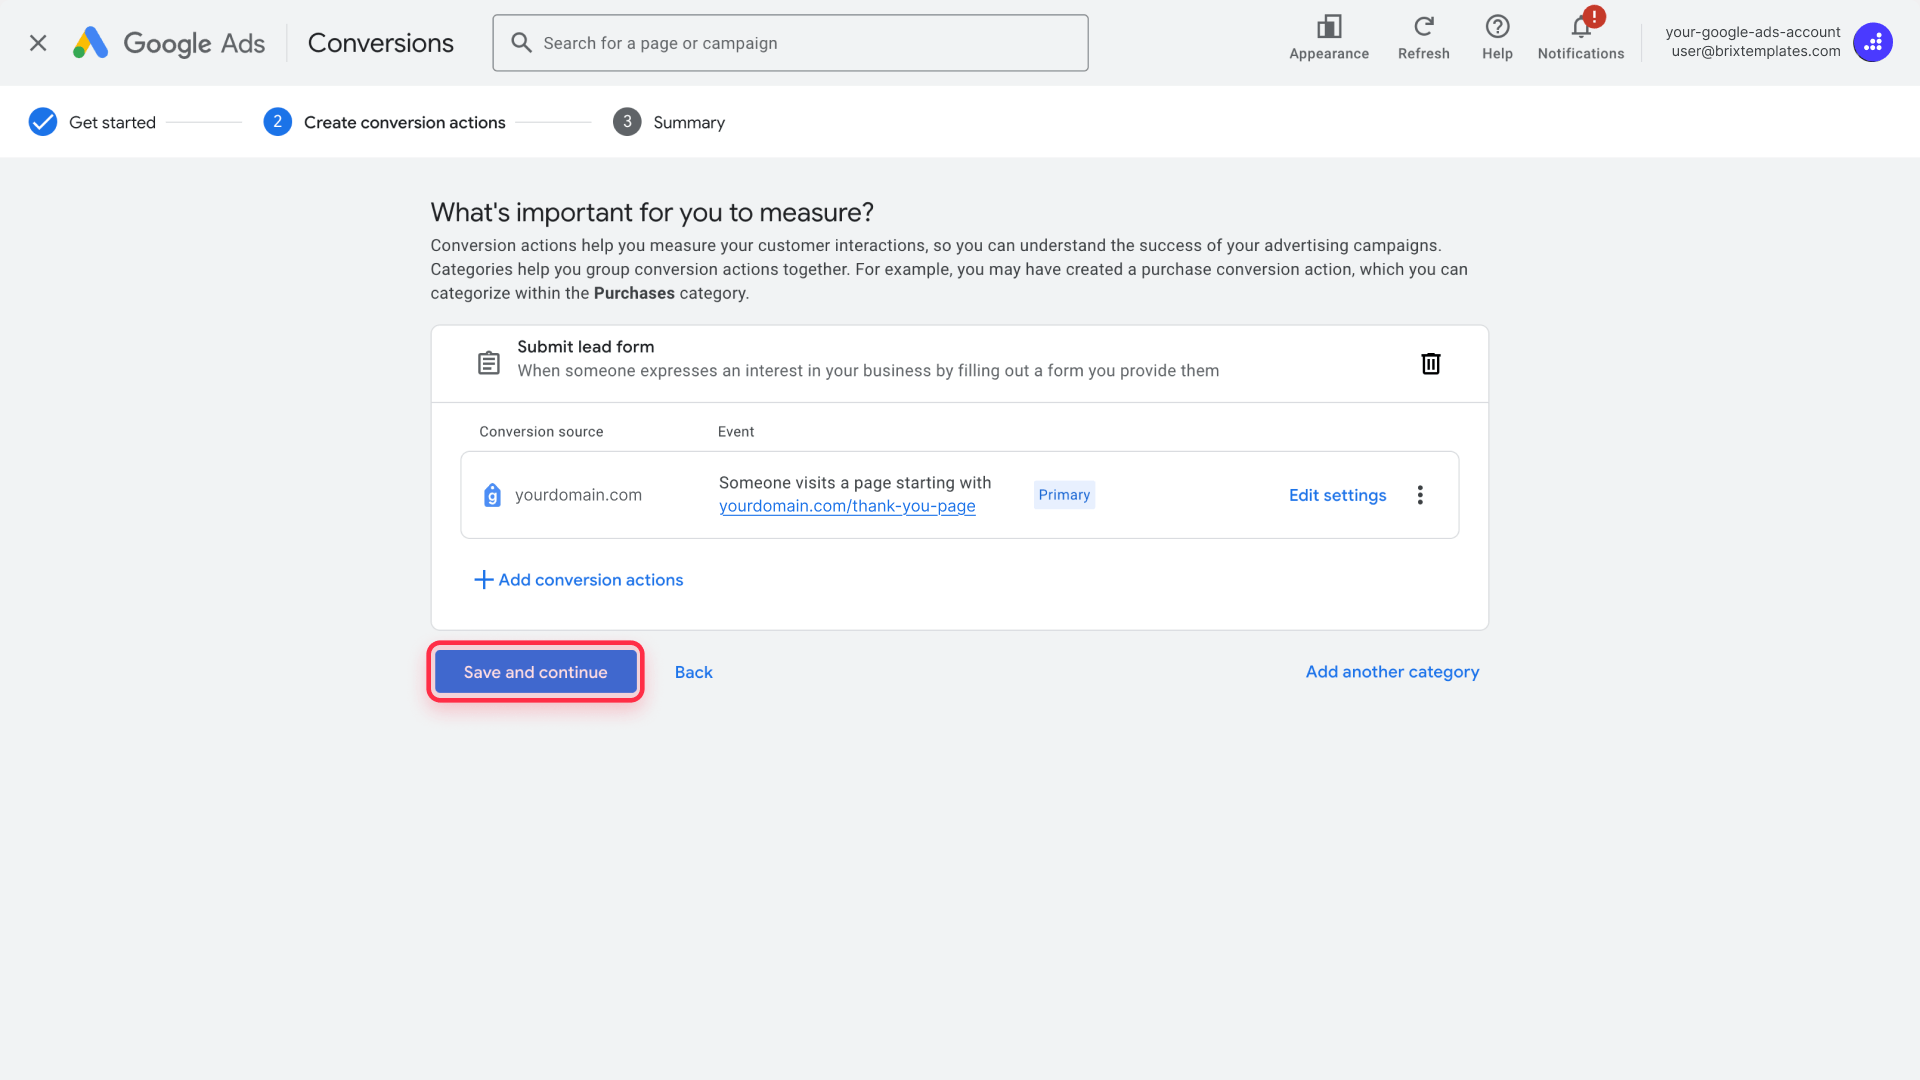
5 - Review and Save: Check your conversion summary and click Save and continue
With this method, you only need to install the Google tag site-wide. Google Ads will automatically detect when visitors reach your thank you page URL and count it as a conversion.
Method 2: Manual event snippet tracking for Webflow
Use this method only if you need dynamic values, custom parameters, or more control:
1 - Choose "Set up manually using code": This option requires adding code to your thank you page
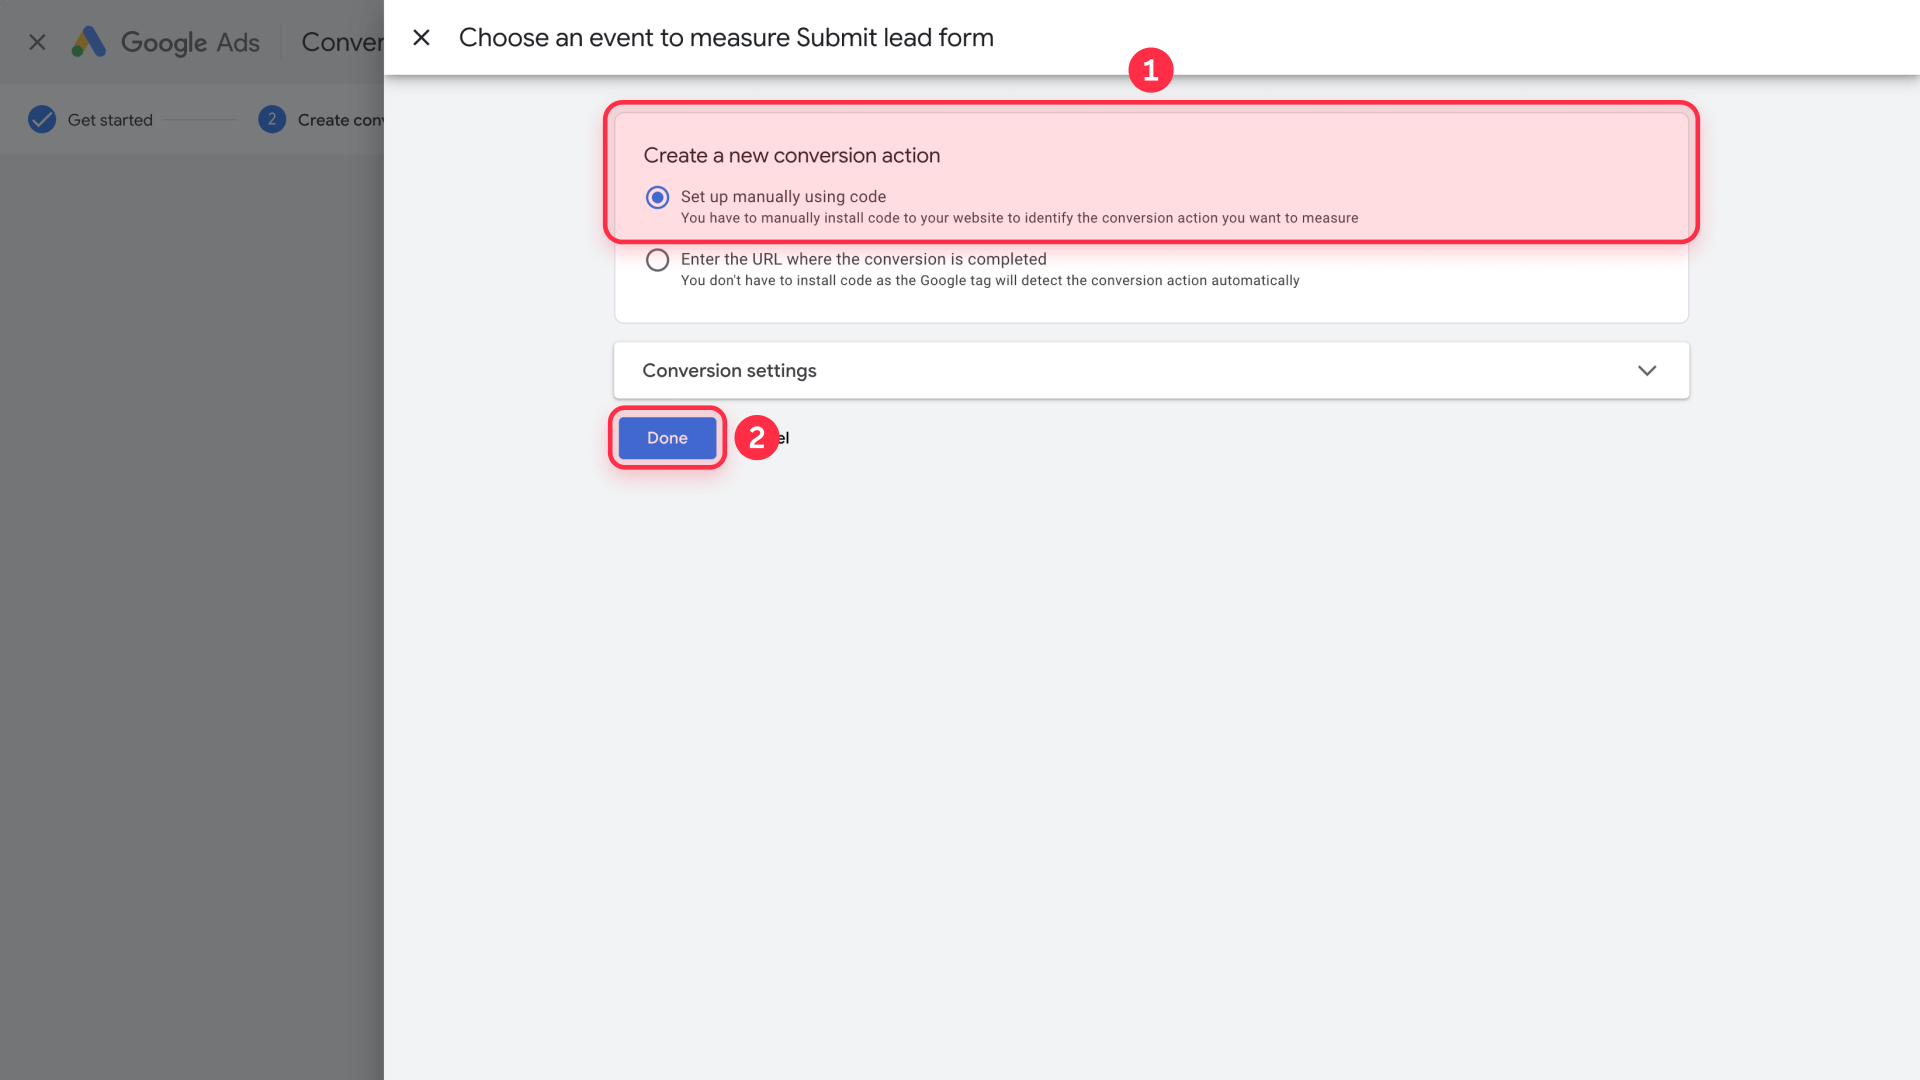
2 - Configure conversion settings:
- Conversion name: Enter a descriptive name like "Contact Form Submission"
- Category: Select Submit lead form
- Value: Set to $1 or your preferred value
- Count: Choose One (for lead forms)
- Conversion window: Keep at 90 days for click-through
- Attribution model: Select Data-driven
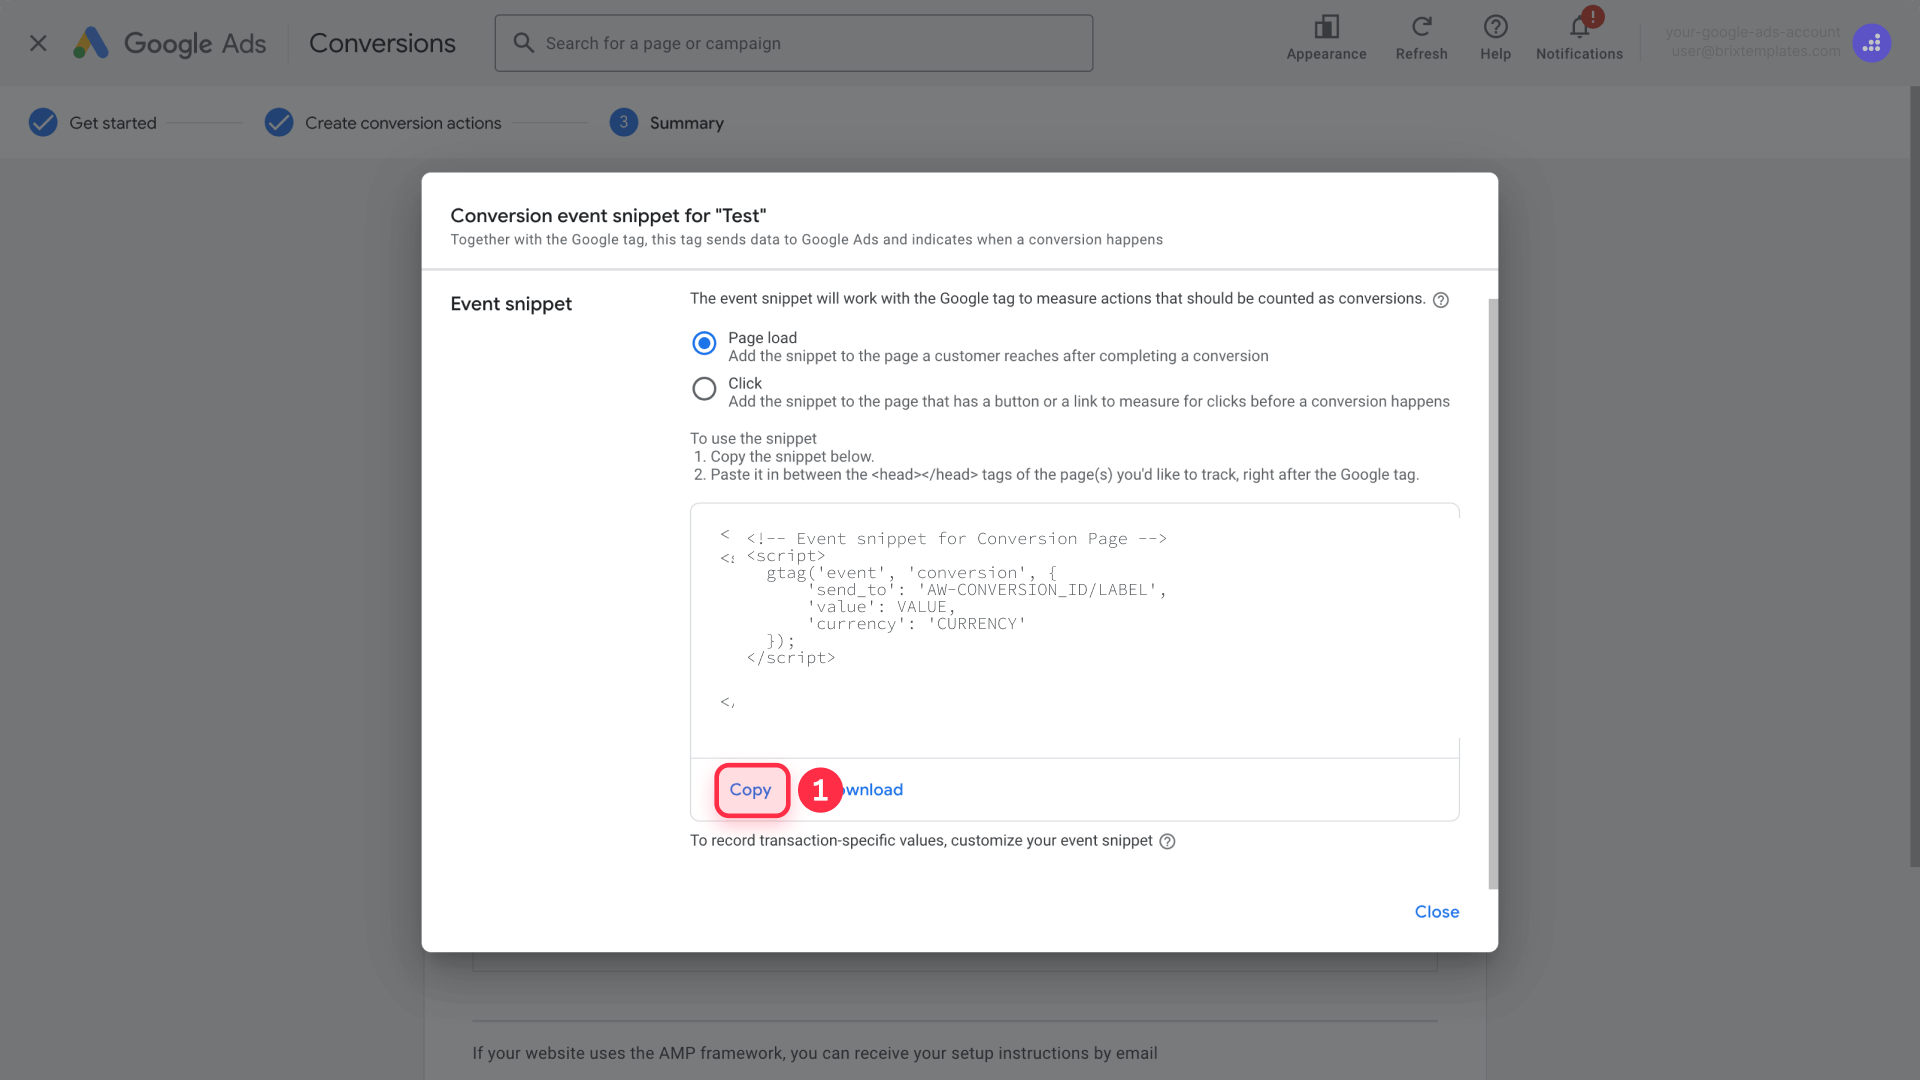
3 - Access event snippet: In your conversion setup, look for See event snippet
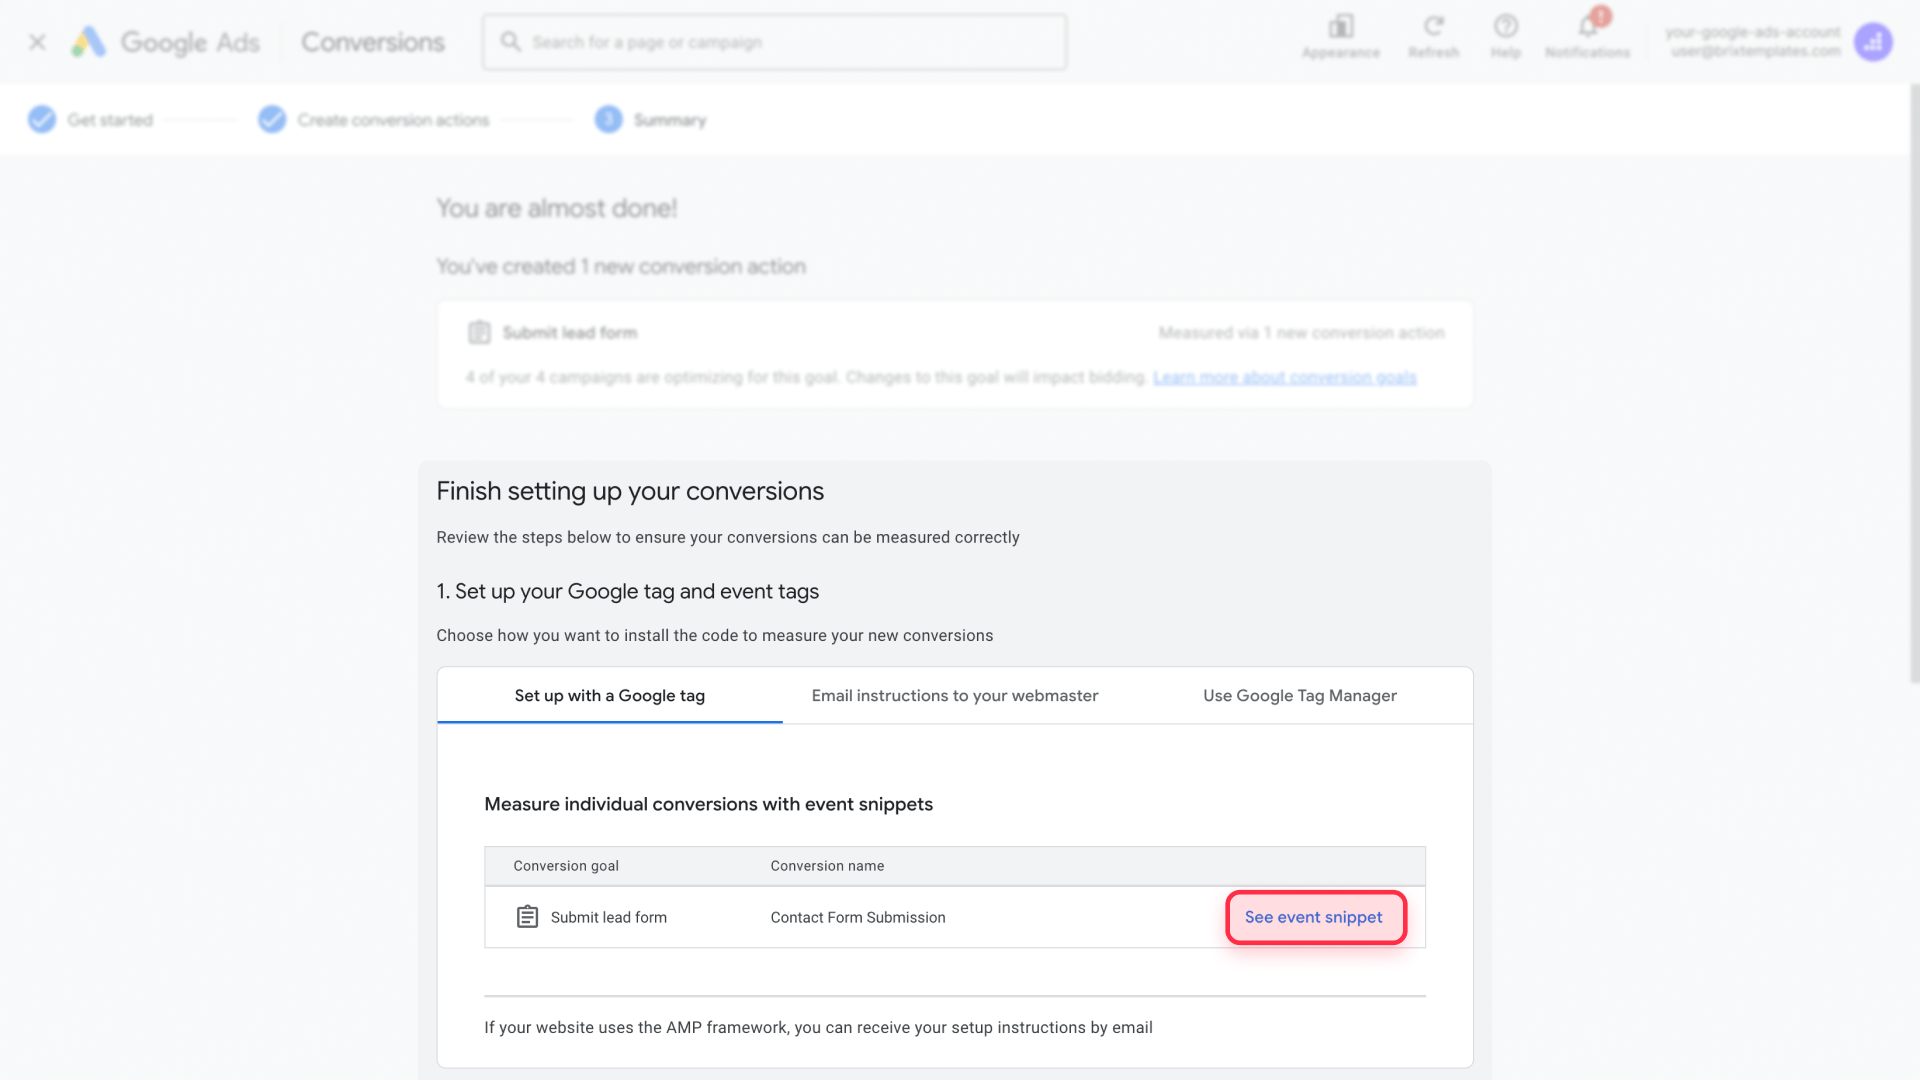
4 - Select Page load, copy the event snippet, and save it for later in the installation. You’ll need it when adding the code to your thank-you page.
3 - Installing the Google tag site-wide in Webflow
Regardless of which method you chose, you need to install the Google tag on all pages of your Webflow site.
Finding your Google tag installation code
After creating your conversion action, you need to access the installation code:
1 - Navigate to conversion details: In Goals → Conversions → Summary, find your new conversion action
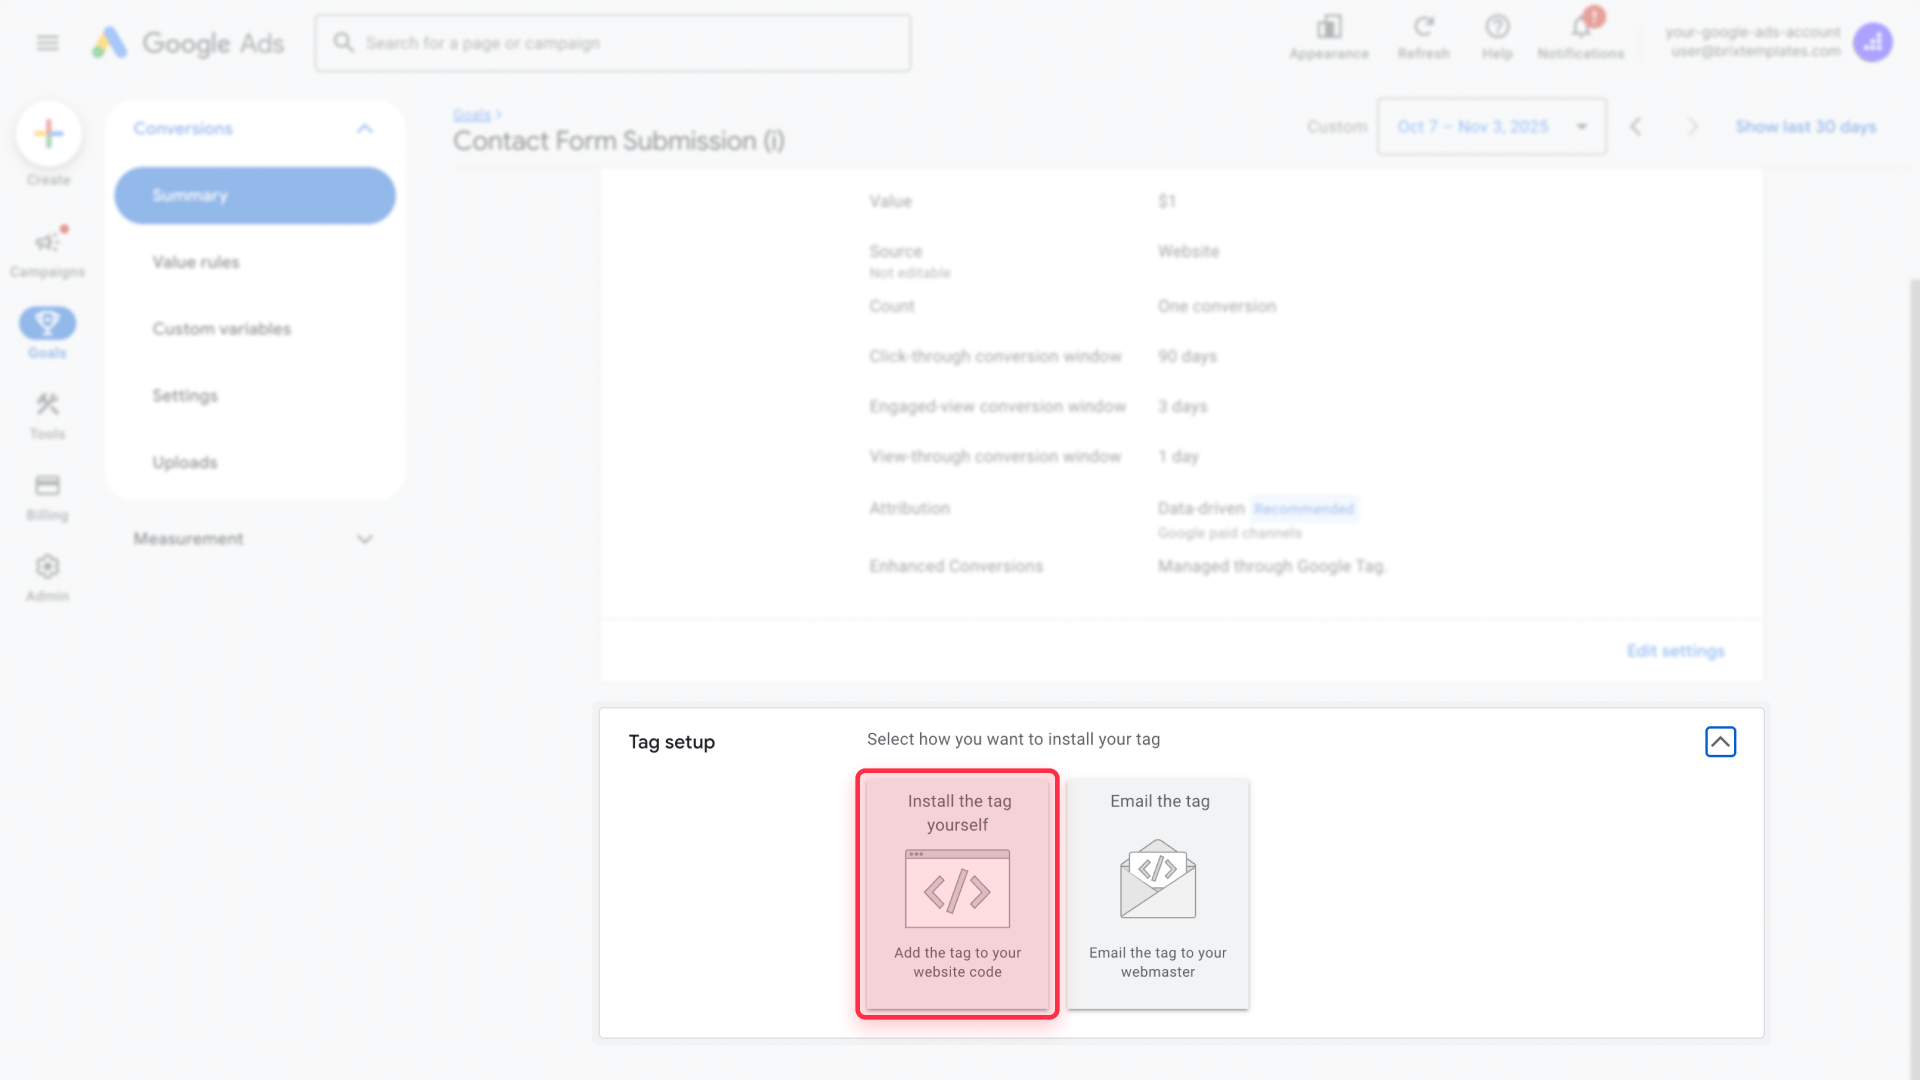
2 - Access tag setup: Click on your conversion name (it will show as "Inactive" initially)
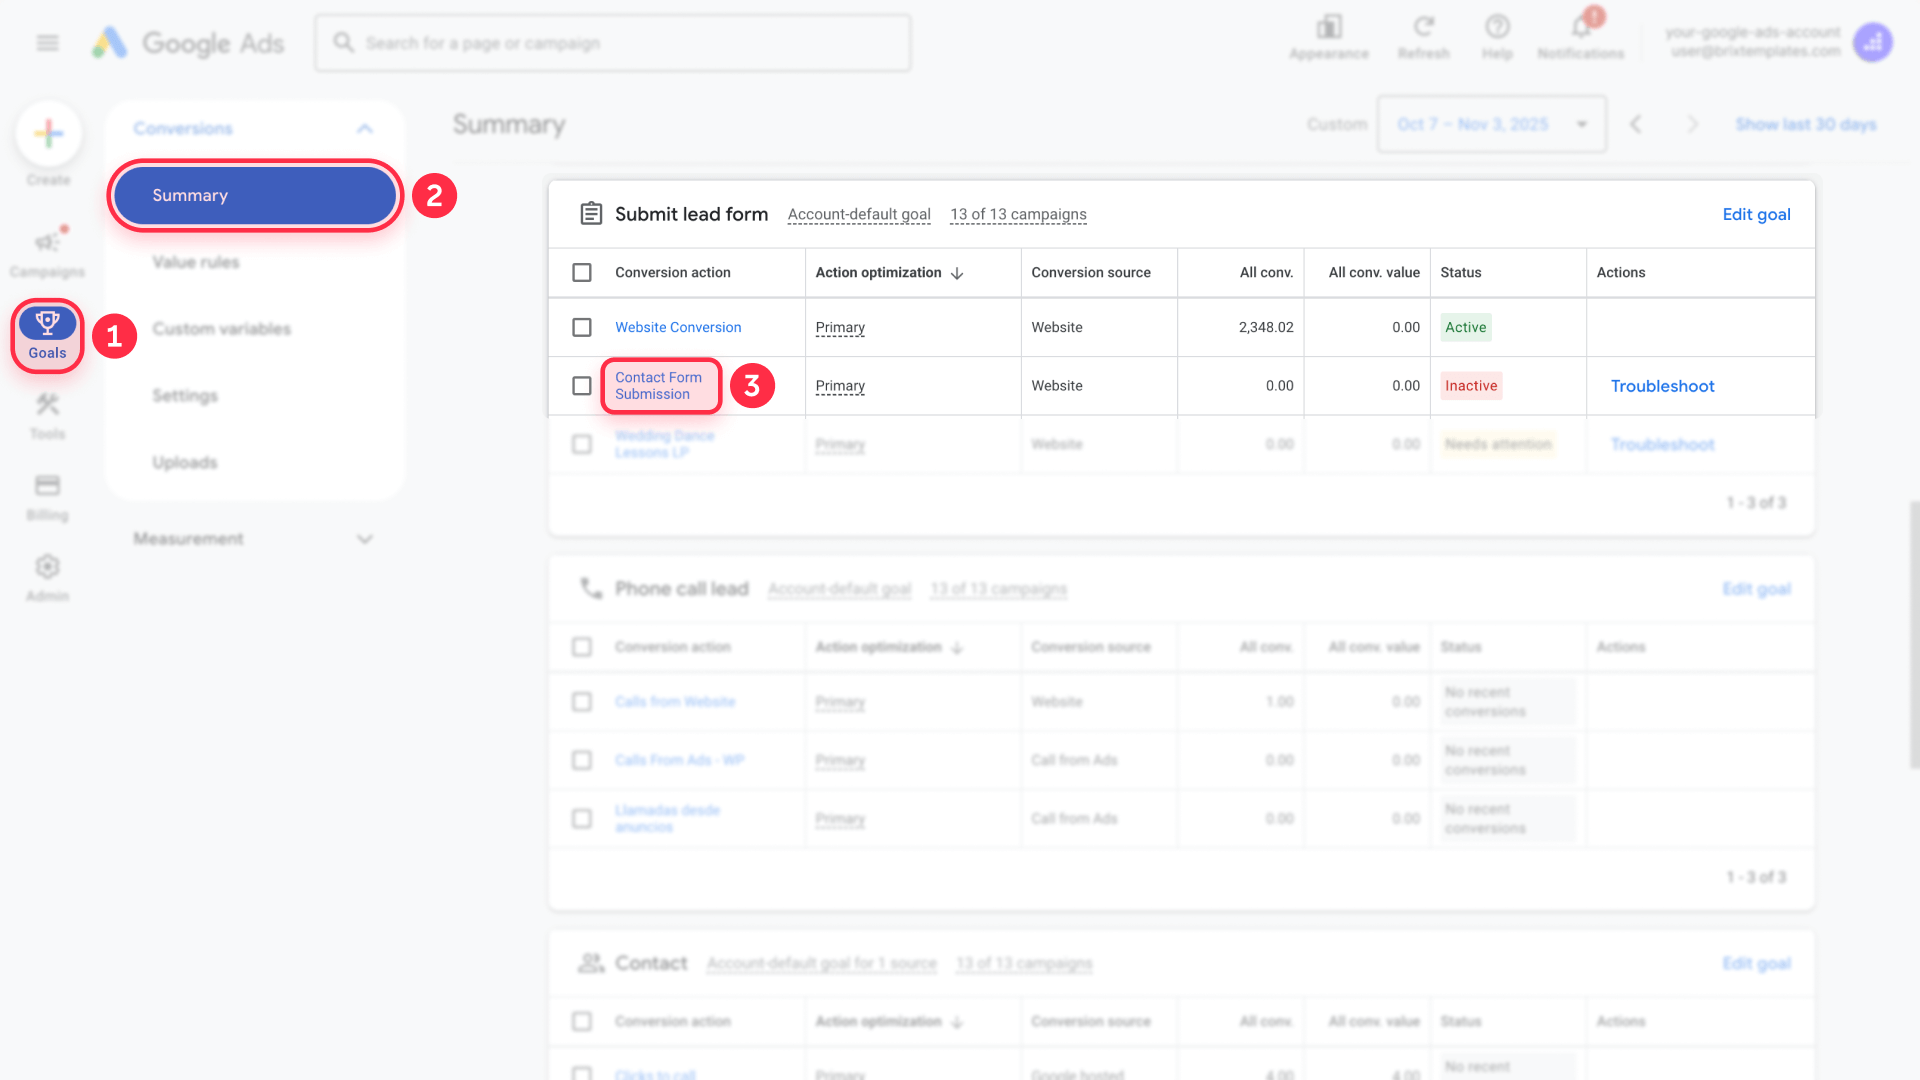
3 - Get installation code: Click Install the tag yourself to view the code
4 - Copy the Google tag: You'll see code that looks like this:
<!-- Google tag (gtag.js) -->
<script async src="https://www.googletagmanager.com/gtag/js?id=AW-XXXXXXXXX"></script>
<script>
  window.dataLayer = window.dataLayer || [];
  function gtag(){dataLayer.push(arguments);}
  gtag('js', new Date());

  gtag('config', 'AW-XXXXXXXXX');
</script>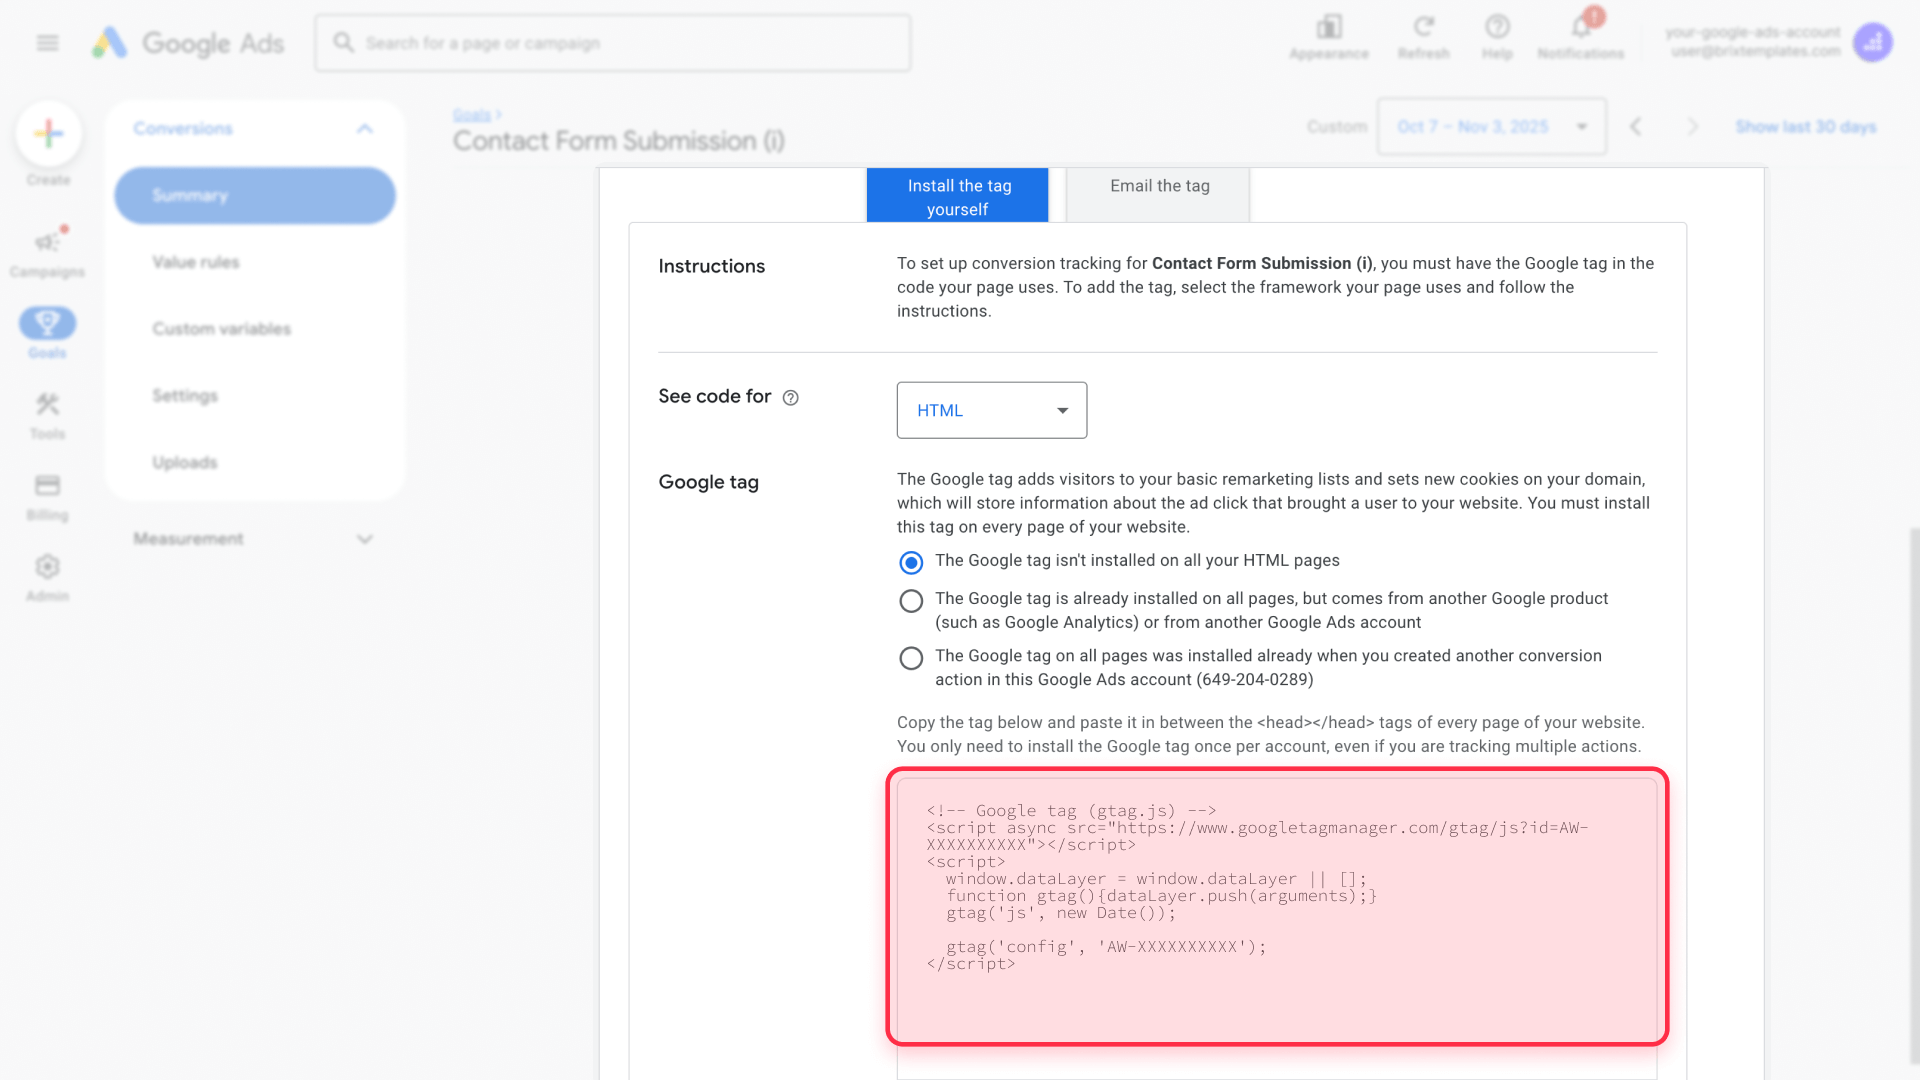
Select HTML format and copy the entire code snippet.
Installing the tag in Webflow's project settings
Add the Google tag to your entire Webflow project:
- Open Project Settings: In Webflow Designer, click the Webflow logo → Project Settings
- Navigate to Custom Code: Click the Custom Code tab
- Add to Head Code: Paste your Google tag in the Head Code section
- Save and Publish: Click Save Changes, then publish your site
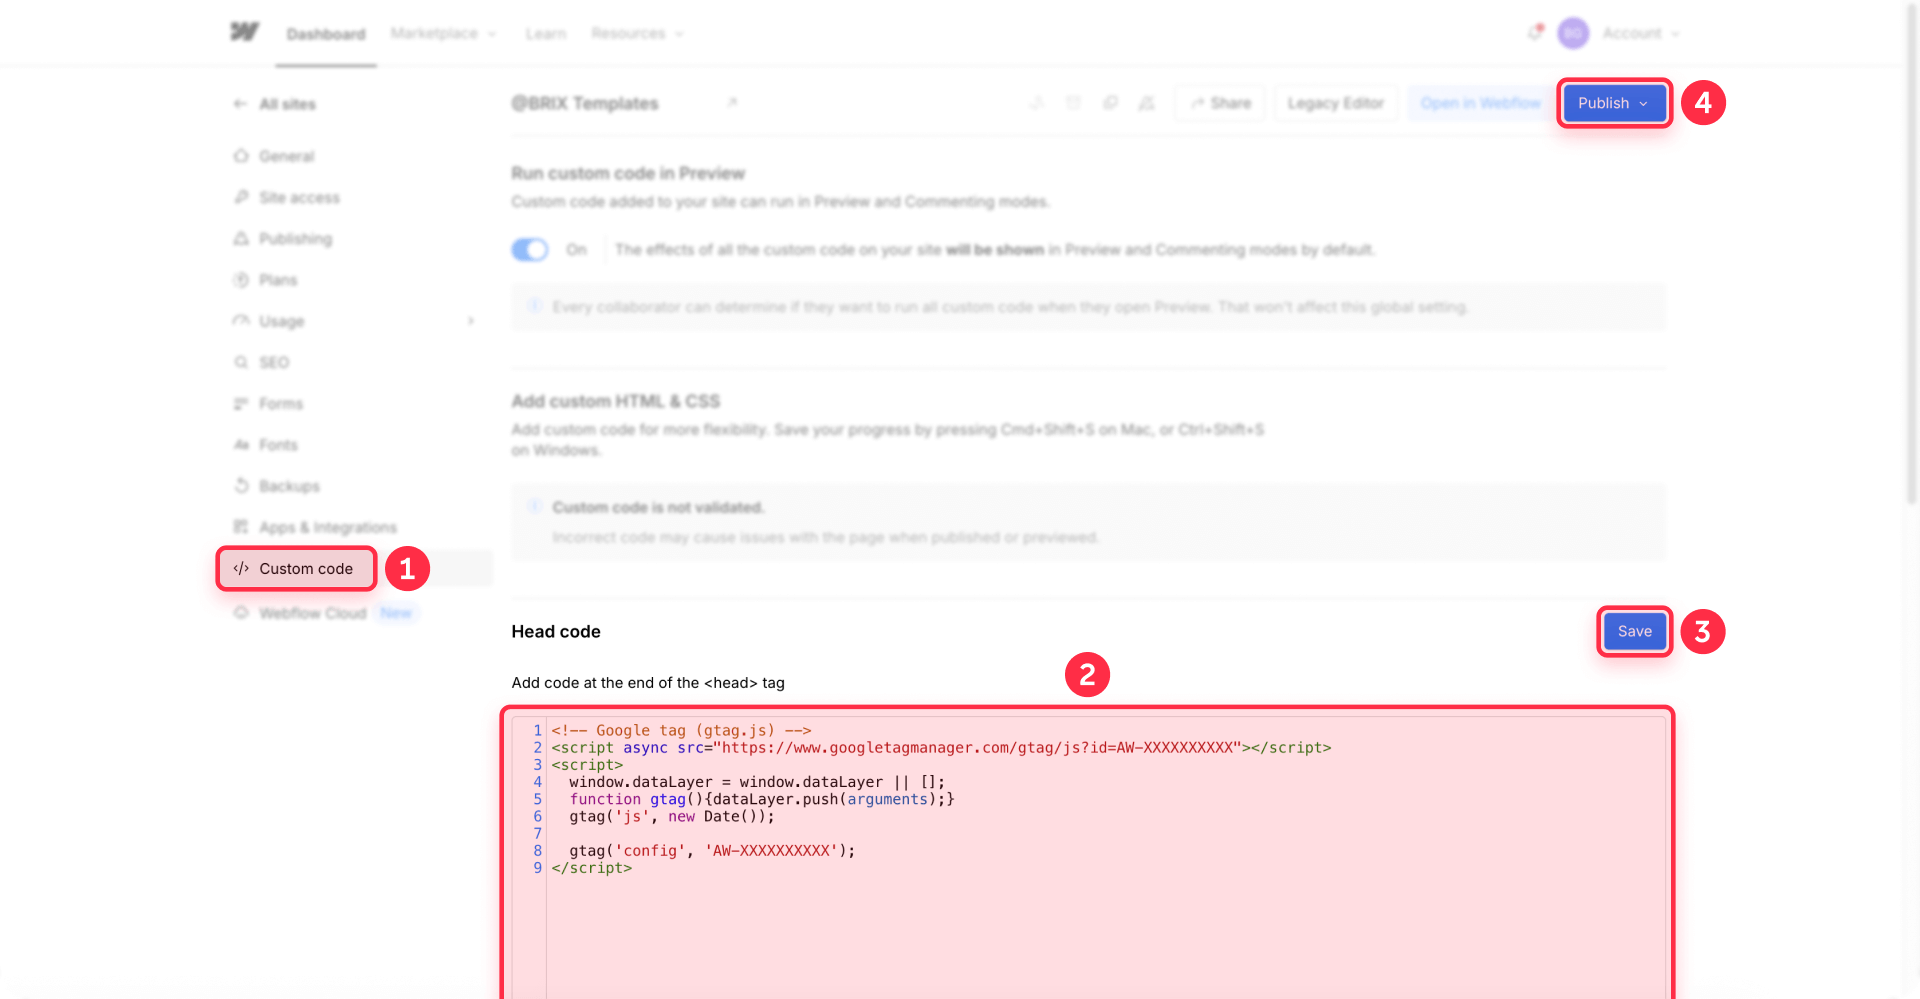
The Google tag is now installed site-wide and will load on every page of your Webflow site.
4 - Setting up your event snippet (Manual Method Only)
With the code you copied in Method 2 (Manual event snippet), we’ll now paste it following the next instructions.
Adding the event snippet to your thank you page in Webflow
- Open your thank you page: In Webflow Designer, navigate to your thank you page
- Access page settings: Click the gear icon for page settings
- Add to Custom Code: Scroll to Custom Code section
- **Paste in Inside tag**: Add your event snippet code here
- Save and Publish: Save the page settings and publish your site
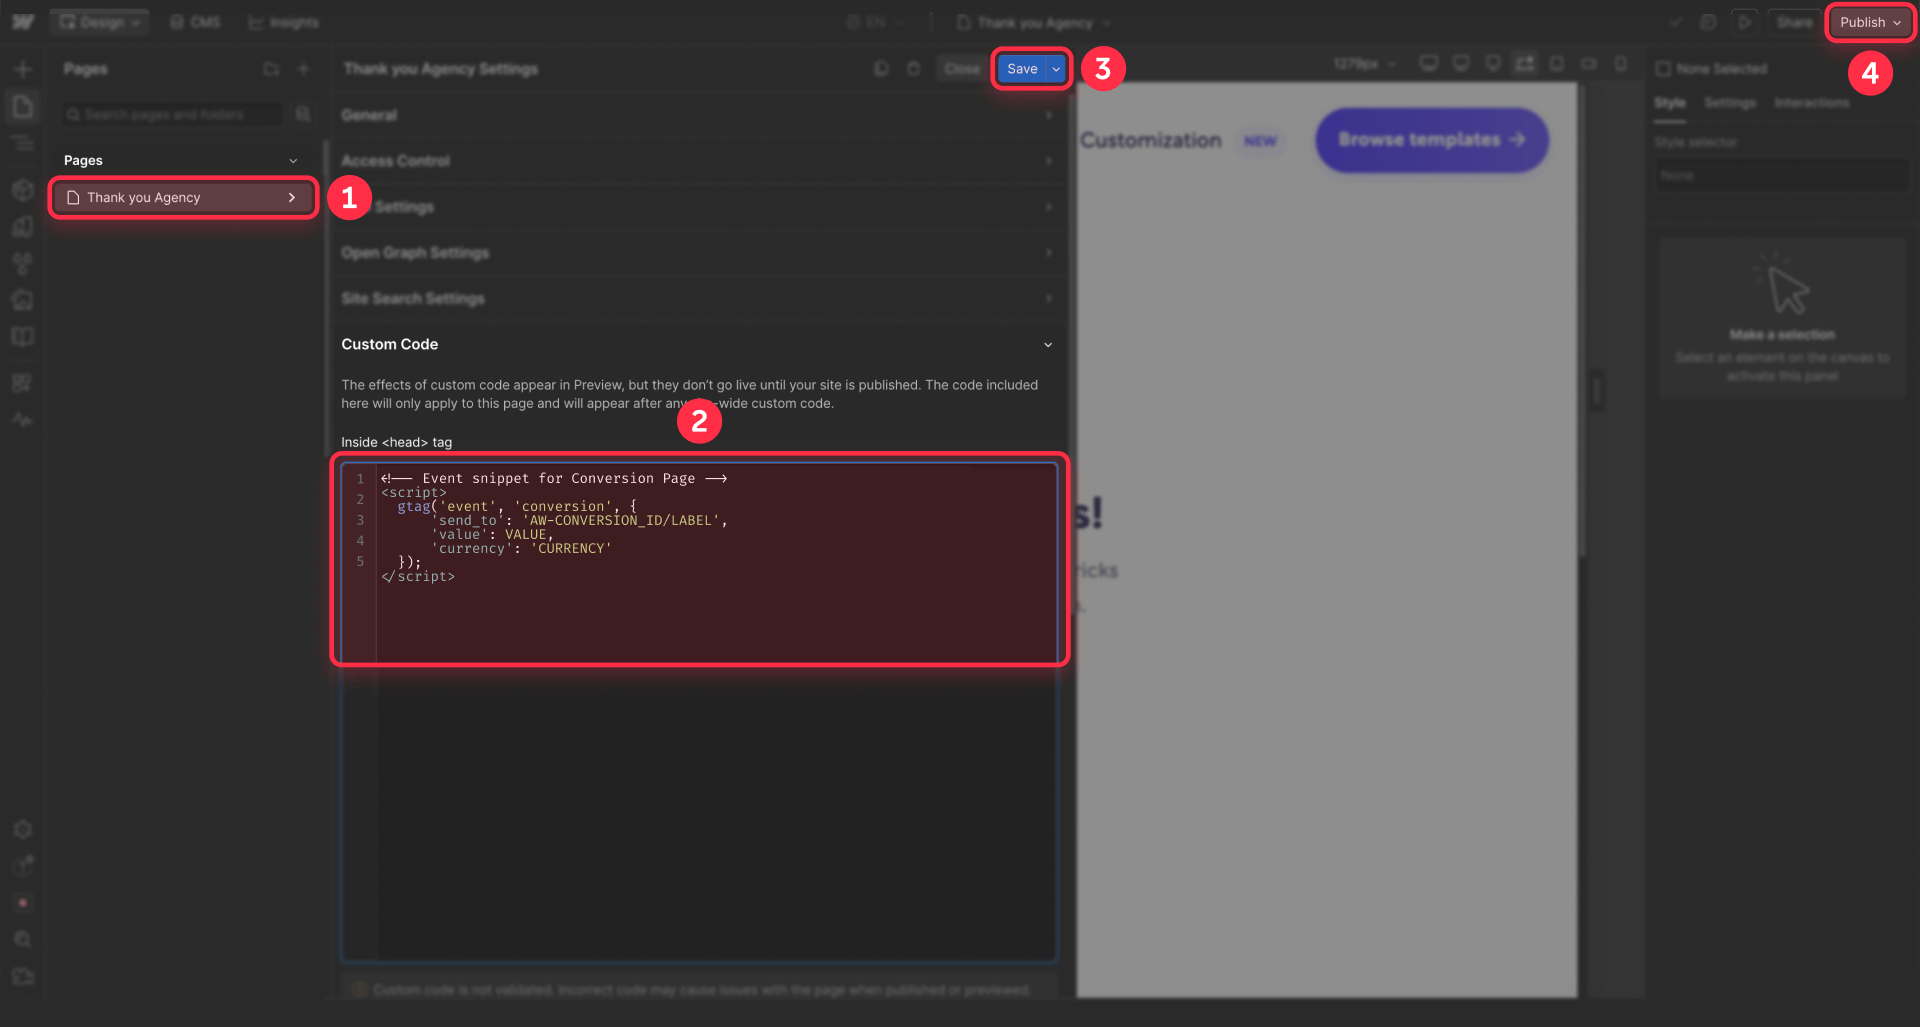
The event snippet will now fire whenever someone reaches your thank you page.
5 - Configuring form redirects to your thank you page
Your forms must redirect to the thank you page after submission for tracking to work.
Setting up form success actions in Webflow
Configure each form to redirect properly:
- Select your form: In Webflow Designer, click on your form element
- Open Form Settings: In the right panel, go to Form Settings
- Set redirect action: Under Action, choose Redirect to page
- Select thank you page: Choose your thank you page from the dropdown
- Publish changes: Save and publish your site
Important: Use the page selector dropdown, not manual URL entry. This ensures the redirect works properly even if your domain changes.
Testing form redirects
Verify your form redirect works correctly:
- Preview your site: Use Webflow's preview or visit your published site
- Submit test form: Fill out and submit your form
- Verify redirect: Confirm you land on the thank you page
- Check Tag Assistant: Verify the Google tag fires on the thank you page, and (for manual method) the conversion event fires
- Check URL parameters: Verify the gclid parameter is preserved through the redirect (if testing via a Google ad)
If the redirect doesn't work, verify you selected the page from the dropdown (not manual URL entry), published your changes, and that the thank you page is accessible.
6 - Testing your Google Ads conversion tracking setup
After installation, thoroughly test your conversion tracking before running paid campaigns.
Using Google Tag Assistant to verify tracking
Tag Assistant provides real-time verification of your tracking implementation:
Install Tag Assistant Extension:
- Go to Chrome Web Store: Search for "Tag Assistant"
- Install the extension: Click "Add to Chrome"
- Access Tag Assistant: Click the extension icon in your browser toolbar
Test Your Conversion:
- Open Google Ads conversions: Go to Goals → Conversions → Summary in Google Ads
- Click Troubleshoot: Find your conversion action and click Troubleshoot in the Actions column
- Launch Tag Assistant: Click Get Started to open Tag Assistant
- Enter your URL: Type your website homepage or landing page URL (not the thank you page directly)
- Click Connect: Tag Assistant will open your site in a new tab
- Navigate the conversion flow: Fill out your form and submit it to reach the thank you page
- Check Tag Assistant: Verify the conversion event fires when you reach the thank you page
- Finish debugging: Click Finish to complete the test
Tag Assistant will show you exactly which tags fire, identify any errors, and confirm your conversion tracking is working correctly.
Verifying conversion tracking status in Google Ads
Monitor your conversion tracking status in Google Ads:
Open conversions summary: Go to Goals → Conversions → Summary in Google Ads
Check tracking status: Look at the Tracking status column for your conversion action
Understand status meanings:
- Unverified: Google hasn't detected the tag yet (normal for first 24 hours)
- No recent conversions: Tag is verified and working, but no conversions recorded in last 7 days
- Recording conversions: Tag is active and recording conversions
- Tag inactive: Tag hasn't fired recently, indicating a problem
Wait for verification: New conversion actions typically verify within a few hours to 24 hours after the first tag fire
If your conversion remains Unverified after 24 hours and you've tested with Tag Assistant, review your installation steps to identify any issues.
Testing actual conversion recording
Complete a test conversion to verify end-to-end tracking:
- Visit your site: Go to your published website
- Complete a conversion: Submit your form or complete the action you're tracking
- Check Google Ads: Wait a few hours, then go to Goals → Conversions in Google Ads
- Look for test conversion: Check if your test conversion appears in the conversions list
- Review campaign data: If you clicked a Google ad before converting, verify the conversion attributes to the correct campaign
Test conversions completed without clicking a Google ad won't appear in campaign reports, but they confirm your technical setup works correctly.
Common issues and quick solutions
Conversion not tracking after installation: Make sure you published your Webflow site after installing the Google tag. Check that the code is in Project Settings → Custom Code → Head Code, then clear your browser cache and test in an incognito window.
No conversions appearing in Google Ads: Wait 3-4 hours after publishing for data to process. Verify auto-tagging is enabled in Admin → Account settings → Auto-tagging, and confirm the gclid parameter appears in your URLs after clicking ads.
Form submits but doesn't redirect to thank you page: Use the page selector dropdown (not manual URL entry) in Webflow form settings. Verify the thank you page is published and accessible by visiting its URL directly.
Tracking stops after site updates: Republish your site after any changes. Confirm your Google tag code wasn't deleted from Project Settings → Custom Code during updates, and verify your thank you page URL hasn't changed.
Frequently asked questions about Google Ads conversion tracking in Webflow
How do I add Google Ads conversion tracking to my Webflow site?
Install the Google tag by copying it from Google Ads and pasting into Project Settings → Custom Code → Head Code. For thank you page conversions, use the codeless URL method in Google Ads to track page visits automatically. A paid Webflow Site plan is required.
Do I need Google Tag Manager for Google Ads conversion tracking in Webflow?
No, Google Tag Manager isn't required. Direct installation through Webflow's custom code works perfectly for basic conversion tracking, especially with the codeless URL method. Consider GTM only if you manage multiple tracking tags or need complex triggers.
How long does Google Ads conversion tracking take to start working in Webflow?
Tracking typically verifies within a few hours to 24 hours after publishing. Your conversion status will show Unverified initially, then change to No recent conversions once Google detects the tag. Actual conversions from ads appear within a few hours.
How do I track multiple forms with different Google Ads conversions in Webflow?
Create separate conversion actions in Google Ads for each form. Install the Google tag once in project-level code, then create unique thank you pages for each form type (like /contact-thank-you and /newsletter-thank-you). Set up codeless URL tracking for each page.
What Webflow plan do I need for Google Ads conversion tracking?
You need a paid Site plan (Basic, CMS, Business, or Ecommerce) to access custom code features. The free Starter plan doesn't support the site-wide head code required for Google Ads tracking. Basic plans start at $14/month annually.
Conclusion
Setting up Google Ads conversion tracking in Webflow gives you complete visibility into which campaigns and keywords deliver actual results. The modern codeless URL approach requires only a paid Webflow Site plan and takes just a few minutes to set up.
Once implemented, you'll know exactly which ads drive conversions, allowing you to optimize bids and allocate budget to your best-performing campaigns based on real data rather than guesswork.
For advanced tracking implementations like enhanced conversions, cross-domain tracking, or complex multi-step funnels, our Webflow development team can build custom solutions that capture every valuable interaction while maintaining site performance and code quality.


Join readers commenting on this post!