
Mailchimp is one of the most popular email marketing tools, trusted by thousands of businesses worldwide. Even so, Webflow doesn’t have a built-in way to connect its forms directly to Mailchimp. Don’t worry—this guide will show you exactly how to integrate your Webflow forms with Mailchimp, no third-party tools required!
Before we start, let’s explain how Webflow forms connect to Mailchimp.
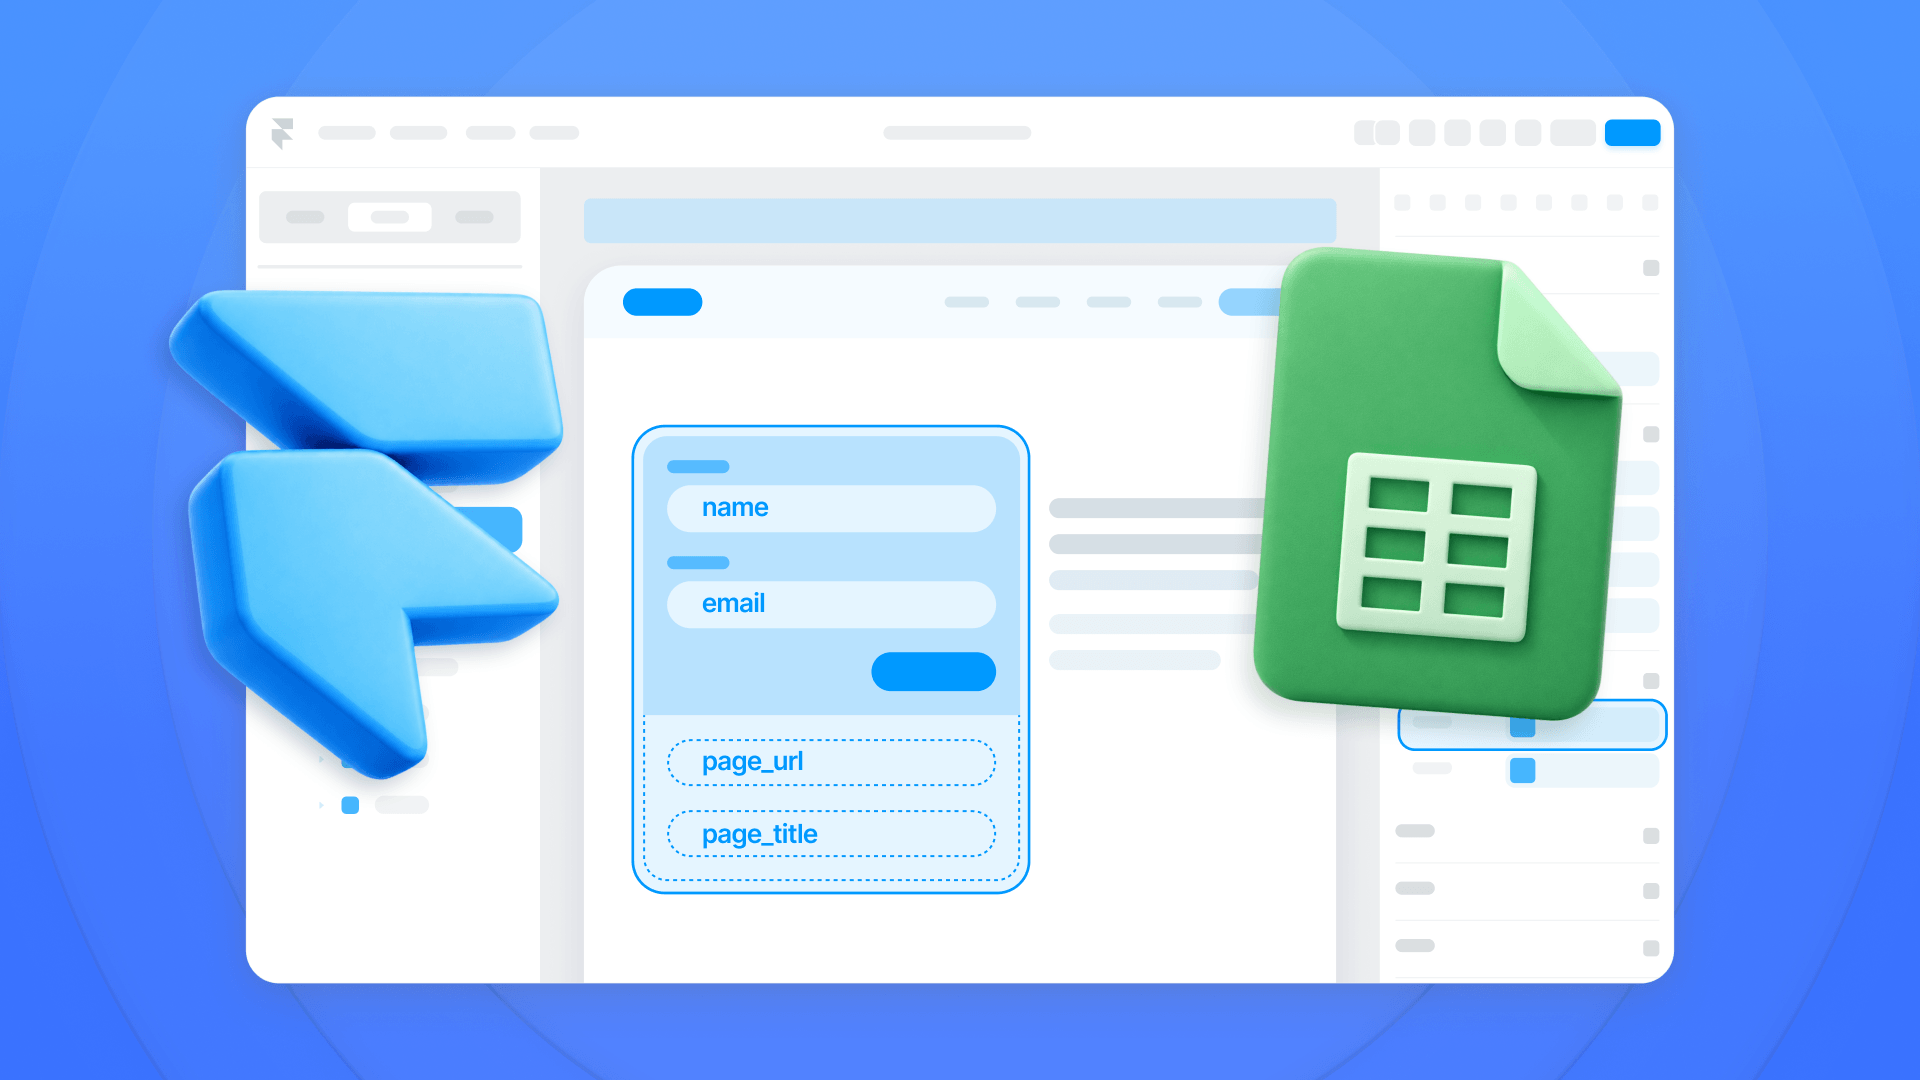
How Webflow forms can be connected to Mailchimp
When someone submits a form on your Webflow site, the data is typically stored in Webflow's form submissions by default. However, if you prefer to have this data sent directly to Mailchimp, you'll need to specify where the form should send the information. This is where the “Action URL” comes into play!
The Action URL is a special URL that connects your Webflow form directly to a specific audience in Mailchimp. By adding this URL to your Webflow form settings, all submitted data is automatically transferred to Mailchimp. This ensures your leads are added to the right list without any extra steps.
Why integrate Webflow forms directly with Mailchimp?
Before we dive into the guide, here’s why this method is the best option compared to other alternatives:
- No third-party tools needed: Skip the extra costs of automation tools like Zapier or Make.
- Use your own Webflow forms: Connect your Webflow forms to Mailchimp without adding Mailchimp’s forms or messing with extra code.
- Instant lead capture: Your form submissions go straight to your Mailchimp lists without delays.
- More reliable: Direct integration means fewer points of failure in your setup.
Now that you understand how the integration works and why it's the best option, let’s get started!
Step-by-step integration: Connecting Webflow forms with Mailchimp
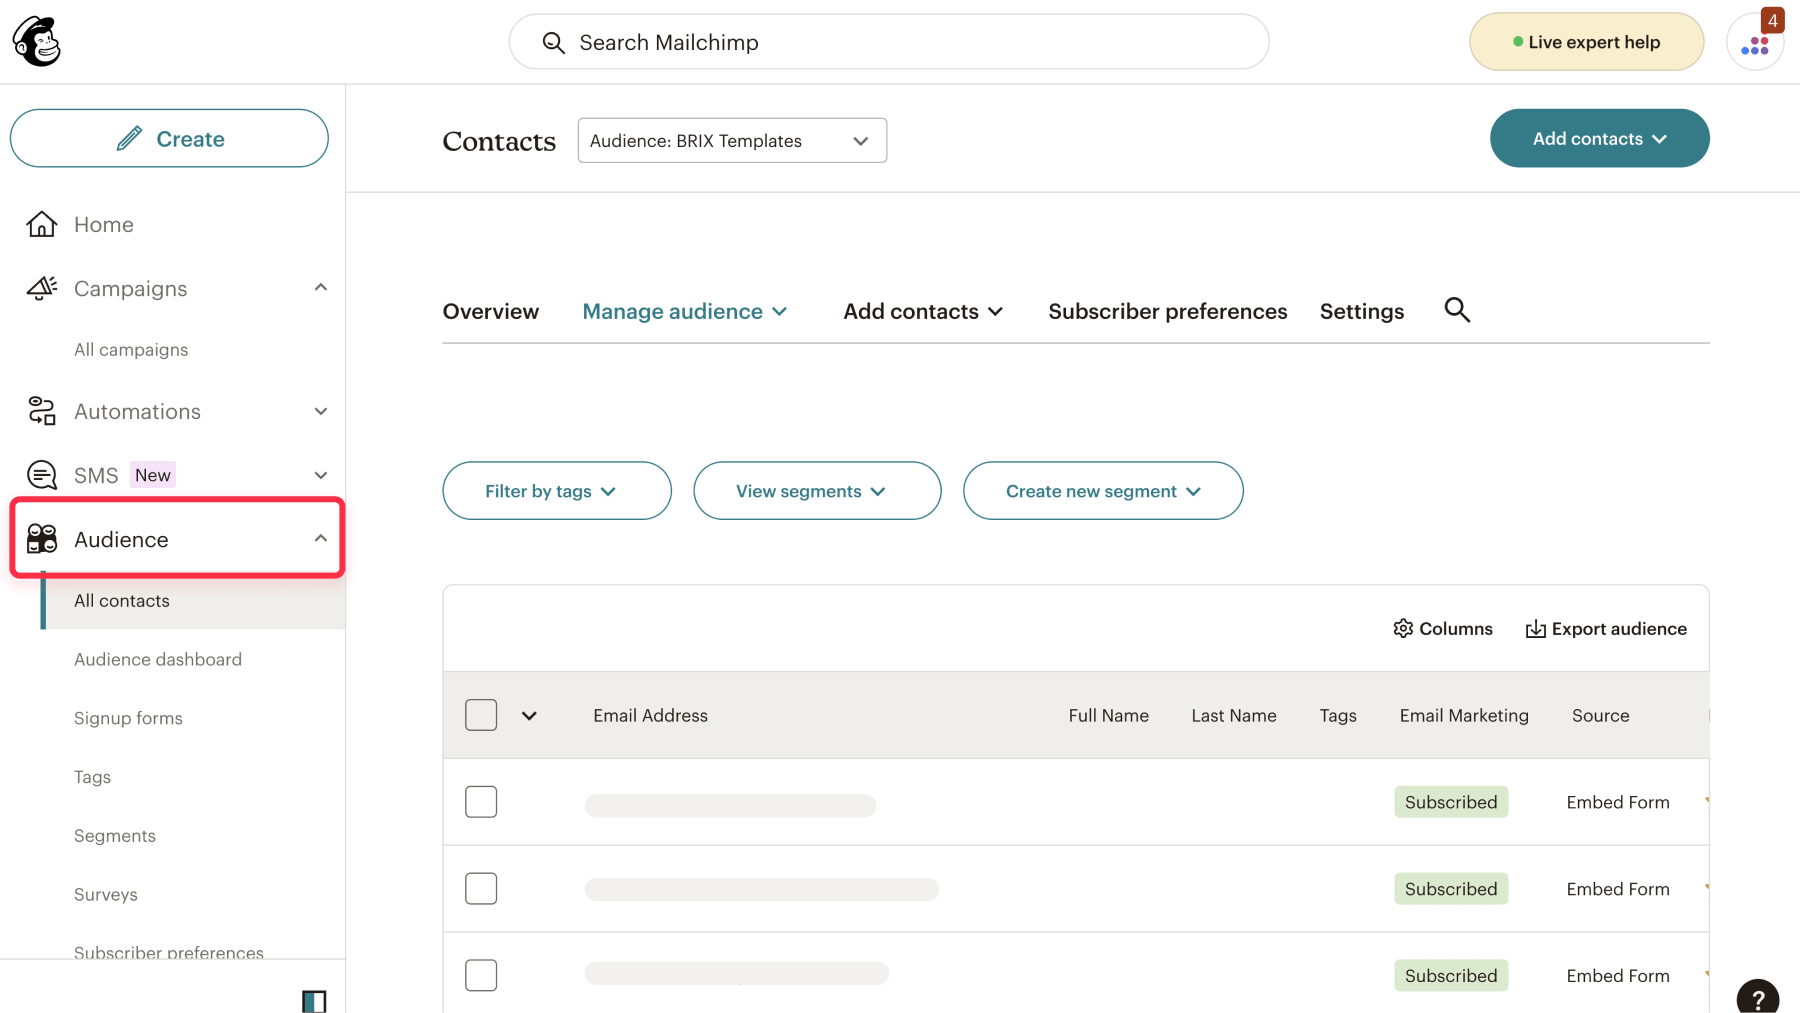
Step 1: Setting up your Mailchimp audience
Before connecting your Webflow form, you need to ensure you have a Mailchimp audience. Here’s how:
- Log into your account: Head to Mailchimp and sign in.
- Go to audience settings: Navigate to Audience > All contacts.
- Create or select an audience: In the Audience tab, click All contacts. If you already have an audience, select it. If not, go to Settings, choose Manage audiences, and click Create Audience to set up a new one.
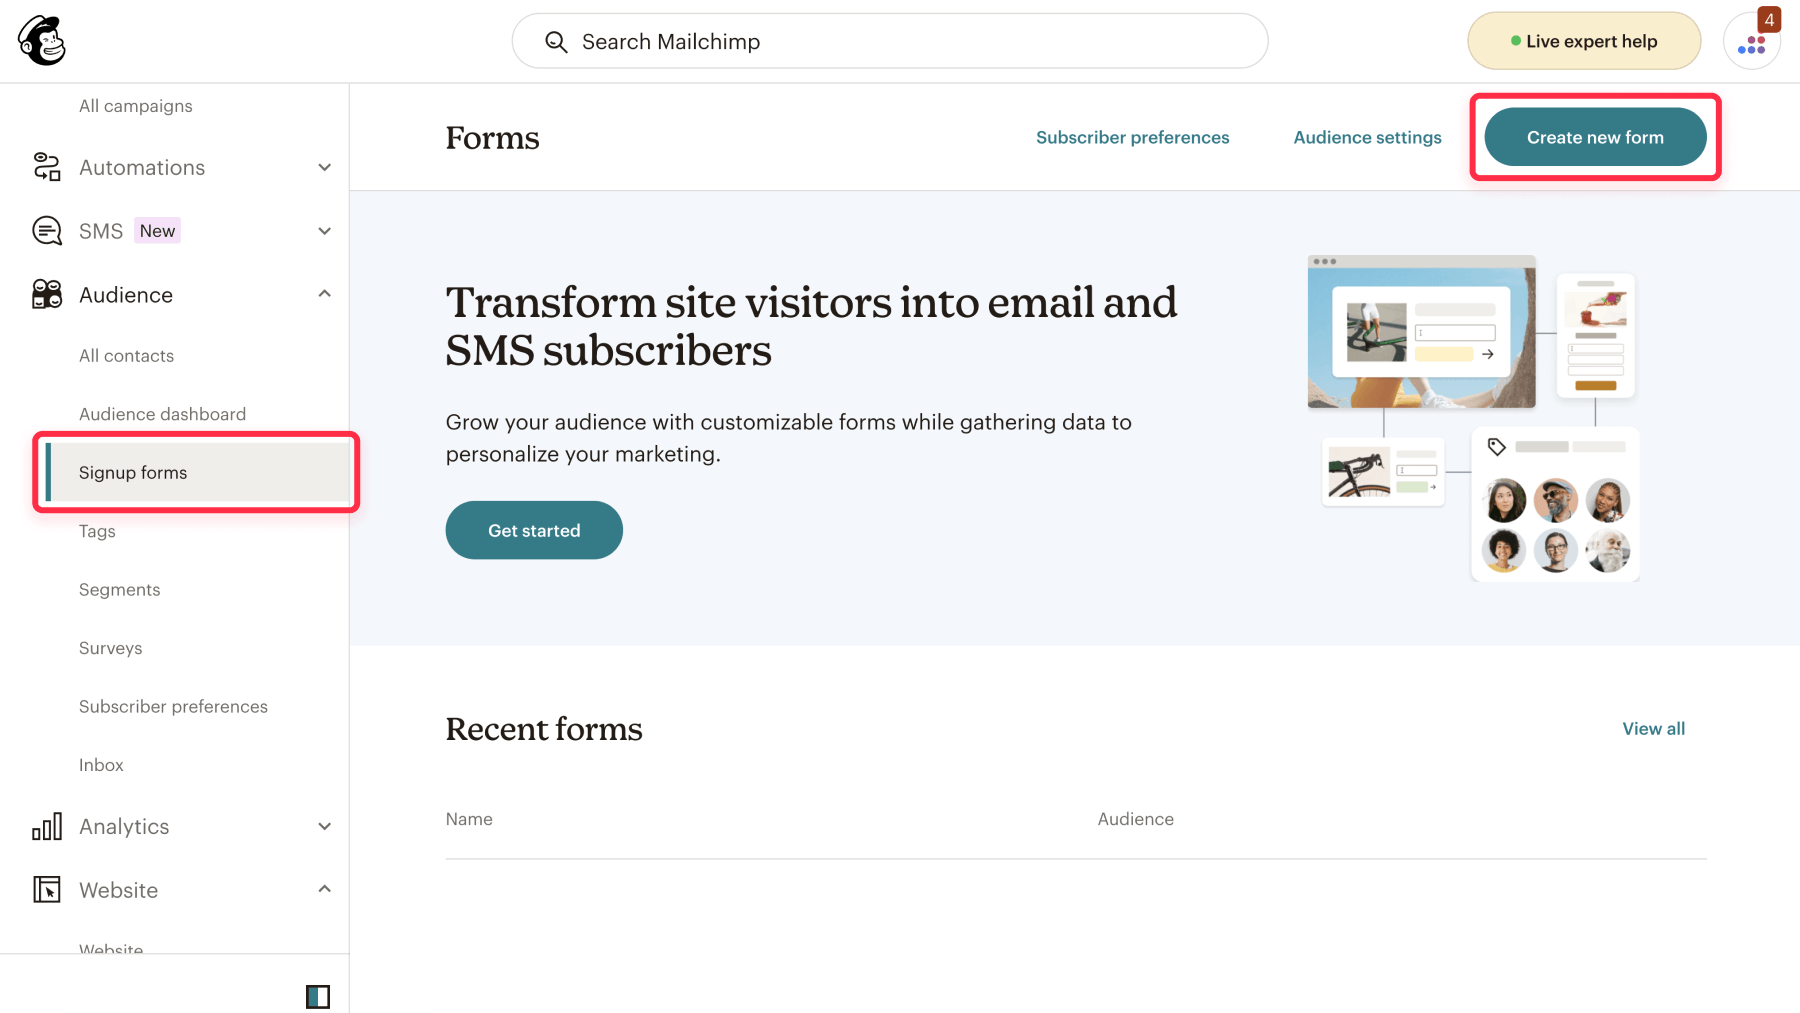
Step 2: Creating a Mailchimp signup form
With your audience ready, it’s time to create or customize a signup form:
- Go to signup forms: In your selected audience, navigate to Signup forms and click Create a new form. If you already have a form, click on it instead of creating a new one.
- Save your form: Once your form is ready, save it. Mailchimp will generate the form code containing the Action URL needed for integration.
Step 3: Customizing form fields
If you need to collect more information than just email addresses, you can add extra fields to your form. Follow these steps to ensure everything connects smoothly:
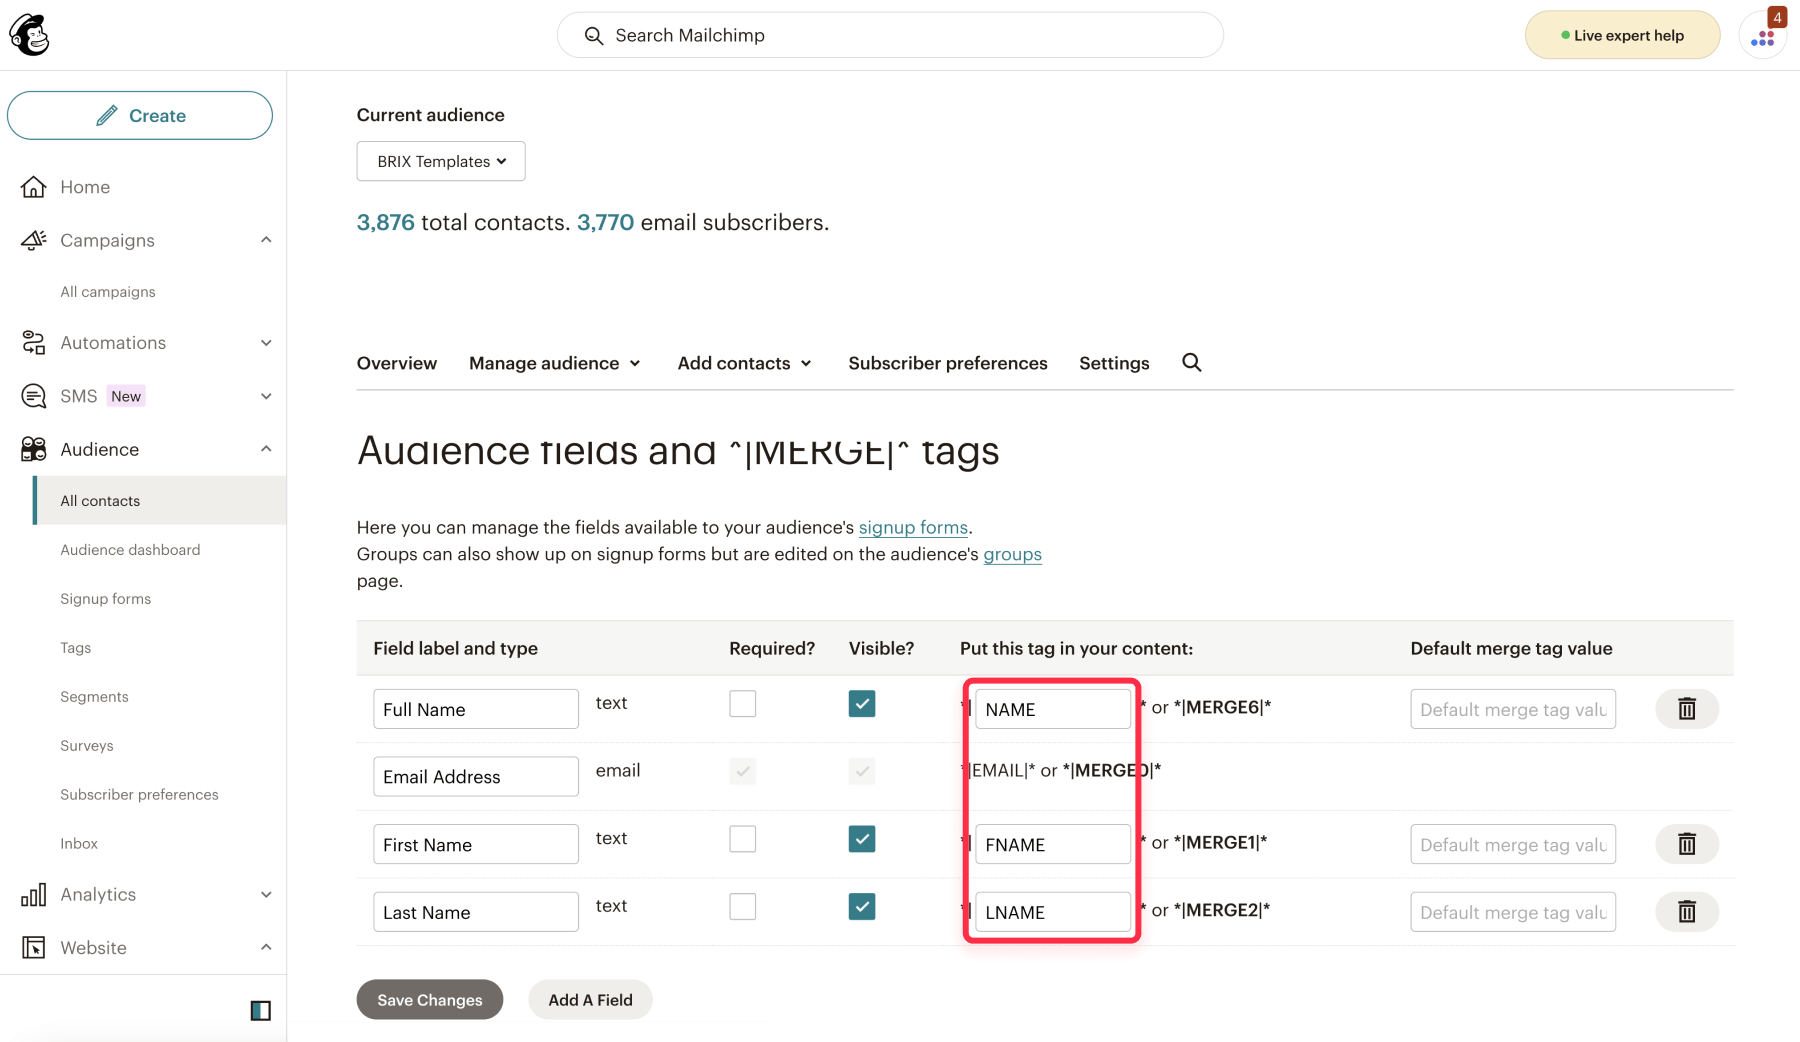
- Add the fields you need: In your signup form, go to Audience Fields settings and add fields like Full Name, Last Name, or any custom fields you plan to collect.
- Note the field names: Each field has a "Name" (e.g., EMAIL, FNAME) in the settings. Write these down—you’ll use them later when connecting your Webflow form.
- Save your form again: After adding the fields, click Save to update your form. Mailchimp will generate a new code that includes the new fields.
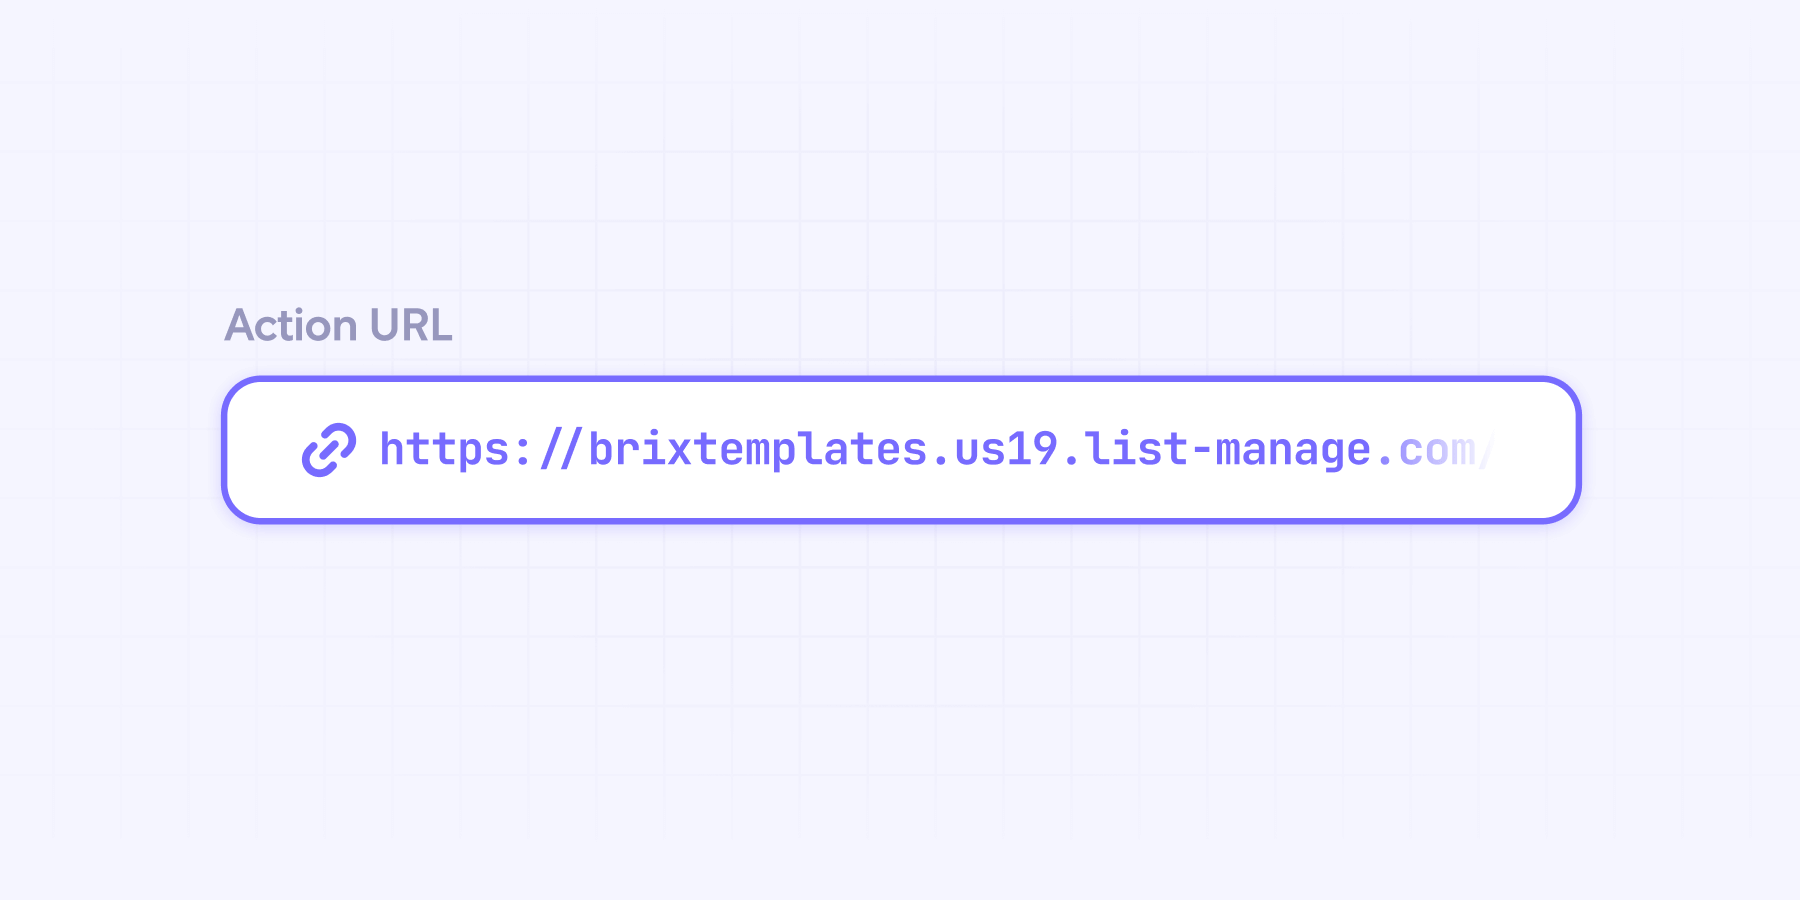
Step 4: Obtaining your Mailchimp Action URL
Now that you’ve generated your form code, it’s time to extract the Action URL. The great news? We’ve created a handy tool to make this process super simple! Just paste the code that Mailchimp generated into the text area below and click Get Action URL button.
You’ll get a link that looks like this:
https://yourdomain.usX.list-manage.com/subscribe/post?u=unique_id&id=unique_id
In addition to the Action URL, the tool also provides the field names you’ll need later to match your Webflow form fields with the corresponding Mailchimp fields. If you prefer to retrieve the Action URL manually, here’s how to do it:
1. Locate the Action URL: In the code you generated, look for the line starting with <form action="https://...">. The URL inside the action attribute is your unique Action URL.
2. Copy the Action URL: Carefully copy the entire URL between the quotation marks, making sure there are no extra spaces or characters.
Now that you have your Action URL, you’re ready to move on to the next step: adding it to your Webflow form.
Step 5: Connecting your Webflow form to Mailchimp
It’s time to connect your Webflow form to Mailchimp. Here’s how to do it step by step:
- Open your Webflow project: Log in to your Webflow account and open the project containing your form.
- Select your form: In the Webflow Designer, navigate to the page with your form and click on the form element to select it.
- Access form settings: With the form selected, open the Settings panel by clicking the gear icon.
- Set the Action URL: Paste the Mailchimp Action URL you copied earlier into the Action field.
- Set the form method: In the Method dropdown, select POST.
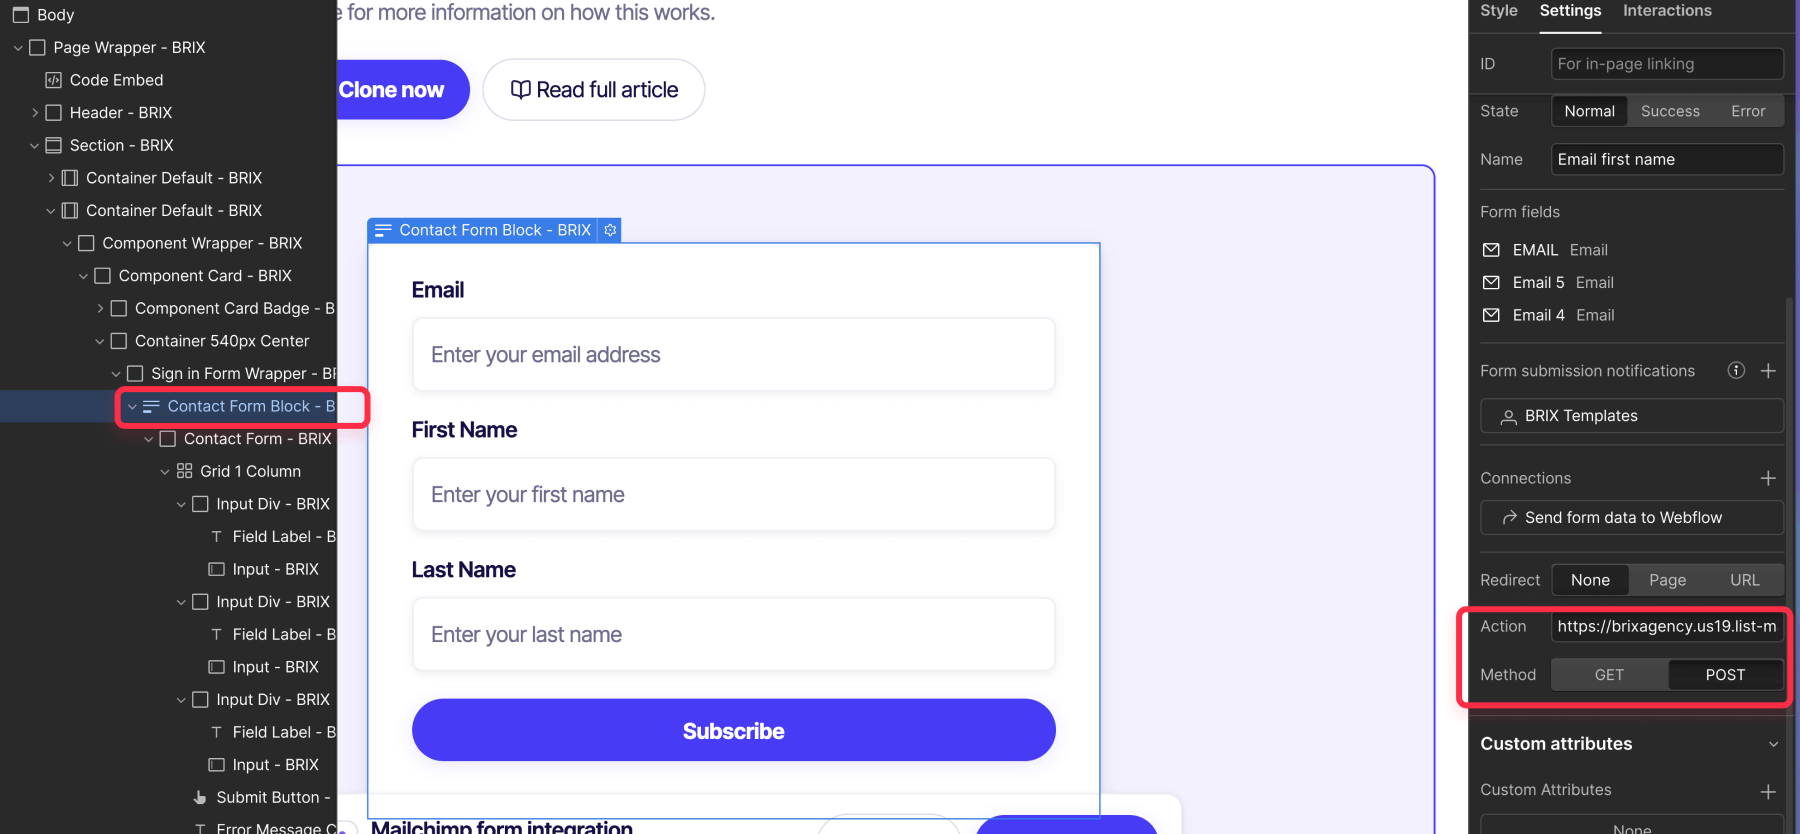
Your form is now connected to Mailchimp! The next step is to match your Webflow form fields to the correct ones in Mailchimp to ensure your data flows smoothly.
Step 6: Matching your form fields
With your Webflow form connected, the next step is to match its fields to the correct ones in Mailchimp. This ensures that the data you collect (like email addresses, names, or custom fields) is sent to the correct fields in your Mailchimp audience.
If you used the tool earlier, the "Name" of each field will be listed along with the Action URL. If you retrieved the Action URL manually, you can find these field names in your Mailchimp Audience Fields settings. Here’s how to match them:
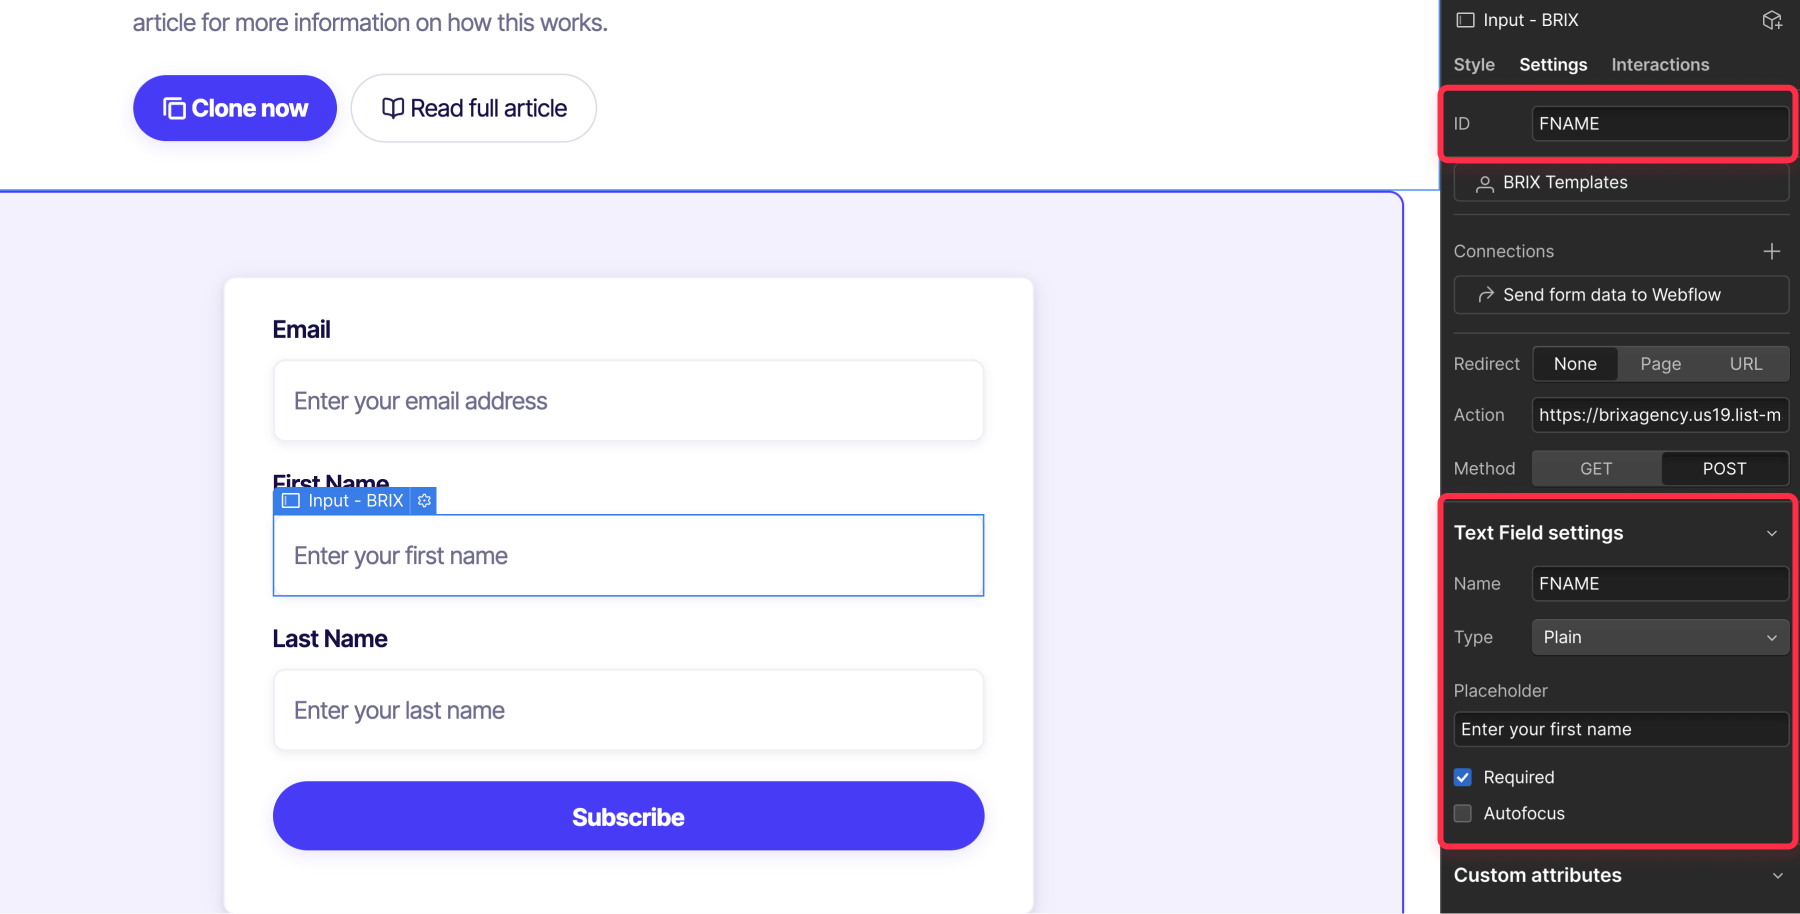
- Select form fields: In the Webflow Designer, click on each form input you want to map (e.g., Email, First Name).
- Set field names: In the Settings panel, update the Name attribute of each field to match the corresponding field name from Mailchimp (e.g., EMAIL, FNAME).
- Double-check required fields are included: Check your Mailchimp audience settings to confirm all required fields are present in your Webflow form and are properly filled out.
- Repeat for all fields: Confirm every Webflow field corresponds to a Mailchimp field.
- Add hidden fields (optional): If you need to collect extra data, like campaign IDs, you can add hidden fields to your Webflow form and assign them to the appropriate Mailchimp fields. This step is optional, but you can also use hidden fields to pass URL parameters into your form submissions. Learn how to pre-fill Webflow forms with URL parameters.
Perfect—your Webflow forms will now automatically send data to your Mailchimp audiences. Now let's make sure that everything works correctly.
Step 7: Testing and verifying your integration
Before making your form live, test the integration to ensure everything works:
- Publish your Webflow site: In the Webflow Designer, click Publish to push your changes to staging (webflow.io version).
- Submit a test entry: Open your live site and fill out the form with sample data. Avoid using the word 'test' in any field since Mailchimp may block entries with this term.
- Check Mailchimp audience: Log into Mailchimp and confirm the test entry appears under Audience > All contacts.
- Verify field mapping: Ensure all Webflow fields map correctly to Mailchimp fields.
- Ensure unique field names: Double-check that your Webflow form fields have unique names and don’t overlap with other forms in the same project. Duplicate field names can cause conflicts and disrupt the integration.
If everything is set up correctly, your test data should appear in Mailchimp without any issues. This confirms that your integration is working as expected.
Troubleshooting common issues with your Webflow form to Mailchimp connection
Sometimes things don’t go as planned, but that’s okay! Here are the most common issues you might encounter and how to fix them quickly.
- Double-check the Action URL: Ensure the Mailchimp Action URL is copied accurately with no missing characters or extra spaces.
- Verify field names: Confirm that the "Name attributes" in your Webflow form exactly match the field names in your Mailchimp form.
- Check for confirmation messages or success redirects: Ensure the success message or redirect you’ve configured in Webflow appears as expected after form submission.
- Fill required fields: Make sure your form includes all required fields from your Mailchimp form and that they’re properly filled out.
- Check for typos: Even small errors in field names or the Action URL can break the integration.
- Review Mailchimp audience settings: Ensure your audience is active and set up to receive data from your form.
Conclusion
Connecting your Webflow forms directly to Mailchimp makes your lead capture process seamless. It saves you time by automatically adding subscribers to your email lists and ensures your data is accurate and reliable.
If you’re looking to do even more—like creating personalized campaigns, syncing audience data with Facebook Ads, automating workflows based on user behavior, or analyzing your email performance in Google Analytics—our team at BRIX Templates is here to help!
If you encounter any challenges or have questions about connecting your Webflow forms to Mailchimp, our support team at BRIX Templates is always here to assist you. Contact us here for personalized support and expert guidance.


Join readers commenting on this post!