Running Pinterest ad campaigns without proper conversion tracking is like driving with your eyes closed. You're spending money on promoted pins, but you have no idea which ones actually lead to leads, sales, or sign-ups on your Webflow site.
The Pinterest tag (what many people still call the "Pinterest pixel") solves this by tracking real actions visitors take after clicking your ads. Once installed correctly, you'll see which pins drive form submissions, add-to-cart events, and completed purchases—not just clicks.
This guide shows you the exact steps to install the Pinterest tag in Webflow, set up conversion events that fire at the right moment, and verify everything works before you spend another dollar on ads.
Why Pinterest tag tracking matters for Webflow sites
Proper Pinterest tag implementation transforms guesswork into data-driven optimization. With the right tracking setup in your Webflow project, you gain visibility into which promoted pins actually drive business results instead of just engagement metrics.
- Stop optimizing for clicks alone: Track meaningful actions like leads, add-to-cart events, and purchases instead of relying on engagement metrics that don't reflect business outcomes.
- Enable conversion-focused campaign delivery: Pinterest uses event signals to optimize ad delivery for users most likely to convert, dramatically improving your return on ad spend.
- Build high-intent retargeting audiences: Create custom audiences from visitors who viewed specific products, added items to cart, or started checkout, allowing you to re-engage warm leads.
- Avoid false conversion data: The most common Webflow mistake is firing checkout events when someone simply visits the checkout page, not when they complete a purchase—proper setup prevents this.
Understanding Pinterest pixel vs Pinterest tag in Webflow
Pinterest officially calls their tracking code the "Pinterest tag," though most marketers still refer to it as the "Pinterest pixel." Both terms mean the same thing, but Pinterest's interface, documentation, and troubleshooting tools all use "tag." Understanding this terminology helps when you're troubleshooting or searching for help with your Webflow implementation.
- Base tag: The site-wide snippet that must load on every page of your Webflow site. This establishes tracking capability across your entire domain.
- Event codes: Additional JavaScript calls that tell Pinterest when specific conversions happen—like form submissions, add-to-cart actions, or completed purchases.
The base tag alone provides basic visitor data, but conversion events are what enable campaign optimization and ROI measurement.
Preparing your Pinterest and Webflow accounts before installation
Before installing any code, verify you have the necessary access and capabilities in both platforms. This preparation step prevents frustration midway through the Webflow installation process.
Confirming Pinterest account access for Webflow setup
You need a Pinterest business account with advertiser access to install the tag and view conversion data. Log in to your Pinterest business account and confirm you can access the Conversions section under the hamburger menu.
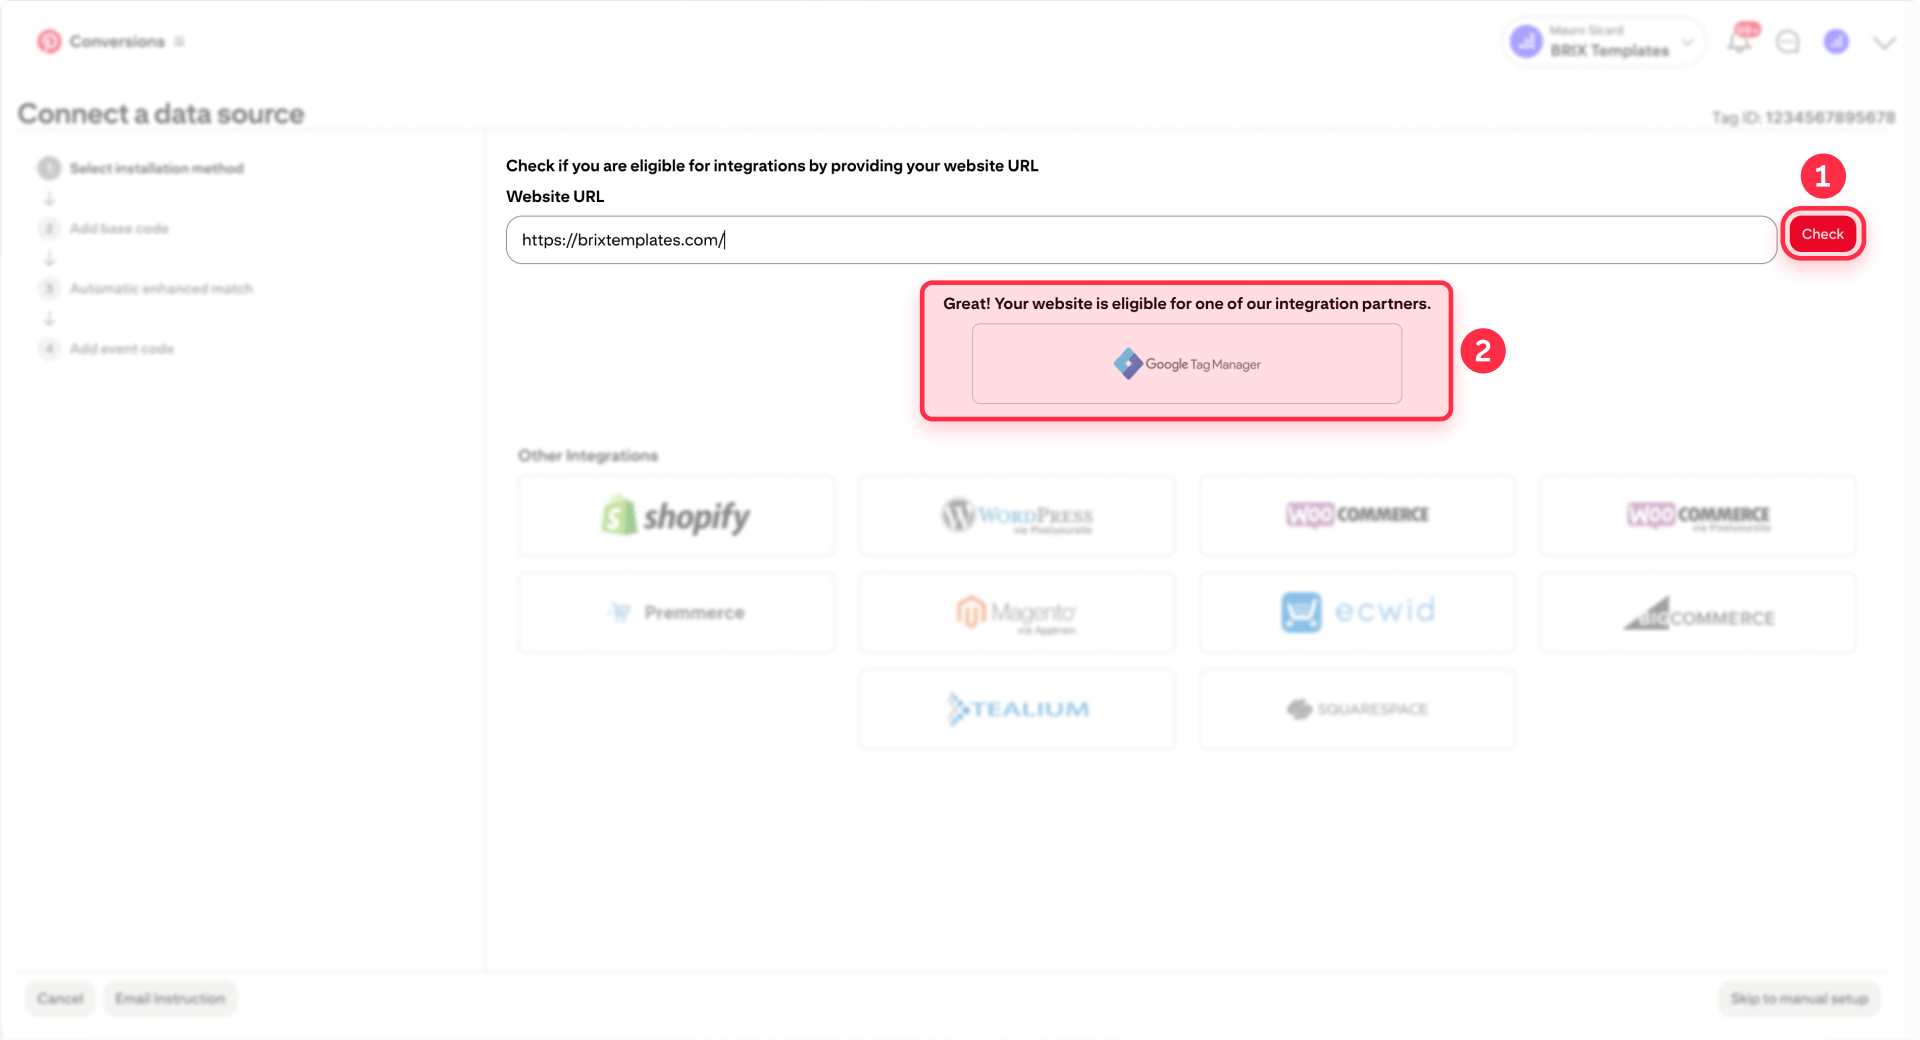
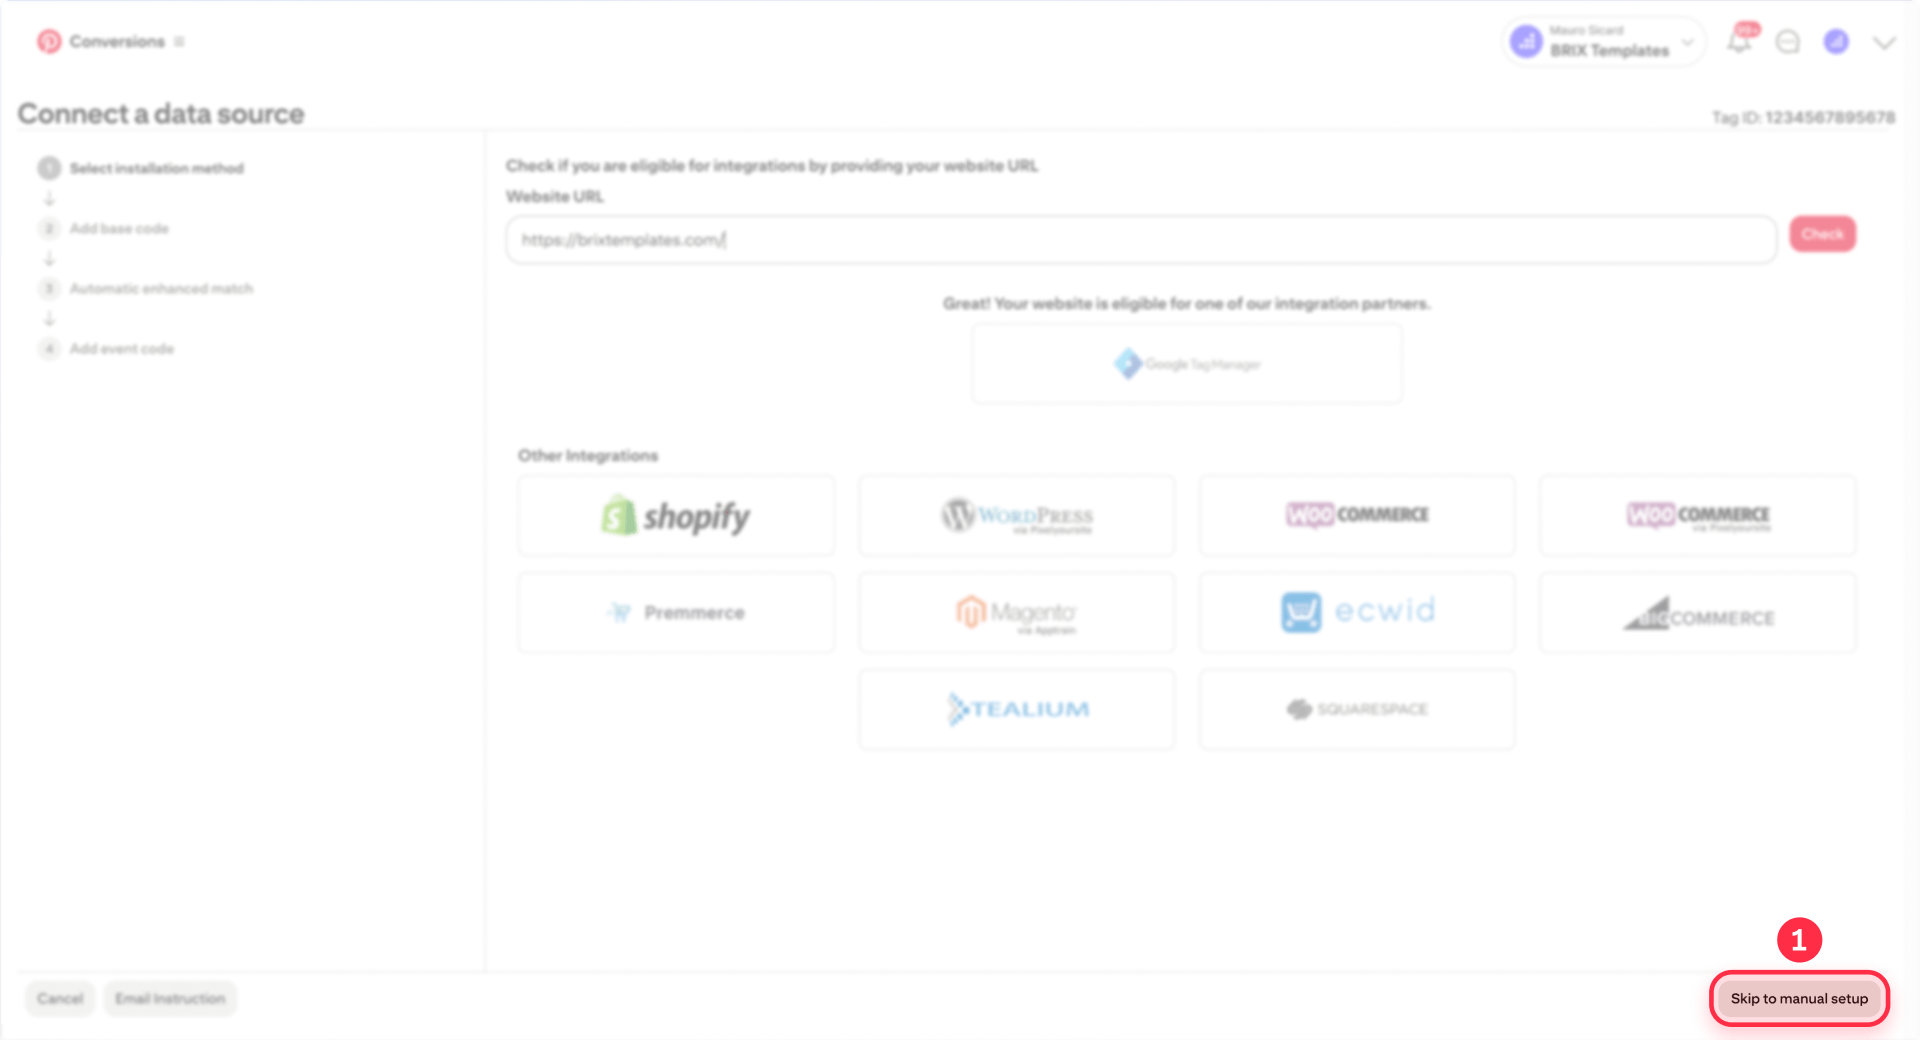
When you start the Pinterest tag setup and enter your website URL, Pinterest may show a large "Google Tag Manager" integration option after you click "Check." This is Pinterest's streamlined integration partner method that connects directly with your GTM container. If you already use GTM on your Webflow site, this integration partner path is the fastest and most reliable option. Alternatively, you can choose manual installation by skipping to the code copy step.
Important: Choose ONE install path (GTM OR manual). Don't use both methods, as this will cause duplicate tag firing and inaccurate conversion data.
Verifying Webflow custom code access for tag installation
Webflow only allows site-wide custom code on paid site plans (Basic, CMS, Business, or Ecommerce). The free Starter plan does not support the custom code features required for Pinterest tag installation.
Keep these Webflow limitations in mind:
- 50,000 character limit per custom code field
- Changes don't go live until you publish your site
- Never paste <html>, <head>, or <body> wrapper tags into custom code fields
If your current plan doesn't support custom code, you'll need to upgrade to a paid Webflow Site plan. GTM also requires custom code in Webflow, so it isn't a workaround for the free plan.
Step 1: start Pinterest tag setup and choose GTM or manual
The base tag contains your unique tag ID and must be obtained directly from Pinterest. This ensures your Webflow site reports conversions to your Pinterest account, not someone else's.
Accessing your Pinterest tag setup for Webflow installation
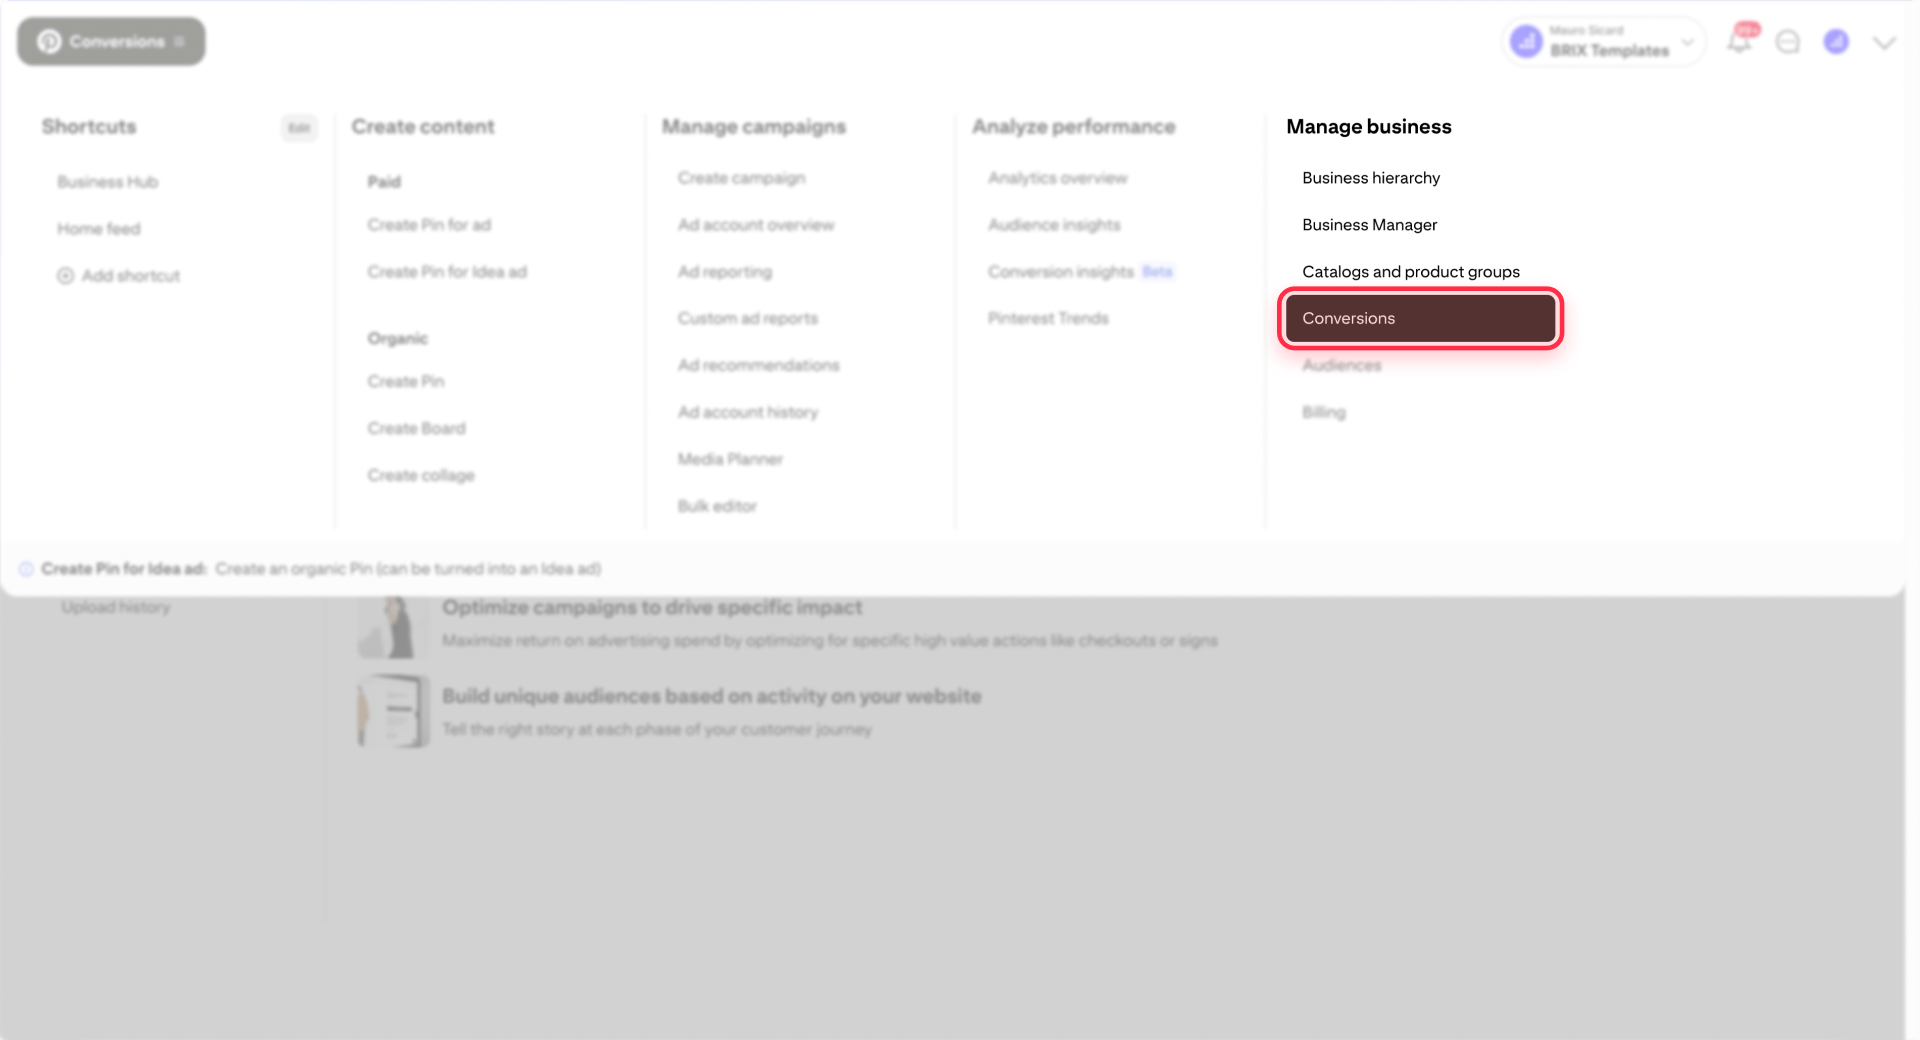
Follow this exact click-path to begin your tag setup in the current Pinterest interface:
- Log in to your Pinterest business account
- Click the hamburger icon in the top-left corner
- Under Business, click Conversions
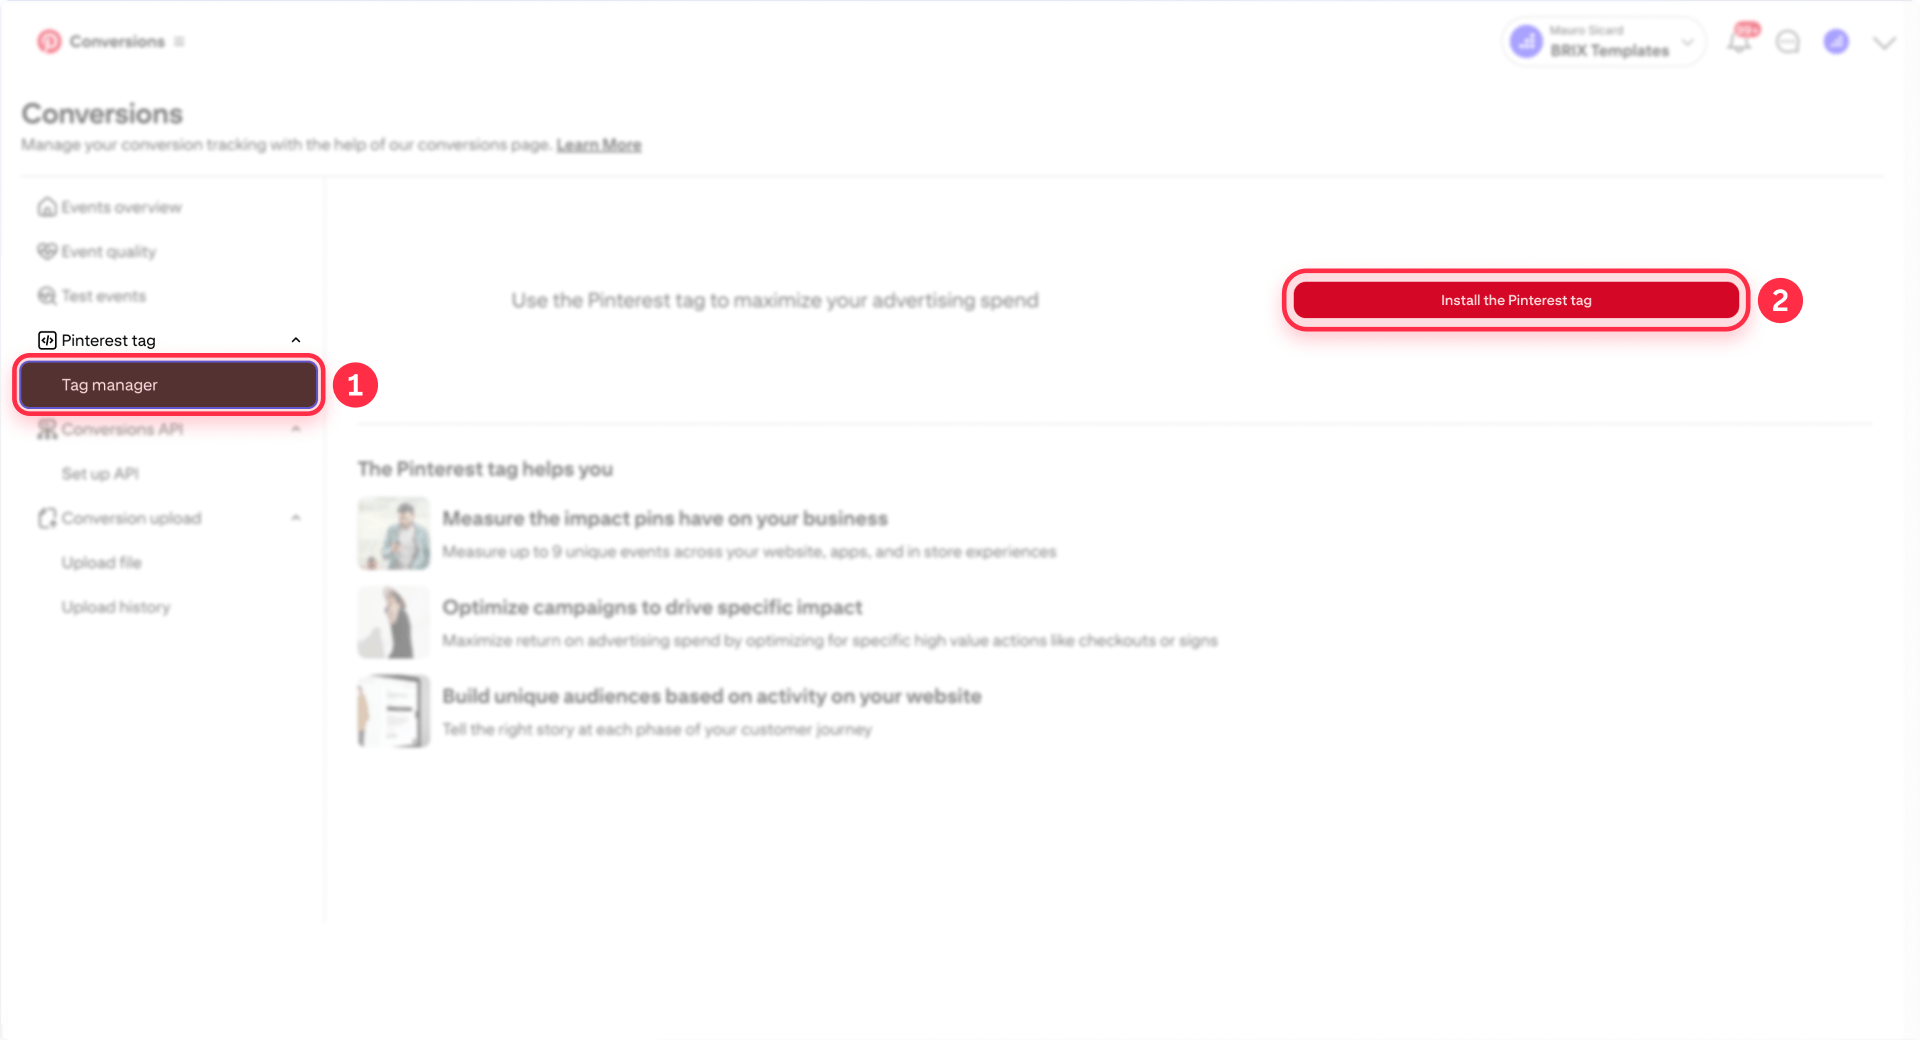
- Click Tag manager in the left navigation
- Click Install the Pinterest tag
- Enter your website URL and click Check
At this point, Pinterest may display a "Google Tag Manager" option as an integration partner. If you see this option and already have GTM installed on your Webflow site, proceed with the GTM integration method below (recommended). If you prefer manual installation or don't use GTM, skip to the alternative manual method.
Step 2: installing the Pinterest tag in Webflow
Choose ONE of the following installation paths. Do not use both methods, as this will cause duplicate tracking.
Recommended: Install Pinterest tag in Webflow using GTM (primary method)
Google Tag Manager provides a streamlined way to install and manage the Pinterest tag on your Webflow site. This method is recommended for sites that already use GTM or plan to track multiple conversion events.
Prerequisites: Confirm GTM is already installed on your Webflow site and published. If you haven't installed GTM yet, follow our guide to install GTM in Webflow first.
Installation steps:
- In Pinterest Ads Manager, open Conversions and start the setup (the UI may say "Connect a data source" or "Install the Pinterest tag")
- Enter your website URL and click Check
- When Pinterest displays integration options, select "Google Tag Manager" as the integration partner and click continue
- Follow the prompts until Pinterest confirms the setup or connection is complete
- IMPORTANT: Open Google Tag Manager and click Submit/Publish so the changes go live on your Webflow site
- Verify the base tag is firing by visiting your published Webflow domain and using the Pinterest Tag Helper browser extension
The GTM integration automatically configures the Pinterest base tag to fire on all pages. You'll configure conversion events in GTM using the steps in Step 4 below.
Alternative: Manual install in Webflow (no GTM)
If you prefer manual installation or Pinterest doesn't show the GTM integration option, you can copy the base code directly and paste it into Webflow's custom code settings.
If Pinterest shows a GTM integration option, click "Skip to manual setup" or navigate back to copy the base code instead.
Accessing your personalized Pinterest tag code:
- In Pinterest Ads Manager at Conversions → Tag manager → Install the Pinterest tag
- Click Skip at the bottom-right
- Click Copy code
The code you copy includes your unique tag ID. This is the complete Pinterest base tag that loads on every page of your Webflow site to establish tracking capability.
Example only — don't paste this. Copy your real code from Pinterest so it includes your Tag ID.
<!-- Pinterest Tag -->
<script>
!function(e){if(!window.pintrk){window.pintrk = function () {
window.pintrk.queue.push(Array.prototype.slice.call(arguments))};var
  n=window.pintrk;n.queue=[],n.version="3.0";var
  t=document.createElement("script");t.async=!0,t.src=e;var
  r=document.getElementsByTagName("script")[0];
  r.parentNode.insertBefore(t,r)}}("https://s.pinimg.com/ct/core.js");
pintrk('load', 'YOUR_TAG_ID_HERE');
pintrk('page');
</script>
<noscript>
<img height="1" width="1" style="display:none;" alt=""
  src="https://ct.pinterest.com/v3/?tid=YOUR_TAG_ID_HERE&event=pagevisit&noscript=1" />
</noscript>
<!-- end Pinterest Tag -->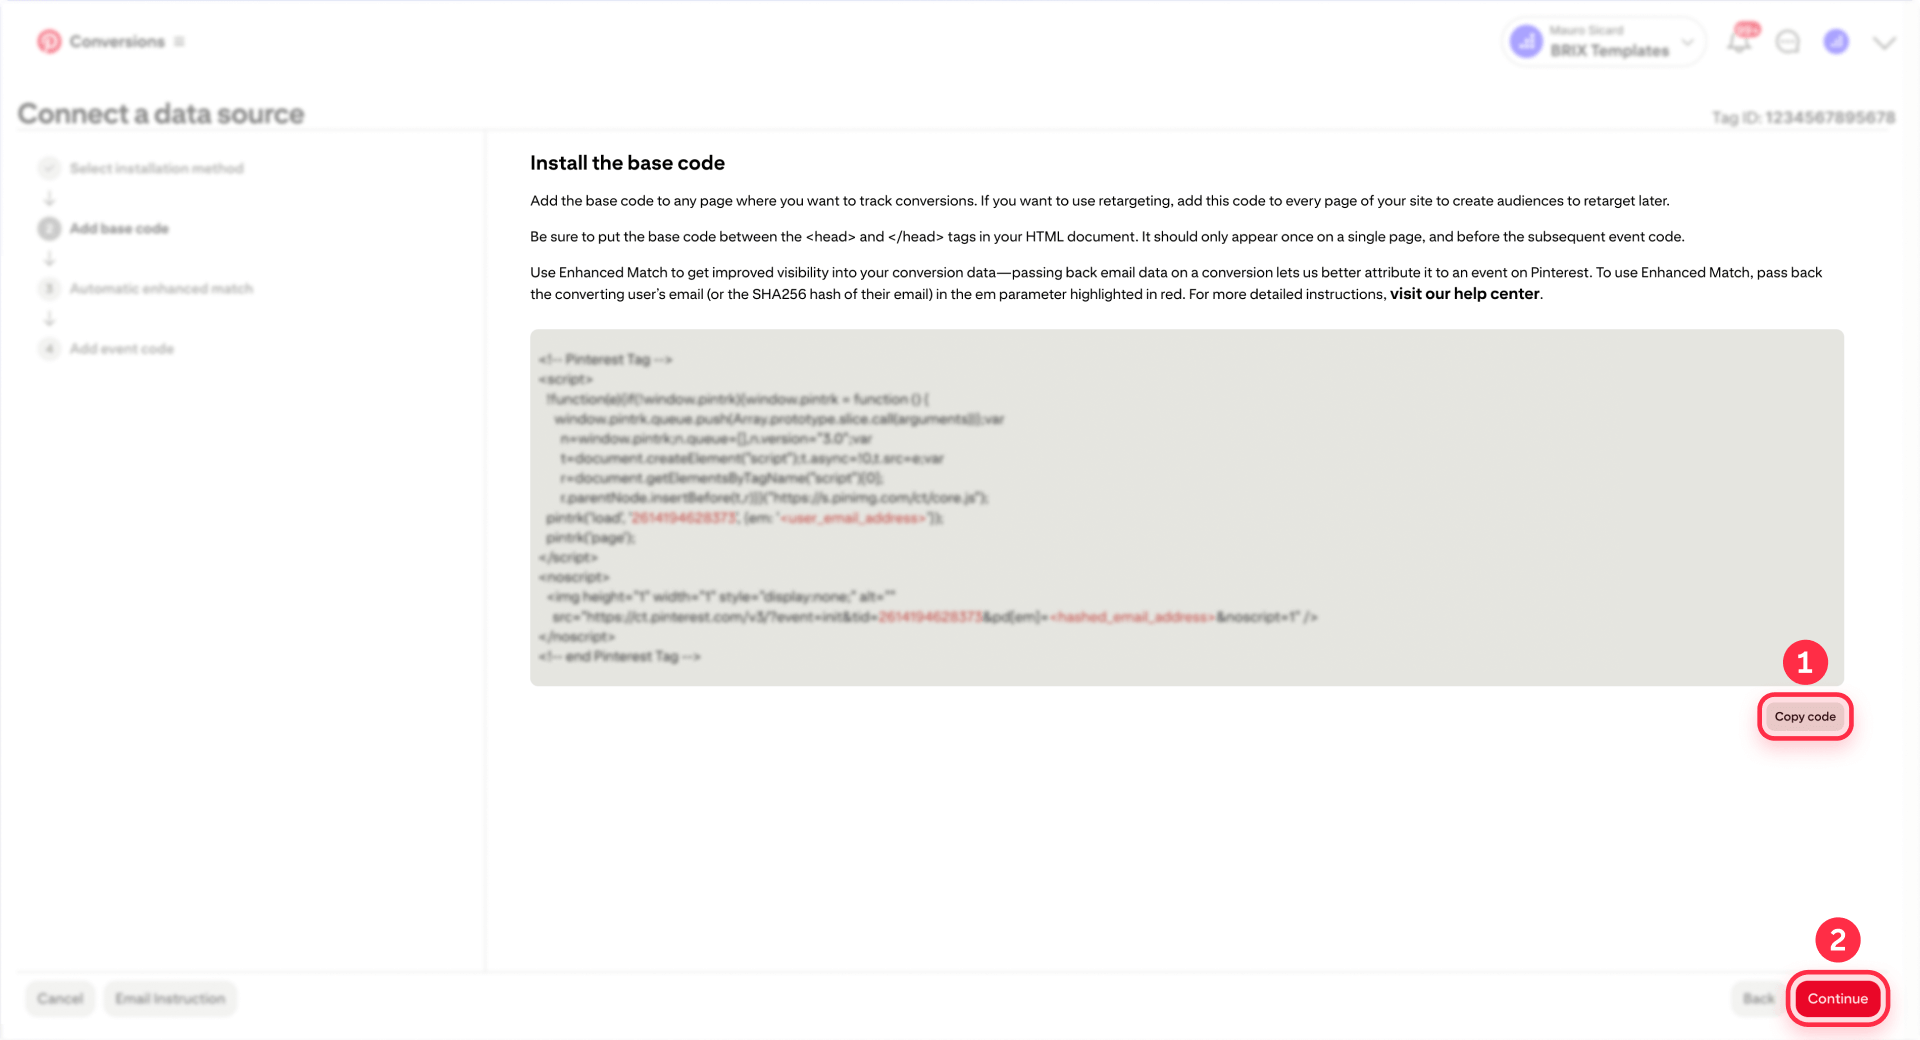
Adding Pinterest tag code to Webflow project settings:
Once you've copied the base code, install it site-wide through Webflow's custom code feature:
- In the Webflow Dashboard, open your project and go to Project Settings
- Click the Custom Code tab
- Paste your Pinterest base code into the Head Code field
- Click Save Changes
- Click Publish in the top-right corner
- Select your domain(s) and click Publish to selected domains
The base tag will now load on every page of your Webflow site. Verify it's working by visiting your published domain (not webflow.io preview) and using the Pinterest Tag Helper browser extension.
Step 3: verifying Pinterest tag installation on your Webflow site
Before setting up conversion events, confirm your base tag loads correctly on your published Webflow site. This verification step prevents frustration later when conversion events don't fire because the base tag isn't working.
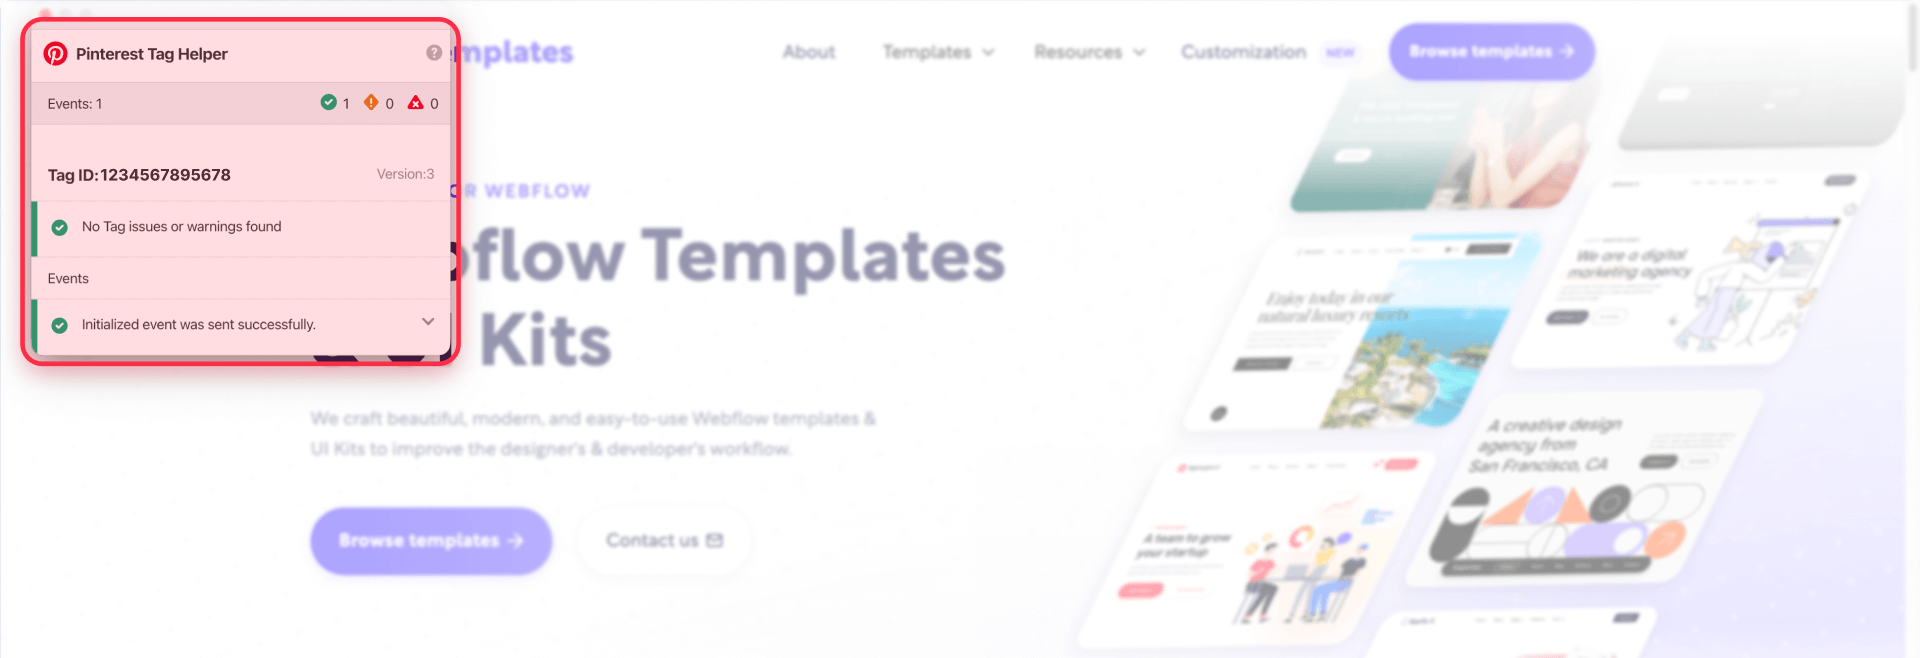
Using Pinterest Tag Helper for immediate Webflow verification
The Pinterest Tag Helper browser extension is the fastest way to verify your tag fires correctly on your published Webflow domain.
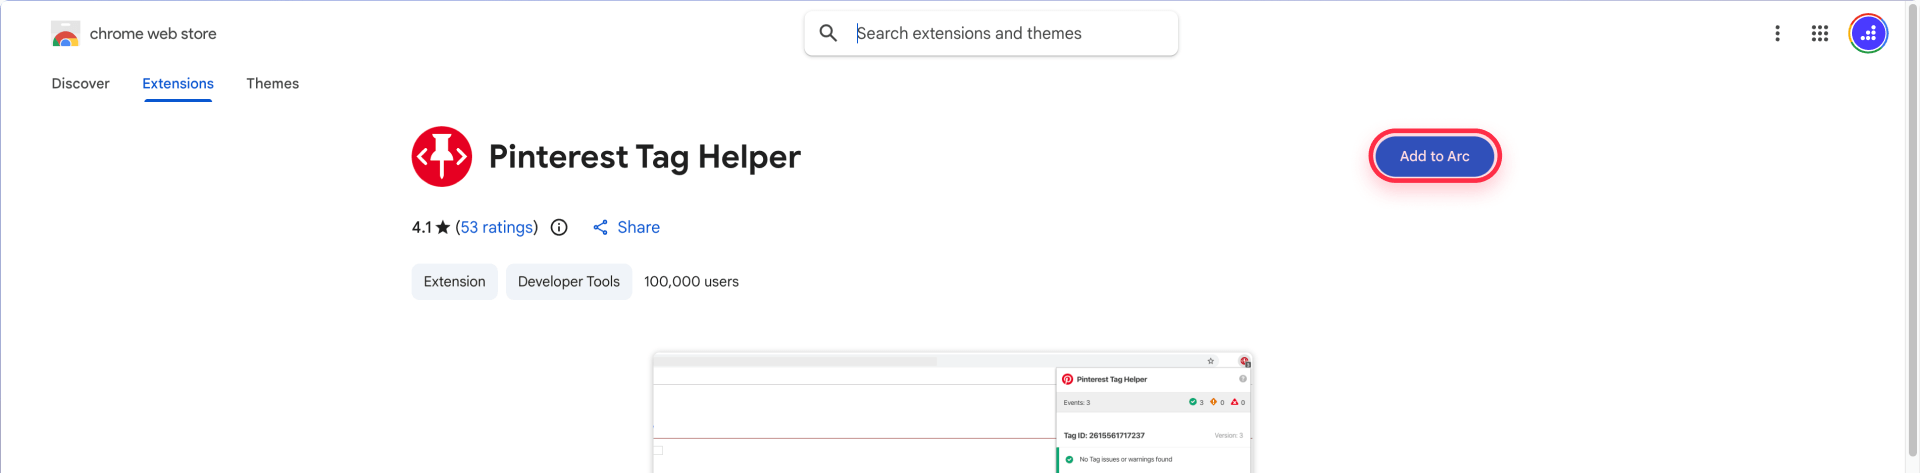
- Install the Pinterest Tag Helper extension for Chrome
- Visit your published Webflow site (not the Designer or webflow.io preview URL)
- Click the Pinterest Tag Helper icon in your browser toolbar
- Confirm it shows your tag ID and "PageVisit" event
If Tag Helper shows no tag: For GTM installations, confirm your GTM container is published (Submit/Publish) and you're testing the same domain where GTM is installed. For manual installations, verify the code is in Project Settings → Custom Code → Head Code and your site is published. Check DevTools Network tab filtered for ct.pinterest to confirm the tag request fires.
Pinterest Ads Manager may also include a Test events feature where you can trigger test conversions and see them appear in real-time. This is an optional secondary verification method, but Pinterest Tag Helper remains the primary tool for quick verification.
Step 4: setting up a conversion event in Webflow (thank-you page example)
The base tag alone only tracks page views. Conversion events tell Pinterest when specific actions happen—like form submissions, purchases, or other key conversions. This is where tracking becomes valuable for campaign optimization.
We'll show one GTM example using a thank-you page to track form submissions. For other events like AddToCart or Checkout, choose what matches your funnel or contact us for an advanced setup.
Tracking Lead conversions with a thank-you page via GTM
The most reliable way to track form submissions in Webflow is by triggering a Lead event when someone lands on a dedicated thank-you page after submitting a form.
Setup steps:
- Create or identify your thank-you page: In Webflow, create a page with a URL like /thank-you or /thank-you-newsletter. This page should only be accessible after form submission
- Configure your form to redirect: In your Webflow form, go to Form Settings → Action and select Redirect to page, then choose your thank-you page
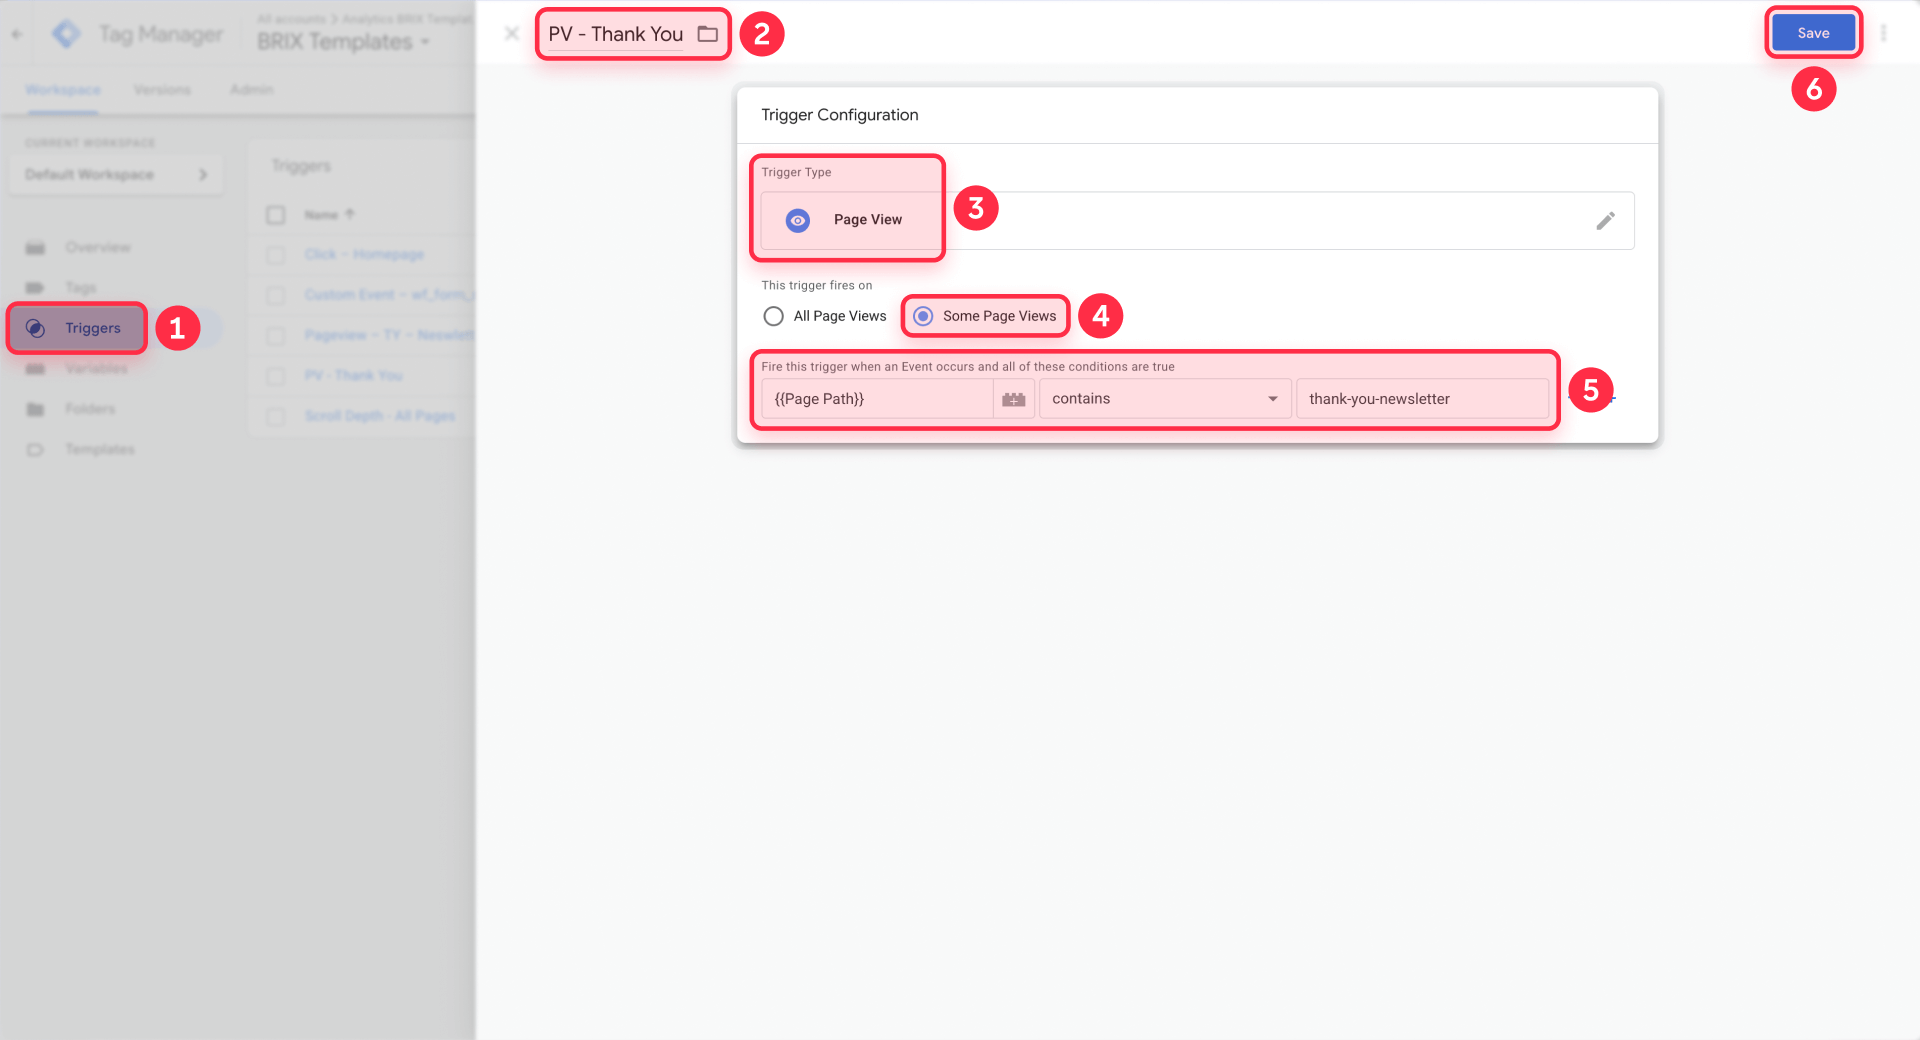
- In GTM, create a Page View trigger:
- Go to Triggers → New
- Trigger Type: Page View
- This trigger fires on: Some Page Views
- Page Path contains: /thank-you (or your specific thank-you page slug)
- Save the trigger
- In GTM, create a Custom HTML tag:
- Go to Tags → New
- Tag Type: Custom HTML
- HTML: Paste this code:
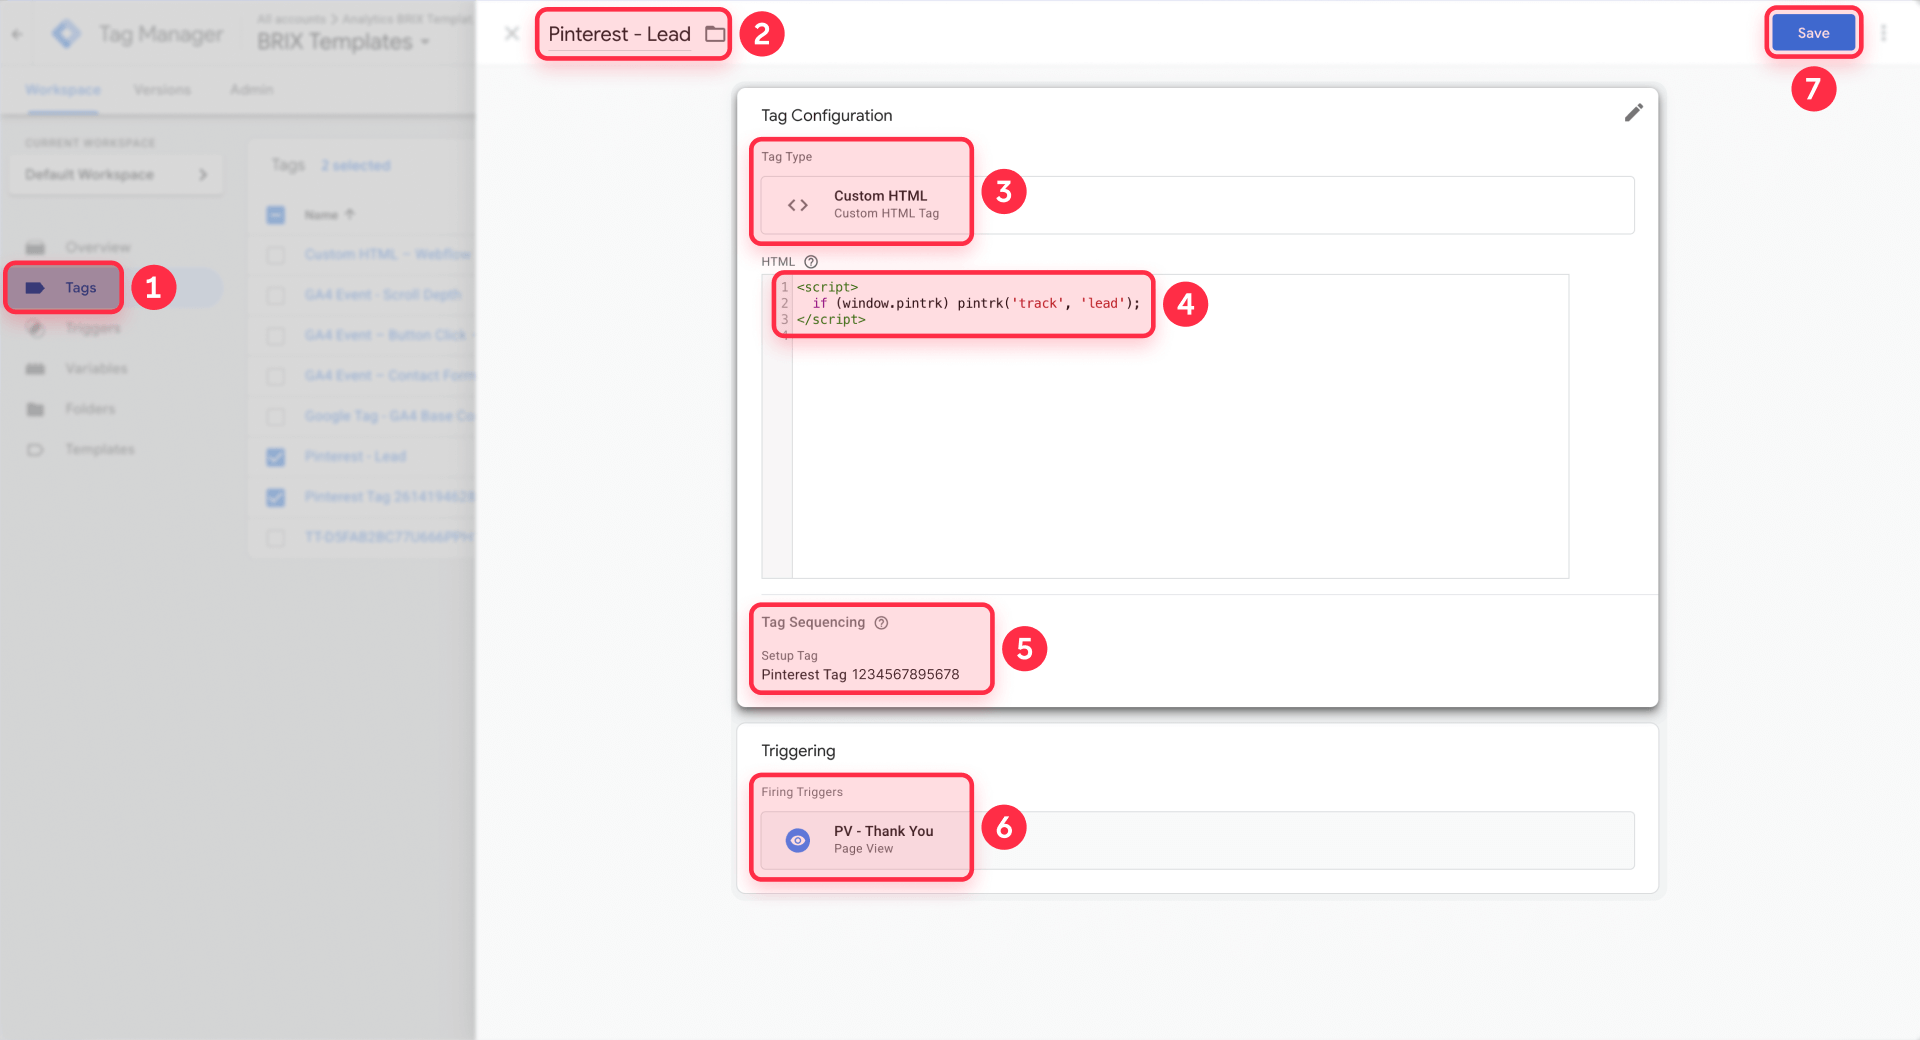
<script>
pintrk('track', 'lead');
</script>- Triggering: Select the thank-you page trigger you just created
- Tag Sequencing: Click Advanced Settings → Tag Sequencing and enable "Fire a tag before this tag fires" — select your Pinterest base tag
- Publish your GTM container: Click Submit in GTM, add a version name, and publish
- Verify the event: Submit your form on the published Webflow site, land on the thank-you page, and check Pinterest Tag Helper — you should see both the PageVisit event and the Lead event
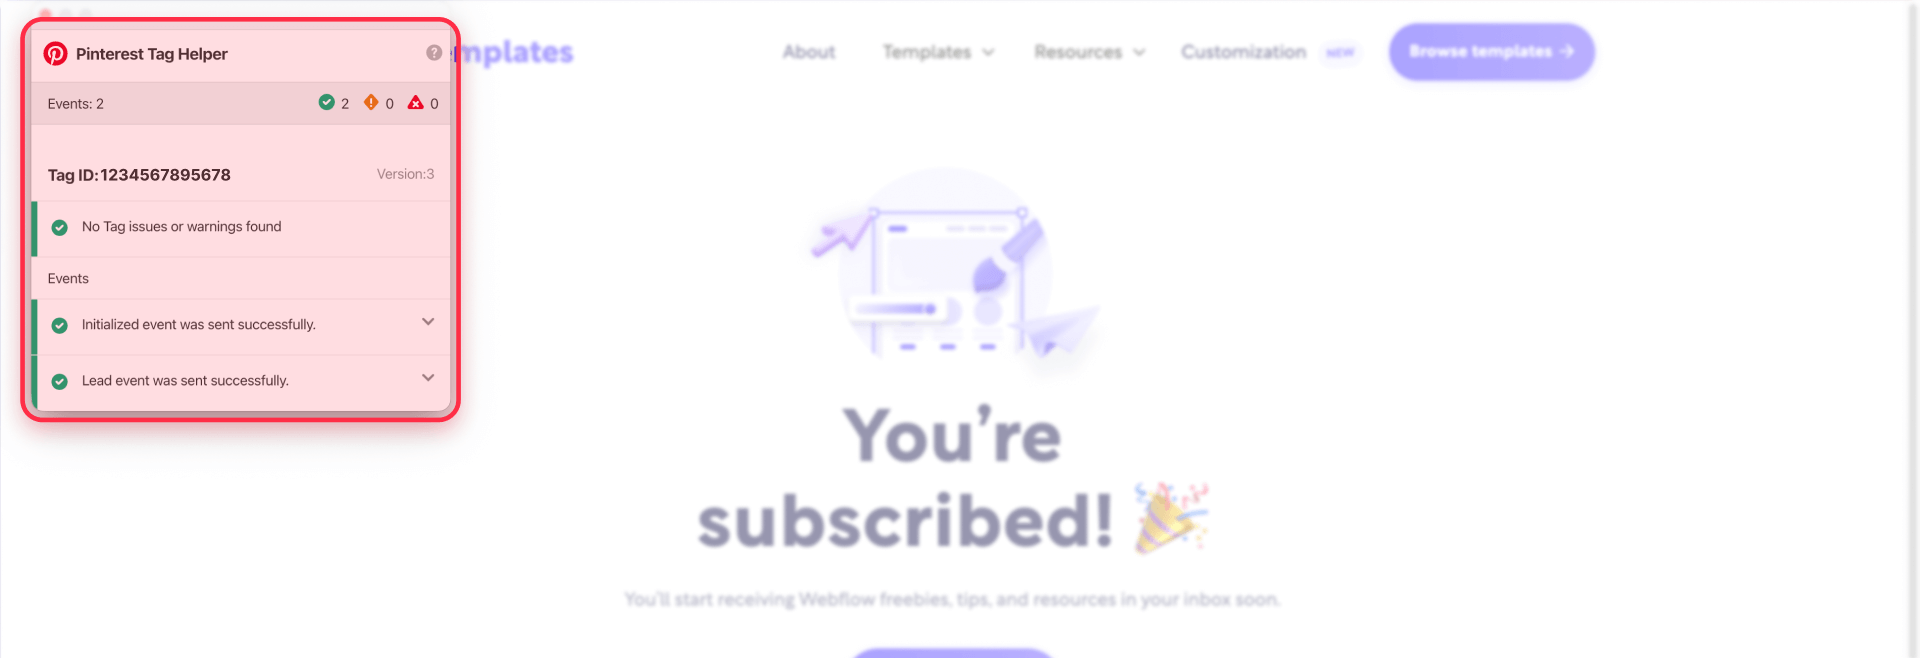
If your Pinterest account includes the Test events feature, you can also verify the event appears there in real-time.
Other common events
Depending on your business model and funnel, you may want to track additional conversion events:
- AddToCart: Fire when customers click an add-to-cart button (click-based trigger, not page load)
- Checkout: Fire only on the Order Confirmation page after successful payment (never on /checkout itself)
- ViewContent: Fire on key product or landing pages to build retargeting audiences
- Signup: Track newsletter signups or account registrations (similar pattern to Lead)
Each of these events requires careful trigger setup in GTM to avoid false conversions. Need help implementing the full event map? We can help—get in touch.
Troubleshooting Pinterest tag issues in Webflow
When implementing Pinterest tag tracking on your Webflow site, you may encounter several common issues. Here are the most frequent problems and their solutions:
- Pinterest Tag Helper shows "No tag found" on Webflow site: Confirm you pasted the base code in Project Settings → Custom Code → Head Code (not individual page settings). Republish your Webflow site—changes don't take effect until published. Check DevTools Network for ct.pinterest requests to verify the tag loads.
- No tag found (GTM method): Confirm GTM is installed on Webflow, the container is published (Submit/Publish in GTM), and the Pinterest tag fires on All Pages in GTM.
- Pinterest shows "Inactive" status after Webflow installation: Wait up to 24 hours for Pinterest to detect the tag. Use Test events and Tag Helper for immediate verification instead of waiting for Ads Manager status updates. If still inactive after 24 hours, verify your base tag code was copied correctly from Pinterest.
- Checkout event fires when visiting Webflow checkout page: You likely placed the Checkout event code on the /checkout page instead of the Order Confirmation page. Move the Checkout event to fire only on Order Confirmation after successful payment.
- AddToCart fires randomly or on page view in Webflow: This happens when AddToCart is implemented as a page-load event instead of a click event. Use a click-based trigger in GTM that only fires when customers click your add-to-cart button.
- Form submits in Webflow but Lead event doesn't fire: Verify your form redirects to the thank you page using Form Settings → Action → Redirect to page (not a manual URL). Confirm the thank you page is published and accessible. Check that the Lead event code is present in a Code Embed element on the thank you page.
- Events show in Tag Helper but not in Pinterest reporting from Webflow: Wait 3–4 hours for data to process. Verify your events include required parameters like currency for ecommerce events. Check that test conversions came from actual ad clicks—organic conversions don't appear in campaign reports but still validate your Webflow setup.
Frequently asked questions about Pinterest tag in Webflow
Many Webflow users have similar questions when implementing Pinterest tag tracking. Here are answers to the most common queries about Pinterest conversion tracking on Webflow sites.
What is the Pinterest tag and why does Pinterest call it a "tag" instead of "pixel" in Webflow?
The Pinterest tag is Pinterest's conversion tracking code that monitors visitor actions after they click your ads. Pinterest's interface, documentation, and troubleshooting tools use "tag" terminology, even though many marketers still say "pixel".
In Webflow, you install a base tag site-wide, then add event codes to track specific conversions like Lead, AddToCart, and Checkout.
Tip: Use "Pinterest tag" when searching Pinterest's tools and documentation, since that matches their current UI.
How do I install the Pinterest tag in Webflow site-wide correctly?
You have two options: GTM integration (recommended) or manual installation. For GTM, connect Pinterest to your GTM container through Pinterest's integration partner option and publish the container. For manual installation, copy your base code from Pinterest Ads Manager at Conversions → Tag manager → Install the Pinterest tag → Copy code and paste it into Webflow's Project Settings → Custom Code → Head Code field.
Click Save Changes, then Publish to activate. Custom code doesn't run in preview mode, so publishing is required.
Verify immediately using Pinterest Tag Helper or DevTools Network filtered for ct.pinterest.
What's the easiest way to track form conversions with Pinterest tag in Webflow?
Create a dedicated thank you page (like /thank-you) and set your Webflow form to redirect there using Form Settings → Action → Redirect to page. Then in GTM, create a Page View trigger for that URL and a Custom HTML tag that fires pintrk('track', 'lead'); with Tag Sequencing enabled.
This ensures Lead fires only after real submissions, not random visits.
Tip: The thank you page redirect method is the simplest "set it and forget it" option for lead tracking in Webflow.
How do I track Pinterest AddToCart events in Webflow without false conversions?
Don't fire AddToCart on page load—fire it only on button click. In GTM, create a click trigger on your add-to-cart button and attach a Custom HTML tag with the Pinterest AddToCart event code. Enable Tag Sequencing to ensure the base tag fires first.
For detailed implementation help with AddToCart and other events, contact us for a custom setup.
Where do I add Pinterest Checkout tracking code in Webflow Ecommerce sites?
Fire the Checkout event only on the Order Confirmation page after successful payment, not on /checkout itself. /checkout views include abandoners, while Order Confirmation appears only after payment completes.
For detailed implementation help with Checkout tracking, contact us for a custom setup.
How do I verify Pinterest tag is working correctly on my Webflow site?
Use Pinterest Tag Helper, Pinterest Test events, and DevTools Network (filter ct.pinterest). Tag Helper is the fastest verification method.
Test your thank-you page conversion: submit a form on your published site and check Tag Helper on the thank-you page—you should see both PageVisit and Lead events. Always verify on the published site.
What Webflow plan do I need to install Pinterest tag for conversion tracking?
You need a paid Webflow site plan (Basic, CMS, Business, or Ecommerce) to use Project Settings → Custom Code. The free Starter plan doesn't support site-wide custom code injection required for the Pinterest base tag.
Tip: Check that you have access to the Custom Code tab before you start your Pinterest setup.
Should I use GTM or manual installation for Pinterest tag on Webflow?
GTM is recommended when you need multiple events across many pages, click-based triggers without adding scripts on individual pages, or team workflows with version control. Manual installation is faster and simpler for basic setups with just a few events.
GTM requires adding the container code to Webflow and configuring Pinterest inside GTM. Choose one install path to avoid duplicate firing.
How long does Pinterest tag take to start tracking conversions after Webflow installation?
Pinterest Tag Helper and Test events can show results within seconds after you complete a conversion action. Pinterest Ads Manager status and reporting can take up to 24 hours to update.
Don't wait for Ads Manager to flip to active—verify immediately with Tag Helper and Test events right after publishing.
What's the difference between Pinterest tag and Pinterest Conversions API for Webflow sites?
The Pinterest tag is browser-based JavaScript tracking conversions during visitor interactions. Pinterest Conversions API is a server-to-server method that can improve reliability when browser tracking is limited.
For most Webflow sites, start with browser tag + events first. Consider Conversions API only after your browser setup is stable and you understand deduplication requirements.
Conclusion
A properly installed Pinterest tag transforms your ad campaigns from expensive experiments into data-driven systems. Once your base tag loads site-wide on Webflow and your key conversion events fire at the right moments, Pinterest can optimize delivery for users most likely to convert and build high-intent retargeting audiences from real site behavior.
The key is getting event timing right: Lead events on thank you pages, AddToCart on button clicks (not page views), and Checkout only on Order Confirmation pages. Verify everything with Tag Helper and Test events before launching campaigns—this prevents wasted ad spend on broken tracking.
Need help setting up additional conversion events beyond the thank-you page example? We can help—get in touch.
For advanced implementations like Pinterest Conversions API integration, enhanced match setup, or complex multi-event tracking workflows, our agency can assist with custom solutions that capture every valuable conversion while maintaining clean, maintainable code.


Join readers commenting on this post!