
You've built a beautiful Framer site, but without analytics, you're flying blind. You can't measure what matters—visitor behavior, conversion rates, or which pages actually drive results. Every day without proper tracking means lost insights and missed opportunities to optimize your site's performance.
Google Analytics 4 (GA4) is the current standard for website analytics, and connecting it to your Framer site is essential for understanding your audience. In this guide, you'll learn how to create a Google Analytics 4 account from scratch, obtain your Measurement ID, integrate it with Framer's native analytics settings, and verify that data is flowing correctly. Whether you're launching your first site or migrating from another platform, this step-by-step tutorial will have you tracking visitors in under 20 minutes.
Why Google Analytics 4 matters for Framer sites
Before diving into the setup process, it's worth understanding why GA4 is a critical tool for any Framer website. Here are the key reasons to implement analytics tracking:
Understand visitor behavior on your Framer site: GA4 tracks how users navigate through your pages, which sections engage them most, and where they drop off. This data helps you optimize your Framer site's layout, content, and user flow to increase conversions and reduce bounce rates.
Measure conversion rates and goal completions: Whether you're tracking form submissions, button clicks, or page visits, GA4 lets you define and monitor specific goals. For Framer sites with lead generation forms or e-commerce functionality, this means quantifiable ROI from your web presence.
Identify your top-performing content in Framer: Discover which blog posts, landing pages, or CMS collection items drive the most traffic and engagement. This insight allows you to double down on what works and improve or eliminate underperforming pages.
Track traffic sources and marketing campaigns: GA4 reveals whether visitors find your Framer site through organic search, social media, paid ads, or direct visits. You can also track UTM parameters to measure the effectiveness of specific marketing campaigns and allocate your budget wisely.
Analyze user demographics and interests: Understanding who visits your Framer site—their location, device type, and interests—enables you to create more targeted content and improve user experience for your actual audience, not assumptions.
Make data-driven decisions for Framer site improvements: Stop guessing what changes might help your site. GA4 provides concrete evidence about user behavior patterns, allowing you to test hypotheses, implement improvements, and measure their impact objectively.
Understanding Google Analytics 4 for Framer
Before you begin the setup process, it's important to clarify what you're working with. Google Analytics 4 is the only version of Google Analytics that currently collects new data. Universal Analytics, which used tracking IDs starting with UA-, stopped processing data on July 1, 2023. If you come across older tutorials mentioning Universal Analytics, know that they're outdated—GA4 is now the standard.
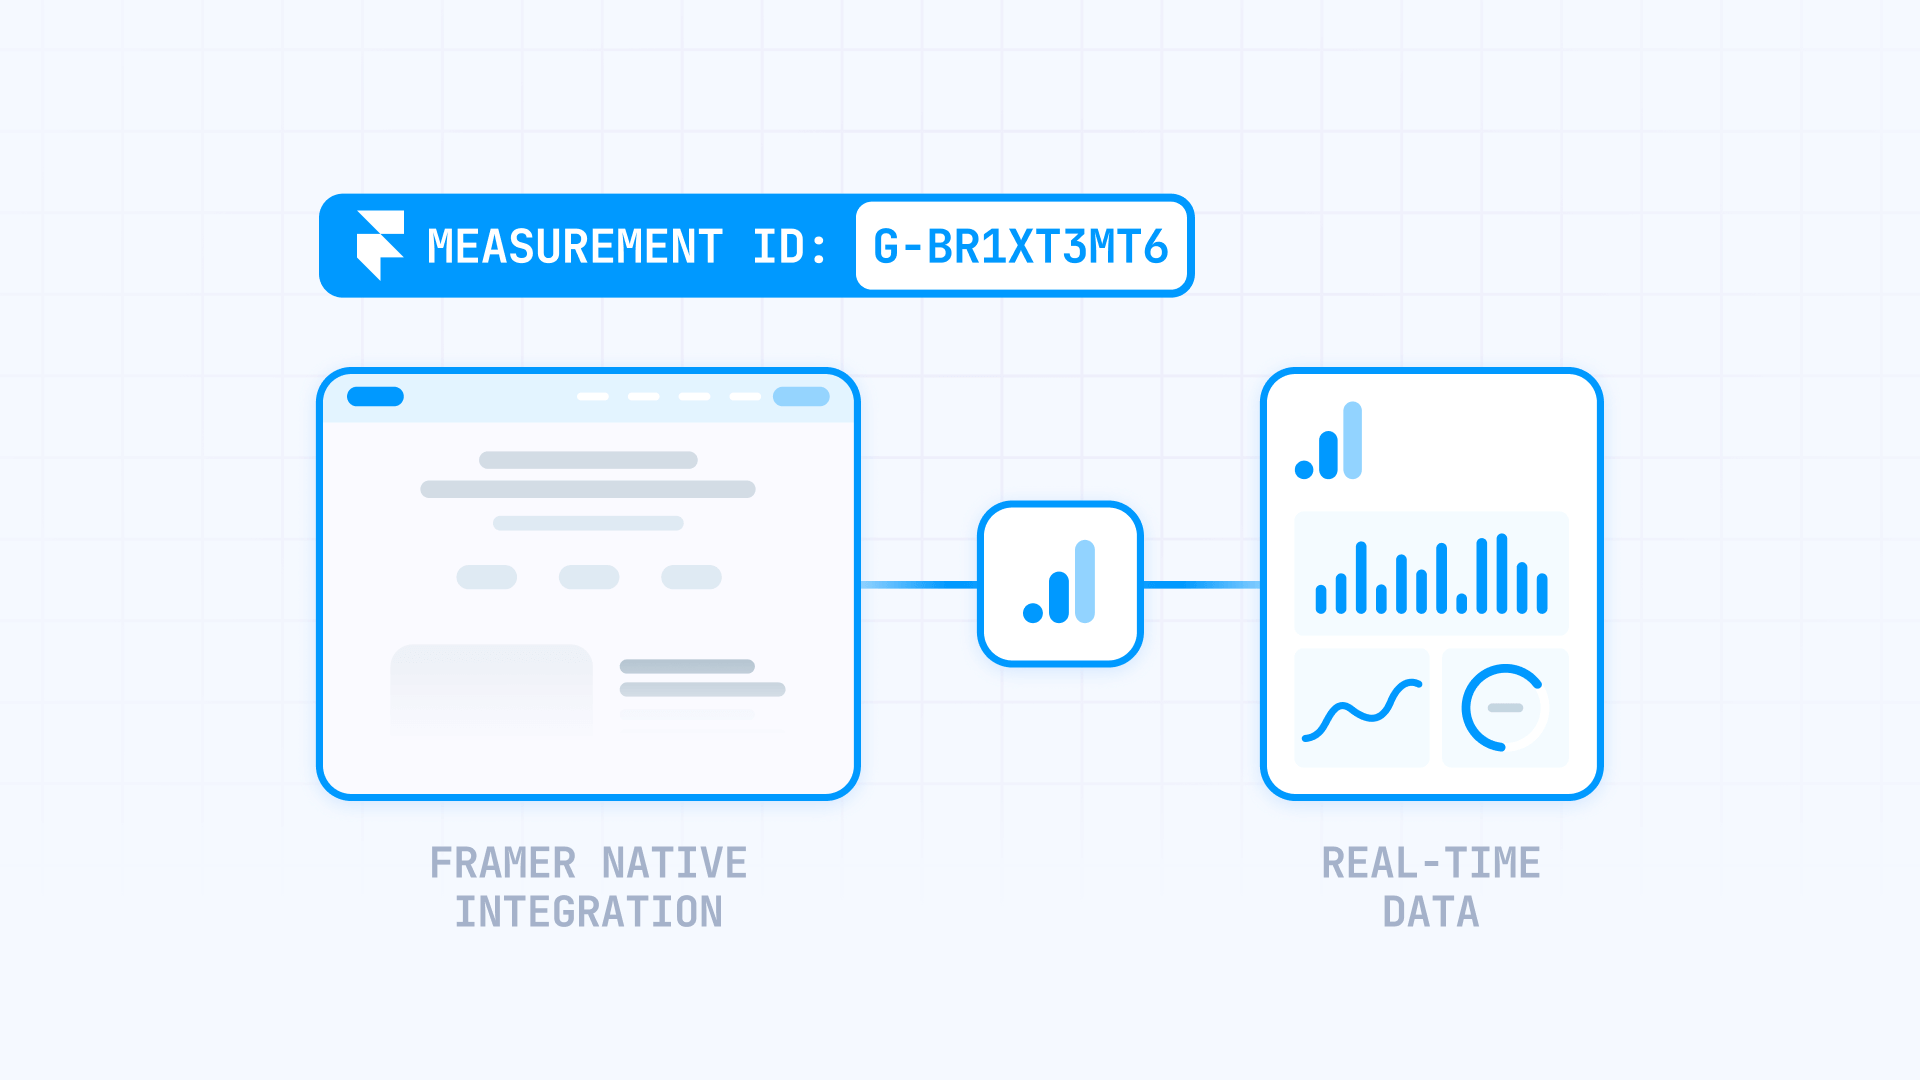
The key identifier you'll need for your Framer site is called a Measurement ID, which follows the format G-XXXXXXXXX. This ID connects your website to a specific data stream in your GA4 property, ensuring that all visitor data flows to the correct reporting dashboard. Framer has made this integration remarkably simple by providing a dedicated field in your site settings where you paste this Measurement ID—no manual code editing required.
Prerequisites for setting up Google Analytics on Framer
Before you start the installation process, make sure you have these items ready. Having everything prepared will make the setup process smooth and prevent interruptions.
You'll need a Google account to access Google Analytics. If you don't have one, create a free account at accounts.google.com. This same account can manage analytics for multiple websites, so you only need to set it up once.
Your Framer project must be ready to publish or already published. While you can add analytics to a project at any stage, you won't be able to verify that data is flowing until your site is live on a production domain. If you're still in development, you can complete the setup now and test later.
You should also have basic information about your website ready, including your site URL, business name, reporting time zone, and preferred currency. Google Analytics will ask for these details during property creation to ensure your reports display data in the correct format and timezone.
Finally, confirm that you have access to Framer's site settings. The native Google Analytics Measurement ID field is accessible across Framer plans, allowing you to set up basic GA4 tracking.
Step 1: Create your Google Analytics 4 account
Creating a Google Analytics account is your first step toward tracking your Framer site. This account serves as the top-level container for all your properties and data streams.
Navigate to analytics.google.com and sign in with your Google account. If this is your first time using Google Analytics, you'll see a welcome screen prompting you to set up your account. Click the Start measuring button to begin.
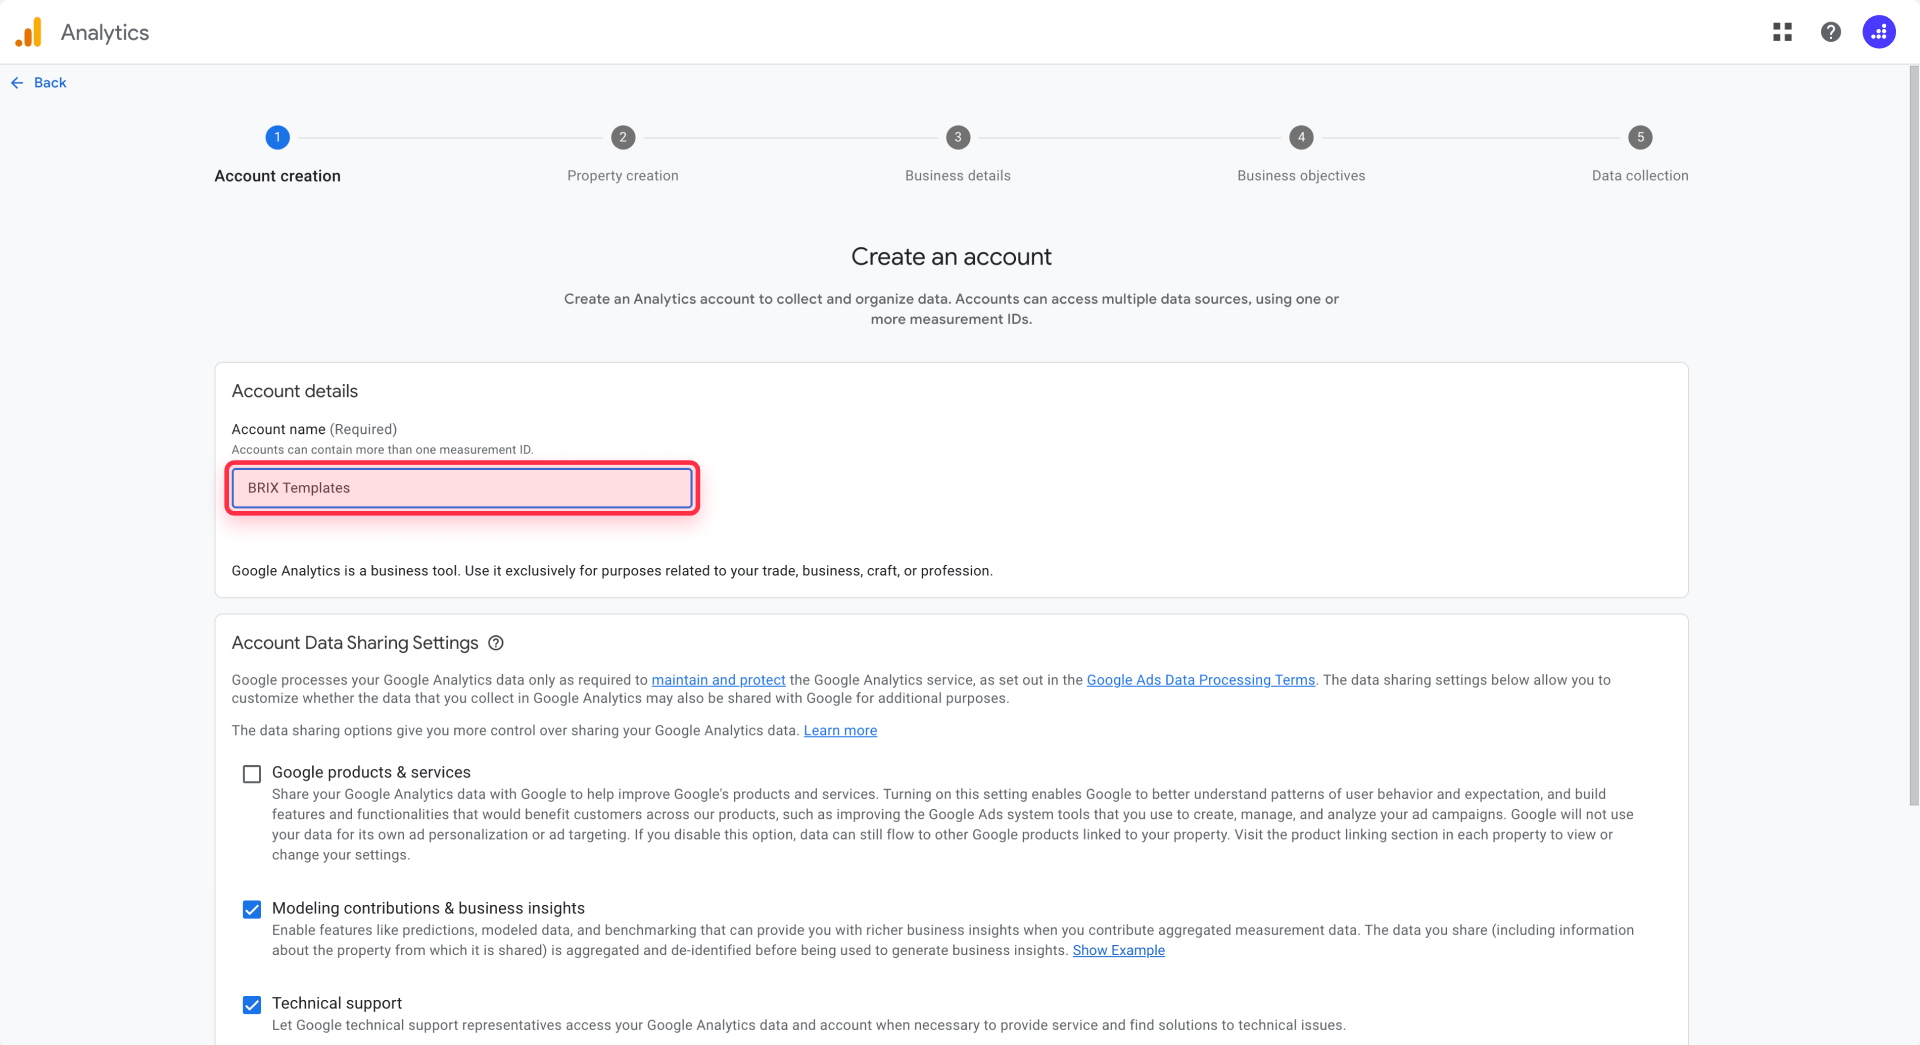
On the account creation screen, enter an Account name that makes sense for your organization. This could be your company name, personal brand, or a descriptive label if you manage multiple businesses. The account name is only visible to you and other users you grant access to, so choose something that will help you organize your properties later.
Below the account name, you'll see Account data sharing settings with several checkboxes. These settings control whether Google can use your data to improve its products and provide benchmarking insights. The recommendations are generally safe to accept, but review each option to ensure it aligns with your privacy preferences. At minimum, you'll want to enable settings that allow you to receive technical support and account specialists' assistance.
Click Next to proceed to property creation. Don't worry about setting up everything perfectly—you can always modify account settings later from the Admin panel.
Step 2: Create a Google Analytics 4 property for your Framer site
A GA4 property is where your Framer site's data will be collected and organized. Each property represents one website or app, and you can create multiple properties under a single account.
Enter a Property name that clearly identifies your Framer site. If you manage multiple sites, use a naming convention that makes each property instantly recognizable—for example, "Marketing Site" or "Portfolio 2026." This name appears throughout your GA4 interface, so clarity matters.
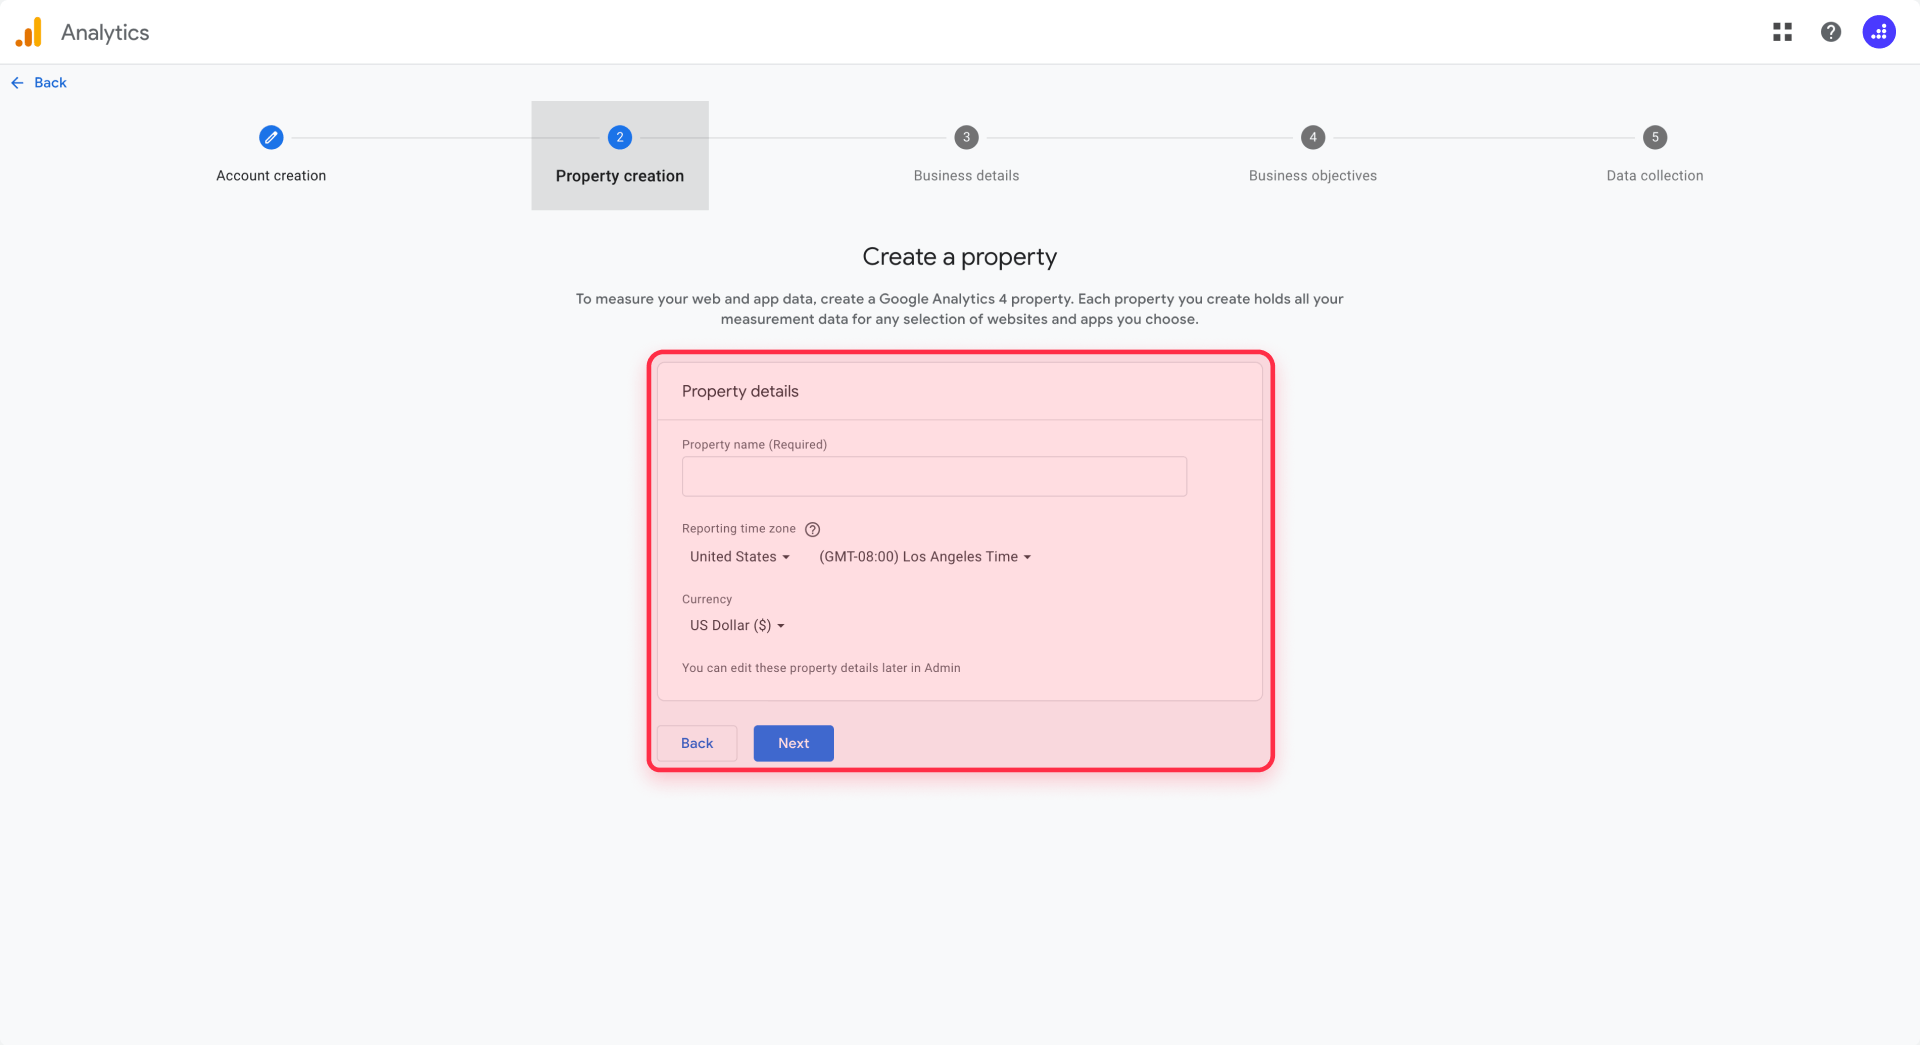
Select your Reporting time zone from the dropdown menu. This setting determines how Google Analytics groups your data by day, week, and month. If you select Pacific Time, for instance, your "Monday" traffic will reflect Monday in Pacific Time, regardless of where your visitors are located. Choose the timezone that makes the most sense for your business operations.
Choose your Currency for any monetary values in your reports. If you're not tracking e-commerce transactions or setting up conversion values, this setting won't significantly impact your reports, but it's worth setting correctly from the start.
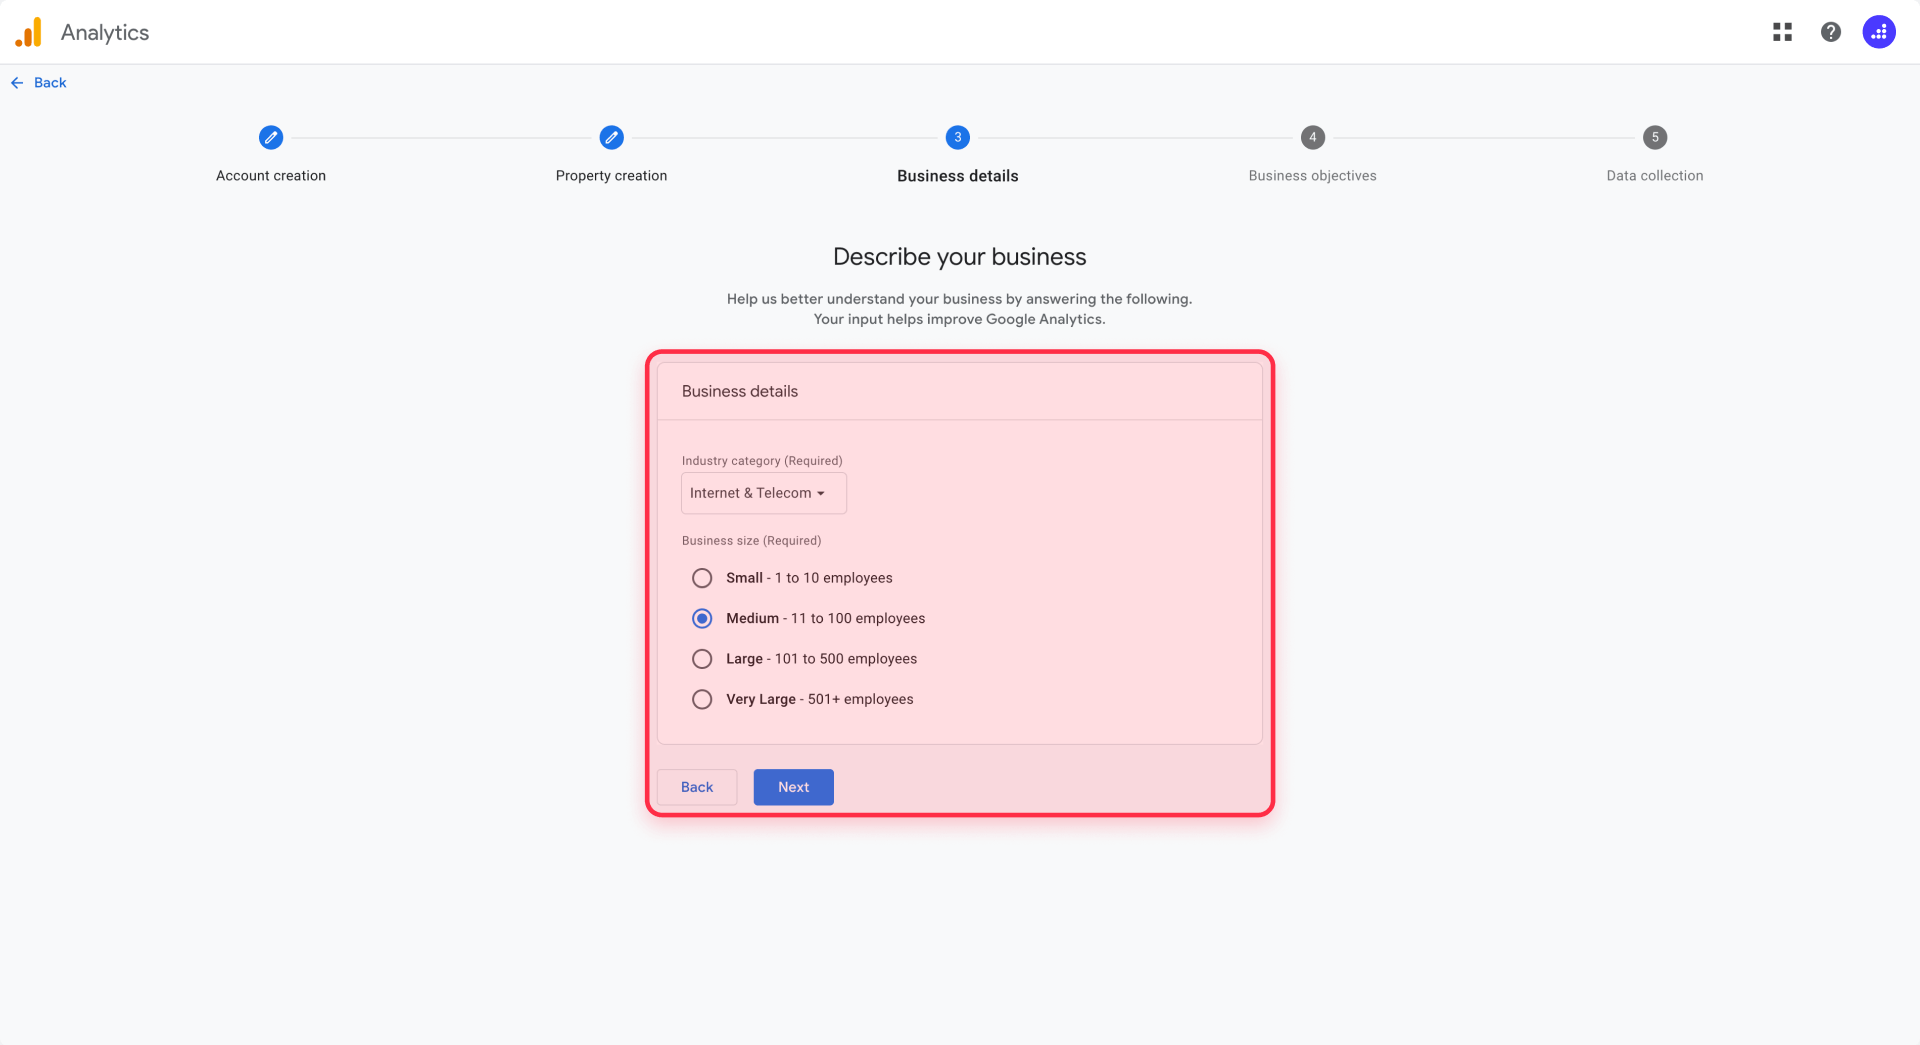
Click Next to continue. On the next screen, Google asks about your business information. Select your industry category from the dropdown menu and indicate your business size. These selections help Google tailor your default reports and suggestions, though they don't limit what you can track.
The following screen asks How you intend to use Analytics. You can select multiple options such as "Examine user behavior," "Measure advertising ROI," or "Baseline reports." Your selections influence which default reports and insights GA4 prioritizes, but you'll have access to all features regardless of your choices.
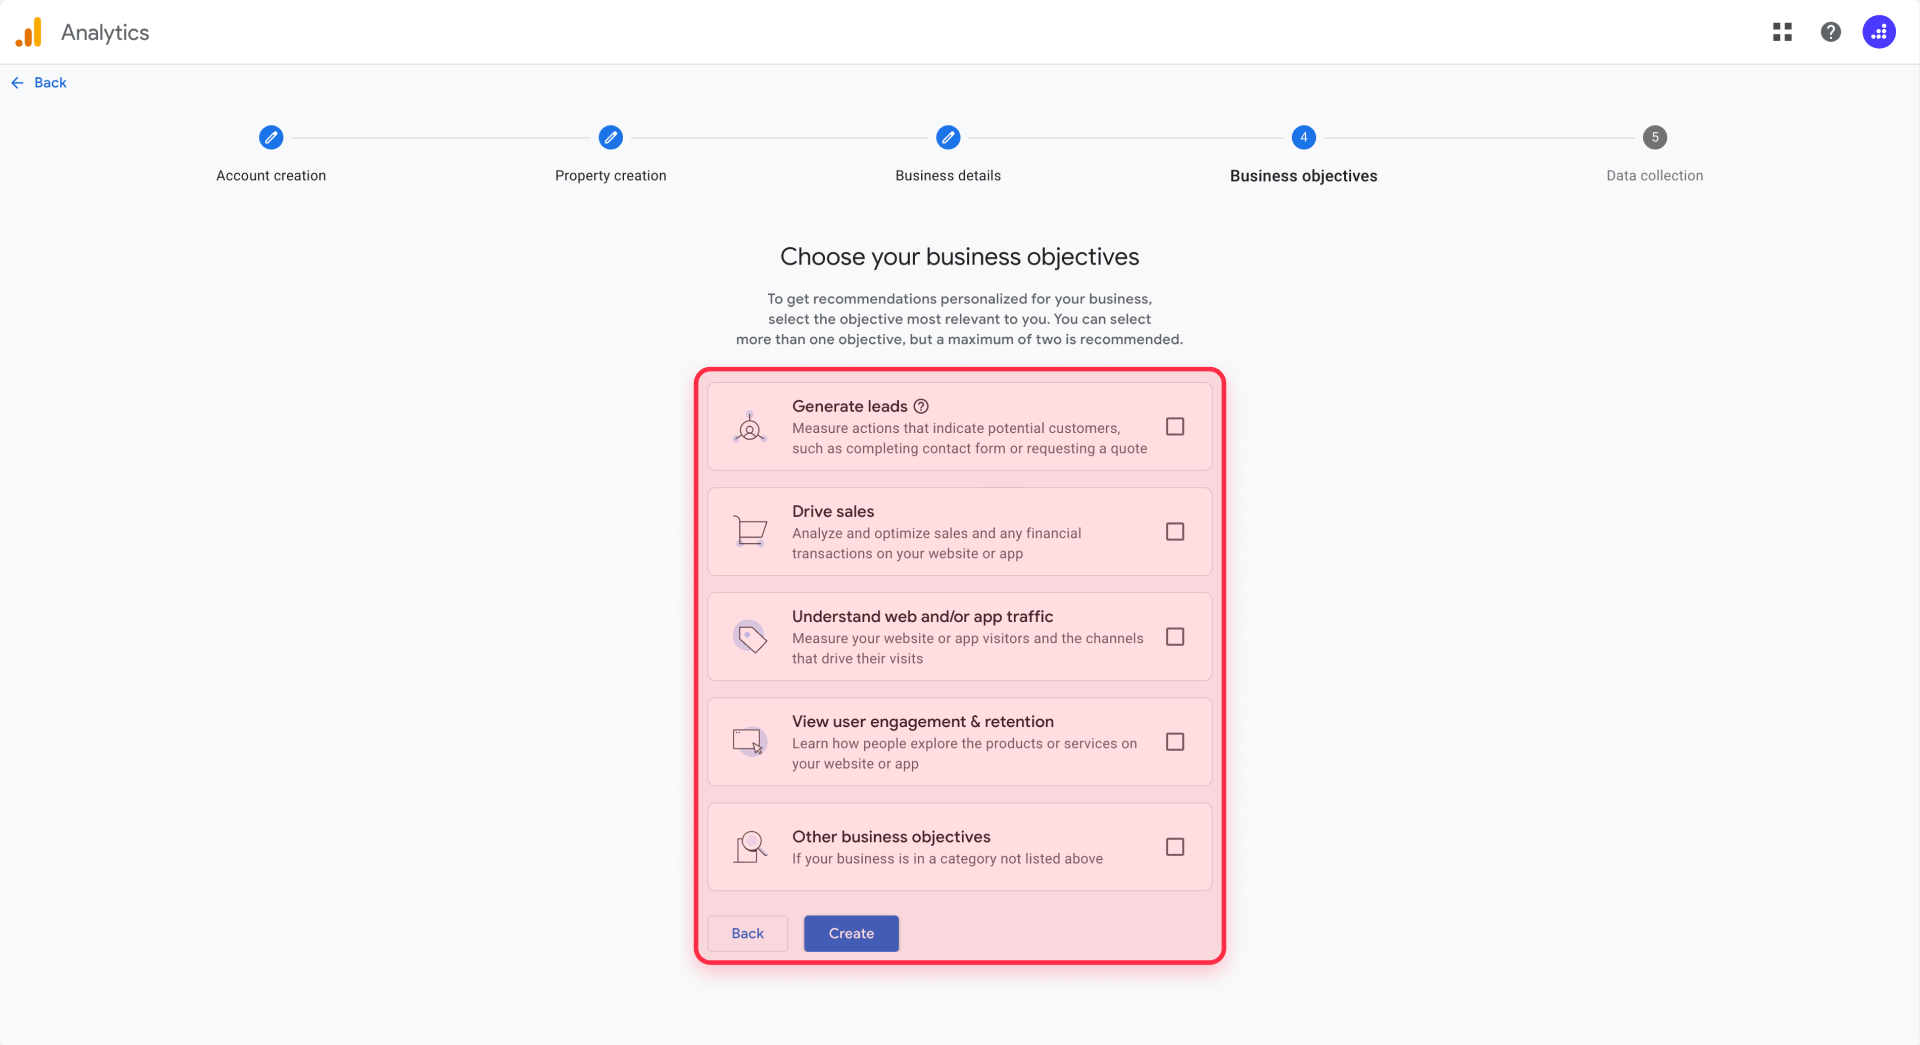
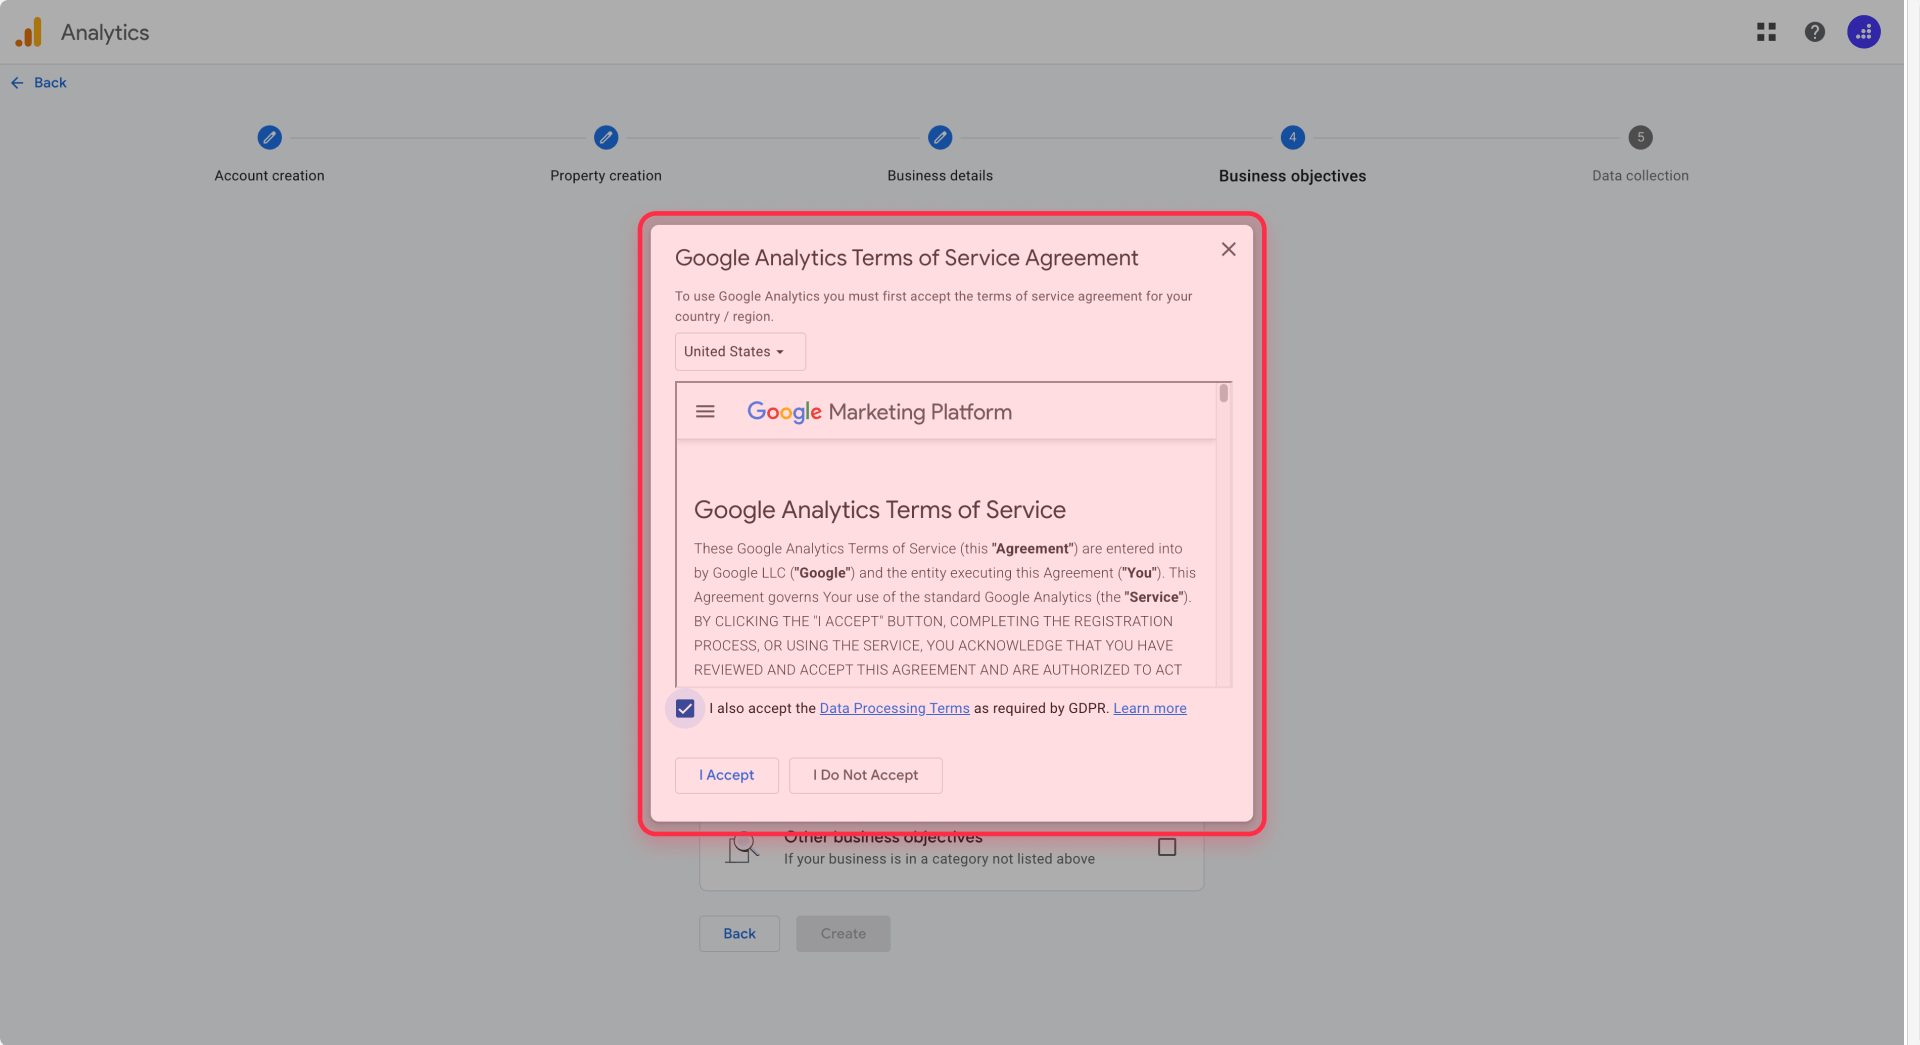
Click Create and accept the Google Analytics Terms of Service and Data Processing Amendment for your region. These are standard agreements required to use the service. After accepting, you'll be redirected to the data collection setup screen.
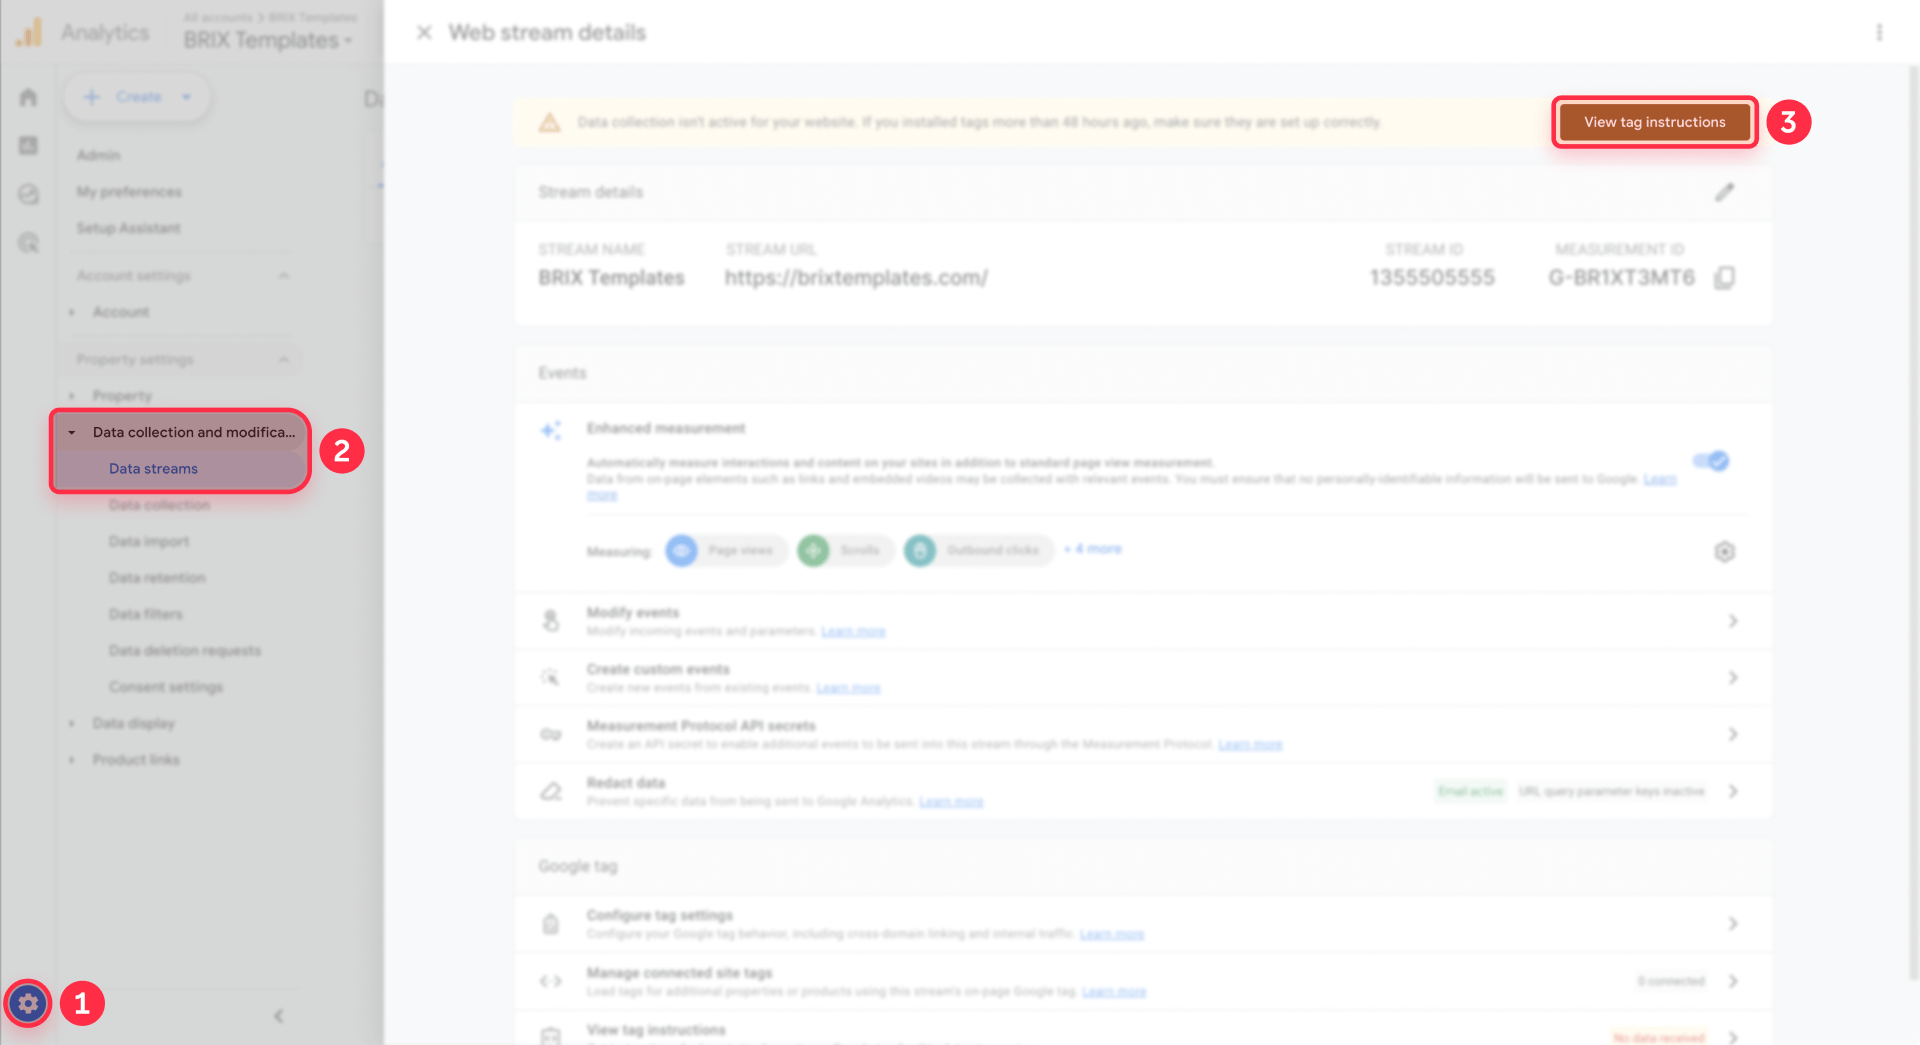
Step 3: Add a web data stream and get your Measurement ID for Framer
Data streams are the connection points between your website and your GA4 property. For a Framer site, you'll create a web data stream.
On the data collection screen, click Web to create a web data stream. If you've navigated away from this screen, you can access it from Admin → Data Streams → Add stream → Web.
In the Website URL field, enter your Framer site's production domain. This should be your live URL (like https://yoursite.com), not your Framer preview URL (like https://yourproject.framer.website). If you haven't published your site yet, enter the custom domain you plan to use. You can always update this later if needed.
Enter a Stream name to identify this data stream within your GA4 property. The stream name is for internal organization, so something simple like "Main Website" or your site's name works well. If you plan to track multiple sites or apps under this property, use descriptive names to differentiate them.
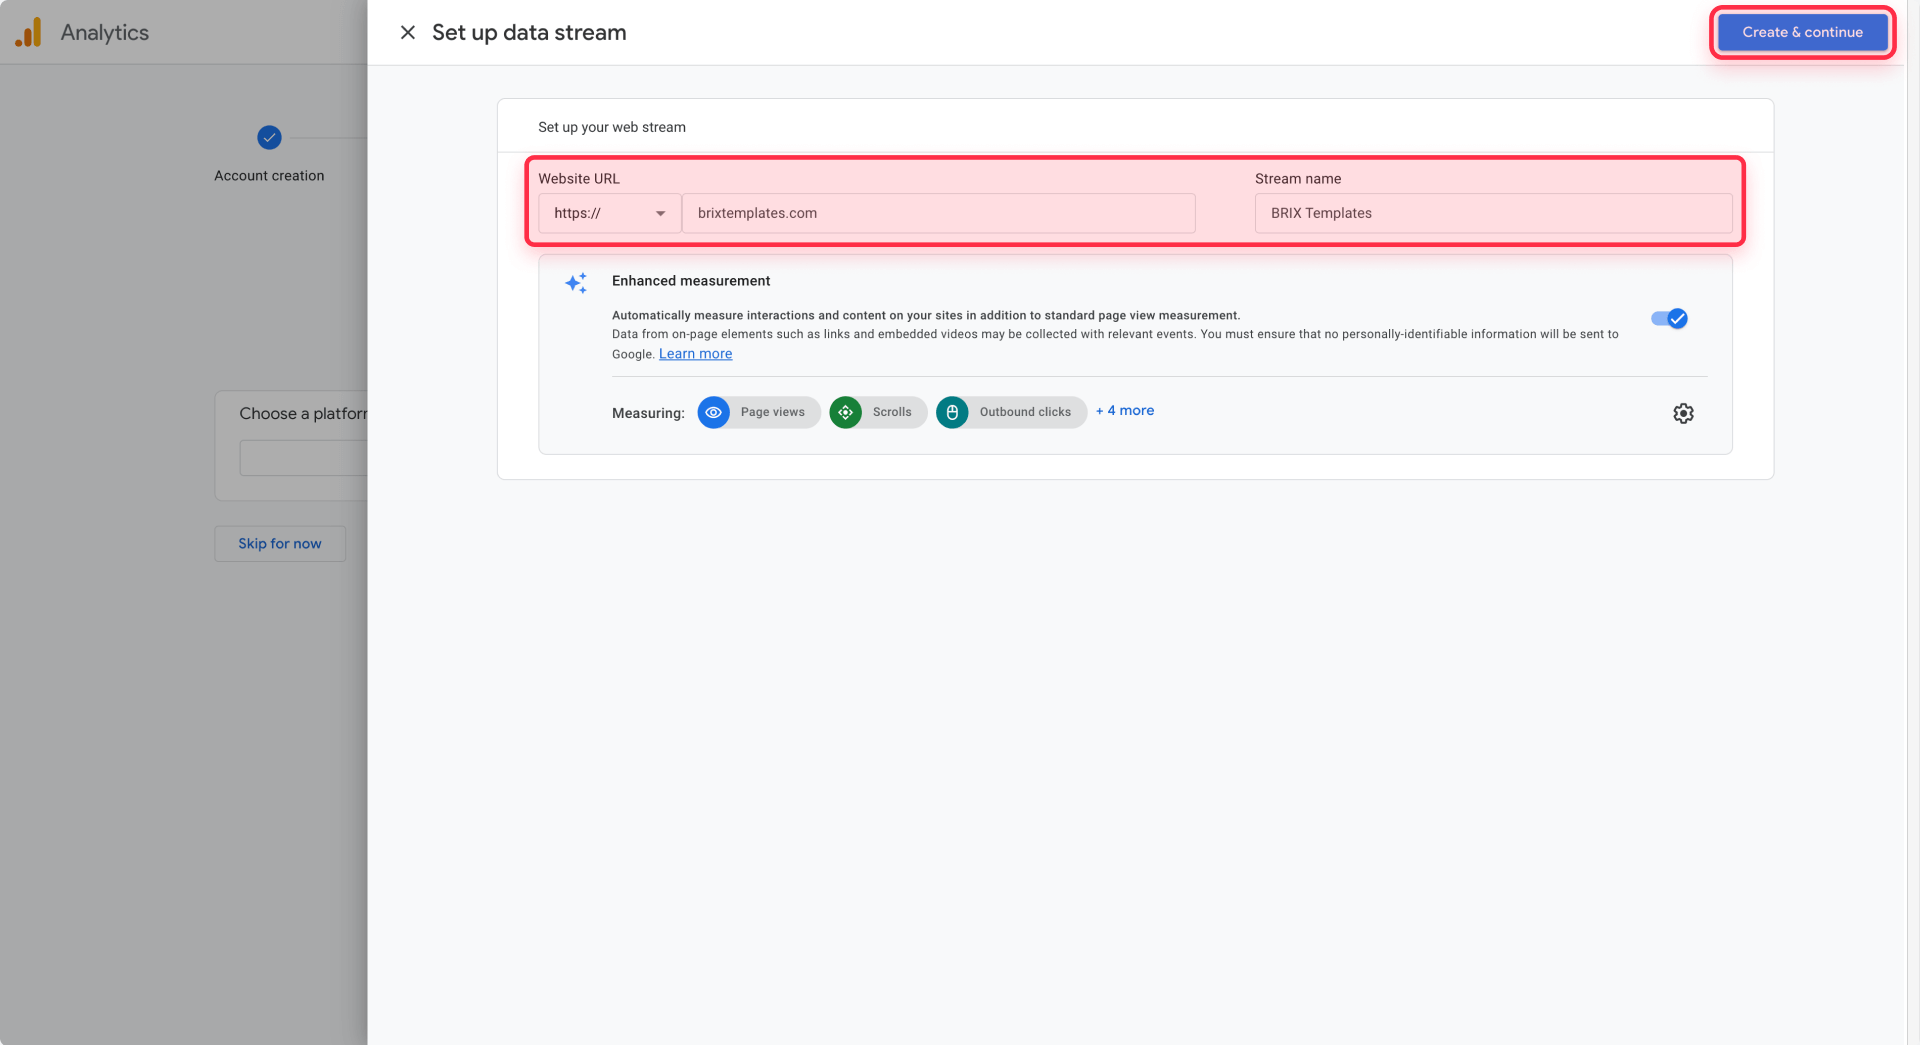
Before clicking Create stream, notice the Enhanced measurement toggle, which should be enabled by default. Enhanced measurement automatically collects common events like page views, scrolls, outbound clicks, site search, video engagement, and file downloads. Leave this enabled unless you have specific reasons to customize these events later—it provides valuable data without additional setup.
Click Create stream. Your web data stream is now active, and you'll see the stream details page.
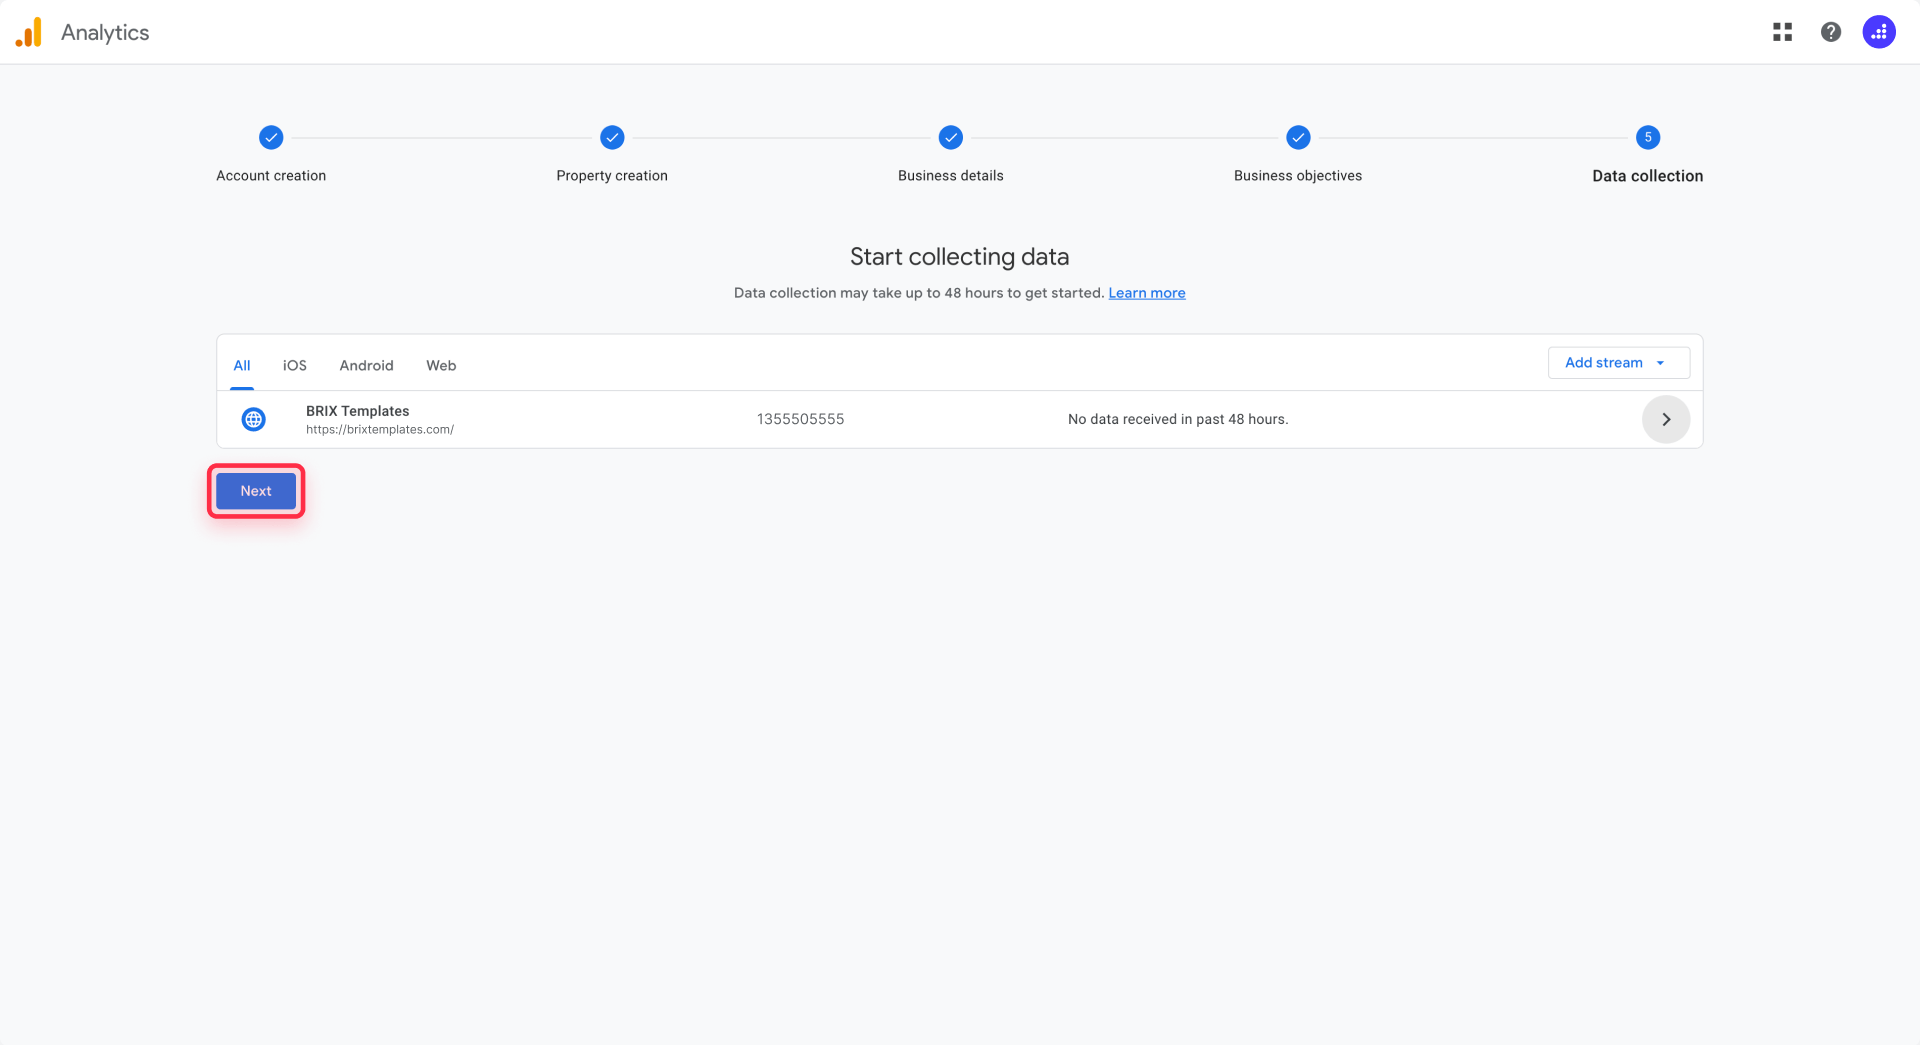
On this page, locate the Measurement ID in the top-right section of the screen. It will be labeled clearly and follows the format G-XXXXXXXXX (for example, G-PSW1MY7HB4). This is the critical identifier you need to connect your Framer site to Google Analytics 4.
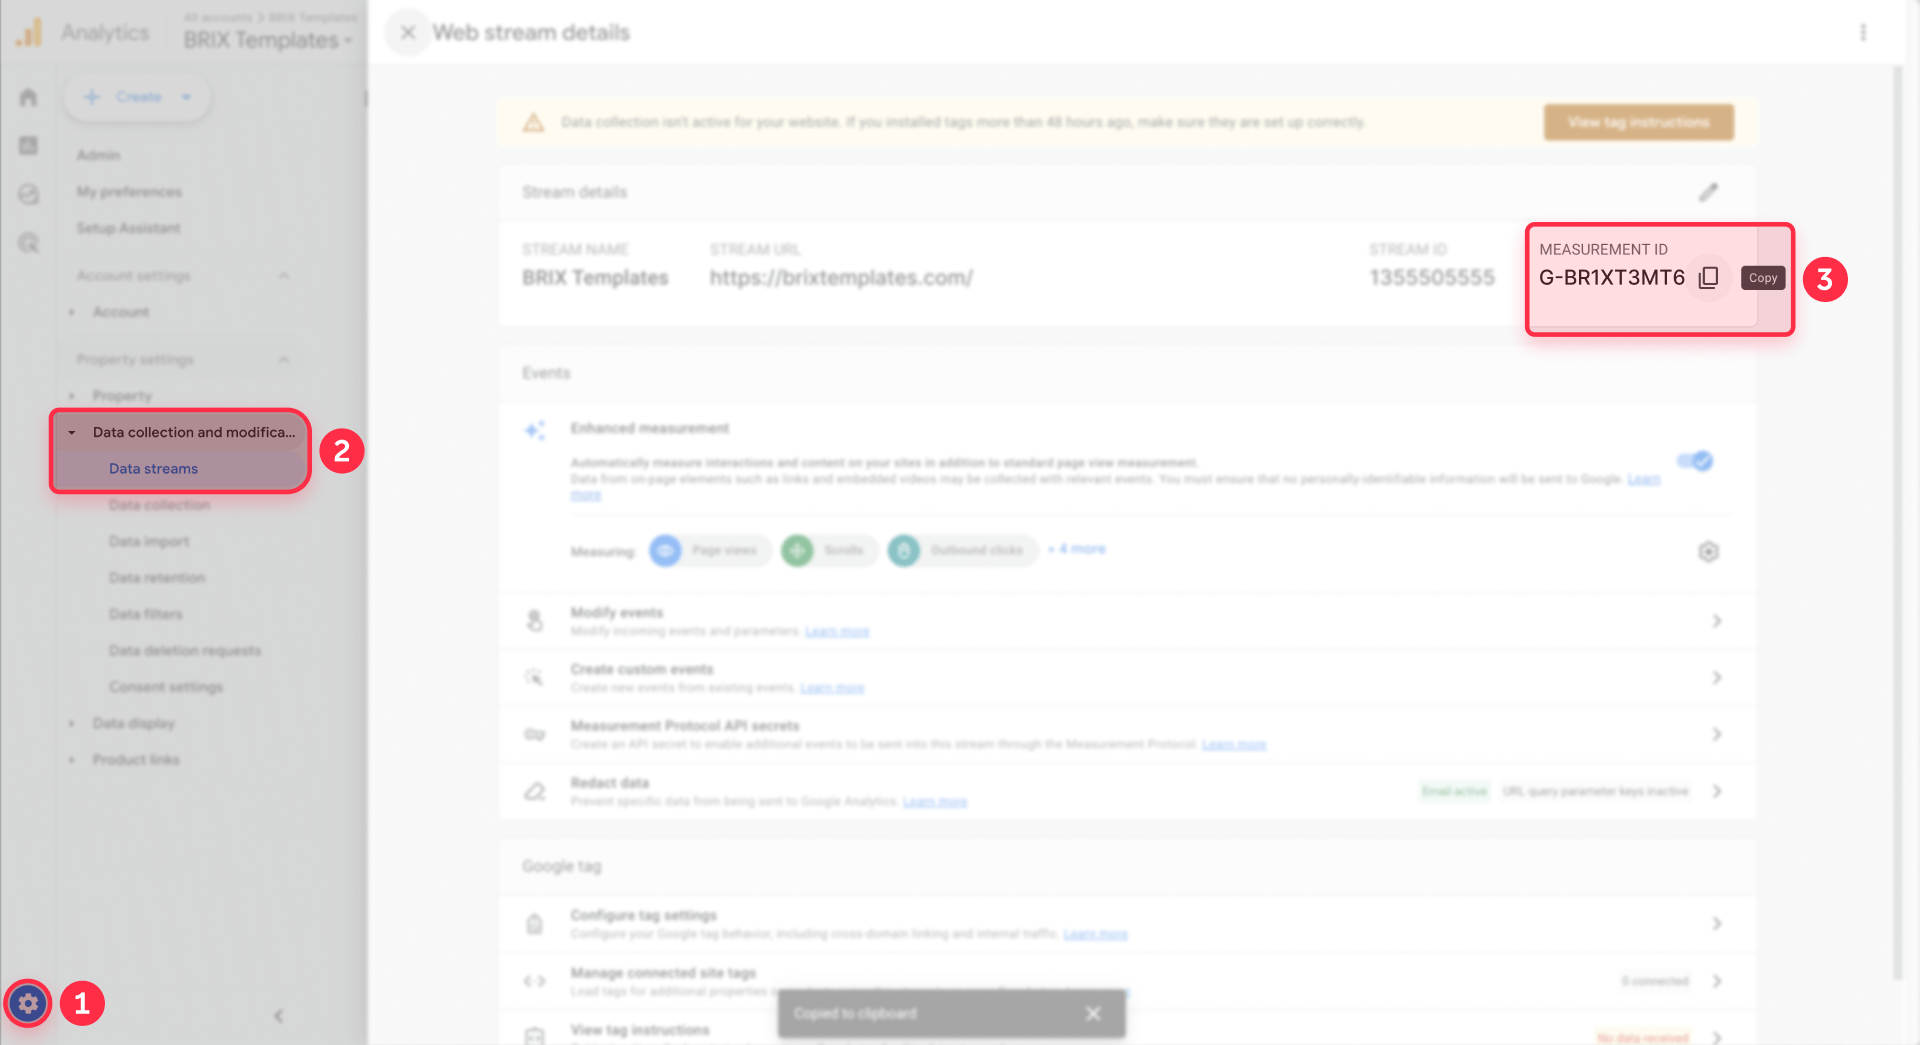
Click the Copy icon next to your Measurement ID or manually select and copy it. Keep this ID handy—you'll paste it into Framer in the next step. If you lose it, you can always return to Admin → Data Streams → [Your Stream] to retrieve it.
Choose how you want to install GA4 on your Framer site
Before you connect GA4 to Framer, decide which installation method you want to use. There are three valid approaches, and you should pick one to avoid duplicate tracking:
Method 1 – GA4 via Google Tag Manager (recommended for marketing teams)
Google Tag Manager (GTM) provides centralized management for GA4 and other marketing tags. This method is ideal if you plan to add Facebook Pixel, LinkedIn Insight Tag, or other tracking tools later.
To use this method:
- First, install Google Tag Manager on your Framer site by following our complete guide: How to install Google Tag Manager in Framer
- Inside GTM, create a Google Tag (GA4) with your Measurement ID:
- Go to Tags → New → Google Tag
- Paste your Measurement ID (G-XXXXXXXXX)
- Set the trigger to Initialization – All Pages
- Save and Publish your GTM container
With this method, GA4 is fully managed through GTM. Do not paste your Measurement ID into Framer's native Google Analytics field.
Method 2 – Native GA4 integration in Framer (simple, recommended for most users)
This is the simplest method and is covered in detail in Step 4 below. You paste your Measurement ID directly in Framer's Site Settings, and Framer handles the Google tag automatically.
This method is perfect if you only need basic GA4 tracking and don't plan to use other marketing tags.
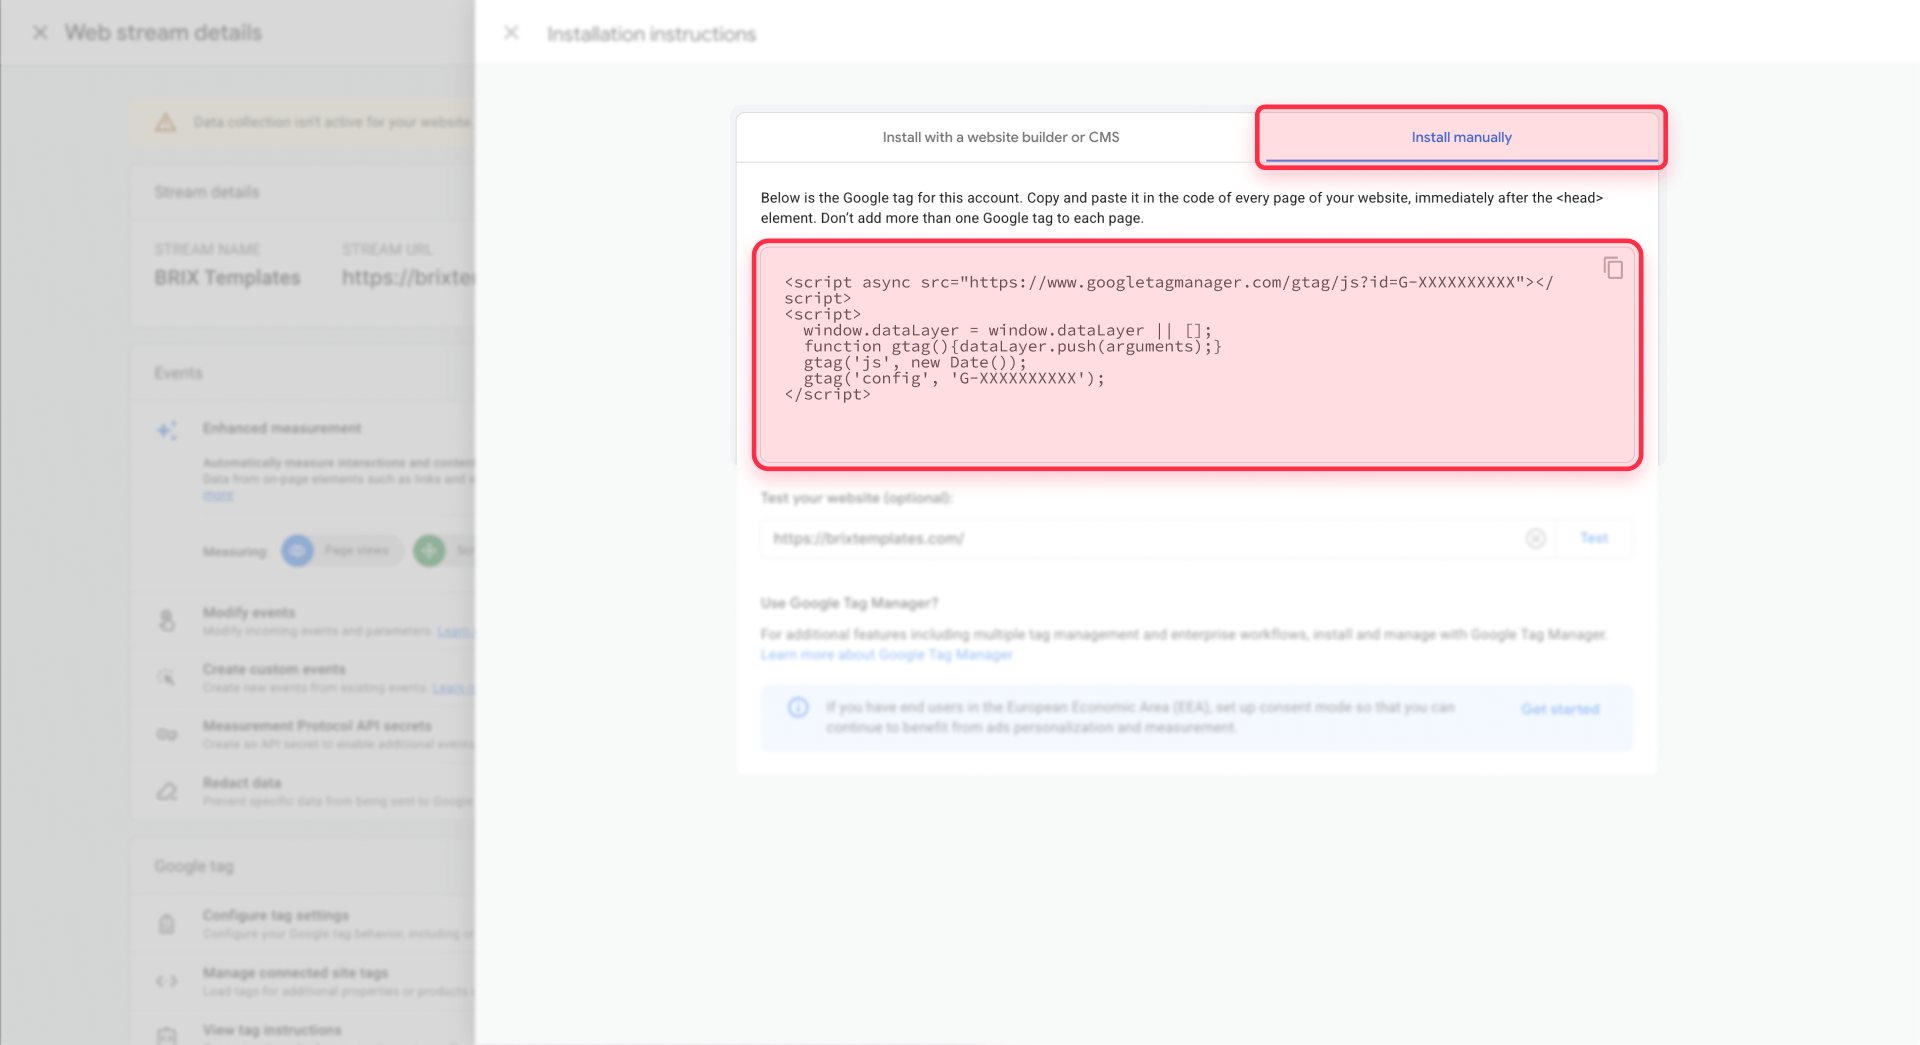
Method 3 – Manual gtag.js via Custom Code (advanced)
This method gives you complete control over the GA4 script and configuration. You manually paste the gtag.js code snippet into Framer's Custom Code section in the <head> tag.
Use this method only if you need custom GA4 configuration parameters or have specific implementation requirements that the native integration doesn't support.
⚠️ Critical: Use only ONE of these methods at a time.
- If you've added GA4 as a tag in GTM (Method 1), do not also paste your Measurement ID in Framer's Google Analytics field
- If you use manual gtag.js code (Method 3), do not use the native Measurement ID field or GTM
- If you prefer the simple native integration (Method 2), skip the GA4 tag in GTM
Using multiple methods simultaneously will cause duplicate tracking, inflating your metrics and making your data unreliable.
Step 4: Connect Google Analytics 4 to your Framer site (Method 2 – native integration)
Now that you have your Measurement ID, integrating Google Analytics with your Framer site takes just a few clicks. Framer's native integration handles all the technical implementation automatically and is the recommended method for most users because it's simple and doesn't require GTM knowledge.
If you chose Method 1 (GA4 via GTM) above, you can skip this step and manage GA4 entirely through your GTM tag.
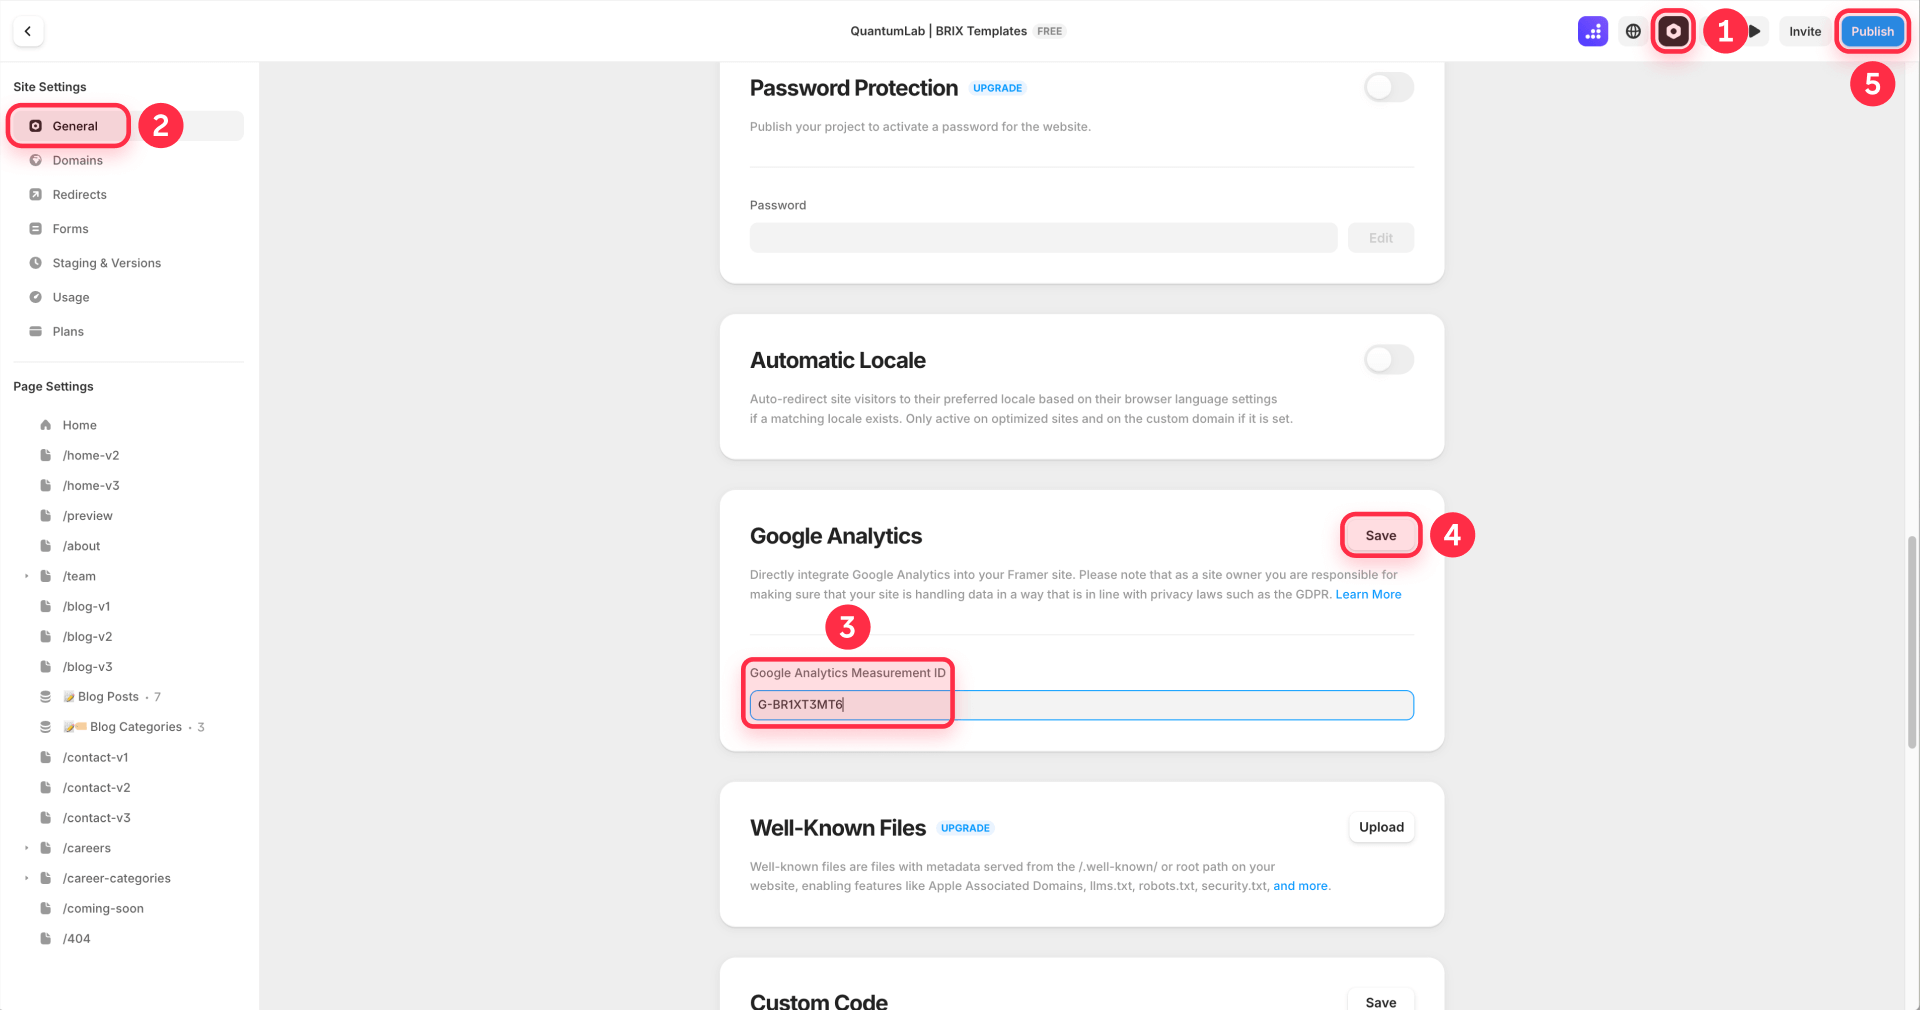
Open your Framer project and navigate to the Site Settings panel. You can access this by clicking the site name or settings icon in the top toolbar, or by using the keyboard shortcut.
In the left sidebar of Site Settings, click General. Scroll down until you find the Google Analytics section. You'll see a field labeled Google Analytics Measurement ID.
Paste your Measurement ID (G-XXXXXXXXX) into this field. Make sure you've copied the complete ID including the G- prefix, with no extra spaces before or after. Framer will automatically validate the format.
Below the Measurement ID field, you may see options for additional settings or notes about GDPR compliance. Framer's help documentation notes that GA4 does not log or store IP addresses by default, but you should still ensure your site complies with GDPR, CCPA, or other regional privacy regulations by implementing a cookie consent banner if required in your jurisdiction.
Click Save to apply your changes. The Google Analytics integration is now configured in your Framer project, but it won't be active until you publish your site.
Click Publish in the top-right corner of Framer to push your changes live. If you've already published your site, republishing will update it with the new analytics code. Framer automatically injects the Google Analytics tracking script (gtag.js) into your site's HTML, so there's no need to manually add code snippets.
Step 5: Verify that Google Analytics 4 is tracking your Framer site
After publishing, it's essential to confirm that Google Analytics is collecting data correctly. The fastest way to verify this is through GA4's Realtime report.
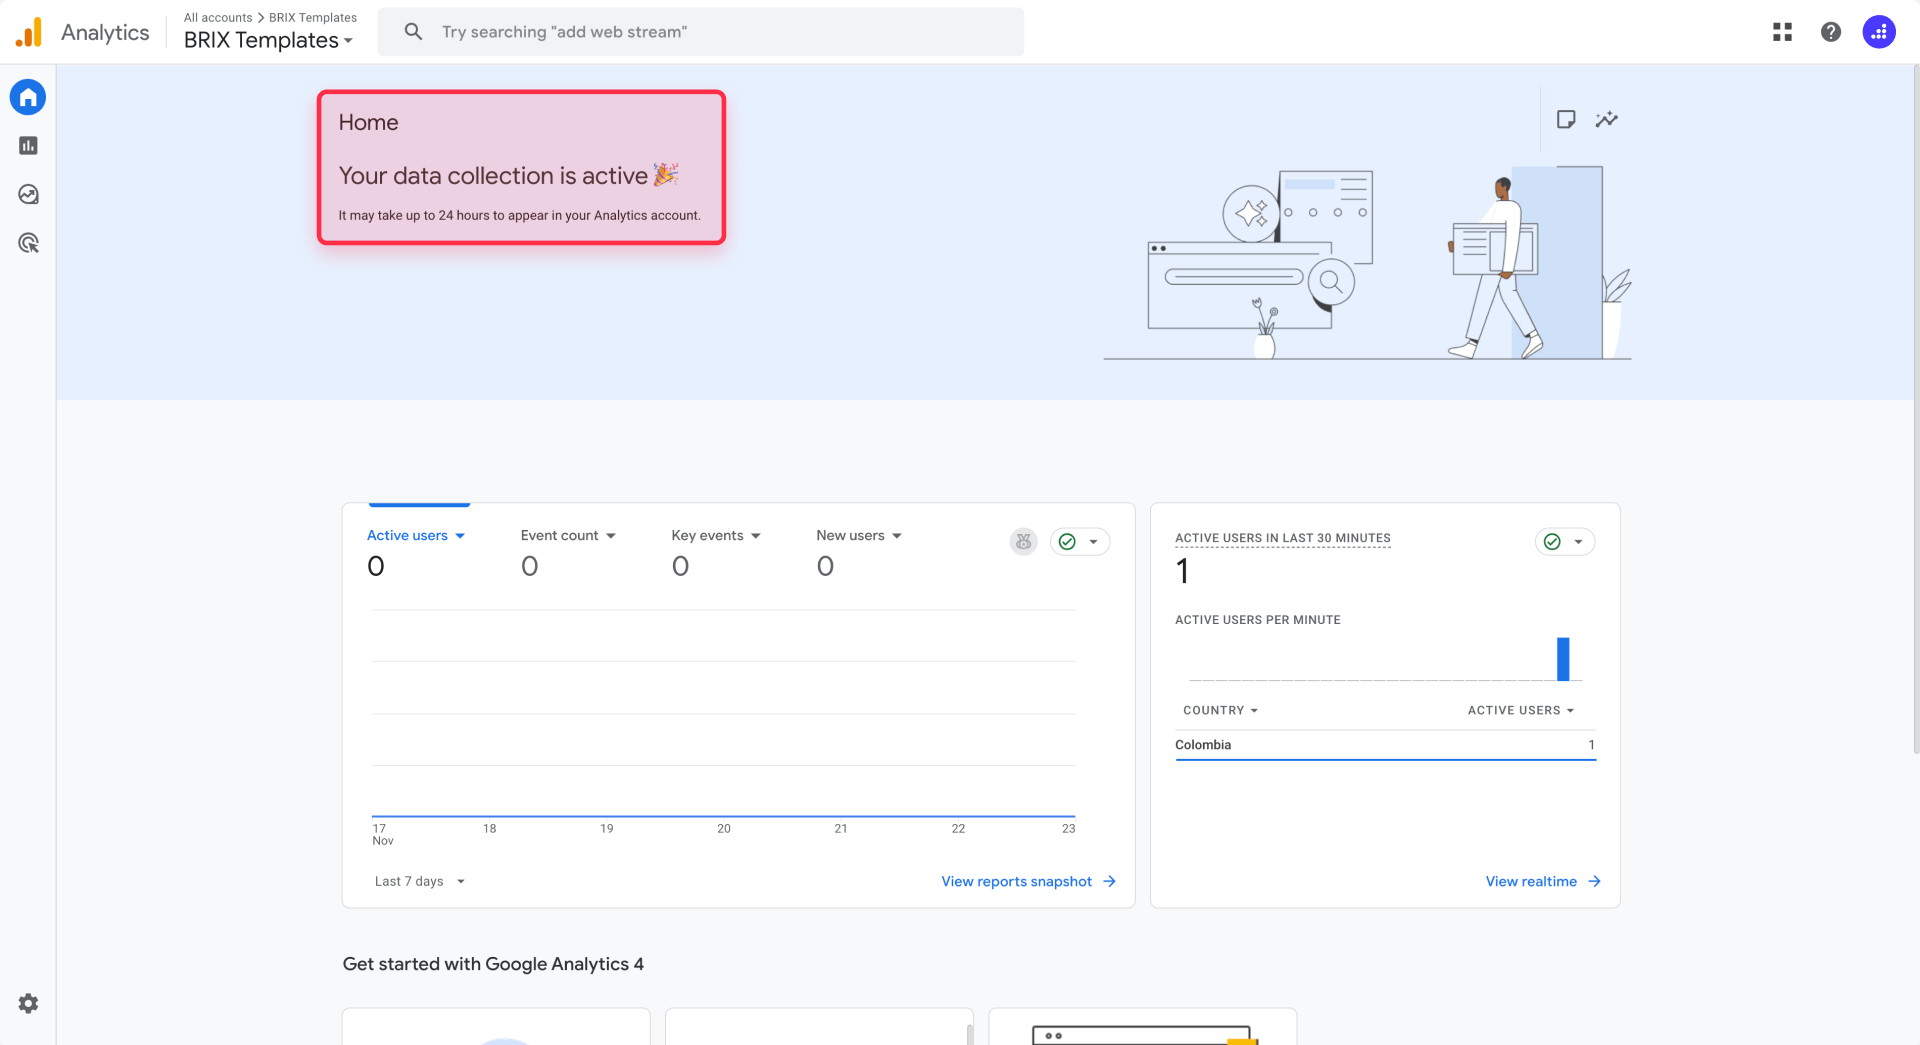
Open a new browser tab or incognito/private window and visit your live Framer site. Navigate to a few pages, click some buttons, or interact with your content. This activity will generate events that GA4 should capture within seconds.
Return to your Google Analytics 4 property. In the left sidebar, click Reports → Realtime. The Realtime report shows activity from the last 30 minutes, updating every few seconds.
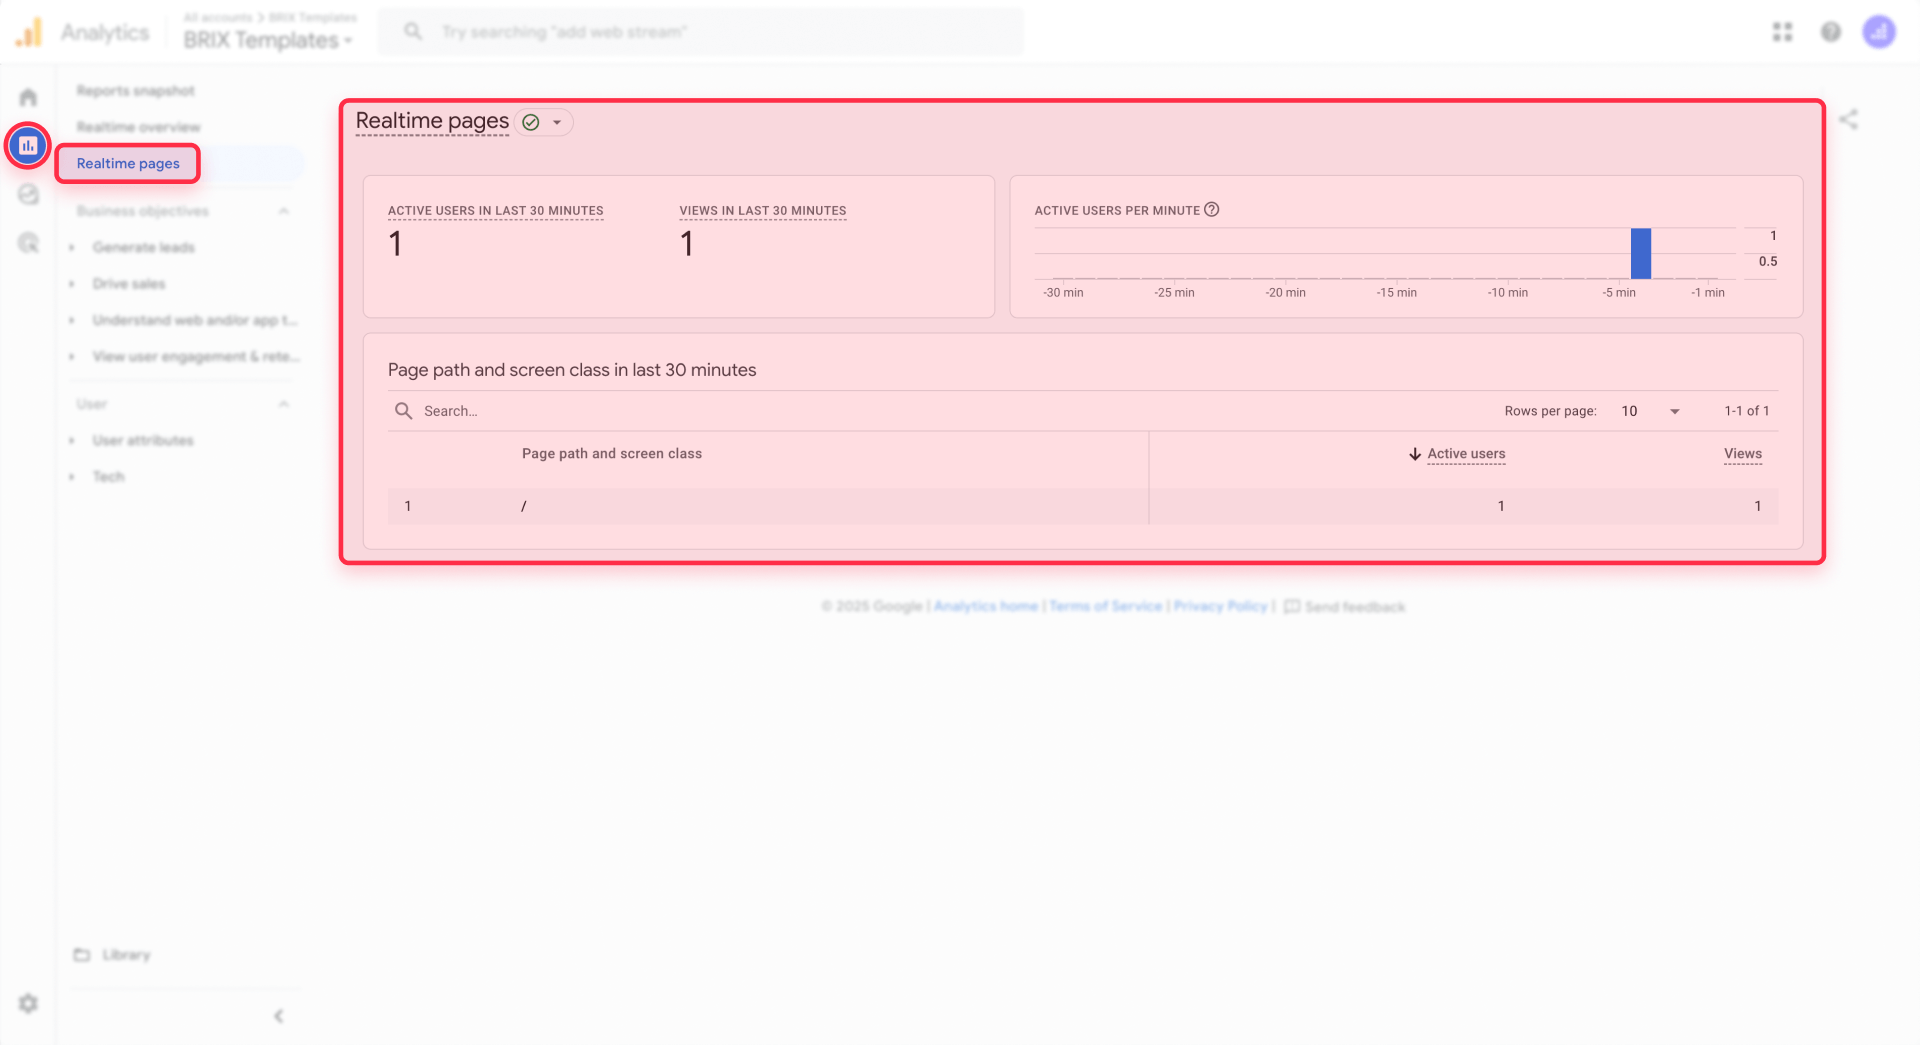
If your integration is working correctly, you should see at least one active user (yourself) in the Realtime report. The report displays a map showing user locations, the pages they're viewing, and the events being triggered (like page_view events).
If you see your visit reflected in the Realtime report, congratulations—your Google Analytics 4 integration is working. Data will now continuously flow from your Framer site to GA4 as visitors use your site.
Keep in mind that while Realtime reports update within seconds, standard GA4 reports (like the Traffic acquisition or Engagement reports) can take 24-48 hours to fully process and display data. If you don't see historical data immediately, this is normal—check back the next day to see your full traffic reports.
If you don't see any activity in the Realtime report, proceed to the troubleshooting section below to diagnose common issues.
Alternative method: Adding Google Analytics to Framer via custom code
While Framer's native Google Analytics integration is the recommended approach for most users, some advanced scenarios may require manual code implementation. This method gives you more control over when and how the analytics script loads.
To use custom code, navigate to Site Settings → General → Custom Code. You'll see fields for adding code to different parts of your page: Start of <head> tag, End of <head> tag, Start of <body> tag, and End of <body> tag.
For Google Analytics 4, paste your tracking code into the Start of <head> tag field. Here's the standard GA4 tracking script:
<!-- Google tag (gtag.js) -->
<script async src="https://www.googletagmanager.com/gtag/js?id=G-XXXXXXXXX"></script>
<script>
  window.dataLayer = window.dataLayer || [];
  function gtag(){dataLayer.push(arguments);}
  gtag('js', new Date());
  gtag('config', 'G-XXXXXXXXX');
</script>
Replace both instances of G-XXXXXXXXX with your actual Measurement ID. The script loads the Google Analytics library asynchronously and initializes tracking with your specific property.
Important: If you use both the custom code method and Framer's native Google Analytics field, or you combine custom code with a GA4 tag in Google Tag Manager, you'll create double tracking—every page view and event will be recorded twice, inflating your metrics. Choose one implementation: native Measurement ID, GA4 via GTM, or custom gtag.js, but never more than one at the same time.
The custom code approach is primarily useful for advanced implementations, such as adding custom event tracking, implementing multiple GA4 properties, or integrating other analytics tools alongside Google Analytics. For standard tracking, stick with Framer's native integration.
Troubleshooting common Google Analytics issues in Framer
Even with a straightforward setup process, you may encounter issues getting Google Analytics to work properly with your Framer site. Here are the most common problems and their solutions.
No data appearing in Google Analytics Realtime report: Confirm you've published your Framer site after adding the Measurement ID—changes in the editor don't take effect until you click Publish. Verify you're viewing the correct GA4 property (not an old Universal Analytics property) and that your Measurement ID in Framer matches the ID in your GA4 data stream settings.
Measurement ID field not accepting my code: The Framer Google Analytics field only accepts Measurement IDs in the format G-XXXXXXXXX. If you're pasting the entire tracking script (including <script> tags), remove everything except the Measurement ID itself. Framer handles the code injection automatically.
Double counting page views and events: This happens when Google Analytics is installed both through Framer's native field and via custom code in the <head> section. Check your site settings and remove one implementation. To verify, check your GA4 Realtime report—if you see two active users when only one person is browsing, you have duplicate tracking.
Ad blockers preventing Google Analytics from loading: Browser extensions like uBlock Origin and AdBlock Plus block GA4 by default. Test in a fresh browser profile or mobile device without ad blockers to verify tracking works. Consider privacy-focused alternatives like Humblytics or Simple Analytics if ad blocker interference is a major concern.
Data taking too long to appear in reports: The Realtime report updates within seconds, but standard reports (Traffic acquisition, Pages and screens) can take 24-48 hours to process data, especially for new properties. This is normal GA4 behavior. Very small amounts of data may not appear immediately in aggregate reports due to sampling and processing thresholds.
Enhanced measurement events not recording: If automatic events like scrolls, outbound clicks, or file downloads aren't recording, verify that Enhanced measurement is enabled. In GA4, go to Admin → Data Streams → [Your Stream] → Enhanced measurement and confirm the toggle is on. You can enable or disable individual event types from this panel.
Frequently asked questions about Google Analytics in Framer
What is the Google Analytics Measurement ID for Framer and where do I find it?
The Google Analytics Measurement ID is a unique identifier (format G-XXXXXXXXX) that connects your Framer site to your GA4 property. To find it, log into Google Analytics, go to Admin → Data Streams, click your web stream, and copy the Measurement ID from the top of the page. Paste this ID into Site Settings → General → Google Analytics Measurement ID in Framer, then save and publish. Analytics tracking begins automatically without manual code insertion.
Do I need a separate Google Analytics account for multiple Framer sites?
No. A single Google Analytics account can hold up to 2,000 properties, and each property can track different sites. Create one account for your organization, then add individual properties for each Framer site. For example, one account called "My Company" can contain properties for "Site A," "Site B," and "Site C." Each property gets its own Measurement ID to paste into the respective Framer site's settings.
How do I track CMS page views in Framer with Google Analytics?
CMS page tracking works automatically once you install your Measurement ID. GA4 tracks all pages, including dynamically generated CMS collections, blog posts, and portfolio items. To view CMS traffic, open GA4 and go to Reports → Engagement → Pages and screens. You'll see all page paths with view counts, including your CMS items like /blog/post-title or /work/project-name.
Can I add Google Analytics to Framer on the free plan?
Yes, you can add Google Analytics to Framer using the native Google Analytics Measurement ID field, which is available across Framer plans. This field allows you to set up basic GA4 tracking and monitor visitor behavior, page views, and standard events without needing to upgrade. However, more advanced setups that rely on global Custom Code sections—such as implementing Google Tag Manager, adding custom tracking scripts, or configuring complex event tracking—typically require a paid site plan. Framer's pricing and feature availability can change over time, so if you need Custom Code access for advanced analytics implementations, check Framer's current plan features to confirm what's included in your subscription. For most users, the native Measurement ID integration provides all the essential tracking capabilities needed to understand site performance and visitor behavior.
What's the difference between Framer Analytics and Google Analytics?
Framer Analytics is built-in and provides basic metrics (page views, visitors, traffic sources) directly in your Framer dashboard with no setup required. Google Analytics 4 is a comprehensive third-party platform offering advanced features like detailed event tracking, conversion tracking, audience segmentation, Google Ads integration, and customizable reports. Most users run both simultaneously—Framer Analytics for quick insights and GA4 for detailed analysis and marketing attribution.
How long does it take for Google Analytics to show data from my Framer site?
The Realtime report updates within seconds to minutes after publishing your site with the Measurement ID—this is the fastest verification method. However, standard GA4 reports (Traffic acquisition, Engagement, Pages and screens) typically take 24-48 hours to display complete data for new properties. For established properties, most reports update every 30 minutes to several hours, though complex metrics may take up to 24 hours.
Is Google Analytics 4 better than Universal Analytics for Framer sites?
GA4 is the only option—Universal Analytics stopped collecting data on July 1, 2023. You can view historical UA data, but it won't track new visitors. GA4 uses event-based measurement (vs. session-based), offers better privacy compliance with cookieless measurement, and provides enhanced cross-device tracking. While there's a learning curve from UA, GA4's capabilities for modern web tracking are essential for any Framer site.
How do I set up conversion tracking for Framer forms in Google Analytics?
First, ensure your Measurement ID is installed and Enhanced measurement is enabled. GA4 automatically tracks form submissions as form_submit events. To mark this as a conversion, go to Admin → Events in GA4, find form_submit, and toggle Mark as conversion. For tracking specific forms separately, use Google Tag Manager or Framer code overrides to fire custom event names (like newsletter_signup), then mark those as conversions.
Can I use Google Tag Manager instead of directly adding Google Analytics to Framer?
Yes. GTM provides centralized management for multiple tracking tags. Create a GTM account, copy your container snippets, and paste them into Site Settings → General → Custom Code (head snippet in Start of <head> tag, body snippet in Start of <body> tag). Then in GTM, create a Google Tag with your GA4 Measurement ID and set the trigger to Initialization - All Pages. This approach is useful for complex tracking but requires GTM knowledge.
Do I need to add a cookie banner to my Framer site when using Google Analytics?
It depends on your audience location. GA4 doesn't store IP addresses but still sets cookies for session tracking. If you have EU visitors, you need a GDPR-compliant cookie consent banner allowing users to opt in before tracking begins. California visitors may require CCPA disclosures. Framer doesn't include built-in consent tools, so integrate third-party solutions like Cookiebot or Osano, or build a custom banner that conditionally loads the Google tag based on user consent.
Conclusion
Installing Google Analytics 4 on your Framer site is a straightforward process that unlocks powerful insights into your visitors' behavior, traffic sources, and content performance. By following this guide, you've created a GA4 property, obtained your Measurement ID, integrated it with Framer's native settings, and verified that data is flowing correctly. With analytics properly configured, you can now make data-driven decisions to improve your site's user experience, optimize for conversions, and measure the ROI of your marketing efforts.
As you become more comfortable with Google Analytics, explore advanced features like custom event tracking, audience segmentation, and integration with Google Ads for remarketing campaigns. If you need help implementing more complex analytics setups, creating custom reports, or building conversion funnels for your Framer site, our Framer agency specializes in helping businesses maximize their web presence with strategic design and development solutions.


Join readers commenting on this post!