
If you've built your site in Framer and need to track visitors, conversions, or events, you've probably hit a wall: you need analytics tools, but you don't know where to start. You paste code in the wrong places, GTM preview mode won't connect to your site, and you end up more confused than when you started.
This tutorial will guide you step by step through installing Google Tag Manager on your Framer site and verifying that everything works correctly. Once GTM is installed, you'll have a flexible system ready to manage Google Analytics, Google Ads, Meta Pixel, and any other tracking tags—all from one central place.
Why Google Tag Manager matters for Framer sites
Before diving into the technical setup, it's important to understand why you need GTM instead of simply pasting tracking scripts directly into Framer:
Centralized management of multiple pixels: Instead of pasting code from Google Analytics, Google Ads, Meta Pixel, LinkedIn Insight Tag, and other scripts directly into your Framer site, GTM acts as a single container that manages all these tags from one interface. When you need to add a new pixel, you do it in GTM without touching Framer's code again.
Custom event tracking without code: Need to track when someone clicks a specific button, downloads a file, or submits a form? With GTM you can configure these events using visual triggers instead of writing custom JavaScript for every interaction you want to measure.
Privacy control and regulatory compliance: Framer's Cookie Banner component can be connected to Google Tag Manager and used to implement Google Consent Mode. This allows you to configure your marketing tags to fire only after user consent, which helps with GDPR and similar privacy regulations. Keep in mind that depending on how Consent Mode is configured, Google may still send cookieless or aggregated pings before consent is granted—so the exact behavior depends on your specific setup.
Flexibility to scale your tracking: Today you only need GA4, but tomorrow you'll want to add Google Ads conversions, Facebook remarketing, and custom events. With GTM already installed, these changes take minutes instead of requiring you to edit your Framer site's code every time.
Simplified testing and debugging: GTM includes a preview mode that lets you see exactly which tags are firing, when, and with what data, before publishing changes live. This eliminates the frustrating cycle of "publish → check → find error → publish again" that you experience when pasting code directly.
Data duplication prevention: One of the most common mistakes is installing GA4 both through Framer's Measurement ID field and through GTM, which results in duplicated data and inflated reports. GTM gives you a single point of control that eliminates this confusion.
Requirements before installing Google Tag Manager in Framer
Before starting the installation, make sure you have these elements ready to avoid problems midway through the process:
Active Google account
You need a Google account to access Google Tag Manager. If you already have Gmail or another Google service, you can use that same account.
Access to Custom Code in Framer
You need access to the Site Settings → General → Custom Code section in your Framer project. This section is currently available on Free plan sites using a Framer subdomain (like yourproject.framer.website).
If you don't see the Custom Code section or you get an upgrade message, you may need to upgrade to a paid site plan to access this feature.
Site published on a domain
GTM doesn't work in Framer's preview mode within the editor. Tracking scripts only run when your site is published on a real domain (this can be Framer's free domain like yourproject.framer.website or your custom domain).
This means that after pasting the GTM code, you must publish the site for the changes to take effect. Don't try to test tracking on the editor URL (design.framer.com/...) because it simply won't work.
Step 1: Create your Google Tag Manager account and container for Framer
Let's create the Google Tag Manager container that will act as the "central hub" for managing all your tracking tags.
Access Google Tag Manager
- Go to tagmanager.google.com and sign in with your Google account
- If it's your first time, you'll see a Create Account button in the center of the screen

Create the Tag Manager account
- Click Create Account (top right corner if you already have other accounts)
- Enter an Account name: use your company or project name, like "My Web Agency" or "Client Sites"
- Select your country from the dropdown menu
- Check the box to accept the terms of service
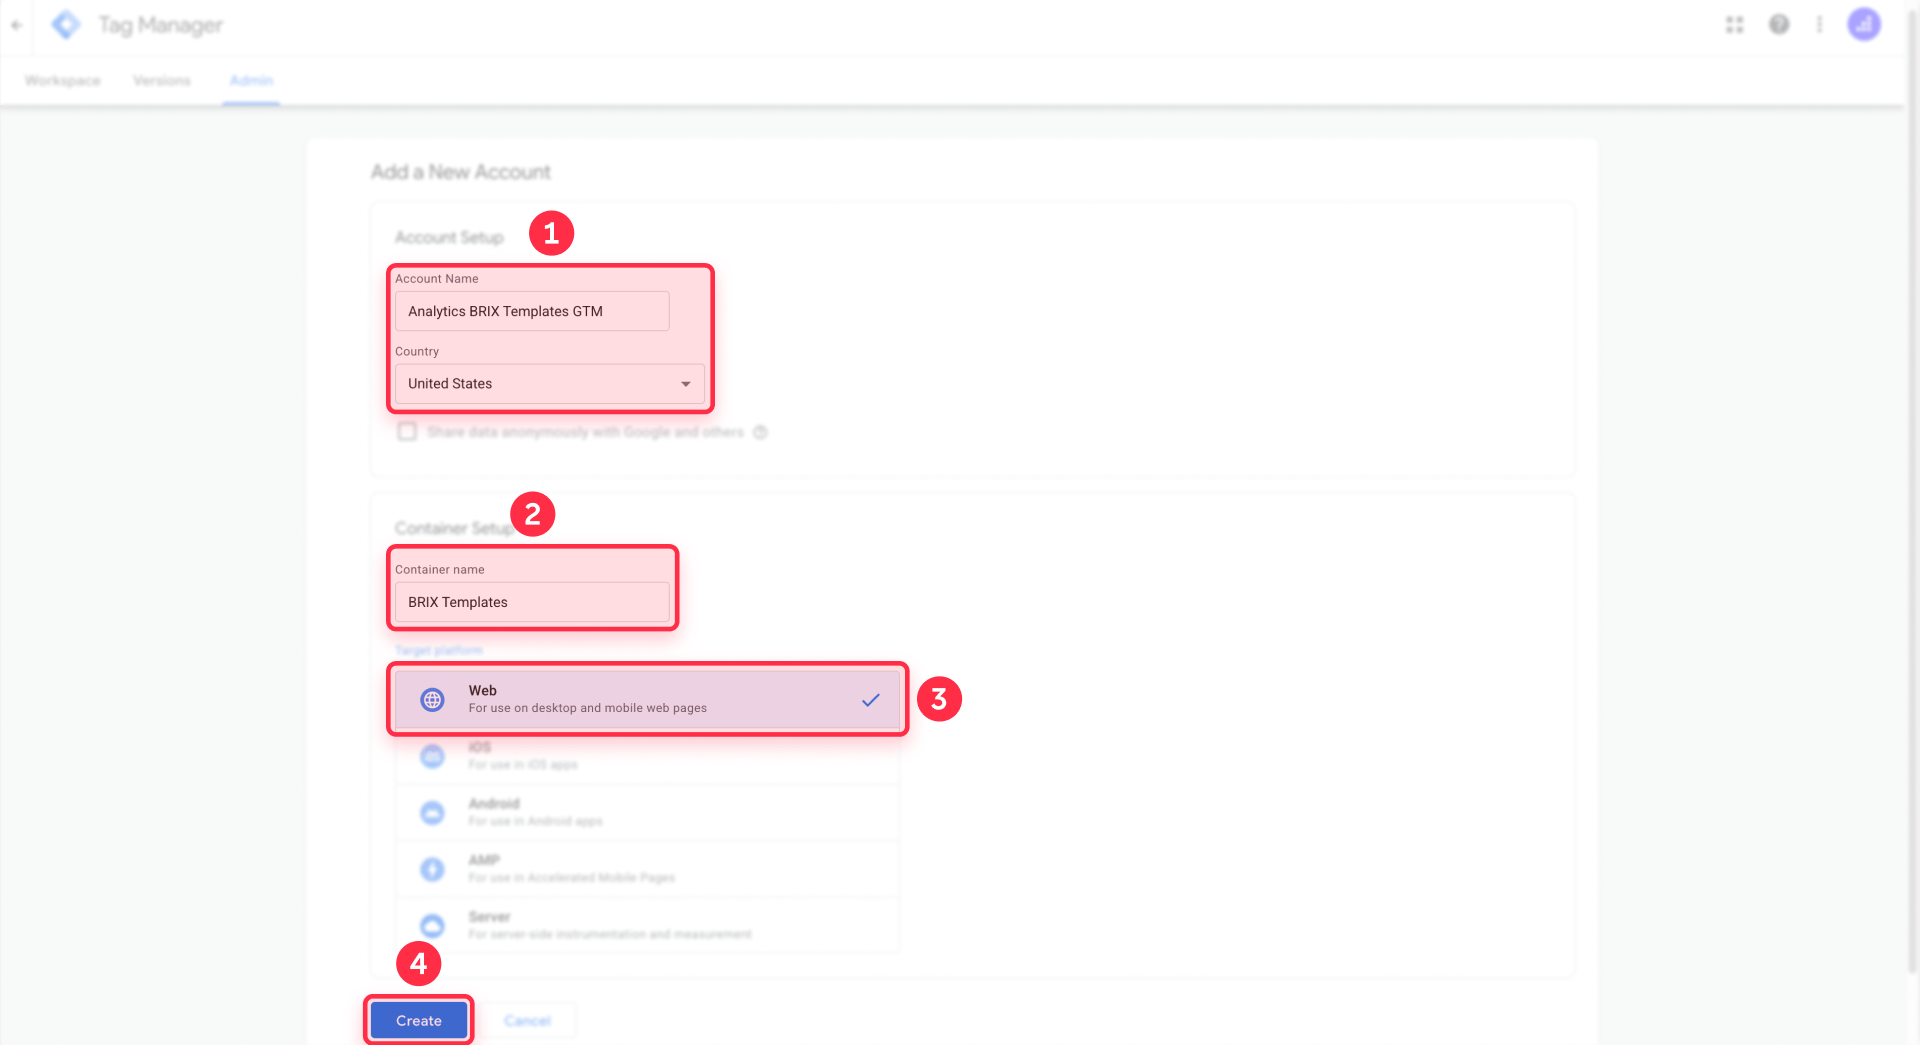
Configure the web container for Framer
- In the Container setup section, enter a Container name. This should be specific to the site, for example: "Corporate Framer Site" or "Q1 2025 Landing Page"
- Select Web as the target platform (don't select AMP, iOS, or Android)
- Click Create
Get the GTM installation snippets
Immediately after creating the container, Google Tag Manager will show you a modal titled "Install Google Tag Manager" containing two code blocks.
Don't close this window yet. We're going to copy both snippets:
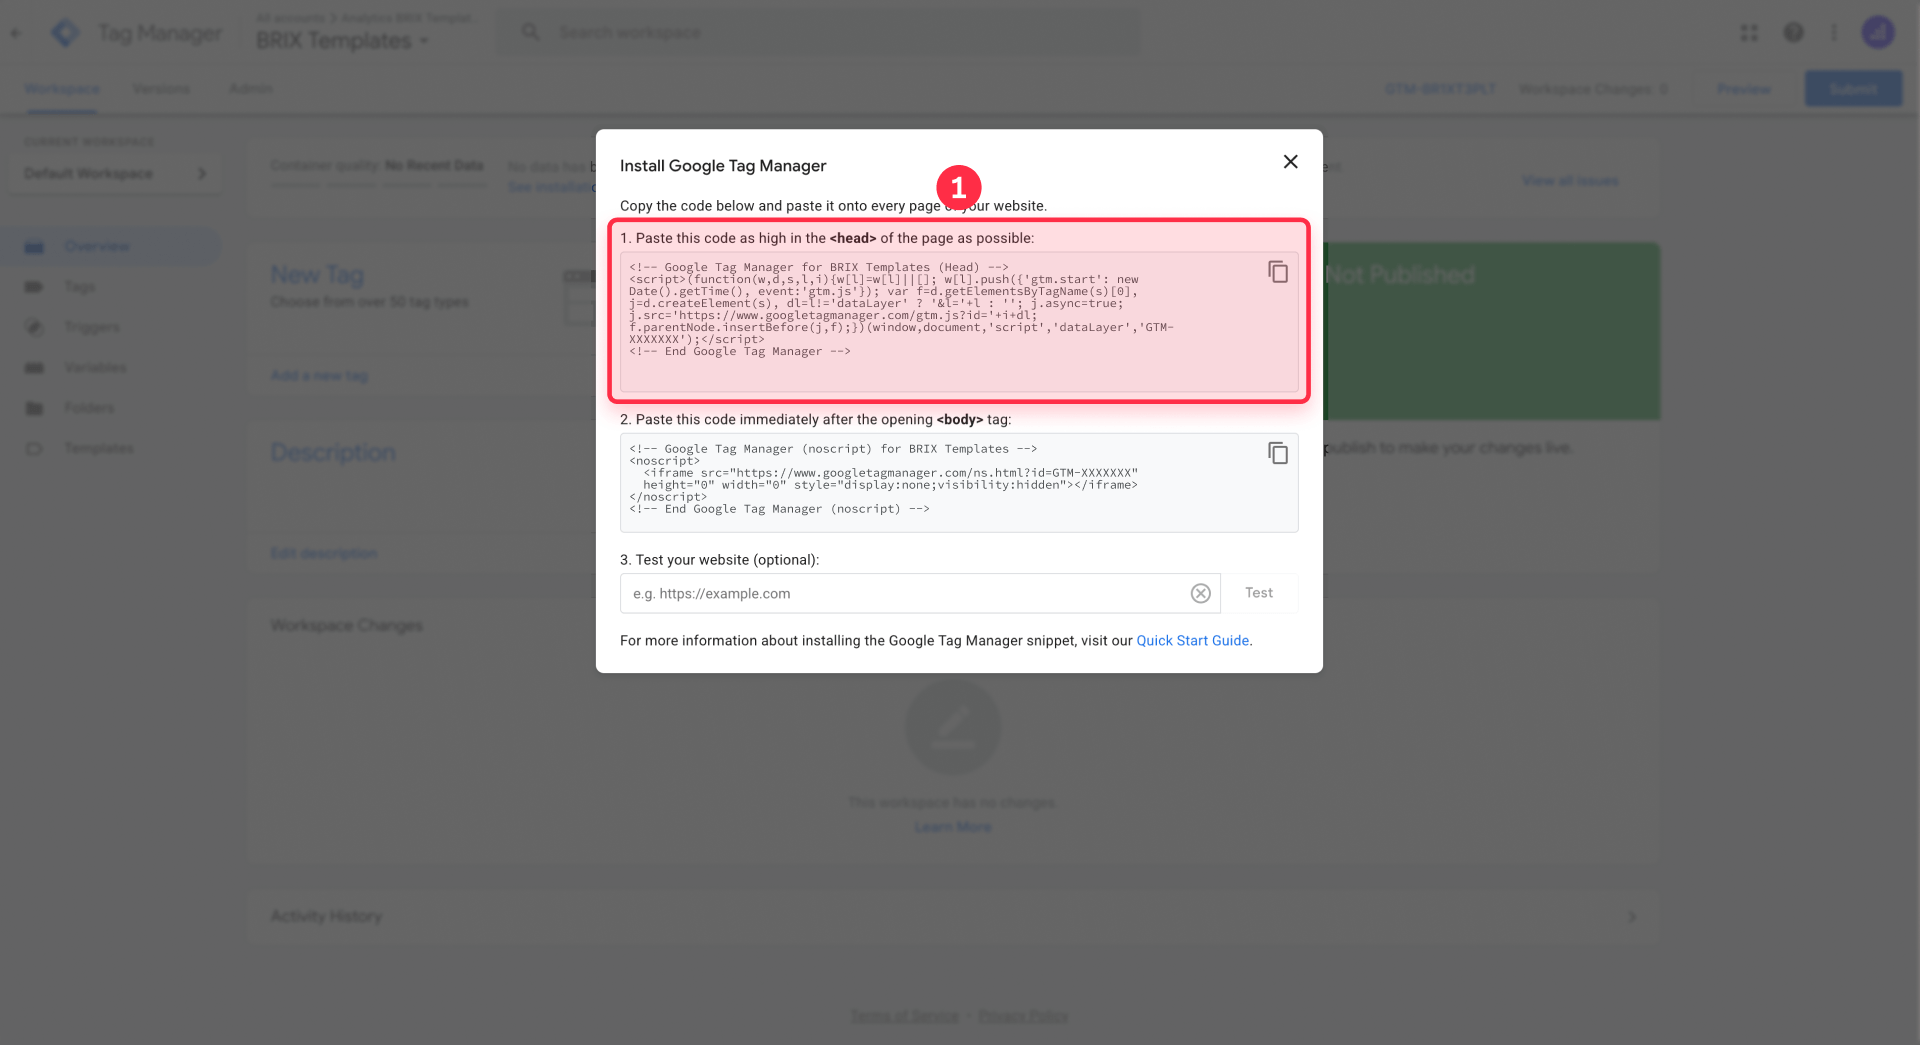
First snippet (for the <head>):
<!-- Google Tag Manager -->
<script>(function(w,d,s,l,i){w[l]=w[l]||[];w[l].push({'gtm.start':
new Date().getTime(),event:'gtm.js'});var f=d.getElementsByTagName(s)[0],
j=d.createElement(s),dl=l!='dataLayer'?'&l='+l:'';j.async=true;j.src=
'https://www.googletagmanager.com/gtm.js?id='+i+dl;f.parentNode.insertBefore(j,f);
})(window,document,'script','dataLayer','GTM-XXXXXX');</script>
<!-- End Google Tag Manager -->
Second snippet (for the <body>):
<!-- Google Tag Manager (noscript) -->
<noscript><iframe src="https://www.googletagmanager.com/ns.html?id=GTM-XXXXXX"
height="0" width="0" style="display:none;visibility:hidden"></iframe></noscript>
<!-- End Google Tag Manager (noscript) -->
Copy both snippets completely (including the HTML comments) to a notepad. Notice how both contain your Container ID (format GTM-XXXXXX).
Important note: The Container ID (GTM-XXXXXX) identifies your Tag Manager container. This is different from the GA4 Measurement ID (G-XXXXXXXXXX) that you'll use later when connecting Google Analytics.
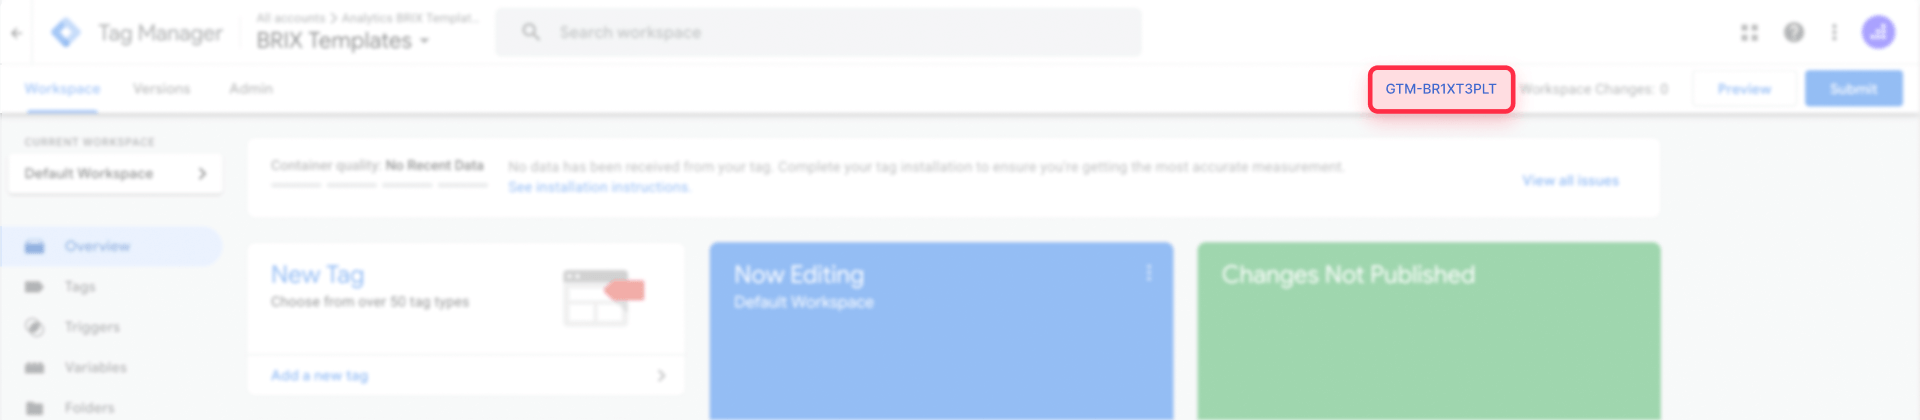
If you accidentally closed the installation modal, you can retrieve the snippets like this:
- In the GTM interface, click on your Container ID in the top right corner
- Select Install Google Tag Manager from the menu
- You'll see the two code snippets again
Now that you have both snippets saved, it's time to install them in your Framer site.
Step 2: Install the Google Tag Manager snippets in your Framer site
With both GTM snippets copied, we'll now paste them in the correct locations within your Framer project. This step is crucial: if the snippets aren't placed correctly, GTM may not work as expected.
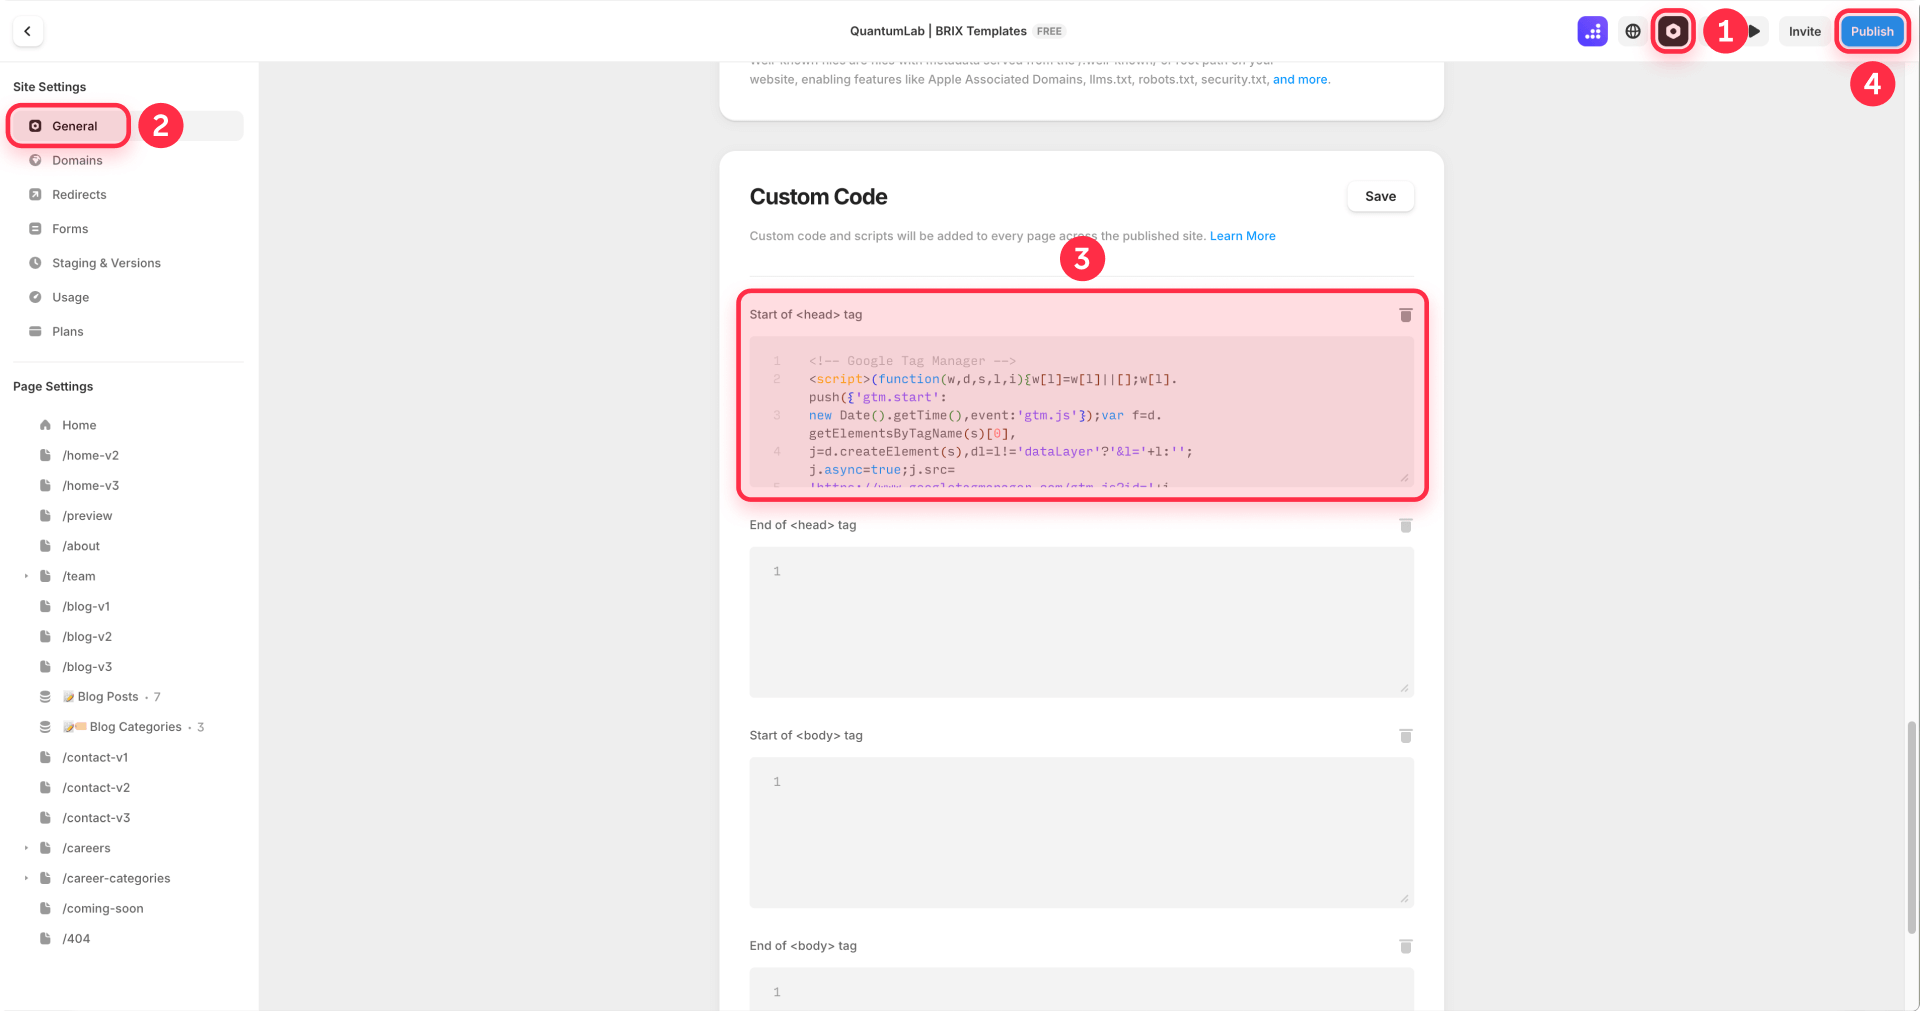
Open custom code settings in Framer
- Open your Framer project in the editor
- Click the gear icon (Settings) in the left sidebar
- Select General in the Site Settings menu
- Scroll down until you find the Custom Code section
If the Custom Code fields are locked (appear grayed out), it means you're on Framer's Free plan. You'll need to upgrade to any paid site plan to continue.
Reveal the advanced custom code fields in Framer
By default, Framer's Custom Code section only shows two fields:
- End of <head> tag
- End of <body> tag
To see the additional fields where we recommend placing the GTM snippets, click the Show Advanced button. This will reveal two more fields:
- Start of <head> tag
- Start of <body> tag
Paste the first snippet in Framer's <head>
- After clicking Show Advanced, locate the Start of <head> tag field
- Paste the complete first snippet of GTM (the one that starts with <!-- Google Tag Manager -->)
- Make sure to paste the complete code, including the HTML comments and the entire script
Don't modify anything in the code. Don't change the container ID, don't add extra line breaks, and don't delete any part of the snippet.
Paste the second snippet in Framer's <body>
- Locate the Start of <body> tag field (revealed after clicking Show Advanced)
- Paste the complete second snippet of GTM (the one containing <noscript><iframe>)
- Again, paste the complete code without modifications
Save and publish your Framer site
- Click Save (top right in Site Settings)
- Close the Settings panel
- Publish your site by clicking Publish in the top right corner of the editor
This last step is absolutely critical. GTM scripts don't run in Framer's editor preview mode. You must publish the site to your real domain (either Framer's free domain or your custom domain) for the snippets to activate.
Common error: Many users paste the code, don't publish, and then get frustrated when GTM Preview won't connect to their site. Remember: you always need to publish after adding or modifying custom code in Framer.
After publishing, wait about 30-60 seconds for the changes to fully propagate. Now your Framer site has Google Tag Manager installed and ready to use.
Step 3: Verify that Google Tag Manager is installed on your Framer site
Before adding any tags, let's confirm that GTM is correctly installed using the Preview mode.
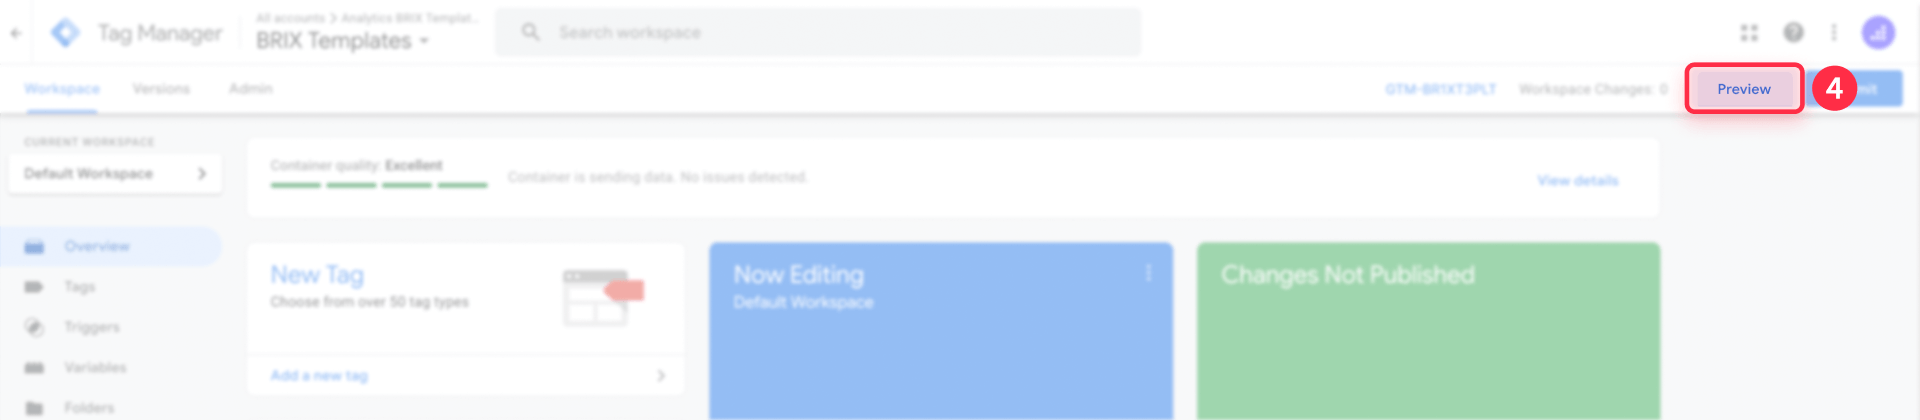
Connect GTM Preview to your Framer site
- In the GTM interface, click Preview (top right corner)
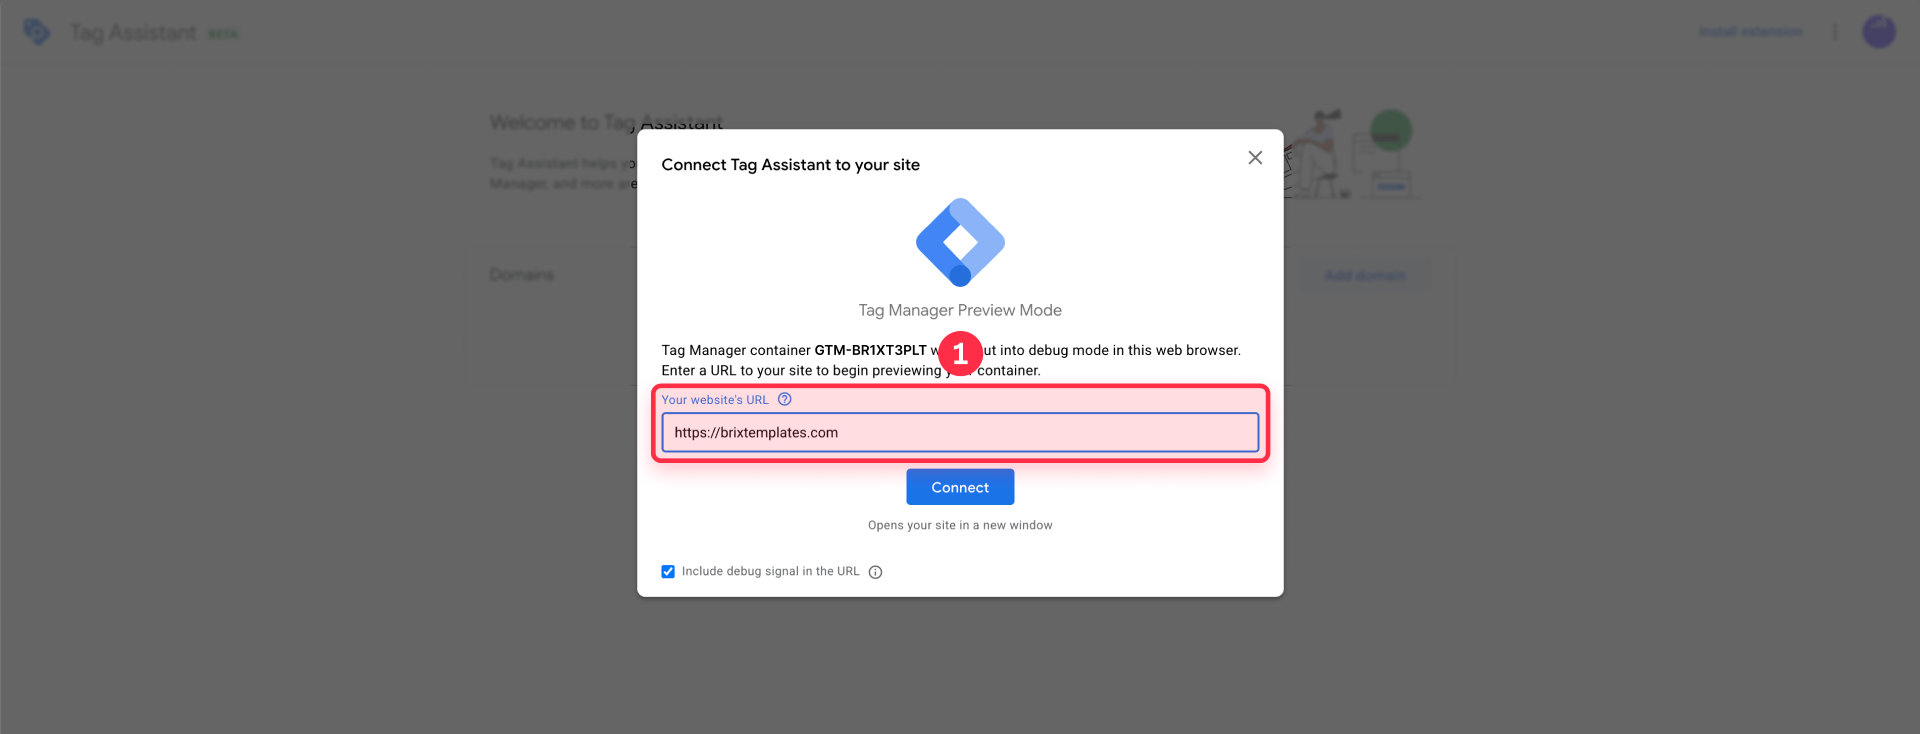
- A new Tag Assistant window will open
- Enter the URL of your published Framer site (example: https://yoursite.framer.website)
- Click Connect
Verify the container is loaded in Tag Assistant
If everything is configured correctly:
- You'll see your site load in a new window with a Tag Assistant debug bar at the bottom
- In the Tag Assistant interface, you should see a Container Loaded event showing your GTM container ID
- You should also see Window Loaded event confirming the page fully loaded
If you see the Container Loaded event with your container ID, your GTM installation is complete and working correctly.

What to check if Preview doesn't connect
If the Tag Assistant shows a timeout error or doesn't connect:
- Did you publish your Framer site after pasting the snippets?
- Are you using the URL of the published site (not the editor URL design.framer.com/...)?
- Do you have ad blockers active? Try in an incognito window without extensions
- Is the snippet complete and unmodified? Double-check that you copied the entire code block
- Is the Container ID correct? Verify it matches the ID shown in your GTM workspace
Once you've verified that GTM is installed, you're ready to add tags like Google Analytics 4, Google Ads conversions, or any other tracking pixels.
Step 4: Add your first GA4 tag in Google Tag Manager for Framer
The first tag most teams add is Google Analytics 4 (GA4). You can either manage GA4 entirely through GTM, or use Framer’s native Measurement ID field. The key is to pick a single method to avoid duplicate tracking.
Since you're managing everything from GTM, here's how to add Google Analytics 4:
Important: Only add this GA4 tag if you're not already using Framer's native Google Analytics Measurement ID field to connect GA4. If GA4 is already configured and working through that field, skip this step to avoid double-counting all pageviews and events.
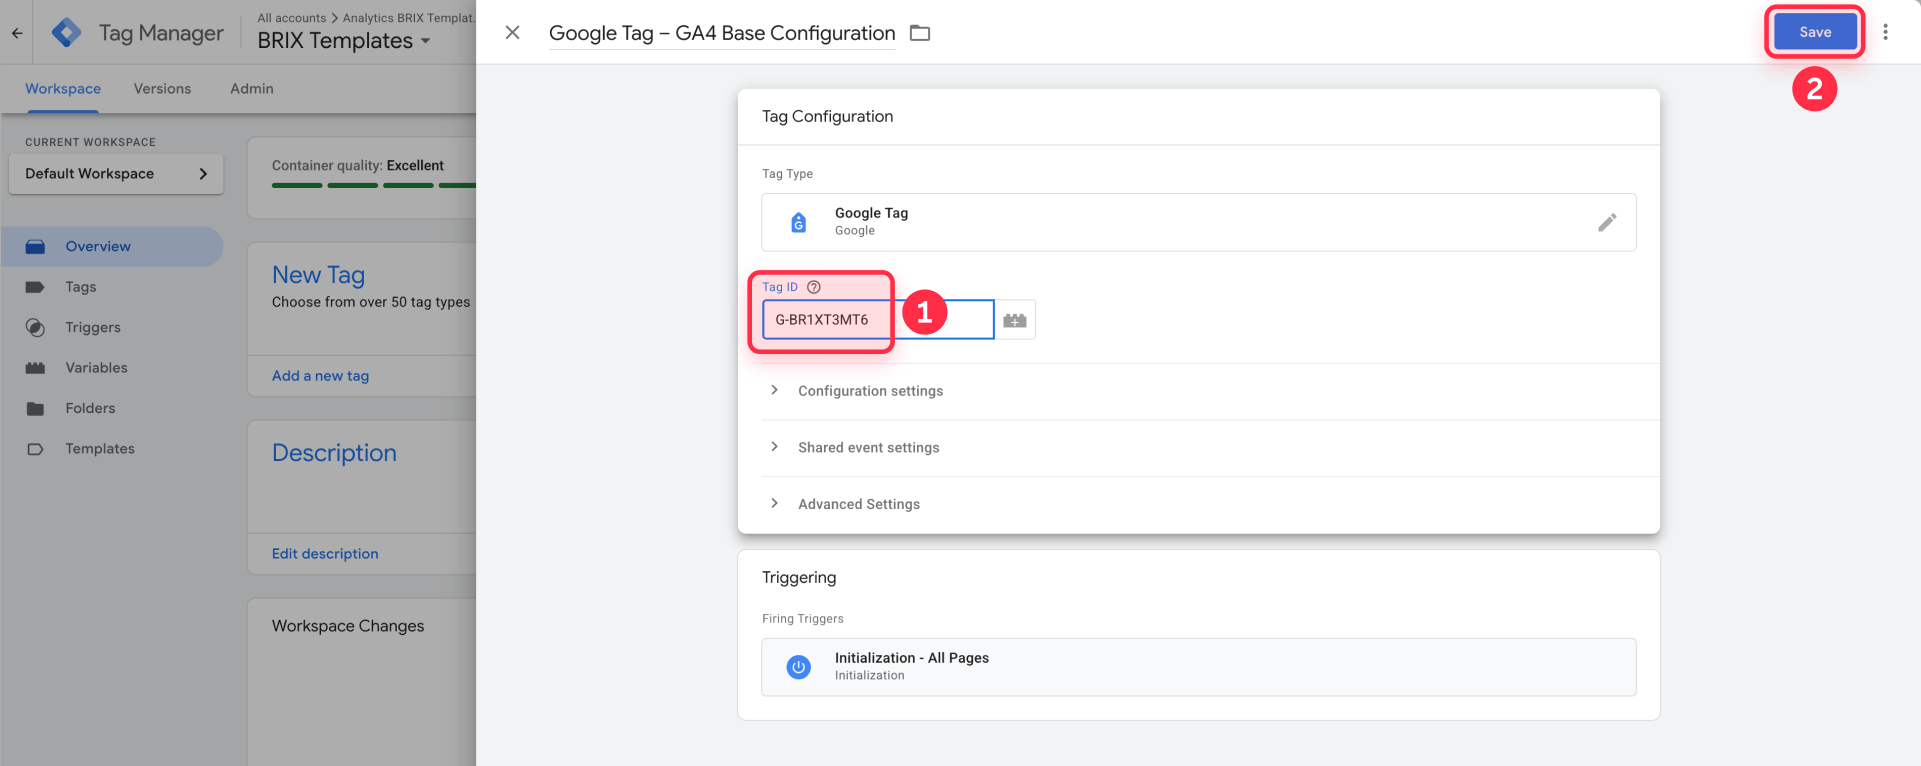
- In GTM, go to Tags → New
- Choose Google Tag as the tag type
- Enter your GA4 Measurement ID (starts with G-)
- Set the trigger to Initialization – All Pages
- Save the tag, then click Submit to publish your GTM container.
From now on, remember that any time you add or change tags in GTM, those changes won’t affect real visitors until you click Submit to publish a new container version.
If you prefer to keep GA4 configuration inside Framer instead of GTM, you can skip this GA4 tag and follow our separate guide on how to install Google Analytics 4 in Framer, using only the Measurement ID field in Site Settings.
Troubleshooting common GTM issues in Framer
Even following all steps correctly, you may encounter problems. Here are solutions to the most common scenarios reported by Framer users.
GTM Preview shows "timeout" when trying to connect to my Framer site: This is the most reported issue in Framer communities. The most common causes are: the site isn't published yet (GTM Preview only works on published domains), ad blockers or browser extensions are blocking the connection, or browser cache issues. Try publishing the site, then test in Chrome incognito without extensions.
The Custom Code fields are locked in my Framer project: You're on the Free Framer plan, which doesn't allow custom code. You need to upgrade to any paid site plan to access these features. Once you upgrade, the fields will unlock automatically.
Tag Assistant shows "No container found" on my Framer site: This error typically occurs when: the site hasn't been published yet after adding the snippets, the snippet was accidentally modified or is incomplete, the Container ID in the snippet doesn't match your GTM container, or ad blockers are preventing GTM from loading. Double-check that you pasted the complete, unmodified snippet and that the site is published. Placing the snippet in Start of <head> tag is recommended for earlier loading, but the snippet should work in End of <head> tag as well.
GTM only fires on the first page load in my Framer site, not on subsequent navigations: This happens because Framer behaves like a single-page application (SPA). The browser doesn't fully reload the page when you click internal links. For basic tracking this is usually acceptable, but for advanced SPA tracking you'll need custom virtual pageview configuration.
I can't find my Container ID or the installation snippets anymore: In GTM, click on your Container ID in the top right corner of the workspace, then select Install Google Tag Manager from the dropdown menu. You'll see both snippets again.
My site loads slowly after adding GTM: GTM itself has minimal performance impact. If you notice slowness, check if you've added heavy tags inside GTM (like multiple chat widgets or video tracking). Use GTM's Preview mode to identify which tags are loading and consider optimizing or removing unnecessary ones.
Frequently asked questions about Google Tag Manager in Framer
What is Google Tag Manager and why do I need it for my Framer site?
Google Tag Manager is a tag management system that lets you add and update measurement tags (like Google Analytics, Google Ads, Meta Pixel) on your Framer site without editing code every time. Instead of pasting multiple scripts in Framer's Custom Code, you install GTM once and manage all other tags from GTM's interface.
What's the difference between the GTM Container ID and the GA4 Measurement ID?
The Container ID (GTM-XXXXXX) identifies your Tag Manager container and goes in Framer's Custom Code fields. The Measurement ID (G-XXXXXXXXXX) identifies your Google Analytics 4 property and goes inside a GA4 tag you create in GTM. They're completely different IDs serving different purposes.
Can I install GA4 in Framer without using Google Tag Manager?
Yes, Framer has a native field called "Google Analytics Measurement ID" in Site Settings → General where you can paste your Measurement ID directly. This is simpler if you only need basic GA4 tracking. However, if you'll eventually need conversion tracking or multiple marketing pixels, install GTM from the start.
Do I need a paid Framer plan to install Google Tag Manager?
Yes, you need any paid site plan because GTM snippets go in Framer's Custom Code section, which is disabled on the Free plan. If you access Site Settings → General → Custom Code on the Free plan, the fields will be grayed out and locked.
How do I verify that Google Tag Manager is working correctly on my Framer site?
Use GTM Preview Mode. In Google Tag Manager, click Preview, enter your published Framer site URL, and click Connect. If GTM is installed correctly, Tag Assistant will open showing a Container Loaded event with your container ID.
Can I use both Framer's Google Analytics field and GTM at the same time?
You shouldn't. If you paste your Measurement ID in Framer's GA field and install GA4 through GTM, you'll send analytics data via two different paths, resulting in duplicated data. Choose one method only.
Why does GTM Preview show "timeout" when connecting to my Framer site?
The most common causes are: the site isn't published yet (GTM only works on published domains), you're using the editor URL instead of the published URL, or ad blockers are active. Always publish your site after pasting snippets and test in an incognito window.
Where exactly do I paste the GTM snippets in Framer?
Go to Site Settings → General → Custom Code, then click Show Advanced to reveal all fields. Paste the first snippet (the <script> one) in Start of <head> tag (recommended) or End of <head> tag. Paste the second snippet (the <noscript> one) in Start of <body> tag. Save and publish.
How long does it take for GTM to start working after installation?
GTM starts working immediately after you publish your Framer site. You can verify the installation right away using Preview mode. However, any tags you add inside GTM (like GA4) will only start collecting data after you configure and publish them within GTM.
Can I track button clicks and form submissions with GTM in Framer?
Yes, GTM allows you to track custom events like button clicks, form submissions, and link clicks using triggers and event tags. This requires additional configuration beyond the basic installation covered in this tutorial. We'll cover event tracking in a separate detailed guide.
Conclusion
You've successfully installed Google Tag Manager on your Framer site and verified that it's working correctly. Now you have a flexible foundation ready to manage all your tracking needs—from Google Analytics and Google Ads to Meta Pixel and beyond—all from one central interface.
The benefits of this setup will become evident as you scale your marketing: adding new tracking pixels takes minutes instead of hours, and you never need to touch Framer's code again. Everything is managed from the GTM interface.
If this process felt complex or you'd simply prefer experts to handle it for you, our team at BRIX Templates has configured tracking for dozens of Framer sites. We specialize in GTM implementations with multiple pixels and Consent Mode to ensure your site complies with privacy regulations while capturing the data you need.


Join readers commenting on this post!