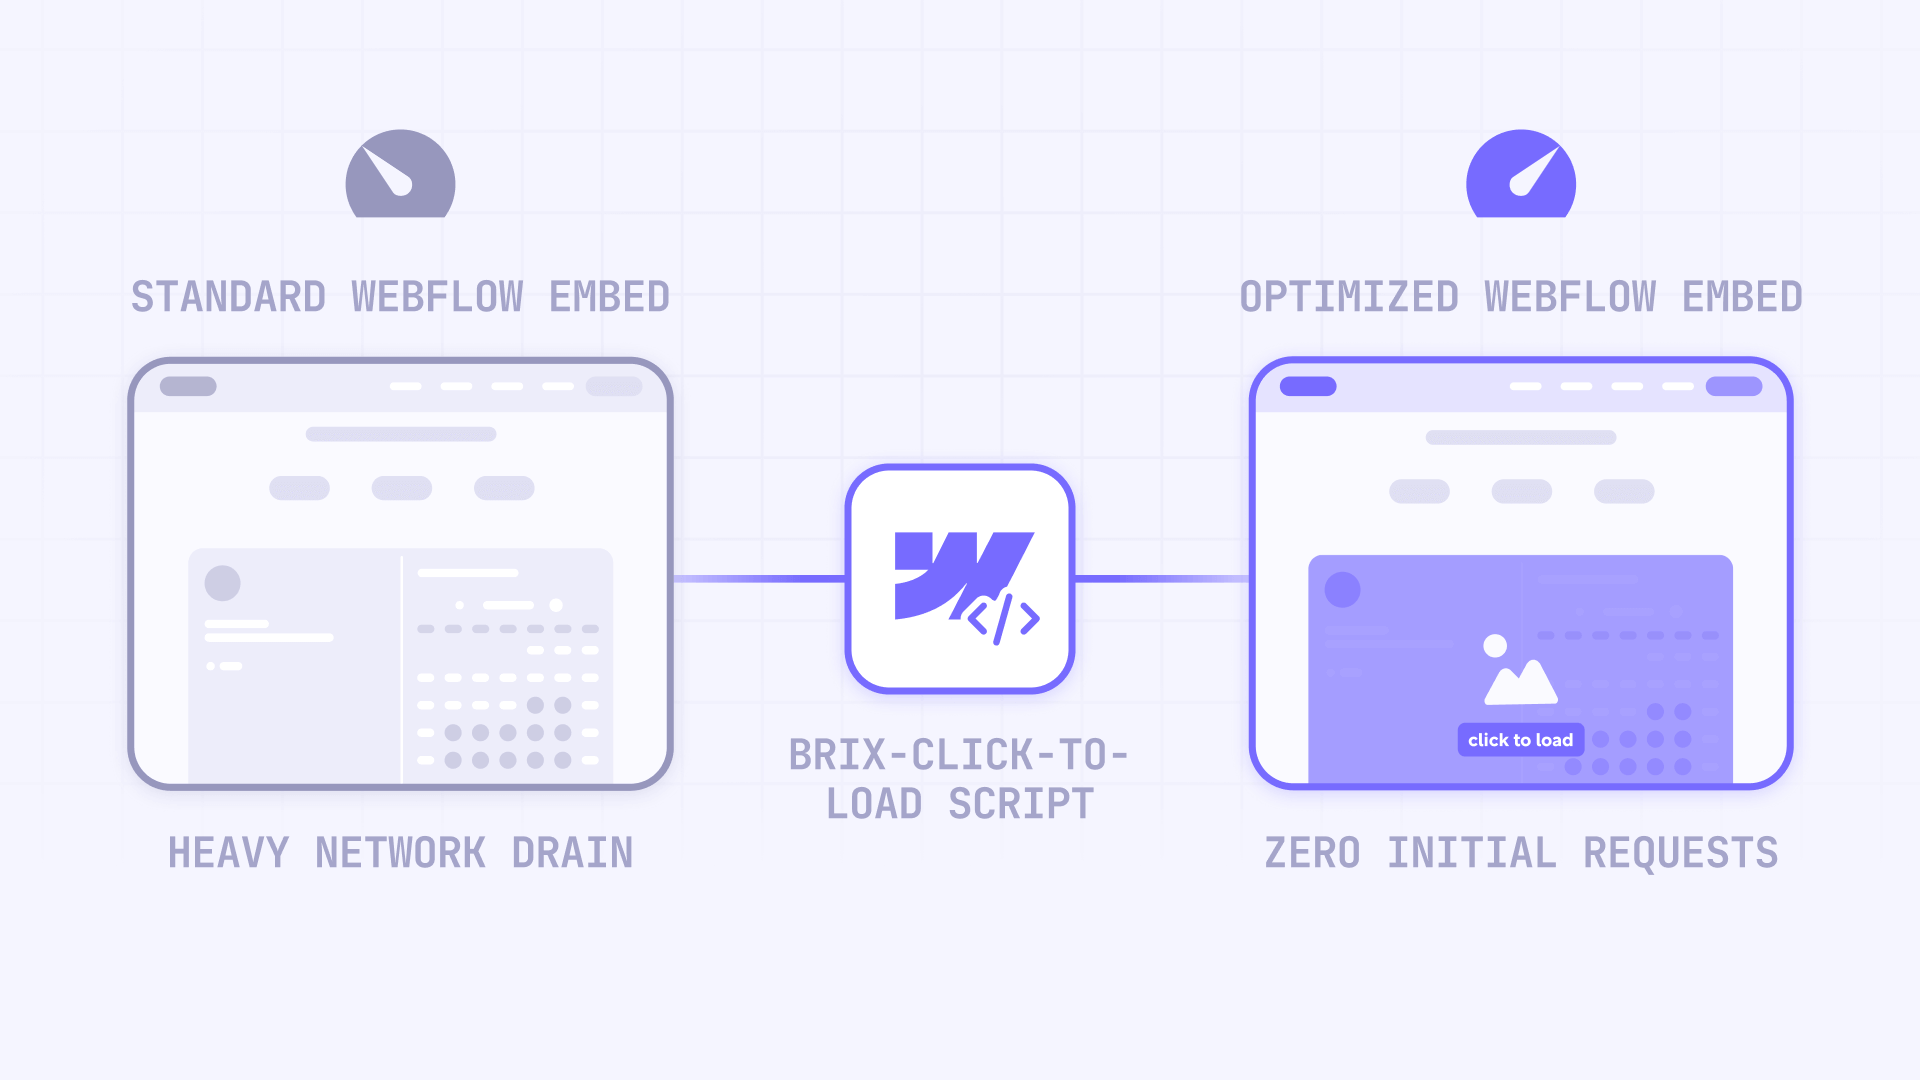
Heavy third-party embeds can destroy your Webflow page's performance. Many third-party iframes start downloading resources the moment your page loads, creating massive network waterfalls, slow interaction times, and poor Lighthouse scores—even for something as simple as a calendar or map.
Click-to-load is a straightforward performance pattern: don't let the browser load the embed until the user explicitly requests it. Instead of an iframe rendering immediately, visitors see a fast placeholder with a clear "Click to load" action. This tutorial shows you how to implement this pattern in Webflow, verify it works using Chrome DevTools, and fix the three most common failure modes.
Why click-to-load embeds matter for Webflow sites
- Above-the-fold booking widgets: When a Calendly calendar loads instantly, it can dominate your initial page load. Click-to-load keeps your hero section fast until users are ready to book.
- Multiple embeds on one page: Pages with several maps, videos, forms, or reviews often stack multiple heavy requests. Click-to-load prevents "death by a thousand widgets."
- Embeds inside modals and tabs: Some browsers don't reliably initialize third-party widgets when they start inside hidden Webflow elements. Loading on click (after the modal opens) avoids this initialization problem.
- Mobile performance drops from video embeds: YouTube and Vimeo players can dramatically reduce mobile PageSpeed scores. A placeholder image loads instantly; the player loads only when requested.
- Performance triage when you can't remove the embed: If the embed is non-negotiable (booking, maps), click-to-load is a realistic way to reduce initial load impact without removing functionality.
- Cleaner UX control: You can match the placeholder's dimensions to the embed to avoid layout shift and keep the page stable during loading.
Plan a click-to-load strategy for heavy embeds in Webflow
Before building anything, confirm you're gating the right embed and choosing the right pattern. Click-to-load works best when used intentionally, not everywhere.
Identify which Webflow embeds are "heavy"
A Webflow embed is usually "heavy" when it triggers any of these on initial load:
- Multiple third-party requests (scripts, CSS, fonts, tracking beacons)
- A large iframe document with subresources
- Third-party iframes that load many subresources (Calendly iframe, Google Maps iframe, YouTube/Vimeo iframe)
- Anything that spikes Total Blocking Time or delays interaction
If you open DevTools → Network and see huge files from Google, video players, or booking platforms loading immediately, that's a prime candidate for click-to-load.
Choose click-to-load vs lazy-loading in Webflow
These patterns are not the same:
- Click-to-load: Loads only after explicit interaction. Best for above-the-fold embeds or pages where you want maximum control over initial performance.
- Lazy-loading: Defers until the iframe is near the viewport. Best for below-the-fold embeds where you don't want to add an extra click.
A simple rule of thumb: if the embed is visible immediately and not critical to see instantly, use click-to-load. If the embed is below the fold, consider adding loading="lazy" to the iframe instead (or in addition).
Here's a simple example of lazy-loading an iframe:
<iframe
  src="https://www.youtube.com/embed/VIDEO_ID"
  width="560"
  height="315"
  frameborder="0"
  loading="lazy"
  allow="accelerometer; autoplay; clipboard-write; encrypted-media; gyroscope; picture-in-picture"
  allowfullscreen
></iframe>
Understand the UX trade-offs for click-to-load in Webflow
Click-to-load improves initial speed, but it adds friction. Users need one extra click, and the embed loads slightly later (only after the click). If the embed is required to understand the page, click-to-load can feel annoying. Use it where it improves outcomes: faster first impression, smoother scrolling, and fewer initial requests.
Create the click-to-load iframe Embed element in Webflow Designer
This section walks you through the exact Webflow Designer steps. The key principle: the iframe must not have a real URL in src on initial load, otherwise the browser will load it immediately.
Add the Webflow Embed element and reserve space
- Open your project in Webflow Designer
- Open the Add panel
- Drag an Embed element into your layout where the embed should appear
- Select the Embed element and give it a class in the Selector field (example: click-to-load-embed)
- In the Style panel, set a fixed height that matches your intended embed height (example: 700px for Calendly, 450px for a map)
Setting a real height here prevents Cumulative Layout Shift. If you skip this, the placeholder and iframe can collapse to zero height or "jump" when loaded.
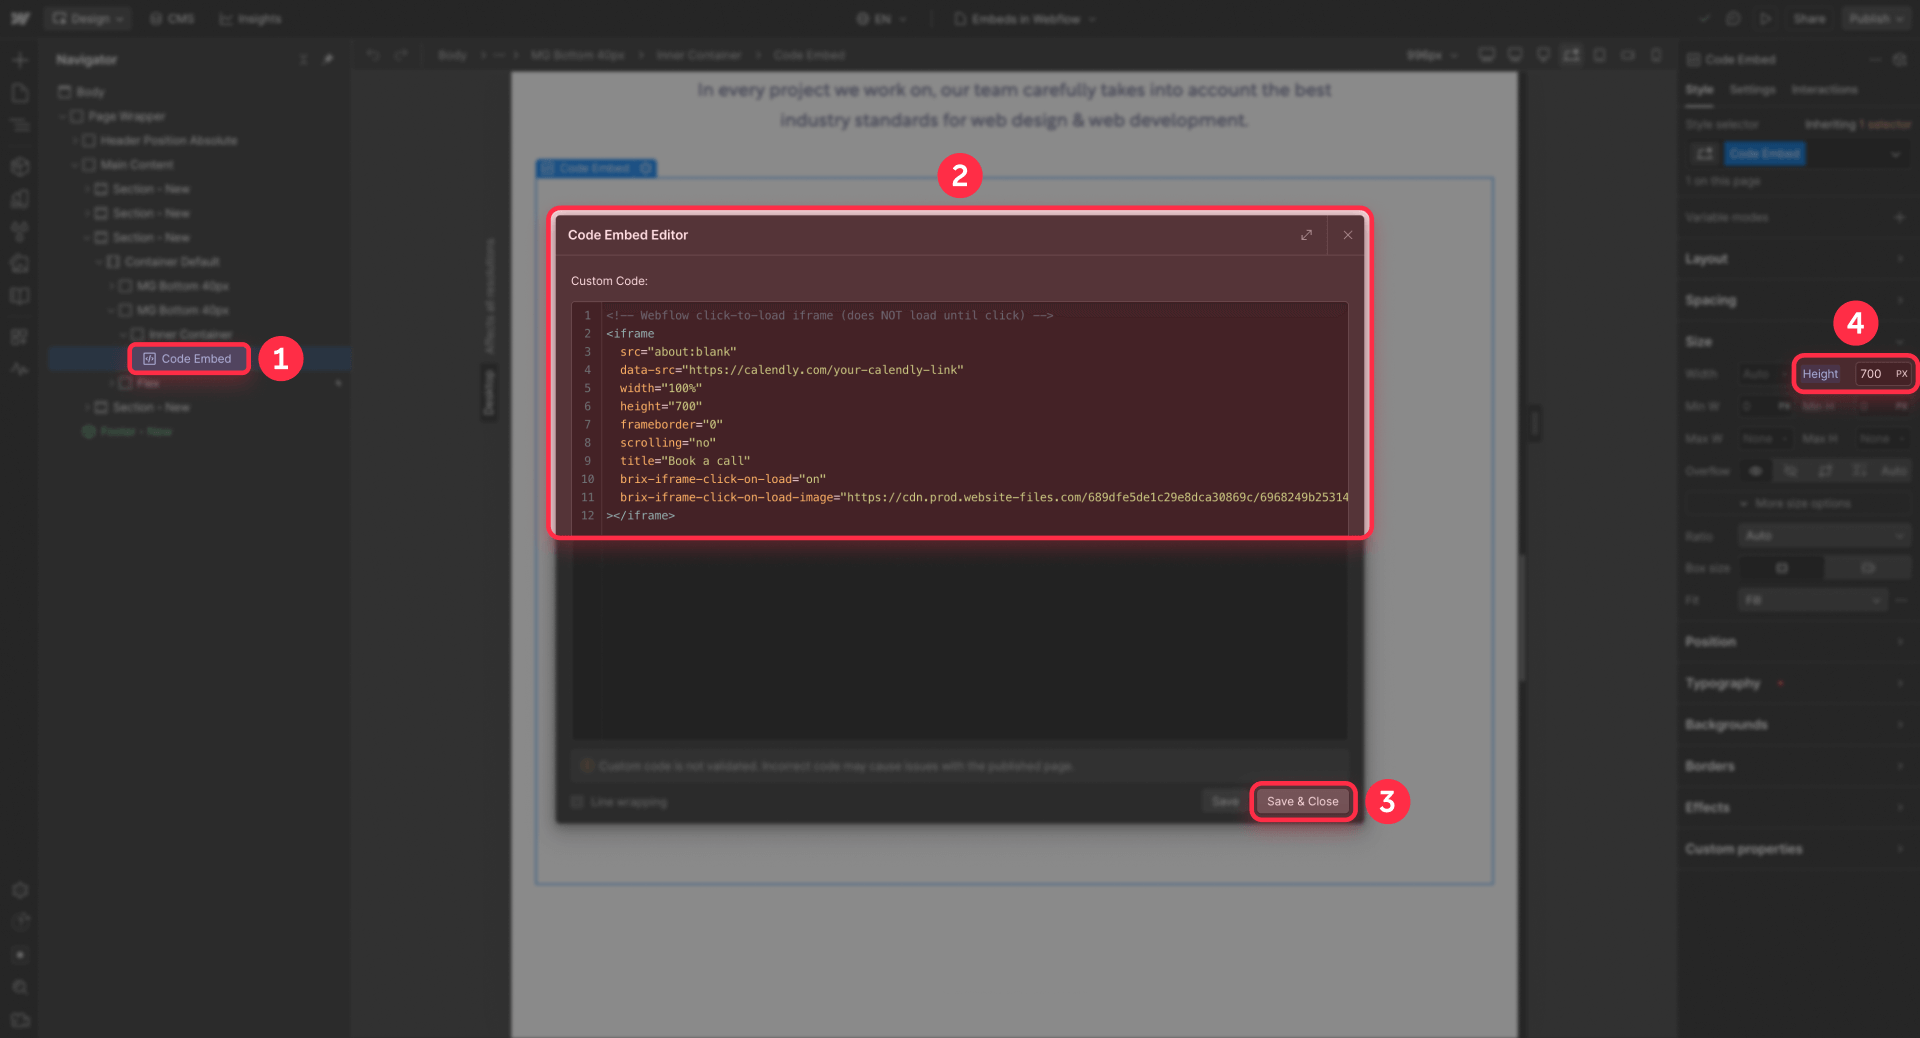
Paste an iframe that will not load until click in Webflow
- Click the Embed element
- Click Edit custom code
- Paste an iframe that uses src="about:blank" and stores the real URL in data-src
- Click Save & close
Here's a working starter snippet you can adapt (replace the data-src URL with your real embed URL):
<!-- Webflow click-to-load iframe (does NOT load until click) -->
<iframe
  src="about:blank"
  data-src="https://calendly.com/your-calendly-link"
  width="100%"
  height="700"
  frameborder="0"
  scrolling="no"
  title="Book a call"
  brix-iframe-click-on-load="on"
  brix-iframe-click-on-load-image="YOUR_WEBFLOW_ASSET_PLACEHOLDER_IMAGE_URL"
></iframe>
This guide covers iframe embeds only—if your provider doesn't offer an iframe option, you'll need a different implementation.
Add the two required BRIX iframe attributes in Webflow
You already saw them in the snippet above. For this tutorial, they must be placed exactly on the iframe tag:
- brix-iframe-click-on-load="on": Marks the iframe so the helper script can detect and apply click-to-load.
- brix-iframe-click-on-load-image="URL": Provides the placeholder image URL used by the helper script. Upload a placeholder image to Webflow Assets and paste that Asset URL here.
Both must appear on the iframe tag, not on the Embed wrapper or a parent element. If you skip them or move them, the helper script won't activate.
Example of correctly applied BRIX attributes in Webflow
Here's how a fully attributed iframe looks inside your Embed HTML:
<iframe
  src="about:blank"
  data-src="https://calendly.com/your-calendly-link"
  width="100%"
  height="700"
  frameborder="0"
  scrolling="no"
  brix-iframe-click-on-load="on"
  brix-iframe-click-on-load-image="YOUR_WEBFLOW_ASSET_PLACEHOLDER_IMAGE_URL"
></iframe>
When this publishes, the helper script (described next) scans for brix-iframe-click-on-load="on", wraps the iframe in a clickable placeholder, and swaps src from about:blank to the real URL when the user clicks. This single change stops the iframe from loading until requested.
Add the click-to-load helper script in Webflow custom code
The helper script is what makes the pattern functional. It finds the BRIX-enabled iframes and creates placeholders dynamically.
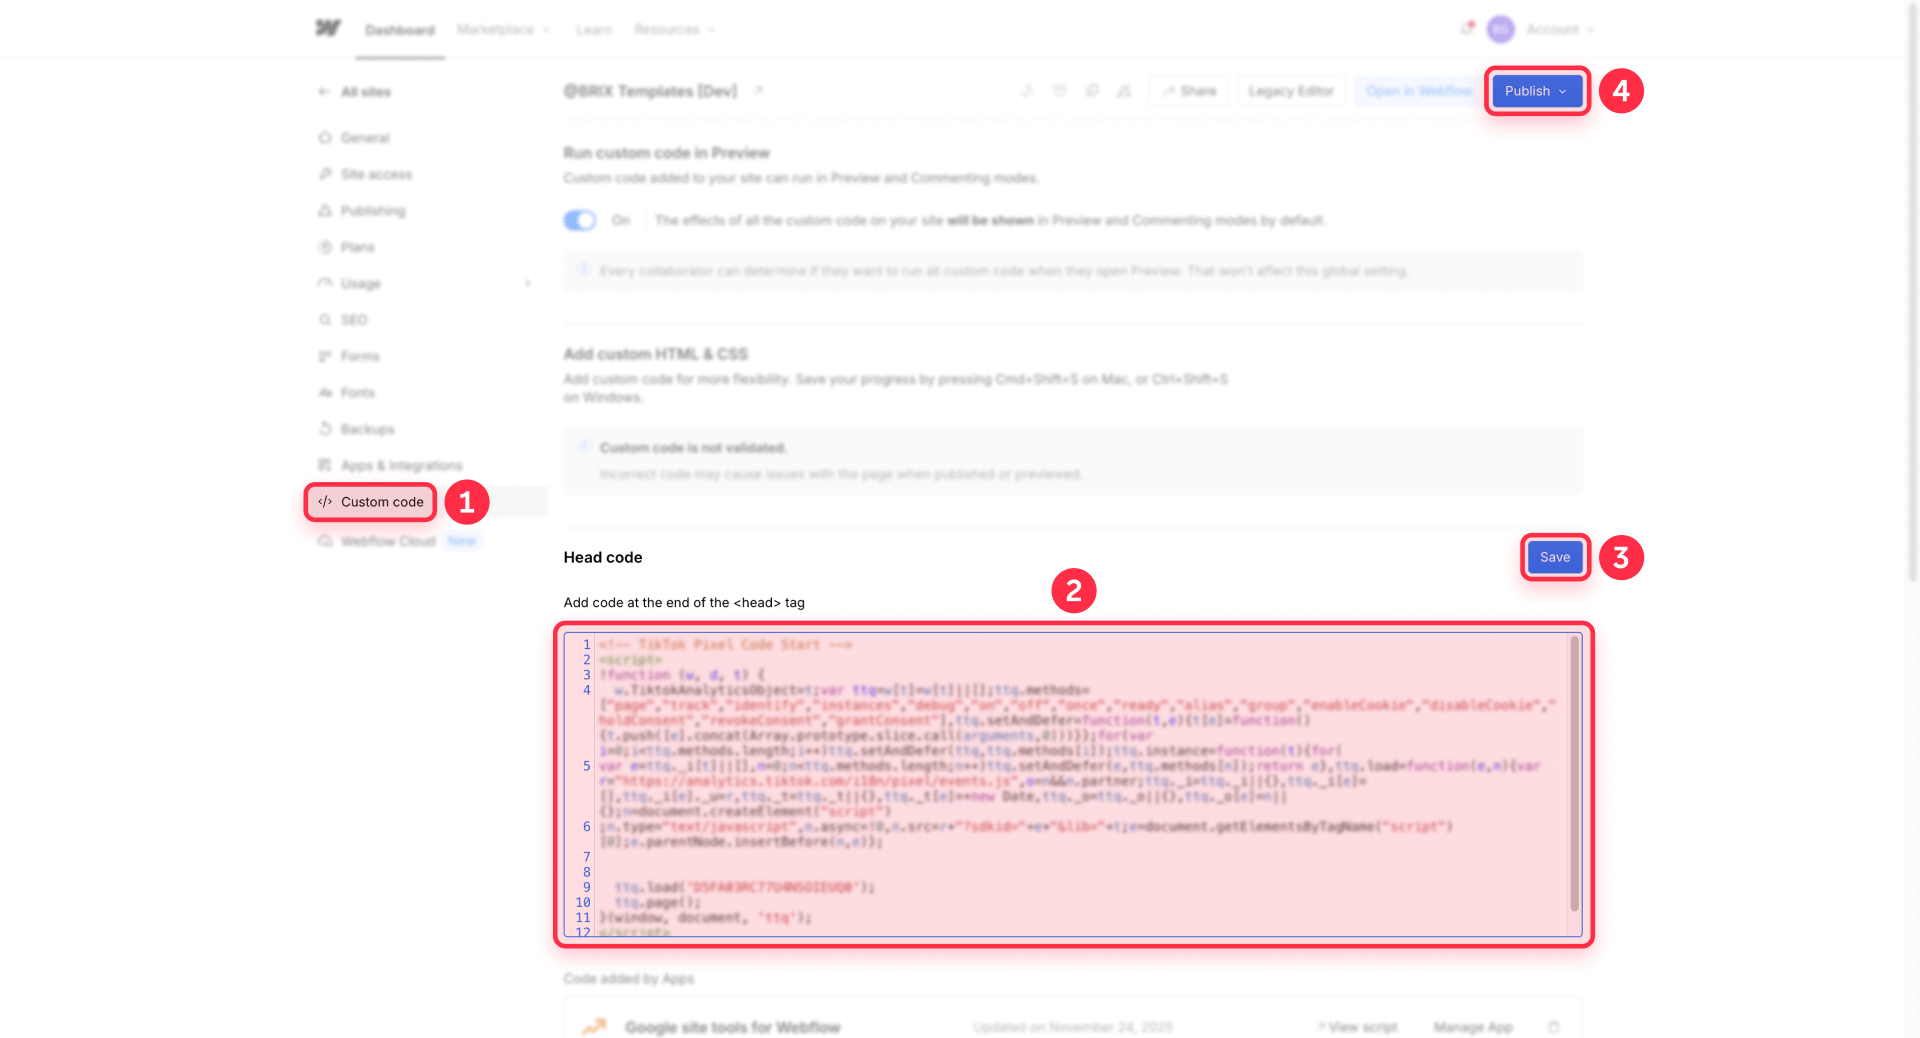
Where to add the script in Webflow
In Webflow Designer:
- Go to Project Settings → Custom Code
- Find the Footer Code section
- Paste the full script below
- Publish
Placing it in Footer Code ensures the script runs after the page content is present. This guarantees the iframe elements are in the DOM when the script executes.
The complete click-to-load helper script for Webflow
<script>
/*!
 * BRIX Templates Click-to-Load Iframes for Webflow
 * ----------------------------------------------------------------------------
 * Replaces heavy third-party iframe embeds with lightweight placeholders.
 * Loads the real iframe only after user interaction.
 *
 * Usage: brix-iframe-click-on-load="on" brix-iframe-click-on-load-image="..."
 * Author: BRIX Templates
 */
(function () {
  function init() {
    var iframes = document.querySelectorAll('iframe[brix-iframe-click-on-load="on"]');
    if (!iframes.length) return;

    iframes.forEach(function (iframe) {
      var placeholderUrl = iframe.getAttribute('brix-iframe-click-on-load-image') || '';
      var realSrc = iframe.getAttribute('data-src') || '';
      var currentSrc = iframe.getAttribute('src') || '';

      // Enforce correct setup:
      // If the iframe ships with a real src, the browser may already have requested it.
      // Don't pretend we can "fix" that after the fact—warn and exit.
      if (!realSrc && currentSrc && currentSrc !== 'about:blank') {
        console.warn('[Click-to-load] This iframe has a real src. Move it to data-src and use src="about:blank" for true click-to-load.', iframe);
        return;
      }

      if (!realSrc) return;

      // Hide iframe until activation
      iframe.style.display = 'none';

      // Create facade wrapper
      var wrapper = document.createElement('div');
      wrapper.style.position = 'relative';
      wrapper.style.width = '100%';
      wrapper.style.overflow = 'hidden';
      wrapper.style.cursor = 'pointer';
      wrapper.style.backgroundPosition = 'center';
      wrapper.style.backgroundSize = 'cover';
      wrapper.style.backgroundRepeat = 'no-repeat';

      // Robust height handling
      var h = iframe.getAttribute('height');
      if (h && String(h).trim() !== '') {
        wrapper.style.height = /^\d+$/.test(h) ? (h + 'px') : h;
      } else {
        wrapper.style.height = '100%';
        wrapper.style.minHeight = '240px';
      }

      if (placeholderUrl) {
        wrapper.style.backgroundImage = 'url("' + placeholderUrl + '")';
      } else {
        wrapper.style.background = '#f2f2f2';
      }

      // Button for accessibility + intent
      var button = document.createElement('button');
      button.type = 'button';
      button.setAttribute('aria-label', 'Load embed');
      button.textContent = 'Click to load';
      button.style.position = 'absolute';
      button.style.left = '50%';
      button.style.top = '50%';
      button.style.transform = 'translate(-50%, -50%)';
      button.style.padding = '12px 16px';
      button.style.border = '0';
      button.style.borderRadius = '8px';
      button.style.fontSize = '16px';
      button.style.lineHeight = '1';
      button.style.cursor = 'pointer';

      wrapper.appendChild(button);

      // Insert wrapper before iframe, then move iframe inside wrapper
      var parent = iframe.parentNode;
      parent.insertBefore(wrapper, iframe);
      wrapper.appendChild(iframe);

      function activate() {
        iframe.setAttribute('src', realSrc);
        iframe.style.display = 'block';
        wrapper.style.backgroundImage = 'none';
        button.remove();
        wrapper.style.cursor = 'default';
      }

      button.addEventListener('click', function (e) {
        e.preventDefault();
        activate();
      });

      // Optional: click background to load too
      wrapper.addEventListener('click', function (e) {
        if (e.target === wrapper) activate();
      });
    });
  }
  if (document.readyState === 'loading') {
    document.addEventListener('DOMContentLoaded', init);
  } else {
    init();
  }
})();
</script>
This script uses plain JavaScript and does not rely on jQuery. It finds each iframe with the BRIX attribute, wraps it with a styled placeholder, and swaps src on click.
Verify click-to-load works in Chrome DevTools after publishing
After publishing your Webflow site with the click-to-load iframe, use Chrome DevTools to confirm the pattern is working correctly. This verification step is critical because incorrect configurations often fail silently, and you'll only discover the problem by checking Network activity and element attributes.
How to open DevTools and prepare for testing in Webflow
- Open your published Webflow page in Google Chrome (or Webflow Preview with "Enable custom code" toggled on).
- Right-click anywhere on the page and select Inspect (or use Ctrl+Shift+I / Cmd+Option+I).
- Click the Network tab in DevTools.
- Enable Preserve log by checking the box near the top of the Network panel (this keeps all requests visible even if the page reloads).
- Perform a hard reload: Ctrl+Shift+R (Windows/Linux) or Cmd+Shift+R (Mac). This clears the cache and forces the browser to fetch everything fresh.
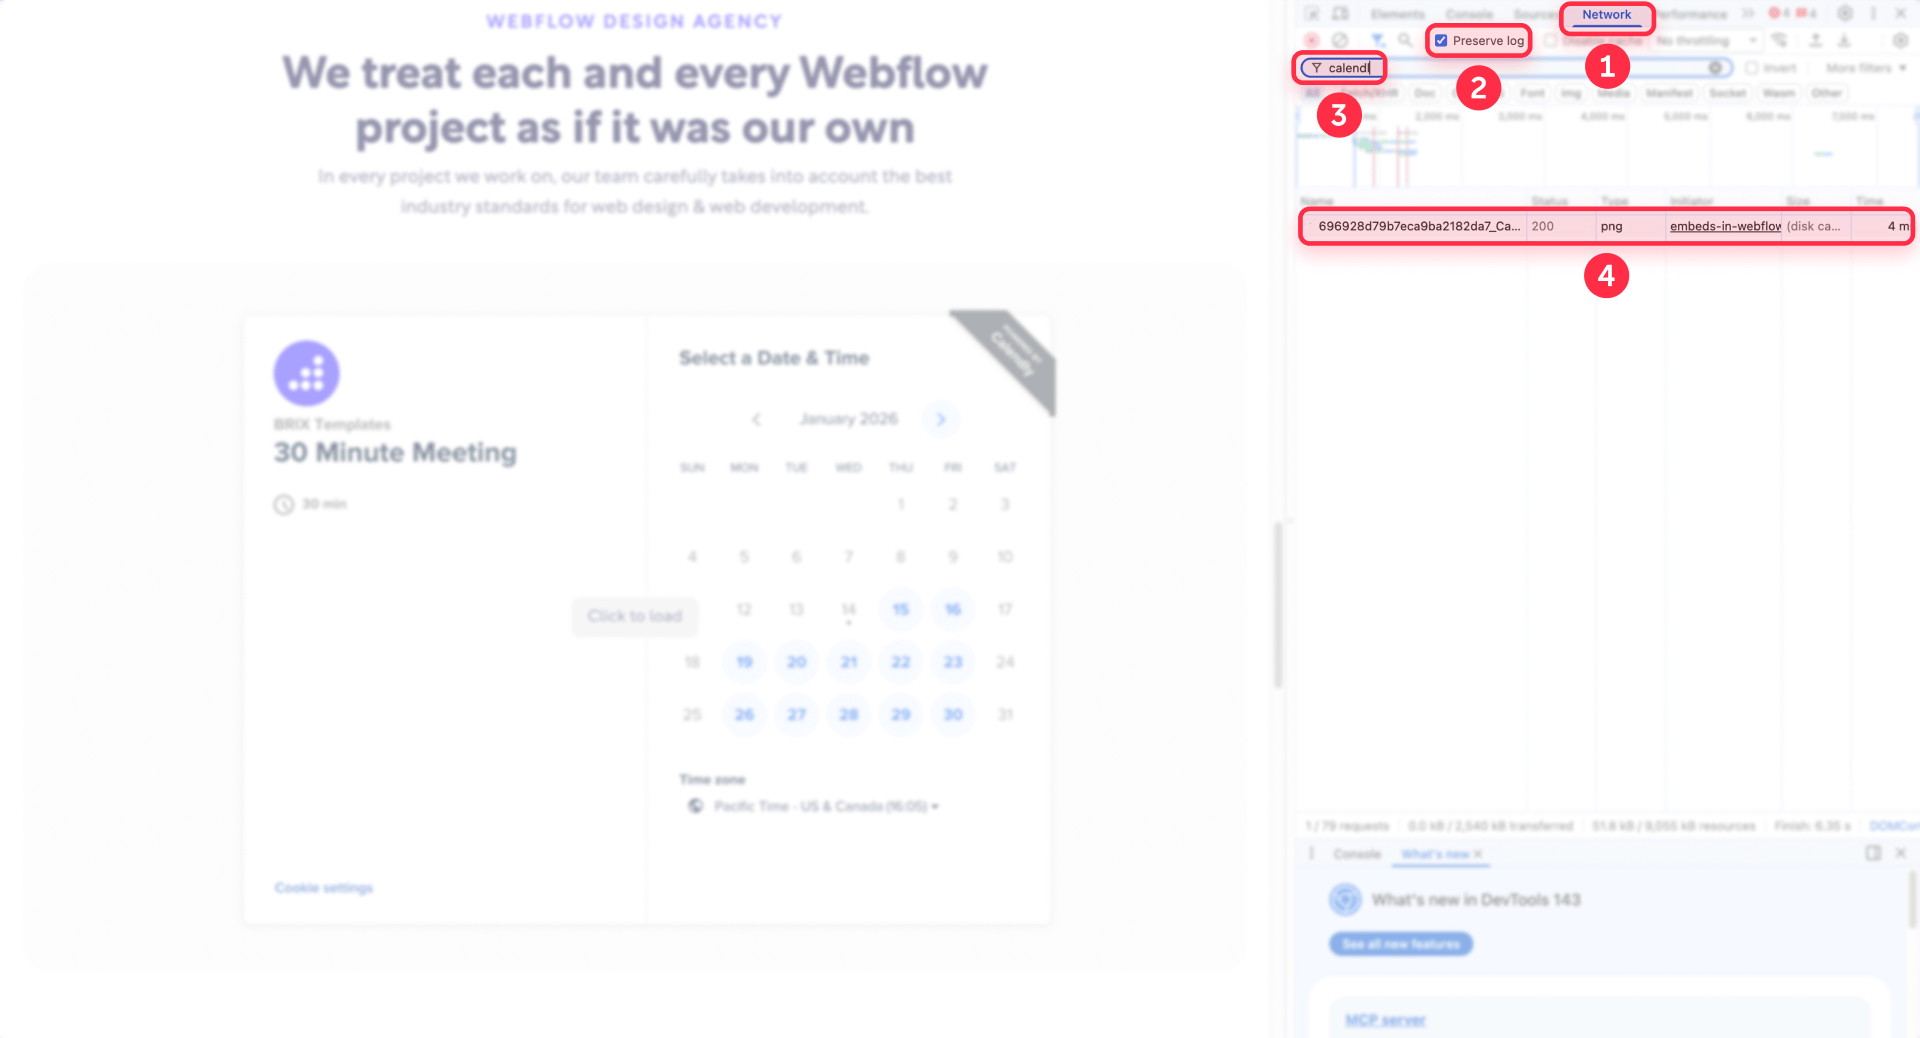
Verify the iframe is not loading on initial page load
After the hard reload, look at the Network panel and filter requests by the third-party provider's domain (e.g., calendly.com, google.com/maps, youtube.com, vimeo.com). If click-to-load is working correctly, you should not see requests to these domains before you interact with the placeholder.
If you immediately see provider requests appearing, the iframe is loading prematurely. Common causes:
- The iframe still has a real URL in src instead of about:blank.
- The helper script is not executing (check Console tab for JavaScript errors).
- BRIX attributes were placed on the wrong element.
Fix these issues before moving to the next step.
Check the iframe element attributes before clicking
In DevTools, switch to the Elements tab. Find your iframe (you can right-click the placeholder on the page and select Inspect). Confirm:
- The src attribute is about:blank (not the real URL).
- The data-src attribute contains the real embed URL.
- Both BRIX attributes (brix-iframe-click-on-load="on" and brix-iframe-click-on-load-image) are present directly on the iframe tag.
If any of these are missing or incorrect, return to Webflow Designer, correct the Embed HTML, and republish.
Confirm the iframe loads after clicking the placeholder
With Network still open and Preserve log enabled, click the placeholder. You should immediately see new requests to the provider domain appearing in the Network panel. Switch back to Elements and inspect the iframe element again—the src attribute should now contain the real embed URL (matching what was in data-src).
If clicking does nothing:
- Check the Console tab for JavaScript errors.
- Confirm the helper script is in Footer Code and saved correctly.
- Verify the wrapper element (created by the script) is actually present in the DOM and clickable (not obscured by other overlays or z-index issues).
Verify placeholder image is rendering in Webflow
Look at the placeholder before clicking. If you specified a brix-iframe-click-on-load-image, you should see that image as the background. If the placeholder is blank or shows a broken image icon, open the image URL directly in the browser to verify it's accessible.
Common fixes:
- Use an HTTPS image URL (mixed content can fail on secure pages).
- Upload the placeholder to Webflow Assets and use that URL for reliability.
- Check that the placeholder image isn't blocked by hotlinking restrictions.
If the placeholder renders correctly and the iframe loads only after click, click-to-load is working as designed.
Scale click-to-load embeds across your Webflow site
Once the pattern works for one iframe, you can scale it across your entire site.
Apply click-to-load to multiple embeds in Webflow Designer
Use the same Embed element setup for each heavy iframe:
- Set src="about:blank" and data-src with the real URL.
- Add the BRIX attributes (brix-iframe-click-on-load="on" and brix-iframe-click-on-load-image).
- Reserve the expected height on the Embed element in the Style panel.
Because the helper script scans for brix-iframe-click-on-load="on" globally, you don't need to duplicate script logic. Add the attributes once, and the script handles the rest automatically.
Scale click-to-load across CMS lists in Webflow
For CMS-driven pages with many embeds, click-to-load is often better than lazy-loading because you might have many embeds near the top (maps, directories, "locations" lists). Keep placeholder images lightweight and preferably hosted in Webflow Assets to avoid broken hotlinks. Use one global helper script (Section "Add the click-to-load helper script in Webflow custom code") so each new CMS item automatically gets the behavior.
Troubleshooting click-to-load embeds in Webflow
- Iframe still loads immediately in Webflow: Confirm the BRIX attributes are on the iframe tag, not on the Embed wrapper or a parent div. Confirm the iframe src is about:blank on initial load and the real URL is in data-src. If the iframe has a real src in the initial HTML (not about:blank), the browser may request it immediately—before the script can intervene. Fix the markup first. Verify fix: hard reload in Network tab and confirm no provider requests until click.
- Placeholder image not showing in Webflow: Open the image URL directly in the browser. If it 404s, blocks hotlinking, or redirects strangely, it won't render as a background image. Ensure the URL is HTTPS (mixed content can break in secure pages). Best fix: upload the image to Webflow Assets and use that URL in brix-iframe-click-on-load-image. Verify fix: reload the page and confirm the placeholder renders before clicking.
- Conflicts with other scripts in Webflow: Temporarily disable other custom scripts (GSAP, analytics, chat widgets) to isolate the conflict. Make sure you didn't import another version of jQuery—Webflow sites include jQuery by default, and importing a different version may cause conflicts and unexpected behavior. If Asynchronously load JavaScript is enabled in Advanced publishing options, it may change script timing and cause unexpected behavior with custom scripts. If issues occur, test with the toggle disabled. Verify fix: check the Console tab for errors, then re-test in Network.
Frequently asked questions about click-to-load embeds in Webflow
What is click-to-load for heavy embeds in Webflow?
Click-to-load is a pattern where a Webflow page shows a lightweight placeholder first, and only loads the real embed after the user clicks. Set the iframe src to about:blank, store the real URL in data-src, and use a script to swap the URL on click. Best for above-the-fold embeds you don't need to render immediately.
Why do iframe embeds slow down Webflow pages on initial page load?
An iframe is a separate document that can load its own scripts, styles, fonts, and requests. When Webflow renders your page, the browser immediately starts fetching the iframe source and its dependencies, increasing blocking time and creating a huge Network waterfall. Using click-to-load can reduce those early requests for non-essential embeds.
What's the difference between click-to-load and loading="lazy" for iframes in Webflow?
Lazy-loading delays an iframe until it's near the viewport, while click-to-load delays the iframe until the user explicitly interacts. Click-to-load is better for above-the-fold embeds or when you want maximum control over initial performance. For below-the-fold embeds, try loading="lazy" first.
When should I use click-to-load instead of lazy-loading in Webflow?
Use click-to-load when you want to guarantee an embed does not load until requested—especially for above-the-fold calendars, maps, or videos that aren't essential to see immediately. It's also strong for pages with multiple embeds, because even lazy-loading can trigger early loads if embeds are near the viewport. Start with your heaviest single embed first.
How do I load an iframe only after a user click in Webflow?
Set src to about:blank, store the real URL in data-src, and use a click handler to swap src from data-src after the user clicks. The helper script shown in this tutorial automatically creates a placeholder and performs the swap. Keep the script in Footer Code for consistent behavior.
Where exactly do I put brix-iframe-click-on-load="on" in Webflow?
Place brix-iframe-click-on-load="on" directly on the iframe tag inside your Embed element's HTML, not on the Embed wrapper or parent. After publishing, inspect in DevTools to confirm the attribute is on the iframe itself and that src is about:blank before clicking.
How do I set brix-iframe-click-on-load-image in Webflow?
Add brix-iframe-click-on-load-image="YOUR_IMAGE_URL" on the iframe tag with a real, públicamente accesible image URL. Upload a compressed placeholder to Webflow Assets for reliability, and set a fixed height on the Embed element to prevent layout shift.
Why is my iframe still loading immediately even with brix-iframe-click-on-load="on" in Webflow?
The iframe likely has a real URL in src instead of about:blank, or the BRIX attributes are on the wrong element. Ensure src is about:blank and the real URL is in data-src. Verify in Network that no provider requests fire until click.
How do I verify click-to-load works using Chrome DevTools in Webflow?
Use DevTools → Network with Preserve log enabled. Hard reload and filter for the embed provider domain. You should not see provider requests before interaction. After clicking, requests should start immediately and the iframe src should change from about:blank to the real URL.
Can click-to-load iframes affect SEO in Webflow?
Yes—click-to-load delays embed content until user interaction, and crawlers may not execute that interaction. If the embed contains important indexable content, gating it can reduce what search engines see. Keep critical content as native Webflow text and treat embeds as enhancements. For purely functional embeds (booking, map, video), click-to-load is usually fine.
Conclusion
Click-to-load is one of the most practical ways to protect Webflow performance when you can't avoid heavy third-party embeds. You reduce initial network requests, keep the page responsive, and give users a clear, intentional interaction before loading expensive widgets.
Next steps: apply the pattern to your heaviest iframe embed first, then expand to multi-embed pages, modals, and CMS-driven lists. If you want a reusable, scalable solution across a large Webflow build, an experienced team can help you implement it cleanly and consistently. If you'd like hands-on assistance, our agency can help with Webflow performance optimization.


Join readers commenting on this post!