Running TikTok ads to a Webflow site without proper pixel tracking means you're buying traffic blind. The typical failure happens when Pixel Helper detects something but Test Events stays empty, events show as inactive, or purchases never appear in your dashboard.
TikTok Pixel tracking requires a connection between TikTok Events Manager and your Webflow site's custom code. This guide walks you through creating the pixel in TikTok, installing it correctly in Webflow using either manual code or Google Tag Manager (GTM), verifying the installation with TikTok's diagnostic tools, and implementing conversion events that survive modern tracking limitations. You'll learn exactly where to paste code, how to verify properly, and how to fix the most common pixel issues on Webflow sites.
Why TikTok Pixel matters for Webflow sites
Proper TikTok Pixel implementation transforms ad campaigns from guesswork into measurable performance.
- Conversion optimization in Webflow: Optimize TikTok campaigns for real actions like form submissions or purchases instead of just clicks, allowing the algorithm to find users who actually convert on your Webflow site.
- Retargeting audiences from Webflow site behavior: Build custom audiences from specific site actions such as visitors who viewed a product page but didn't add to cart, enabling precise remarketing without wasting ad spend on cold traffic.
- Diagnostics-driven fixes for Webflow tracking: TikTok surfaces specific issues like missing parameters or cookie problems through Events Manager diagnostics, so you can fix tracking before spending money on broken campaigns.
- Full-funnel measurement on Webflow sites: Track the complete customer journey from ViewContent to AddToCart to Purchase and identify exactly where Webflow visitors drop off, informing site optimization decisions.
- Faster creative iteration with clean Webflow data: When event data is accurate and complete, TikTok's learning phase completes faster and creative testing becomes meaningful rather than random.
- Upgrade path for Webflow sites facing tracking limits: Pixel-only data can be incomplete under consent and browser restrictions, so TikTok recommends pairing the Pixel with Events API as a secondary data channel for improved attribution.
Requirements for TikTok Pixel tracking in Webflow
Before installing TikTok Pixel on your Webflow site, verify you have the necessary access and understand code placement rules.
Prerequisites checklist for TikTok Pixel in Webflow
- Access to TikTok Ads Manager account that owns the pixel
- Ability to open Tools → Events Manager in TikTok
- Webflow access to Project Settings → Custom Code for site-wide injection
- Ability to Publish the Webflow site (custom code won't be live until publish)
- A paid Webflow Site plan that unlocks custom code capability
- A GTM account and container if using the GTM method
Webflow code placement rules for TikTok Pixel
Understanding Webflow's custom code limitations prevents common installation mistakes.
Don't paste HTML structure tags like <html>, <head>, or <body> into Webflow custom code fields, as this can break your site layout. Site-wide code belongs in Head code or Footer code in Project Settings, while page-specific code lives in Page settings → Custom code. Webflow custom code fields have a 50,000 character limit per section. If you're verifying in Designer preview, toggle Enable custom code in the bottom-left corner, though it runs on a canvas subdomain rather than your live domain.
1. Create the TikTok Pixel in Webflow using TikTok Events Manager
TikTok's current setup flow requires creating a Web data connection in Events Manager before you can install any code.
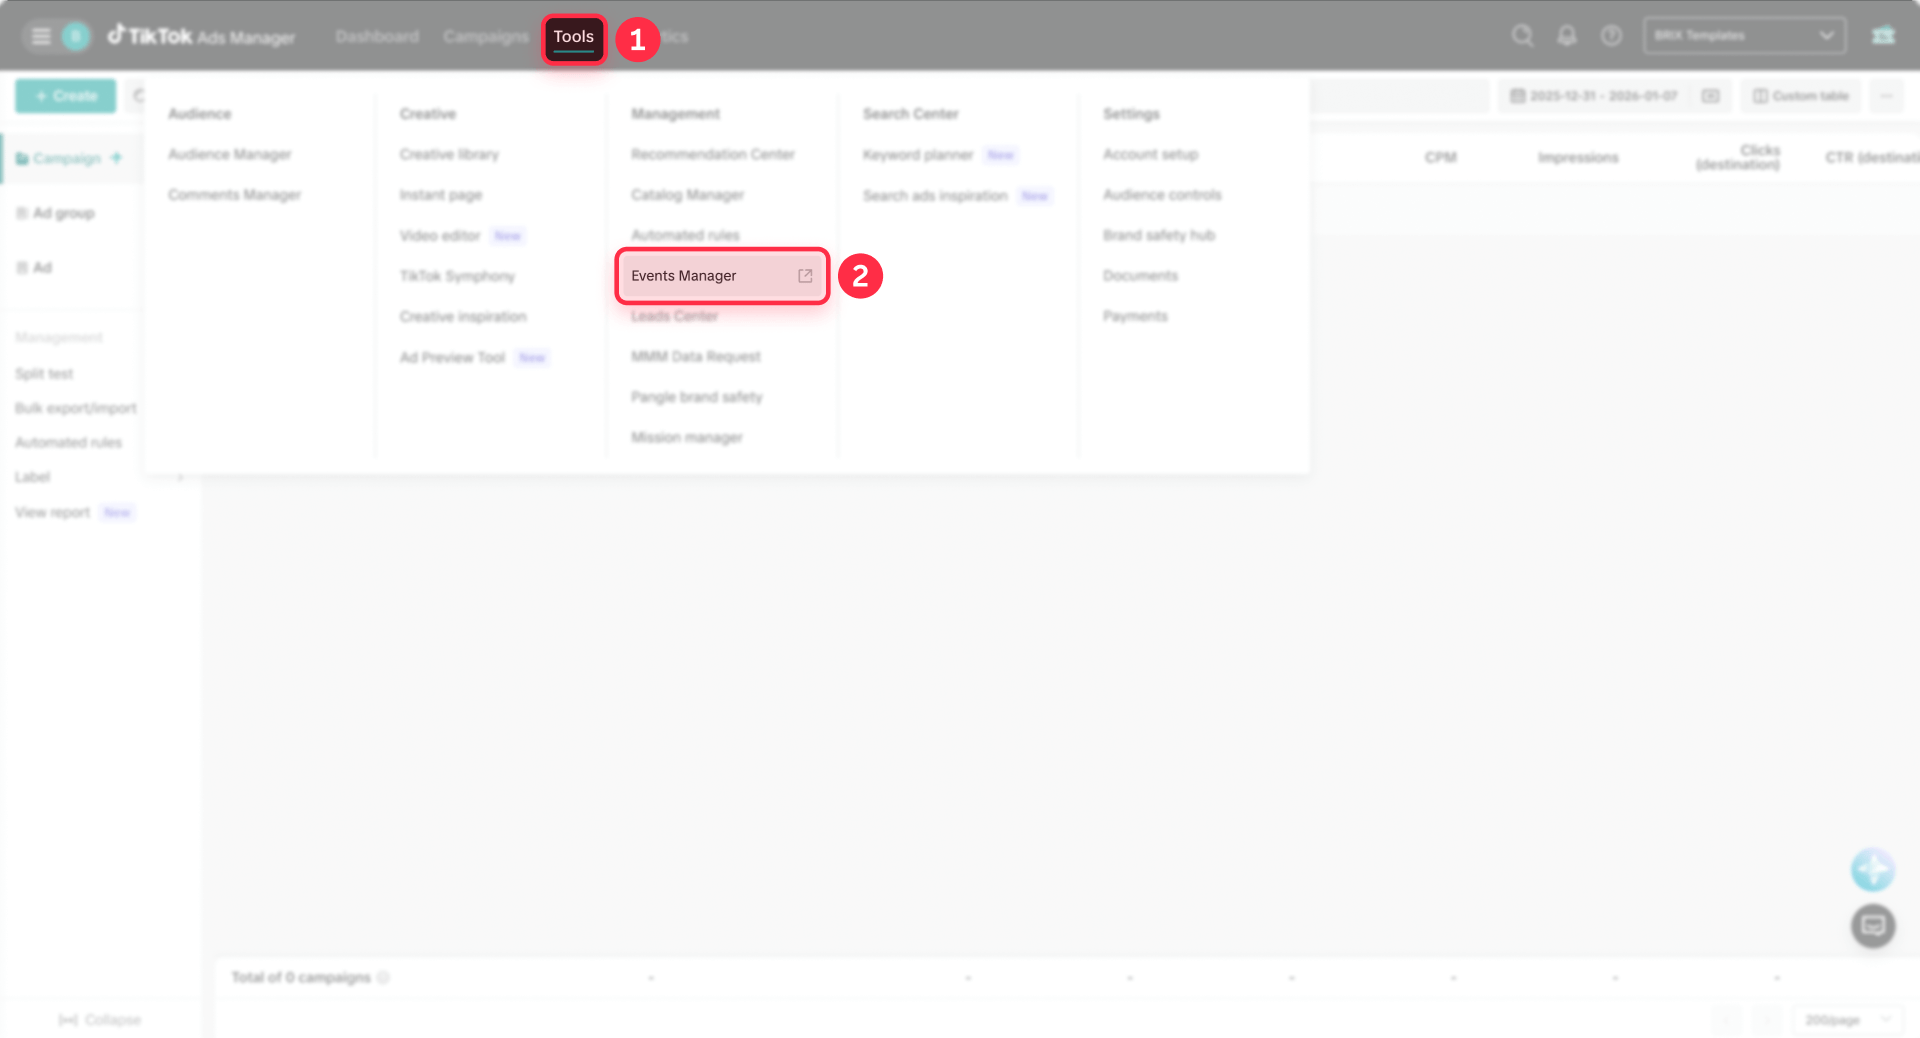
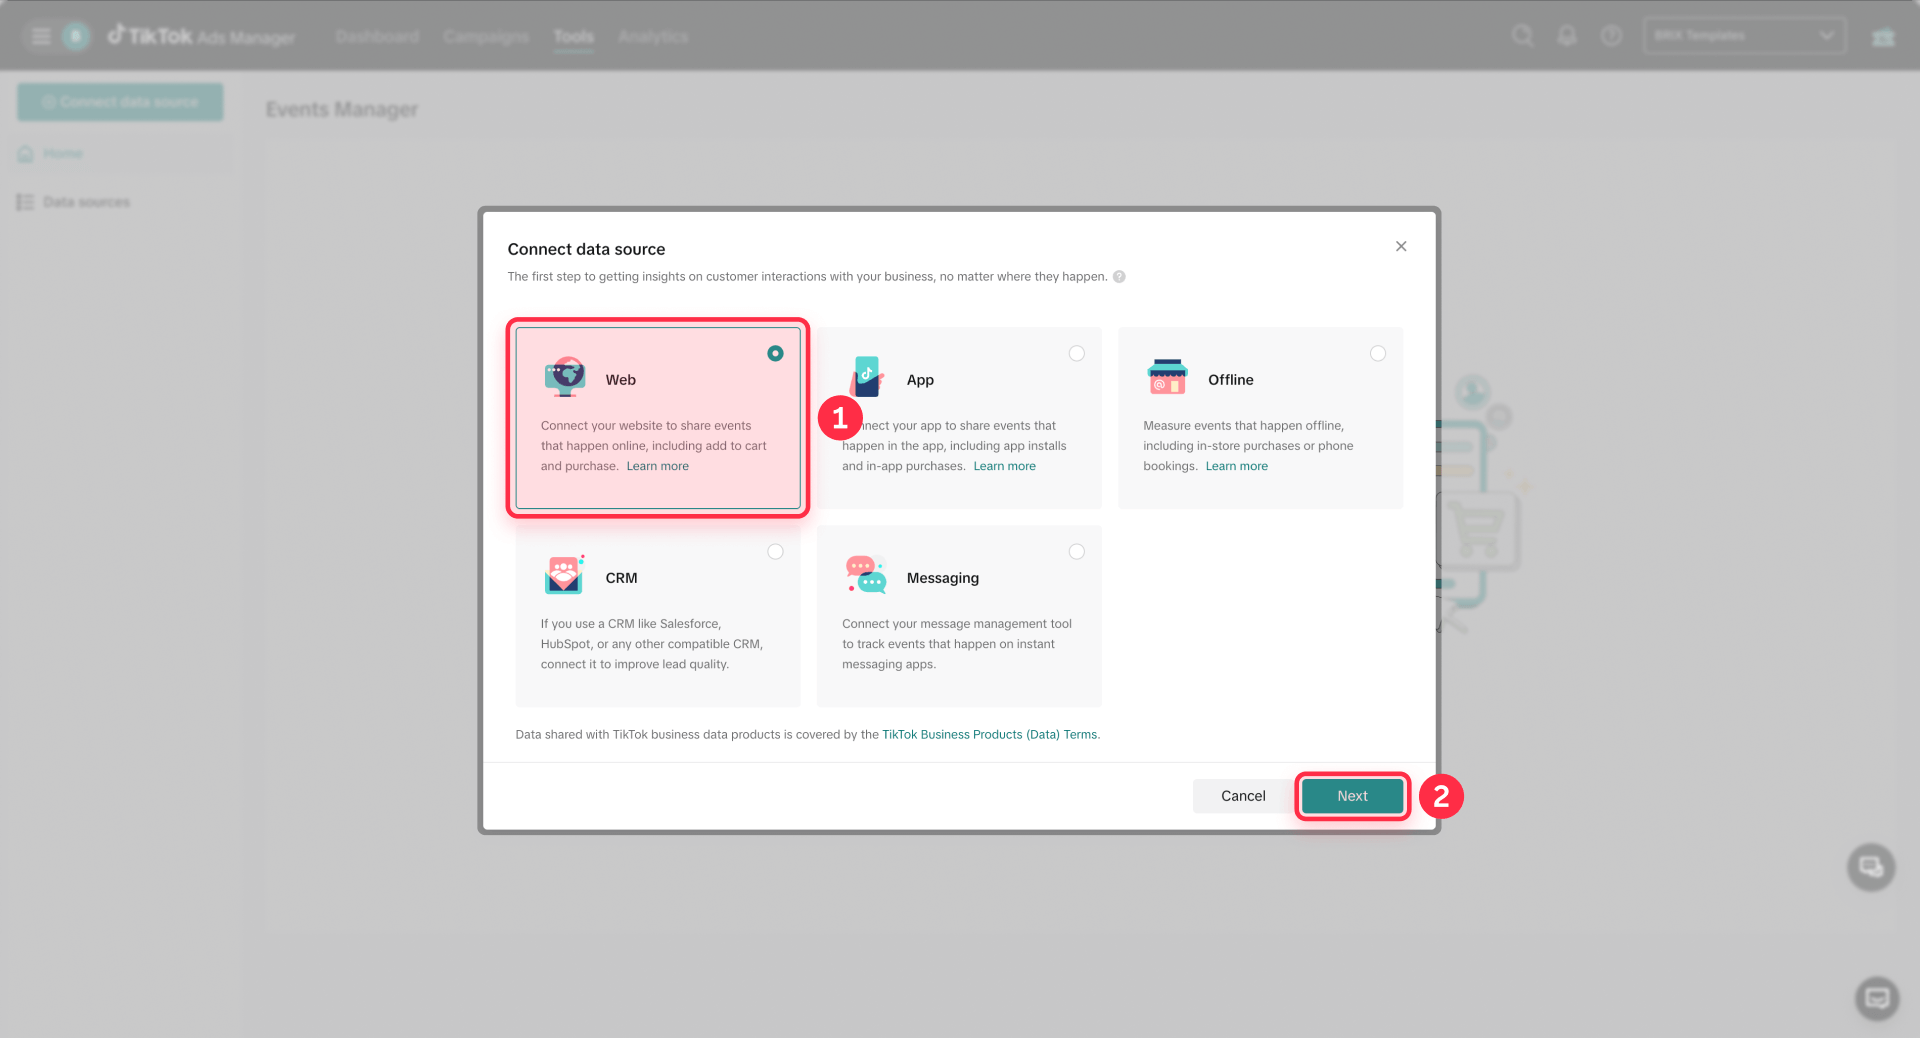
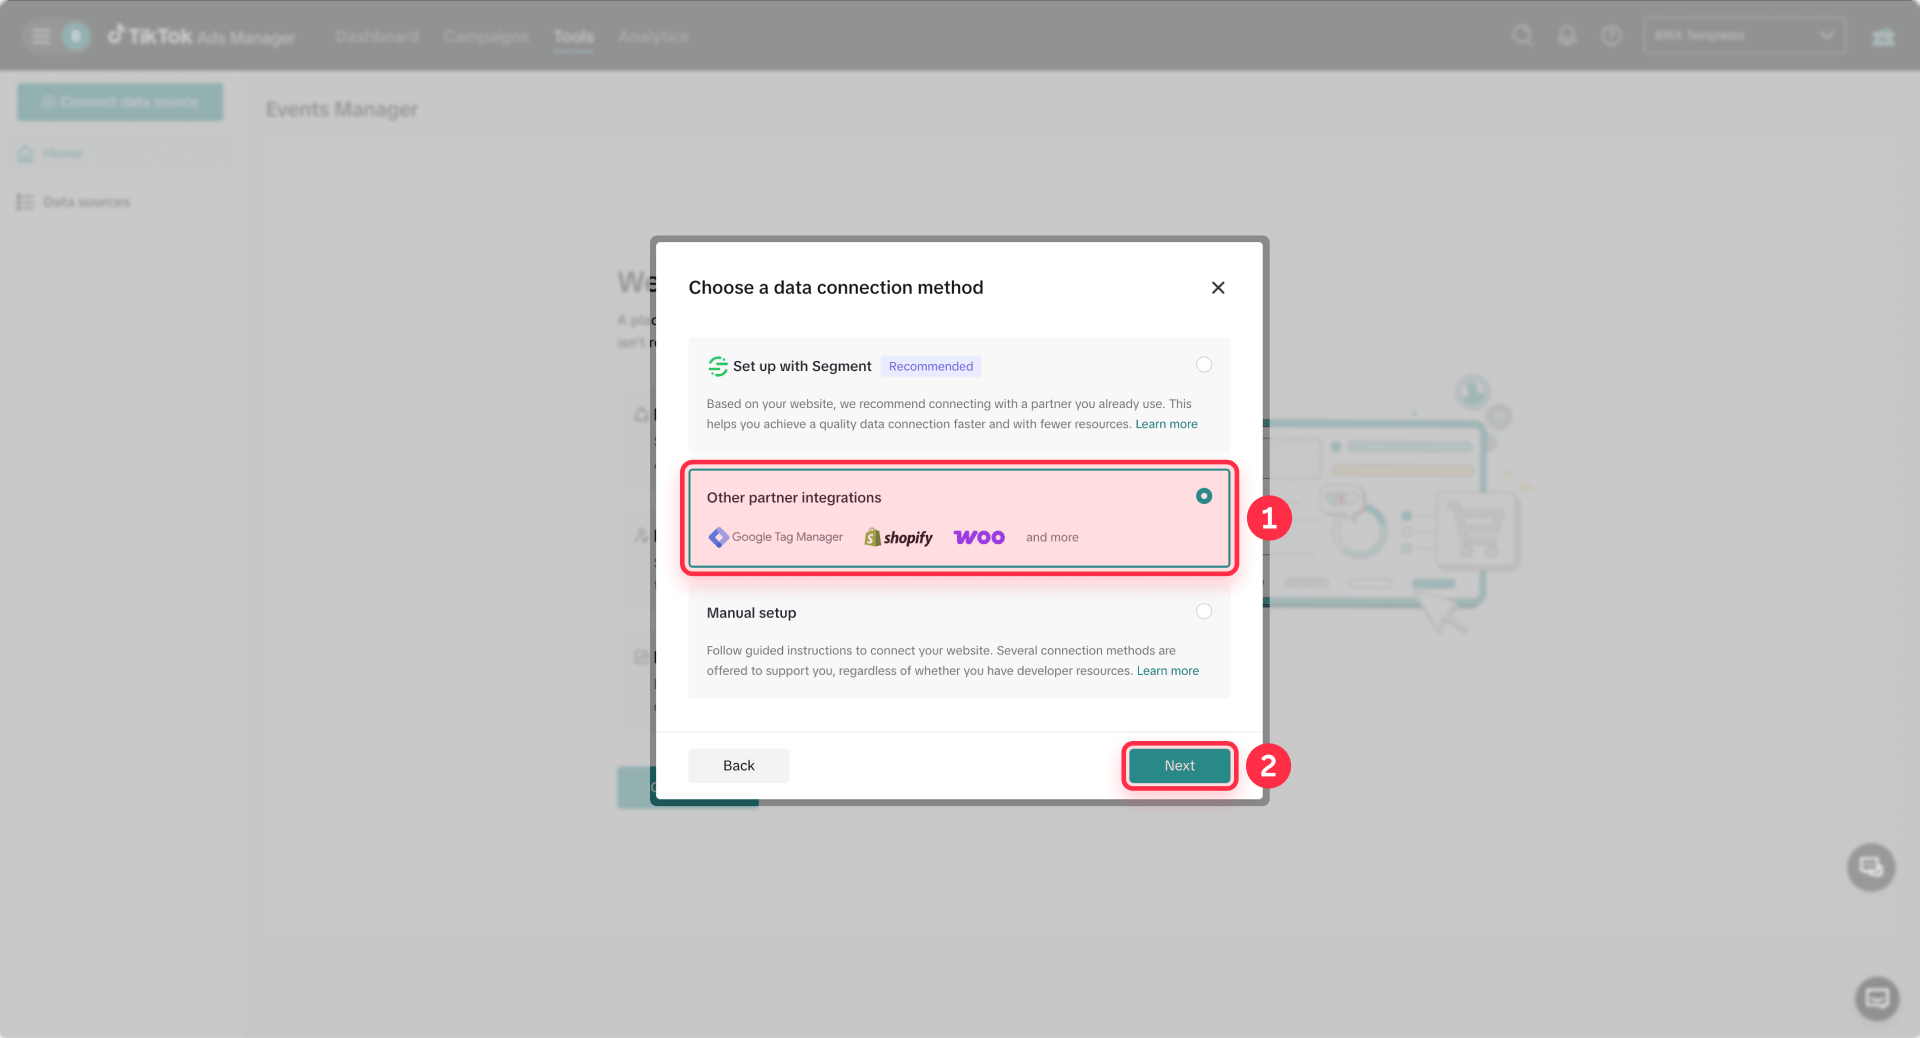
Start by logging into TikTok Ads Manager and navigating to Tools → Events Manager. Click Connect Data Source, select Web as your data source type, and enter your Webflow website URL when prompted. You'll see two setup options: Partner Integration or Manual Setup. Choose based on whether you'll use GTM or manual code installation.
When prompted to name your pixel, create a descriptive name tied to your domain or site. TikTok allows up to 128 characters for pixel names, so use something clear that prevents confusion if you manage multiple sites.
TikTok's interface notes you can create additional data connections by clicking Connect data source from the top-right corner, though you can only connect one data source at a time during the setup flow.
2. Install TikTok Pixel in Webflow
You have two installation paths for TikTok Pixel on Webflow sites. Choose based on your current tracking setup and long-term management needs.
Important: Choose one install path (manual install or GTM). Don't double-install—otherwise you'll duplicate events.
Recommended: TikTok Pixel in Webflow using GTM
Use GTM if you already run multiple marketing tags, need consent-based firing, or want clean governance without cluttering Webflow settings.
First, install GTM on your Webflow site. Navigate to Project Settings → Custom Code in Webflow. Paste the first GTM snippet into Head code and the second GTM snippet into Footer code. Click Save changes and Publish your site. Verify GTM loads correctly before proceeding with TikTok configuration.
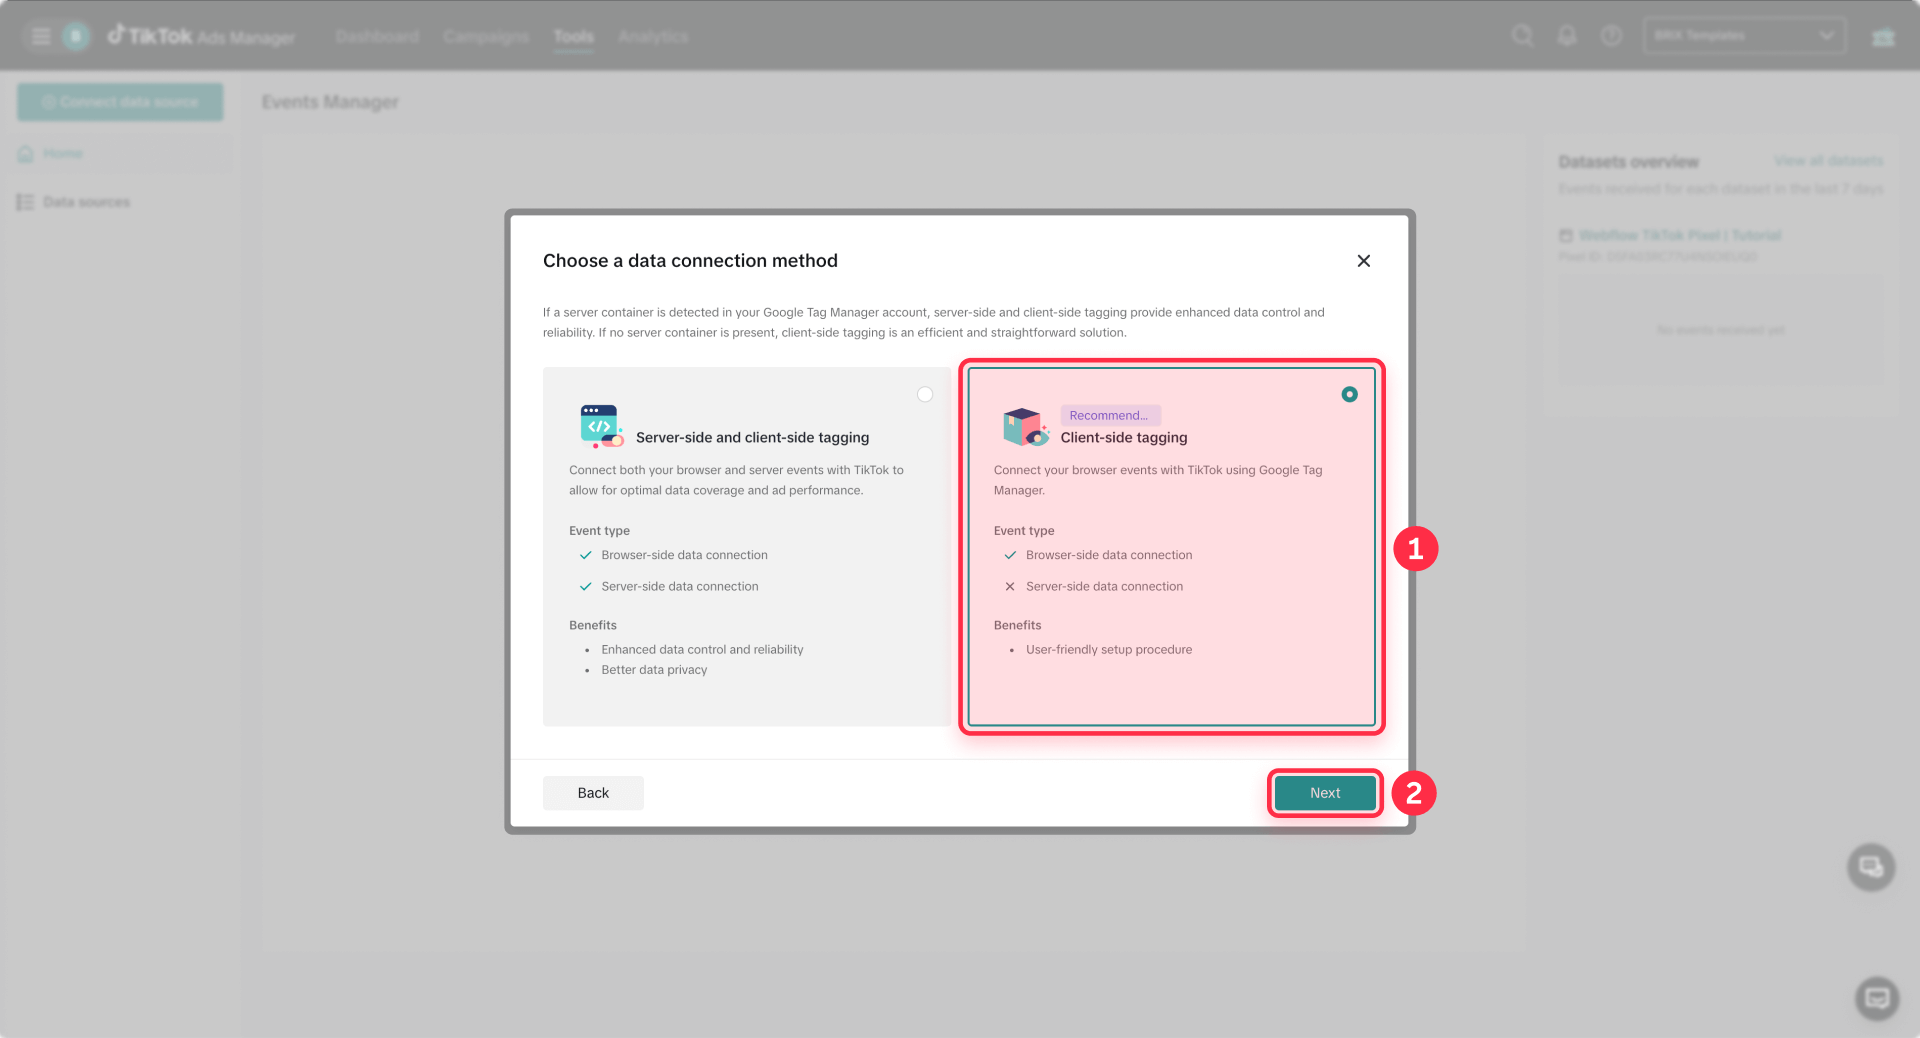
Once you’ve connected TikTok Pixel to your GTM container (Partner Platform → GTM) and selected Client-side tagging, TikTok may add a couple of extra screens before you can start creating events. The exact labels can vary, but the flow is typically:
- Review and publish resources
TikTok will show a summary of what it’s about to create in your GTM container (usually a Custom HTML tag that installs the TikTok pixel base code with an All Pages trigger). Confirm the details and click Publish to push the resources to your GTM workspace.
Important: TikTok’s setup flow can create the tag in your GTM workspace, but it won’t go live until you publish the container in Google Tag Manager. Open your GTM container, confirm the TikTok tag is present, then click Submit → Publish. After publishing, verify on your live site using TikTok Pixel Helper or Test Events.
- Manage configurations (optional)
TikTok may prompt you with recommended configuration toggles. For most Webflow sites, keep Allow first-party cookies enabled and keep Enhance data postback enabled. Leave Automatic Advanced Matching (AAM) off unless you specifically want it and you have the right consent/privacy setup. - Set up events (launch Event Builder)
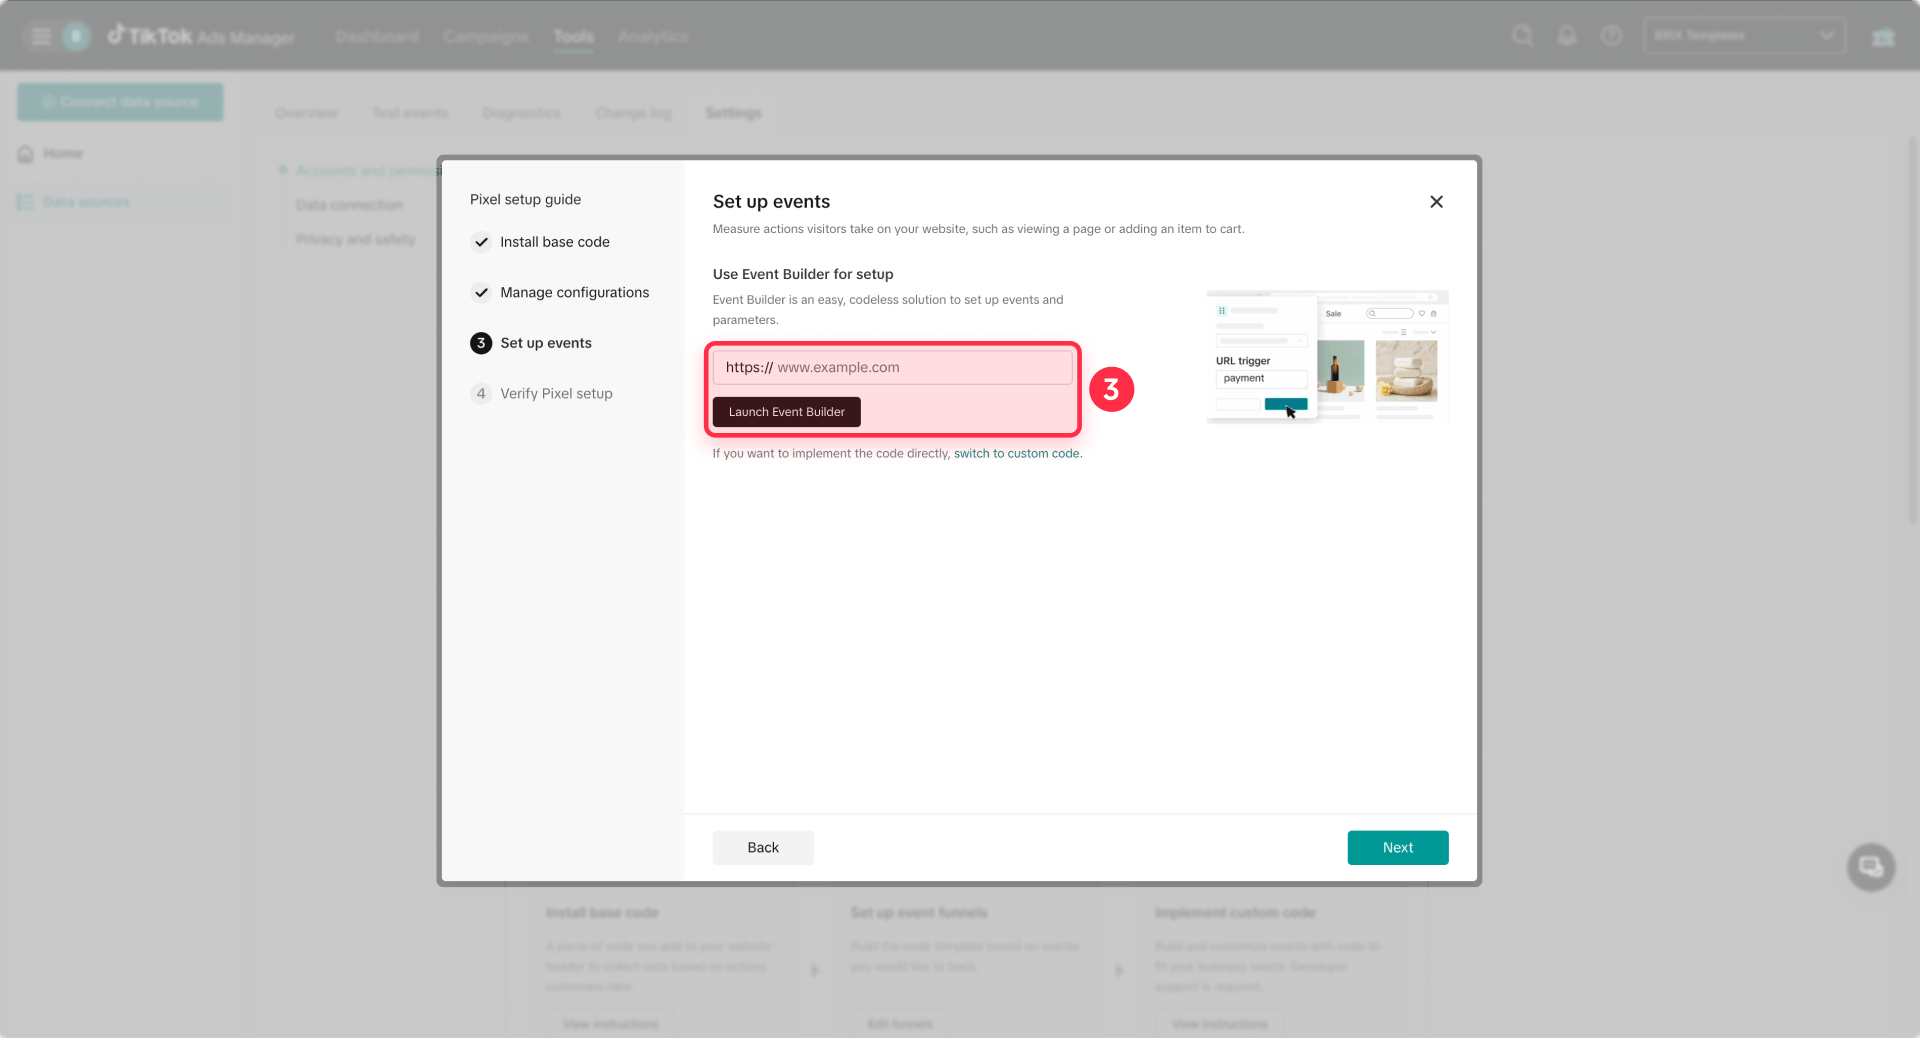
TikTok will ask for the URL you want to measure. Enter your published Webflow domain (not Designer preview) and click Launch Event Builder. This opens the event builder so you can create URL-based or click-based events without writing code. - Testing
After setting up events, TikTok may route you to a Testing screen with two verification options:
- Test Events (recommended): Click Go to Test events and trigger one clear action on your live site (page view, form submit, add to cart) to confirm events are coming through. Allow for latency.
- TikTok Pixel Helper: Install the Chrome extension and verify the pixel loads correctly on your live domain.
If Test Events is empty, the most common causes are: the GTM container hasn’t been published yet, the Webflow site hasn’t been published to the correct domain, or ad blockers are preventing the pixel from firing.
Alternative: TikTok Pixel in Webflow manual install
Use manual installation for the fastest setup when you only need TikTok tracking and don't manage multiple marketing tags.
TikTok's guidance is explicit: install the pixel base code in the header section of your website for all pages. Pixel Helper will flag "not installed in header" as an error if you place it elsewhere.
In Events Manager, open your Web data connection or pixel setup and copy the Pixel base code exactly as TikTok provides it. Don't use random snippets from forums or documentation—use the snippet TikTok generates in your specific setup flow so your Pixel ID and mode are correct.
Navigate to your Webflow project from the dashboard and open Project Settings → Custom Code. Paste the TikTok base code into Head code, then click Save changes. Webflow warns that external scripts in the head can slow page loads, so keep your head section clean, and prefer async or defer attributes when you control the script tag.
Here's a safe placeholder wrapper for the TikTok Pixel base code. Replace this entire block with the exact snippet from TikTok Events Manager.
<!-- TikTok Pixel base code (example placeholder) -->
<script>
  (function (w, d, t) {
    // This is a placeholder for documentation only.
    // Replace this entire block with the full snippet from TikTok Events Manager.
    w.TiktokAnalyticsObject = t;
    var ttq = (w[t] = w[t] || []);

    // Minimal calls you should see in the real snippet:
    ttq.load('YOUR_TIKTOK_PIXEL_ID');
    ttq.page();
  })(window, document, 'ttq');
</script>
<!-- TikTok Pixel base code end -->
After saving the code, Publish your Webflow site to your custom domain. Open the live domain in a browser to verify. Webflow explicitly notes custom code may appear in preview mode, but it won't go live until you publish the site.
3. Verify TikTok Pixel in Webflow before adding events
Verification confirms your base pixel installation works before you spend time configuring conversion events.
Verify TikTok Pixel in Webflow with TikTok Pixel Helper
Install the TikTok Pixel Helper Chrome extension from the Chrome Web Store. Open your live Webflow site in Chrome and check the extension output in your browser toolbar.
Common Pixel Helper warnings and their fixes:
- "Pixel code is not installed in header" → Move the base code into Webflow Head code.
- "Invalid Pixel ID" → Confirm the Pixel ID in Events Manager matches your installation code.
- "First-Party Cookies Not Found" → Enable them in Events Manager Cookie Info settings.
Verify events in TikTok Events Manager
TikTok's Test Events tool lets you monitor events during setup and debugging, but there may be latency.
In Events Manager, open your pixel and click Test Events. TikTok's documentation describes entering your URL to generate a QR code you scan in the TikTok app, but the interface also allows opening your site directly in the test environment. Use whichever flow your current UI presents.
Once you're in a test session, perform one clear action on your Webflow site such as submitting a form, adding to cart, or reaching a confirmation page. Watch Test Events for the corresponding event to appear. TikTok explicitly notes event data isn't displayed in real time and latency may occur, so wait a few seconds between actions.
Verify TikTok Pixel in Webflow using Diagnostics
In Events Manager, open your pixel and click the Diagnostics tab (or use the Diagnostics section on the Events Manager home page). Review Active issues and click Learn more for concrete fixes and sample affected events.
TikTok's diagnostics cards offer direct actions like Enable first-party cookies when that's the issue blocking proper tracking. Address all critical issues before adding conversion events or launching campaigns.
Verification checklist
- Open your published Webflow site on the live domain in an incognito window with ad blockers disabled.
- Confirm TikTok Pixel Helper shows your pixel installed correctly in the header.
- Trigger one clear conversion action (form submit, purchase, etc.).
- Confirm the event appears in Test Events (allow for latency).
- Check Events Manager → Diagnostics for critical warnings (cookies, missing parameters).
If any step fails, return to the relevant section above and fix the issue before launching paid campaigns. Clean tracking data is essential for TikTok's optimization to work properly.
4. Add a reliable TikTok conversion event in Webflow
Once the base pixel is verified, implement conversion events starting with your most important business action.
Decide which TikTok Pixel events to implement on Webflow first
For most Webflow sites, implement events in this order: PageView for baseline sanity checks, SubmitForm or CompleteRegistration for lead generation, ViewContent for content or product detail pages, and AddToCart plus Purchase for ecommerce.
TikTok explicitly warns not to send sensitive visitor data when configuring events. Keep your event payloads clean and policy-compliant.
Track Webflow form leads with TikTok Event Builder
TikTok Event Builder lets you create events from Button Clicks or URL Visits without writing code. TikTok notes changes can take up to 30 minutes to take effect after configuration.
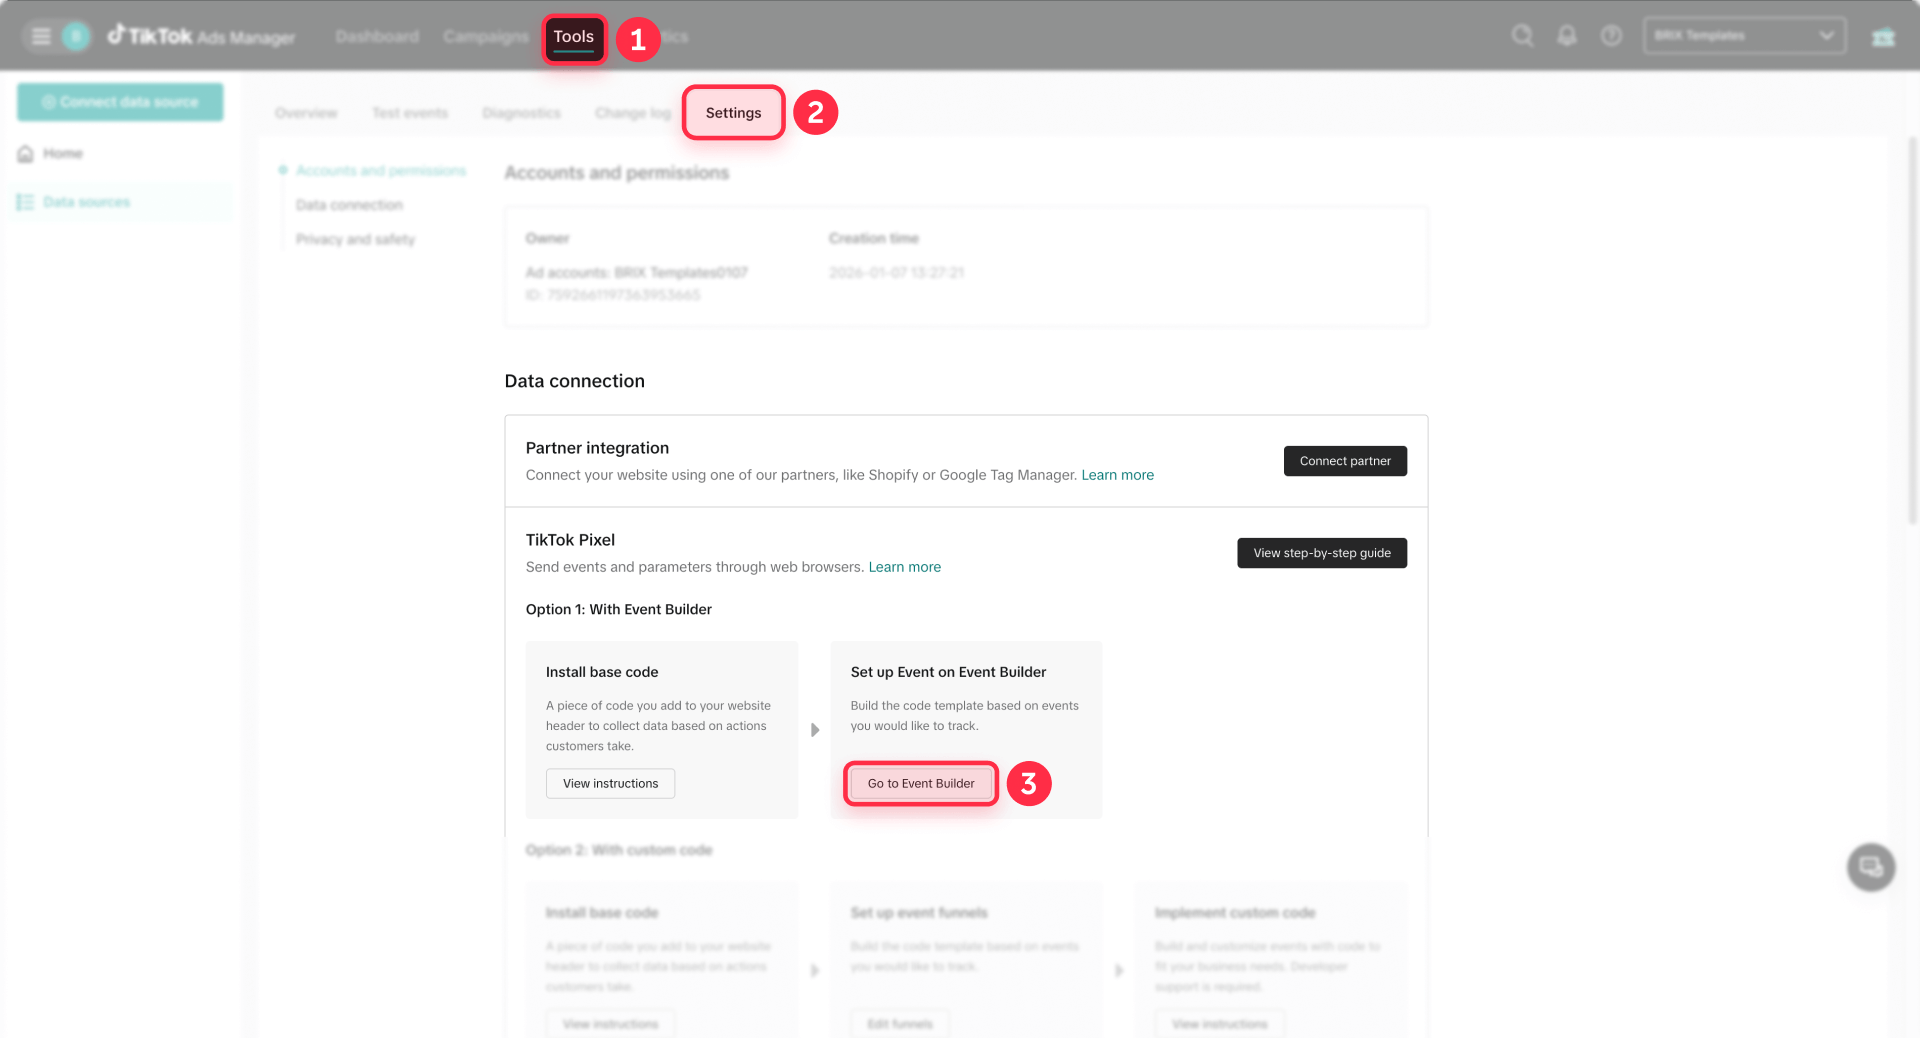
Set your Webflow form to redirect to a dedicated thank-you URL on your domain. In TikTok, go to Tools → Events Manager, select Data Sources, and choose your pixel. Click Complete Setup, enter your business URL, and launch Event Builder. It opens your site in a new tab.
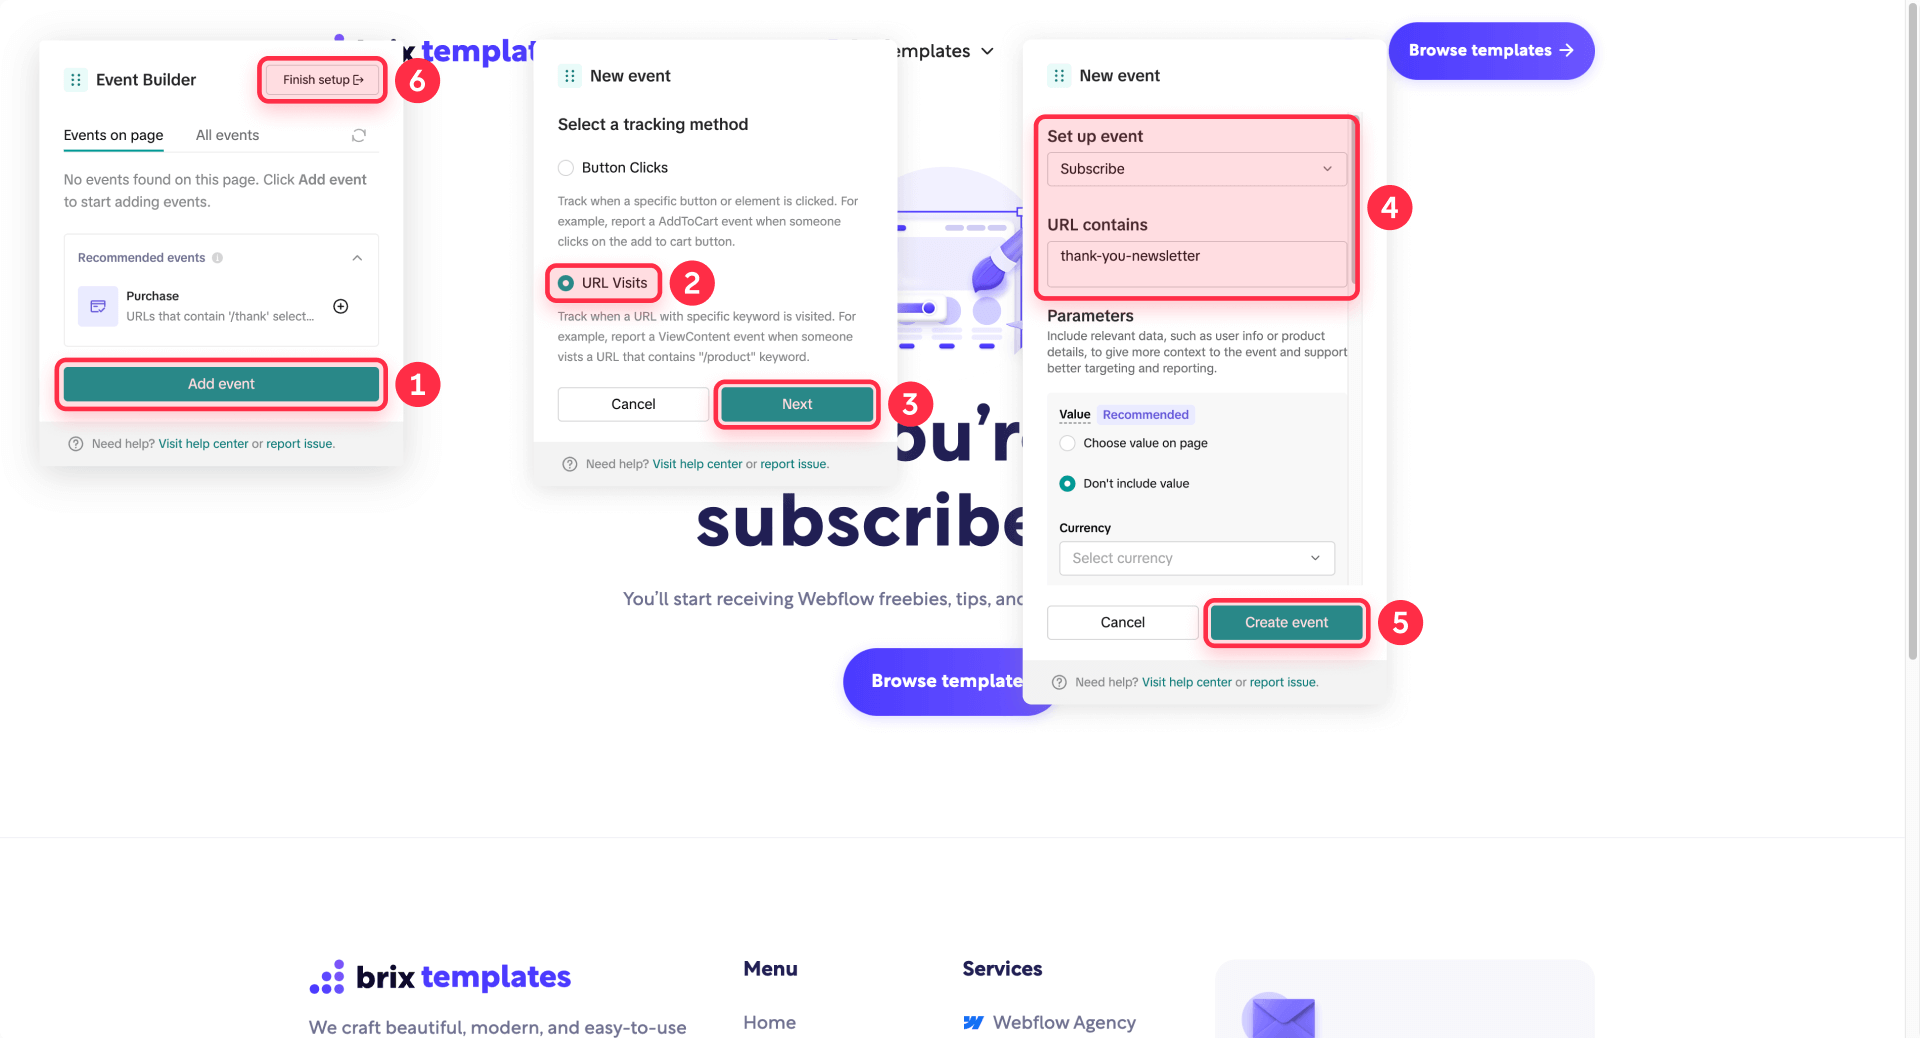
Click Add event and choose URL Visits for thank-you page tracking. Use a URL keyword like thank-you and set the event to SubmitForm. Add parameters like Value, Currency, Content ID, and Content Type if you have them.
After creating the event rule in Event Builder, verify it appears in Test Events by submitting a real form on your Webflow site. Check Diagnostics for parameter warnings or formatting issues.
Track Webflow ecommerce purchases with TikTok Event Builder
Webflow's documentation states the order confirmation page is fully customizable, unlike the checkout page where custom code may be blocked.
In TikTok Event Builder, choose URL Visits and target your order confirmation URL keyword such as order-confirmation. Set the event to Purchase and include value and currency parameters if your Webflow ecommerce setup provides them.
Verify in Test Events by completing a test purchase, then monitor Diagnostics for any parameter or format warnings. Track conversions on the order confirmation page rather than checkout to avoid script blocking issues.
Need help setting up a custom event? We can help—get in touch.
After adding Event Builder rules, remember TikTok notes changes may take up to 30 minutes to become effective. Re-verify in Events Manager after the waiting period (using Test Events).
Troubleshooting TikTok Pixel in Webflow
Common issues have straightforward fixes when you know where to look.
- Pixel Helper says "Pixel code is not installed in header": Move the base code to Webflow Head code section in Project Settings → Custom Code, Publish your site, reload the page, and re-check Pixel Helper to confirm the warning is resolved.
- TikTok Events Manager shows zero events: Confirm you published the Webflow site (not just previewed), verify you're testing the correct domain, and test with ad blockers disabled. Webflow custom code doesn't go live until you click Publish.
- No events appear in Test Events: Use the Test Events flow by entering your URL or scanning the QR code depending on your UI version, trigger an action on your site, and allow for latency since events aren't displayed in real time.
- Events are duplicated (PageView firing twice): You installed tracking twice through both Webflow custom code and GTM. Remove one installation path, Publish your site, and re-verify to confirm only one pixel fires.
- "First-Party Cookies Not Found" warning: In Events Manager settings, open Cookie Info and enable first-party cookies, then re-verify your pixel installation with Pixel Helper.
- Value/currency errors or missing parameters: Follow Pixel Helper's formatting rules—value must be a number without symbols or commas, currency must be a valid currency code, and content type must be product or product_group.
- Purchase tracking fails on Webflow checkout: Track purchases on the order confirmation page with URL Visits instead of the checkout page. Webflow's order confirmation page is fully customizable while checkout can block custom code.
- Webflow custom code "does nothing": Ensure you didn't paste forbidden HTML tags like <html>, <head>, or <body>, verify you're under the 50,000 character limit, and confirm you Published the site after adding the code.
- Preview confusion in Webflow Designer: Toggle Enable custom code in the bottom-left corner of preview mode, but do final verification on the published domain since preview runs on a canvas subdomain with different behavior.
Frequently asked questions about TikTok Pixel in Webflow
What is the TikTok Pixel in Webflow and what does it track?
TikTok Pixel is a browser script that sends key site actions back to TikTok so you can measure and optimize ads. It tracks standard events like PageView, ViewContent, AddToCart, SubmitForm, and Purchase, along with parameters you configure.
On Webflow sites, the practical goal is reliability. Confirm PageView events are arriving in Events Manager, then track exactly one conversion event that matches your business goal. Validate it in Events Manager using Diagnostics and Test Events first—then add more events only after it's stable.
How do I create a TikTok Pixel in TikTok Events Manager for a Webflow site?
In TikTok Ads Manager, go to Tools → Events Manager, click Connect Data Source, select Web, and enter your Webflow URL. Choose Partner Integration for GTM or Manual Setup for direct Webflow code installation.
Name your pixel dataset after your domain to avoid confusion with other sites. TikTok allows up to 128 characters for pixel names, and you can start a new connection from the top-right Connect data source button (one data source at a time during creation).
Your setup is complete only after you install the base code and verify it using Test Events or Pixel Helper—not when you finish creating the pixel in the interface.
Where do I paste TikTok Pixel in Webflow: Head code or Footer code?
Use Webflow Head code for the TikTok Pixel base code. TikTok flags missing header placement as an implementation error in Pixel Helper, and loading the pixel early reduces the chance users bounce before the script initializes.
Webflow supports both Head and Footer scripts, but tracking reliability beats marginal speed gains for conversion tracking. Keep your Head code lean by limiting it to essential tracking like one tag manager maximum, then Publish and confirm with Pixel Helper using the verification steps.
Is it better to install TikTok Pixel in Webflow manually or via GTM?
If you already run multiple marketing tags or need consent gating, GTM is the better long-term choice for Webflow sites. It centralizes tracking, makes rollbacks safer when issues occur, and prevents your Webflow project settings from becoming an un-auditable collection of scripts.
Manual installation works for quick starts, but it becomes fragile when you need frequent changes or manage multiple ad platforms. Whichever route you choose, install via only one path—don't keep a base pixel in Webflow custom code and also install it through GTM, as this creates duplicated events.
Why is TikTok Events Manager not receiving PageView events from my Webflow site?
When TikTok can't see PageView events, the cause is usually straightforward: you didn't publish after adding code, the pixel isn't in the header section, the Pixel ID is wrong, or testing is blocked by privacy tools.
First, Publish your Webflow site (custom code doesn't go live until you publish). Next, run Pixel Helper and fix explicit errors like "not installed in header" or "invalid ID". Then verify in Test Events on your real domain before troubleshooting campaigns.
Can I track Webflow form submissions as a TikTok Lead event without custom code?
Yes—use a redirect-based flow with TikTok Event Builder. Set your Webflow form to redirect to a dedicated thank-you URL on your domain after successful submission, then use Event Builder with URL Visits to fire SubmitForm when that page loads.
This method survives design changes and avoids brittle scripts tied to Webflow's success-state markup. Make the thank-you URL keyword unique like /thank-you-demo so your Event Builder rule can't accidentally match other pages on your site.
How do I avoid duplicate TikTok Pixel events in Webflow when using GTM?
Duplicate events almost always mean the base pixel is loading twice—one installation in Webflow settings and another in GTM. Choose one install path, delete the other completely, Publish your site, and re-verify.
After removing a tag, hard-refresh your browser and verify in incognito mode so cached scripts don't give false results. Use Pixel Helper to confirm only one Pixel ID is present, then check Page settings → Custom code for any page-level embeds that might load tracking separately.
How do I verify TikTok Pixel events on a Webflow site in Events Manager?
Open Events Manager, select your pixel, and go to Test Events. TikTok describes entering your URL to generate a QR code you scan in the TikTok app, but the interface also allows opening your website directly in the test environment—use whichever flow your current UI shows.
Perform one clear action (form submit, add to cart, confirmation page), and watch for the event to appear. Test one event at a time and allow for latency, since events aren't displayed in real time. When Test Events consistently shows your conversion events with correct parameters, your tracking is ready for campaigns.
Do I need TikTok Events API with Webflow, or is TikTok Pixel enough?
Pixel-only tracking can work initially, but it's increasingly fragile under consent requirements and browser restrictions. TikTok recommends Events API as a second channel alongside the pixel because server-side signals can recover conversions that browsers miss due to ad blockers or privacy settings.
Don't build server-side tracking until your browser events are already clean—otherwise you'll just duplicate bad data faster. When you do implement Events API, deduplication matters: send the same event_id from browser and server so TikTok can merge or deduplicate correctly.
If you want the most reliable attribution in 2026, Events API is the upgrade path after your Pixel setup is verified and stable.
How do I track Purchase on Webflow ecommerce when checkout tracking is limited?
Track purchases on the Webflow order confirmation page, not the checkout page. Webflow documentation states the order confirmation page is fully customizable, while community reports suggest checkout can block custom code.
Use TikTok Event Builder with URL Visits for an order-confirmation keyword, firing Purchase with value and currency parameters if your Webflow ecommerce setup provides them. Validate in Test Events by completing a real test order, then check Diagnostics for missing value or currency formatting issues.
Conclusion for TikTok Pixel in Webflow
A working TikTok Pixel setup on Webflow follows a specific sequence: connect the Web data source in Events Manager, install the base code correctly in Webflow Head code or via GTM, verify installation with Test Events and Pixel Helper, and only then add conversion events with proper parameters. Once the baseline tracking is stable, the advanced path includes consent-aware firing and pairing Pixel with Events API to strengthen attribution under modern privacy constraints.
If you'd rather have this implemented and audited end-to-end including GTM governance, event naming conventions, and a clean debugging workflow, our Webflow agency can handle the complete setup as a dedicated build partner.


Join readers commenting on this post!