Running TikTok ads to a Framer site without proper pixel tracking means you're buying traffic blind. The common failure happens when the Pixel appears installed but Test Events stays empty, events show as inactive, or purchases never appear—especially when your checkout lives on a different domain.
TikTok's setup now follows a TikTok Events Manager → Connect Data Source → Web workflow, while Framer's side involves Project Settings → Custom Code with precise placement and page-visit execution controls. This guide walks you through connecting a TikTok web data source, installing the pixel correctly in Framer, verifying it inside Events Manager, and implementing conversion events that survive consent and modern browser limits. You'll learn exactly where to paste code in Framer and how to fix the most common pixel issues.
Why TikTok Pixel matters for Framer sites
Proper TikTok Pixel implementation transforms Framer campaigns from guesswork into measurable performance.
- Conversion optimization on real actions in Framer: Optimize for outcomes like SubmitForm or Purchase, not just clicks, allowing TikTok's algorithm to find users who actually convert on your Framer site.
- Retargeting built on intent from Framer flows: Build custom audiences from visitors who hit key Framer pages like pricing, product details, or checkout starts, enabling precise remarketing without wasting ad spend.
- Clear diagnostics instead of guessing in Framer: TikTok's Diagnostics and Pixel Helper show exactly what's broken—cookies, invalid IDs, or missing parameters—so you can fix tracking before spending money.
- Faster iteration with Framer Custom Code: Framer's Custom Code snippets keep tracking changes separate from design work, letting you update tracking without touching your canvas or breaking layouts.
- Upgrade path for privacy limits in Framer: If client-side tracking drops events due to consent or browser restrictions, TikTok's Events API with deduplication is the reliable next step.
Requirements for TikTok Pixel tracking in Framer
Before installing TikTok Pixel on your Framer site, verify you have the necessary access and understand Framer's Custom Code system.
Prerequisites checklist for TikTok Pixel in Framer
- Access to TikTok Ads Manager and Events Manager
- Access to the Framer project Project Settings
- Ability to open Project Settings → Custom Code and add scripts
- Ability to Publish or Republish your Framer site after code changes
- A real production URL ready for TikTok's Web setup and verification flows
- A Google Tag Manager (GTM) account and container if using the GTM method
Framer Custom Code placement and execution rules for TikTok Pixel
Understanding Framer's Custom Code system prevents common installation mistakes and duplicate events.
Framer's Custom Code lets you add scripts from Project Settings → Custom Code → Add Script. You can choose where code is placed on your site (head or body placement) and optionally restrict it to specific pages. Most importantly, you choose execution behavior: Once loads the script one time, while Run on every page visit re-executes the script on navigation.
For TikTok Pixel base code, always use Once so the pixel initializes once and doesn't reload unnecessarily.
1. Create the TikTok Pixel in Framer using TikTok Events Manager
TikTok's current setup flow is consistent: connect a Web data source, then choose Partner Integration or Manual Setup.
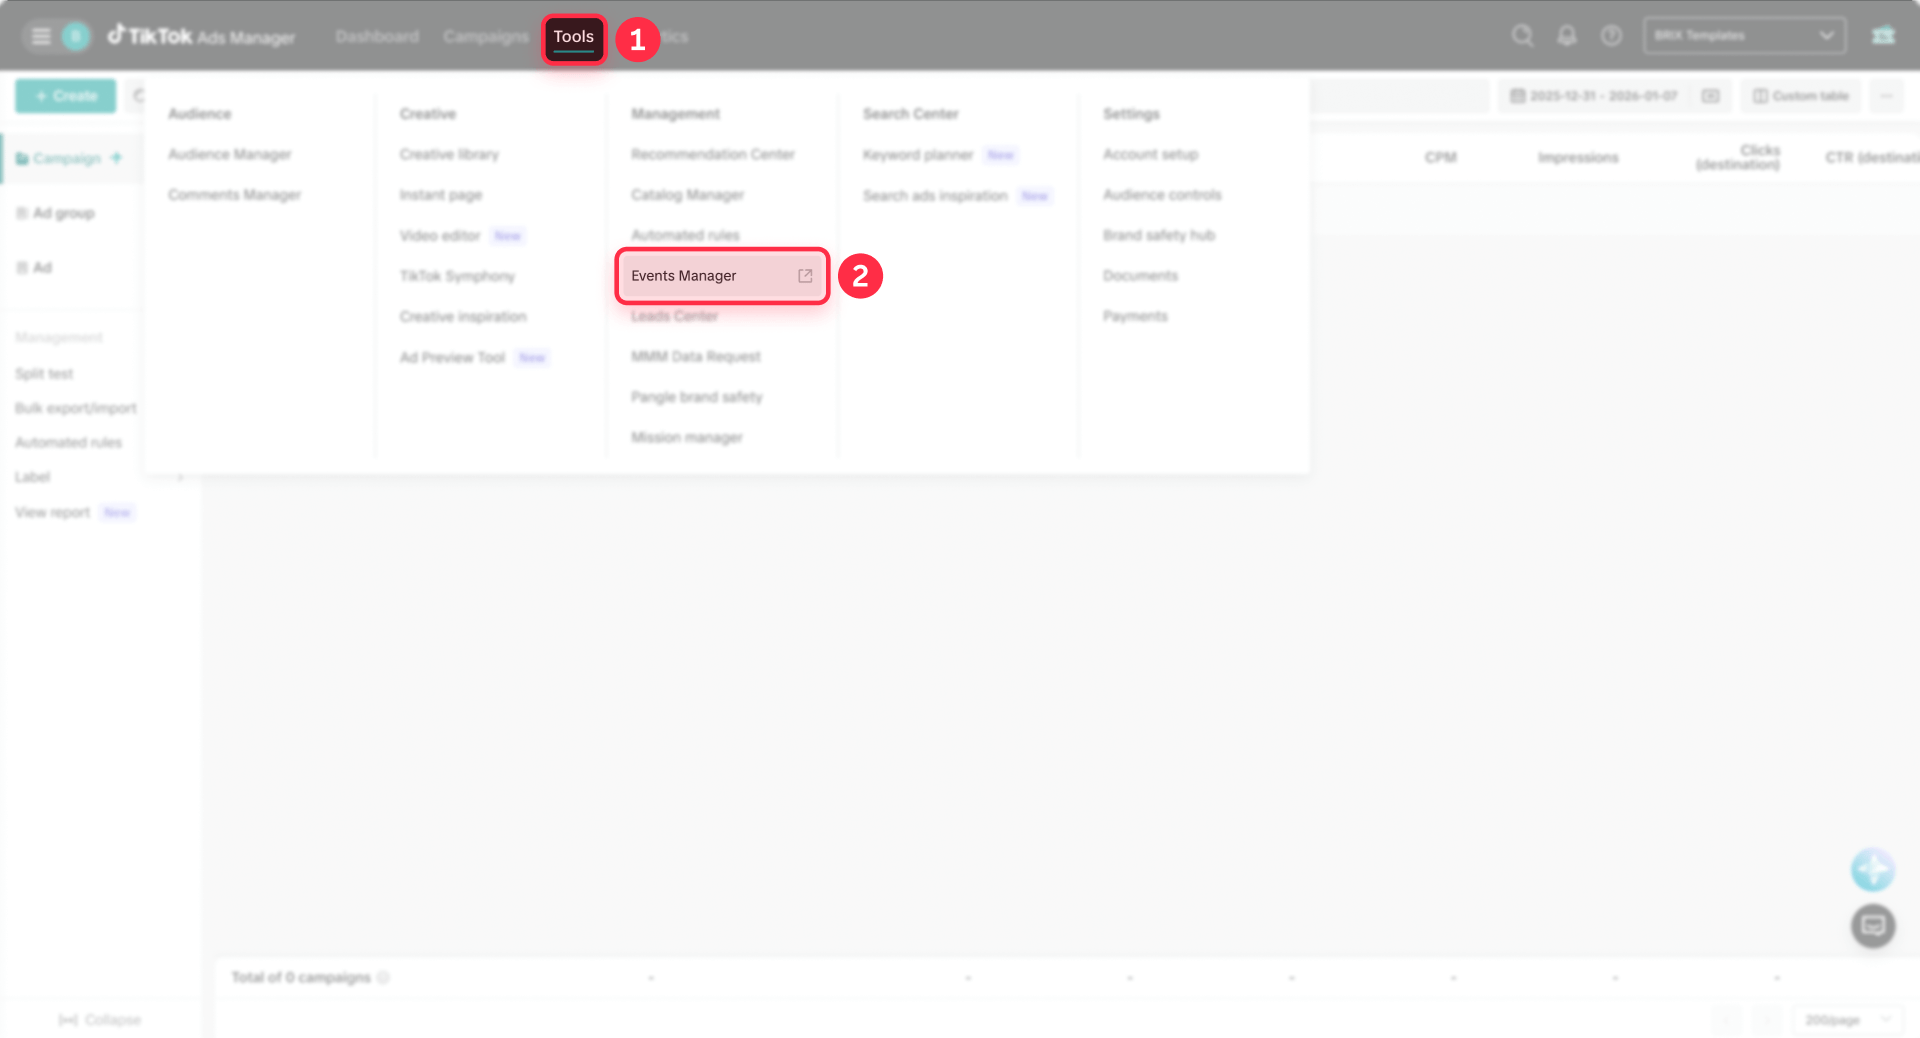
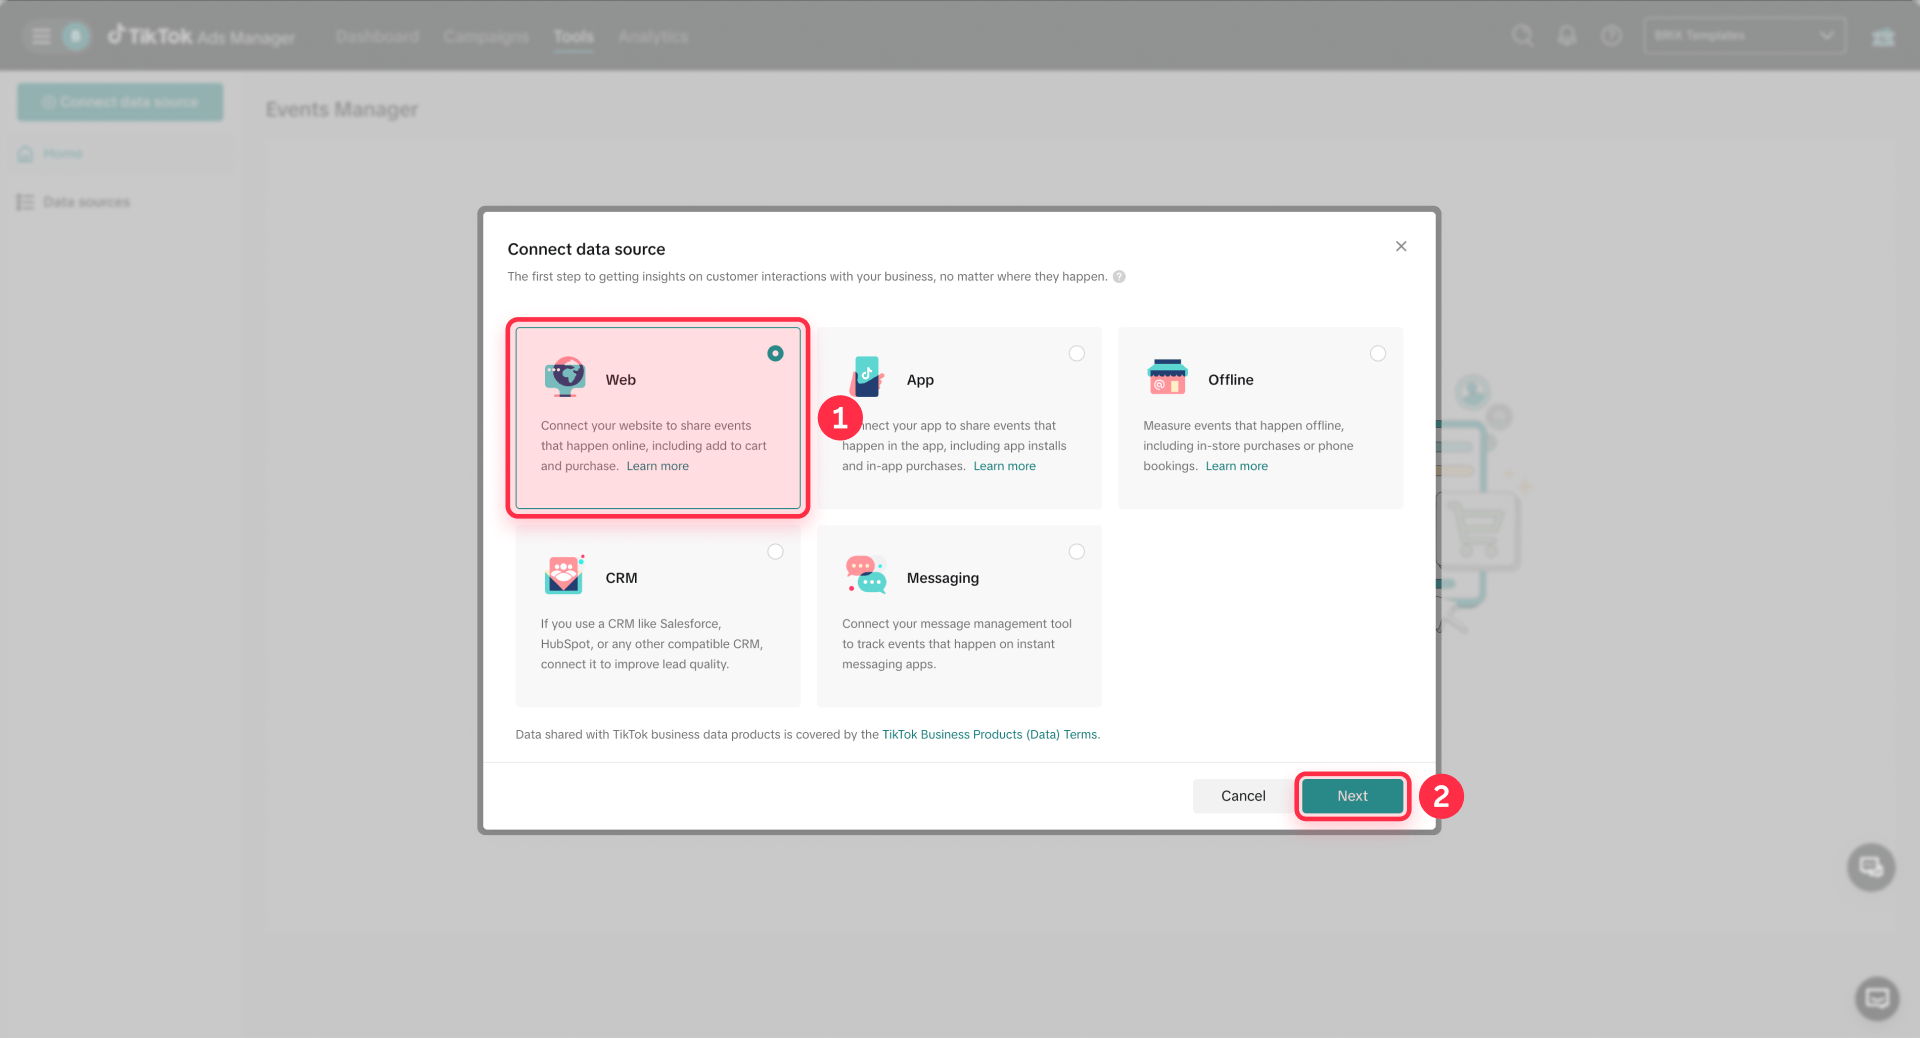
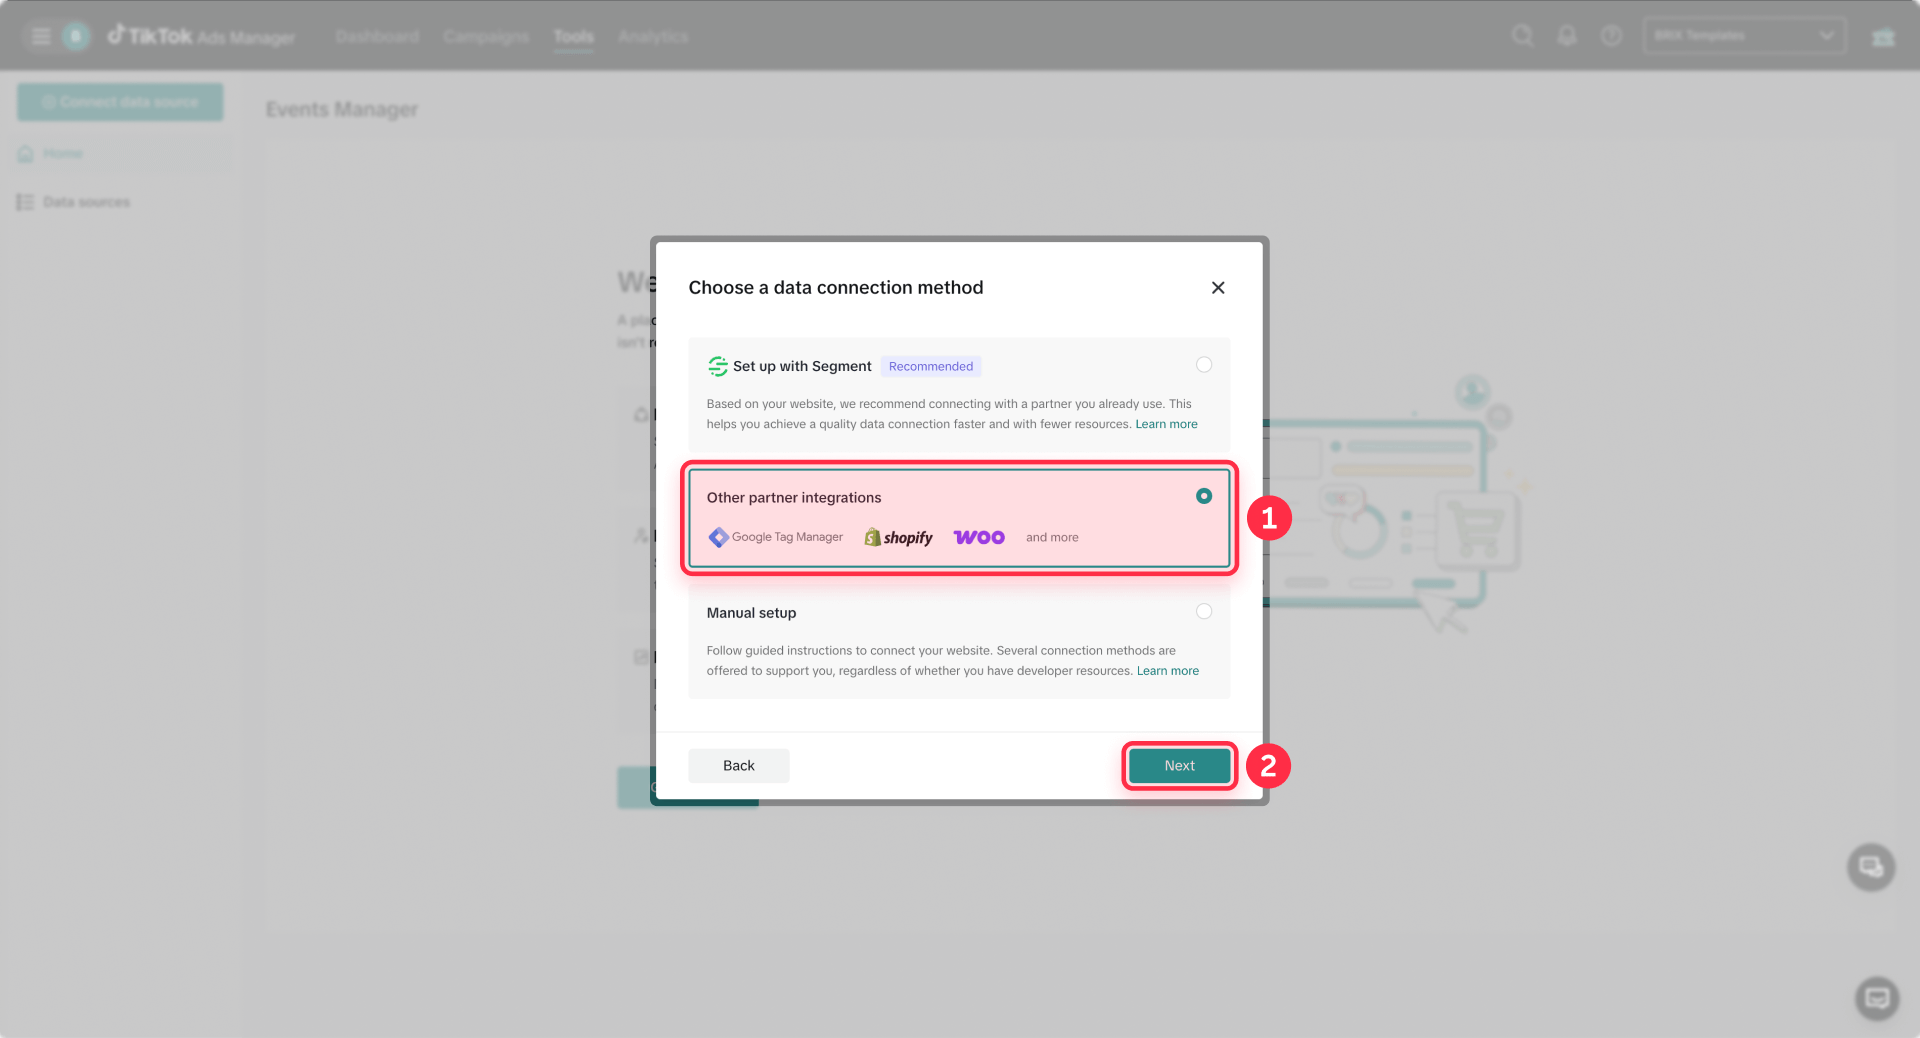
Start by logging into TikTok Ads Manager and navigating to Tools → Events Manager. Click Connect Data Source, select Web as your data source type, and enter your Framer website URL when prompted. You'll see two setup options: Partner Integration for GTM or Manual Setup for direct code installation.
When prompted to name your pixel, create a clear dataset name tied to your production domain. Avoid generic names like "test" or "new pixel". Finish the setup flow until TikTok shows the base code and installation options.
2. Install TikTok Pixel in Framer
You have two installation paths for TikTok Pixel on Framer sites. Choose based on your tracking governance needs and expected change frequency.
Choose one install path (don't double-install). Installing both manual Custom Code and GTM causes duplicated events and ruins optimization signals.
Recommended: TikTok Pixel in Framer using GTM
Use GTM if you want consent-based firing, cleaner debugging, and centralized control across platforms. TikTok supports a native GTM flow in Events Manager.
Before you start, make sure GTM is already installed and working on your Framer site (see our GTM + Framer setup guide). If GTM isn’t loading on your published domain, TikTok tags won’t load either.
Once GTM is working, connect TikTok Pixel to your GTM container from TikTok Events Manager:
- Go to Tools → Events Manager → Data sources and select your TikTok Pixel.
- Click Settings, then go to Partner Platform and click Choose Partner.
- Select Google Tag Manager and continue.
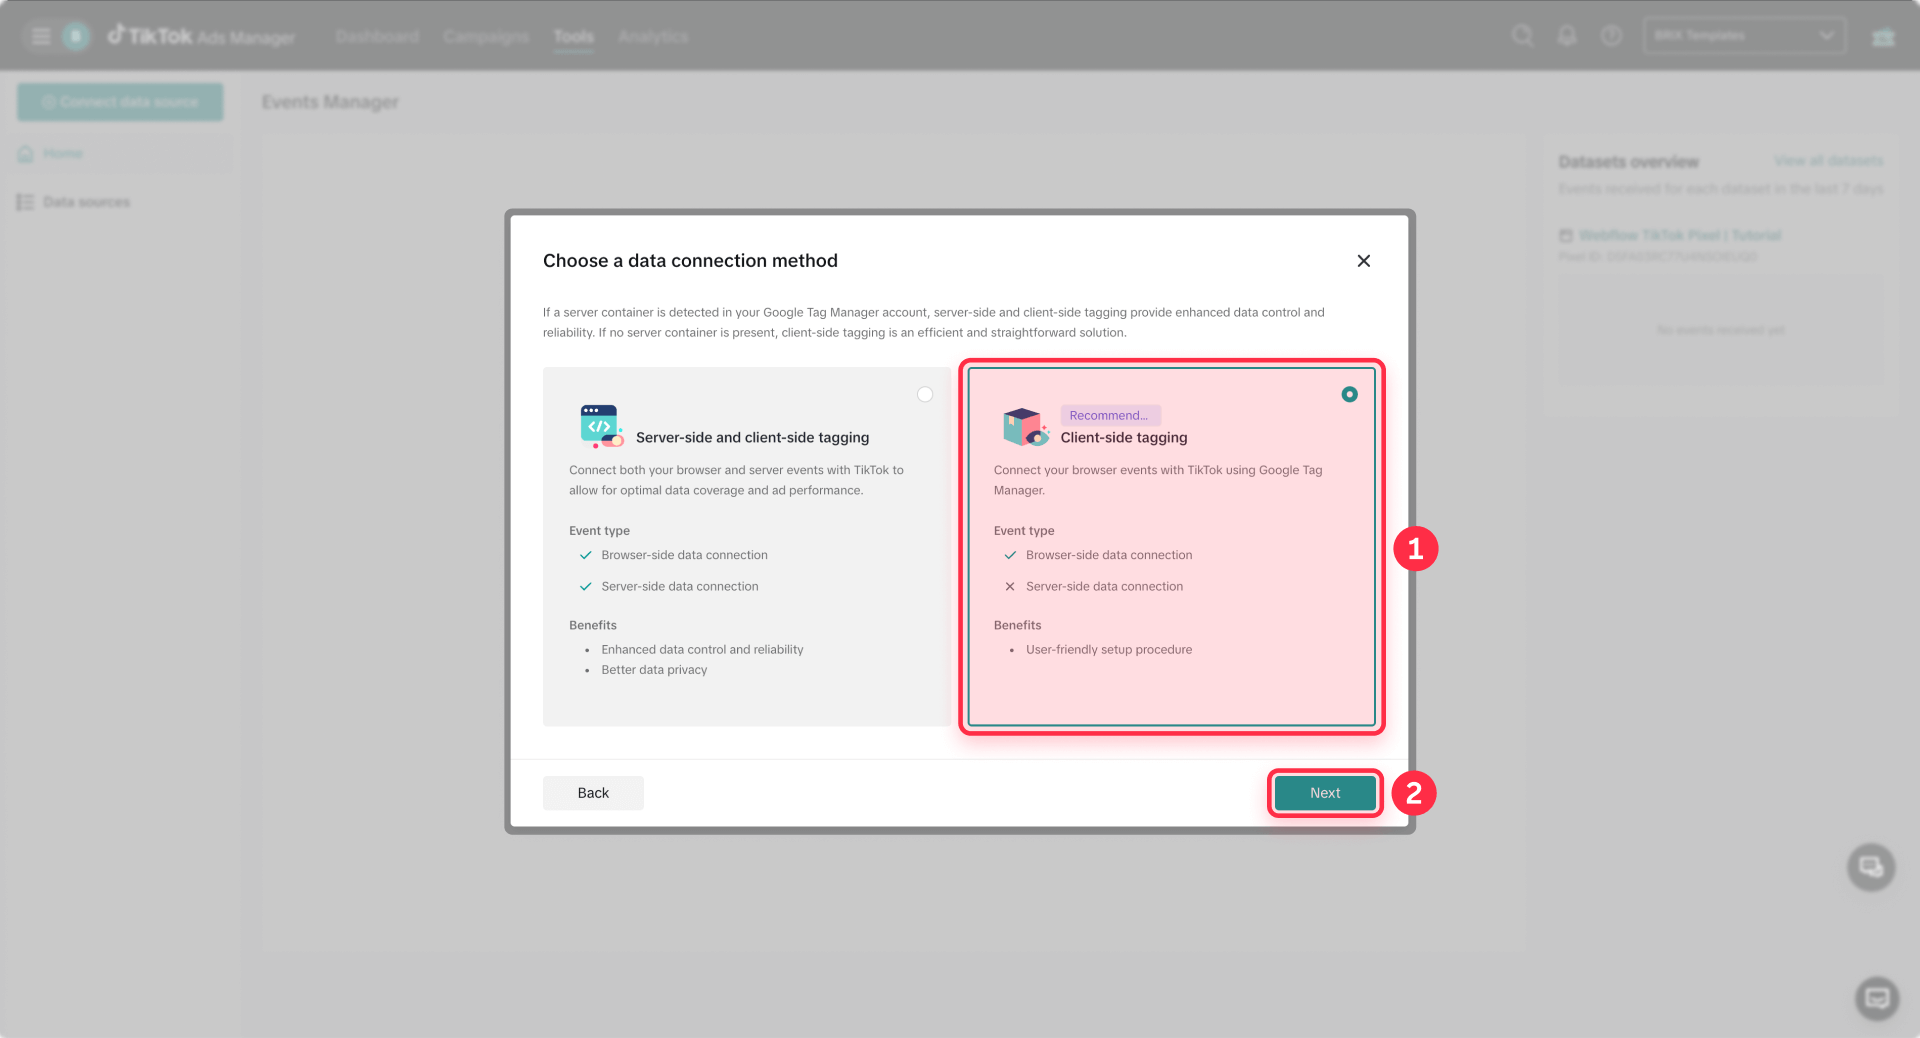
- Choose Client-side tagging, then log in and select your GTM Account, Container, and Workspace.
TikTok may show additional setup screens before you can build events, such as Review and publish resources (pushing a TikTok pixel tag into your GTM workspace), an optional Manage configurations step (first-party cookies/postback/advanced matching), and a Testing step that links to Test Events and the TikTok Pixel Helper.
Important: After TikTok creates the tag in GTM, you still need to open Google Tag Manager and Submit → Publish your container changes for the pixel to go live.
Alternative: TikTok Pixel in Framer manual install using Custom Code
Use manual installation for the fastest setup when you only need TikTok tracking and don't manage multiple marketing tags.
TikTok expects the base pixel to load early, and Pixel Helper explicitly flags missing header placement. Framer's own Meta Pixel guidance tells you to paste pixel code at the start of the head and republish—follow the same approach for TikTok.
In Events Manager, open your pixel or data connection and copy the Pixel base code exactly as TikTok provides it. Don't use random snippets from forums—use the snippet TikTok generates in your specific setup flow so your Pixel ID and mode are correct.
In Framer:
- Open Project Settings → Custom Code → Add Script.
- Name the snippet something obvious like TikTok Pixel (base).
- For Placement, choose the option that inserts code at the start of the Head.
- Set execution to Once so the base pixel loads once and doesn't reinitialize on navigation.
- Save and Republish your Framer site.
Here's a safe placeholder wrapper for the TikTok Pixel base code. Replace this entire block with the exact snippet from TikTok Events Manager.
<!-- TikTok Pixel base code (example placeholder) -->
<script>
  (function (w, d, t) {
    // This is a placeholder for documentation only.
    // Replace this entire block with the full snippet from TikTok Events Manager.
    w.TiktokAnalyticsObject = t;
    var ttq = (w[t] = w[t] || []);

    // Minimal calls you should see in the real snippet:
    ttq.load('YOUR_TIKTOK_PIXEL_ID');
    ttq.page();
  })(window, document, 'ttq');
</script>
<!-- TikTok Pixel base code end -->
Framer code changes don't go live until you republish the site.
3. Verify TikTok Pixel in Framer before adding events
Verification confirms your base pixel installation works before you spend time configuring conversion events.
Verify TikTok Pixel in Framer using TikTok Pixel Helper
Install the TikTok Pixel Helper Chrome extension from the Chrome Web Store. Open your published Framer site in Chrome and check the extension output in your browser toolbar.
Common Pixel Helper warnings and their fixes:
- Invalid Pixel ID: Confirm the Pixel ID in Events Manager matches your installation code.
- First-Party Cookies Not Found: In Events Manager settings, open Cookie Info and enable first-party cookies.
- Header placement issues: Verify your Framer Custom Code snippet uses Head placement.
Verify events in TikTok Events Manager
TikTok's Test Events tool lets you monitor events during setup and debugging, but there may be latency.
In Events Manager, open your pixel and click Test Events. TikTok documents two experiences: QR-based testing and a live test environment where you can open your site directly without scanning a QR code. Use whichever flow your current UI presents.
Once in a test session, visit your published Framer URL and trigger a clear action such as submitting a form, clicking a CTA, or reaching a confirmation page. Watch Test Events for the corresponding event to appear. TikTok explicitly notes event data isn't displayed in real time and latency may occur, so wait a few seconds between actions.
Verify TikTok Pixel in Framer using Diagnostics
In Events Manager, open your pixel and click the Diagnostics tab or use the Diagnostics section on the Events Manager home page. Review Active issues and click Learn more for concrete fixes and sample affected events.
TikTok's diagnostics cards offer direct actions like Enable first-party cookies when that's the issue blocking proper tracking. Address all critical issues before adding conversion events or launching campaigns.
Verification checklist
- Open your published Framer site in an incognito window (ad blockers disabled).
- Confirm TikTok Pixel Helper shows your pixel is installed correctly.
- Trigger your conversion action (form submit, CTA click, etc.).
- Confirm the event appears in Test Events (latency may occur).
- Check Diagnostics for cookie issues or missing/invalid parameters.
- Repeat 2–3 times to confirm consistent tracking (and test on another browser/device if possible).
4. Add a reliable TikTok conversion event in Framer
Once the base pixel is verified, implement conversion events starting with your most important business action.
Decide which TikTok Pixel events to implement on Framer first
For most Framer sites, implement events in this order:
- ViewContent (for key pages like pricing, product detail, or offer pages)
- SubmitForm (for Framer lead forms)
- AddToCart, InitiateCheckout, and Purchase (if you have ecommerce or a checkout flow)
TikTok explicitly warns not to send sensitive visitor data when configuring events. Keep your event payloads clean and policy-compliant.
Track Framer form leads with TikTok Event Builder (URL-based method)
TikTok Event Builder lets you create events from Button Clicks or URL Visits without writing code. This works well for Framer because you can create URL-based rules for thank-you pages, confirmation routes, or pricing pages.
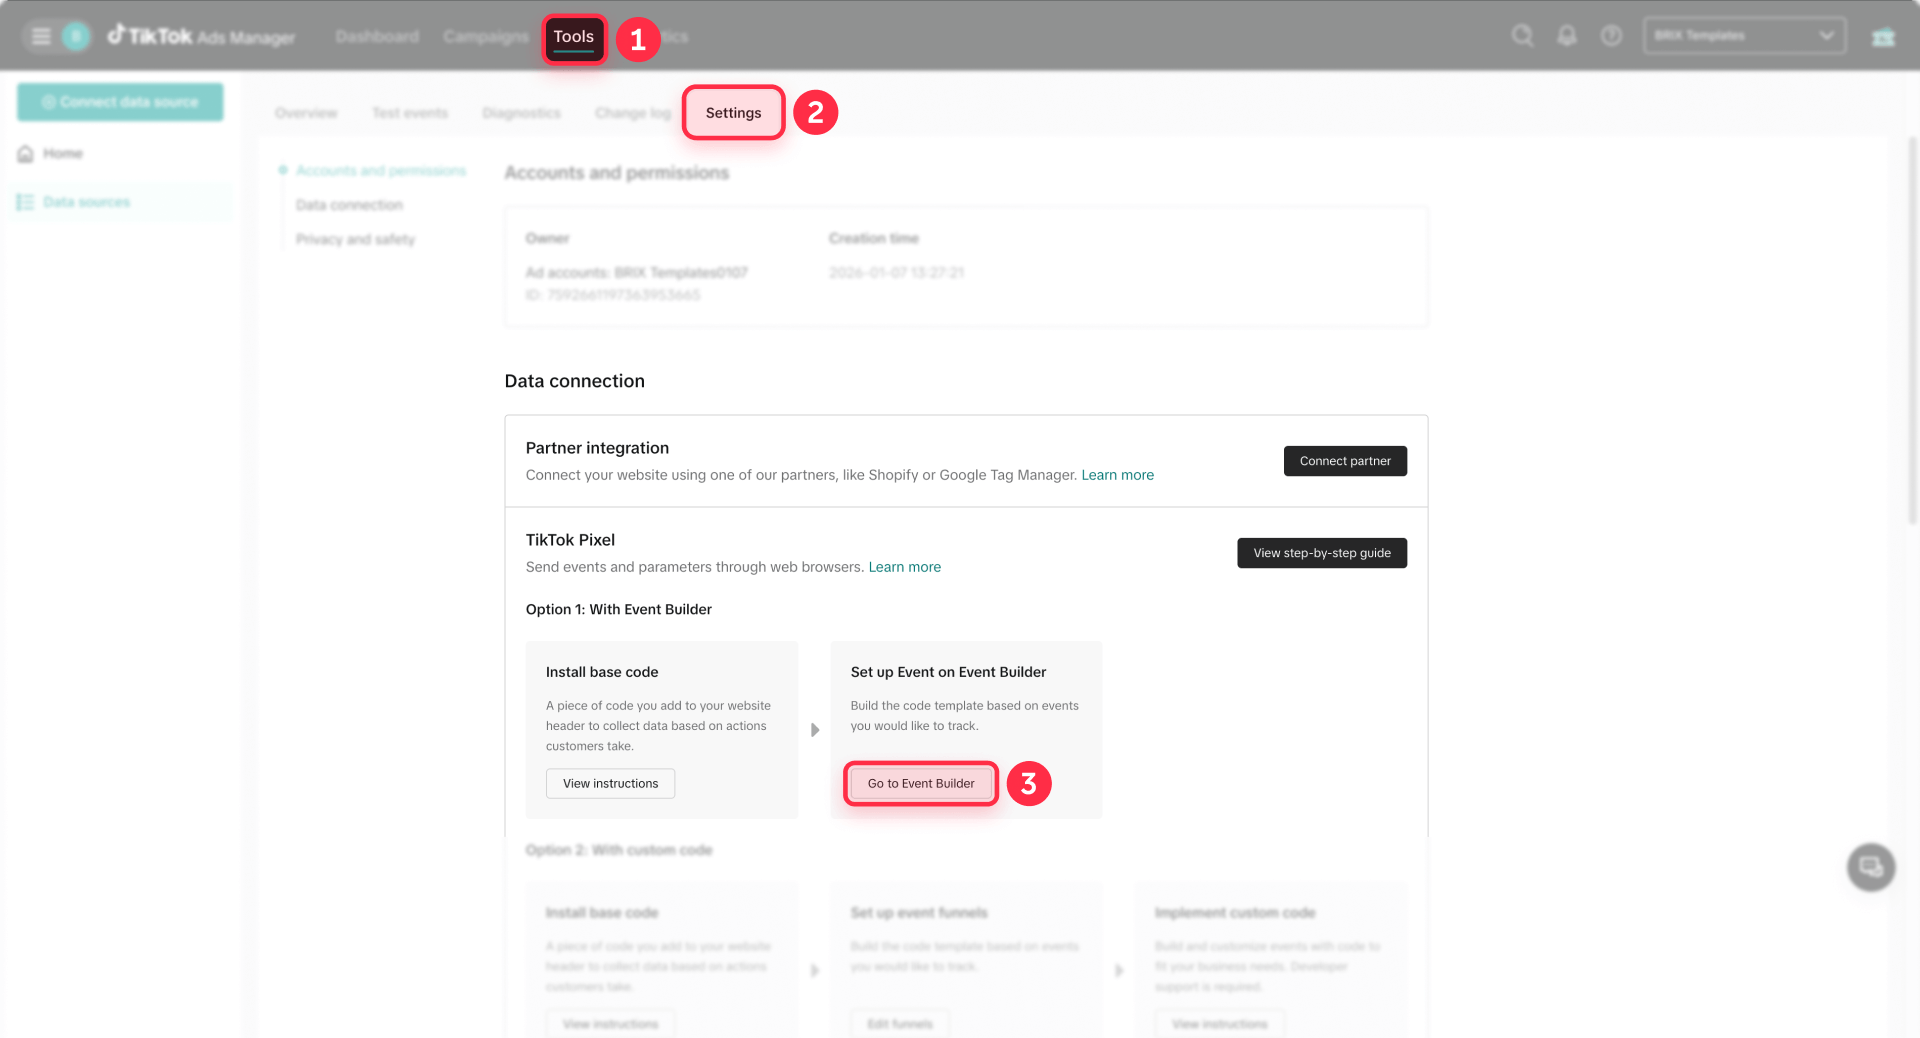
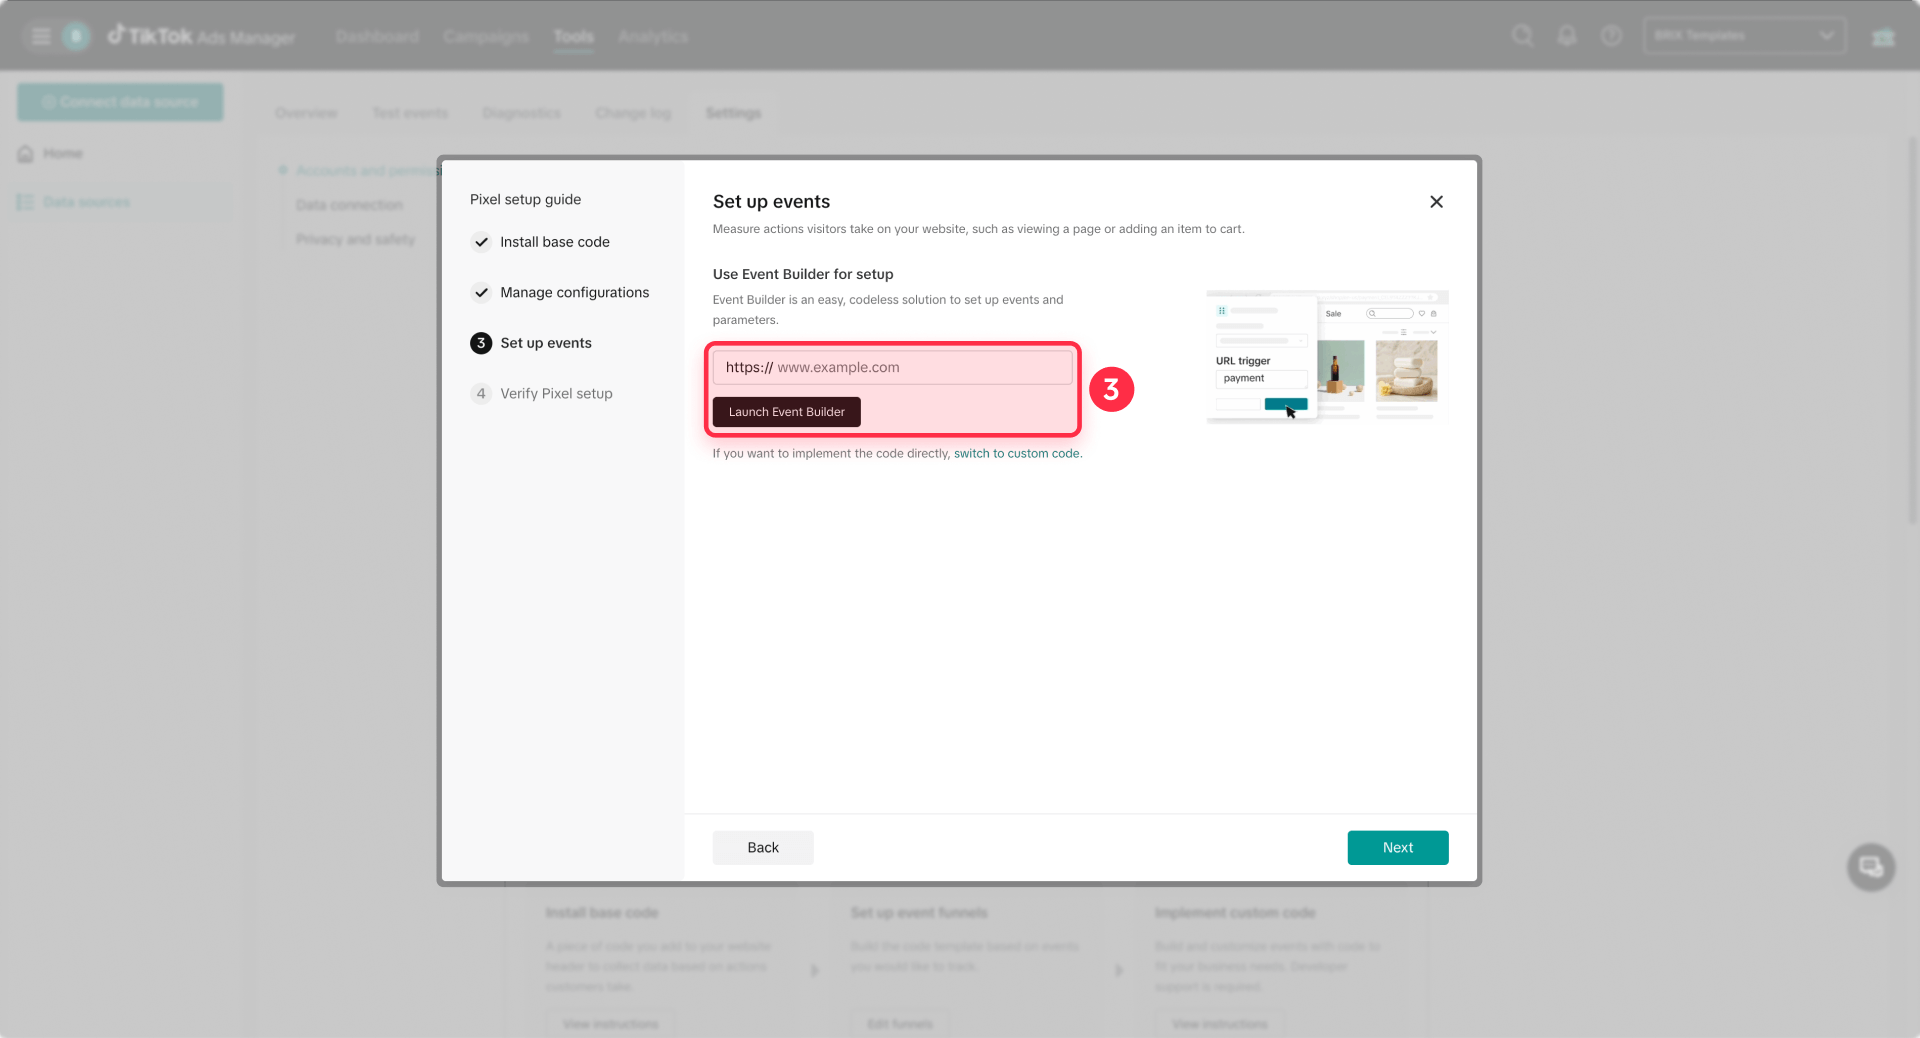
In TikTok, go to Tools → Events Manager, select Data Sources, and choose your pixel. Click Complete Setup, enter your business URL, and launch Event Builder. It opens your site in a new tab.
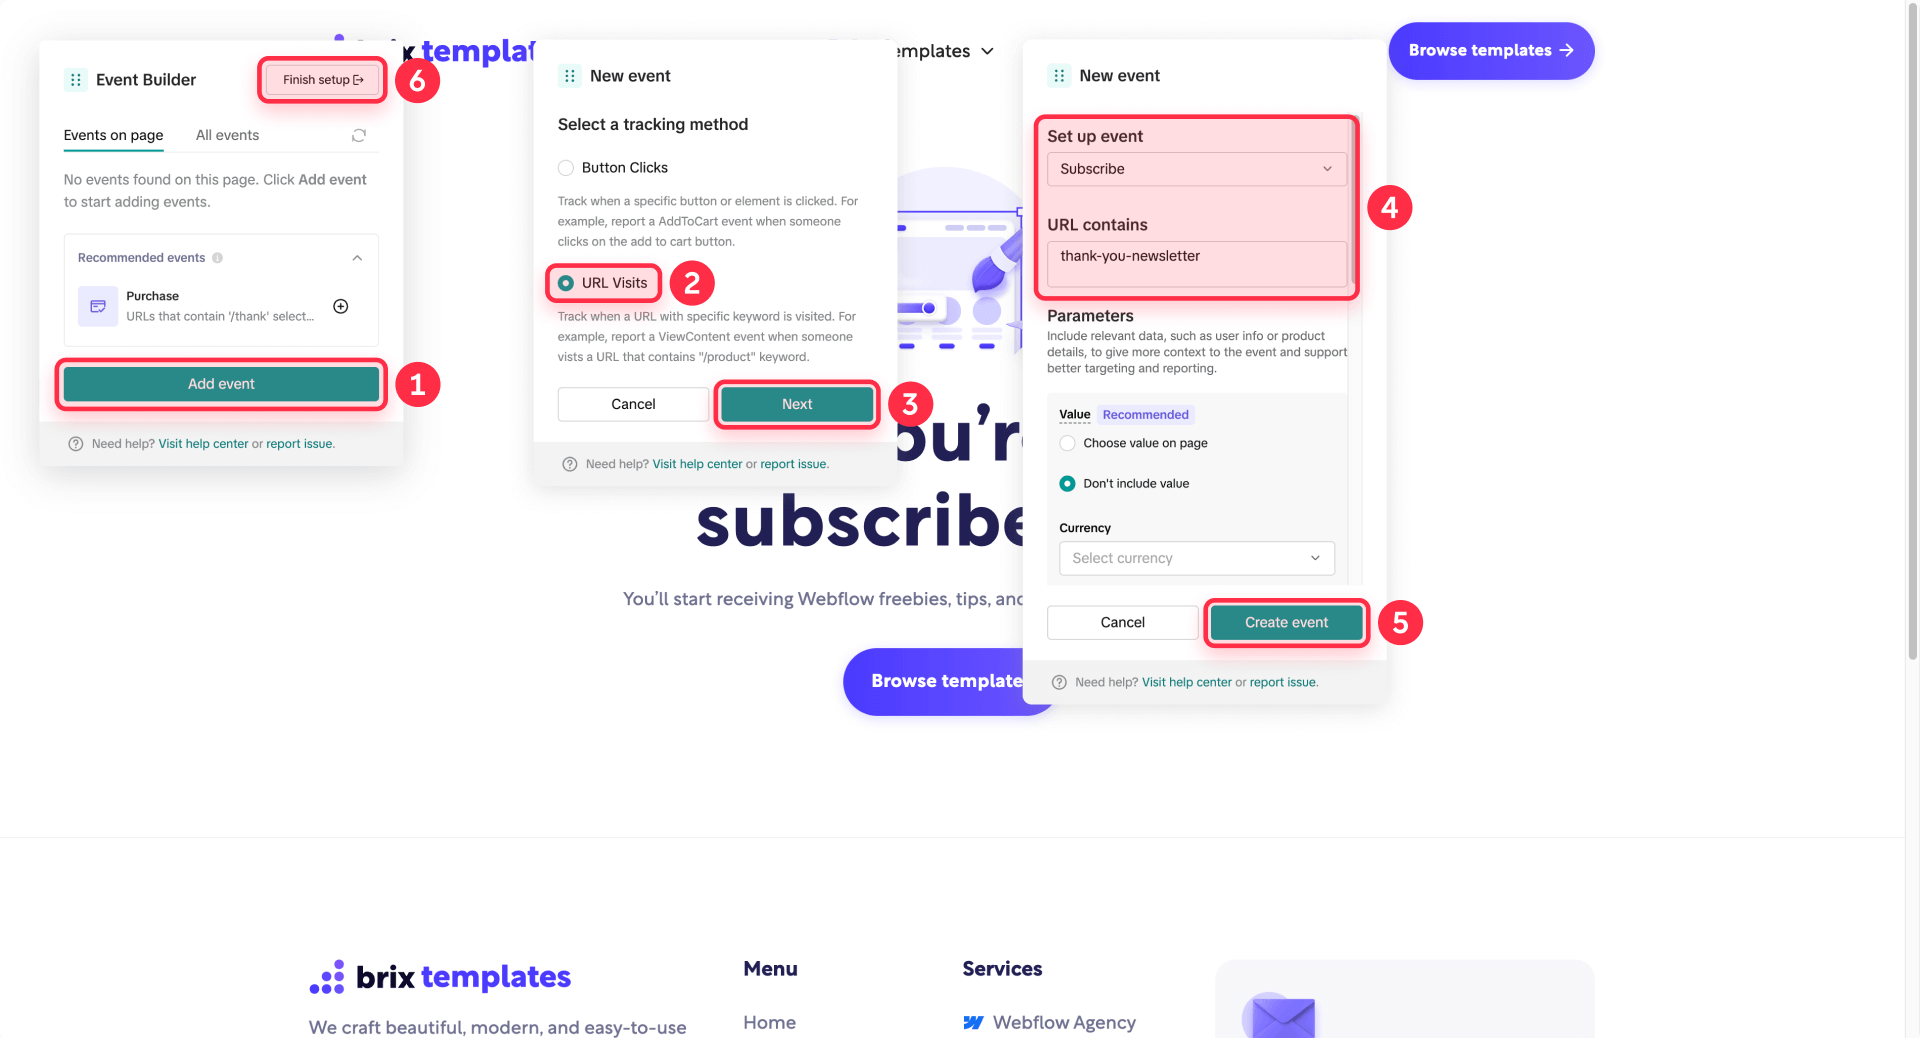
Click Add event and choose URL Visits for thank-you page tracking. Use a URL keyword like thank-you and set the event to SubmitForm. Add parameters like Value, Currency, Content ID, and Content Type if you have them.
After creating the event rule in Event Builder, verify it appears in Test Events by submitting a real form on your Framer site. Check Diagnostics for parameter warnings or formatting issues.
Need help setting up a custom event? We can help—get in touch.
Track Framer purchases when checkout is on another domain
If your Framer site sends users to an external checkout domain (common with LemonSqueezy or similar providers), purchase tracking often breaks because TikTok wants conversion events on the same naked domain.
Your realistic options:
- Move checkout to the same domain if your provider supports a custom domain.
- Track Purchase via a return or thank-you page on your Framer domain using TikTok Event Builder URL Visits.
- Upgrade to Events API and deduplicate with event_id for best reliability.
Don't waste time trying to force a client-side pixel to behave cross-domain without proper infrastructure. Purchase tracking on Framer is easiest when the entire conversion flow stays on one domain.
Troubleshooting TikTok Pixel in Framer
Common issues have straightforward fixes when you know where to look.
- Pixel Helper shows "Invalid Pixel ID": Open Events Manager, copy the correct Pixel ID and base code, update your Framer Custom Code snippet, and Republish to fix the mismatch.
- Pixel Helper shows "First-Party Cookies Not Found": In Events Manager settings, open Cookie Info and enable first-party cookies, then re-test with Pixel Helper to confirm the warning is resolved.
- Test Events shows nothing: Use TikTok's live test environment (your UI may allow direct open without QR), trigger one clear action, disable ad blockers, and wait for the event to appear with latency considered.
- Duplicate events (PageView twice, conversions doubled): You installed TikTok twice through both manual Custom Code and GTM. Remove one installation path completely, Republish Framer, and re-check with Pixel Helper.
- Events appear in Pixel Helper but not in Events Manager dashboards: Use Test Events and Diagnostics—dashboard reporting can lag significantly, and Diagnostics will tell you exactly what's missing or malformed.
- Purchase never fires with external checkout: Your checkout domain is not your Framer domain. Use a custom checkout domain on your main domain, track on a return thank-you page on your Framer domain, or implement Events API.
- Framer custom domain behaves inconsistently: Fix your DNS configuration so your naked domain and subdomain resolve correctly for Framer, as bad DNS causes flaky tracking and verification failures.
- Custom Code changes don't appear live: Ensure you clicked Republish in Framer after adding or modifying Custom Code snippets, as code changes don't go live until republish.
Frequently asked questions about TikTok Pixel in Framer
These questions address the most common searches and concerns about TikTok Pixel implementation on Framer sites.
What is TikTok Pixel in Framer and what does it track?
TikTok Pixel in Framer is a browser script that sends website actions back to TikTok so you can measure and optimize ads.
The only implementation that matters is one that's verified: you should see page activity in Events Manager and at least one conversion event firing consistently in Test Events. Dashboard reporting can lag, so use Diagnostics to spot cookie, ID, or parameter issues.
The pixel tracks standard events like PageView, ViewContent, AddToCart, SubmitForm, and Purchase, along with the parameters you configure. If you're using an external checkout, treat Purchase tracking as a separate domain alignment problem.
How do I create a TikTok Pixel in Framer using TikTok Events Manager?
To create TikTok Pixel in Framer, go to TikTok Ads Manager → Tools → Events Manager → Connect Data Source → Web, enter your Framer website URL, then choose Partner Integration (GTM) or Manual Setup for direct installation.
After creation, TikTok shows installation steps and verification tools. Your immediate next move should be verification: install the base code in Project Settings → Custom Code with Head placement and Once execution, Republish your site, then validate using Pixel Helper and Test Events.
Where do I add TikTok Pixel in Framer Custom Code: head or body?
For TikTok Pixel in Framer, place the base code in Head placement so it loads early on every page. TikTok's Pixel Helper flags header placement issues explicitly, and Framer's own guidance for pixel-style tags like Meta Pixel instructs you to paste code at the start of the head and republish.
Keep the base pixel as a site-wide snippet with execution set to Once so it doesn't reinitialize on navigation. After republishing, verify on your production domain using Pixel Helper, then use Test Events to confirm TikTok is receiving events correctly.
Is it better to install TikTok Pixel in Framer manually or via GTM?
TikTok Pixel in Framer should be installed via GTM if you want long-term control: easier consent gating, centralized debugging, and fewer mystery scripts inside your Framer project. Manual installation is faster and totally fine for simple setups.
The biggest mistake is doing both—manual plus GTM causes duplicated events and ruins optimization signals. If you already use tag management for other platforms, choose GTM and keep Framer Custom Code limited to just the GTM installation snippets.
Why is TikTok Events Manager not receiving events from my Framer site?
When TikTok Pixel in Framer isn't sending events, it's usually one of four issues:
- Wrong Pixel ID or base code
- Incorrect placement (not in Head)
- You didn't Republish after Custom Code changes
- Testing is blocked by ad blockers or cookie settings
Start by validating the base install with Pixel Helper and fix the exact error message it reports. Then run Test Events on your published URL and trigger a single clear action like a click or form submit, and check Diagnostics for cookie issues (including first-party cookies) and parameter warnings.
Can I track Framer form submissions as a TikTok lead event without writing overrides?
Yes—TikTok Pixel in Framer can track lead generation without code by using TikTok Event Builder with URL Visits for a thank-you page, confirmation route, or completion page on your Framer domain.
In Event Builder, set the URL rule and map it to SubmitForm. After publishing the rule, verify it in Test Events by completing a real submission, then review Diagnostics for any parameter or cookie warnings.
How do I avoid duplicate TikTok Pixel events in Framer?
Duplicate events happen when TikTok Pixel in Framer is installed twice—most commonly once via Framer Custom Code and again via GTM. The fix is simple: choose one installation method, remove the other completely from Framer Custom Code, then Republish and re-test.
Use Pixel Helper to verify only one pixel instance is detected on-page, then use Test Events to confirm event counts look normal. If duplicates persist, audit your Project Settings → Custom Code list for older snippets you forgot about.
How do I verify TikTok Pixel events on a Framer site using Test Events?
To verify TikTok Pixel in Framer, open your pixel in Events Manager and go to Test Events. TikTok may show a QR-based flow or a live test environment that lets you open your website directly—use whichever your UI presents.
Visit your published Framer URL and trigger a single action you expect to track, such as form submit, CTA click, or reaching a confirmation page. Watch the Test Events activity panel for the event to appear, keeping in mind there may be latency. If nothing appears, disable ad blockers and check Diagnostics for cookie or configuration issues.
Do I need Events API for TikTok Pixel in Framer, or is pixel-only enough?
TikTok Pixel in Framer can be sufficient for basic tracking, but it gets less reliable as consent rules and browser restrictions reduce client-side signals over time. The upgrade path is Events API, which sends events server-side and can recover conversions the browser misses due to ad blockers or privacy settings.
If you implement Events API, you must deduplicate properly to avoid double counting by using the same event_id across Pixel and Events API events. The right sequence is: get pixel-only tracking clean and verified first, then add Events API when signal loss starts hurting optimization or attribution becomes inconsistent.
Why is Purchase tracking hard on Framer when checkout is on another domain?
TikTok Pixel in Framer struggles with Purchase when checkout happens on another domain because conversion attribution is tied to where the event fires, and cross-domain tracking breaks when domains don't match.
The practical fixes are: use a checkout provider that supports a custom domain on your main domain, track Purchase on a return or thank-you page on your Framer domain using URL-based Event Builder rules, or move to Events API for server-side tracking with proper deduplication. Don't waste time trying to force a client-side pixel to behave cross-domain without proper infrastructure—it won't work reliably.
Conclusion for TikTok Pixel in Framer
A working TikTok Pixel setup on Framer follows a specific sequence: connect the Web data source in Events Manager, install the base code properly in Framer Custom Code with Head placement and Once execution, verify installation with Pixel Helper and Test Events, then implement standard conversion events with a clean strategy for forms and checkout. If you want higher reliability under consent and browser limits, the next step is Events API with correct deduplication using event_id.
If you'd rather have this implemented and audited end-to-end including GTM governance and a clean debugging workflow, our Framer agency can handle the complete setup as a dedicated build partner. Get in touch.


Join readers commenting on this post!