
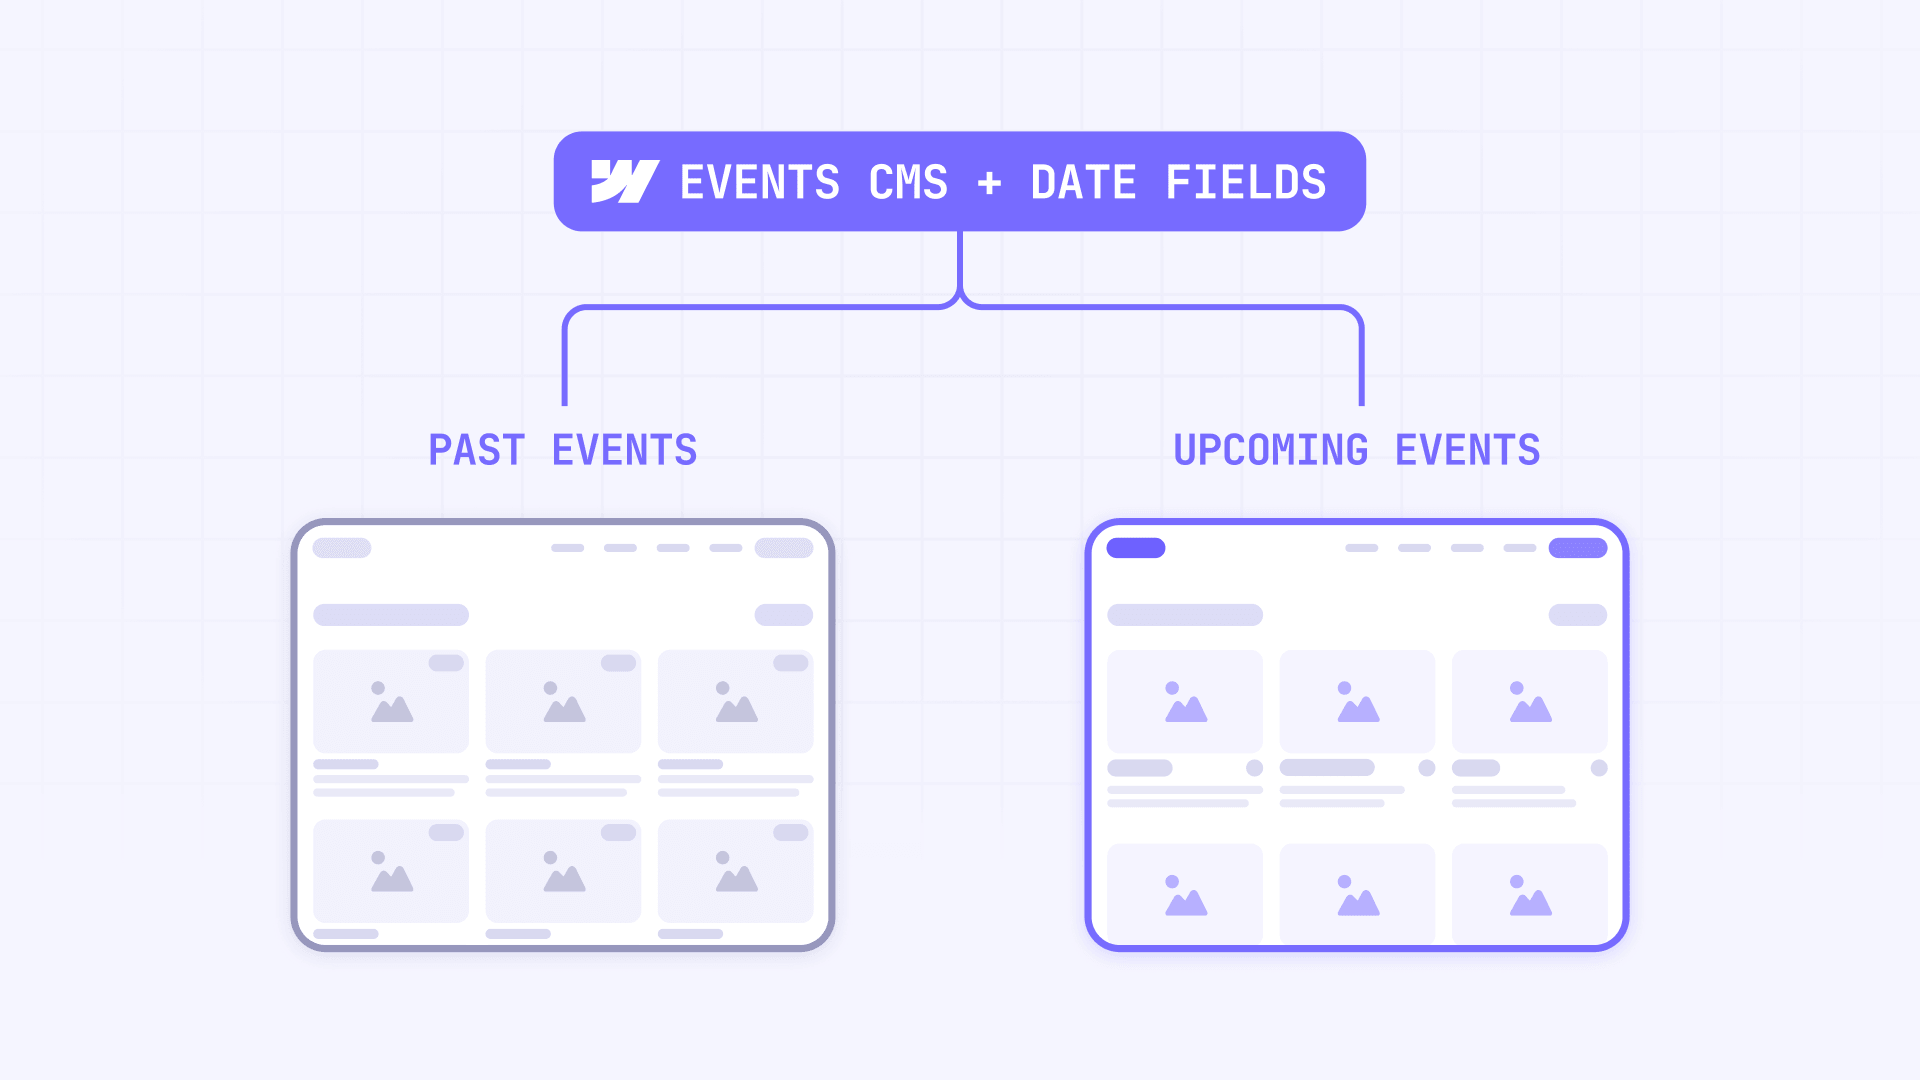
Event pages get outdated fast when past webinars, workshops, or meetups still show registration CTAs. Instead of manually moving or archiving events, structure your Webflow CMS around start and end dates so upcoming and past sections update automatically.
In this tutorial, you’ll learn how to build a simple Events CMS setup that separates upcoming and past events, handles multi-day dates, shows the right CTAs, and keeps empty states from looking broken.
Why date-driven Webflow event pages matter
When an event page runs on dates instead of manual status fields, the whole system becomes easier to maintain — for developers, editors, and clients.
- Less manual maintenance. Editors add the event once, set the start and end dates, and let the filters decide where it appears.
- Cleaner visitor experience. Visitors see registration CTAs for future events and recording links for past events, with less risk of outdated buttons.
- Better content longevity. Past webinars, talks, and workshops become an on-demand library instead of disappearing after the event date.
- More reliable client handoff. Clients do not need to remember which section to move each event into after it ends.
What Webflow CMS can handle natively for events
Webflow's Collection List supports date-based filters with relative conditions like Is after or equal to today and sort orders like Oldest to newest. That means you can build a basic upcoming/past split without any third-party tools.
What native filters handle well:
- Filtering events by date relative to today (upcoming, past).
- Sorting events by start date or end date in either direction.
- Displaying empty state messages when no items match.
When native filters are not enough:
- Visitor-controlled filtering by event type, location, or speaker.
- Search across event titles and descriptions.
- Exact time-based logic (moving an event to past at the exact end hour, not just the day).
- Automatic CMS status changes after an event ends.
For those cases, Finsweet attributes, custom JavaScript, or automation tools like Make can fill the gap. But start with native filters first — they cover most event page needs.
Plan your Webflow Events CMS structure
Before building anything in the Designer, set up your CMS fields. Every filter, sort rule, and conditional button pulls from these fields, so getting them right from the start saves time later.
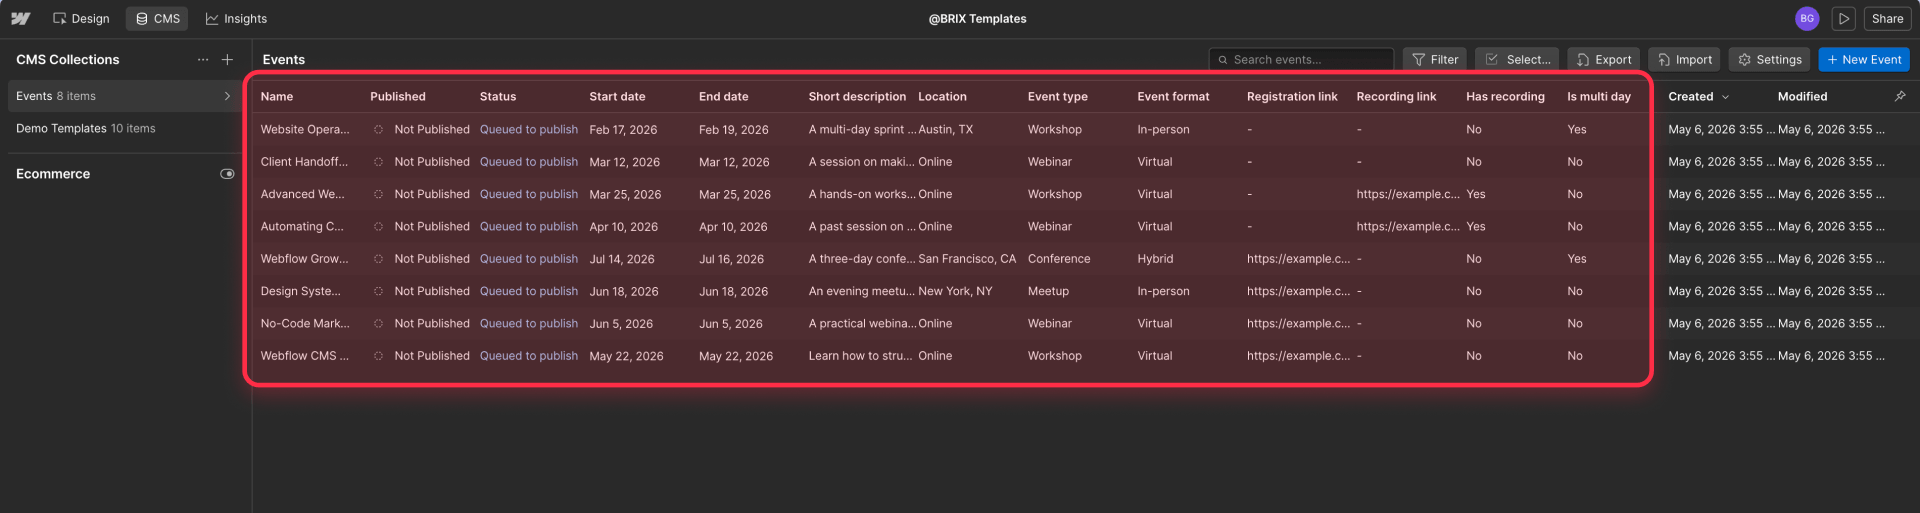
Minimum fields for the upcoming/past setup
These six fields power the core date logic and CTAs:
- Event name — Plain Text (default). The title shown on cards and landing pages.
- Start date — Date/Time. When the event begins. Used for sorting.
- End date — Date/Time. When the event ends. Used for filtering the upcoming/past split.
- Registration link — Link. External registration or RSVP destination.
- Recording link — Link. Recording or on-demand video destination.
- Has recording — Switch. Whether a recording is available after the event.
The Start date and End date fields are the ones that drive the actual date logic. Start date controls the display order. End date controls whether an event appears in the upcoming or past section.
Optional fields
Depending on the project, you can also add: location, event type, event format, featured image, short description, event description, speakers (multi-reference), price, capacity, calendar download link, slides link, an "Is multi-day" switch, and a status field for labels like Cancelled or Sold out. Not all of these are necessary for the basic setup — add them as your design requires. For events where you want attendees to save the date, see our tutorial on how to add a free add-to-calendar button in your Webflow site.
Tip: For one-day events, still fill out both Start date and End date. Set the End date to the same calendar day. This keeps your filtering logic consistent across all events.
Use dates, not manual status, to separate upcoming and past events
Many teams add an "Event status" option field and set it to "Upcoming" or "Past" manually. This works for a handful of events, but breaks down fast — someone forgets to update the status, a weekly webinar generates dozens of manual changes per month, or the client does not realize they need to change it at all.
The better approach: drive upcoming and past logic from your date fields. An event where the End date has not passed yet is upcoming. An event where the End date has passed is past.
Use the End date for the split — not the Start date. A conference that starts Monday and ends Thursday should stay in the upcoming section through Thursday. If you filter by Start date, it disappears on Tuesday while the event is still happening.
A Status field is fine for edge cases like Cancelled, Sold out, or Invite only. But it should not be the primary way you separate upcoming from past events.
Build the upcoming events section
The upcoming events section shows events that have not ended yet, sorted from soonest to latest.
Step 1 — Add the Collection List
- Add a new section to your events page with a heading like Upcoming events.
- Add a Collection List element and set the source to Events.
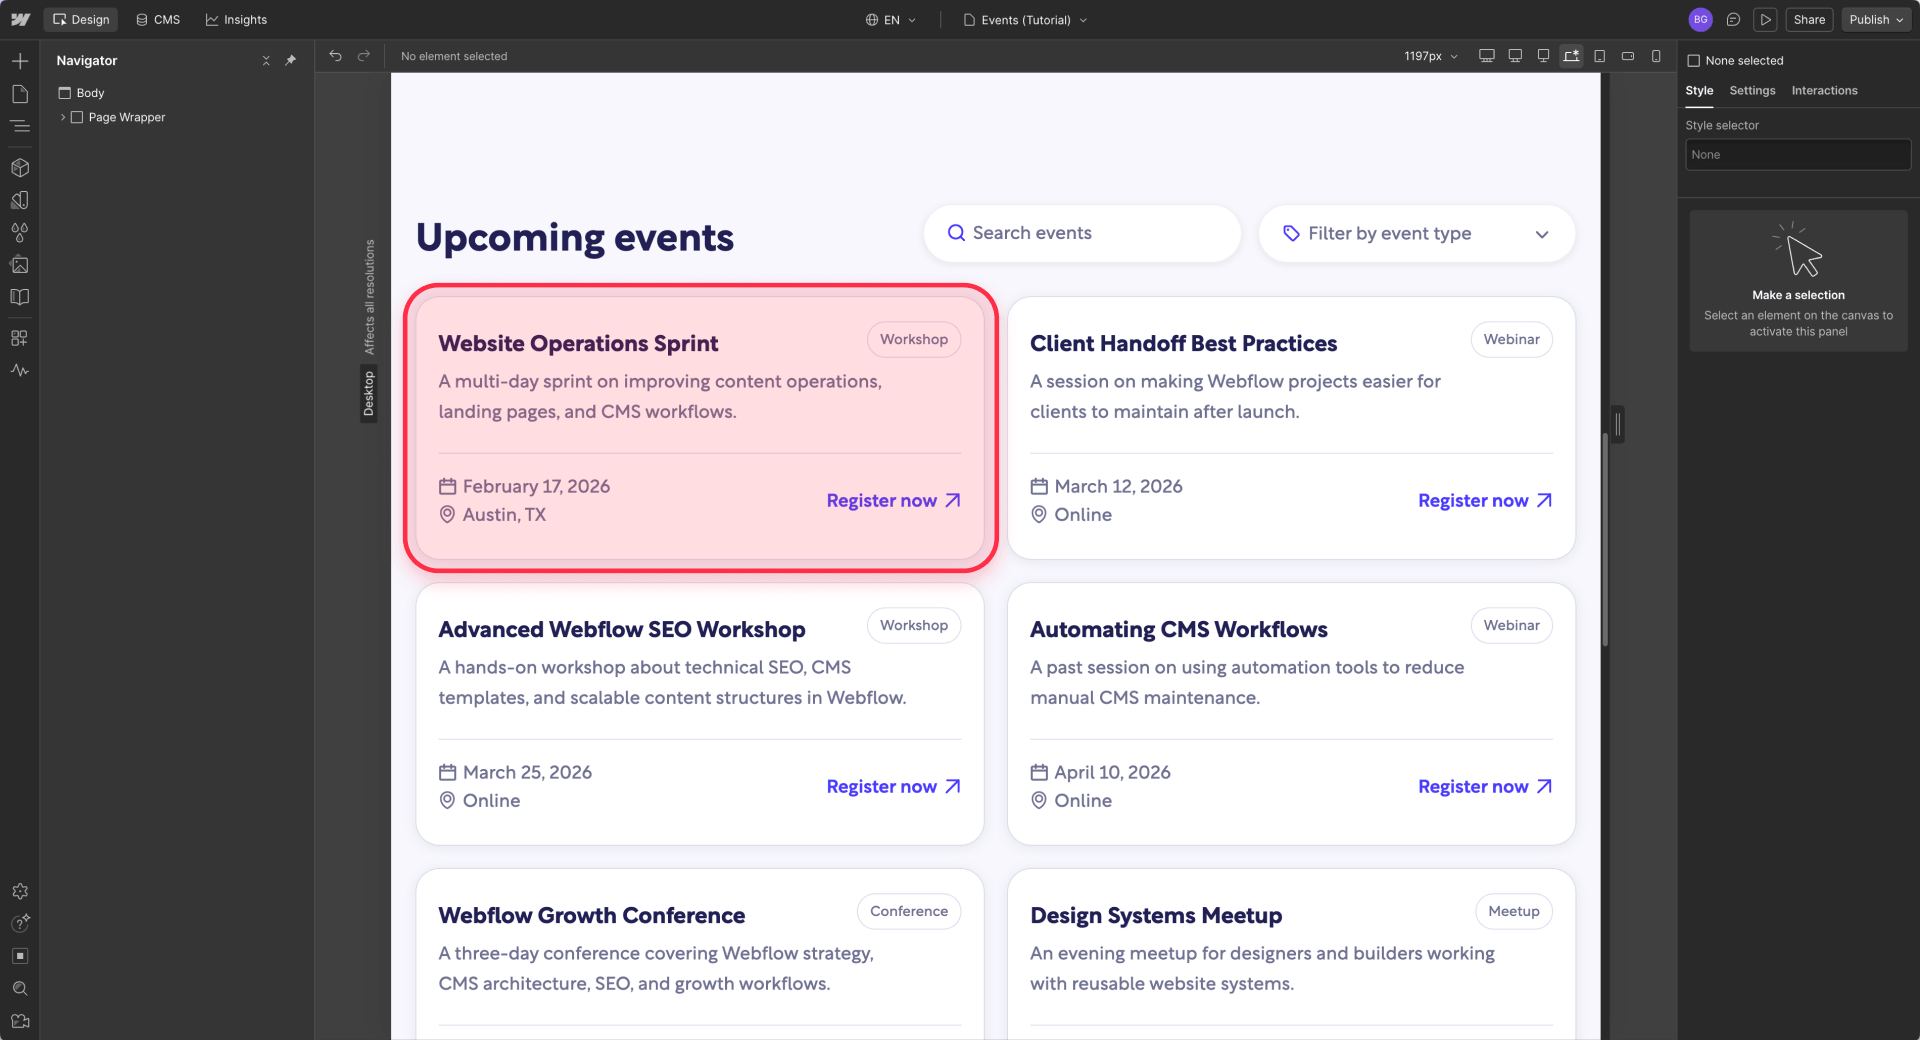
- Design the event card inside the Collection Item.
Inside each card, include:
- Event type label (Webinar, Workshop, etc.)
- Event name
- Start date and time
- End date when the event is multi-day, using an "Is multi-day" switch or custom logic if needed
- Location or "Online"
- Short description
- Register now button linked to the Registration link field
Step 2 — Filter to show only future events
- Select the upcoming Collection List.
- Open Element settings → Collection list settings → Filters.
- Add a filter: End date → Is after or equal to → 0 days (today).
- Click Save.
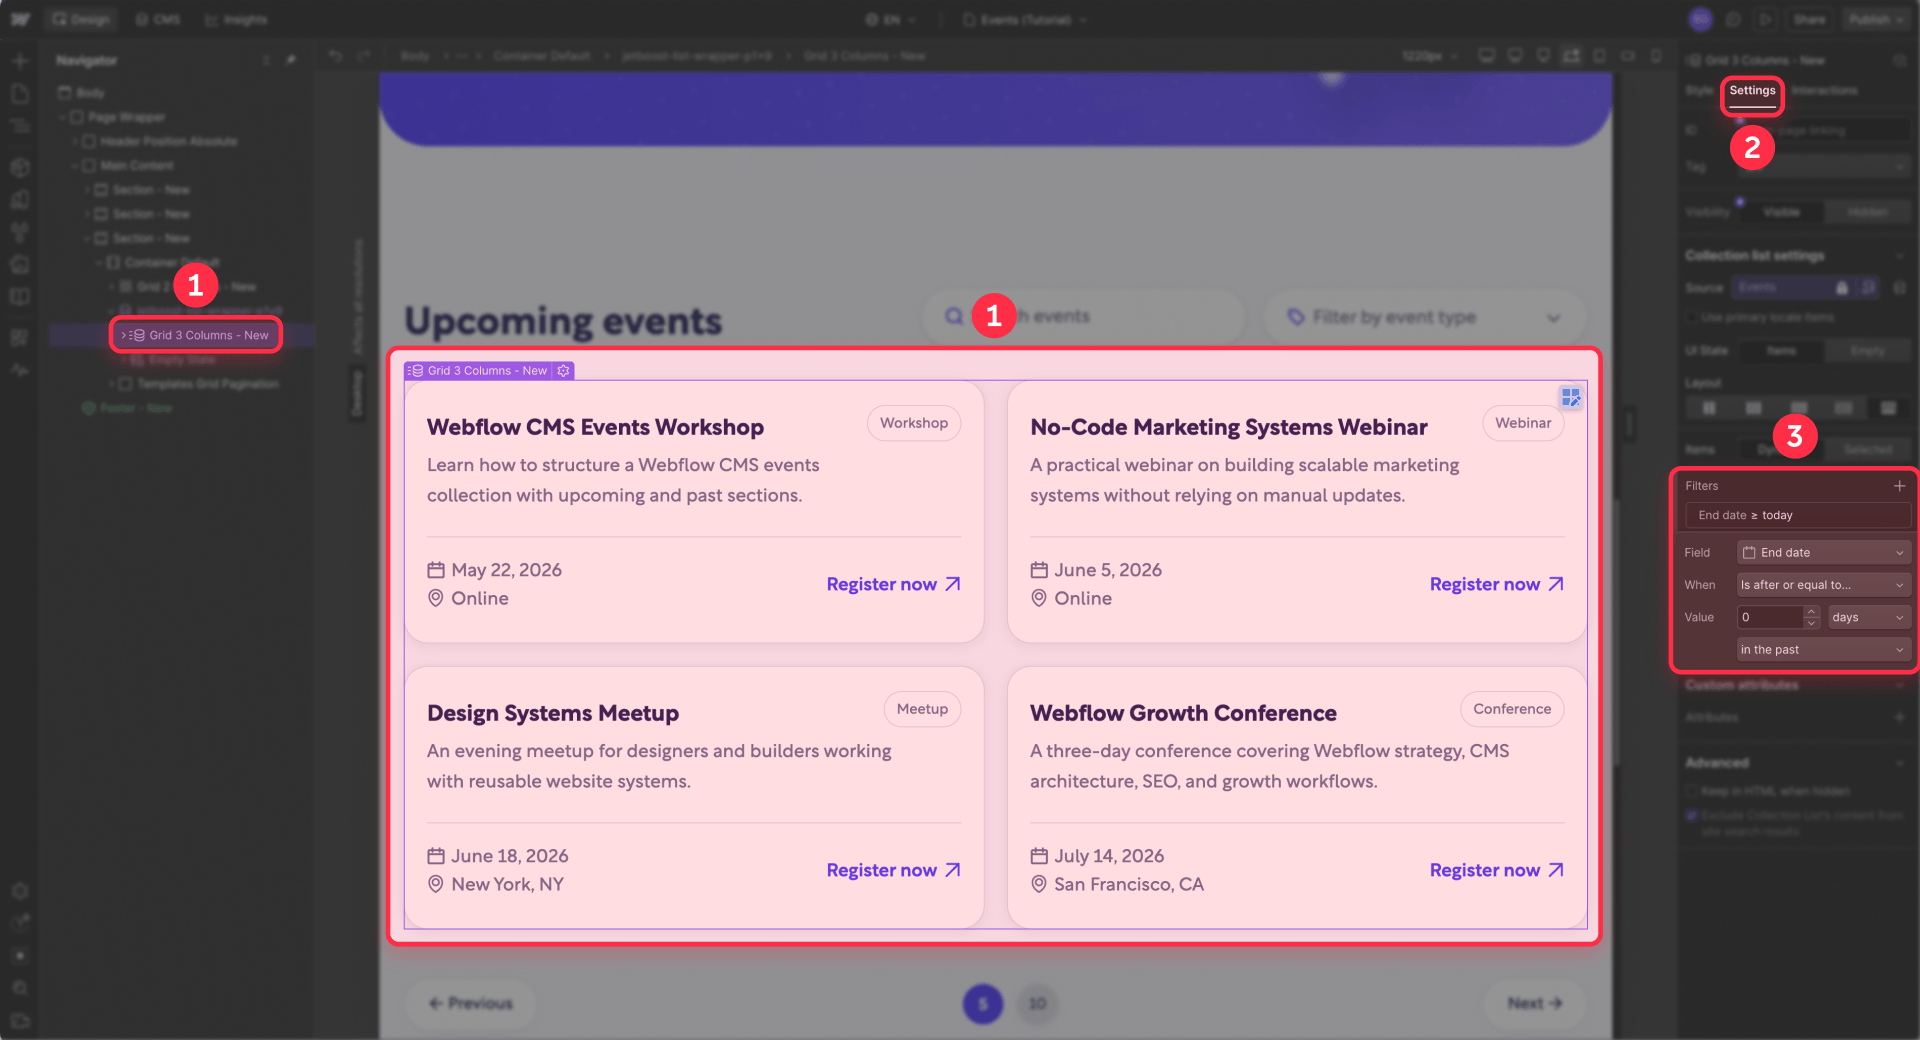
This keeps events visible when their End date is today or later.
Tip: If your past section also includes today, same-day events may appear in both sections. Many teams keep events in the upcoming section through the current day and move them to the archive the next day.
Step 3 — Sort by start date ascending
- Select the upcoming Collection List.
- Open Element settings → Collection list settings → Sort.
- Choose Start date → Oldest to newest.
- Click Save.
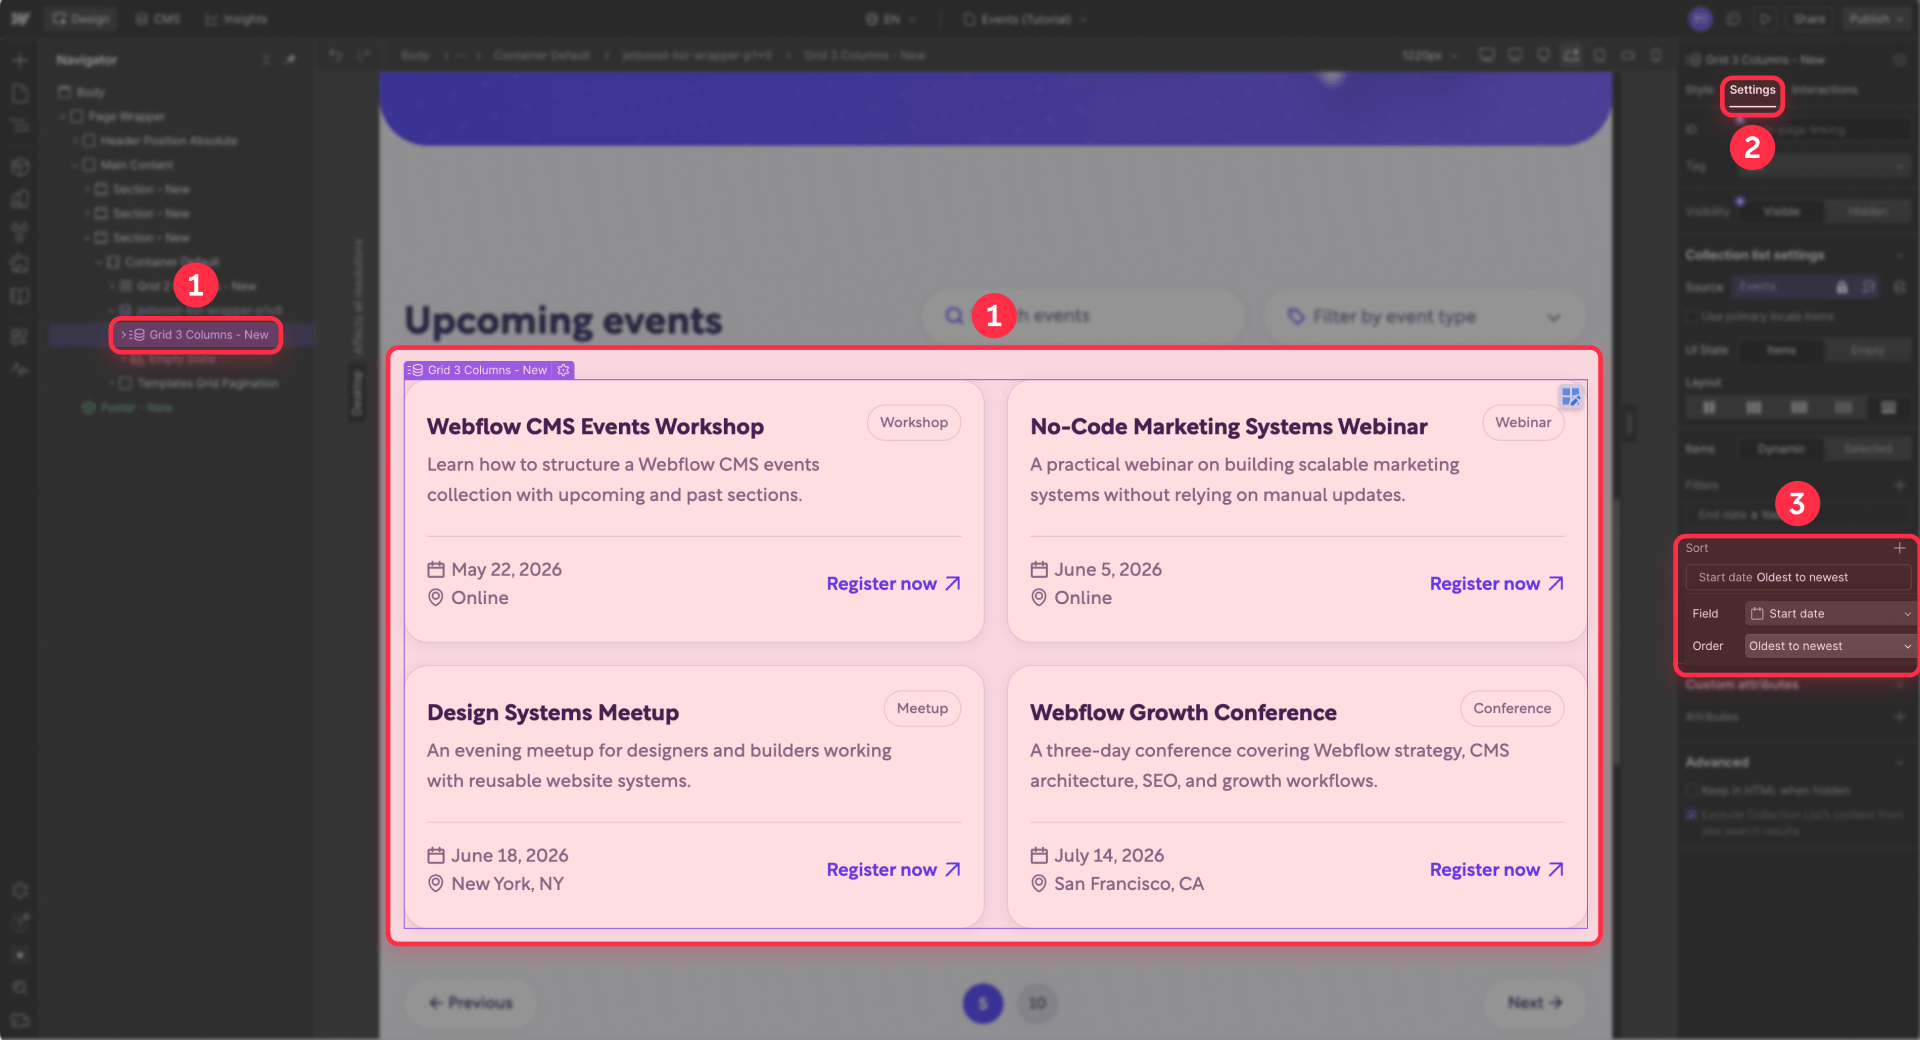
This places the next event at the top.
Build the past events section
The past events section uses the same Events collection with the filter and sort reversed. You do not need to repeat the full setup — just apply the opposite logic.
- Filter: End date → Is before or equal to → 1 day in the past. Using 1 day avoids placing events that end today into the archive while they may still be happening.
- Sort: End date → Newest to oldest. This puts the most recently completed event at the top. Use Start date instead if most of your events are single-day.
Past event CTAs should change from registration to archive language: Watch recording (when Has recording is checked and Recording link is set), Download slides, View recap, or a non-clickable Recording unavailable label. Always show a label instead of leaving a dead or empty button.
Add empty states for when there are no events
An events page with an empty section looks broken. Webflow's Empty state replaces a Collection List when there are no items to display, including when items are filtered out. Select any Collection List, switch the UI state to Empty state in the Designer, and customize the message.
- No upcoming events: "No upcoming events are scheduled right now. Check back soon for new webinars, workshops, and community sessions."
- No past events: "No past events are available yet. Once our first sessions are complete, recordings and recaps will appear here."
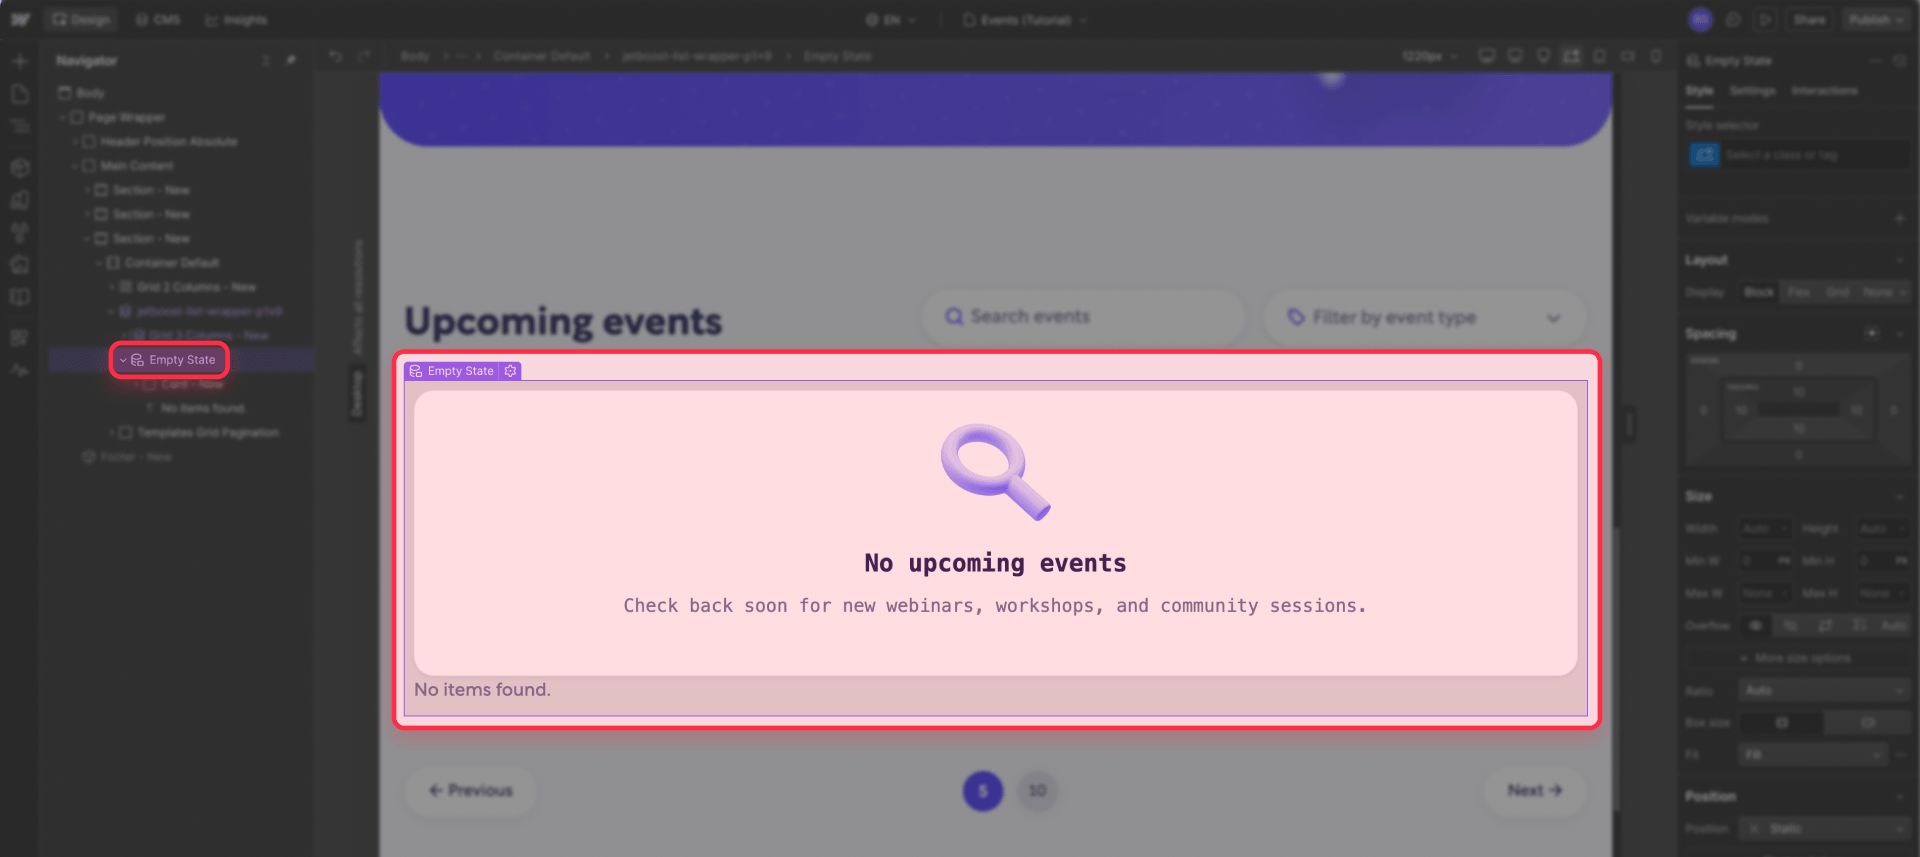
Both empty states can include a CTA — subscribe for updates, browse upcoming events, or contact us about private workshops. For a deeper walkthrough on handling empty CMS sections, see our guide on how to hide empty CMS sections in Webflow. For client projects, document what editors should do before the first event is published. A polished empty state is much better than a page that looks unfinished.
Handle multi-day and ongoing events correctly
Multi-day events are where many event pages break. As covered earlier, always use End date for the upcoming/past split so a conference running Monday through Thursday stays visible for all four days.
For the display, show both dates on the card when they differ: "March 15–17, 2026" or "March 29 – April 1, 2026." For single-day events, show only the start date. Webflow cannot natively compare two date fields inside conditional visibility, so you have a few options for hiding the end date on single-day events: use an "Is multi-day" Switch field and set visibility on the end date element, always show both dates, or use custom code.
For recurring events, create individual CMS items for each occurrence so each instance can be filtered and sorted independently.
Show different buttons for upcoming vs past events
Upcoming and past events should not use the same CTA logic.
Upcoming buttons:
- If Registration link is set, show Register now.
- If the event is sold out, show Join waitlist.
- If registration is not open yet, show Coming soon or hide the button.
Past buttons:
- If Has recording is checked and Recording link is set, show Watch recording.
- If Slides link is set but no recording exists, show Download slides.
- If neither is available, show View recap or a non-clickable Recording unavailable label.
Requiring both conditions for the recording button avoids visible buttons that point to empty or broken URLs.
On CMS Template Pages, use Conditional Visibility under Element settings to show or hide each button. On static pages with Collection Lists, the simplest approach is to use two separate Collection Lists — one for upcoming, one for past — with the right buttons baked into each.
When native Webflow CMS filters are not enough
Native filters cover most event pages. But real client projects often need more — visitor-controlled filters, search, tabs, load-more behavior, or automatic CMS status changes. Use the native setup first, then add tools only when the requirement clearly needs them.
Finsweet Attributes can add visitor-controlled filtering by event type, location, or speaker, search across titles and descriptions, CMS-powered tabs, and load-more or infinite scroll behavior. For a step-by-step walkthrough, see our tutorial on adding real-time search to your Webflow CMS collections. Use Finsweet when visitors need to interact with the list. Use native filters when the page only needs automatic upcoming and past sections.
Custom JavaScript helps when an events page needs exact time-based logic — for example, moving an event to the past section at the exact end hour, showing a "Live now" badge during the event window, changing "Register now" to "Join live," or using the visitor's timezone.
Automation or the Webflow API is needed when your workflow requires the CMS item itself to change — setting Status to Past, flipping the Recording available switch, or syncing events from another platform. Note that the API does not natively support filtering items by custom date fields, so you will likely need to fetch items and compare dates in your own code.
This level of customization is more technical than a basic date-filtered Collection List, but it is useful when a client needs a more polished and dynamic events experience. If your team needs help building advanced event logic in Webflow, our Webflow agency can help structure the CMS, design the experience, and implement the custom behavior.
Common mistakes when building Webflow event lists
Use this checklist when the upcoming or past sections do not look right.
- Upcoming events disappear after they start. The list is probably filtered by Start date instead of End date. Change the filter and verify that a multi-day event stays visible after day one.
- Same-day events appear in both sections. Your filters may both include today. Keep upcoming based on End date is after or equal to today, and set the past archive to yesterday or earlier.
- Event buttons show blank or broken links. Add conditional visibility that checks both the switch and the link field, or use separate card designs for upcoming and past sections.
- Using two separate collections for upcoming and past events. This duplicates the schema, breaks internal links, and requires constant maintenance. Use a ingle collection with date-based filtering instead.
- The empty state still says "No items found." Select the Collection List, switch the UI state to Empty state, and rewrite the placeholder message.
Frequently asked questions about Webflow CMS events
Can I separate upcoming and past events in Webflow without custom code?
Yes. Webflow's native Collection List filters support relative date conditions that handle the split automatically — no third-party tools needed. To set it up, select your Collection List, go to Element settings → Filters, and add End date → Is after or equal to → 0 days (today) for the upcoming section. For the past section, add End date → Is before or equal to → 1 day in the past. Then sort upcoming events by Start date ascending (next event first) and past events by End date descending (most recent first). This covers most event pages. You only need Finsweet Attributes or custom JavaScript when visitors need to filter by type, search across titles, or when you need exact time-based logic like moving events at the specific end hour.
Should I use a manual Event status dropdown to separate upcoming from past events in Webflow?
Avoid using a manual status field as the primary way to separate upcoming from past events. A dropdown that someone has to remember to update creates maintenance problems — a weekly webinar generates dozens of manual changes per month, and clients often forget to update the status after an event ends. Instead, drive the logic from your Date fields: if the End date has not passed, the event is upcoming; if it has, the event is past. A Status field is useful for edge-case labels like Cancelled, Sold out, or Invite only, but dates should control the upcoming/past split.
How do I handle multi-day events in Webflow CMS?
Add two Date/Time fields to your Events collection: Start date and End date. Filter by End date to determine whether the event is still ongoing, and sort by Start date for display order. This way, a conference running Monday through Thursday stays in the upcoming section for all four days instead of disappearing after day one. On your event cards, show both dates when they differ (for example, "March 15–17, 2026") and show only the start date for single-day events. You can add an "Is multi-day" Switch field to your CMS and use Conditional Visibility on the end date element to control when it appears.
How do I show different buttons for upcoming and past events in Webflow?
On CMS Template Pages, use Conditional Visibility (under Element settings) to show or hide each button based on the event state. For upcoming events, show a Register now button when the Registration link field is set, or a Join waitlist button for sold-out events. For past events, show a Watch recording button only when the Has recording switch is checked and the Recording link field is set — requiring both conditions prevents buttons that lead to empty or broken URLs. If neither a recording nor slides are available, show a non-clickable label like "Recording unavailable" instead of leaving an empty space. On static pages with Collection Lists, use two separate lists — one filtered for upcoming, one for past — with the right buttons built into each card design.
How do I add on-demand events alongside upcoming and past events in Webflow?
On-demand events do not have a live date, so they do not fit the standard upcoming/past date logic. Add an "On-demand" value to your Event type option field, then build a third Collection List filtered to show only items where Event type equals On-demand. To keep on-demand items out of your date-based sections, add an additional filter condition to your upcoming and past Collection Lists: Event type is not On-demand. If the content structure for on-demand events is significantly different from live events (different fields, different card layouts), consider using a separate CMS collection instead.
Does Webflow automatically move events to the past section after they end?
Yes for display, no for the CMS item itself. Webflow's date-based Collection List filters automatically stop showing an event in the upcoming section once the End date passes and start showing it in the past section — no manual action needed. However, the underlying CMS item does not change: its fields, slug, and status remain exactly as they were. If your workflow requires actual CMS item updates after an event ends (for example, flipping a "Recording available" switch or changing a Status field), you need the Webflow API or an automation tool like Make.
When do I need Finsweet or custom code for a Webflow events page?
Native Webflow filters are enough for a basic events page that automatically separates upcoming and past events by date. Finsweet Attributes is worth adding when visitors need to filter events by type, location, or speaker, search across titles and descriptions, or use tabs and load-more behavior. Custom JavaScript is needed for exact time-based logic — like moving an event to past at the specific end hour, showing a "Live now" badge during the event window, or adapting times to the visitor's timezone. Automation or the Webflow API is required when you need the CMS item itself to change after an event ends. Start with native filters, then add tools only when the project clearly needs them.
Conclusion
A well-built events page runs on dates, not manual updates. When you structure your CMS collection with start and end date fields, upcoming and past events separate and sort themselves automatically. Editors still need to add recordings, slides, or recaps after each event — but they no longer need to move items between sections or remember to archive old events.
Set up your fields once, build your Collection Lists with the right filters and sort order, add empty states for quiet periods, and use conditional buttons to show the right CTA for each event state. The result is an events page that largely maintains itself.
Real client projects often go beyond the basics — combining multi-day logic, on-demand libraries, custom CTAs, Finsweet filters, and automation into a single polished events experience. If your team wants help building that, BRIX Templates' Webflow agency services can structure the CMS, design the event experience, and deliver a maintainable setup your clients can actually use.









Join readers commenting on this post!