

Connecting Framer and Mailchimp can be done in several ways, but each method handles fields, tags, double opt-in, styling, and troubleshooting differently. The right choice depends on what you need — a simple newsletter signup, a form with custom fields, or a production integration with advanced segmentation.
In this guide, you will learn the three main methods for connecting your Framer forms to Mailchimp: using the native component, using Mailchimp's embedded signup form code, and setting up webhook workflows. We will help you pick the right one, map custom fields beyond email, and walk through troubleshooting the issues users commonly encounter.
Why connecting Framer forms to Mailchimp matters for your marketing site
Integrating your Framer site with Mailchimp helps you build a marketing workflow that grows your audience without manual effort.
- Automated lead capture: Send signup data from your Framer site to Mailchimp when users submit a form, depending on your opt-in settings.
- Audience segmentation: With the right setup, categorize new leads based on the page, form, tag, group, or hidden field used.
- Custom data mapping: Collect professional information like job titles, company sizes, or interests using custom merge tags in Mailchimp.
- Helps trigger welcome emails: Send new signup data to Mailchimp so welcome emails or automations can start after the contact is successfully subscribed or confirmed.
- Conversion tracking: Monitor which forms on your Framer project are driving the most signups and optimize your design accordingly.
Three ways to connect Framer forms to Mailchimp
Before diving into the setup, it is important to understand which method fits your project's specific needs:
- Native Component: Best for basic newsletter signups. It is extremely fast to set up with no code required, but it is best documented for simple forms and advanced field mapping may require other methods.
- Embedded Code: Best for forms with extra fields. It supports tags and groups depending on configuration and offers better field control, though it requires HTML tweaks and can be tricky on mobile.
- Webhooks (Zapier/Make): Best for production-grade sites. This method is often better for custom logic and segmentation while offering more control, but adds a third-party tool and potential cost.
Method 1 — Using Framer's native Mailchimp component
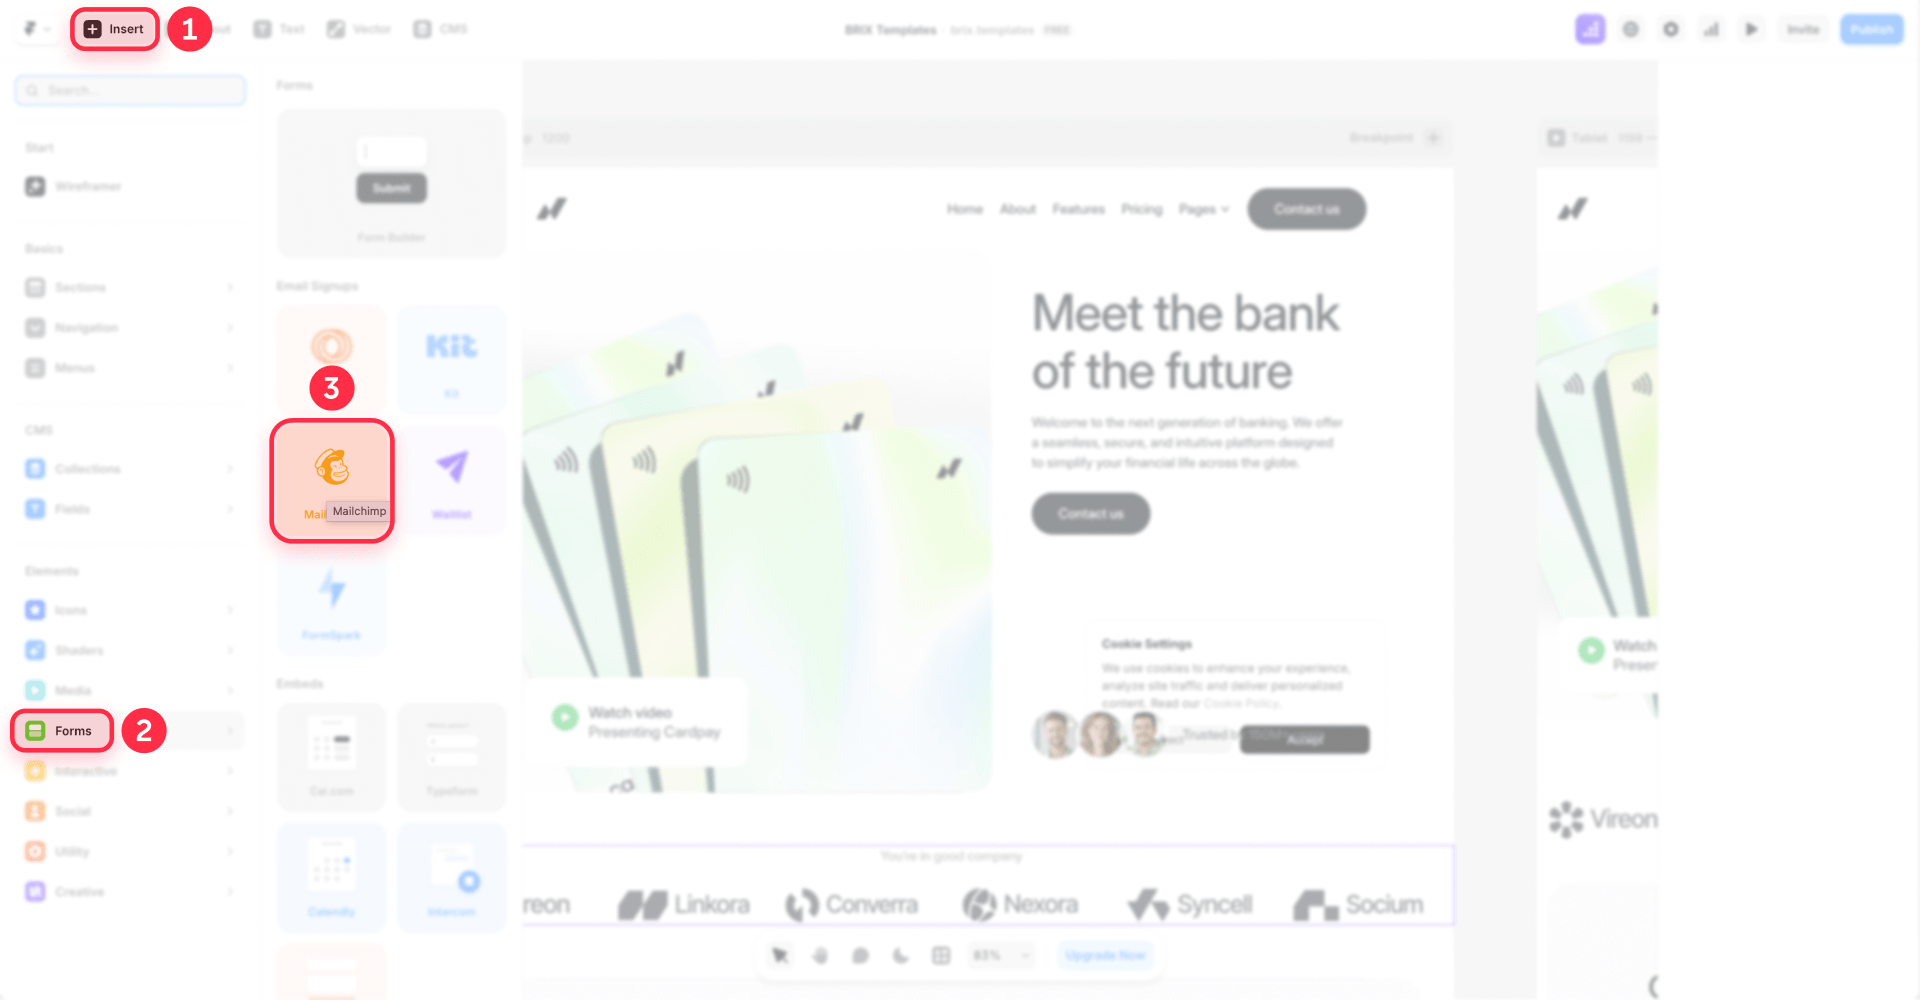
The simplest way to start is using the built-in Mailchimp component found in the Insert panel. This method uses the Mailchimp form action URL from Mailchimp's embedded signup form code to send data to your audience list.
- Open your Framer project and press I to open the Insert panel.
- Search for "Mailchimp" and drag the component onto your canvas.
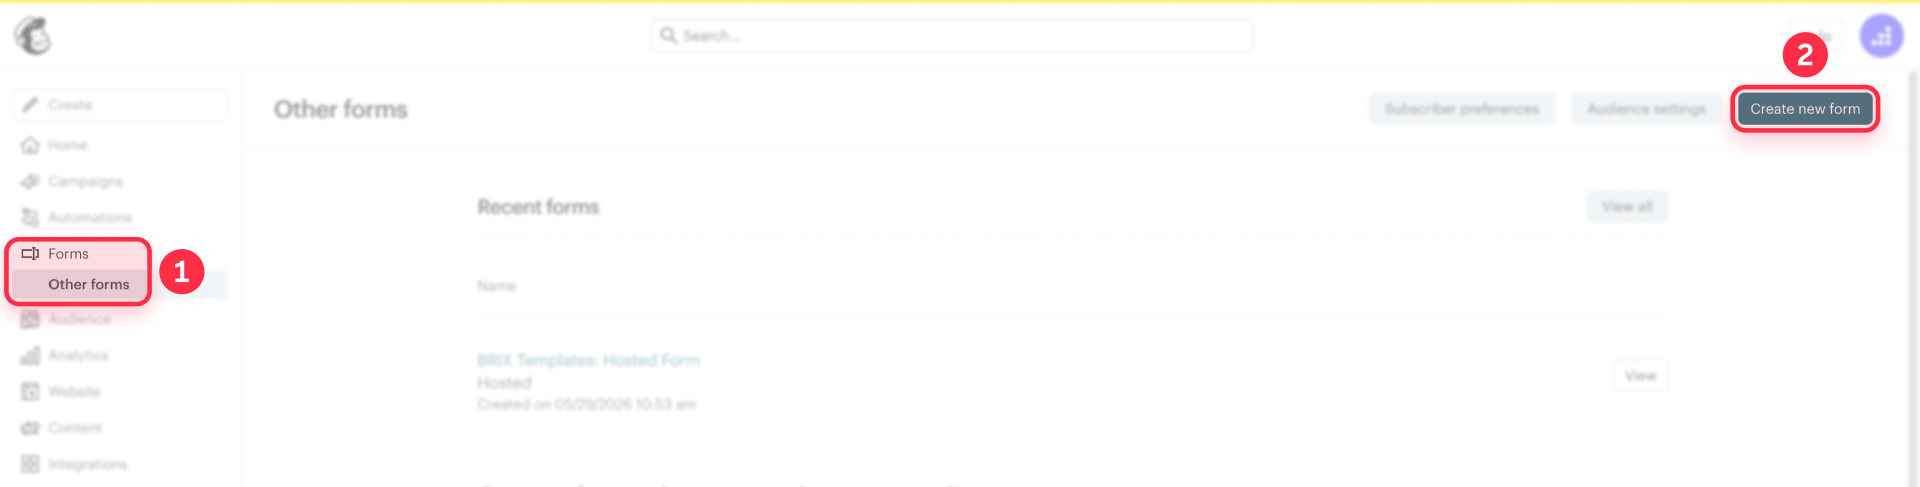
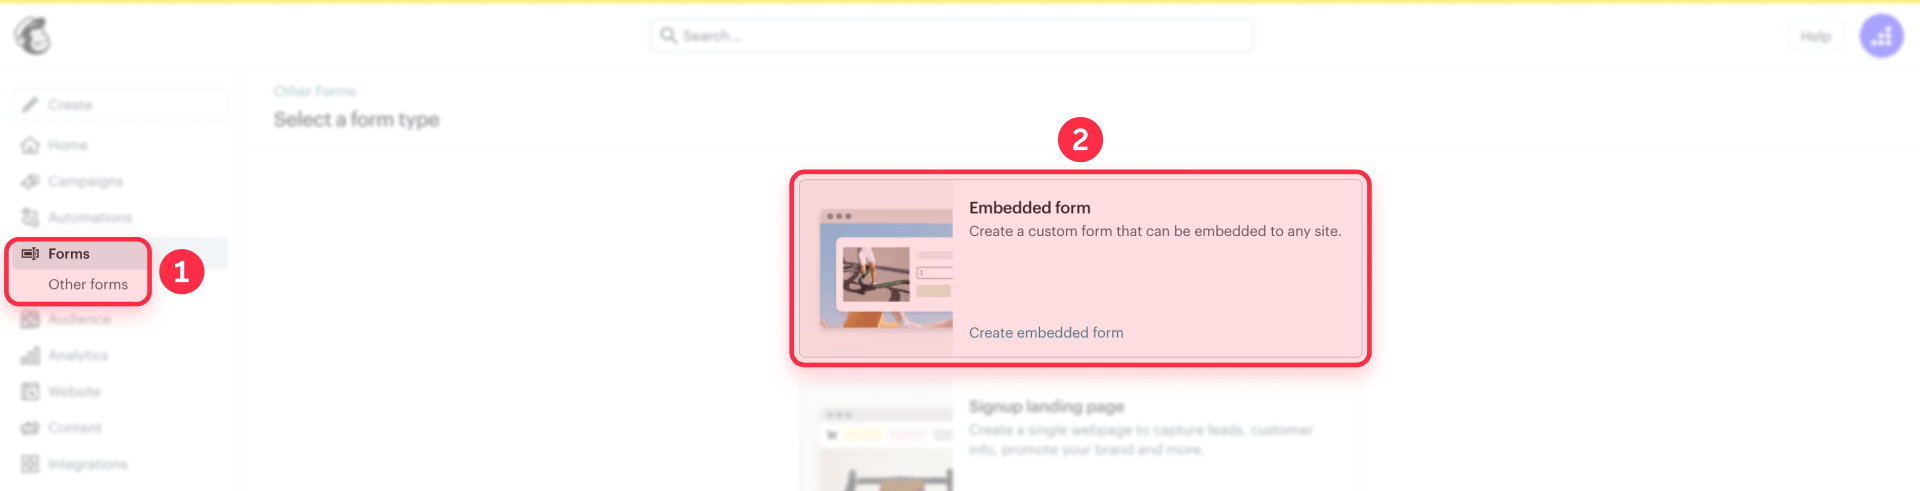
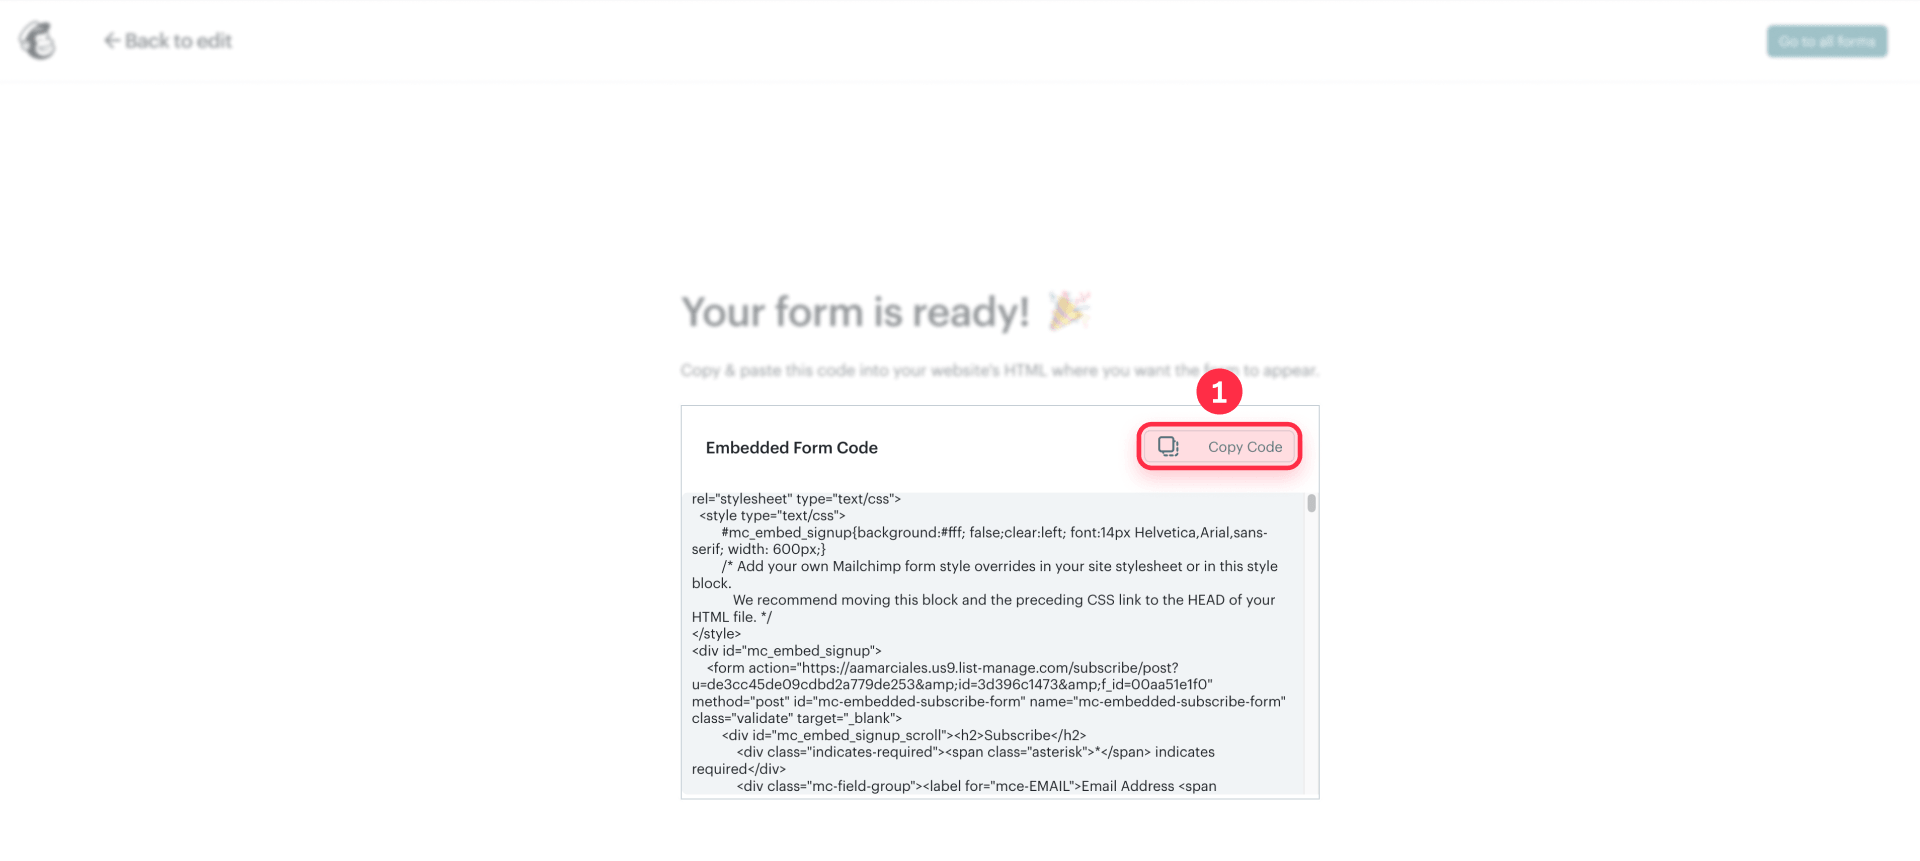
- In your Mailchimp account, navigate to Forms > Other forms > Create new form > Create embedded form > Continue to builder > Continue > Copy Code.
- Look for the Mailchimp form action URL inside the code snippet. It usually starts with https://[your-account].list-manage.com/subscribe/post?u=...
- Copy only the URL within the quotes of the action attribute.
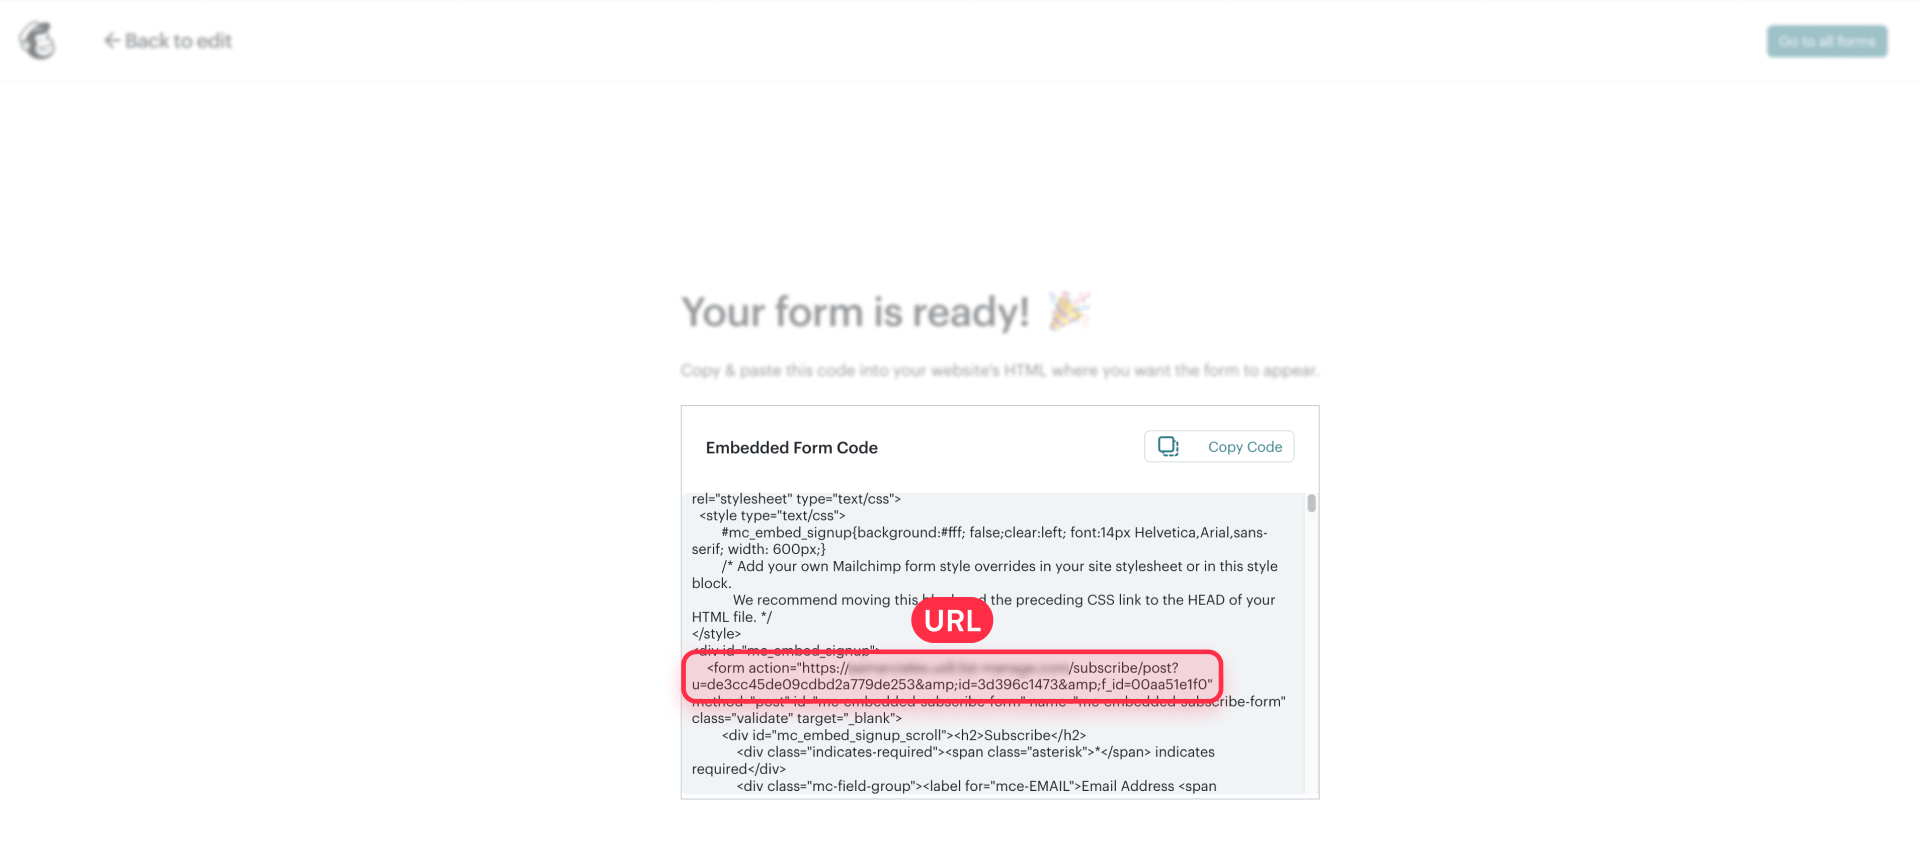
- Return to Framer, select the Mailchimp component, and paste the URL into the Form URL field in the Properties panel.
- Confirm the component includes the email input, customize the design, then publish or preview your site to test.
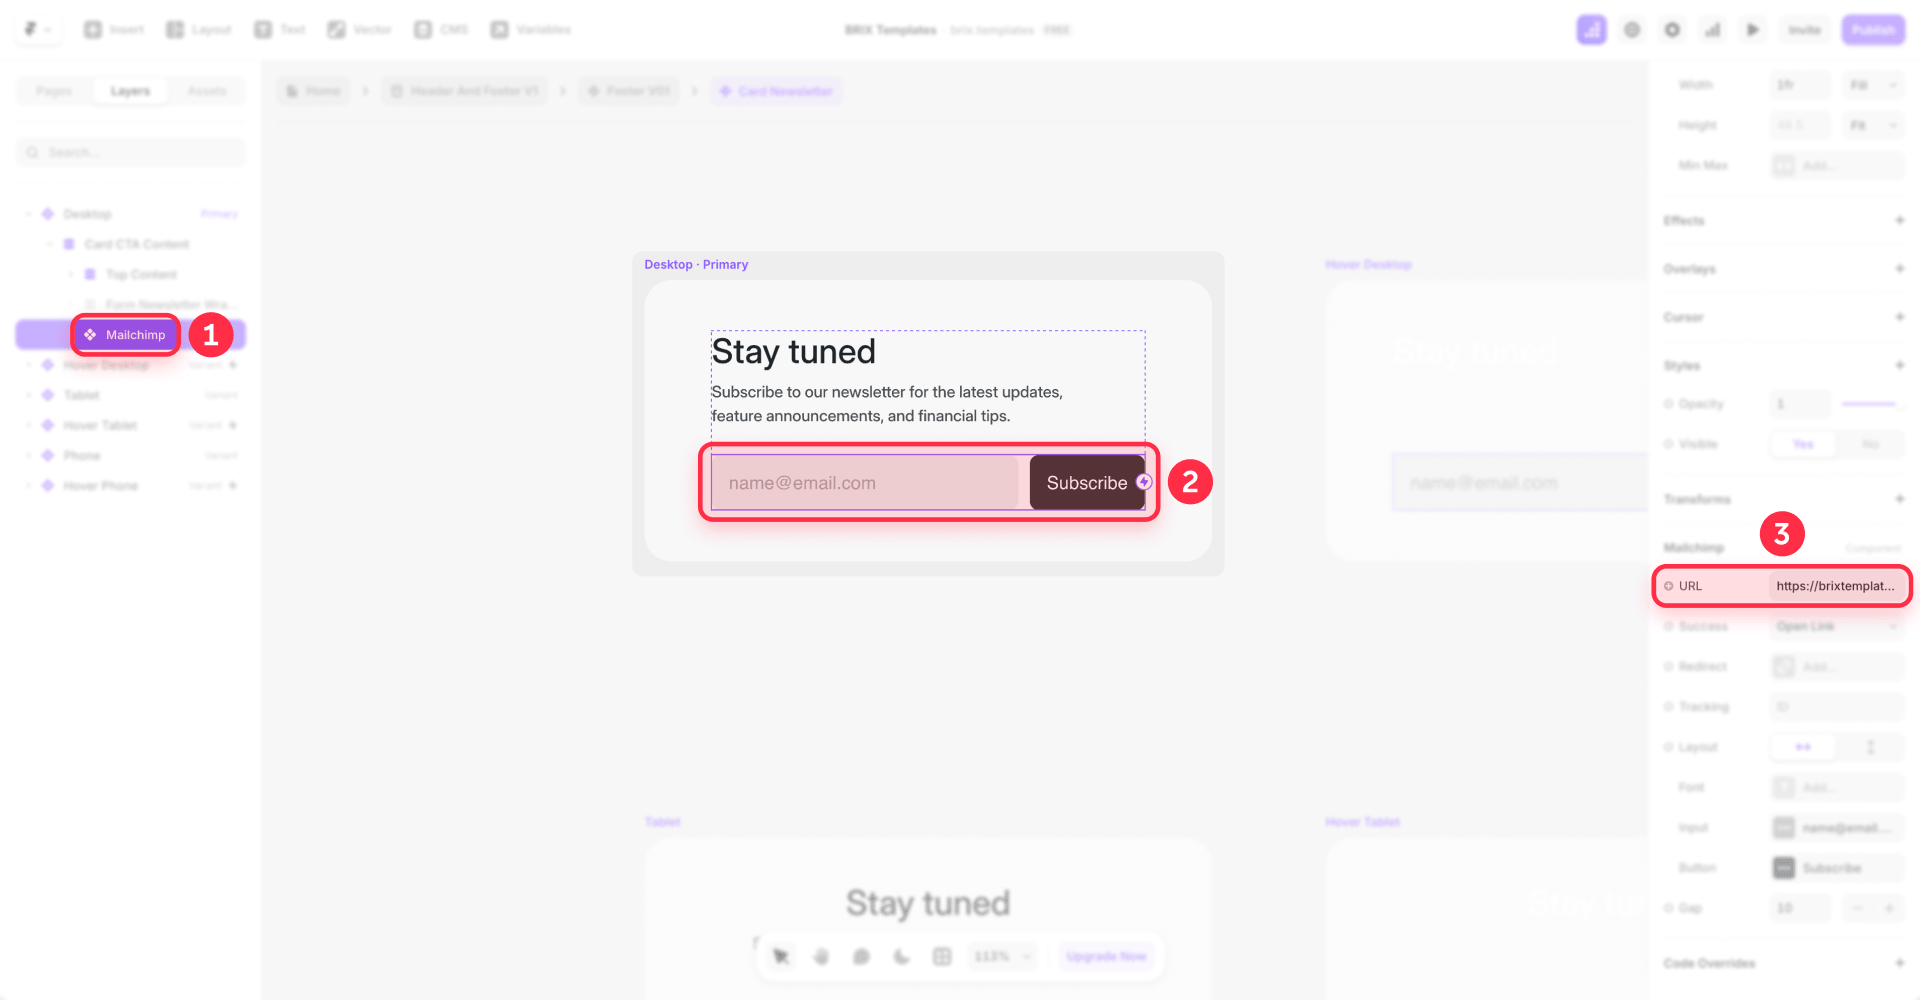
Framer's official Mailchimp component is best documented for simple newsletter signup forms. Advanced field mapping, tags, groups, or custom logic may require Mailchimp embed code, webhooks, a plugin, or custom API work.
Common issues with the native Framer component
The most frequent failure is copying the wrong URL from Mailchimp. Ensure you are copying the Mailchimp form action URL from the embedded form section, not just your audience link. Also, if you have required fields in your Mailchimp audience settings that are not present in your Framer form, the submission may fail or not behave as expected.
Method 2 — Using Mailchimp's embedded signup form code in a Framer custom code block
If you need to collect more than just an email address—such as first names, last names, or hidden groups—using Mailchimp's embedded signup form code inside a Framer Embed component is a solid choice.
- In your Mailchimp account, navigate to Forms > Other forms > Create new form > Create embedded form > Continue to builder > Continue > Copy Code.
- Customize your fields and generate the code snippet.
- In Framer, go to the Insert panel and add an Embed component.
- Select the Embed block and paste your Mailchimp HTML code into the HTML field in the right sidebar.
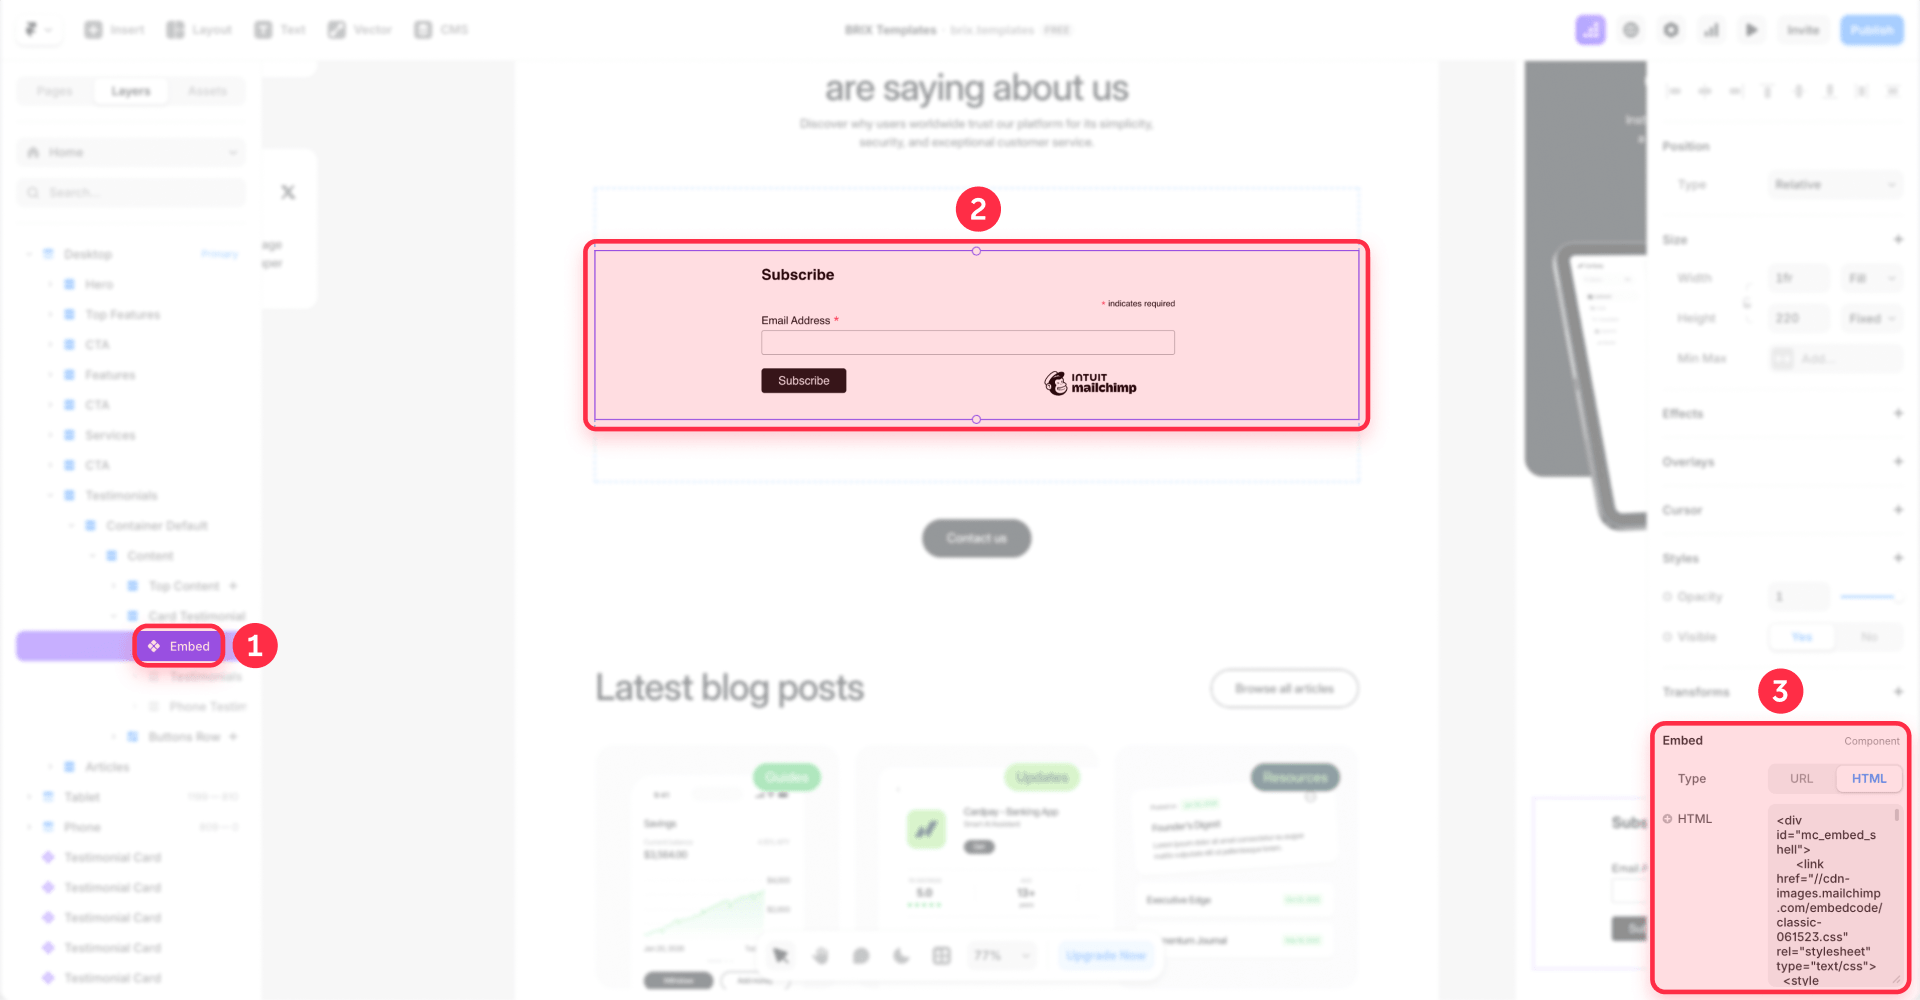
- Set the Width to Fill to ensure it fits your layout.
- Adjust the CSS within the code block if you want to strip Mailchimp's default styles and use your site's fonts and colors.
This method gives you more control over field mapping and allows you to include hidden fields for tracking. Note that you may need to apply custom CSS overrides and test the embed carefully on mobile, because custom HTML/CSS can behave differently across breakpoints.
Method 3 — Connecting Framer forms via webhooks (Zapier or Make)
For professional production sites that require tags and complex segmentation, using a webhook through an automation tool like Zapier or Make provides better debugging options and custom logic.
- Build your form in Framer using the native Form elements (Input, Button).
- Create a new "Zap" in Zapier or "Scenario" in Make.
- Select "Webhook" as the trigger and copy the provided Webhook URL.
- In Framer, select your form and set the Submit action to Webhook. Paste your URL.
- Submit a test form from your live Framer site to send data to the webhook.
- Map the incoming fields from Framer to your Mailchimp Merge Tags (e.g., Map "Name" to FNAME).
- Enable the integration and publish.
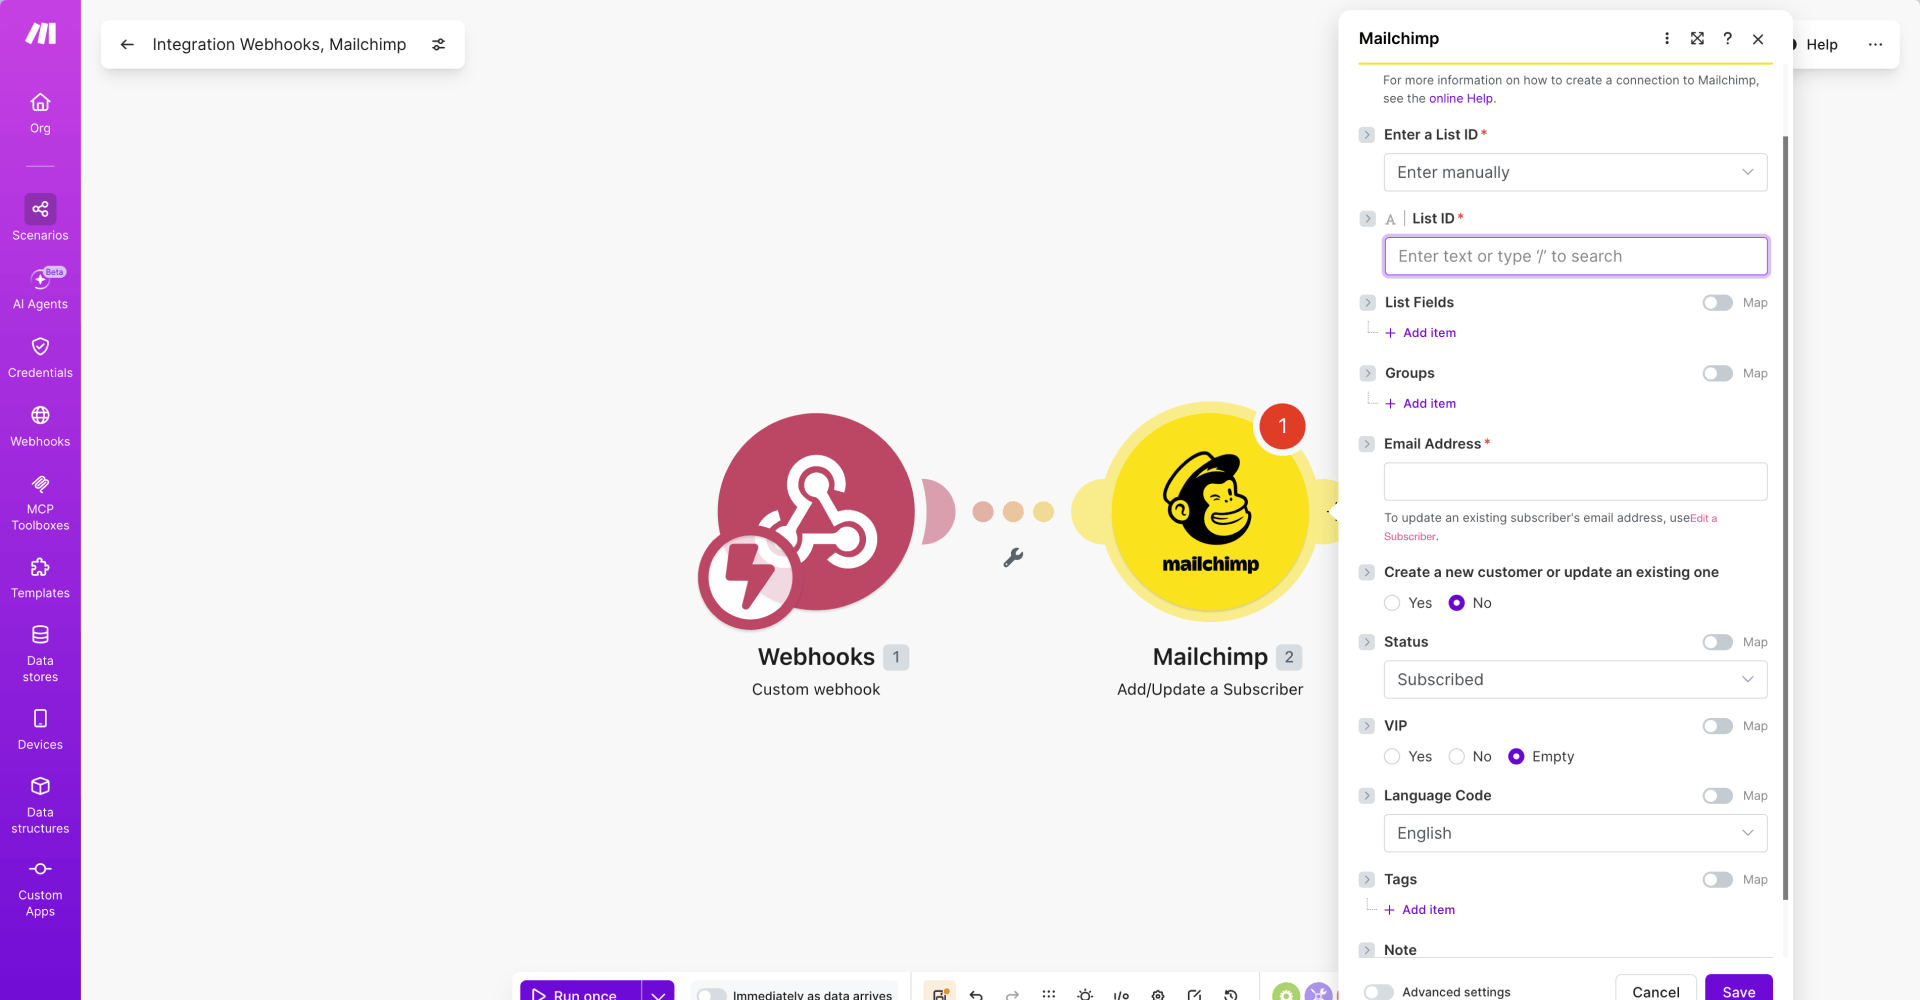
While this method might involve a third-party cost if you exceed free tiers, it is often better for custom logic. It allows you to automatically add tags to new subscribers, which is helpful for personalized marketing campaigns.
How to add custom fields beyond email in Framer
A common challenge is passing information like phone numbers or job titles to Mailchimp. To do this correctly, you must match your Framer field names to Mailchimp's internal Merge Tags.
- In Mailchimp, go to Audience > Settings > Audience fields and Merge Tags.
- Create the fields you need (e.g., "Company Name") and note the Merge Tag (e.g., MMERGE3 or COMPANY).
- In Framer, ensure your form input's Name property matches the Merge Tag exactly (these are case-sensitive and should not contain spaces). If you are collecting phone numbers, you might also want to add a phone number mask to your Framer forms to ensure the data is formatted correctly before it reaches Mailchimp.
- For webhooks, the mapping happens inside Zapier or Make, giving you the most flexibility to transform data before it reaches Mailchimp.
Always verify your field mapping with a checklist before going live. Mismatched names are a common reason custom data fails to sync.
How to set up double opt-in correctly in Framer
If your contacts are not appearing in your Mailchimp list, check if Double Opt-in is enabled.
- The Flow: When double opt-in is enabled, Mailchimp sends the user a confirmation email after they submit your Framer form. The contact does not become subscribed until they confirm by clicking the link in that email.
- Check Status: If double opt-in is enabled, verify whether the confirmation email was sent, received, and clicked. Pending contacts may not appear as subscribed until confirmation.
- Configuration: You can enable or disable double opt-in in Audience > Settings > Audience name and defaults.
Keep "pending" separate from "unsubscribed" when troubleshooting—these are different statuses. While disabling double opt-in makes the signup process faster, keeping it enabled ensures higher list quality and helps with GDPR compliance.
How to style your Mailchimp form to match your Framer site
Design consistency is key to maintaining trust. Depending on your method, styling requires different approaches.
- Native Component: Use the Properties panel to adjust colors, border radius, and fonts. However, hover states and advanced transitions are limited.
- Embedded Code: You should often remove the default Mailchimp CSS so the form can inherit your site's styles.
- Webhook Forms: Since these use native Framer elements, they inherit your site's Styles and Components automatically. This is a great option for an "on-brand" look.
For a professional finish, ensure your Success and Error states are styled to match your site's aesthetic.
How to test your Framer Mailchimp integration is working
Never assume an integration is working just because the button clicked. Follow this testing protocol:
- Use unique email addresses: Mailchimp deduplicates submissions. Use a service like temp-mail.org or use "plus-addressing" (e.g., yourname+test1@gmail.com) for every new test.
- Check the correct status views: Check the subscribed view, all contacts/status filters where available, unsubscribed or cleaned contacts where applicable, and the confirmation email flow if double opt-in is enabled.
- Verify actual destinations: For webhooks, check the Zapier or Make task history or logs to see exactly what data was received from Framer. For native or embedded methods, verify the Mailchimp audience, the form action URL, required fields, and whether double opt-in is enabled.
- Test mobile rendering: Ensure the form is easy to use on a small screen, especially if using the Embed method.
Common mistakes when connecting Framer forms to Mailchimp
Avoid these pitfalls to ensure a smooth setup:
- Using the audience link instead of the action URL: The general share link for your audience will not work in the native component.
- Repeating test emails: You will think the form is broken because Mailchimp won't show the second submission for the same address.
- Ignoring hidden required fields: If a field such as First Name is marked as required in Mailchimp but is not included in your Framer form, the submission may fail or not behave as expected.
- Confusing Pending with Unsubscribed: Keep in mind these are distinct statuses with different underlying causes.
- Incorrect Merge Tag casing: fname is not the same as FNAME. Always match the exact casing shown in Mailchimp settings.
Frequently asked questions about Framer and Mailchimp
Can I connect Framer forms to Mailchimp without Zapier?
Yes, you can use the native Mailchimp component or Mailchimp's embedded signup form code. Both allow for a direct connection to your Mailchimp audience without needing an intermediary tool.
Why does my Framer submit button do nothing when clicked?
This is typically caused by a missing or incorrect Mailchimp form action URL in the component settings. Other causes include having required fields in Mailchimp that aren't present in your form, or not having published your latest Framer changes. Check your browser's console for errors to see if a 404 or 403 error is being returned.
How do I add a Mailchimp popup to my Framer site?
You can create a Framer Overlay and place your Mailchimp form (using any of the three methods) inside it. You can then trigger this overlay with a button click or a timed scroll delay.
Is there a free alternative to Zapier for Framer webhooks?
Make and Zapier may offer free tiers, but pricing, task limits, and operation limits can change, so check their current pricing before choosing a workflow. There are also Framer-specific plugins available in the marketplace, though you should check their individual pricing.
Why are my Framer contacts showing as unsubscribed in Mailchimp?
These are distinct from pending contacts. A previously unsubscribed contact may need to resubscribe through Mailchimp's approved resubscription process, as standard forms may not force them back onto the list.
Can I use Mailchimp tags with the native Framer component?
Mailchimp embed code can support tags/groups depending on how the form is configured, while Framer's native Mailchimp component may not expose advanced tag/group mapping clearly. For reliable segmentation, use embed code, webhooks, a plugin, or custom API workflows.
Does the Mailchimp integration work on Framer's free plan?
Check Framer's current pricing and feature availability, because form actions and webhook availability can depend on your plan.
How do I map a phone number field from Framer to Mailchimp?
First, create a "Phone" field in your Mailchimp audience settings and note its Merge Tag (usually PHONE). Then, in your Framer form settings, ensure the Name property of your phone input matches that tag exactly. If you are using webhooks, you can map the Framer input to the Mailchimp phone field in your automation tool.
Why are Mailchimp confirmation emails not being sent?
This usually happens because Double Opt-in is disabled in your Mailchimp settings, or the email is being caught in the user's spam filter. If it is enabled and still not sending, verify your Mailchimp Signup form settings.
Can I redirect users to a custom page after they sign up?
Depending on the method, use Framer's available success state or redirect options, Mailchimp's confirmation/thank-you page settings, or your automation workflow's response handling. Keep in mind that webhook endpoints should return a direct successful 2xx response; redirects may not be handled as successful webhook responses.
Conclusion
Connecting your Framer forms to Mailchimp effectively requires choosing the method that balances ease of use with the technical requirements of your marketing strategy. The native Mailchimp component is an excellent starting point for basic newsletters, while Mailchimp's embedded signup form code and webhooks offer more control.
Remember that testing with unique email addresses and checking the actual destination for the data are important steps to a successful launch. If you need help building advanced integrations or creating a marketing site, our experienced Framer development team can assist in scaling your project.








Join readers commenting on this post!