
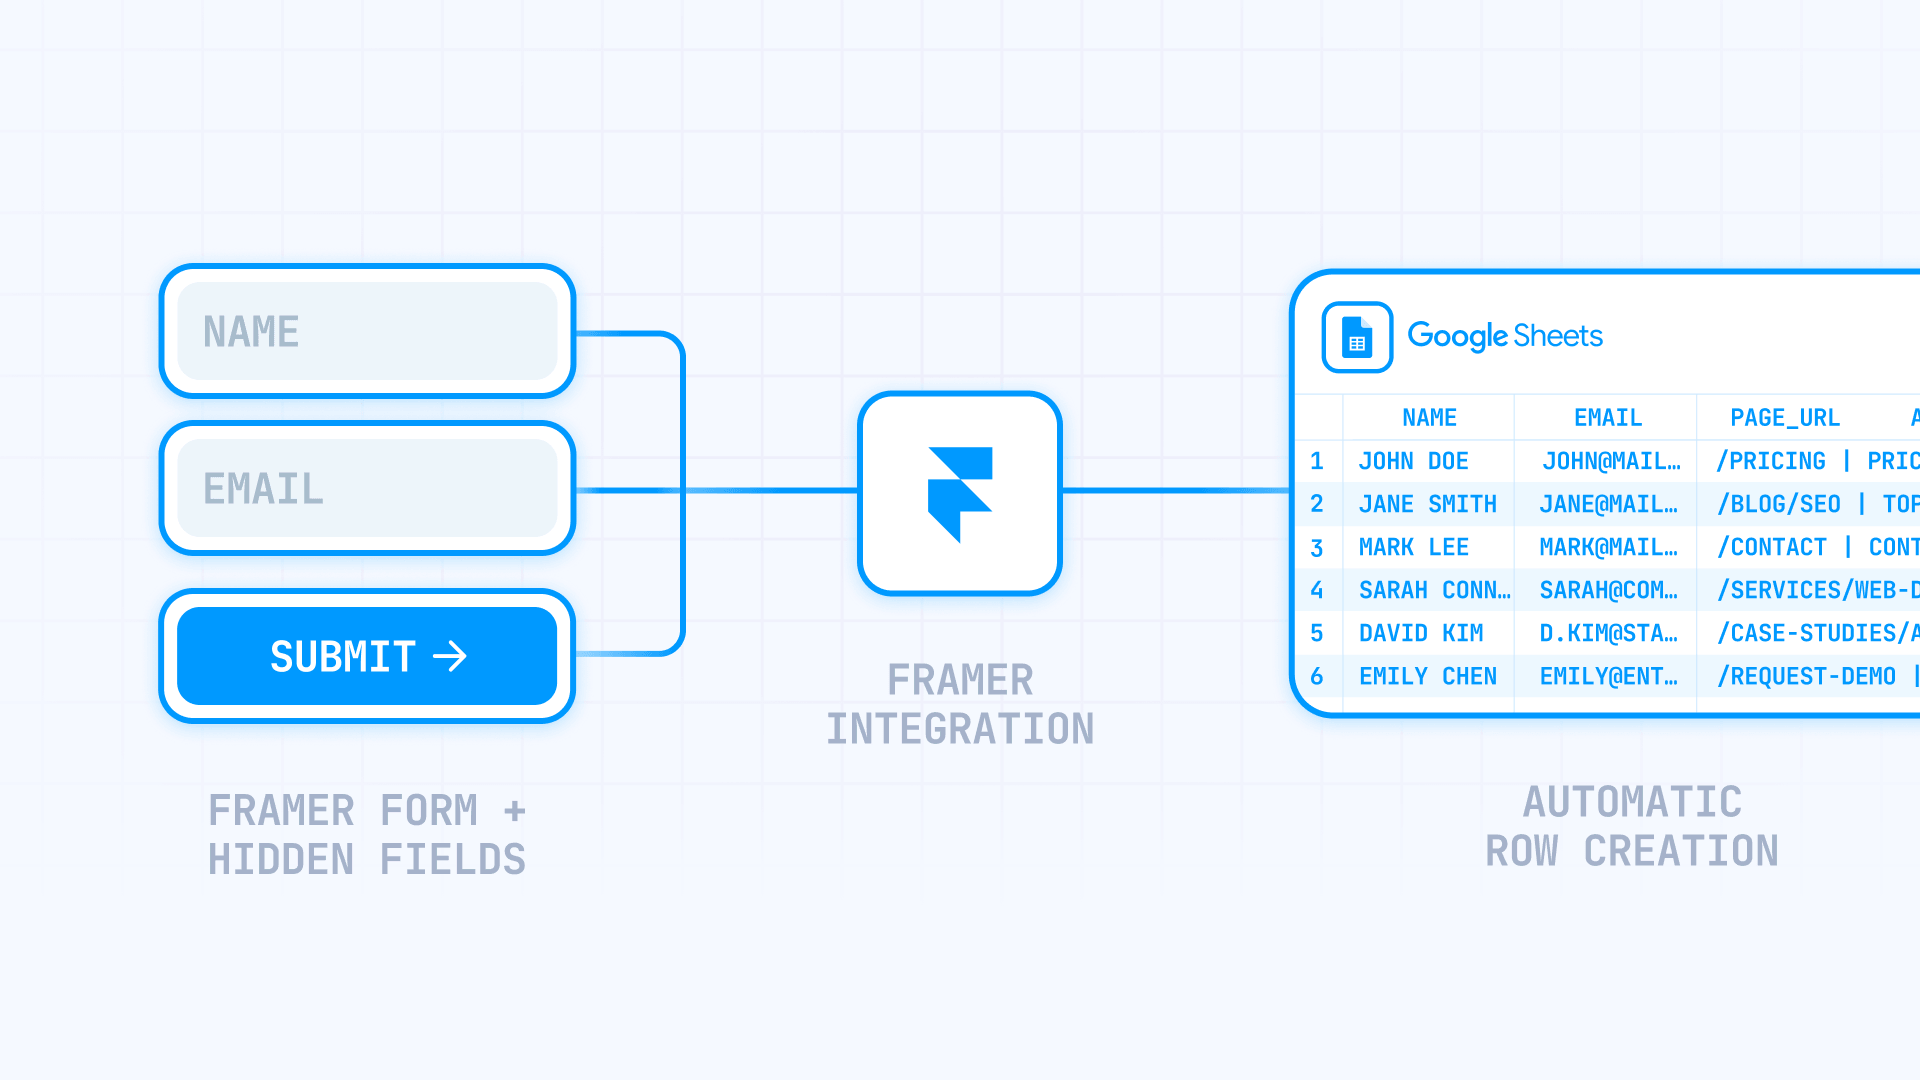
Are you looking to automatically send your Framer form submissions to a spreadsheet? Now that Framer supports Google Sheets as a native form destination, you can connect them directly — no Zapier, no third-party form tool, no custom backend required.
The setup is straightforward and takes about five minutes. Once connected, every form submission lands as a new row in a Google Sheet that your team can review, filter, and share. This guide walks you through the full process: preparing your form, connecting the sheet, adding hidden fields for source tracking, and knowing when Google Sheets is enough versus when a webhook makes more sense.
What to know before connecting Framer forms to Google Sheets
Two common mistakes cause most of the confusion around this setup. Clearing them up first saves a lot of time.
The first is confusing forms with the CMS plugin. Framer has a Google Sheets plugin in the marketplace, but that's designed for importing spreadsheet content into Framer CMS — mapping columns to CMS fields and syncing content into your site. It's not the tool for collecting visitor form submissions.
If your goal is lead capture, signups, or contact forms, use Framer's native form system. If your goal is pulling spreadsheet content into your CMS, use the marketplace plugin. They solve different problems, and it's easy to end up in the wrong setup flow if you don't know the difference.
The second is expecting the native connection to work like a database. Framer's official docs clearly support Google Sheets as a form destination, and for simple lead capture it works well. Where it gets less reliable is when you try to connect to an existing spreadsheet, send multiple forms to one specific file, or target a specific tab. Community reports consistently describe Framer creating new sheets in these cases rather than writing into the one you already have.
That doesn't mean the integration is unreliable for its intended use — it means it's best suited for straightforward capture workflows. If your setup depends on one exact existing spreadsheet with formulas and dashboards already in place, a webhook is the more predictable path.
How to add and structure a Framer form for Google Sheets
Before connecting the sheet, it's worth setting up the form structure correctly. The way you name your fields before connecting determines how readable your spreadsheet will be once submissions start coming in.
Adding a native form in Framer
- Open the Insert Menu in Framer
- Go to Forms
- Drag a Form component onto the page
- Add the input fields you need — keep them inside the form element

By default, a Framer form doesn't send data anywhere until you set a Send To destination. Every input placed inside the form element is automatically included in the submission, and each input has a Name property that controls how the data is labeled when it's sent.
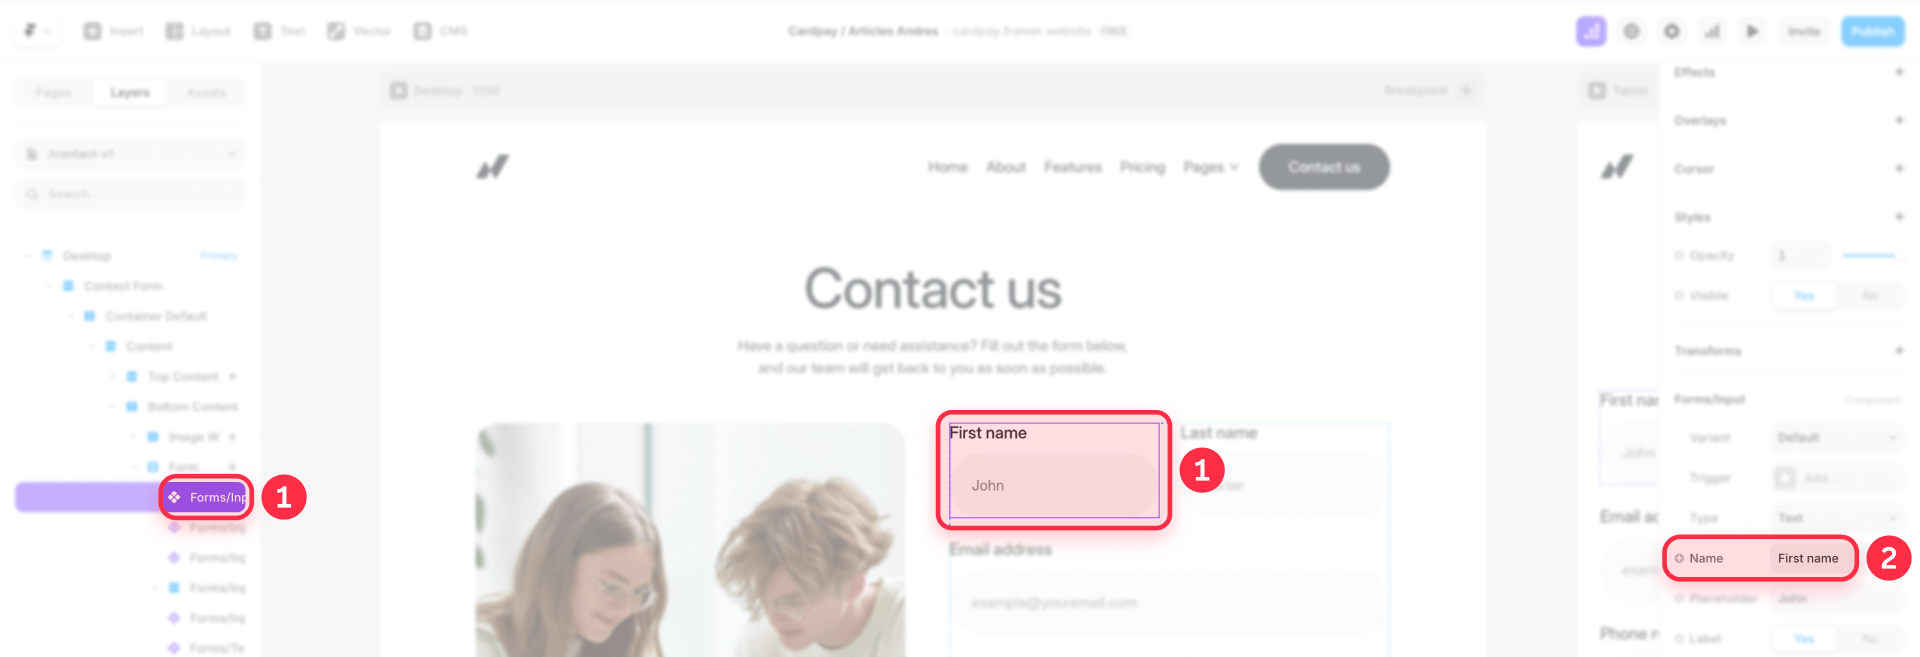
Naming your fields before connecting Google Sheets
The Name property on each input becomes the column header in your Google Sheet. This is a small detail that makes a big difference once you have real data in the spreadsheet.
If you leave the default names — Input 1, Input 2, Input 3 — your columns will be hard to read and sort. Renaming them to something clear like full_name, work_email, or company_size makes the data immediately usable.
Before connecting the sheet:
- Remove any fields you don't actually need
- Rename every input's Name to something short and descriptive — lowercase with underscores works well for consistency
- Set the correct input type for each field: Text, Email, Number, Phone number, URL, Date, or Time
- Mark only the truly essential fields as Required
This is one of those steps that feels minor during setup but pays off quickly. Clean field names mean your team can work with the spreadsheet data right away instead of spending time figuring out which column is which.
How to connect your Framer form to Google Sheets
The connection itself is quick. After setting it up, it's worth running a few test submissions to make sure everything looks right before launching.
Setting up the Google Sheets destination in Framer
- Select the Form on the canvas
- In the right sidebar, find Send To
- Choose Google Sheets as the destination
- Complete the Google authorization prompt when Framer shows it
- Let Framer create the spreadsheet destination for submissions

That's the core setup. Framer handles the connection and creates a spreadsheet where submissions will land.
Testing the connection
After connecting, it's worth submitting two or three test entries before driving real traffic to the form. This lets you verify the column structure, confirm the field names look correct in the spreadsheet, and catch any issues while they're still easy to fix.
- Submit a complete entry from the published form
- Submit a second entry with different values
- Open the spreadsheet and verify every expected field appears as a column
- Confirm both rows landed correctly
If submissions aren't appearing, re-open the form and confirm the Google Sheets destination is still attached, then try a fresh test. Community reports show occasional cases where the connection appears active but submissions stop arriving — if this happens on an important form, switching to a webhook gives you more reliability.
Testing from both desktop and mobile before launch is also a good habit, since form behavior can sometimes differ across devices.
How to add hidden fields and tracking to Framer forms
Hidden fields are one of the most useful parts of this setup, and they're easy to overlook. They let you include extra information with each submission — like which page the form is on — without showing anything to the visitor.
Adding hidden fields for source tracking in Framer
The most common use case is when multiple landing pages feed the same Google Sheet. Without hidden fields, every submission looks the same and you can't tell which page generated each lead. With a hidden field like source_page set to pricing or homepage, that context is captured automatically. For an even more automated approach, our guide to automatically capturing the current page URL and title in Framer forms (PENDIENTE DE PUBLICAR) eliminates the need to set these values manually on each page.
- Select the Form component on the canvas
- Add an Input to the form
- Select that input and open the right panel
- Enable Hidden
- Set a clear Name like source_page or form_variant
- Set the Value to whatever identifier makes sense for this form
- Remove the label if it's still visible
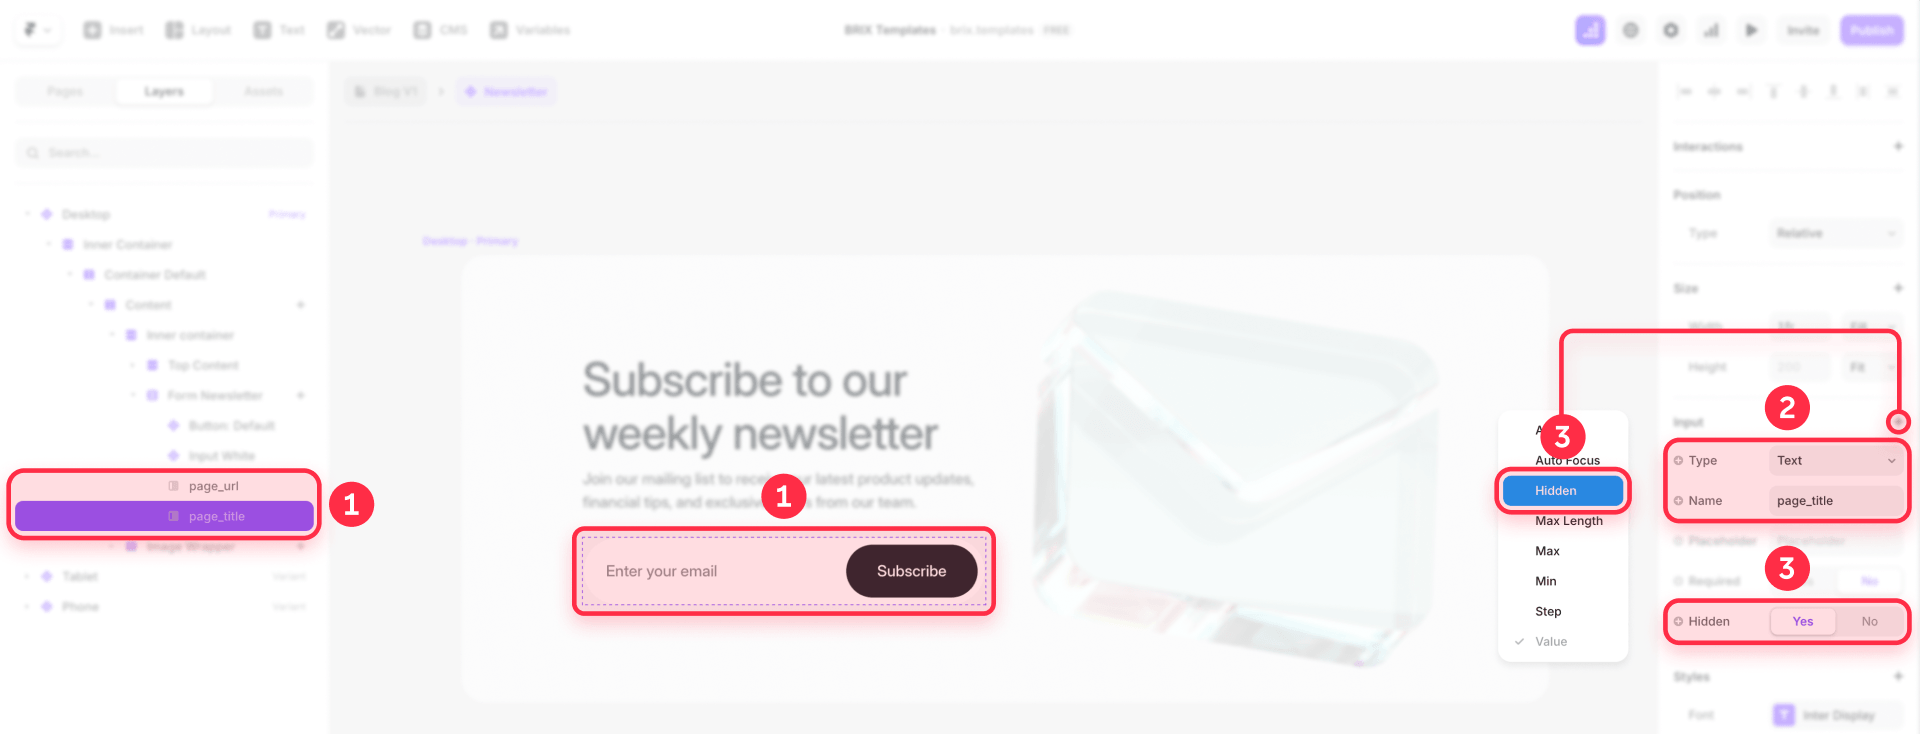
One important detail: use the Hidden property, not the Visible toggle. Inputs hidden with Visible are excluded from submissions entirely, which means the data won't reach your spreadsheet. The Hidden property keeps the field in the submission while hiding it from the visitor — which is exactly what you want.
Enabling UTM and campaign tracking in Framer forms
Framer also supports automatic campaign tracking on Scale and Enterprise plans. When enabled, Framer captures UTM parameters and GCLID values automatically with each form submission.
- Open Site settings in Framer
- Select Forms from the left menu
- Enable Campaign tracking
- Submit a test form with a tagged URL and verify the campaign data appears in the spreadsheet
Hidden fields and campaign tracking solve related but slightly different problems. Hidden fields are for static metadata you set manually — like which page the form lives on. Campaign tracking is for dynamic URL parameters that change per visitor — like UTM source, medium, and campaign. To measure what happens after submission, our guide to tracking Framer form submissions with GTM and GA4 covers the full analytics setup. Using both gives you the full picture of where each lead came from and which campaign drove them.
It's worth noting that hidden fields don't automatically bind to UTM values. If you need custom URL parameters beyond Framer's built-in campaign tracking and your plan doesn't include it, a code override is needed to capture those values.
When to use a webhook instead of Google Sheets for Framer forms
Google Sheets is a great destination when the workflow is simple: collect submissions, review them in a spreadsheet, share with the team. It starts to feel limiting when you need more control over where the data goes and what happens after submission.

When Google Sheets is the right choice
Stick with Google Sheets when your workflow looks like this:
- One form or a small set of simple forms
- Straightforward data capture with no conditional logic
- No need to write into a specific existing spreadsheet
- No need to trigger other apps after submission
- The team just needs a shared, filterable list of leads
This is the sweet spot Framer is optimizing for: quick setup, real-time spreadsheet updates, built-in spam protection, and a lightweight pipeline with no extra tools.
When a webhook is the better choice
A webhook becomes the better path when your needs go beyond simple collection. Framer's webhook system sends JSON to any HTTPS URL you specify, with your input names as the data keys. It's worth considering when you need any of these:
- Write to one exact existing spreadsheet or specific tab
- Combine several Framer forms into one controlled schema
- Validate or transform data before storing it
- Trigger CRM, email, SMS, or other app actions after submission
- Route different form types to different destinations
Common webhook destinations include Google Apps Script (for controlled spreadsheet writing), Make or Zapier (for multi-app workflows), or your own backend endpoint. The webhook path requires more setup, but it gives you precise control over where each submission goes and what happens next.
A useful way to think about it: if Google Sheets is still just a spreadsheet in your workflow, the native connection is great. If you're starting to ask the spreadsheet to route, validate, and trigger other systems, that's a sign a webhook would serve you better.
Frequently asked questions about Framer forms and Google Sheets
Can Framer forms connect directly to Google Sheets without Zapier?
Yes. Framer supports Google Sheets as a native form destination. You add a form, choose Google Sheets in the Send To setting, authorize your Google account, and submissions start landing in a spreadsheet. For simple lead capture, the native connection is all you need — no third-party automation required.
What's the difference between the Framer Google Sheets plugin and Framer form submissions?
The Google Sheets plugin imports spreadsheet content into Framer CMS — it's for syncing site content, not collecting form data. Framer forms collect visitor input and send it out to Google Sheets, email, or a webhook. If your goal is lead capture, use forms. If your goal is CMS content sync, use the plugin.
Why are my form field names showing up wrong in Google Sheets?
The Name property on each input is what becomes the column header. If the defaults were left in place — like Input 1 or Input 2 — that's what shows up in the spreadsheet. Renaming each field to something descriptive before connecting the sheet ensures your columns are readable from the first submission.
Can I connect a Framer form to an existing Google Sheet?
This is where the native connection can be unpredictable. Framer tends to create a new spreadsheet rather than writing into an existing one. Community reports consistently describe friction with targeting specific files or tabs. If your workflow depends on writing into a specific existing spreadsheet that already has formulas or dashboards, a webhook with Google Apps Script is the more reliable approach.
How do I track which page a form submission came from?
Use hidden fields. Add an input to the form, enable Hidden, and set the value to an identifier like pricing-page or homepage-cta. The visitor won't see it, but the value appears in your spreadsheet alongside every submission. For automatic UTM and GCLID tracking, enable Campaign tracking in Site settings → Forms on Scale or Enterprise plans.
Why are my Framer form submissions not reaching Google Sheets?
Re-open the form and confirm the Send To destination is still set to Google Sheets, then submit a fresh test entry. If the connection looks active but submissions aren't arriving, this is a known issue that some users have reported. For forms that are critical to your business, a webhook provides more reliability and makes troubleshooting easier.
How do I send multiple Framer forms to one Google Sheet?
This is one of the areas where the native connection can be inconsistent. Community reports describe multiple forms sometimes creating separate sheets instead of feeding one destination. If you just need to tell submissions apart, a hidden field with a form identifier like contact-form or demo-request works well. If you truly need multiple forms writing into one controlled spreadsheet structure, a webhook gives you the precision to route everything correctly.
When should I switch from Google Sheets to a webhook?
When your needs go beyond simple collection. If you need to write into a specific existing sheet, combine multiple forms, validate data before storing it, trigger CRM or email actions, or route submissions to different destinations — those are all cases where a webhook serves you better. Google Sheets is great for straightforward capture. Webhooks are for workflows where you need control over what happens after the submission arrives.
Conclusion
Connecting Framer forms to Google Sheets is one of the simplest and most useful things you can set up on a Framer site. The native connection works well for straightforward lead capture, and the setup takes just a few minutes.
The details that make the difference between a smooth setup and a frustrating one are small: name your fields clearly before connecting, use hidden fields to track where submissions come from, test with a few entries before launching, and know when a webhook makes more sense once your workflow outgrows a simple spreadsheet.
If you want your Framer forms, tracking, and lead capture set up properly from day one — our Framer team can handle the setup so everything works correctly from launch.


Join readers commenting on this post!