
You build a Webflow blog, publish solid content, and then hit the obvious gap: readers have no way to respond. The confusing part is that Webflow has a feature called Comments, but that's for internal collaboration inside the Webflow workspace — not public discussions on your published blog.
Webflow does not have native public comments for blog posts. There's no hidden toggle in Site settings. Adding a comment section to your blog requires a third-party tool, and the setup is straightforward once you understand the architecture. The critical detail most people miss isn't the embed itself — it's making sure each post maps to its own unique comment thread. Get that wrong, and every post on your blog shares one giant conversation.
This guide covers how Webflow blog comments work, which tools to use, how to set up thread IDs correctly, and step-by-step instructions for the two best options: Disqus and Hyvor Talk.
Why Webflow doesn't have native blog comments
This is where most of the confusion starts. Webflow's Comments feature lets workspace members and guests leave feedback inside the Webflow editor during the design and review process. It's a collaboration tool for your team, not a front-end discussion system for site visitors.
That means tutorials that imply there's a built-in comment section you just need to enable are wrong. Public blog comments in Webflow are a third-party integration — and that's actually fine, because dedicated comment platforms handle moderation, spam control, user management, and notifications far better than a basic built-in feature ever would.
How Webflow blog comments actually work
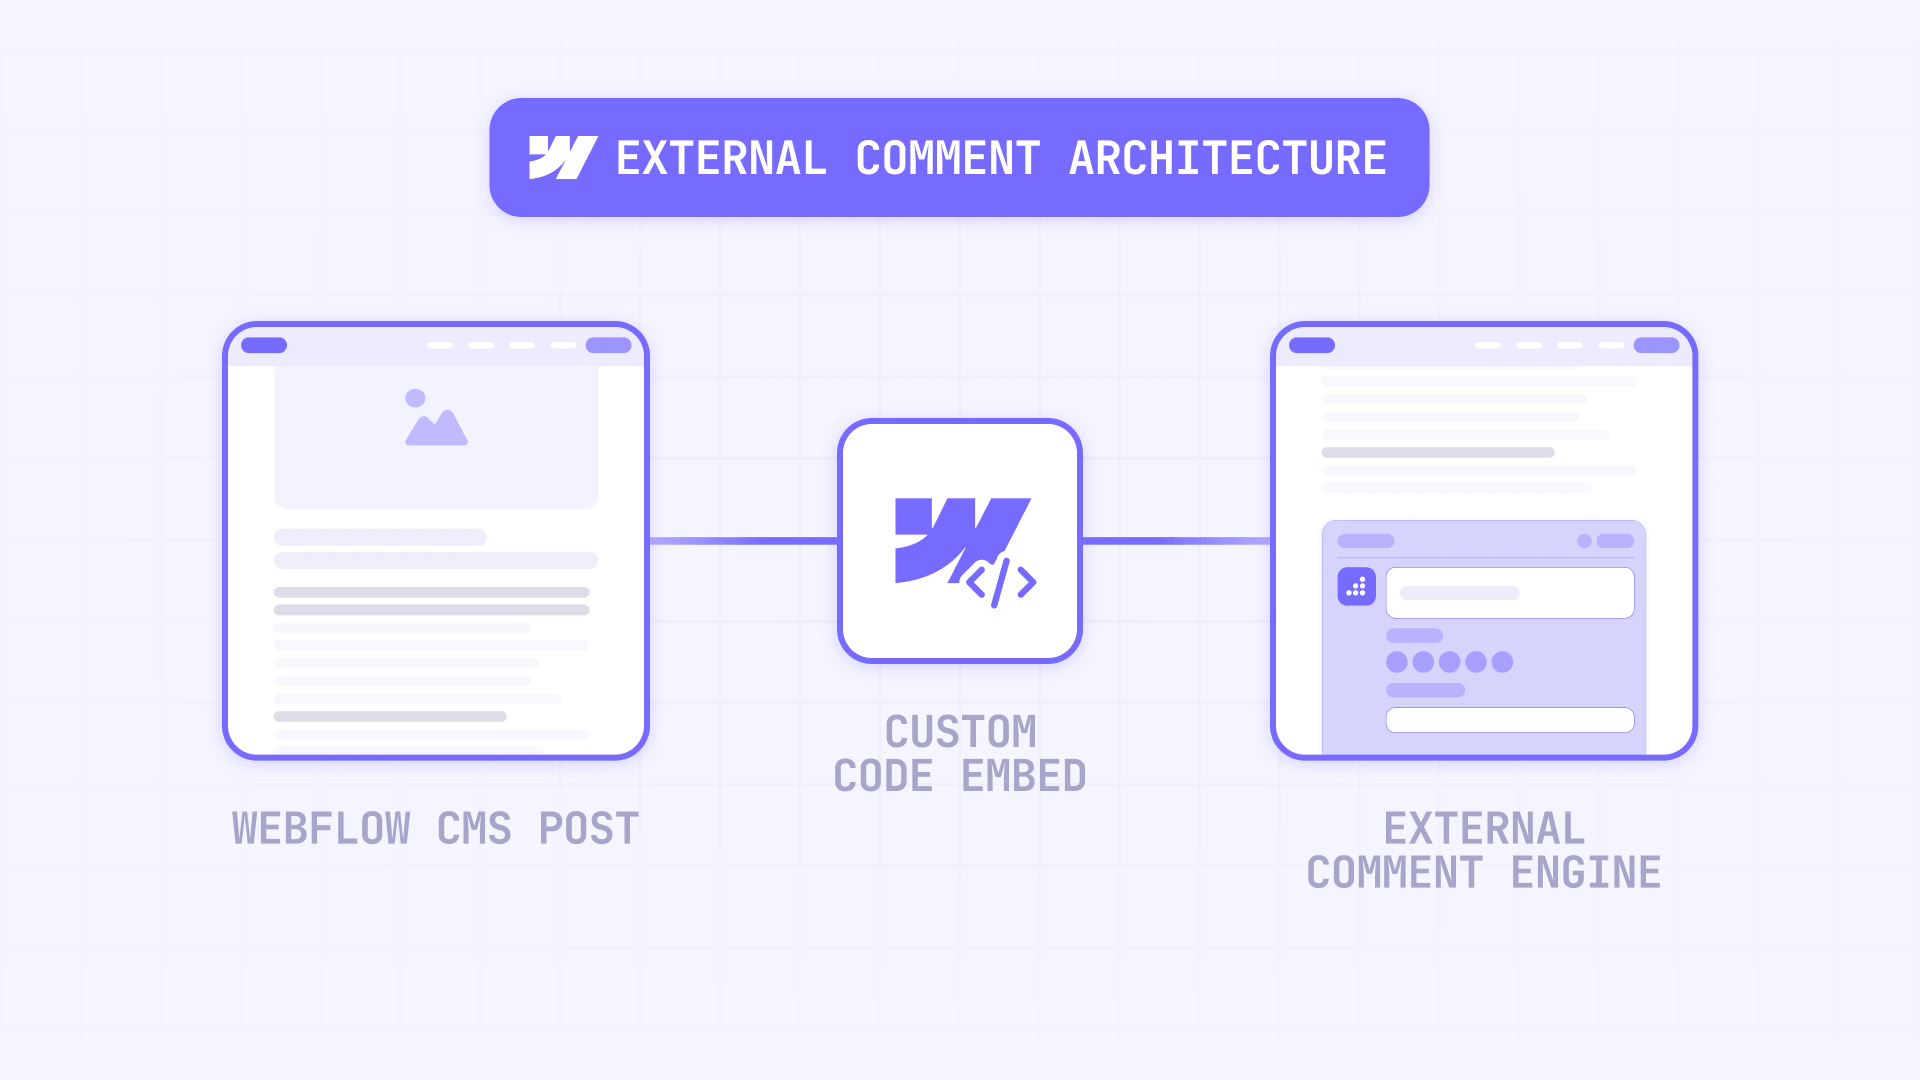
The architecture is simple once you see it. Webflow provides the front-end shell — your blog layout, CMS structure, and page templates. The comment tool provides everything else: the actual comments, user authentication, moderation, spam filtering, and data storage.
You connect the two by placing a Code Embed element on your blog's Collection Template page. Because it's on the template, every CMS post automatically gets the comment widget. The comment tool then needs a way to know which post it's looking at — that's the thread identity, which is either a URL, a custom ID, or both.
A few technical details matter:
- Webflow's Code Embed element supports HTML, CSS, and JavaScript with a 50,000-character limit
- You should not place html, head, or body tags inside an embed
- Some comment tools also need a script loaded once in the site's Head code area, while the visible widget sits in the page layout
- Webflow supports running custom code in Preview mode when Run custom code in Preview is enabled in Site settings — useful for testing before publishing
Which comment tool to use for Webflow blogs

For most Webflow blogs, the real choice is between two tools.
Disqus is the default free option and the fastest way to get comments running. It's widely known, easy to install, and has a mature moderation dashboard. The downside is equally well-known: the free tier shows ads on your site, the design lives inside an iframe that's hard to style, and there are ongoing concerns about privacy and data collection. For a personal blog or a quick proof-of-concept, Disqus is fine. For a business or branded content site, the trade-offs start to matter.
Hyvor Talk is the better option for businesses and professional blogs. It offers a cleaner UI, stronger privacy positioning (no ads, no tracking), better moderation tools, comment counts, multi-language support, and a more reliable per-post identity model. It's not free — paid plans start at a reasonable price — but for any site where brand perception and reader trust matter, Hyvor Talk is the stronger long-term choice.
The recommendation is straightforward: start with Disqus if you need something free and fast. Move to Hyvor Talk if you're running a business blog, client site, or any project where ads, privacy, and design quality matter.
How to set up comment thread IDs before you embed anything
This is the step most people skip — and it's the reason most broken Webflow comment setups fail. Do this before you paste any code.
A comment platform needs a way to know that Post A and Post B are different conversations. That identity can be a URL, a custom ID, or both. The problem with relying only on URLs is that they change — slugs get edited, domains get swapped, protocols shift from HTTP to HTTPS. When the URL changes, the comment tool thinks it's a new page and creates a new empty thread, leaving your old comments orphaned.
The fix is boring but effective:
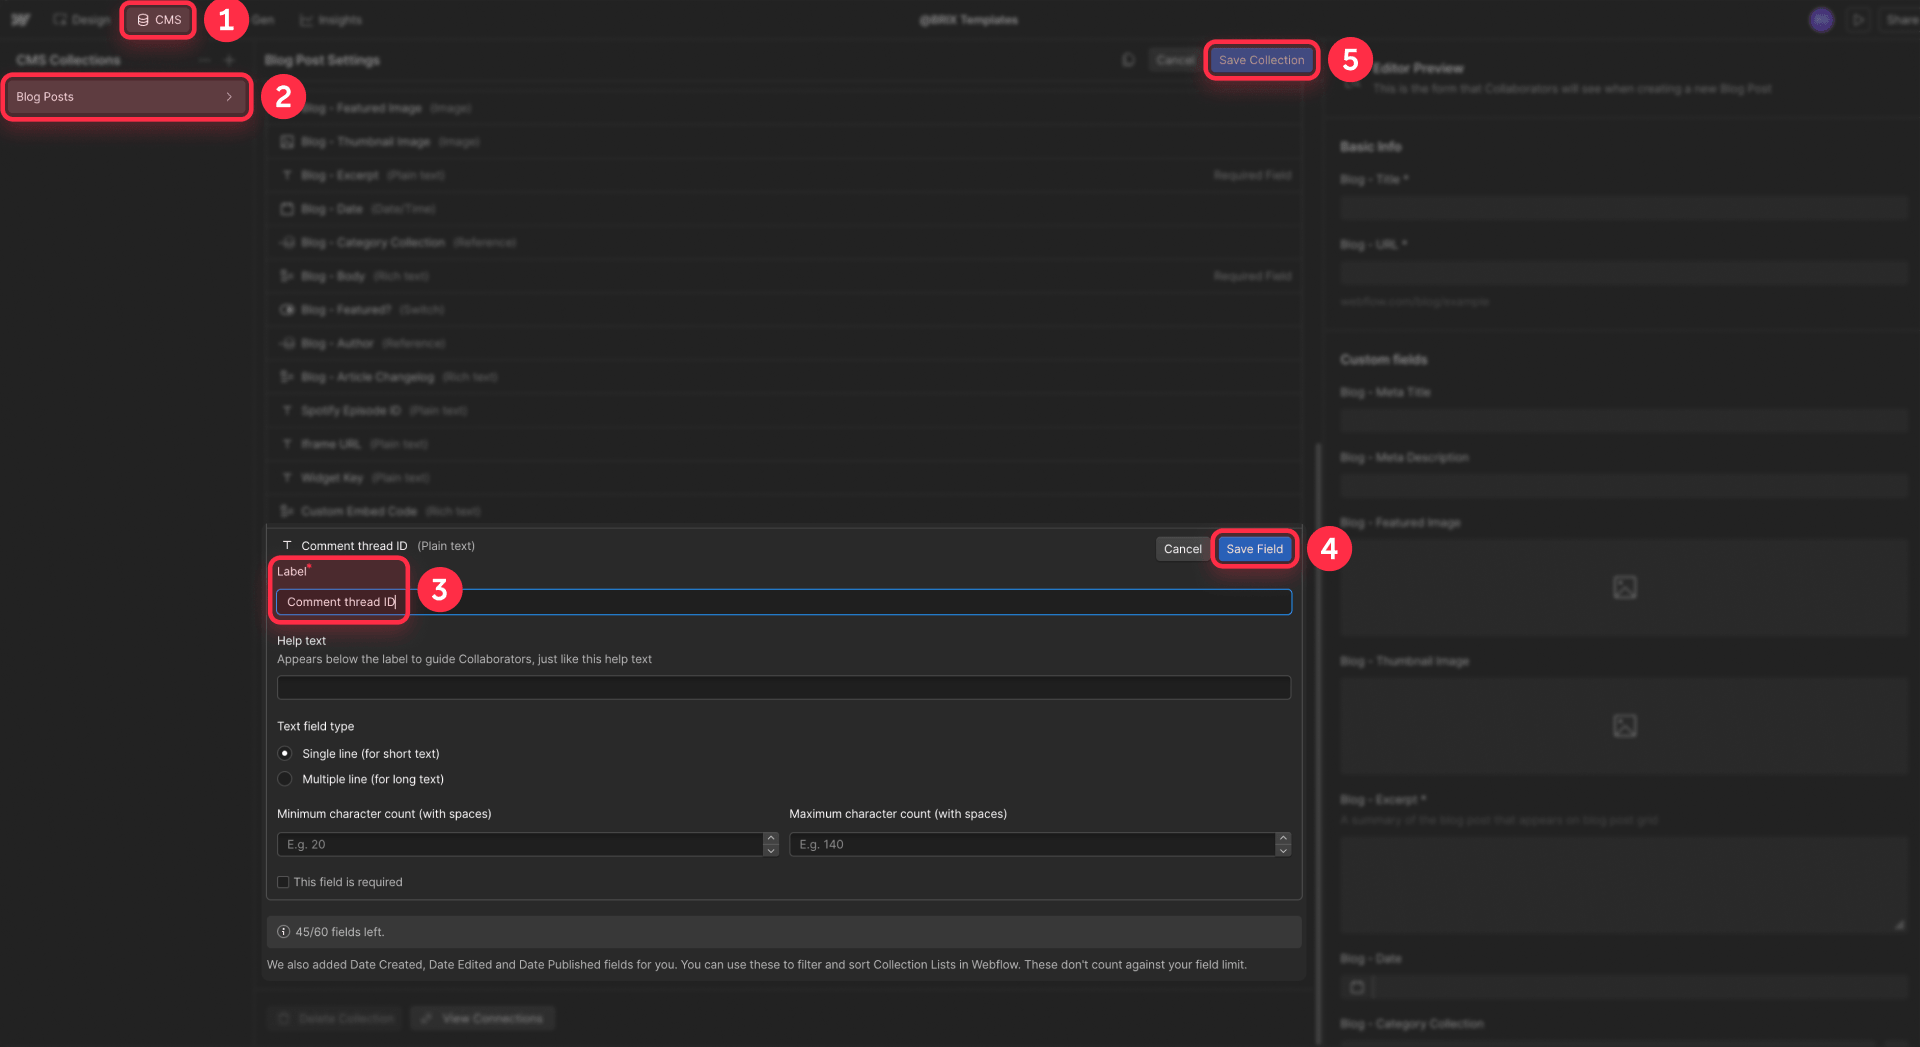
- Create a plain text CMS field in your blog collection called something like Comment thread ID
- Give each post a stable value — blog-001, blog-002, or any consistent format
- Never change that value after the post is published
- Use that field as the primary thread identifier in your comment tool
- Use the post URL as the location reference, not as your only identity
Both Disqus and Hyvor Talk explicitly recommend stable identifiers for exactly this reason. A simple CMS field is cheap insurance against the most common long-term failure mode.
Using the Slug field works for a quick setup, but slugs change more often than people admit. A dedicated ID field is safer for any site you plan to maintain for more than a few months.
How to add Disqus comments to Webflow CMS posts
Disqus is the fastest route. The setup takes about 10 minutes if you already have a Disqus account.
Setting up your Disqus account for Webflow
- Create a Disqus account if you don't have one
- Register your website inside Disqus and note your shortname — you'll need it in the embed code
- Confirm the main domain you want Disqus to use
- In your Disqus site settings, make sure the domain matches your published Webflow domain
Adding the Disqus embed to your Webflow blog template
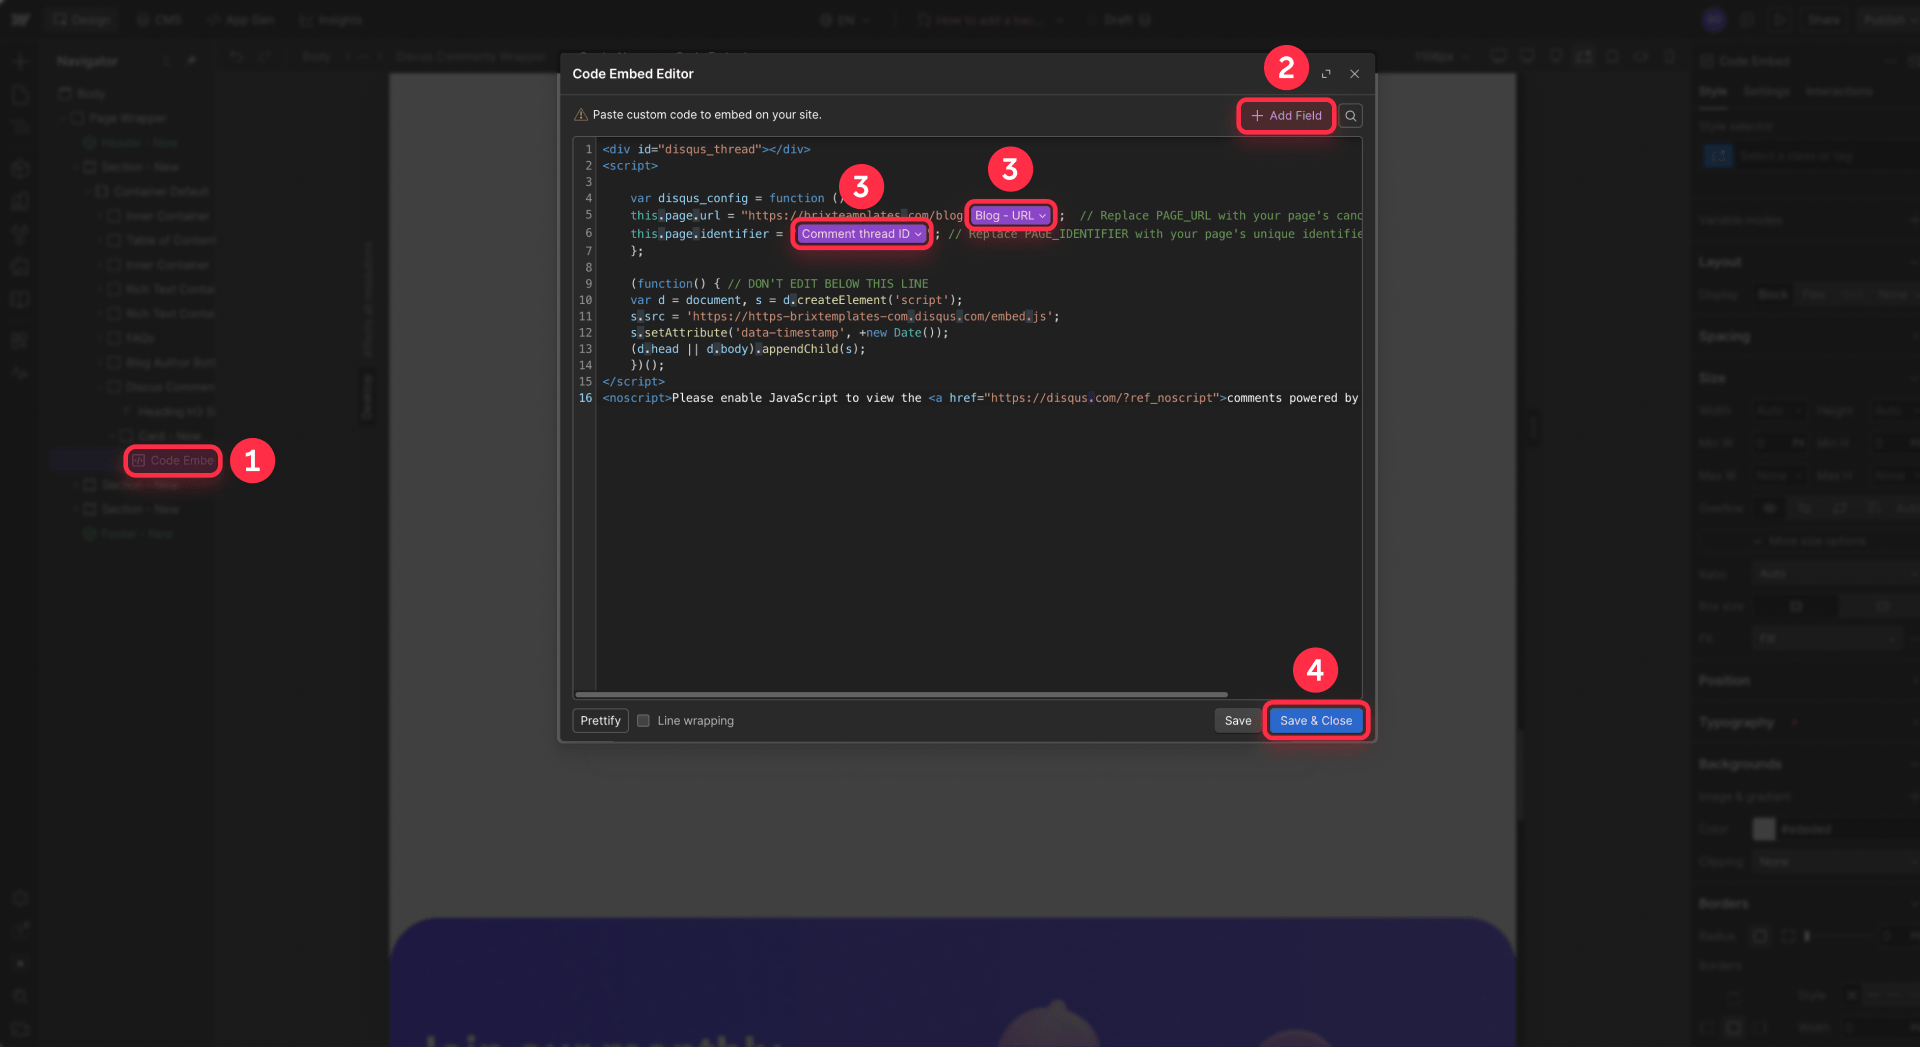
- Open your blog Collection Template page in the Webflow Designer
- Add an Embed element where you want the comment section to appear (usually below the post content)
- Paste the following code into the embed:
<div id="disqus_thread"></div>
<script>
var disqus_config = function () {
  // Use the canonical published URL for the current post
  this.page.url = "https://www.example.com/blog/CURRENT_POST_SLUG";

  // Use a stable ID field — replace with your dynamic CMS field
  this.page.identifier = "CURRENT_POST_COMMENT_ID";
};

(function () {
  var d = document, s = d.createElement('script');

  // Replace YOUR_SHORTNAME with your actual Disqus shortname
  s.src = 'https://YOUR_SHORTNAME.disqus.com/embed.js';

  s.setAttribute('data-timestamp', +new Date());
  (d.head || d.body).appendChild(s);
})();
</script>
- Replace the placeholder values: swap CURRENT_POST_SLUG with your dynamic Slug CMS field, swap CURRENT_POST_COMMENT_ID with your Comment thread ID CMS field, and replace YOUR_SHORTNAME with your real Disqus shortname
- Save the embed and publish the site
The critical part is making sure both the URL and the identifier use dynamic CMS values that change per post. If either one is hardcoded, every post will share the same thread.
Verifying Disqus works correctly on Webflow
- Open two different blog posts on your live published domain
- Add a test comment to one post
- Confirm it does not appear on the other post
- Check your Disqus moderation dashboard and confirm the comment shows under the correct post
If both posts show the same comments, your identifier isn't dynamic — go back to the embed and make sure you're pulling from CMS fields, not static text.
One important note: Webflow styles don't fully control the Disqus UI because it loads inside an iframe. If design consistency matters to your brand, this is the main reason teams move to Hyvor Talk.
How to add Hyvor Talk comments to Webflow CMS posts
Hyvor Talk takes slightly more setup than Disqus but gives you a cleaner result with better long-term control.
Setting up your Hyvor Talk account for Webflow
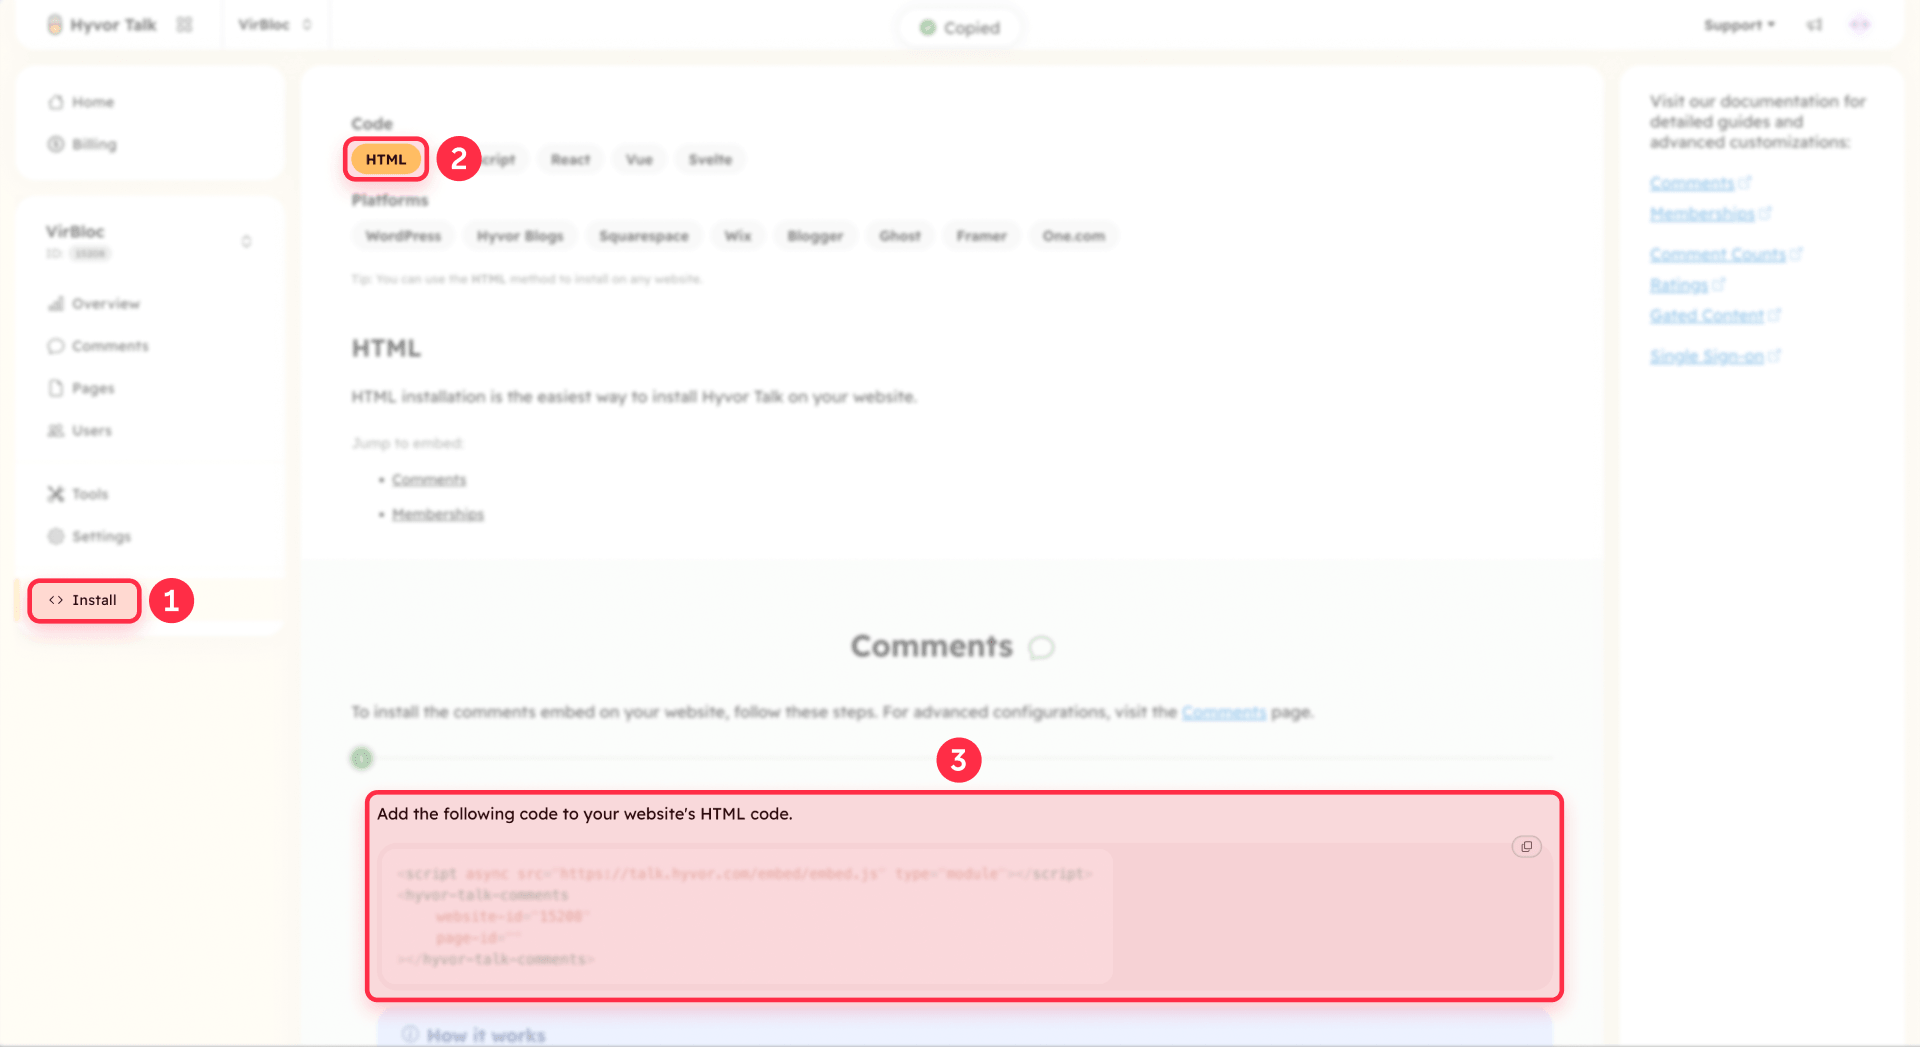
- Create a Hyvor Talk account
- Add your website in the Hyvor dashboard and copy your Website ID
- Decide which CMS field you'll use as the page-id for each post — your Comment thread ID field is ideal
Hyvor's documentation is clear on the key point: page-id is the most important attribute. If you leave it blank, Hyvor falls back to the page's canonical URL, which works but is weaker than a stable ID.
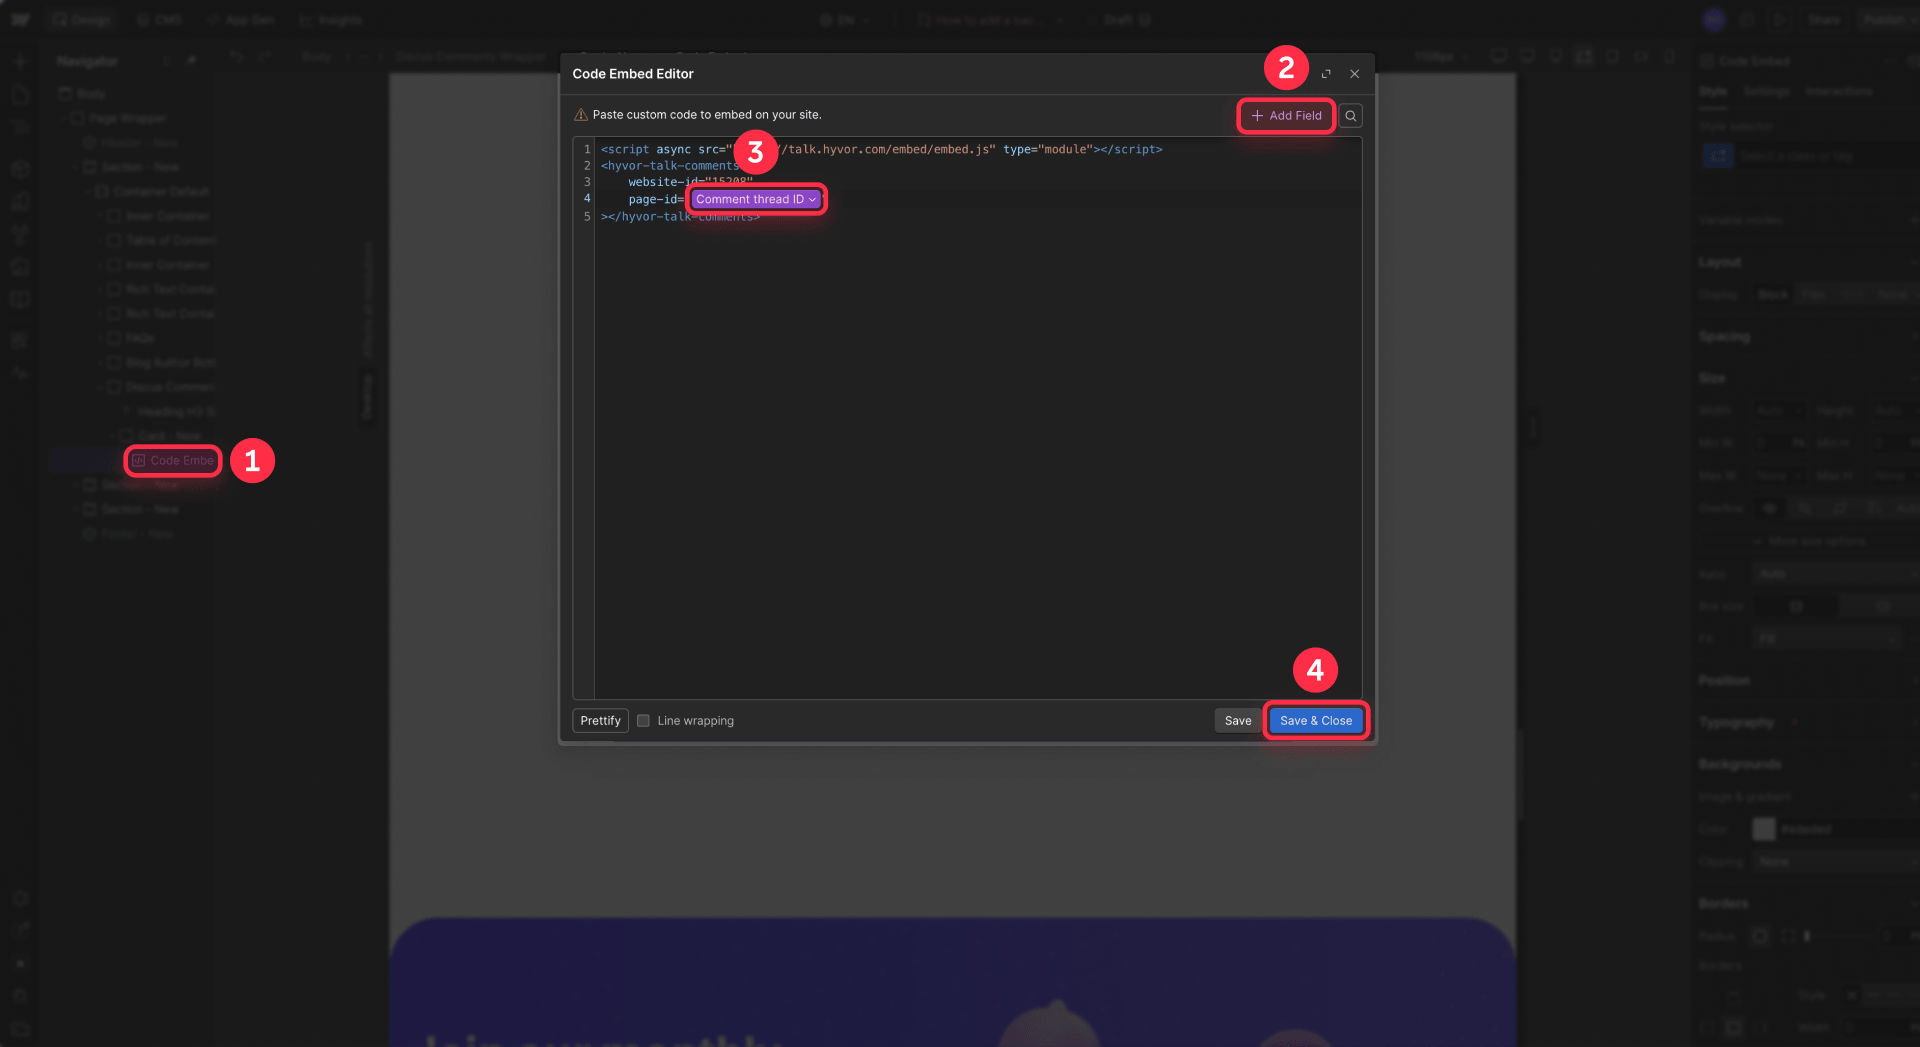
Adding the Hyvor Talk embed to your Webflow blog template
- Open your blog Collection Template in the Webflow Designer
- Add an Embed element where comments should appear
- Paste the following code:
<script async src="https://talk.hyvor.com/embed/embed.js" type="module"></script>

<hyvor-talk-comments
  website-id="YOUR_WEBSITE_ID"
  page-id="CURRENT_POST_COMMENT_ID"
  loading="lazy"
></hyvor-talk-comments>
- Replace YOUR_WEBSITE_ID with your actual Hyvor Website ID and CURRENT_POST_COMMENT_ID with your dynamic Comment thread ID CMS field
- Save the embed and publish the site
The loading="lazy" attribute is a good default — it delays loading the comment widget until the reader scrolls to it, which helps page performance on content-heavy posts.
Verifying Hyvor Talk works correctly on Webflow
- Open two different blog posts on your live published domain
- Confirm the comment form loads correctly on both
- Add a test comment on one post
- Confirm the second post shows a different, empty thread
- Check moderation settings, spam rules, and language preferences inside Hyvor
Hyvor also supports reactions, rich text comments, real-time updates, SSO, comment counts for listing pages, and API access — which makes it much more than a simple drop-in widget. If you want to show comment counts on your blog index page, Hyvor provides an official count component that works with the same page-id mapping.
One detail to decide before launch: Hyvor supports guest comments by default, but guest commenters cannot edit or delete their own comments later. Set that policy before people start using the system.
How to verify your Webflow comments work correctly
Regardless of which tool you chose, run the same verification every time:
- Publish the site — don't rely on preview alone
- Open two different blog posts on the live domain
- Submit a test comment on one post
- Confirm it does not appear on the other post
- Check the moderation dashboard in your comment tool and confirm the comment is under the correct post
- Test on both desktop and mobile
If all posts show the same comments, the thread identifier is hardcoded or the embed isn't using dynamic CMS data. If comments work in preview but not on the live site, check whether the comment tool has domain validation that needs your published domain added.
Preview testing is useful as a first pass — enable Run custom code in Preview in Site settings — but the live domain is always the final proof. Webflow's preview runs on a .canvas.webflow.com domain, and some third-party scripts behave differently there.
Frequently asked questions about Webflow blog comments
Does Webflow have native comments for blog posts?
No. Webflow's Comments feature is for internal collaboration inside the workspace, not public discussions on your published site. There's no hidden toggle to enable reader comments. You need a third-party tool like Disqus or Hyvor Talk embedded on your blog's Collection Template.
Which is better for Webflow blog comments: Disqus or Hyvor Talk?
Disqus is better when you need something free and fast — it's the quickest install with the most familiar interface. Hyvor Talk is better for businesses and professional blogs where ads, privacy, and design quality matter. Disqus shows ads on the free tier and loads inside an iframe that's hard to style. Hyvor is ad-free, more customizable, and has stronger moderation tools. For any site where brand perception matters, Hyvor is the stronger choice.
Why do all my Webflow blog posts show the same comments?
Your thread identifier isn't dynamic. Either the embed is on a static page instead of the Collection Template, or the identifier value is hardcoded instead of pulling from a CMS field. Fix it by placing the embed on the Collection Template and binding the ID to a per-post CMS field like Comment thread ID.
Do I need a unique ID for each Webflow blog post's comments?
Yes. Without a unique identity per post, the comment tool can't separate conversations. The safest approach is creating a dedicated Comment thread ID field in your CMS and giving each post a stable value that never changes — even if the slug changes later. Both Disqus and Hyvor explicitly recommend this.
Can I style Disqus comments to match my Webflow design?
Only partially. Disqus loads inside an iframe, which limits how much you can control with Webflow's Designer or custom CSS. You can adjust some colors and fonts in the Disqus admin, but deep visual customization isn't possible. If design consistency is a priority, Hyvor Talk gives you significantly more control.
Do blog comments help with Webflow SEO?
Don't count on it. Disqus loads comments via JavaScript, and search engines don't reliably index iframe content. Hyvor Talk renders comments more accessibly, but the SEO benefit of comments is generally about engagement signals and fresh content, not direct indexing. Choose a comment tool for reader experience, not for SEO tricks. For a broader look at what actually drives search performance on the platform, read our analysis of how Webflow handles SEO.
What happens to my Webflow comments if I change a blog post's slug?
If you're using URL-only mapping, the comment tool sees the new URL as a different page and creates a new empty thread — your old comments become orphaned. If you're using a stable Comment thread ID field, the slug change doesn't matter because the thread identity stays the same. This is exactly why the ID field matters.
Can I show comment counts on my Webflow blog listing page?
Yes. Hyvor Talk provides an official comment count component that uses the same page-id mapping. You place a count element per post on your listing page with the dynamic CMS ID, and Hyvor displays the number. Disqus also supports count widgets, but the implementation requires more custom work.
Conclusion
Adding comments to Webflow CMS posts is straightforward once you understand the pattern: choose a third-party tool, embed it on the Collection Template, and map each post to a stable thread ID. The tool handles moderation, spam, and user management — Webflow handles the front-end layout.
For a free quick setup, Disqus works. For any business or branded blog where ads, privacy, and design quality matter, Hyvor Talk is the better investment. And regardless of which tool you choose, a simple Comment thread ID field in your CMS is the one detail that prevents the most common failures.
If you want blog comments implemented cleanly — with proper thread mapping, performance optimization, and a design that matches your brand — our team at BRIX Templates can handle the full setup for you.


Join readers commenting on this post!