When collecting leads through Webflow forms that lead to Calendly bookings, users often need to enter their information twice: once in your form and again on the Calendly page. This guide shows you how to automatically pass information from your Webflow forms to Calendly using data attributes, eliminating duplicate data entry and improving conversion rates.
Unlike other solutions that require manual setup of form IDs and separate JavaScript for each form, our approach uses dynamic data attributes that automatically handle any number of forms on your site. This means less code, easier maintenance, and a better experience for both you and your users.
Why implement dynamic Calendly pre-filling in Webflow using our simple script?
Traditional implementations often require you to manually set up form IDs and write separate JavaScript for each form-to-Calendly connection. This approach is not only time-consuming but also prone to errors and difficult to maintain. Our solution using data attributes offers several advantages:
- Dynamic URL generation: Each form automatically builds its own Calendly URL with pre-filled data.
- Multiple form support: Use as many forms as needed on the same page without conflicts.
- Flexible field mapping: Connect any form field to any Calendly parameter.
- Easy maintenance: No need to update JavaScript when adding new forms.
- Error-resistant: Robust handling of special characters and empty fields.
Understanding how Webflow-to-Calendly pre-filling works
Before diving into the implementation, let's understand the core concept. When a visitor submits your Webflow form, our script:
- Reads the target Calendly URL from a data attribute on the form
- Collects values from form fields marked with special data attributes
- Automatically builds a Calendly URL with these values as query parameters
- Redirects the user to their pre-filled booking page
Setting up the Calendly data attribute system in your Webflow forms
Step 1: Add the BRIX Webflow to Calendly script
Add this script to your Webflow project by going to Project Settings > Custom Code > Footer code and pasting it in the code box.
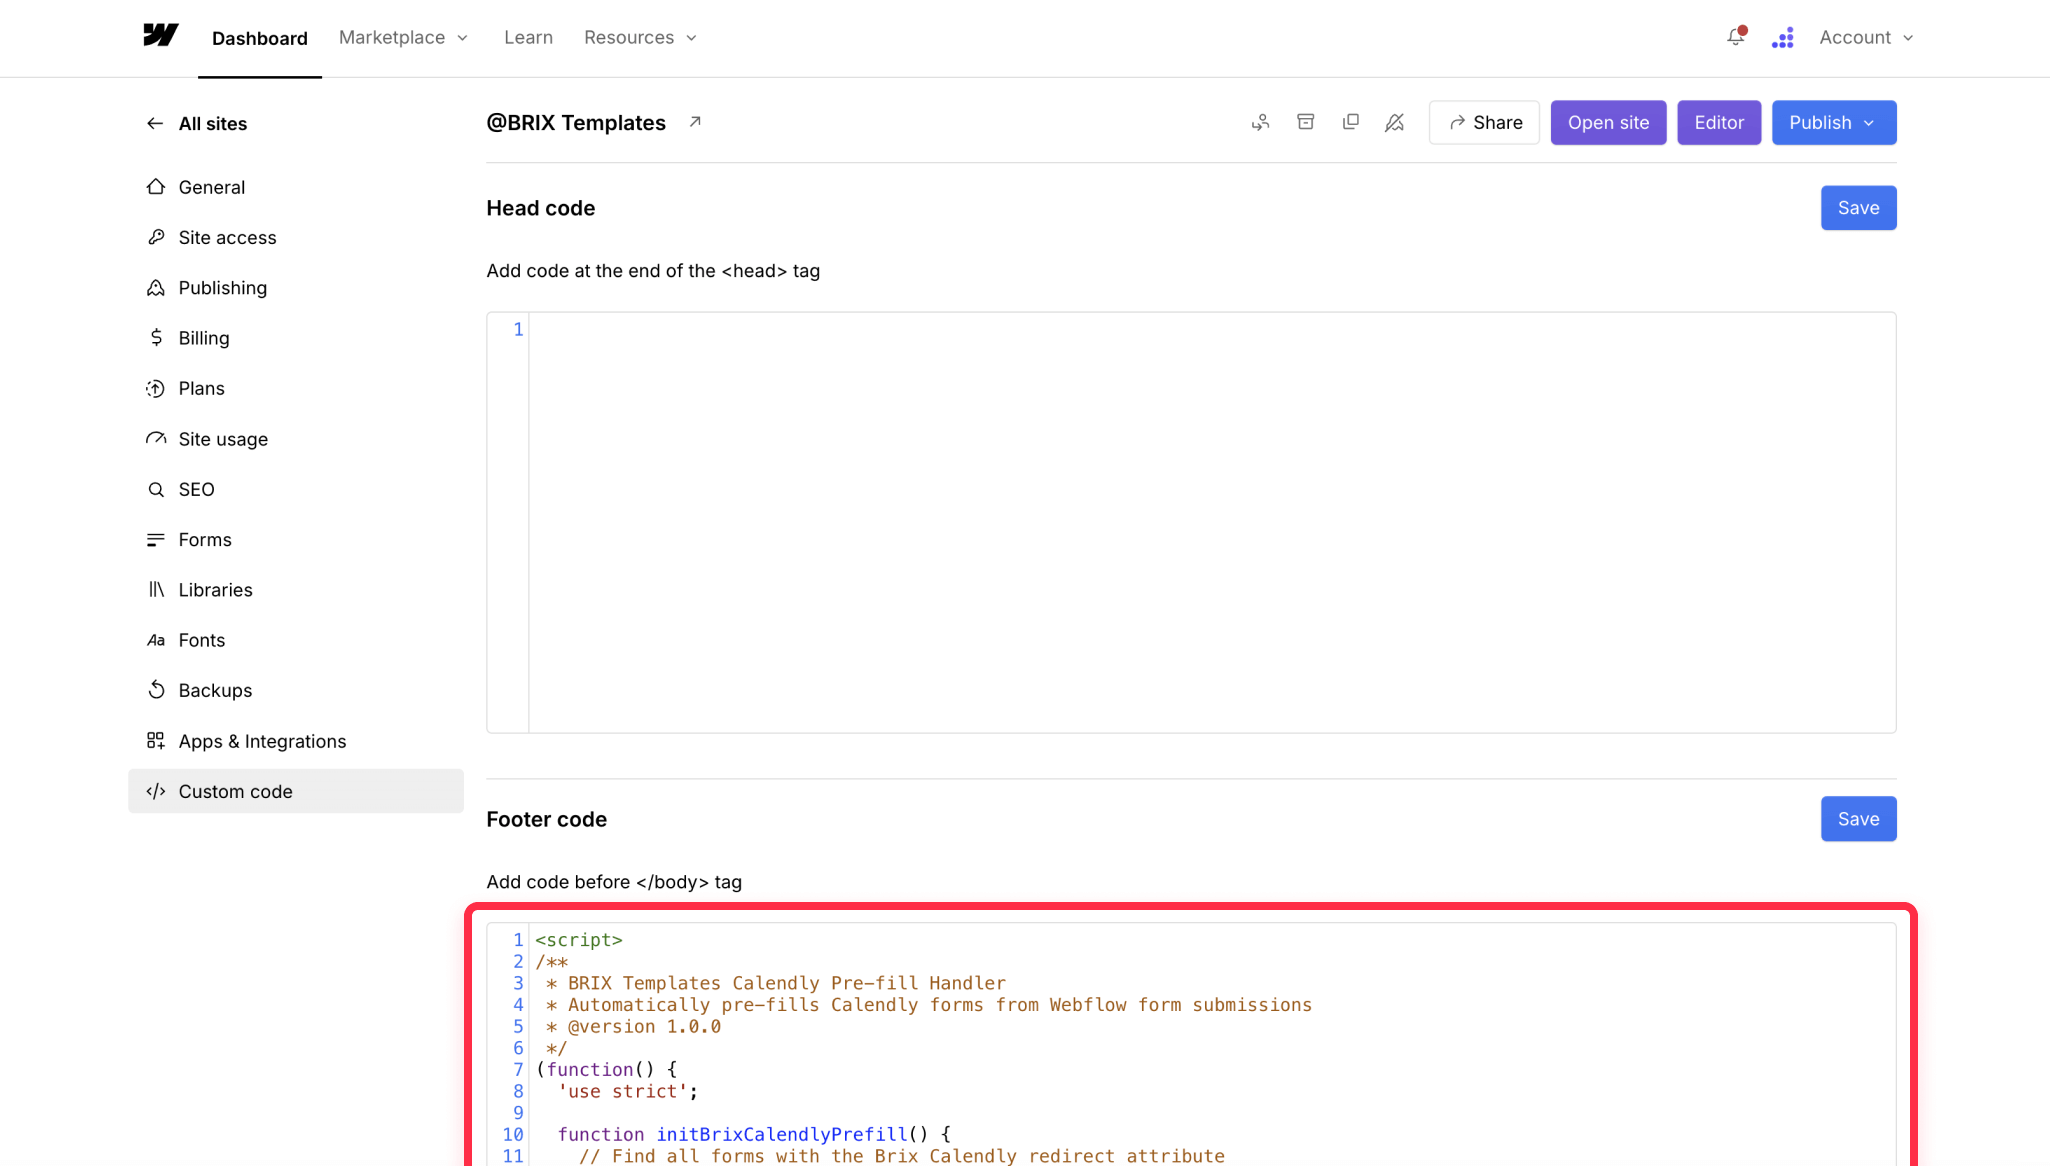
If you only want the functionality on a specific page of your Webflow project, you can add it to the Before </body> tag custom code section under Page Settings instead.
<script>
/**
* BRIX Templates Calendly Pre-fill Handler
* Automatically pre-fills Calendly forms from Webflow form submissions
* @version 1.0.0
*/
(function() {
'use strict';
function initBrixCalendlyPrefill() {
// Find all forms with the Brix Calendly redirect attribute
const calendlyForms = document.querySelectorAll('form[data-brix-calendly-redirect]');
if (!calendlyForms.length) {
console.log('No forms with [data-brix-calendly-redirect] attribute found.');
return;
}
calendlyForms.forEach(form => {
form.addEventListener('submit', function(e) {
e.preventDefault();
// Get base Calendly URL
const baseCalendlyURL = form.getAttribute('data-brix-calendly-redirect');
if (!baseCalendlyURL) {
console.log('No Calendly URL specified in data-brix-calendly-redirect');
return;
}
// Collect parameters from form fields
const queryParams = [];
const fieldInputs = form.querySelectorAll('[data-brix-calendly-field]');
fieldInputs.forEach(input => {
const paramName = input.getAttribute('data-brix-calendly-field');
const paramValue = encodeURIComponent(input.value.trim());
if (paramValue) {
queryParams.push(`${paramName}=${paramValue}`);
}
});
// Build final URL with parameters
let finalURL = baseCalendlyURL;
if (queryParams.length > 0) {
finalURL += (finalURL.includes('?') ? '&' : '?') + queryParams.join('&');
}
console.log(`Redirecting to Calendly: ${finalURL}`);
window.location.href = finalURL;
});
});
}
// Run when DOM is ready
if (document.readyState === 'loading') {
document.addEventListener('DOMContentLoaded', initBrixCalendlyPrefill);
} else {
initBrixCalendlyPrefill();
}
})();
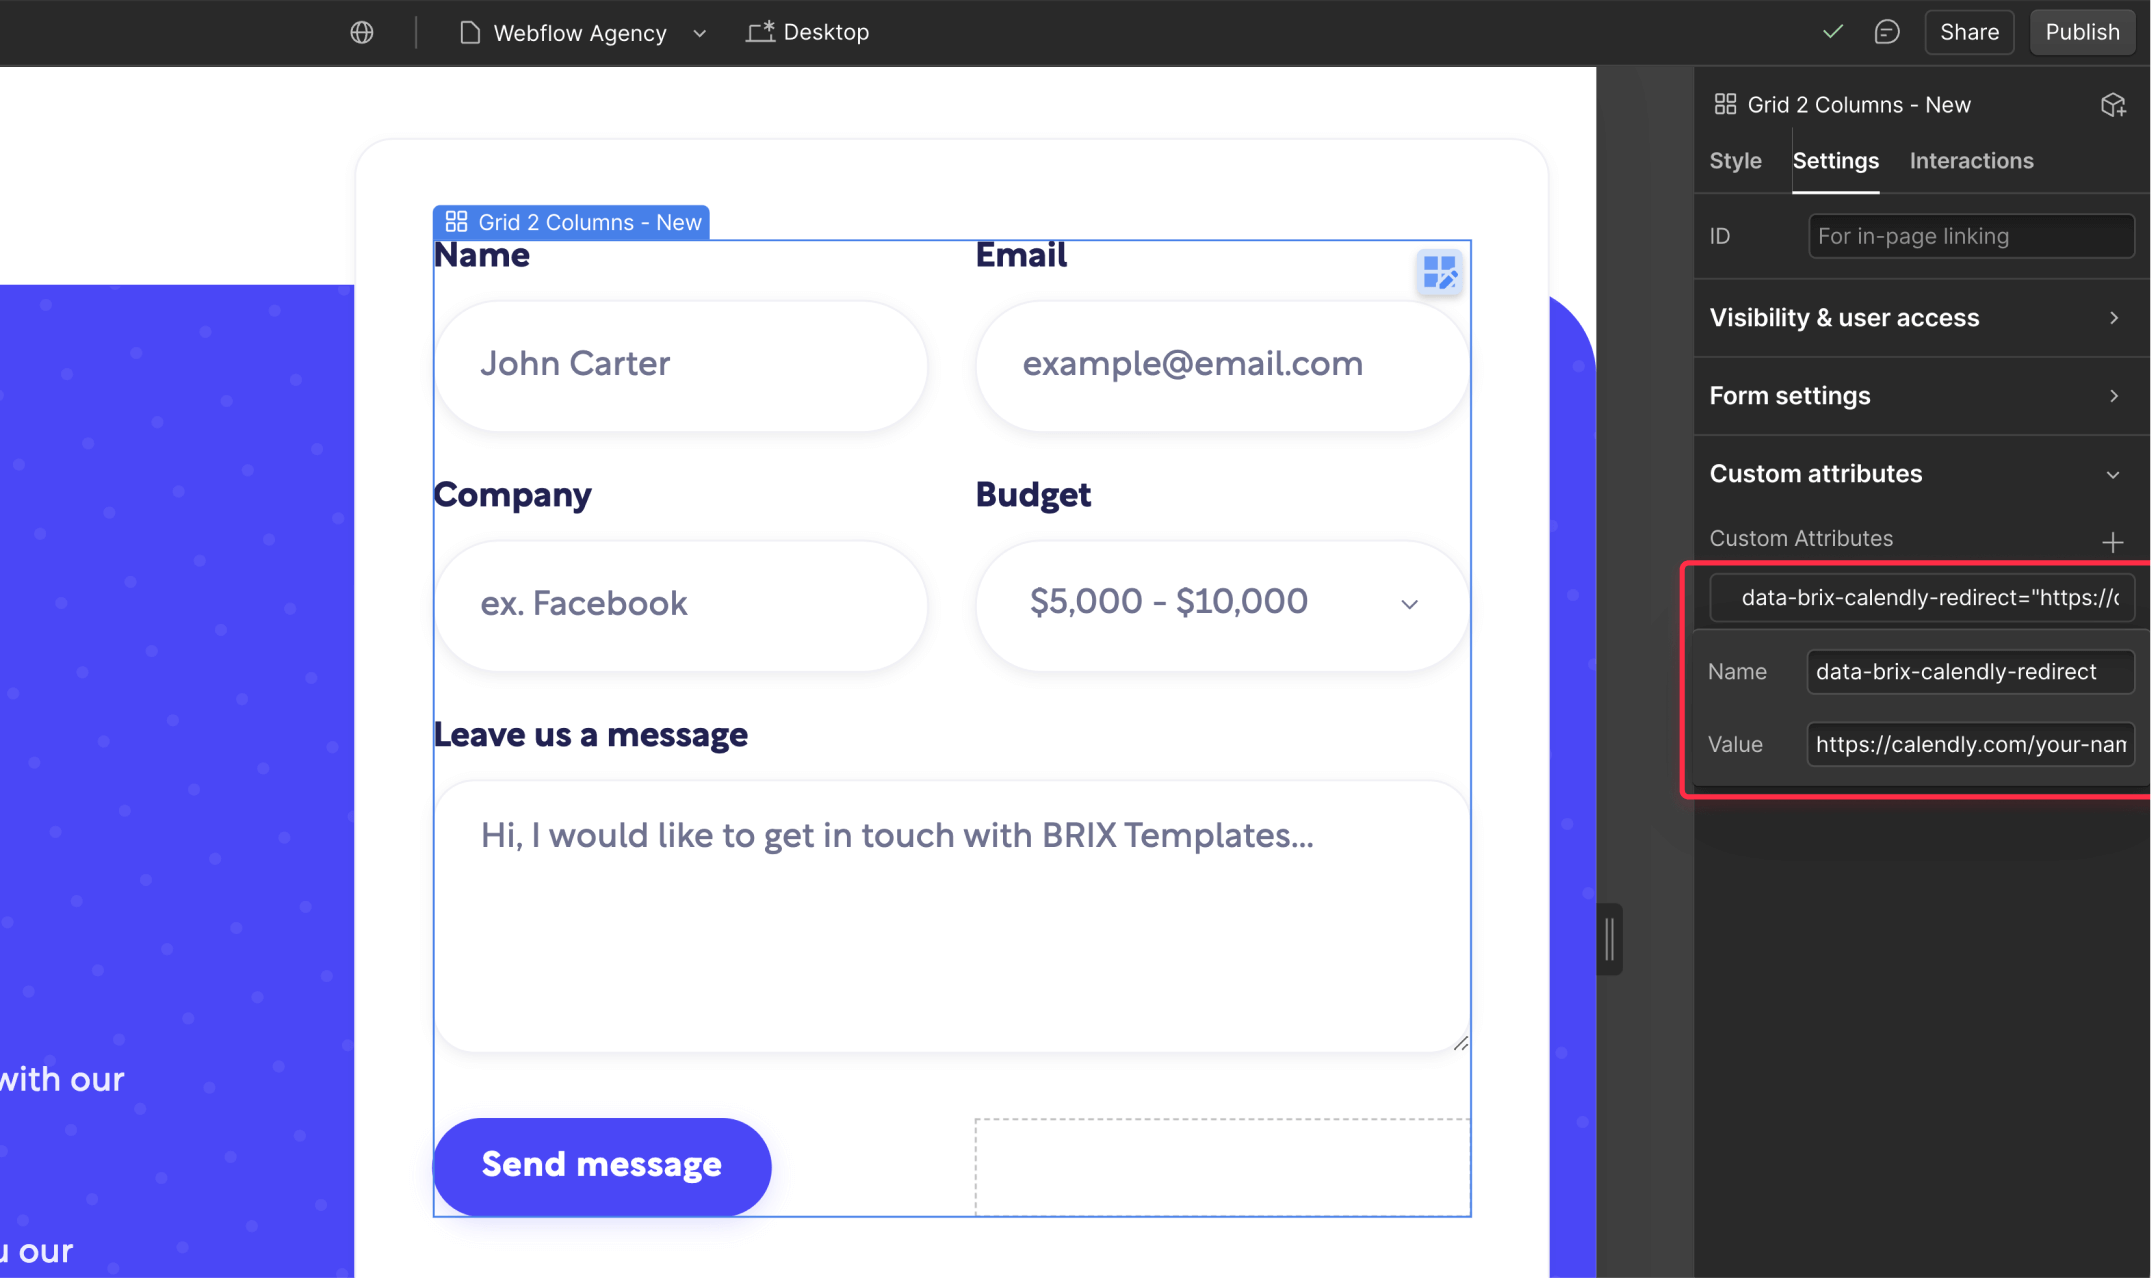
</script>Step 2: Configure your Webflow form settings
- Open your Webflow Designer
- Select your Form element
- In the Settings panel, locate "Custom Attributes"
- Add the following attribute:
- Name: data-brix-calendly-redirect
- Value: Your Calendly booking URL (e.g., https://calendly.com/your-name/30min)
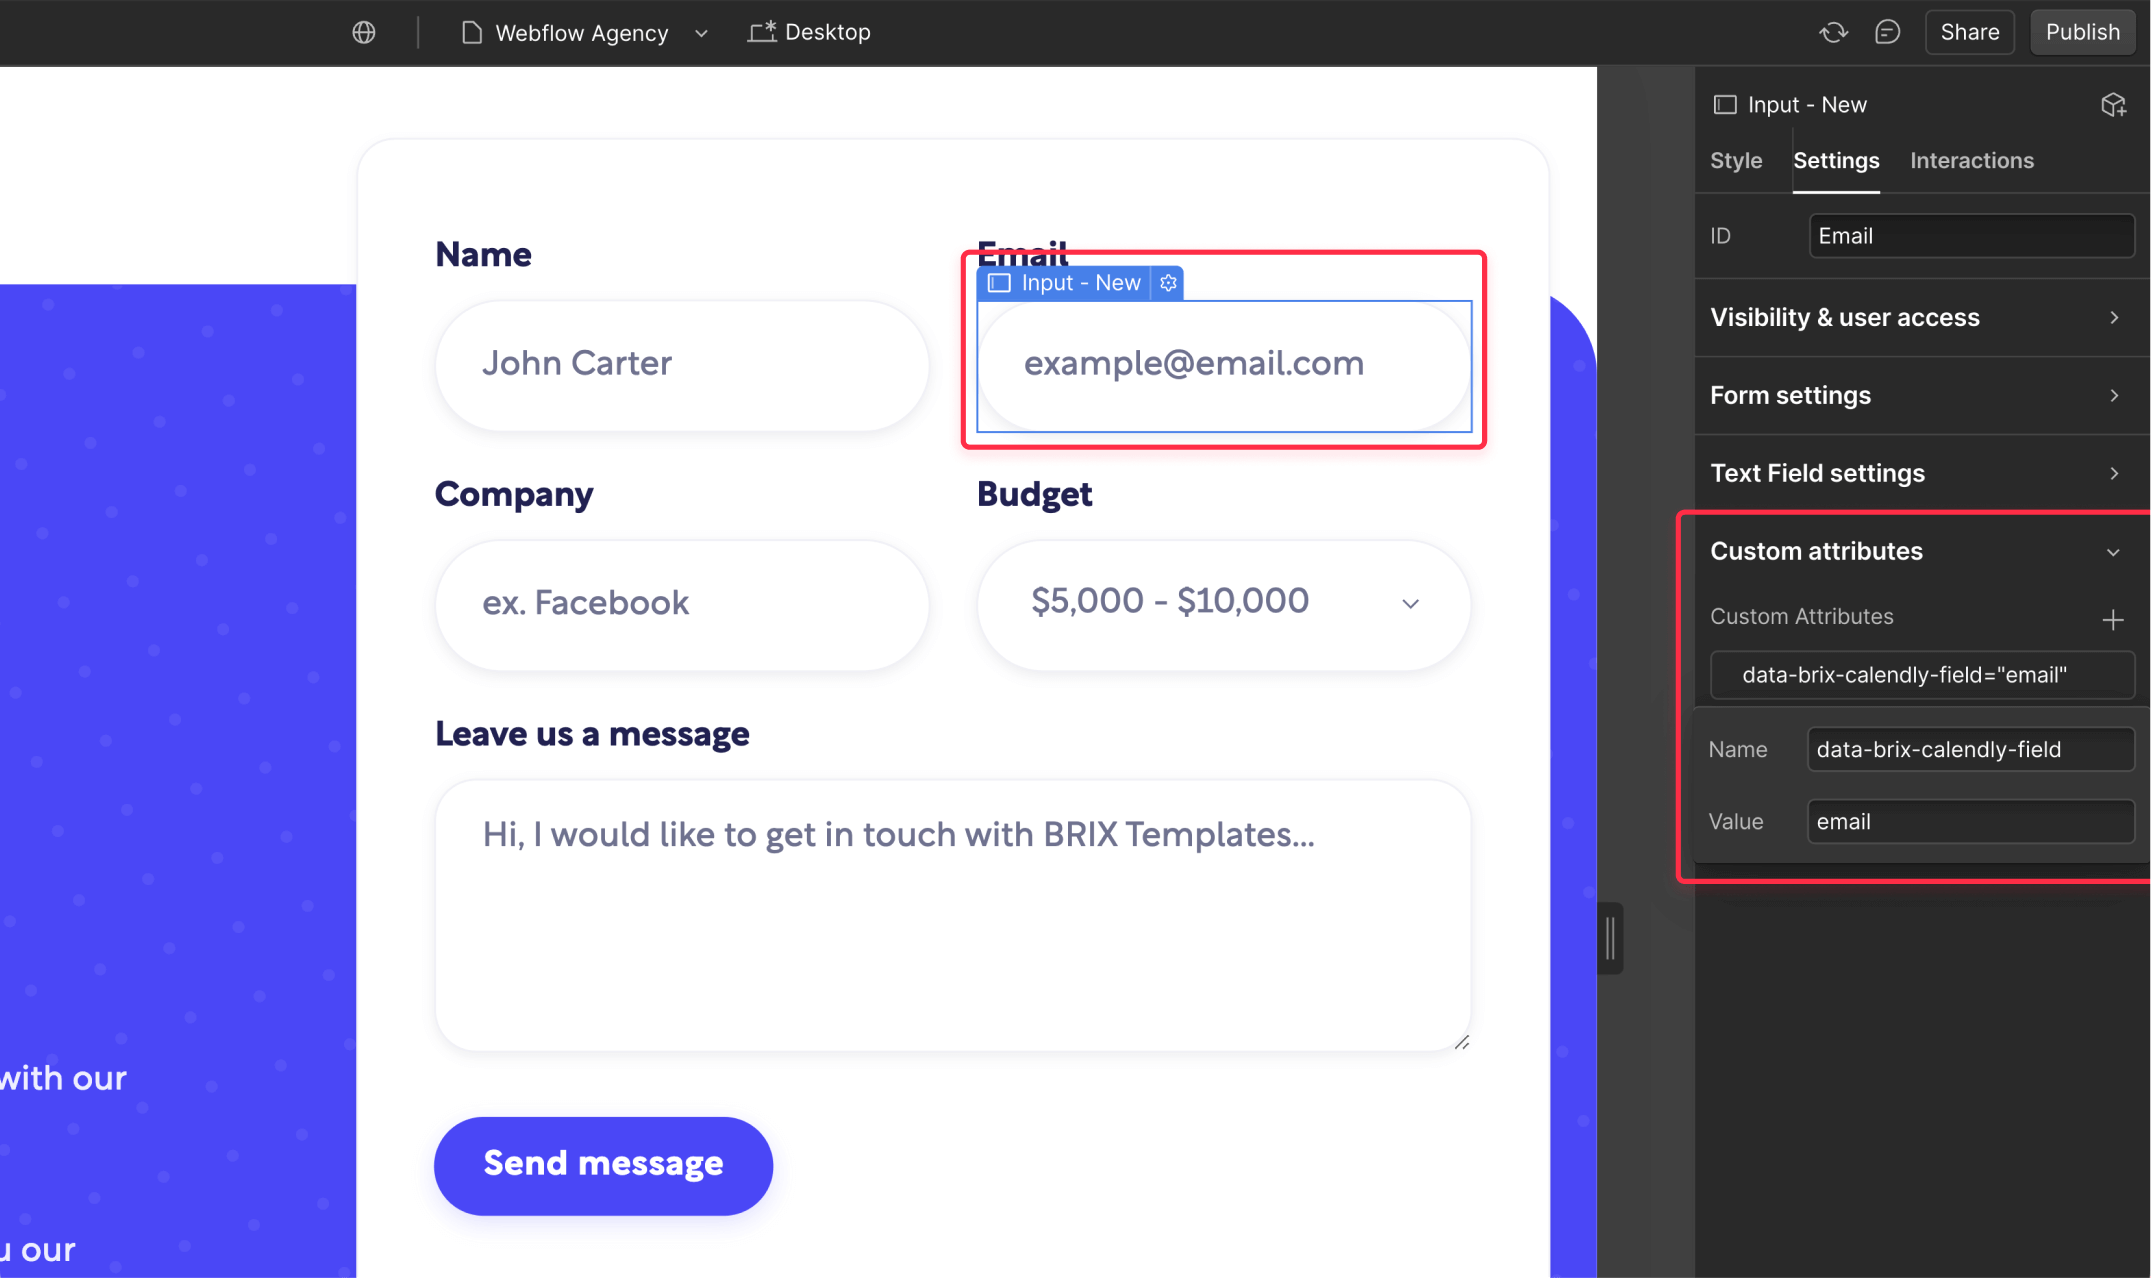
Step 3: Map form fields to Calendly parameters
For each form field you want to pre-fill in Calendly, add the appropriate data attribute:
- Select the input element
- Add a custom attribute:
- Name: data-brix-calendly-field
- Value: The corresponding Calendly parameter (i.e. email, name, first_name, etc)
Supported Calendly parameters and their uses
Calendly supports various parameters for pre-filling booking information. Here are the most commonly used ones:
Basic information
- email: Visitor's email address
- name: Full name (single field)
- first_name: First name only
- last_name: Last name only
Contact and location options
- location: Meeting location (for in-person meetings)
- phone: Phone number (when event type is set to phone call)
- guests: Additional attendee emails (comma-separated)
Custom questions
- a1: First custom question
- a2: Second custom question
- a3: Third custom question (and so on...)
Testing your implementation
1. Publish your site: Ensure your site is published (ideally we recommend to test first on staging) with all custom attributes and scripts.
2. Test the form: Submit the form with sample data.
3. Check the redirect: Verify you're taken to Calendly with all parameters in the URL.
4. Verify the data: Confirm all fields are correctly pre-filled on the Calendly page.
Troubleshooting common issues
Form doesn't redirect to Calendly
- Verify the data-brix-calendly-redirect attribute contains a valid Calendly URL
- Check that the script is properly added to your site's custom code and nsure there are no JavaScript conflicts in the browser console related to any other script you may have added to your site
Fields aren't pre-filling
- Confirm data-brix-calendly-field values match Calendly's expected parameters
- Check for typos in attribute names
Custom questions aren't working
- Ensure you're using the correct parameter (a1, a2, etc.)
- Check that custom questions are enabled in your Calendly event and verify the question order matches your Calendly event settings
Conclusion
By using BRIX Templates' data attributes for Calendly pre-filling, you've implemented a flexible, maintainable solution that can grow with your needs. This approach eliminates the common pitfalls of manual ID-based implementations while providing a seamless booking experience for your users.
Remember to keep your Calendly event settings in sync with your form fields, and regularly test the booking flow to ensure everything works as expected. As your needs evolve, this system can easily accommodate new forms and fields without requiring code changes.
Need help with more advanced connections between Webflow and Calendly, or looking to integrate other third-party services with your Webflow site? Our team of Webflow pros is here to help – just send us a message, and we'll help you create the perfect integration for your needs.


Join readers commenting on this post!