
Webflow doesn't natively track which page a form submission came from or capture page context information, which can be frustrating when you're trying to measure campaign effectiveness or understand your lead sources. The good news? There's a simple workaround that automatically captures and submits the current page URL and page title with every form submission.
This guide will show you how to implement a form data tracking Webflow attribute that works with both hidden and visible form inputs, giving you complete visibility into your form submission sources and content context, and the best part is that it's 100% free forever with no ongoing costs.
Why implement automatic page data submission for Webflow forms
Standard Webflow forms provide limited insight into submission sources and content context, especially when working with multi-page campaigns or content-driven lead generation. Here's why automatic URL and title tracking makes sense for different scenarios:
- Lead attribution: Know exactly which page, blog post, or landing page generated each lead submission, including readable page titles for easier analysis.
- Campaign tracking: Measure the effectiveness of different pages and content pieces in driving conversions with both technical URLs and human-readable titles.
- CMS-driven analytics: Automatically track form submissions across dynamic content pages with meaningful page titles alongside unique URLs.
Understanding how our custom page data tracking Webflow attribute works
The brix-form-data attribute we'll implement offers a simple, reliable page information capture system:
- Automatic detection: Finds form inputs marked with the special attribute and populates them with the current page URL and/or page title based on the attribute value.
- Universal compatibility: Works with both hidden inputs (for background tracking) and visible inputs (when users need to see the information).
How to add the page data tracking script to your Webflow site
Let's break down the implementation process into clear, manageable steps.
How to add the form data script to your Webflow project
First, we need to add the script that powers the automatic URL and title capture functionality:
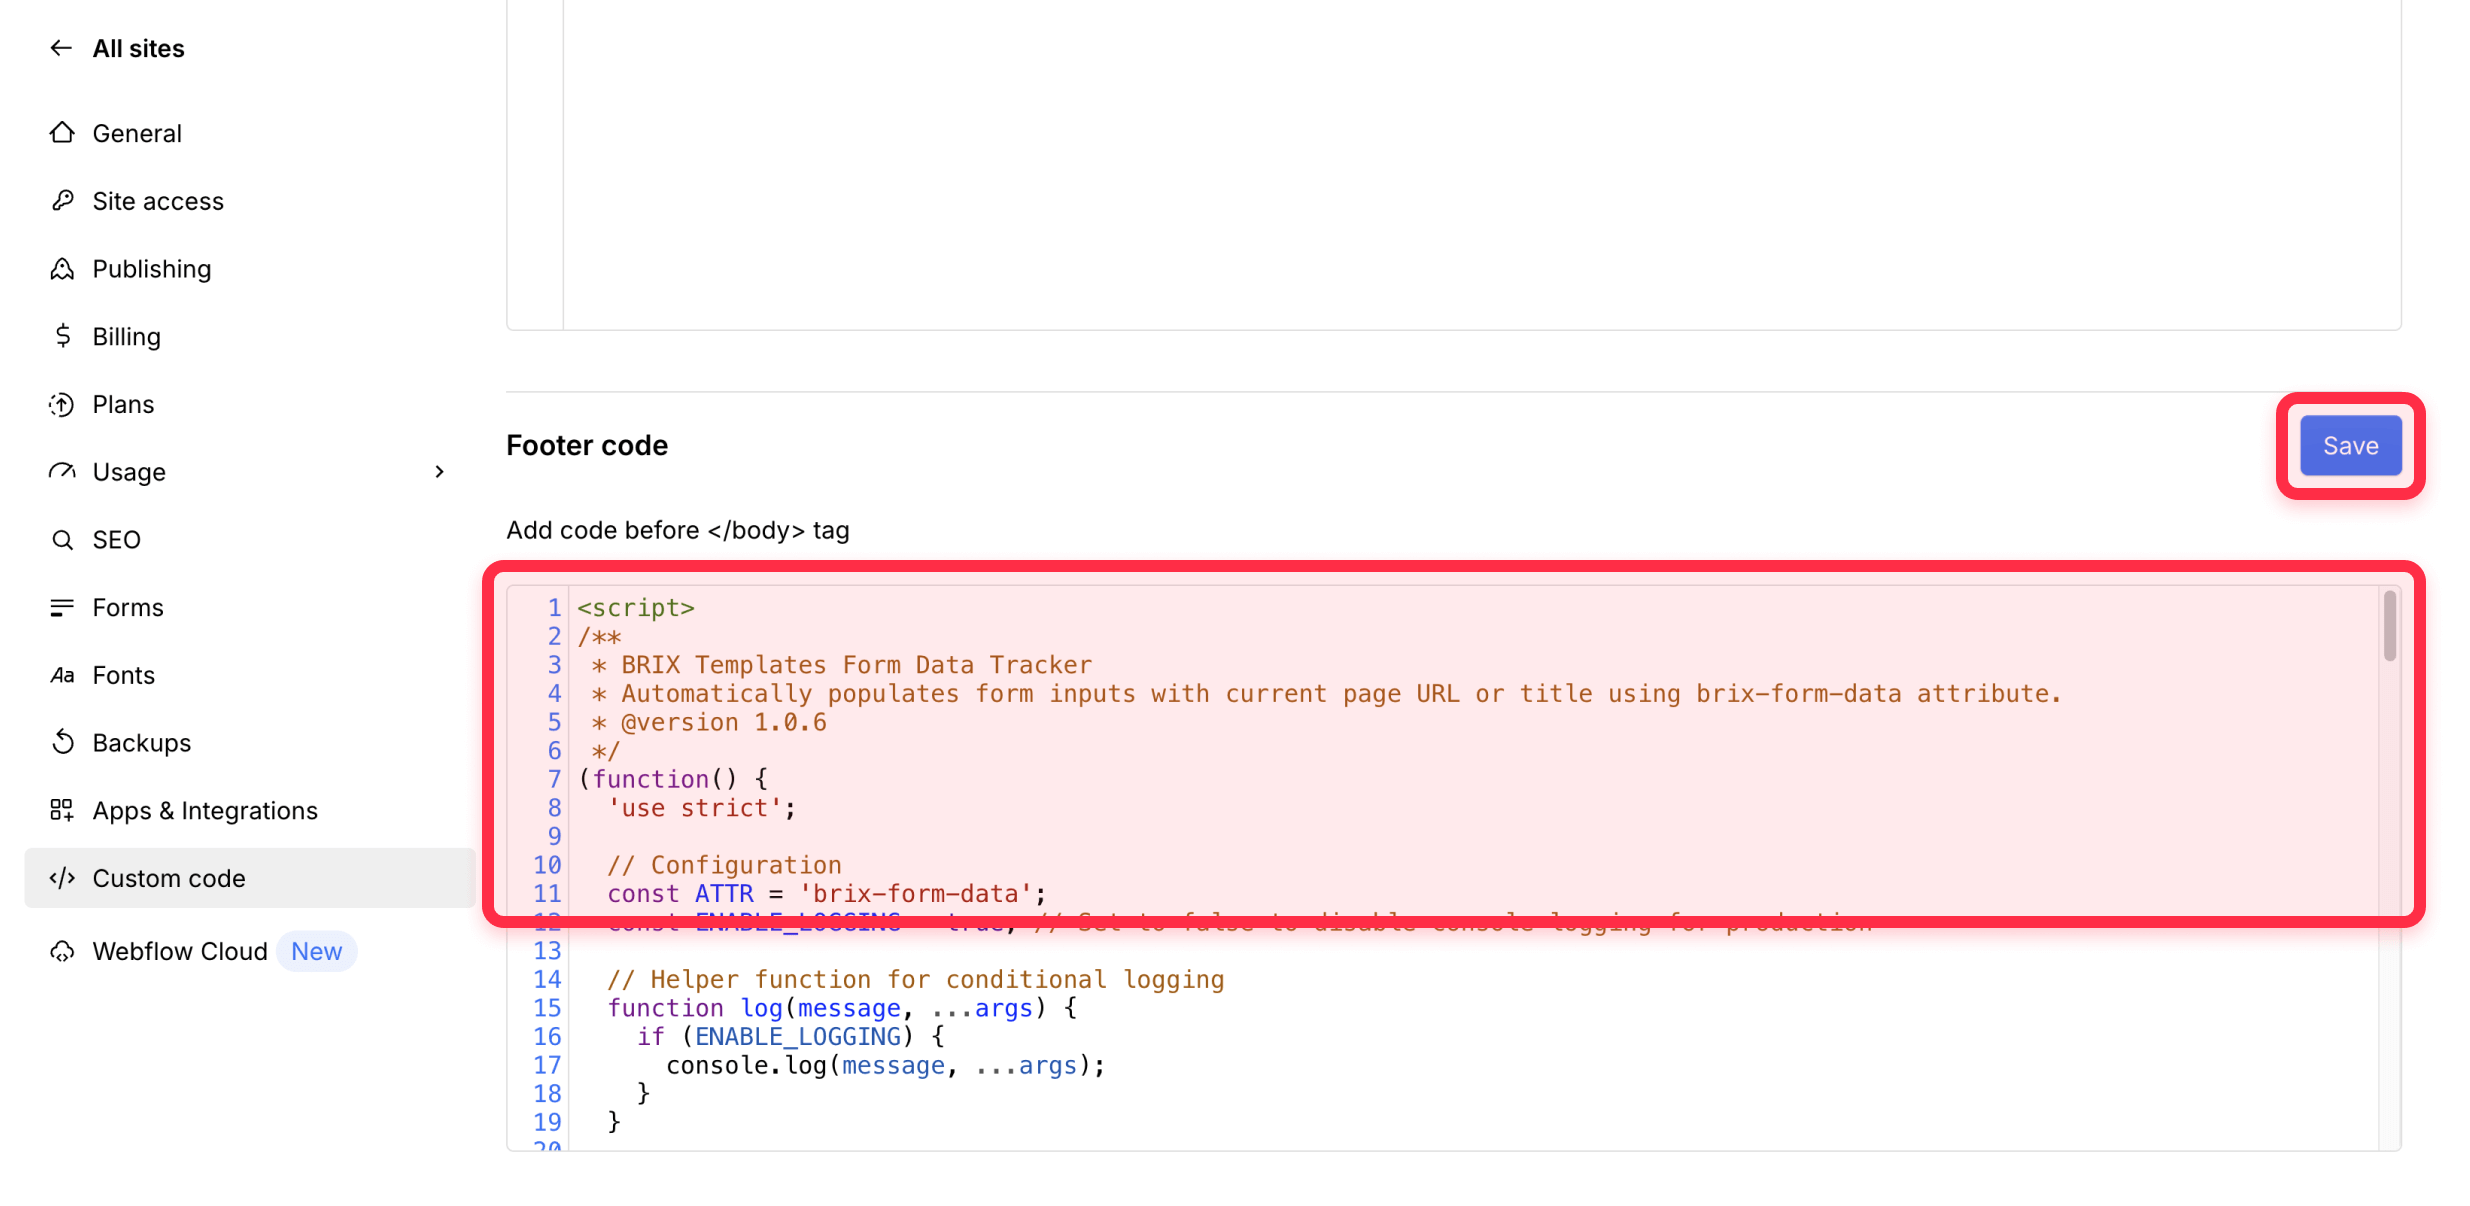
- Access your Webflow project settings
- Navigate to the Custom Code section
- Locate the "Before </body> tag" field
Inside that code box, please insert the following code.
<script>
/**
 * BRIX Templates Form Data Tracker
 * Automatically populates form inputs with current page URL or title using brix-form-data attribute.
 * @version 1.0.6
 */
(function() {
  'use strict';

  // Configuration
  const ATTR = 'brix-form-data';
  const ENABLE_LOGGING = true; // Set to false to disable console logging for production

  // Helper function for conditional logging
  function log(message, ...args) {
    if (ENABLE_LOGGING) {
      console.log(message, ...args);
    }
  }

  function warn(message, ...args) {
    if (ENABLE_LOGGING) {
      console.warn(message, ...args);
    }
  }

  function error(message, ...args) {
    if (ENABLE_LOGGING) {
      console.error(message, ...args);
    }
  }

  // Initialize when DOM is ready
  if (document.readyState === 'loading') {
    document.addEventListener('DOMContentLoaded', init);
  } else {
    init();
  }

  function init() {
    log('📝 BRIX Form Data Tracker - Initializing');
    populateDataInputs();

    // Watch for dynamically added forms
    observeFormChanges();
  }

  function populateDataInputs() {
    const dataInputs = document.querySelectorAll(`input[${ATTR}], textarea[${ATTR}]`);

    if (dataInputs.length === 0) {
      log('📝 BRIX Form Data Tracker - No data tracking inputs found on this page');
      return;
    }

    const currentURL = window.location.href;
    const pageTitle = document.title;
    log('📝 BRIX Form Data Tracker - Current page URL:', currentURL);
    log('📝 BRIX Form Data Tracker - Current page title:', pageTitle);

    dataInputs.forEach((input, index) => {
      try {
        const dataType = input.getAttribute(ATTR);
        let valueToSet = '';

        if (dataType === 'url') {
          valueToSet = currentURL;
        } else if (dataType === 'title') {
          valueToSet = pageTitle;
        } else {
          warn(`❌ BRIX Form Data Tracker - Invalid data type "${dataType}" for input ${index + 1}. Use "url" or "title".`);
          return;
        }

        // Set the value to current URL or title
        input.value = valueToSet;

        log(`✅ BRIX Form Data Tracker - Input ${index + 1} populated with ${dataType}:`, valueToSet);

        // Trigger change event for any listeners
        const changeEvent = new Event('change', { bubbles: true });
        input.dispatchEvent(changeEvent);

      } catch (err) {
        error('❌ BRIX Form Data Tracker - Error populating input:', err);
      }
    });

    log(`📝 BRIX Form Data Tracker - Successfully populated ${dataInputs.length} data inputs`);
  }

  function observeFormChanges() {
    // Watch for dynamically added forms (useful for SPA-like behavior)
    const observer = new MutationObserver((mutations) => {
      let shouldCheck = false;

      mutations.forEach((mutation) => {
        if (mutation.type === 'childList') {
          mutation.addedNodes.forEach((node) => {
            if (node.nodeType === 1) { // Element node
              if (node.tagName === 'FORM' || node.querySelector(`[${ATTR}]`)) {
                shouldCheck = true;
              }
            }
          });
        }
      });

      if (shouldCheck) {
        log('📝 BRIX Form Data Tracker - New form detected, re-scanning for data inputs');
        setTimeout(populateDataInputs, 100); // Small delay to ensure DOM is ready
      }
    });

    observer.observe(document.body, {
      childList: true,
      subtree: true
    });
  }

  // Also populate on form focus (backup method)
  document.addEventListener('focusin', (e) => {
    if (e.target.hasAttribute && e.target.hasAttribute(ATTR) && !e.target.value) {
      const dataType = e.target.getAttribute(ATTR);
      if (dataType === 'url') {
        e.target.value = window.location.href;
        log('📝 BRIX Form Data Tracker - URL populated on input focus');
      } else if (dataType === 'title') {
        e.target.value = document.title;
        log('📝 BRIX Form Data Tracker - Title populated on input focus');
      }
    }
  });

})();
</script>
When to use site-wide vs. page-specific implementation:
- Site-wide (recommended for most cases): Use project-level custom code if you have forms across multiple pages, site-wide footer forms, or want consistent page data tracking throughout your site.
- Page-specific: Use Page Settings > Custom Code > Before </body> tag if you only need data tracking on specific landing pages or campaign pages.
Setting up automatic page data capture for your Webflow forms
Follow these steps to implement URL and title tracking on any Webflow form, whether on static pages or CMS collection templates:
1 - Add an Input element to your Webflow form:
- For most use cases, add a Text Input element from the Form elements panel
- Place it anywhere within your form structure
2 - Configure the input settings:
- Set the Name to something descriptive like "page_url", "page_title", "source_page", or "content_title"
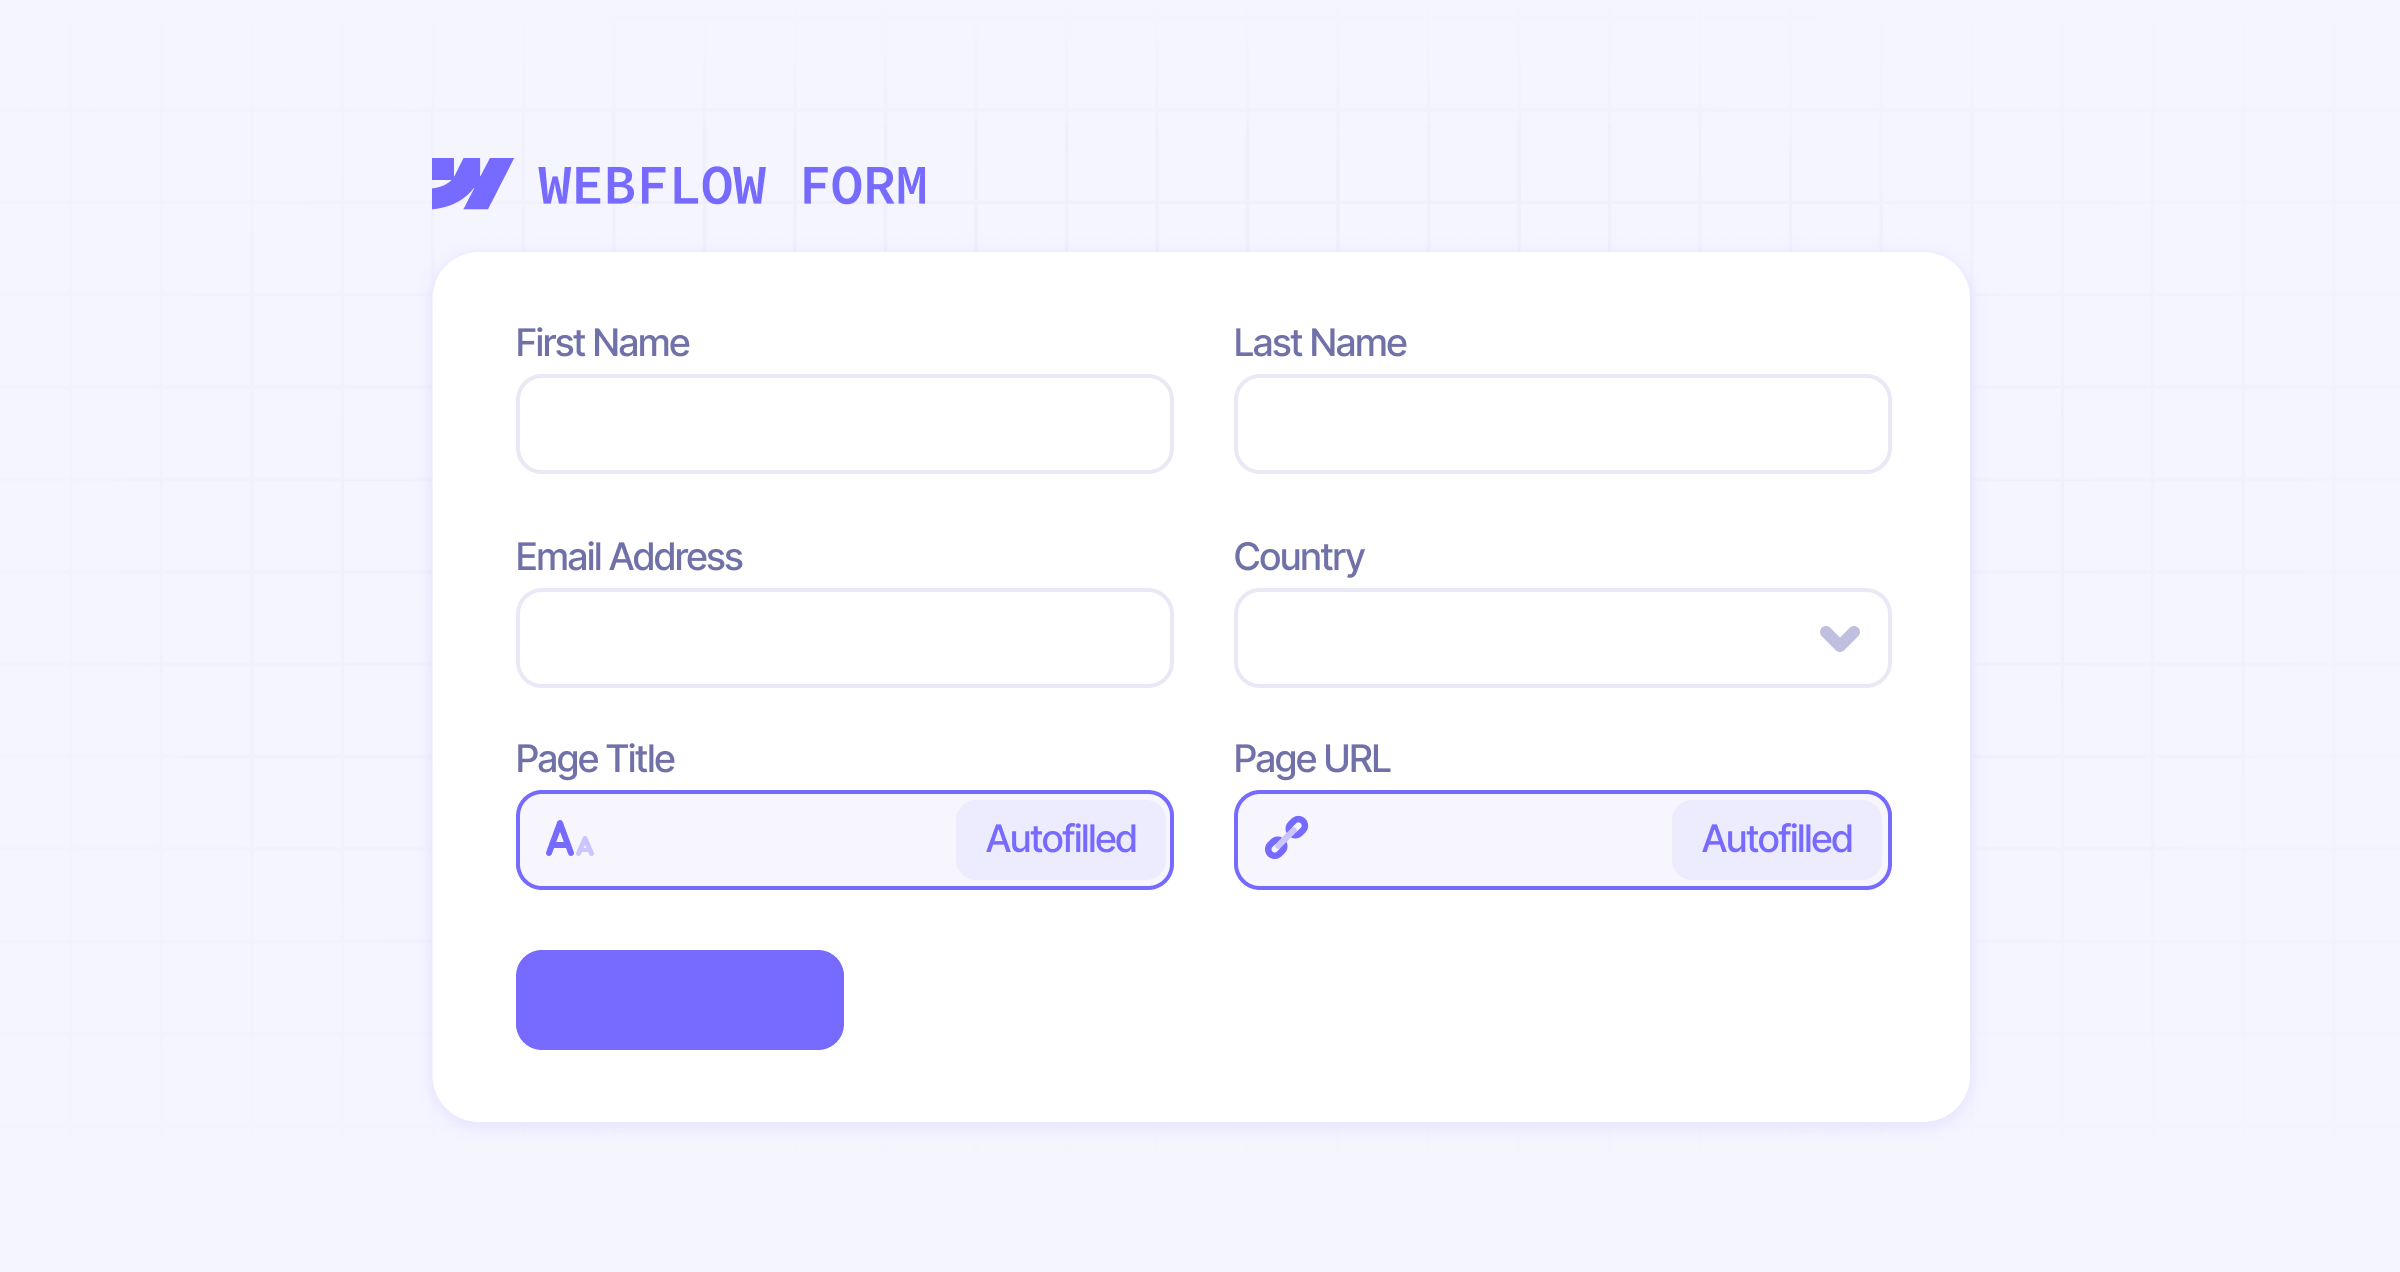
- Add a helpful Placeholder like "Page URL (auto-filled)" or "Page Title (auto-filled)" so you can easily identify this data when receiving form submissions
- Leave the Value field empty (the script will populate this automatically)
- Set Required based on your needs (typically we recommend leaving it unchecked, in case the user has Javascript disabled on the browser, as otherwise they won’t be able to submit the form)
3 - Add the tracking attribute: In the Input element's settings panel, add the brix-form-data attribute with one of these values:
- Use "url" to capture the current page URL
- Use "title" to capture the current page title
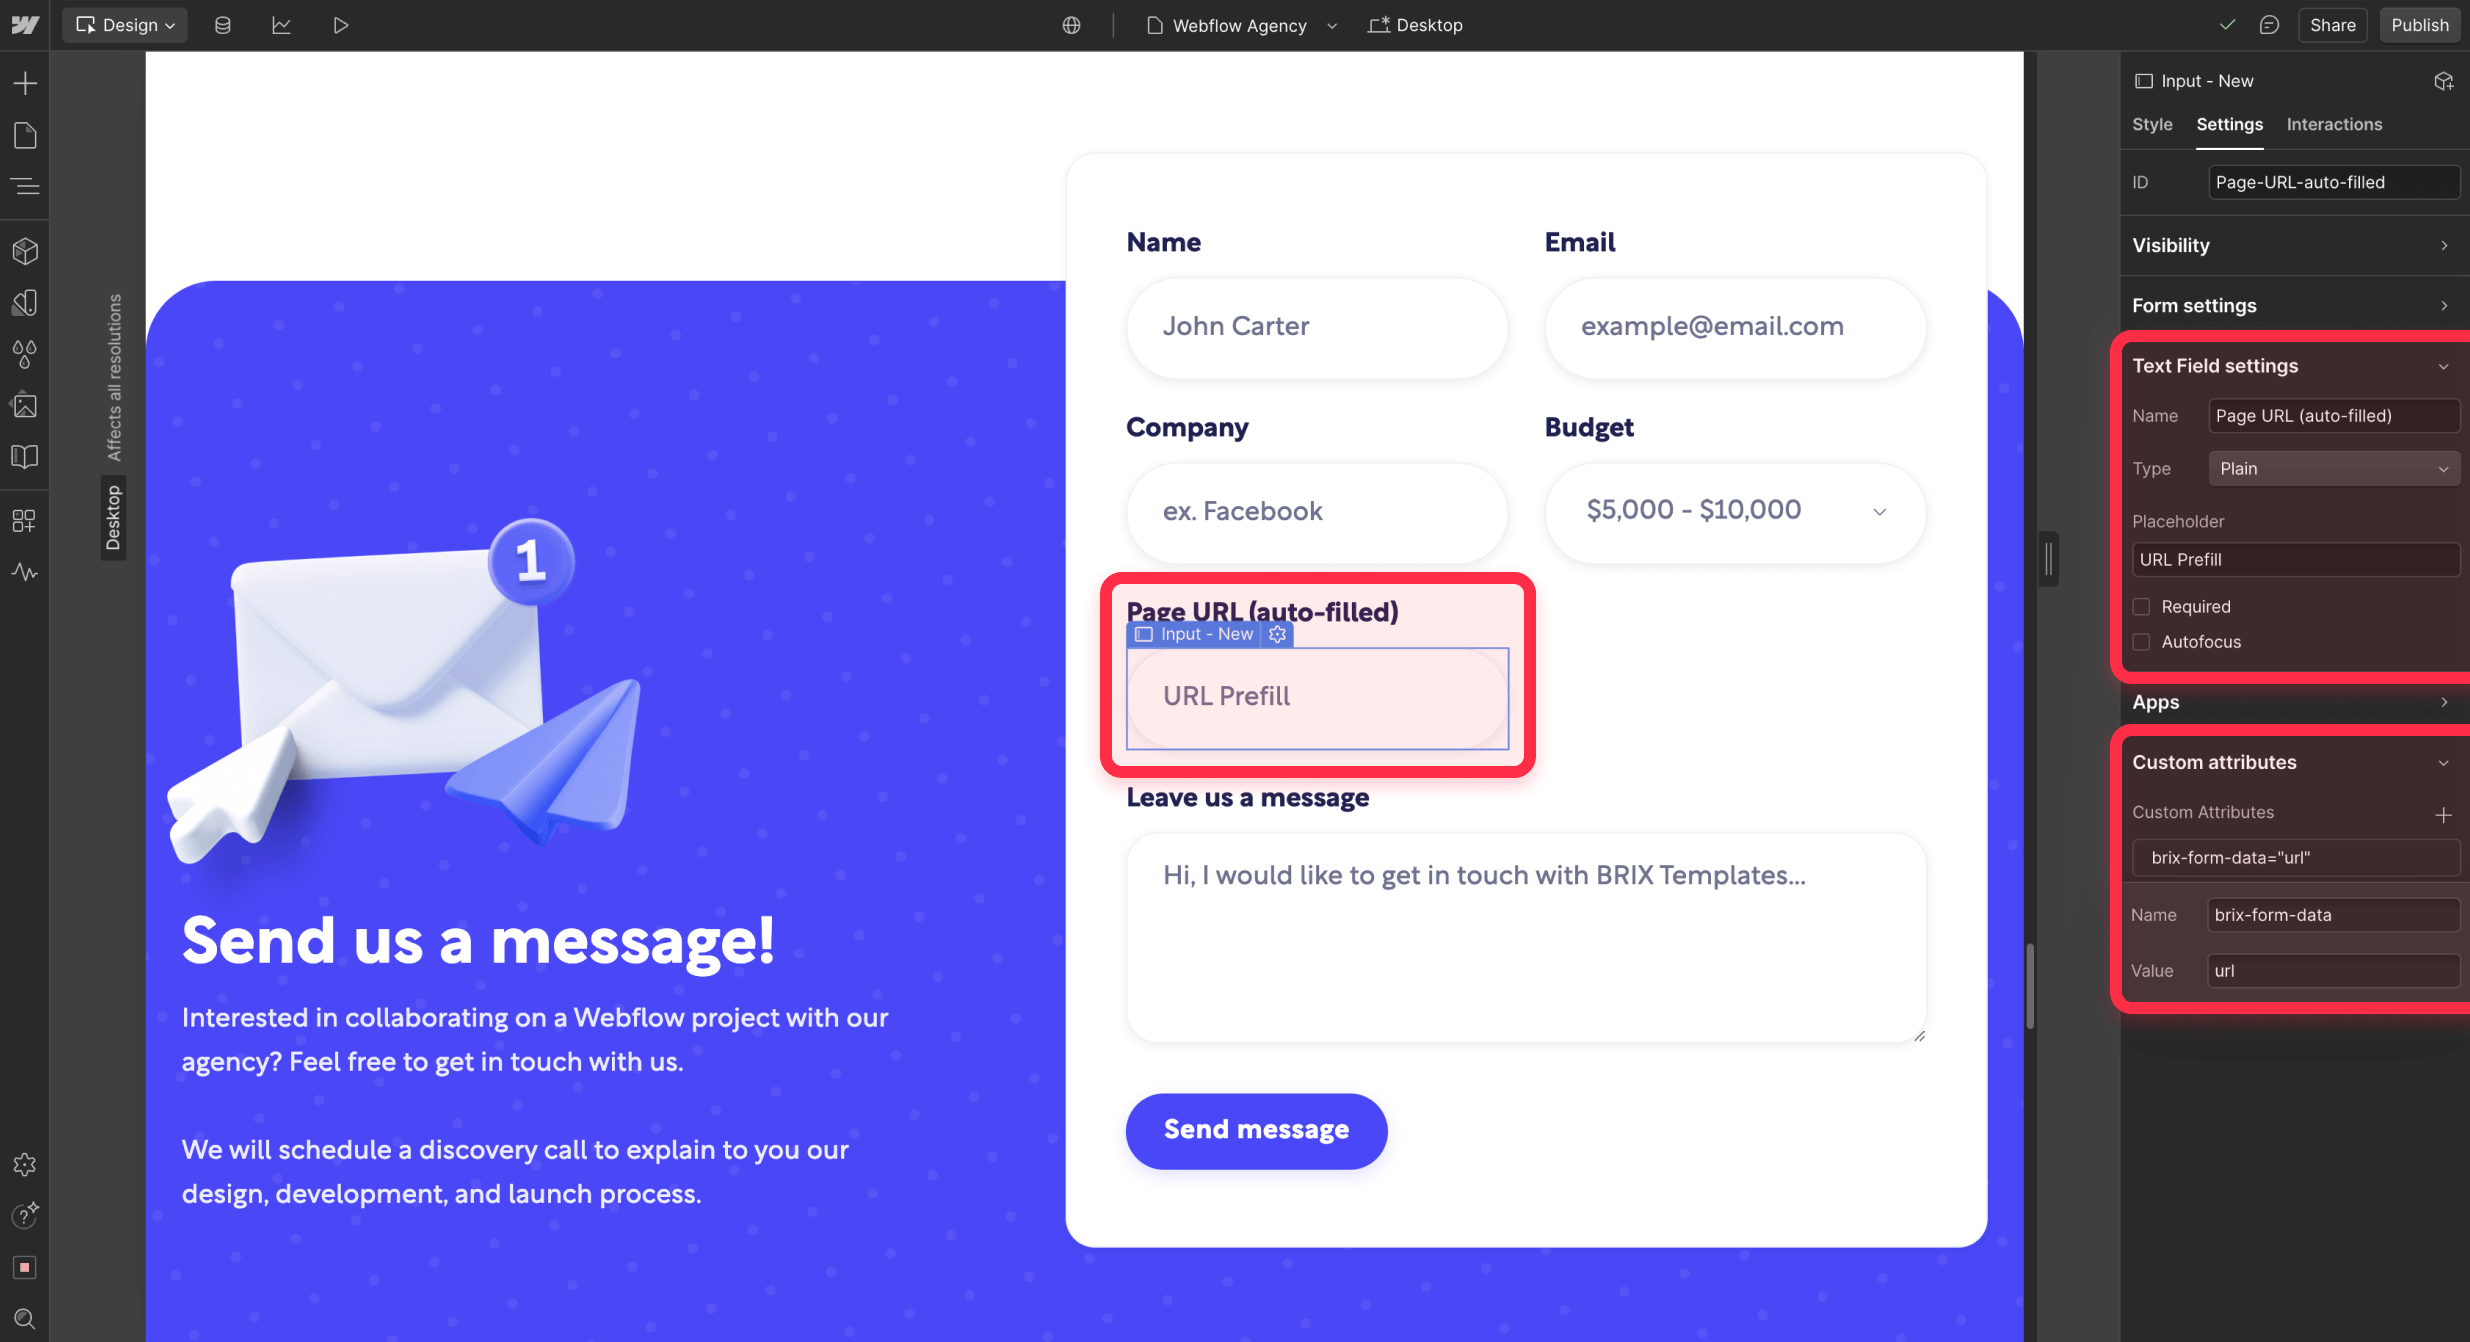
You can add multiple inputs to the same form with different values to capture both URL and title
4 - Optional configurations:
Hide the input: Set the input's display to none in the style settings if you want invisible page data tracking. Otherwise, the input will be visible to users, so it's recommended to hide it unless you specifically want users to see the captured information.
The input will be automatically populated with the requested page data when the page loads. This works perfectly across static pages, landing pages, and CMS collection pages, allowing you to track lead sources from blog posts, product pages, portfolio items, and any other content-driven pages in your Webflow site.
Steps before publishing your Webflow site
- Publish to staging: Push your changes to the webflow.io staging environment first to test in a live environment
- Verify data collection: Submit forms from various pages and check that unique URLs and/or titles are being captured
- Publish to production: After confirming everything works correctly on staging, publish your changes to your live Webflow site
Common troubleshooting scenarios
If your page data tracking isn't working properly, check these common issues:
- Verify that your brix-form-data attribute is spelled exactly as shown above and has a valid value ("url" or "title")
- Ensure the script is properly placed in your project's custom code section, under the Footer/Before </body> tag
- Confirm that you've published your site after making these changes, as the script only works on the live published site
- Check the browser console (F12 → Console) for detailed logs about the script's activity and any error messages (ensure ENABLE_LOGGING is set to true in the script)
- Verify that the form input Name field is set to something descriptive for easy identification in submissions
- Ensure Webflow's form handling is properly configured and form notifications are set up to include your page data fields (verify this in Project Settings > Forms)
Frequently Asked Questions
How do I automatically capture page URLs and titles in Webflow forms?
Add our custom script to your Webflow project and include an input element with the brix-form-data attribute in your forms. Set the attribute value to "url" for page URLs or "title" for page titles. The script automatically populates the input with the requested information, allowing you to track which pages generate form submissions.
Can I track form submission sources across different Webflow pages?
Yes, you can track form submission sources across all pages in your Webflow site by adding the page data tracking script site-wide and including data capture inputs in your forms. Each form submission will include the specific page URL or title (or both) where it was submitted.
How do I add hidden page data tracking to Webflow forms?
Add a text input element to your Webflow form, set a descriptive name like "page_url" or "page_title", add the brix-form-data attribute with value "url" or "title", and set the input's display to none in the style settings. The input will automatically capture the requested page information without being visible to users.
How do I track lead sources from different Webflow landing pages?
Implement page data tracking across your Webflow landing pages by adding the script and page data inputs (with the brix-form-data attribute set to "url" or "title") to your forms. Each lead submission will include the specific landing page information, allowing precise lead attribution.
Conclusion
Implementing automatic page data tracking for Webflow forms gives you crucial insights into your lead generation and conversion processes. Whether you're running multi-page campaigns, managing content-driven lead generation, or simply want better attribution data, this solution provides the tracking capabilities you need.
The combination of hidden and visible input options, along with seamless CMS integration, means you can implement page data tracking that fits your specific workflow while maintaining a clean user experience.
Need help implementing this solution or looking to explore more advanced form tracking capabilities? Our top-notch Webflow agency specializes in creating custom solutions that enhance your Webflow site's functionality while maintaining clean, world-class designs. Feel free to reach out to discuss how we can help optimize your Webflow project's lead tracking and analytics.


Join readers commenting on this post!