
Google stands as one of the most crucial traffic sources for many companies, capable of driving valuable organic traffic from users actively searching for your products or services. This makes maintaining proper indexing and Google presence absolutely essential for your business success.
Whether you're launching a new site, migrating from another platform to Webflow, or managing an existing site, discovering that your Webflow website isn't appearing in Google searches can be particularly frustrating.
In this guide, we'll explore the potential causes and provide straightforward solutions to resolve this issue.
Verify if your Webflow site is indexable
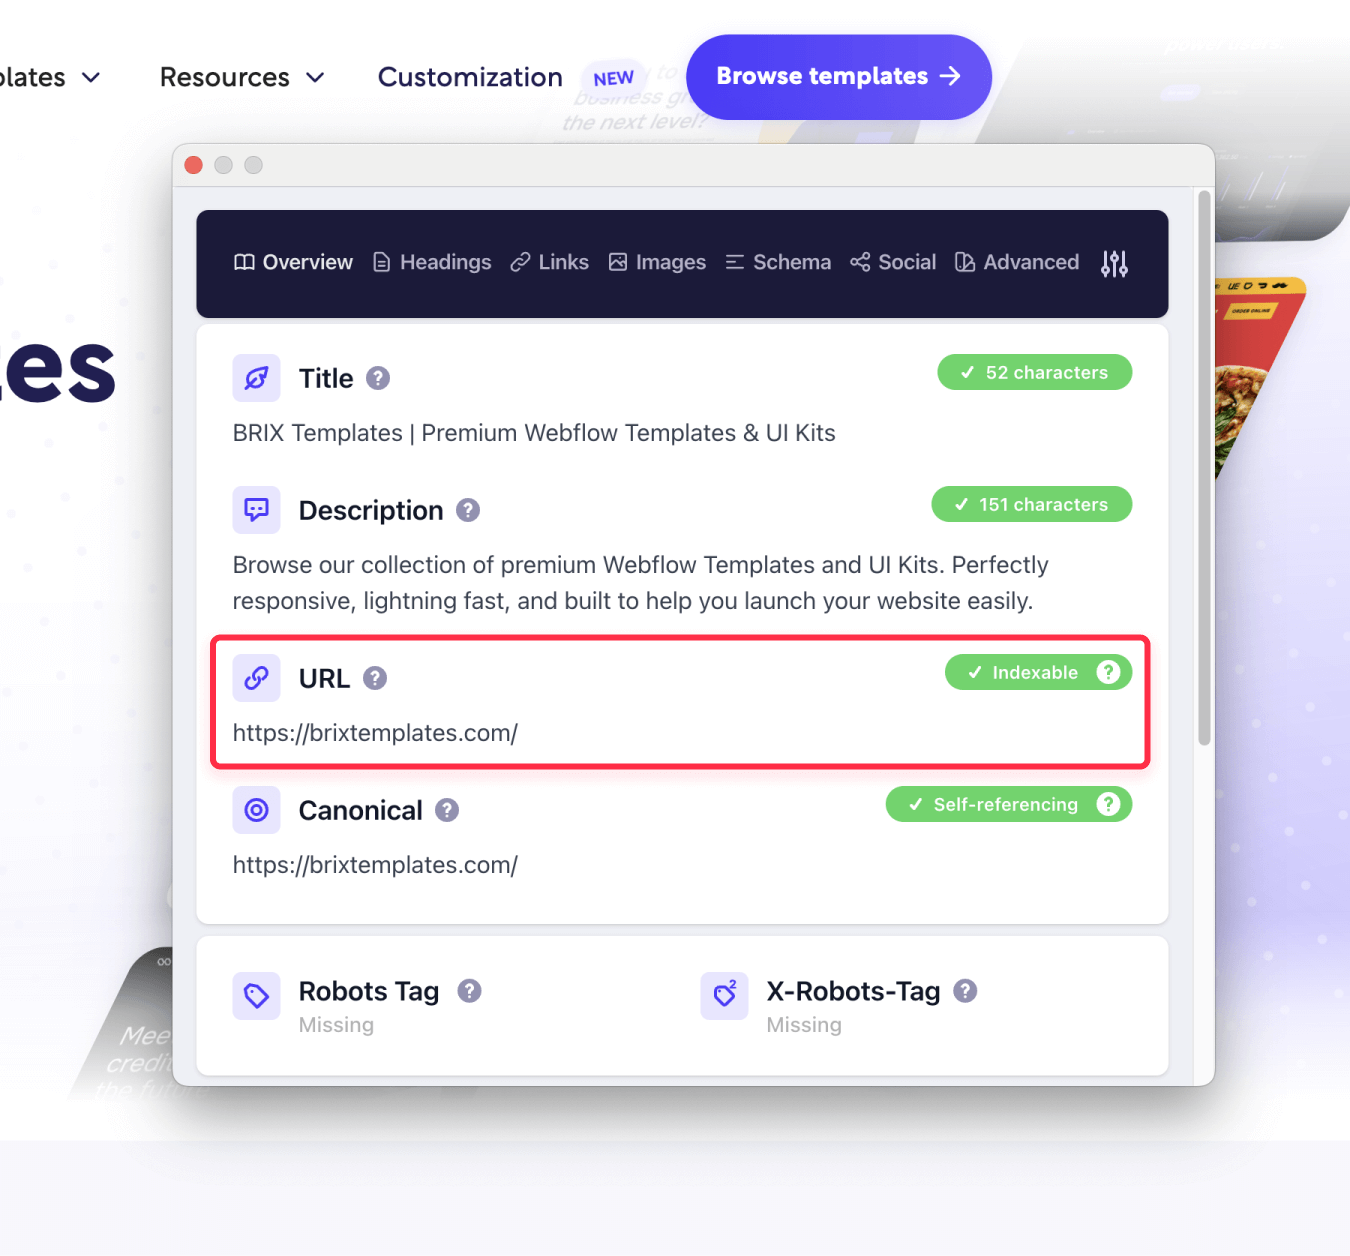
Before trying to request Google Search Console to index our site, we need to actually know if it is indexable at all, and for this we recommend downloading the Detailed SEO extension for your preferred browser to check your site's indexability. Here's how to verify your site's indexing status:
- Install the Detailed SEO extension in your browser
- Navigate to your Webflow site
- Click on the Detailed SEO extension icon
- Select the "Overview" section
- Check if your URL shows as "Indexable" in the results
If your site shows as indexable but still isn't appearing in Google, you can proceed to the Request indexing for your Webflow site section. However, if your site isn't indexable, here are the three main areas to check:
1. Check Webflow project settings for no-index tags
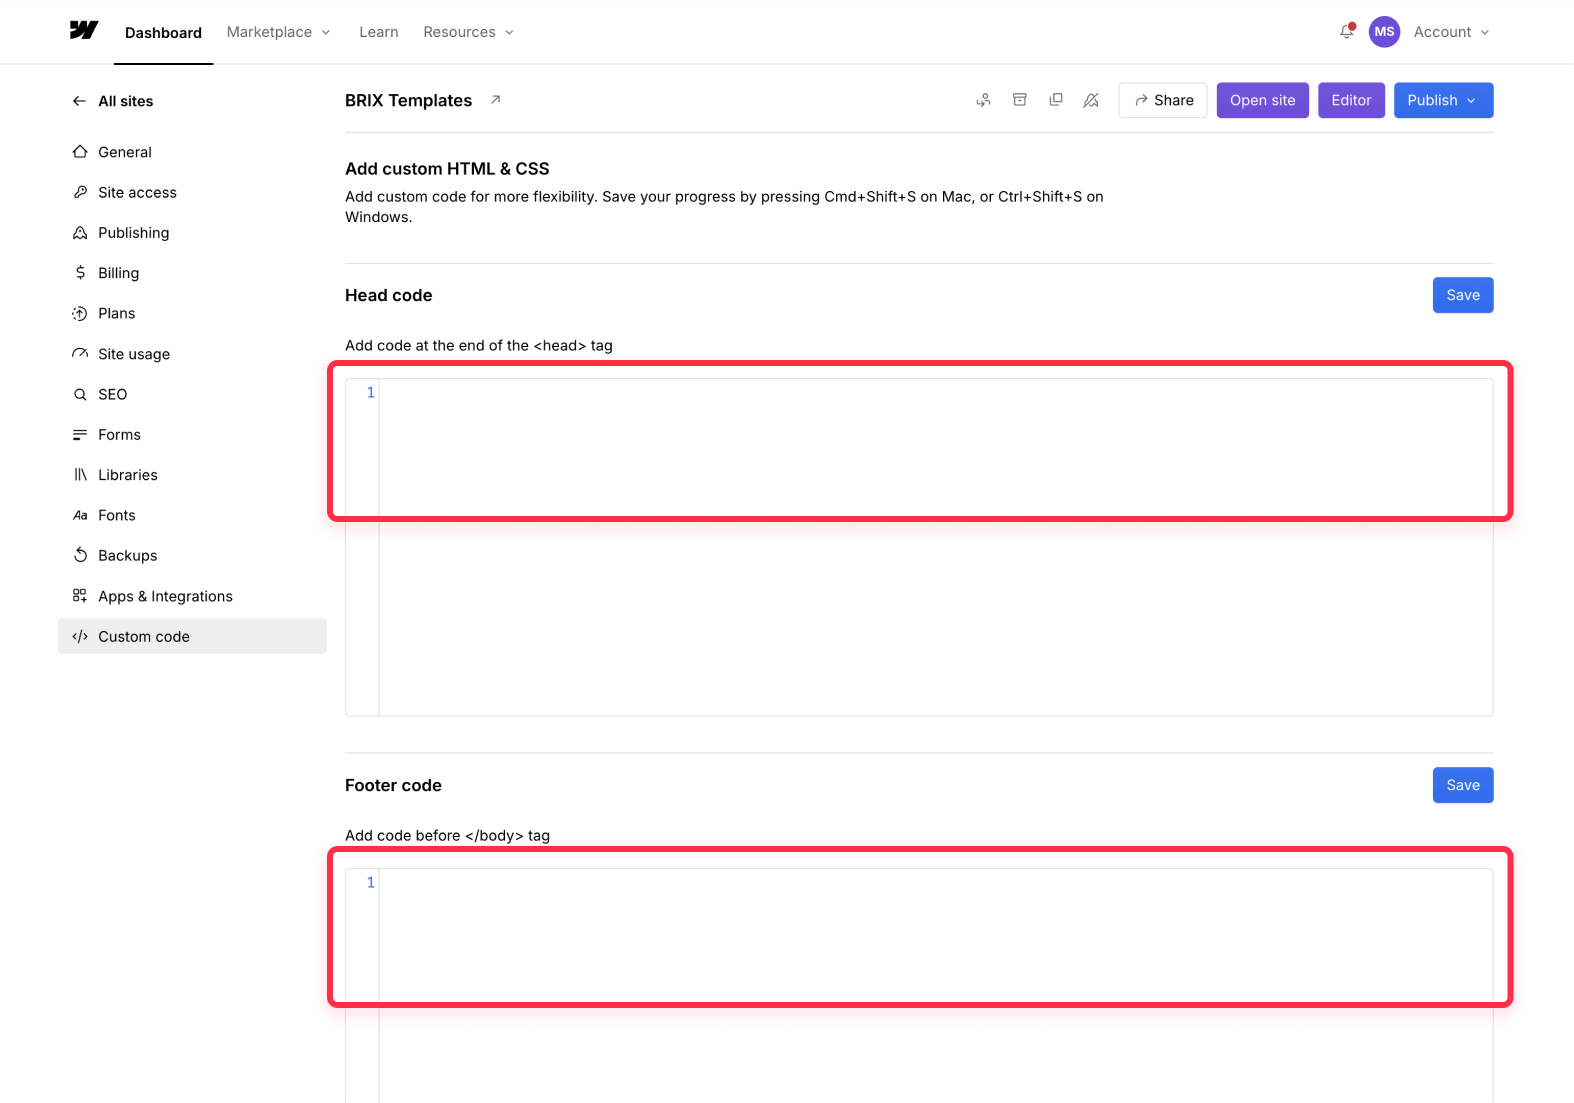
No-index tags in your project settings can prevent Google from indexing your entire website. Here's how to check and fix this:
- Log into your Webflow account
- Navigate to your Dashboard
- Select your project
- Click on "Project Settings"
- Scroll to "Custom Code"
- Review both header and footer code for any no-index tags
- If found, remove any code containing <meta name="robots" content="noindex"> or similar
- Click "Save Changes"
- Publish your site to apply the changes
2. Review page-specific custom code
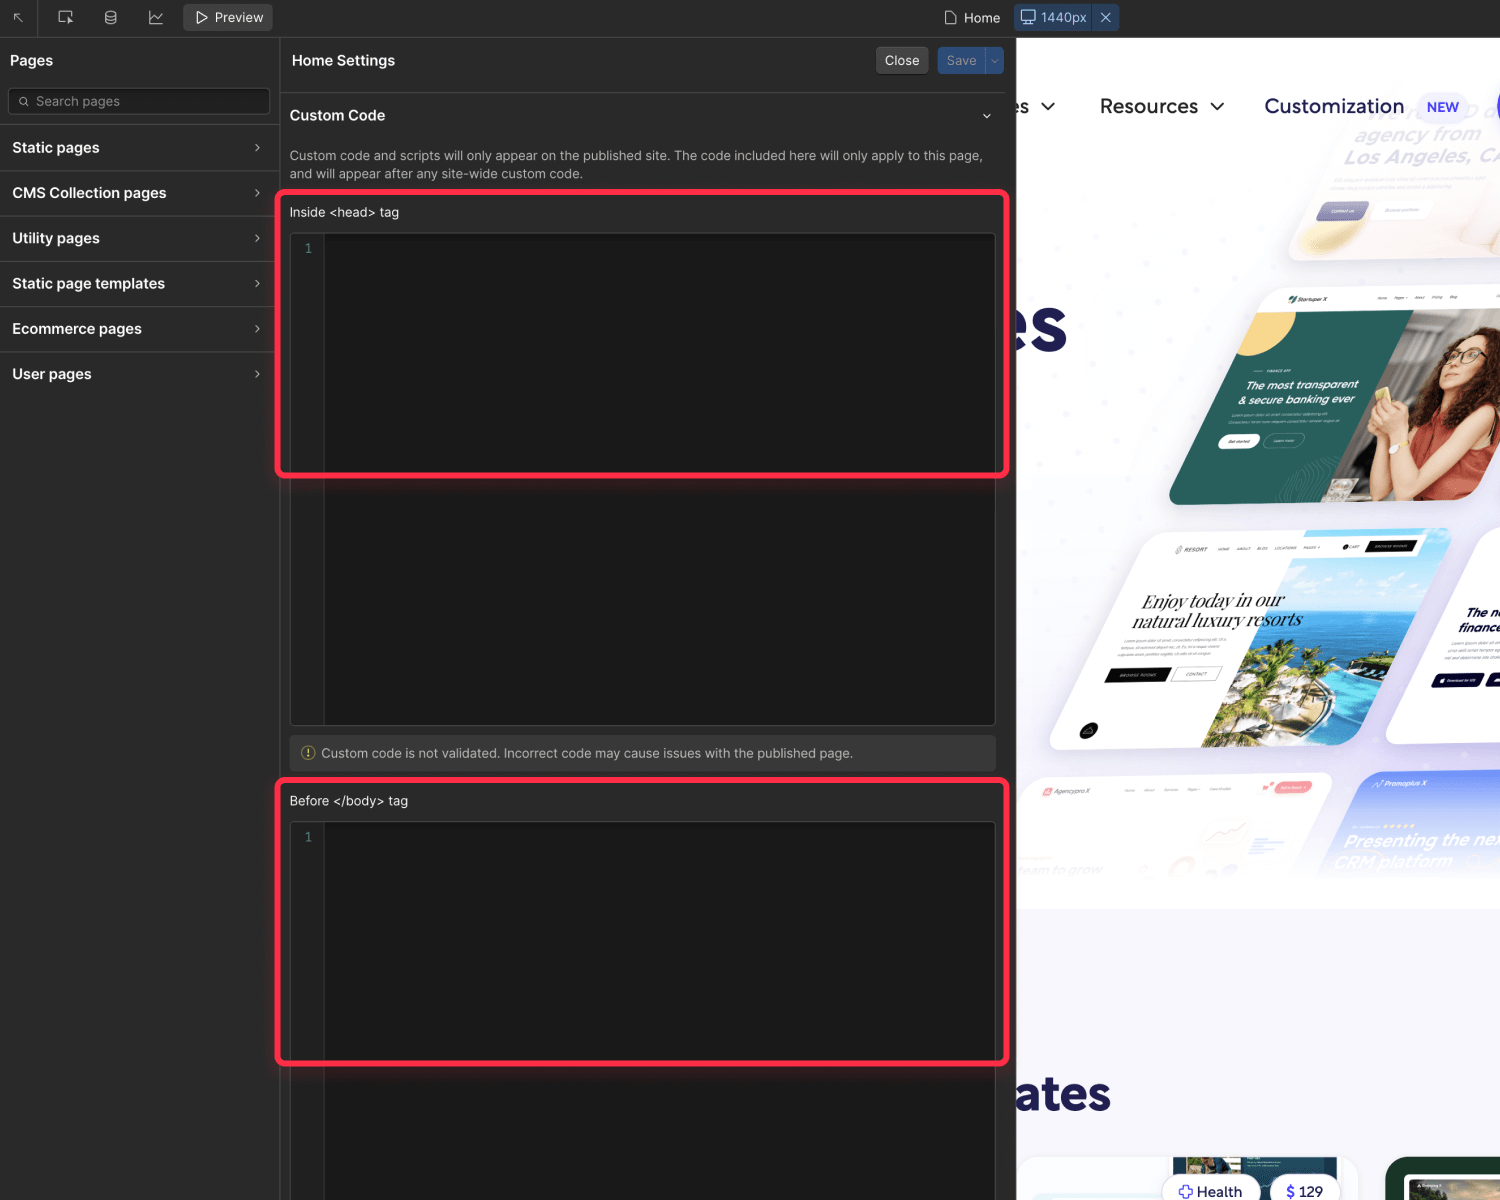
Individual pages might have no-index tags that prevent them from appearing in search results. Let's check these settings:
- Open the Webflow Designer
- Click on "Pages" in the left sidebar
- Select the specific page that isn't being indexed
- Click the settings gear icon
- Navigate to "Custom Code"
- Remove any found no-index tags
- Save your changes
- Publish the site to apply changes
3. Verify sitemap inclusion settings
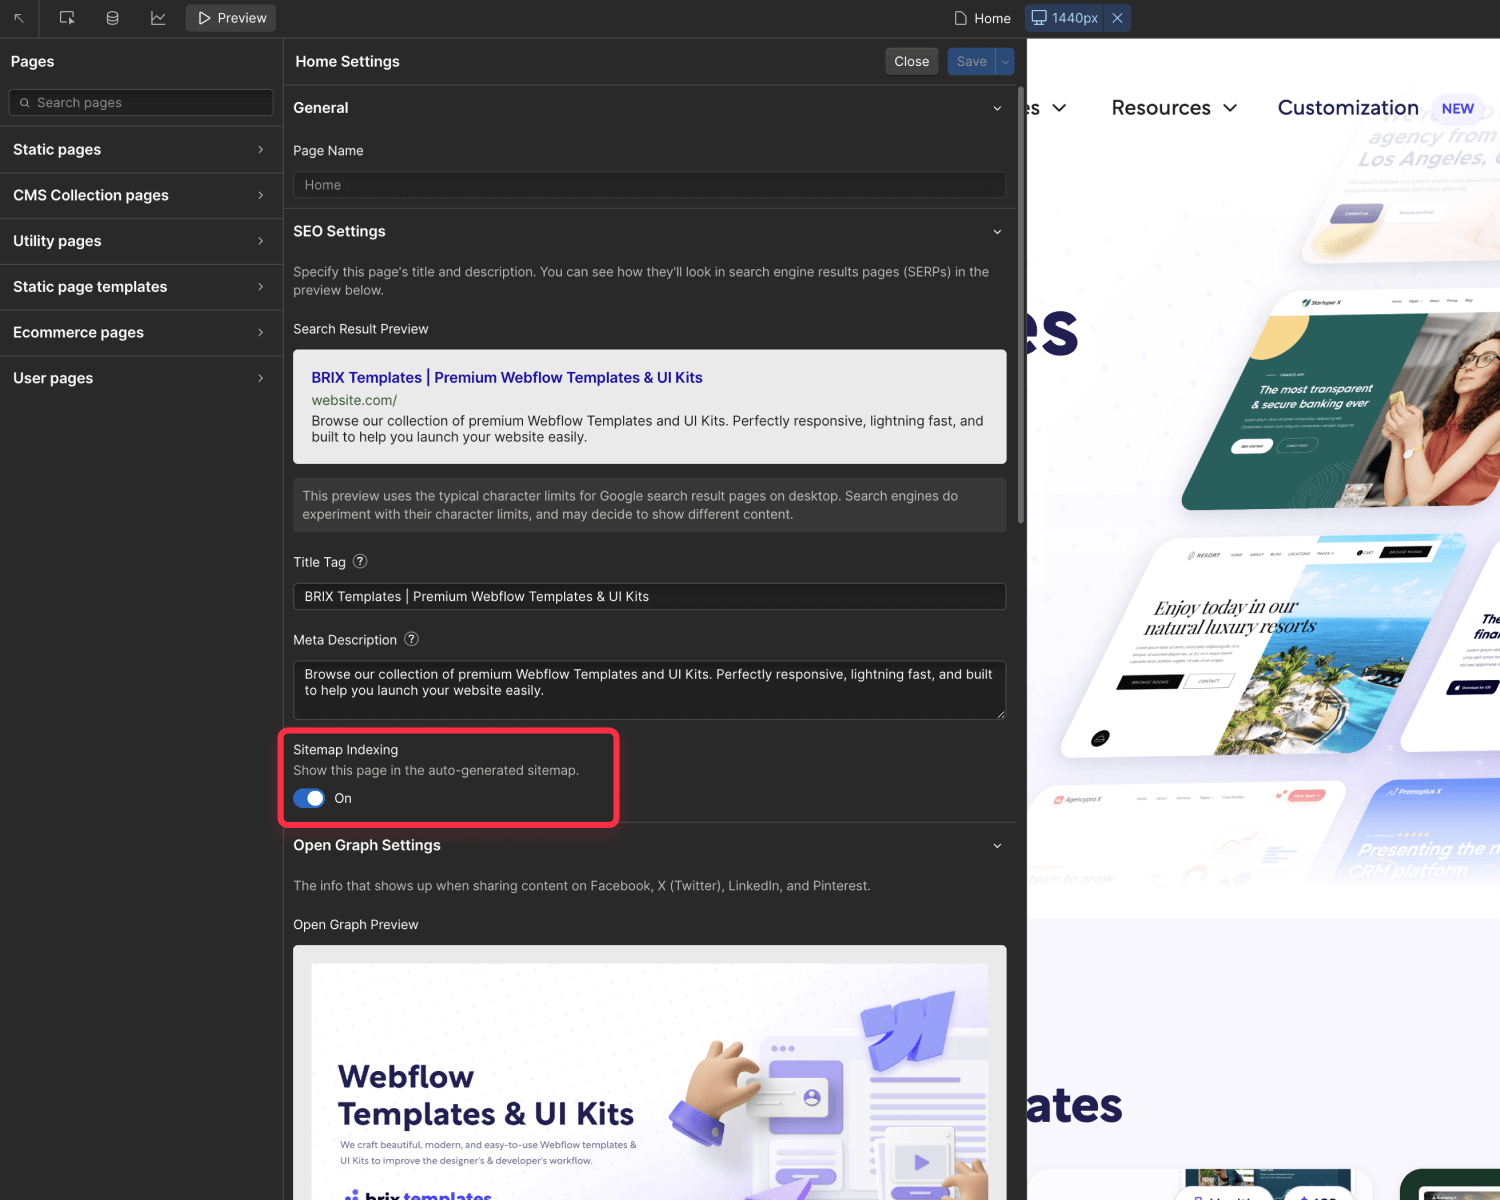
Your page must be included in your sitemap for Google to find it efficiently. Here's how to verify this setting:
- Stay in the page settings
- Scroll to find "Show this page in the auto-generated sitemap"
- Enable this checkbox if it's turned off
- Click "Save"
- Publish your site to apply changes
Now that we've identified and fixed any potential indexing barriers, let's proceed with getting your site properly indexed by Google. The next section will guide you through the process of submitting your site to Google's search index.
Request indexing for your Webflow site
1. Set up your sitemap
Before we can submit your site to Google, we need to ensure your sitemap is properly configured. The sitemap serves as a roadmap for search engines to discover all the pages on your website. Here's how to set it up:
- Navigate to your Webflow project settings:
- Log into your Webflow account
- Go to your project dashboard
- Click "Project Settings"
- Select "SEO"
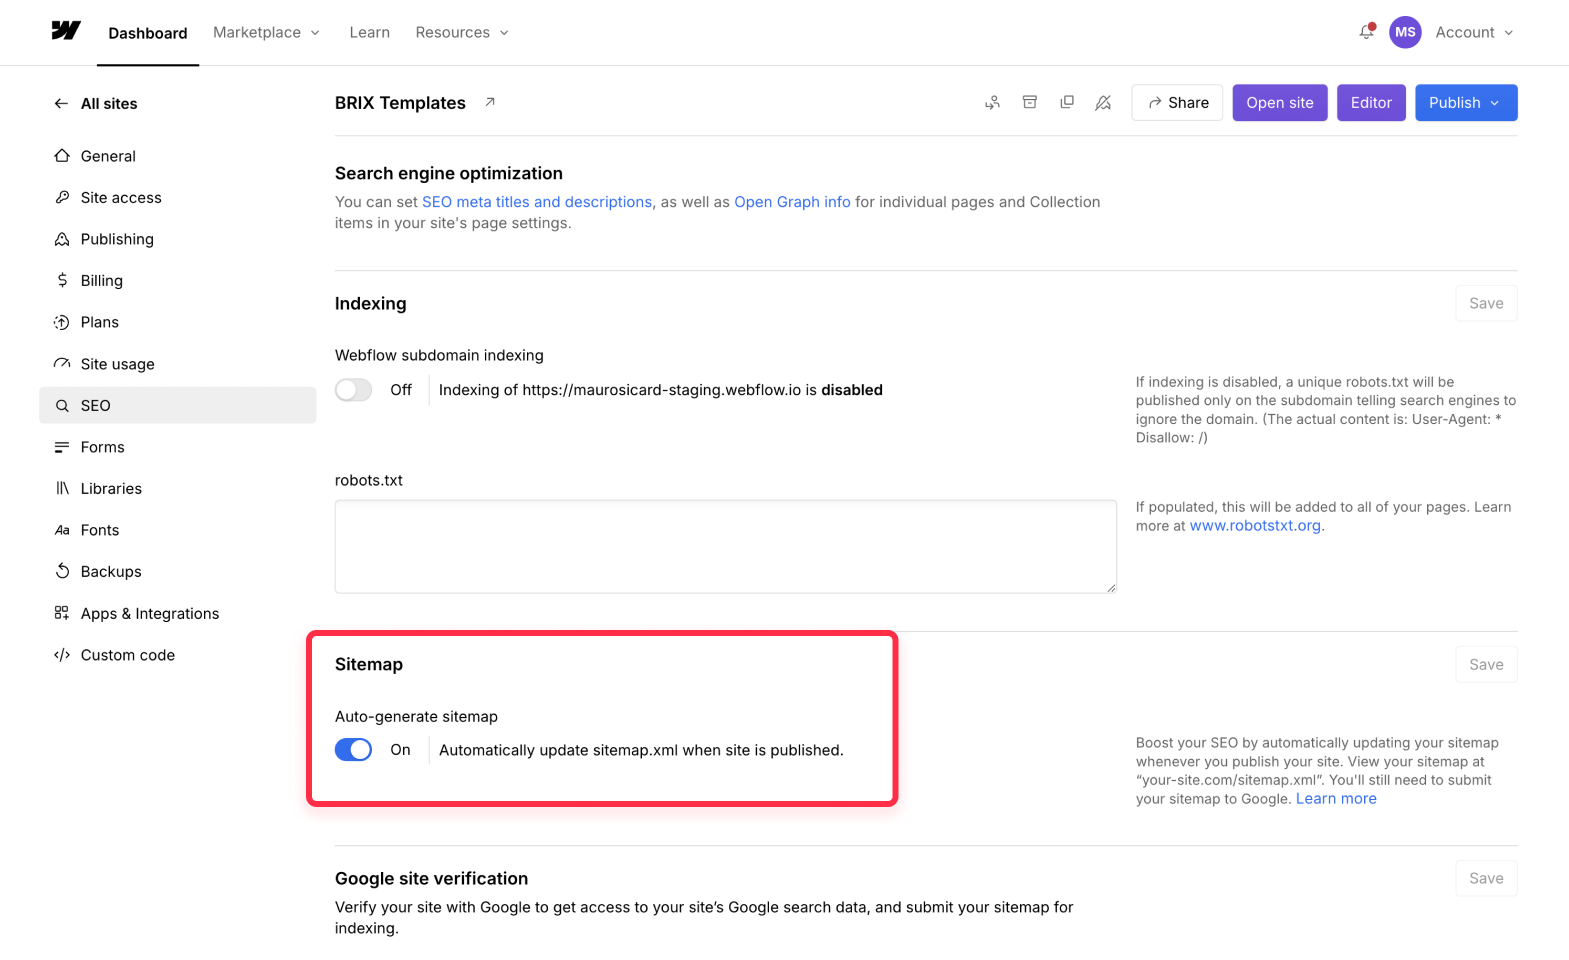
- Enable sitemap generation:
- Find "Auto-generate sitemap"
- Enable the checkbox
- Click "Save Changes"
- Publish your site
- Verify your sitemap:
- Visit yourdomain.com/sitemap.xml
- Confirm it loads and shows your pages
2. Set up Google Search Console
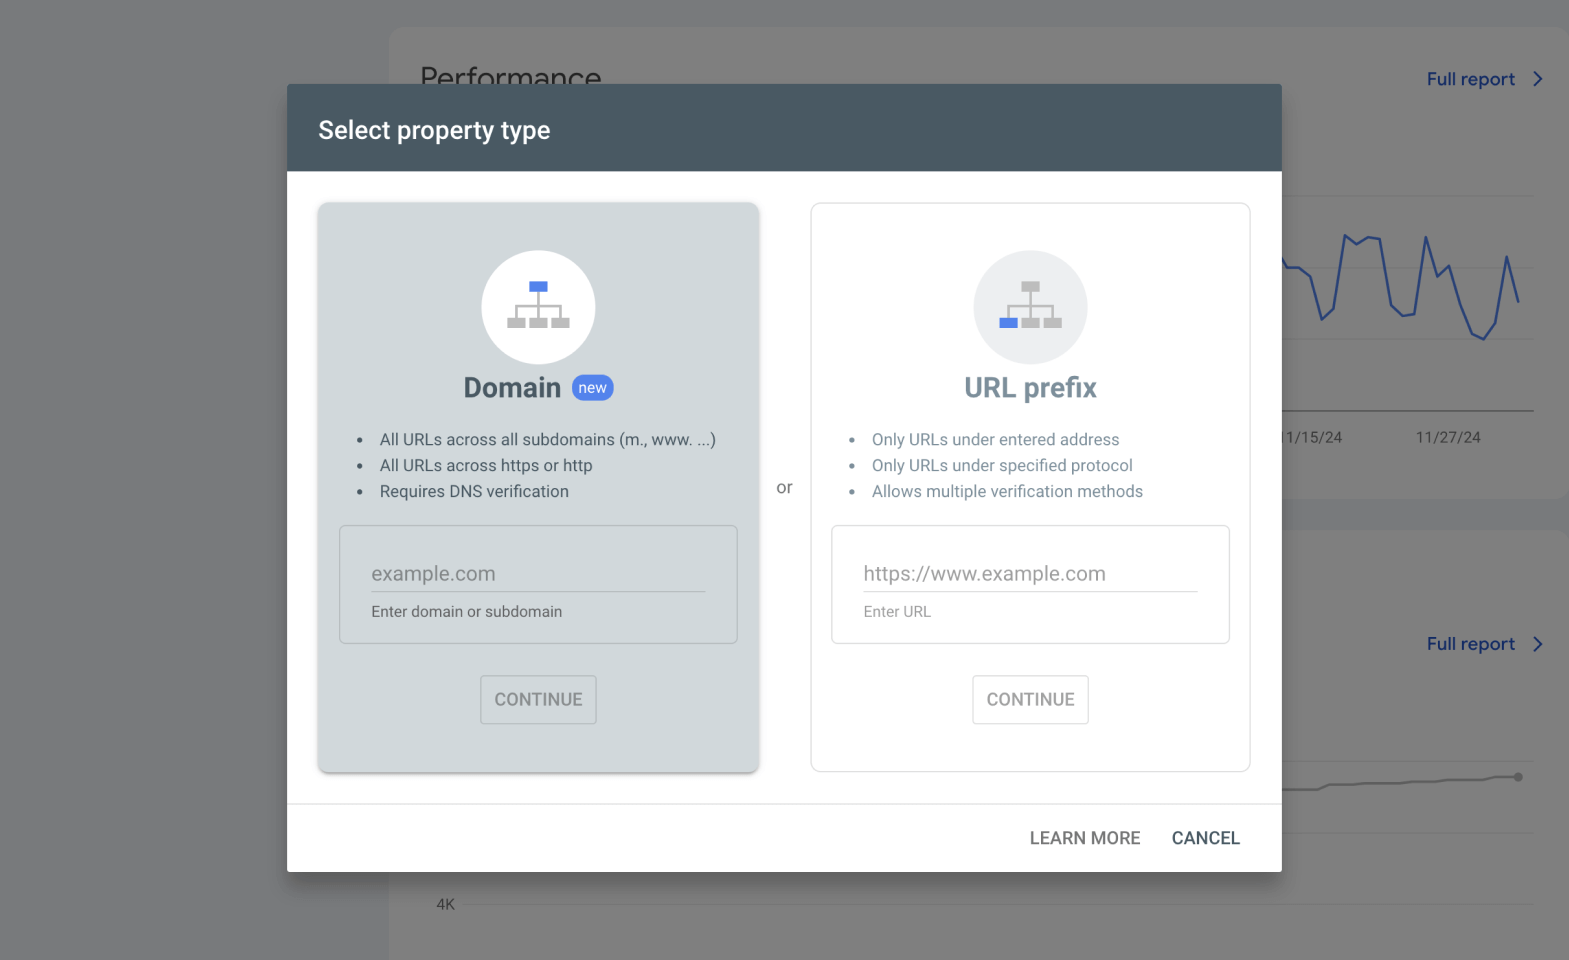
Google Search Console is essential for managing your site's presence in Google search results. When setting up your property, you'll need to choose between two verification methods. Your choice here will depend on your role and access level within your organization.
If you have access to your domain's DNS settings (typically if you're the domain owner or have administrative access through your domain provider), the Domain Property method is your best option. This provides the most comprehensive coverage as it includes all subdomains and protocols (like www and non-www versions of your site, along with any subdomains you might create later). Think of this as having master access to manage your entire domain's presence in Google.
However, if you're part of a team that only manages the website itself, or if you don't have access to DNS settings (common in larger organizations where different teams handle different aspects), the URL Prefix method is your solution. While it only covers the specific URL you enter, it's much simpler to set up and still provides all the essential features you need for managing your site's search presence (for that subdomain). This is particularly useful for marketing teams or web developers who need to manage search console but don't have domain-level access.
- Access Search Console:
- Go to Google Search Console
- Log in with your Google account
- Click "Add Property" at the top
- Choose and set up your preferred verification method:
Option A - Domain Property (Recommended)
- Select "Domain"
- Enter your domain without www or https://
- Click "Continue"
- Follow DNS verification instructions from your domain provider
Option B - URL Prefix
- Select "URL prefix"
- Enter your complete website URL
- Click "Continue"
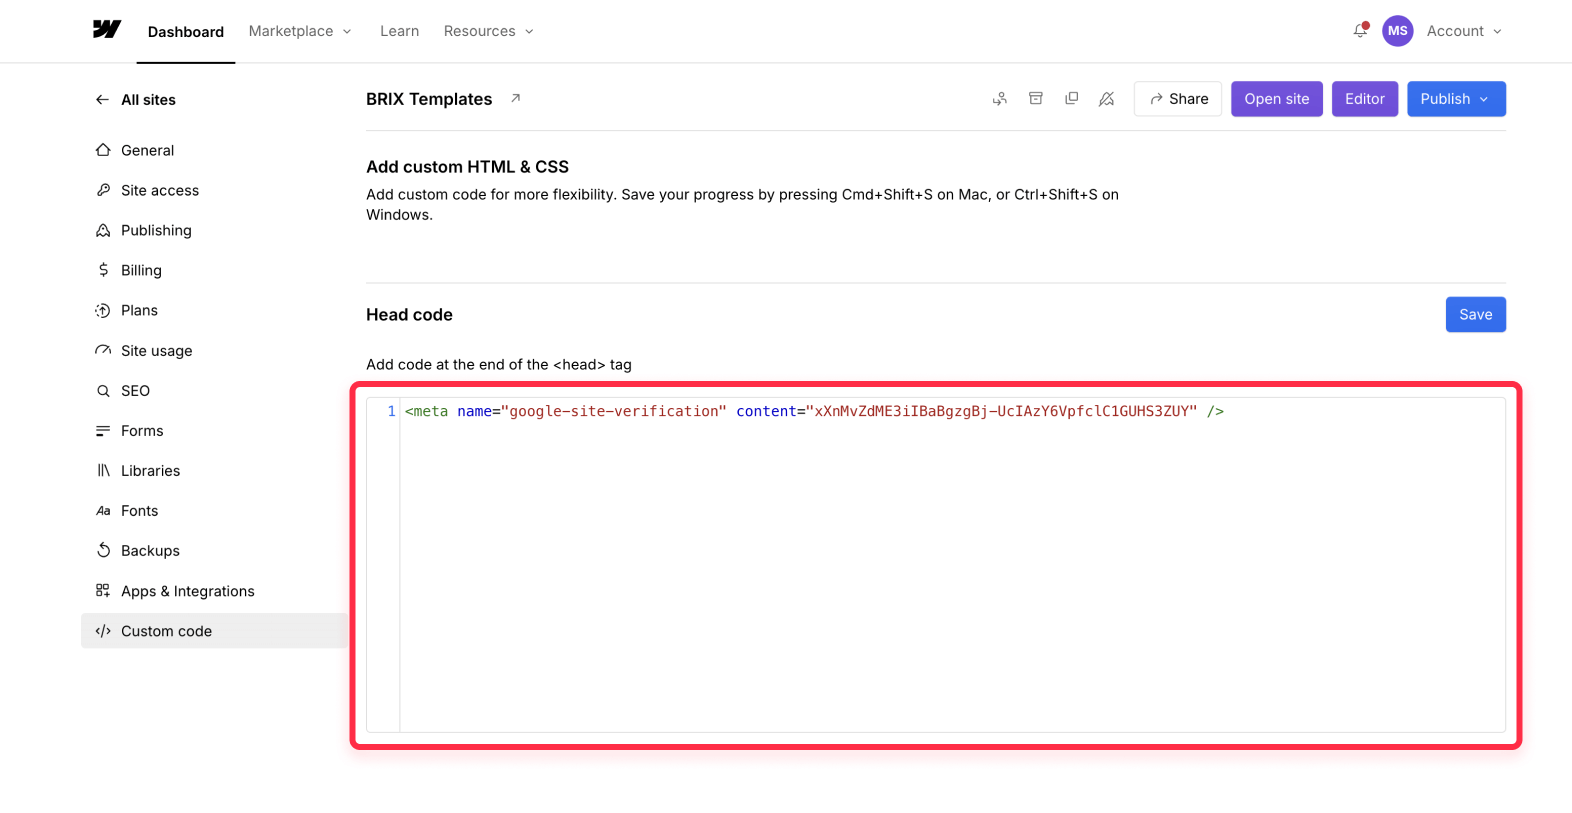
- Choose HTML tag verification
- Copy the provided meta tag
- Go to Webflow project settings > Custom Code
- Paste the tag in the header section
- Publish your site
- Return to Search Console and click "Verify"
3. Submit your sitemap
With Search Console properly set up, we can now submit your sitemap to ensure Google knows about all your pages. Here's the process:
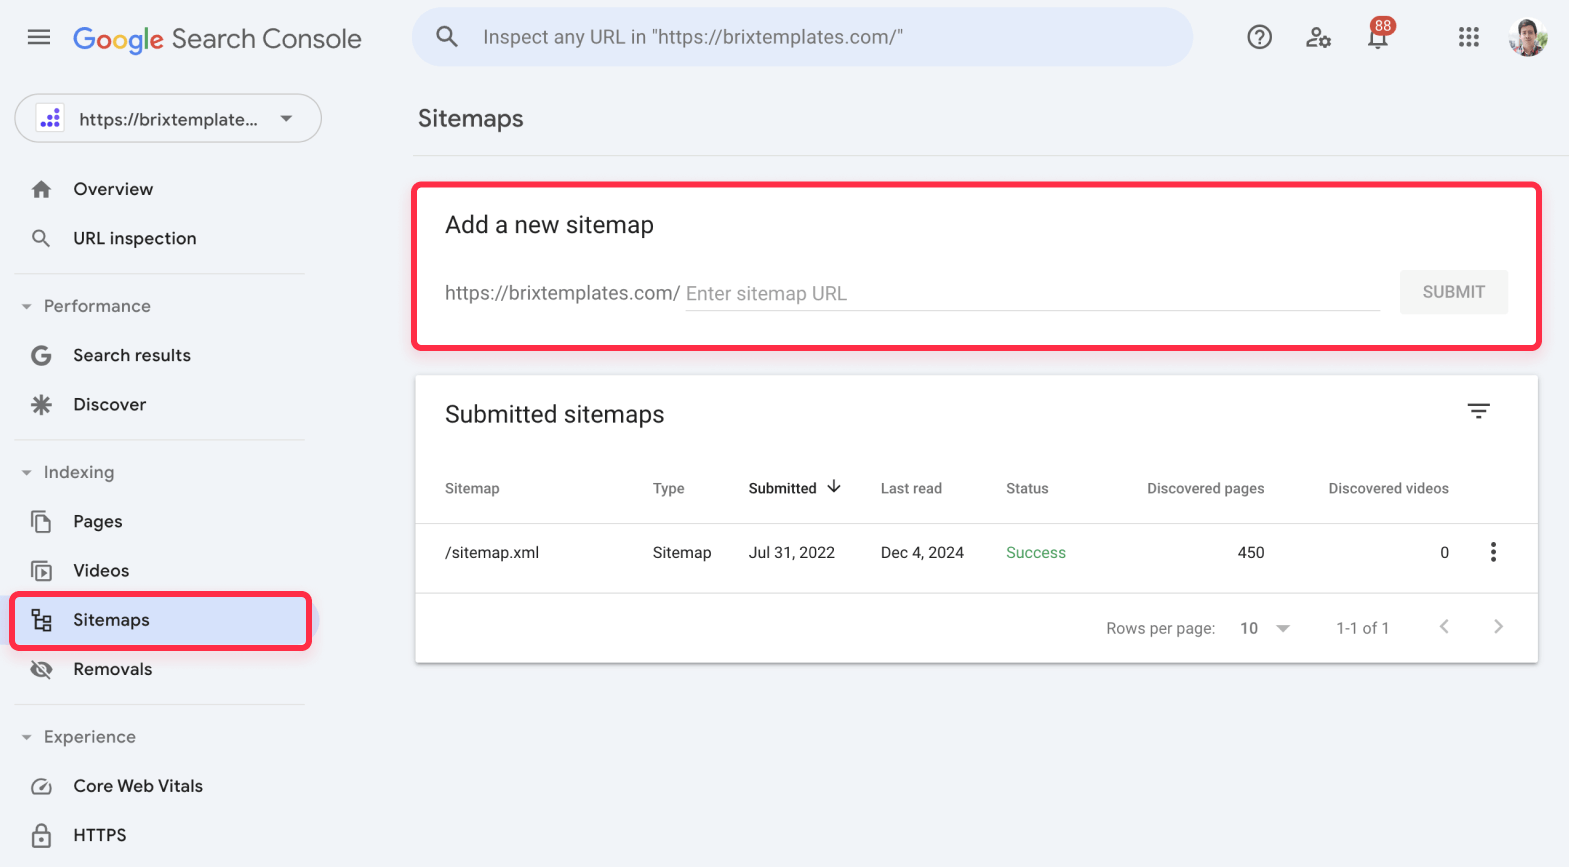
- In Search Console:
- Click "Sitemaps" in the left sidebar
- Enter "sitemap.xml" in the field
- Click "Submit"
- Monitor indexing status:
- Check the status tab periodically
- Allow several days for initial indexing
What to do if the Webflow site is still not indexed after submitting the sitemap and waiting a few weeks
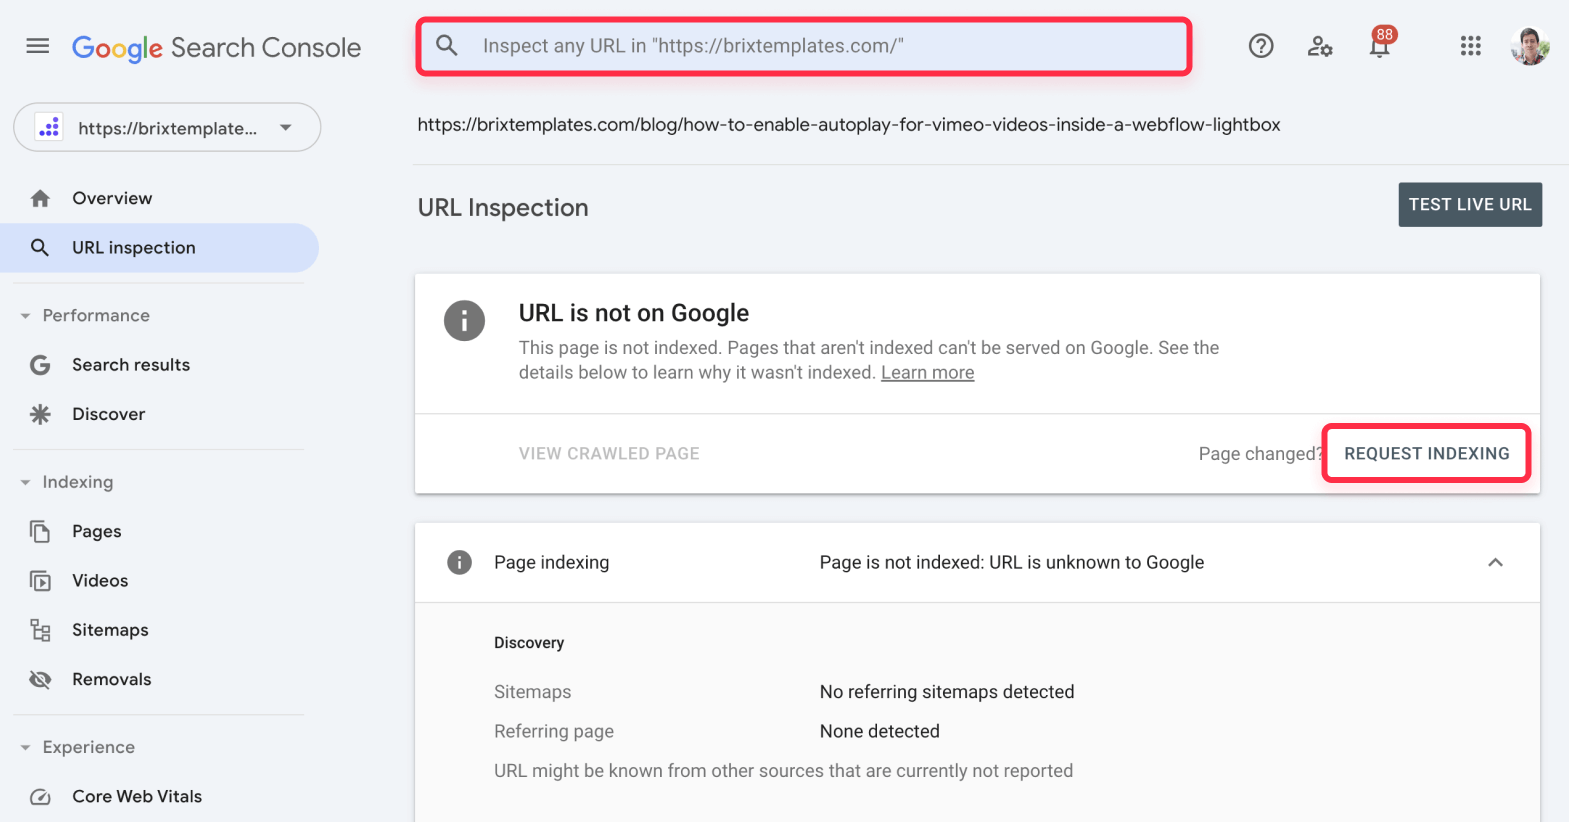
Sometimes, even after following all the previous steps, you might find that your site still isn't appearing in Google's index. In these cases, you can use Google's URL Inspection tool to request manual indexing. Here's how:
- Access URL Inspection:
- Open Google Search Console
- Find the URL inspection bar at the top
- Enter the specific URL that isn't indexed
- Request indexing:
- Click "Test Live URL"
- Wait for the test to complete
- Click "Request Indexing"
- Repeat for other important pages if needed
- Monitor progress:
- Check back in 24-48 hours
- Use the URL Inspection tool to verify status
- Monitor your sitemap status in Search Console
While manual indexing requests can speed up the process, it's generally better to let Google discover and index your pages naturally through your sitemap, so we recommend to only use this method if you've waited 1 - 2 weeks without seeing results.
If you've followed all these steps and are still experiencing indexing issues, don't worry – you're not alone in this. Our team of Webflow experts is here to help you identify any underlying issues and quickly find a solution. Feel free to reach out to us, and one of our team members will get back to you within 24 hours.


Join readers commenting on this post!