
Whether you're managing a Webflow client site, running a private portfolio, or maintaining multiple versions of your Webflow site, you'll inevitably need control over which pages appear in search engine results.
Search engines are designed to index everything they can find, but not every page on your site should be publicly discoverable. From confirmation screens to staging environments, having unwanted pages in search results can dilute your SEO efforts and expose content that should remain private. Fortunately, Webflow provides several built-in methods to control which pages search engines can and cannot index.
In this guide, you'll learn the 5 main approaches to unindex content in Webflow, when to use each method, and how to implement them correctly without affecting your site's overall search performance.
Why unindexing matters for Webflow sites
Having control over what search engines index is crucial for maintaining a clean, professional online presence. Here are the key scenarios where unindexing becomes essential:
- Avoid private content being indexed: Keep client previews, internal documentation, and confidential project portfolios away from public search results
- Prevent staging site competition: Stop your yourstagingsite.webflow.io development domain from competing with your custom domain and creating duplicate content issues in search results
- Control functional page visibility: Keep confirmation pages, success pages, and other post-action content from cluttering search results
- Manage seasonal content: Remove outdated promotional pages, event listings, or time-sensitive content that's no longer relevant
- Protect work-in-progress content: Hide incomplete pages or content that's published but not ready for public discovery
- Maintain clean search presence: Ensure only your most valuable pages appear in search results to maximize SEO impact
How to unindex individual static pages in Webflow
This method works best for specific static pages like thank you pages, confirmation screens, or internal documentation that you want to keep out of search results.
Individual page unindexing is the most straightforward approach when you need specific control over which static pages appear in search engines. You'll use this for pages that serve a functional purpose on your site but don't add value to search results.
Steps to unindex a static page in Webflow
- Navigate to your target page in the Webflow Designer
- Click the gear icon (⚙️) in the top-left corner to access Page Settings
- Scroll down to the SEO section in the Page Settings panel
- Find the "Sitemap indexing" toggle
- Toggle OFF the "Sitemap indexing" option
- Save your changes and publish the site
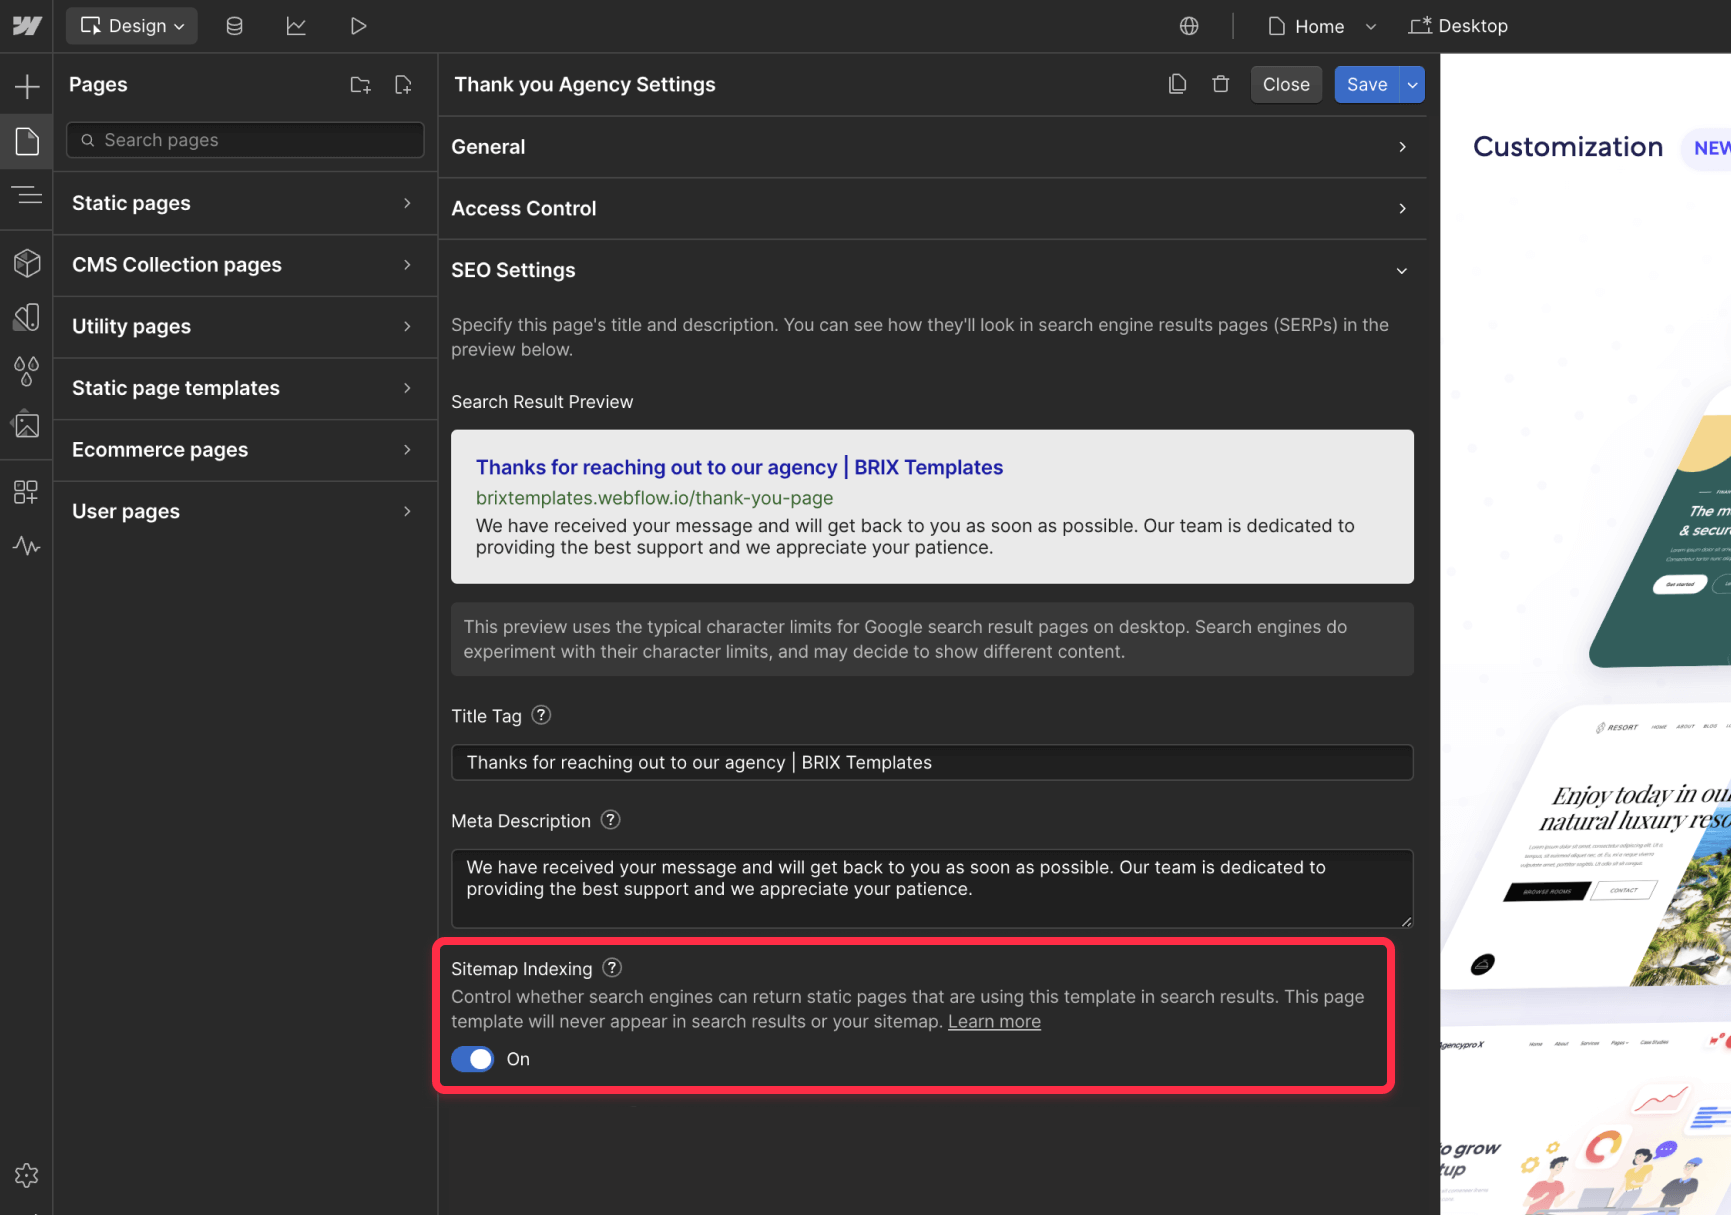
When you disable sitemap indexing, Webflow automatically adds meta content="noindex" name="robots" to the page head and removes the page from your auto-generated sitemap. This tells search engines to stop crawling and indexing that specific page while leaving the rest of your site unaffected.
How to unindex entire CMS collections in Webflow
Use this method when you want to prevent all individual item pages within a CMS collection from being indexed. This is ideal for collections that serve functional purposes or when you only want the collection overview page to appear in search results, not the individual items.
This approach works well for various scenarios: team member profiles where individual bio pages aren't valuable for search, product catalogs where you prefer category-level visibility, portfolio collections used primarily for visual display, or any collection where the individual pages don't provide unique value to search users. It's more efficient than unindexing items individually when your entire collection follows the same indexing strategy.
Steps to unindex CMS collection templates in Webflow
- Navigate to your CMS Collection Template page in the Webflow Designer
- Click the gear icon (⚙️) to access the template Page Settings
- Navigate to the "Custom Code" tab in the settings panel
- In the "Head Code" section, add: <meta name="robots" content="noindex">
- Save your changes
- Publish your site to apply changes to all collection items
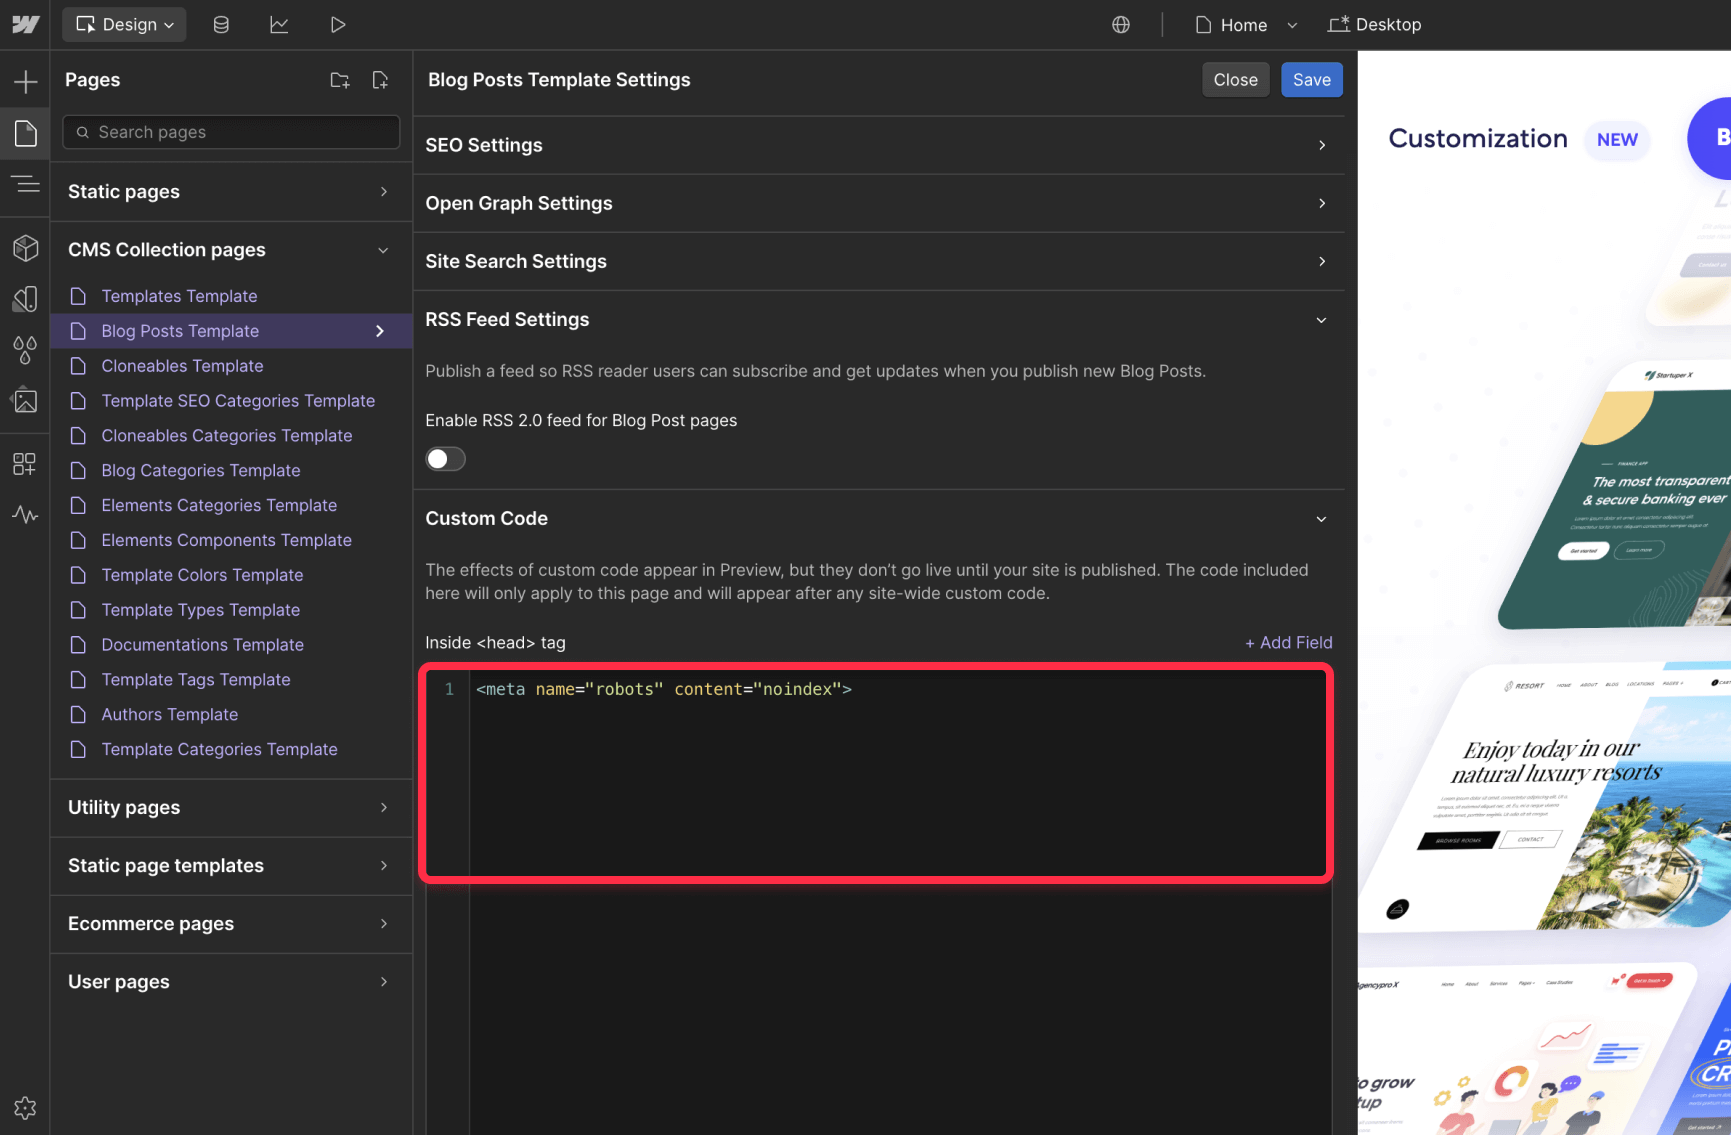
This custom code affects every page generated from the collection template, meaning all individual CMS item pages will include the noindex meta tag and be excluded from search engine indexing. The collection listing page itself remains indexed unless you separately configure it.
When to use collection template unindexing vs individual item unindexing: Choose collection template unindexing when you want to exclude the entire collection, and individual item unindexing (Method 3, described below) when you only want to exclude specific items within a collection.
How to unindex specific Webflow CMS items
Use this approach when you need granular control over specific CMS items while keeping the rest of your collection visible in search results.
It requires a paid Site plan and works within the CMS panel, making it perfect for scenarios like incomplete portfolio pieces, draft content for stakeholder review, or items that were published prematurely but need to remain accessible via direct links.
Steps to unindex individual CMS items in Webflow
- Open the CMS panel by clicking the database icon in the left sidebar of the Designer
- Select the collection containing the item you want to unindex
- Find and click on the specific CMS item to open its settings
- Look for the "Search engine indexing" toggle in the item settings
- Toggle OFF the "Search engine indexing" option
- Click "Publish" to make the changes live
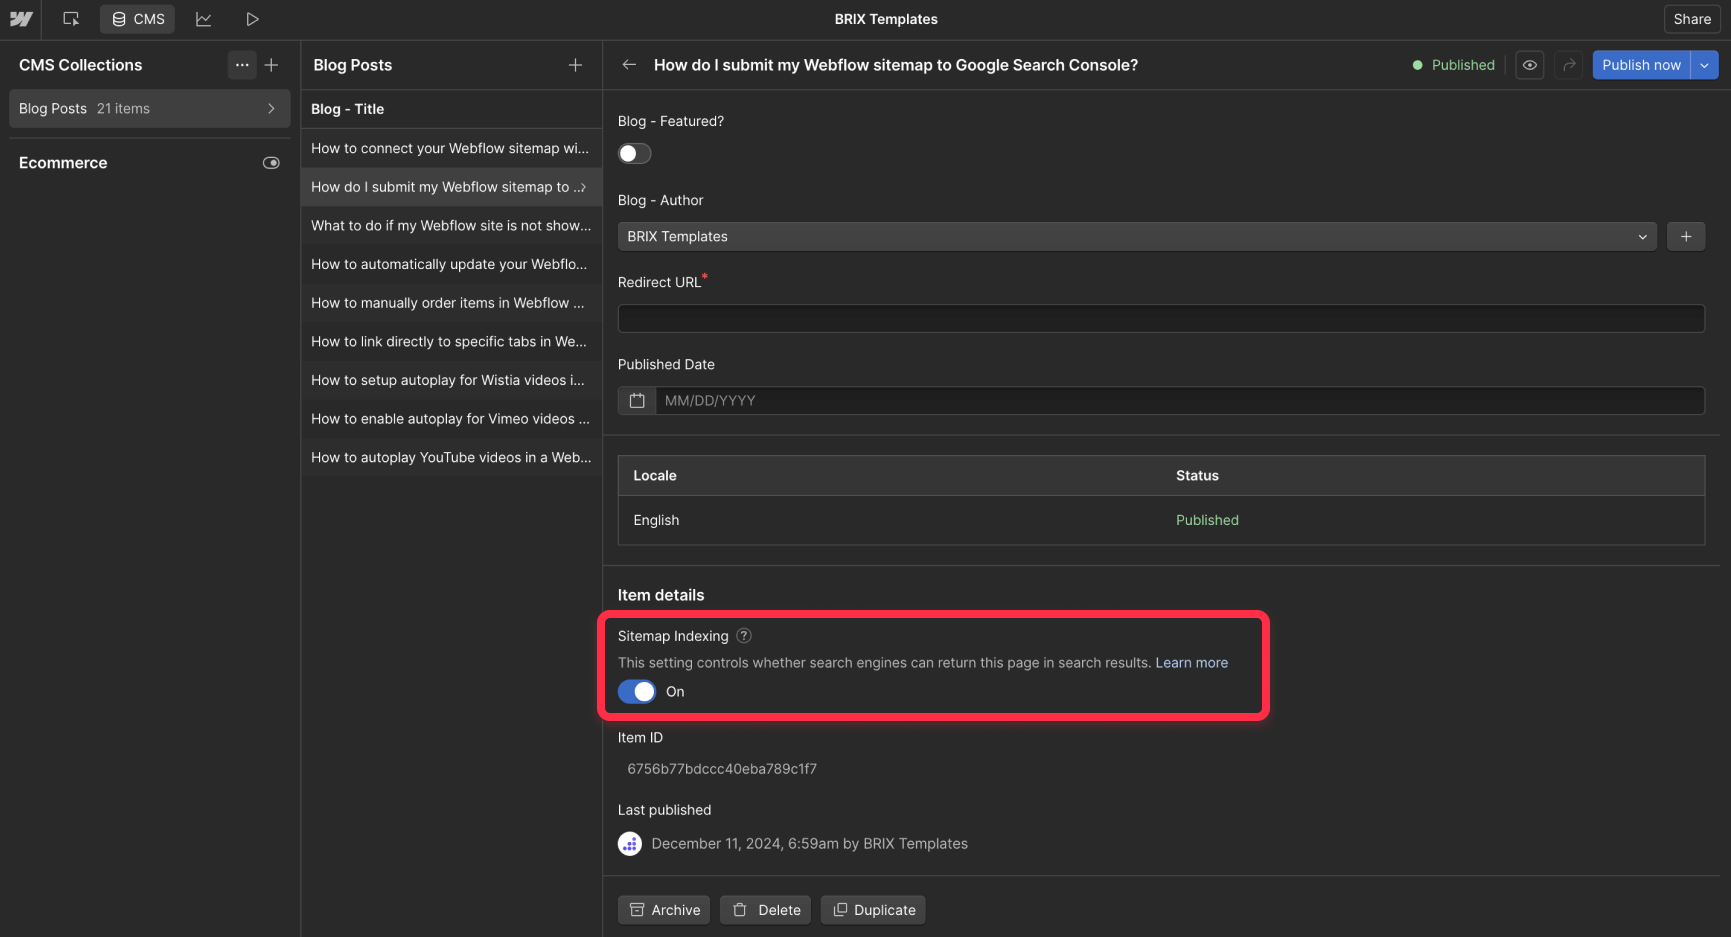
This method overrides the global site indexing setting for that specific item, adding a noindex meta tag to just that page while keeping other collection items indexed normally. It works seamlessly with Webflow's draft publishing features, allowing you to control visibility at the individual item level.
How to unindex your Webflow staging subdomain
Prevent your site.webflow.io staging domain from appearing in search results while keeping your custom domain fully indexed and visible.
This is essential for maintaining clean search results when you have both a custom domain and a Webflow subdomain active. Without this setting, search engines might index both versions, creating duplicate content issues and diluting your SEO efforts.
Steps to unindex Webflow subdomain staging sites
- Go to Project Settings by clicking the gear icon (⚙️) in the top-right corner
- Navigate to the "SEO" tab in the project settings
- Find "Staging indexing" option
- Toggle OFF this setting to prevent subdomain indexing
- Save changes and publish your site
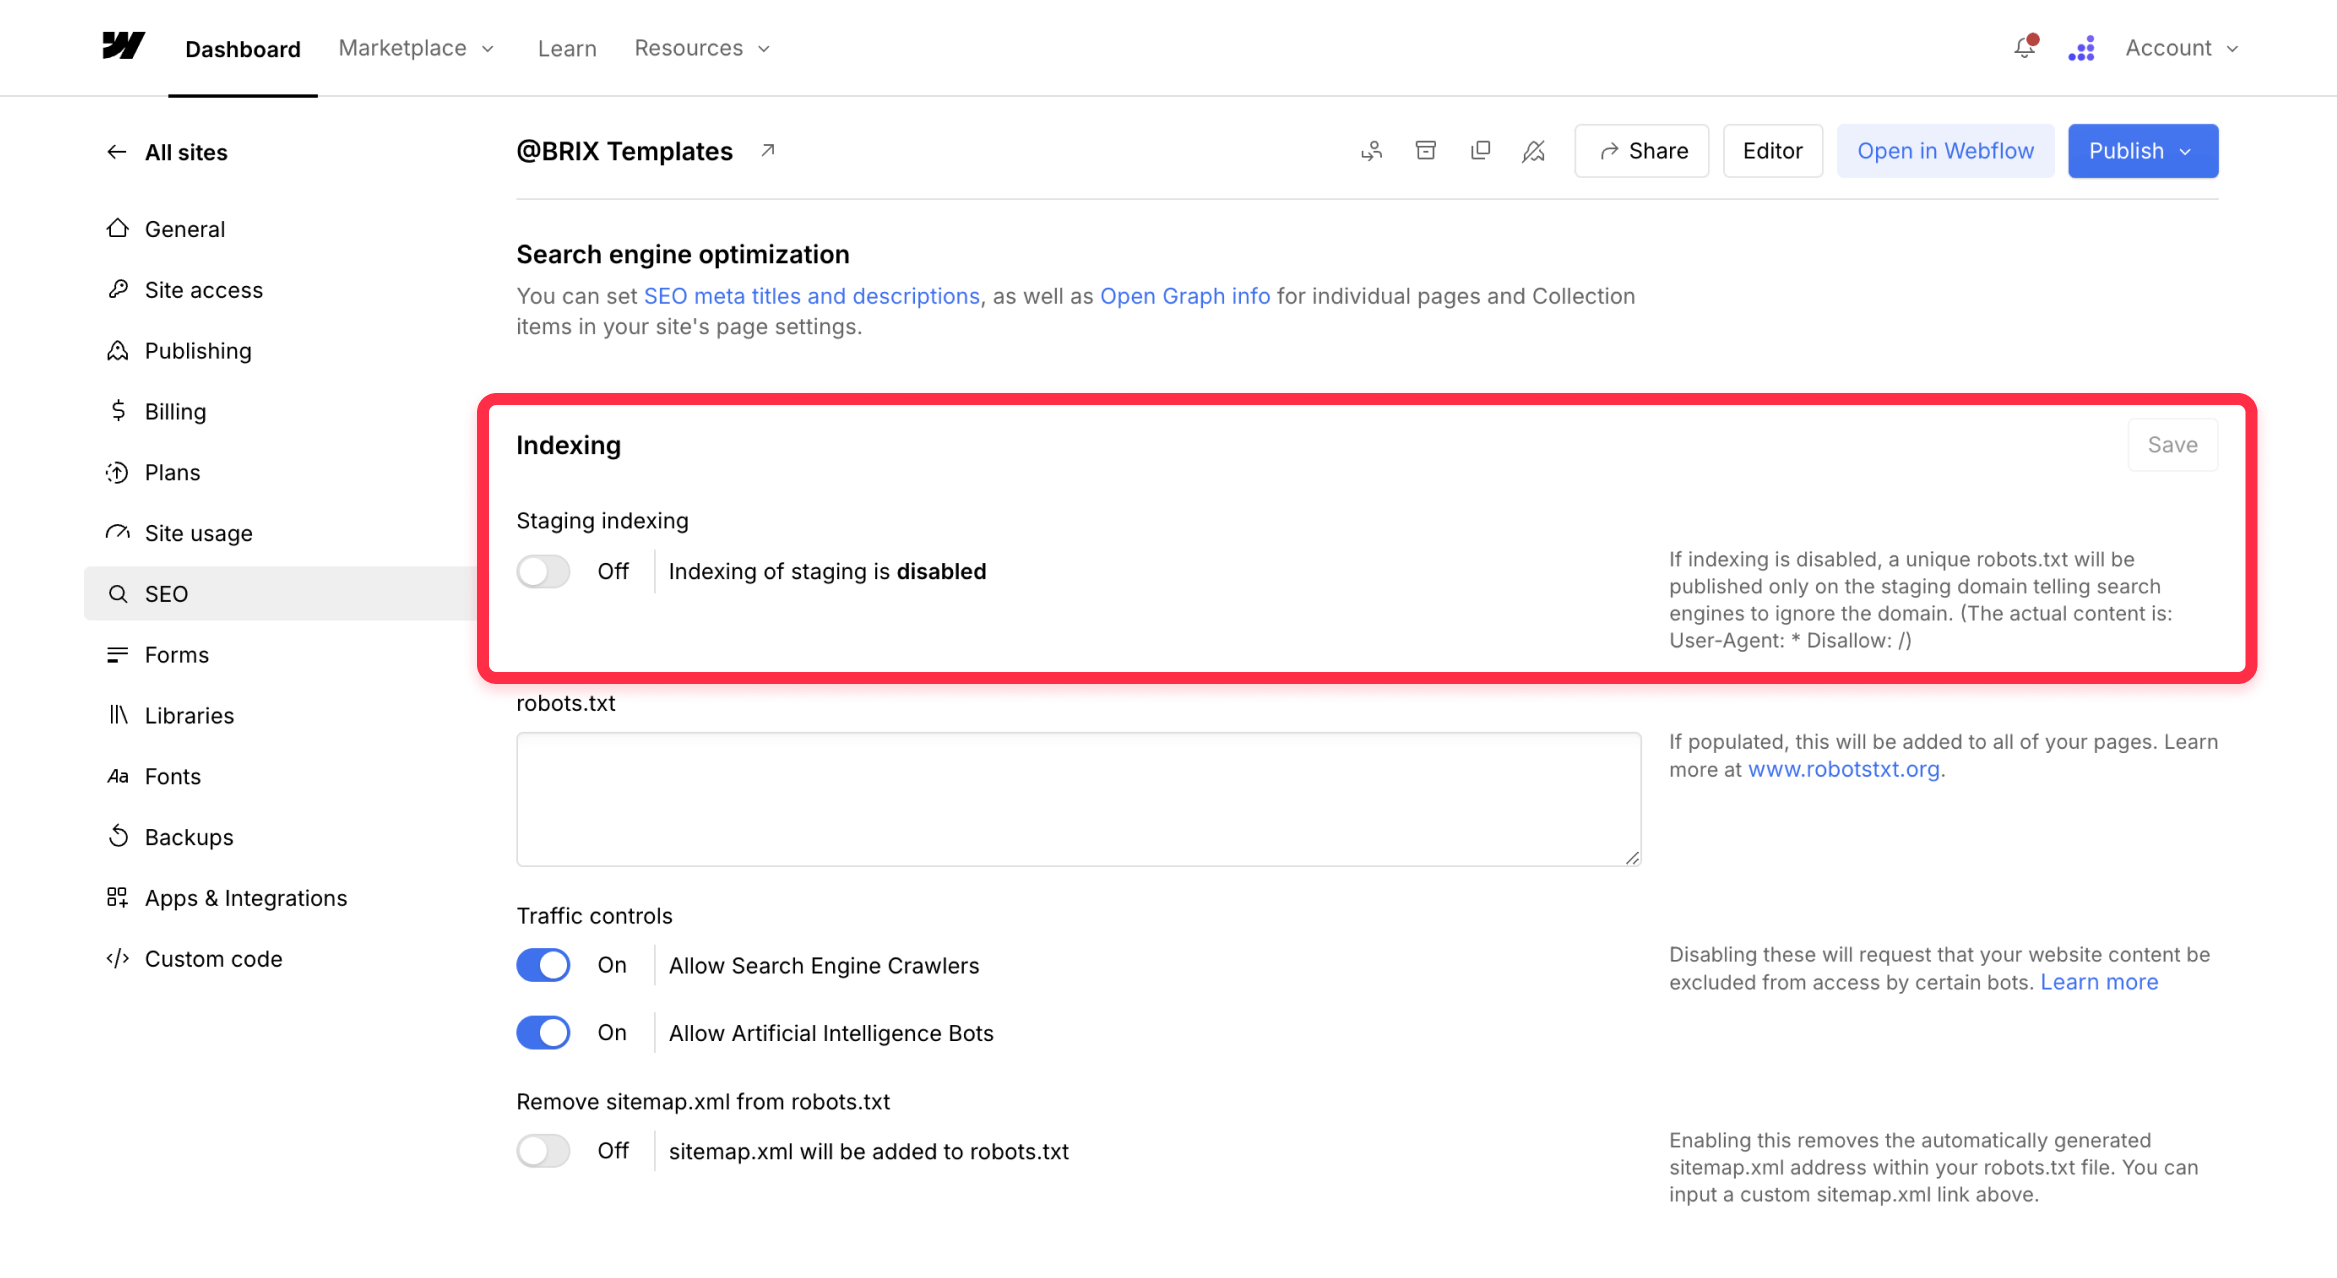
This creates a unique robots.txt file specifically for your webflow.io subdomain that prevents search engine indexing. Your custom domain remains completely unaffected, allowing you to maintain separate staging and production environments without SEO conflicts.
Important note: This setting only prevents new indexing. If your staging site was already indexed before enabling this setting, you'll need to use Google Search Console's URL Removal Tool or wait for Google to naturally remove the outdated results during its next crawl cycle.
How to completely unindex your Webflow custom domain
This is not a common use case, but if you need to completely remove your entire Webflow custom domain from search engines while keeping the site functional, you have 2 options available.
You have two main options for completely unindexing your entire custom domain: password protection (which both unindexes and gates access) or custom code implementation (which unindexes while keeping content publicly accessible).
- Password protection is the most comprehensive method—perfect for private client sites, wedding websites, or confidential project portfolios where you want complete privacy.
- Custom code implementation using site-wide noindex tags works when you want to hide everything from search engines but still allow direct access via URLs.
Method 1: Password protection for complete privacy
Steps to password protect your entire Webflow site:
- Access Project Settings by clicking the gear icon (⚙️) in the top-right corner
- Navigate to the "General" tab in project settings
- Find the "Password Protection" section
- Toggle ON password protection
- Set a secure password for your entire site
- Save changes and publish to activate protection
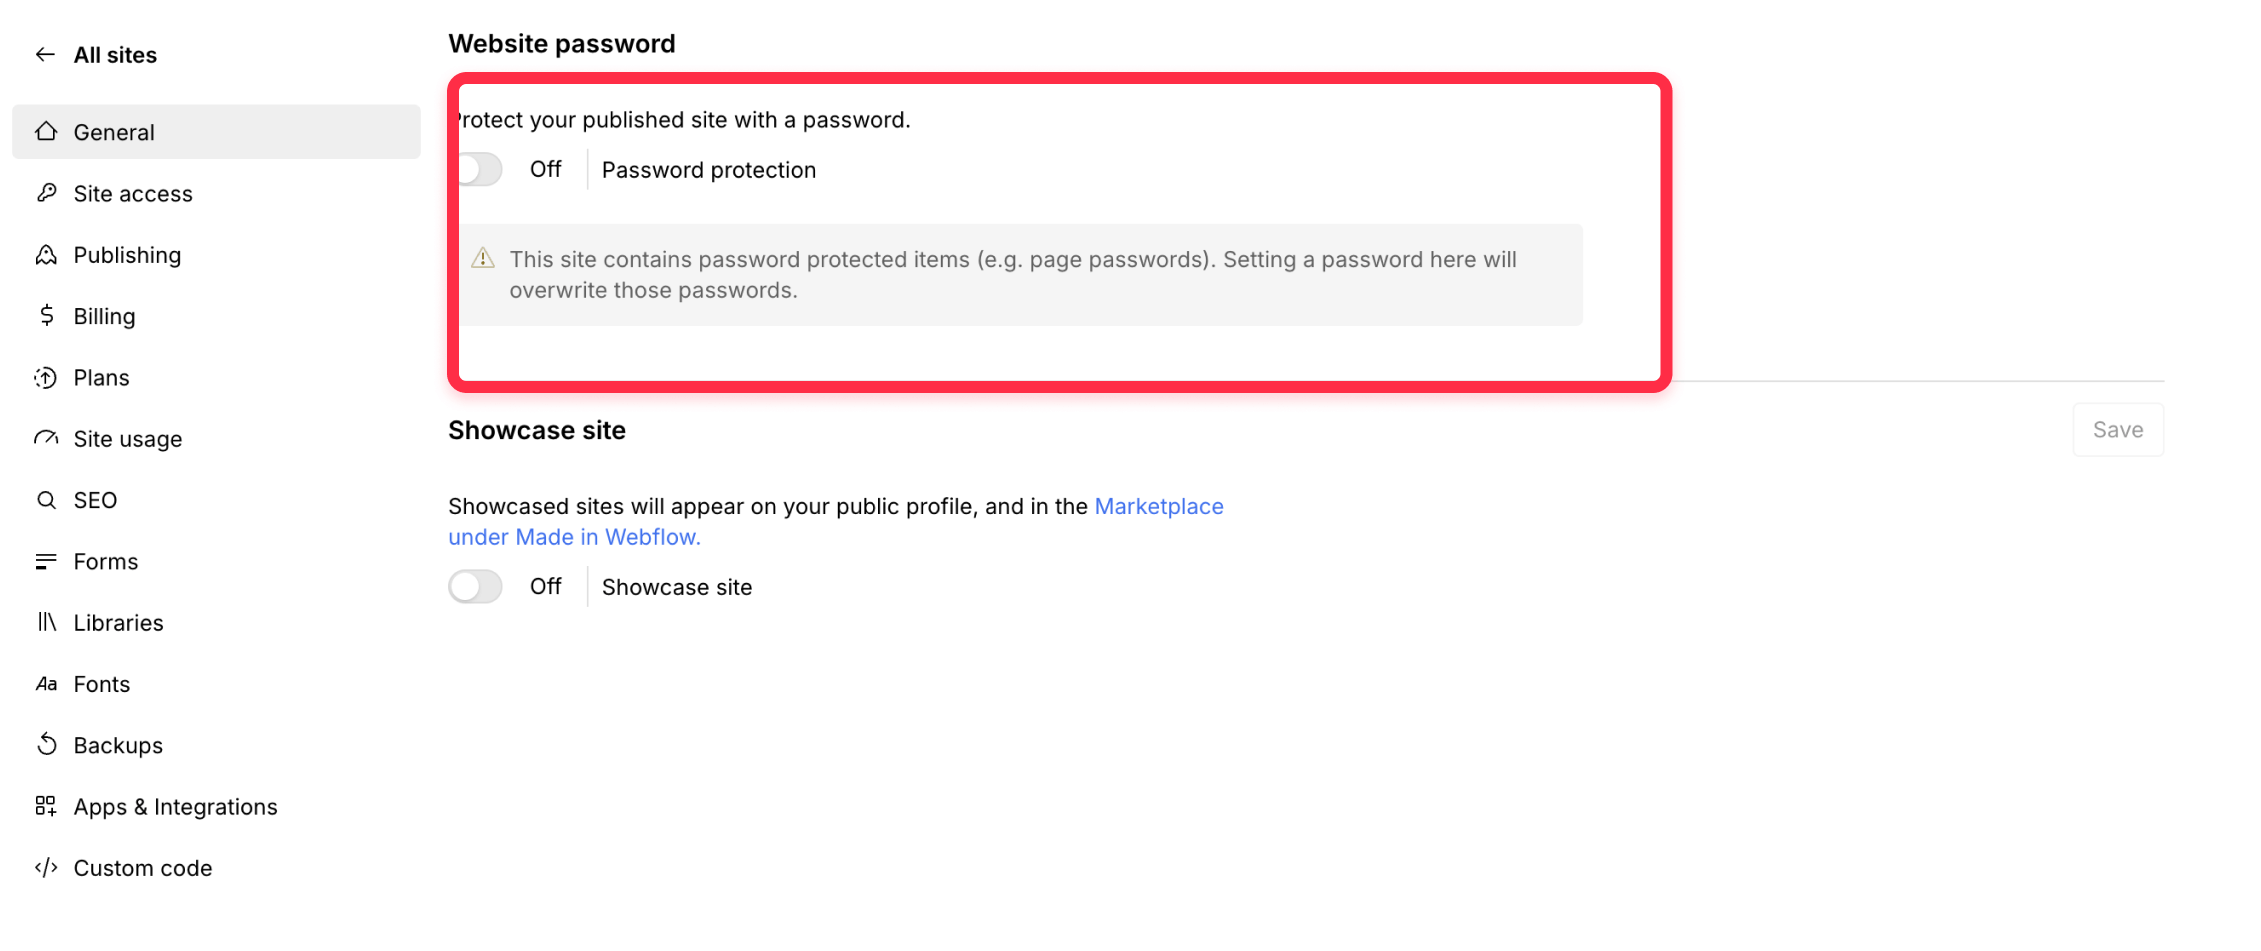
When password protection is enabled, every page on your custom domain requires authentication before visitors can access any content. This automatically excludes all content from search engine indexing and sitemaps, making it the most effective method for complete privacy.
Method 2: Custom code for unindexing without gating
If you want to unindex your entire site while keeping it publicly accessible, you can add a site-wide noindex meta tag through Webflow's custom code section:
- Go to Project Settings and navigate to the Custom Code tab
- In the "Head Code" section, add: <meta name="robots" content="noindex, nofollow">
- Save and publish your site
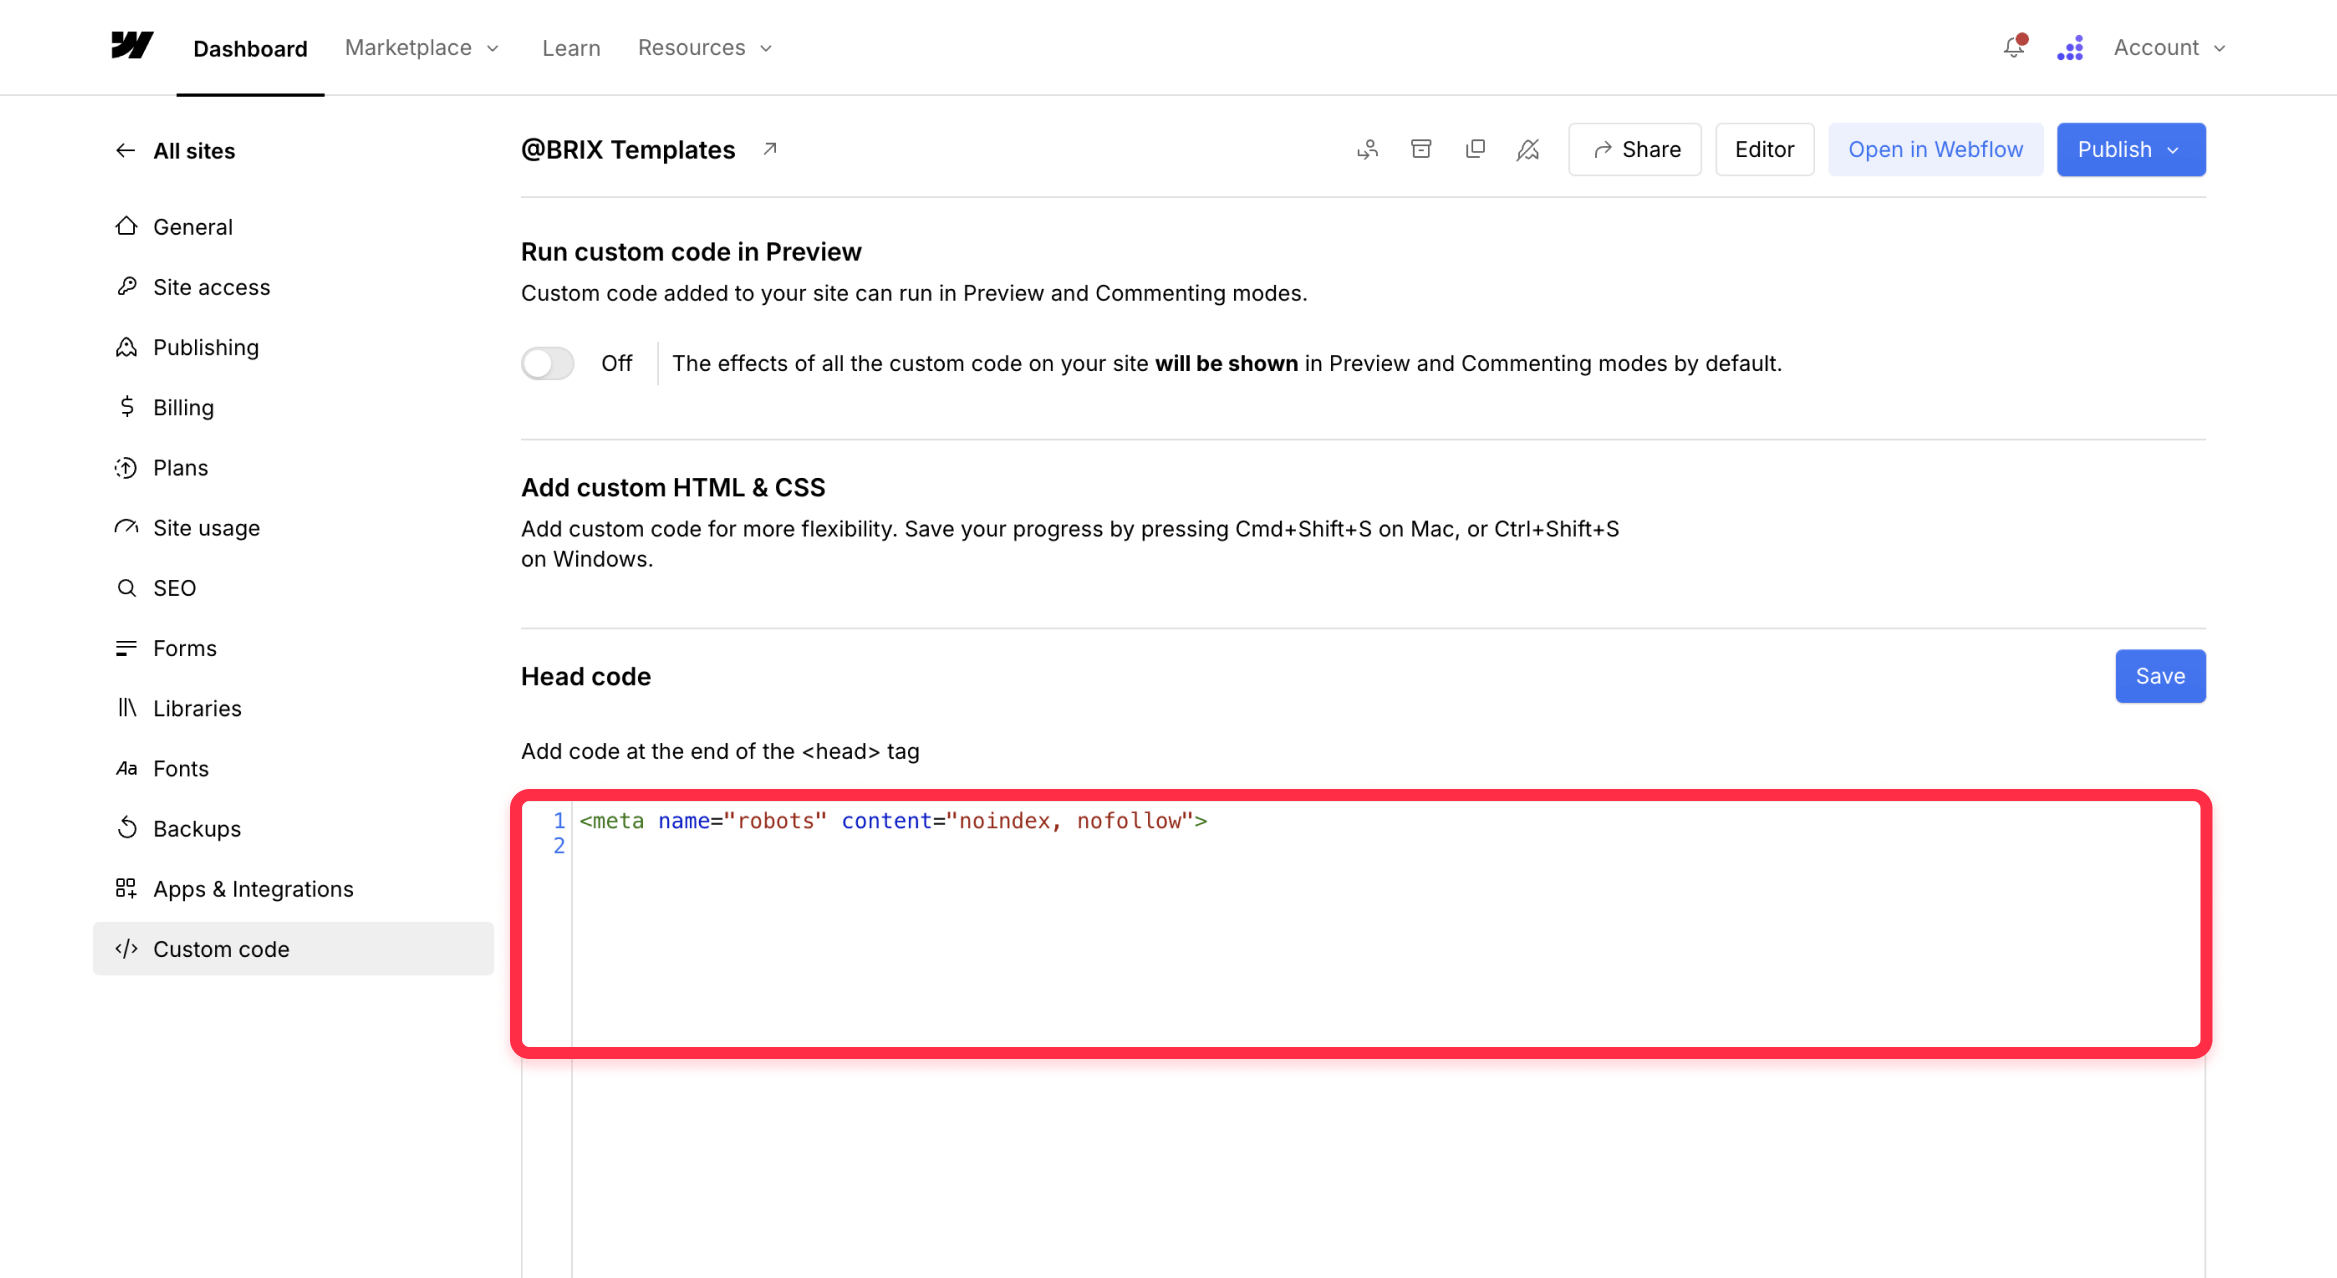
This approach tells search engines not to index any pages on your domain while allowing users to access content directly through URLs. It's useful for staging sites or internal tools that need to remain accessible but shouldn't appear in search results.
You can also apply password protection to specific folders or CMS collection templates instead of the entire site, giving you granular control over which sections require authentication while keeping other areas publicly accessible.
Frequently asked questions about unindexing pages in Webflow
What's the difference between unindexing and password protection in Webflow?
Unindexing tells search engines not to include specific pages in search results, but the pages remain publicly accessible to anyone with the direct URL. Password protection completely blocks access to pages, requiring authentication before anyone can view the content. Use unindexing for pages you want hidden from search but accessible to users, and password protection for truly private content.
How long does it take for unindexed Webflow pages to disappear from Google?
Google typically processes noindex tags within 1-4 weeks, but this varies based on your site's crawl frequency and the specific pages involved. High-traffic pages may be removed faster, while rarely-visited pages might take longer. You can speed up the process by submitting a removal request through Google Search Console for immediate action on specific URLs.
Can I unindex my Webflow blog posts without affecting my main pages?
Yes, you can unindex individual blog posts using the CMS item method, or unindex your entire blog collection using the collection template method while keeping static pages indexed. This gives you complete control over which content appears in search results without affecting your homepage, about page, or other static content.
Which Webflow unindexing method works best for staging sites?
Use the Disable Webflow subdomain indexing setting in Project Settings > SEO tab. This specifically targets your yoursite.webflow.io staging domain while leaving your custom domain fully indexed. This method is designed exactly for staging site scenarios and won't affect your production site's search visibility.
Is using robots.txt better than Webflow's built-in unindexing options?
No, robots.txt is not recommended for unindexing in Webflow or any modern website. Google deprecated noindex support in robots.txt in 2019, and robots.txt only controls crawling, not indexing. Pages blocked in robots.txt can still appear in search results if linked from external sites. Always use Webflow's native noindex settings or password protection instead.
How do I unindex thank-you pages and confirmation screens in Webflow?
Use the individual static page unindexing method for thank you pages. Go to Page Settings > SEO section > toggle OFF "Sitemap indexing" for each confirmation page. This prevents these functional pages from cluttering search results while keeping them accessible to users who complete forms or purchases on your site.
Can I partially unindex a Webflow CMS collection?
Yes, you can partially unindex a Webflow CMS collection by selectively hiding specific items. Go to your CMS panel in the Webflow Designer, select the collection containing items you want to unindex, click on individual CMS items, and toggle OFF the "Search engine indexing" option for each item you want to hide.
What happens to my Webflow sitemap when I unindex pages?
Webflow automatically removes unindexed pages from your auto-generated sitemap.xml file. This happens immediately when you publish changes, ensuring search engines receive consistent signals about which pages should and shouldn't be indexed. You don't need to manually update your sitemap—Webflow handles this automatically.
Will unindexing pages in Webflow affect my site's overall SEO performance?
Unindexing irrelevant pages actually improves your SEO by helping search engines focus on your most valuable content. Removing thank you pages, duplicate content, and staging sites from search results increases the authority and relevance of your remaining indexed pages, potentially boosting rankings for your important content.
How do I re-index previously unindexed Webflow pages?
Simply reverse the unindexing process by toggling ON the relevant indexing settings and publishing your site. For static Webflow pages, enable "Sitemap indexing" in Page Settings. For Webflow CMS items, enable "Search engine indexing" in the item settings. Google will typically re-index the pages within 1-2 weeks, or you can request immediate re-indexing through Google Search Console.
Conclusion
Proper unindexing control is essential for maintaining a professional, SEO-friendly Webflow site. Whether you need to hide staging sites, protect private content, or clean up search results, Webflow's built-in unindexing methods provide the flexibility and control you need without compromising your site's performance.
If you need help optimizing your Webflow site's search engine visibility or implementing advanced SEO strategies, our agency can assist with custom solutions tailored to your specific requirements.


Join readers commenting on this post!