

Manually toggling "New" badges on and off in Webflow CMS is easy to forget, especially when you manage blogs, templates, resources, changelogs, or directories. A better approach is to make the badge date-driven: Webflow shows it while the item is new and hides it automatically once the window expires.
In this guide, you'll set up a custom Date/Time field, place a badge inside a CMS card, and choose between two methods to control visibility — native Webflow conditionals or the BRIX New Badge attribute.

Why automatic New badges matter for Webflow CMS sites
- Visitors spot fresh content faster without scanning dates manually.
- Editors set a date once and never need to remember to remove the badge.
- The system scales across dozens or hundreds of CMS items without manual switches.
- The badge disappears on its own, so "New" labels never stay visible for months.
Create a custom Date/Time field in your Webflow CMS
Webflow tracks system dates automatically (created, published, modified), but a custom Date/Time field gives you direct control over when the badge logic starts. This matters when content is imported, scheduled, or migrated from another platform.
Steps
- Open your Webflow project.
- Go to the CMS panel.
- Open the Collection where you want the badge (Blog Posts, Resources, Templates, etc.).
- Click Collection settings > New Field > Date/Time.
- Name the field based on your workflow:
- Release Date — for templates, products, resources, or feature releases.
- Launch Date — for campaigns, directories, or announcements.
- Published Date — when the display date should differ from the system publish date.
- Badge Start Date — when badge timing is separate from the actual publish date.
- Decide whether the field should be Required.
- Save the field.
After adding the new Date/Time field, publish the full site. Webflow requires a full-site publish when a Collection schema changes, so the new field and any conditionals connected to it are reflected on the published site.
For example, if you publish a template on Monday but want the New badge to start on Wednesday when the launch campaign begins, Badge Start Date gives you that flexibility.
Add and style the New badge inside your Webflow CMS card
The badge must sit inside the Collection Item, not outside the Collection List. Each CMS item needs its own visibility logic.
Steps
- Select the Collection List on your page.
- Open one Collection Item.
- Choose where the badge should appear: above the title, beside the category, or over the image.
- Add a Div Block or Text Block inside the card.
- Type New as the text.
- Give it a class like Badge New.
- Style it:
- Font size: 12–13px
- Font weight: 600 or 700
- Padding: 4px top/bottom, 8px left/right
- Border radius: 999px (pill style)
- Display: Inline flex or inline block
Create one reusable badge class and use combo classes for variations (Badge New, Badge Updated, Badge Ending Soon) to keep your CMS card system scalable.
Choose the best Webflow New badge method for your setup
Before you connect the badge to a date, decide which method works best for your project.
When to use native Webflow conditionals
Native conditionals are the cleanest no-code option when you need:
- A simple one-off badge setup on one Collection List.
- No custom code in Page settings or Site settings.
- A single badge rule with a fixed window (e.g., 7 days).
- Clients who only manage one CMS list or one badge type.
When to use the BRIX New Badge attribute
The BRIX-style attribute method is better when you need:
- Reusable CMS cards across multiple Collection Lists or pages.
- Different badge windows per card or per list (e.g., 7 days for blog posts, 30 days for templates).
- CMS card components that appear in more than one place.
- Cleaner client handoff — once the script is installed, each card is controlled with attributes like brix-new-badge-days="14" instead of rebuilding conditions in every list.
- Future extensibility for more badge states (Updated, Coming soon, Ending soon).
The BRIX attribute method requires a shared JavaScript snippet added to Page settings or Site settings, which depends on your Workspace or Site plan. Once installed, it can be easier to execute because you control each badge with attributes rather than rebuilding Webflow conditions for every new Collection List.
The native method is best when you want a no-code setup and only need one badge rule. The BRIX attribute method is best when you want reusable logic: add the script once, then control each card with attributes such as brix-new-badge-date and brix-new-badge-days.
Method 1: Set native Webflow conditional visibility for a 7-day New badge
This method uses Webflow's built-in conditional visibility. No custom code is needed.
Connect the badge to the Date/Time field using Webflow's conditional visibility. The logic needs two conditions:
- Release Date is within the last 7 days.
- Release Date is today or earlier (prevents future items from showing the badge early).
Steps
- Select the New badge element inside the Collection Item.
- Open Element settings > Visibility.
- Click the conditional control (plus icon).
- Condition 1: Choose your custom Date/Time field and set a relative date rule that matches items inside your badge window, such as a rule for dates on or after 7 days in the past if that operator is available in your Webflow UI.
- Condition 2: Add a second Date/Time rule that only allows dates today or earlier, so future-dated CMS items do not show the badge early.
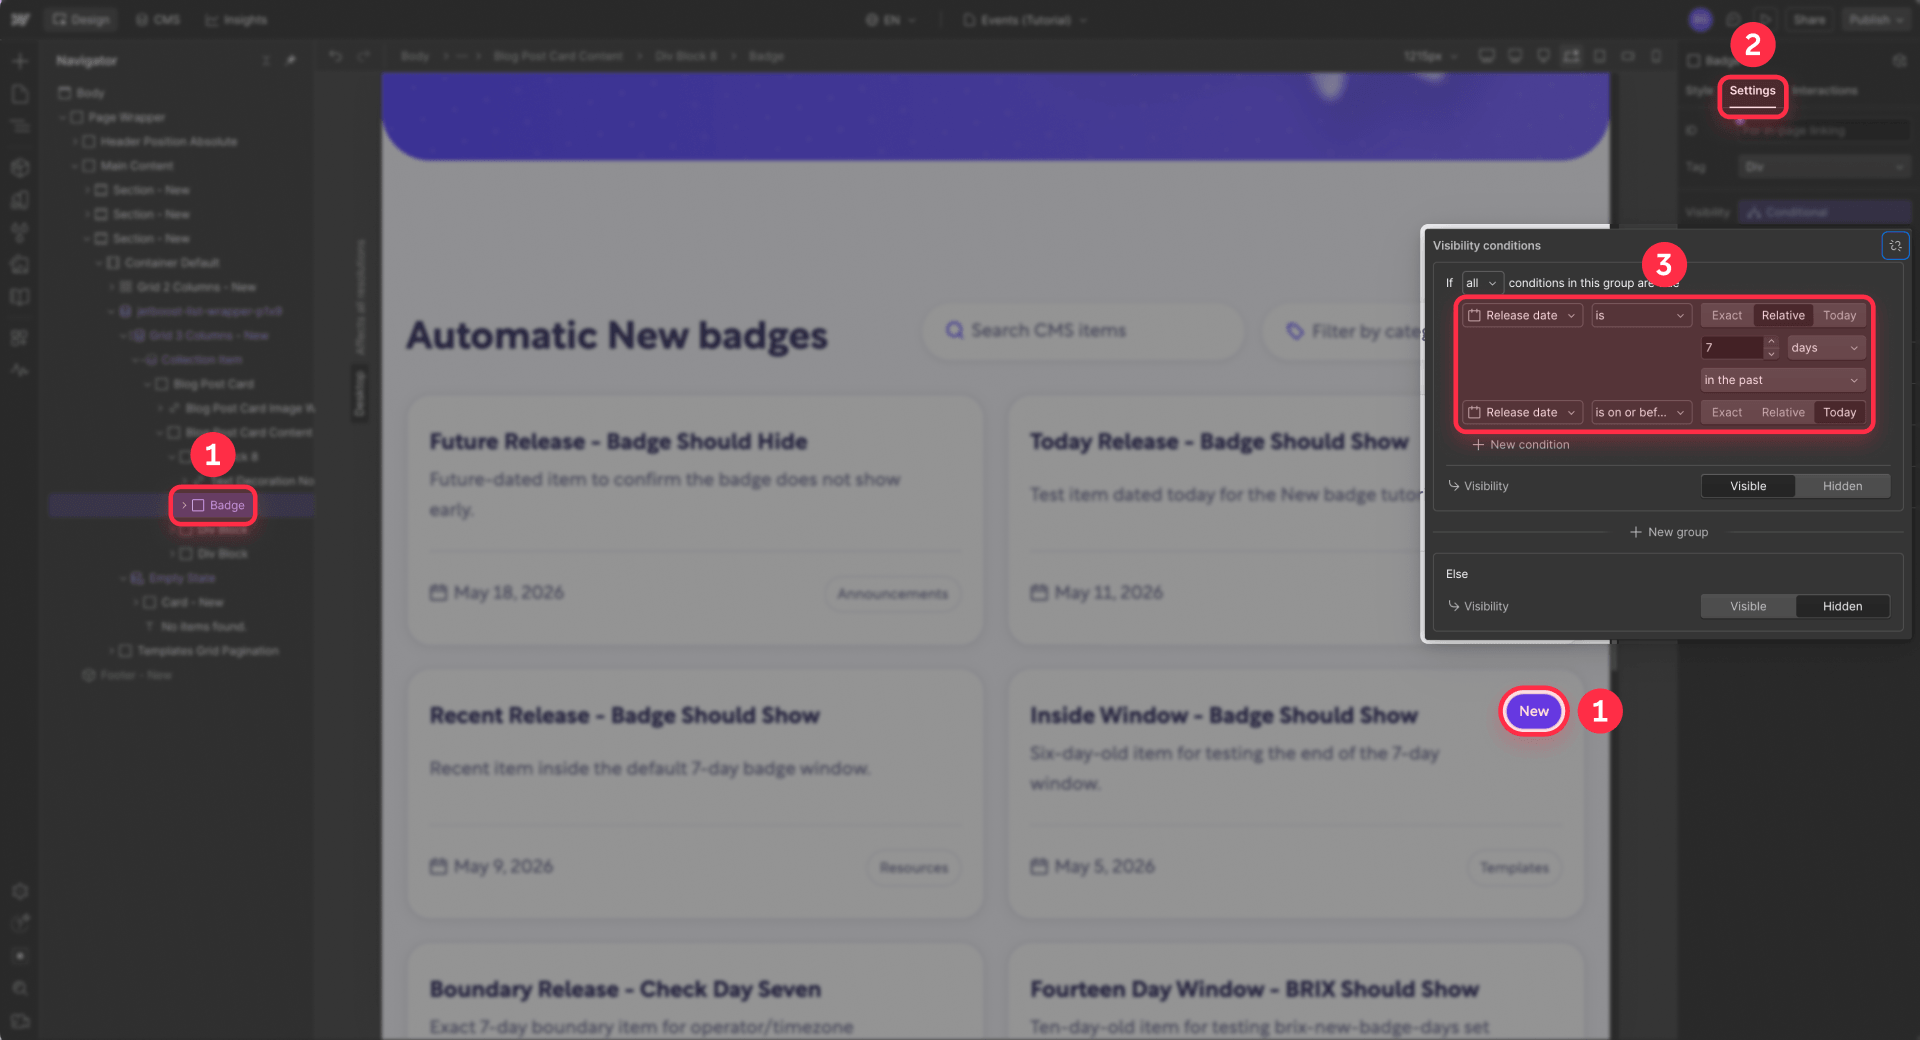
The exact operator names can vary between Webflow filters and conditionals, so test the setup with one recent item, one old item, and one future-dated item.
Make sure both date conditions are in the same condition group and that the group requires all conditions to be met. If the group is set to match any condition, future-dated items may still show the badge.
- Set the output to Visible when conditions are met.
- Set the fallback (Else) to Hidden.
- Save, publish, and test.
Example with today as May 8
- Release Date = May 7 → badge should show.
- Release Date = May 3 → badge should show in a 7-day window.
- Release Date = April 20 → badge should be hidden.
- Release Date = May 15 → badge should be hidden because it is future-dated.
For dates exactly on the edge of the 7-day window, test your setup carefully. Depending on the operator, time value, and timezone behavior, an item dated exactly 7 days ago may show or hide. If you need the badge to remain visible through the end of the seventh calendar day, define that behavior clearly and test with real CMS dates.
Test with three CMS items: one recent, one old, one future-dated. This is the fastest way to confirm your logic works before handing the CMS to a client.
Method 2: Add the BRIX New Badge attribute for reusable Webflow CMS cards
This method uses a shared JavaScript snippet and custom attributes to control badge visibility. Once the script is installed on your site, each CMS card is controlled by attributes instead of per-list conditionals.
What the BRIX New Badge attribute does
The BRIX New Badge attribute is a lightweight utility that:
- Finds every CMS card wrapper marked with brix-new-badge="item".
- Reads a machine-readable date source, starting with brix-new-badge-date on the card wrapper and falling back to an element marked with brix-new-badge="date" when needed.
- Compares the date against today and the configured badge window.
- Shows the badge when the date is inside the window and hides it when the window has ended or has not started yet.
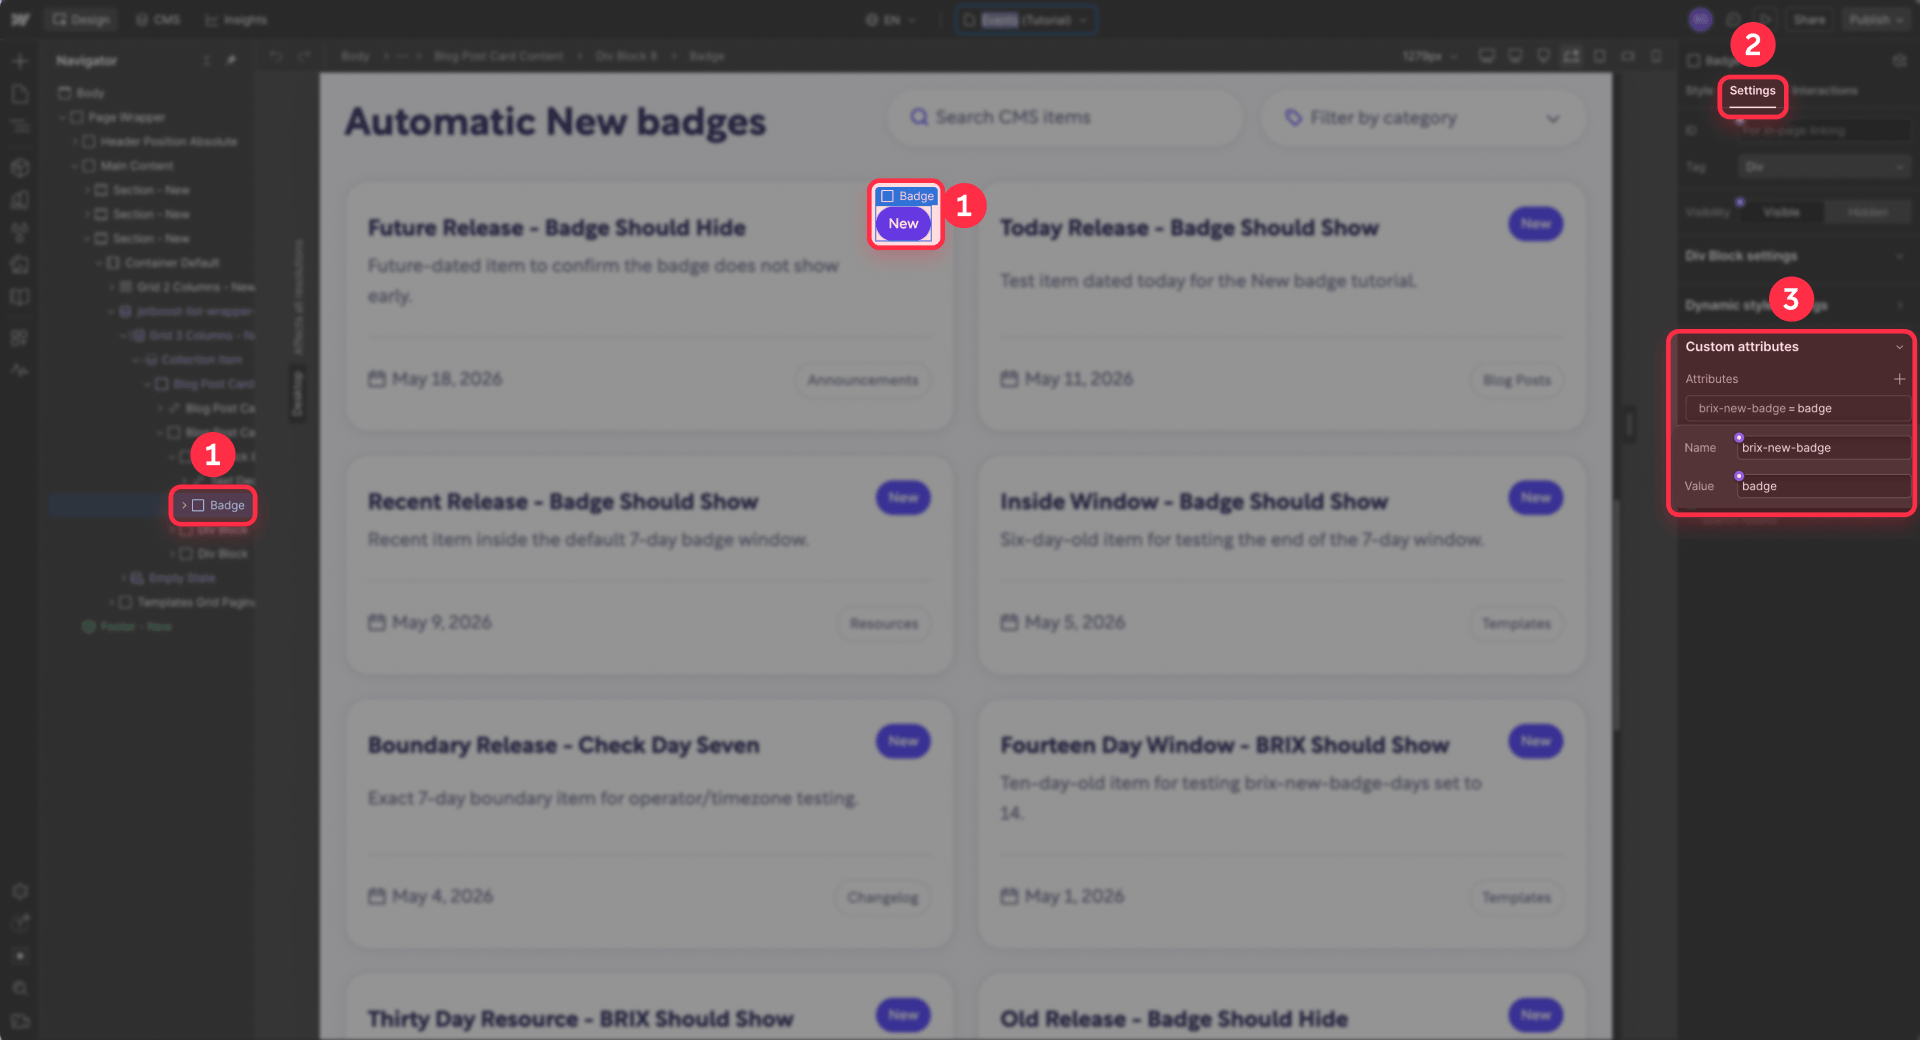
Required BRIX New Badge attributes
- brix-new-badge="item" — on the CMS card wrapper. This tells the script which cards to evaluate.
- brix-new-badge="badge" — on the visible New badge element. This is the element the script shows or hides.
- A machine-readable date source — preferably brix-new-badge-date="2026-05-08" on the CMS card wrapper. If you cannot place the date on the wrapper, use a dedicated date element with brix-new-badge="date" and expose the date through brix-new-badge-date, datetime, or a predictable machine-readable text value.
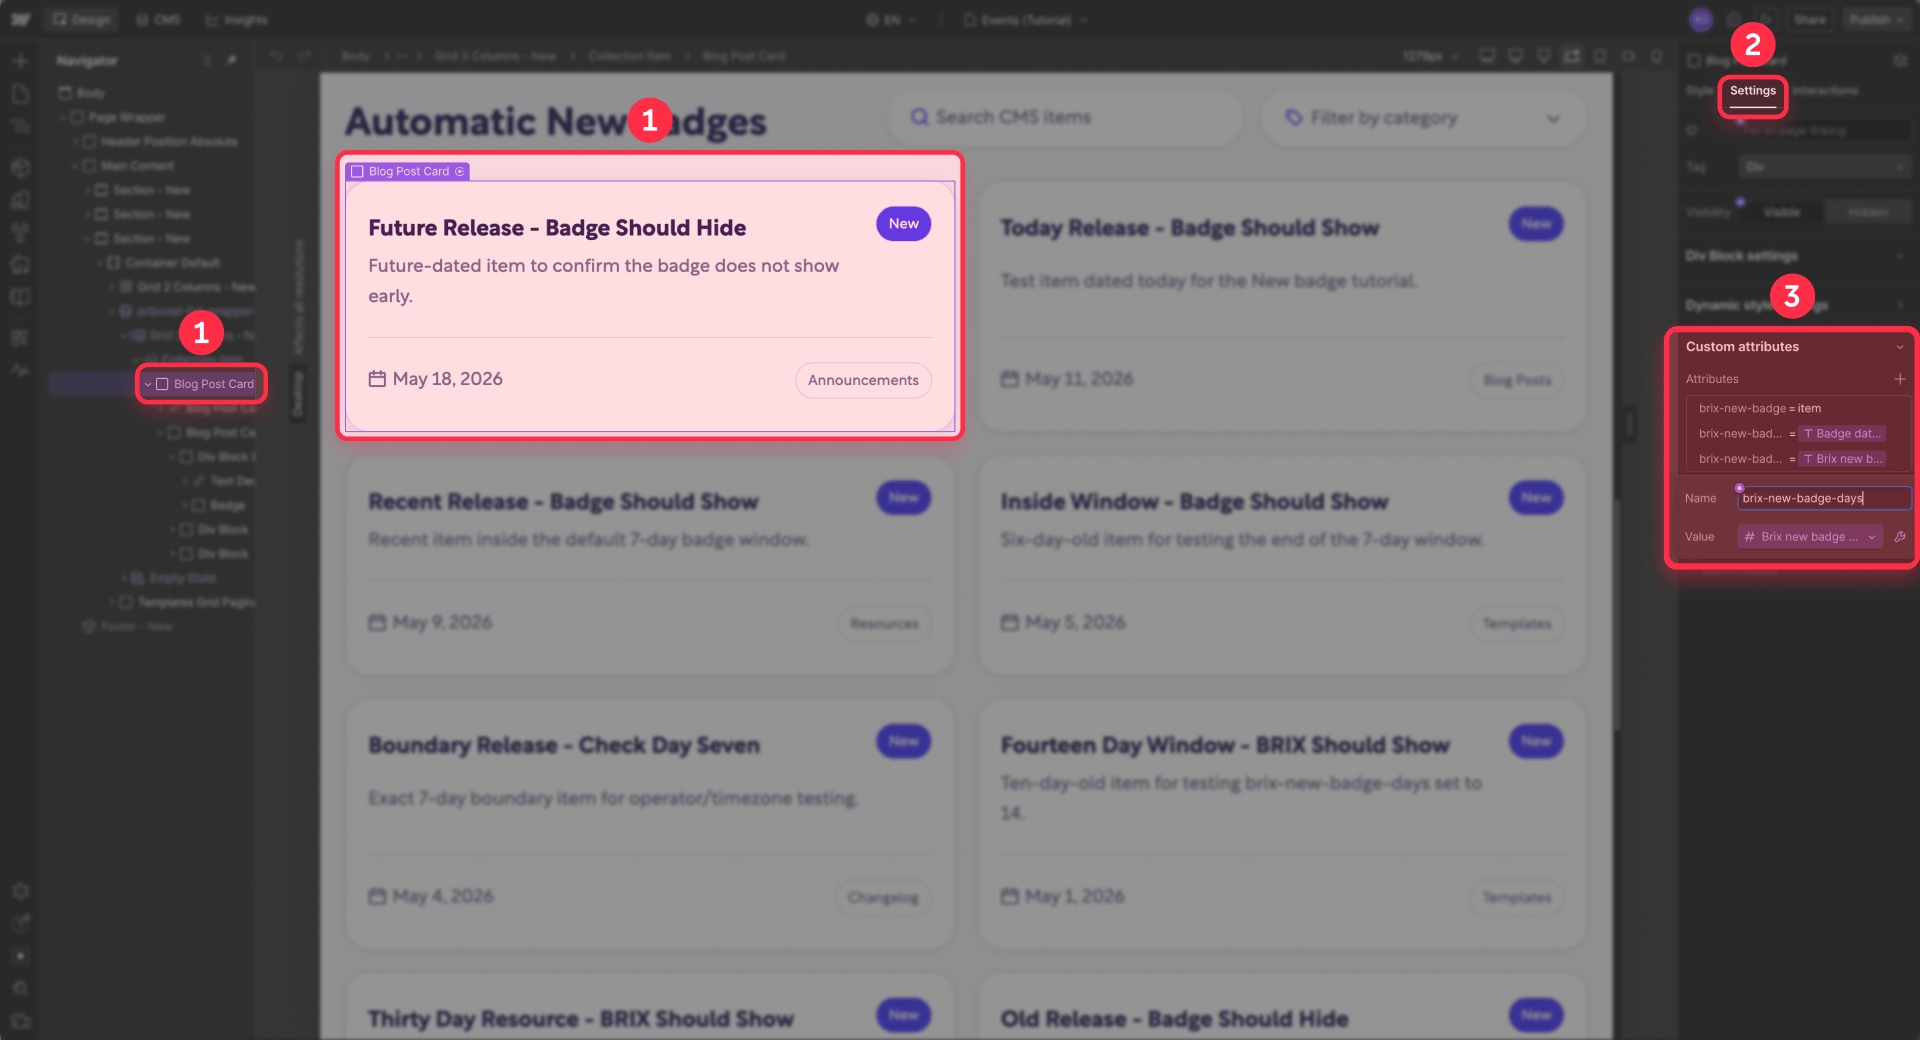
Optional BRIX New Badge attributes
- brix-new-badge="date" — alternative date placement inside the card when the date is not stored directly on the wrapper. If you use this element, expose the date through brix-new-badge-date, datetime, or a predictable machine-readable text value.
- brix-new-badge-days="7" — on the card wrapper to override the default badge window. For example, brix-new-badge-days="14" gives the badge a 14-day window instead of the default 7 days.
- datetime="2026-05-08" — acceptable fallback if the date is placed on a semantic date/time element (such as a <time> tag).
The date used by the script should be machine-readable. Use a predictable value such as YYYY-MM-DD or YYYY-MM-DDTHH:mm:ssZ. Avoid relying on localized visual dates like May 8, 2026, 08/05/2026, or 5/8/26, because browser date parsing can vary by format and locale. If you display a human-readable date for visitors, that visible date can stay separate from the machine-readable date used by the script.
Webflow already supports binding CMS data to custom attributes in Collection Lists and Collection Pages, which is why this attribute method works with CMS date values.
After binding the CMS date to brix-new-badge-date, inspect the published HTML and confirm the value is actually machine-readable. If Webflow outputs a localized or unexpected date format, create a separate plain text CMS field such as Badge Date ISO and store the value as YYYY-MM-DD, or use a dedicated date element with a reliable datetime value.
Custom code for the BRIX New Badge attribute
Add this script before the closing </body> tag in Page settings or Site settings.
In this script, now >= startDate prevents the badge from showing before the release date, while now < endDate hides the badge once the badge window has ended. With this logic, a 7-day window shows the badge from the start date until, but not including, the calculated end date. If you want the badge visible through the end of the seventh calendar day, adjust the end-date logic and test that exact behavior with real CMS dates.
How to set up the BRIX New Badge attribute in Webflow
- Add the New badge inside the CMS card.
- Add brix-new-badge="item" to the CMS card wrapper.
- Add brix-new-badge="badge" to the visible badge element.
- Add brix-new-badge-date to the CMS card wrapper and bind its value to the CMS Release Date field when possible.
- Use a predictable value such as YYYY-MM-DD or YYYY-MM-DDTHH:mm:ssZ, then inspect the published HTML to confirm Webflow outputs the value in that format.
- If you cannot place the date value on the wrapper, add a dedicated date element inside the card, add brix-new-badge="date" to it, and expose the machine-readable date through brix-new-badge-date, datetime, or a predictable machine-readable text value.
- Optionally add brix-new-badge-days="14" to the card wrapper to change the badge window.
- Add the script to Page settings or Site settings before the closing </body> tag.
- Publish and test with recent, old, future-dated, and edge-case dates.
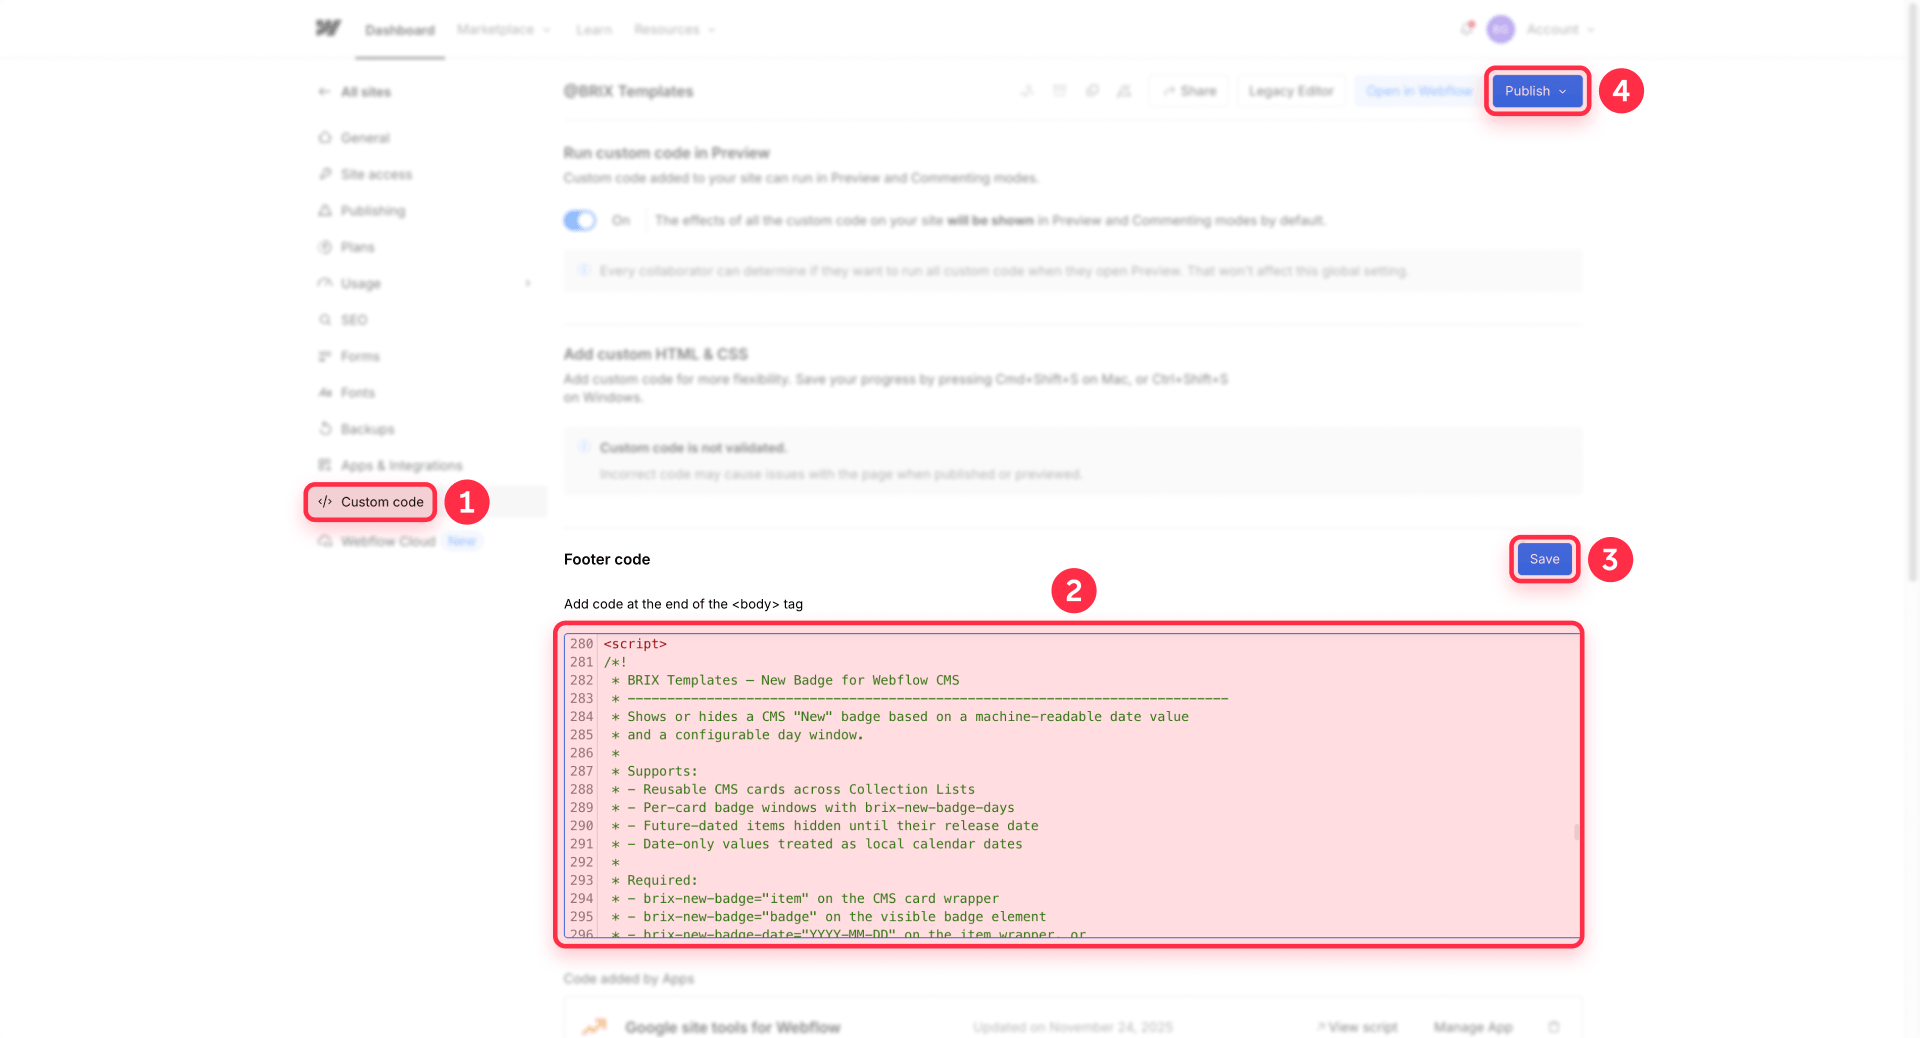
How Webflow dynamic attributes help with reusable CMS components
Webflow's newer dynamic attributes for components make this kind of setup even more useful when your CMS card is built as a reusable component. You can connect attributes like brix-new-badge-date and brix-new-badge-days to component props, CMS fields, or page data, which makes it easier to control values per component instance.
This is useful when the same CMS card component appears across multiple pages or Collection Lists. If the card is not a component, you can still add the attributes directly to the elements. This update does not remove the need for the script — it makes it easier to pass the right attribute values into reusable component instances.
How to test the BRIX New Badge attribute in Webflow
- Create at least three test CMS items: one dated today, one older than the badge window, and one future-dated.
- Publish the site before final testing. Webflow custom code may appear in preview, but it does not go live until the site is published, and the published page is the safest place to inspect CMS-generated attributes.
- Open the live Collection List page.
- Confirm that only the recent item shows the badge.
- Inspect the published HTML and verify that each card wrapper contains brix-new-badge="item", the badge element contains brix-new-badge="badge", and the date attribute outputs a predictable value such as 2026-05-08.
- Test an edge-case date exactly on the boundary of the badge window (e.g., day 7). Depending on the time value and timezone, the badge may show or hide. Adjust and test if you need specific behavior at the boundary.
Hide the Webflow New badge automatically after the window ends
Regardless of which method you use, the badge should disappear without anyone changing the CMS item.
How automatic hiding works with native conditionals
When the current date moves outside your rule, Webflow applies the fallback state. If you set fallback to Hidden, the badge disappears on its own. The CMS item stays visible in the Collection List. No editor needs to remove a switch, delete a label, or update the design.
How automatic hiding works with the BRIX attribute
The BRIX script runs when the page loads and evaluates every marked card. When the current date falls outside the badge window, the script sets the badge element to hidden. The CMS item remains visible. No editor needs to change anything in the CMS.
How to verify
- Set a CMS item's Release Date to within the badge window → badge appears.
- Change it to a date outside the window → badge disappears.
- Change it to a future date → badge also disappears.
If the badge still shows on old content, check that the native fallback state is set to Hidden (Method 1) or that the date attribute contains a correct machine-readable value (Method 2).
Adjust the Webflow New badge window for different content types
Seven days is a good default, but the right window depends on how long content feels fresh to visitors.
Recommended windows
- Changelog updates: 3–7 days — updates feel old quickly when releases happen often.
- Blog posts: 7–14 days — readers benefit from a short freshness signal.
- Resource libraries: 14–30 days — guides, ebooks, and tools stay relevant longer.
- Template galleries: 14–30 days — new templates need more time to be discovered.
- Directory listings: 7–30 days — depends on listing volume.
- Product-style CMS items: 7–30 days — longer window if launches are less frequent.
How to change the window with native conditionals
- Select the badge element.
- Open Element settings > Visibility.
- Change the relative date from 7 days to your preferred window (e.g., 14 days).
- Keep the second condition that prevents future items from showing early.
- Test and publish.
How to change the window with the BRIX attribute
Add or change the brix-new-badge-days attribute on the card wrapper. For example, set brix-new-badge-days="14" for a 14-day window. Each card can have a different value, which is useful when the same script drives badges across multiple content types.
For dates exactly on the edge of your chosen window (e.g., day 14 in a 14-day badge), test carefully. Depending on the operator, time value, and timezone behavior, edge-case items may show or hide unpredictably. Always verify with real CMS dates near the boundary.
When to use a different badge label
Not every time-based badge should say "New":
- New — recently published item.
- Updated — existing item with meaningful changes.
- Just launched — new product, template, or campaign.
- Coming soon — future-dated item visible before launch.
- Ending soon — time-sensitive event, promotion, or listing.
If you need multiple states on the same card, native conditionals can handle a few separate badge elements. The BRIX custom attribute method can be extended for multiple states, but the current script controls New badge visibility only. Additional states require extra logic.
Common mistakes when adding New badges in Webflow CMS
- Using a manual switch instead of a date field — someone has to remember to turn it off. Use a Date/Time field instead, and test with one recent and one old CMS item to confirm only the recent one shows the badge.
- Forgetting to block future dates — a single "after 7 days ago" condition includes future dates because any future date is technically after that point. Add a second condition so the date must be today or earlier, make sure both conditions are in the same group set to all (not any), and test with a future-dated item.
- Not publishing after changing the CMS schema — adding a new Date/Time field changes the Collection schema. Webflow requires a full-site publish for schema changes to take effect on the live site. Publish the full site, then test the live Collection List to confirm the field and conditionals work.
- Assuming Webflow outputs the CMS Date/Time field in the right format — after binding the date to a custom attribute, inspect the published HTML. If the value is localized or inconsistent, use a separate Badge Date ISO plain text field set to YYYY-MM-DD, or a reliable datetime value on a semantic element.
- Placing the badge outside the Collection Item — Webflow evaluates visibility per CMS item, so the badge must sit inside the repeated Collection Item, not outside the Collection List wrapper. Move it inside and verify that different items show different badge states.
Frequently asked questions about New badges in Webflow CMS
How do I show a New badge for only 7 days in Webflow?
Create a custom Date/Time field in your CMS Collection (for example, Release Date). Add a badge element inside the Collection Item card. Select the badge, go to Element settings > Visibility, and add two conditions in the same group: (1) a relative date rule that matches items inside your 7-day window (such as dates on or after 7 days in the past, using the closest available operator in your Webflow UI), and (2) a rule that only allows dates today or earlier. Make sure the condition group requires all conditions to be met — not any. Set the output to Visible when both conditions are met, and set the fallback (Else) to Hidden. After setup, test with three items: one dated today, one older than 7 days, and one with a future date. Only the recent item should display the badge.
How do I add a New badge to a Webflow Collection List?
Place the badge element inside the Collection Item — not outside the Collection List wrapper. Each item needs its own badge so Webflow can evaluate visibility individually per CMS record. Inside the Collection Item, add a Div Block or Text Block with the text "New" and a reusable class like Badge New. Style it as a compact pill (12–13px font, 600+ weight, 4px/8px padding, 999px border radius). Then select the badge, go to Element settings > Visibility, and add a conditional rule based on your custom Date/Time field with a recent-date condition and a future-date blocker. Set the fallback to Hidden. The badge placement inside the repeated item is what makes it dynamic across the entire Collection List — if you place it outside the item, Webflow cannot evaluate it per CMS record.
Can I use Webflow's system Published On date instead of a custom field in Webflow?
Webflow's system dates (created, published, modified) work in some cases, but a custom Date/Time field is better for most badge setups. System dates may not match your editorial workflow — for example, a template might be created weeks before launch, or blog posts might be migrated from another platform where the original publish date differs from the import date. A custom field like Release Date or Badge Start Date lets editors control exactly when the badge logic begins, and it makes troubleshooting easier because the badge has one clear data source. For client sites especially, a custom date field is the safest and most transparent approach. Use system dates only when they perfectly align with your publishing schedule and you do not import, schedule, or migrate content.
What is the difference between CMS filters and conditional visibility for badges in Webflow?
CMS filters control which Collection items appear in a list — they include or exclude entire items. Conditional visibility controls whether an element inside an item is shown — the item stays in the list, but parts of it appear or disappear. For a New badge, you want conditional visibility because the CMS item should remain visible even after it is no longer new — only the badge should disappear. If you used a filter instead, older items would vanish from the Collection List entirely, which breaks the user experience. Use filters when you need to include or exclude entire items (for example, showing only upcoming events). Use conditional visibility when you want the same card to stay visible but change its internal badge display based on a date field.
How do I change the Webflow New badge window from 7 days to 14 or 30 days?
Select the badge element inside the Collection Item, open Element settings > Visibility, and edit the first date condition. Change the relative date value from 7 days to your preferred window (14 days, 30 days, etc.) using the closest available operator in your Webflow UI. Keep the second condition that blocks future-dated items. Make sure the condition group still requires all conditions to be met. Then test with items at the edge of your new window — for dates exactly on the boundary (such as day 14 in a 14-day window), behavior can vary depending on the operator, time value, and timezone, so always verify with real CMS dates near that boundary. A good testing setup is one item inside the window, one item exactly on the edge, and one item clearly outside.
How do I prevent future-dated Webflow CMS items from showing the New badge early?
Add a second condition to your visibility rule. The first condition checks that the date is within your badge window (using a relative date rule for recent items). The second condition should only allow dates today or earlier, using the closest available operator in your Webflow UI. Make sure both conditions are in the same group set to require all conditions — not any. Without this second rule, a future-dated item passes the first condition because any future date is technically "after 7 days ago." Set the fallback (Else) to Hidden so items that fail either condition do not show the badge. Always test with a future-dated CMS item to confirm the badge stays hidden before publishing.
Can I show different badge labels like "Updated" or "Coming soon" on the same Webflow CMS card?
Yes, but the approach depends on complexity. For two or three fixed labels, use separate badge elements inside the CMS card — each with its own conditional visibility rule tied to a different Date/Time field. For example, one badge shows "New" based on Release Date, and another shows "Ending Soon" based on an End Date field. Each badge needs its own condition group, its own future-date blocker, and its fallback set to Hidden. For more states or reusable card components, you can extend a custom attribute approach with JavaScript, but the basic setup is separate native conditionals for each label. Keep the badge elements independent so each one evaluates its own date field without conflicting with the others.
Conclusion
A strong New badge setup in Webflow should be automatic, date-driven, and easy for editors to understand. Native Webflow conditional visibility works well for simple one-off setups. For reusable CMS cards, multiple Collection Lists, and per-card badge windows, the BRIX New Badge attribute gives you a cleaner way to manage badges across your project.
If you need a more custom Webflow CMS badge system, advanced conditional logic, or a scalable CMS component setup, BRIX Templates' Webflow agency services can help implement it properly.







Join readers commenting on this post!