
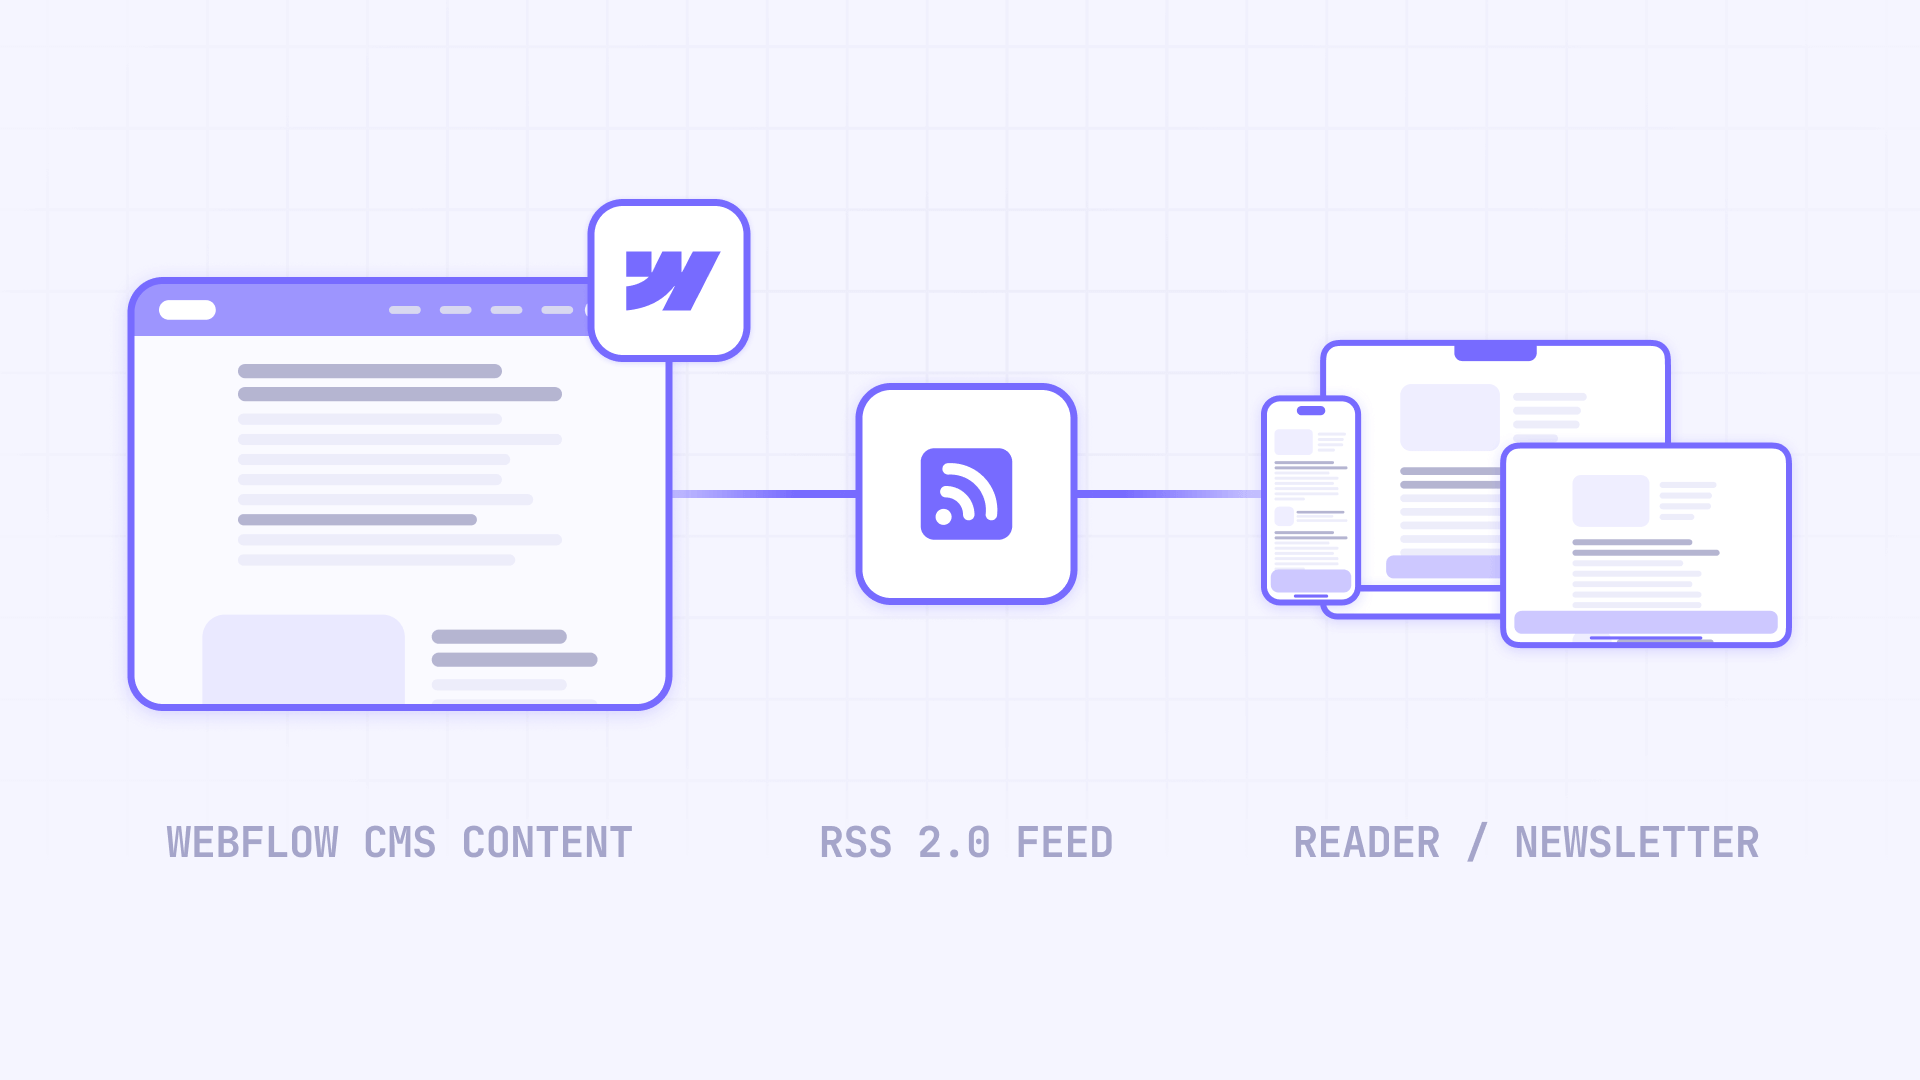
Getting your Webflow blog content in front of readers shouldn't require manual work every time you hit publish. RSS feeds solve this by automatically notifying external tools when new content appears—triggering newsletter sends, updating subscribers in Feedly, or posting to social media without you lifting a finger. While Webflow offers built-in RSS functionality, it comes with significant limitations that many users discover too late. This guide walks you through two proven methods for creating RSS feeds from your Webflow CMS, helping you choose the right approach based on your specific needs.
Webflow's native RSS is designed for titles and summaries (plus optional image and date), but it doesn't include full Rich Text article content or podcast-style enclosures. You'll learn both the quick native method and a more powerful Zapier-based approach that includes everything your feeds might need. By the end, you'll have a working RSS feed URL ready to connect to any automation tool.
Why RSS feeds matter for Webflow sites
Understanding when and why to implement RSS helps you make smarter decisions about content distribution across your Webflow projects:
- Automated newsletters without manual campaigns: Services like Mailchimp read your RSS feed and automatically send emails to subscribers when you publish new content. No more creating individual campaigns for each blog post or forgetting to notify your audience about fresh content.
- RSS readers and content aggregators: Users who prefer Feedly, Inoreader, or other RSS apps can subscribe to your blog and see updates alongside their other favorite sites. This expands your reach to audiences who consume content through dedicated reading apps rather than visiting websites directly.
- Workflow automation with Zapier: RSS feeds can trigger complex automation sequences—share new posts to social media, notify your team in Slack, add items to a content tracking spreadsheet, or sync content across multiple platforms simultaneously.
- Podcast distribution considerations: Audio platforms like Spotify and Apple Podcasts require RSS feeds with specific metadata and enclosure tags (GUIDs, iTunes namespace, artwork specs, etc.) that go beyond what Webflow or Zapier RSS can provide. For podcast distribution, use a dedicated hosting platform like Transistor, Buzzsprout, or Podbean instead. This article focuses on blog/content RSS for newsletters and readers.
- Indirect SEO benefits through wider distribution: More distribution channels mean more potential traffic back to your site. Readers who discover your content through feeds, newsletters, and aggregators often become direct visitors and subscribers over time.
Before you start with Webflow RSS setup
Before diving into RSS configuration, confirm you have the following prerequisites in place:
Your Webflow project needs a CMS Collection with published items (such as Blog Posts, News, or Episodes). Webflow's Starter plan includes limited CMS functionality (enough to test), while higher plans offer expanded CMS item and Collection limits.
For optimal RSS output, your Collection should include these recommended fields: a Name field for titles, a summary or excerpt field, a featured image, and a publish date field.
Here's a quick decision guide to help you choose your method:
- Use Method 1 (native Webflow) if you only need basic RSS for Feedly subscriptions or simple newsletter links that show article previews with "read more" links
- Use Method 2 (Zapier) if you need full article content in your feed (up to Zapier's 10KB per-item limit), audio enclosures, or custom CMS fields that Webflow's native RSS doesn't expose
Method 1: Native Webflow RSS setup
Webflow includes built-in RSS 2.0 support for CMS Collections. This method takes about five minutes and requires no external tools; availability may vary by site plan or account configuration.
Enabling and configuring RSS in Webflow
The RSS toggle lives in your Collection template page settings—not the Collection list page. Follow these steps:
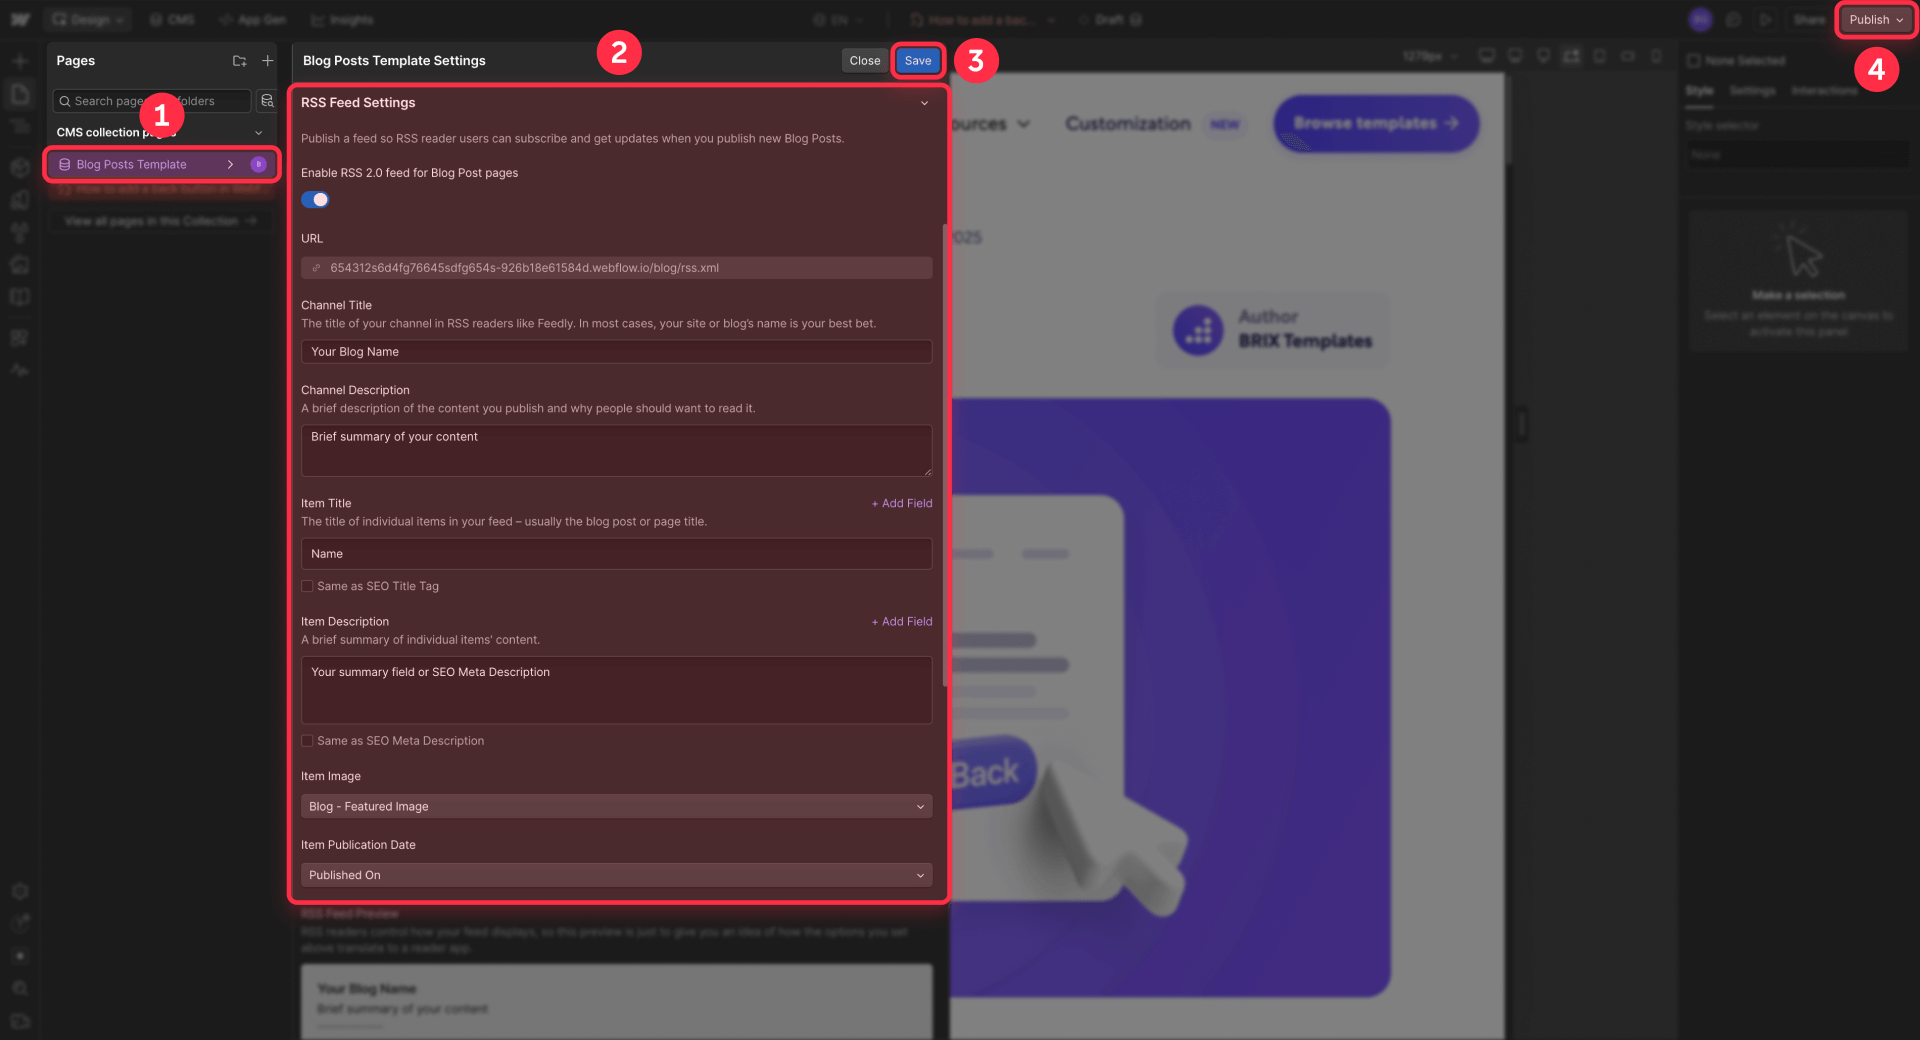
- Open Webflow Designer and click the Pages panel in the left sidebar
- Find your Collection template page (the page that displays individual items, not the Collection list page)
- Click the settings cog icon next to that page name
- Scroll down to RSS Feed Settings and toggle Enable RSS 2.0 feed to ON
- Configure the field mappings: Channel Title (your blog name), Channel Description (brief summary of your content), Item Title (usually Name), Item Description (your summary field or SEO Meta Description), and optionally Item Image (featured image field)
- For Item Publication Date, choose Published On. Avoid Updated On because editing posts would change their date and potentially re-trigger RSS-based automations.
- Click Save
Publishing and accessing your Webflow RSS feed URL
Your RSS feed only becomes accessible after publishing your site:
- Click Publish in the top right corner of Webflow Designer
- Publish to your staging domain or custom domain
- Return to Pages panel → Collection template page → settings cog → RSS Feed Settings
- Copy the RSS feed URL directly from this panel
Critical note about the URL: If the URL shows website.com as a placeholder, manually replace it with your real custom domain or staging subdomain (such as yoursite.webflow.io). Do not assume a specific URL pattern like /blog/rss.xml—always copy the exact URL from RSS Feed Settings.
Testing your Webflow RSS feed
Paste the feed URL into your browser—you should see XML content with your posts. Then open Feedly or another RSS reader, add your feed URL, and confirm your posts appear with correct titles, descriptions, and images. Optionally, validate your feed at validator.w3.org/feed/.
Keep in mind that native RSS only includes summaries—if you need full article content, continue to Method 2.
Method 2: Webflow webhooks + Zapier RSS
Zapier can create RSS feeds that include full Rich Text content (up to 10KB per item), audio file references, and any custom CMS fields you need. This method requires a paid Zapier plan since Webhooks by Zapier is a Premium app.
When you need Zapier RSS for your Webflow site
This method makes sense when your requirements exceed native RSS capabilities: full-content newsletters that display complete articles instead of summaries, custom field syndication (author names, reading time, categories), or Rich Text body content that Webflow's native feed excludes.
Setting up Webflow webhooks with Zapier RSS
The integration works by having Webflow send CMS data to Zapier via webhook whenever you publish content, then Zapier adds it to a hosted RSS feed. Follow these steps:
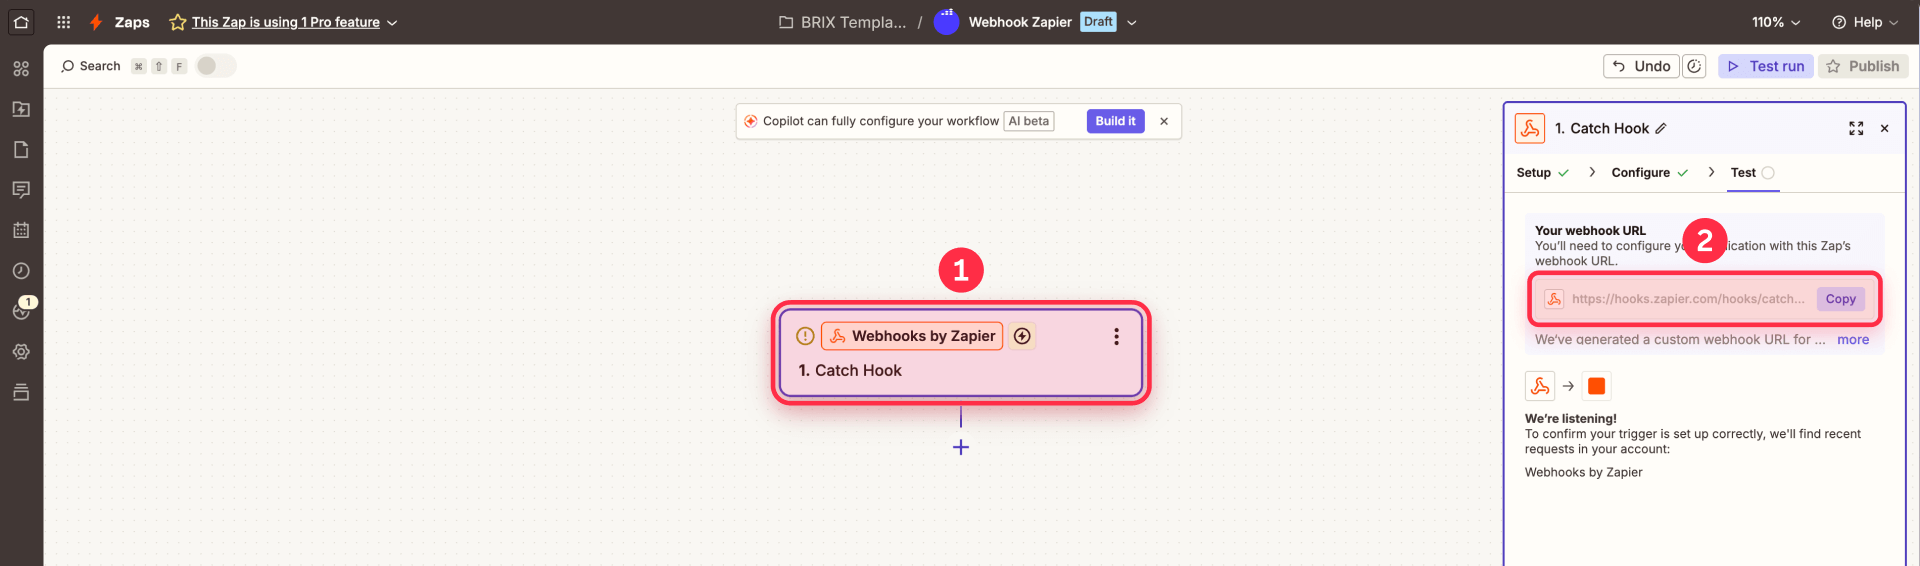
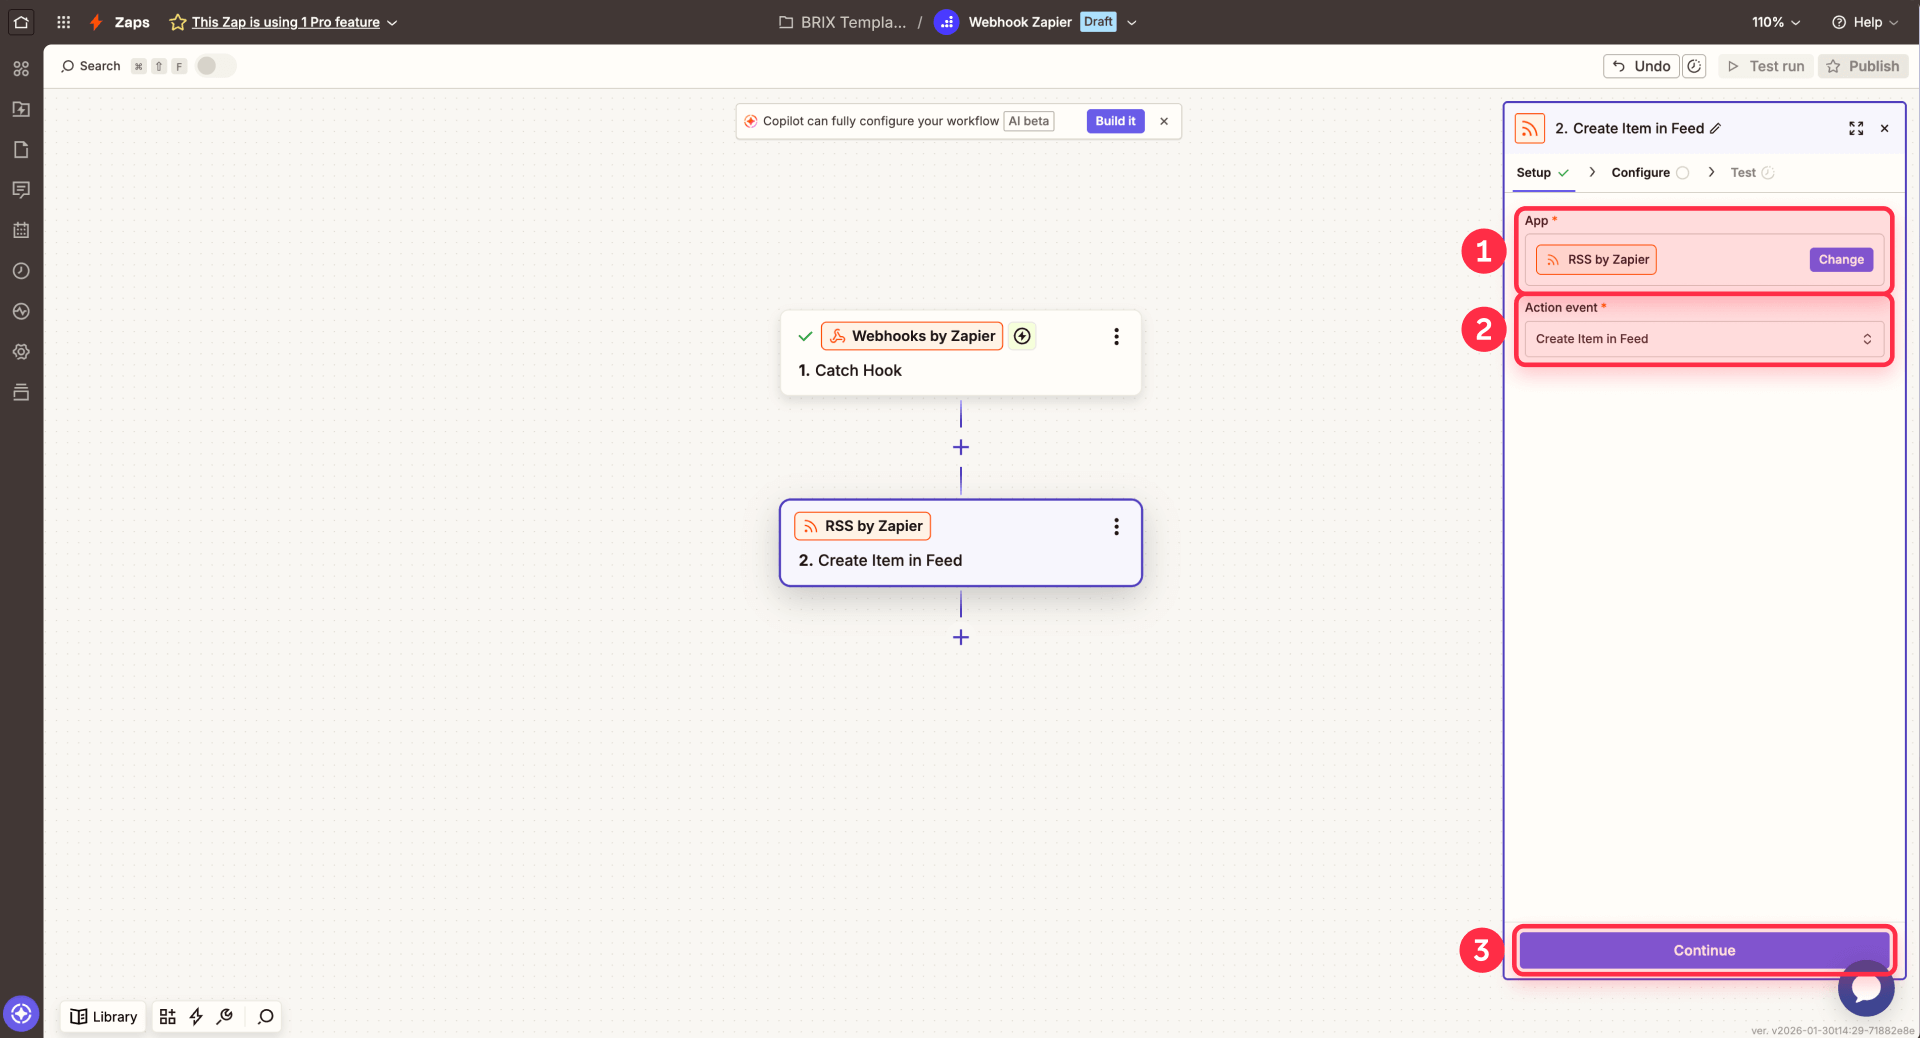
1 - Create your Zap and get the webhook URL:
Log in to Zapier, click Create Zap, and name it "Webflow Blog to RSS Feed". Search for Webhooks by Zapier, select Catch Hook as the trigger, click Continue, and copy the Custom Webhook URL.
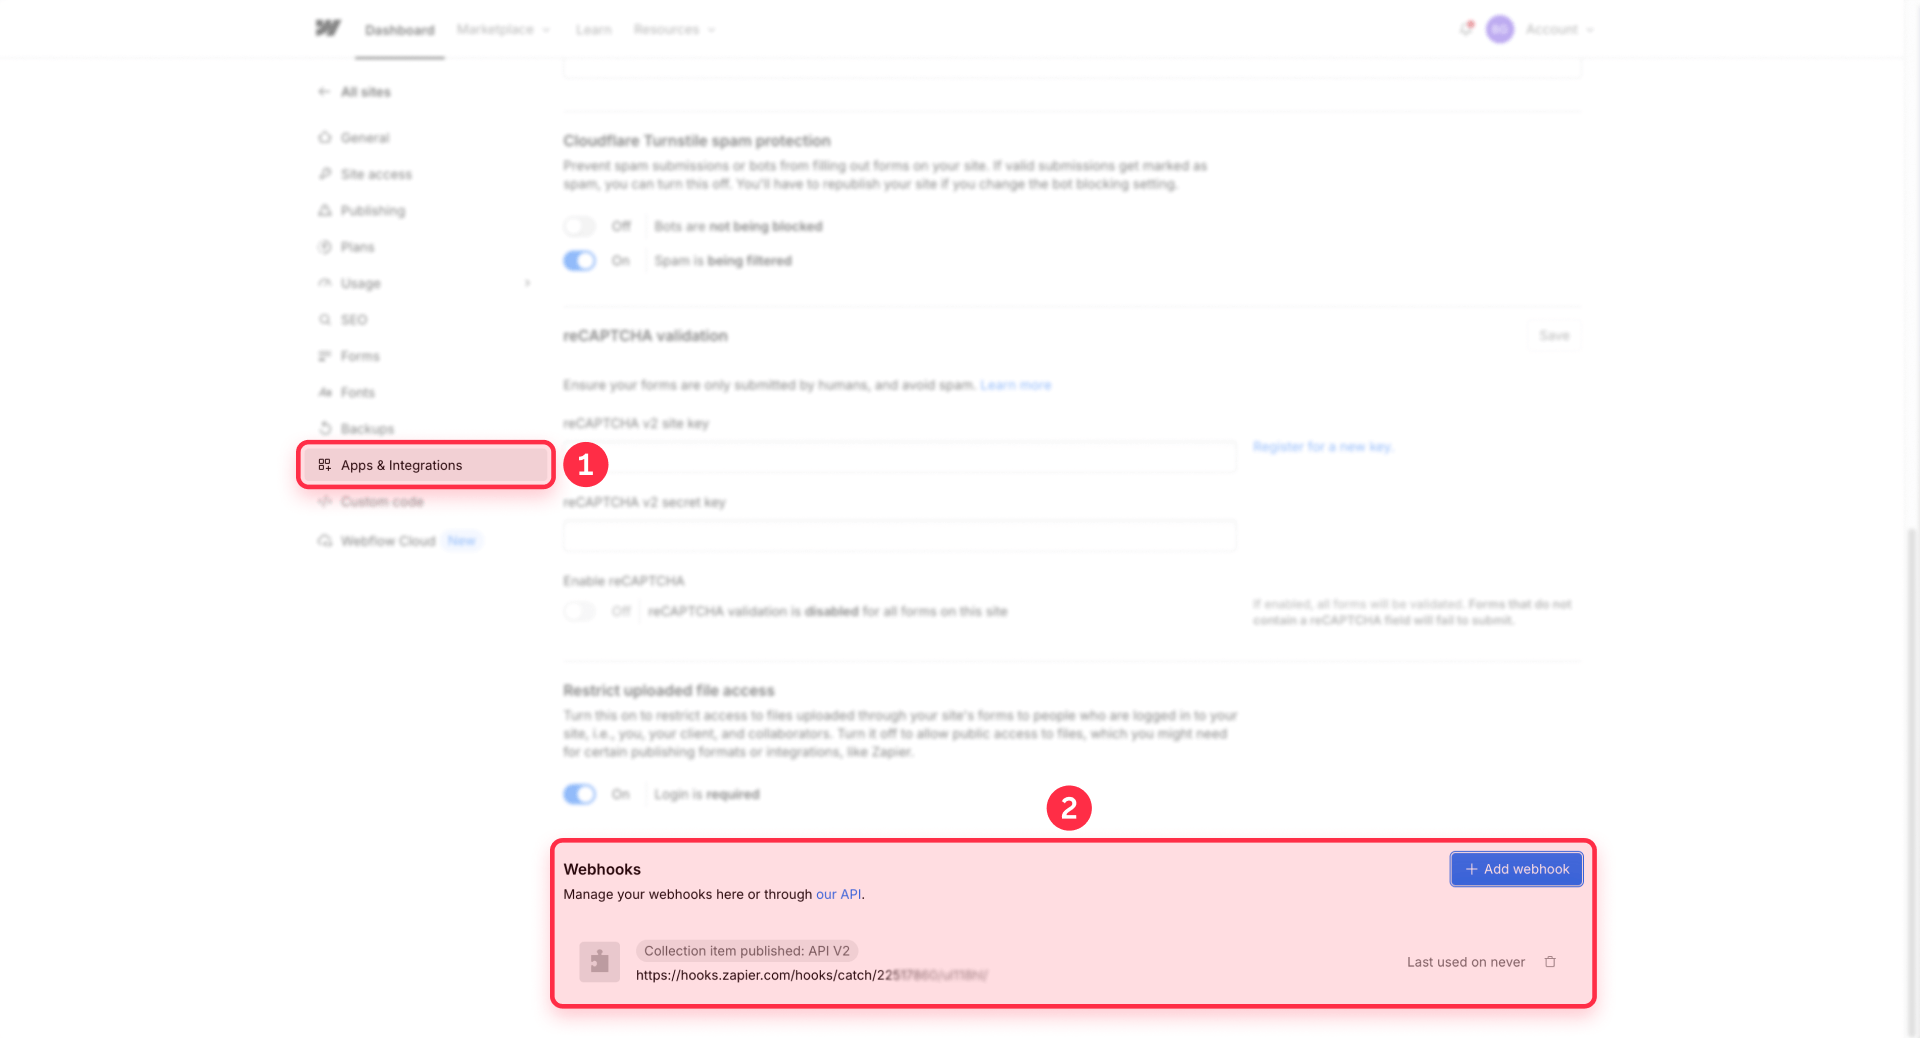
2 - Create the webhook in Webflow:
Go to Site settings → Apps & integrations → Webhooks (called Project settings in older UI). Click Add webhook, choose the Collection item published event (triggerType: collection_item_published), select API version v2 if available, paste the Zapier webhook URL, and click Add webhook.
3 - Test and configure the RSS action:
Publish a test item in Webflow CMS (make sure it goes live, not just saved as draft). Return to Zapier and click Test trigger to verify data was received. Then click + to add an action, search for RSS by Zapier, and select Create Item in Feed.
4 - Map your fields and activate:
Map these fields from the webhook fieldData: Feed Title (your blog name), Feed URL (unique identifier like "my-webflow-blog"), Item Title (the name field), Item Content (your Rich Text field), Item Source URL (construct from your Collection template path + slug), and Pubdate (lastPublished or custom date). Click Test action, then Publish to activate. Copy your RSS feed URL from the action configuration.
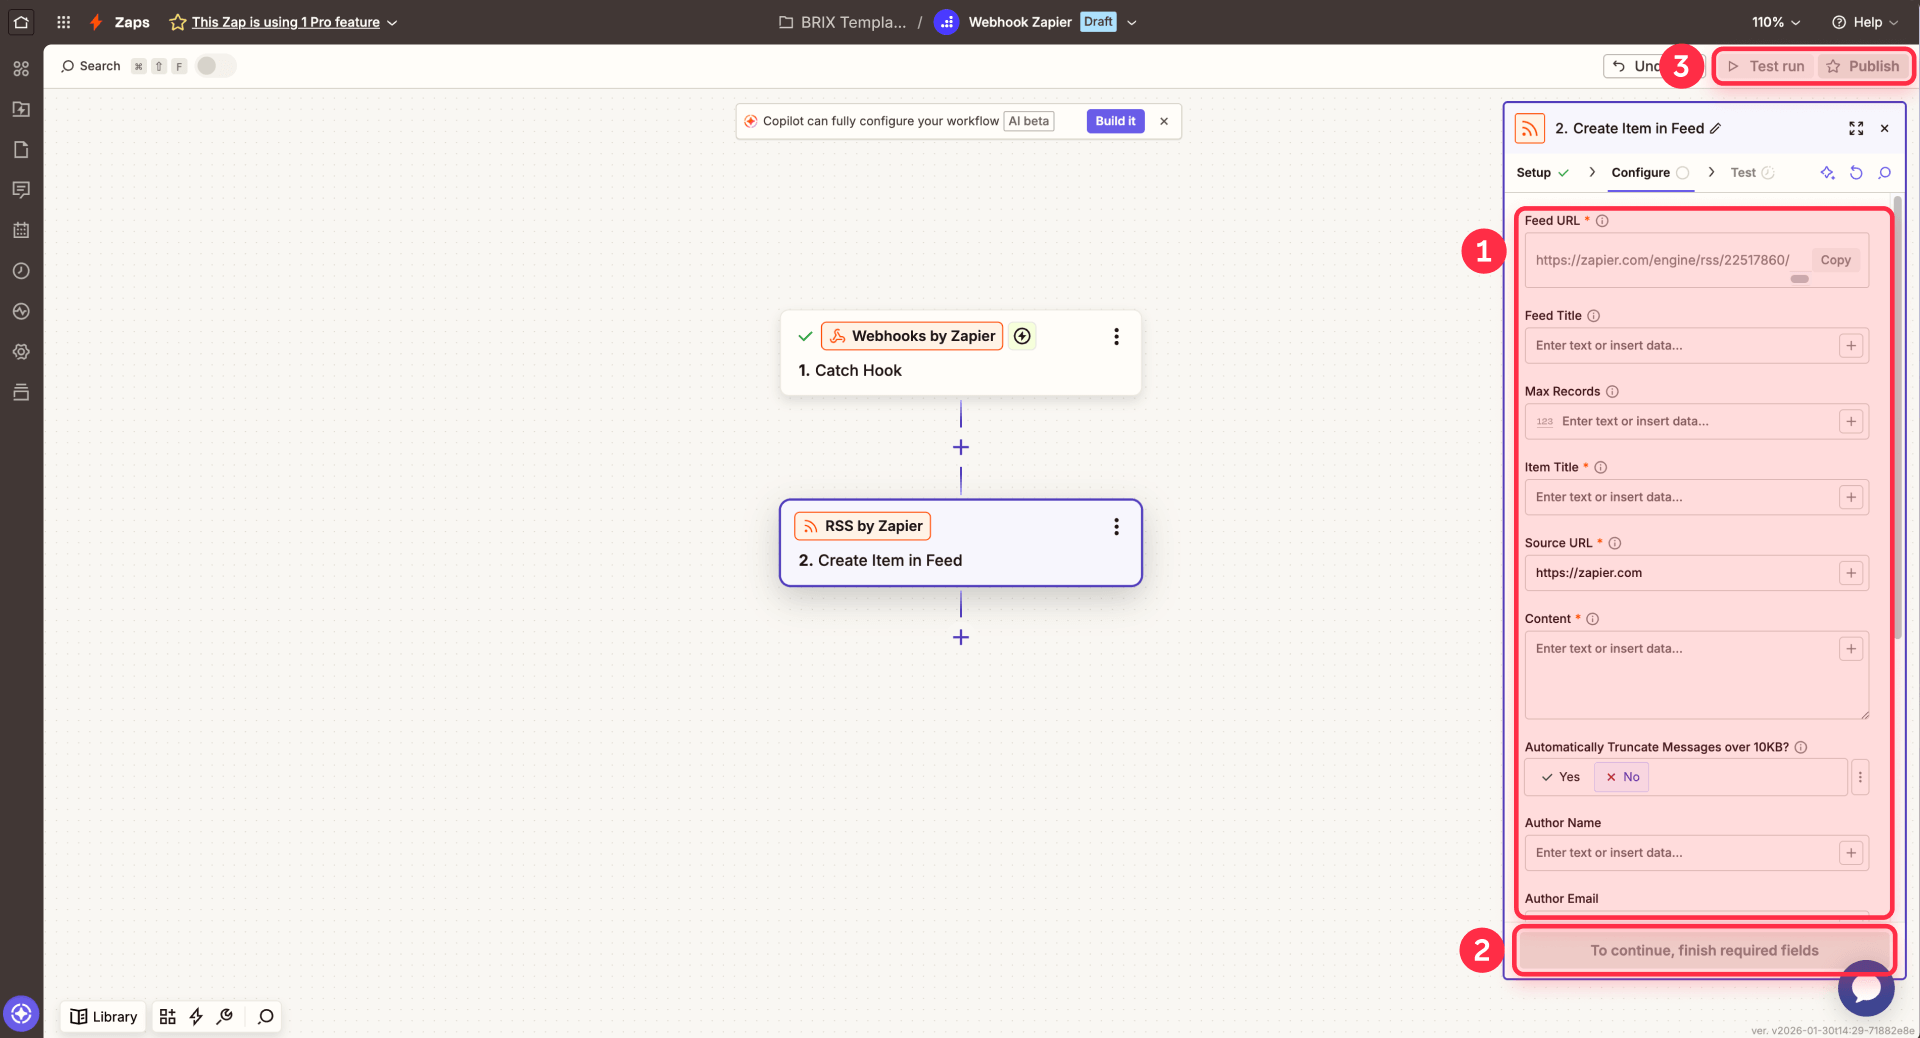
Note: Reference fields (like linked authors) arrive as IDs only. For actual referenced data, you may need an additional API call using Webflow's List Items endpoint.
Zapier RSS limitations and pricing
Technical limits (per Zapier documentation): maximum 50 items in the feed (older items drop off), 10KB per item (long articles may need truncating), feed data deleted after 14 days of inactivity, and items cannot be edited once added.
Pricing: Webhooks by Zapier requires a paid plan. Triggers don't count as tasks, but each action does—a multi-step Zap uses one task per action per run. See Zapier pricing for current rates.
Method 3: Custom enterprise Webflow RSS solutions
For organizations with needs beyond Zapier's capabilities, custom RSS automation solutions offer more flexibility and control.
When to consider a custom solution for Webflow RSS:
- High-volume publishing that exceeds Zapier's task limits
- Multiple Collections requiring coordinated RSS feeds
- Specific metadata requirements not covered by standard RSS specifications
- Need to avoid recurring per-task pricing
- Complex filtering or transformation of content before syndication
What custom implementations include:
Tailored RSS generators expose exactly the metadata you need without recurring automation costs. Solutions can include custom field mapping, multi-collection feeds, category filtering, and integration with your existing infrastructure.
Contact our Webflow agency to discuss your specific requirements and get a custom solution built for your workflow.
Troubleshooting common Webflow RSS issues
Here's how to diagnose and fix the most common problems you'll encounter with both native and Zapier RSS implementations.
- Feed is empty or shows an error in Webflow: Verify your site is published and your Collection has published items. Check that your URL uses the correct domain (not the website.com placeholder). Confirm RSS is enabled in your Collection template page settings by navigating to the settings cog and verifying the toggle is ON.
- Fields appear empty in your Webflow RSS feed: Check that all Collection items have the mapped fields filled with content. If using Same as SEO Title Tag or similar options, verify SEO settings are configured for each individual item. Empty fields in source items result in empty fields in the feed output.
- Editing a post makes it appear as "new" in Webflow RSS: This is documented Webflow behavior—updating and republishing a post can add it to the feed as new content. Be careful with RSS-to-email automations that might re-send old posts. Consider using a custom Date/Time field for "Original Publish Date" instead of the built-in Published On field.
- Zapier not receiving webhook data from Webflow: Verify the webhook URL in Webflow matches exactly what Zapier provided. Confirm you're using collection_item_published (not collection_item_created which fires for drafts too). Check that the webhook is enabled in Webflow's Site settings → Apps & integrations → Webhooks and ensure your Zap is published with the toggle showing ON.
- Rich Text content not appearing in Zapier RSS feed: Verify you mapped the correct fieldData field in Zapier's action configuration. Check the webhook data in Zap History to confirm Webflow is sending the Rich Text field. Very long content may be truncated due to the 10KB limit—enable auto-truncation in the RSS action settings if needed.
Frequently asked questions about RSS feeds in Webflow
Can I include full blog post content in my Webflow RSS feed?
Webflow's native RSS only includes title and summary fields, not your full Rich Text article content. To include complete articles in your feed, you need to use Webflow webhooks with Zapier RSS (Method 2 in this guide), which can access and include your entire Rich Text field. This requires a paid Zapier plan that includes Premium apps.
What's the difference between native Webflow RSS and Zapier RSS?
Native Webflow RSS is built-in and requires no external tools but is limited to title, description, date, link, and image fields. Zapier RSS requires a paid plan with Premium app access but can include full Rich Text content and custom fields. Choose native RSS for simple Feedly subscriptions or newsletter links; choose Zapier RSS when you need complete articles in your feed.
Why does editing a post make it appear as "new" in my Webflow RSS feed?
This is documented Webflow behavior. When you update and republish a post, it can appear in the feed as new content, potentially causing RSS-to-email tools to re-send old posts to subscribers. To avoid this, consider creating a custom Date/Time field for your original publication date rather than relying on the built-in Published On field.
Does Webflow RSS work with Mailchimp for automated newsletters?
Yes, both native Webflow RSS and Zapier RSS work with Mailchimp's RSS-to-email campaigns. Create an RSS campaign in Mailchimp, paste your feed URL, and configure your send schedule. Native RSS shows summaries with links; Zapier RSS can include full article content directly in the email.
Can I create a podcast RSS feed from my Webflow CMS?
Webflow's native RSS cannot support podcast distribution because it lacks enclosure tags and iTunes namespace metadata. While you can add enclosure fields using Zapier RSS, creating a fully compliant podcast feed for Apple Podcasts or Spotify requires additional metadata (GUIDs, artwork specs, categories, etc.) that goes beyond what's covered here. For serious podcast distribution, consider using a dedicated podcast hosting platform that handles all compliance requirements automatically.
Can I create separate RSS feeds for different blog categories in Webflow?
Native Webflow RSS creates one feed per Collection with no filtering options. If you need category-specific feeds, you'll need a custom solution. Options include creating separate Collections for each category (not ideal for most workflows) or building a custom RSS generator that filters items before adding them to specific feeds. For complex multi-feed requirements, our agency team can build custom solutions tailored to your content structure.
Conclusion
Creating RSS feeds from your Webflow CMS opens up powerful content distribution possibilities that work automatically every time you publish. Native Webflow RSS handles simple use cases like Feedly subscriptions and basic newsletter links in just five minutes when available. Webflow webhooks combined with Zapier RSS handle more complex needs—full-content newsletters and custom field syndication—though this requires a paid Zapier plan.
Start with native RSS if your needs are straightforward, then consider the webhook-to-Zapier approach when you need more control over what your feed contains. Both methods produce industry-standard RSS 2.0 feeds that work with virtually any automation tool or content platform.
For enterprise needs that exceed these solutions—high-volume publishing, complex multi-collection feeds, or custom metadata requirements—our Webflow development team can create tailored RSS solutions without recurring per-task costs.


Join readers commenting on this post!