Running LinkedIn ads without proper measurement means you can't accurately assess which campaigns generate leads and customers for your business.
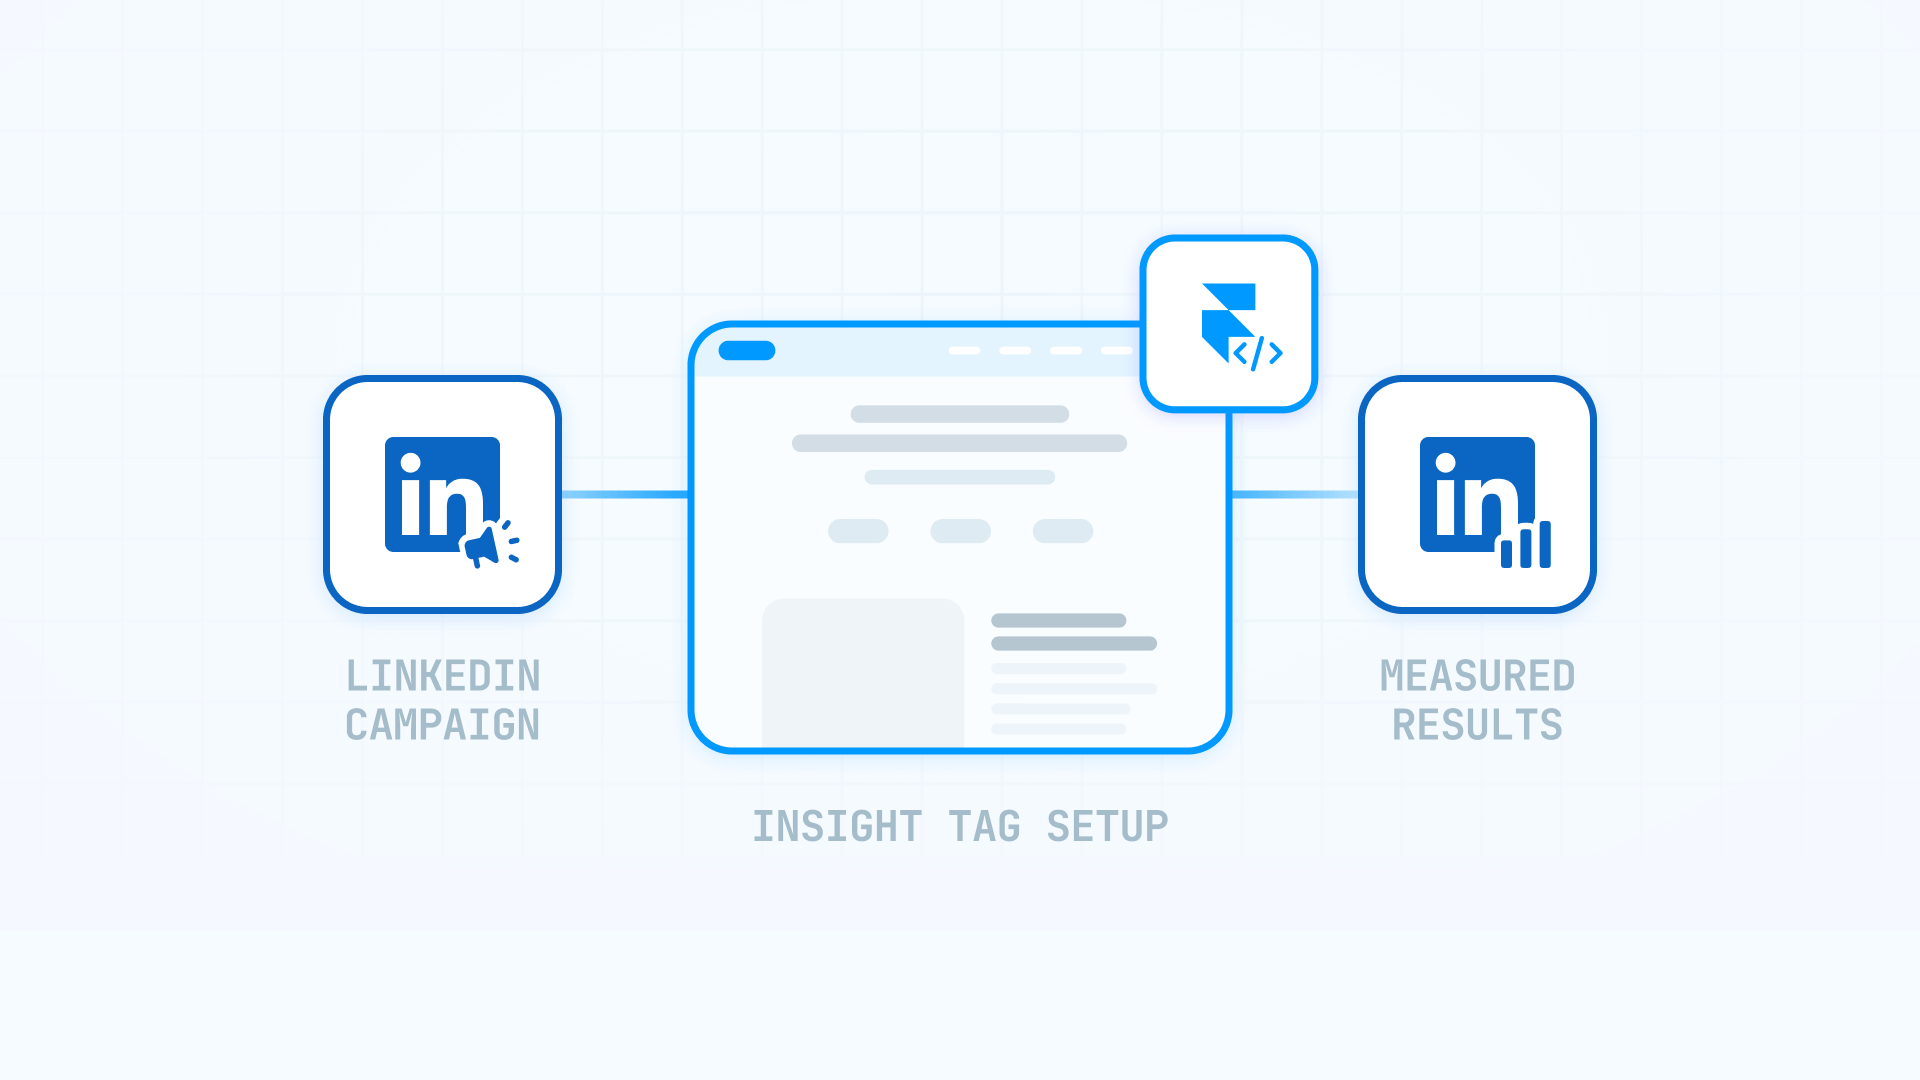
The LinkedIn Insight Tag connects your advertising performance directly to outcomes on your Framer website. When paired with conversion tracking, you'll see exactly which campaigns deliver results, which audiences are worth targeting, and how to allocate your budget for the best return.
This tutorial shows you how to add the LinkedIn Insight Tag to your Framer site and configure conversion tracking that delivers actionable performance data.
Why LinkedIn conversion tracking matters for Framer sites
Implementing proper tracking on your Framer site unlocks specific advantages for different marketing objectives:
- Lead generation for B2B companies: Discover which professional demographics and seniority levels submit contact forms, allowing you to refine audience targeting and improve lead quality through data-driven campaign adjustments
- Gated content and resource distribution: Measure downloads of industry reports, educational guides, and webinar signups to identify your most engaged professional segments and prioritize content that resonates
- Free trial and consultation booking: Connect ad interactions to trial registrations and demo bookings, revealing which messaging approaches and audience filters drive the most qualified prospects to take action
- Professional event promotion: Track webinar registrations and conference signups while creating retargeting pools of interested professionals who viewed your event pages but haven't committed yet
- Enterprise account targeting: Monitor how specific companies engage with your site across multiple touchpoints, track interactions from different decision-makers within target accounts, and adjust campaigns based on account-level insights
Understanding LinkedIn Insight Tag and conversion tracking on Framer
The LinkedIn Insight Tag is tracking code that creates a reporting bridge between your Framer website and your LinkedIn Campaign Manager account. It functions as a communication channel that tells LinkedIn when people from your advertisements visit your site and complete important actions.
After installation on your Framer site, the tag monitors every page view and relays that activity to LinkedIn. When someone clicks through from your LinkedIn advertisement and arrives at your site, LinkedIn can track their journey and report exactly what they accomplished—from casual browsing to form completions and purchases.
The system becomes powerful when you combine the base tag with conversion definitions. You specify which pages represent successful outcomes (typically confirmation pages that appear after form submissions), and LinkedIn automatically recognizes and reports these conversions in your Campaign Manager dashboard. This data enables you to make informed decisions about campaign performance and budget allocation.
1 - Setting up your LinkedIn Campaign Manager account for Framer tracking
Before adding tracking code to your Framer site, you'll need access to LinkedIn Campaign Manager and your unique tracking snippet.
Creating or accessing your LinkedIn Campaign Manager account for Framer
Follow these steps to access your advertising account and tracking tools:
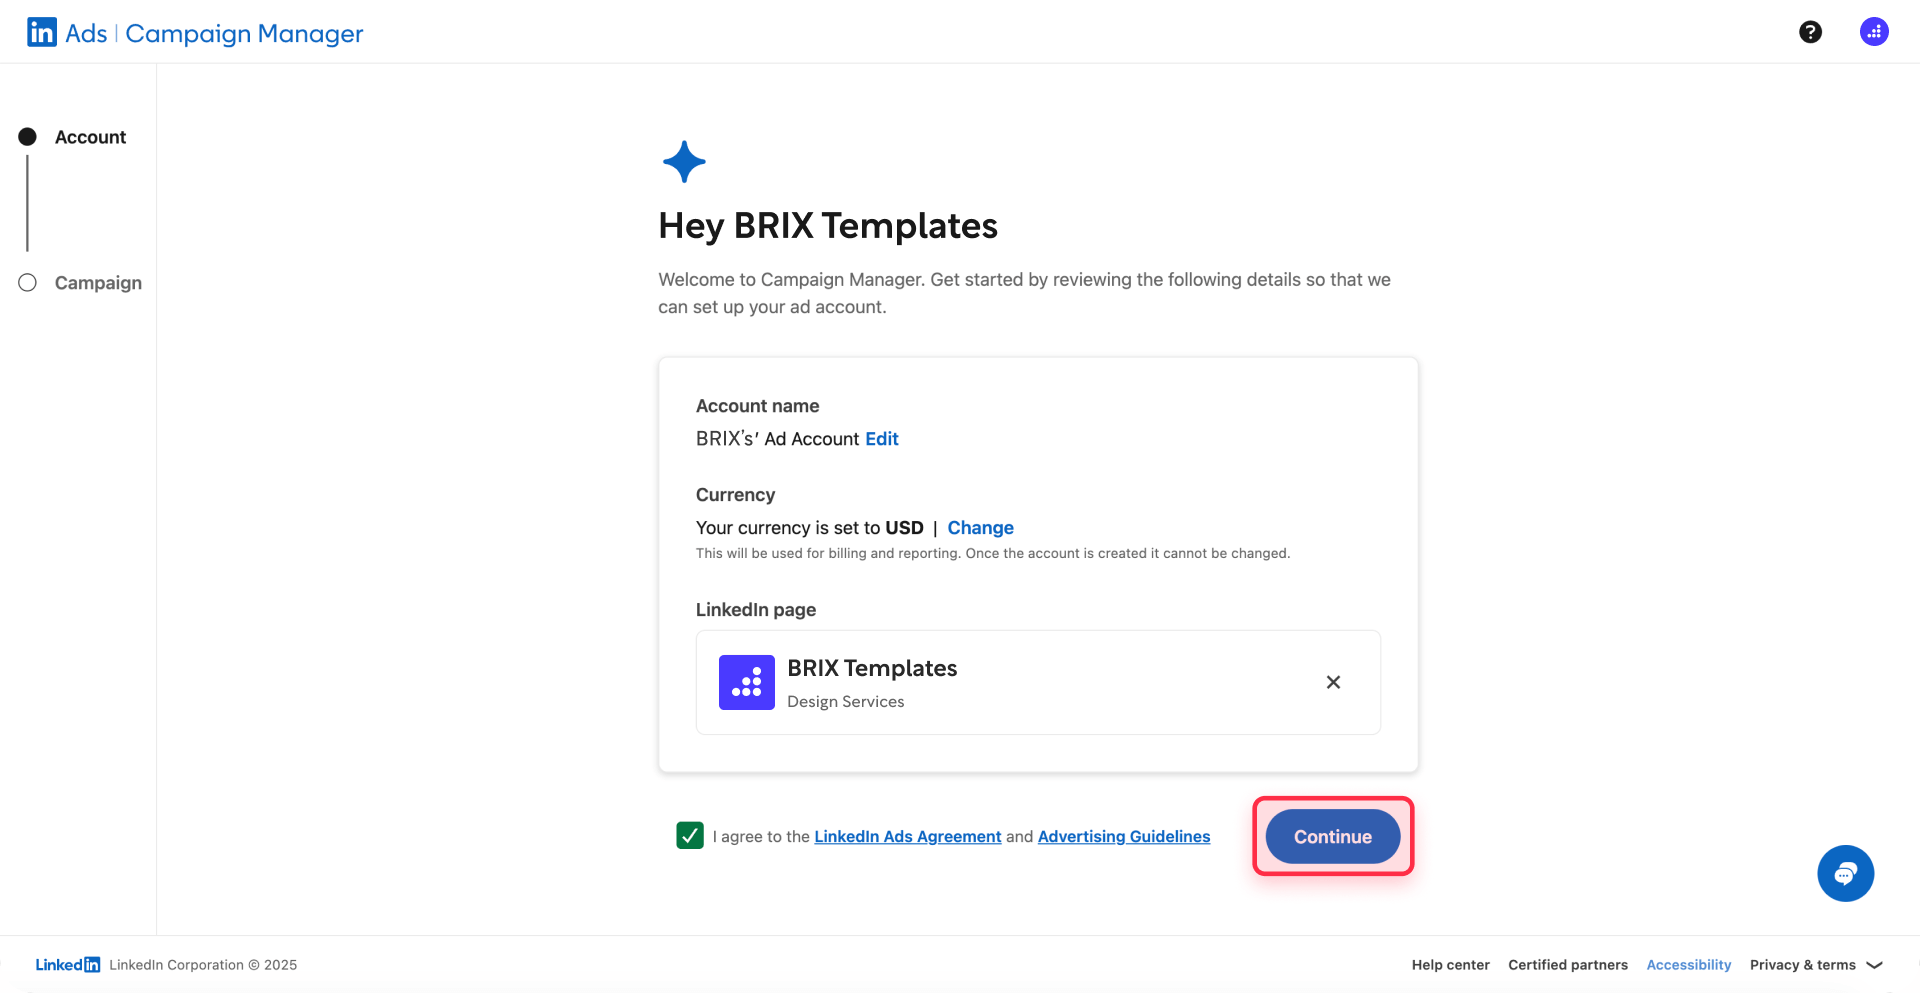
- Navigate to LinkedIn Campaign Manager: Visit linkedin.com/campaignmanager and log in using your LinkedIn credentials
- Select or create an account: Pick an existing advertising account from the dropdown menu in the upper-left corner, or click Create account if you're setting up your first campaign
- Verify account access: Confirm you have adequate permissions to access and modify account settings, as you'll need these rights to retrieve tracking code
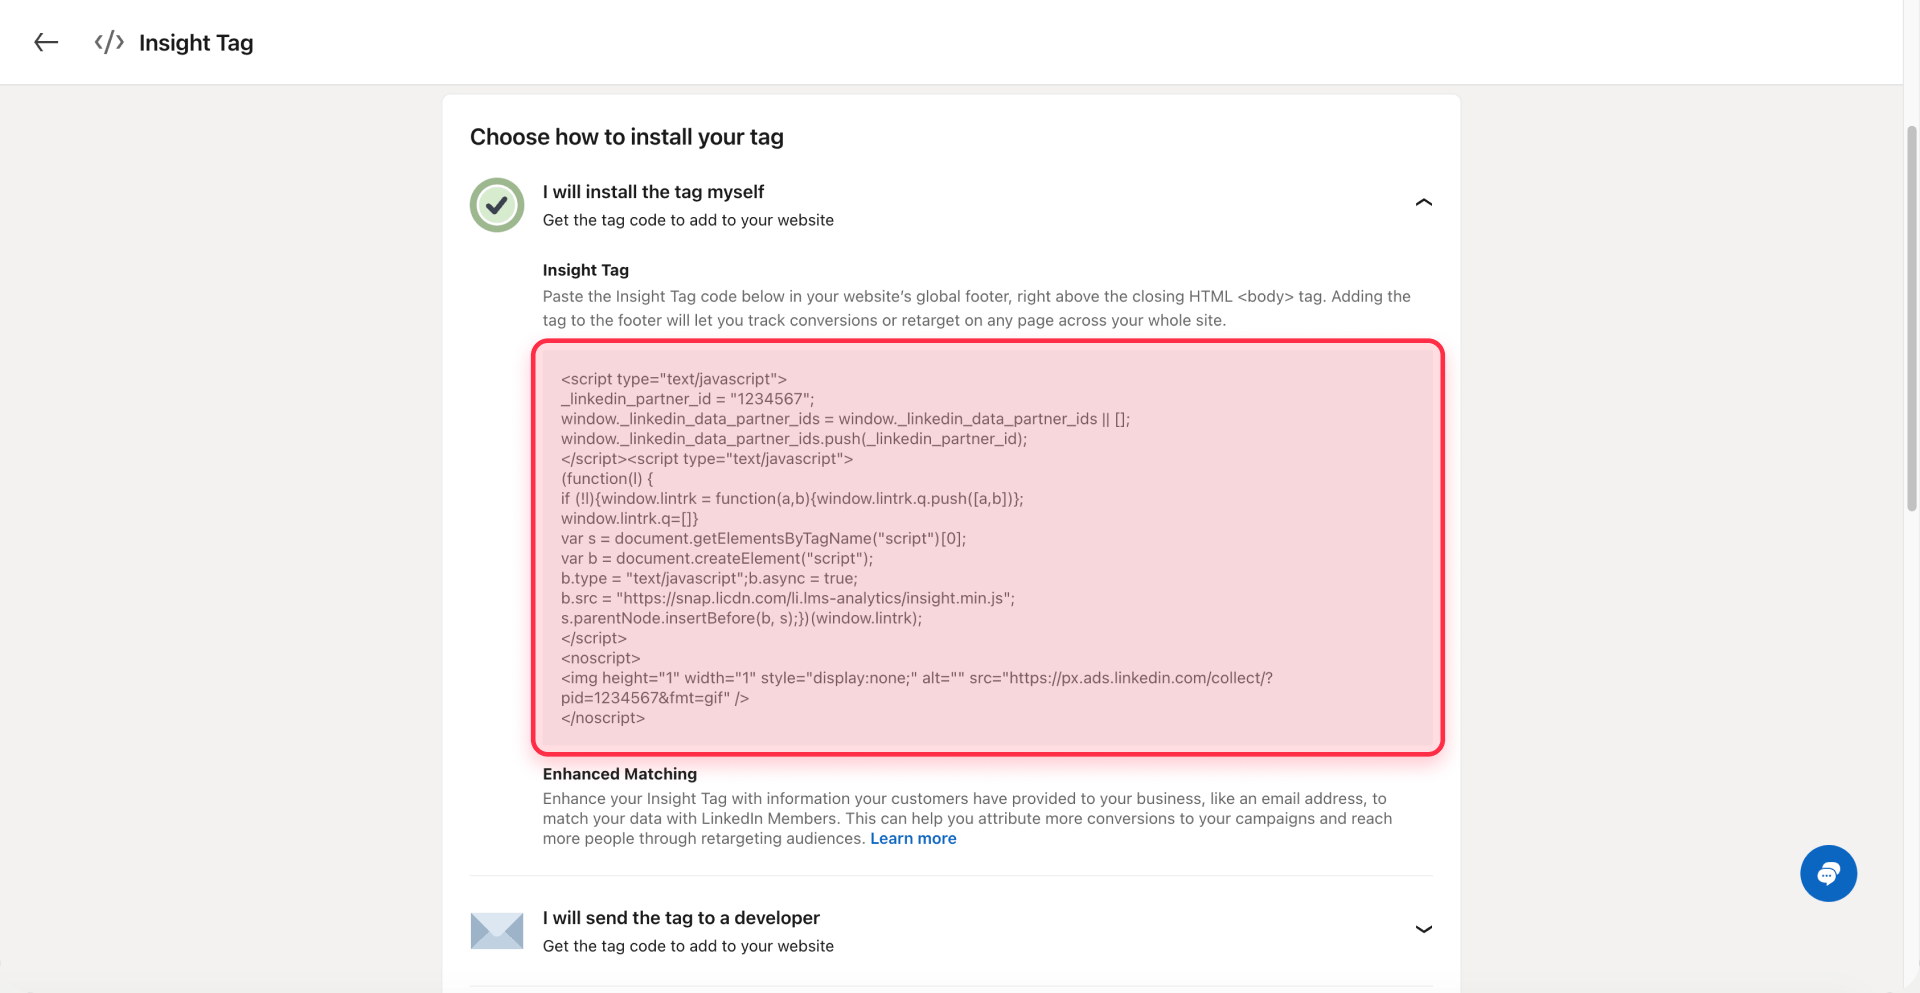
Generating your LinkedIn Insight Tag code for Framer installation
Once you're in Campaign Manager, obtain your tracking code:
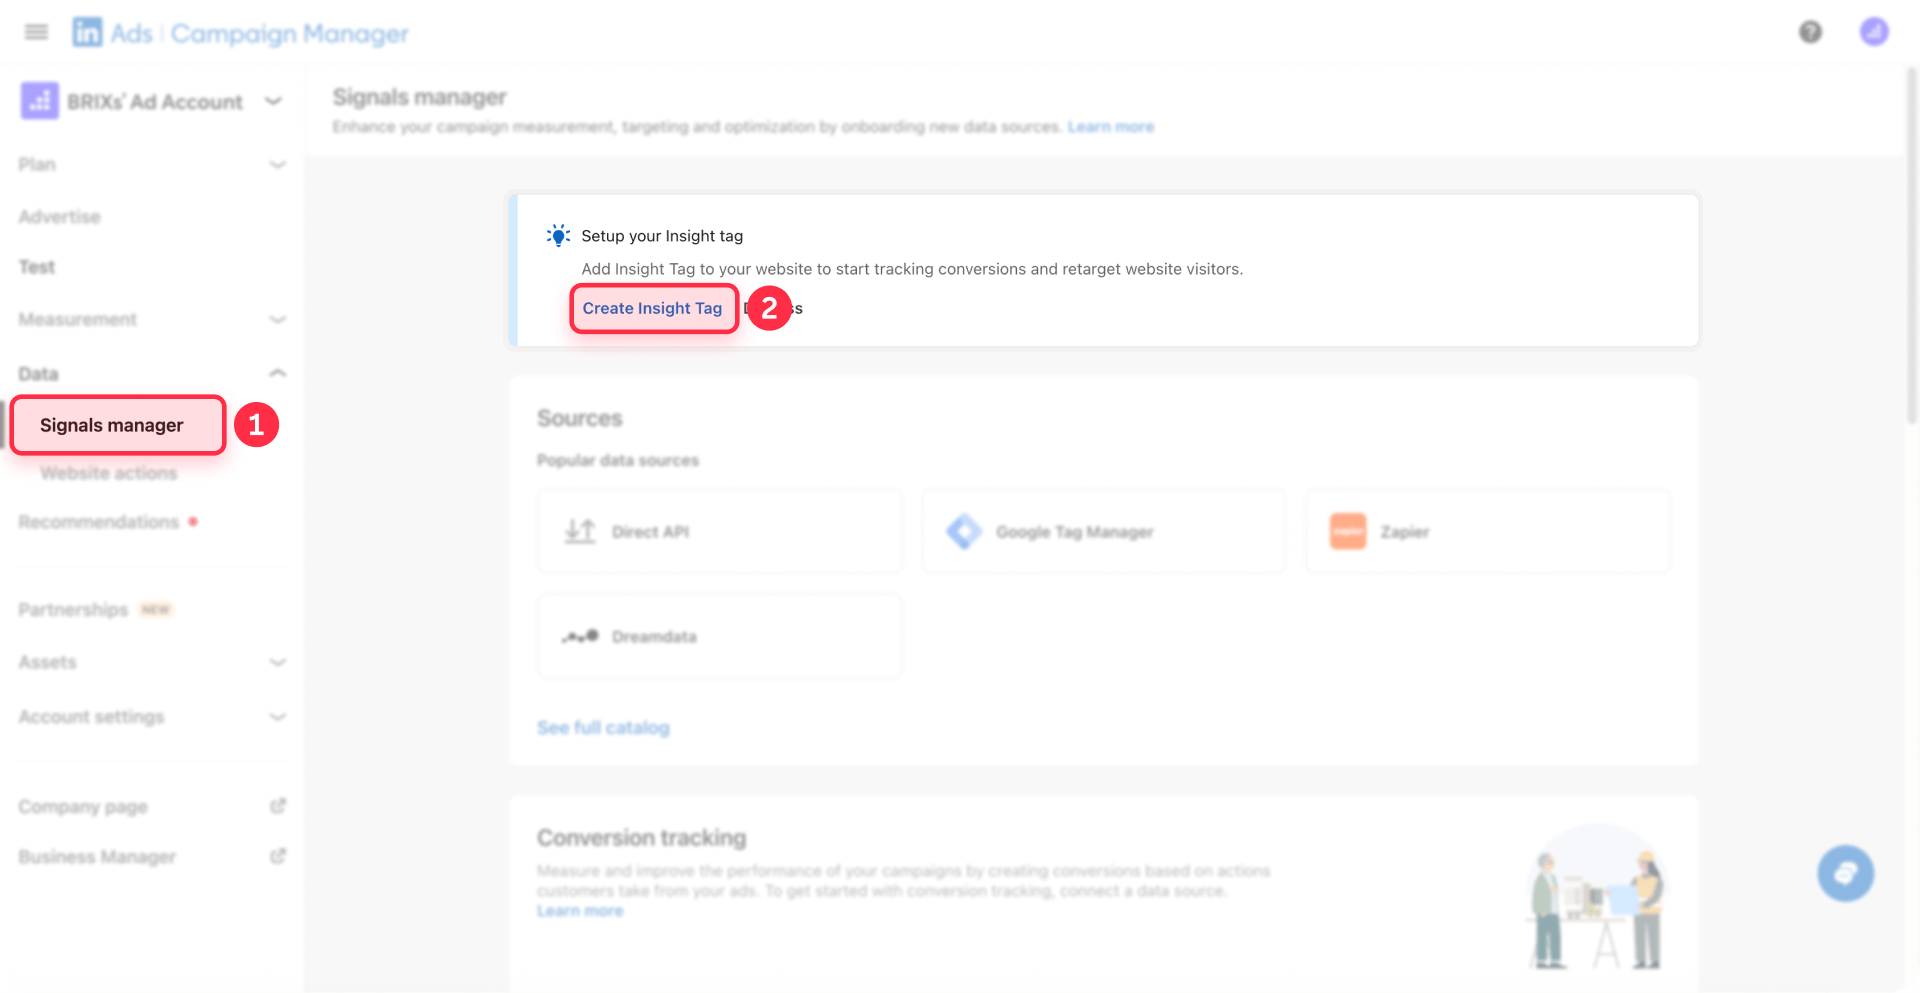
1- Access the Insight Tag section: Navigate to the Insight Tag settings in Campaign Manager. Note: Navigation may vary—look for Data > Signals manager > Insight Tag, or Analyze > Insight Tag, depending on your Campaign Manager interface version. If you don't see these options, contact LinkedIn support for guidance specific to your account.
2 - Create your tag if needed: If you haven't created an Insight Tag yet, click Create Insight Tag and follow the setup prompts
3 - Choose installation method: Select I will install the tag myself to display the complete tracking code
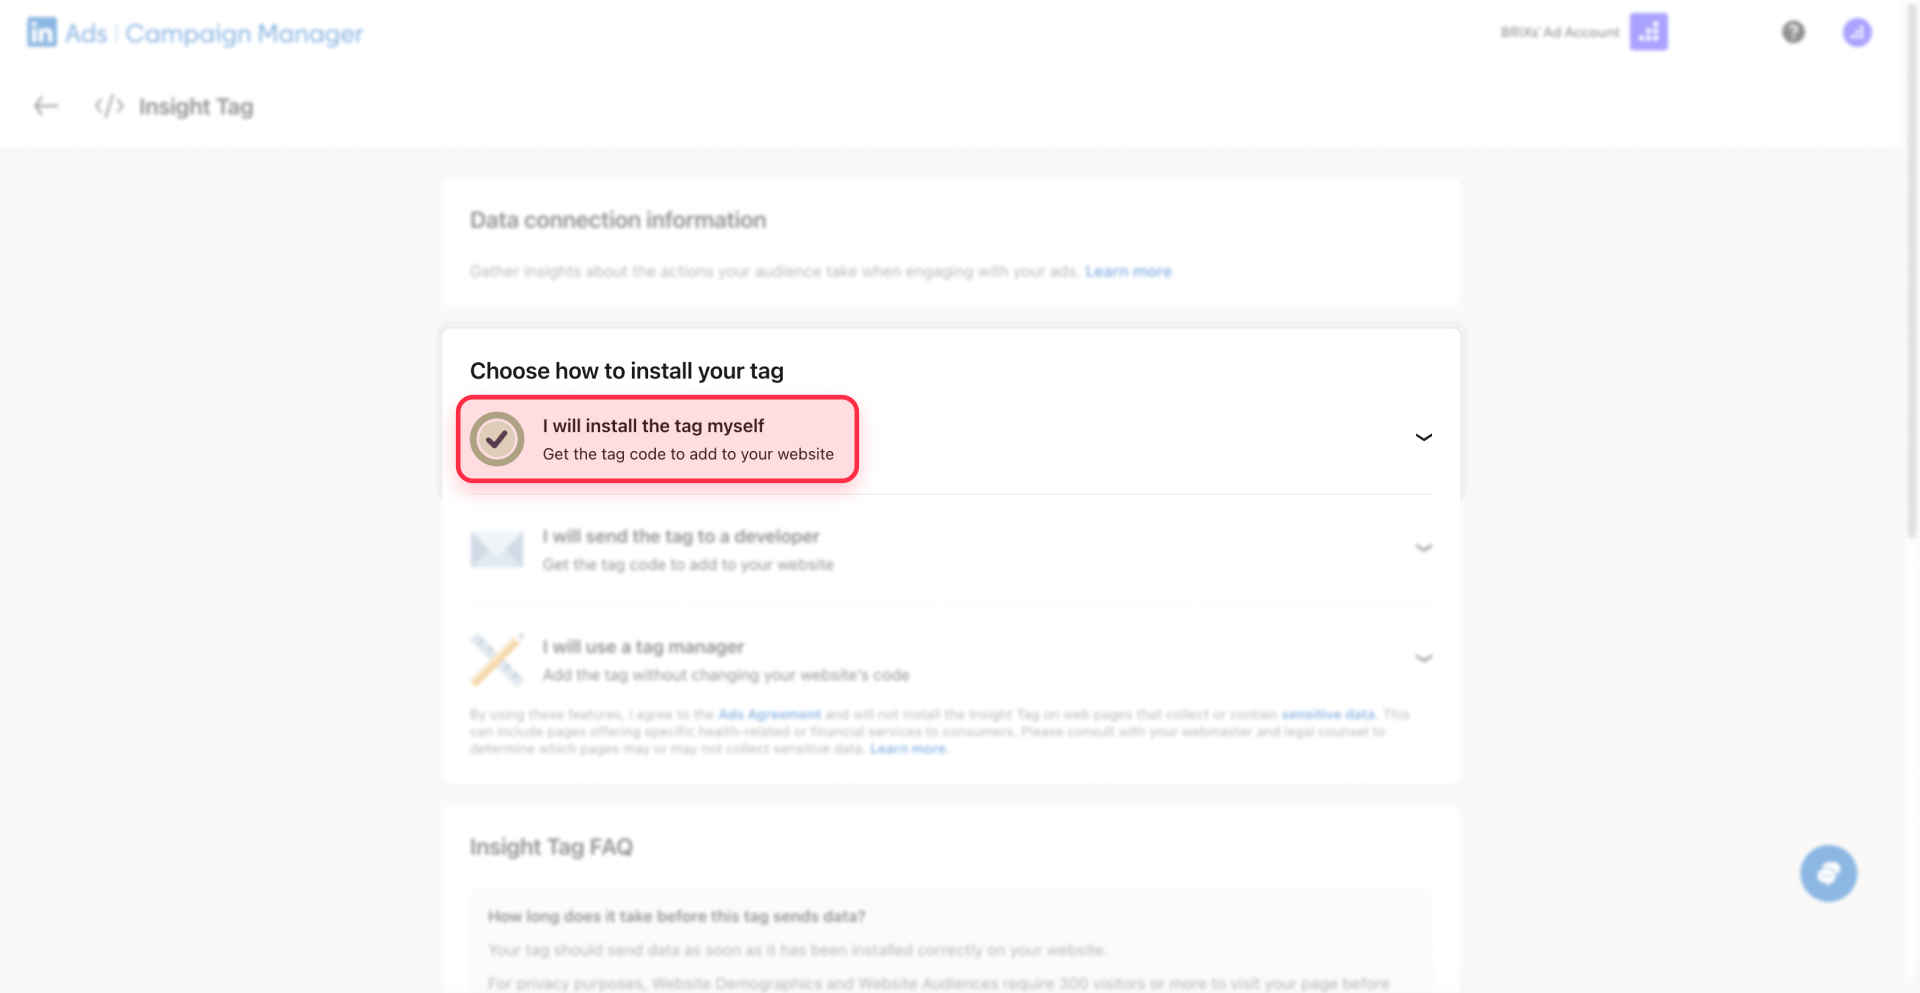
4 - Copy your tracking code: Hover over the code snippet and click to copy the full JavaScript block
5- Save your Partner ID: Find the line showing _linkedin_partner_id = "1234567"; and note this number for verification purposes
LinkedIn's free Insight Tag includes unlimited basic conversion tracking and works well for most Framer sites running professional B2B marketing campaigns.
2 - Installing the LinkedIn Insight Tag on Framer
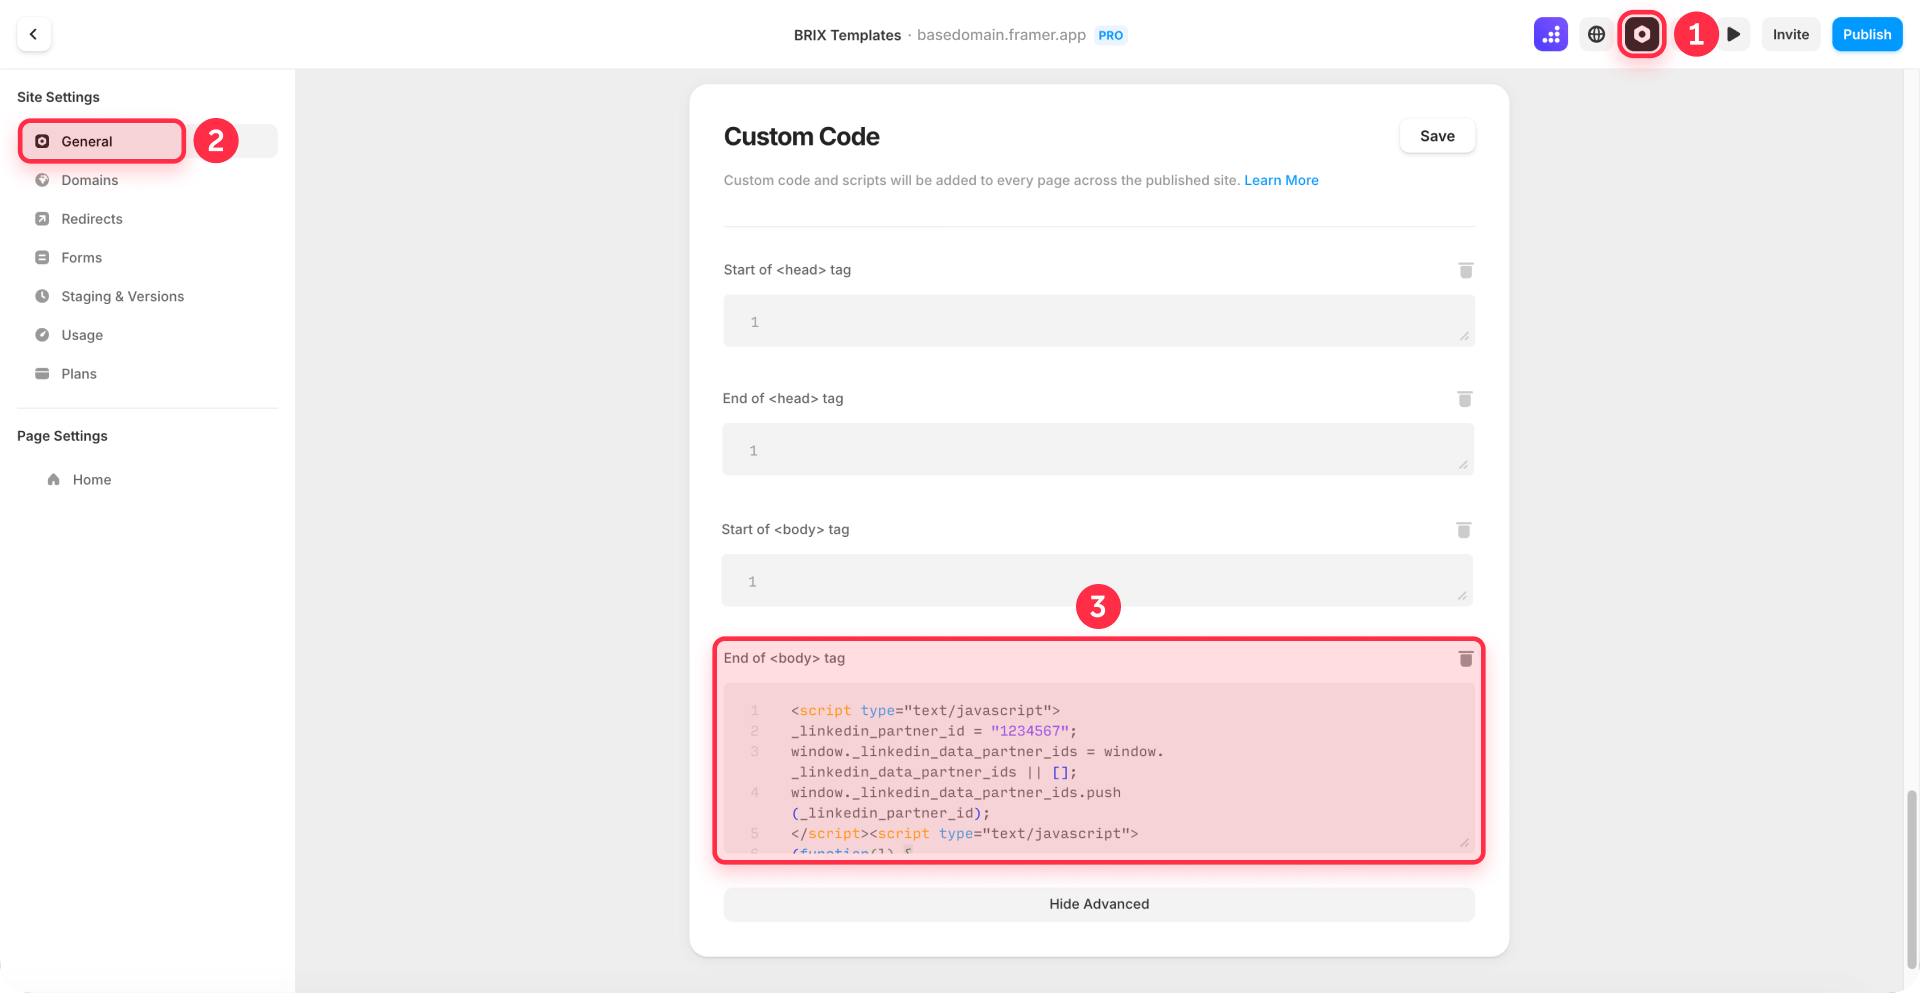
The LinkedIn Insight Tag should be added to your Framer site's custom code section to ensure it loads across all pages.
Adding LinkedIn Insight Tag code to your Framer site settings
Here's how to implement the tracking code across your entire Framer site:
- Access your Framer project: Log into your Framer account and open the project where you want to add LinkedIn tracking
- Open site settings: Navigate to Site Settings in your Framer project
- Navigate to custom code: Click the Custom code section in the settings menu
- Paste code in the end of body section: Locate the End of body section and paste your complete LinkedIn Insight Tag code
- Save your changes: Click Save to apply the code changes
- Publish your site: Click Publish in the top-right corner of Framer and deploy to your live domain
The tag will now fire on every page of your published Framer site, automatically monitoring page views and preparing your site for conversion measurement.
Verifying LinkedIn Insight Tag installation on your Framer site
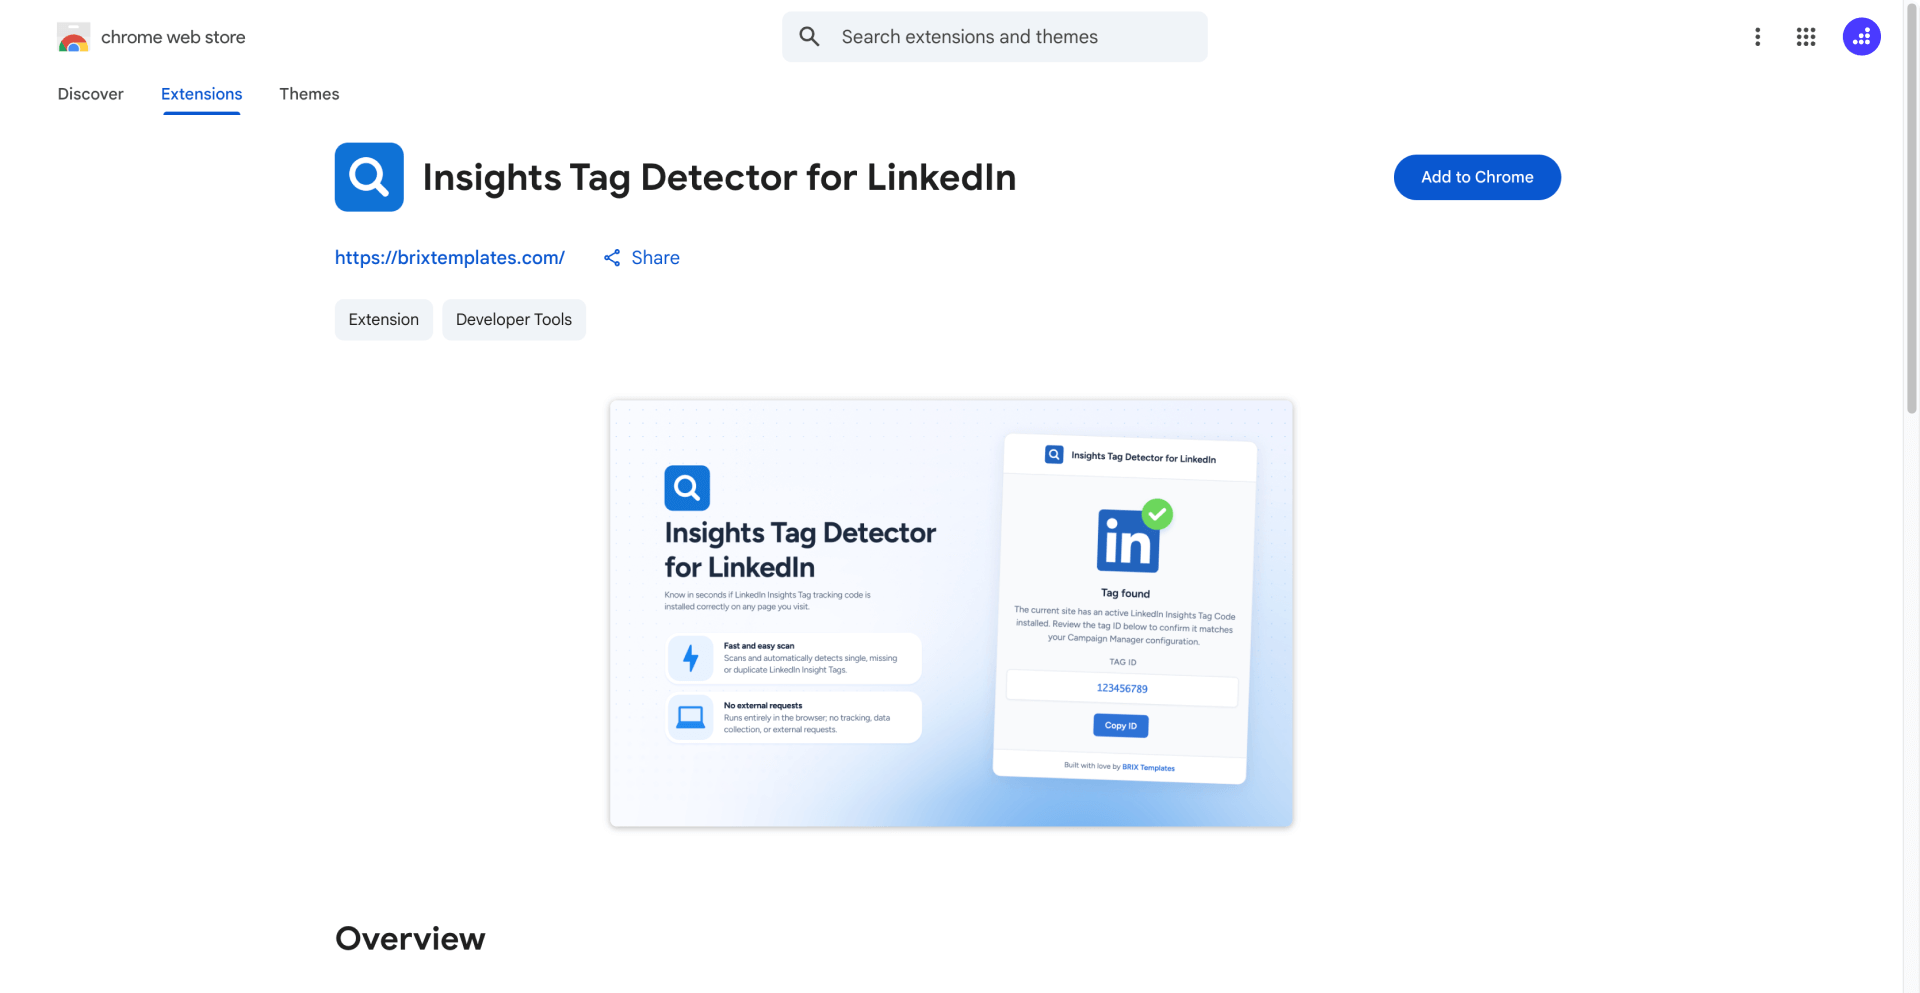
After publishing your Framer site with the LinkedIn Insight Tag, one convenient way to verify functionality is through a third-party Chrome extension, though LinkedIn Campaign Manager remains the authoritative source for confirmation.
Install the free Insight Tag Checker for LinkedIn extension from the Chrome Web Store. Once you've added it to your browser, visit your live Framer site and click the extension icon. It will immediately confirm whether the tag is active and display the Partner ID. Note: This is an unofficial third-party tool. Always verify tag status in LinkedIn Campaign Manager as the authoritative source.
For authoritative verification directly in LinkedIn Campaign Manager:
- Navigate to the Insight Tag section: Go to your Insight Tag settings (path may vary: Data > Signals manager > Insight Tag, or Analyze > Insight Tag)
- Check your domains list: Your published domain should appear under the Insight Tag
- Verify Active status: The tag status should display as Active once LinkedIn receives traffic from your site
Domains can appear in 5-10 minutes after a page view, but the tag typically displays as Active within 24 hours, depending on your site's traffic volume.
3 - Creating confirmation pages in Framer for conversion tracking
Confirmation pages serve as clear indicators that visitors have completed desired actions, making them ideal endpoints for conversion measurement.
Designing effective confirmation pages in Framer for LinkedIn conversions
Build dedicated confirmation pages for each conversion type you want to measure:
- Add a new page to your Framer project: Click the + icon in the pages panel
- Name your confirmation page descriptively: Use clear names like thank-you-demo-request, thank-you-whitepaper, or thank-you-contact that identify the conversion action
- Set a clean URL slug: In Page Settings, configure the slug to match your page name (example: /thank-you-demo-request)
- Hide from search engines: In Page Settings, toggle Show page in search engines to off (this adds noindex to prevent search engine indexing)
- Design your confirmation message: Include a clear heading acknowledging the action (example: "Thanks for booking your demo!"), outline what happens next and expected timelines, and optionally add relevant resources or related content
Keep these pages accessible only through form submission flows and avoid linking them in your primary navigation, ensuring visitors only reach them by completing conversions.
Configuring Framer form redirects to confirmation pages for LinkedIn tracking
Set up your Framer forms to direct users to confirmation pages after submission:
- Select your form element: Click on the form you want to track in the Framer canvas
- Open form properties: Find the Properties panel on the right side
- Set the redirect URL: In the Redirect field, enter your confirmation page URL (example: /thank-you-demo-request)
- Test the form submission: Submit a test entry to verify the redirect functions correctly and you arrive at the confirmation page
- Repeat for all forms: Configure redirects for every form you want to measure, using separate confirmation pages for different conversion types
This method works for native Framer forms. If you're using external form providers, configure their redirect settings to point to your Framer confirmation pages.
4 - Setting up LinkedIn conversion tracking for Framer confirmation pages
With the Insight Tag installed and confirmation pages created, you can now establish conversion tracking in LinkedIn Campaign Manager.
Creating page visit conversions in LinkedIn Campaign Manager for Framer
Page visit conversions monitor when visitors arrive at specific URLs on your site. Follow this 3-step process:
Step 1: Settings
1 - Navigate to conversion tracking: In Campaign Manager, click Measurement in the left navigation menu, then select Conversion tracking. Click the Create conversion button
2 - Select conversion type: Choose Insight Tag conversion from the dropdown options
3 - Name your conversion: Enter a clear name like "Demo Booking" or "Guide Download"
4 - Select conversion category: Choose the relevant category such as Lead, Download, or Sign up
5 - Set conversion value (optional): Enter the monetary value if you track revenue per conversion
6 - Choose conversion window: Set timeframes for tracking. Standard settings are 90 days for clicks and 90 days for views
7 - Select attribution model: Choose Last Touch - Each ad set (recommended for most B2B campaigns)
9 - Click Next step: Proceed to source configuration
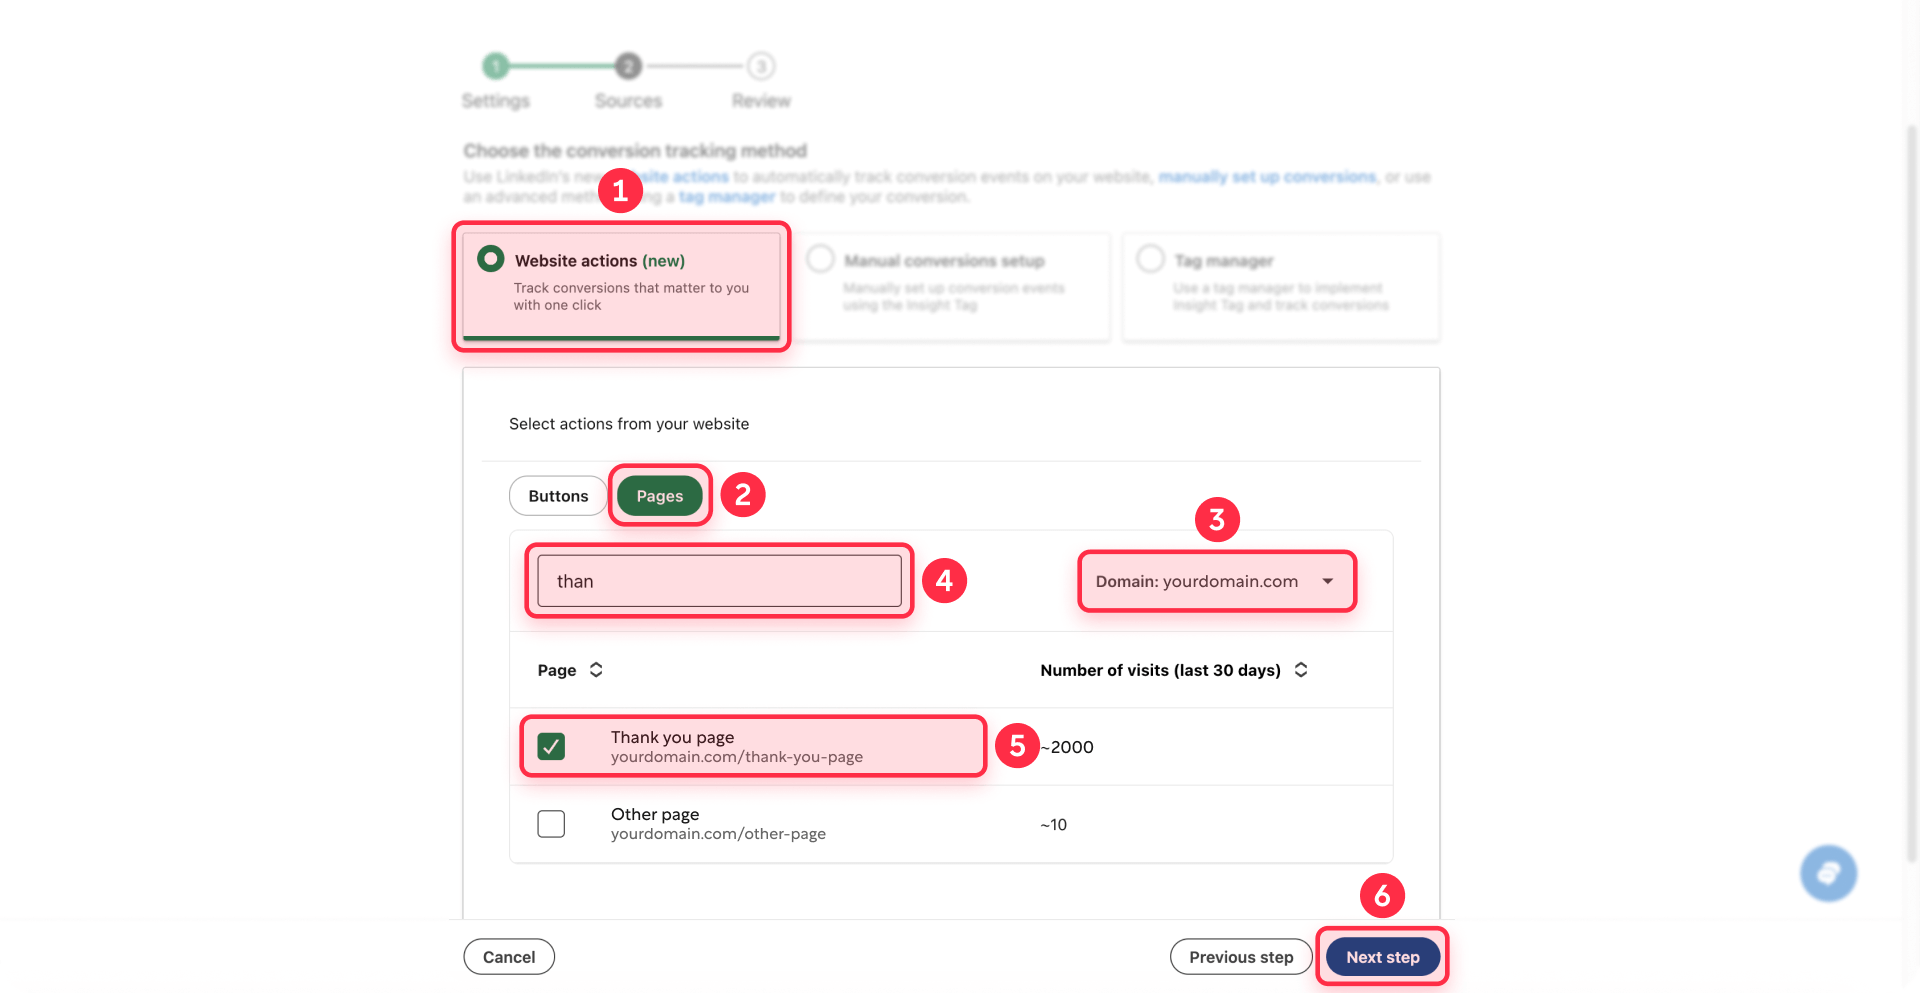
Configuring URL rules for confirmation page tracking in Framer
After completing the initial settings, configure which pages should register as conversions:
- Click Next step to proceed to the Sources configuration
- Select your domain: Choose your Framer site domain from the Domain dropdown menu (example: brixtemplates.com)
- Choose between Buttons or Pages: Click the Pages tab to track page visits (not Buttons)
- Search for your confirmation page: Use the search box to filter pages. For example, type "than" to find pages containing "thank-you"
- Select your confirmation page: Check the box next to your confirmation page from the list. LinkedIn shows the number of visits in the last 30 days to help you identify the right page
- Review the selection: The selected page will show with a checkmark. You can select multiple confirmation pages if needed
Note: If you don't see your confirmation page in the list, ensure:
- Your Insight Tag is installed and showing as Active
- Your confirmation page has received at least one visit in the last 30 days
- You've published your Framer site (not just saved in the Editor)
7 - Click Next step: Proceed to the Review page
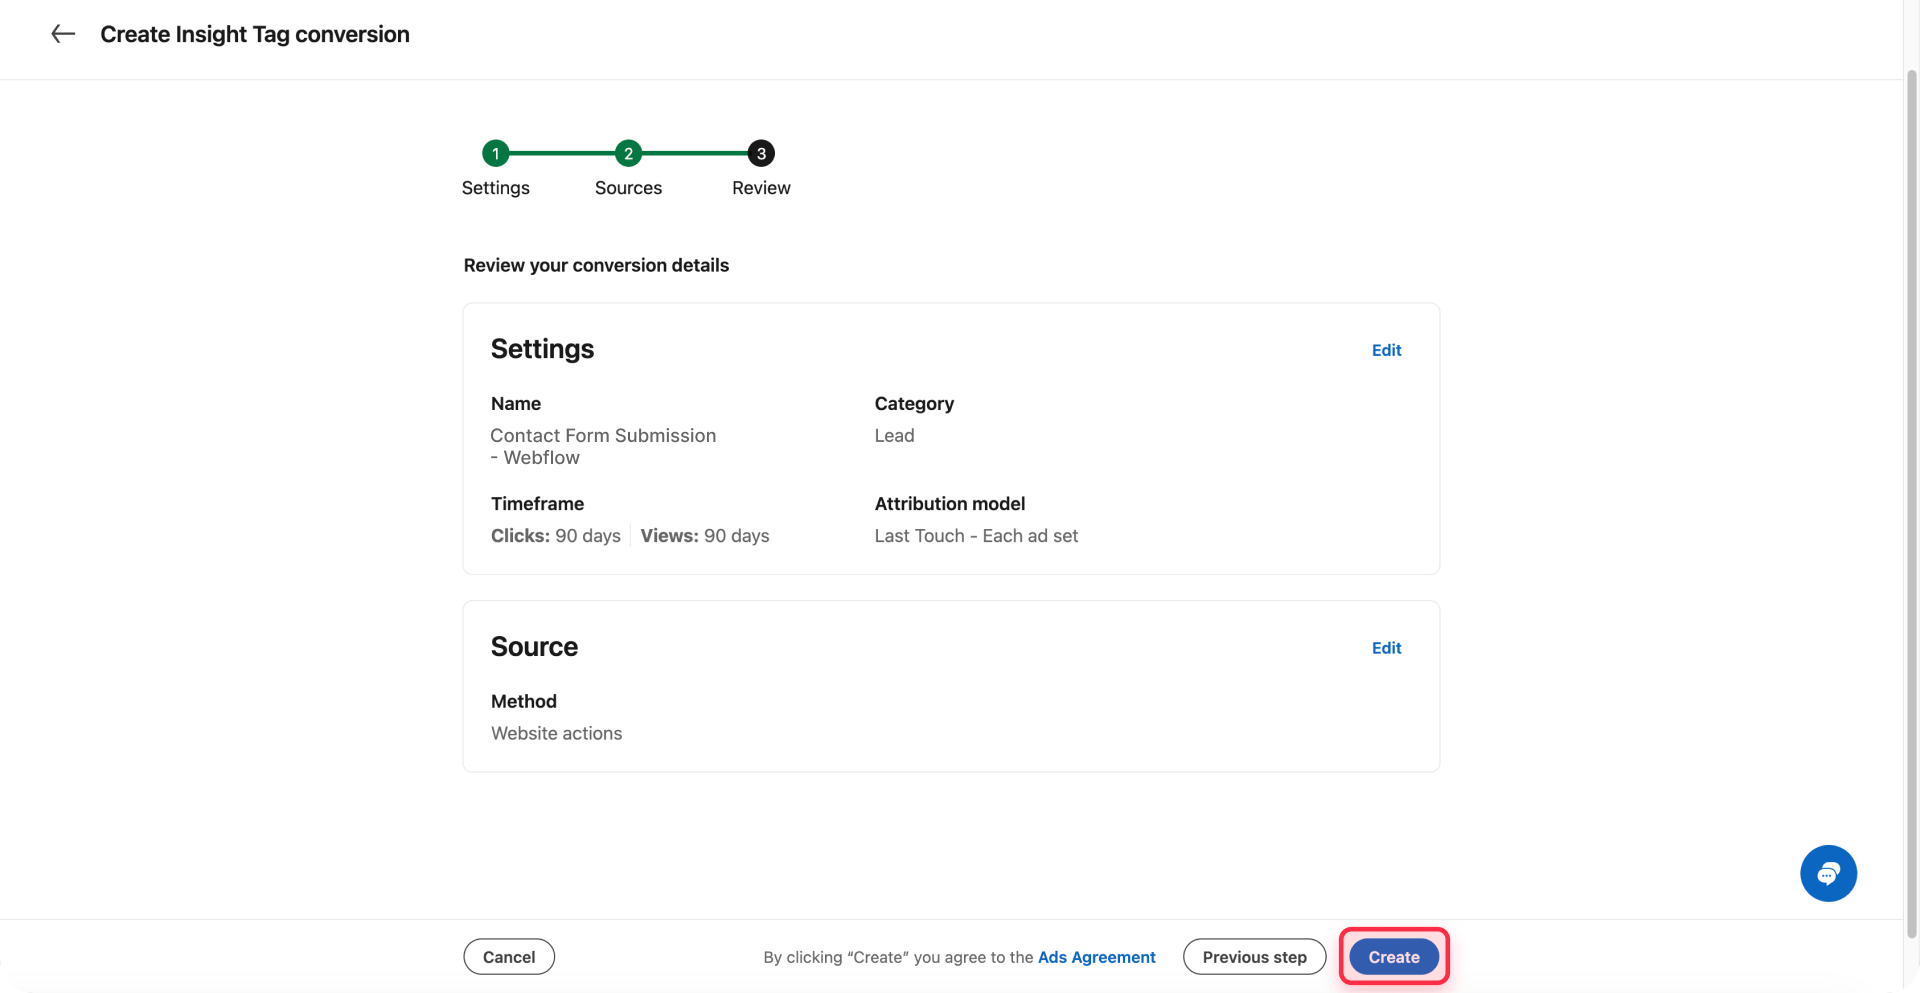
8 - Review your conversion details: Verify all settings including:
- Name: Your conversion name
- Category: The conversion type (Lead, Download, etc.)
- Timeframe: Click and view-through windows
- Attribution model: Your selected attribution method
- Method: Should show "Website actions"
- Selected pages: Your confirmation page(s)
9 - Click Create: Your conversion is now active and will begin tracking when visitors reach your confirmation pages
Your conversion is now live and will begin recording when visitors from your LinkedIn ads reach the designated confirmation pages.
Testing and verifying LinkedIn conversion tracking on Framer
Thorough testing confirms your conversions record accurately before launching live campaigns.
Testing LinkedIn conversions on your Framer site
Follow this verification process to validate tracking functionality:
- Clear your browser cookies: Open an incognito or private browsing window to simulate a fresh visitor
- Visit your Framer site: Navigate to the page containing your tracked form
- Complete and submit the form: Fill out all mandatory fields and submit the form
- Confirm confirmation page redirect: Verify you land on the intended confirmation page
- Wait for processing: Conversion data may take 5-30 minutes to surface in Campaign Manager
Avoid testing directly from a LinkedIn ad click for your initial test, as this can distort data. Instead, complete a direct form submission first to validate the technical implementation.
Checking conversion status in LinkedIn Campaign Manager for Framer
Verify your conversion is collecting signals:
- Navigate to conversion tracking: Go to Measurement > Conversion tracking in Campaign Manager
- Find your conversion: Locate the conversion you just established in the list
- Check the Status column: Look for the status indicator, which should display Active once LinkedIn receives a signal. Domains can surface in 5-10 minutes after a page view, but tag activation may require up to 24 hours depending on traffic
- View your domains: Check the Insight Tag settings to see when your Insight Tag last transmitted data
If the status stays Unverified after 24 hours and multiple test conversions, consult the troubleshooting section below.
Troubleshooting common LinkedIn Insight Tag issues on Framer
Tag shows as "Unverified" after 24 hours: Check that you copied the complete code from Campaign Manager without modifications, verify the code is in the End of body section, ensure straight quotes weren't changed to curly quotes during copy/paste, and confirm your site is published (not just saved in the Editor).
"No website actions found" message: This appears when your Insight Tag hasn't collected enough data yet. Ensure your tag shows as Active in your Insight Tag settings, verify you have traffic on your site in the last 30 days, and wait 24-48 hours after tag installation for LinkedIn to detect actions on your site.
Conversions not recording despite Active tag: Verify your confirmation page URL exactly matches the URL rules in your conversion settings, test that forms redirect properly to confirmation pages, and confirm conversions are attached to active campaigns in Campaign Manager.
Wrong Partner ID appears: If you manage multiple LinkedIn ad accounts, navigate to the correct Campaign Manager account's Insight Tag settings and verify the Partner ID in your Framer code matches the one shown there.
Frequently asked questions about LinkedIn Insight Tag on Framer
How do I install LinkedIn Insight Tag on Framer?
Copy the tracking code from LinkedIn Campaign Manager, navigate to your Framer project's Site Settings > Custom code section, paste the code in the End of body area, then save and publish your site. The tag will automatically track all visitors across your site.
How long does it take for LinkedIn Insight Tag to activate?
The tag typically shows as Active in LinkedIn Campaign Manager within 24 hours after installation, though domains may appear in 5-10 minutes after the first page view. Activation time depends on your site's traffic volume.
Can I track form submissions with LinkedIn Insight Tag on Framer?
Yes. Create confirmation pages in Framer, configure your forms to redirect to these pages after submission, then set up Page visits conversions in LinkedIn Campaign Manager using your confirmation page URLs to track form submissions.
Do I need a paid Framer plan to use LinkedIn Insight Tag?
You can add custom code on Framer's Free plan for testing, but publishing with a custom domain (required for professional tracking) needs at least a Basic plan at $5/month when billed annually.
Why isn't my LinkedIn Insight Tag tracking conversions?
Common causes include: confirmation page URLs not matching your conversion rules exactly, the tag showing as Unverified instead of Active, forms not redirecting properly to confirmation pages, or conversions not being attached to active campaigns in Campaign Manager.
Conclusion
Installing the LinkedIn Insight Tag on your Framer site and setting up conversion tracking provides the measurement infrastructure needed to run effective LinkedIn advertising campaigns. With conversion data flowing into Campaign Manager, you can identify which audiences generate results, refine campaigns based on actual outcomes, and demonstrate clear ROI from your LinkedIn advertising investment.
The installation process typically takes less than 30 minutes for most users. Once configured, the conversion data enables informed decisions about targeting, messaging, and budget allocation. LinkedIn's Insight Tag uses first-party cookies for enhanced tracking reliability, and you can later add LinkedIn's Conversions API for server-side event tracking and improved measurement accuracy.
Need help with advanced tracking configurations, custom conversion strategies, or integrating LinkedIn data with other analytics platforms? Our Framer development team specializes in measurement implementations that capture accurate data and drive campaign optimization.


Join readers commenting on this post!