
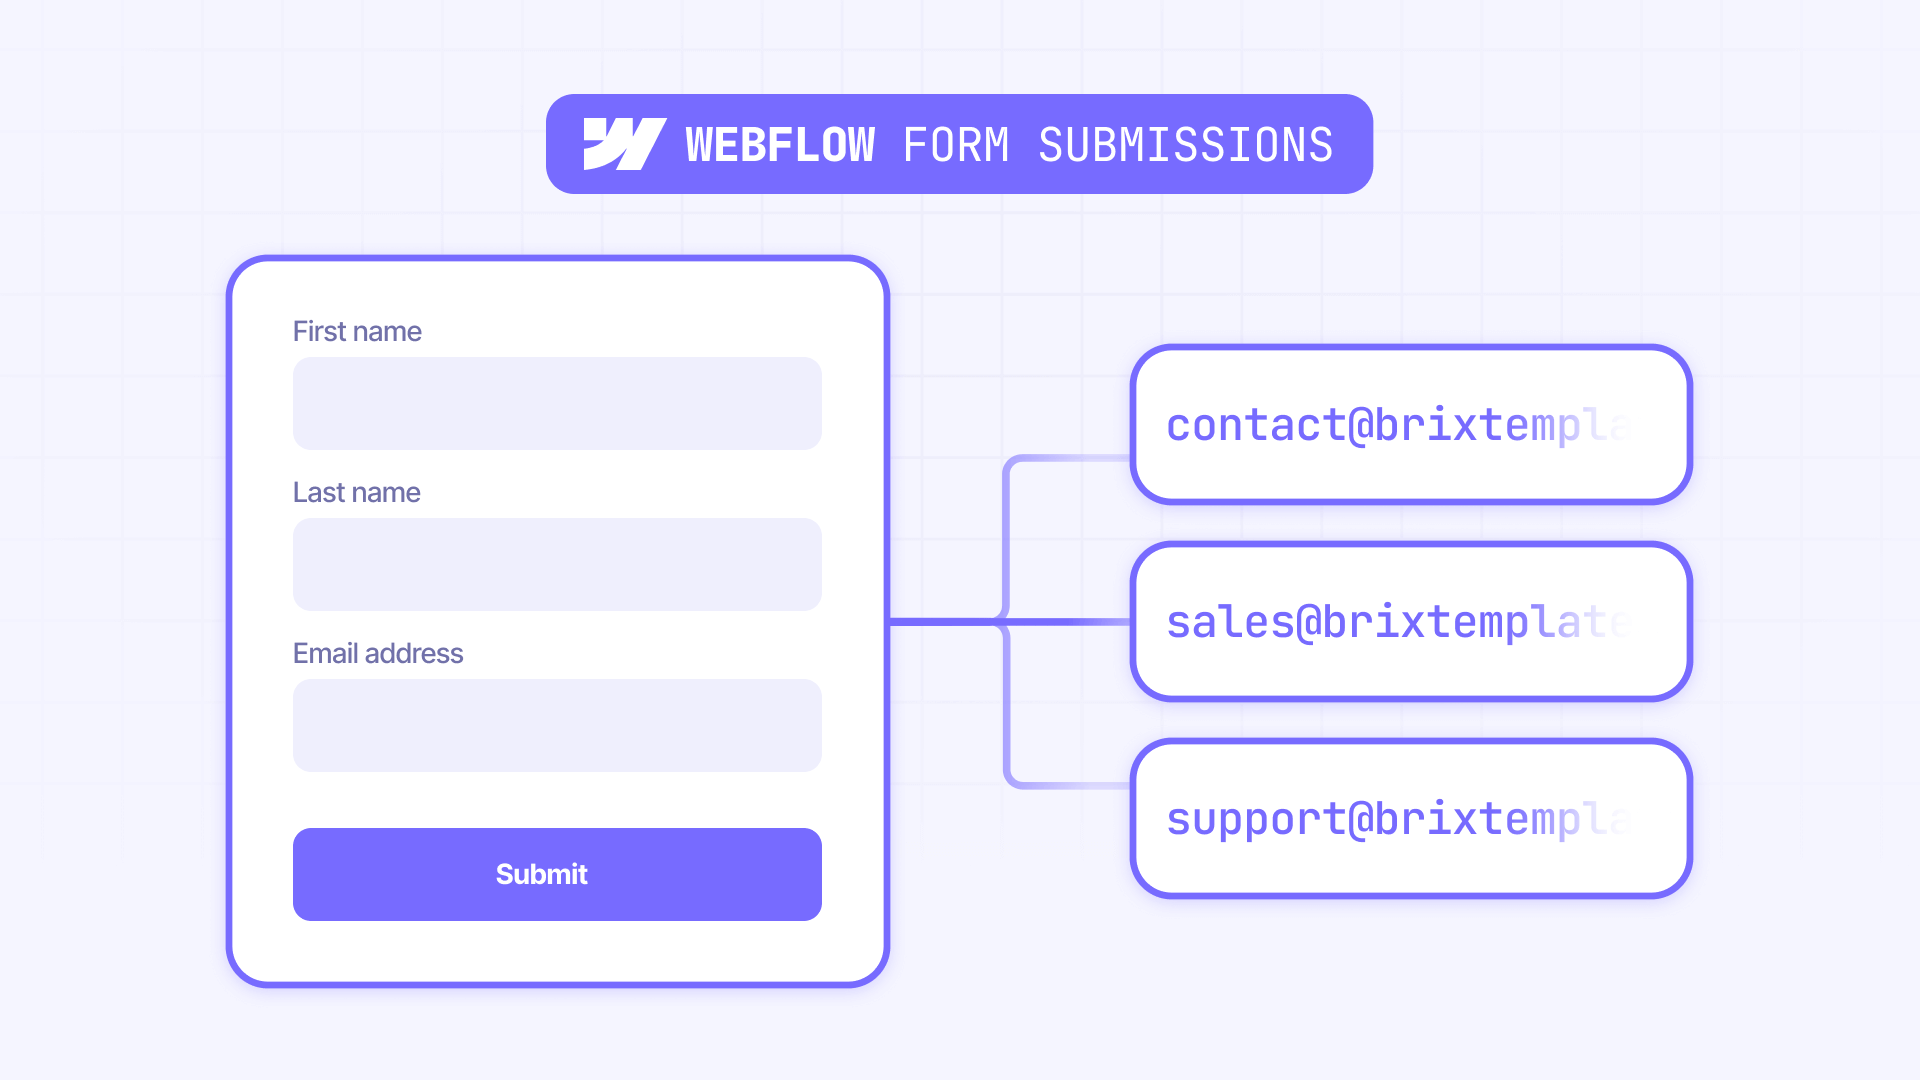
Managing form submissions effectively is crucial for any business website. When different departments need to receive specific forms—sales inquiries to the sales team, support requests to customer service, and job applications to human resources—routing becomes essential. Without proper setup, important submissions can get lost, responses may be delayed, and opportunities can slip away.
In October 2025, Webflow introduced form-level settings, allowing you to configure each form independently with unique notification recipients.
In this guide you'll learn how to set up different forms to send to different email addresses and customize notification content, all using Webflow's native features without third-party tools.
How to configure Webflow form notifications for multiple email addresses
Setting up different email recipients for each form is straightforward with Webflow's native form-level settings. The configuration happens directly in the Designer, eliminating the need to toggle between different settings panels.
Step 1: Access your Webflow form settings
- Open your Webflow project in the Designer
- Select the Form element you want to configure on the canvas or in the Navigator
- Open the Settings panel on the right side of your screen
- Locate the Send to section under Form settings
- Click on Email Notifications (if it's not listed, click the "add" icon and select Email Notifications)
The notification settings panel will open, showing all available configuration options.
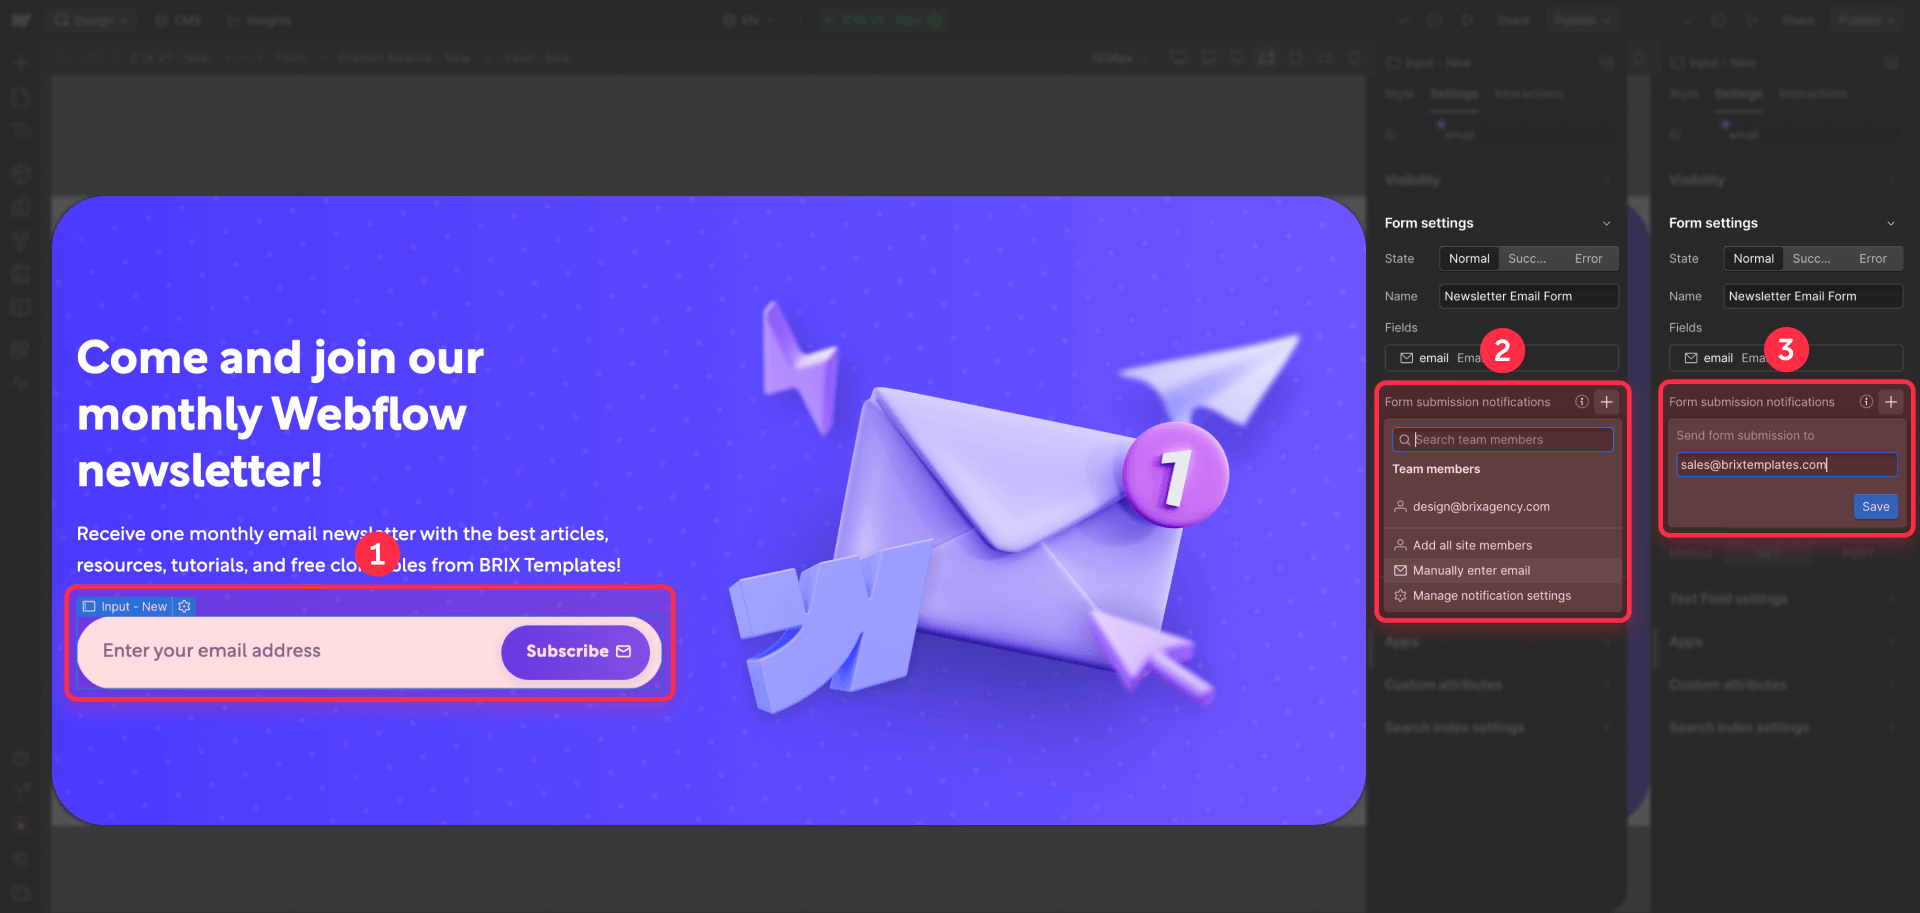
Step 2: Add multiple email recipients
- In the To field, enter the first email address
- Press Enter on your keyboard
- Enter the next email address and press Enter again
- Repeat this process for each additional address you want to add
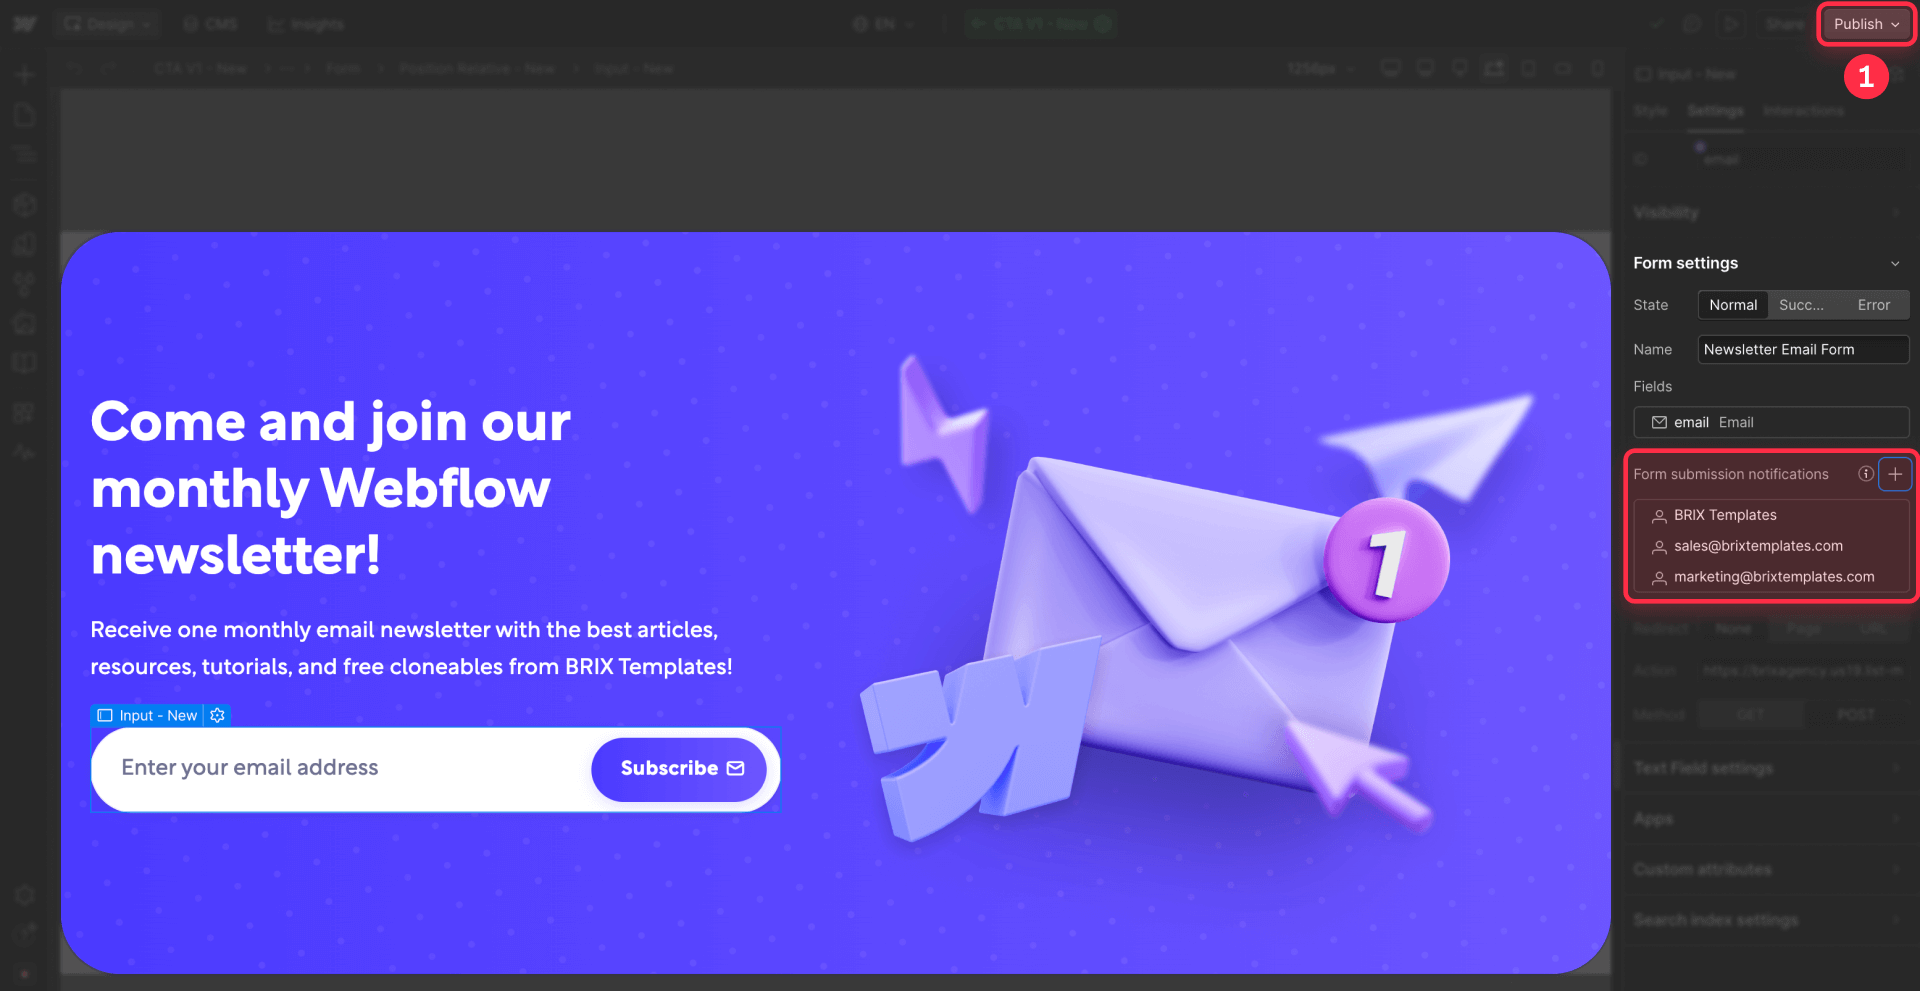
Each email address you add will receive an automatic notification every time someone submits this form.
Optional customization: If you want, you can also customize the Sender name, Reply to address, Subject line, and Body content in the same settings screen.
For multiple forms: Repeat this process for each form on your site. It's recommended to give each form a unique descriptive name (like "Sales Form" or "Support Form") to easily identify them in your Webflow panel.
Step 3: Publish and test your configuration
- Click Publish in the top-right corner to make your changes live
- Visit your published site and submit test data through each form
- Verify that the correct recipients receive notifications for each form type
- Check that subject lines and email content display correctly
After confirming everything works as expected, your form routing is complete and ready for real submissions.
Troubleshooting common Webflow form routing issues
Even with proper setup, you might encounter issues. Here's how to diagnose and fix the most common problems:
Form notifications aren't arriving: Verify that the To field in your form settings contains valid email addresses without typos. Check your spam folder and confirm that your email provider isn't blocking messages from Webflow's notification addresses.
Some recipients receive notifications while others don't: Check that all email addresses are entered correctly in the To field with proper formatting (press Enter after each address). Verify that recipients' email servers aren't blocking emails from Webflow.
Notifications have generic subject lines: Make sure you've customized the Subject line field in Email Notifications settings and saved your changes before publishing.
Form submissions aren't being captured: Confirm that you've published your Webflow site after configuring form settings. Verify that your form includes a Submit button (not a regular button) and that all required fields are configured correctly.
Changed settings aren't taking effect: Make sure you've clicked Publish after modifying form settings—changes only take effect on the live site after publishing.
Frequently asked questions about sending Webflow forms to multiple email addresses
How to send a Webflow form to multiple email addresses?
In Webflow, select your form in the Designer, open the Settings panel and click Email Notifications. In the "To" field, enter the first email address and press Enter. Repeat this process for each additional address. Webflow will automatically send notifications to all addresses you add. This feature has been available since October 2025.
Can each Webflow form send to a different email address?
Yes, Webflow allows you to configure different recipients for each form on your site. Each form has its own independent Email Notifications settings. For example, your contact form can send to [email protected], while your support form sends to [email protected], all on the same website.
How many recipients can I add to a Webflow form?
Webflow doesn't specify an exact limit of recipients per form. You can add multiple email addresses by pressing Enter after each one. In practice, most businesses set up between 2 and 5 recipients per form. For larger teams, it's recommended to use a group email address (like [email protected]).
Why am I not receiving my Webflow form notifications?
The most common causes are misspelled email addresses in settings, not publishing the site after making changes, or emails landing in spam. Check your spam folder first. Then, confirm in Settings > Email Notifications that addresses are correct and that you've clicked Publish to apply changes.
Can I customize the subject and content of Webflow form notifications?
Yes, Webflow allows complete customization of notifications. In Email Notifications you can modify the Sender name, Subject line, and Body content. Additionally, you can insert dynamic values from form fields using variables like {{formName}} or {{fieldName}} to create personalized notifications.
How do I route different Webflow forms to different departments?
Set up each form with its own Email Notifications configuration by selecting the form in the Designer and configuring the To field with department-specific email addresses. Give each form a descriptive name to keep track of routing. This native approach works perfectly for departmental routing without additional tools.
What's the difference between form-level and site-level email settings in Webflow?
Form-level settings (introduced in October 2025) allow each form to have unique notification recipients and customization. Site-level settings apply to all forms by default. Form-level settings override site-level settings, giving you precise control over where each form's submissions are sent.
Can I use Webflow form routing with custom domains for email?
Yes, you can send Webflow form notifications to any valid email address, including custom domain addresses. The notifications will come from Webflow's servers, but recipients can be any email address you specify in the To field, whether it's Gmail, custom domains, or business email services.
How do I test if my Webflow form routing is working correctly?
Visit your published site and submit test data through each form. Check that all specified recipients receive the notification emails. Verify that subject lines, sender names, and content appear correctly. Test with different email providers if possible to ensure compatibility across platforms.
Can I add CC or BCC recipients to Webflow form notifications?
Webflow's native form settings don't currently include separate CC or BCC fields. However, you can add all recipients directly in the To field, and they'll all receive notifications. For more advanced routing needs with CC/BCC functionality, third-party form services or custom solutions may be required.
Conclusion
Routing Webflow form submissions to multiple email addresses is now simple and straightforward thanks to the October 2025 form-level settings update. Webflow's native solution provides everything most businesses need for departmental routing without requiring third-party tools or complex workarounds.
If you need assistance implementing these solutions or want to explore more advanced form workflows, our Webflow agency can help you optimize your form routing system.


Join readers commenting on this post!