
Webflow's form handling captures submissions effectively, but there's a common challenge: getting those form submissions in front of your team quickly. Without immediate notifications, important leads and inquiries can sit unattended in your dashboard for hours or even days, leading to missed opportunities and frustrated customers.
In this guide, you'll learn how to set up automated notifications in Slack whenever someone submits a form on your Webflow site using Make (formerly Integromat)—a powerful and cost-effective automation platform that will keep your team informed instantly.
Why Slack notifications matter for Webflow forms
- Lead response time: When potential customers submit a form, every minute counts. Slack notifications enable your team to respond within minutes rather than hours, dramatically increasing conversion rates.
- No dashboard monitoring: Eliminate the need for team members to constantly check the Webflow dashboard for new submissions—bring the information directly to where your team already works.
- Intelligent routing: Send different Webflow form types to the appropriate Slack channels automatically—contact forms to #sales, support requests to #help, and job applications to #recruiting.
- Complete submission data: View all form fields directly in Slack, allowing team members to qualify leads or prioritize requests without switching platforms.
- Visible accountability: When form notifications appear in public channels, it's clear who takes ownership of each submission, reducing duplicate responses and preventing leads from being ignored.
Available methods for Webflow-Slack integration
Before diving into the setup, it's worth noting that there are two reliable methods for connecting your Webflow forms with Slack:
- Sending Slack notifications with Make (recommended): Our top recommendation offering a generous free tier with 1,000 operations monthly—plenty for most websites with moderate traffic.
- Zapier integration for Slack notifications: A solid alternative if you're already using Zapier for other workflows, though it typically comes with higher costs for similar functionality (free tier limited to 100 tasks).
Let's explore the Make method in detail, as it offers the best balance of functionality and affordability for most Webflow projects.
How to send Webflow form submissions to Slack using Make
Setting up automated Slack notifications with Make involves creating a webhook connection between your Webflow forms and Slack. In this walkthrough, we'll first prepare your Webflow form, then create the automation in Make, and finally configure the Slack notification that will be sent to your team.
This entire setup should take about 10-15 minutes and works reliably for sites of any size.
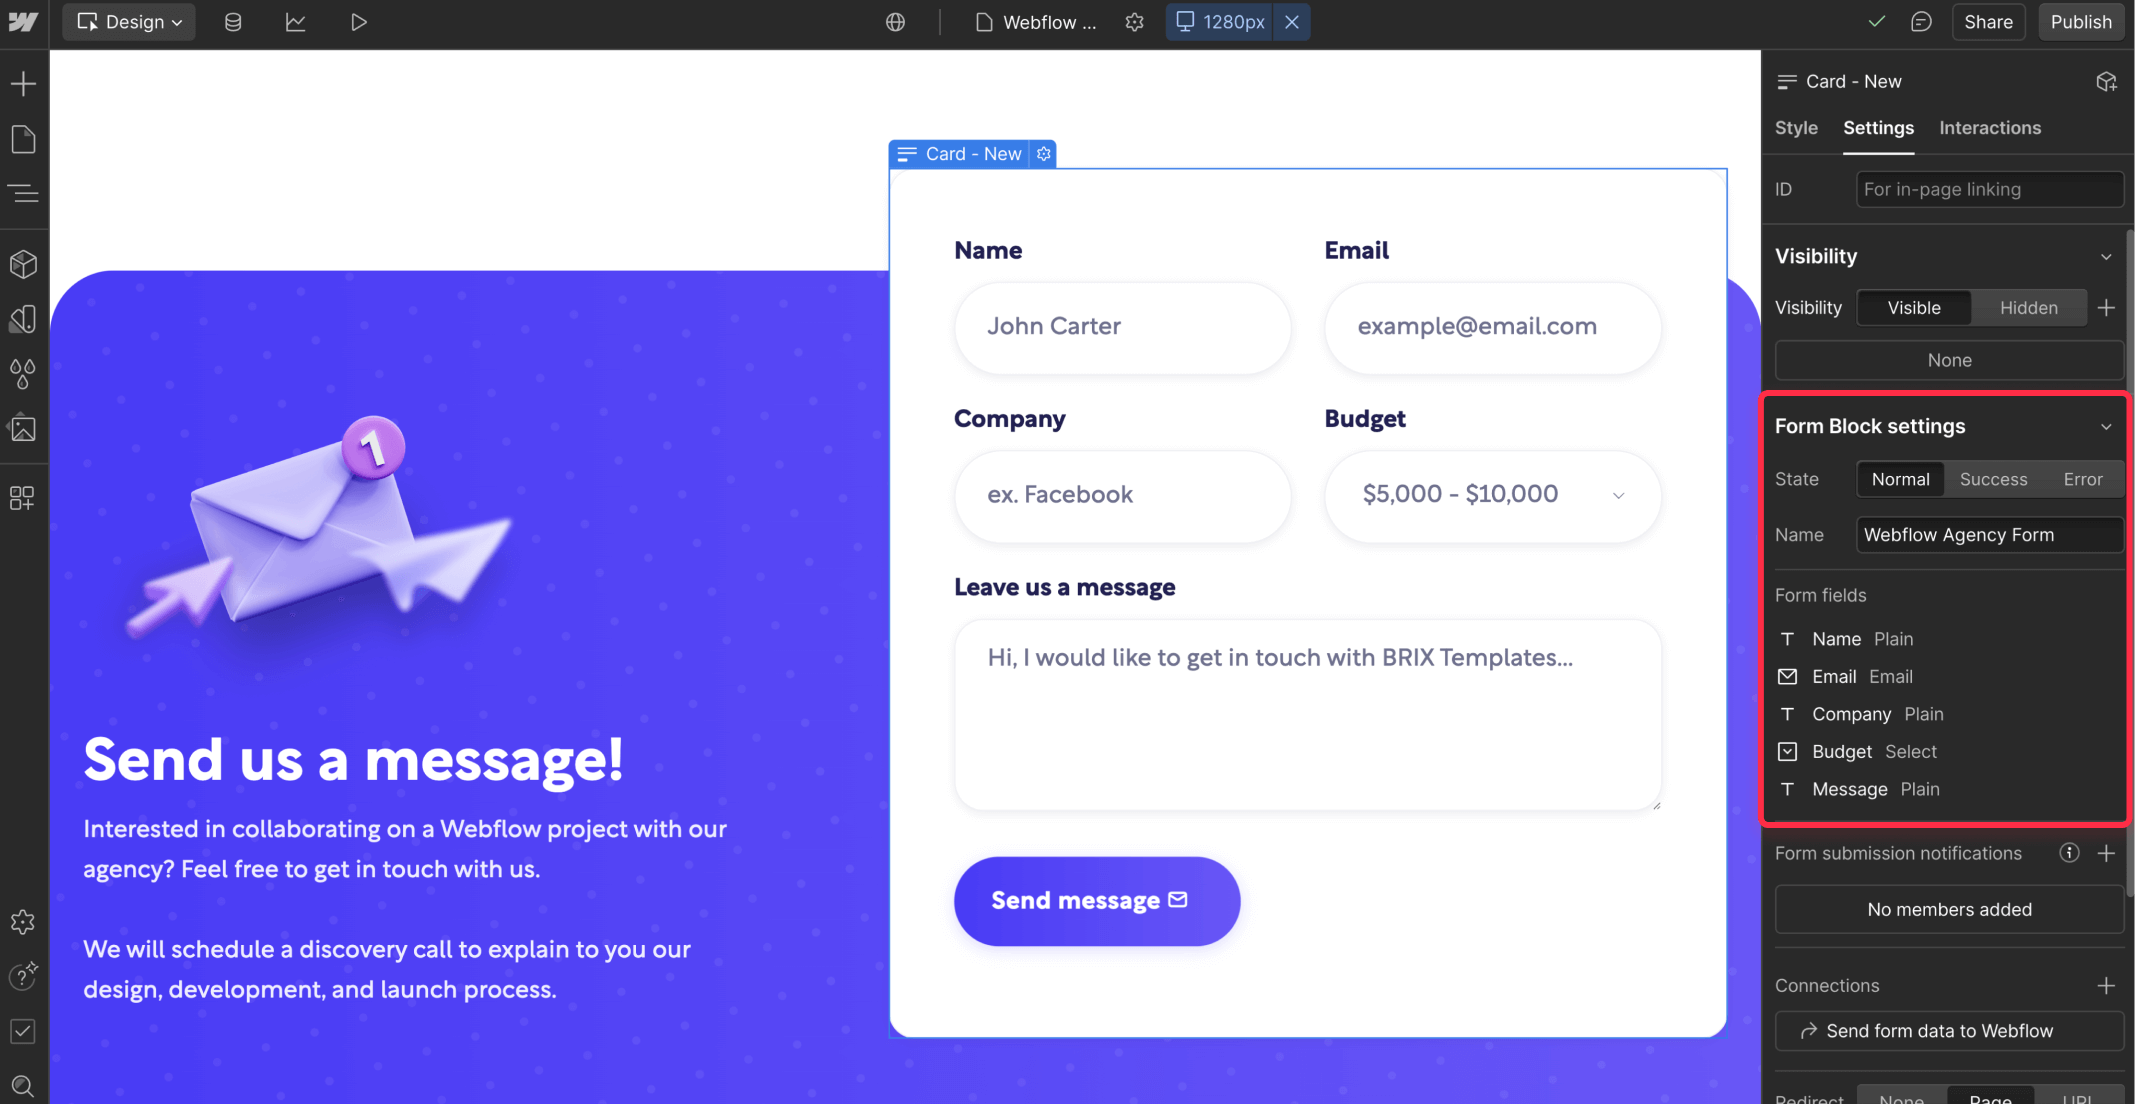
Step 1: Setting up your Webflow form for Slack integration
- Navigate to your Webflow project and select the page where you want to add or modify a form.
- If you don't already have a form, add a Form element from the Add Elements panel.
- Configure your form fields to collect necessary information (name, email, message, etc.).
- Under form settings (gear icon), ensure your Form Name is clearly labeled for identification in Make.
- Add your success and error messages as needed.
- Publish your site for the form to be accessible to Make. 🚨 This is crucial—Make can only detect forms on published sites.
Step 2: Creating a Webflow form automation in Make for Slack notifications
- Sign up for a free Make account if you don't already have one.
- From the Make dashboard, click the Create a new scenario button.
- Give your scenario a descriptive name, such as "Webflow Form Submission to Slack Notification."
- Click the large + icon in the center of the screen to add your first module.
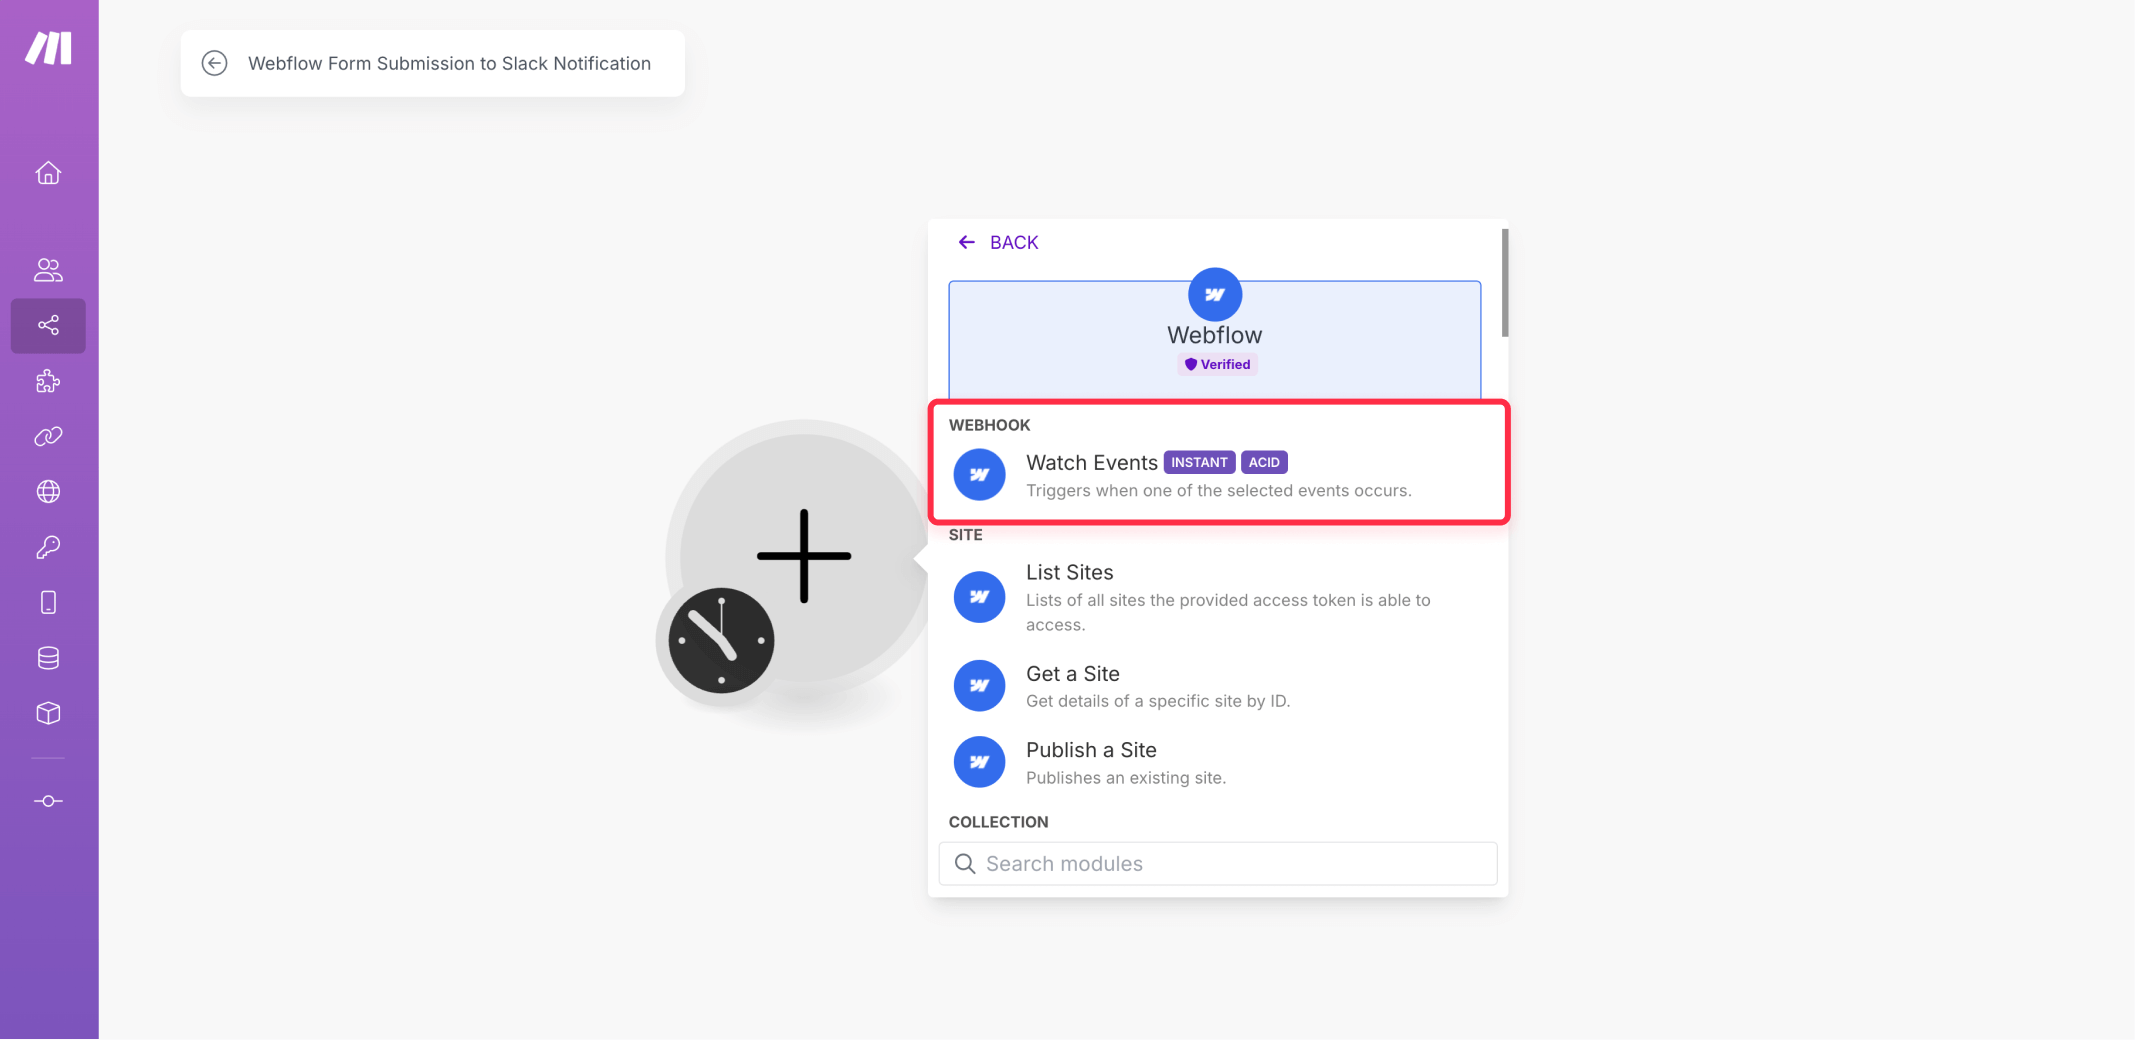
- Search for and select "Webflow" from the apps list.
- For the trigger, select "Watch Events" (which will capture form submissions).
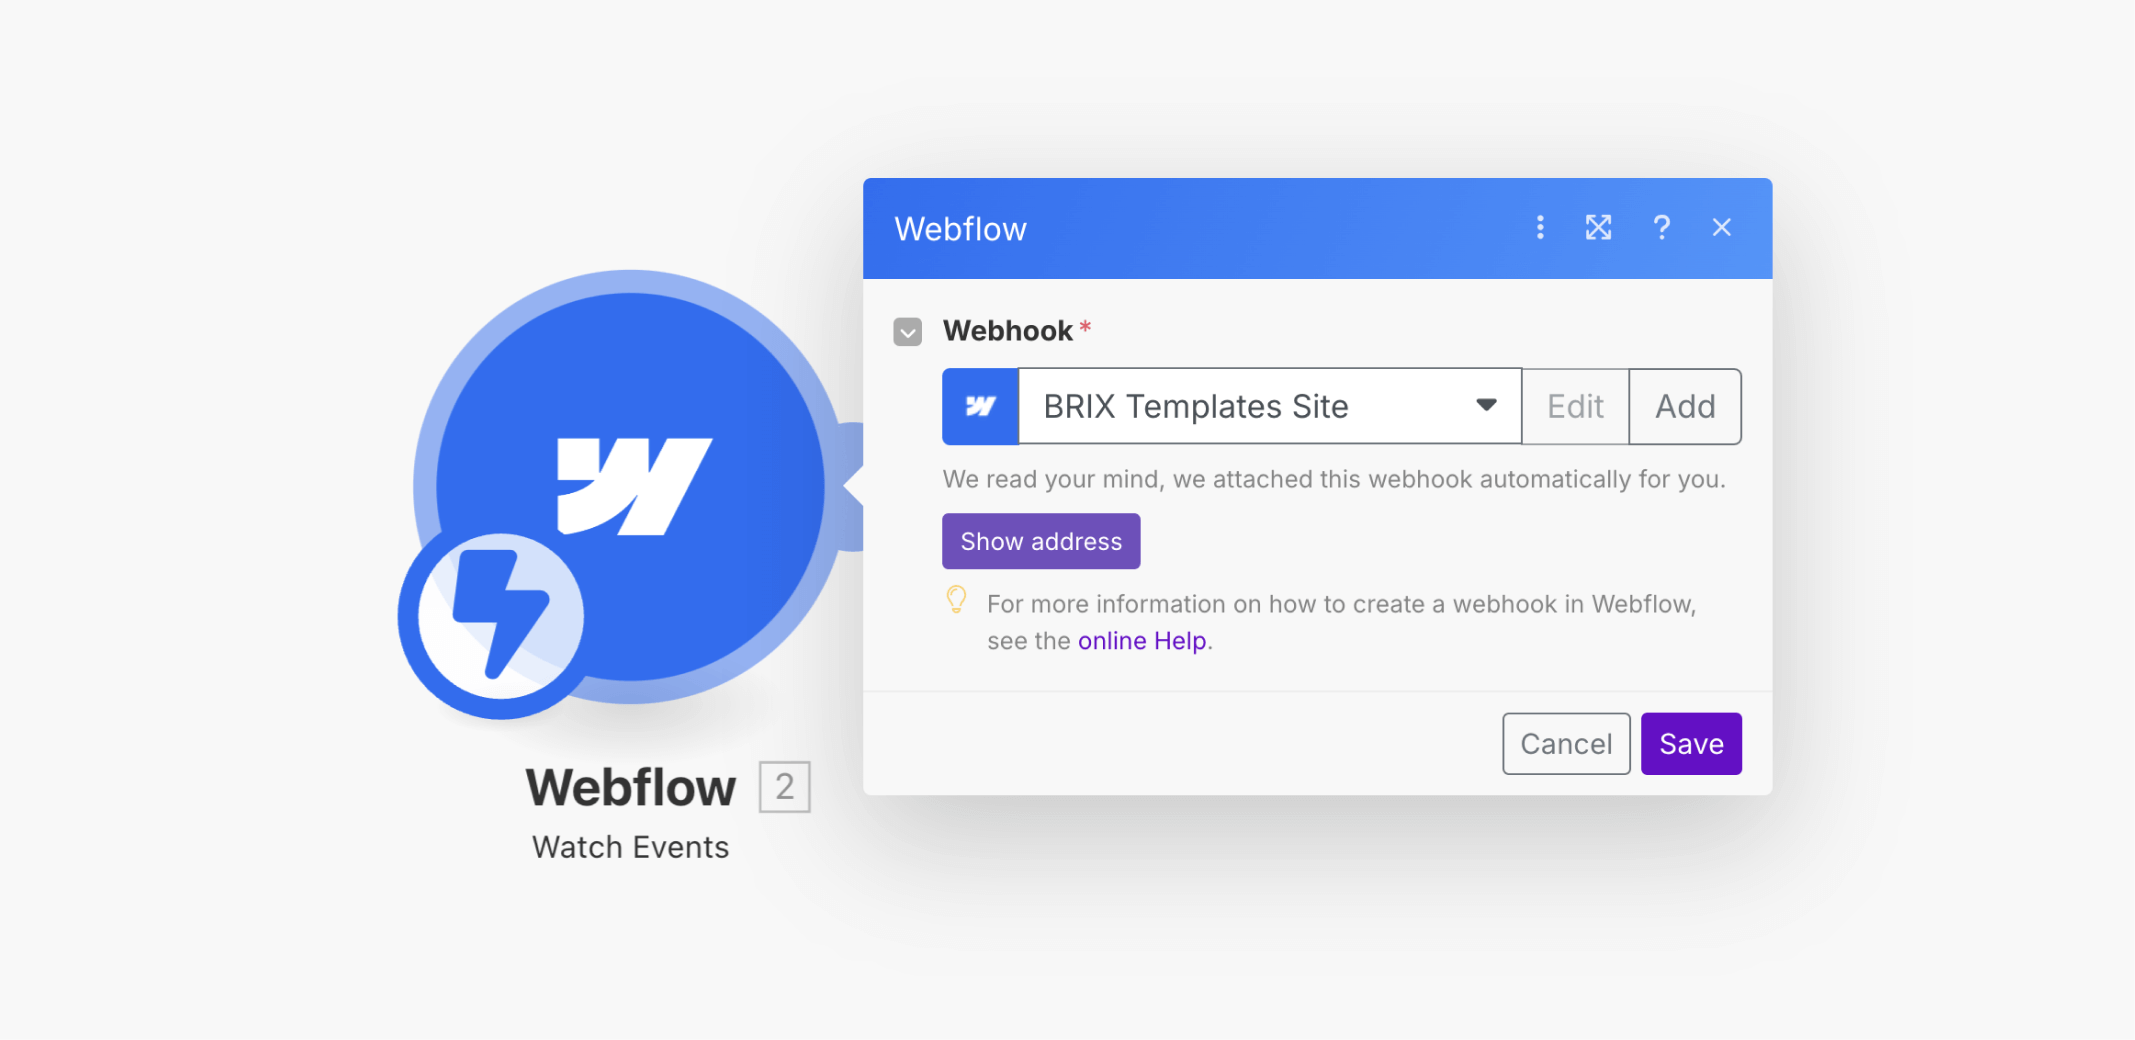
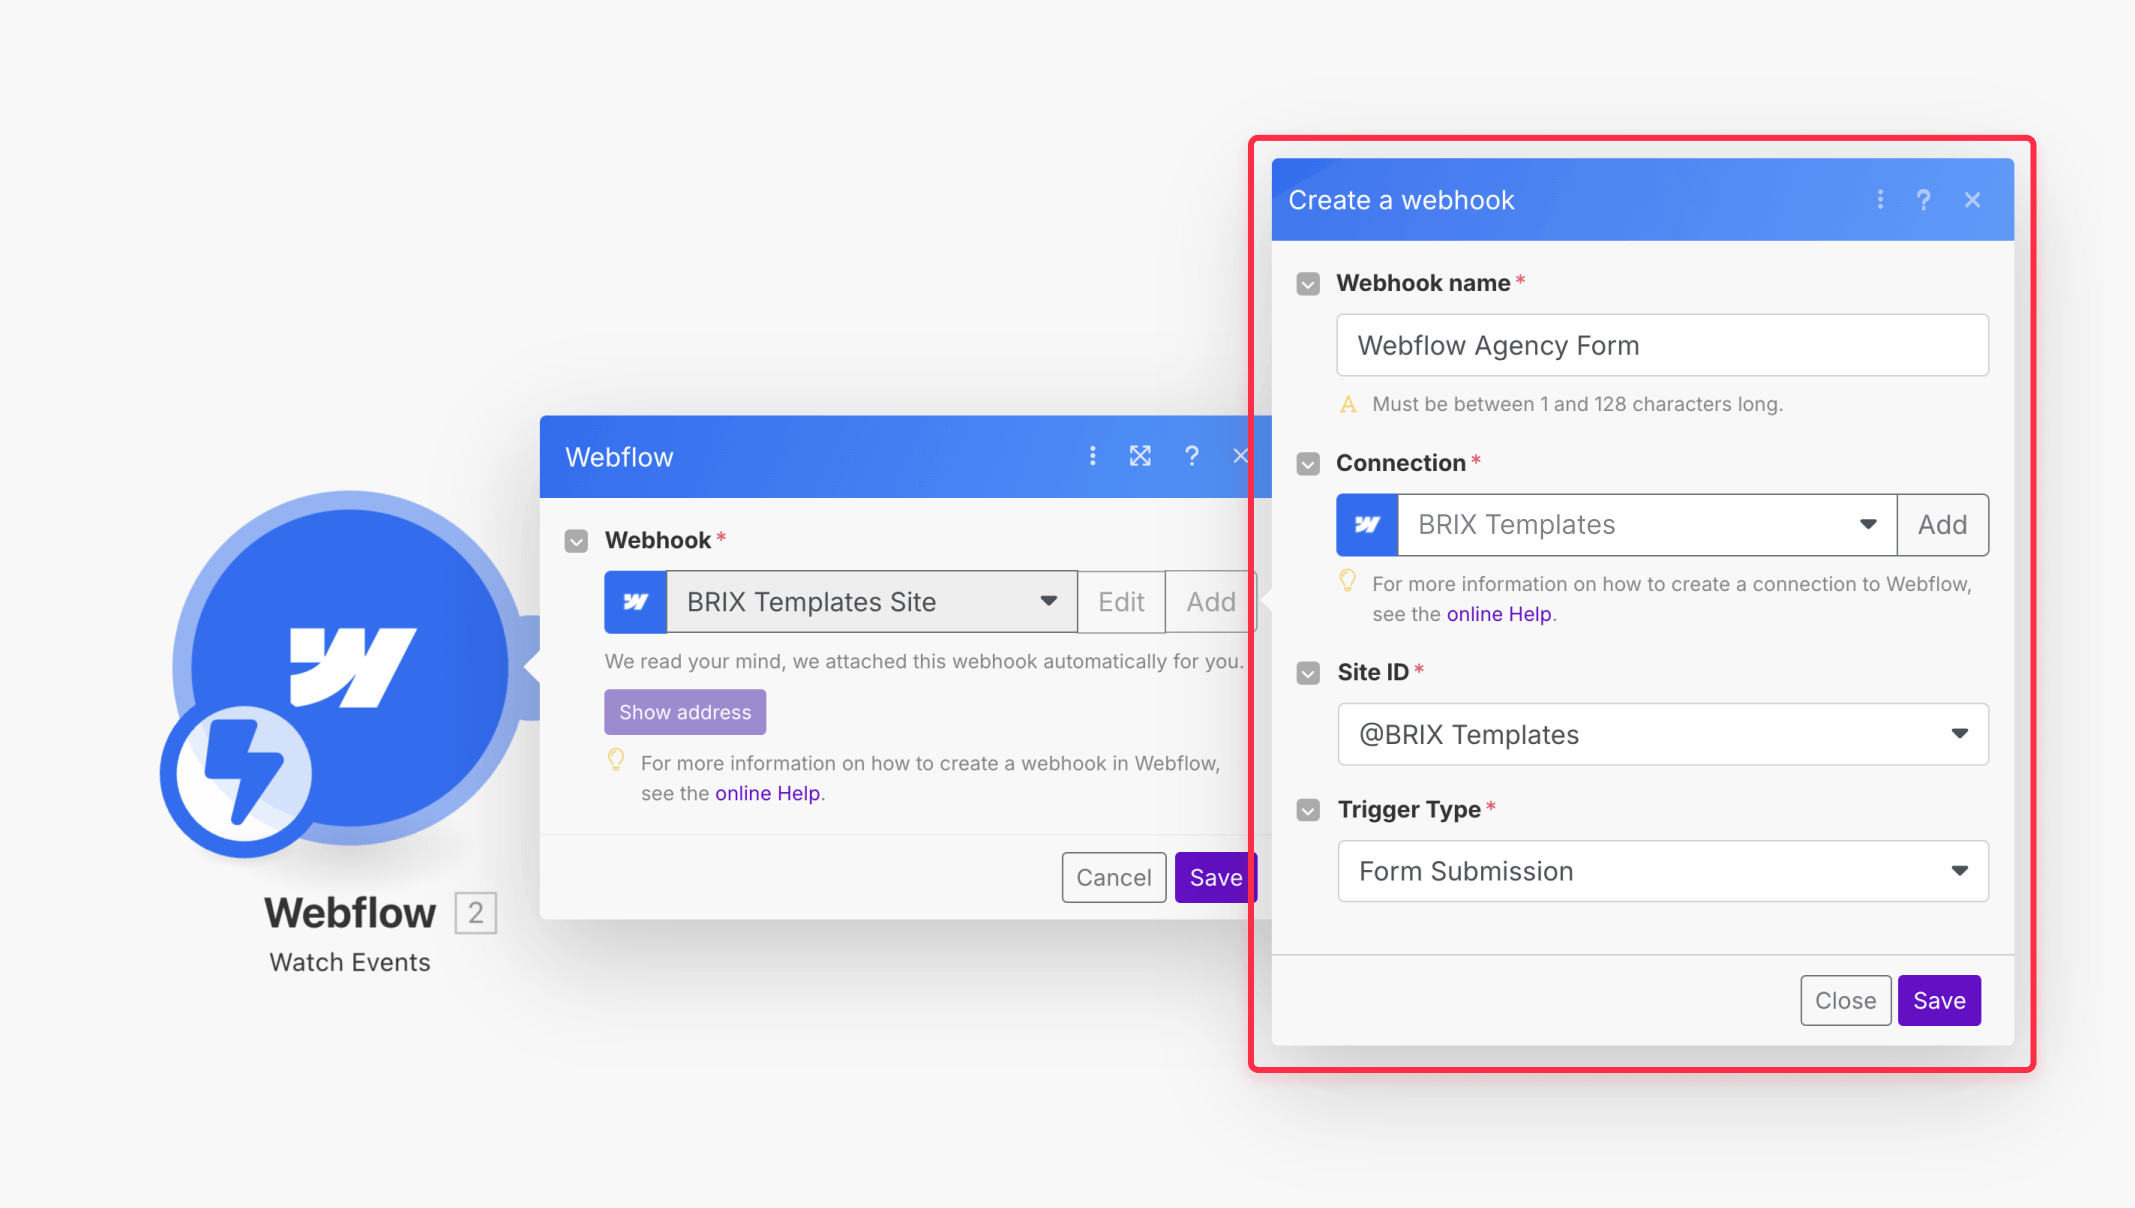
Step 3: Setting up the Webflow webhook connection in Make
- Click + Add next to the "Webhook" dropdown to create a new webhook.
- For Webhook name, enter a descriptive name (e.g., "Contact Form" or your site name).
- Next to Connection, click + Add to create a new connection to your Webflow account.
- Enter a Connection name (e.g., "Webflow Account").
- Click Save to create the connection.
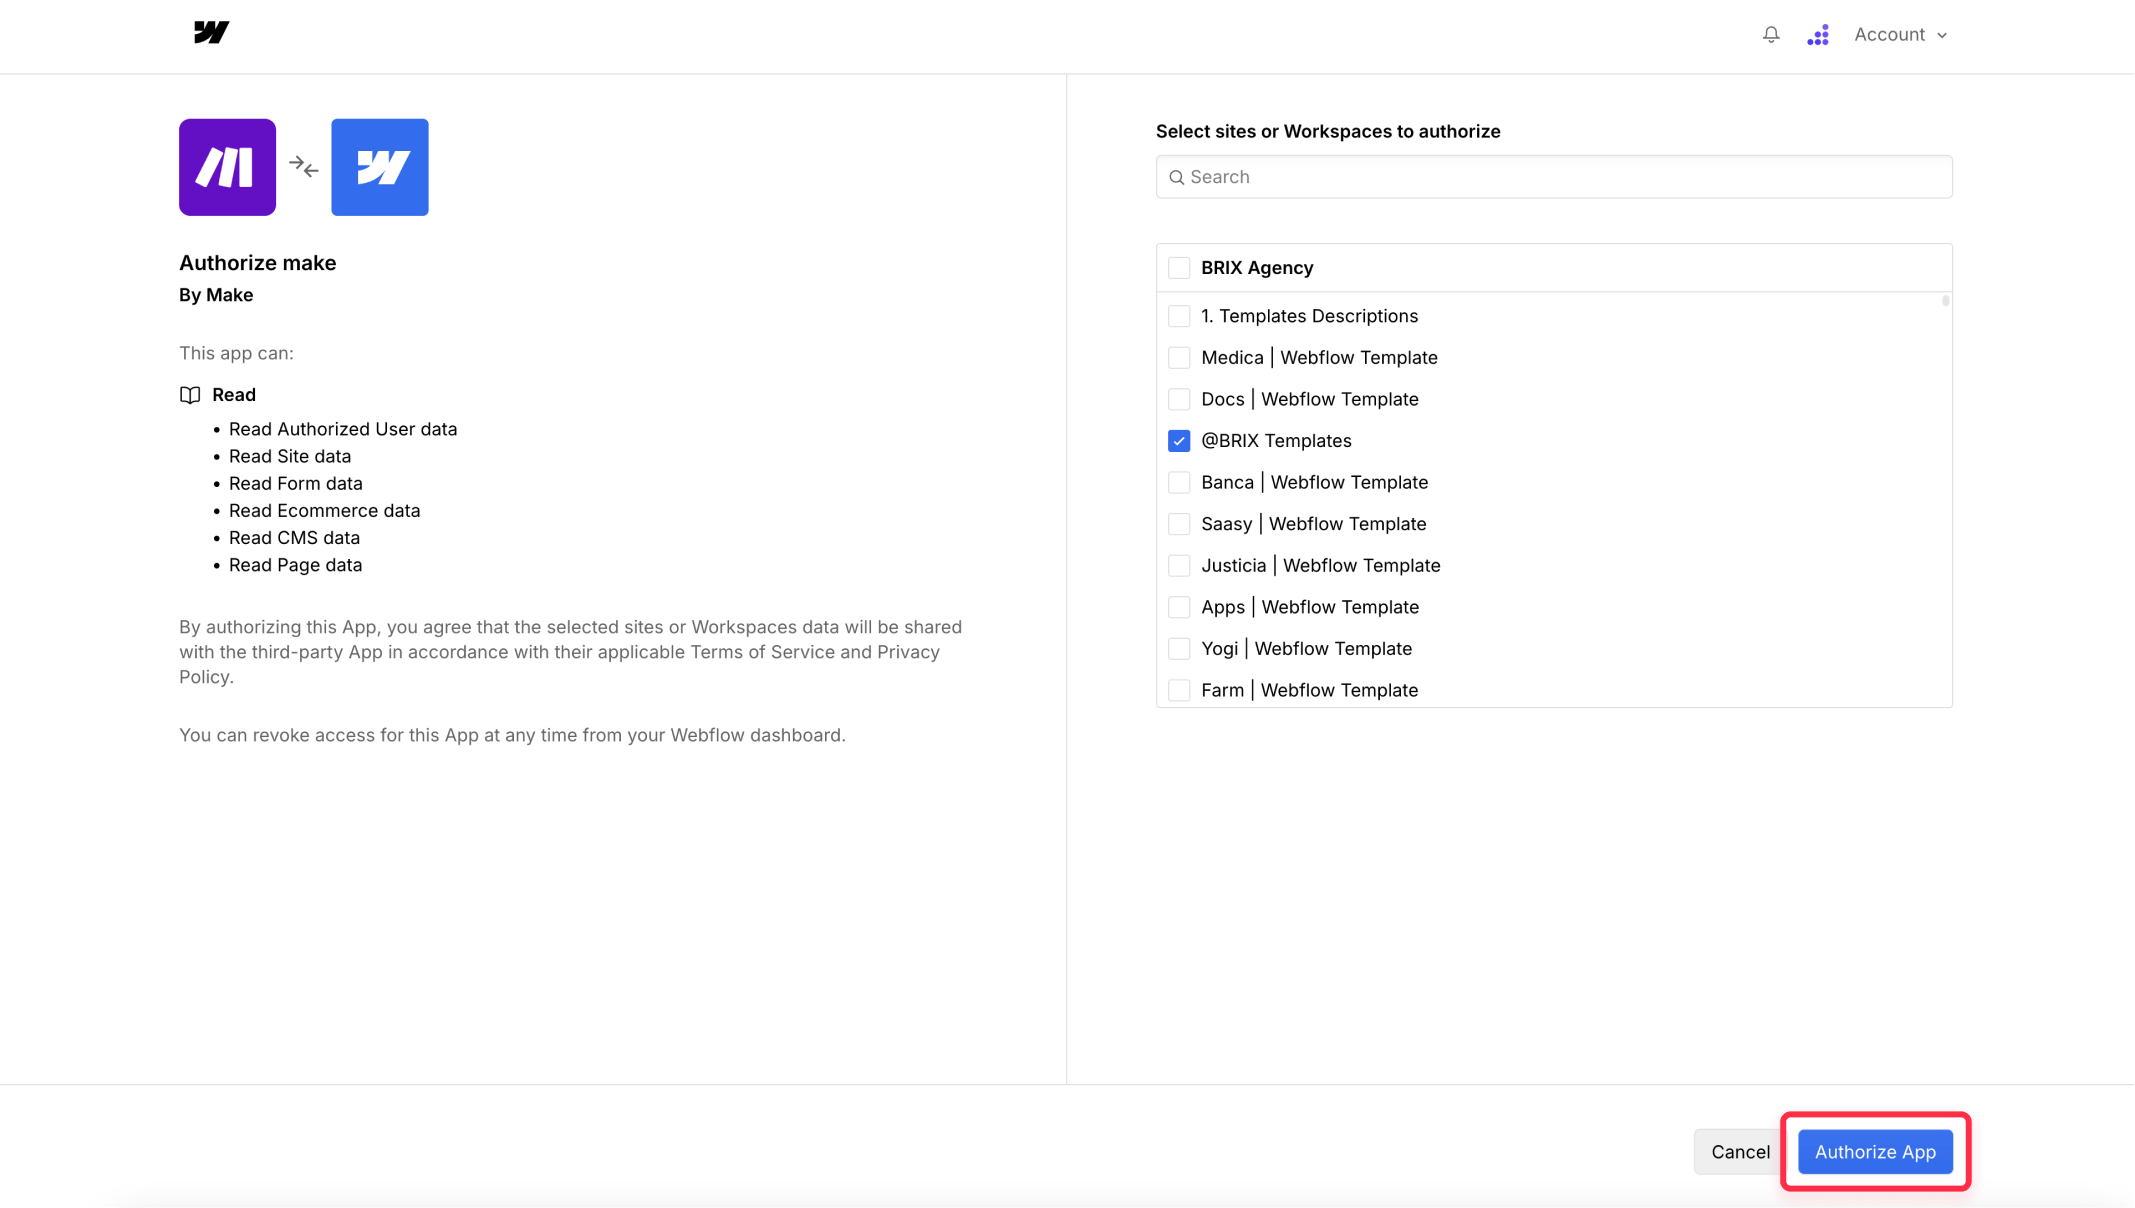
Make will open a new tab/window to Webflow, and now you need to:
- Authorize Make to access your Webflow account.
- Select the specific site you want to connect from the dropdown.
- Click Authorize App.
Back in Make:
- The Site ID dropdown should now populate. Select your site.
- For Trigger Type, select Form Submission.
- Click Save to complete the webhook setup.
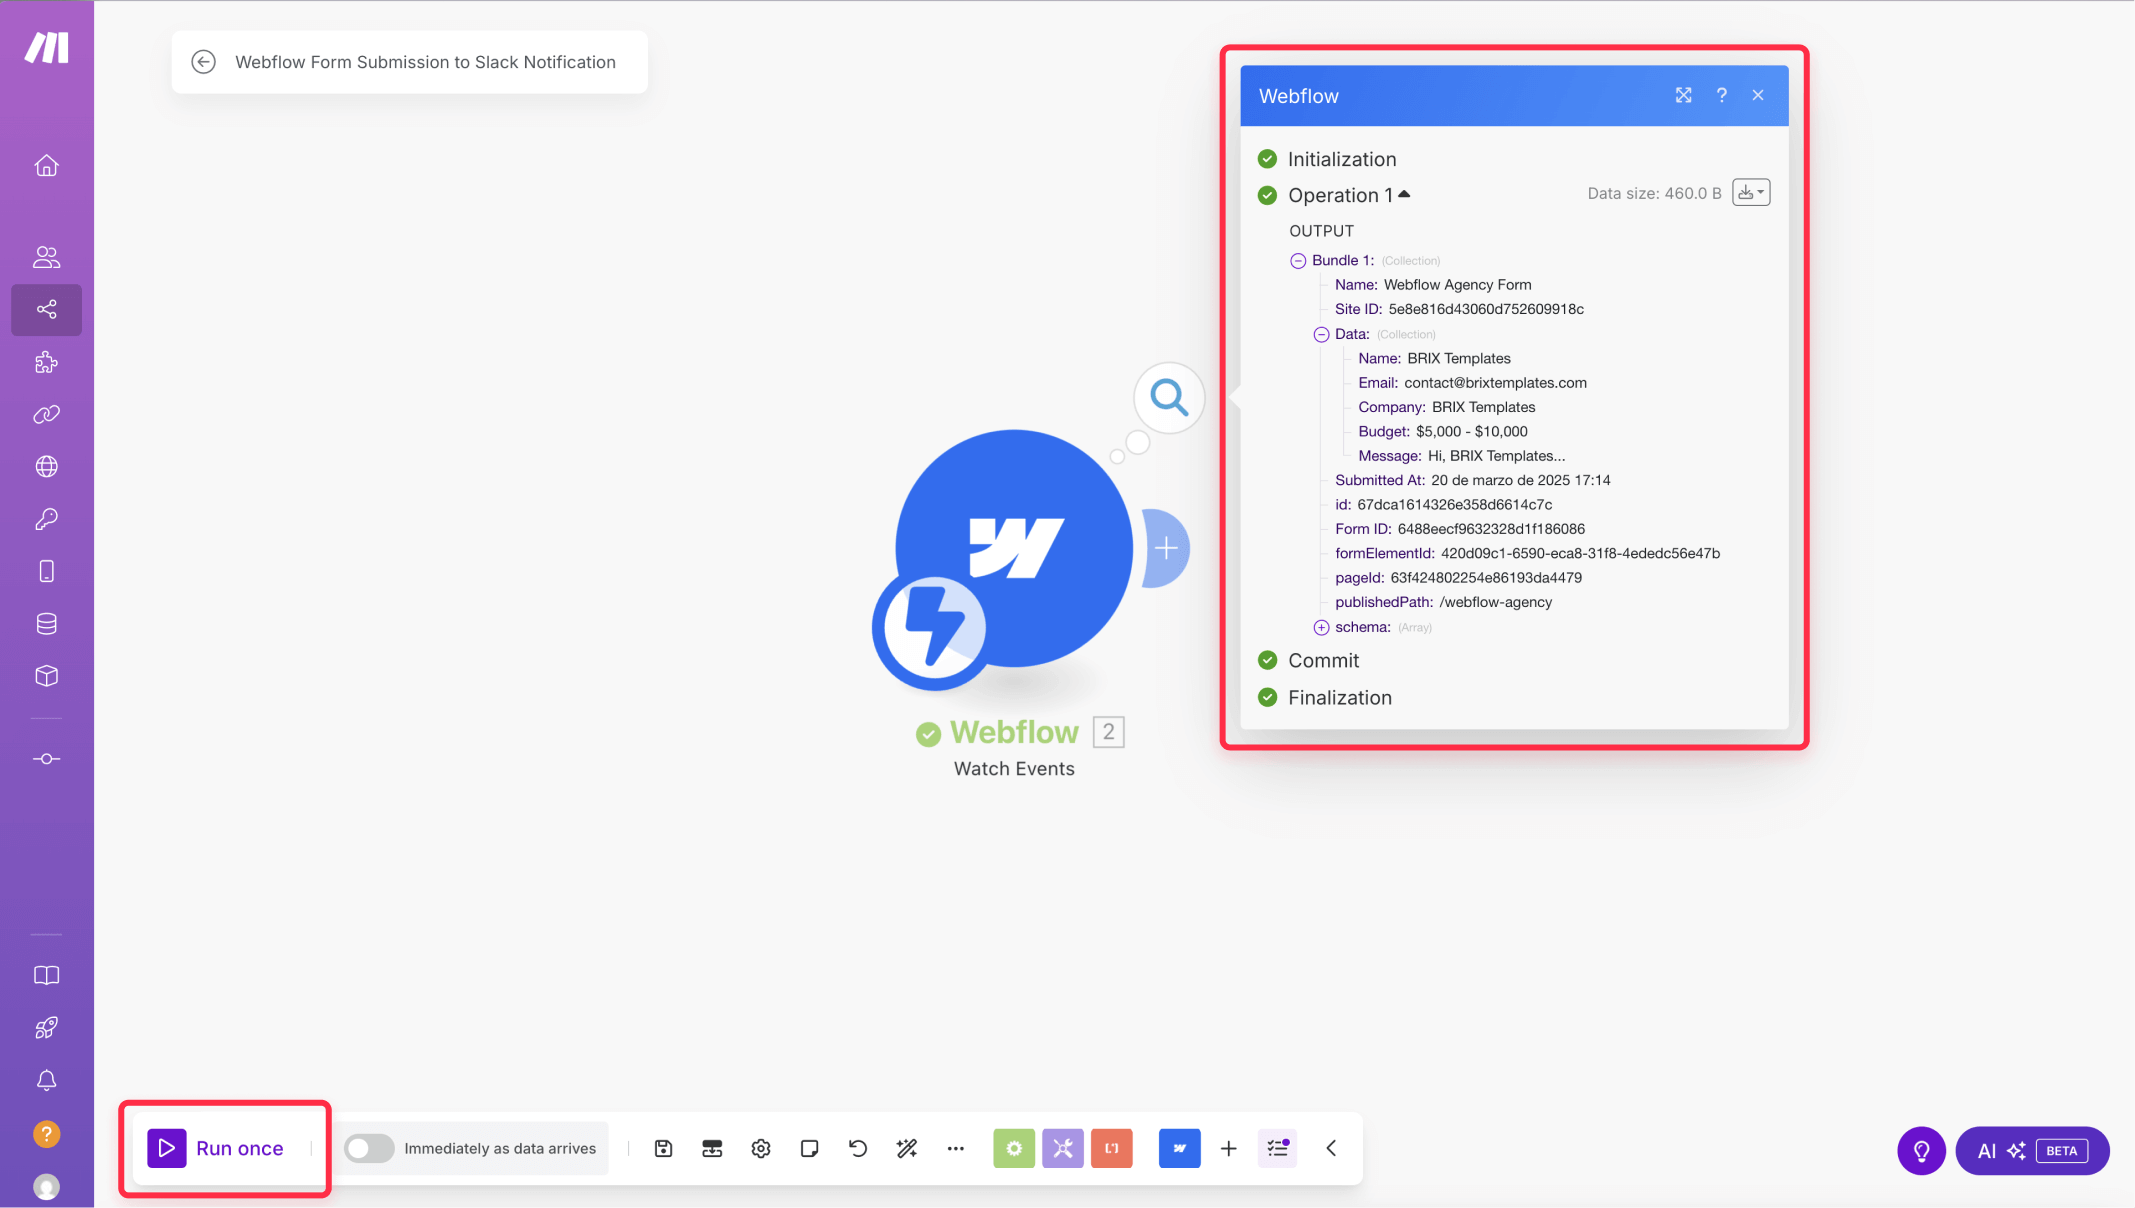
Step 4: Testing your Webflow form connection with Make
Important: Ensure your Webflow site is published with the form. The form must be live for Make to detect it.
- Click the Run once button at the bottom left of the Make scenario editor. This puts Make into a listening mode.
- Go to your published Webflow site and fill out your form completely. Use real data for testing (so you can verify the Slack notification contains accurate information).
- Submit the form.
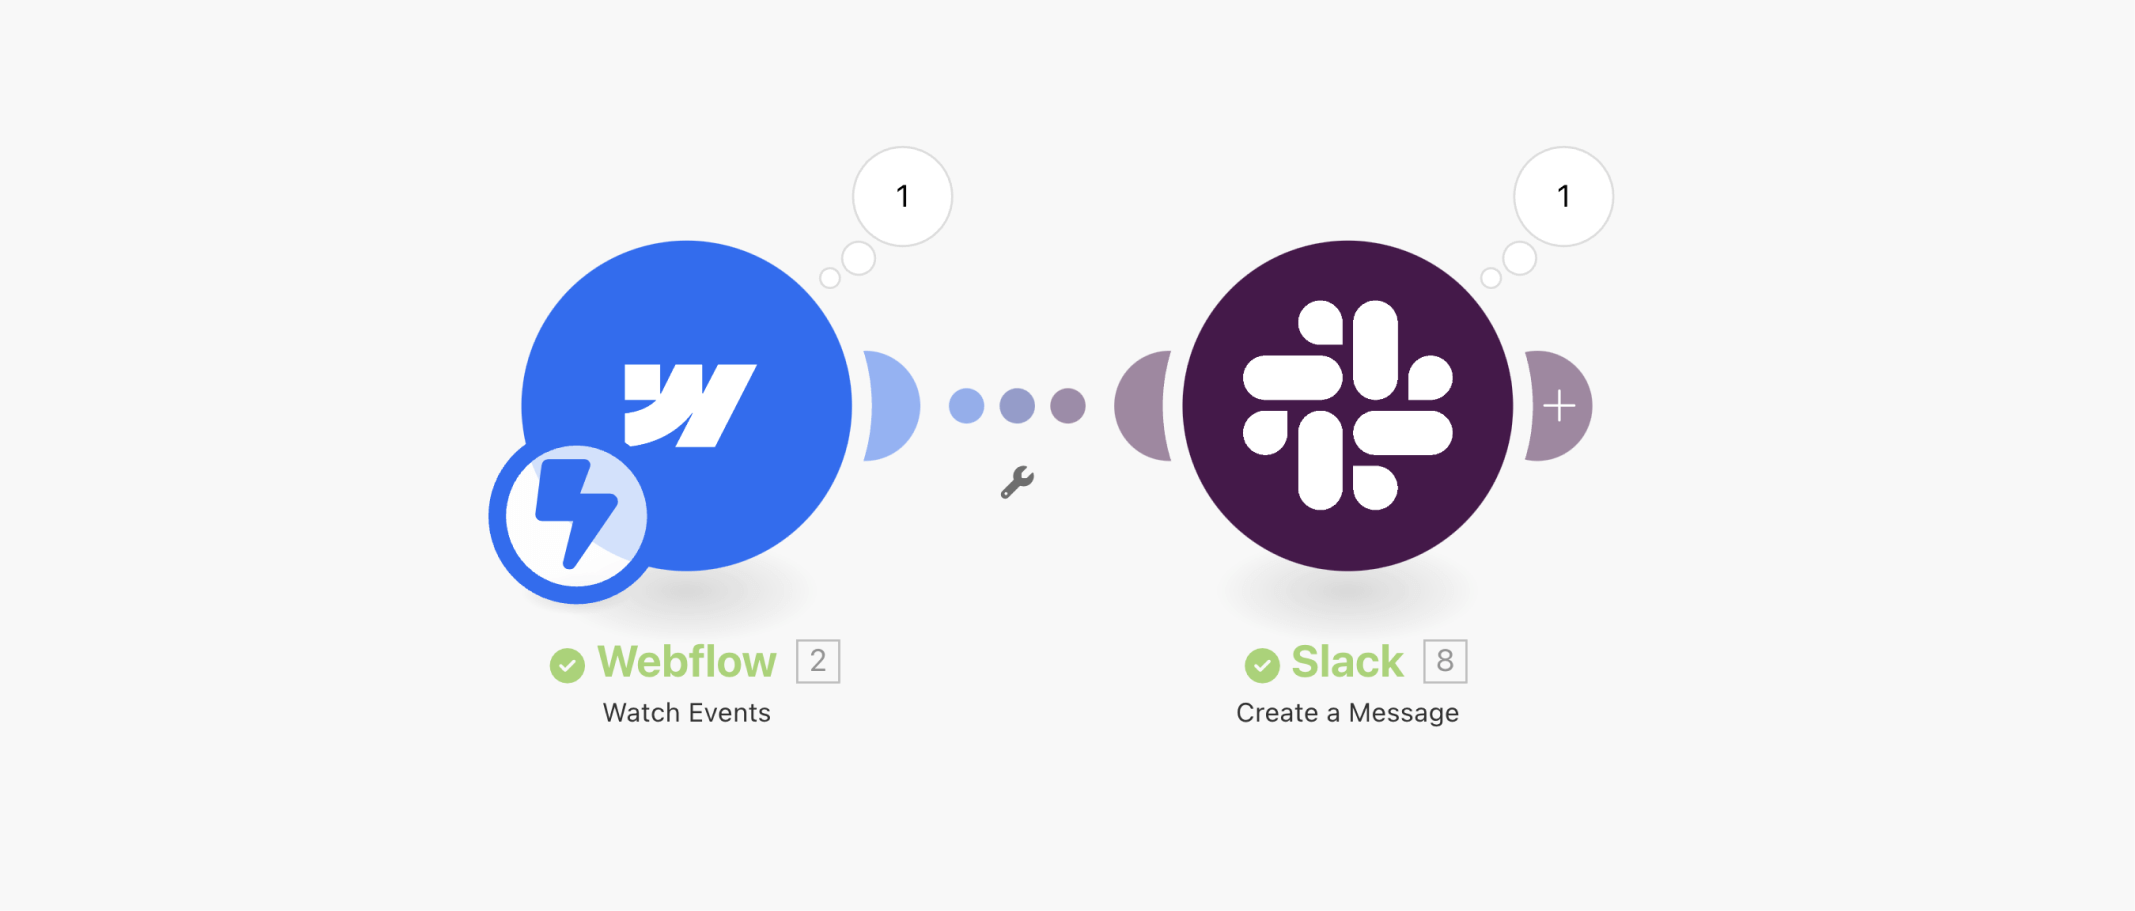
- Return to Make. You should see a bubble with a "1" appear above the Webflow module, indicating that Make successfully received the form submission data.
- Click the magnifying glass icon on the bubble to inspect the data Make received from your form submission.
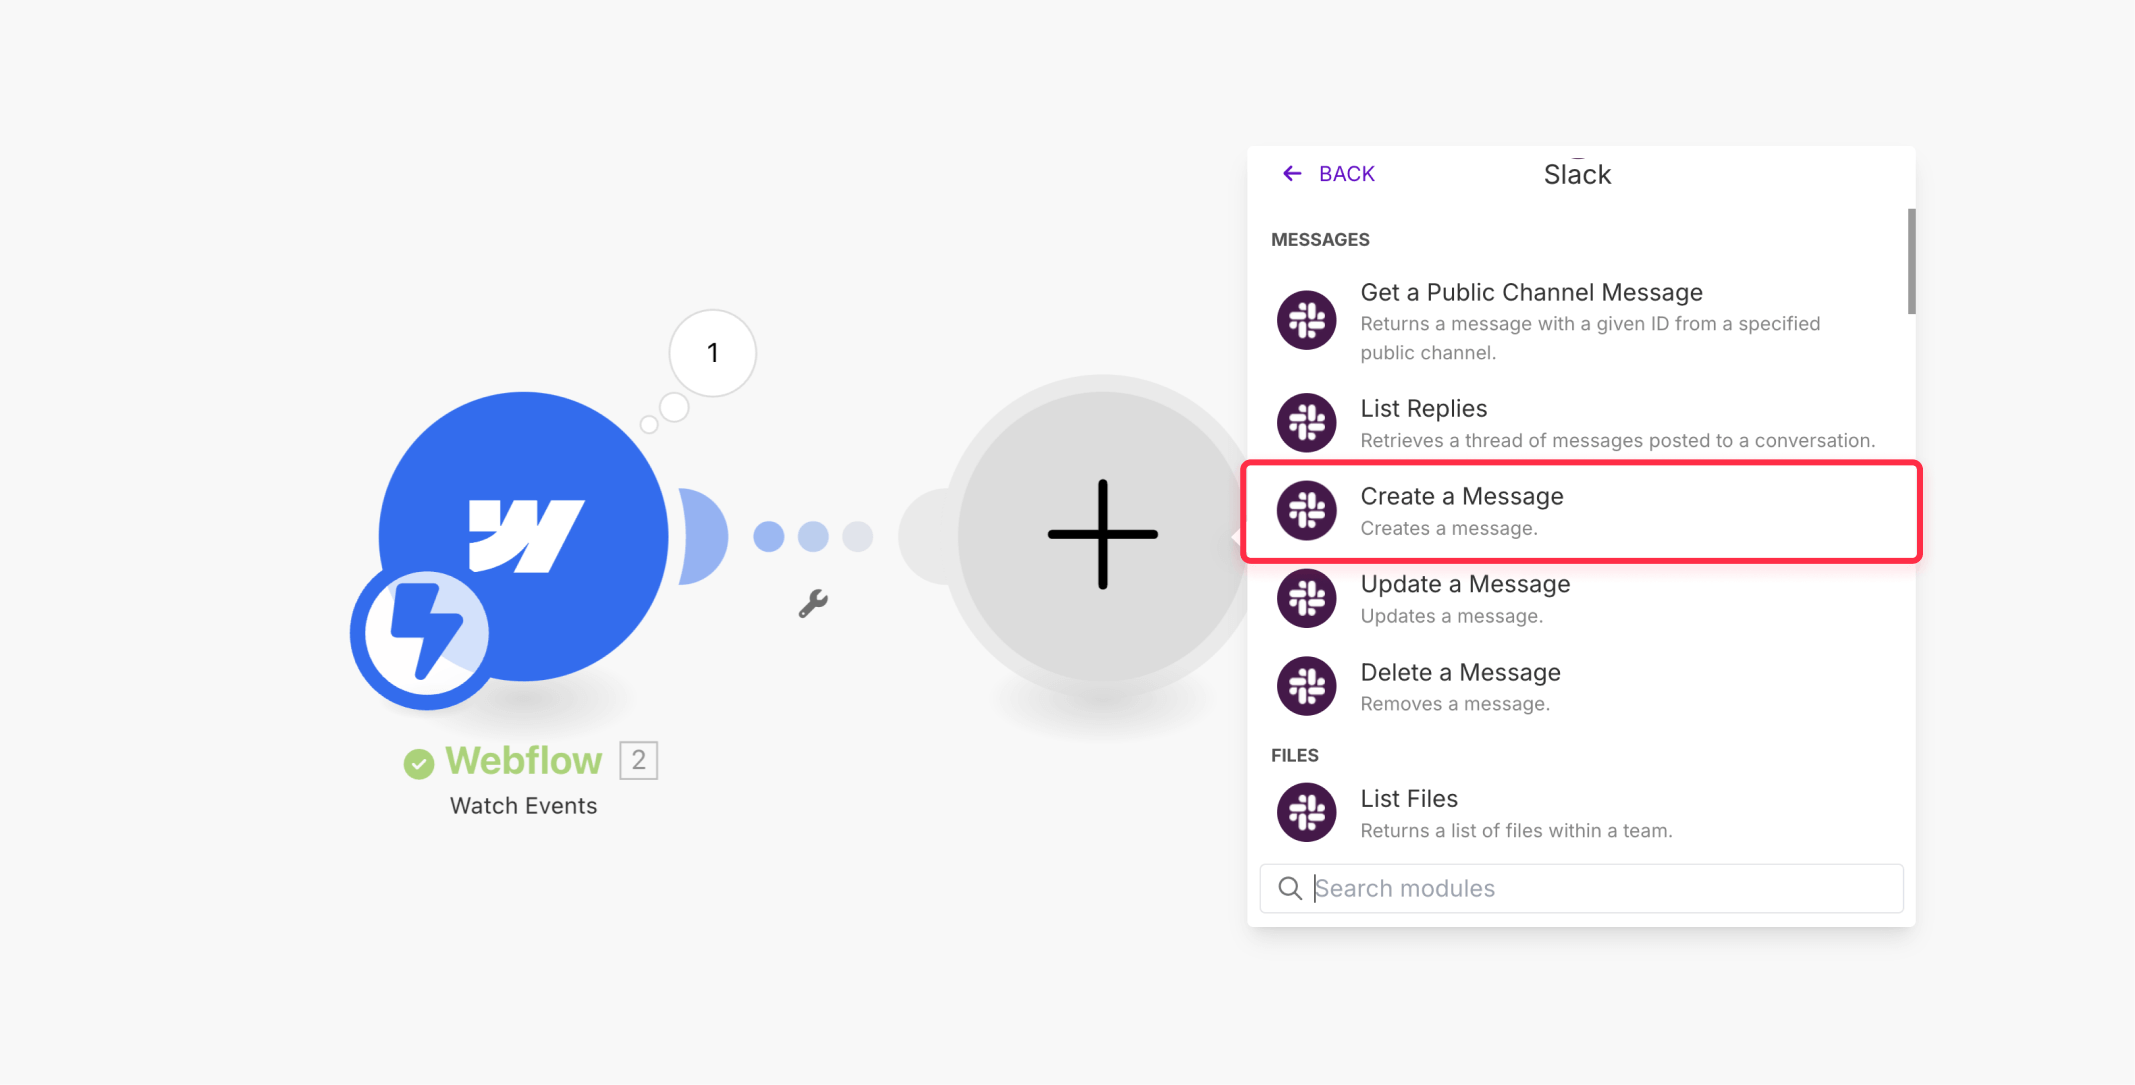
Step 5: Adding the Slack module to your Webflow form automation
- Click the + icon to the right of your Webflow module to add another step.
- Search for and select "Slack" from the apps list.
- Select "Create a Message" as the action.
Step 6: Configuring your Slack connection for Webflow form notifications
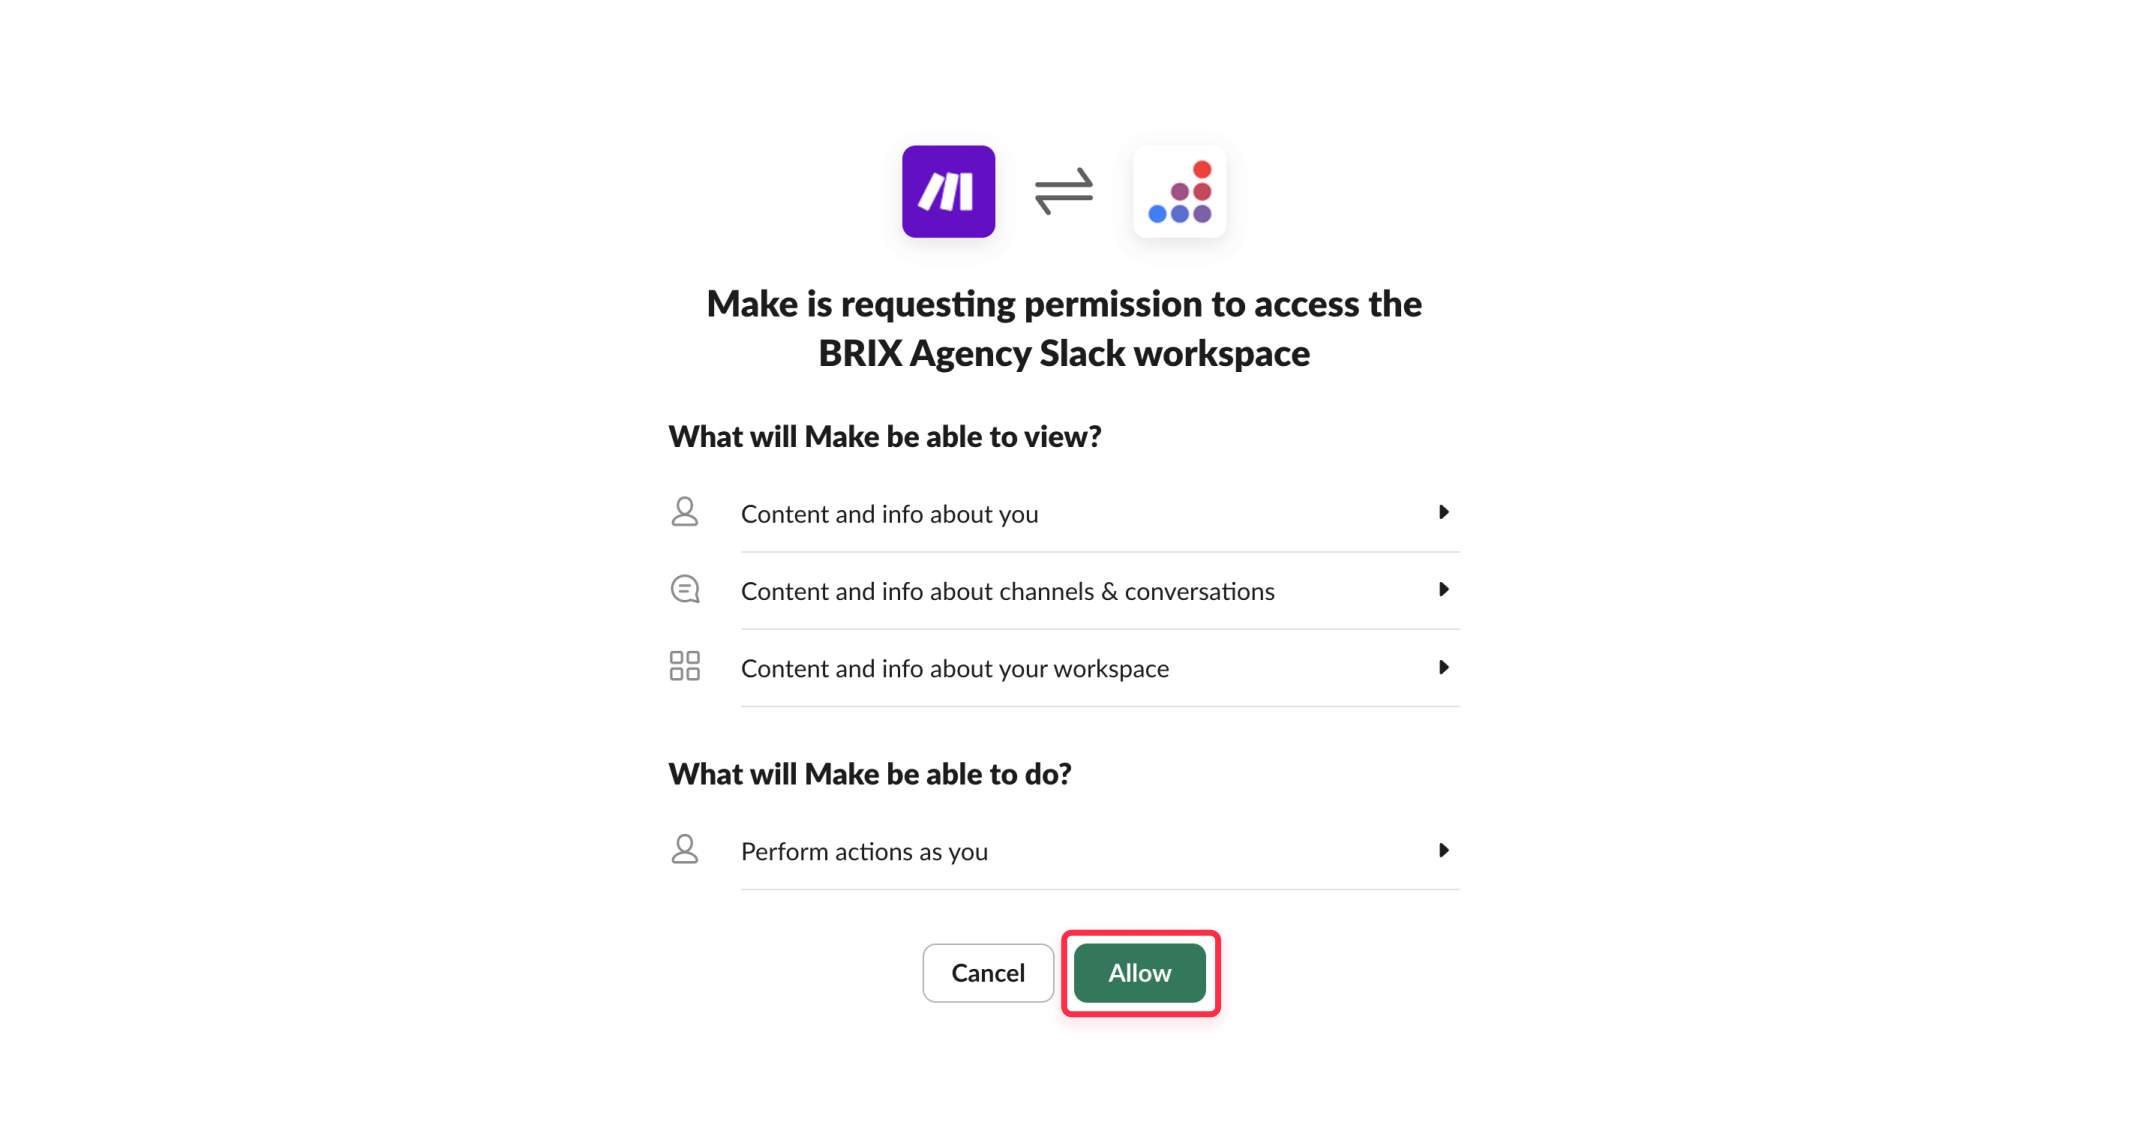
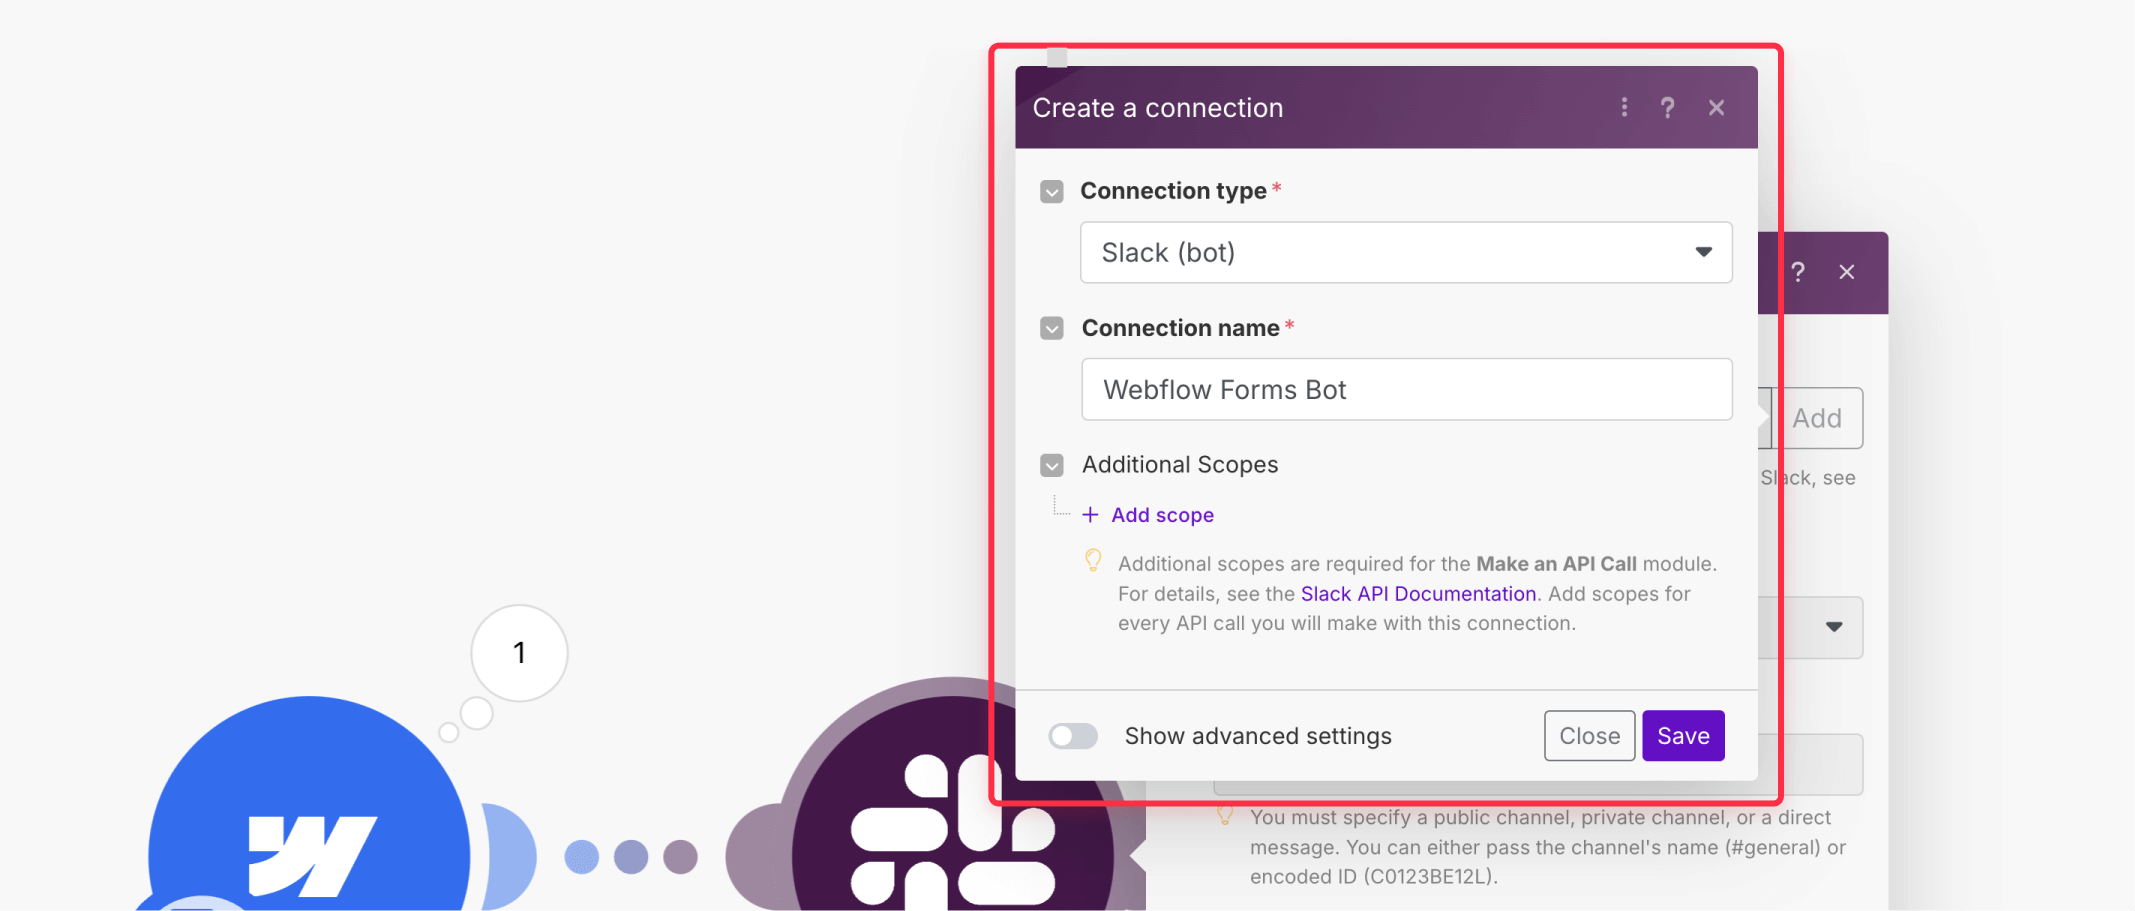
- For Connection, click + Add to create a new Slack connection.
- Make will redirect you to Slack's authorization page.
- Select the Slack workspace where you want to send notifications.
- Review the permissions Make is requesting and click Allow.
- You'll be redirected back to Make with your Slack connection established.
Step 7: Setting up your Slack notification template for Webflow form data
Now you'll configure how your Slack notification will appear:
- In the Channel dropdown, select the Slack channel where you want notifications to appear.
- For Text, click in the field to open the data mapping panel. This is where you'll build your message with form data.
Here's an example of what your message could look like:
📝 *New form submission received*
*Name:* {{1.Data.Name}}
*Email:* {{1.Data.Email}}
*Subject:* {{1.Data.Subject}}
*Message:* {{1.Data.Message}}
Submitted at: {{formatDate(1.timestamp; "YYYY-MM-DD HH:mm:ss")}}Notice that we're using {{1.Data.FieldName}} to dynamically insert data from the form submission. The field names should match exactly what you have in your Webflow form.
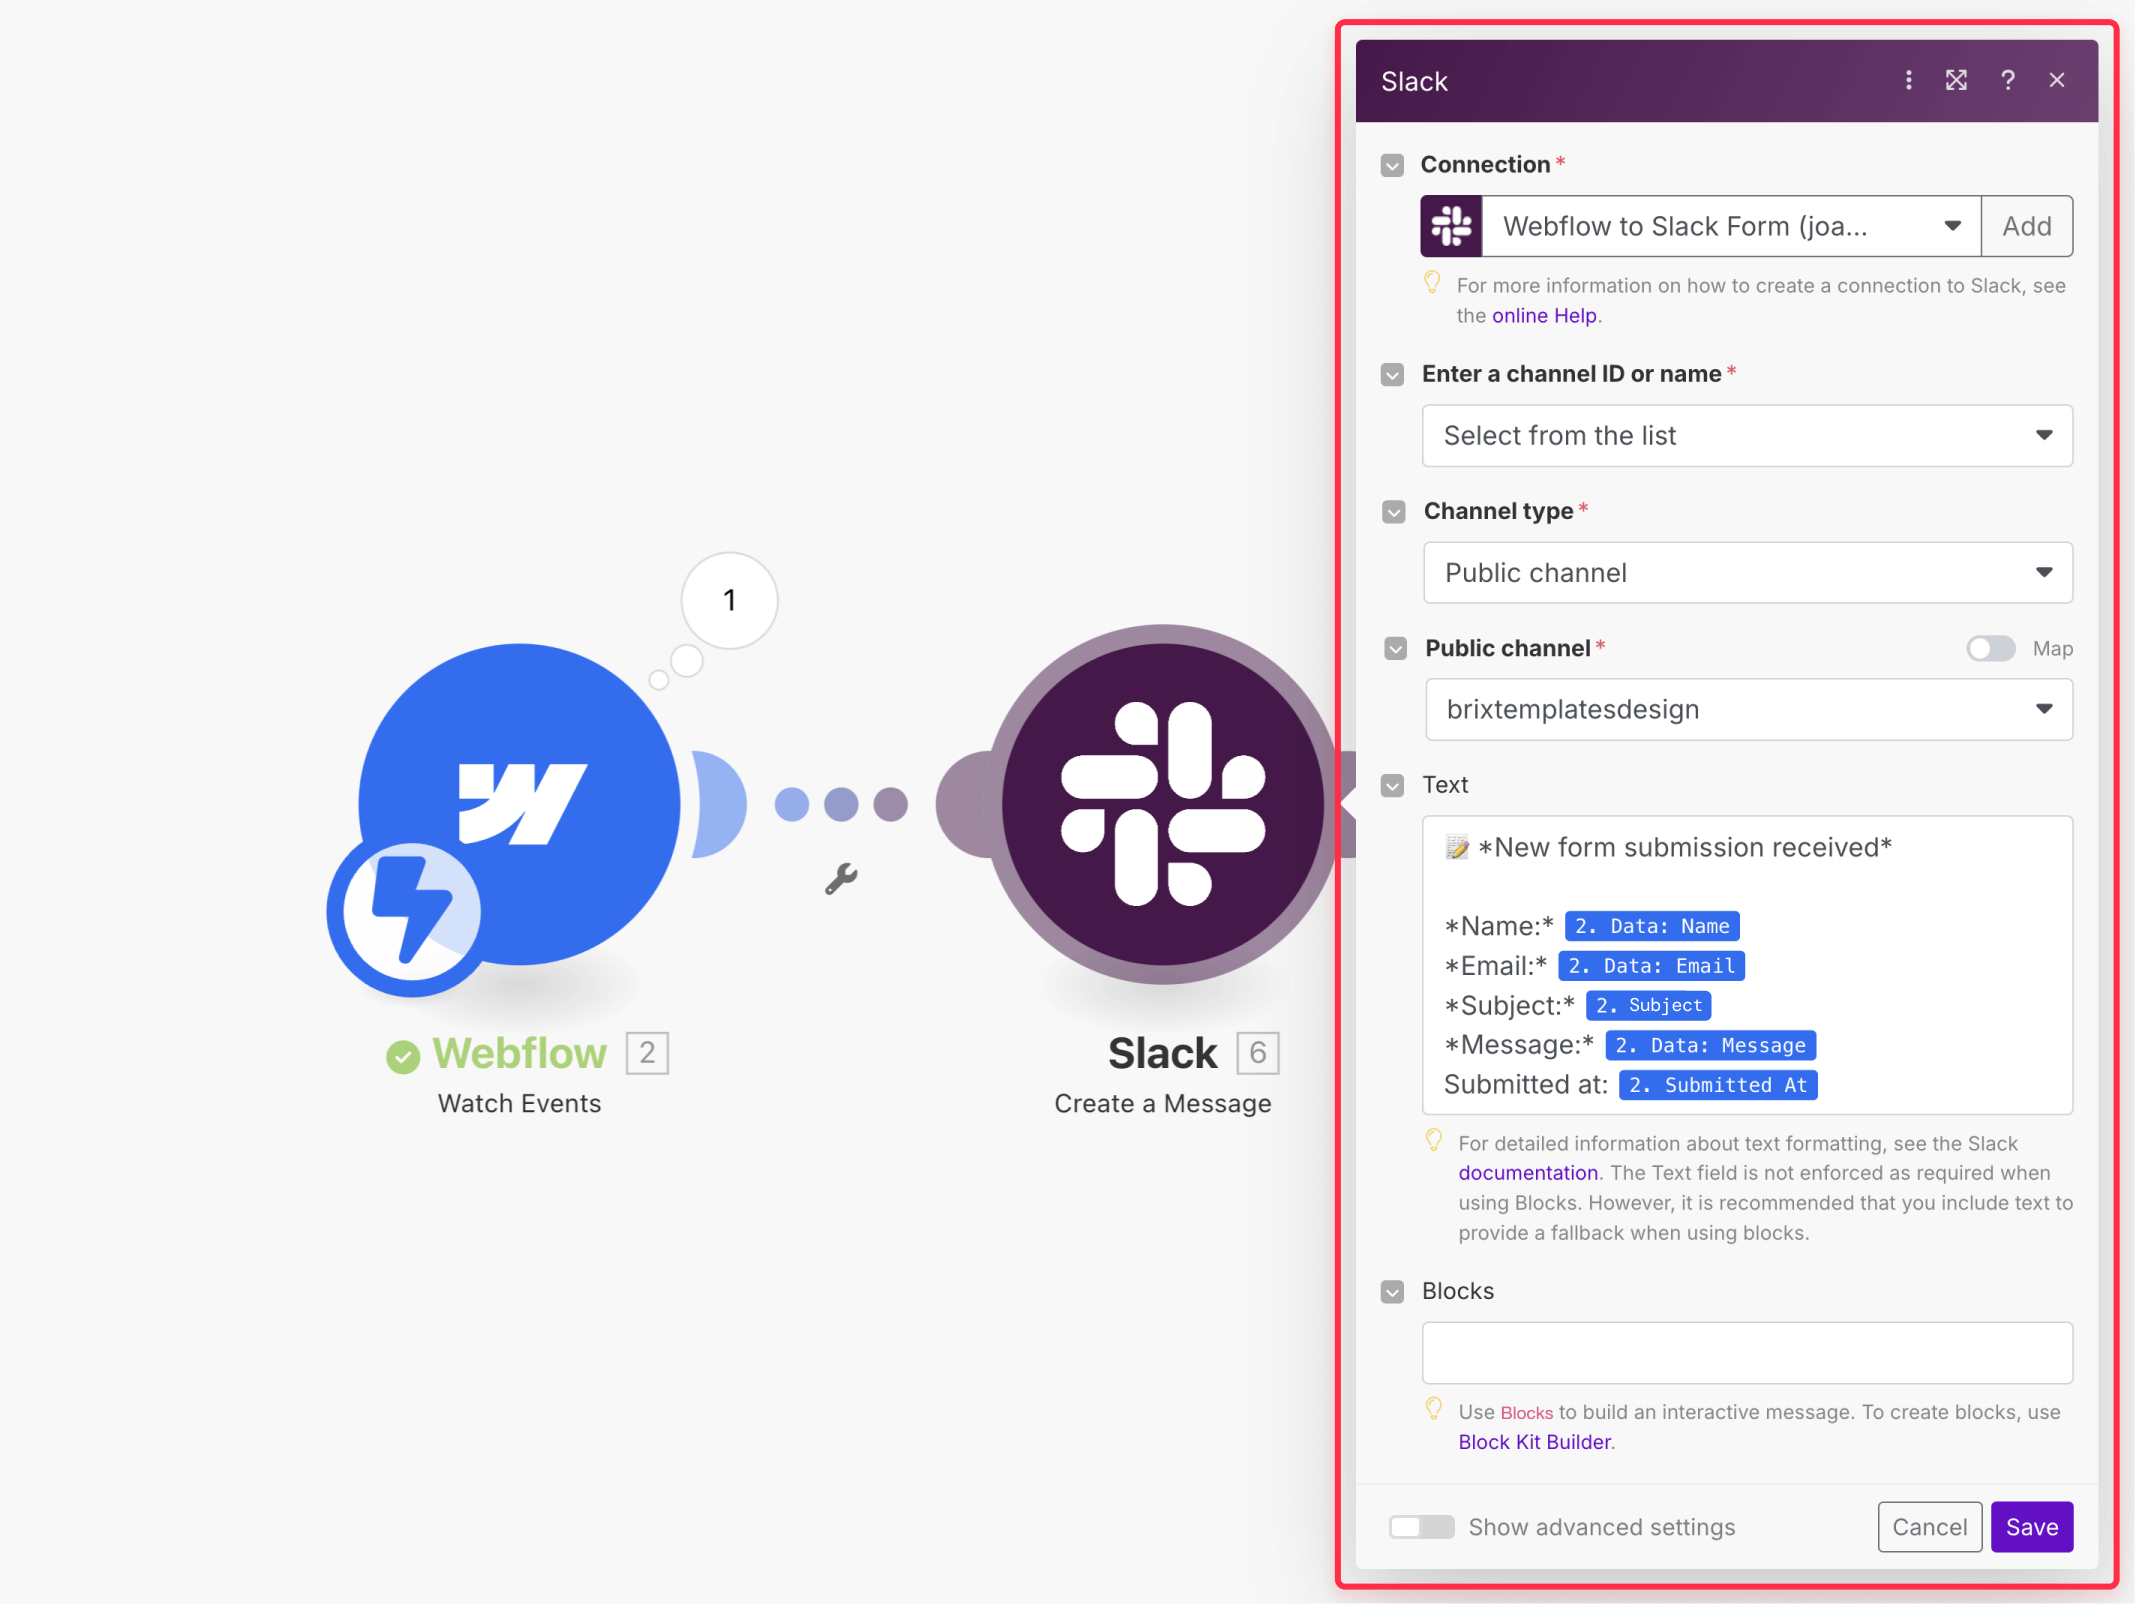
- Optionally, for Bot Name, enter a custom name for the bot that will post messages (e.g., "Webflow Forms Bot").
- For Bot Icon, you can set a custom emoji (e.g., ":incoming_envelope:") or upload an icon.
- Leave the remaining options at their default values unless you have specific requirements.
- Click OK to save your Slack message configuration.
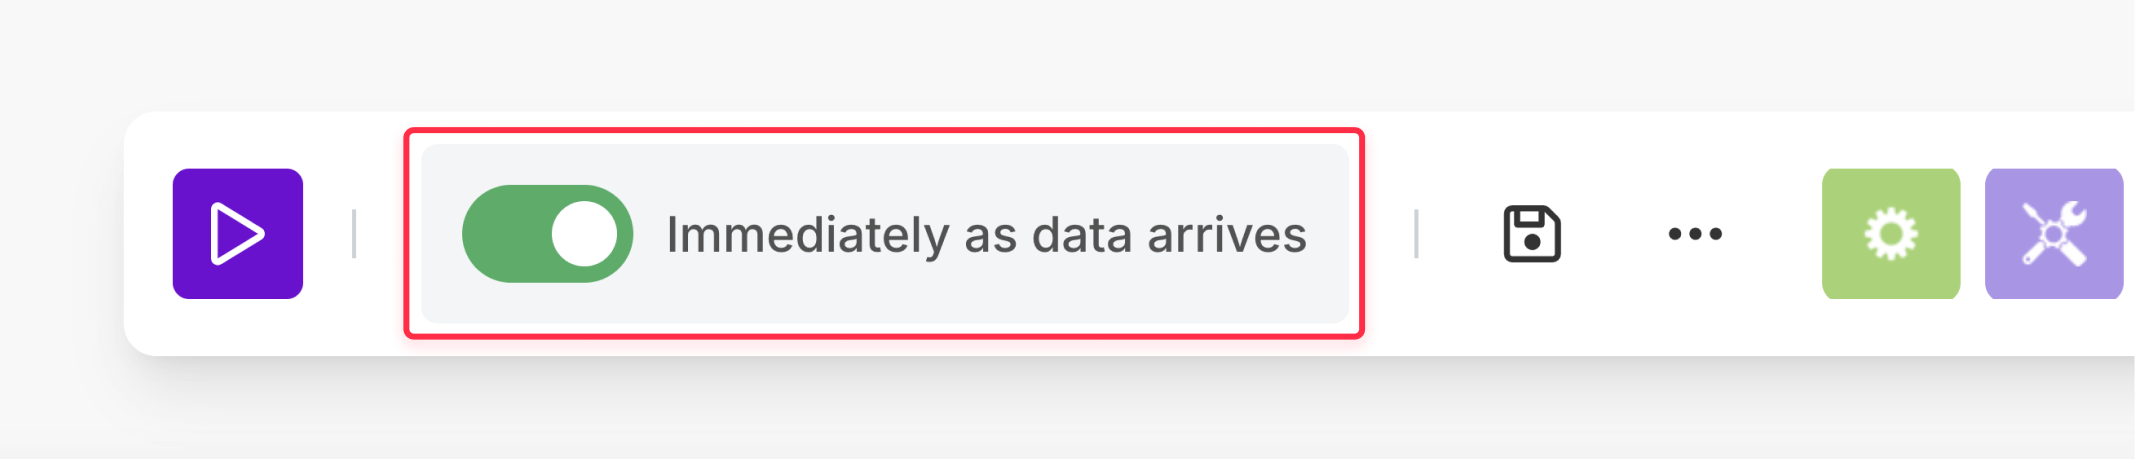
Step 8: Activating your Webflow form to Slack automation
- Click Save to save your complete scenario.
- Toggle the scheduling switch (at the bottom left, next to "Run once") to the ON position.
- The default schedule, "Immediately as data arrives" is usually the best option for form submissions. This ensures notifications are sent right away.
- Click OK to activate the scenario.
Step 9: Testing the complete Webflow form to Slack workflow
- Go to your published Webflow site.
- Submit another test form with sample data.
- Check your Slack channel to confirm that you received the notification with the correct form data.
- If needed, return to Make to adjust the message format or other settings.
Advanced Webflow form to Slack notification options
Once you've set up the basic Webflow form to Slack notification, Make offers several powerful features to enhance your workflow:
Adding conditional logic to Webflow form notifications in Slack
You can create different notification formats or send to different Slack channels based on form selections:
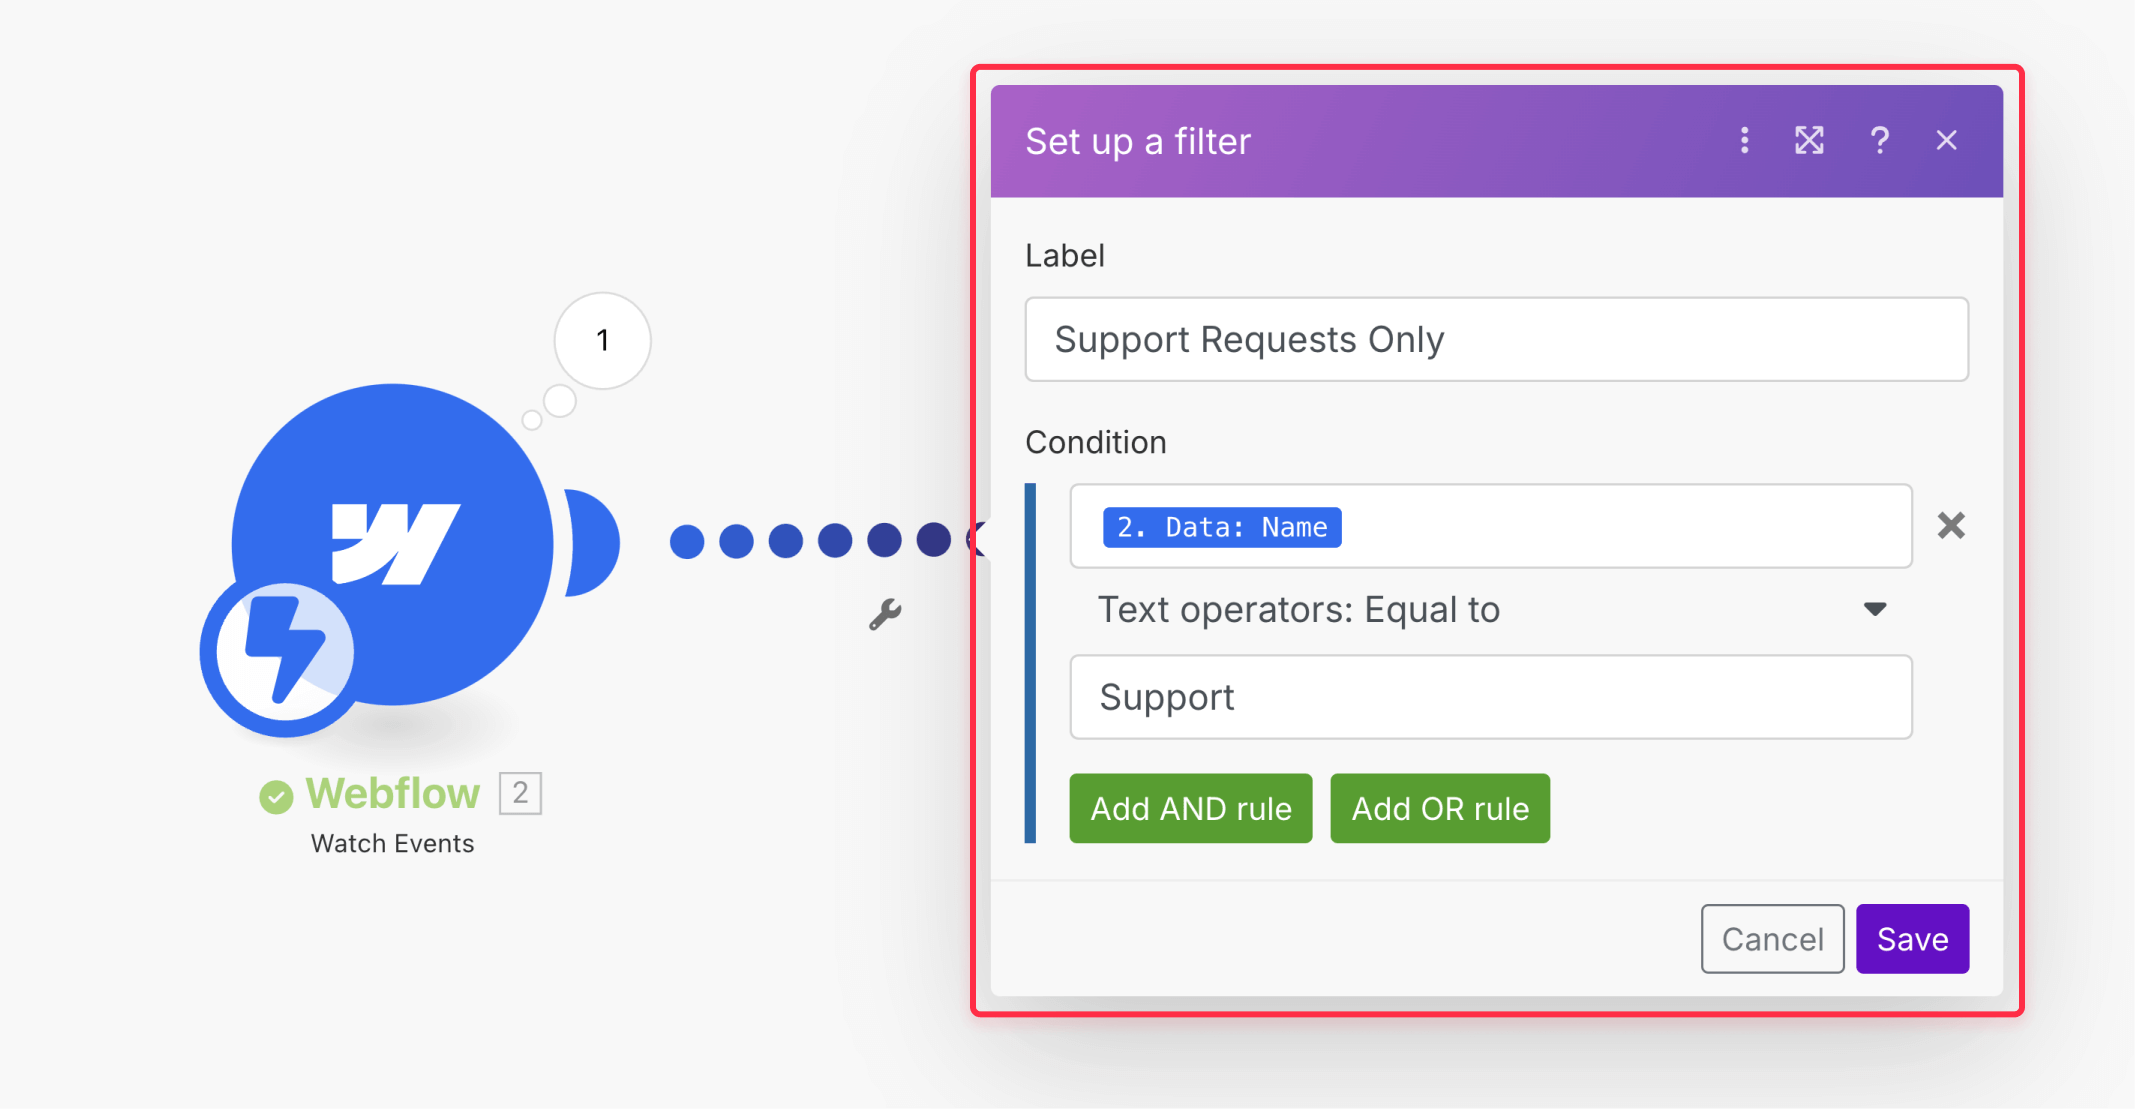
- Click the wrench icon on the connection line between your Webflow and Slack modules.
- Select "Set up a filter".
- Give the filter a label (e.g., "Support Requests Only").
- Set the condition by choosing a form field (e.g., "Department"), an operator (e.g., "Equal to"), and the value to match (e.g., "Support").
- Click Save.
You can then add a second Slack module with a different filter to send notifications to another channel based on different form selections.
Using Zapier as an alternative for Webflow form notifications in Slack
While Make is our recommended solution, Zapier is a solid alternative if you're already using it for other automations:
- Create a Zapier account or log into your existing account.
- Create a new Zap with Webflow as the trigger app and "New Form Submission" as the trigger event.
- Select your Webflow site and form from the dropdown options.
- Add an action step with Slack as the app and "Send Channel Message" as the action event.
- Connect your Slack account and select the channel where you want to send notifications.
- Configure the message format using Zapier's template options.
- Test and activate your Zap.
The main drawback with Zapier is you'll only get 100 tasks per month on their free plan, compared to Make's 1,000 operations. If you're expecting more than a handful of form submissions weekly, Make will likely save you money in the long run.
Troubleshooting common Webflow form to Slack integration issues
- Form submissions aren't triggering the automation: Make sure your Webflow site is published after making any form changes. The webhook in Make can only detect published forms.
- Make doesn't see your Webflow form submission: Try clicking "Run once" in Make before submitting your test form. This puts Make into listening mode to capture the data.
- Missing Webflow form fields in Slack notifications: Verify that the field names in your Slack message template match exactly the field names in your Webflow form, including capitalization.
- Webflow notifications not appearing in Slack: Check that your Slack connection is authorized with correct permissions and that the channel name is typed exactly as it appears in Slack (case-sensitive).
- Error messages in Make for Webflow forms: If you see a red bubble instead of green after submitting a form, click on it to view the error details. Common issues include incorrect data mapping or expired authorization tokens.
- Formatting issues in Slack messages from Webflow: Test your message format with simple text first before adding more complex formatting to ensure the basic connection is working correctly.
Conclusion
Setting up automated Slack notifications for Webflow form submissions streamlines team communication and significantly improves response times to potential customers. With Make's generous free tier and straightforward interface, you can create professional notification workflows that keep your team informed without requiring constant monitoring of your Webflow dashboard.
For most Webflow sites, the Make integration offers the perfect balance of functionality, reliability, and cost-effectiveness. Zapier remains a viable alternative, particularly if you're already invested in that ecosystem, but typically comes with higher costs for similar capabilities.
Need help implementing more complex form handling or other Webflow customizations? Our full-service Webflow no-code agency specializes in creating tailored solutions that elevate your site's functionality while maintaining a seamless user experience.


Join readers commenting on this post!