
UTM parameters are essential for tracking marketing attribution — but by default, they disappear when users navigate between pages. A visitor lands on your site from a Facebook ad with full UTM data in the URL, clicks to your pricing page, and the parameters are gone. Your analytics sees the initial landing, but if the conversion happens on a different page, the attribution data is lost.
The good news is that Framer has two native features designed to address this problem. The bad news is that both come disabled by default, so most Framer sites lose attribution data without realizing it. Once you activate these features, you'll have solid baseline UTM tracking with zero custom code.
This guide covers how UTM tracking works, how to activate Framer's native features, and how to implement BRIX Templates' persistent attribution script for advanced scenarios like return visits, first-touch attribution, or third-party form integration.
When UTM parameter tracking matters for Framer sites
This implementation becomes critical when your conversion doesn't happen on the first landing page — which is most real-world funnels.
- Paid advertising attribution: A visitor clicks your Facebook or Google ad, browses multiple pages, then fills out a contact form. Without proper tracking, you can't attribute that lead to the specific ad that drove it.
- Multi-page conversion flows: Your landing page drives traffic, but the actual form lives on a separate "/contact" or "/get-started" page. The UTMs need to survive that navigation.
- Influencer and partnership campaigns: You give each partner a unique UTM-tagged link. When leads come through, you need to know which partner drove them — even if the lead browsed five pages before converting.
- Email marketing campaigns: Subscribers click through from your newsletter, read a few blog posts, then sign up for a demo. You want that conversion attributed to the email campaign, not marked as "direct traffic."
- CRM and sales handoff: Your sales team needs to know where each lead originated so they can tailor their approach. Without UTM data flowing into form submissions, that context is lost.
How UTM parameter tracking works in Framer
Before diving into implementation, it helps to understand why UTM parameters get lost and what each solution actually does.
The core problem with UTM parameters
UTM parameters live in the URL. When someone clicks your ad, they land on something like:
yoursite.com/landing?utm_source=facebook&utm_medium=cpc&utm_campaign=spring_sale
The problem is that when they click an internal link to "/pricing", the browser loads a new URL — and those parameters disappear:
yoursite.com/pricing ← no UTMs
Your analytics might track the initial landing, but if the conversion happens on a different page, the attribution data is lost.
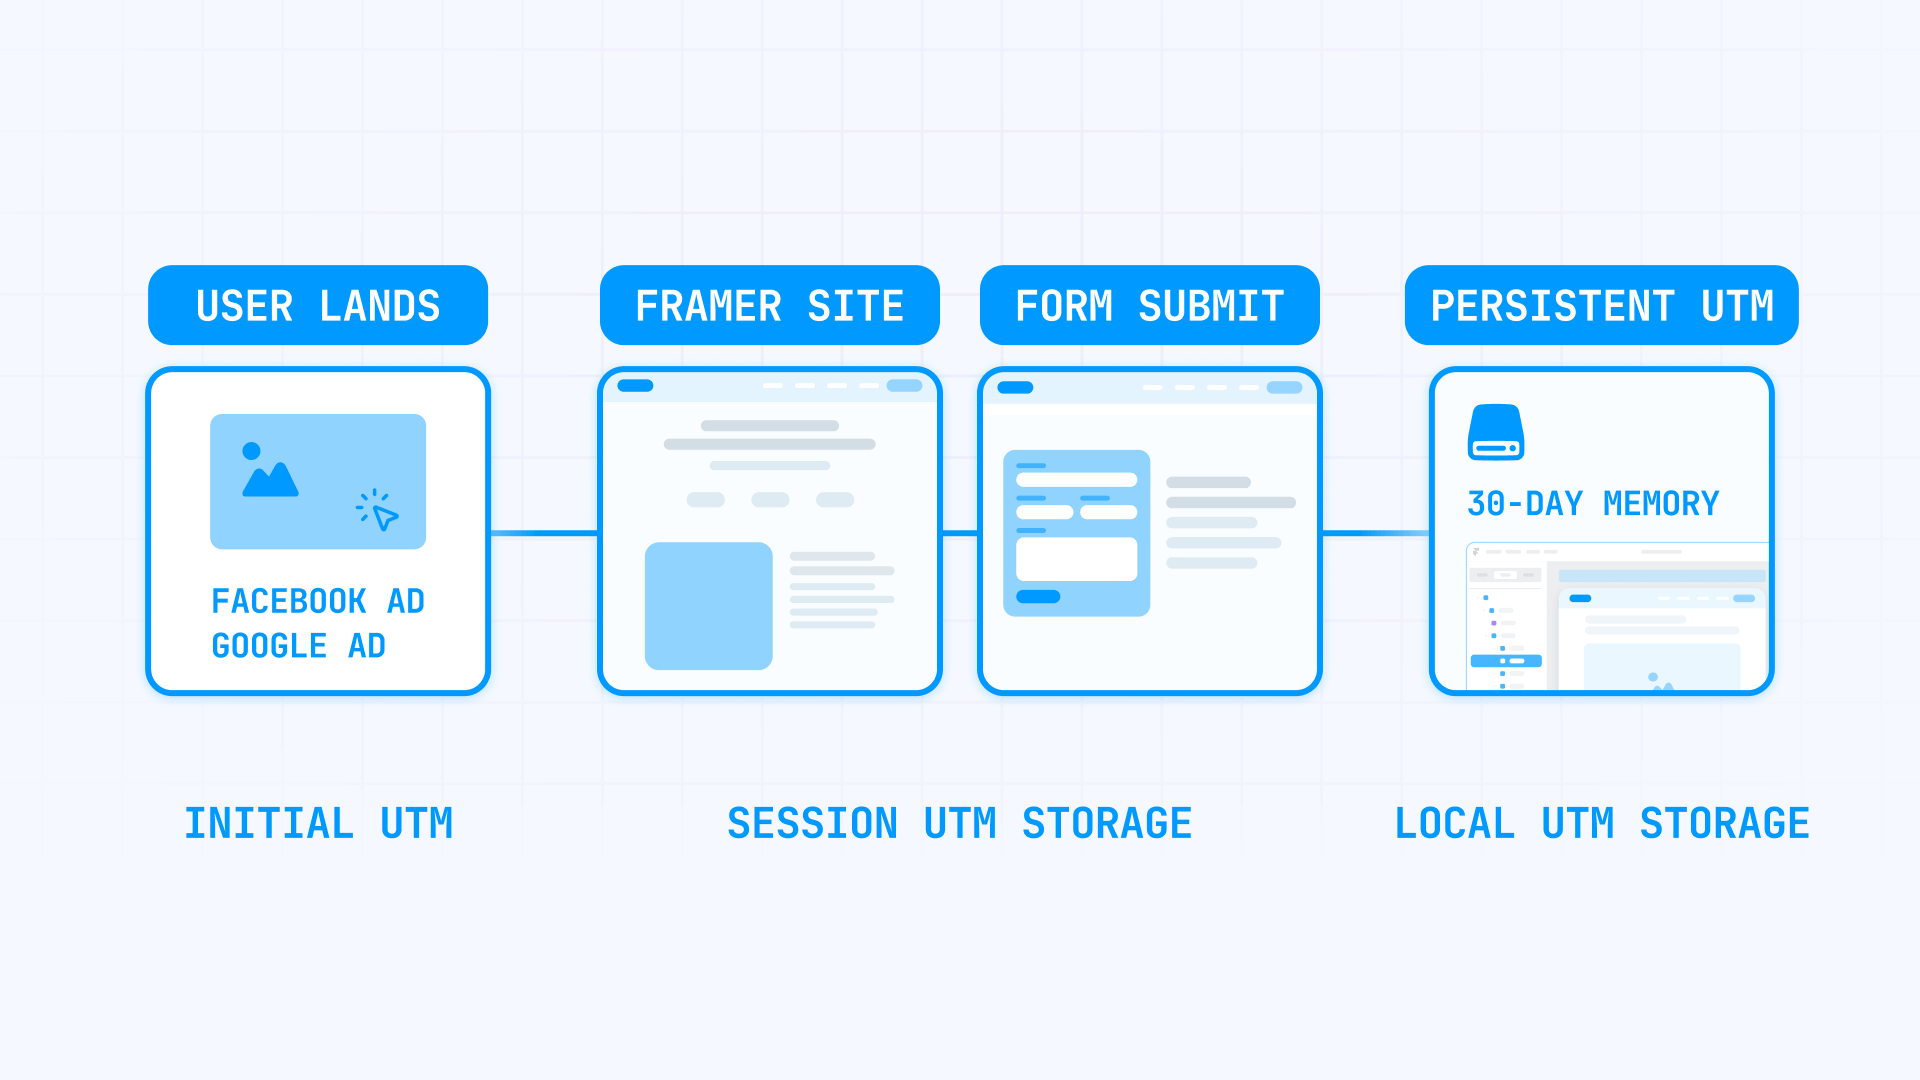
The three layers of UTM tracking in Framer
Framer addresses this with a layered approach, where each layer solves a different part of the problem:
Layer 1 — Keep UTMs in the URL during navigation: When someone navigates between pages, Framer can automatically append the current URL parameters to internal links. This keeps ?utm_source=facebook alive as users browse your site. This is a native Framer feature.
Layer 2 — Capture UTMs in form submissions: Even if UTMs are in the URL, forms don't automatically include them in the submission data. Framer can automatically inject UTM values into form submissions so your CRM/webhook receives them. This is also a native Framer feature.
Layer 3 — Store UTMs for return visits: The first two layers only work during the current session. If someone leaves and comes back later (without UTMs in the URL), the attribution is lost. This is where BRIX Templates' persistent attribution script comes in — it saves UTMs in browser storage and retrieves them on return visits, enabling advanced attribution scenarios that Framer's native features don't cover.
For most Framer sites, Layers 1 and 2 are enough — and both are native features you just need to turn on. Layer 3 is a capability extension for advanced use cases.
Method A — Preserve UTM parameters across Framer pages
This is the foundation of UTM tracking in Framer. Without it, parameters disappear on the first internal click.
What this Framer feature does
When enabled, Framer automatically appends the current URL's query parameters to all internal links. If a user lands on:
yoursite.com?utm_source=facebook&utm_campaign=spring
And clicks a link to your pricing page, they'll go to:
yoursite.com/pricing?utm_source=facebook&utm_campaign=spring
The UTMs stay in the URL throughout their browsing session.
How to enable URL parameter preservation in Framer
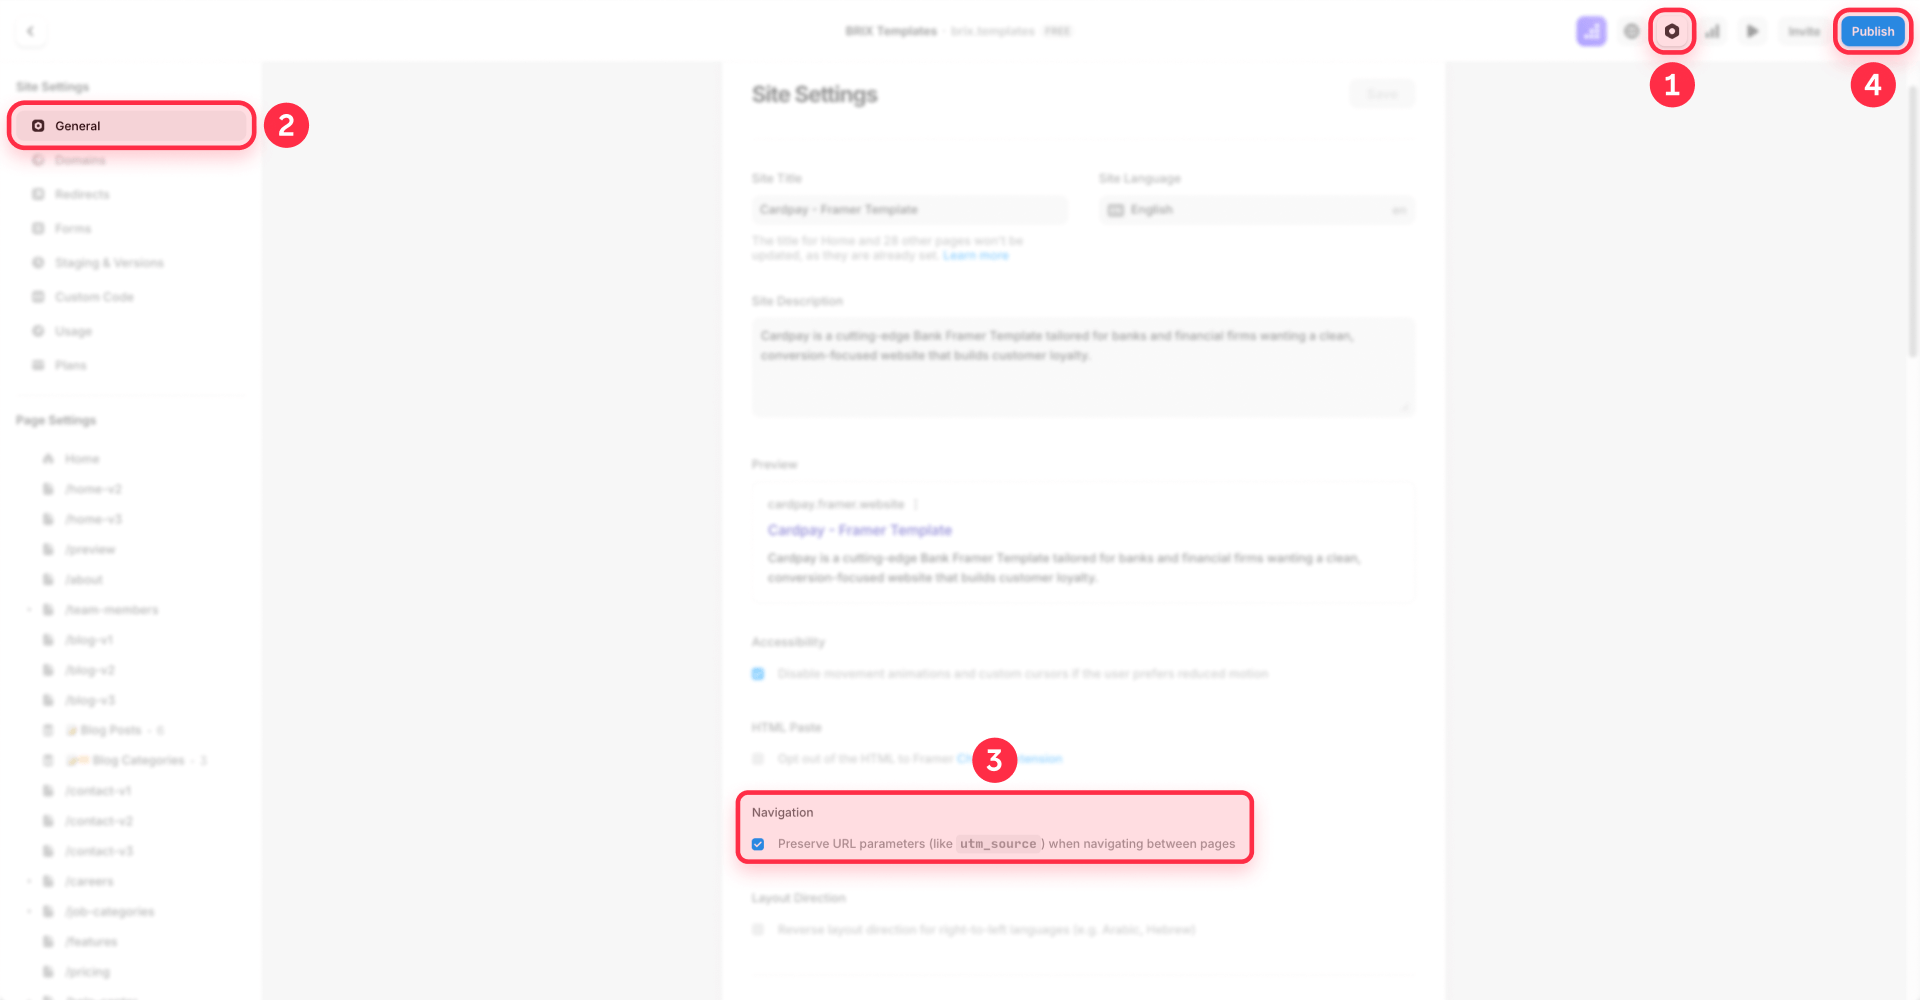
- Open your Framer project.
- Go to Site Settings (gear icon).
- Navigate to Navigation.
- Enable Preserve URL Parameters.
- Publish your site.
That's it. Every internal navigation now carries query parameters forward.
What this Framer feature doesn't solve
This keeps UTMs in the URL — but it doesn't capture them anywhere. If the user submits a form, the form submission data won't automatically include the UTM values just because they're in the URL. That's what Method B solves.
Also, if the user closes their browser and returns later (typing your URL directly), the UTMs are gone. That's what Method C solves.
Method B — Capture UTM parameters in Framer form submissions
Method A keeps UTMs alive in the URL. Method B gets them into your actual conversion data.
What this Framer feature does
When enabled, Framer automatically includes UTM parameters and Google Click ID (GCLID) in form submission data. You don't need to add hidden fields or write any code — Framer handles it automatically for native Framer Forms.
The parameters captured include:
- utm_source
- utm_medium
- utm_campaign
- utm_content
- utm_term
- gclid (Google Ads click ID)
How to enable campaign tracking in Framer forms
- Open your Framer project.
- Go to Site Settings.
- Navigate to Forms.
- Enable Campaign tracking.
- Publish your site.
Now every Framer Form submission automatically includes whatever UTM parameters are present in the current URL.
What this Framer feature doesn't solve
Only works with Framer Forms: If you're using embedded forms (Typeform, HubSpot, Cal.com, or custom HTML forms), Framer's native campaign tracking won't help. Those forms don't know about Framer's settings.
Only captures standard parameters: If you need custom parameters like affiliate_id or referral_code, this toggle won't capture them.
No persistence across sessions: If a user visits today (with UTMs), leaves, and returns tomorrow (without UTMs), the form submission won't have attribution data — because the UTMs aren't in the URL anymore.
For any of these cases, you need Method C.
Method C — Persistent UTM storage for advanced attribution in Framer
This is BRIX Templates' capability extension for when Framer's native features aren't enough. It requires adding a script to your site, but gives you significantly more power over attribution tracking.
When you need persistent UTM storage in Framer
Consider this approach when:
- Return visit attribution: A visitor clicks your ad on Monday, browses, leaves. Returns on Friday via direct traffic, converts. You want that conversion attributed to Monday's ad.
- First-touch vs last-touch attribution: You want to know the first channel that introduced a user, not just the most recent one.
- Custom parameters: You need to track affiliate_id, partner_code, or other non-standard parameters.
- Third-party forms: You're using Typeform, Cal.com, HubSpot forms, or other embedded tools that Framer's native tracking doesn't cover.
- Webhook/CRM workflows: You need UTM data in hidden fields that get sent to your automation tools.
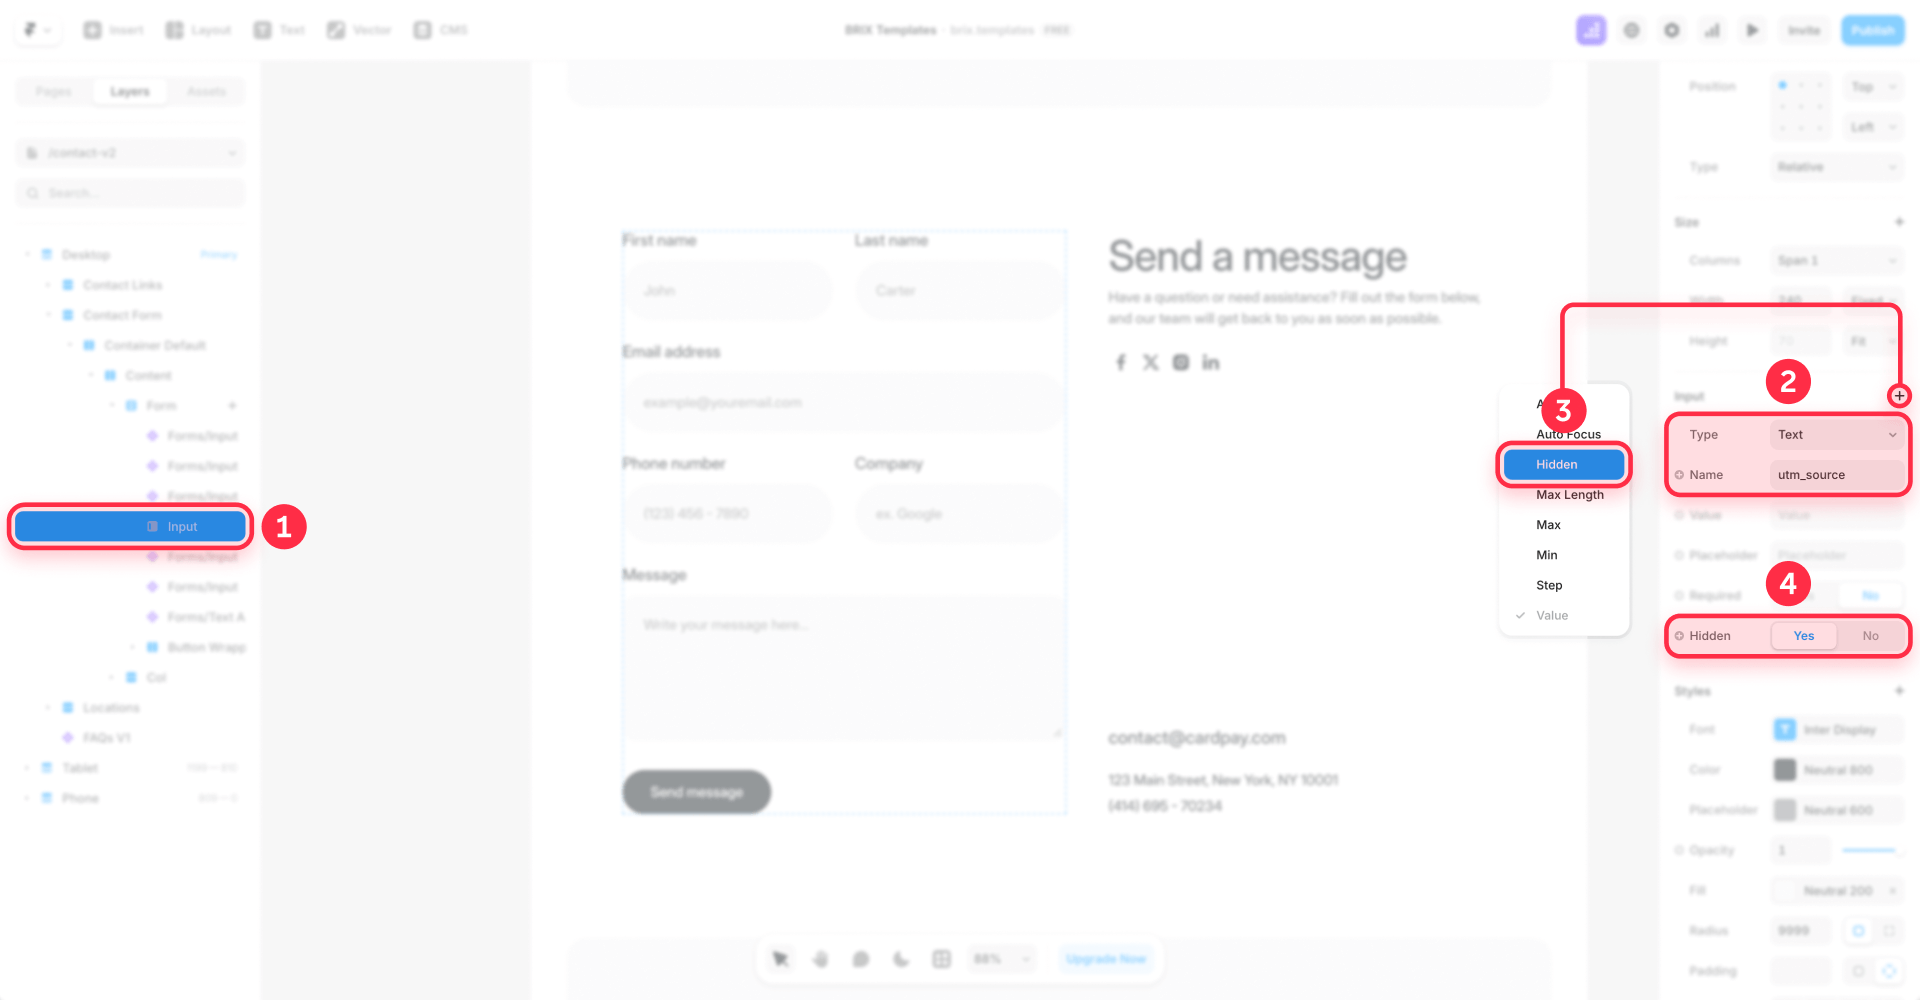
Step 1 — Add hidden fields to your Framer form
Hidden fields are form inputs that users don't see, but their values get included in the submission. You'll create one for each parameter you want to capture.
- Select your Form component in Framer.
- Add an Input field.
- In the field settings, enable the Hidden property.
- Set the Name to match the parameter (e.g., utm_source).
- Repeat for each parameter you want to track.
Common hidden fields to add:
- utm_source
- utm_medium
- utm_campaign
- utm_term
- utm_content
- gclid
Important: Use the Hidden property, not the Visible toggle. Framer excludes invisible fields from form submissions entirely — only fields with the Hidden property enabled will submit their values while remaining invisible to users.
Step 2 — Add the BRIX attribution script to Framer
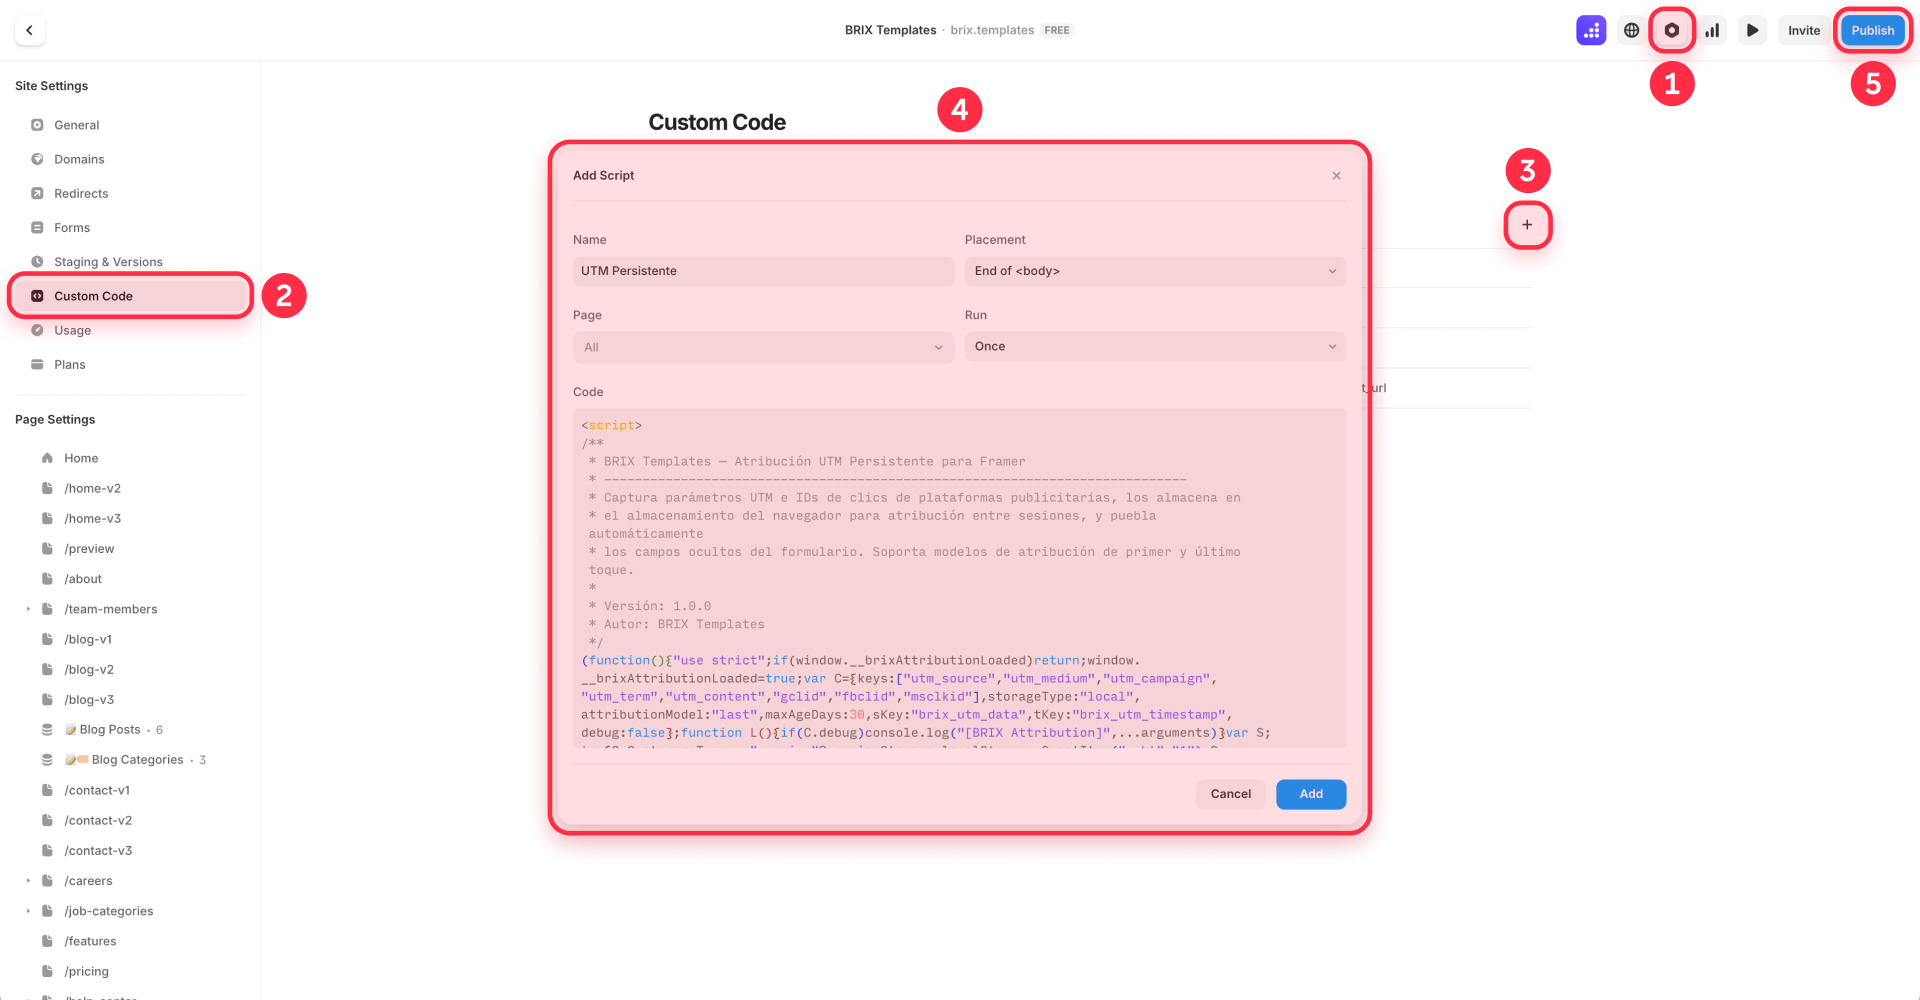
This script reads UTM parameters, stores them in the browser, and automatically fills hidden fields when forms are present.
- Open Project Settings in Framer.
- Go to Custom Code.
- Click Add Script.
- Set placement to End of <body>.
- Set scope to All pages (or specific pages with forms).
- Set run mode to Once.
- Paste the script below.
<script>
/**
 * BRIX Templates — Framer Persistent UTM Attribution
 * --------------------------------------------------------------------------
 * Captures UTM parameters and ad platform click IDs, stores them in browser
 * storage for cross-session attribution, and automatically populates hidden
 * form fields. Supports first-touch and last-touch attribution models.
 *
 * Version: 1.0.0
 * Author: BRIX Templates
 */
</script>
<script src="https://apps.brixtemplates.com/framer-persistent-utm-attribution/script.js"></script>
How the BRIX attribution script works
The script does four things:
- Reads parameters from the current URL when the page loads
- Stores them in localStorage (survives browser close) or sessionStorage (current tab only)
- Merges with existing data using your chosen attribution model (first-touch or last-touch)
- Fills hidden fields whose name matches a stored parameter key
So if you have a hidden field named utm_source and the stored data has utm_source: "facebook", the field gets filled automatically.
Configuring the BRIX script for your Framer site
The script's behavior is controlled by the config object at the top:
attributionModel: Set to "first" if you want to track the original source that brought a user. Set to "last" (default) if you want the most recent source to win.
maxAgeDays: How long to remember attribution. 30 days is standard for most marketing attribution windows. Set higher for longer sales cycles.
storageType: Use "local" for cross-session persistence (user closes browser, attribution survives). Use "session" if you only want attribution during the current tab.
keys: Add any custom parameters you need to track (e.g., "affiliate_id", "partner_code").
How to test your Framer UTM implementation
Don't publish and hope. Test each layer systematically.
Testing Method A (URL preservation) in Framer
- Open your published site with test parameters: ?utm_source=test&utm_medium=email
- Click through several internal pages.
- Check that the URL still contains the parameters on each page.
Testing Method B (form capture) in Framer
- Enable Campaign tracking in Site Settings → Forms.
- Visit your site with UTM parameters in the URL.
- Submit a test form.
- Check your form destination (email, webhook, spreadsheet) for the UTM data.
Testing Method C (persistent storage) in Framer
- Add hidden fields to your form (utm_source, utm_medium, etc.).
- Add the script to Custom Code.
- Visit your site with UTM parameters.
- Open browser DevTools → Application → Local Storage → look for brix_utm_data.
- Submit a test form and verify hidden field values arrive at your destination.
- Return visit test: Close the browser, reopen, visit your site without UTMs in the URL, submit the form — the stored attribution should still be present.
Best practices for UTM tracking in Framer
Always enable Method A and B first. Even if you plan to use Method C, the native features provide a solid foundation and handle cases where JavaScript might not run.
Don't add UTMs to internal links manually. Let the Preserve URL Parameters setting handle this. Manually adding UTMs creates conflicts and tracking inconsistencies.
Use consistent UTM naming conventions. Decide on lowercase vs uppercase, underscores vs hyphens, and stick to it. utm_source=Facebook and utm_source=facebook will show as different sources in analytics.
Test on mobile devices. Some browsers handle localStorage differently, especially in private/incognito mode. Verify your tracking works across the devices your audience actually uses.
Update your privacy policy. If using Method C with localStorage, you're storing user data. Mention UTM tracking in your privacy policy to stay compliant with GDPR/CCPA.
Don't over-engineer. Most Framer sites only need Method A + B. Add Method C only when you have a specific use case that requires it.
Troubleshooting Framer UTM tracking
- UTM parameters disappear after one click: Verify that Preserve URL Parameters is enabled in Site Settings → Navigation. Publish your site after enabling.
- Form submissions don't include UTM data: Check that Campaign tracking is enabled in Site Settings → Forms. Also verify that UTMs are actually present in the URL when submitting — if Method A isn't working, Method B won't have data to capture.
- Hidden fields are empty in submissions: Confirm you used the Hidden property, not the Visible toggle. Check that the hidden field name exactly matches the parameter key (e.g., utm_source not UTM_Source).
- Script doesn't seem to run: Check browser DevTools console for errors. Verify the script is placed at End of <body> and set to run on the correct pages. Remember that Custom Code doesn't run in Framer's preview — you must test on the published site.
- Return visit attribution not working: Check DevTools → Application → Local Storage for brix_utm_data. If it's missing, the script may not have run on the initial visit. If it exists but fields aren't filling, verify hidden field names match exactly.
- Attribution data seems wrong: If using first-touch model, stored data won't update with new UTMs. Check the attributionModel setting. Also verify maxAgeDays hasn't expired the data.
Frequently asked questions about UTM parameters in Framer
Does Framer preserve UTM parameters automatically between pages?
Framer has a native feature to preserve URL parameters during internal navigation, but it's disabled by default. You need to enable it manually in Site Settings → Navigation → Preserve URL Parameters. Once enabled, any query parameters (including UTMs) will automatically carry forward when users click internal links. This works for the current session only — if users close their browser and return, the parameters won't be there.
How do I capture UTM parameters in Framer form submissions?
Enable Campaign tracking in Site Settings → Forms. Once activated, Framer automatically includes UTM parameters (utm_source, utm_medium, utm_campaign, utm_content, utm_term) and Google Click ID (gclid) in every Framer Form submission. You don't need to add hidden fields or write code — it happens automatically. This only works with native Framer Forms, not embedded third-party forms.
Why are both Framer UTM features disabled by default?
Framer likely keeps these features opt-in because they modify default browser behavior (URL preservation) and add data to form submissions (campaign tracking). Not every site needs marketing attribution, and some users may have privacy concerns. The good news is that enabling both takes about 30 seconds and requires no code.
What's the difference between URL preservation and campaign tracking in Framer?
URL preservation keeps parameters in the URL as users navigate between pages — it solves the "disappearing UTMs" problem during browsing. Campaign tracking captures those URL parameters and includes them in form submission data — it solves the "getting UTMs into your CRM" problem. You typically want both enabled: preservation keeps UTMs alive, tracking captures them at conversion.
Can I track UTM parameters across multiple visits in Framer?
Not with native features alone. Framer's built-in URL preservation and campaign tracking only work during the current session. If a user visits Monday with UTMs, leaves, and returns Friday without UTMs, the attribution is lost. For cross-session tracking, you need Method C — the BRIX Templates attribution script that stores parameters in localStorage and retrieves them on return visits.
Do Framer's UTM features work with embedded forms like Typeform or HubSpot?
No. Framer's native campaign tracking only works with Framer Forms. Embedded third-party forms (Typeform, HubSpot, Cal.com, etc.) don't receive data from Framer's settings. For embedded forms, you need Method C with hidden fields that the script populates, then configure your embedded form to read those values — or use the third-party tool's own UTM capture features if available.
What is first-touch vs last-touch attribution in Framer?
First-touch attribution credits the conversion to the first marketing channel that brought the user. Last-touch attribution credits the most recent channel before conversion. Example: User clicks a Facebook ad Monday, returns via Google search Friday, converts. First-touch credits Facebook; last-touch credits Google. Framer's native features effectively do last-touch (they capture whatever's in the URL now). For first-touch, you need Method C with attributionModel: "first".
How long should I store UTM attribution data in Framer?
The standard is 30 days, which matches most ad platform attribution windows (Google Ads, Facebook Ads). If you have a longer sales cycle (enterprise B2B, high-ticket items), consider 60-90 days. The script's maxAgeDays setting controls this. Setting it too long can create misleading attribution; setting it too short loses legitimate conversions.
Will UTM tracking slow down my Framer site?
The native features (Method A and B) have zero performance impact — they're built into Framer's infrastructure. Method C adds a small script that runs once on page load, which has negligible impact on modern browsers. The script is under 3KB and executes in milliseconds. Don't let performance concerns stop you from implementing proper attribution.
Do I need to update my privacy policy for Framer UTM tracking?
For Methods A and B, probably not — they don't store persistent user data. For Method C with localStorage, yes — you're storing information in the user's browser that persists across sessions. Mention that you use browser storage for marketing attribution in your privacy policy. This is similar to how Google Analytics and Facebook Pixel operate, which you likely already disclose.
Conclusion
UTM parameter tracking in Framer comes down to three layers: keeping parameters in the URL during navigation, capturing them in form submissions, and optionally persisting them across sessions.
The first two are native Framer features that come disabled by default — enable Preserve URL Parameters in Navigation settings and Campaign tracking in Forms settings to get solid baseline attribution for most use cases.
For advanced scenarios like return visit attribution, first-touch tracking, or third-party forms, the BRIX Templates persistent attribution script gives you the power to handle them — but only add that complexity when you actually need it.
If you need help setting up advanced attribution workflows, integrating UTM data with your CRM, or building custom tracking solutions for your Framer site, our Framer agency can help you get it right.


Join readers commenting on this post!