
Watching your visitor count climb feels great until you realize those numbers tell you nothing about what's actually happening on your Framer site. Are people finding what they need? Where are they dropping off? Which sections create confusion? Standard traffic metrics alone can't answer these questions. Microsoft Clarity fills this gap by recording exactly how visitors navigate your site with heatmaps, session replays, and behavior insights that reveal user click patterns, scroll behavior, points of friction, and exit triggers. The tool is completely free with no session caps or feature restrictions.
This guide shows you how to integrate Microsoft Clarity into your Framer site using custom code injection and verify your installation is capturing data correctly. Adding Clarity to your Framer project requires just minutes and provides actionable data that can help you improve your site's performance and user satisfaction.
Why Microsoft Clarity matters for Framer sites
Recognizing the practical applications of behavior tracking helps you leverage Clarity across different site types:
- Agency portfolios demonstrating expertise: Analyze which case studies hold attention longest, discover if visitors reach your contact information before bouncing, and measure engagement with project galleries to showcase your most compelling work first
- SaaS companies perfecting onboarding flows: Record user journeys through sign-up processes to spot confusion points, track where trial users abandon registration steps, and identify interface elements that cause repeated clicks or rage-clicking behaviors
- Course creators maximizing enrollment: Study landing page scroll patterns to position key selling points at optimal locations, watch session replays to understand pricing objections, and track which testimonials or social proof elements drive the most engagement
- Startup landing pages validating assumptions: Monitor which value propositions capture attention versus which get skipped entirely, identify navigation patterns that reveal user intent, and measure interaction with different CTA placements to inform design decisions
- Personal brands building authority: Track content consumption patterns to understand which topics resonate strongest, identify whether visitors explore multiple pages or leave immediately, and optimize layout based on real reading behavior rather than design preferences
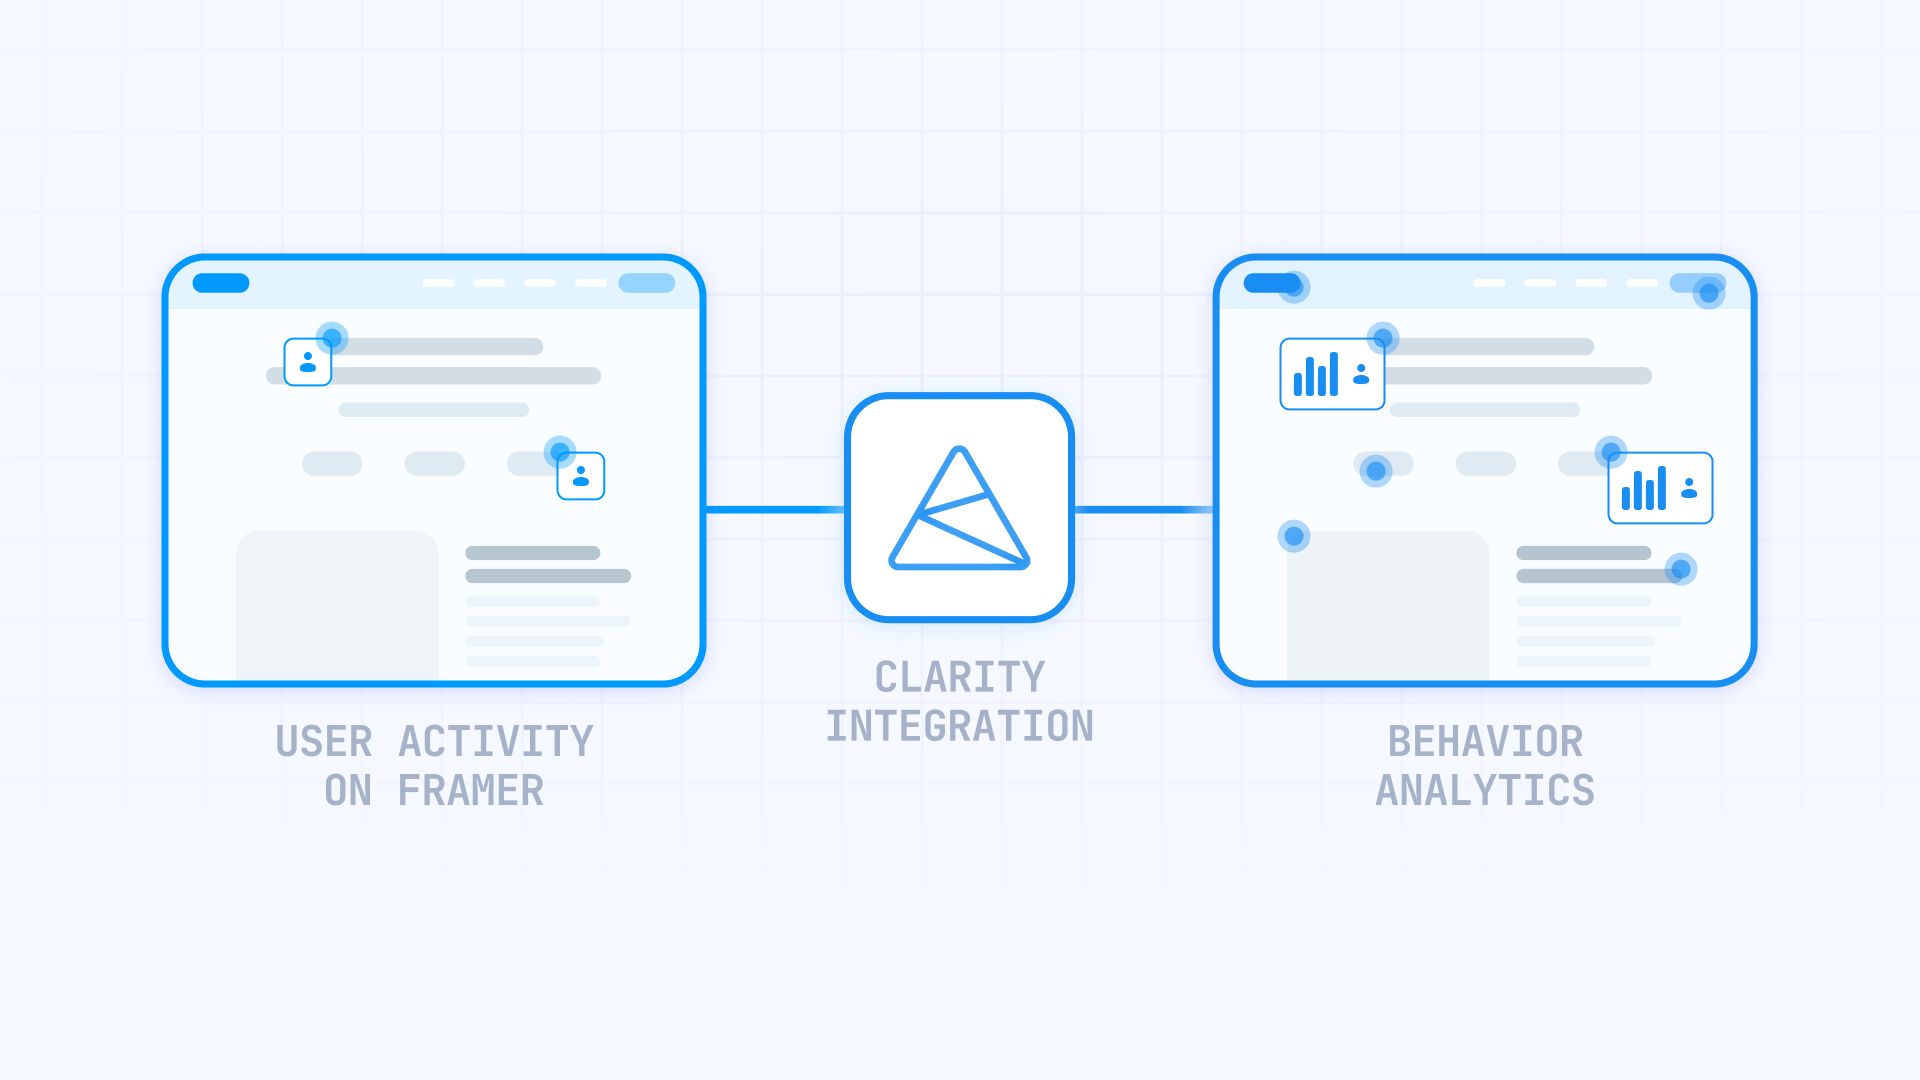
How Microsoft Clarity integrates with Framer
Microsoft Clarity connects to your Framer site through manual code installation. This approach inserts a lightweight tracking script that captures user interactions without affecting site performance.
The manual installation method gives you full control over script placement and loading behavior. Once configured, the setup takes just a few minutes and begins tracking immediately after you publish your site. The script automatically records mouse movements, clicks, scrolls, and navigation patterns, then transforms this data into session recordings, heatmaps, and AI-powered insights that reveal friction points like rage clicks and dead clicks.
What you'll need:
- A free Microsoft Clarity account
- A Framer site with publishing access
- A paid Framer plan with custom code access (Basic plan or higher)
1 - Creating your Microsoft Clarity account for Framer integration
Establishing your Clarity account provides access to unlimited tracking features without payment requirements.
Registering for a Microsoft Clarity account
Complete these steps to activate your account:
- Navigate to Microsoft Clarity: Open clarity.microsoft.com and locate the Sign up option at the top of the page
- Select authentication method: Choose between Microsoft Account, Google, or Facebook for login credentials. Your selection doesn't affect which other Microsoft services you use.
- Agree to service terms: Read through Microsoft Clarity's terms and privacy policies, then confirm acceptance
Your account activates immediately with access to create unlimited projects and track unlimited sessions.
Establishing your first Clarity project for Framer tracking
Configure a tracking project for your Framer site:
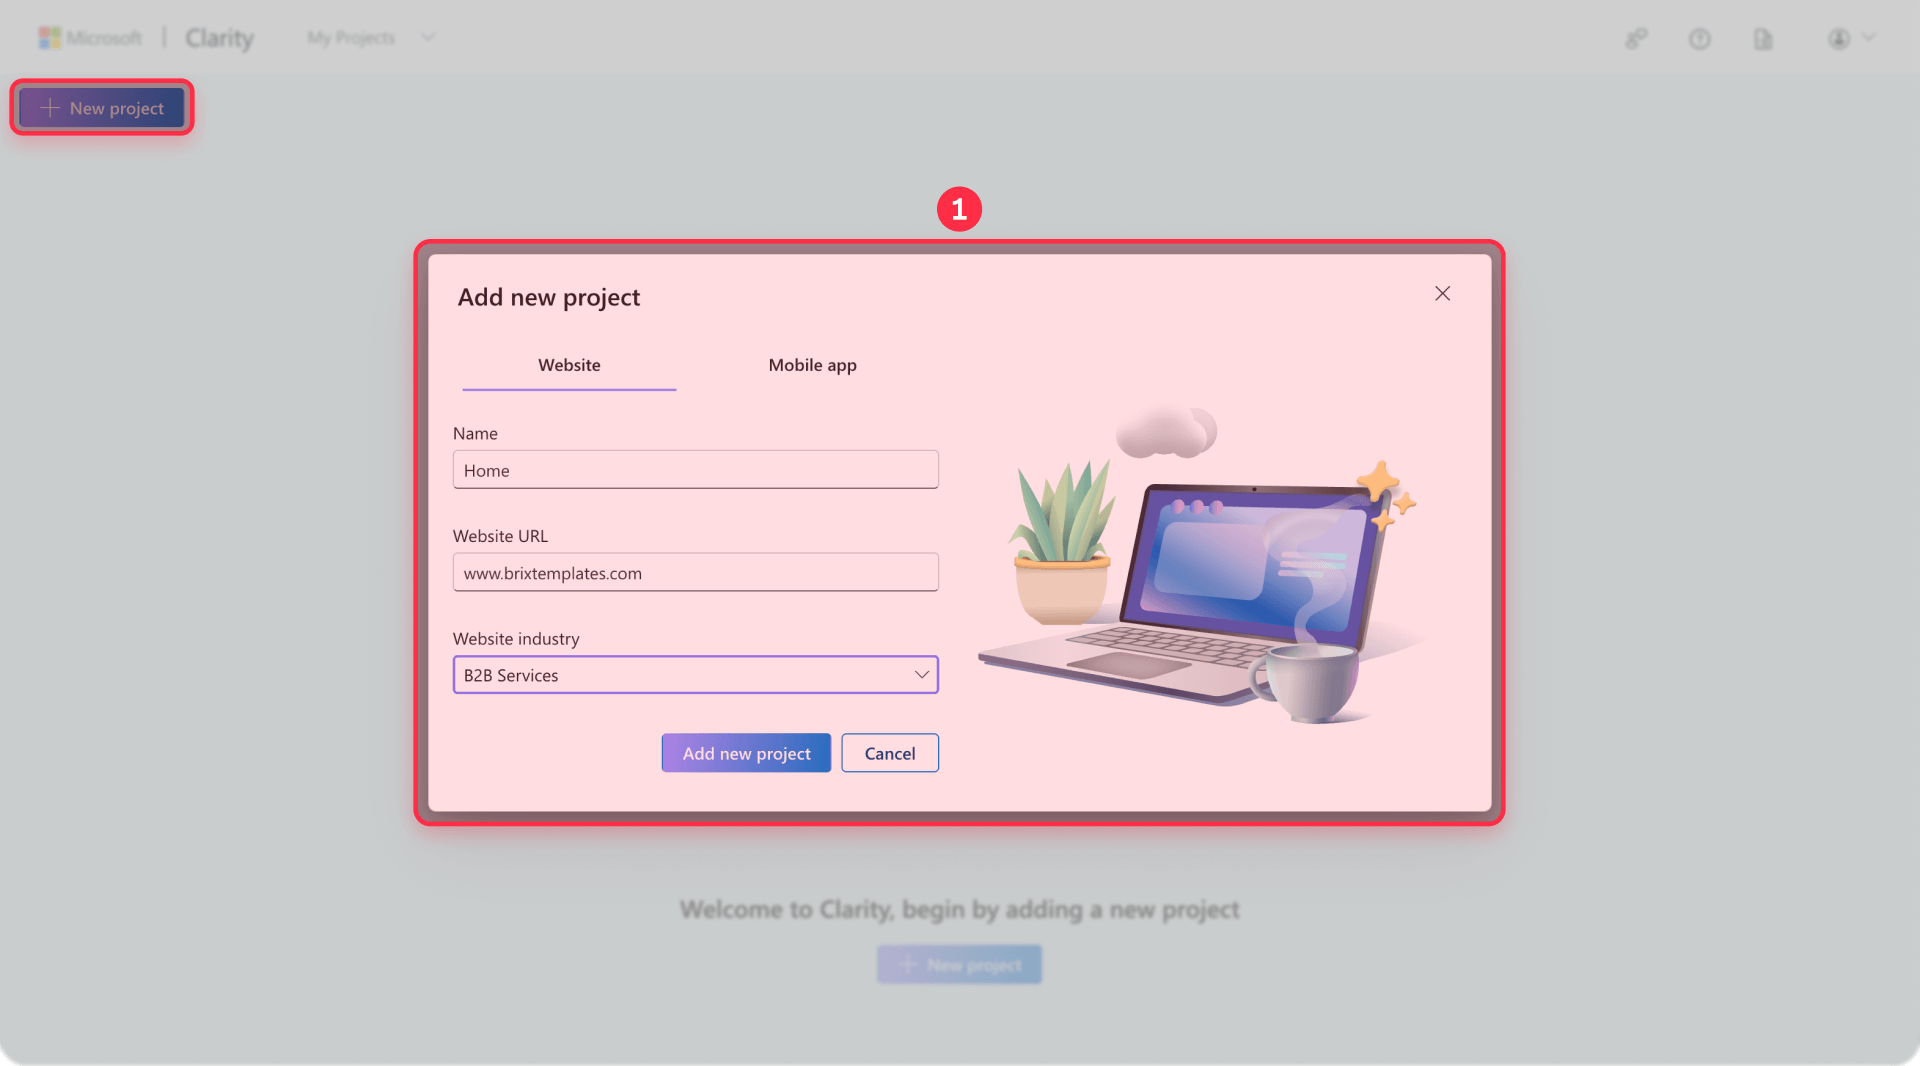
- Initialize new project: Inside the Clarity dashboard, select Add new project
- Configure project settings: Input your Project name (something descriptive like "Framer Portfolio" or your company name), add your Website URL (complete domain such as https://yoursite.com), and pick your Industry from available options
- Generate the project: Select Add to create your tracking project
Clarity produces a unique tracking script for this specific project. You'll use this code to connect your Framer site with Clarity's analytics platform.
2 - Installing Microsoft Clarity tracking on your Framer site
Framer requires manual code installation, as there's currently no native Clarity integration in the marketplace.
Retrieving your Microsoft Clarity tracking script for Framer
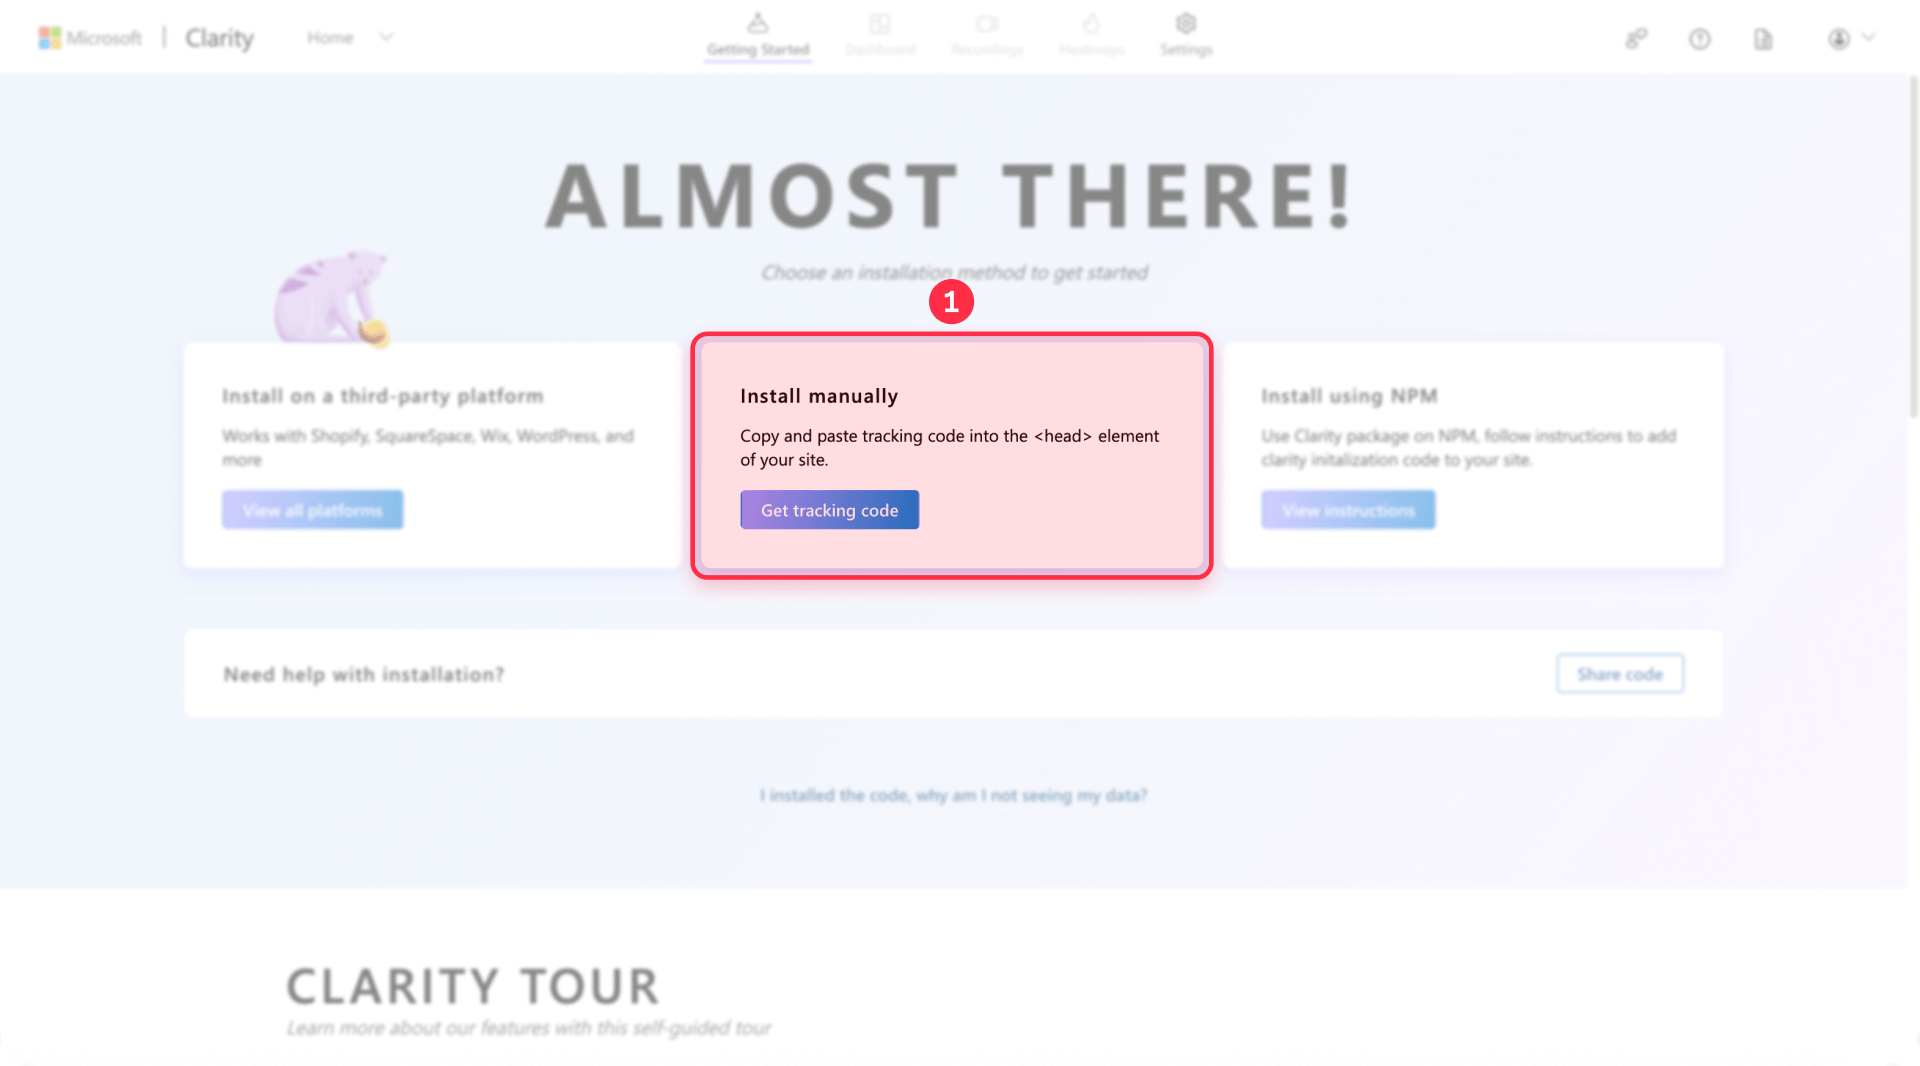
After creating your Clarity project, Microsoft automatically displays an installation screen with three setup options. Since Framer isn't listed in the third-party platform integrations, you'll use the manual installation method:
1- Select manual installation: On the "Choose an installation method to get started" screen, click Get tracking code under the "Install manually" option (the middle card)
2- Copy the tracking code: Clarity displays your unique JavaScript snippet beginning with <script type="text/javascript">. Click Copy to grab the entire code block
3 - Store your project ID: Note that your tracking snippet contains your unique project identifier embedded within the script
If you've already passed this initial setup screen, you can access your tracking code anytime by going to Settings → Setup in your Clarity project's left sidebar.
Adding Microsoft Clarity code to your Framer project settings
Insert the tracking code into your site's header:
- Open project settings: In your Framer dashboard, select the site where you want tracking, then click the Settings icon (gear symbol) in the top navigation
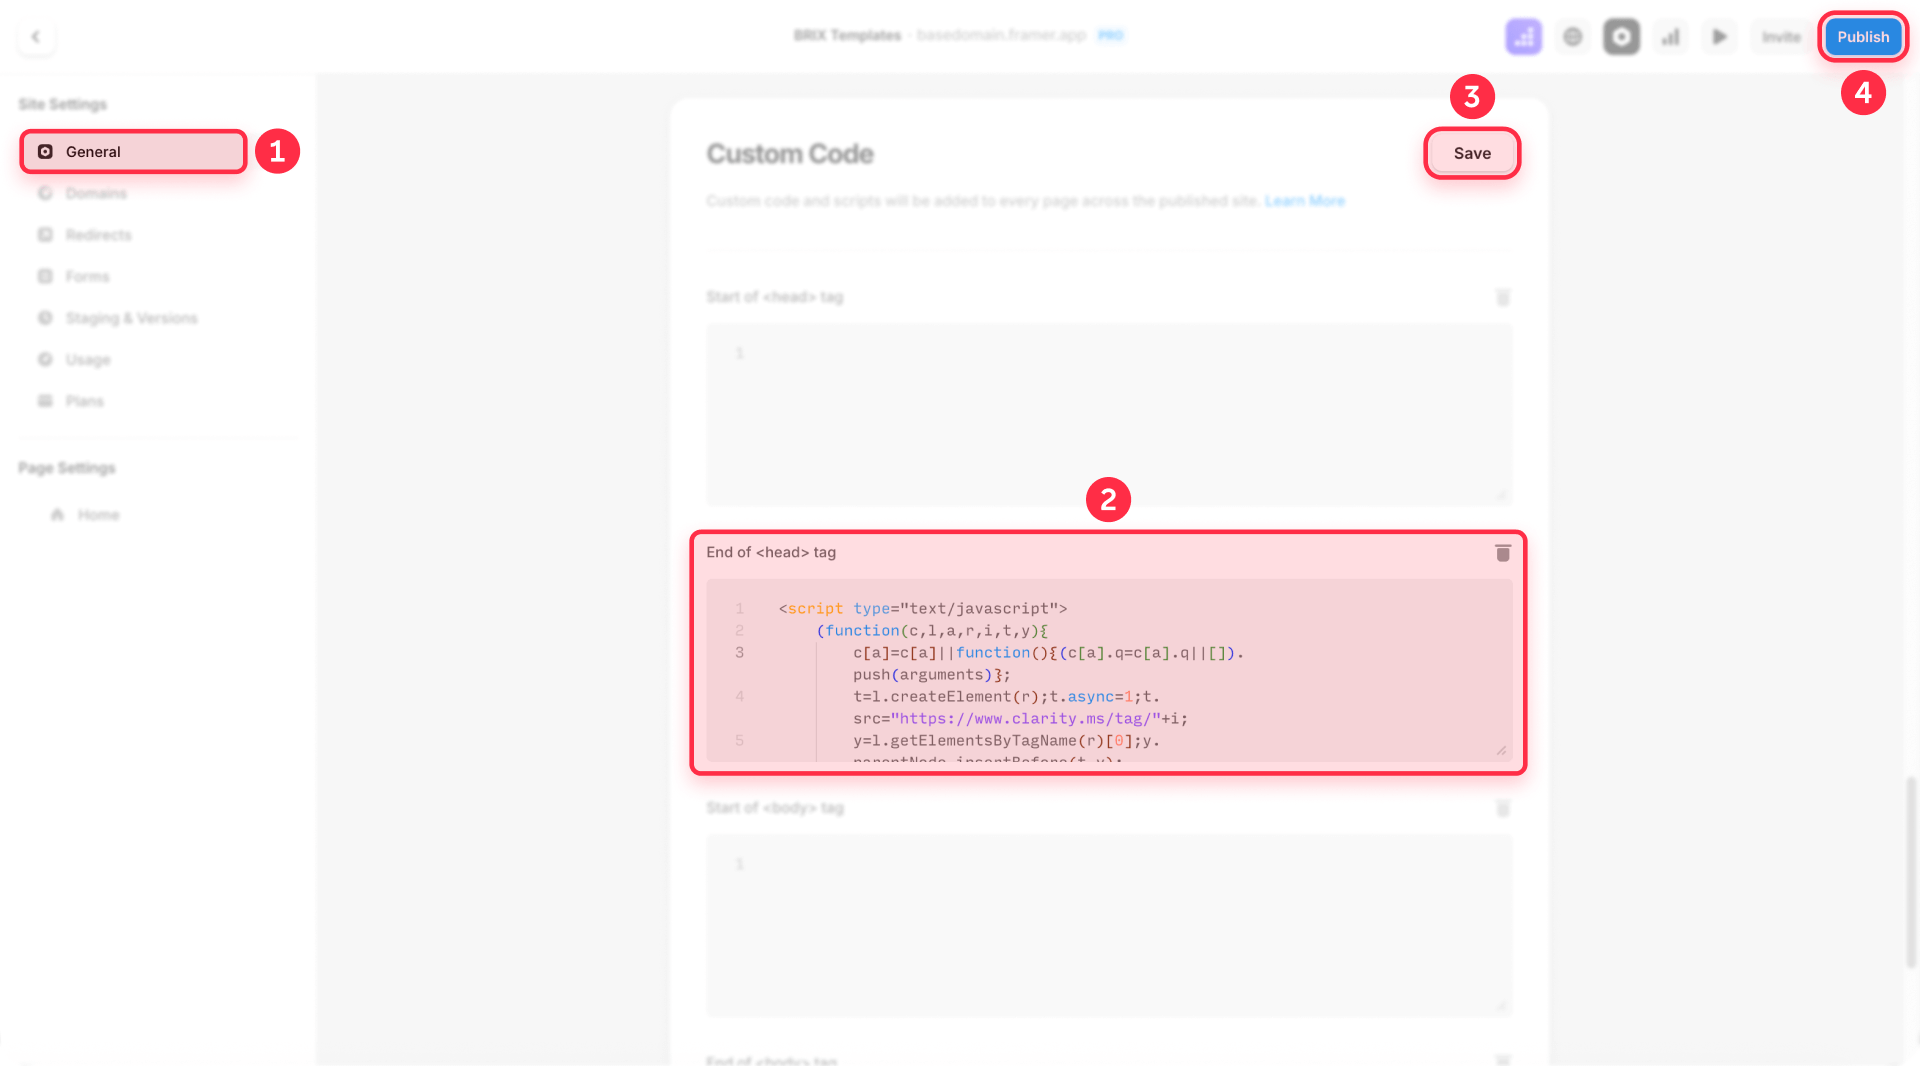
- Navigate to custom code: Choose the General tab from the left sidebar, then scroll to the Custom Code section near the bottom of the page
- Access advanced options: Click Show Advanced to reveal all code injection points (if not already visible)
- Insert into head section: Locate the End of <head> tag input field and paste your Clarity tracking code there. This placement ensures the script loads before your page content renders but after critical page structure is defined.
- Preserve existing code: If other tracking scripts already exist in this field, paste your Clarity code above or below them, maintaining separation between different scripts
- Save modifications: Click Save or the equivalent button to store your changes
The End of <head> tag position optimizes performance by loading analytics scripts after essential page elements while still capturing all user interactions from the moment the page renders.
Publishing your Framer site to activate Clarity tracking
Make your code changes live:
- Access publish controls: Return to your main Framer project view and locate the Publish button in the top navigation
- Review changes: Check that you're publishing to your intended domain (custom domain or Framer subdomain)
- Execute publish: Click Publish to push all modifications, including your new Clarity tracking code, to your live site
- Confirm deployment: Wait for the publication process to complete, typically taking 10-30 seconds
Publishing activates your Clarity tracking immediately. Your code won't collect data until this step completes and your changes appear on your live site.
3 - Verifying your Microsoft Clarity installation in Framer
Confirmation that tracking works correctly prevents wasted time analyzing incomplete data.
Using browser developer tools to check Clarity implementation
Validate your installation technically:
- Open your live site: Navigate to your published Framer site in a new browser window or incognito/private browsing mode
- Access developer console: Right-click anywhere on your page, select Inspect or Inspect Element, then switch to the Console tab
- Check for Clarity object: Type clarity in the console and press Enter. If Clarity loaded correctly, you'll see a function object rather than an "undefined" error
- Examine network requests: Switch to the Network tab, refresh your page, then filter by "clarity" in the search box. You should see requests to Clarity's servers confirming data transmission
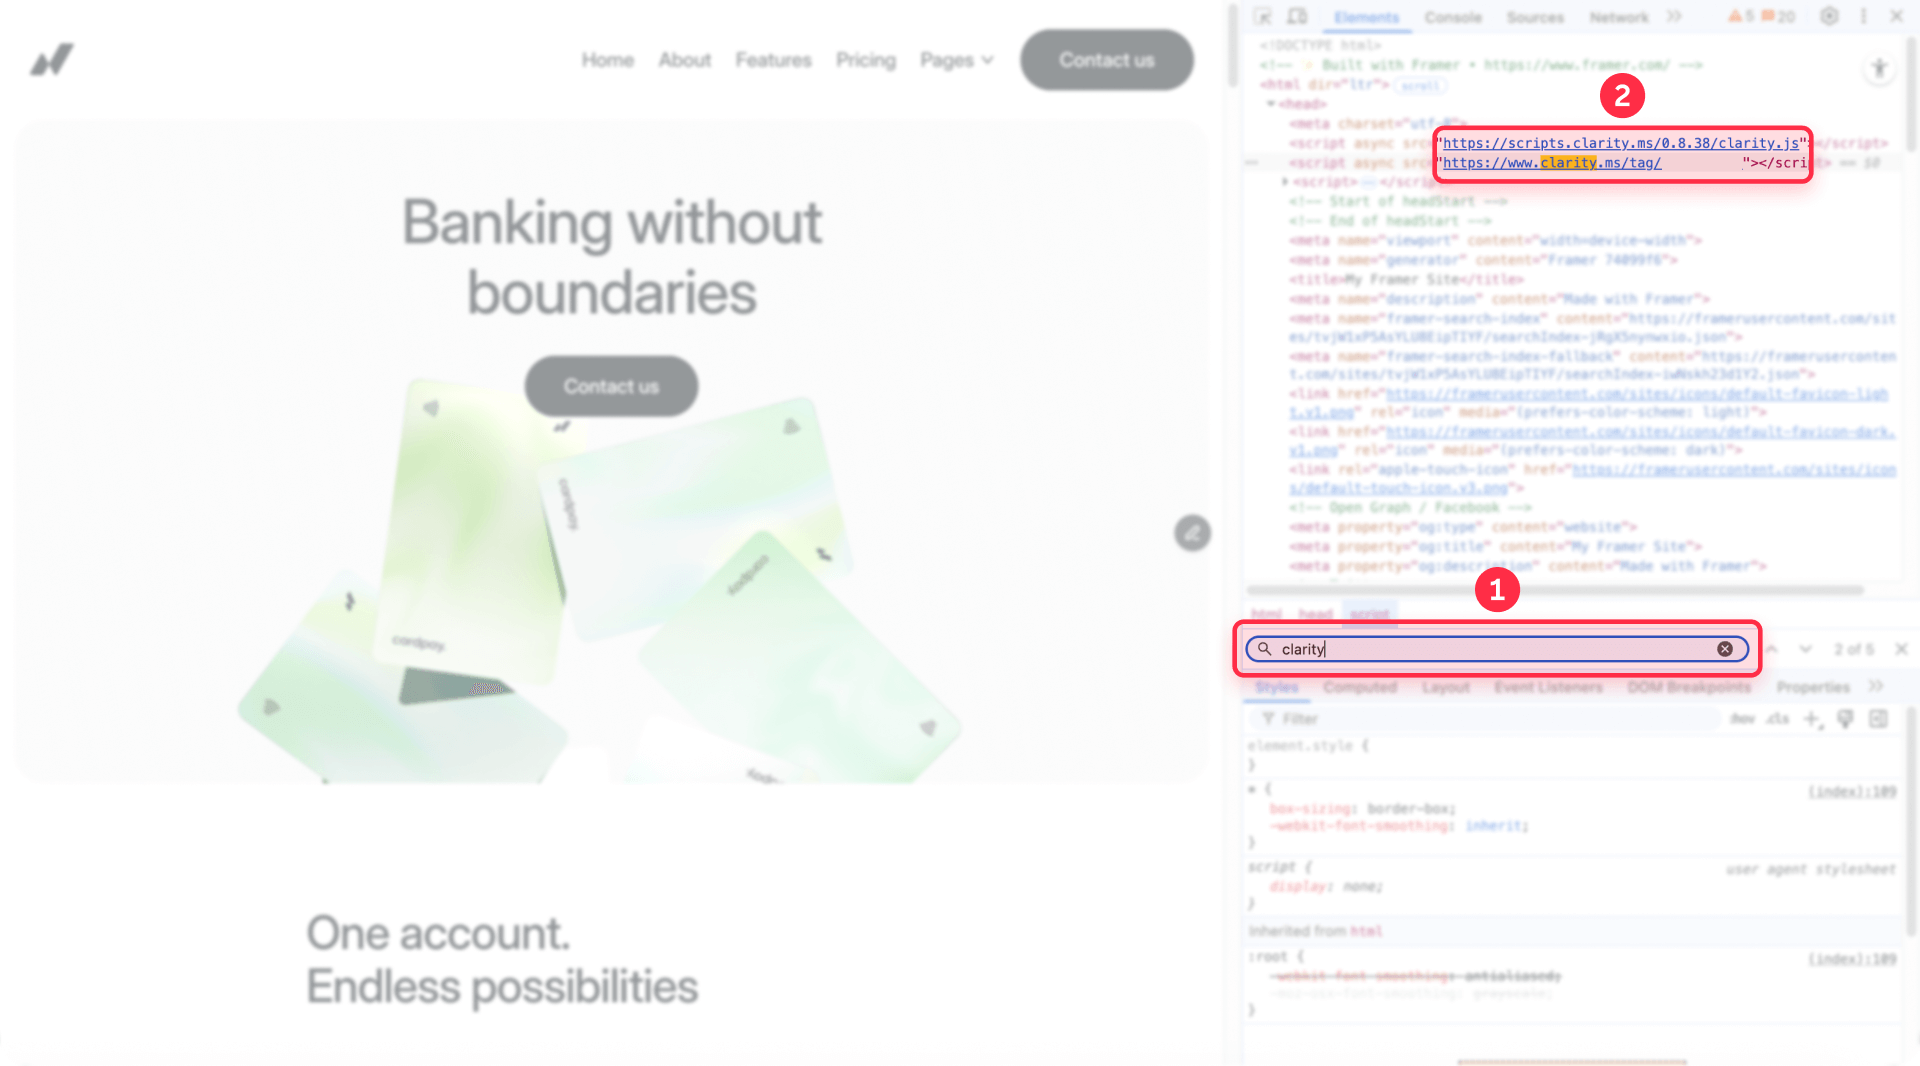
- Verify script placement: Switch to the Elements tab, press Ctrl+F (or Cmd+F on Mac), search for "clarity", and confirm your tracking script appears in the <head> section
These checks confirm the technical installation succeeded before you wait for data to appear in your dashboard.
Confirming data collection in your Clarity dashboard
Verify analytics are recording:
- Return to Clarity dashboard: Open clarity.microsoft.com and select your Framer project
- Wait for initial data: Allow 30 minutes to 2 hours after publishing for your first session data to process and appear
- Check the Dashboard tab: Look for the session count increasing from zero and verify your own test visit appears
- Review Recordings section: Navigate to Recordings in the left sidebar and confirm you can see your test session with the timestamp matching your visit
- Examine Heatmaps: Click Heatmaps to verify Clarity is generating click and scroll data for your pages
If you don't see data after 2 hours, return to the troubleshooting section below to diagnose installation issues.
Testing Clarity features on your Framer site
Validate specific tracking capabilities:
- Generate test interactions: Visit multiple pages on your live site, click various elements, scroll to different depths, and navigate your menu
- Watch a recording: Return to Clarity's Recordings section, find your session, and play it back to confirm all your interactions were captured accurately
- Check heatmap accuracy: Go to Heatmaps, select a page you visited, and verify that clicks appear in the correct locations matching your actual behavior
- Test device filtering: If possible, visit your site from mobile and desktop devices, then use Clarity's device filter to confirm it distinguishes between them
- Verify real-time updates: Clarity processes data continuously, so new sessions should appear within an hour of visitor activity
Successful validation across these areas confirms your Clarity integration is fully operational.
Common issues and quick solutions
Clarity not tracking after installation: Make sure you published your Framer site after adding the tracking code. Check that the code is in the Custom Code section under Settings → General, then clear your browser cache and test in an incognito window.
No data appearing in dashboard: Wait 30 minutes to 2 hours after publishing for data to process. Verify your Framer domain matches exactly what you entered in your Clarity project settings.
Tracking stops after site updates: Confirm your custom code wasn't deleted during updates. Re-save and republish your site entirely to ensure all code changes propagate to your live environment.
Dashboard not loading properly: Try accessing Clarity directly at clarity.microsoft.com instead of through another platform, update your browser, or clear your cache and cookies.
Frequently asked questions about Microsoft Clarity in Framer
How do I add Microsoft Clarity to my Framer website?
Create a free account at clarity.microsoft.com and generate a new project. Copy your tracking code, then in your Framer project, navigate to Settings → General → Custom Code, and paste the script in the End of <head> tag field. Save your changes and publish your site. Note that custom code access requires a paid Framer plan (Basic or higher).
Is Microsoft Clarity free for Framer sites?
Yes, Microsoft Clarity is completely free with unlimited session recordings, unlimited heatmaps, and all features including AI-powered Copilot insights. There are no hidden costs, traffic limits, or forced upgrades. You only need a free Microsoft Clarity account to get started.
How long until Microsoft Clarity starts showing data after installation?
Expect to see your first data within 30 minutes to 2 hours after publishing your Framer site with the tracking code installed. The platform processes sessions in near real-time with a short delay for data aggregation. You can speed up your first session by visiting your live site immediately after publishing.
Does Microsoft Clarity affect my Framer site's performance?
Microsoft Clarity has minimal impact on your site's loading speed. The tracking script is lightweight and loads asynchronously, preventing it from blocking other page elements. According to Microsoft's internal benchmarks, Clarity has no measurable impact on page load time for the vast majority of websites and won't negatively affect your Google PageSpeed scores or Core Web Vitals.
Is Microsoft Clarity GDPR compliant for Framer websites?
Yes, Microsoft Clarity complies with GDPR, CCPA, and LGPD regulations through automatic IP anonymization and sensitive content masking. However, starting October 31, 2025, Microsoft enforces consent signal requirements for all visitors from the European Economic Area (EEA), United Kingdom, and Switzerland. Without valid consent signals through a Consent Management Platform (CMP), Clarity features including session recordings and heatmaps will be automatically disabled for visitors from these regions.
Conclusion
Integrating Microsoft Clarity into your Framer site delivers behavioral insights that expose exactly how visitors experience your design. The free platform offers unlimited session replays, heatmaps, and AI-driven analytics that transform vague assumptions into concrete data points. The manual installation process takes just minutes and immediately begins revealing which design elements work effectively and which create friction for your users.
Combining Framer's design-focused building platform with Clarity's behavioral tracking creates a continuous improvement cycle. You identify usability problems through session recordings, implement design refinements in Framer's visual editor, and validate improvements through updated analytics data.
For advanced tracking requirements involving custom event sequences across complex user journeys, sophisticated segmentation strategies for audience analysis, or full-stack analytics integration with your existing tools, our Framer development team can create tailored analytics implementations that provide the precise insights your business needs to make confident optimization decisions.


Join readers commenting on this post!