LinkedIn advertising works best when you can measure exactly what happens after someone clicks your ad. Without proper tracking, you're making decisions in the dark about which campaigns drive real business results.
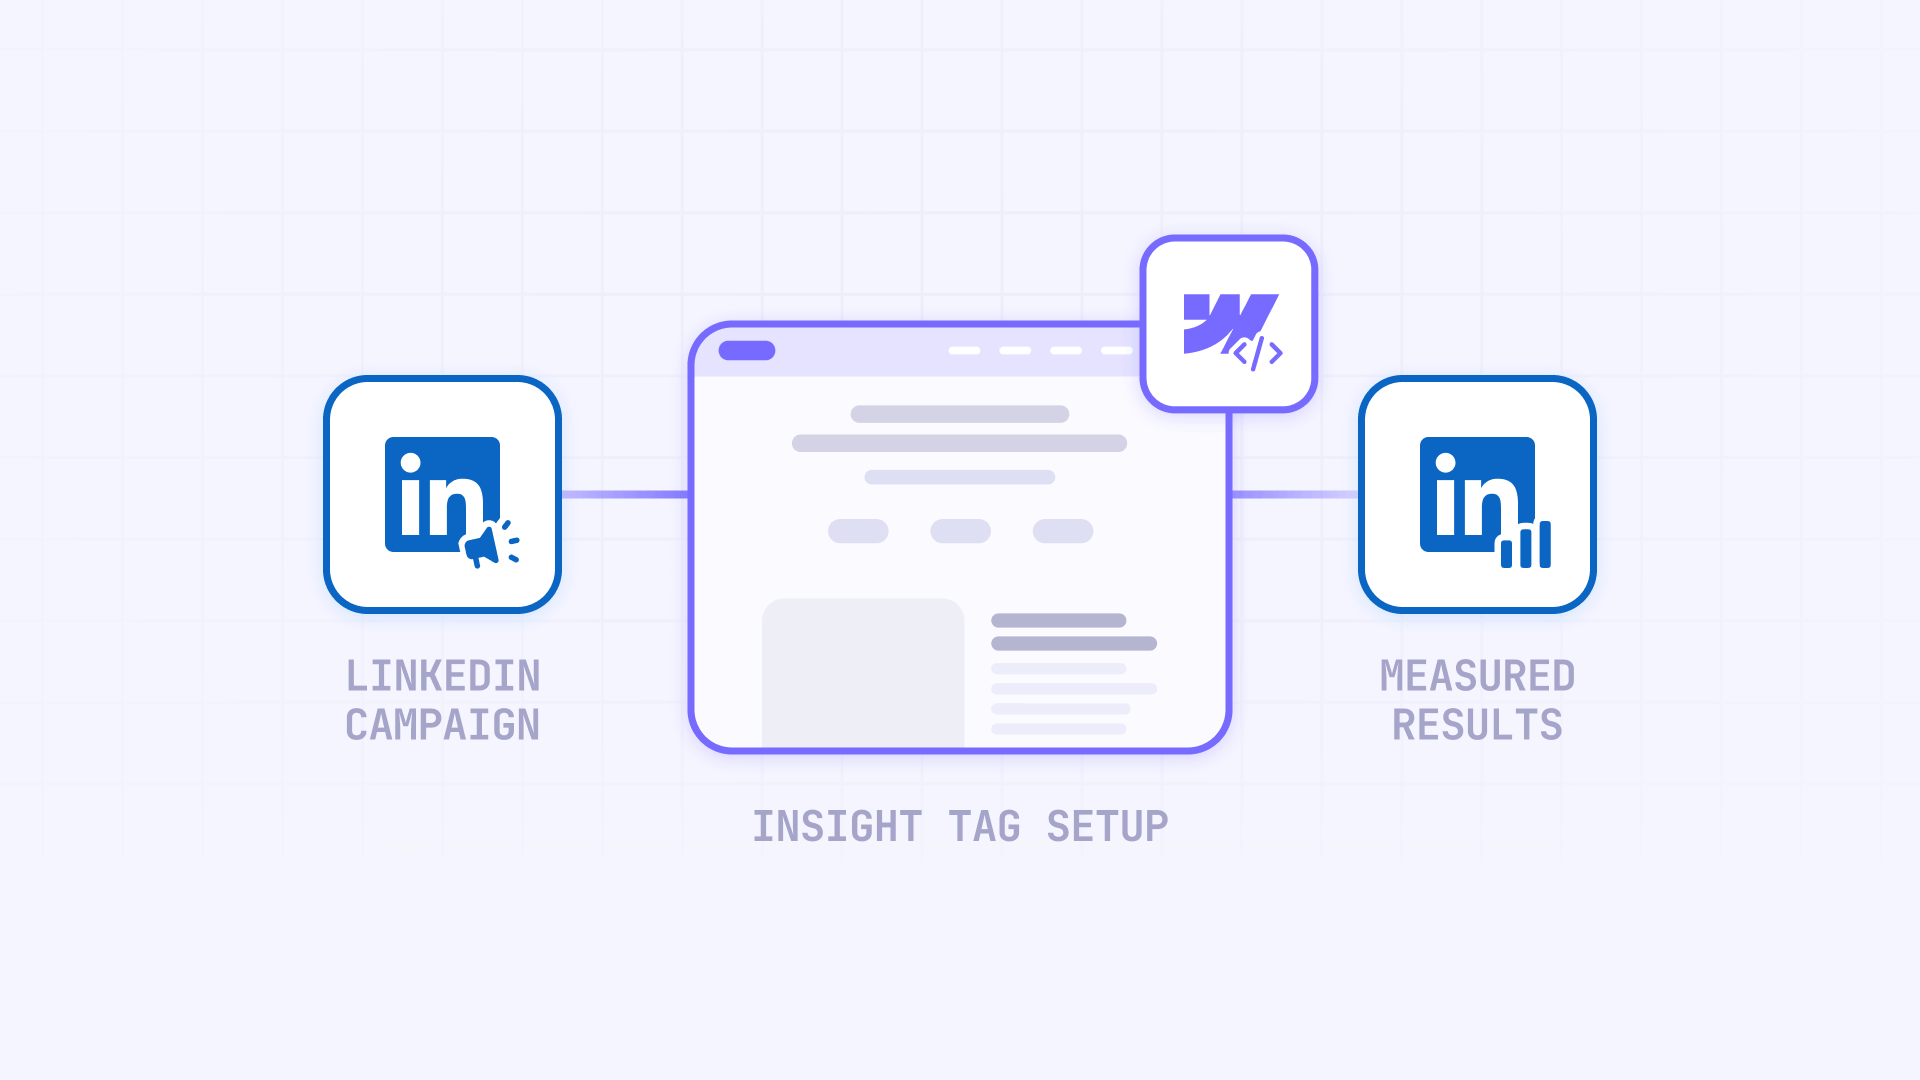
The LinkedIn Insight Tag solves this problem by connecting your ad performance to actual conversions on your Webflow site. Combined with thank you page tracking, you'll know precisely which campaigns generate leads, which audiences convert best, and where to invest your budget for maximum return.
This guide walks you through installing the LinkedIn Insight Tag on your Webflow site and setting up conversion tracking that measures real business outcomes.
Important: Data Privacy and Compliance
The LinkedIn Insight Tag should not be installed on web pages that collect or display sensitive personal data. According to LinkedIn's terms of service, this includes:
- Pages with medical appointment scheduling or health information
- Financial transaction or account management pages
- Pages collecting protected health information (PHI)
- Any pages where visitors enter sensitive personal data
For example, the tag may be appropriate for a general business homepage but should not be placed on pages where users manage accounts or submit sensitive information. This is not legal advice—consult your legal counsel and review LinkedIn's terms to determine appropriate implementation for your specific use case.
Why LinkedIn conversion tracking matters for Webflow sites
Understanding how LinkedIn's conversion tracking capabilities benefit different business objectives helps you implement tracking that aligns with your goals:
- B2B lead generation campaigns: Automatically track which job titles, industries, and company sizes convert into qualified leads, enabling precise targeting refinements and better lead quality over time
- Content marketing and downloads: Monitor whitepaper downloads, ebook acquisitions, and webinar registrations to understand which professional audiences engage most with your content and identify high-value segments
- Product demo requests and trial signups: Track the full journey from ad click to demo request, measuring conversion rates by audience segment and identifying the messaging that drives qualified prospects
- Event registration and attendance: Capture registrations for webinars, conferences, and training sessions while building retargeting audiences of engaged professionals who showed interest but didn't register
- Account-based marketing initiatives: Measure engagement and conversions from target accounts, track multiple touchpoints across decision-makers, and optimize campaigns based on account-level performance data
Understanding LinkedIn Insight Tag and conversion tracking in Webflow
The LinkedIn Insight Tag is a tracking code that reports website activity back to your LinkedIn Campaign Manager. Think of it as a bridge between your Webflow site and your LinkedIn advertising account that tells LinkedIn when people from your ads visit your site and take valuable actions.
Once installed on your Webflow site, the tag automatically tracks page views and sends that data to LinkedIn. When someone clicks your LinkedIn ad and then visits your site, LinkedIn can track their activity and show you actions they took—such as pages viewed, forms submitted, or purchases completed—depending on their browser settings and privacy preferences.
The real power comes from pairing this tag with conversion tracking. You tell LinkedIn which pages represent successful outcomes (like thank you pages after form submissions), and LinkedIn automatically counts and reports these conversions in your Campaign Manager. This provides valuable data to help you understand which campaigns may be driving results and inform decisions about advertising budget allocation.
1 - Setting up your LinkedIn Campaign Manager account for Webflow tracking
Before installing tracking code on your Webflow site, you need access to LinkedIn Campaign Manager and your unique Insight Tag code.
Creating or accessing your LinkedIn Campaign Manager account for Webflow
Follow these steps to set up your advertising account and access the tracking tools:
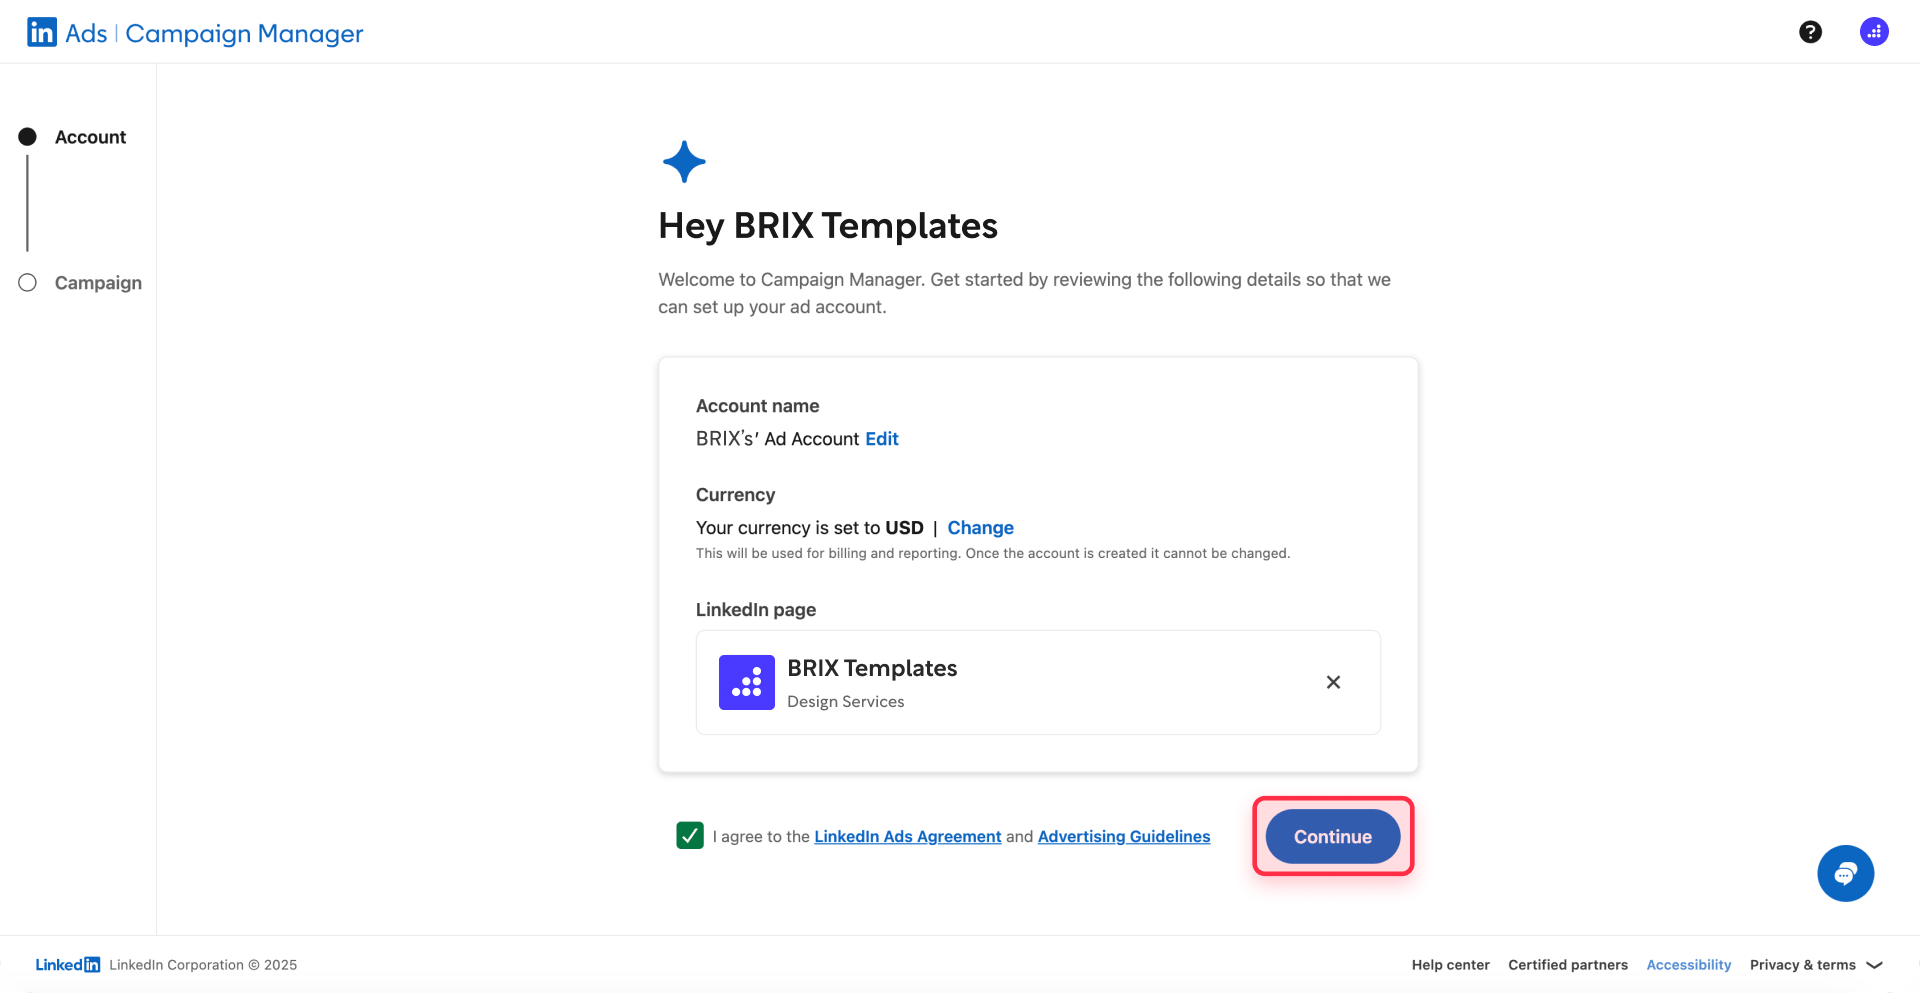
- Navigate to LinkedIn Campaign Manager: Go to linkedin.com/campaignmanager and sign in with your LinkedIn credentials
- Select or create an account: Choose an existing ad account from the dropdown in the upper-left corner, or click Create account if this is your first campaign
- Verify account access: Make sure you have the appropriate permissions to view and edit account settings, as you'll need access to tracking code
Generating your LinkedIn Insight Tag code for Webflow installation
Once you're in Campaign Manager, retrieve your tracking code:
1 - Access the Insight Tag section: Click Data in the left sidebar, then select Signals manager > Insight Tag
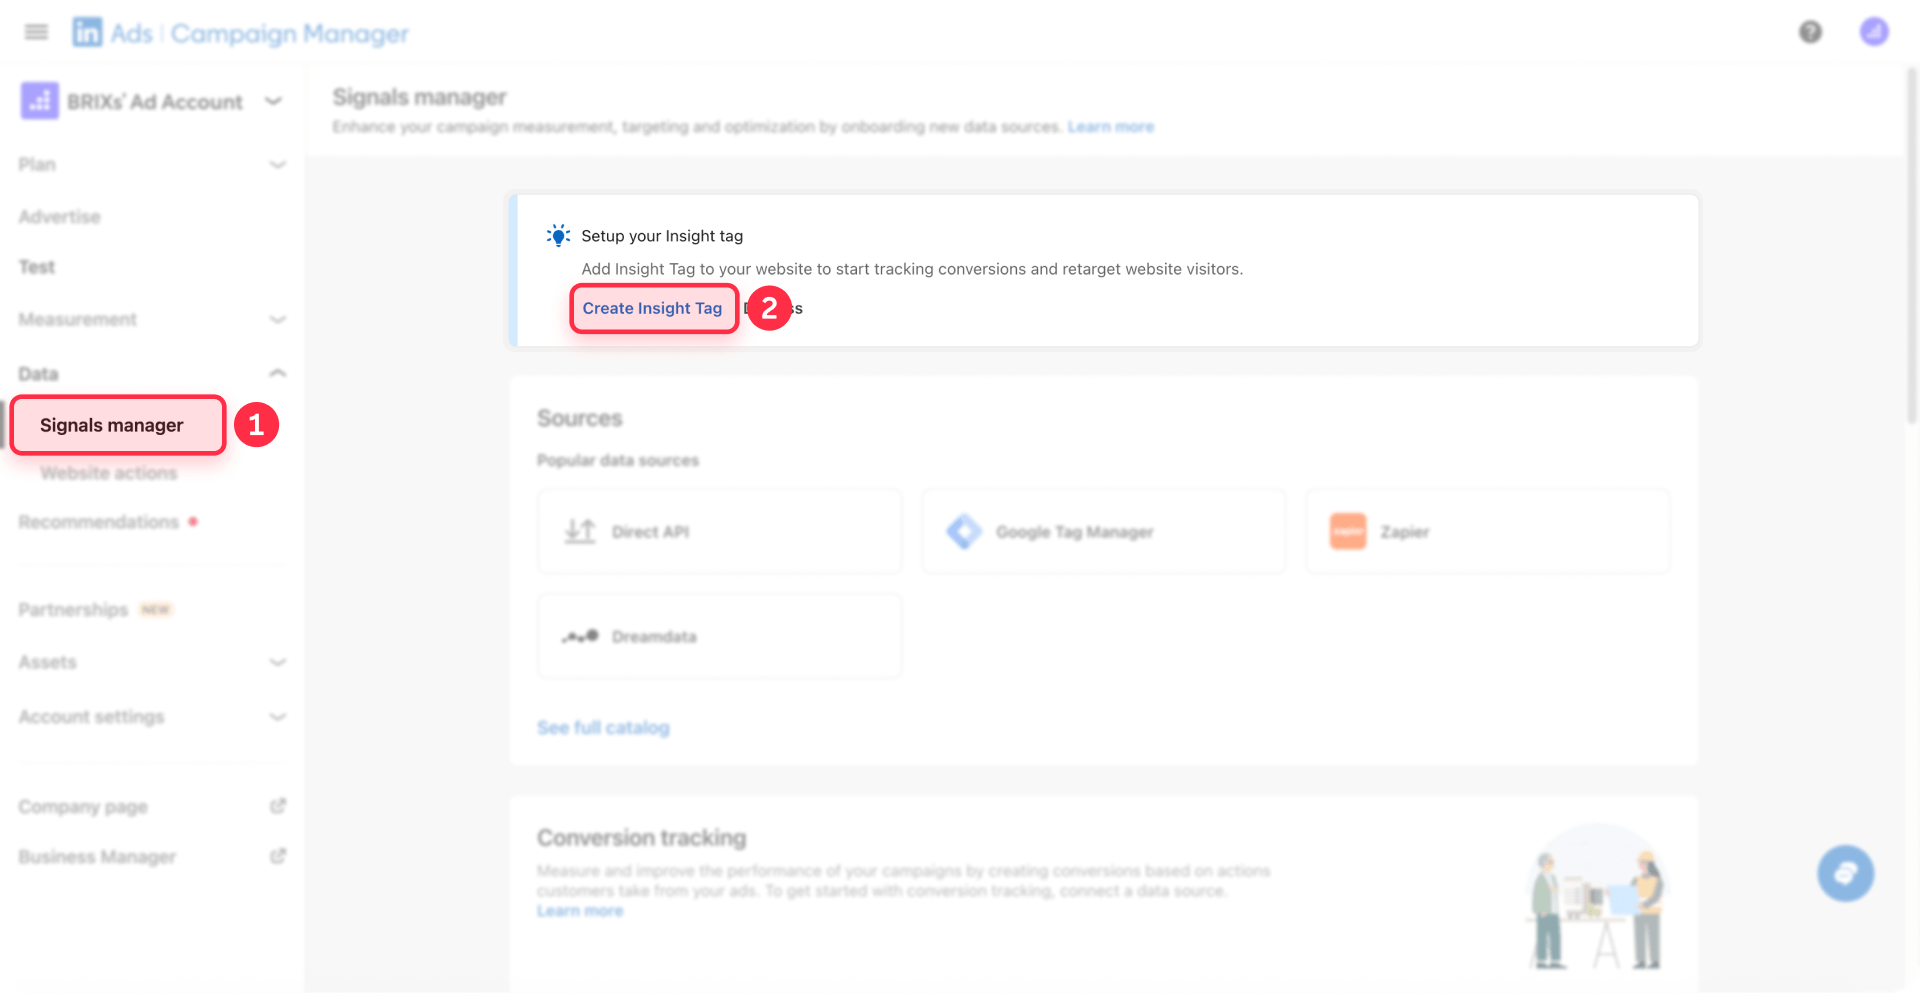
Note: Some Campaign Manager accounts may display this navigation as Analyze > Insight Tag instead of Data > Signals manager, depending on your account's interface version.
2 - Create your tag if needed: If you haven't created an Insight Tag yet, click Create Insight Tag and follow the prompts
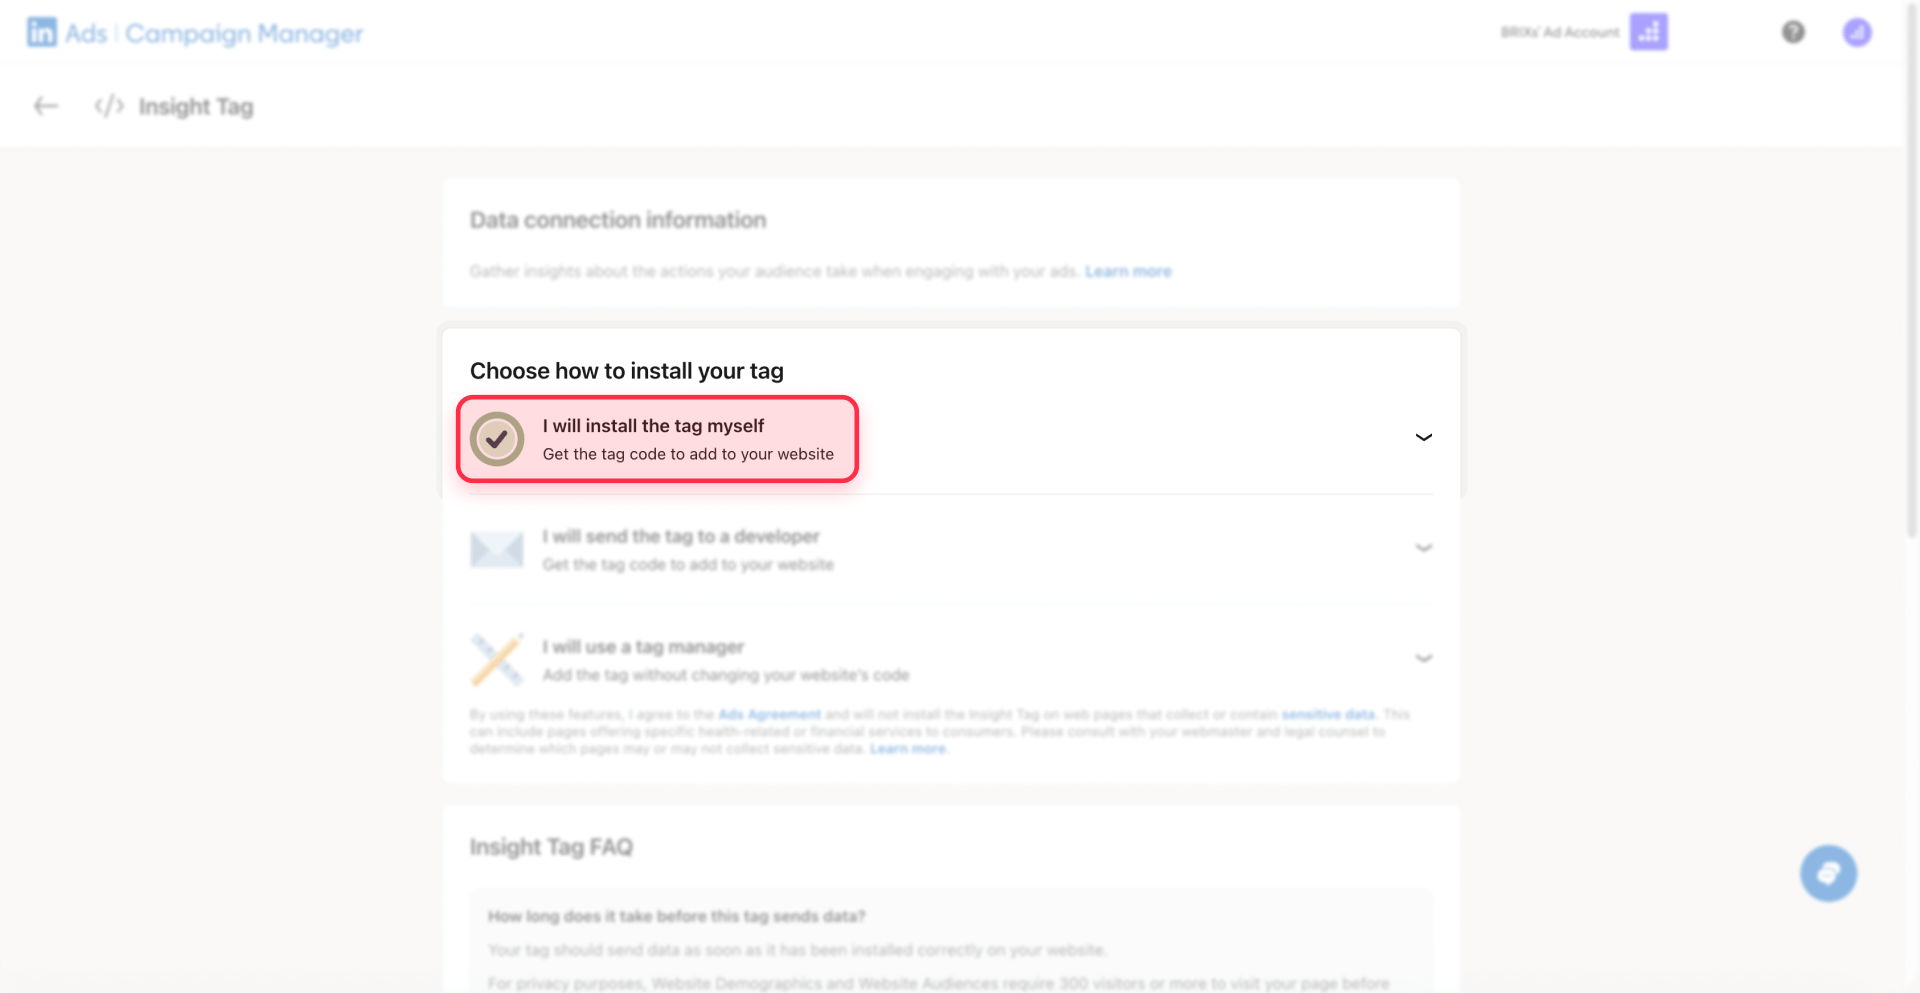
3 - Choose installation method: Select I will install the tag myself to reveal the full tracking code
4 - Copy your tracking code: Hover over the code snippet and click to copy the entire block of JavaScript code
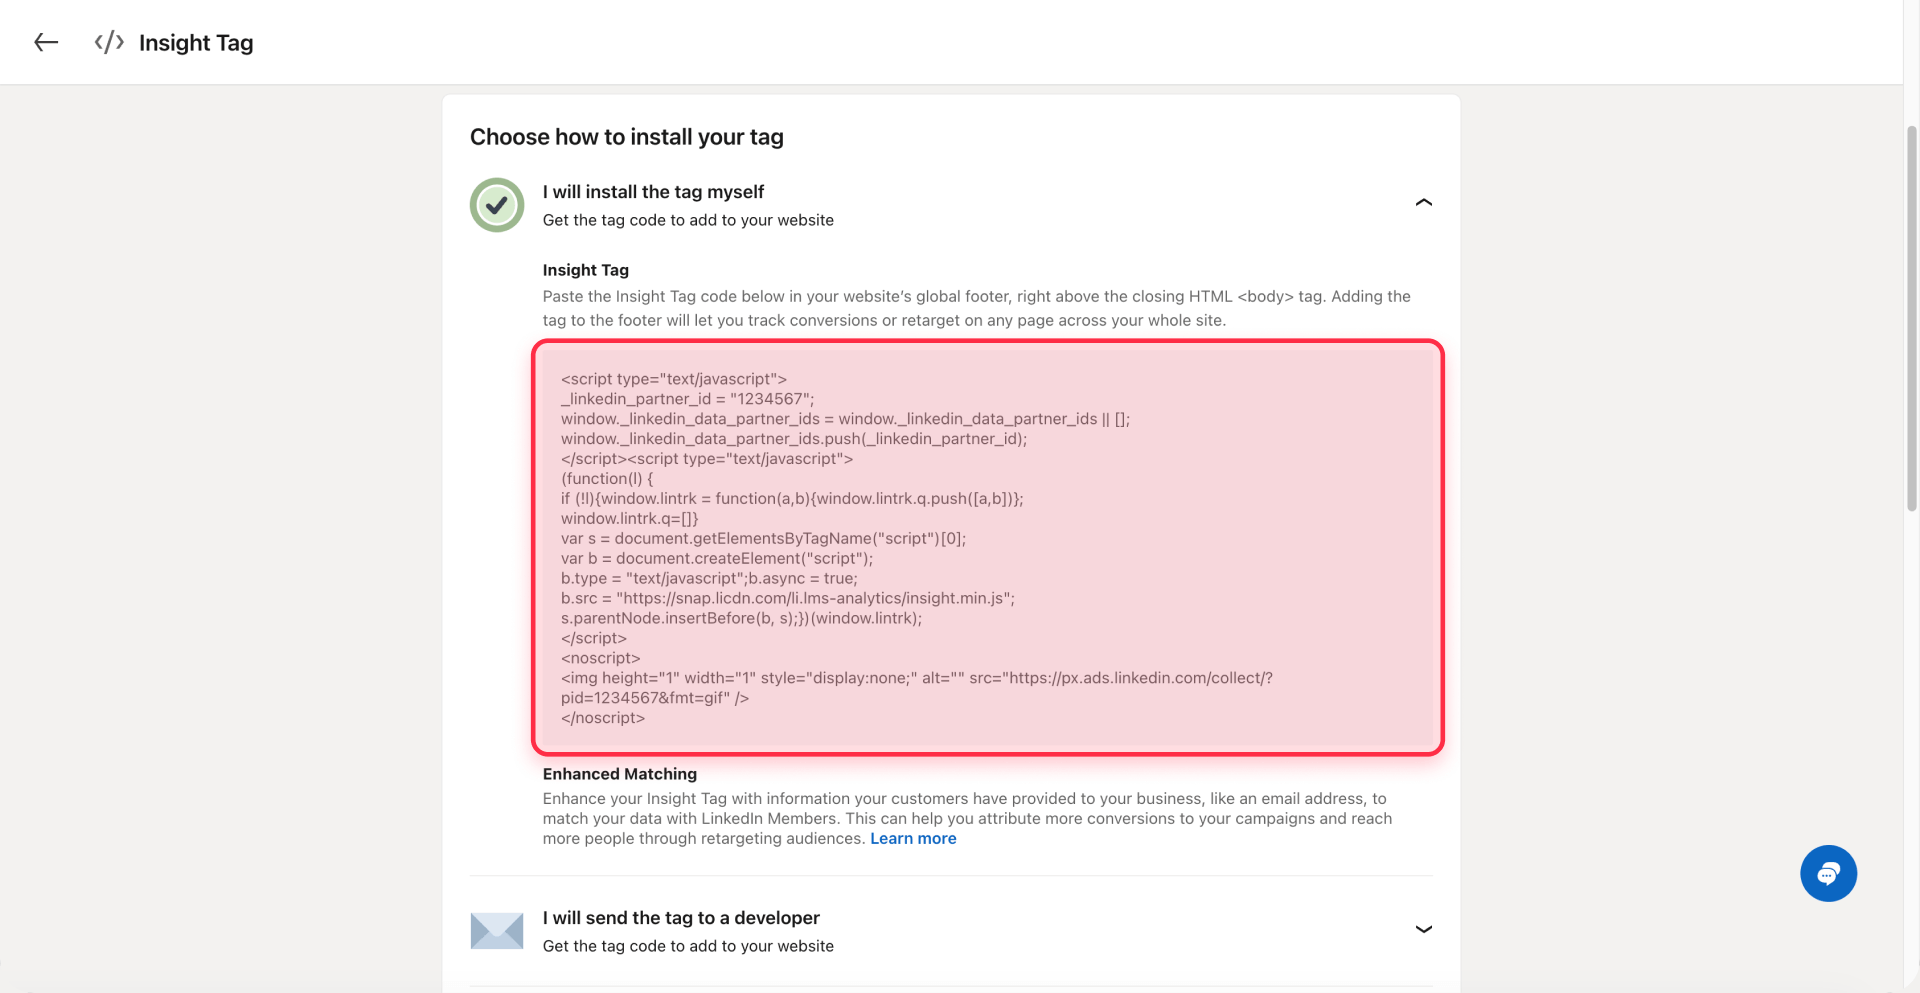
5 - Save your Partner ID: Look for the line that says _linkedin_partner_id = "1234567"; and note this number, as you'll need it for verification
The free LinkedIn Insight Tag includes unlimited tracking for basic conversions and is suitable for Webflow sites running B2B marketing campaigns.
2 - Installing the LinkedIn Insight Tag in Webflow
The LinkedIn Insight Tag needs to be placed in your Webflow site's custom code section so it loads on every page automatically.
Prerequisite: Publishing site-wide custom code to a custom domain requires a paid Site plan (Basic, CMS, Business, or higher). Note: During the building phase, Workspace plans (Core or Growth) also unlock custom code functionality in the Designer.
Adding LinkedIn Insight Tag code to your Webflow project settings
Here's how to install the tracking code across your entire Webflow site:
1 - Access your Webflow project: Log into your Webflow account and open the project where you want to install LinkedIn tracking
2 - Open project settings: From your Webflow Dashboard, open the project Settings (click on the project card's settings option)
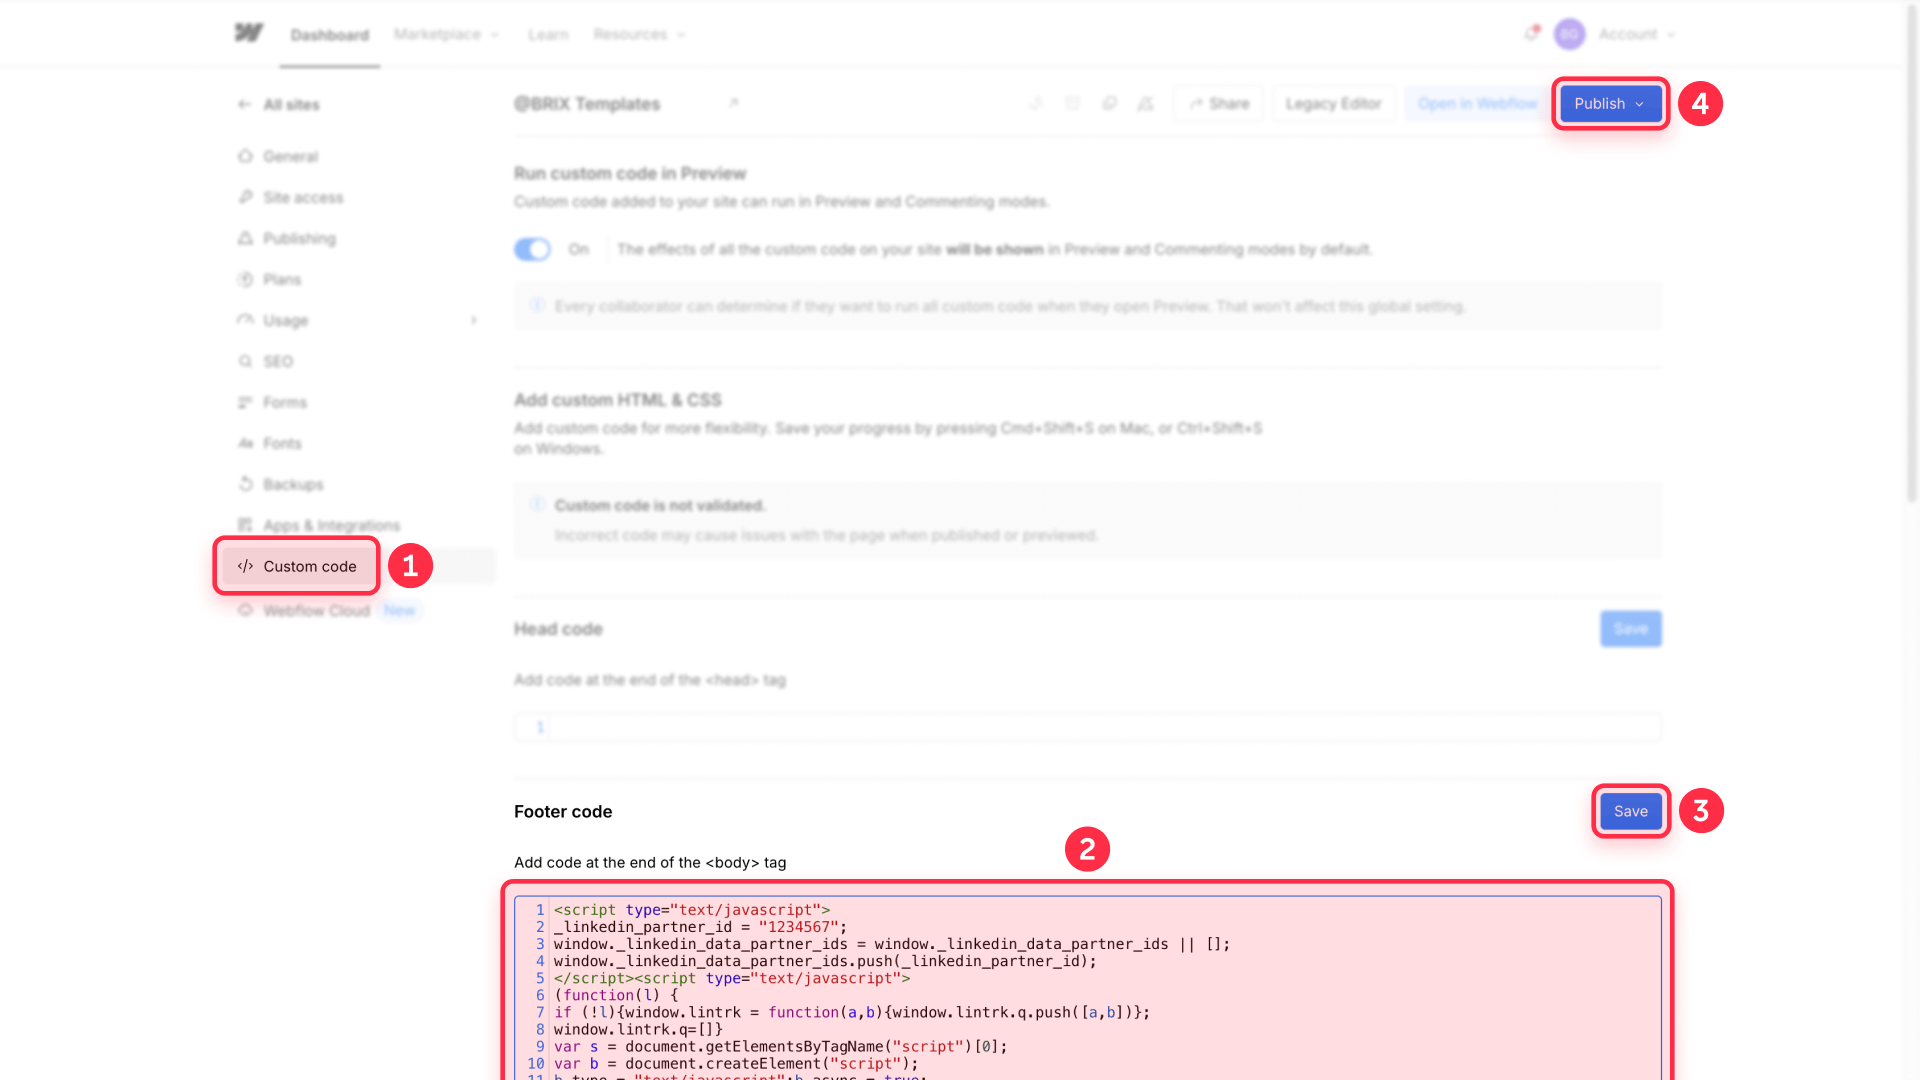
3 - Navigate to custom code: Click the Custom code tab in the settings menu
4 - Paste code in the footer section: Scroll down to the Footer Code section and paste your complete LinkedIn Insight Tag code
LinkedIn supports head or footer placement; their docs commonly show footer (just above the closing tag). Either works since the script loads asynchronously.
5 - Save your changes: Click Save Changes at the top of the page
6 - Publish your site: Click Publish in the top-right corner of the Webflow Designer and select all domains where you want tracking active
The tag will now load on every page of your published Webflow site, automatically tracking page views and preparing your site for conversion tracking.
Verifying LinkedIn Insight Tag installation on your Webflow site
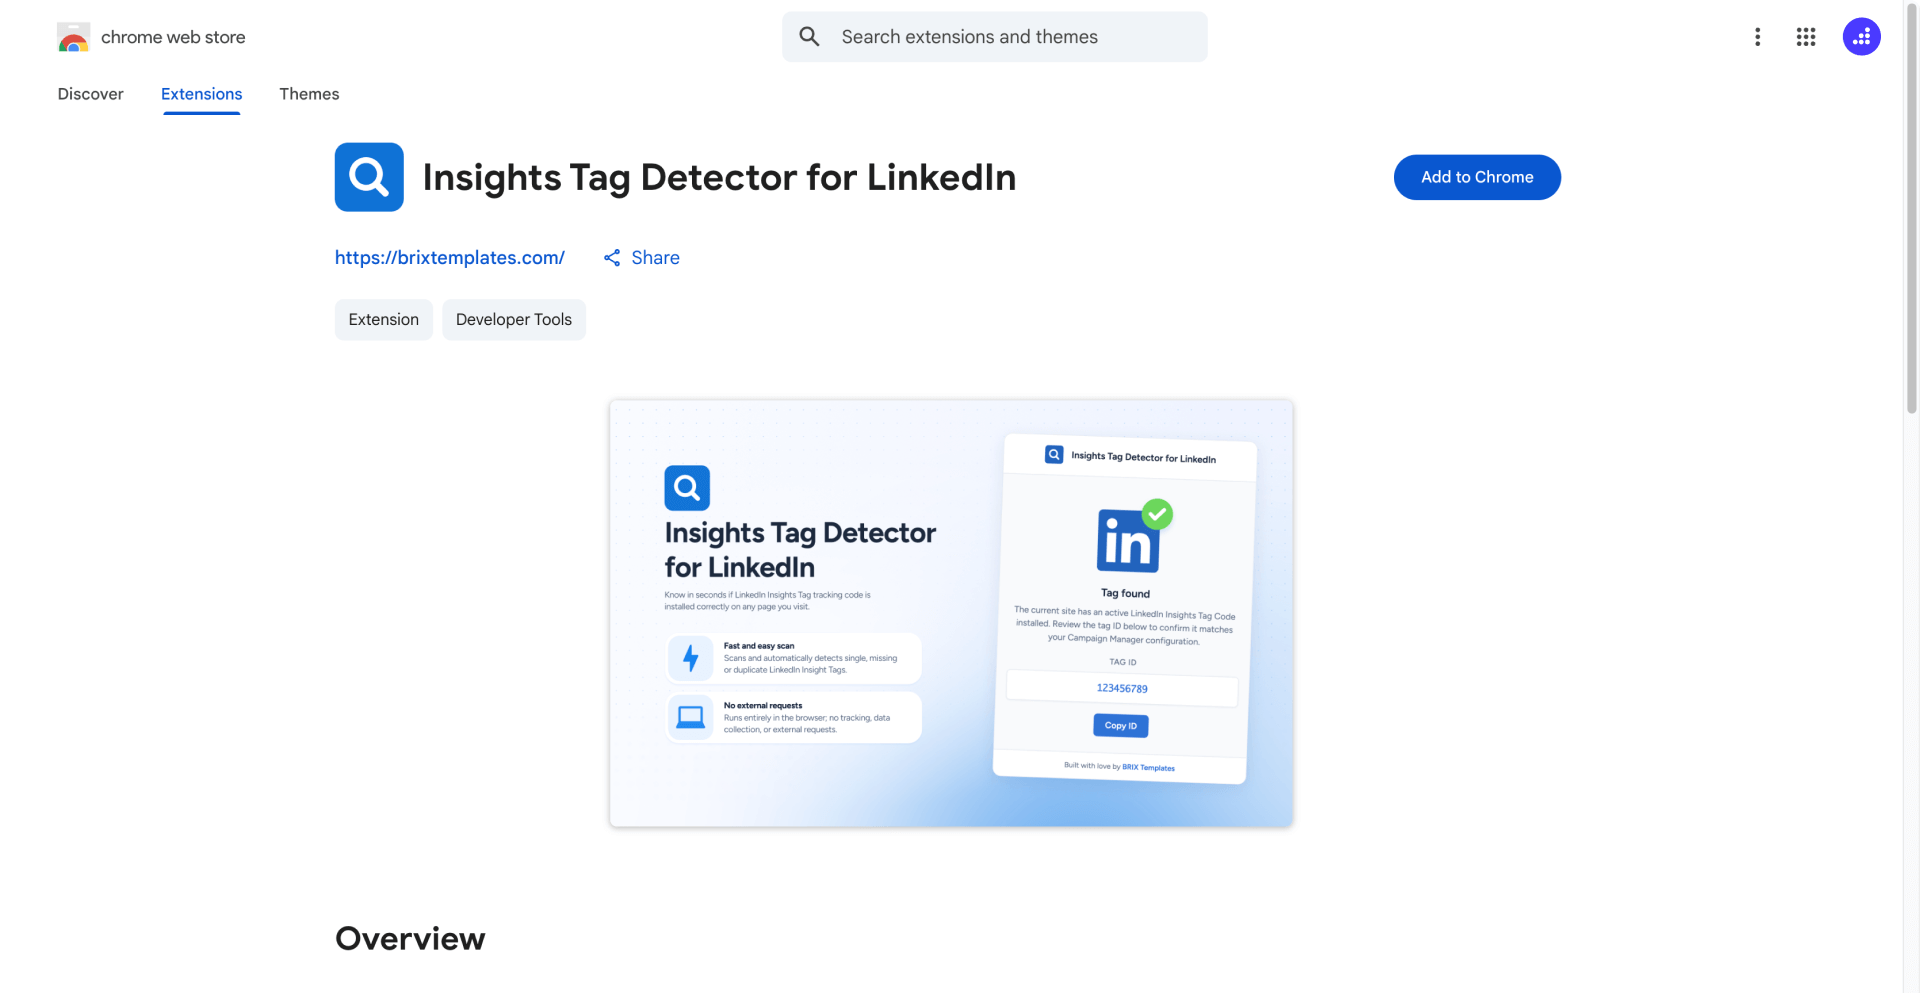
After publishing your Webflow site with the LinkedIn Insight Tag, the easiest way to verify it's working correctly is using a Chrome extension designed specifically for this purpose.
Install the free Insight Tag Checker for LinkedIn extension from the Chrome Web Store. After adding it to your browser, visit your published Webflow site and click the extension icon. It will instantly tell you if the tag is installed and show you the Partner ID, confirming everything is set up correctly without any technical knowledge required.
Alternatively, check the tag status directly in LinkedIn Campaign Manager:
- Navigate to Data > Signals manager > Insight Tag (or Analyze > Insight Tag in some accounts)
- Look for your domain in the list
- The status should show as Active once LinkedIn has received signals from your site
The tag typically shows as Active within 24 hours after someone visits your published site, depending on your traffic volume. During this validation period, continue with the conversion tracking setup in the next section.
3 - Creating conversion tracking for Webflow thank you pages
LinkedIn conversion tracking measures specific actions visitors take on your site after clicking your ads. The most reliable method for Webflow sites uses dedicated thank you pages that load after form submissions.
Understanding LinkedIn conversion tracking methods for Webflow
LinkedIn offers several conversion tracking approaches for websites. Based on the current LinkedIn Campaign Manager interface, the recommended method for Webflow sites is:
Website Actions (Recommended for Webflow): LinkedIn's newest tracking method that automatically detects and tracks conversion events on your website with one click. This approach uses page visit tracking to monitor when visitors land on specific URLs, like thank you pages after form submissions. Website Actions works reliably with Webflow's native forms and requires no additional code beyond the base Insight Tag.
Alternative methods include manual conversion setup and tag manager implementations, but Website Actions provides the simplest and most reliable tracking for most Webflow implementations.
Setting up thank you pages in Webflow for conversion tracking
Before configuring conversions in LinkedIn Campaign Manager, create dedicated thank you pages in your Webflow project:
1 - Create a new page: In the Webflow Designer, add a new page and name it something like "Thank You - Contact Form"
2 - Design your thank you page: Add a heading, confirmation message, and any next steps for the visitor
3 - Set SEO settings: In Page Settings > SEO, set the page to noindex to prevent it from appearing in search results (since only form submitters should see this page)
4 - Note the page URL: The full URL will be something like yourdomain.com/thank-you-contact. You'll use this exact URL when setting up the conversion in LinkedIn Campaign Manager
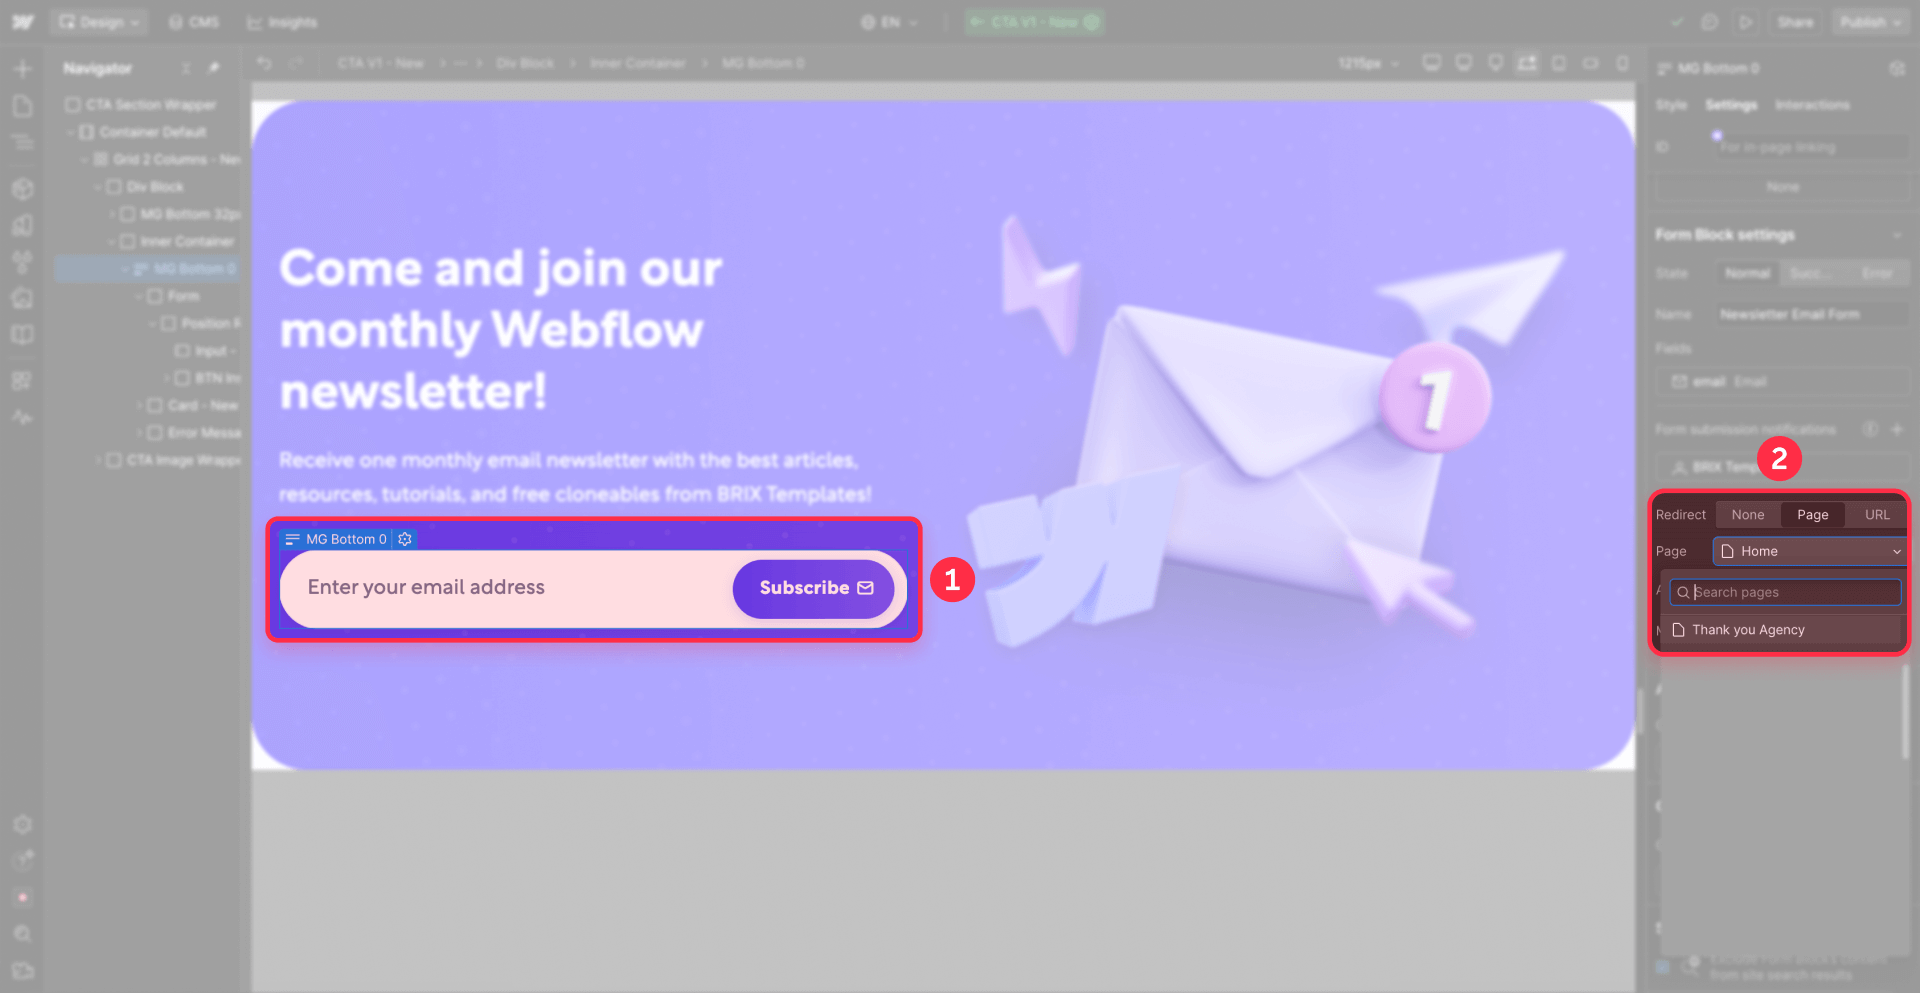
5 - Configure form redirect: In your form settings, set the "Redirect to page" option to your new thank you page
6 - Publish your changes: Publish the site to make the thank you page live
Repeat this process for each form you want to track, creating unique thank you pages with distinct URLs for each conversion type (contact forms, demo requests, downloads, etc.).
Creating conversions in LinkedIn Campaign Manager
With your thank you pages published, configure the corresponding conversions in LinkedIn:
1 - Access conversion tracking: In Campaign Manager, click Measurement in the left sidebar, then select Conversion tracking
2 - Create a new conversion: Click the Create conversion dropdown button and select Insight Tag conversion
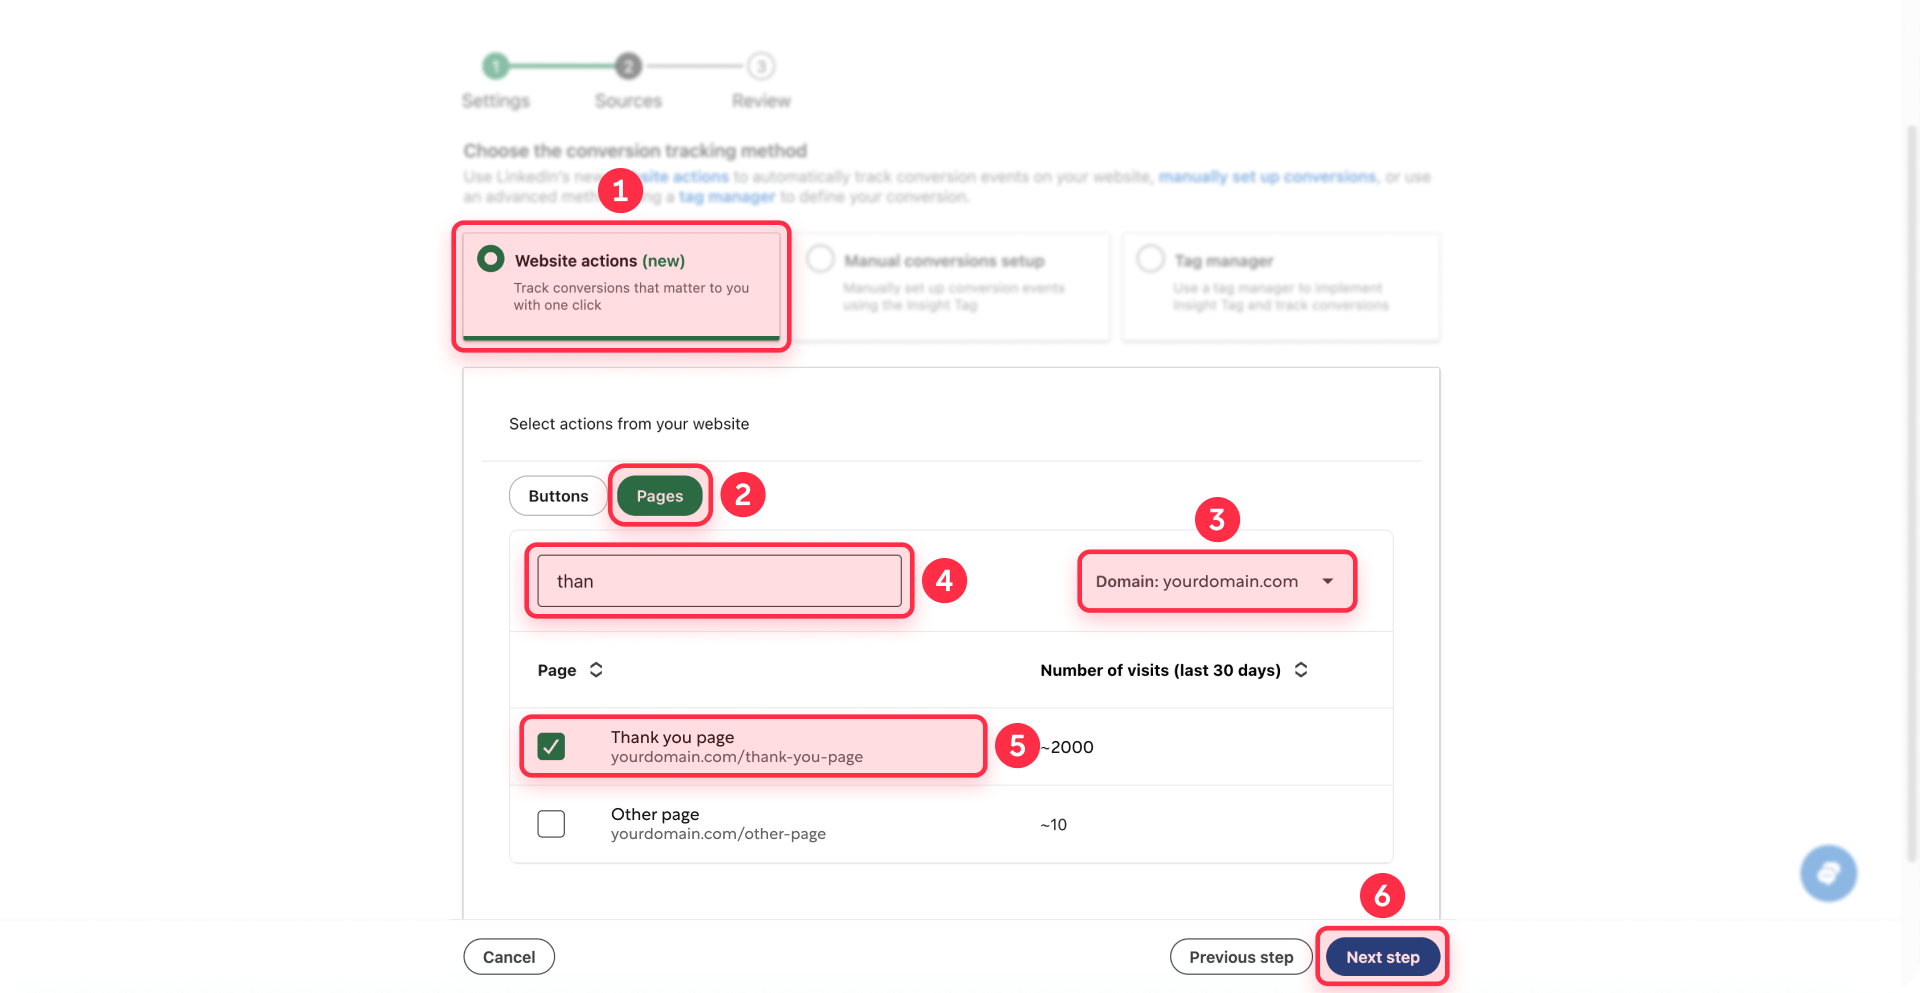
3 - Choose tracking method: Select Website actions (new) as your conversion tracking method. This option automatically tracks conversion events on your website with one click.
4 - Configure conversion settings
In the Settings step, configure the following:
Name: Use a descriptive name like "Contact Form Submission - Webflow" that clearly identifies the action
Category: Choose the type that matches your business goal:
- Lead for form submissions, demo requests, or contact inquiries
- Purchase for ecommerce transactions
- Apply for job applications
- Sign-up for account registrations or trial signups
- Key page view for important pages like pricing pages
- Other for custom conversion goals
- Conversion value (optional): Enter a monetary value if you want to track revenue or assign a dollar value to leads
Timeframe: Select how long after clicking or viewing an ad LinkedIn should attribute conversions:
- Clicks: 1-90 days (30-90 days recommended)
- Views: 1-90 days (7-90 days recommended)
Attribution model: Choose Last Touch - Each ad set for straightforward attribution or another model based on your needs
Click Next to continue to the Sources step.
5 - Select your tracking source:
In the Sources step, you'll select which pages to track:
- Select domain: Choose your Webflow domain from the dropdown (e.g., brixtemplates.com)
- Select action type: Click the Pages tab (not Buttons)
- Find your thank you page: Use the search box to find your thank you page by typing part of its name or URL
- Select the page: Click the checkbox next to your thank you page URL (e.g., brixtemplates.com/thank-you-contact)
LinkedIn will display the number of visits each page received in the last 30 days to help you identify the correct page.
Click Next to continue to the Review step.
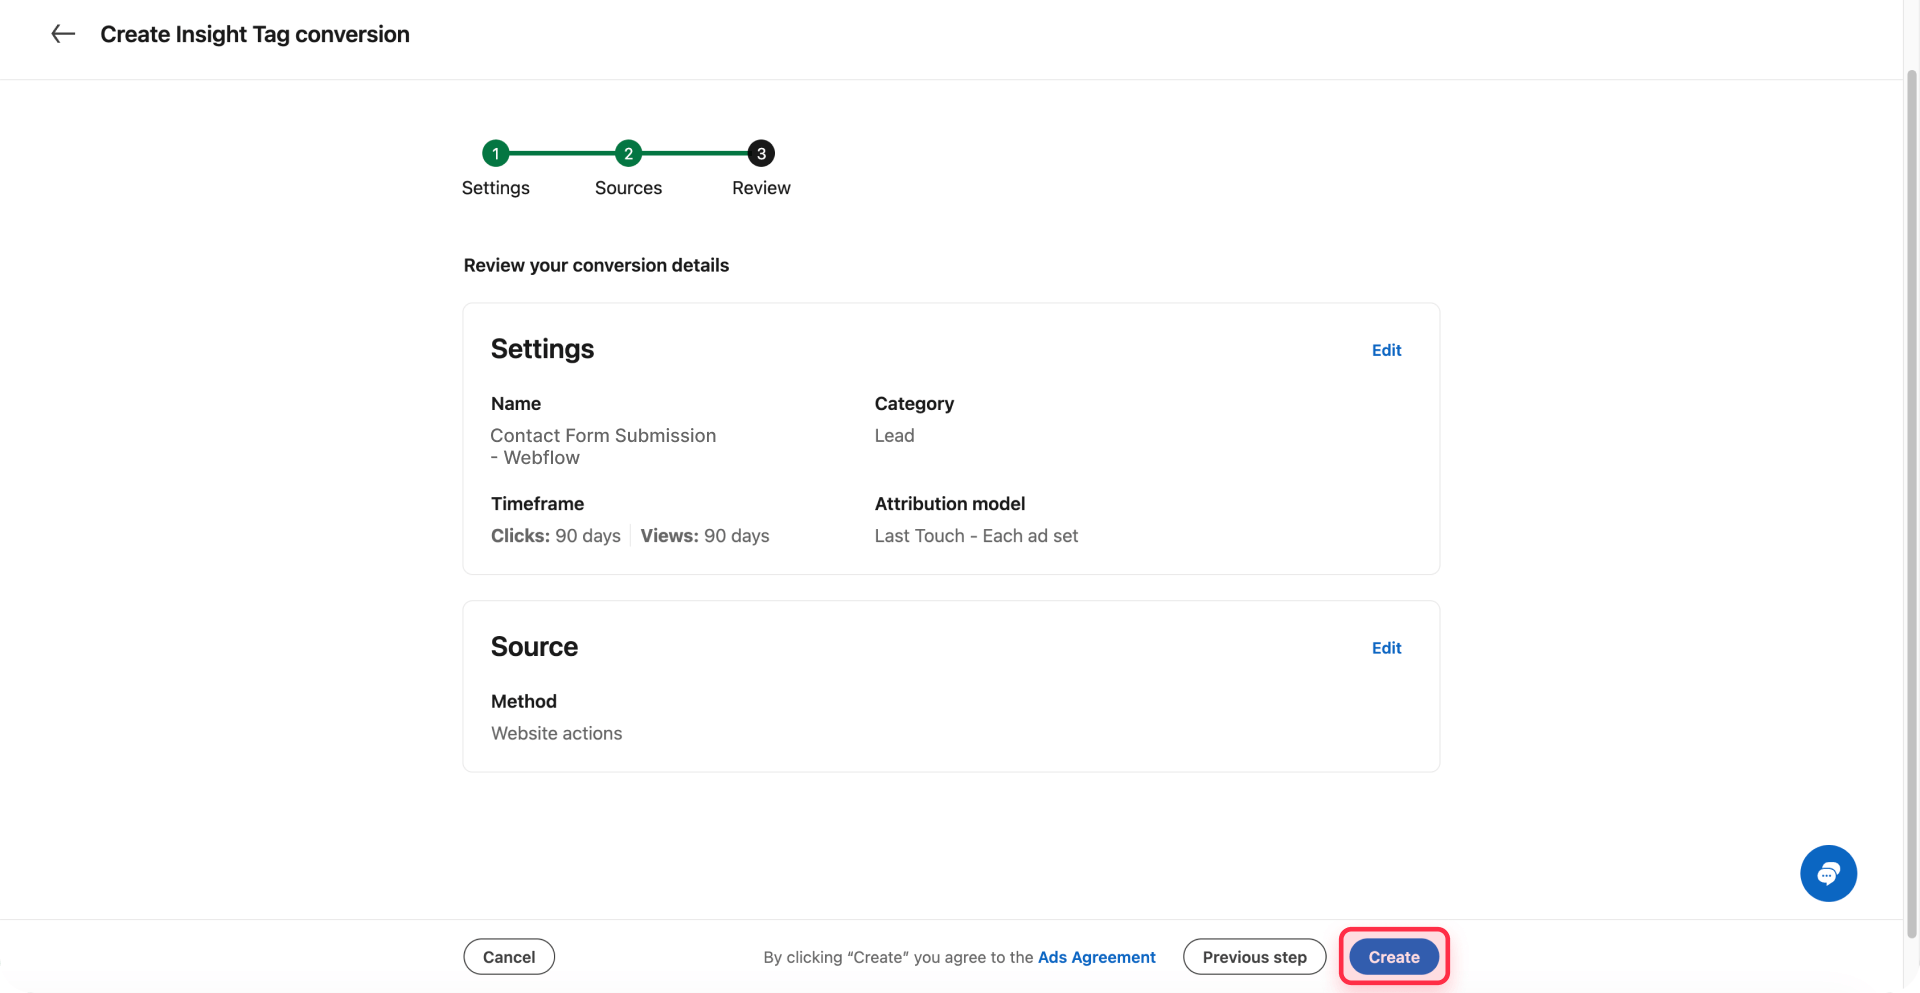
6 - Review and create:
In the Review step:
- Verify all settings are correct (Name, Category, Timeframe, Attribution model)
- Confirm the tracking method shows as Website actions
- Review the selected page
- If you don't have ad sets yet, you'll see a warning message—you can create ad sets later
- Click Create to finish setup
Your conversion will show as Active immediately and begin tracking when visitors from your LinkedIn ads reach the specified thank you page. You'll see a success message confirming "Your conversion has been successfully created."
Testing your conversion tracking setup
Before running live campaigns, verify that conversions track correctly:
1 - Check conversion status: After creating your conversion, it will immediately show as Active in the Conversion tracking dashboard with a green status indicator
2 - Verify in the conversion list: Go to Measurement > Conversion tracking and confirm your conversion appears in the list with:
- Status: Active
- Data source: Website actions
- Category: Your selected category (e.g., Lead)
- Ad sets selected: May show "0" if you haven't attached it to campaigns yet
3 - Test the conversion flow: Click a LinkedIn ad (if you have active campaigns) or visit your site directly, fill out your Webflow form, and submit it to trigger the redirect to your thank you page
4 - Monitor conversion data: Conversion data typically appears in Campaign Manager reports within a few hours, though it may take up to 24 hours for the first conversions to show
If your conversion shows as Unverified or isn't tracking, double-check that:
- The LinkedIn Insight Tag shows as Active in Data > Signals manager > Insight Tag
- Your website had traffic in the last 30 days before creating the conversion
- Your thank you page appeared in the page selection list during setup
- You've published your Webflow site (not just saved it in the Designer)
- The form successfully redirects to the thank you page (test this manually)
Troubleshooting common LinkedIn Insight Tag issues in Webflow
Tag shows as Unverified after 24 hours: Check that you copied the complete code from Campaign Manager without edits, verify the code uses straight quotation marks (not curly quotes), confirm the code is in the Footer Code section of Project Settings, and ensure your site is published (not just saved in Designer).
"No website actions found" message in conversion setup: This means LinkedIn hasn't detected activity from your Insight Tag yet. Verify that your Insight Tag is installed correctly and shows as Active in Data > Signals manager > Insight Tag. Make sure you had traffic on your website in the last 30 days. Wait 24 hours after tag installation before creating conversions.
Conversions not tracking despite Active tag: Verify the thank you page URL exactly matches your conversion URL rules in Campaign Manager. Test that your Webflow form successfully redirects to the thank you page. Confirm the conversion is attached to your active campaigns.
Wrong Partner ID or multiple tracking tags: Go to Data > Signals manager > Insight Tag in the correct Campaign Manager account. Verify the Partner ID in your Webflow code matches the one displayed. If you have multiple LinkedIn ad accounts, ensure you're using the correct Partner ID.
Frequently asked questions about LinkedIn Insight Tag in Webflow
How do I install LinkedIn Insight Tag on my Webflow site?
To install the LinkedIn Insight Tag in Webflow, copy the complete tracking code from LinkedIn Campaign Manager under Data > Signals manager > Insight Tag, then paste it into your Webflow project's Custom code tab under Footer Code in Project Settings. After saving and publishing your site, the tag will automatically load on all pages and begin tracking visitor activity for your LinkedIn campaigns.
Where do I add LinkedIn Insight Tag code in Webflow?
Add the LinkedIn Insight Tag code in Webflow's Project Settings under the Custom code tab, specifically in the Footer Code area (before the closing tag) or in the Head Code section. Both placements work since the script loads asynchronously. This ensures the tag loads site-wide on all published pages while maintaining optimal page performance.
How long does LinkedIn Insight Tag take to activate in Webflow?
After installing the LinkedIn Insight Tag in Webflow and publishing your site, the tag typically shows as Active in LinkedIn Campaign Manager within 24 hours, depending on your site's traffic volume. Domains can appear in Campaign Manager in 5-10 minutes after the first page view. For immediate verification, use the "Insight Tag Checker for LinkedIn" Chrome extension to confirm the tag is firing correctly.
Does LinkedIn Insight Tag work with Webflow forms?
Yes, the LinkedIn Insight Tag works well with Webflow's native forms. After installing the tag site-wide, configure your Webflow forms to redirect to specific thank you pages, then set up Page visits conversions in LinkedIn Campaign Manager using those thank you page URLs to automatically track form submissions from your LinkedIn ads.
Can I track multiple LinkedIn conversions on the same Webflow site?
Yes, you can track unlimited LinkedIn conversion actions on a single Webflow site using one Insight Tag installation. Simply create separate conversions in LinkedIn Campaign Manager with different URL rules using Page visits in Website Actions for different thank you pages, or use Button clicks in Website Actions to track different button interactions across your site.
Conclusion
Installing the LinkedIn Insight Tag on your Webflow site and configuring thank you page conversion tracking gives you the measurement foundation needed to run effective LinkedIn advertising campaigns. With conversion data flowing into Campaign Manager, you can identify which audiences may be driving results, optimize campaigns based on actual business outcomes, and measure ROI from your LinkedIn advertising investment.
The straightforward installation process can typically be completed in a single session, and the conversion data you'll capture enables smarter decisions about targeting, messaging, and budget allocation. LinkedIn's Insight Tag uses first-party cookies for improved tracking reliability, and you can later add LinkedIn's Conversions API for even more accurate measurement as browser restrictions increase.
Need help implementing more sophisticated tracking setups, integrating LinkedIn data with other analytics platforms, or developing custom conversion strategies for complex user journeys? Our Webflow agency specializes in measurement implementations that capture accurate data and drive campaign optimization.


Join readers commenting on this post!