If you've installed the Pinterest pixel and still see zero conversions, random checkouts, or "No tag found" in Tag Helper, it's usually not Pinterest being flaky. It's almost always: the base tag isn't truly site-wide, your event code fires on page load instead of after the real action, or your Framer navigation isn't triggering events correctly.
This guide shows you the exact steps to install the Pinterest tag (what people call the "Pinterest pixel") across your Framer site, configure the minimum viable events for ad optimization, and verify everything works before you spend a dollar on campaigns.
Why Pinterest tag tracking matters for Framer sites
Proper Pinterest tag implementation transforms guesswork into measurable campaign performance. With the right tracking setup in your Framer project, you gain visibility into which Pinterest ads actually drive conversions instead of just clicks.
- Make Pinterest ads measurable: The tag tracks what visitors do after they engage with an ad, so you can attribute leads or sales to campaigns accurately.
- Optimize for outcomes, not clicks: Pinterest's conversion campaigns require at least one key event (Lead, Signup, Checkout, or AddToCart) to optimize delivery effectively.
- Build retargeting audiences automatically: Base tag plus events let you create custom audiences from real on-site behavior for remarketing campaigns.
- Avoid false conversion data: Pinterest explicitly warns that events must only run after the intended action (button click, form submit), not just because a page loaded.
Understanding Pinterest pixel vs Pinterest tag in Framer
Pinterest officially calls their tracking code the "Pinterest tag," though most marketers still refer to it as the "Pinterest pixel." Both terms mean the same thing, but Pinterest's interface, documentation, and troubleshooting tools all use "tag."
- Base code: The site-wide snippet that must load on every page so events and audiences work correctly across your Framer site.
- Event codes: Additional JavaScript calls added only where you want to track a conversion (Lead, Signup, AddToCart, Checkout).
The base tag alone provides basic visitor data, but conversion events are what enable campaign optimization and ROI measurement.
Preparing your Pinterest and Framer accounts before installation
Before installing any code, verify you have the necessary access and capabilities in both platforms. This preparation step prevents frustration midway through the Framer installation process.
Confirming Pinterest account access for Framer setup
You need a Pinterest business account with advertiser access to install the tag and view conversion data. Log in to your Pinterest business account and confirm you can access the Conversions section under the hamburger menu.
When setting up conversions in Pinterest, you may see a large "Google Tag Manager" option appear after entering your website URL. This is Pinterest offering a direct integration with GTM. Choose ONE install path—either GTM or manual code installation. Installing both causes duplicated events and broken optimization signals that will confuse Pinterest's algorithm.
Pinterest notes it can take up to 24 hours after install to reflect in Ads Manager, but dashboards often lag even longer. Rely on Tag Helper and Test events for immediate verification instead of waiting on dashboard updates.
Verifying Framer custom code access for tag installation
Framer's path to add scripts is Project Settings → Custom Code → Add Script. You'll need to choose placement, apply to pages, and set whether scripts run Once or Run on every page visit.
If you don't see Custom Code available in your project, you're blocked by plan or permissions. You must resolve that first—upgrade or adjust access—or nothing in this tutorial will work.
Step 1: start Pinterest tag setup and choose GTM or manual
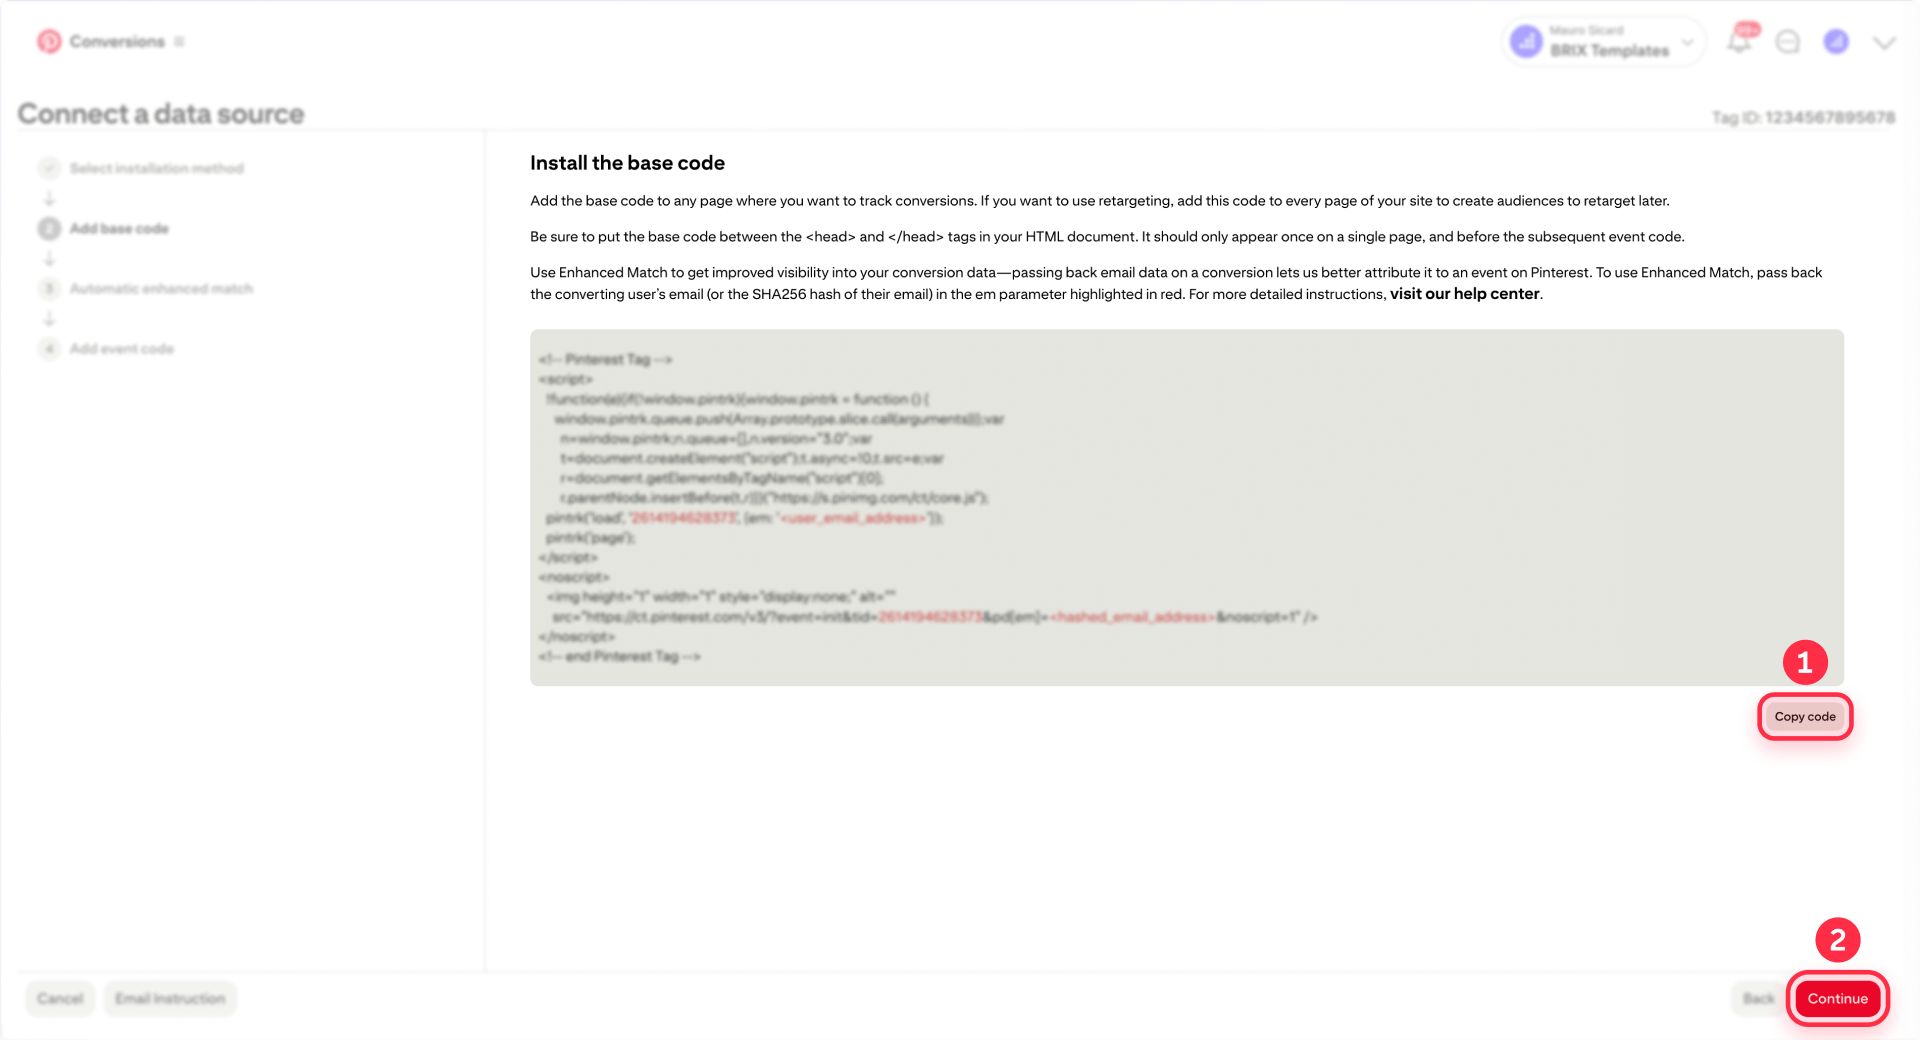
The base tag contains your unique tag ID and must be copied directly from Pinterest—never use a generic sample snippet. This ensures your Framer site reports conversions to your account.
Accessing your personalized Pinterest tag code for Framer installation
Follow this exact click-path to find your tag code in Pinterest:
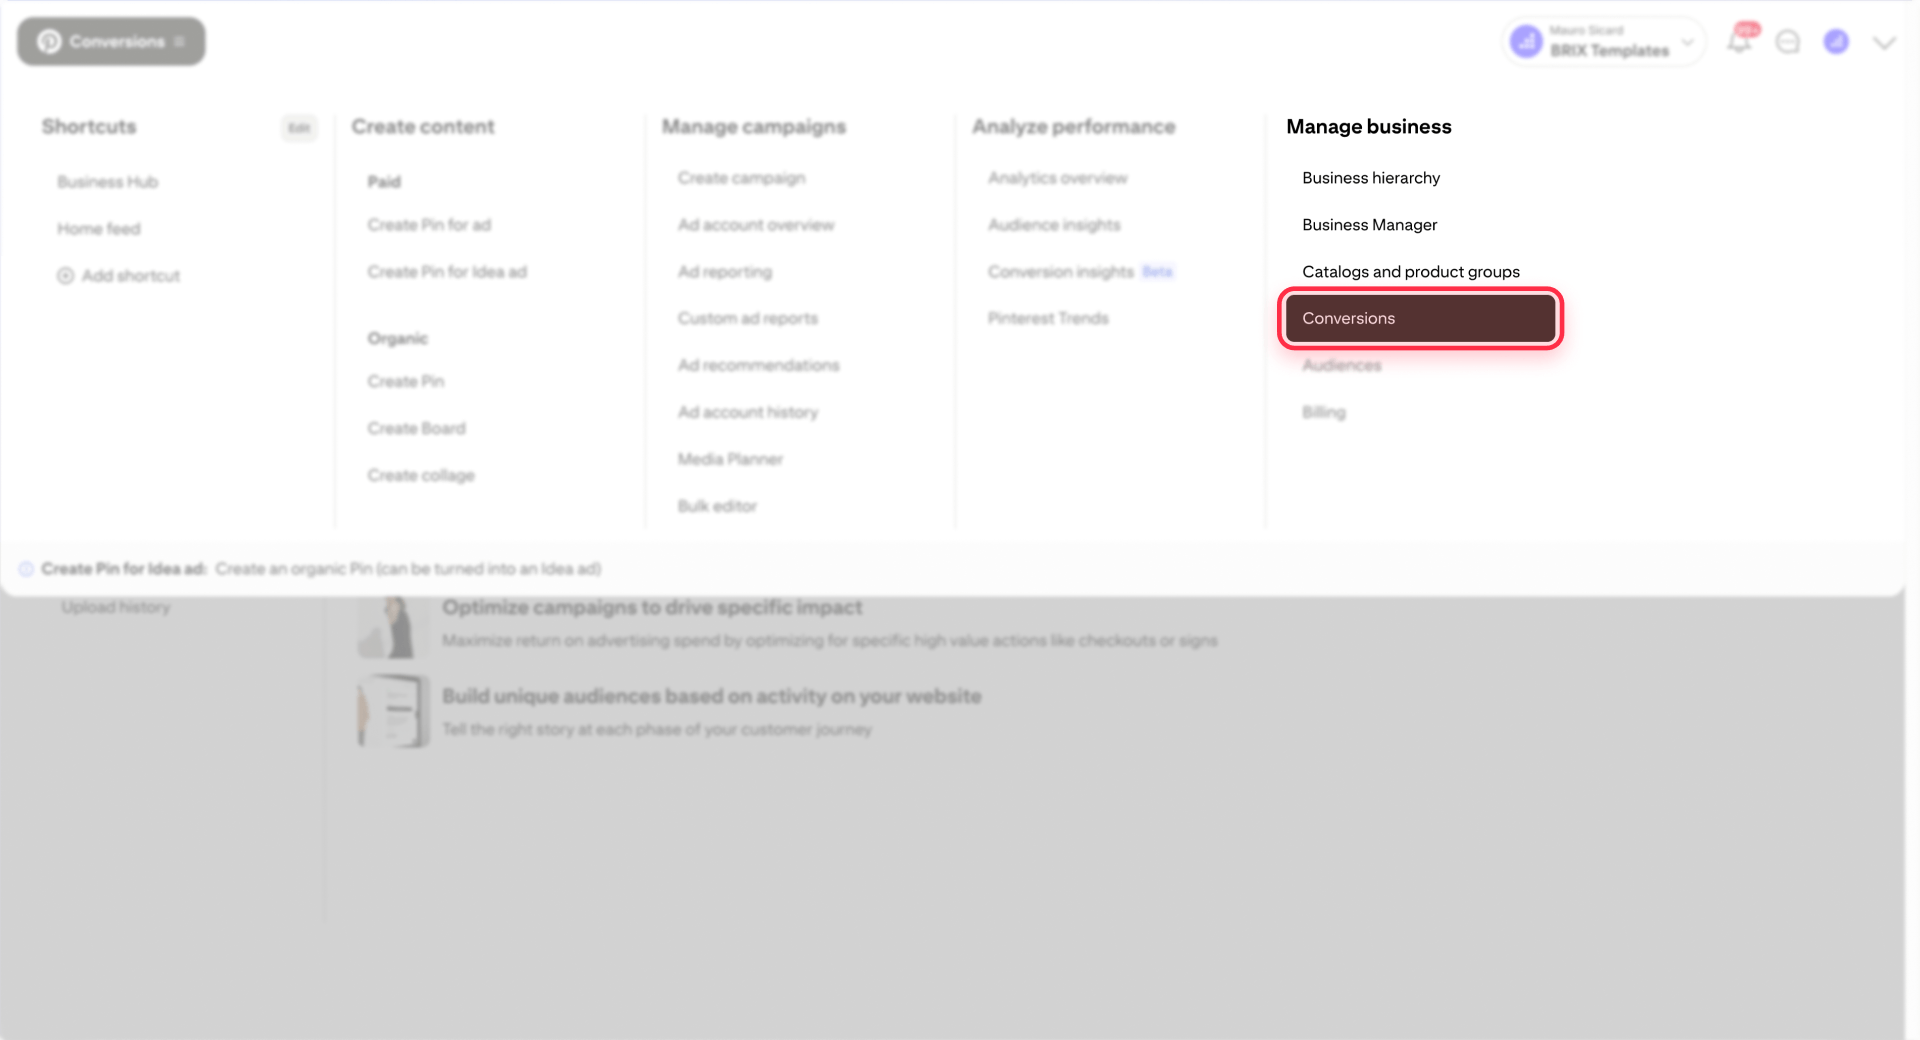
- Log in to your Pinterest business account
- Click the hamburger icon (top-left)
- Under Business, click Conversions
- Click Tag manager
- Click Install the Pinterest tag
- If Pinterest shows a Google Tag Manager integration option, you can use GTM instead of copying code (see Step 2A below)
- Manual users can click Skip to reach manual setup
- Click Copy code
Pinterest is explicit: don't copy sample code. You must copy the personalized snippet from Ads Manager so it includes your real tag ID.
If you see the GTM option and want to use that method, you don't need to copy code—proceed directly to Step 2A below.
Step 2: installing the Pinterest tag site-wide in Framer (GTM or manual)
You have two paths to install the Pinterest tag in Framer. Choose ONE method only—installing both will cause duplicate tracking.
A) Recommended: Pinterest tag in Framer using GTM (primary method)
Google Tag Manager provides a scalable way to manage the Pinterest tag alongside other marketing pixels, with centralized governance and easier event management as your tracking needs grow.
Prerequisites:
Confirm GTM is already installed and working on your published Framer domain. If you haven't set up GTM in Framer yet, follow our guide to install GTM in Framer first. If GTM isn't loading on your site, Pinterest won't load either.
Installing Pinterest tag via GTM:
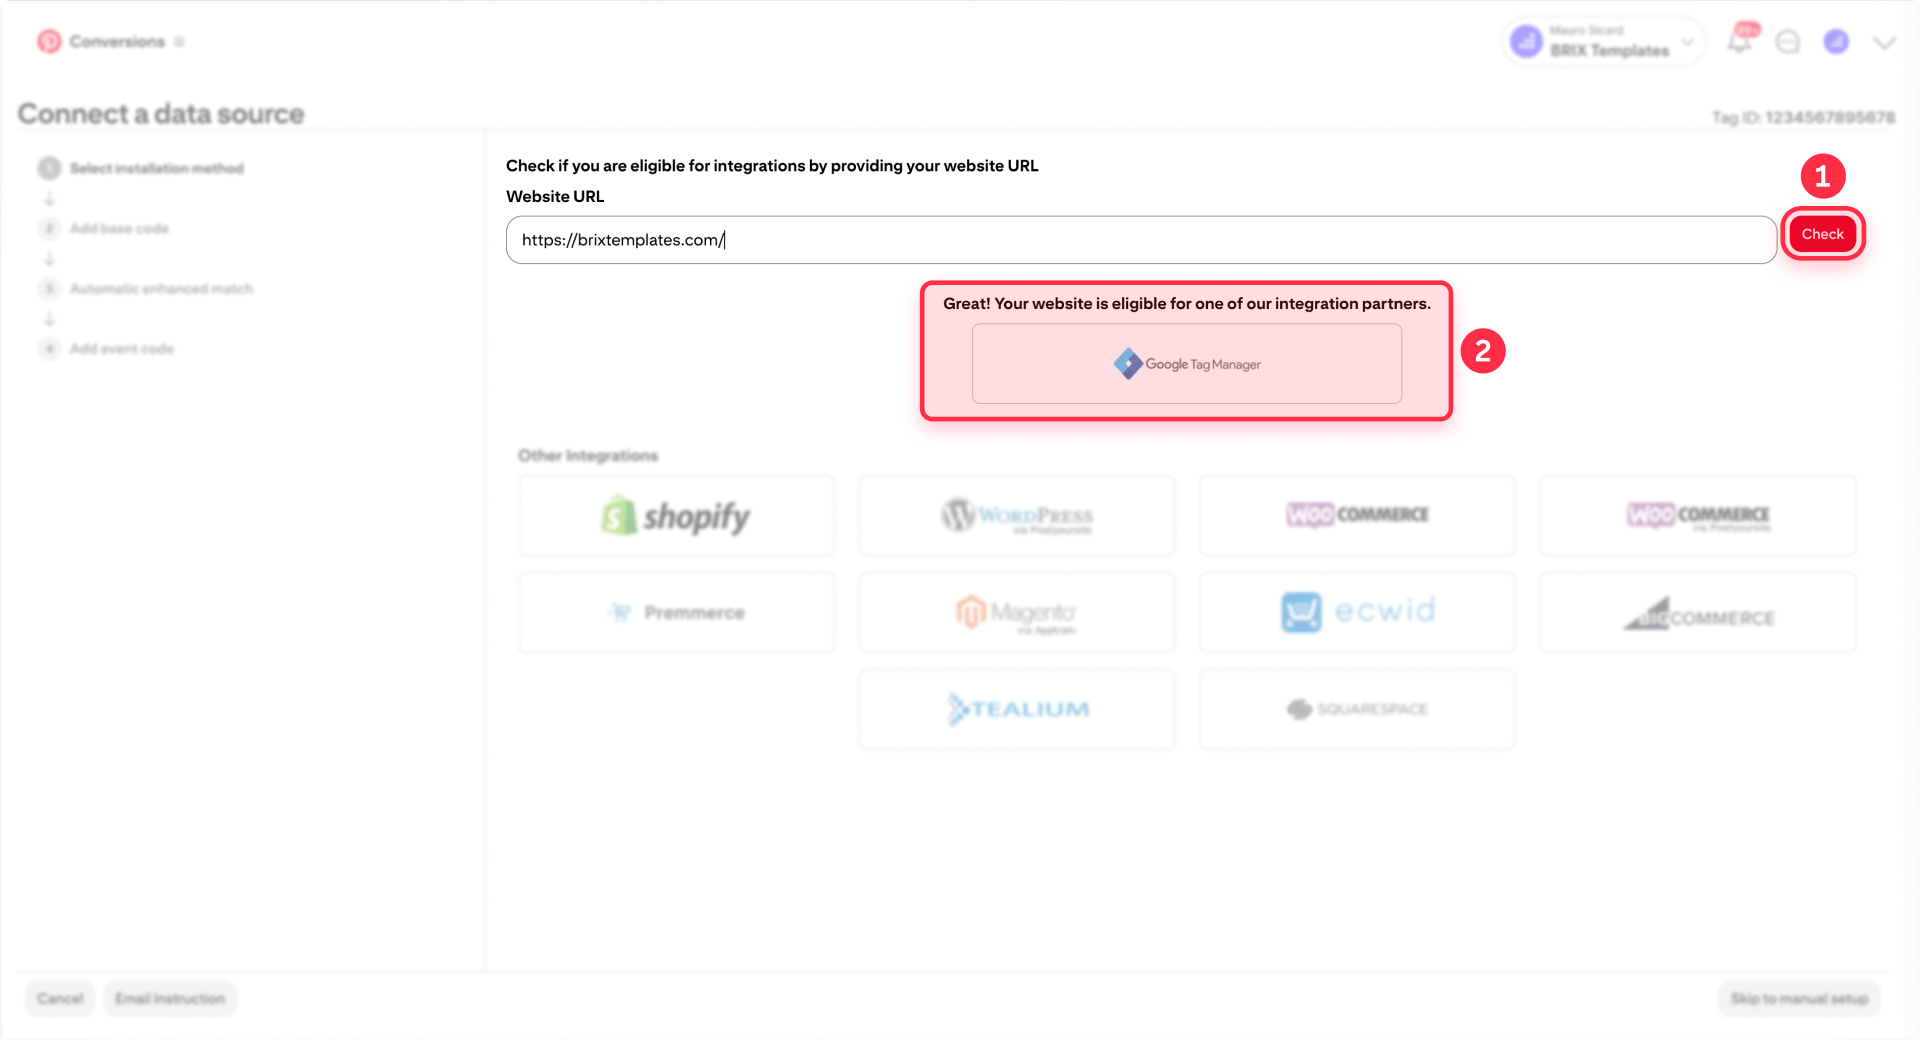
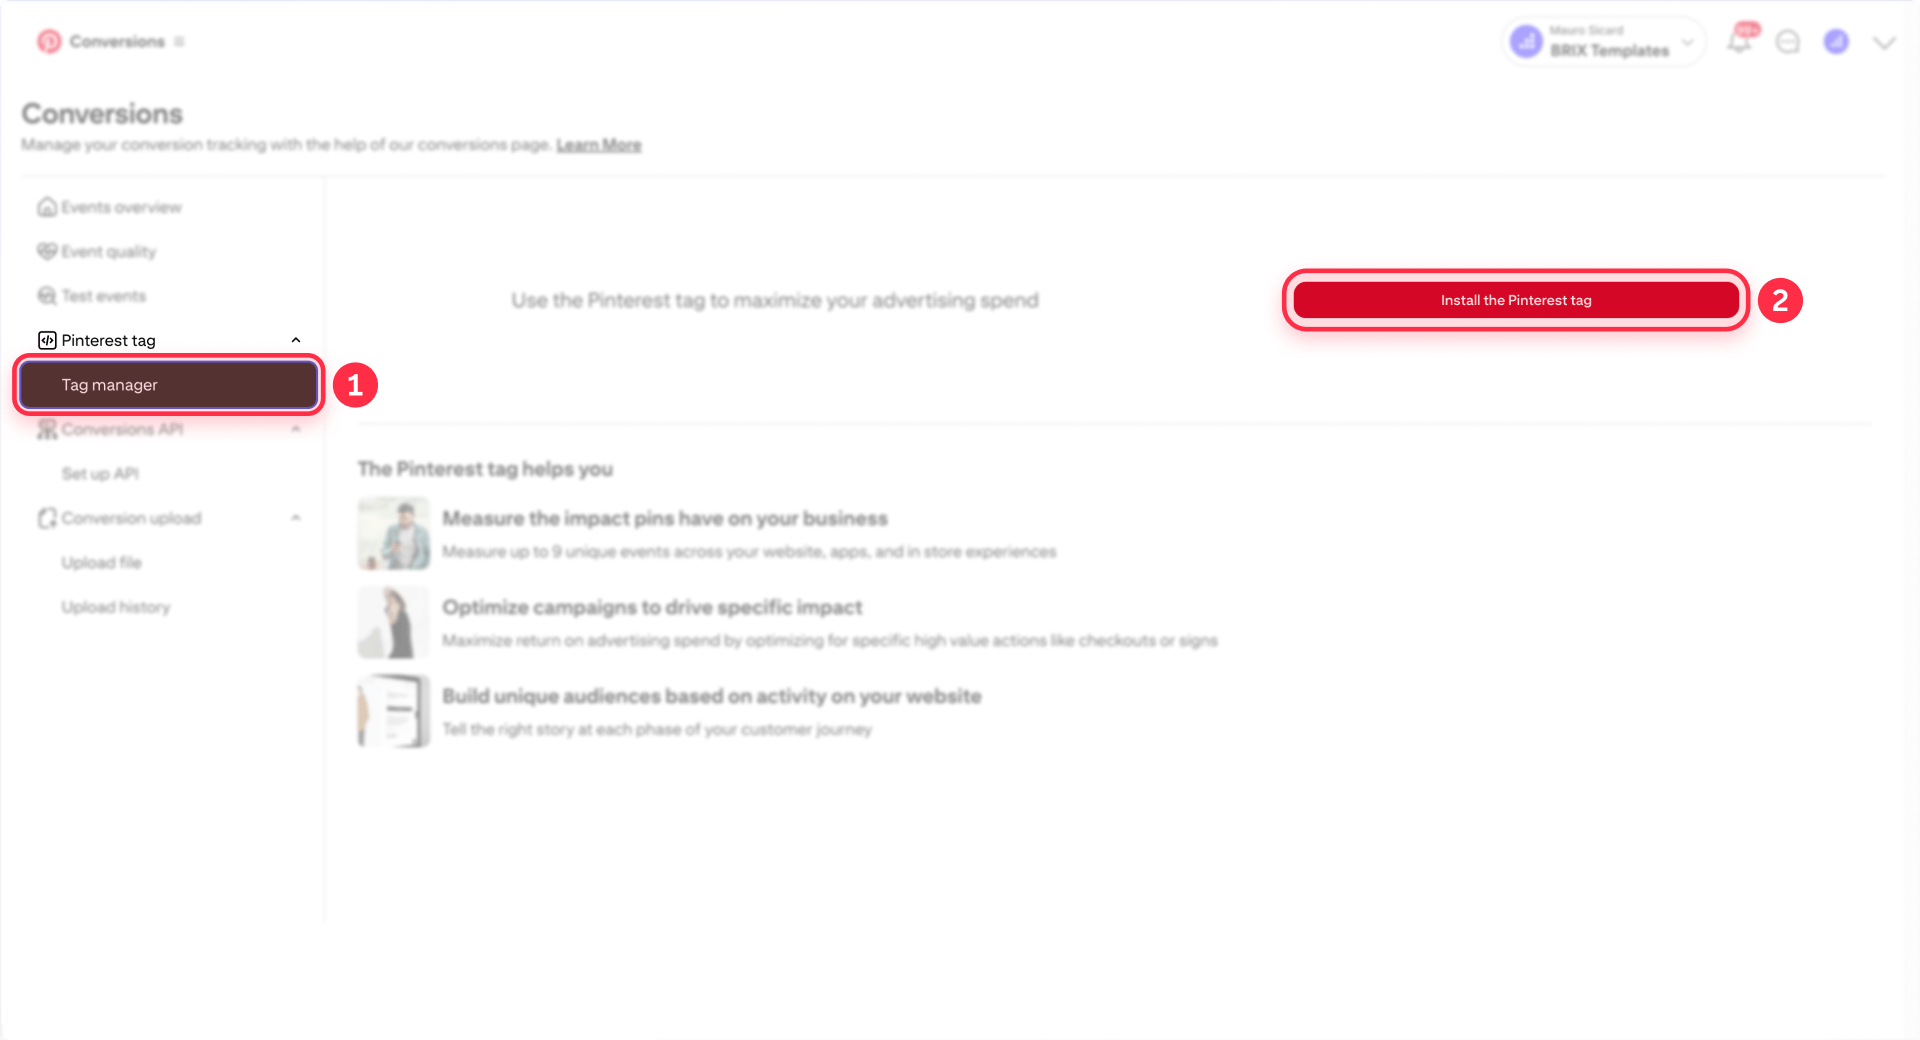
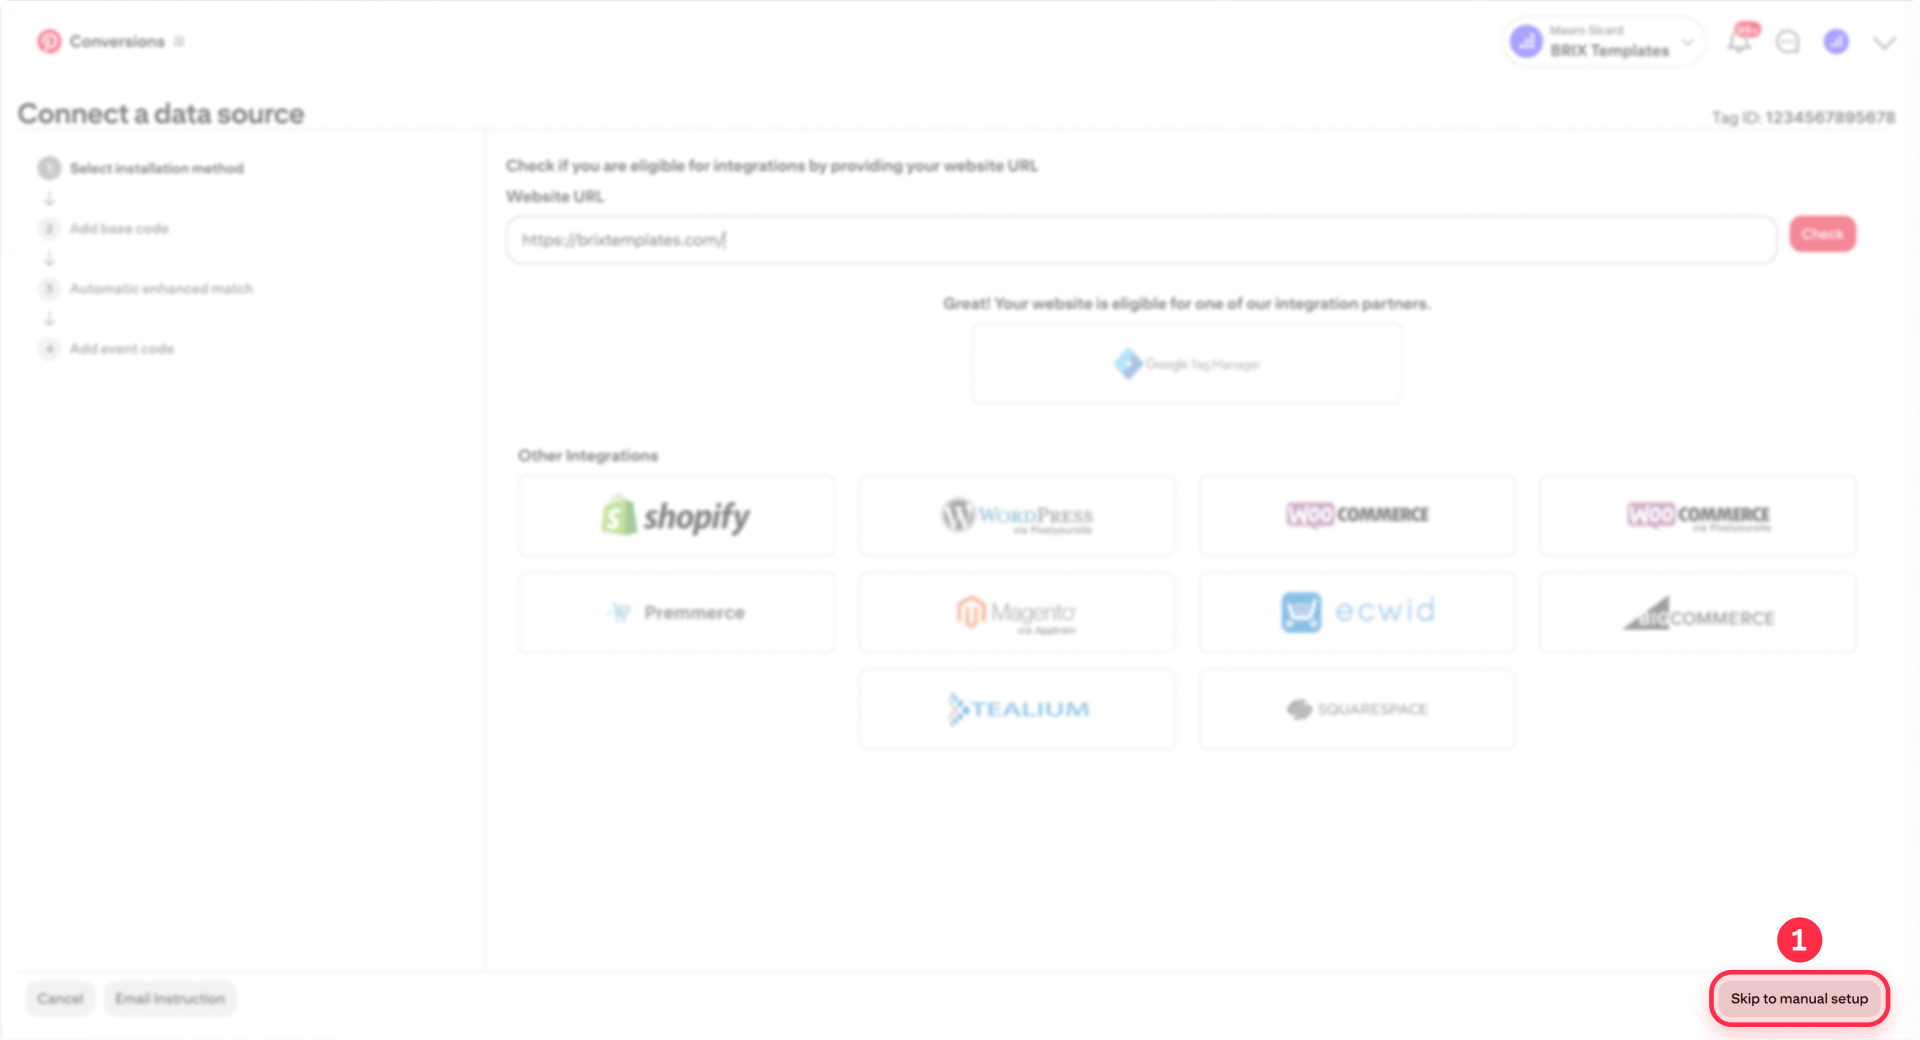
- In Pinterest Ads Manager, navigate to Business → Conversions
- Start the setup flow by clicking "Connect a data source" or "Install the Pinterest tag" (wording varies by interface)
- Enter your website URL and click "Check"
- When Pinterest detects your site, select "Google Tag Manager" as the integration partner
- Continue through the prompts until Pinterest confirms it connected or created the tag
- IMPORTANT: Open Google Tag Manager and click Submit then Publish to make the changes live on your site
Verification:
Test on your published Framer domain using Pinterest Tag Helper. The tag should now load site-wide. If Tag Helper shows "No tag found," confirm GTM is published and you're testing the correct domain where GTM is installed.
B) Alternative: Manual install in Framer Custom Code (no GTM)
If you're not using GTM or prefer direct control for a simple setup, you can manually install the Pinterest tag via Framer's custom code feature.
Pinterest tells you to paste the base code inside the <head> section. In Framer, that means placing the script in Custom Code with a head location and applying it to all pages.
Adding the Pinterest tag code to Framer project settings for site-wide tracking:
Once you've copied the base code from Step 1:
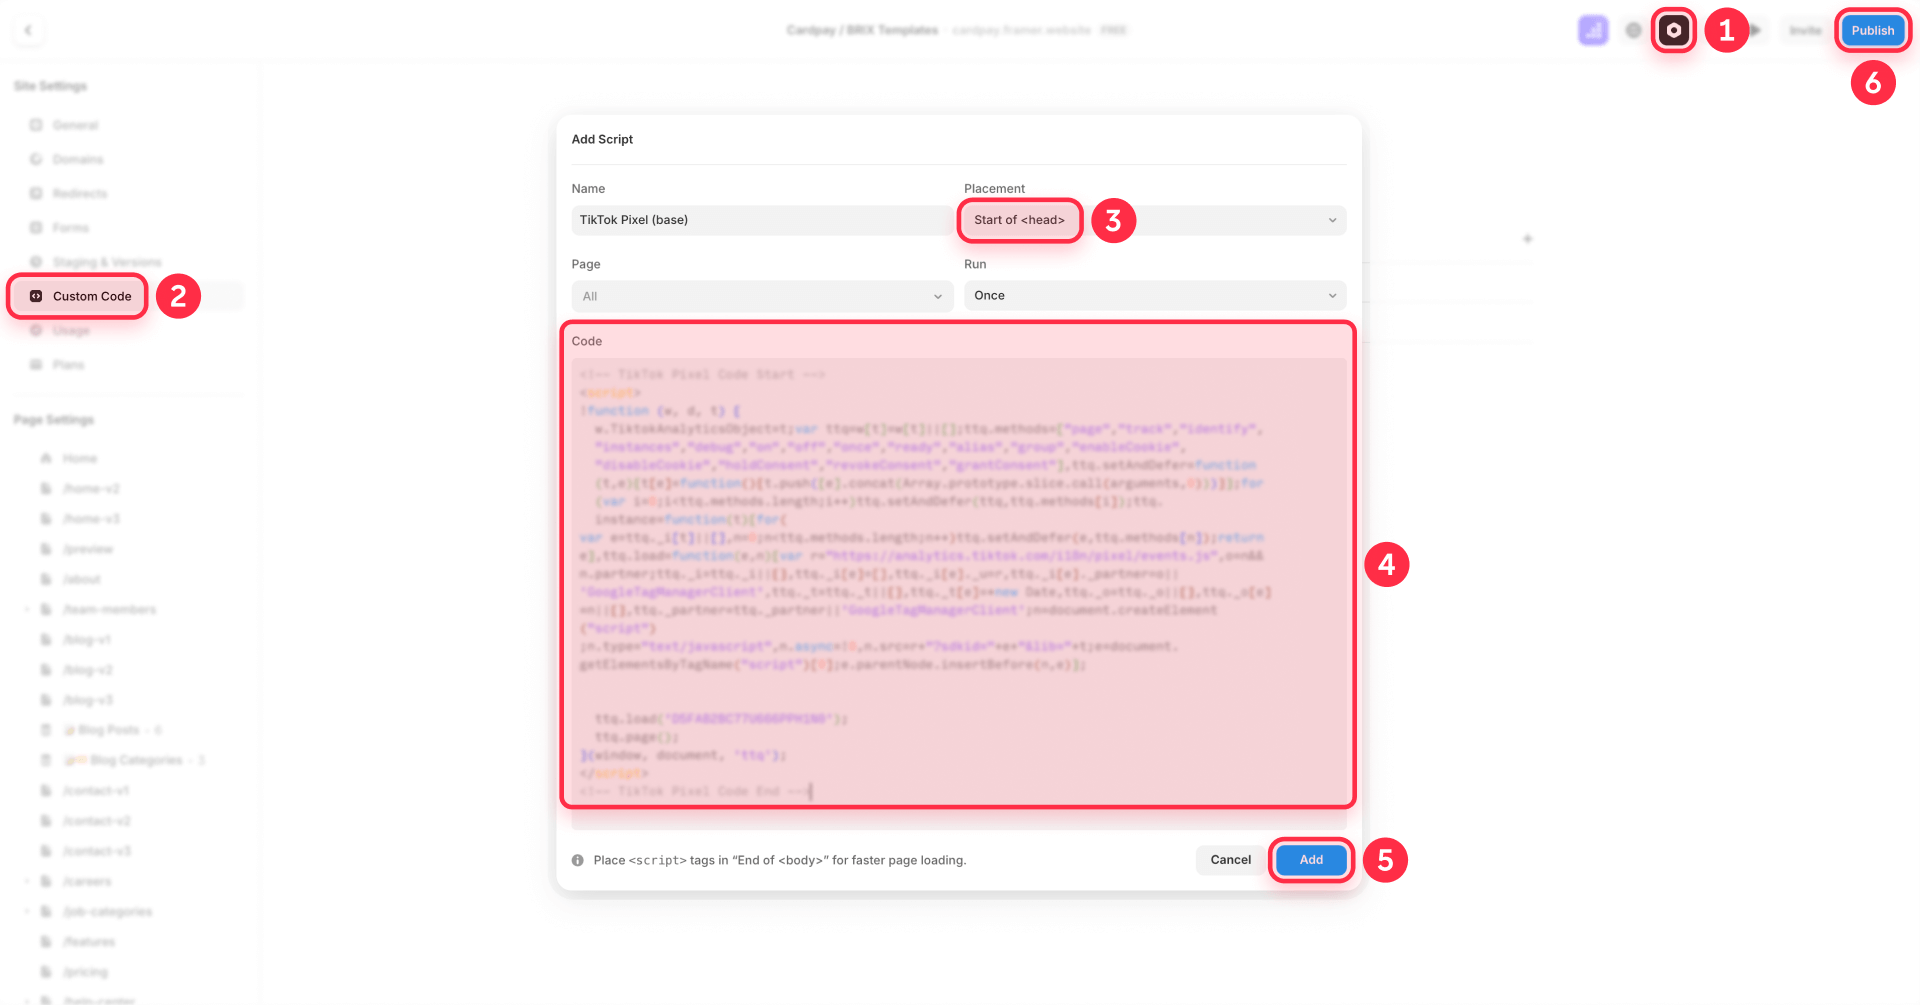
- In Framer, open Project Settings
- Click Custom Code
- Click Add Script (or the + icon)
- Set Name to something clear like Pinterest – Base tag
- In Location, choose headStart or headEnd (both satisfy Pinterest's requirement)
- Paste the personalized Pinterest base code you copied
- Apply it to all pages (don't restrict to one page)
- Set Run to Once (loads the base tag once site-wide)
- Click Publish in Framer
Step 3: creating a Framer thank you page for conversion tracking
For lead generation sites, the simplest and most reliable conversion tracking method uses a dedicated thank you page that visitors reach only after successful form submission. This Framer page becomes your conversion trigger point.
Building a dedicated thank you page in Framer for Pinterest tracking
Create a page where visitors land after completing your desired action:
- In Framer, create a new page
- Name it Thank You or Success
- Set the path to /thank-you or /success
- Add confirmation messaging and any next steps
This page should not be linked anywhere publicly—visitors should only reach it via form redirect after successful submission.
Configuring Framer form redirect for Lead event tracking
To ensure the conversion event fires only after successful form submission, configure your Framer form to redirect to the thank-you page:
- Select your Framer form component
- In the right panel, look for Redirect settings
- Set On Submit to redirect to /thank-you (or your chosen path)
This way, the Lead event script you add in Step 4 fires only when someone reaches that page after a successful form submission, not just because they loaded a page.
Step 4: tracking conversions with Pinterest tag in Framer
We'll show one GTM example (thank-you page conversion). For other events, choose what matches your funnel or contact us for an advanced setup.
Tracking Lead or Signup conversions using a thank-you page (GTM method)
The most reliable conversion tracking approach uses a dedicated thank-you page that visitors reach only after completing your desired action. This page becomes your conversion trigger point.
Create and configure your thank-you page:
- In Framer, create a new page named Thank You or Success with the path /thank-you or /success
- Add confirmation messaging and any next steps
- Configure your Framer form to redirect to this page on successful submission (select your form → Redirect settings → On Submit → redirect to /thank-you)
Configure the Lead event in GTM:
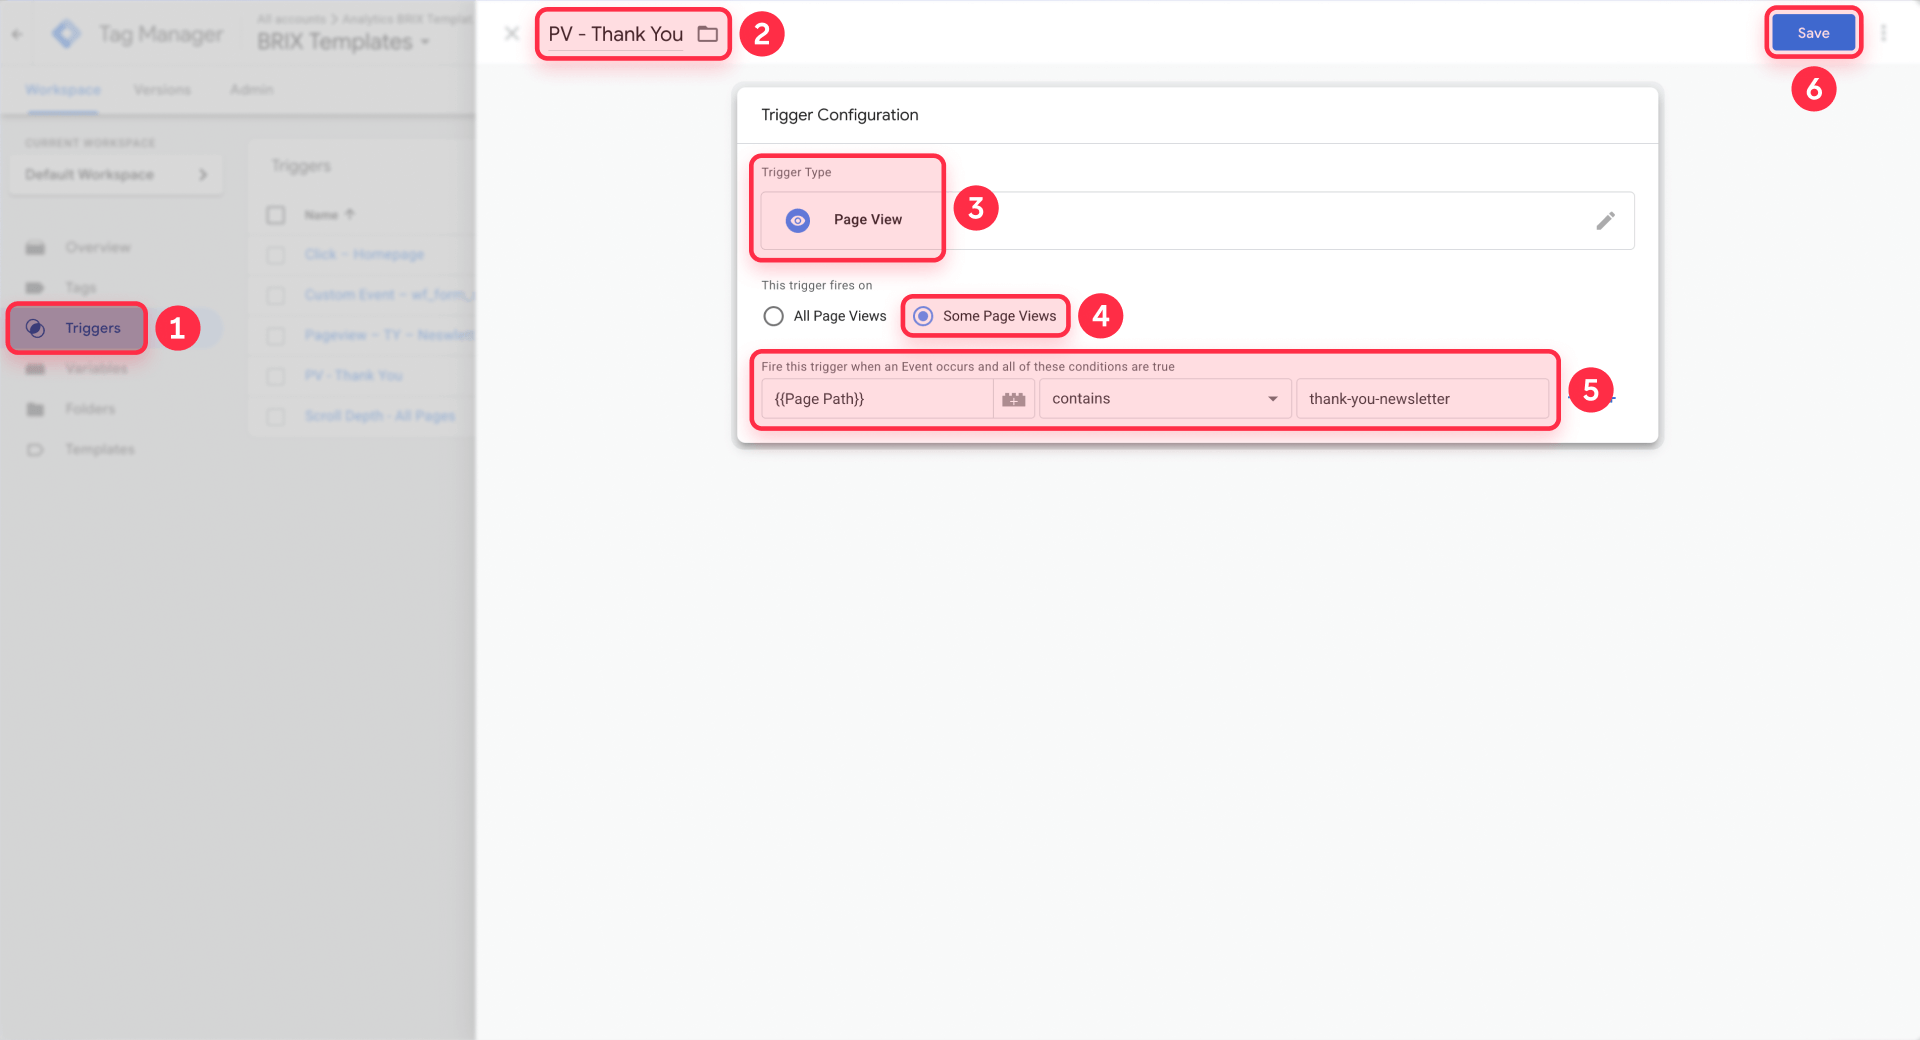
- Confirm the Pinterest base tag already exists and fires on All Pages (from the partner integration). Verify with Tag Helper. Only create it manually if it's missing.
- In Google Tag Manager, create a new trigger:
- Type: Page View
- Trigger fires on: Some Page Views
- Condition: Page Path contains /thank-you (or your chosen slug)
- Create a new tag:
- Tag type: Custom HTML
- HTML code:
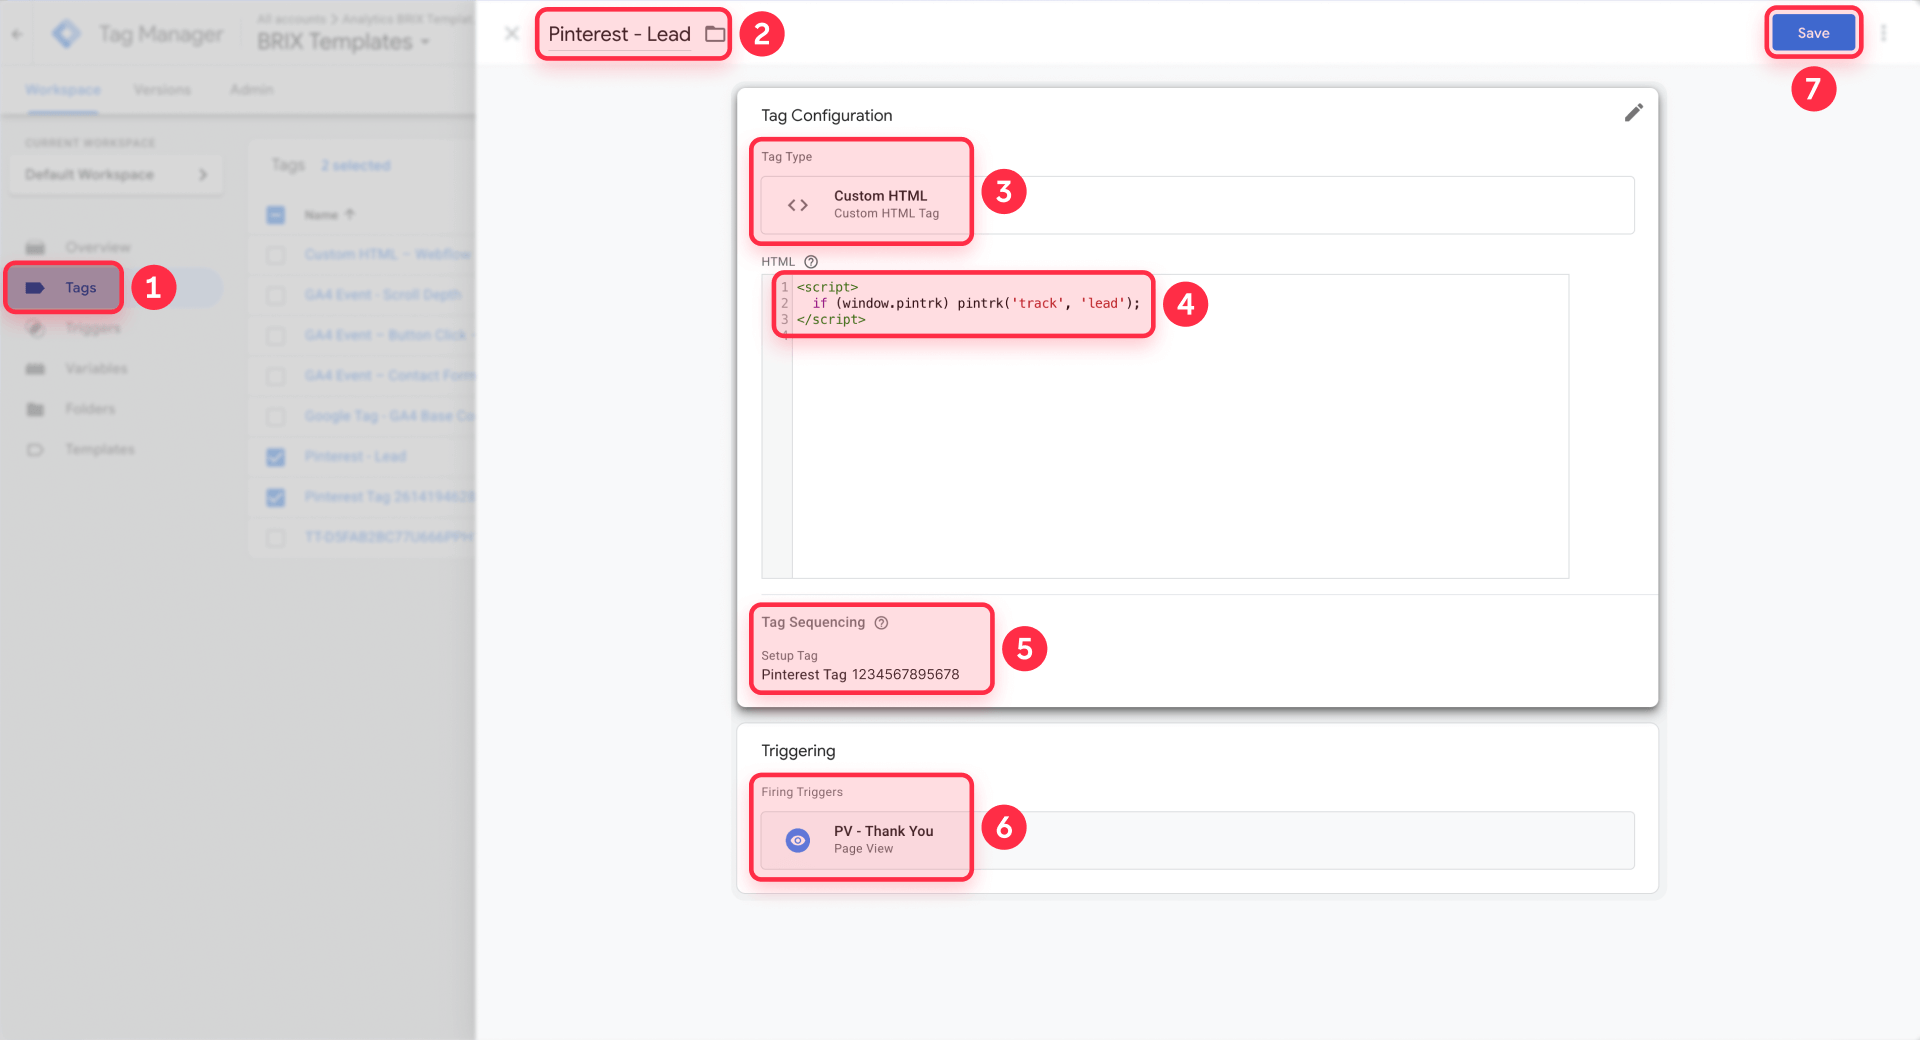
<script>
pintrk('track', 'lead');
</script>- Attach the trigger you just created to this tag
- Enable Tag Sequencing so the Pinterest base tag fires before this event tag
- Click Submit then Publish in GTM to push changes live
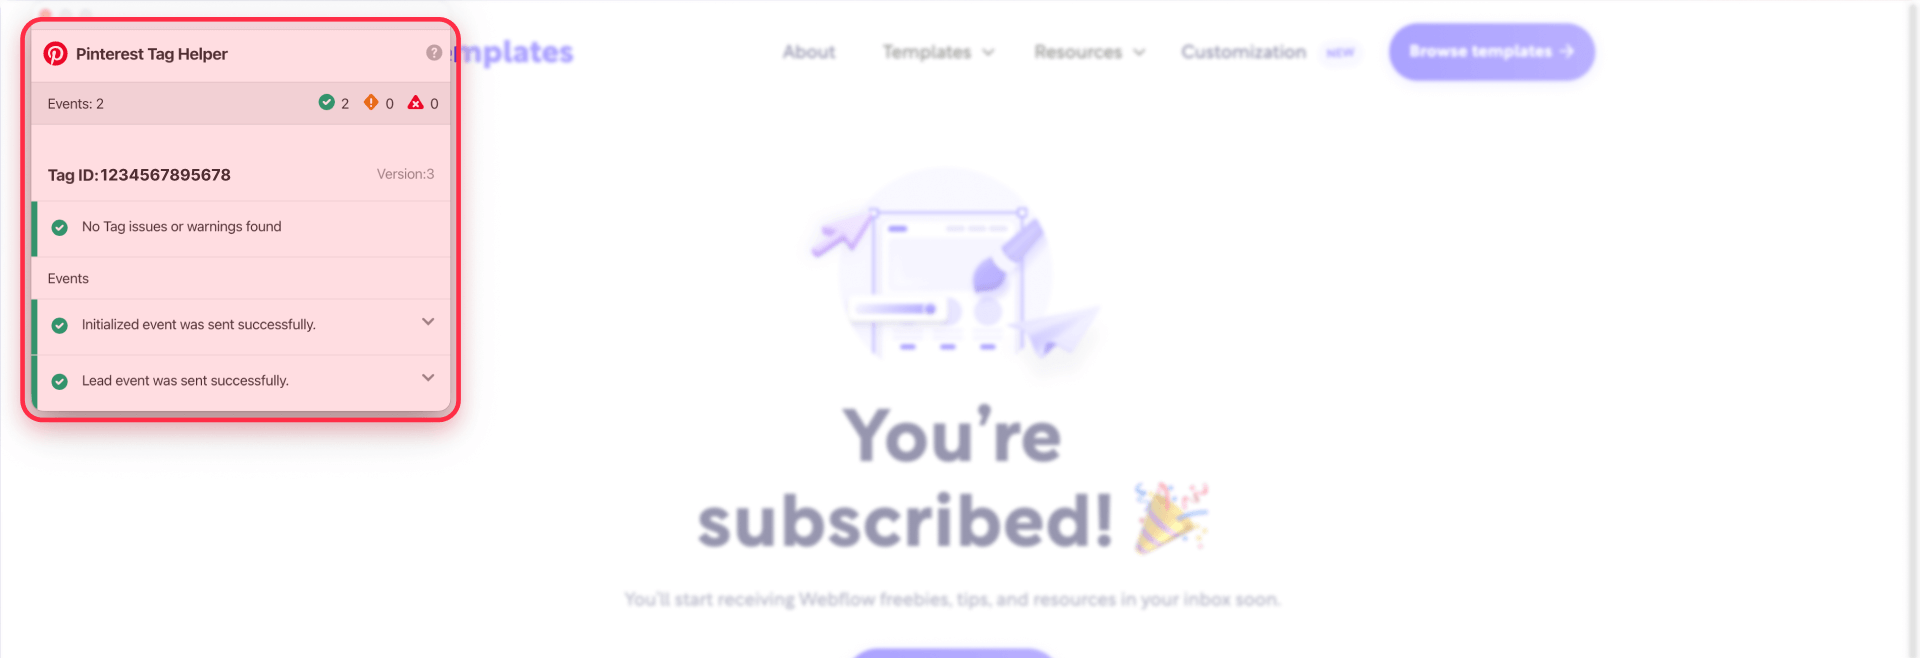
Verify the Lead event:
- Open your Framer site with Pinterest Tag Helper enabled
- Submit your form with real data
- On the thank-you page, Tag Helper should show both PageVisit (base tag) and Lead events
- Optionally check Business → Conversions → Test events in Pinterest to see the Lead event appear in real-time
Other common events
Beyond the thank-you page example above, you may want to track additional Pinterest events based on your conversion funnel:
- AddToCart – Fire on add-to-cart button clicks to track shopping intent
- Checkout – Fire only on order confirmation or success pages after payment completes
- ViewContent – Track engagement on key product or content pages
- Signup – Alternative to Lead for newsletter or account registration flows
Each event requires its own GTM trigger and tag configuration. Need help implementing the full event map? We can help—get in touch.
Verifying Pinterest tag installation across your Framer site
After installing the base tag and events, verify everything works before spending on campaigns. Use multiple verification methods because dashboards can lag for hours or days.
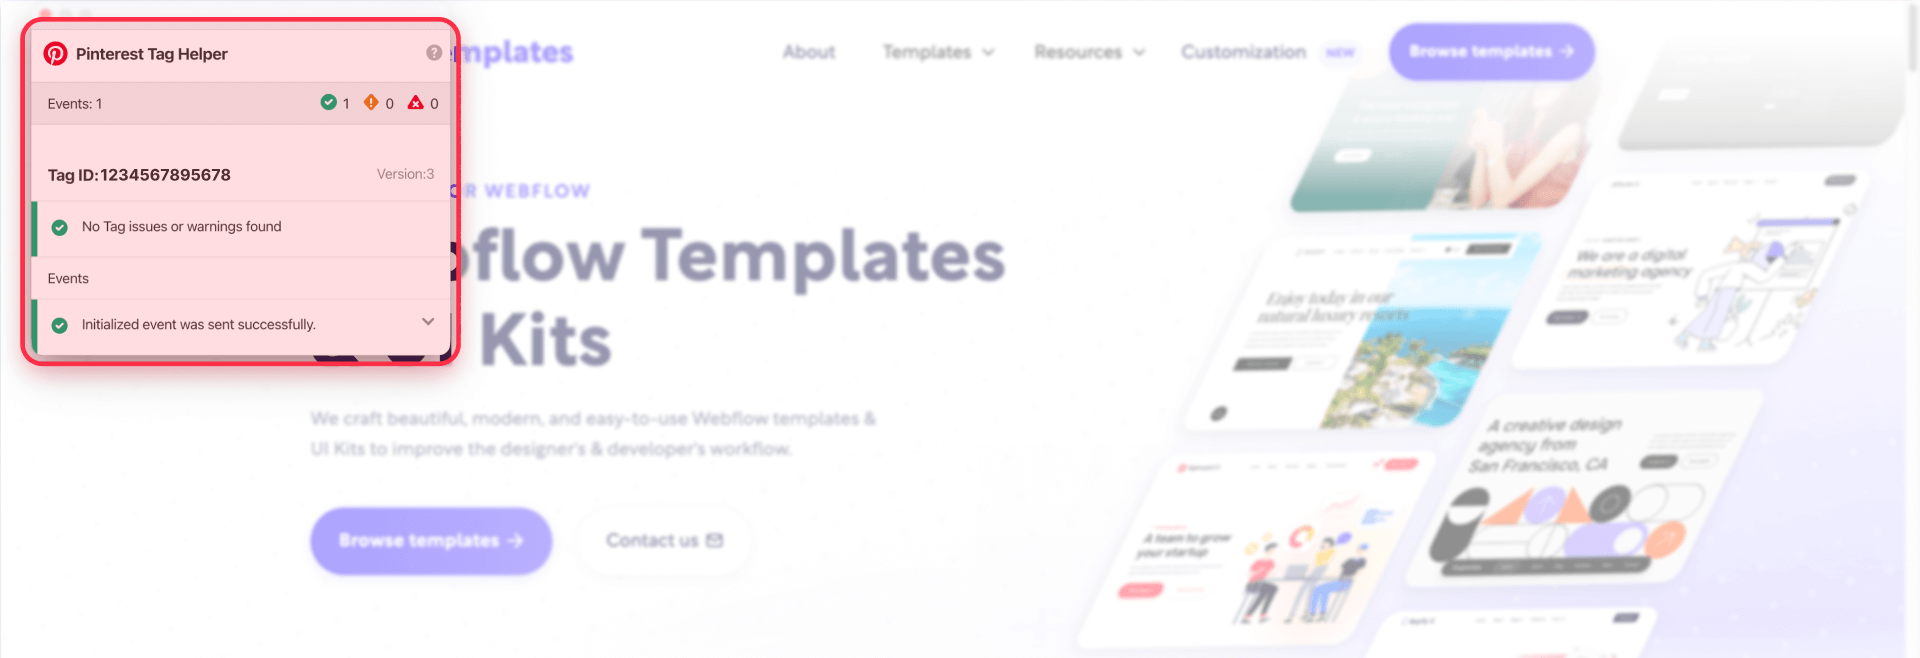
Using Pinterest Tag Helper to verify Framer installation
Install the Pinterest Tag Helper Chrome extension and visit your published Framer site:
- Base tag: Should show PageVisit on every page you navigate to
- Lead/Signup: Should appear only on the thank-you page after form submission
- Other events: Should appear only on their configured trigger pages
If Tag Helper says "No tag found" and you're using the GTM method, confirm the GTM container is published (Submit/Publish in GTM) and you're testing the same domain where GTM is installed. If events appear in Tag Helper but not in dashboards, rely on Test events and allow for normal reporting delay.
Checking Test events in Pinterest Ads Manager
Navigate to Business → Conversions → Test events in Pinterest. This real-time log shows events as they fire:
- Submit a form or complete your conversion action
- Within seconds, the event should appear in Test events with all parameters
- Verify event name and any required parameters (e.g., order_id, value, currency for e-commerce events)
Test events is faster than waiting for dashboard updates and confirms Pinterest received the data.
Inspecting network requests in Chrome DevTools
Open Chrome DevTools (F12 or right-click → Inspect), then:
- Go to the Network tab
- Type ct.pinterest in the filter box
- Navigate your site and trigger conversion actions
- Look for requests to ct.pinterest.com/user/
Each request should include query parameters like:
- tid: Your tag ID
- event: Event name (PageVisit, Lead, Checkout)
- ed: Event data (encoded JSON with parameters)
If you see requests, your code is firing. If Pinterest dashboards still show nothing, you're hitting normal reporting lag.
When to use GTM or Conversions API for Pinterest tracking in Framer
Choosing the right implementation method depends on your tracking complexity, existing infrastructure, and scale.
Google Tag Manager for scalable Pinterest tracking
GTM is the recommended default approach for most Framer sites, especially those with multiple conversion events, complex triggers, or established marketing stacks. GTM provides centralized tag governance, easier event management, and the ability to update tracking without redeploying Framer custom code.
Use GTM when you need multi-event setups, want to manage Pinterest alongside other pixels (Meta, Google), or anticipate frequent tracking changes as campaigns evolve.
Manual Framer installation for simple setups
Manual installation via Framer Custom Code is the quick alternative for simple setups: base tag plus one or two straightforward events (like Lead on thank-you page). If your tracking needs are minimal and you want direct control without learning GTM, manual installation works perfectly.
Manual becomes harder to maintain as tracking complexity grows—adding new events, modifying parameters, or managing multiple conversion paths requires editing Framer custom code and republishing.
Conversions API for advanced server-side tracking
Conversions API sends conversion data directly from your server to Pinterest, bypassing browser-based tracking limitations. This is an advanced next step after browser tracking (GTM or manual) is stable.
Use Conversions API when browser tracking reliability becomes a concern (ad blockers, iOS restrictions), when conversions happen outside your Framer pages (backend systems, CRM), or when you need resilient tracking for high-spend campaigns.
Implement Conversions API only after your browser-based setup is stable and you understand deduplication requirements. This typically makes sense for high-volume advertisers or when browser tracking reliability becomes a concern.
Troubleshooting Pinterest tag issues in Framer
When implementing Pinterest tag tracking on your Framer site, you may encounter several common issues. Here are the most frequent problems and their solutions:
- Pinterest Tag Helper shows "No tag found" on Framer site: Confirm the base code is added via Project Settings → Custom Code and applied to all pages. Re-Publish the site and test on the published URL. Check browser DevTools Network tab for ct.pinterest requests to verify the tag loads.
- No tag found (GTM method): Confirm GTM is installed in Framer, the GTM container is published (Submit/Publish in GTM), and you're testing the correct domain where GTM is live. If GTM isn't loading, Pinterest won't load either.
- Pinterest shows "Inactive" status after Framer installation: Wait up to 24 hours for Pinterest to detect the tag. Use Test events and Tag Helper for immediate verification instead of waiting for Ads Manager status updates. If still inactive after 24 hours, verify your base tag code was copied correctly from Pinterest.
- Lead or Signup fires on the wrong page in Framer: Your event script is probably not restricted to the thank-you page. Use Framer's page-scoped script selection to restrict it properly. If you intended form-submit-only behavior, use Framer's Redirect option so the event fires only after success.
- Checkout fires when someone just visits a page: Pinterest warns that page-load event scripts fire every time the page loads. Don't put Checkout on a non-success page. Move Checkout to a dedicated success URL page returned from your payment provider.
- Event data is missing (value, currency, order_id): Pinterest lists required data for campaign types and states that order_id is required for conversion analysis reporting. Add query params from your payment provider or use Conversions API if your provider can't pass this back to Framer.
- Events missing on Framer navigation: Framer uses client-side navigation, which can sometimes prevent events from firing if triggers aren't URL-based. Ensure your event triggers (GTM or manual page-scoped scripts) are configured to fire on the actual conversion page URLs, and re-test by navigating through the full user flow.
- Custom code changes don't seem live in Framer: You didn't Publish or you're testing in a non-published context. Use Framer's Publish flow and verify on the live URL.
Frequently asked questions about Pinterest tag in Framer
Many Framer users have similar questions when implementing Pinterest tag tracking. Here are answers to the most common queries about Pinterest conversion tracking on Framer sites.
What is the Pinterest tag and why does Pinterest call it a "tag" instead of "pixel" in Framer?
Pinterest's official term is the Pinterest tag, and their interface consistently uses that name even though marketers still say "pixel." Both terms refer to the same tracking code.
In Framer, it's a script you add site-wide to track actions after Pinterest ad clicks: the base tag loads on every page, and event codes track specific conversions. Copy the personalized base code from Pinterest Ads Manager, then add it in Framer via Project Settings → Custom Code applied to all pages, or install it via Google Tag Manager for more scalable management.
How do I install the Pinterest tag site-wide in Framer correctly?
You have two options: GTM (recommended) or manual installation via Framer Custom Code.
For GTM, ensure GTM is already set up in Framer (install GTM in Framer), then use Pinterest's GTM integration option during Conversions setup. Publish the GTM container to activate the tag.
For manual installation, use Framer's Custom Code system so the base script loads across your entire site: create one script with a clear name, choose headStart or headEnd, and apply it to all pages. Set Run to Run on every page visit to reduce tracking gaps when navigating Framer pages.
If Tag Helper doesn't detect it, open DevTools and filter for ct.pinterest to confirm requests are being sent. Always publish after adding code—preview mode doesn't activate tracking.
How do I verify the Pinterest tag is working correctly on my Framer site?
Use three verification methods for complete confidence: Pinterest Tag Helper, Business → Conversions → Test events, and Chrome DevTools (Network filtered by ct.pinterest). Together, they confirm the tag loads, events fire, and requests contain the right data.
Test complete flows end-to-end: submit forms to confirm Lead fires only on the thank-you page, and test any other configured events on their respective trigger pages. If dashboards lag, DevTools is your fastest truth source.
How do I track form conversions with Pinterest tag in Framer?
The cleanest Framer-native approach is redirect-based conversion tracking: set a Redirect on your form so successful submission sends visitors to a thank-you page, then restrict an event script to run only on that page.
Create the thank-you page, add a page-scoped Lead (or Signup) event script via Project Settings → Custom Code (manual method) or configure a Lead event in GTM with a page URL trigger (GTM method), and Publish. Pinterest explicitly warns against firing conversion events just because a page loaded, so this redirect flow keeps timing aligned to real submissions.
How do I track Checkout in Framer if payments happen on Stripe or another platform?
Checkout tracking follows similar principles to the Lead event example in Step 4: configure your payment provider to redirect to a Framer success page (e.g., /purchase-success), then create a GTM trigger and tag for that page URL.
Pinterest documentation shows Checkout requires order_id and currency for conversion tracking. Many providers append identifiers like session_id to the success URL—you can configure GTM to parse these and pass them in the event payload. For help implementing Checkout or other advanced events, get in touch.
Should I use GTM or manual installation for Pinterest tag on Framer?
GTM is recommended as the default approach for most sites because it provides scalable event management, centralized governance, and easier updates without redeploying Framer code. Use GTM when you need multiple events, complex triggers, or when your marketing stack already lives in GTM.
Manual installation is the quick alternative for simple setups with just the base tag plus one or two straightforward events like Lead on a thank-you page. The overhead of learning GTM isn't justified for very simple Framer sites with straightforward conversion paths—but GTM becomes essential as tracking needs grow.
What Framer plan do I need to install Pinterest tag for conversion tracking?
You need access to Framer's Custom Code feature to install the Pinterest tag manually. If you don't see Custom Code in Project Settings, check your plan or permissions.
Without Custom Code access, you can't add the base tag to your site's head section for manual installation. However, you can still use the GTM method if GTM is already installed on your Framer site by someone with Custom Code access.
How long does Pinterest tag take to start tracking conversions after Framer installation?
Pinterest Tag Helper and Test events show results within seconds of completing conversion actions. However, Pinterest Ads Manager can take up to 24 hours to change tag status from "Unverified" to active and to surface conversion data in reports.
Don't wait on Ads Manager status updates—verify immediately with Tag Helper after you Publish. Many status delays are normal, so wait 24–48 hours before judging Ads Manager reporting.
Do I need Conversions API for a Framer site, or is the tag enough?
For most lead-gen Framer sites, the tag (via GTM or manual) plus a Lead or Signup event is enough to start optimizing campaigns. Pinterest states you can use Conversions API in addition to the tag to maximize visibility into conversions, especially when browser tracking is imperfect or conversions happen outside your Framer pages.
Don't add server-side tracking unless you can handle deduplication properly—otherwise, you risk double-counting conversions. Start with the browser tag, verify it works, then consider Conversions API as a second phase if reliability issues justify the complexity. Most Framer sites don't need Conversions API unless spending $10,000+ monthly on Pinterest ads.
How do I debug Pinterest tracking on a Framer site if events don't show?
Use Chrome DevTools and inspect network requests to ct.pinterest.com. Filter the Network tab by typing ct.pinterest to see all Pinterest tracking requests and confirm the browser actually sent the event payload.
Pinterest documentation explains which parameters to check: tid (tag ID), event (event name), ed (event data), and cb (cache buster). If you see requests but Pinterest dashboards show nothing, you're likely hitting normal reporting delay. If you don't see requests, your code isn't installed correctly or the event never fired—always test on your published Framer URL, not in preview mode.
Conclusion
A working Pinterest tag setup in Framer is straightforward when you follow the right sequence: choose your installation method (GTM for scalable management or manual for simple setups), install the base tag site-wide, add meaningful conversion events that map to your actual Framer flows (starting with the thank-you page example), and verify with Tag Helper plus DevTools before spending money on campaigns.
The key is getting event timing right: fire events only after the intended action completes, not on page load. GTM provides the most scalable approach for ongoing event management and multi-pixel coordination, while manual installation works perfectly for straightforward tracking needs. As your campaigns mature, Conversions API offers resilient server-side tracking—especially when conversions happen outside Framer. For end-to-end implementation including additional events, our agency can help with the full setup—get in touch.


Join readers commenting on this post!